PBX Licensing and Activation - Admin guide
This document helps you understand Wildix licensing and explains how to activate a Wildix Per User PBX (Hardware, Virtual, Cloud).
Created: June 2018
Updated: March 2024
Permalink: https://wildix.atlassian.net/wiki/x/7BXOAQ
Useful links:
Other documents related to WMP (Wildix Management Portal):
| Title | Creator | Modified |
|---|---|---|
| Customer Care FAQ | Ksenia Babych | Jun 27, 2024 |
| How to configure and use CLASSOUND | Simon Darienko | Jun 10, 2024 |
| Wildix Terms and Conditions | Elena Kornilova | May 30, 2024 |
| CLASSOUND Virtual DIDs | Tatiana Bieliakova | Apr 17, 2024 |
| PBX Licensing and Activation - Admin guide | Elena Kornilova | Mar 05, 2024 |
| Provisioning of Wildix devices - Admin Guide | Ksenia Babych | Feb 26, 2024 |
| CLASSOUND Activation Request | Elena Kornilova | Feb 13, 2024 |
| HWaaS - Hardware as a Service | Elena Kornilova | Feb 06, 2024 |
| WMP Dashboards | Elena Kornilova | Jan 10, 2024 |
| RMA UK Procedure | Ksenia Babych | Jan 09, 2024 |
| CLASSOUND Instant Virtual Porting (IVP) | Tatiana Bieliakova | Dec 12, 2023 |
| Common RMA Regulations | Ksenia Babych | Aug 22, 2023 |
| How to process and pay bills directly via WMP | Ksenia Babych | Jun 09, 2023 |
| What happens if Partner has overdue invoice payments | Ksenia Babych | Jan 03, 2023 |
| VoIP and 911 Service | Tatiana Bieliakova | Dec 15, 2022 |
| How to place WMP CAPEX orders | Ksenia Babych | Aug 24, 2022 |
Understanding Per User Licensing
Wildix currently offers Per User licensing. It means that you can add as many users of each profile as you need and add more users whenever you need. You pay per user / per period of time.
Here are the steps to activate a Per User PBX:
- Choose the platform: Hardware, Virtual, Cloud
- Choose the recurrent payment cycle: Monthly / Yearly / 5 years / Lifetime (lifetime is not available for Cloud)
- Choose the number of users of each Profile: Basic / Essential / Business / Premium / Wizyconf Room / Wizywebinar / Service
Notes:
- You first select the period of time and then the number of users, this means you cannot select different recurrent payment periods for different types of user profiles, e.g. if the recurrent period is 1 year, it means the users of all types (Basic, Business, Premium) are added for 1 year. You can increase the number of users any time (add more users of any type).
- Lifetime licenses:
Lifetime license bought 01.01.2020 onwards allow to upgrade PBX to WMS5 version.
- Starting from April 19 2022, only one PBX with active licenses is allowed per customer. Other PBXs of the same customer should belong to the same WMS Network and inherit the licenses from the main (server) PBX with active licenses. Otherwise, extra PBXs with active licenses should be moved under other customers.
Starting from May 2022, Wizyconf Station is available as HWaaS only and Wizyconf Room license is added to the PBX with the Wizyconf Station purchase automatically. No need to buy the license.
- x-bees and x-hoppers licenses can be ordered via Wildix Partner Community or via Customer Care request. Documentation: Wildix Partner Community Guide
Example: you need 10 users with basic phone services (fax machines, unattended phones, doorphones), 30 users with access to Collaboration and only 5 users with access to CDR-View. You activate 10 PBX-BASIC users, 30 UC-ESSENTIAL users and 5 UC-PREMIUM users. At any moment, you can add more users of any type.
Details on each user profile: https://www.wildix.com/licensing/.
Per User licensing is available for any PBX type:
Hardware
Virtual
Cloud
PBX Activation
Prerequisites:
For Hardware PBX you need first to purchase a Hardware PBX in WMP -> Cart (code: WPBX-HW):
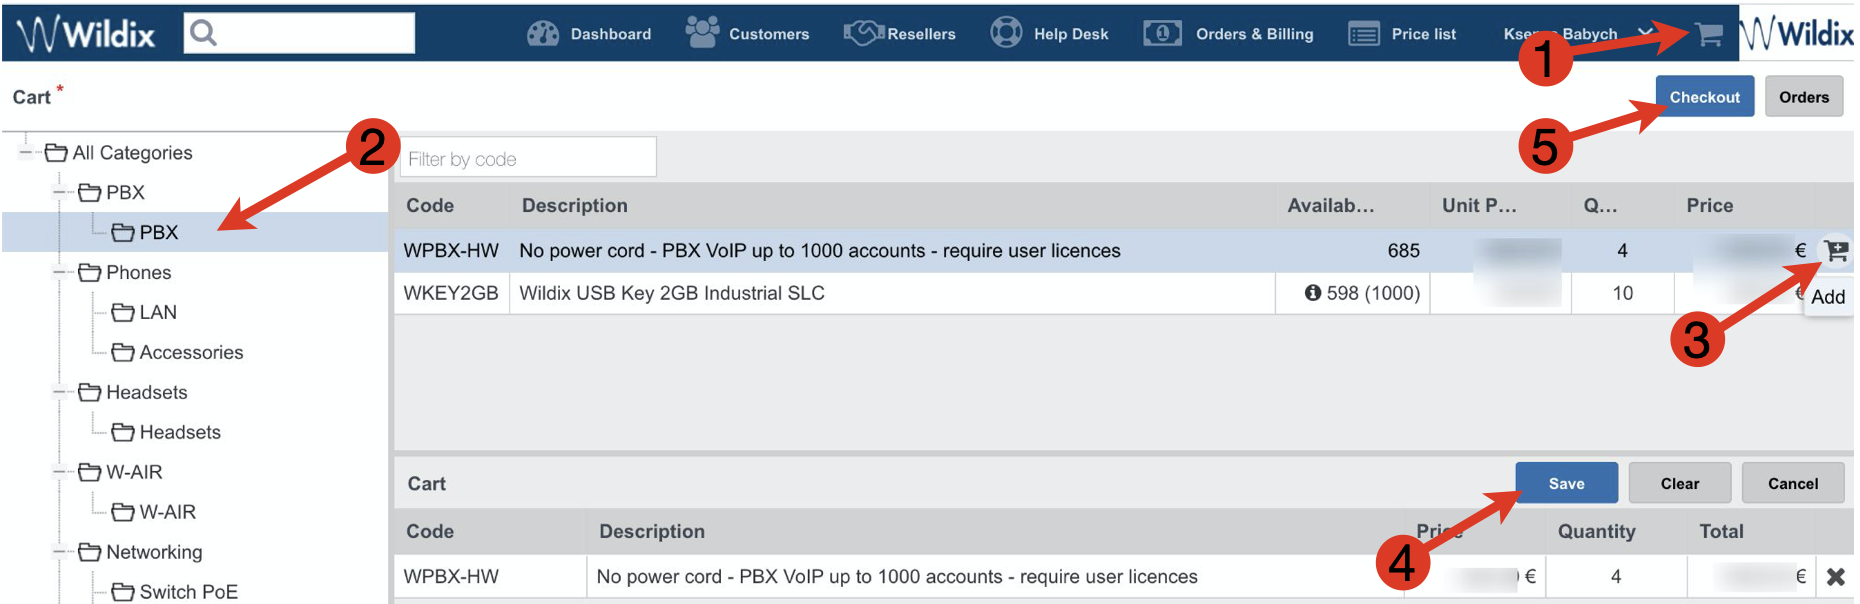
Step 1. Add a new Per User PBX on WMP
Proceed as follows:
Connect to WMP using your credentials
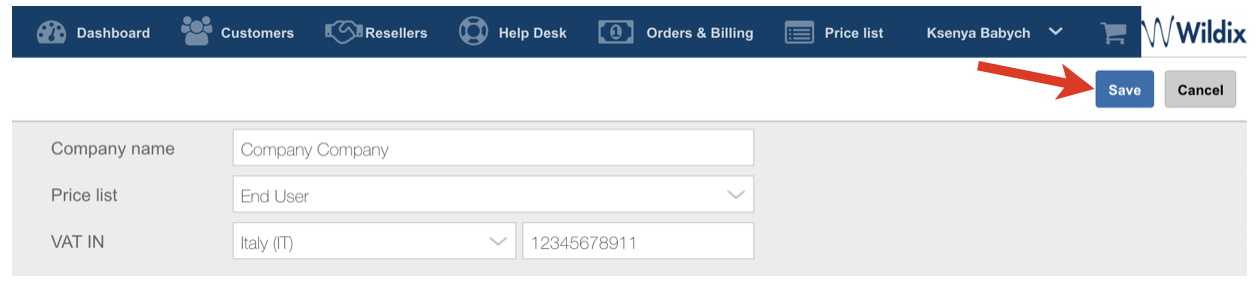
Go to Customers tab; to create a new PBX, you first need to add a customer (if it does not exist yet); click Add:

Create a new customer (company): fill in the fields and click Save:
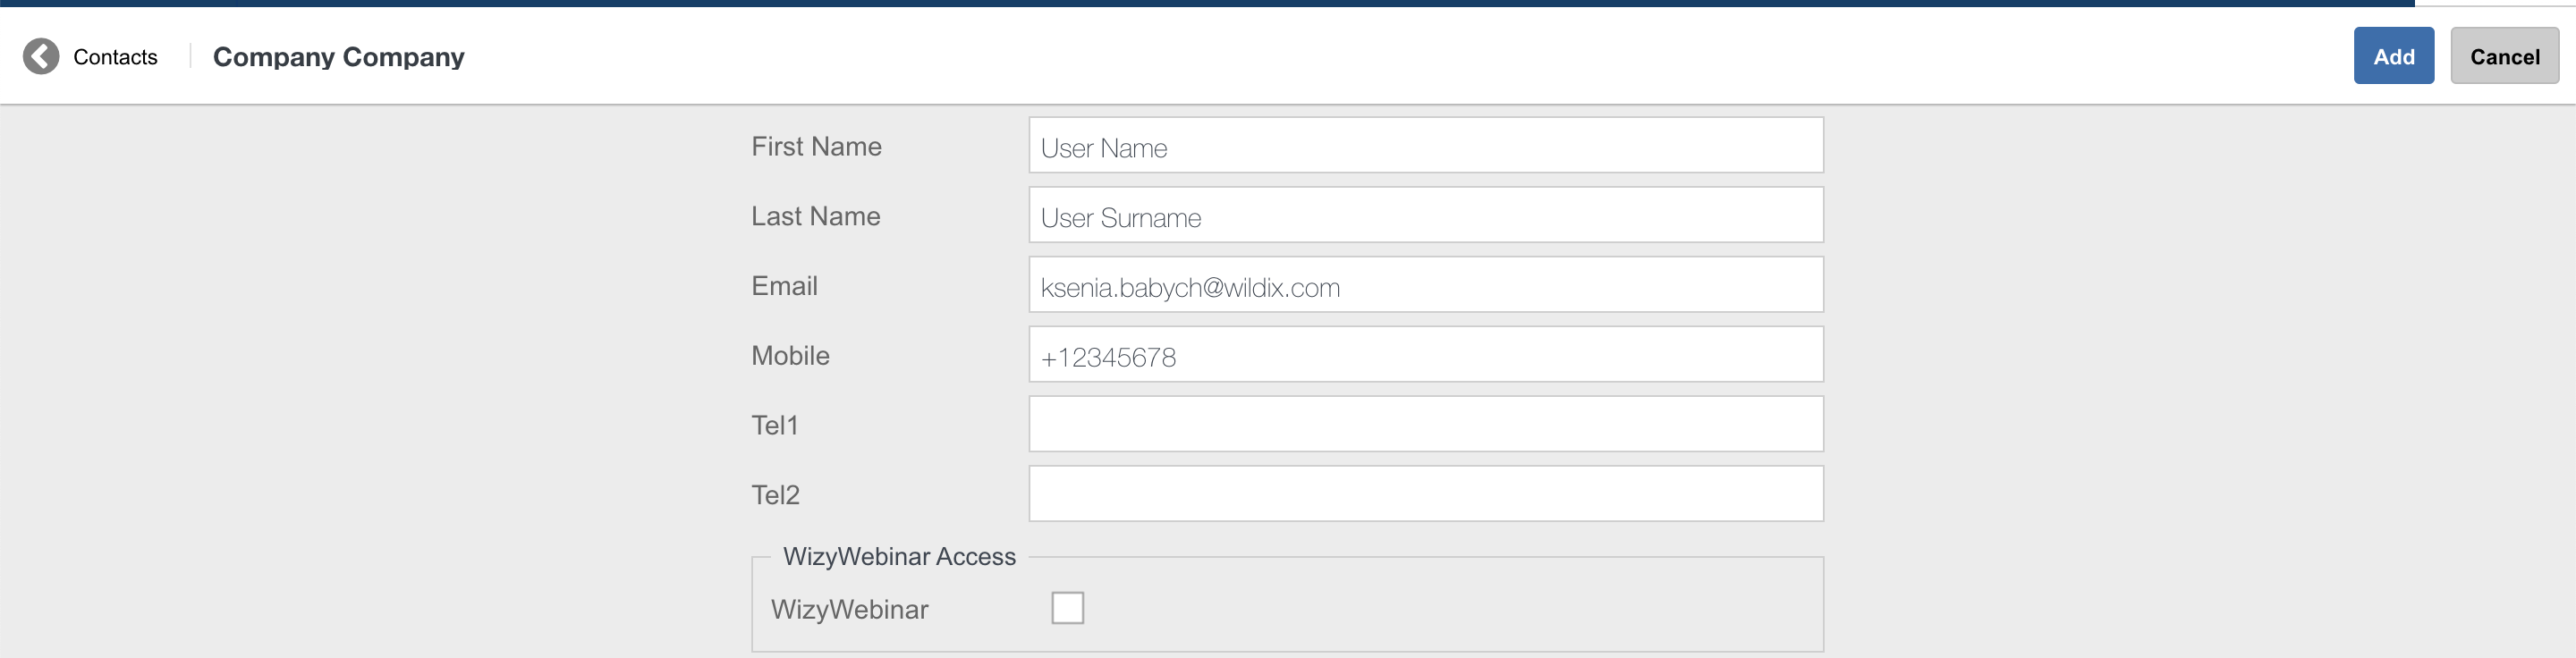
You need to create at least one contact: fill in the fields and click Add:
Now you can proceed with adding a new PBX: go to PBXs tab:

You are now under PBXs tab, click + to add a new PBX:

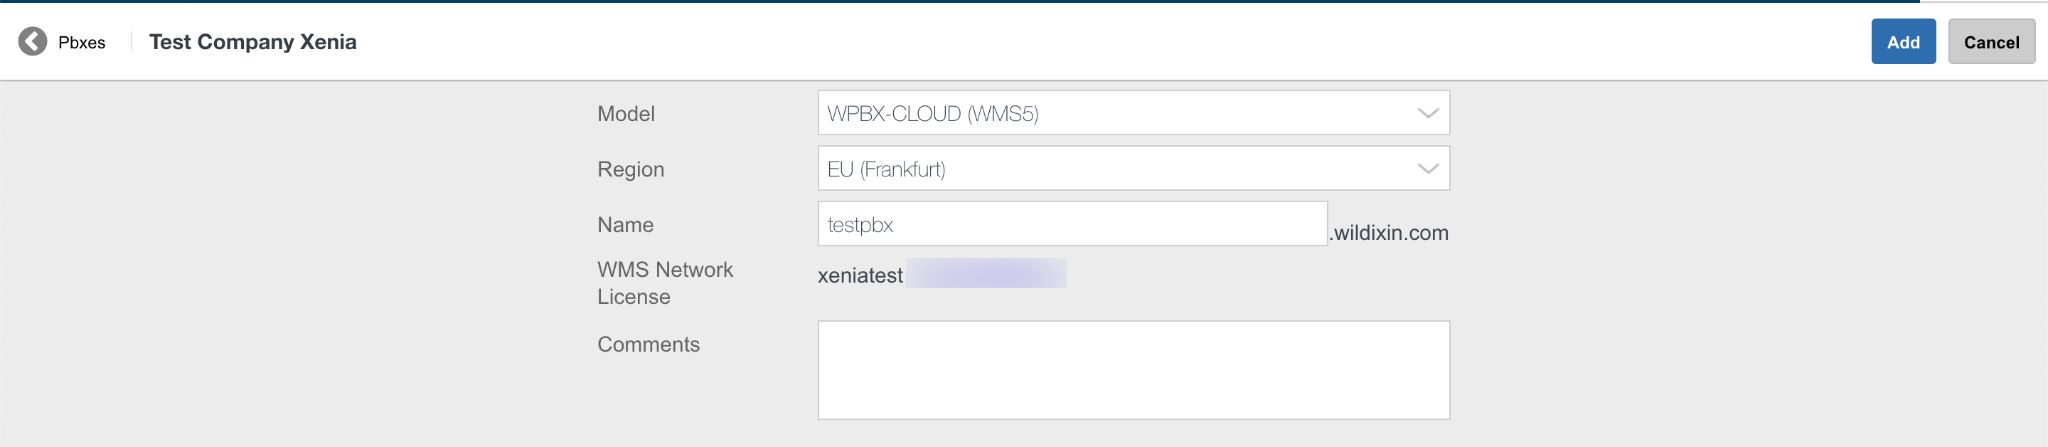
Fill in the fields:
- Licenses type: choose Collaboration or x-bees
Model: select WPBX-CLOUD for Cloud / WPBX-VM/HW for Virtual or Hardware
Region (only for Cloud PBX): select the datacenter region
Name: PBX domain name by which your PBX is accessible via the browser; in the example provided below, the PBX can be accessed by URL https://elenatest2.wildixin.com
Expire: select the recurring billing period: monthly / yearly / lifetime (lifetime is not available for Cloud PBX)
PBX-BASIC / UC-Essential / UC-Business / UC-Premium / UC-Wizyconf Room / UC-Wizywebinar / PBX-Service: add the number of users of each profile (more about each profile: https://www.wildix.com/licensing/; for x-bees, check the document x-bees Admin Guide)
Note: Starting from May 2022, Wizyconf Station is available as HWaaS only and Wizyconf Room license is added to the PBX with the Wizyconf Station purchase automatically. No need to buy the license.
Company data storage (CDS) bundle: select the preferred data storage bundle. For more details, check the page: Company Data Storage Flow. Storage license is also required if you want to increase data storage duration for Cloud Analytics (CDR-View 2.0). Read more in Rotation Policy for Cloud Analytics.
Note: Starting from July 1 2021 onward, all PBXs will get a dynamic IP address by default. If you need to reserve static IP for your Cloud PBX, there are several options:
- Switch to CLASSOUND to provide a more modern service
- Ask your provider to switch from the IP-based authentication to the password/login one
- Buy the storage (If you have previously purchased an extra storage, the IP is reserved)
- x-caracal: tick the option to activate x-caracal ACD stats service on this PBX. Important: make sure you add at least 10 Business/ Premium + 1 Premium licenses on this PBX to be able to activate x-caracal. More information on how to activate x-caracal on the WMS side: x-caracal documentation. Important: x-caracal is supported only on Cloud or Virtual PBXs, Hardware PBXs are not supported. Make sure you have the min. required WMS version
- MS-PhoneSystem: this is an extension of the teams4Wildix (integration of Microsoft Teams with Wildix PBX). It requires the CLASSOUND service to be activated on the PBX. Important: Make sure you have the min. required WMS version
- Commitment: enabling this option, you commit to keep the PBX up and running for 3 or 5 years (depending on your choice), without possibility to make changes to the service. The discount of 15% (for 3-year Commitment) or 20% (for 5-year Commitment) is added to the existing licenses after renewal.
You can add any Service to the PBX under Commitment (Licenses, CLASSOUND or HWaaS) - in this case, billing is applied from the order date (not Commitment start date). It is not allowed to remove any service (License, CLASSOUND or HWaaS) from the PBX under "Commitment" till the end of the Commitment date. If you want to upgrade licenses on PBX under the Commitment, a request to Customer Care should be submitted. See more information on Customer Care FAQ page.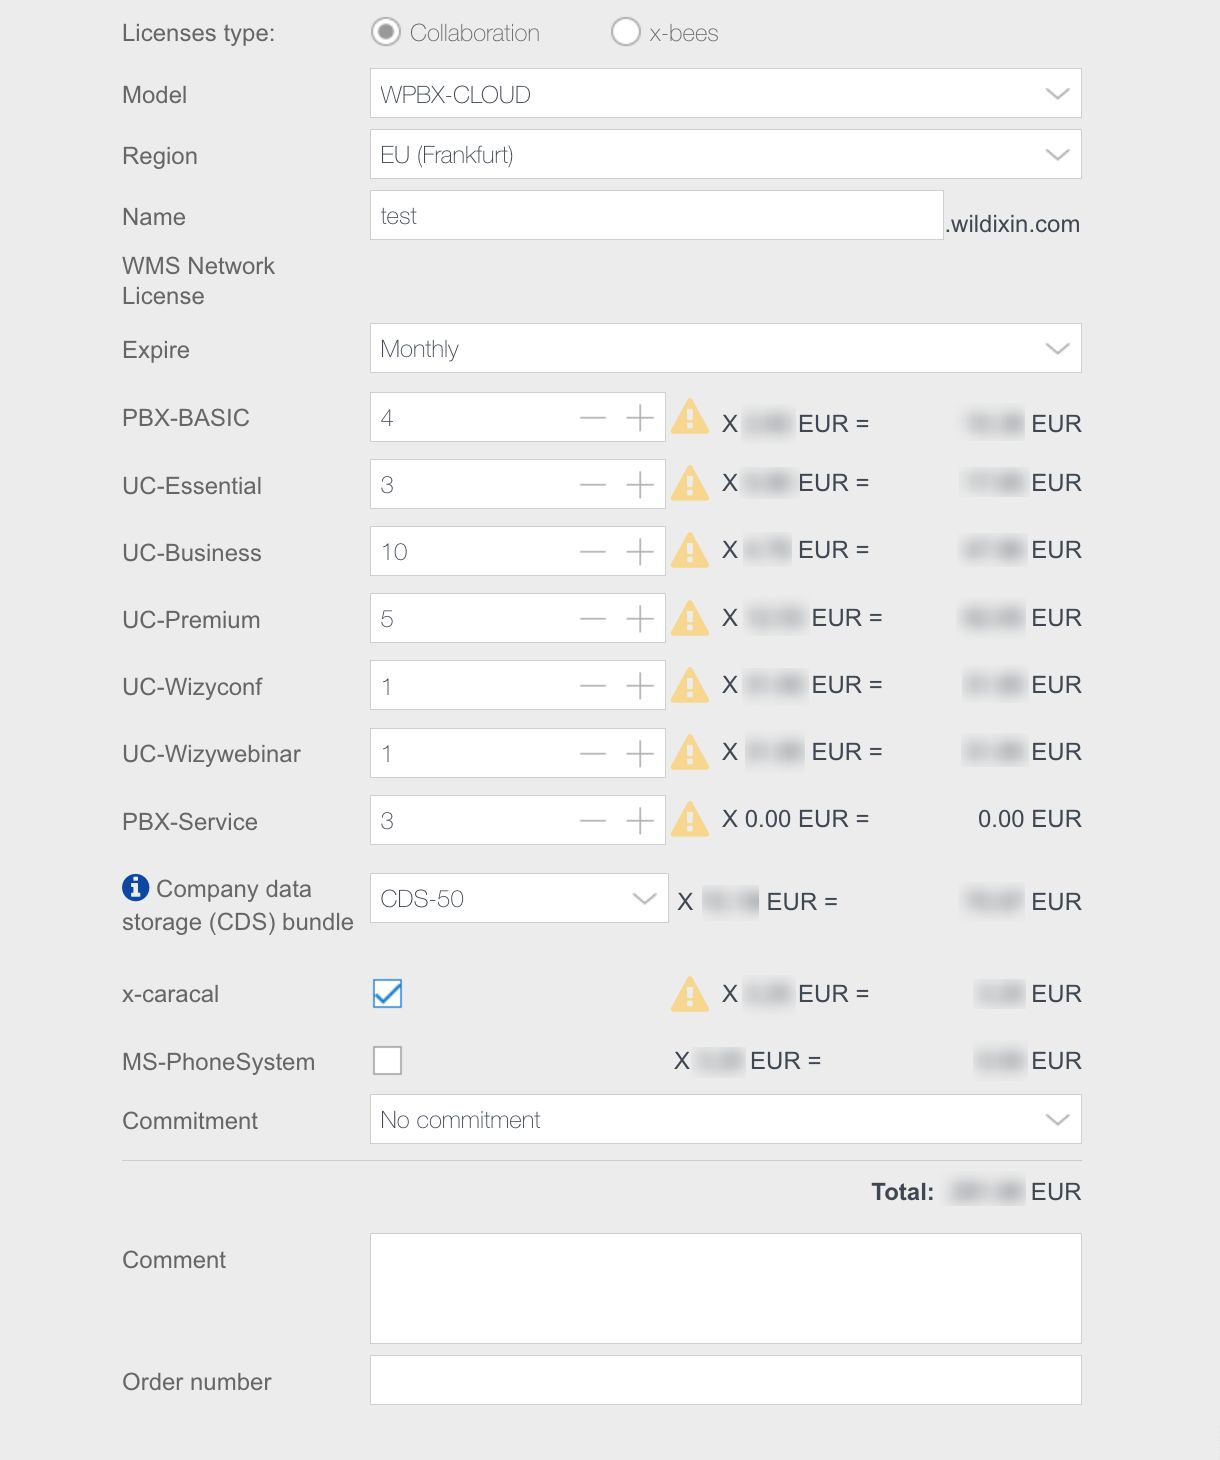
Click Add and then Save
To confirm the subscription fee, tick off
Your PBX has been added:

Note: after the PBX has been added, you can see its Software Serial (SW Serial):

You can use SW Serial to activate new HW PBX in case of RMA or you can replace HW with VM PBX and vice versa. In this case new PBX will take Name, Licenses and attached Devices of the SW serial.
Please note, next activation of HW PBX will automatically convert HW Serial to SW Serial preserving its Name, Licenses and attached Devices. So HW Serial will disappear from portal and new SW Serial will appear instead.
Step 2. Activate PBX from WMS
For Virtual PBX: before proceeding, follow the guide to deploy PBX image:
- WMS version 6.0X: Deploying WMS 6.0 on Hardware, Virtual, Cloud PBXs
- WMS version 5.0X: /wiki/spaces/DOC/pages/30283187
For Cloud PBX: wait for approximately 3 minutes before proceeding. Your PBX will be activated.
Proceed as follows:
Connect to PBX via HTTPS to access WMS using credentials admin : wildix
Change admin user password:
Select admin user and click Set passwords
Generate or create a new WEB password, click Ok
Upgrade WMS to the latest stable release
go to WMS -> Tools and utilities -> Upgrade
In case there is a new version available, click Perform Upgrade
Copy PBX key from WMP:
Only for Virtual and Hardware PBXs. Cloud PBXs are activated automatically (wait for approximately 3 minutes after completing Step 1).
go to Customers tab, select your company, then select the PBX that you have created (Step 1), optional: click Options button (Three dots) and select Edit
click the Copy icon (Copy PBX key to clipboard):

Insert the PBX key on WMS side:
Open WMS -> Tools and utilities -> Activation / Licenses
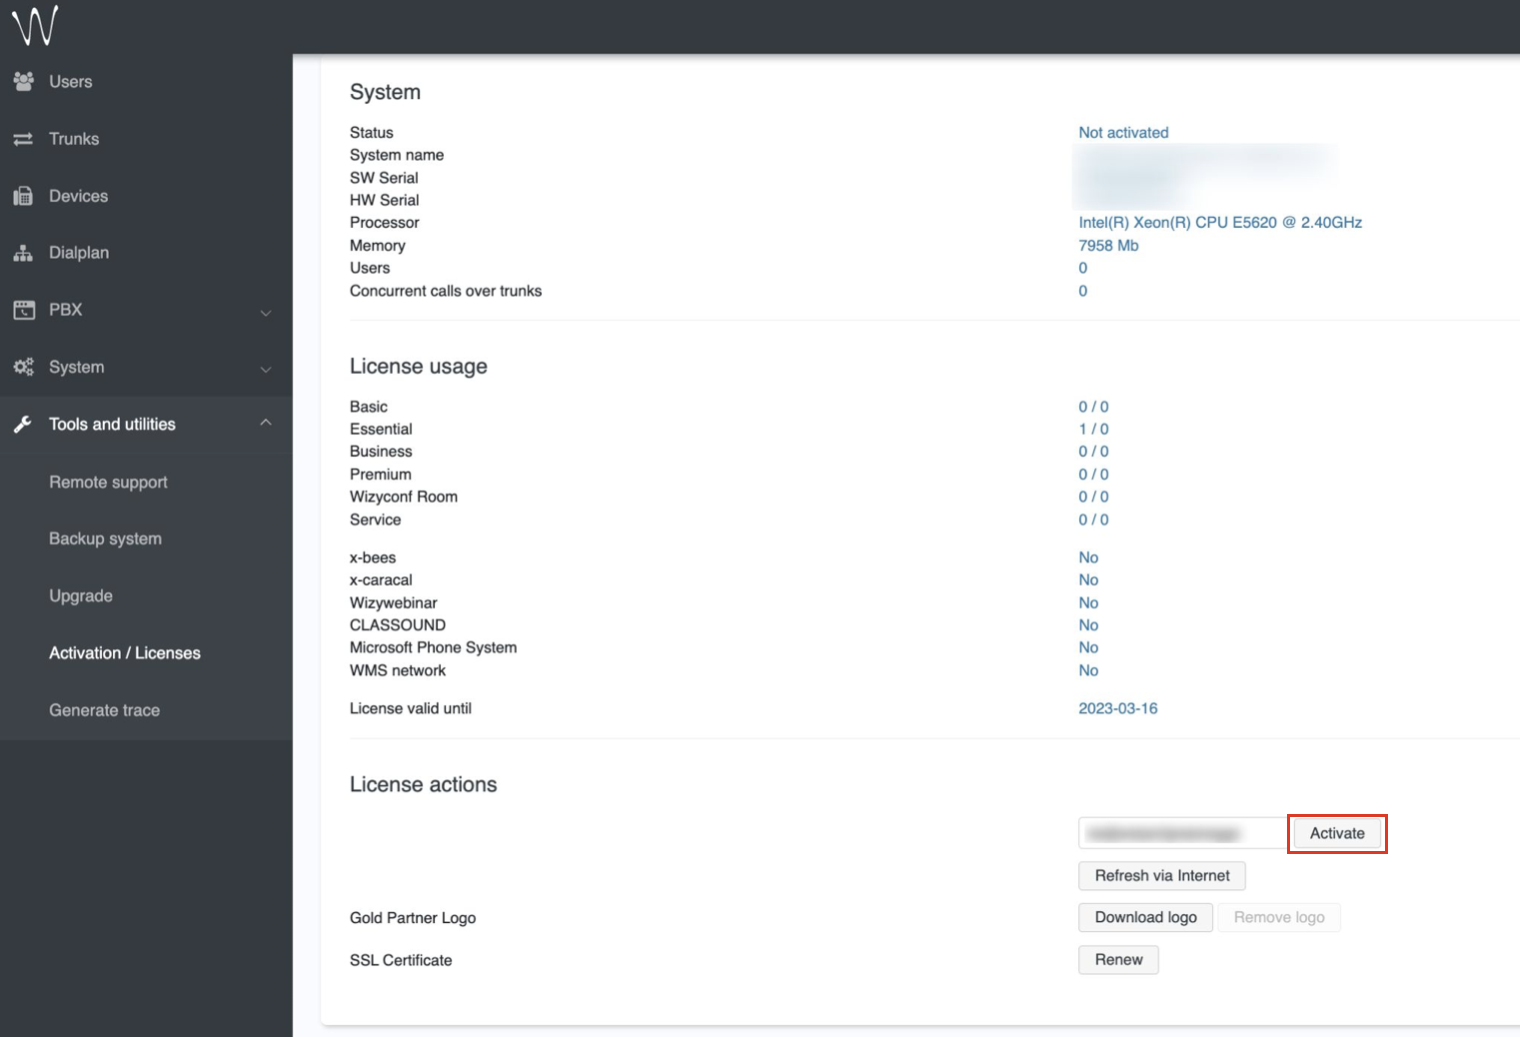
In the License actions section, paste the PBX key copied on the previous step into the PBX Key field:
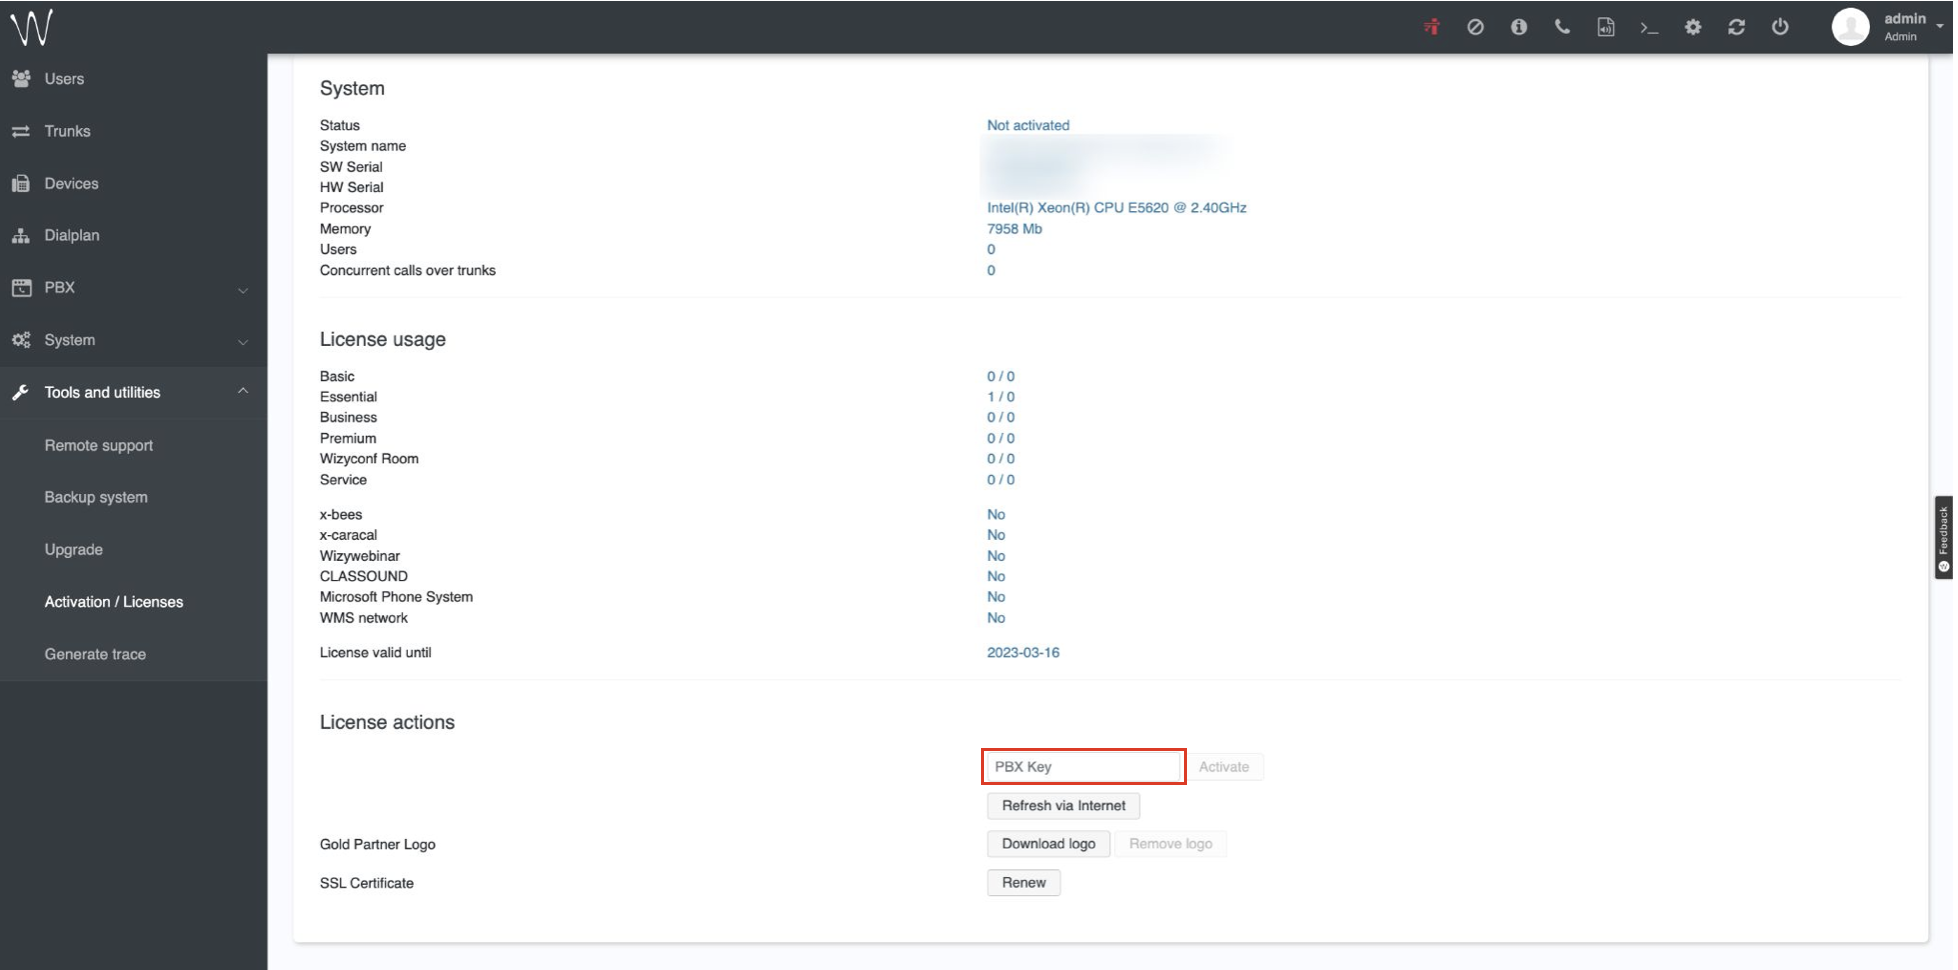
Once entered, click Activate:
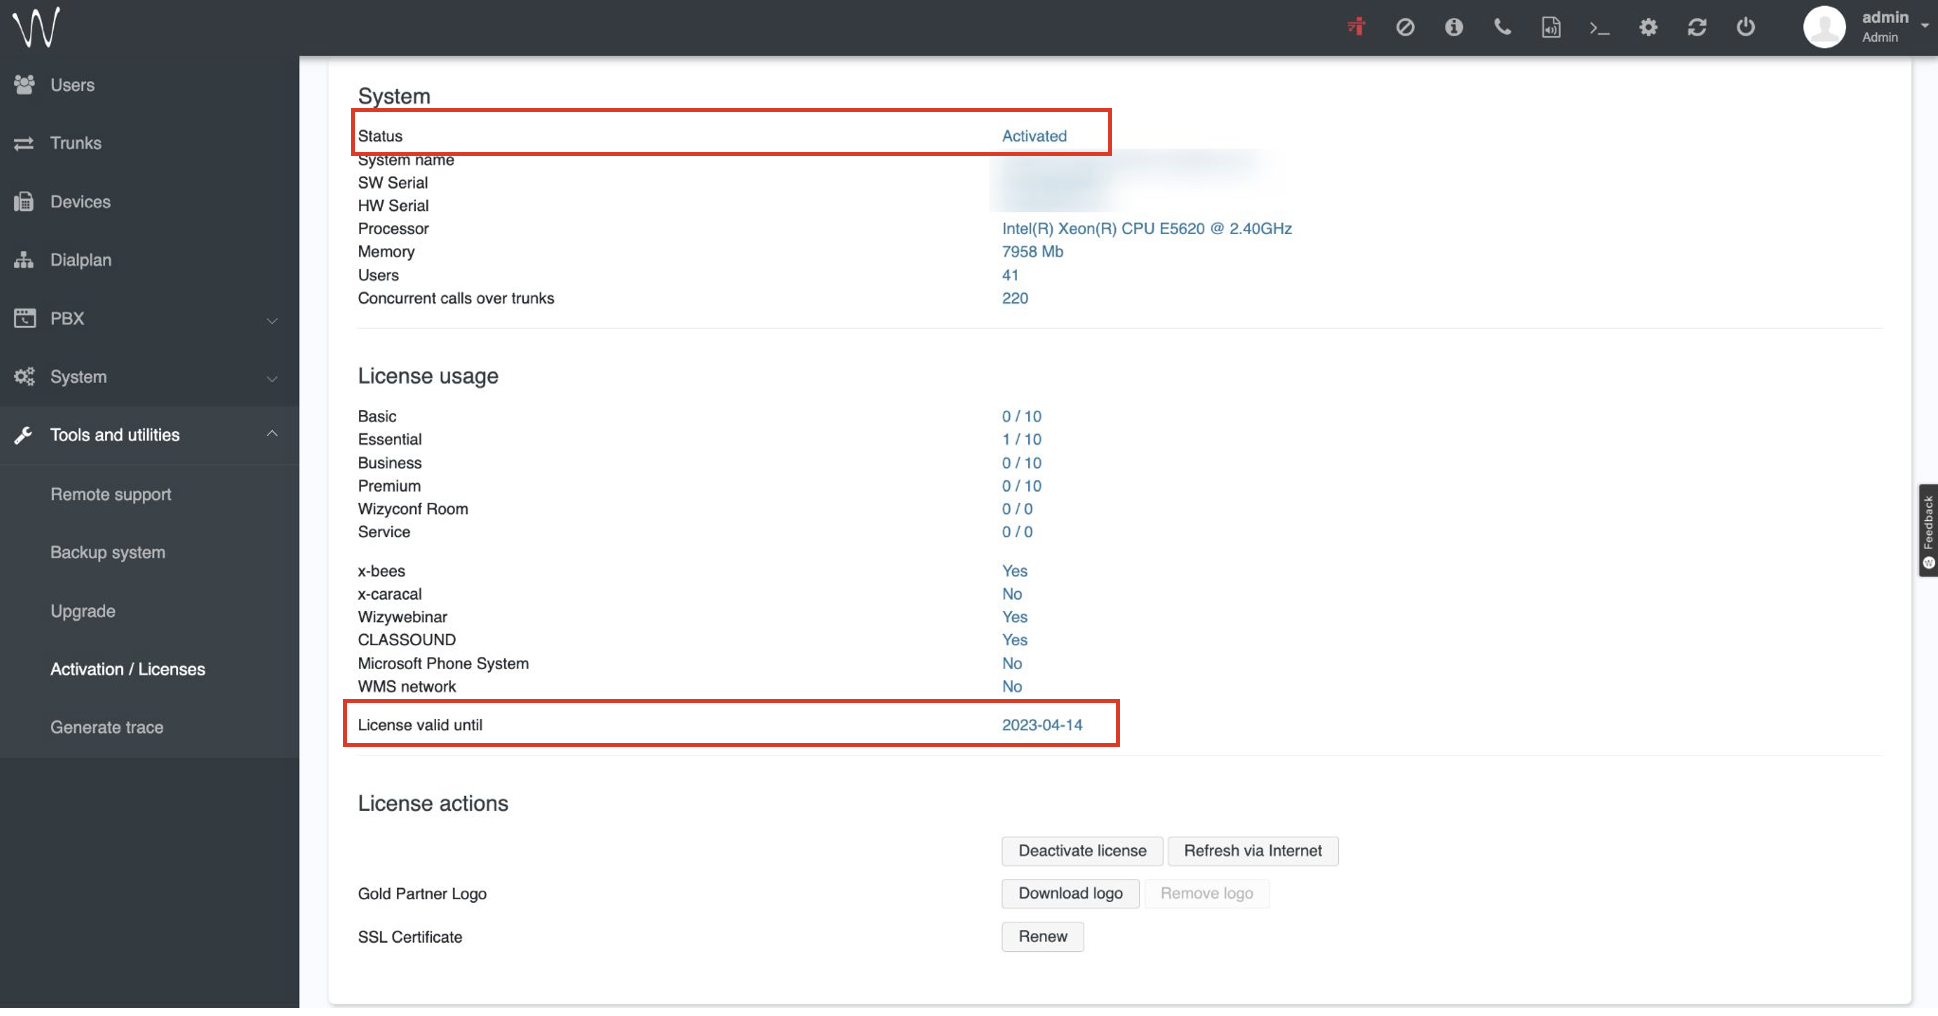
Your PBX is now activated:
Important! After Cloud PBX is activated, make sure to change a default admin password as it is automatically reset within a day after the PBX activation.
In case you face any issues with reset, contact Wildix Support.
Assign correct license type to each user
After you have purchased the licenses on WMP and activated the PBX, please follow WMS Start Guide to configure the system and add users.
This chapter explains how to assign the license type to each user.
The "Admin" user is not included into the total count of users.
Since "Park orbit" type of users has no SIP registration, it is required to assign PBX-Service License (free of charge).
About license types
General recommendations regarding assigning license types to different types of users:
For Collaboration:
- UC-Basic:
- unattended phones
- fax machines
- door phones
- hotel rooms
- users who need only telephony features without chat and presence
- call group manager dummy user (more information: How to set up the Call Group notifications manager feature)
- UC-Essential:
- users who need access to Collaboration
- users who need access to Wildix mobile apps
- users who need presence and chat features on supported Wildix devices
- UC-Business:
- users who need to be able to create Wizyconf conference rooms in Collaboration (everyone can participate in video conferences, but only users with at least a Business license can create new rooms)
- users who need to be contacted via Kite
- users who use WebAPI and TAPI integrations
- users who need to be monitored via x-caracal (provided, x-caracal service is activated on the PBX)
- users who need access to the Wizywebinar platform (additionally, Wizywebinar license must be assigned to this user in WMP for this PBX under Contacts tab)
- UC-Premium:
- one license per system is enough for WBI services (2 hours of service per one license)
- for Voicemail Transcription to email, one license is necessary for each user who needs access to the service
- one license per system is enough for Fias and ESPA monitor integrations
- one license is necessary for each user who needs access to CDR-View
- one license is necessary for each user who needs access to x-caracal (provided, x-caracal service is activated on the PBX)
- one license is necessary for each user who needs to manage Call groups (dynamically add or delete members) via WebAPI Wallboard
- one license per system is enough for WBI services (2 hours of service per one license)
For x-bees:
Note: x-bees licenses in WMS are available starting from WMS Beta 6.04.20230920.1.
x-bees licenses can be ordered via Wildix Partner Community or via Customer Care request. Documentation: Wildix Partner Community Guide
- x-bees Device:
- unattended phones
- W-AIR handset users
- users who need only telephony features without chat and presence
- x-bees Basic:
- users who need access to x-bees
- users who need access to x-bees mobile apps
- users who need presence and chat features on supported Wildix devices
- staff that doesn't deal with customers
- x-bees Standard:
- users who need to be contacted via personal contact-me links (chat and scheduler)
- users who interact with customers
- users who need to use CRM integrations (Salesforce, HubSpot etc)
- x-bees SuperBee:
- users who need to access Live dashboard and Analytics
- users who need to set up website widgets
See detailed licenses description in the document x-bees Admin Guide
For x-hoppers:
Note: x-hoppers licenses in WMS are available starting from WMS Beta 6.04.20230920.1.
x-hoppers licenses can be ordered via Wildix Partner Community or via Customer Care request. Documentation: Wildix Partner Community Guide
- x-hoppers Device:
- SIP devices only
- x-hoppers-BackOffice:
- staff that doesn't deal with customers
- users who need access to internal chat and conferencing features
x-hoppers-HelperHopper:
Note: To users with x-hoppers-HelperHopper license, assign x-hoppers-SalesFloorHopper license in WMS.
- users that interact with customers
- users who need to use integrations
- users who need to use personal contact-me link, meeting scheduler, and website widget
- x-hoppers-SalesFloorHopper:
- users that interact with customers
- users who need to use integrations
- users who need to use personal contact-me link, meeting scheduler, and website widget
- agents who use DECT headset
x-hoppers-SalesFloorHopper + AI:
Note: To users with x-hoppers-SalesFloorHopper + AI license, assign x-hoppers-SalesFloorHopper license in WMS.
- users who need access to AI prompts feature
- agents who use DECT headset
- x-hoppers-SuperHopper + AI:
- users who need access to AI prompts
- users who need access to Wallboard and Analytics
- users who don't need DECT headset and internal broadcast channel
See detailed licenses description in the document x-hoppers Admin Guide
Other:
- Wizyconf Room (one license for each Wizyconf Hardware conference station):
a Wizyconf hardware station must be assigned to a dummy (virtual) user of the system and this user must be assigned a Wizyconf Room license to be able to participate in video conferences
- Wizywebinar:
- one license for each user who needs to have access to Wizywebinar platform and set up webinars.
- NOTE: this license is assigned to the user in WMP, in PBX under the Contacts tab. In WMS it is necessary to make sure that the user's email is the same one indicated in WMP Contacts and the user has at least a Business license: Wizywebinar User Guide
- Service: (free of charge, doesn't support SIP registration, any login permissions (Collaboration/ WMS)
- park orbits
- virtual users created for call forwarding purposes (without login to Collaboration/ any device) in Dialplan
- virtual users used for Identities feature (without login to Collaboration/ any device) to replace a real user's number
- x-caracal:
- x-caracal is Wildix's light and agile ACD stats solution, fully integrated into the communication system: x-caracal documentation
- one license per system (the license is not assigned to any particular user)
- only users with at least a Business license can be monitored with x-caracal
- only users with Premium license can access x-caracal
- MS-PhoneSystem:
- this is an option within teams4Wildix (integration of Microsoft Teams with Wildix PBX) that enables users to place and receive calls not only from the Collaboration tab inside Teams, but also from Teams dialpad (Calls tab)
- one license per system (the license is not assigned to any particular user)
- NOTE: this option requires additional Microsoft 365 licenses, please refer to teams4Wildix Documentation for more details
For more details, please refer to the page https://www.wildix.com/licensing/.
License usage exceeded
Currently in case the number of licenses used is exceeded, users do not lose access to any functionality. For all exceeding user licenses that exist on the PBX for more than 48 hours, a Delivery note is automatically formed and added to the next invoice.
In case the number of licenses used was exceeded, users do not lose access to any functionality, but the system administrator is informed:
notification is displayed in red in WMS telling the system administrator that the number of licenses was exceeded and missing licenses will be billed automatically:
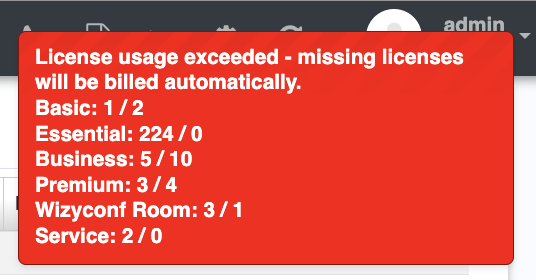
- notification via email is sent to the system administrator each day (temporarily disabled)
You can also check the number of licenses bought and used in WMS -> Tools and utilities -> Activation / Licenses -> License usage section:
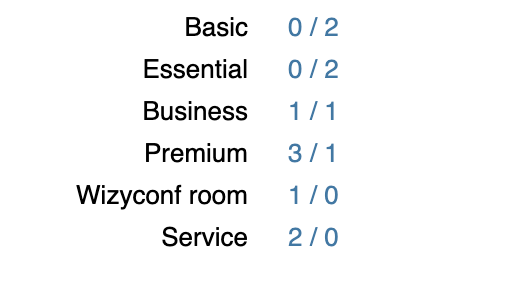
The "Admin" user is not included into the total count of users.
Assigning license type to each user
You need to manually assign the correct license type to each user.
Restrictions and privileges of each license type (Basic, Essential, Business, Premium, etc.) are applied only after you assign the correct license type to each user.
In case the system detects license overuse, for all exceeding user licenses that exist on the PBX for more than 48 hours, a Delivery note is automatically formed and added to the next invoice.
You can assign the correct type of license to each user in WMS -> Users:
- Select one or multiple users and click Edit
Scroll down to the field License type and select the type of the License type from the drop-down list:
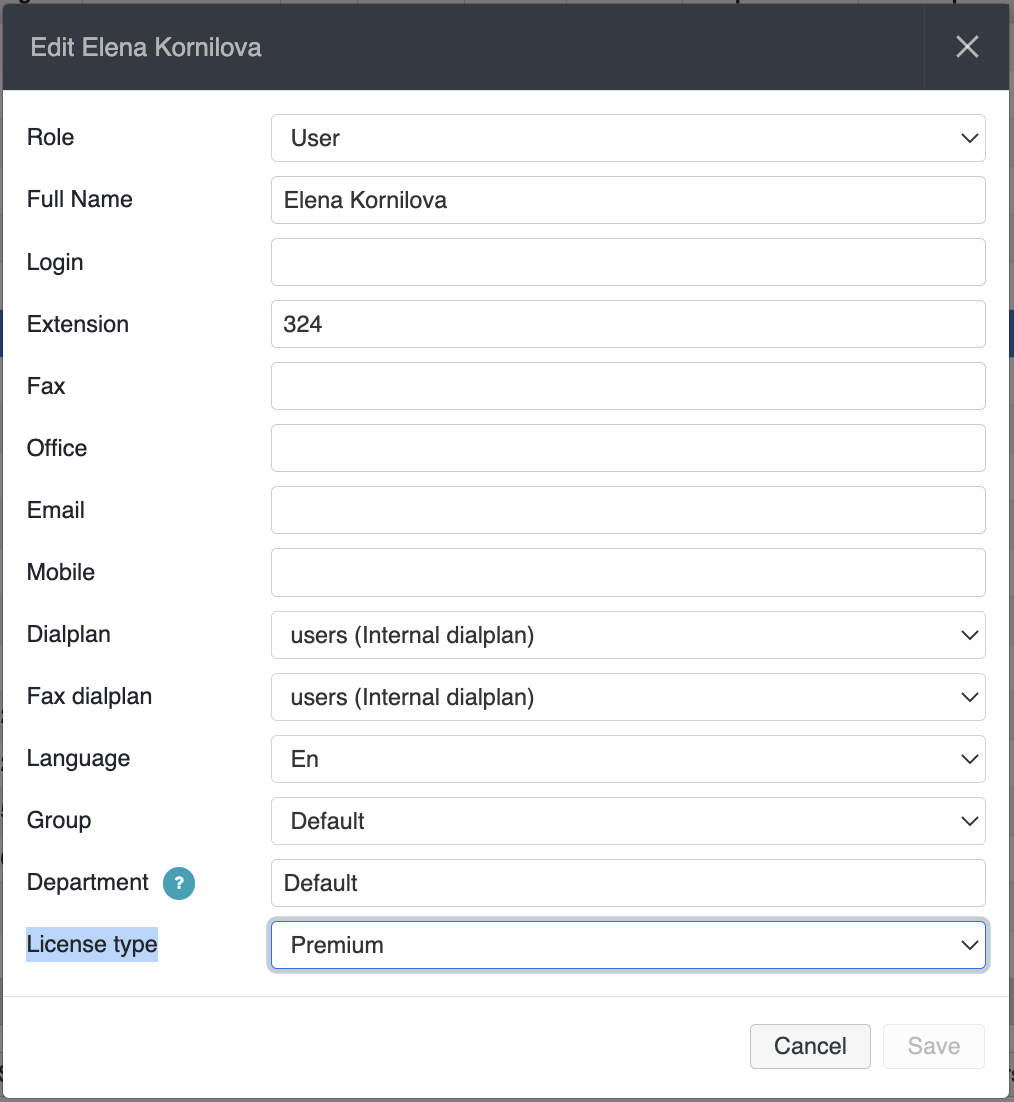
- Click Ok to apply the changes
Newly created or exported users by default are assigned Essential license. It is necessary to manually set the correct license type.
Changes to the license - upgrade, downgrade, increase, decrease, change the term
Increase / decrease, upgrade/ downgrade of licenses
It is possible to increase/ decrease the number of accounts any time.
- Go to WMP -> Customers
- Select your company and customer
- Select the PBX -> click Edit
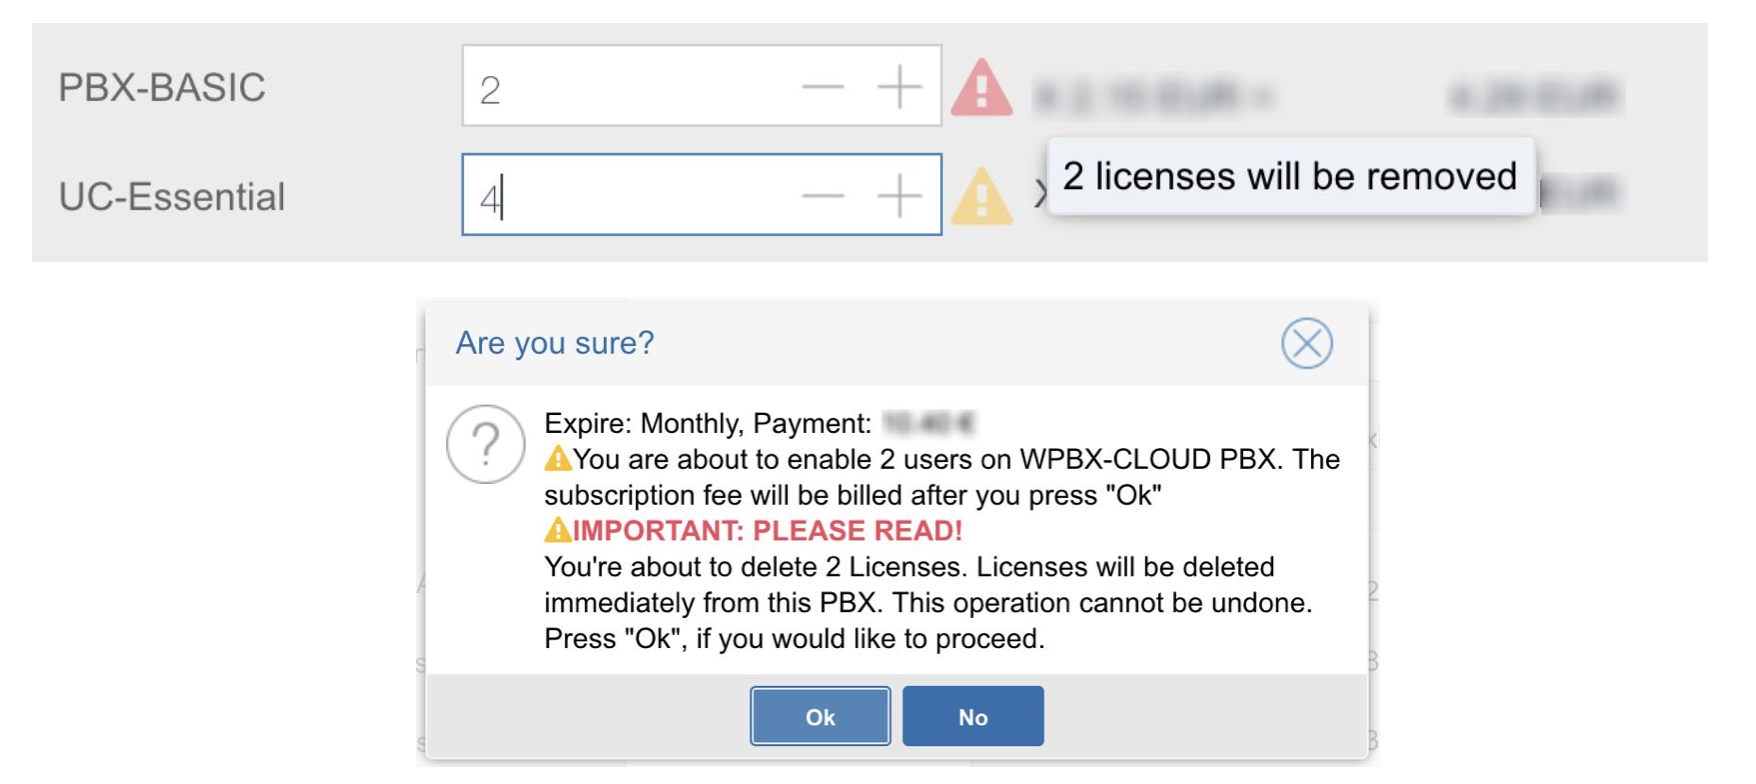
- Add/ remove the number of users of a required profile
- Click Save and Ok to confirm the operation
If you need an upgrade/ downgrade of the existing licenses: any upgrade or downgrade has to be done through the Portal by the Partner only. There will be no money back for the prepaid licenses.
In case of deleting more than 10% of any type of license, you may see pop-up with information about MRR decrease and request to share your feedback:
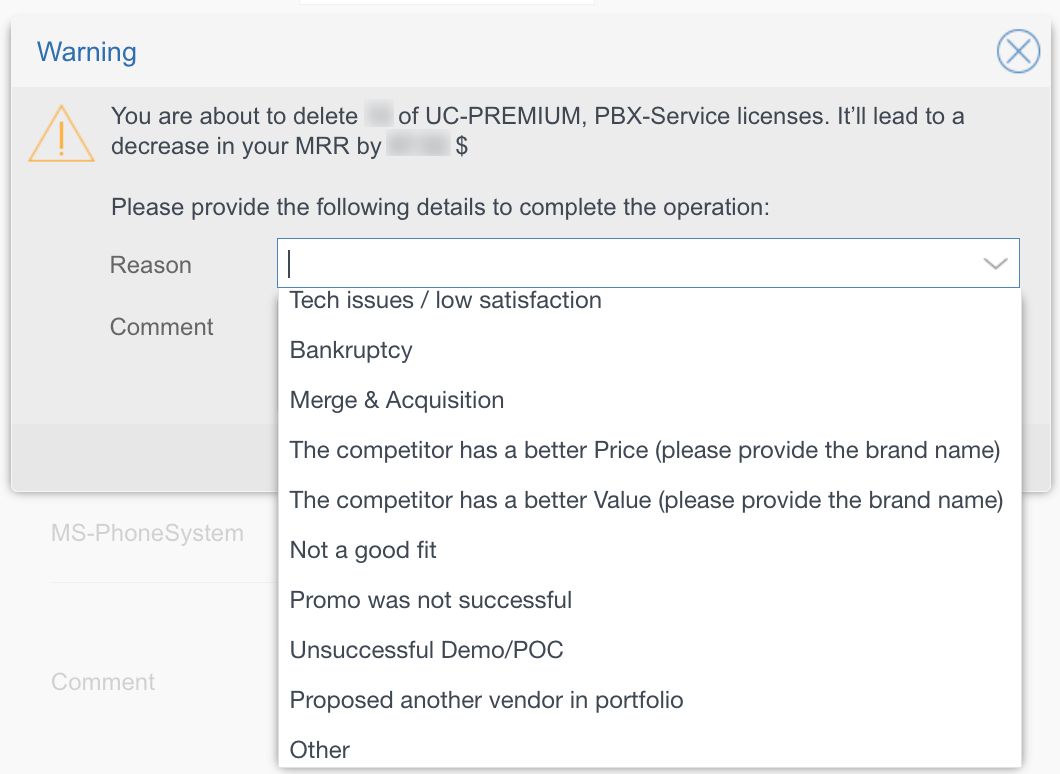
Feel free to let us know the reason, as letting you enjoy the best experience with our services is the top priority for us!
Licenses will be automatically renewed and invoiced on the last day of their expiration term.
We recommend to carry out all of the license changes 2 days before the license expiration date.
IMPORTANT: No license decrease can be done on the last day of the month!
But licenses can be removed at any moment with no money back for prepaid ones.
Change the term of the license
To change the expiration period, follow the steps below:
- Go to WMP -> Customers
- Select your company and customer
- Select the PBX -> click Edit
- Decrease the number of user licenses to zero
- Click Save and Ok to confirm the operation
- Select the PBX again and click Edit
- Change the expiration period (term of the license)
- Add back user licenses
- Click Save and tick off I confirm the order
- Click Ok to confirm the operation
Licenses will be automatically renewed and invoiced on the last day of their expiration term.
We recommend to carry out all of the license changes 2 days before the license expiration date.
IMPORTANT: No license decrease can be done on the last day of the month!
But licenses can be removed at any moment with no money back for prepaid ones.
Move PBX to another Customer
Starting from April 19 2022, only one PBX with active licenses is allowed per customer. Other PBXs of the same customer should belong to the same WMS Network and inherit the licenses from the main (server) PBX with active licenses. Otherwise, extra PBXs with active licenses should be moved under other customers. Below is the procedure of moving PBXs:
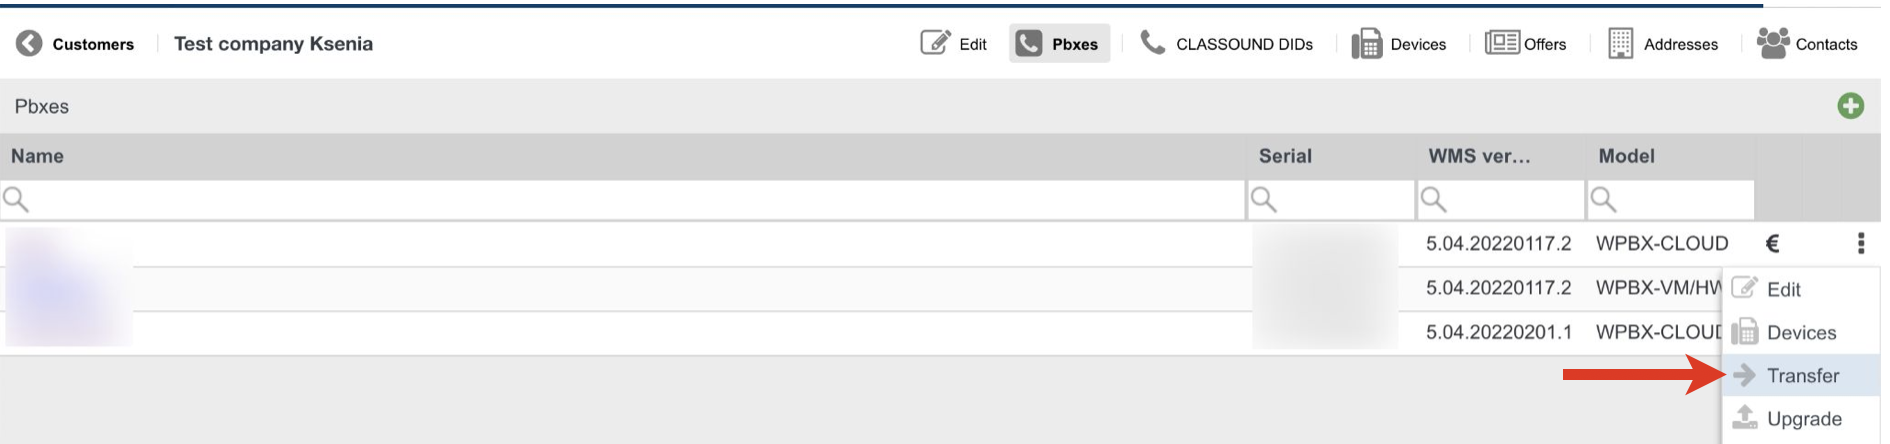
Select a PBX you need to move: click Options button (Three dots) and select Transfer:
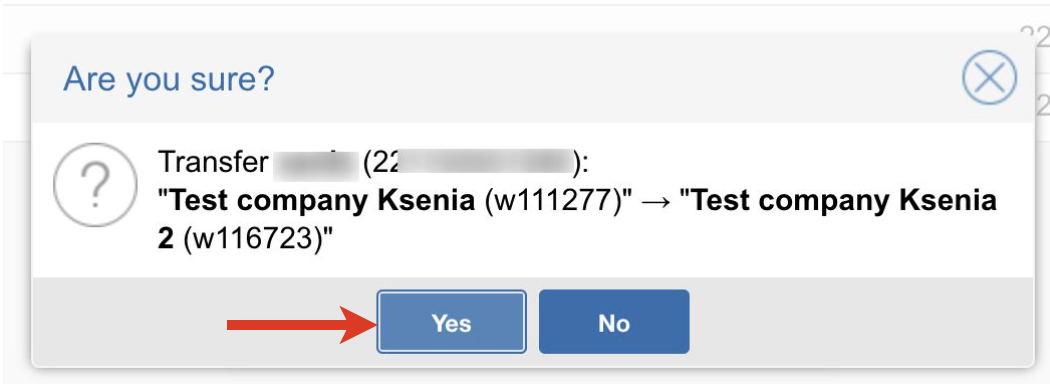
Select a company to move PBX and click Ok:

Confirm the operation by clicking Yes:
Scheduled deletion of Cloud PBXs
Once all user licenses are deleted (decreased to zero) from a Cloud PBX, the PBX is scheduled for deletion: will be stopped in five calendar days and irrevocably deleted in 14 calendar days.
What if I don't want this PBX to be deleted?
The PBX owner (the Partner) has five calendar days to revert this process. They should add back at least one user license and the PBX will no longer be scheduled for deletion.
What if I changed my mind after the PBX was stopped?
Starting from the day when user licenses have been decreased to zero, the PBX owner (the Partner) has 14 calendar days until the PBX is irrevocably deleted. Once the PBX is stopped (after five calendar days), the Partner still has five working days (9 calendar days) until the PBX is irrevocably deleted. If the Partner changes their mind regarding PBX deletion during this time span, they should add back at least one user license and get in touch with their Area Manager ASAP to notify them about this change.
The process:
- Once all user licenses are deleted from a Cloud PBX, it is scheduled for deletion. On the second day notification is sent to the PBX owner (the Partner).
- In five calendar days (since the PBX has been scheduled for deletion) the PBX is stopped.
- In 14 calendar days (since the PBX has been scheduled for deletion) the PBX is irrevocably deleted.
.jpg?version=1&modificationDate=1601050061000&cacheVersion=1&api=v2&width=500&height=324)
Move PBX to Cloud
Limitations:
- DB size for migration is limited by the root partition size on Cloud PBX: about ~6-7G
Important! After the migration to Cloud is completed, turn off or reset to default the old HW PBX to avoid routing/ network issues.
Move a Subscription-based PBX to Cloud (1 month/ 1 year/ 5 years)
Step 1 - Create a new Cloud instance on WMP
To move Per User subscription-based (1 month/ 1 year/ 5 years) PBX to Cloud, you need to access WMP where you have a button that allows creating a new Cloud instance instead of your current PBX. The licenses active on this PBX and the PBX serial will be moved to the new Cloud instance.
Important notes:
- PBX will not be reachable for up to 20 minutes, during which the DNS record will be updated (the migration time depends on the migrated DB size), remember to update/remove any local DNS proxies; phones/media gateways must use the DNS name for provisioning or they will not switch automatically to the Cloud PBX
- The old PBX will stop working as soon as the licence will be synced
How-to:
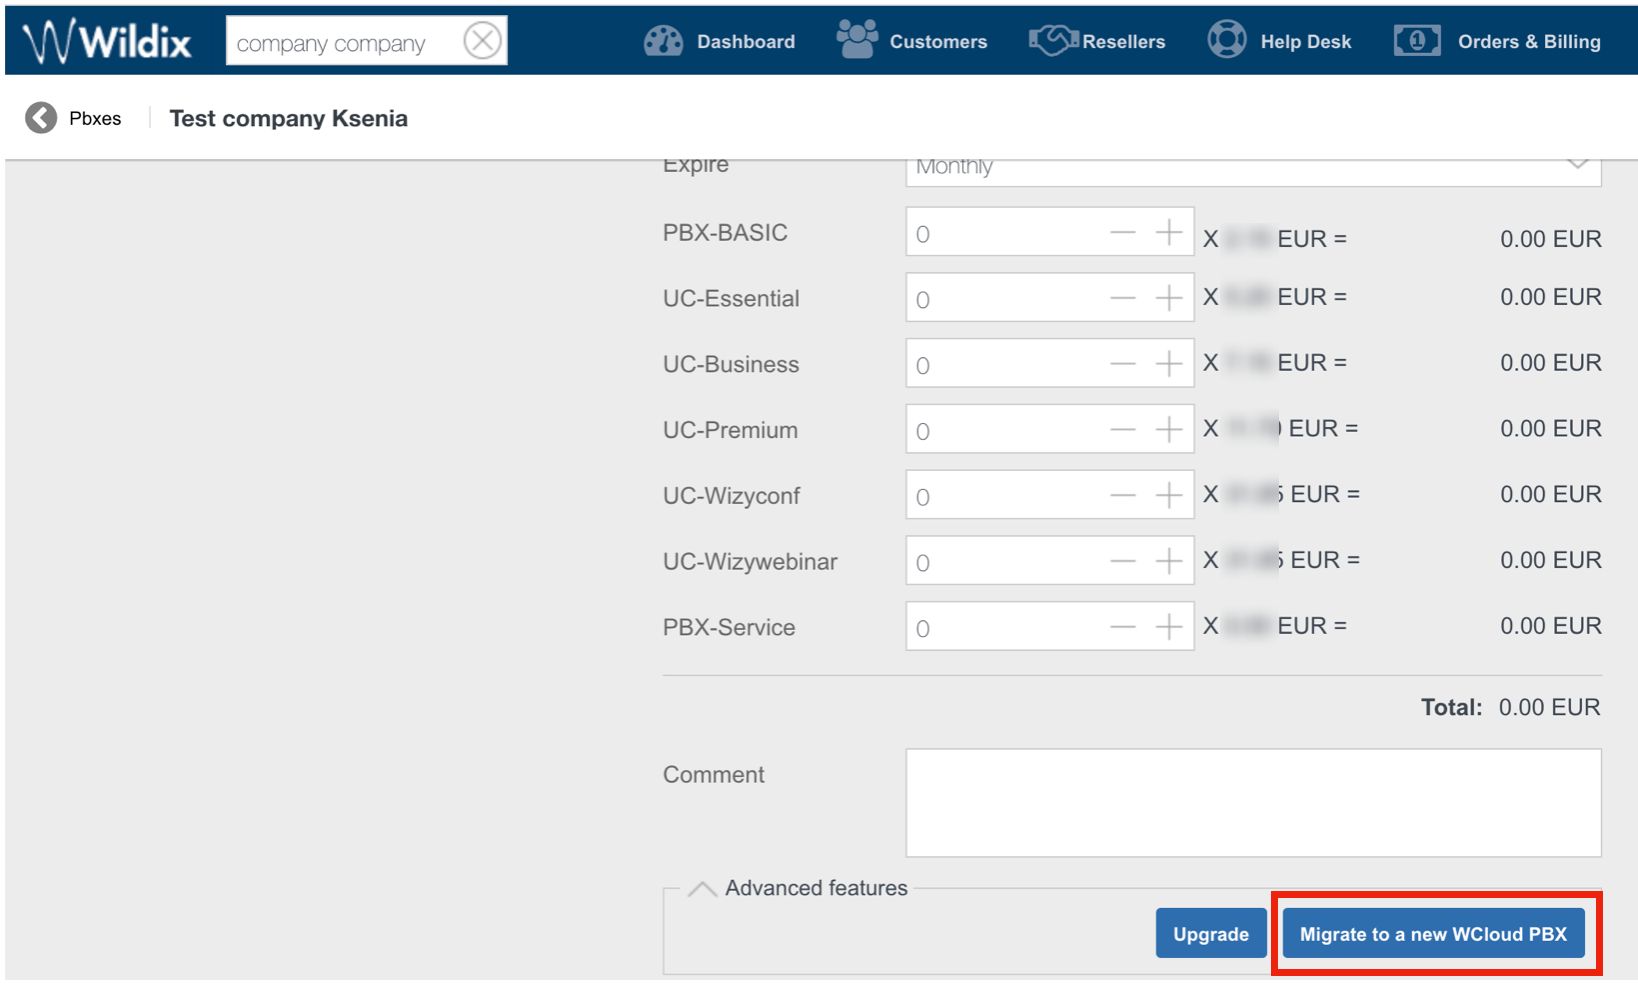
- Access WMP using your credentials
- Select your company and your customer
- Click Options button (Three dots) and select Edit
- Click Advanced features
- Click Migrate to new WCloud PBX
Step 2 - Run the script on old PBX to move all the data
Now when you've created a new Cloud instance for your HW/ VM PBX, you need to launch the script on your old PBX that will move all the data from your old PBX to the new one.
Run the script:
- Access WMS, Open Terminal on the PBX, select the option 10 (Shell), access as root (su - wildix)
Run the following command:
chmod +x /usr/sbin/migrate2cloud
Run the command:
migrate2cloud
Move a Per-Service or a LifeTime PBX to Cloud
Step 1 - Create a new Cloud instance on WMP
Create a new Cloud PBX as described in chapter Add a new Per User PBX on WMP.
Step 2 - Run the script on old PBX to move all the data
- Access WMS, Open Terminal on the PBX, select the option 10 (Shell), access as root (su - wildix)
Run the following command:
chmod +x /usr/sbin/migrate2cloud
Run the command:
migrate2cloud -d <cloud pbx domain>
You will be prompted to enter the password of your new cloud PBX. During the script execution you will be prompted to confirm, which data you would like to be moved. As soon as the script finishes its execution, the data will be moved and you will be able to access the Cloud PBX using the password of your old PBX.
Enable SSH port on Cloud PBXs (optional)
Direct access to SSH port on Cloud PBXs is blocked for security reasons. Now it’s up to you to temporarily enable/ disable SSH port 2222 via WMP:
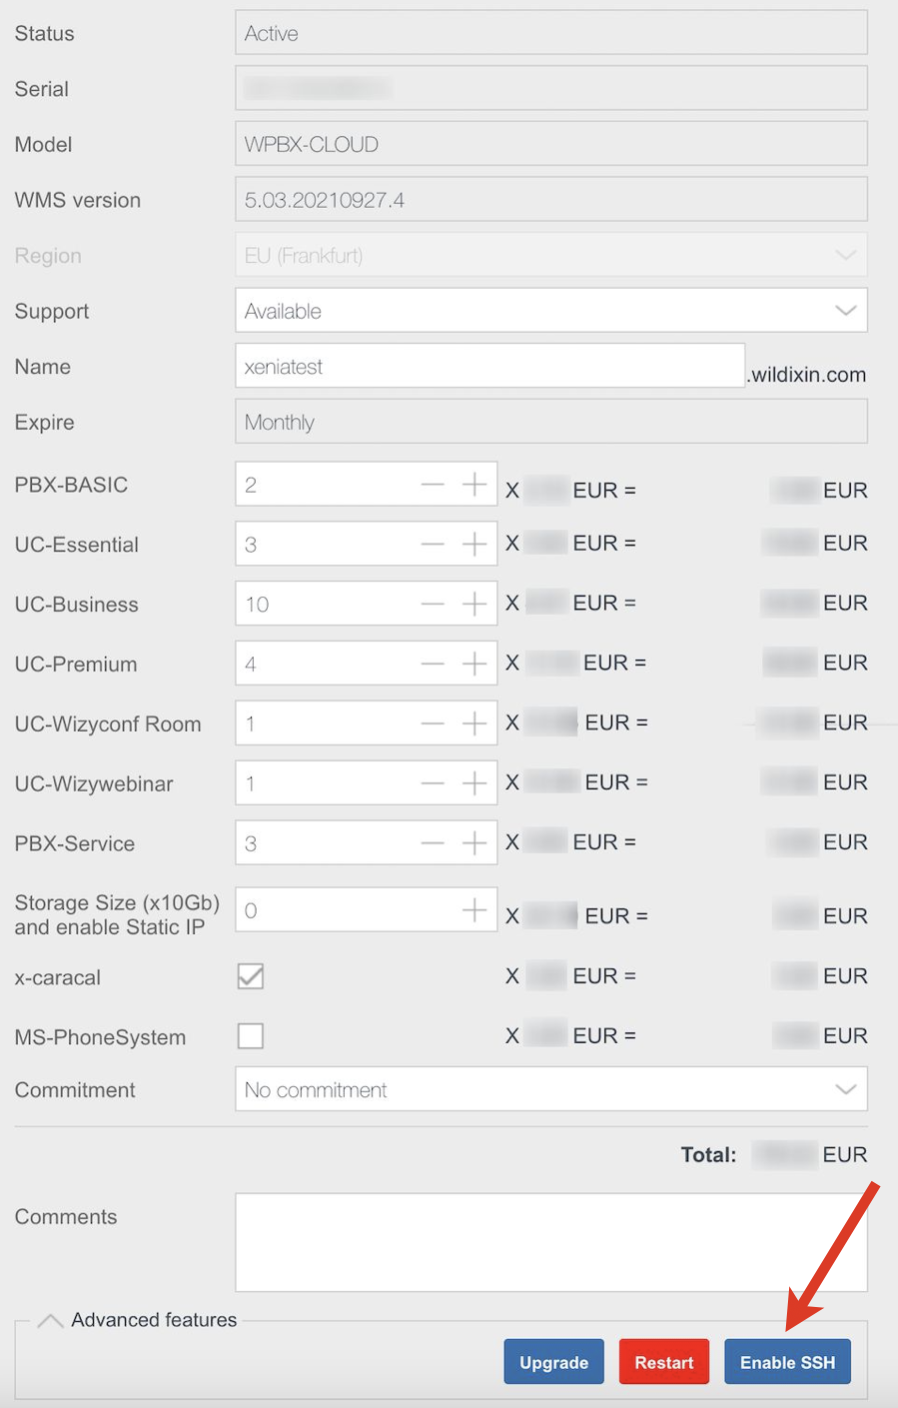
- Access WMP using your credentials
- Select your company and your customer
- Click Options button (Three dots) and select Edit
- Click Advanced features
- Select Enable SSH option
If there is a need to block the port, it can be deactivated via Disable SSH option.
Share Per User Licenses between PBXs over WMS Network
Important: Starting from April 19 2022, sharing licenses between newly created PBXs over WMS Network is done automatically. A customer can have only one PBX with active licenses. Any other PBXs of the same customer are automatically added to WMS network and inherit licenses from the main (Server) PBX.
Licenses are shared over other Cloud, Hardware and Virtual PBXs in the WMS Network. Normally this scenario is used for Failover configuration. In this scenario you add UC profiles (users) only on Server PBX and then you can share the licenses enabled on Server PBX with Client PBX(s).
Prerequisites for this scenario:
The PBXs must belong to the same customer
WMS Network must be enabled between the PBXs
Limitations for Cloud PBXs:
- Cloud PBX cannot be connected to Server PBX with Lifetime license
- Cloud PBX with increased storage size cannot be connected to Server PBX
To enable WMS Network license sharing, proceed as follows:
Go to WMP -> Customers
Select your company and customer
Create a new PBX
- WMS Network License is automatically set
Periodic License Check
As stated here: https://www.wildix.com/licensing/, all Virtual and Hardware systems update their license information daily connecting via port 443 to:
wmp.wildix.com
- api.wildix.com
(this doesn’t apply to Cloud systems)
If connection to the license server is not available, a Hardware / Virtual Per User PBX will continue working for 14 days only. After which the PBX will support only one call for emergency purposes.
In case any of your customer's PBXs are not able to renew its license, you are notified via email containing the following information:
- the name of the customer (company)
- PBX serial and model
- how many days have passed since the PBX couldn't renew the license
In case this PBX should continue working, all you need to do is to make sure the PBX is connected to the Internet again, and in this way it is able to renew its licenses.
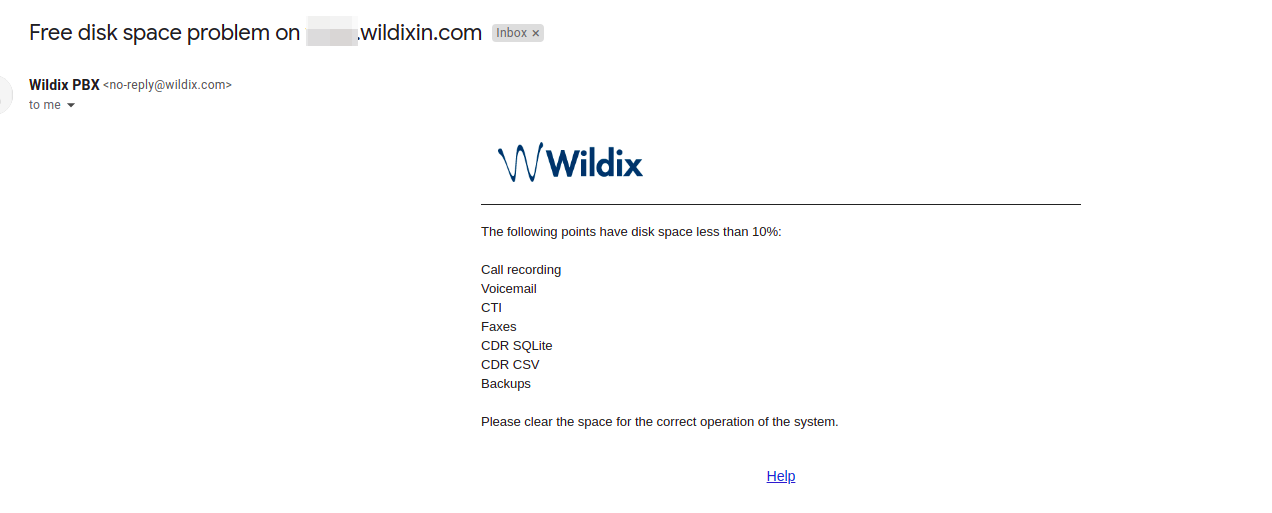
Increase storage on Cloud PBX
By default you have 10 GB of storage available on one Cloud PBX. When there is less than 10% of storage left, the relevant email is sent to the system administrator. See an example of such an email below:
You can increase the storage size. To perform it, proceed as follows:
- Select the customer and choose the Cloud PBX (or add a new one)
- Click Options button (Three dots) and select Edit

- Increase the storage size:
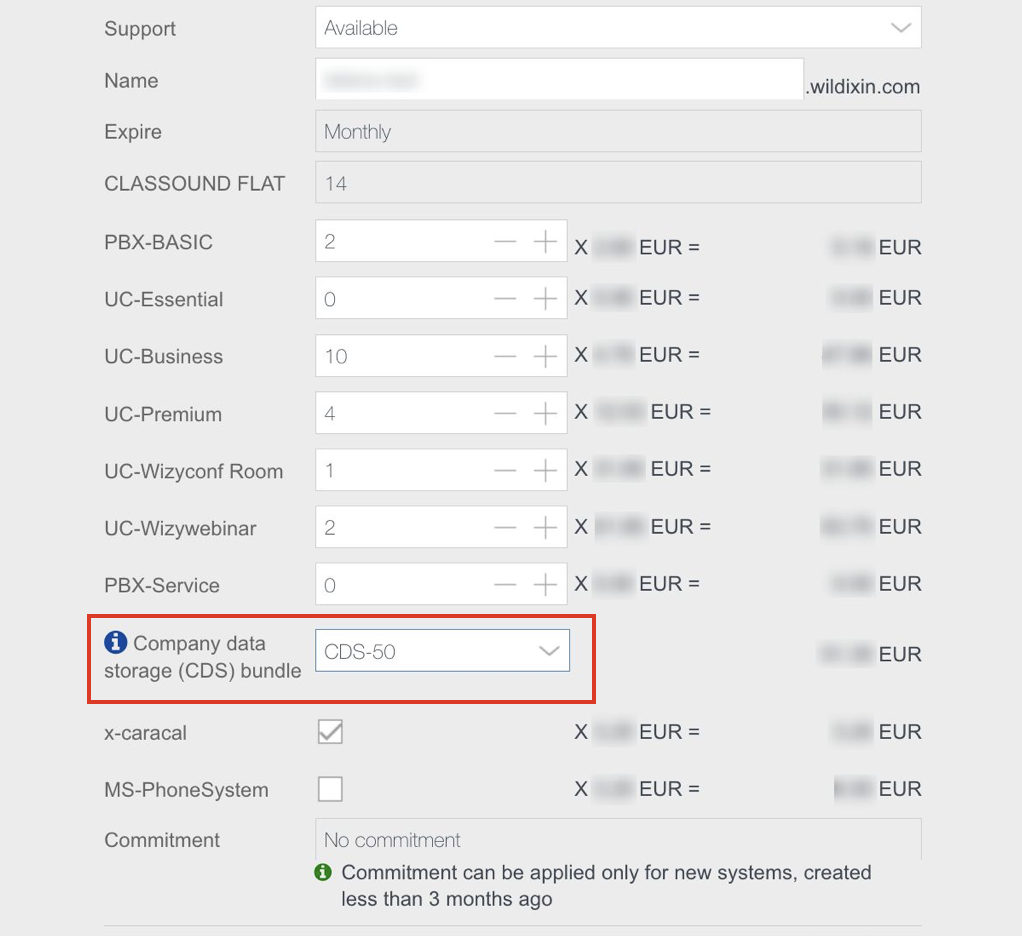
For more details about Company data storage (CDS) bundles, refer to the documentation: Company Data Storage Flow.
Confirm the operation by clicking Yes
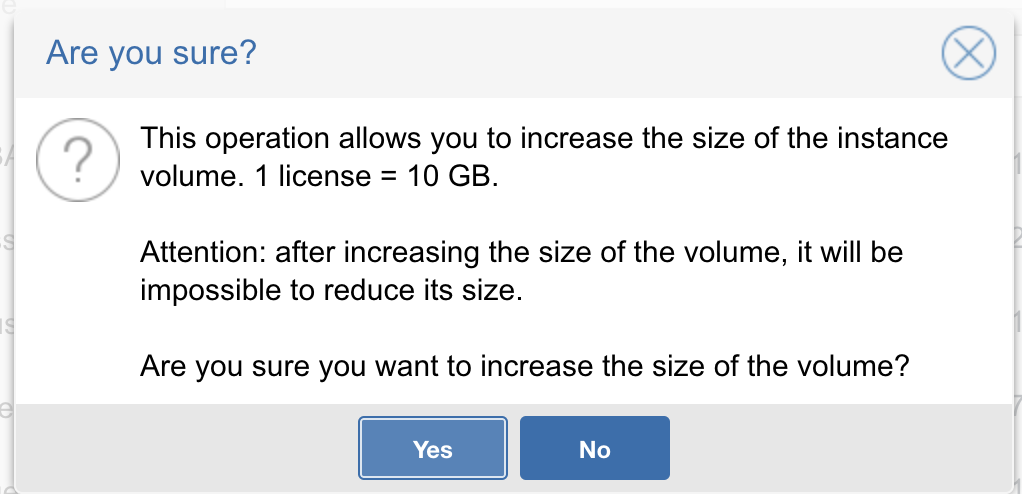
Note: The change will be applied at 1AM.
Important: After you have increased the storage size, it will not be possible to decrease it.
Video Tutorial
WMP Intro Video
Video tutorial: