Remote Provisioning of Wildix devices - Admin Guide
- Ksenia Babych
- Tatiana Bieliakova
- Elena Kornilova
The Guide describes the remote provisioning of each Wildix device.
General information about provisioning: Provisioning of Wildix devices Guide.
Updated: September 2024
Permalink: https://wildix.atlassian.net/wiki/x/cBnOAQ
Note: It is possible to assign unprovisioned devices to users.
Available only for devices added via Remote Provisioning (Semi-automatic mode). Refer to this chapter of WMS Start Guide for detailed information about assigning to users.
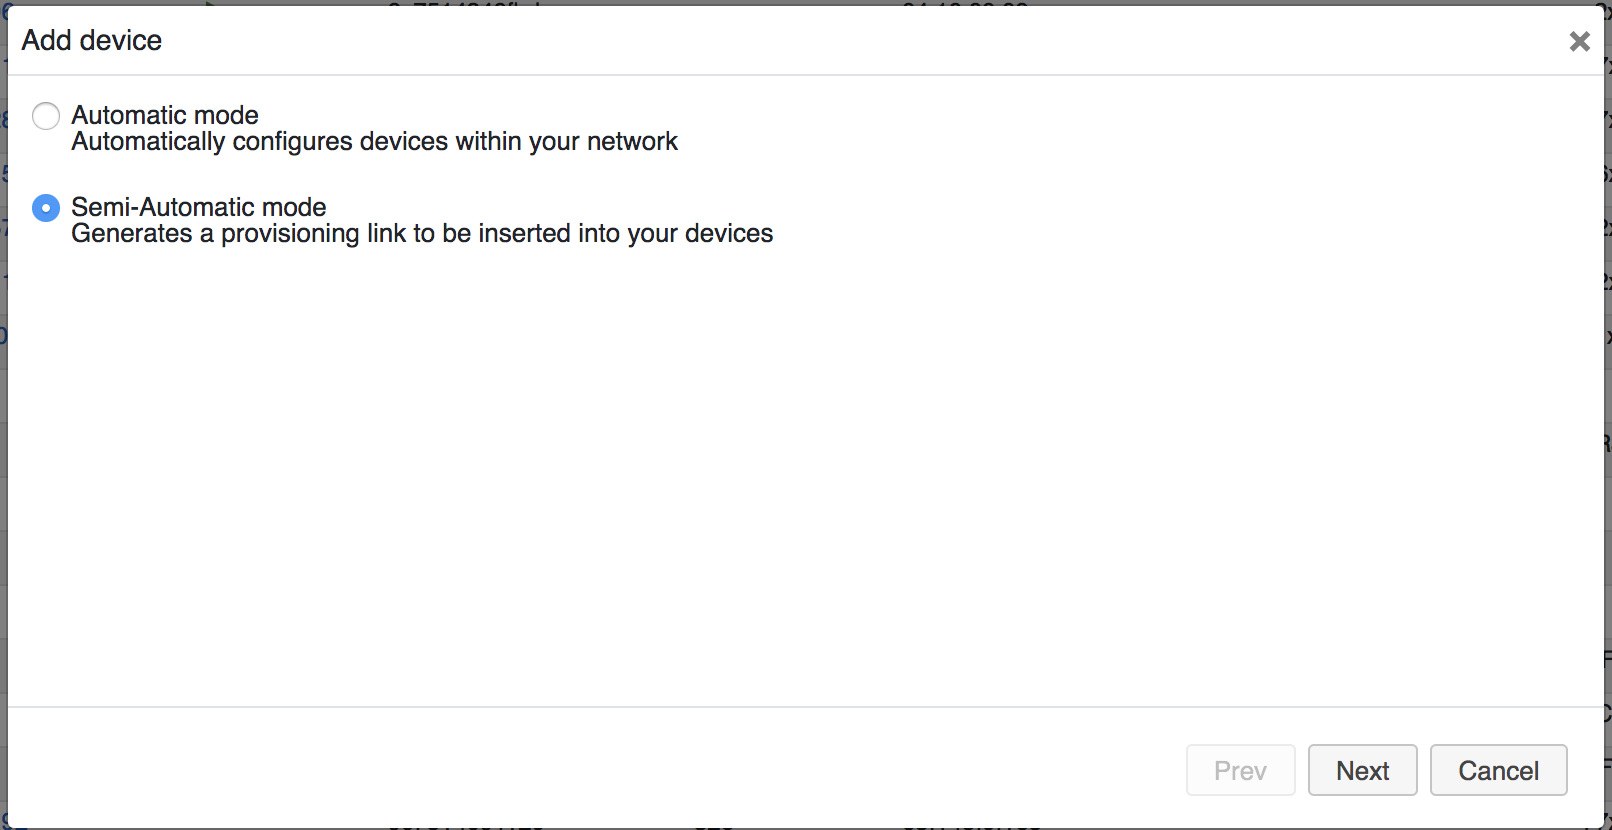
Step 1: Generate a provisioning link on WMS
- Go to the WMS -> Devices
- Click +Add
- Select Semi-Automatic mode and click Next:
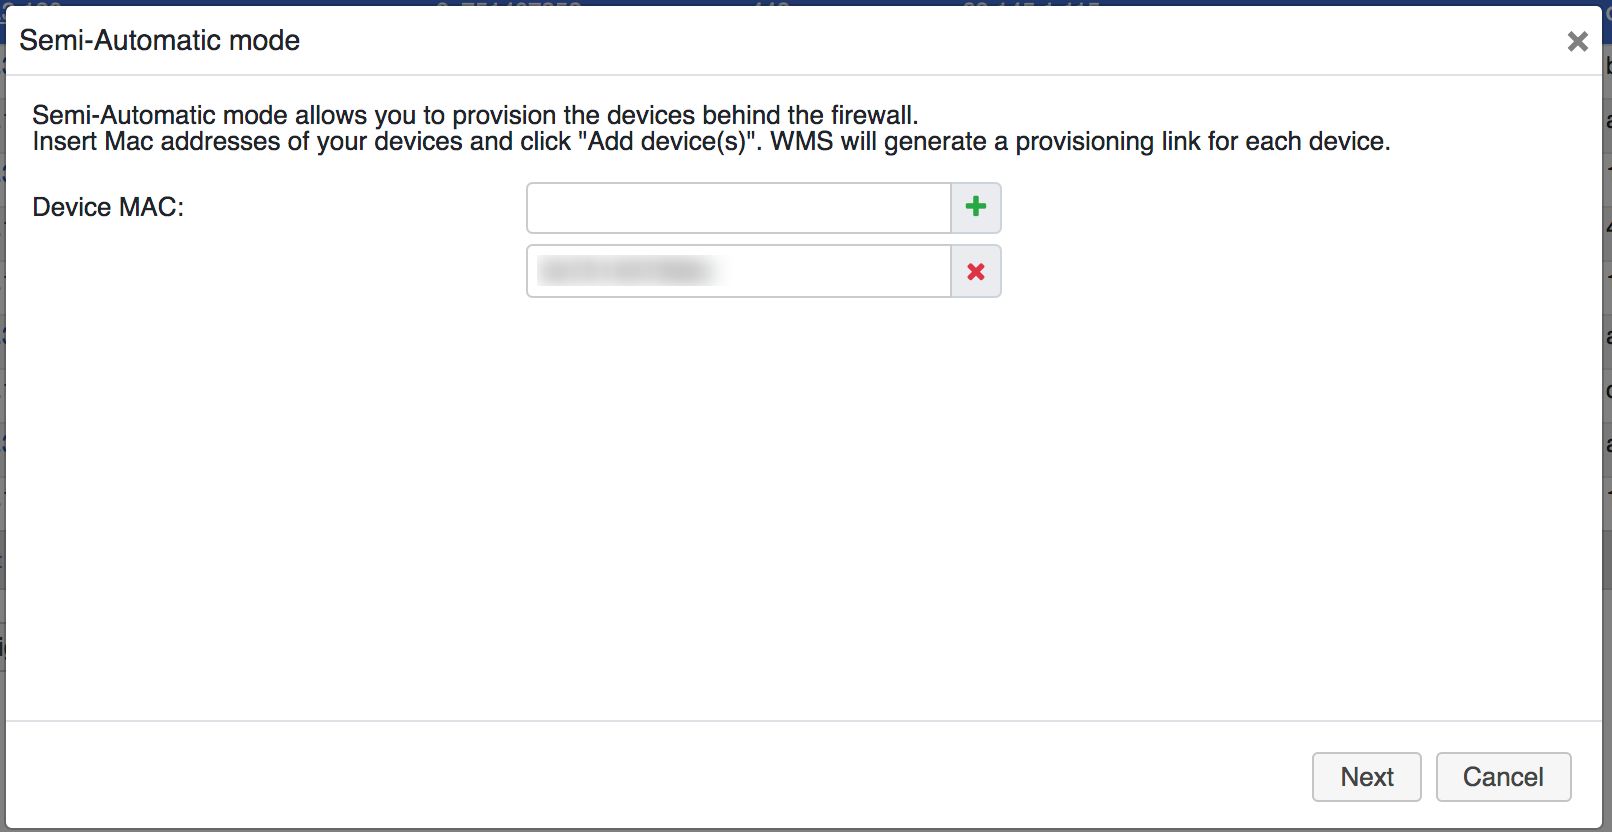
Insert the device’s Mac Address into the field and click Next:
Note: usually Mac Address is located on the rear panel of your device.
- After the provisioning link has been generated, copy the Provisioning URL
Please, make sure that the provisioning URL is copied properly, without any spaces.
Here are examples of a Provisioning URL:
- http://[PBX_IP / PBX_Domain name]/?action=setaps, for instance: http://10.100.1.132/?action=setaps or http://maartentest.wildixin.com/?action=setaps.
- http://[PBX_IP / PBX_Domain name]/?action=setaps&config=xml (only DaySaver/ W01GSM)
For Virtual / Hardware PBX you can use either IP address or PBX domain name in this Provisioning ULR. If you provision devices to Cloud PBX, please make sure PBX domain name is used in the Provisioning URL, and not the IP address.
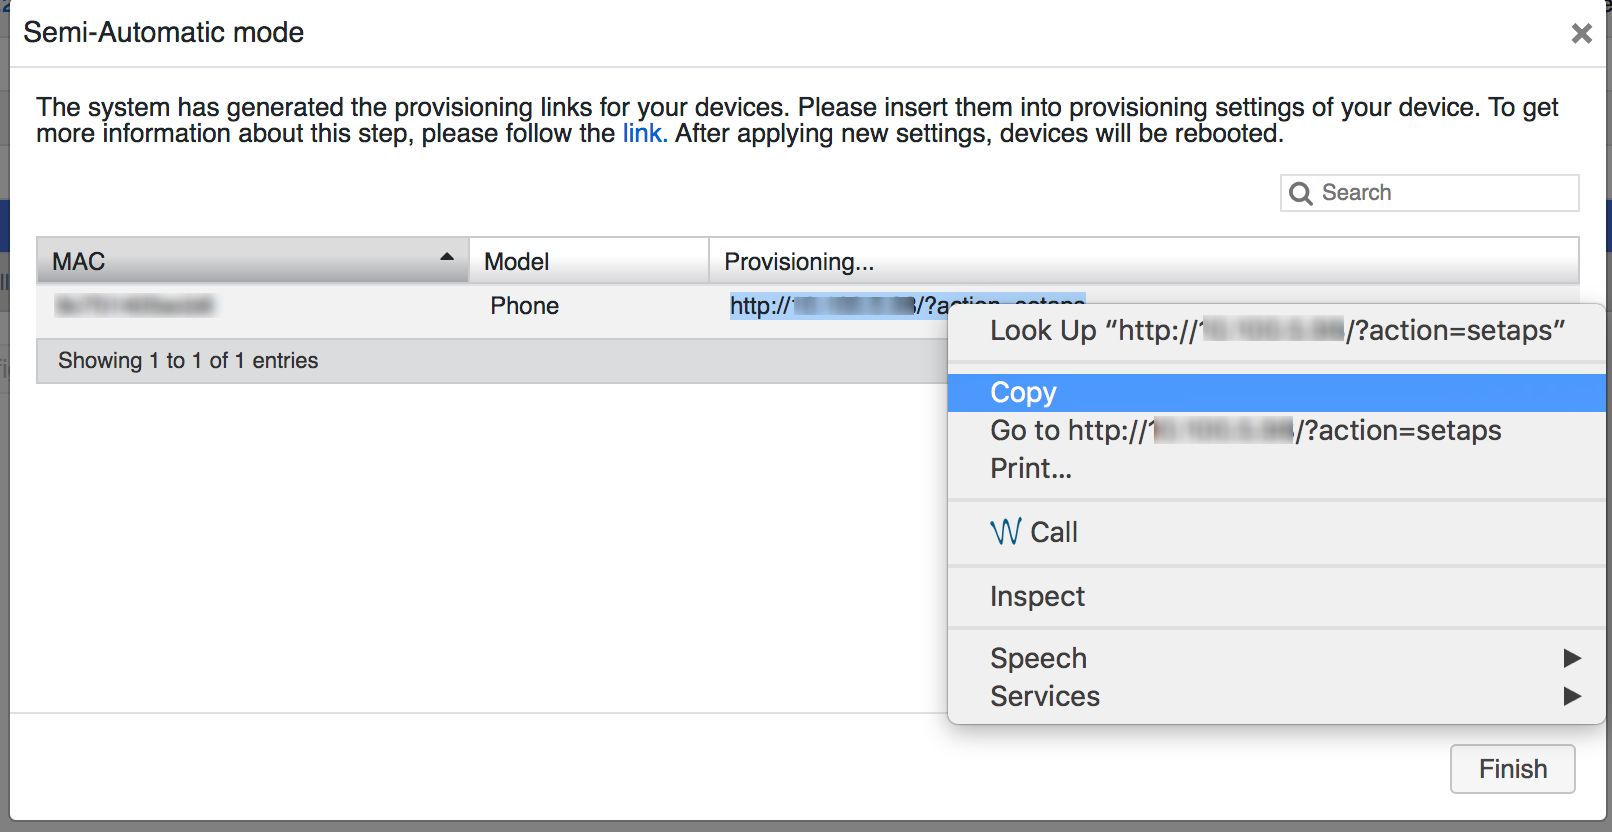
- After you click Finish, the new device appears on the list:

Step 2: Insert the provisioning link on the device’s web interface
Start 5, WorkForce 5, ForcePro 5, WelcomeConsole 5
- Go to device’s web interface
Credentials for the first time access: admin : admin - Go to menu System -> Auto Provision tab
- Proceed to the section Static Provisioning Server and insert the PBX domain into the field Server Address
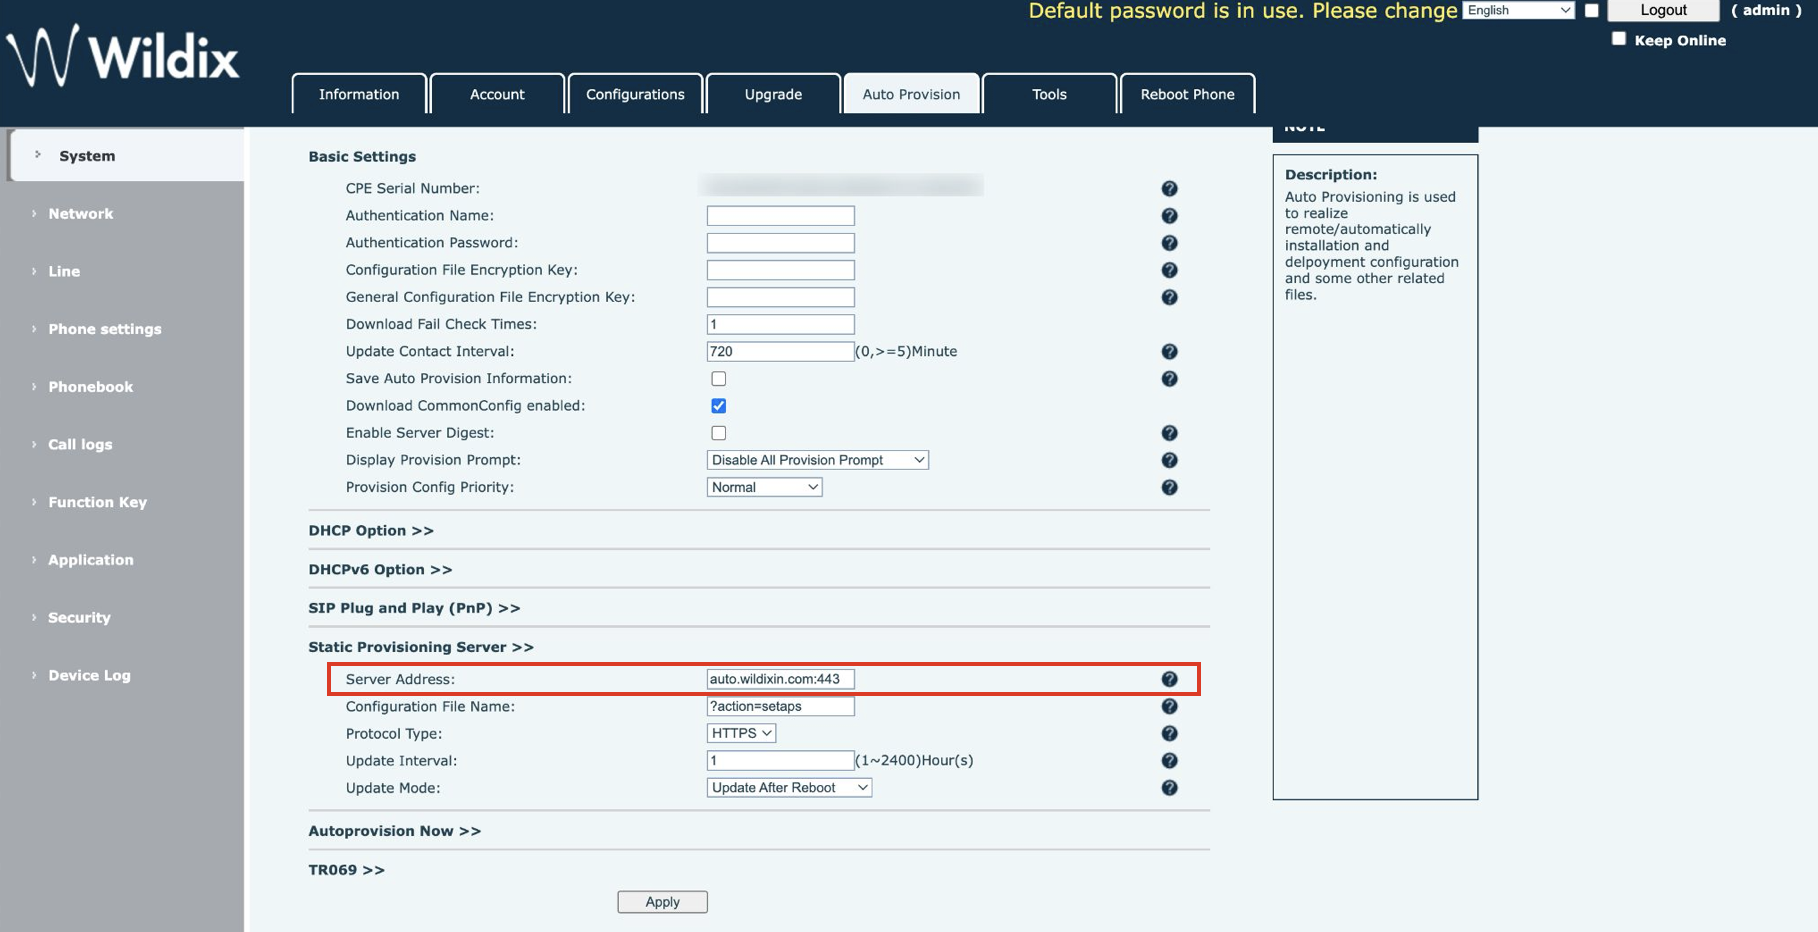
- Make sure HTTPS is chosen as Protocol Type:
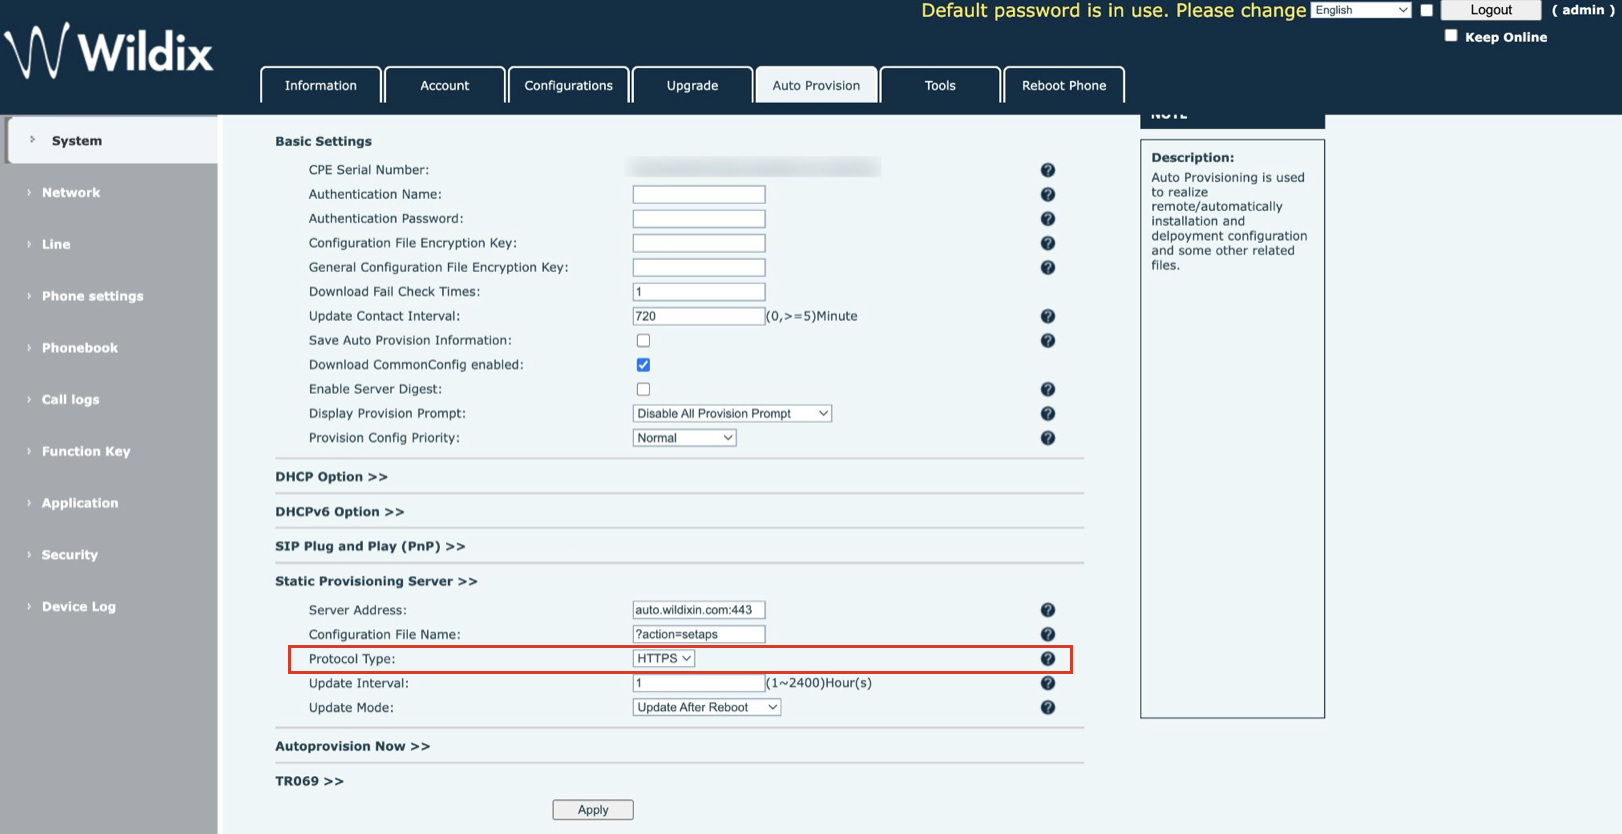
- Press Apply to save the changes.
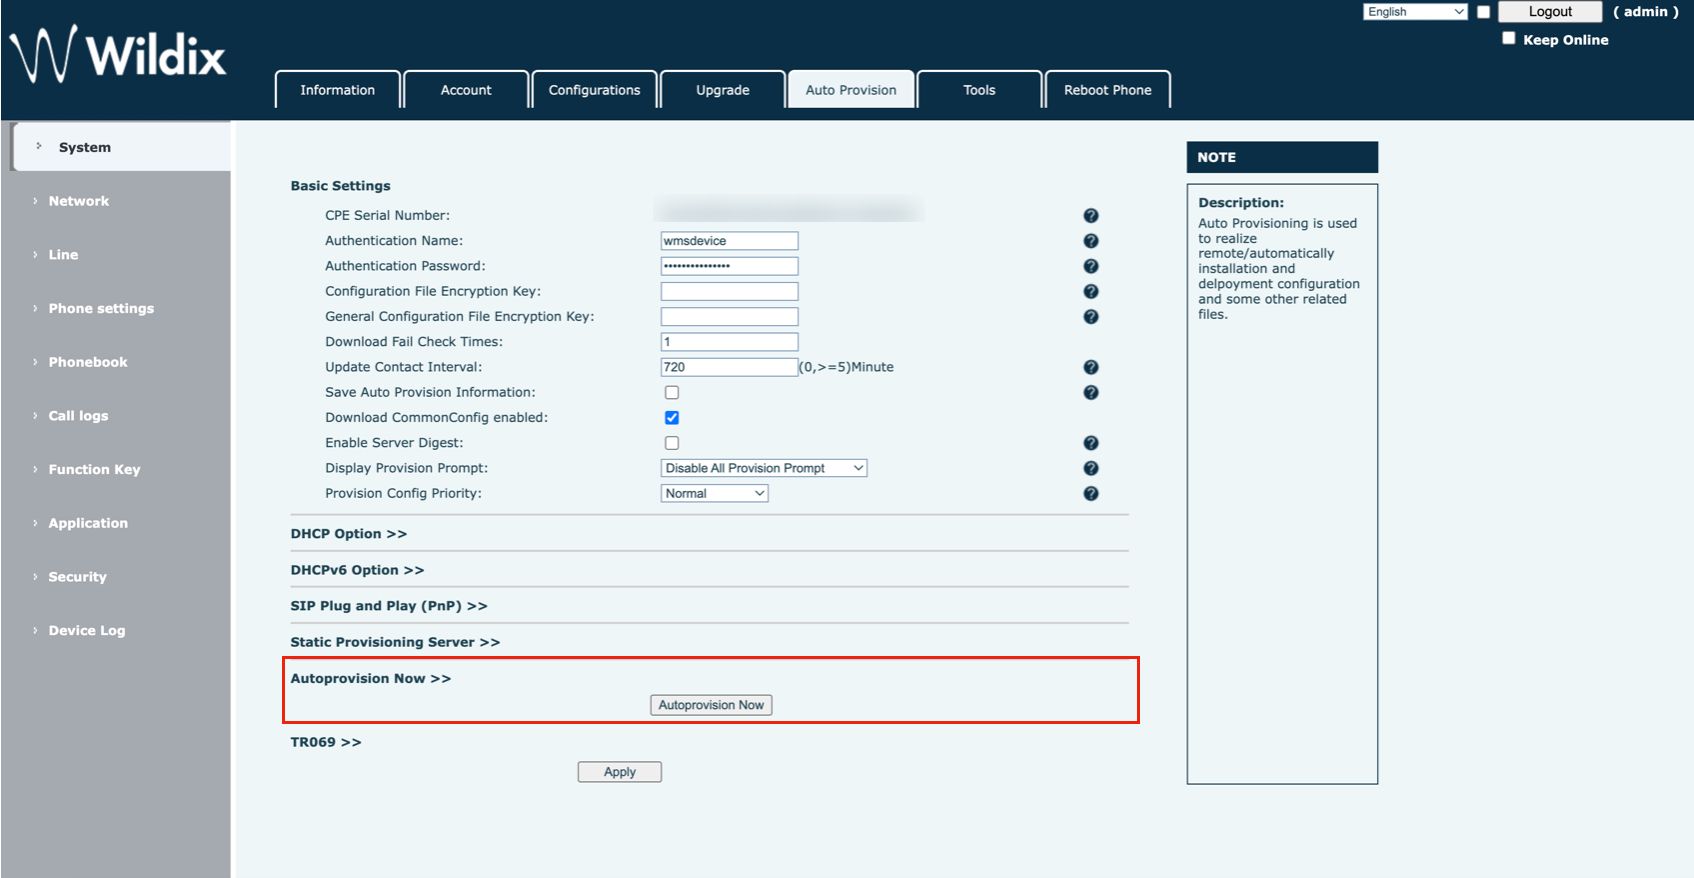
- Proceed to the section Autoprovision Now and click the Autoprovision Now button
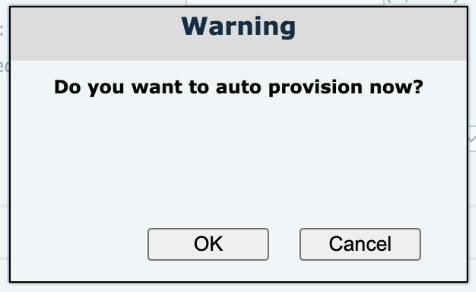
- Confirm the provisioning by pressing OK on the screen that pops up:
WP4X0 2015 - 2016 - 2017, Start, WorkForce, WelcomeConsole
- Go to device’s web interface
Credentials for the first time access: admin : admin
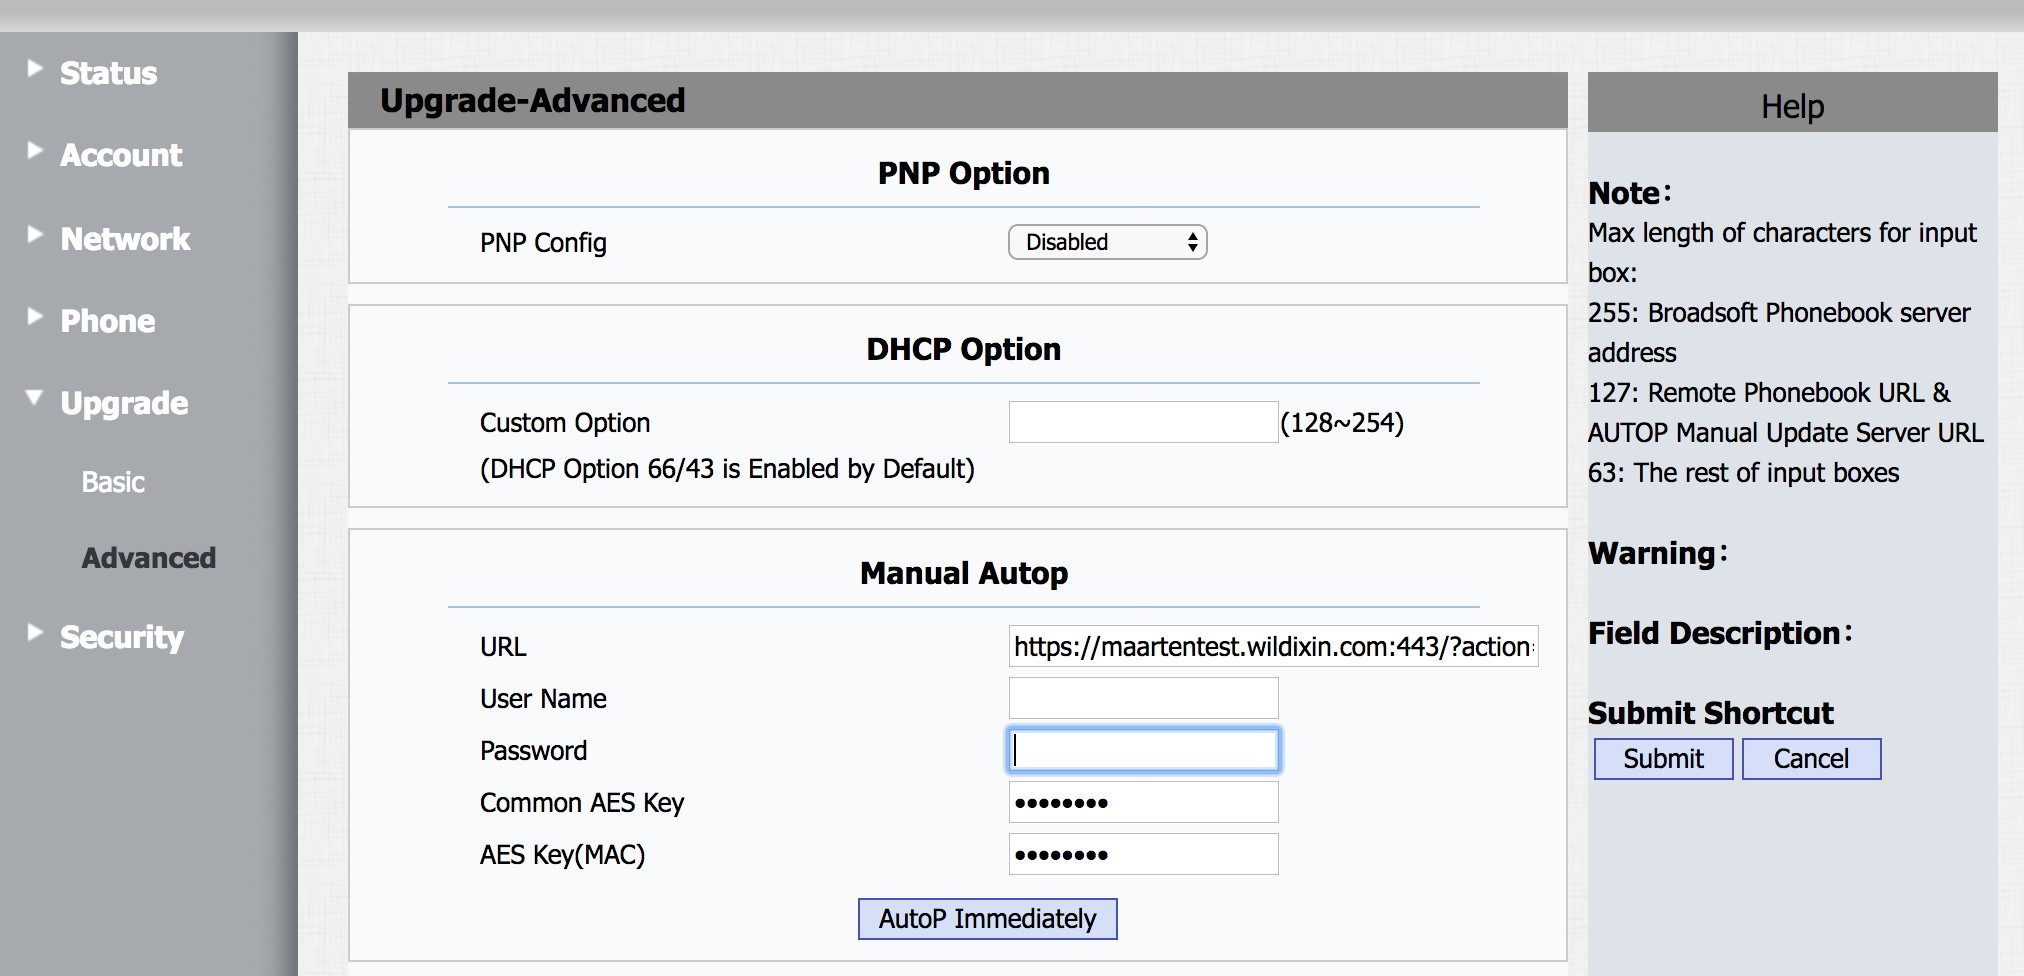
- Go to menu Upgrade -> Advanced
- Insert the provisioning URL into the field “URL”
- Click AutoP Immediately
Device is now rebooting (the phone screen indicates that the device is rebooting). After the reboot, you can see the date and time, soft keys and “login0X” on the screen of the device.
WP4X0 old generation and WP500
- Go to device’s web interface
Credentials for the first time access: admin : admin
- Go to the menu Upgrade -> Advanced
- Insert the provisioning URL into the field “URL”
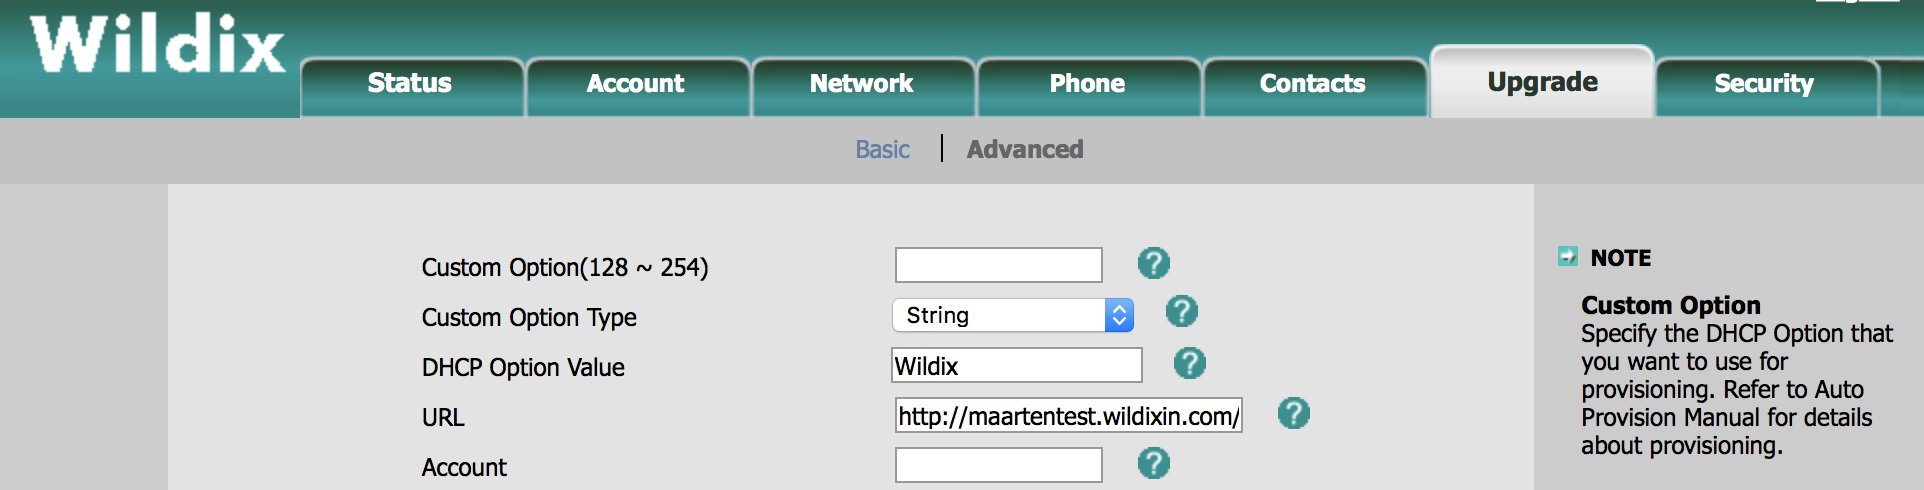
- Click Confirm to save URL
- Click Auto provision
Device is now rebooting (the phone screen indicates that the device is rebooting). After the reboot, you can see the date and time, soft keys and “login0X” on the screen of the device.
WP600 old generation
Note: This is WP600 old generation (pre 2015); new generation WP600AXX do not support provisioning via WMS, for configuration of WP600AXX (both remote and local), follow the steps described here: WP600A / WP600ACG – User Guide.
- Go to device’s web interface
Credentials for the first time access: admin : admin
- Go to the menu Phone -> Auto Provision
- Insert the provisioning URL into the field “Server URL”:
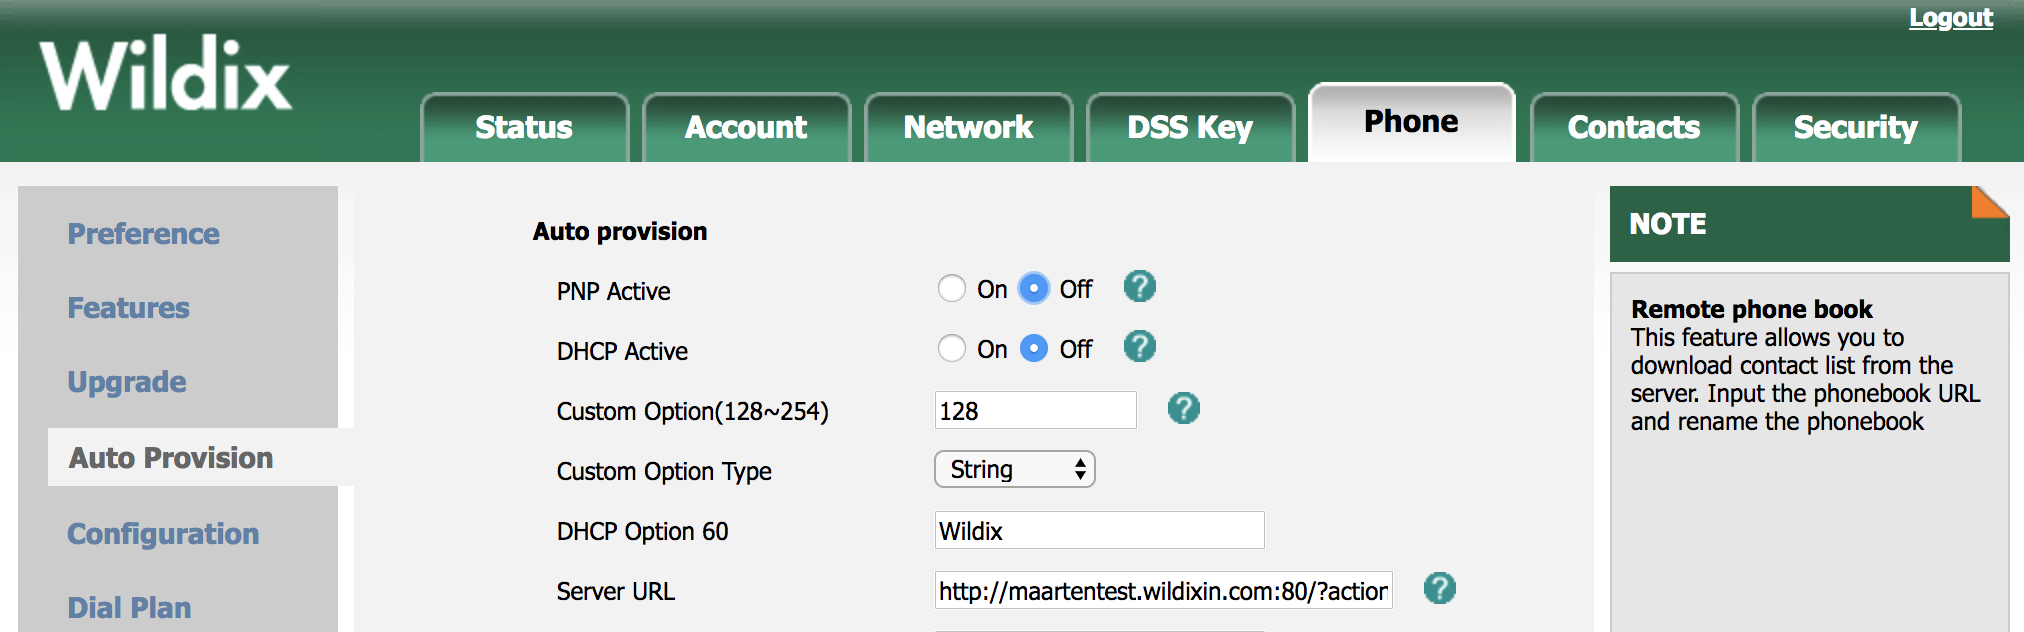
- Click on Autoprovision Now
Device is now rebooting (the phone screen indicates that the device is rebooting). After the reboot, you can see the date and time, soft keys and “login0X” on the screen of the device.
W01GSM
- Go to device’s web interface
Credentials for the first time access: admin : admin
- Go to the menu System -> System Configuration
- Insert the provisioning URL into the field “Primary Profile URL”
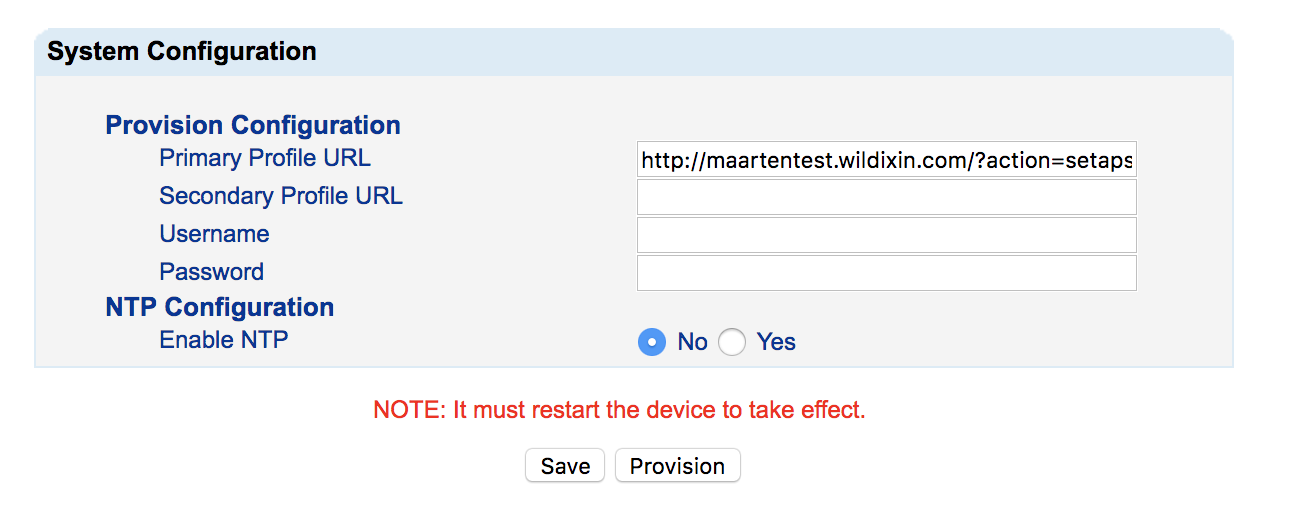
- Click on Save
- Press Back on the prompt page
- Click on Provision
Device is now rebooting.
DaySaver
- Go to device's web interface
Credentials for the first time access: admin : admin - Go to the menu System -> Provision
- Check off Enable
- Insert the provisioning URL into the field "URL"
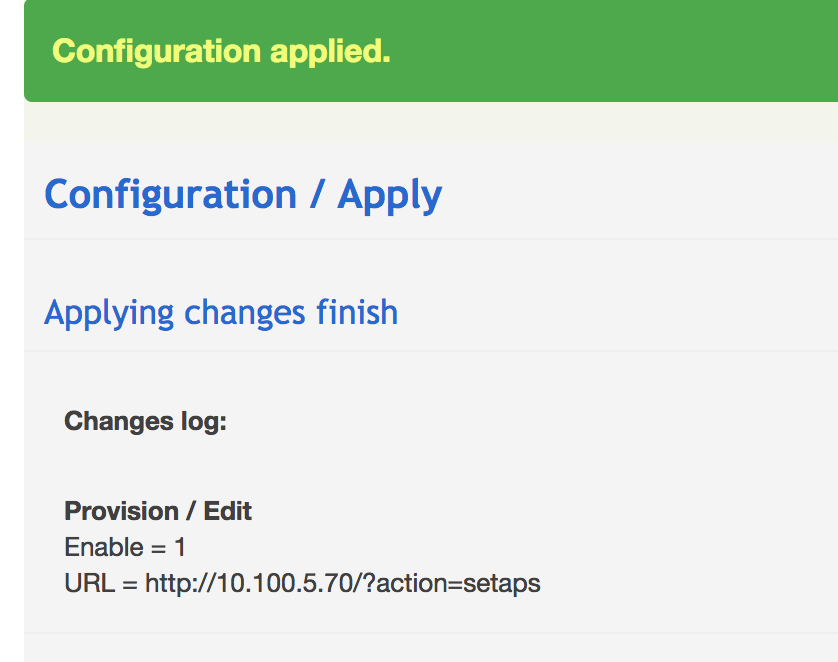
Click Save
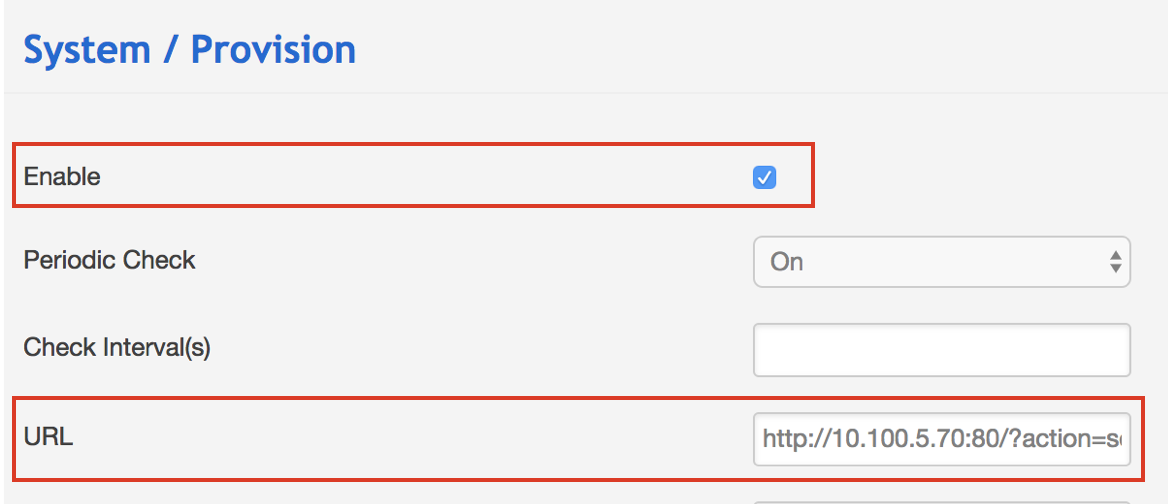
Confirm by clicking Apply

Configuration is now applied
W02FXS 2018, W04FXS 2020, W04FXO 2020/2023, W24FXS 2015, W24FXS 2023
- Go to device’s web interface
Credentials for the first time access: admin : admin
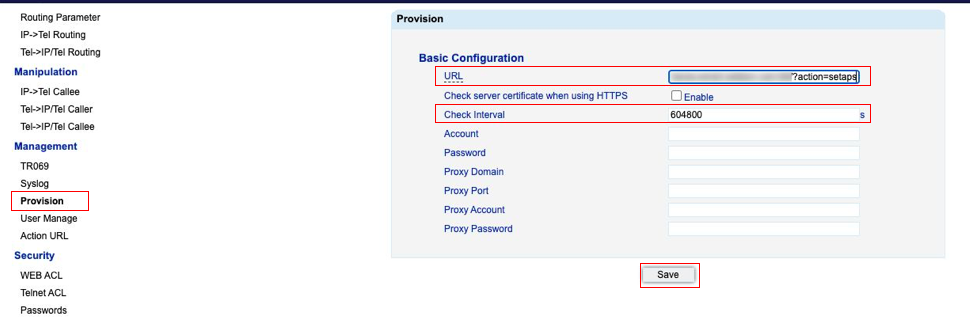
- Go to the menu Management -> Provision
- Fill in the following fields:
URL: insert the provisioning URL
- Check Interval: 604800
- Click Save
W01FXS 2014 / W02FXS 2015
- Go to device’s web interface
Credentials for the first time access: admin : admin
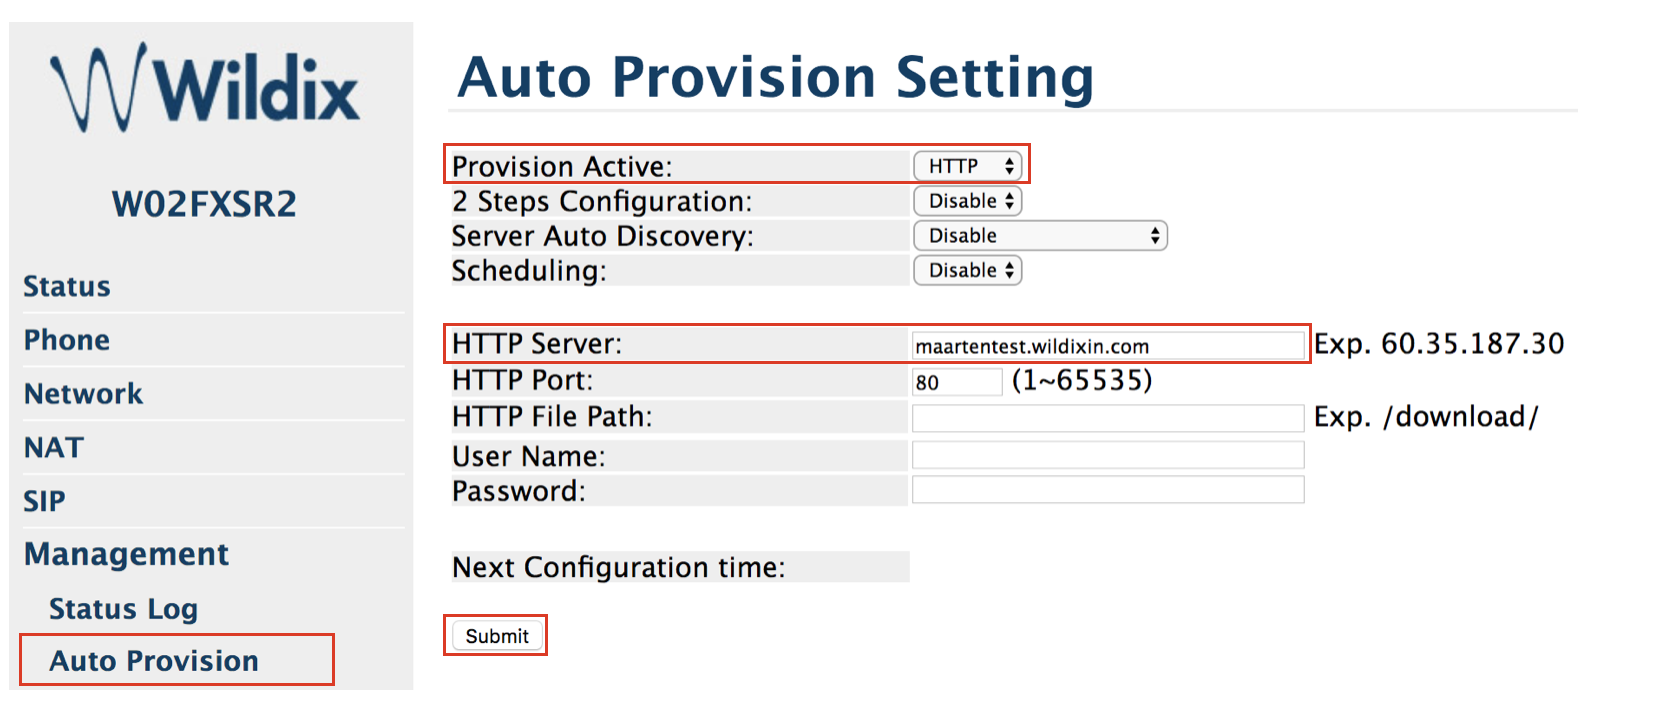
- Go to the menu Management -> Auto Provision
- Fill in the following fields:
- Provision Active: select “HTTP”
- HTTP Server: enter the PBX IP address or domain
- Click Submit
Click on save and reboot:
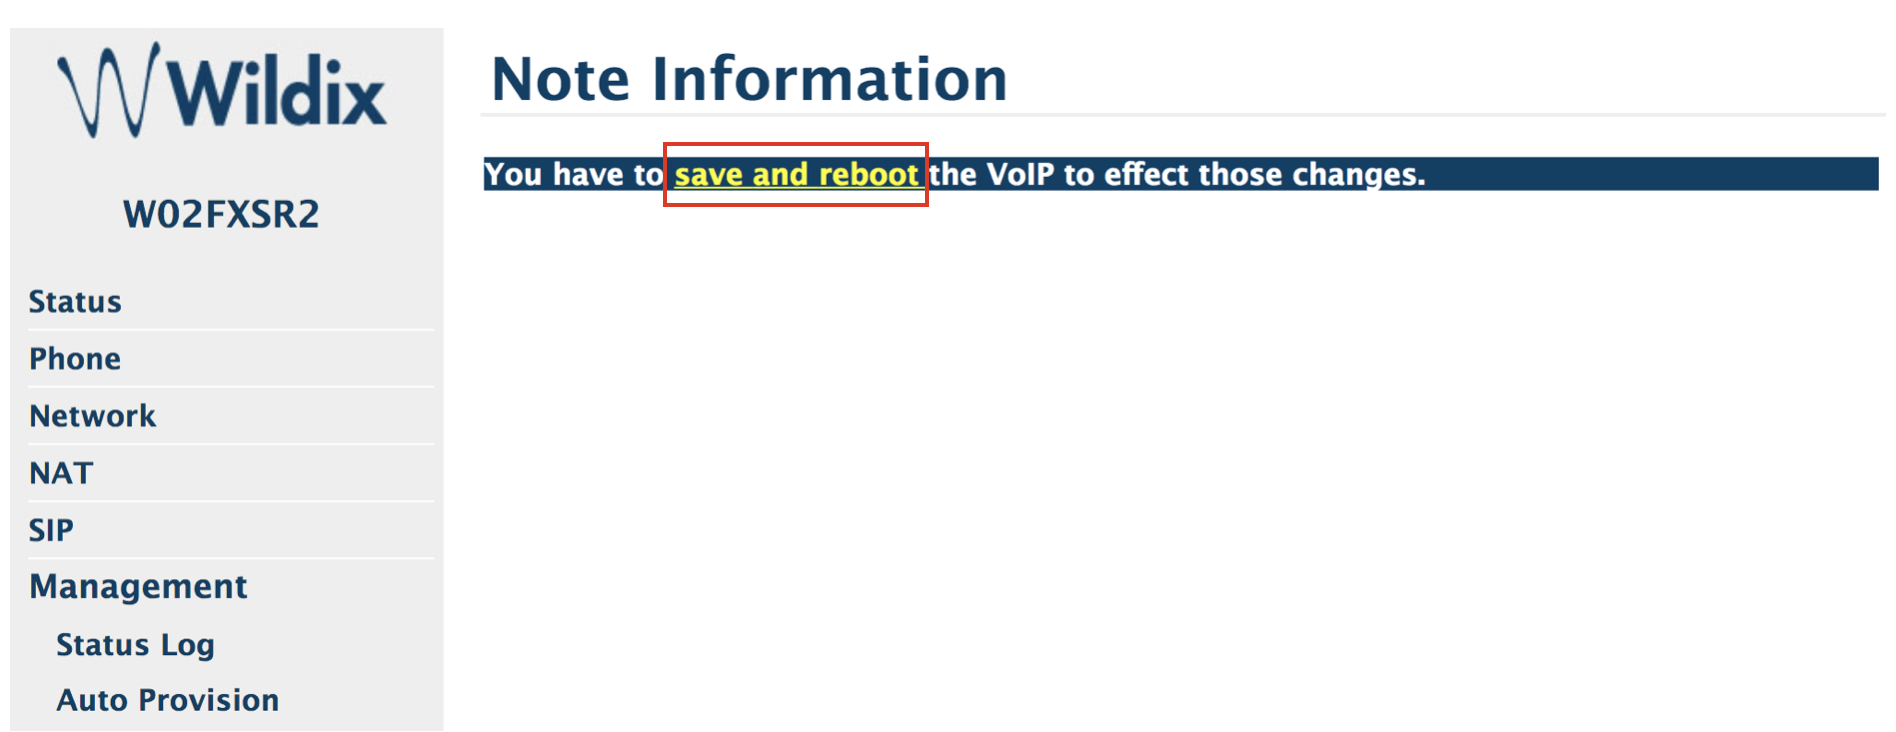
Device is now rebooting.
W04FXS 2017 and W04FXO 2015
- Go to device’s web interface
Credentials for the first time access: admin : admin OR admin : wildix (depending on the fw version)
- Go to the menu Device Setting -> Provisioning
- Insert the provisioning URL into the field “HTTP Config URL”
- Make sure that the following parameters are correct:
- Provisioning type: HTTP
- Refresh Interval (minute): 14400
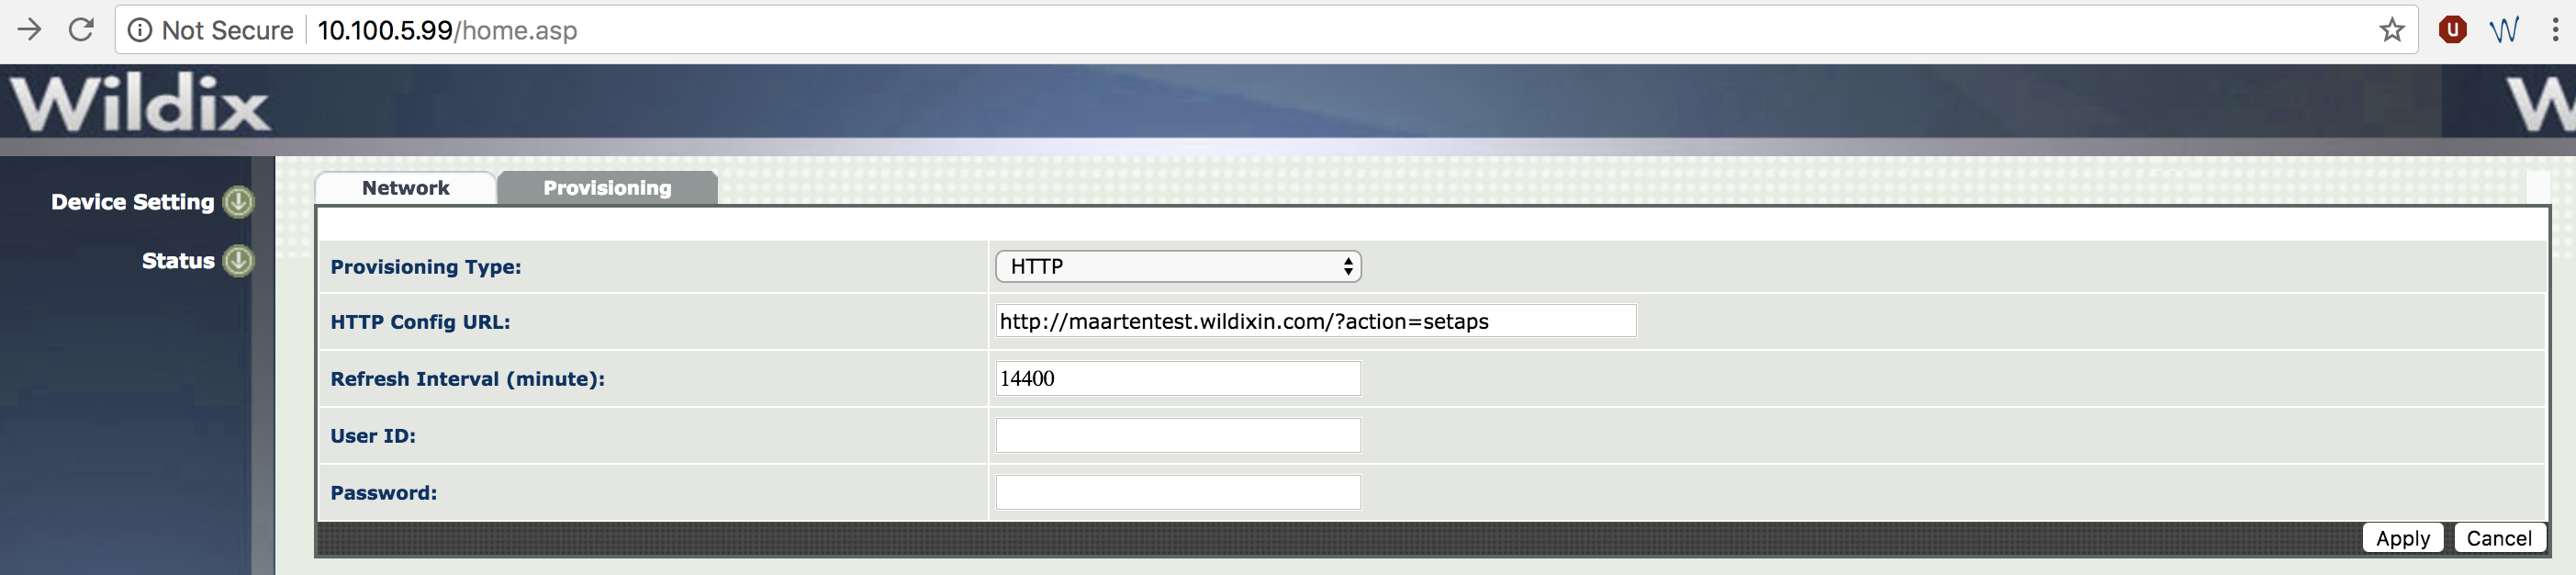
- Click Apply
- Change the URL address: instead of "/home.asp" add "/Maintenance.asp" to the URL
Example: http://10.100.5.99/Maintenance.asp
- Select Reboot and press Apply
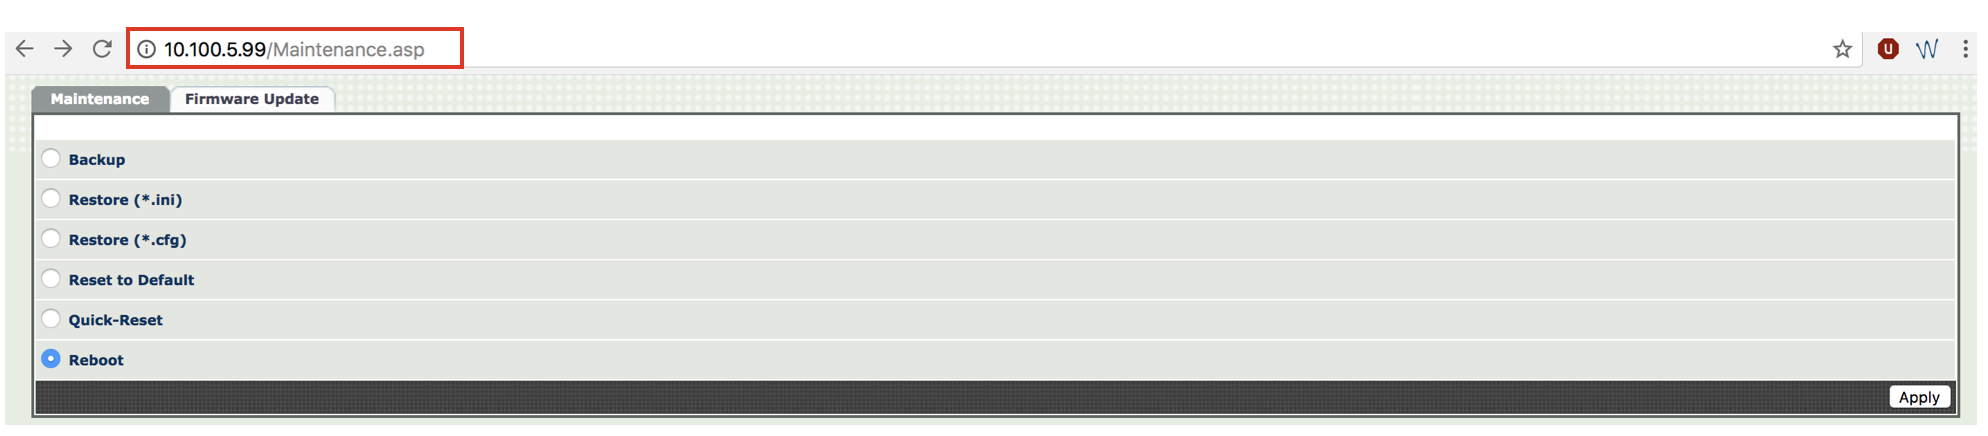
Device is now rebooting.
PRI, BRI, W04FXS (old generation), W08FXS, W16FXS and W24FXS (old generation)
- Go to device’s web interface
User name for the first time access: public, no password needed
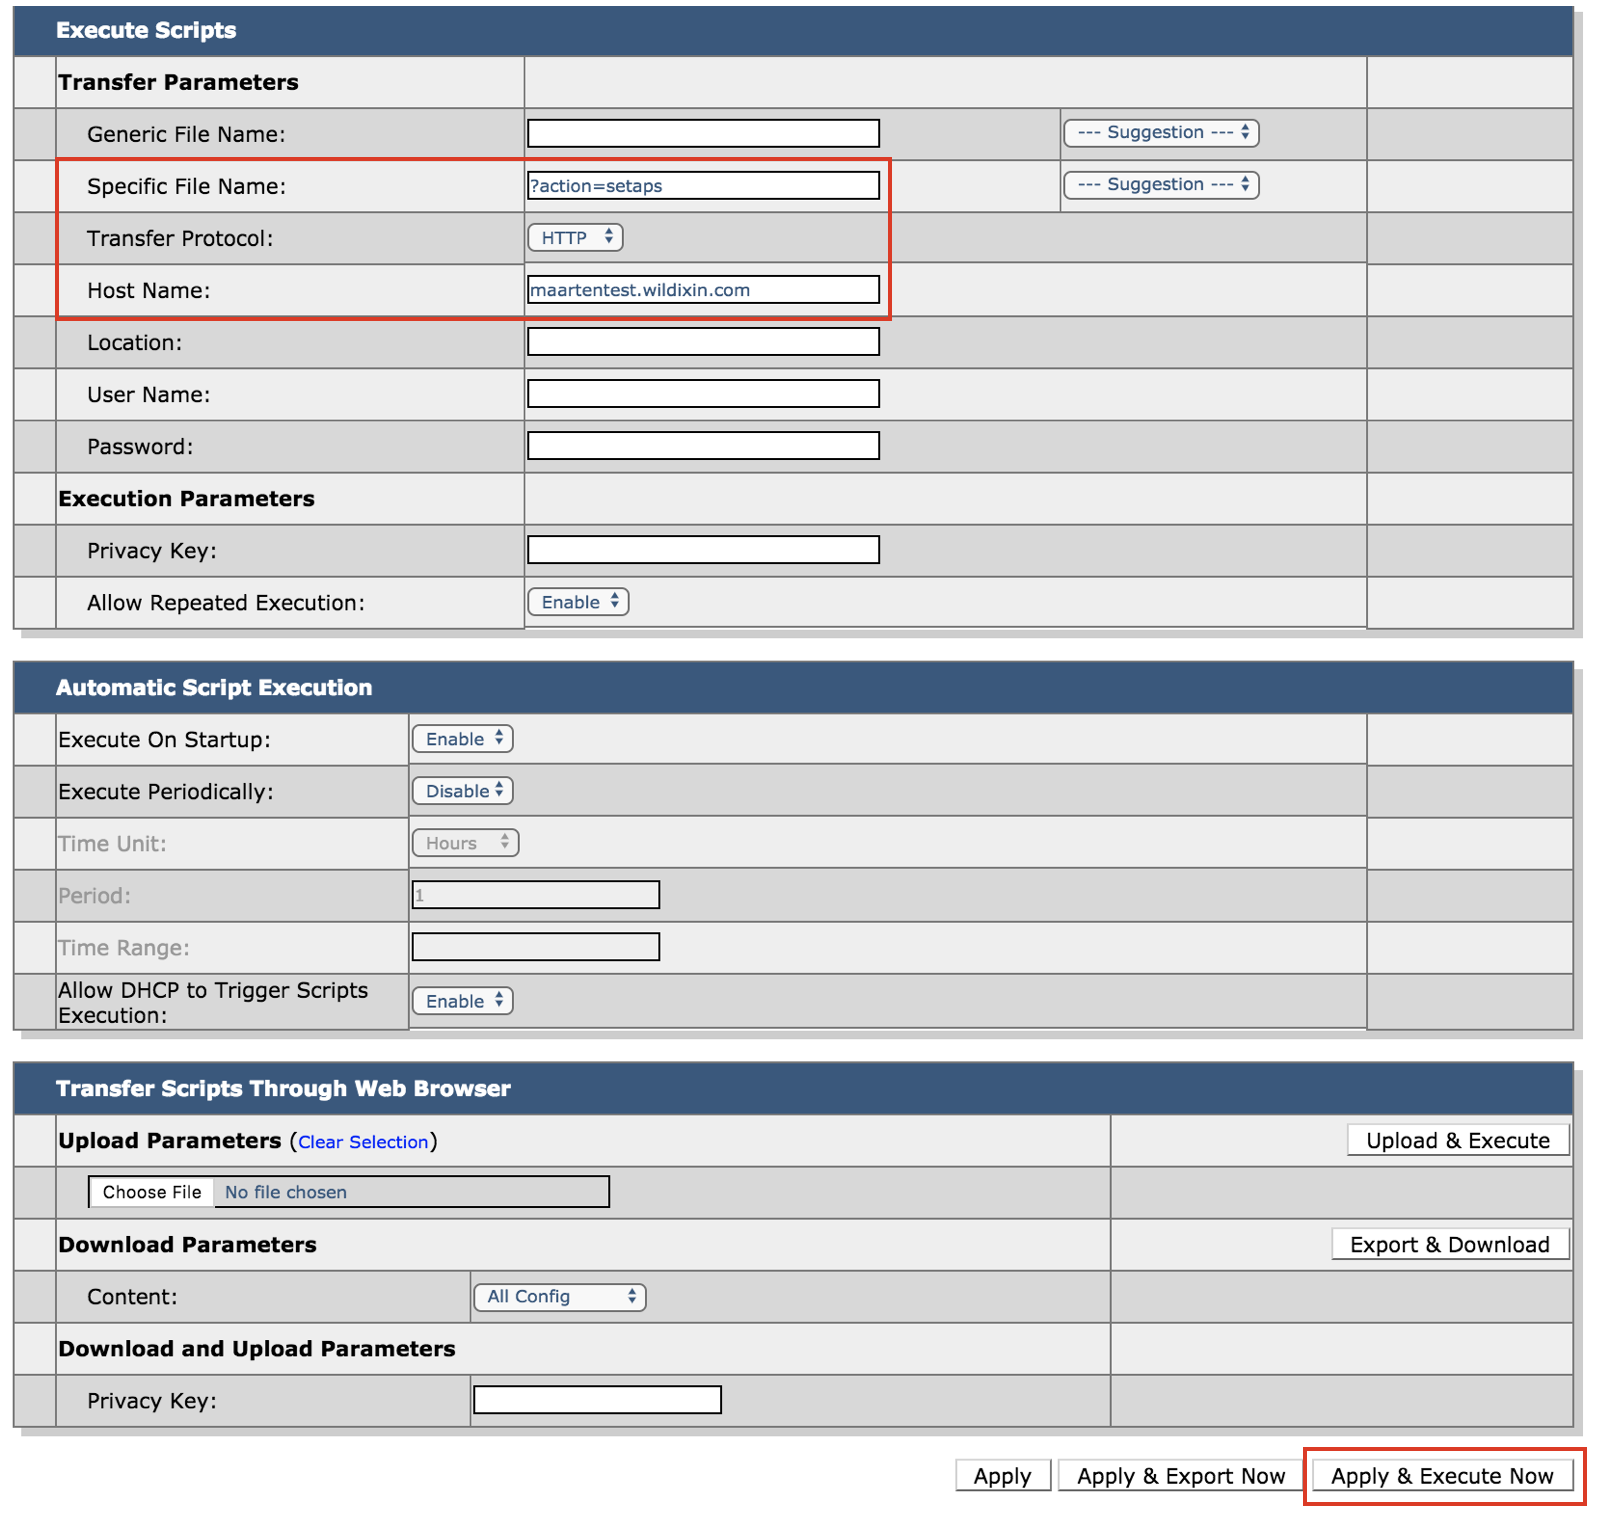
- Go to the menu Management -> Configuration Scripts
- Fill in the following fields inside the section “Execute Scripts”:
- Specific File Name: insert the part of the provisioning URL without the PBX IP address: ?action=setaps
- Transfer Protocol: select “HTTP”
- Host Name: enter the PBX IP address or domain name
- Click on Apply & Execute Now
Device is now rebooting.
W01FXS old generation
- Go to device’s web interface
Credentials for the first time access: administrator : 84117341
- Go to the menu Others -> Auto Config
- Modify the following fields:
- Auto Configuration: select “HTTP”
- HTTP Server: enter the PBX IP address or domain
- Click on Submit
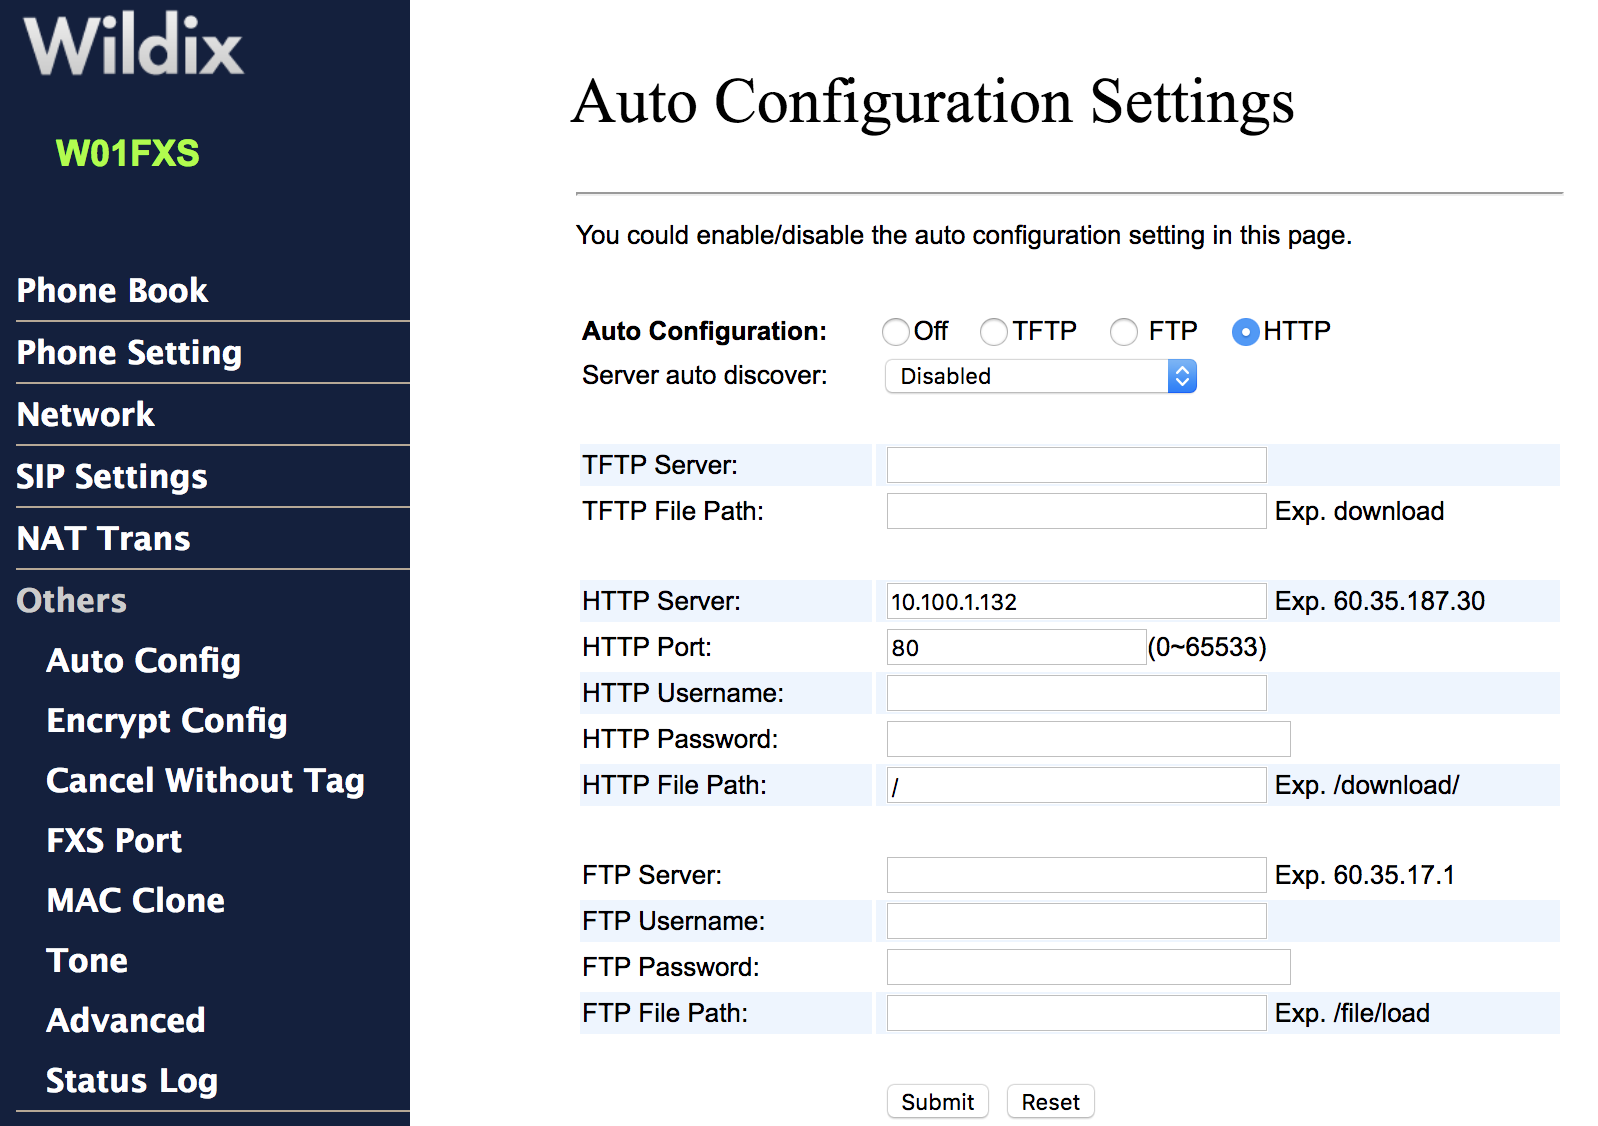
- Go to the menu Save change
- Click on Save

Device is now rebooting.
W-AIR Sync Plus
Go to device’s web interface
Credentials for the first time access: admin : adminNote: Starting from firmware v. 0730b0100, the credentials are: admin : Wildixwair
- Go to the menu Management
- Modify the following fields:
- Management Transfer Protocol: select “HTTP”
- Configuration File Download: select “Base and Multi Cell Specific File”
- Configuration Server Address: enter the PBX IP address or domain name
- Base Specific File: insert the part of the provisioning URL without the IP address of the PBX: ?action=setaps
- Multi Cell Specific File: the same value as in Base Specific File
- Click Save and Reboot
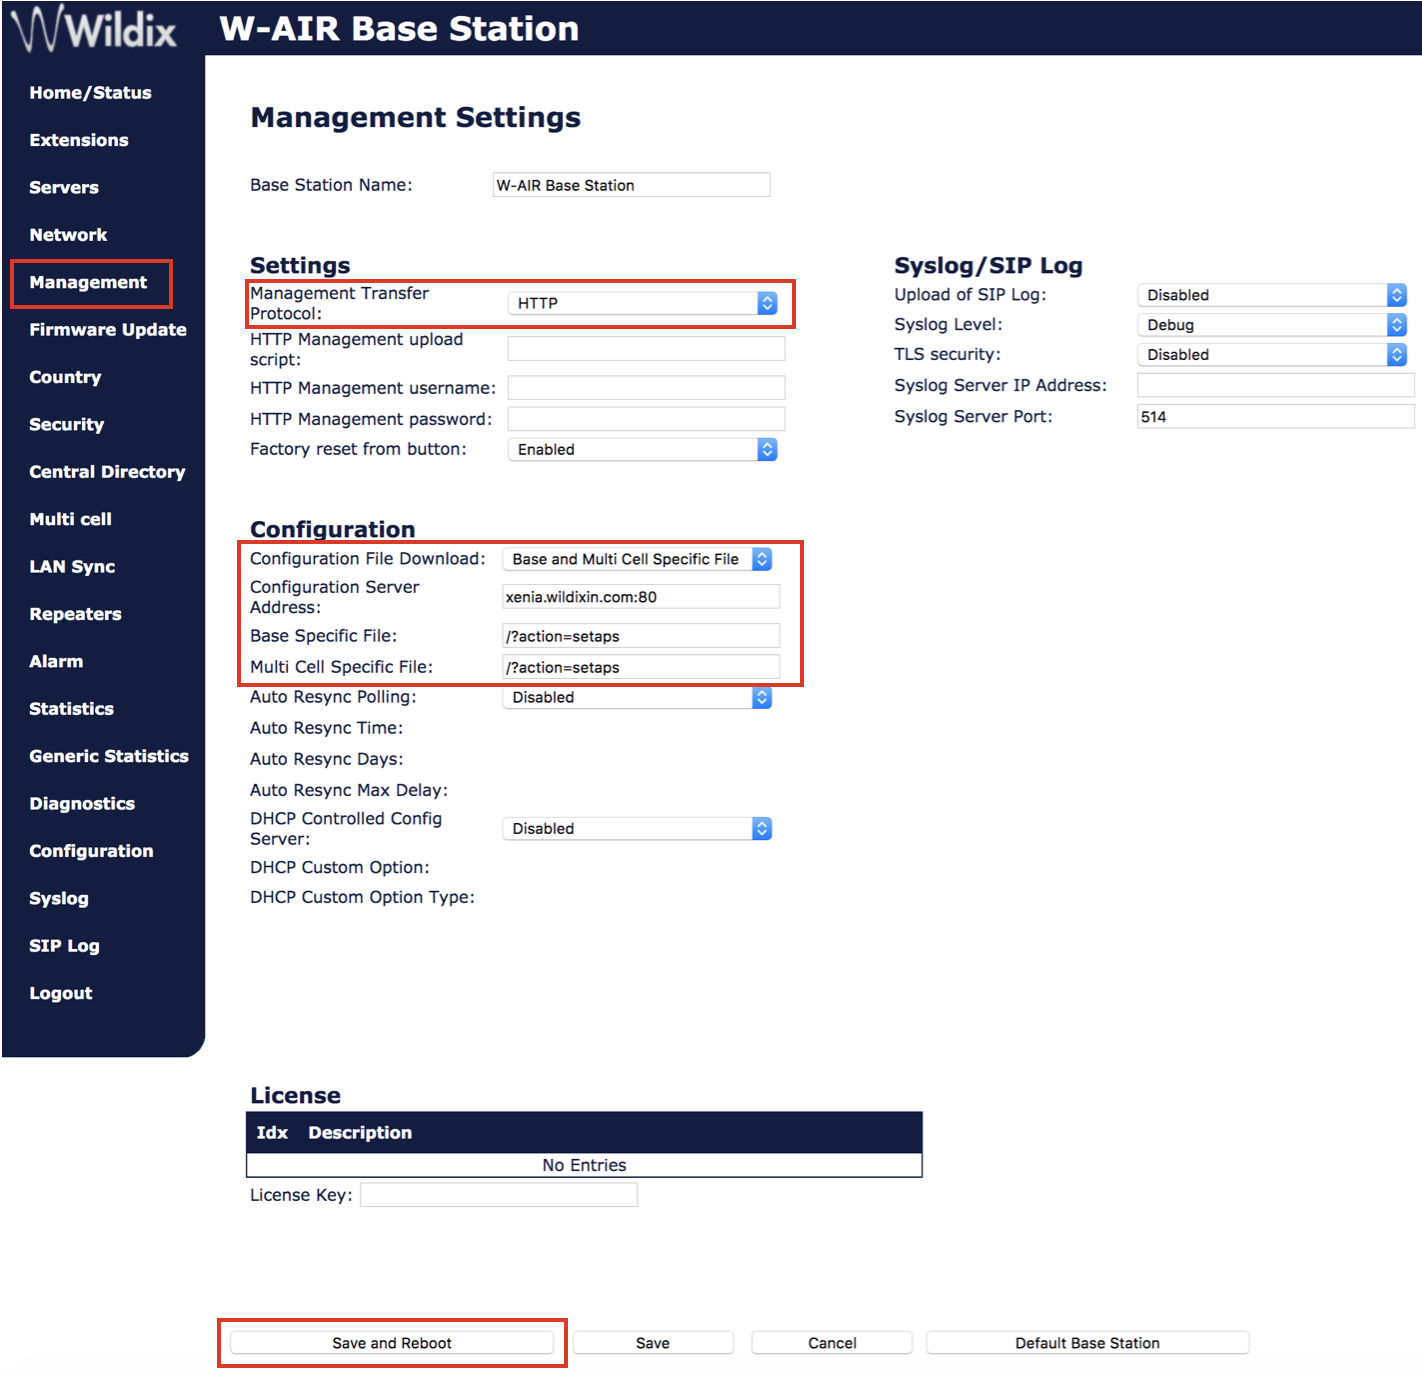
Device is now rebooting.
After rebooting:
- Go to WMS -> Devices -> W-AIR Networks and click Add to create the network with the added base station
- Select W-AIR Sync Plus in Devices tab and click Configure / Sync device
- Reboot the base station one more time to apply changes
W-AIR old generation
Go to device’s web interface
Credentials for the first time access: admin : adminNote: Starting from firmware v. 0730b0100, the credentials are: admin : Wildixwair
- Go to the menu Management
- Modify the following fields:
- Management Transfer Protocol: select “HTTP”
- Configuration File Download: select “Base and Multi Cell Specific File”
- Configuration Server Address: enter the PBX IP address or domain name
- Base Specific File: insert the part of the provisioning URL without the IP address of the PBX: ?action=setaps
- Multi Cell Specific File: the same value as in Base Specific File
- Click Save and Reboot
Device is now rebooting.
After rebooting:
- Go to WMS -> Devices -> W-AIR Networks and click Add to create the network with the added base station
- Select W-AIR in Devices tab and click Configure / Sync device
- Reboot the base station one more time to apply changes
W-AIR Small Business PRE 2021 and 2021
Go to device’s web interface
Credentials for the first time access: admin : adminNote: Starting from firmware v. 0730b0100, the credentials are: admin : Wildixwair
- Go to the menu Management
- Modify the following fields:
- Management Transfer Protocol: select “HTTP”
- Configuration File Download: select “Base Specific File”
- Configuration Server Address: enter the PBX IP address or domain name
- Base Specific File: insert the part of the provisioning URL without the IP address of the PBX: ?action=setaps
- Click on Save and Reboot
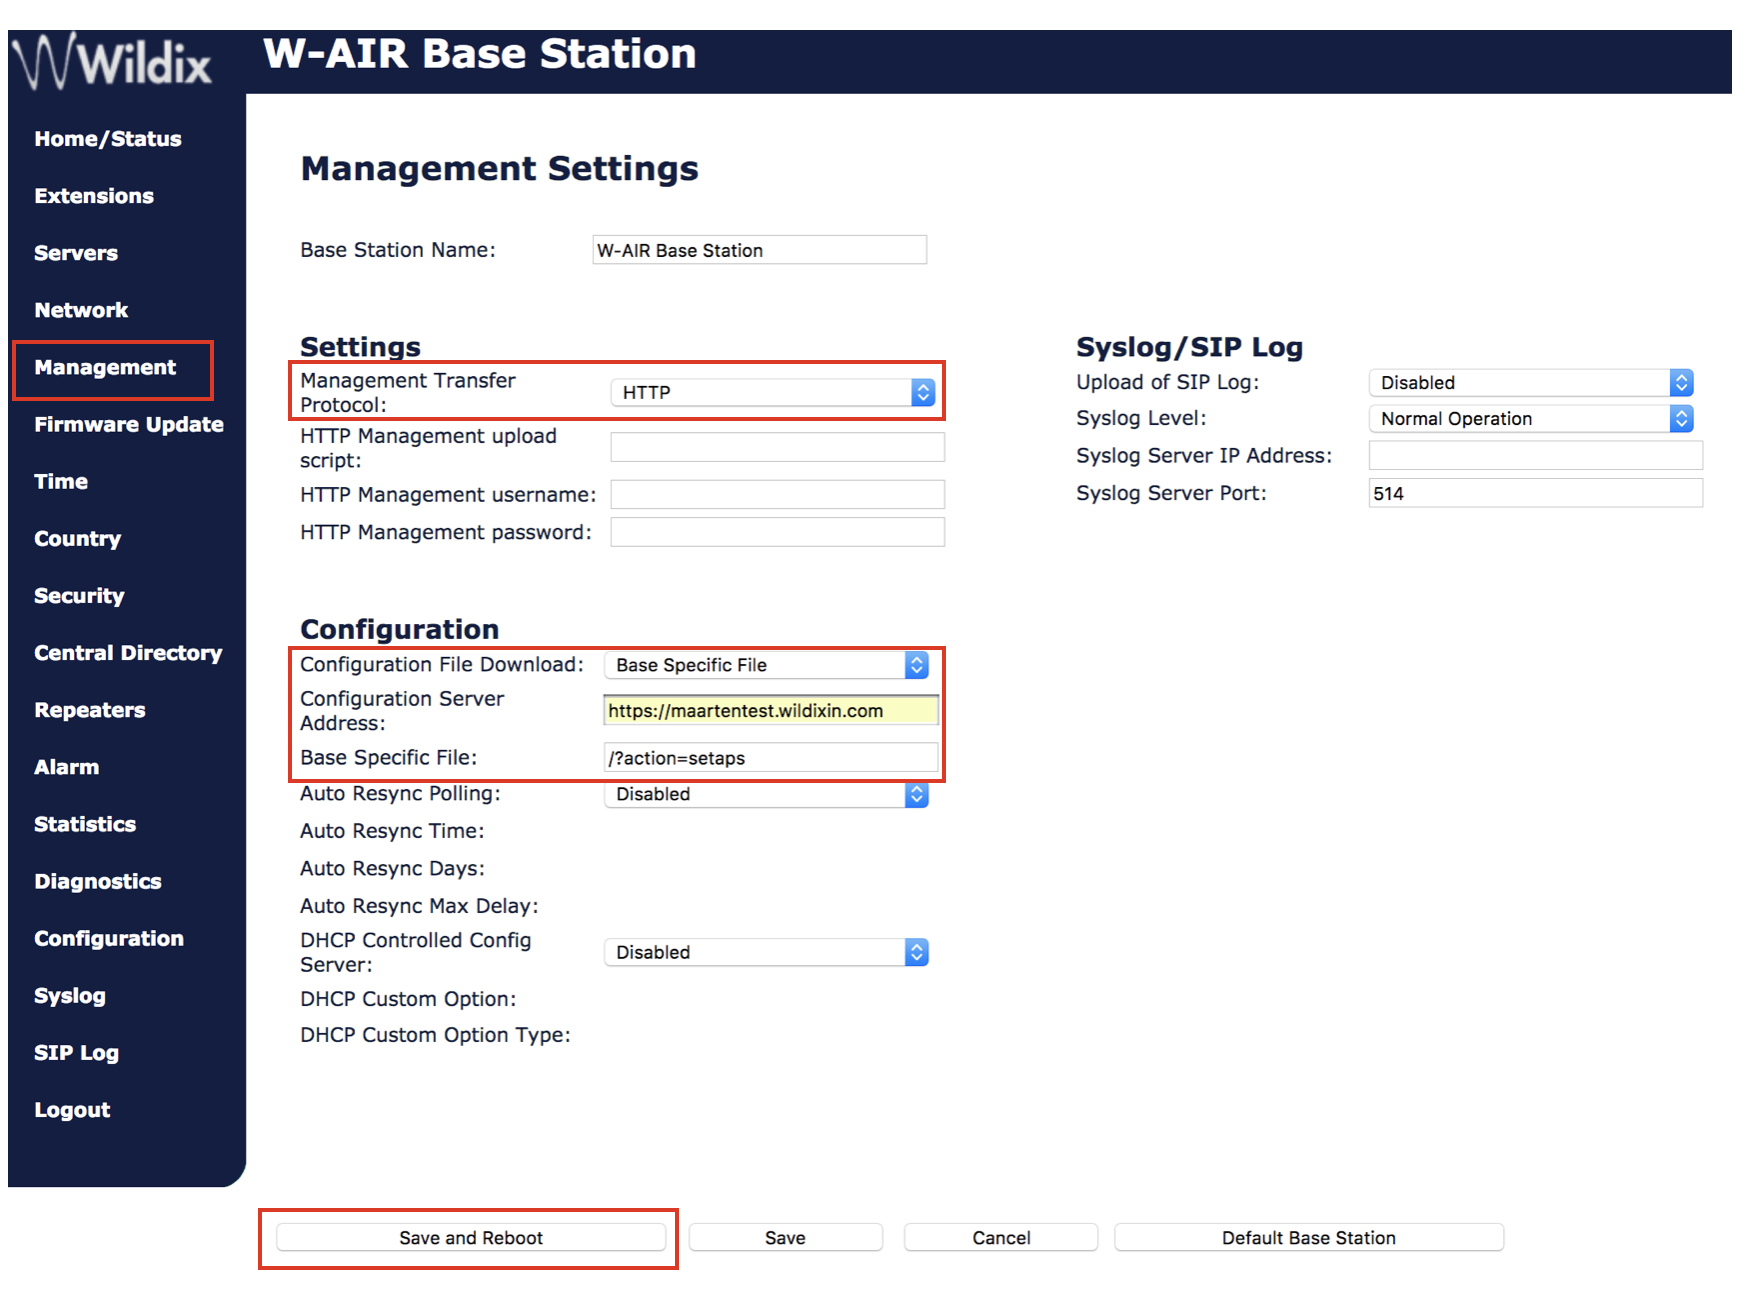
Device is now rebooting.
W-PA
- Go to device's web interface:
- Press Volume - key for 3 seconds to obtain its IP address
IP address will be playbacked through the speaker
Important: to be able to get W-PA IP address, you have to connect external speakers via Speaker interfaces/ a microphone via Microphone interface.
- Use first time access credentials: admin : admin
- Go to menu System -> Auto Provision -> Static Provisioning Server
- Modify the following fields:
- Server Address: enter your PBX host address or public IP
- Configuration File Name: ?action=setaps
- Protocol Type: HTTPS
- Click Apply
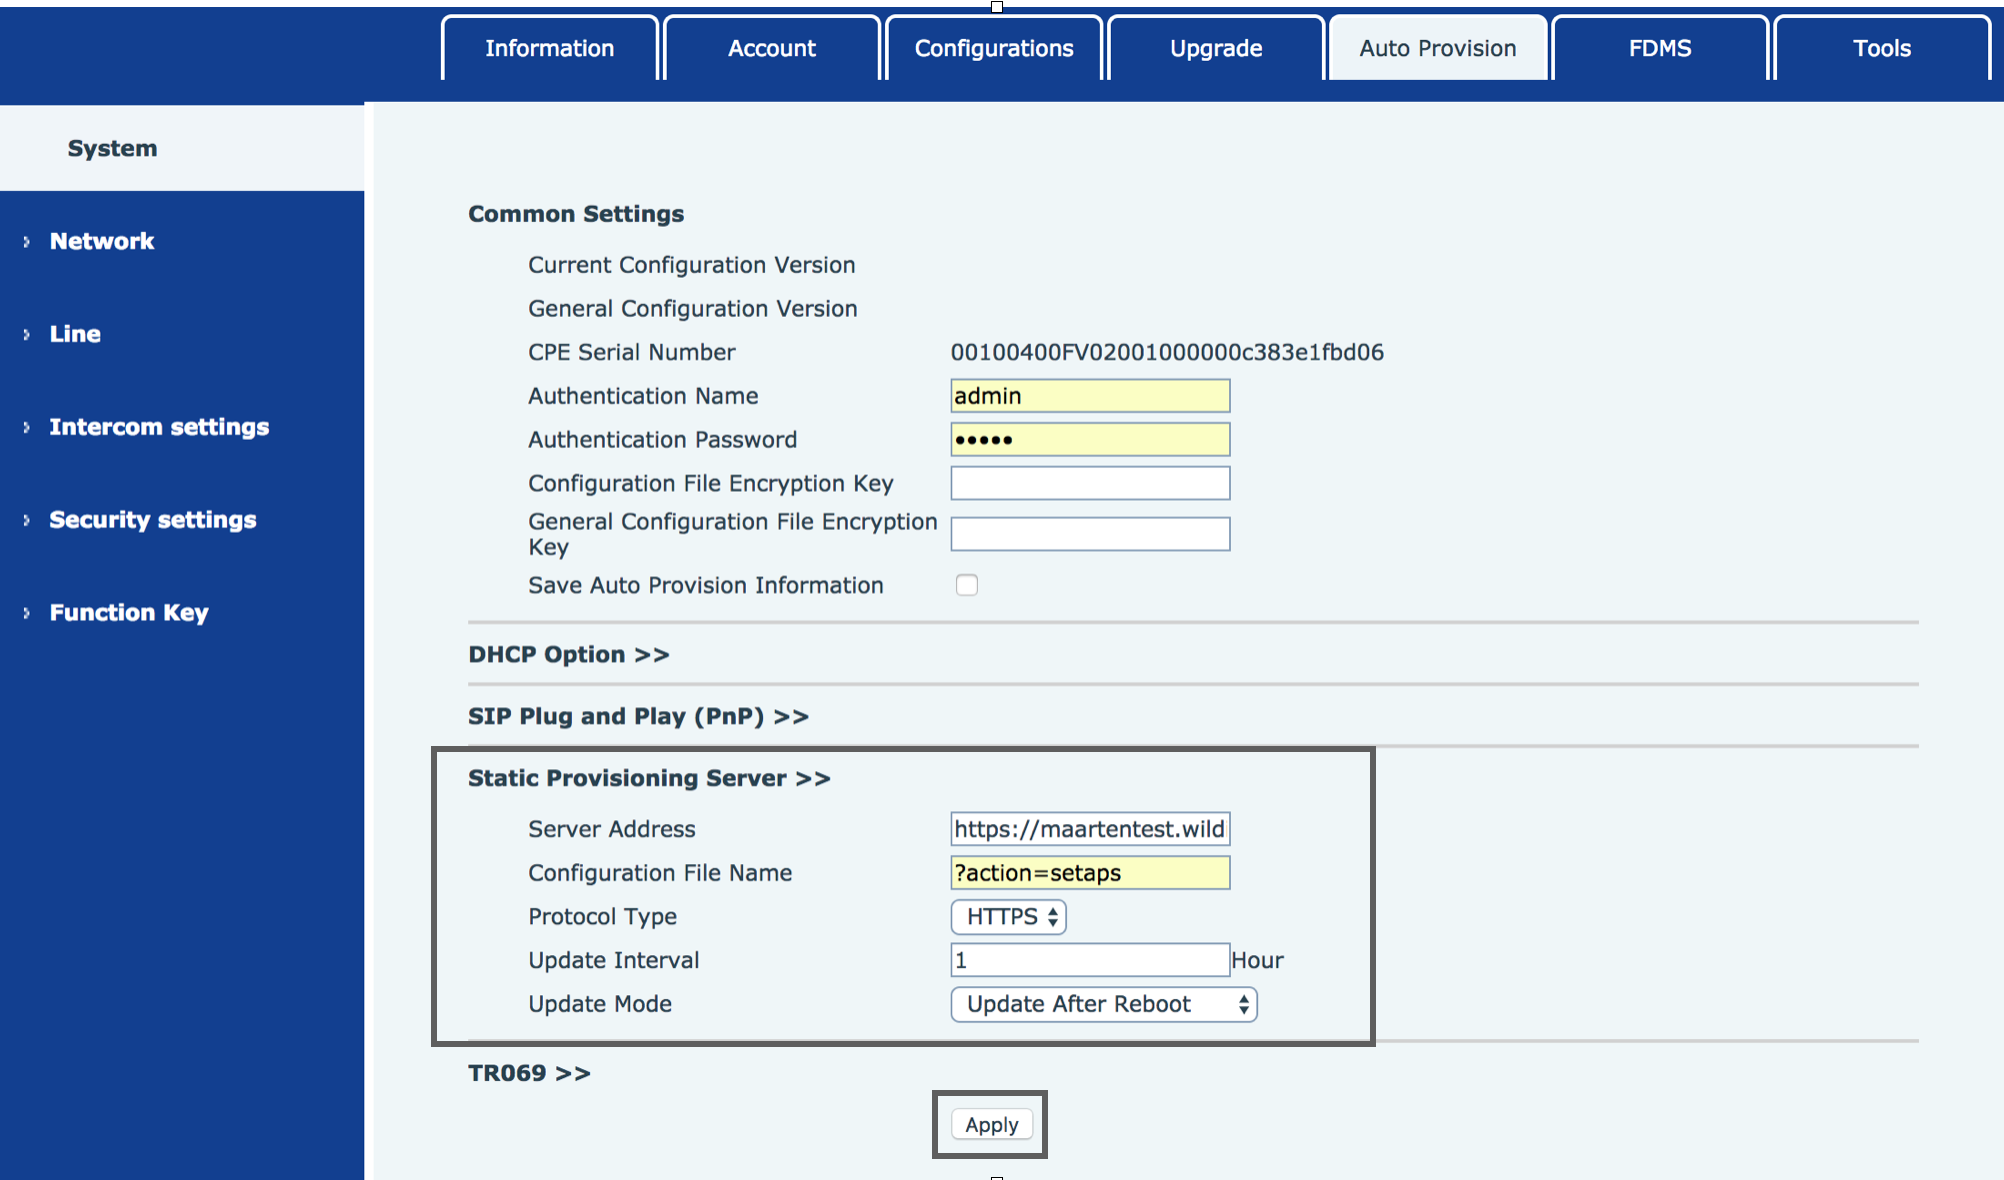
- Go to menu System -> Tools -> Reboot phone
- Click Reboot
- Confirm the reboot by clicking OK
The device is now rebooting. You will hear two audio signals: the first one is played at the beginning of the reboot, the second one is played after it is completed.
Note: After provisioning
As soon as the device has rebooted, go to the WMS -> Devices.
The provisioned device should be present on the list, now you can see the Model (e.g. WelcomeConsole instead of phone), the device’s IP address and the FW version.
Credentials to access the device’s web interface after the provisioning:
- login : admin
- password : use the value in the field “Password” in WMS:
