Dialplan applications - Admin Guide
- Ksenia Babych
- Tatiana Bieliakova
- Anna Zhuravlyova
- Elena Kornilova
This Guide explains in detail each Dialplan application and provides practical examples and use cases.
Updated: October 2024
Permalink: https://wildix.atlassian.net/wiki/x/ahDOAQ
Basic information on how Dialplan works: Dialplan: How does it work?
Call control
Answer the call
Enables the system to answer the call.
Authenticate user
Asks the caller for the user password.
- Set Number: set up the system to ask for the password associated to another user if you indicate another user
- Set Options: set up the system to ask for the password only if phone is blocked
Example:
The caller is asked for the user password and only in case the entered password is correct, the next Dial trunk Dialplan application is executed.
Call through remote PBX
Routes the call through another PBX of WMS Network. As a rule, this option is used to route the call through the trunk present on the remote PBX at minor cost.
- PBX: select the PBX from your WMS Network
- Procedure: enter the Dialplan procedure name to follow, present on remote PBX
- Set Number: modify the called number (to match the selected Dialplan procedure on remote PBX)
- Timeout: enter timeout in seconds, in case of no success within the specified timeout, the system proceeds to the next Dialplan application
- Set Options: provide music on hold instead of ringing tone
Example:
Suppose our local PBX is situated in Italy and remote one in France. Here is the users Dialplan configuration on local (Italian) PBX:
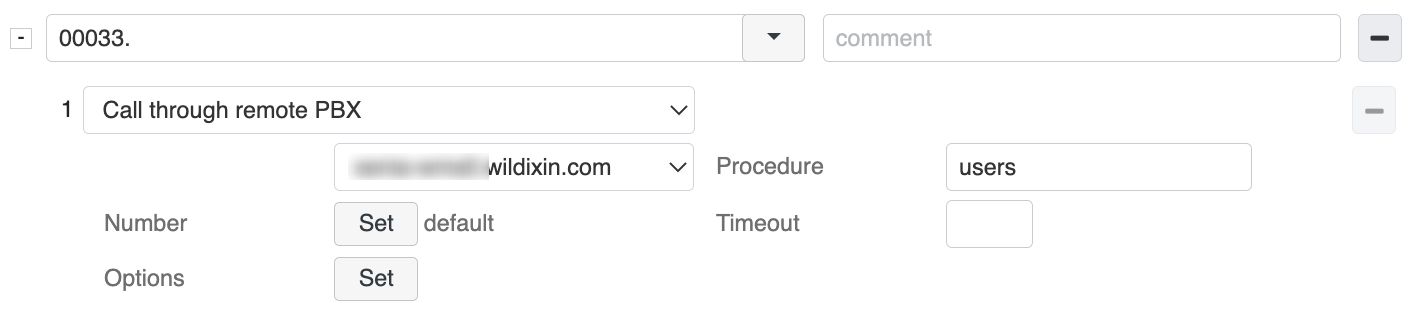
In case the French number is entered, the call is routed via a remote PBX located in France, users Dialplan procedure. Here is the users Dialplan configuration on remote (French) PBX:
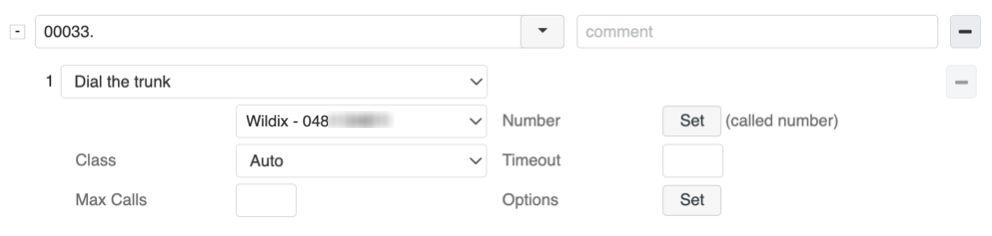
On the remote PBX situated in France, the number is normalized (the first 5 digits standing for the French international prefix are eliminated) and the call is routed via a local trunk.
Correct called number
Verifies if the called number contains international prefix, and if it’s the one defined in Settings -> PBX -> Language & region -> Country Code. If matched, the prefix is substituted by the parameter indicated in Outgoing prefix. If the international prefix is not recognized, + is eliminated, outgoing prefix and international prefix are added.
- Outgoing Prefix: enter the prefix to be added to called number after it’s corrected
- Procedure: select the Dialplan procedure to follow after the called number is corrected
Example:
Suppose the international prefix is 39 (Italy). Here is the users Dialplan configuration example:
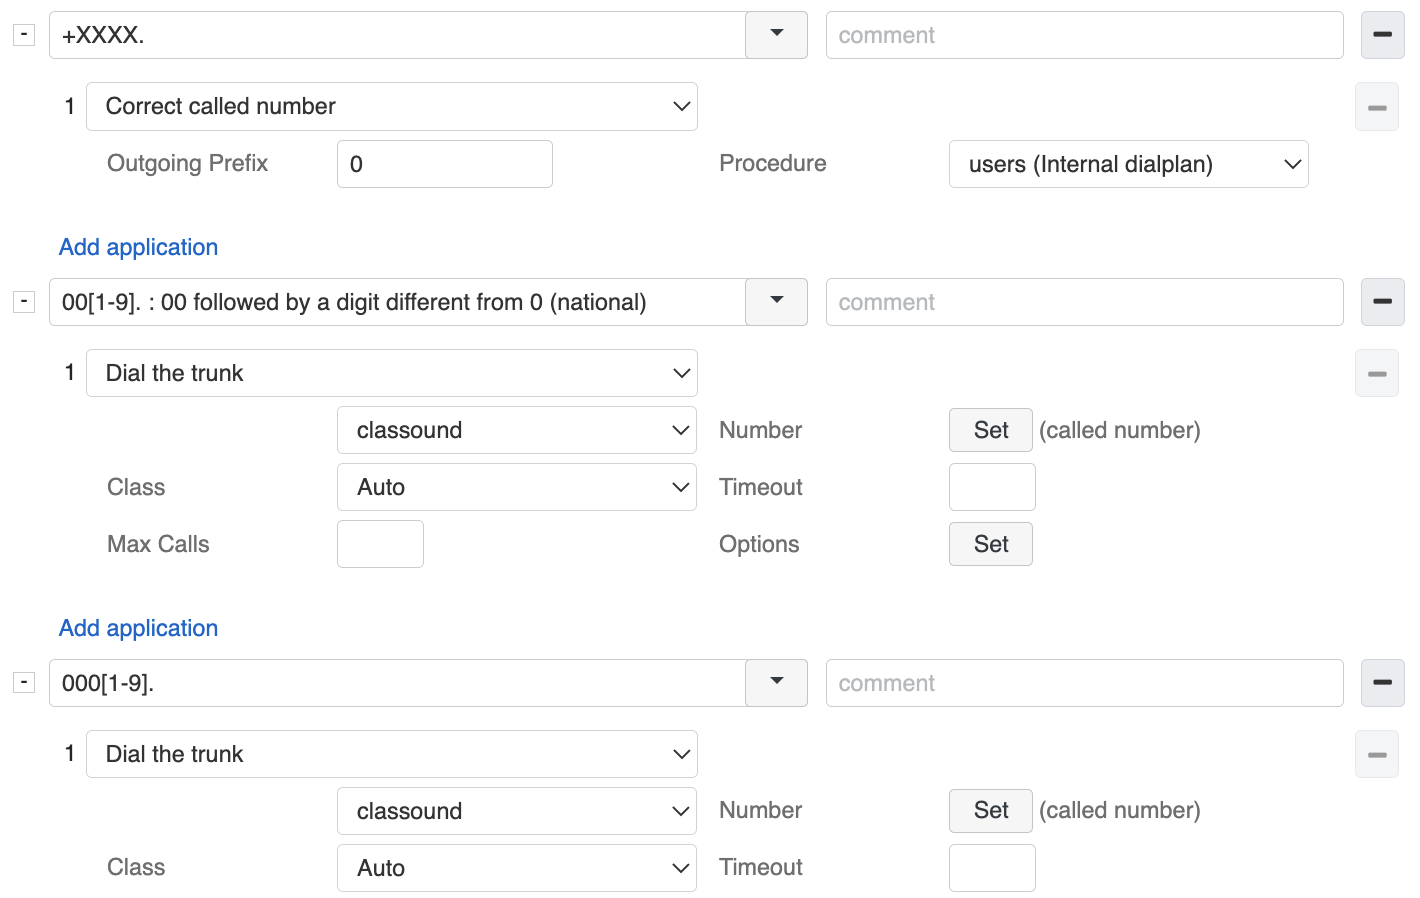
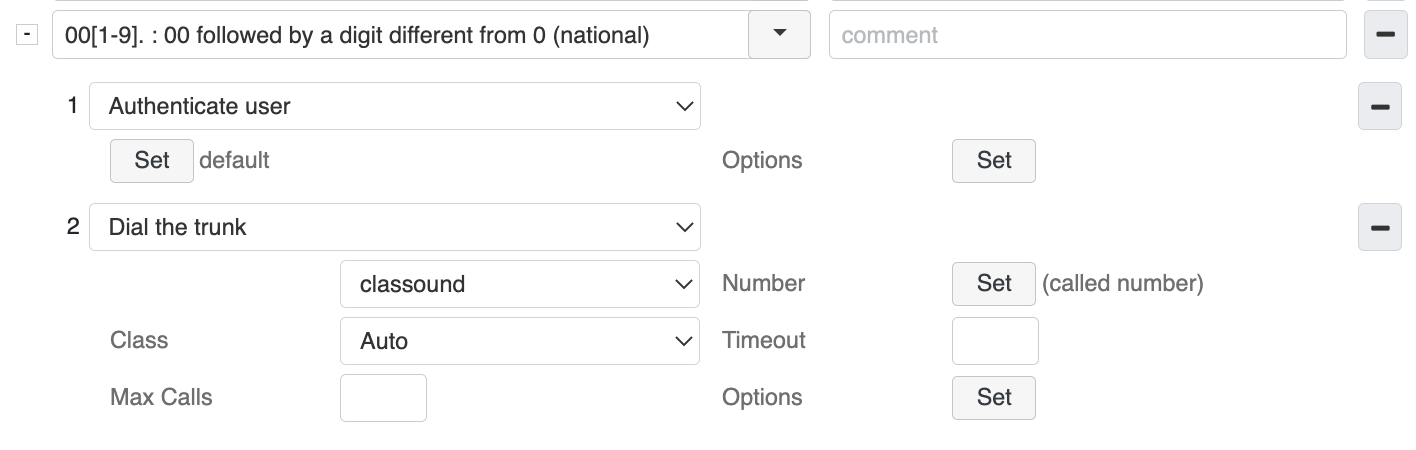
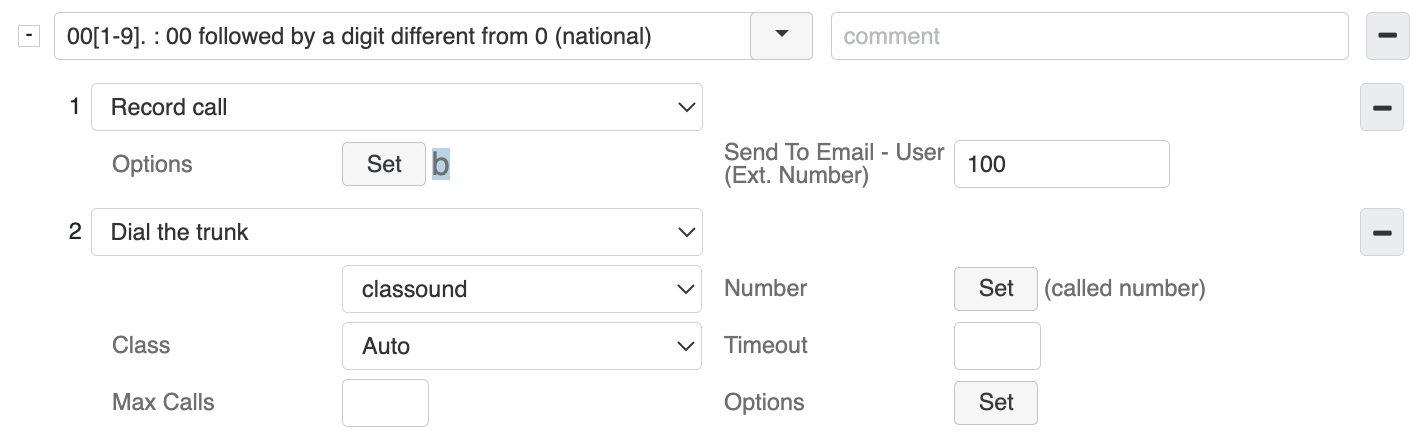
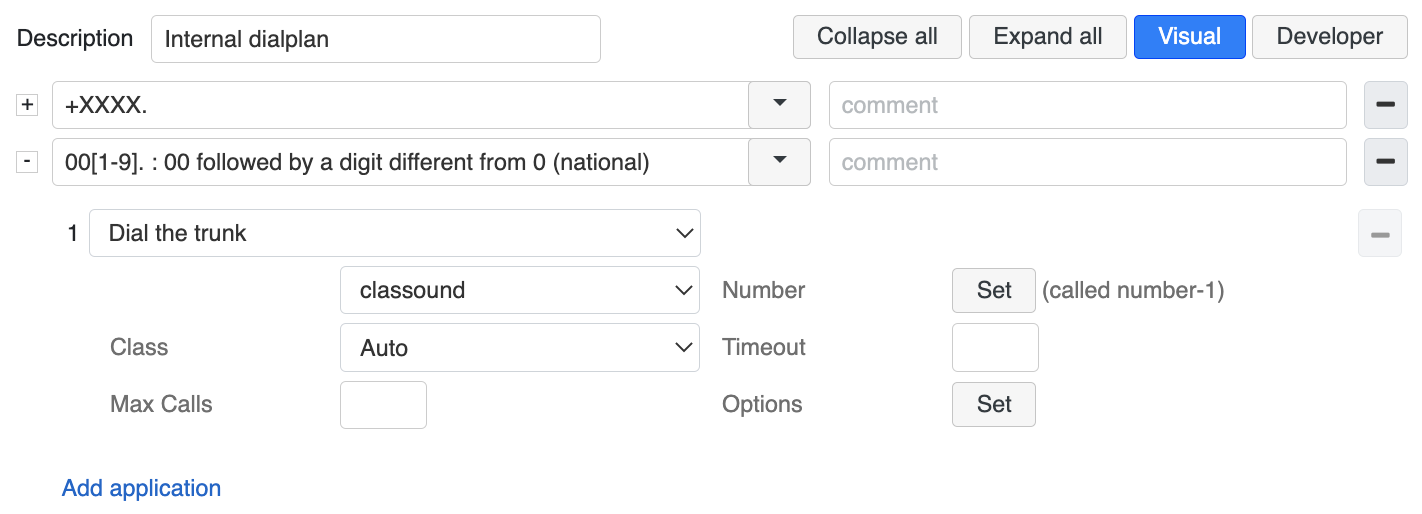
If the called number is +3904611715112, the system removes +39 and adds 0, the number after normalization is: 004611715112 and it matches the number 00[1-9], so the call is routed via the local trunk.
If the called number is +380481234567, the system removes + and adds 000 (00 as International prefix and 0 as Outgoing prefix), the number after normalization is: 000380481234567 and it matches the called number 000[1-9] present in Dialplan procedure, so the call is routed via the international trunk.
Dial the phone
Routes the call to the selected user.
- Set Number: modify the called number
- Timeout: enter timeout in seconds, in case of no success within the specified timeout, the system proceeds to the next Dialplan application
- Set Options: provide music on hold instead of ringing tone
- Message For Operator: click the button … to access the Sounds menu of the PBX to be able to select or record the message to be played back to the call group member after the call is answered (before connecting to the caller) (this message, for example, can notify an operator present in several call groups, on the type of the call; e.g. one call agent is present both in Tech Support and in Sales group, the message can notify the user that this call is addressed to Tech Support group)
Example:
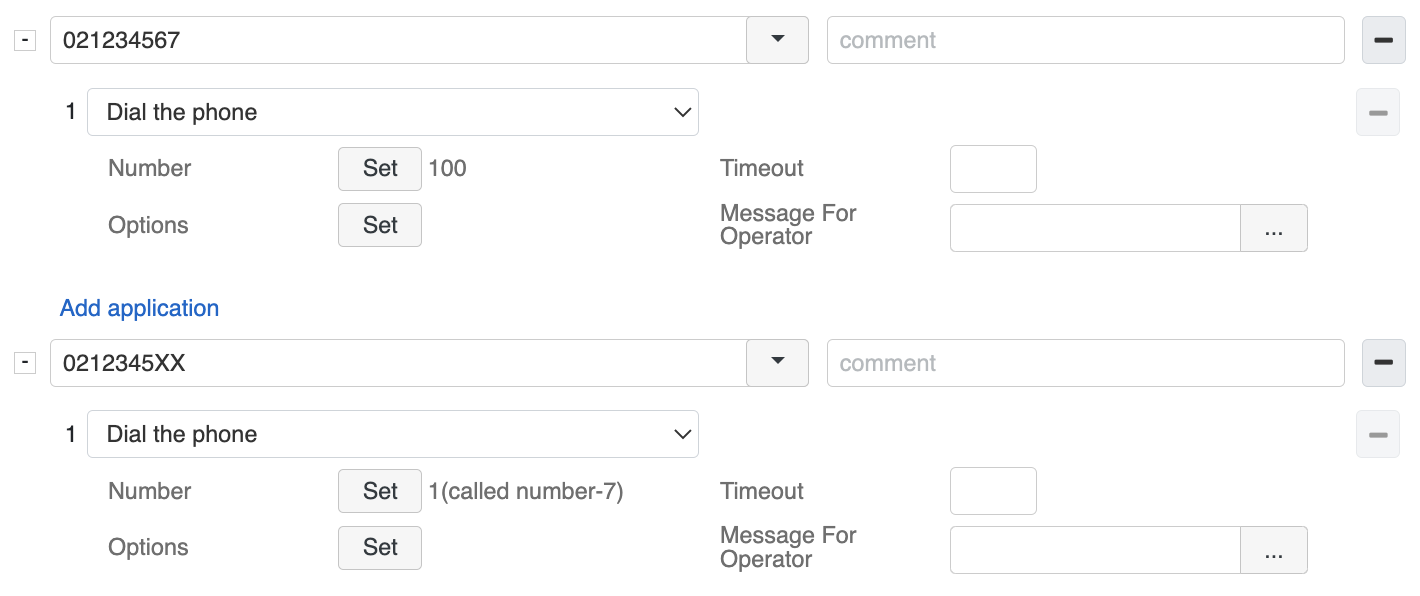
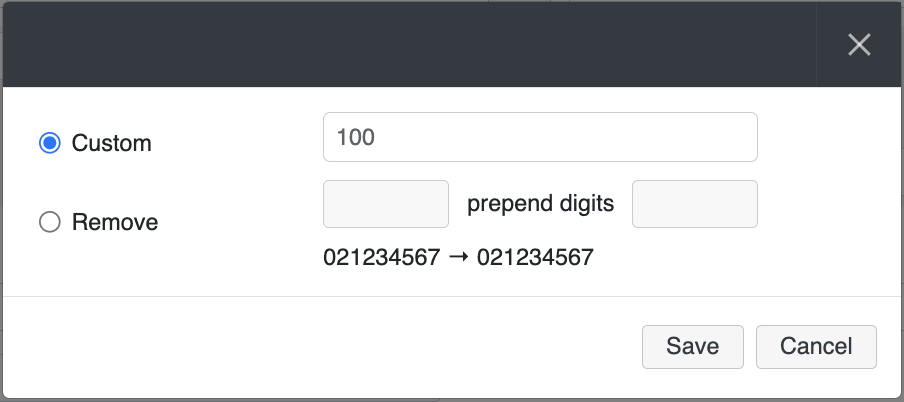
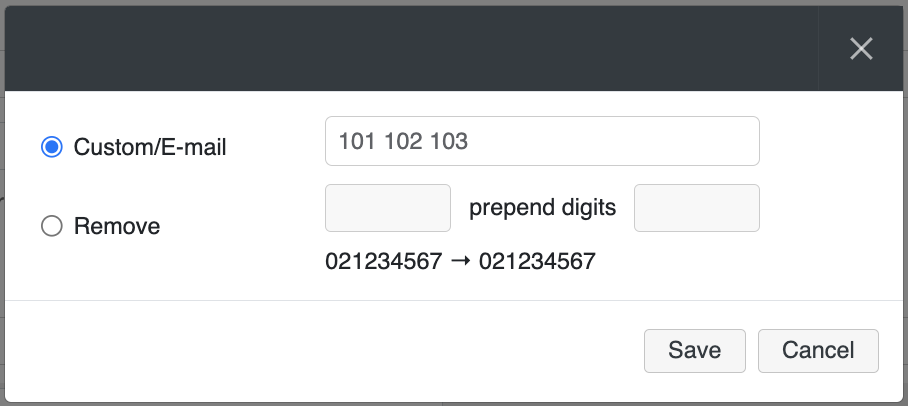
Call coming from 021234567 must be routed to the user 100: Set number -> Custom: 100.
Call coming from 021234533 must be routed to the user 133, call coming from 021234532 must be routed to the user 132, etc: Set number -> remove – 7 -> prepend digits – 1 (DID management). Here is an example of Dialplan configuration for incoming calls (main) in this case:
Dial the trunk
Routes the call through the specified trunk.
- Select trunk: select the trunk from the list through which the call must be routed
- Set Number: modify the called number
- Class: assign the call class for this call to manage the permissions via ACL groups
- Timeout: enter timeout in seconds, in case of no success within the specified timeout, the system proceeds to the next Dialplan application
- Max Calls: specify max number of calls on trunk
- Set Options: provide music on hold instead of ringing tone
Example:
The Timeout and Max Calls options allow you to decide when to stop dialing one trunk and try another one, here is an example of the users procedure configuration:
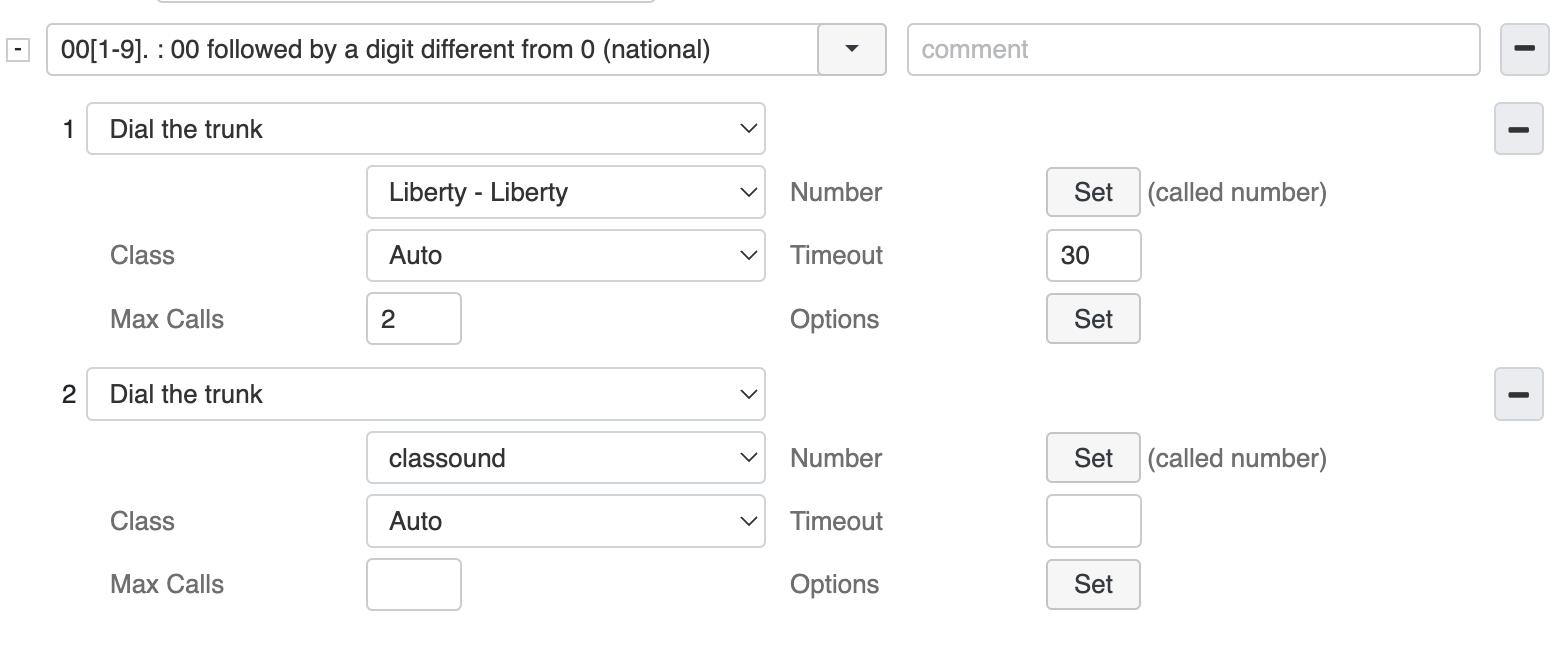
In our example, the system first tries to dial one trunk, in case the timeout of 30 seconds or the maximum number of 2 calls is reached on this trunk, the system tries to route the call via another trunk.
Hangup
Enables the system to terminate the call. Choose the reason from the list at which the system will terminate the call.
Trunk group
Routes the call through the specified Trunk group (Read the chapter of WMS Start Guide, dedicated to Trunk groups).
- Select trunk group: select the trunk group from the list through which the call must be routed
- Set Number: modify the called number
- Class: assign the call class for this call to manage the permissions via ACL groups
- Strategy: change the order of trunk occupation within the specified hunt group
Services
Automatic Call Back
Routes the incoming call directly to the user who had made an outgoing call to this number (within one hour) with No Answer Dial Status.
Note: the CDR must be enabled on the PBX.
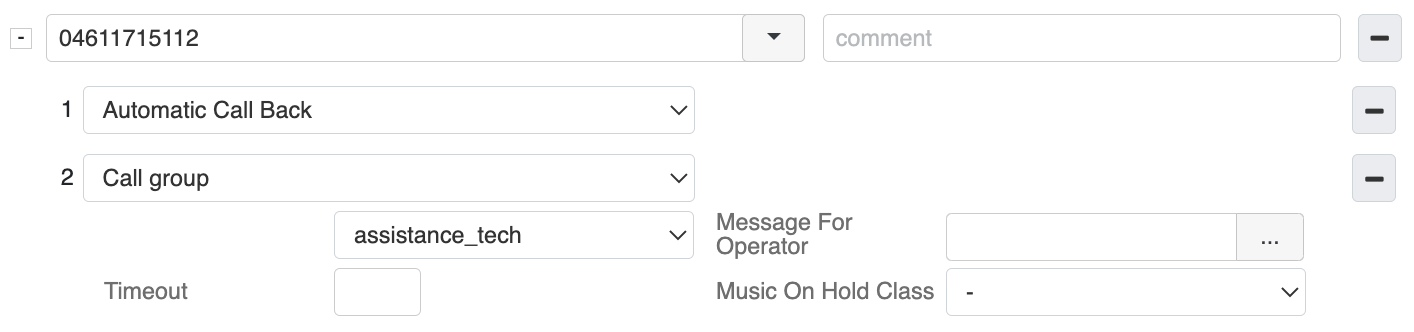
Example: User 100 made a call to the number 39123456789 but no one replied. In forty minutes the called party has noticed a missed call and calls the number displayed on the screen (the office number, e.g. 04611715112). The system routes the call directly to the user 100 who had previously made an outgoing call. To do this, we must edit the Dialplan for incoming calls (main), by adding the Automatic Call Back Dialplan application to the office number (04611715112):
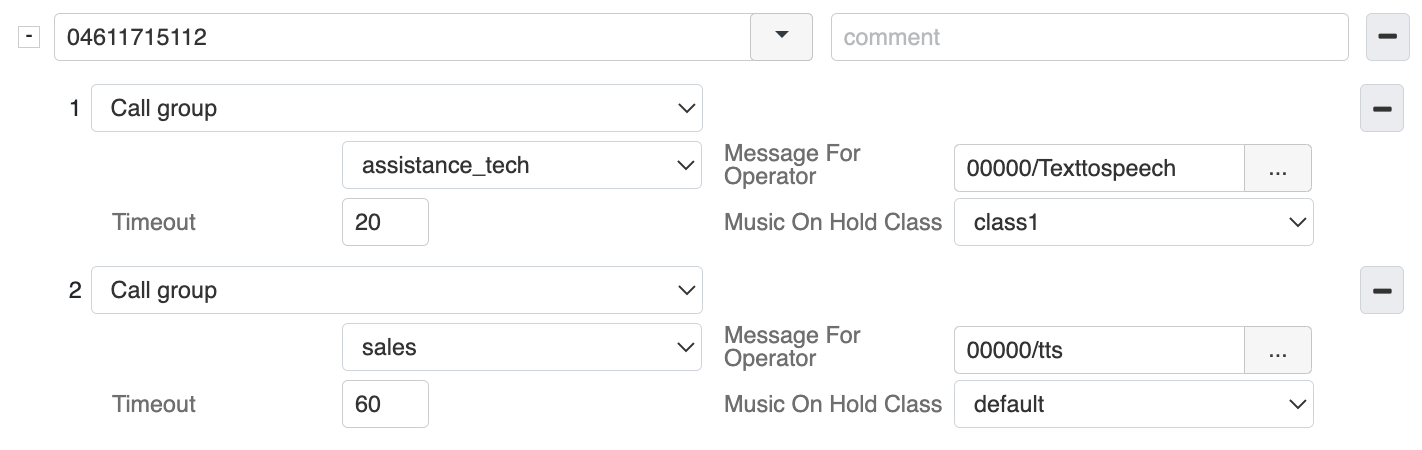
Call group
Routes the call to the selected Call Group. Call Groups are set up in Dialplan -> Call Groups (Read the chapter of WMS Start Guide, dedicated to Call groups).
- Select Call group: select the call group from the list to which the call is routed
- Message For Operator: click the button … to access the Sounds menu of the PBX to be able to select or record the message to be played back to the call group member after the call is answered (before connecting to the caller) (this message, for example, can notify an operator present in several call groups, on the type of the call; e.g. one call agent is present both in Tech Support and in Sales group, the message can notify the user that this call is addressed to Tech Support group)
- Timeout: enter timeout in seconds, in case of no success within the specified timeout, the system proceeds to the next Dialplan application; note that in case you enter no timeout, call will remain in queue forever
- Music On Hold Class: select the music on hold to be played to the caller
Example:
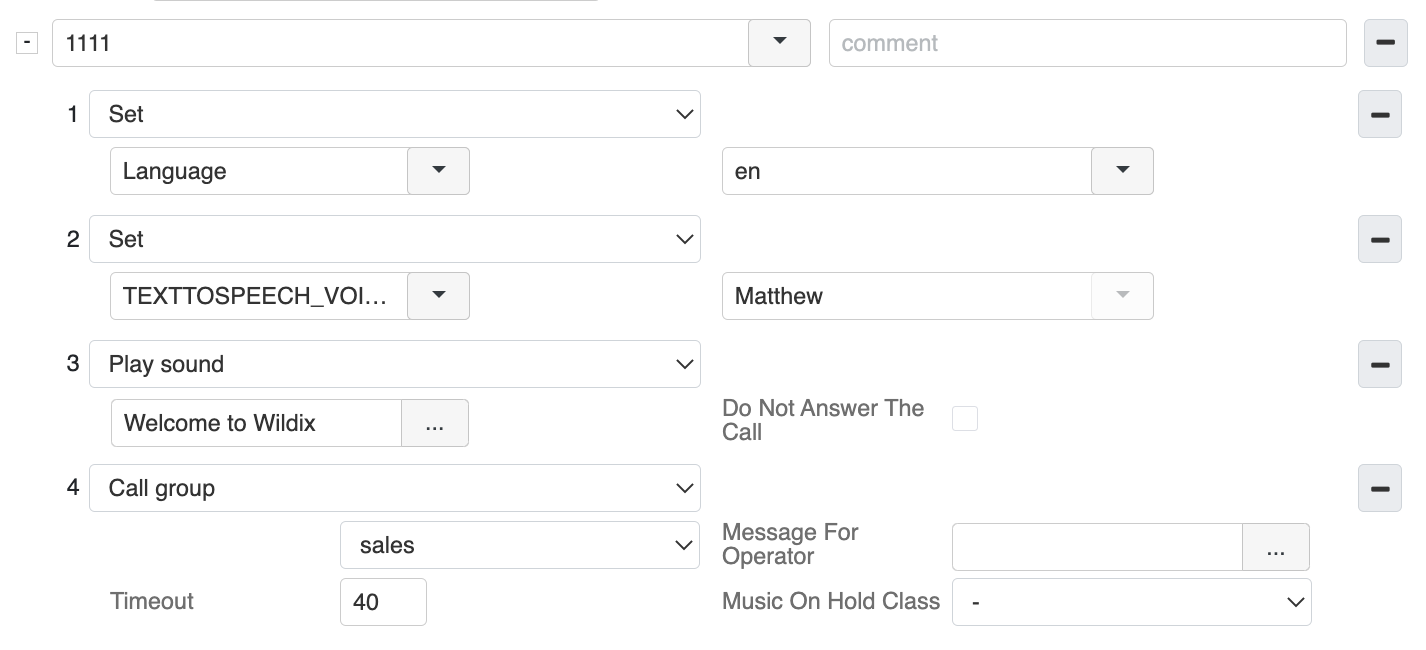
Here is an example of the Dialplan procedure for incoming calls (main), where an incoming call to the tech support number is first routed to the tech support group, if no one answered within the timeout of 20 seconds, the call is routed to the sales group:
Conference
Puts the call into multiconference.
- Room Number: enter the conference room ID number; in case the room number with such ID doesn’t exist, it is automatically created
Example:
In the first example of the main Dialplan configuration, the incoming calls to the number 021234567 are routed to the conference room 123:

The second example demonstrates DISA configuration in which we have three different conference rooms (1, 2, 3) and the caller is asked to enter the number in order to enter each conference room: e.g. caller must enter 11234 to enter the conference room number 1, 11567 to enter the conference room number 2, 11890 to enter the conference room number 3.
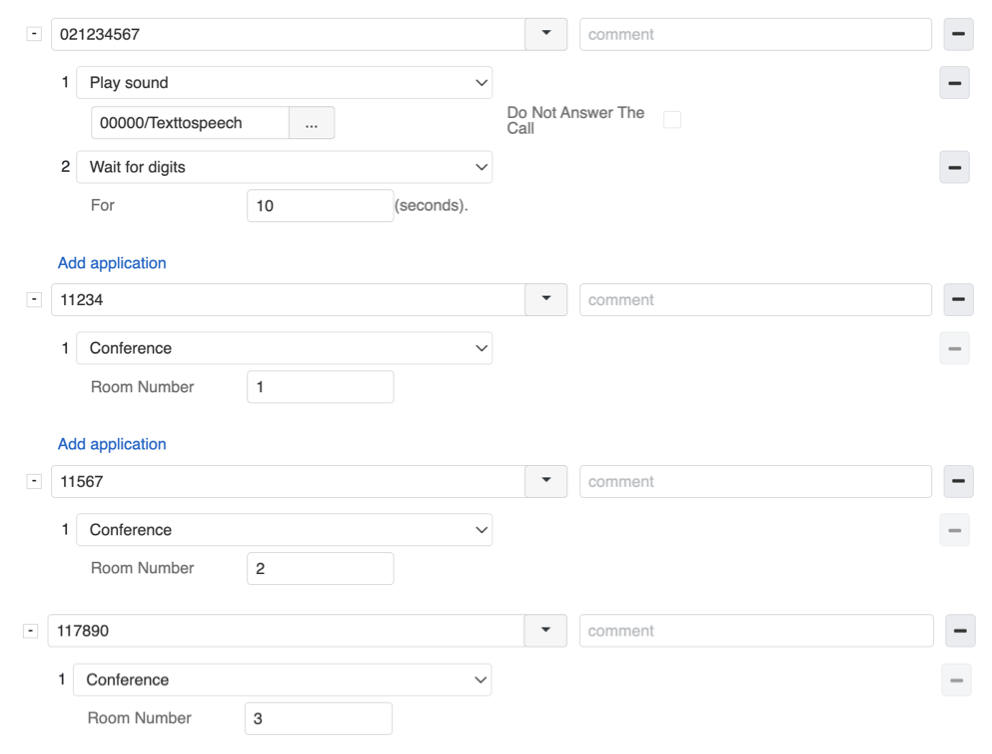
By the way, any user of the system can access these conference room by simply dialing a Feature code for Conference access (98 by default) + the conference room number, e.g. 981 for conference room number 1.
To enable an external user to participate in the conference without DISA configuration, you can call this external user and then make a blind transfer of this call to the conference (e.g. 981, to enable an external user to participate in the conference with the room number 1).
Dial by name / Directory
Invites caller to enter a part of the name or surname for the search and routes the call to the user in case a match is found. Use DTMF for entering. Instead of letters, press corresponding digits. Press the digit just once to enter any option corresponding to this digit. For example, for the user John Smith, you need to enter 5646 which stands for the name/ 76484 which stands for the surname.
Starting from WMS 6.04.20231012.1, in case more than 5 matches are found, an announcement is played to the caller, which allows the caller to review the matches. To exit the Dial by name service, the caller can press asterisk. The default interdigit timeout for DTMF is 3 seconds. If needed, interdigit timeout can be configured in WMS -> Dialplan -> General settings -> Interdigit timeout (the max. value can be 10 seconds).
Note: the feature is also available via the Feature code Directory 82. To dial users by name, they should have their names previously recorded via another Feature code Voicemail 81 (call 81, press 0 for mailbox options, then press 3 to record your name). For more information, refer to Feature Codes Admin Guide, Directory section.
Fax to e-mail
Answers an incoming call using FAX Server and sends the fax to email or to the user, indicated in Set.
Note: in case the number is used both to receive voice calls and faxes, you can add the Detect fax Dialplan application before this one.
- Set email address: specify one or several email addresses (separated by space) where to route the fax
- Format: select the format (pdf / tiff)
- ID Fax: enter the fax machine ID (to identify faxes received from different numbers)
Example:
Suppose the office fax number is 021234567. Edit the Dialplan for incoming calls (main):

You can enter several extension numbers / email addresses into the field, separated by spaces, in this case the copy of received faxes is sent to multiple destinations:
Read the FAX/ SMS Server Quick Admin Guide for more information on sending and receiving faxes with Wildix Fax Server.
Go to voicemail
Routes the call to the voicemail.
- Set Number: modify the called number/ email address of the voicemail destination. You can enter several extension numbers/ email addresses into the field, separated by comma, space or semicolon. In this case the voicemail will be sent to multiple destinations
Set Options: select to Play beep/ Play busy or unavailable message automatically/ Play unavailable message/ Play busy message to the caller

Intercom
The phone indicated in the Number field answers automatically in speaker mode enabling the caller to talk to the user without his/her intervention.
- Set Number: modify the called number
- Timeout: enter timeout in seconds, in case of no success within the specified timeout, the system proceeds to the next Dialplan application
- Set Options: provide music on hold instead of ringing tone
- Message For Operator: click the button … to access the Sounds menu of the PBX to be able to select or record the message to be played back to the call group member after the call is answered (before connecting to the caller) (this message, for example, can notify an operator present in several call groups, on the type of the call; e.g. one call agent is present both in Tech Support and in Sales group, the message can notify the user that this call is addressed to Tech Support group)
Calls are no longer interrupted by Paging / Intercom on all devices; a user who is already on the phone, receives Paging / Intercom calls as a normal second incoming call. This behavior can be changed via Dialplan Custom application:
- SIPAddHeader(Call-Info: sip:wildixgw;answer-after=0;force) - old behavior, enables the phone to answer Paging / Intercom call automatically, even if user is busy on the phone
- SIPAddHeader(Call-Info: sip:wildixgw;answer-after=5;force) - enables the phone to answer Paging / Intercom call automatically, even if user is busy on the phone after the timeout of five seconds
Paging group
Similar to Intercom, but applied to a group of users (Dialplan -> Paging Groups); the phones of users present in the selected Paging group answer automatically in speaker mode enabling the caller to talk to the users without their intervention (e.g. in this way you can quickly broadcast an urgent message to the group of listeners).
- Paging group: select the paging group from the list
Calls are no longer interrupted by Paging / Intercom on all devices; a user who is already on the phone, receives Paging / Intercom calls as a normal second incoming call. This behavior can be changed via Dialplan Custom application:
- SIPAddHeader(Call-Info: sip:wildixgw;answer-after=0;force) - old behavior, enables the phone to answer Paging / Intercom call automatically, even if user is busy on the phone
- SIPAddHeader(Call-Info: sip:wildixgw;answer-after=5;force) - enables the phone to answer Paging / Intercom call automatically, even if user is busy on the phone after the timeout of five seconds
Record call
Records the call and sends the record to the specified email/user.
A copy of the conversation is also sent in the folder defined in Settings -> System -> Storages.
Note: section Storages is available only in Hardware and Virtual systems.
- Set Options: start recording only after the call has been answered
- Send To Email – User: enter the email address or extension number where to send a copy of the call recording
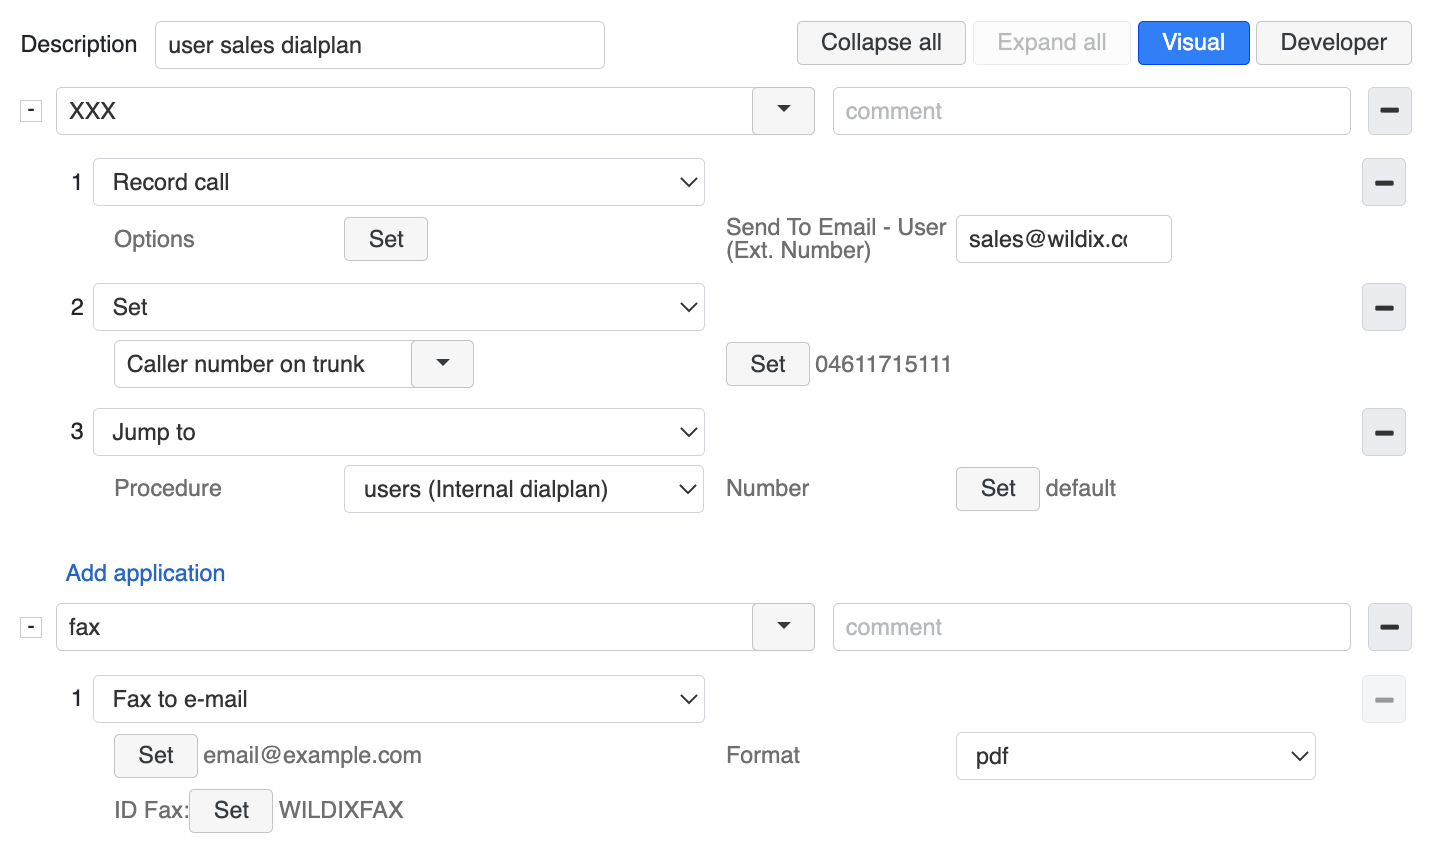
Example:
To enable call recording of outgoing calls, modify the Dialplan procedure used for managing outgoing calls (users):
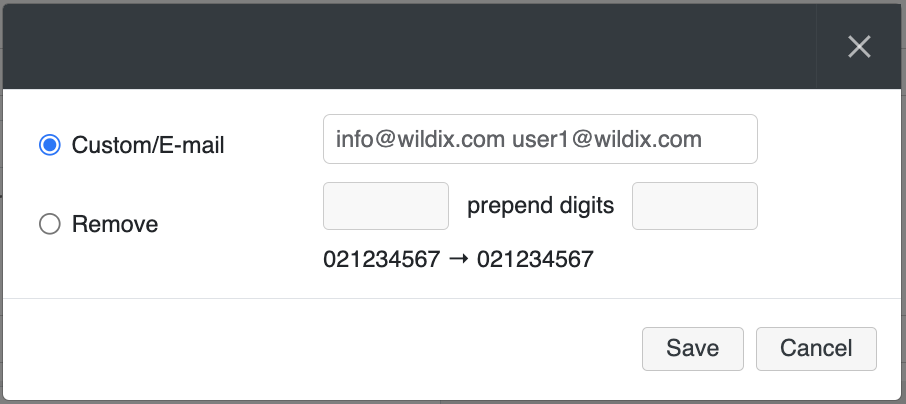
In our example the call recording starts as soon as the call is answered (specified in Set Options), and the copy of the recording is sent to the email address of user 100. To enable call recording of incoming calls, modify the Dialplan procedure used for managing incoming calls (main):
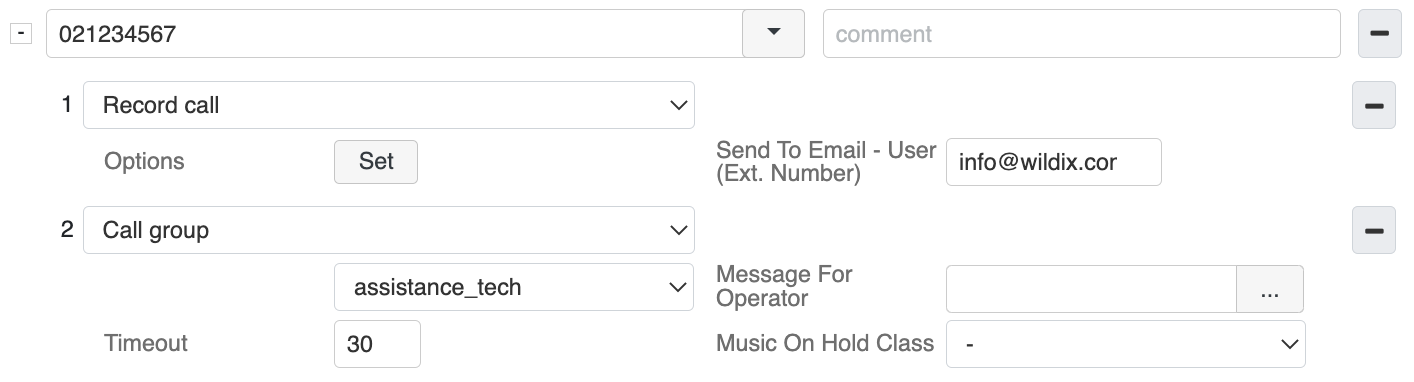
In this case all the incoming calls to the line 021234567 are recorded and the copy of the conversation is sent to the email address info@wildix.com.
Note: in Dialplan -> General Settings it is possible to define whether to save the call recordings in *.wav or in *.mp3 quality.
Voicemail access
Accesses the specified voicemail number. It is possible to enable Voicemail access without password request.
- Access Voicemail Number: set the user for Voicemail access; if empty, the system requests the extension number
- Set Options: skip pin check
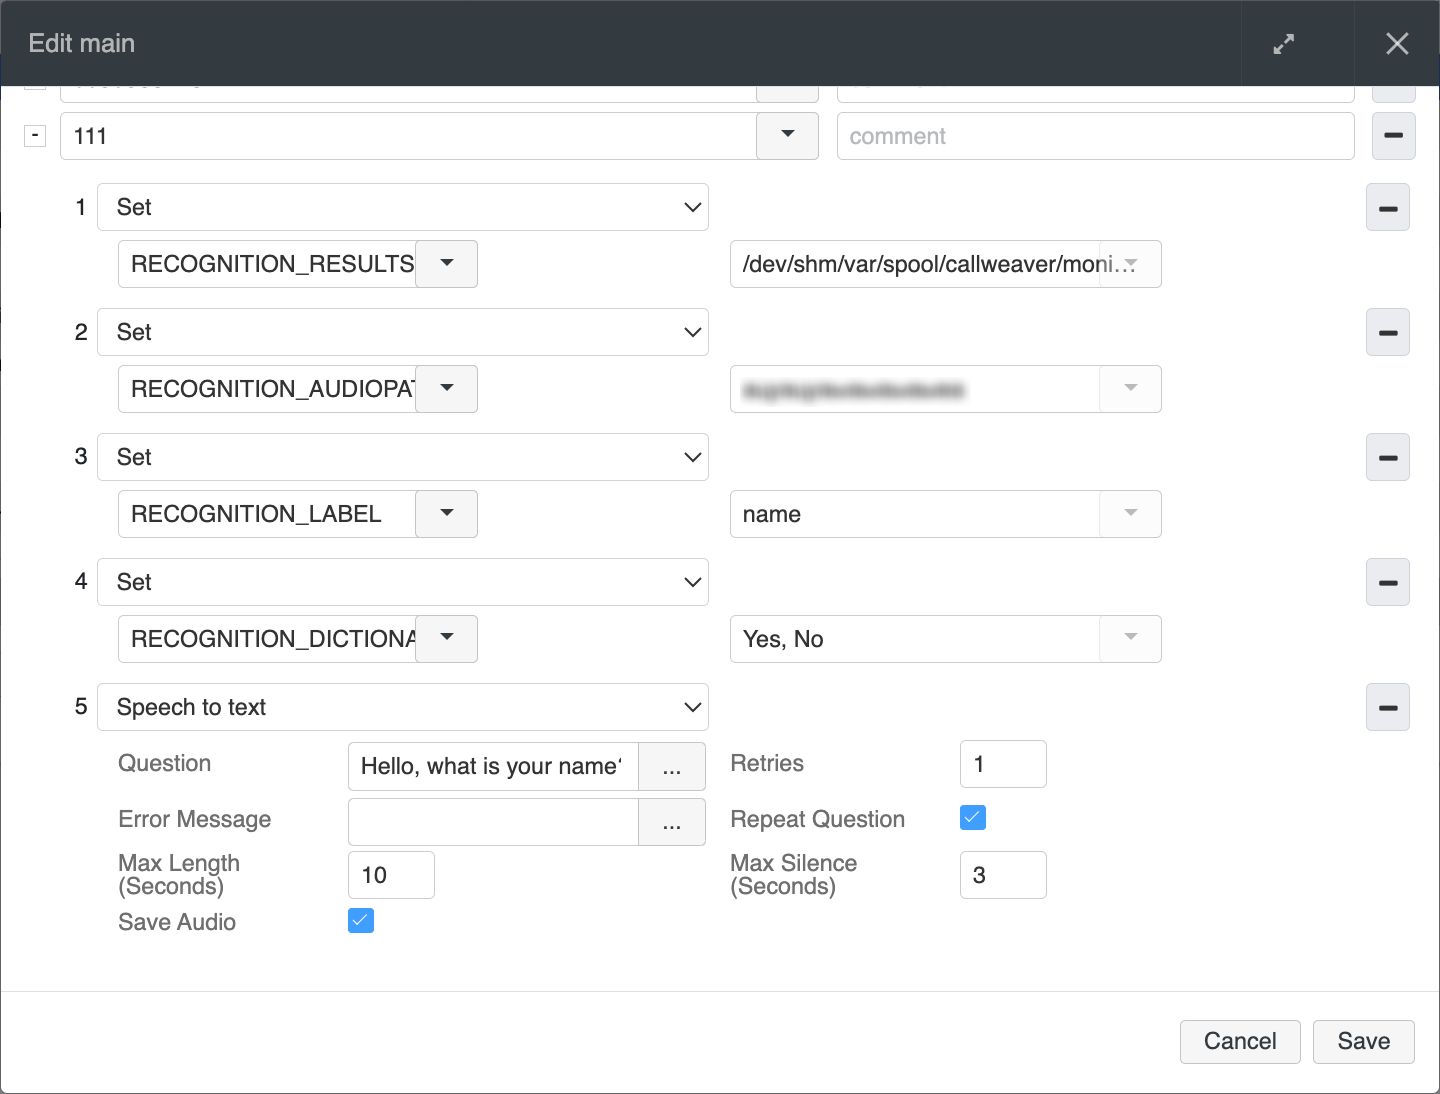
Speech to Text
Notes:
- The support starts from WMS 6.01.20221019.4
- Besides configuring Speech-to-Text in Dialplan, you can use a script that saves all recorded data into one file and passes to a database. See the document for details: How to Set Up Wildix Speech to Text
Allows creating an automatic system that asks the caller some questions, recognizes the answers, and lets you save the recorded files.
- Question: enter the text that will be played for the caller, choose an audio file, or leave the field empty (in this case just a beep is played)
- Retries: enter the number of attempts to recognize a caller’s answer before the application ends. Available values: 0-3. Default value: 1
- Error Message: type the message that is played after an unsuccessful recognition attempt, choose an audio file, or leave the field empty (in this case, the default message “I didn’t not understand your response” is played)
- Repeat Question: if enabled and if Retries parameter is other than 0, the question is repeated after the error message in case of unsuccessful recognition attempt
- Max Length (Seconds): the maximum length of an answer. Available values: 1-60 seconds. Default value: 10 seconds
- Max Silence (Seconds): the maximum length of silence allowed during speech recognition. Available values: 1-60 seconds. Default value: 3 seconds
- Save Audio: if the checkbox is enabled, file with the answer is saved on the disk. Default path: /dev/shm/var/spool/callweaver/monitor/stt/ (can be changed using RECOGNITION_AUDIOPATH variable, see details below).
- Allow DTMF Selection (available starting from WMS 6.07.20240906.1): if enabled, allows DTMF selection

The application can receive and handle the following values as channel variables (can be set via the Set Dialplan application):
RECOGNITION_RESULTS_PATH = path to the file where Speech to Text recognition results should be stored
Note:
- The variable is supported starting from WMS 6.04.20230811.1. It allows saving recognition data to a file to cover cases when the data cannot be stored in RECOGNITION_RESULTS variable, if the data exceeds 4090 Bytes (e.g. if there are many questions or the answers are too detailed)
- To easily navigate through the saved files, you could use Linked ID (LINKEDID is a unique variable of the call) for the file names
- If recognition results data is less than 4090 Bytes, the data is stored both to RECOGNITION_RESULTS variable (as before) and to the file indicated in RECOGNITION_RESULTS_PATH
- RECOGNITION_LABEL = “name“ - a custom parameter that allows to mark specific speech-to-text application entries (e.g. name, age, etc.) in order to be able to create complicated Dialplans and parse results
- RECOGNITION_DICTIONARY = “Yes, No, or other words“ - additional channel variable that lets improve speech-to-text recognition
- RECOGNITION_AUDIOPATH = “path to directory with saved audio files“ - allows to change the default path for saving audio files. Default path is: /dev/shm/var/spool/callweaver/monitor/stt/
Example:
The application returns the following values as channel variables:
- RECOGNITION_STATUS = SUCCESS / NOT_RECOGNIZED / EMPTY_FILE / SERVICE_FAIL
- RECOGNITION_RESULT = returns result of the speech recognition, e.g. ”My name is Alex”
- RECOGNITION_AUDIO = returns name of the audio file, e.g.:
/dev/shm/var/spool/callweaver/monitor/stt/20220916-170648-+380487770777-wildixbox-1663340800.21-1-name.wav
Where:
a) “20220916-170648” = date and time
b) “+380487770777” = Caller ID
c) “wildixbox-1663340800.21” = Linked ID, which is a unique variable of the call (can be found in CDR)
d) “1” = number of question in the Dialplan (1- for the first question, 2- for the second and so on)
e) “name” = variable of the RECOGNITION_LABEL, if set RECOGNITION_RESULTS = a separate channel variable that stores JSON with all the recognition results for the current channel
Note: The maximum length of the variable RECOGNITION_RESULTS is 4090 Bytes. The data that exceeds this limit, cannot be saved to RECOGNITION_RESULTS.
Example:
RECOGNITION_RESULTS = {
"questions":[
{
"question":"Hello, what is your name?",
"status":"SUCCESS",
"audio_file":"/rw2/backups/20220916-170648-+380487770777-wildixbox-1663340800.21-1-name.wav",
"result":"i'm alex",
"label":"name"
},
{
"question":"What is your age?",
"status":"NOT_RECOGNIZED",
"audio_file":"/rw2/backups/20220916-170706-+380487770777-wildixbox-1663340800.21-2-age.wav",
"result":"",
"label":"age"
}
],
"timestamp":"2022-09-16 17:06:48",
"linkedid":"wildixbox-1663340800.21"
}
Conditions
Detect fax
Answers the call and within a timeout specified in Fax Detect Time waits for the tones of a remote fax. Usually 3 seconds is enough. If the fax is detected, the call is passed to another procedure with the possibility to change the number.
- Fax Detect Time: enter the timeout for fax detection in seconds
- Continue The Execution: if enabled, the Dialplan execution continues without waiting for the number of seconds specified in Fax Detect Time field before the fax is detected (to avoid silence while the fax is being detected)
- Procedure: select the procedure to route the call in case the fax is detected
- Set Number: modify called number (to match the selected Dialplan procedure)
Example:
Suppose the company phone and fax number is 021234567. Modify the Dialplan procedure used to manage incoming calls:
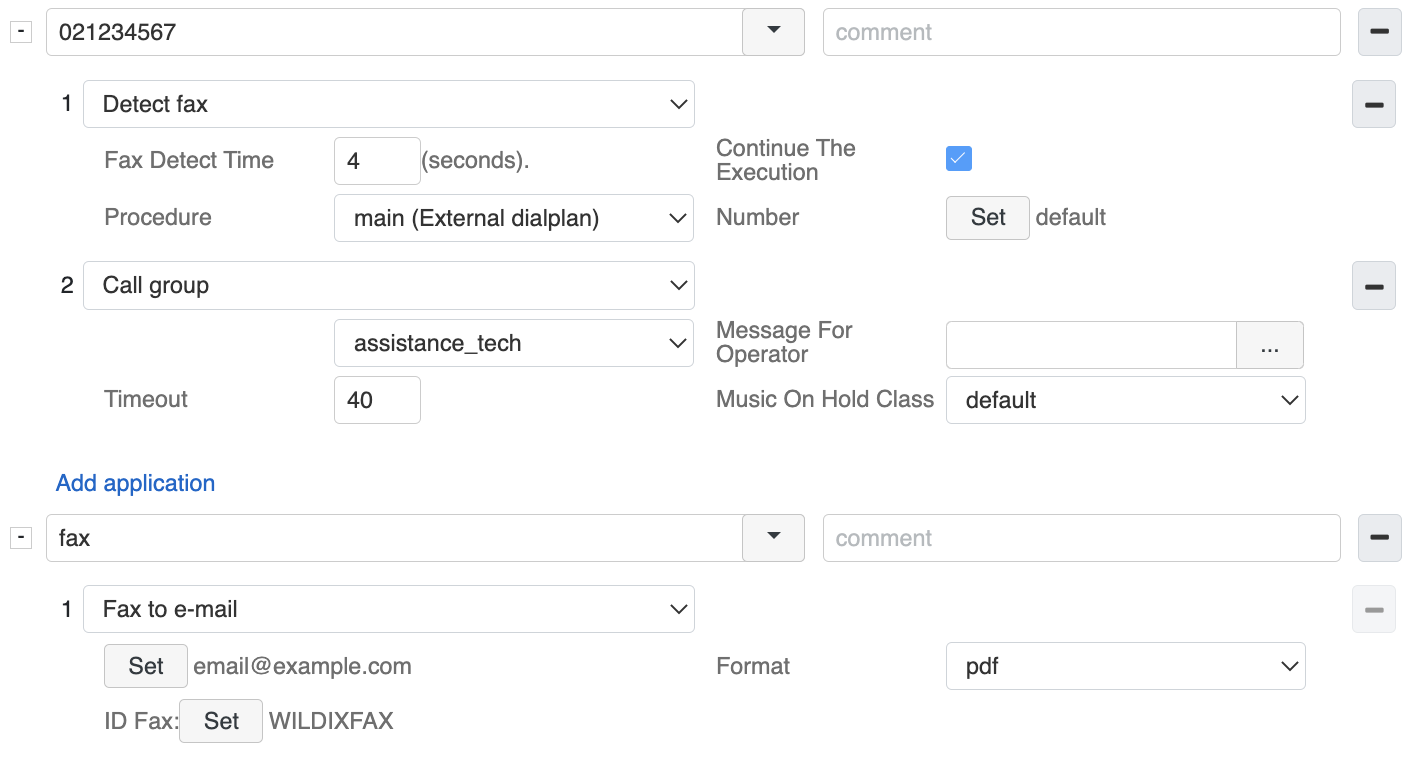
In our example the system tries to detect fax during 4 seconds, while the execution of the Dialplan procedure proceeds to the next step and the call is routed to the call group. In case within the 4 seconds the fax is detected, the system stops the execution of Call group application and the call is forwarded to the fax called number as defined in Set Number option), in which the fax is being sent to email info@wildix.com.
Jump to
Jump to another procedure with the possibility to modify the number.
- Procedure: select the procedure to route the call
- Set Number: modify the called number (to match the selected Dialplan procedure)
Example:
Suppose we have Sales and Tech Support departments and they both use the same trunk for outgoing calls, but they want to receive call recordings to different email addresses (sales@wildix.com and support@wildix.com) and to have different caller number for outgoing calls (04611715111 for sales and 04611715112 for tech support). For this purpose we must create two different Dialplan procedures for managing outgoing calls (users_sales and users_support). Don’t forget to assign these procedures to users belonging to each group in Users, Dialplan (by default users is set).
In both cases the system starts the call recording of the outgoing call, but the copy of call recording is sent to different email addresses; the caller number set on trunk is different for Sales and Tech support. At the third step Jump to, the system routes the call to the users Dialplan procedure, where both types of calls (the one made by Sales or by Tech Support department), use the Dial the trunk Dialplan application:
Jump to if
Jump to another procedure in case matched the condition with the possibility to modify the number.
- Condition: select from the list of available conditions or enter your own one (read Smart Dialplan Guide - use of Custom Applications for more information on conditions)
- Procedure: select the procedure to route the call
- Set Number: modify the called number (to match the selected Dialplan procedure)
Jump to if 3 state switch is on
Verifies the state of the 3 state switch (set up in Dialplan -> Timetable / Switch). If the switch status is ON, the Dialplan routes the call to another procedure and number, otherwise proceeds to the next step.
- Select switch: select the 3 state switch from the list
- Is On: Procedure: select the procedure to route the call in case the switch status is Enabled
- Set Number: modify the called number (to match the selected Dialplan procedure)
- Or Blinking: Procedure: select the procedure to route the call in case the switch status is Extra
- Set Number: modify the called number (to match the selected Dialplan procedure)
Note: it is possible to change the status of the switch by calling a Feature code 3 state switch (94 by default) or by pressing a corresponding BLF button on WP your phone (BLF keys can be added via WMS -> Users or via Wildix Collaboration -> Settings -> Function keys).
Example:
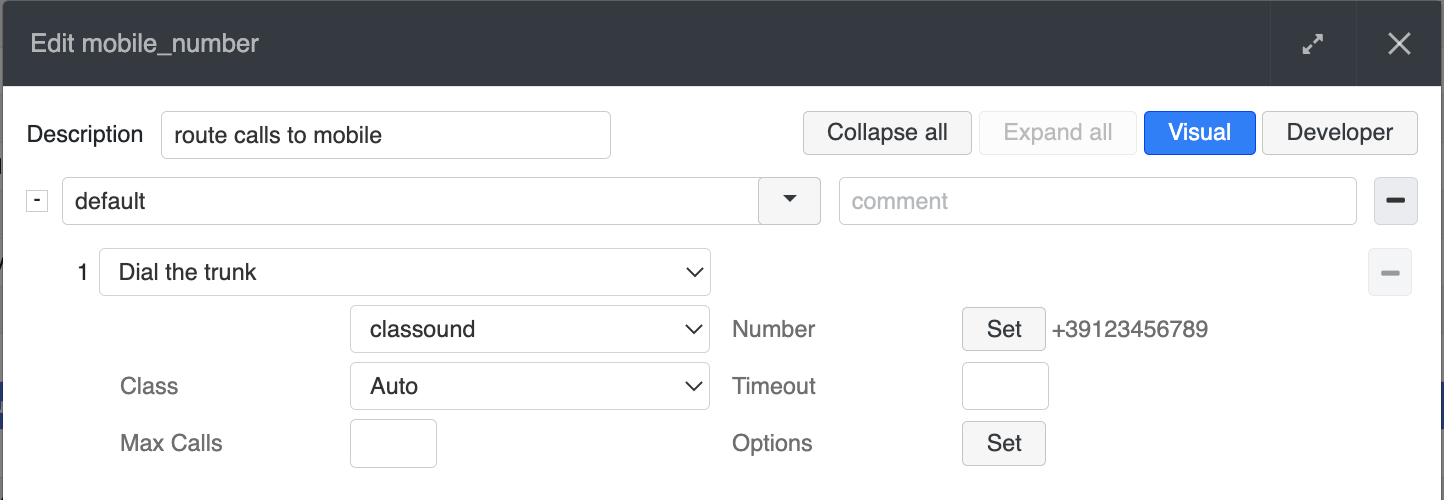
In our example, in case the switch status is ON, the incoming calls are routed to the Closed procedure, in case the switch is in Extra status, the incoming calls are routed to another Mobile_number Dialplan procedure (modify the procedure used for incoming calls, main by default):
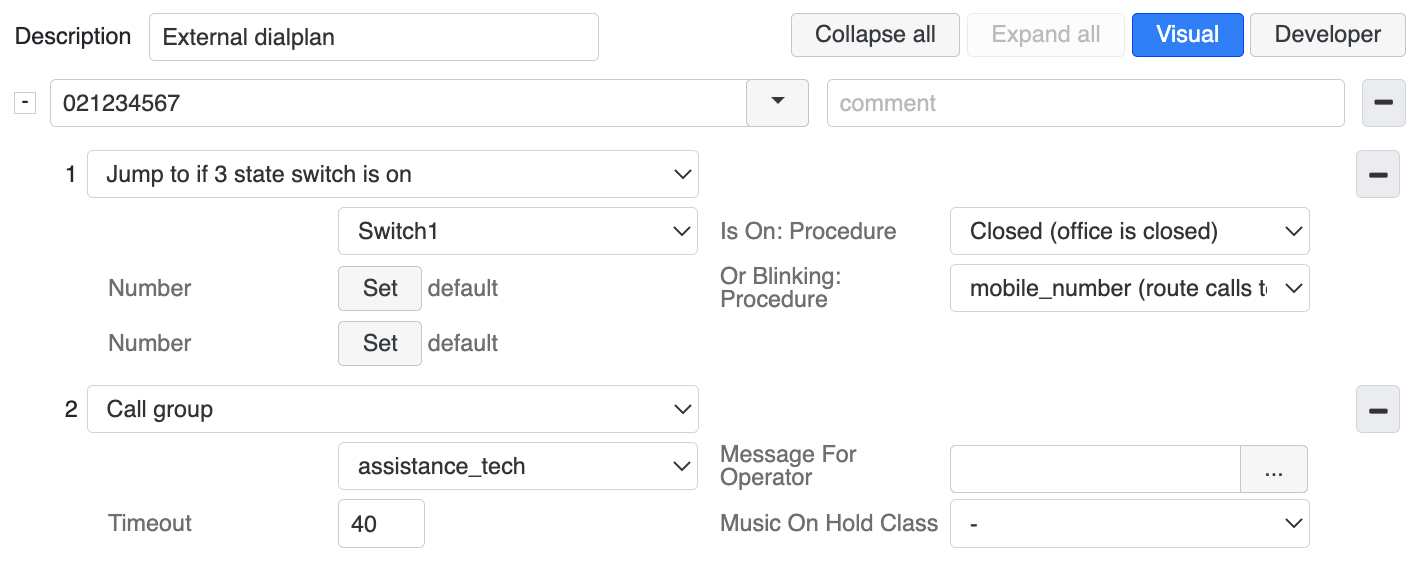
In case the 3 state switch (called Switch1) is OFF, the Dialplan continues its execution and the call is routed to the Call group application.
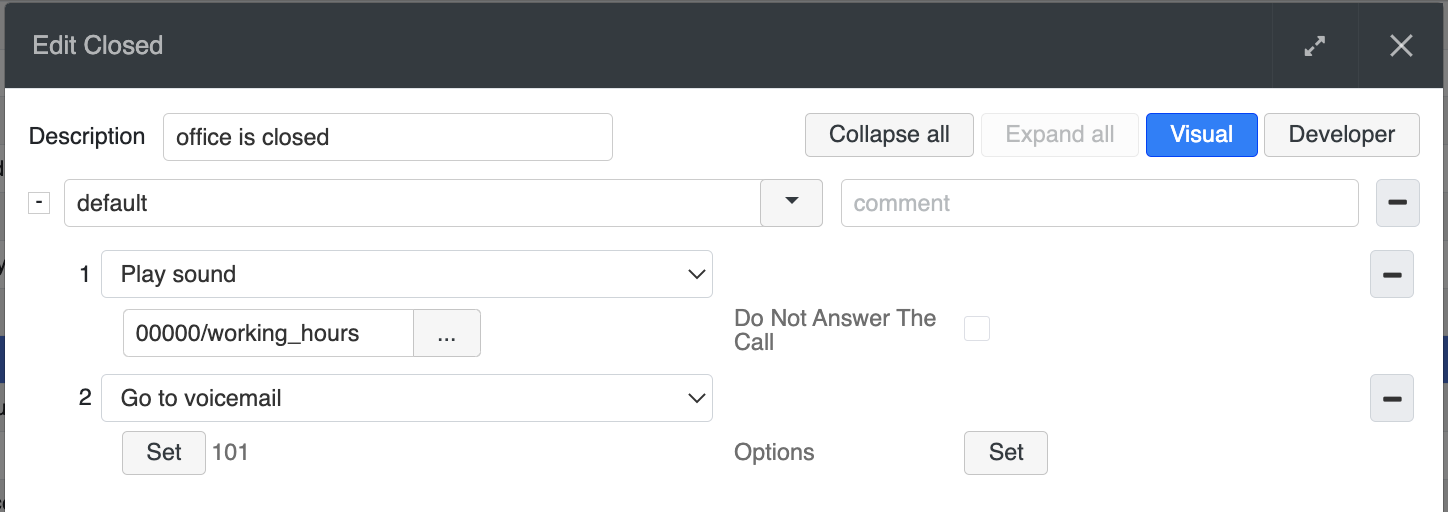
In case the switch status is ON, the call is routed to the Closed procedure, where the message is played to the caller that the offices are closed and the caller is invited to leave the Voicemail message.
In case the switch status is EXTRA (blinking), the call is routed to the mobile_number procedure , where the call is sent to the predefined mobile number via the GSM trunk.
Jump to if call type is
Verifies the type of call, if matched, jumps to another procedure with the possibility to modify the number.
Note: you can set the call type for each contact in Collaboration -> Phonebooks -> Type of contact field.
- Select call type: select the type of call (internal / external / blacklist / whitelist)
- Procedure: select the procedure to route the call in case of matching the selected type of call
- Set Number: modify the called number (to match the selected Dialplan procedure)
Note: you can associate each contact to call type in Phonebook (whitelist / blacklist); otherwise, in case you have imported a phonebook from some DB where you have some custom call class, e.g. myclass, you can set up this custom call class in Select call type section:

Jump to if congested / busy
Analyses the status of the call. If the state (BUSY, NOANSWER, CONGESTION, CHANUNAVAIL.) corresponds to the call, Dialplan jumps to another procedure with the possibility to modify the number. If no match was found, Dialplan proceeds to the next step.
- Select Dial status: select the dial status (BUSY, NOANSWER, CONGESTION, CHANUNAVAIL)
- Procedure: select the procedure to route the call in case of matching the selected dial status
- Set Number: modify the called number (to match the selected Dialplan procedure)
Jump to if switch is on
Verifies the state of the switch (set up in Dialplan -> Timetable / Switch). If the switch status is ON, the Dialplan routes the call to another procedure and number, otherwise proceeds to the next step.
The Jump to if switch is on Dialplan application works in the same way as Jump to if 3 state switch is on, but the usual switch has only two statuses: Off/On (Read the chapter of WMS Start Guide, dedicated to Switches)
Note: it is possible to change the status of the switch by calling a Feature code Switch (93 by default) or by pressing a corresponding BLF button on WP your phone (BLF keys can be added via WMS -> Users or via Wildix Collaboration -> Settings -> Function keys).
- Select switch: select the switch from the list
- Procedure: select the procedure to route the call in case the switch status is Enabled
- Set Number: modify the called number (to match the selected Dialplan procedure)
Jump to if user status is
Verifies the user status (DND / away) and based on the result routes the call to the specified Dialplan procedure with the possibility to edit the called number.
- DND / away: select the user status
- User (called number): set up the user extension number whose status you wish to verify
- Procedure: select the procedure to route the call in case the user status is DND / Away
- Set Number: possibility to specify the called number present in the Dialplan procedure where call is routed
Verify caller
Jump to another procedure, if the number or the caller name contains certain symbols.
- If [Caller Name | Caller Number] contains: enter the symbols
- Procedure: select the procedure to route the call in case the called number / name contains the symbols entered in the field above
- Set Number: modify the called number (to match the selected Dialplan procedure)
Verify number of calls
Jumps to another procedure, if the number of calls exceeds a certain quantity.
- If More Than (active calls): enter the max number of active calls
- Procedure: select the procedure to route the call in case the max number of active calls specified in the field above is reached
- Set Number: modify the called number (to match the selected Dialplan procedure)
Verify timetable
Checks the timetable status (set up in Dialplan -> Timetable / Switch). If the selected timetable’s status is always on, the call is routed to the specified Dialplan procedure, if the selected timetable’s status is check time, the system checks if the actual date and time matches the intervals specified in the timetable, and if the match is found, the call is routed to the specified Dialplan procedure. If the match is not found or if the timetable’s status is never active, the Dialplan execution proceeds to the next step. (Read the chapter of WMS Start Guide, dedicated to Timetables).
- If Matched: select the timetable from the list
- Procedure: select the procedure to route the call in case the timetable status is always on or in case the timetable’s status is check time and the actual date and time matches the interval specified in the timetable
- Set Number: modify the called number (to the one present in the selected Dialplan procedure)
Contacts
Lookup called name in phonebook
Searches for the called name in the specified phonebook with the option to modify the called number in case the match is found.
- Select phonebook: select the phonebook from the list, in which to perform the search
- Set Number: modify the called number
- Set Options: search for the exact match
Lookup caller name in phonebook
Searches for the caller name in the specified phonebook with the option to modify the called number in case the match is found.
- Select phonebook: select the phonebook from the list, in which to perform the search
- Set Number: modify the called number
- Set Options: search for the exact match
Mobility extension lookup
If the caller number (modifiable via the option Set – caller number) corresponds to the mobile number of one of the users, Dialplan jumps to the procedure predefined for the outgoing calls of this user, as if the call was made from this user’s extension number. User is asked to dial the number to call and the call is treated as a usual outgoing call made by this user.
Note: to make it work, make sure that the mobile number is present in User profile (WMS -> Users).
- Set Number: modify the called number (to match the number present in the procedure predefined for the outgoing calls for this user, e.g. Users procedure
- Set Options: hang up and call back to the caller
Sounds / IVR
IVR
Starts the execution of the selected IVR (set up IVR in Dialplan -> IVR). (Read the chapter of WMS Start Guide, dedicated to IVR).
- Select IVR: select the IVR from the list
IVR via ASR with Directory
Extends the capabilities of Dial by name / Directory application and allows you to create IVRs with voice control.
The full description: How to configure IVR via ASR with Directory in Dialplan.
Play sound
Reproduces an audio file to the user. (Read the chapter of WMS Start Guide, dedicated to audio messages).
You can select an existing audio file or create dynamically a new audio file using TTS (Text-to-Speech) upon execution of this Dialplan context.
- Audio file: click the button … to access the Sounds menu of the PBX to be able to select or record the message to be played back to the caller or enter the text to generate using TTS service
- Do Not Answer The Call: if enabled, the Audio file is played without answering the call
How to use TTS in Dialplan:
- It is necessary to first set the language using Set application
- If required, you can change the default voice parameter for TTS message:
- Before WMS 6.03.20230630.3: add Set application and use channel variable TEXTTOSPEECH_VOICE indicating the new voice parameter. Supported voices list can be found in WMS -> Sounds (secondary top menu)-> Text-to-speech page. Note, that the language of the voice parameter should match the language selected in Set application
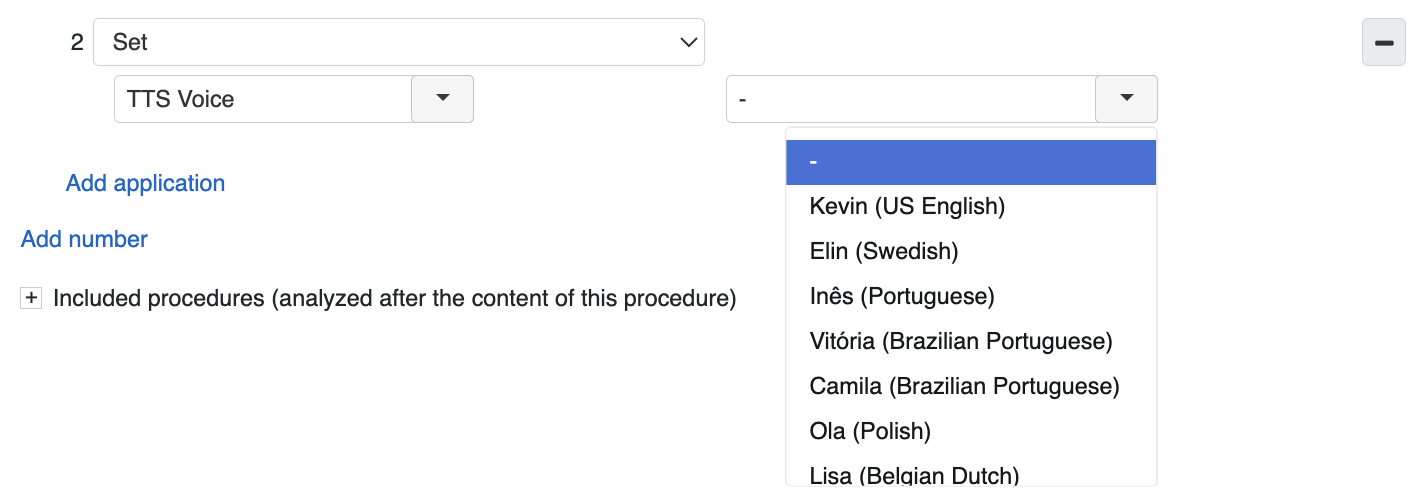
- Starting from WMS 6.03.20230630.3: neural TTS for Dialplan is used by default. You can change the default speaker by adding Set application -> choose the parameter TTS Voice - > select speaker:
- Write a text using Play sound / Play sound and wait for digits applications. In case you need to insert a pause between words/ phrases, use a variable <break time="1s"/>, where the value "1s" can be changed to any number of seconds
- To learn more about variables, read Smart Dialplan Guide - use of Custom Applications
- You can jump to another Dialplan procedure based on TTS result: use Jump to if application with Condition "${TTSSTATUS}"!="SUCCESS" ("UNDEFINED"/"FAILURE")
Note, that this message will not be saved on the PBX and will be generated dynamically upon the execution of this Dialplan application.
Example:
Read more about Wildix Business Intelligence (WBI) services: Wildix Business Intelligence - Artificial Intelligence services.
Prerequisites:
- Per User systems (monthly / yearly / five years subscription)
- Premium license
- It's necessary to set the language using Set application
Play sound and wait for digits
Reproduces an audio file to the user. During the playback, the system analyses the DTMF tones received from the caller and searches for the match to called numbers present in the current Dialplan procedure or in the Included procedures.
- Audio file: click the button … to access the Sounds menu of the PBX to be able to select or record the message to be played back to the caller
- Do Not Answer The Call: if enabled, the Audio file is played without answering the call
This Dialplan application is very useful for DISA management, e.g. the message invites the caller to enter an extension number and then the call is routed to the number entered. (Read the chapter of WMS Start Guide, dedicated to DID and DISA (Post Selection) configuration).
With the help of this Dialplan application you can enable external users to participate in the audio conference:
Create a new conference Dialplan procedure and edit a Dialplan procedure for incoming calls (main by default) by specifying an office number devoted to conference management as Called number (in our example, 04611715109) and adding an operation Jump to –> conference procedure:

- Edit a conference Dialplan procedure
An example of configuration for this Dialplan procedure is provided below:
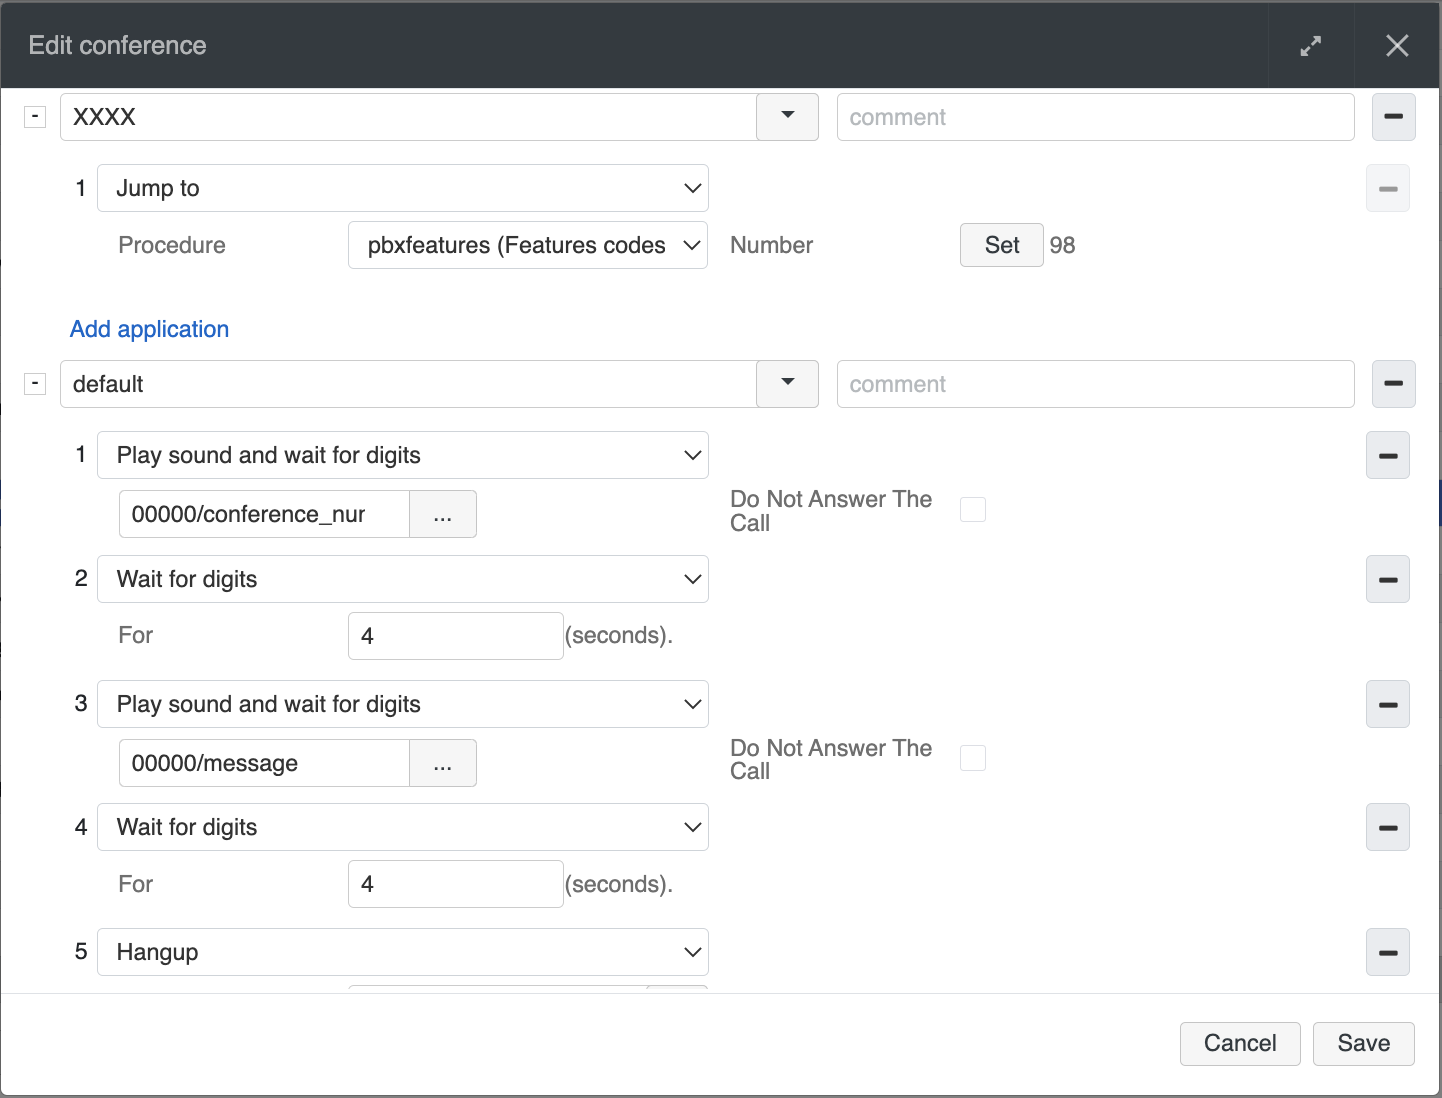
- The user is invited to enter the PIN code of the conference (Play sound and wait for digits)
- The system waits for 4 seconds (Wait for digits)
- In case the user has entered the valid conference PIN number, the call is routed to the conference room (called number –> XXXX (Conference PIN code), Jump to –> pbxfeatures procedure –> 98 (Feature code to access to the conference)
- In case the user has entered a wrong number, he is invited to try again (Play sound and wait for digits)
- After the second unsuccessful attempt, the call is hung up (Hangup)
Wait for digits
Normally this Dialplan application used to give more time to the caller after the audio file is reproduced.
- For (seconds): enter the timeout in seconds
Set
Set
Set up different parameters for the current call:
- Tags: select the tags that you would like to set for this type of calls
Tags are added in Settings -> PBX -> Call and char history, Tags.
Tags can be also set via Wildix Collaboration (read the Wildix Collaboration Guide). Tags set via Collaboration have more priority over tags set up via Dialplan.
Language: select the language among the available ones
Note: The selected sound package should be enabled in the system (WMS -> PBX -> Language & region -> Sound packages), otherwise English is used.
In this language the system audio messages are played to the caller.
- Direct RTP: yes – direct RTP is used for all devices (you can specify the networks in which direct RTP must be used in Settings -> PBX -> Settings SIP-RTP); no – direct RTP is turned off for all devices (if not set up via Dialplan, direct RTP is used only for Wildix devices)
Codecs: force the usage of selected codec for this type of calls (select codec from the list of supported ones)
Note: you can also manually insert several codecs separated by comma:

- Music on hold: select the music on hold from the list
- Ringtone: select a custom ringtone for a call
- Type of call: select the type of call to set for these calls (Internal / External / Whitelist / Blacklist). Type of call can be also set in Wildix Collaboration -> Phonebook, Type of contact field
- Caller name: set the caller name for this type of calls (click Set)
- Caller number: set the caller number for this type of call (click Set). This Dialplan application allows you to rewrite or edit the caller number of the incoming call, it is often used for number normalization (e.g. so that it’s possible to call back the number right away)
- Caller number on trunk: set the caller number on trunk (click Set)
- Timeout: set the timeout in seconds (select among the available options – 10/20/30 or enter your own value). Usually used for outgoing calls (users procedure) before the Dial trunk Dialplan application, allowing you to set the caller number on this trunk
- ITC: speech (default parameter), 3.1khz, unrestricted, set to manage ITC (ISDN Transfer Capability) for the network segment between BRI/ PRI gateway and the operator
- TTS Voice (available starting from WMS 6.03.20230630.3): select the preferred TTS speaker
In case the option you would like to set is not available in the drop-down list of the Set application, you can enter it manually. In this document Practical examples of using Set Dialplan application you can find some examples of using Set application with options which are not available in the drop-down list.
DTMF
Generate DTMF
Generates a DTMF tone. This Dialplan application allows you to insert the DTMF that can be used during a call, for example, in case you are often asked to enter the same code while calling a particular number, via this Dialplan application, you can enable the system to enter the code automatically when calling this number.
Generate Flash Hook
Generates Flash Hook.vFlash Hook is used for integration with legacy PBX and legacy phones. Read the FXP White Paper to find examples of usage.
Other
Custom application
Used to execute custom Dialplan applications, not present in the standard list of Dialplan applications, if recommended by Wildix Support Team or in Tech Wizards FB group.
Read Smart Dialplan Guide - use of Custom Applications to learn more about the use of custom applications for interaction with external software, MySQL server, PHP, CURL request, TAPI, MySQL Microsoft Database.
Remote script
Enter the path to the remote script.
Example:
Wildix PBXs can interact with external programs via AGI interface. You can create for example, a script that includes a PHP AGI library (already present in the WMS) and execute it via this Dialplan application.
When this script is executed, the system pronounces the number (1234), reproduces the file (in your script use the name of the audio file that exists on your PBX) and then dials the user (340).
Make sure that the owner is wms (chown) and give the permissions to execute the script (chmod).
Indicate the path to the place where the remote script is located in the Dialplan application:

In our case, when calling 333, the script “php.test” is executed.
Example of Main procedure configuration.
Example of Users procedure configuration.