Phones Accessories Quick Start Guide
In this Quick Start Guide you can find information on how to connect WHS headsets (WHS-MONO, WHS-DUO), WelcomeConsole-EXT – keypad extension module for WelcomeConsole/ WP490 2015/ WP490G, WPEHS – Wireless Headset Adapter for WelcomeConsole/ WP490 2015/ WP490/ WP480G, WiFi Dongle.
Useful links:
- Phones Accessories Datasheet
- Wildix Phones Documentation (User Guides, Datasheets, End User Brochures): Desk phones documentation
- W-AIR Phones Documentation (User Guides, Datasheets, End User Brochures): W-AIR Documentation
- Collaboration and Mobile Apps Documentation
Updated: August 2024
Permalink: https://wildix.atlassian.net/wiki/x/Fx-OAQ
WHS – Wildix Headsets
- WHS-MONO (one ear)
- WHS-DUO (two ears)
Third party headsets integrated with Wildix phones: Wildix Compatible Headsets - Jabra, Plantronics, EPOS Sennheiser, JPL, Axtel, Orosound.
WHS-MONO / WHS-DUO
Packing list:
- 1 x headset WHS-MONO/ WHS-DUO
- 1 x RJ9 cable
- 1 x 3.5 mm cable
- 1 pair x foam ear pads
Compatibility
- WP4X0 2015/ WP4X0G/ Start pre 2024/ WorkForce pre 2024/ WelcomeConsole pre 2024
- WP600A/ ACG/ Vision/ SuperVision
- WP old series
- W-AIR Basic (EOL)/ W-AIR 100 (EOL)/ W-AIR LifeSaver/ W-AIR LifeSaver-EX/ W-AIR Med/ W-AIR Office
- Compatible with iPhone and Android phones
- Compatible with Apple Mac and Windows PC
Connection
- Use RJ9 cable for WP4X0/ WP4X0G/ Start/ Workforce/ WelcomeConsole and WP old series
- Use 3,5 mm cable for WP600A/ACG, Vision/ SuperVision, W-AIR Basic / W-AIR 100 (EOL)/ W-AIR LifeSaver/ W-AIR LifeSaver-EX / W-AIR Med/ W-AIR Office, iPhone and Android phones, Apple Mac and Windows PC
WelcomeConsole-EXT – Extension module
Packing list
- 1 x Extension module
- 1 x RJ12 cable
Compatibility
- WP490 2015/ WP490G/ WelcomeConsole pre 2024
Features
- WP490EXT 2017: 40 Programmable BLF keys, 4.3” 272*480 COLOR Display
- WP490EXT pre 2017: 20 Programmable BLF keys; 4.3” 272*480 Graphical LCD with Backlight
- Powered by Wildix phone
- Up to 3 Modules Daisy-chain
Port description
- 2 RJ12 ports for data in and out
- AC Power Adapter jack: Input: AC 100-240V; Output: DC 5V/1A
Quick Installation Guide
Connection
Connect the EXT IN port of the extension module to the EXT port of the Wildix phone using RJ12 cable.
To connect another WelcomeConsole-EXT in chain, connect the EXT OUT port of the first extension module to the EXT IN port of the second extension module.
You can connect up to 3 extension modules in chain. In case you connect three modules, it’s necessary to connect the power adapter to the 3rd extension module (available on demand, code: PS-5V2A; also compatible with older version, code: PS-WP4X0G). Also in case you connect two modules + 1 WPEHS, it’s necessary to connect the power adapter to the 2nd extension module.
Note: The backlight settings of WelcomeConsole-EXT extension module are synced with WP490G 2016-2017, WelcomeConsole.
Configuration
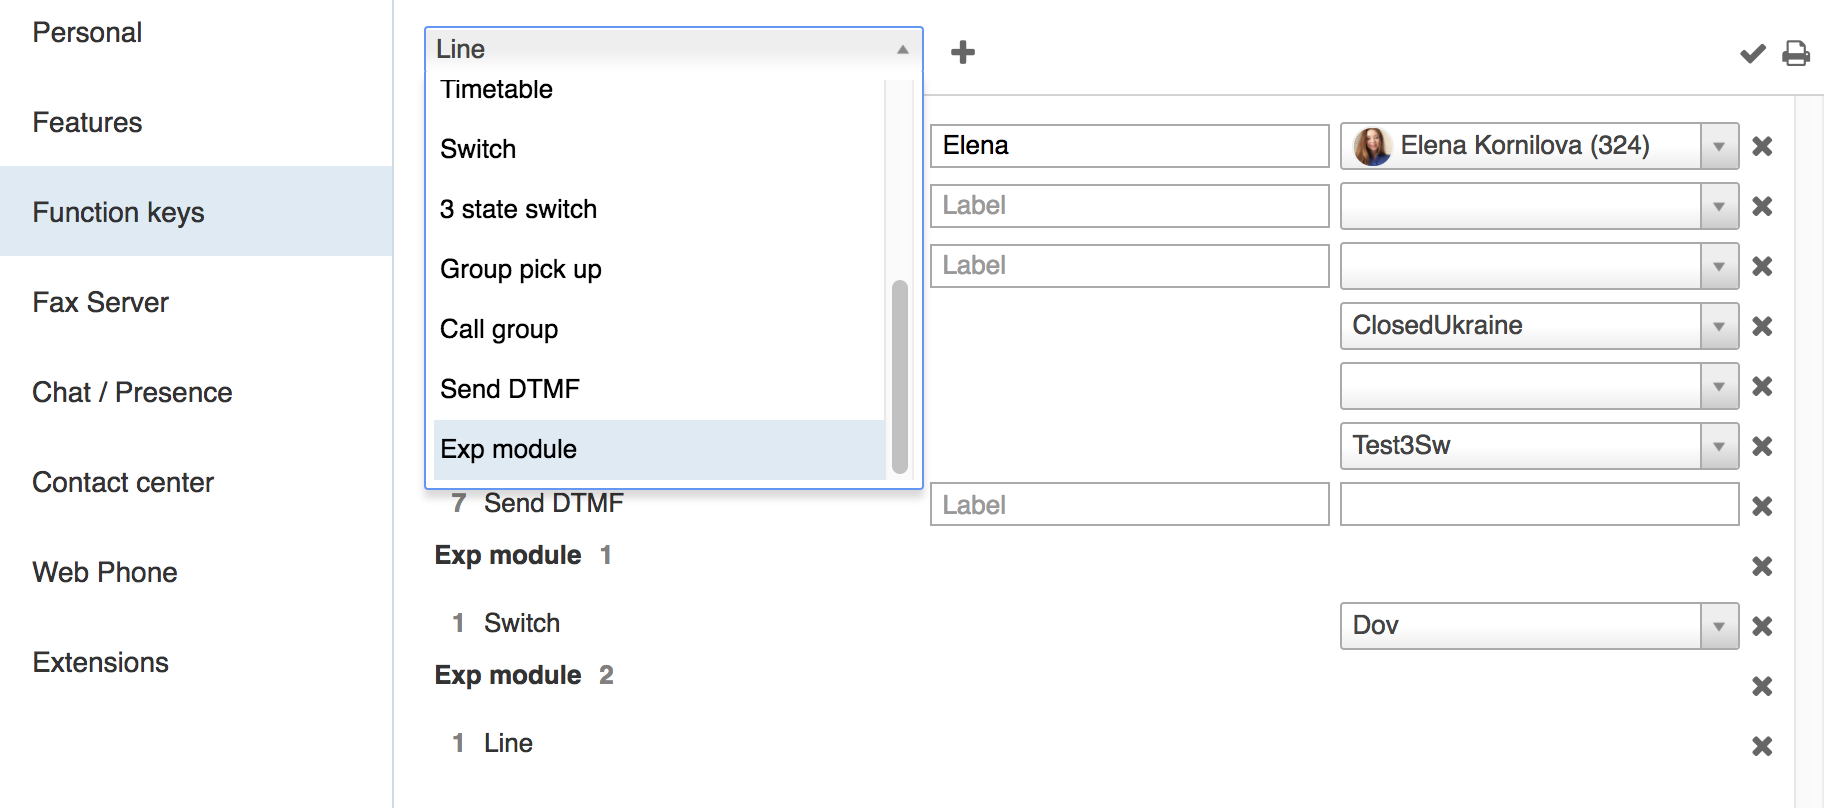
Configure the BLF keys via Wildix Collaboration Settings -> Function keys.
After having configured 20 Function keys (BLF), proceed as follows:
Click Exp module to add one or several extension modules (Add several Exp modules in case you have more than one extension modules connected in chain):
- Add Feature Keys to be monitored via the expansion module and move them under the desired section (under Exp module 1 / Exp module 2 / Exp module 3…)
- Click Save
WiFi Dongle
Notes:
- Min. required WorkForce firmware version 65.145.4.12
- Available only as a HWaaS item
Packing list
1 x WorkForce WiFi Dongle
- 1 x Type-C adapter
Compatibility:
- WorkForce
- WorkForce 5 (2024)
- WelcomeConsole 5 (2024)
Features
- IEEE802.11b/g/n/a/ac Wireless standard
- WPA-PSK/WPA2-PSK; WPA/WPA2 Encryption
- 2.4GHz and 5GHz Dual band frequencies
- Wireless speed up to 600 Mbps
Quick Start Guide
WiFi Dongle Connection
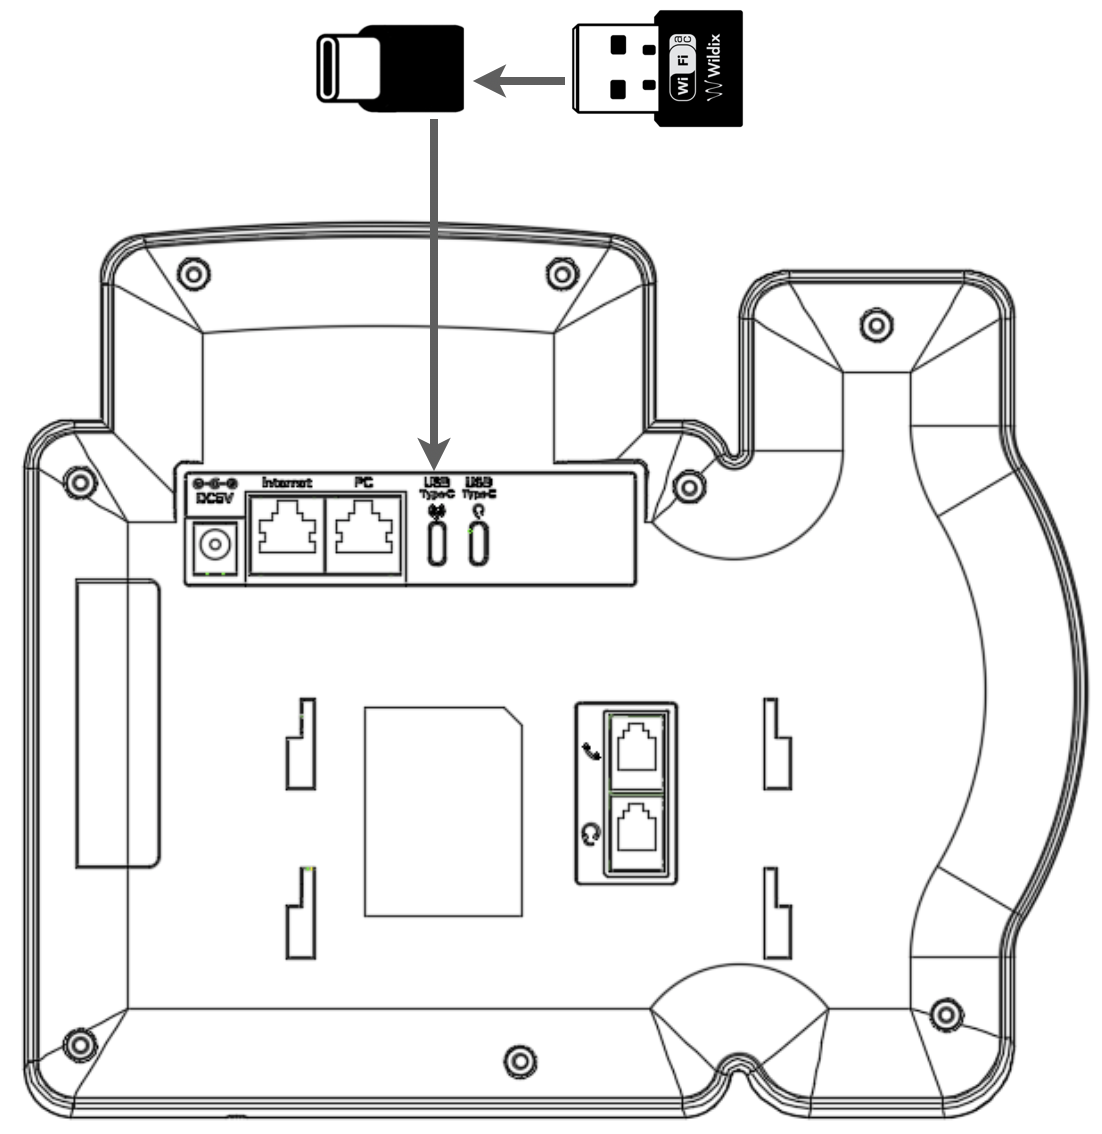
- Connect WorkForce WiFi Dongle to Type-C adapter
Plug the Dongle into WorkForce USB Type-C port
Notes:
- Check that ACL rule “Can use” - “Advanced phone settings menu” is set in WMS -> Users -> Groups for users who need access to the feature
- WorkForce with a connected dongle requires at least 5V 2A power source
- Wi-Fi Bridge mode is not supported
Network connection
To connect WorkForce to a Wi-Fi network:
- Press Menu soft key on WorkForce
- Go to Network menu and select WLAN option
- Enable Wi-Fi connection: use Navigation keys or press Switch soft key to change Wi-Fi connection status from Disable to Enable; press Save soft key
- Searching for Wi-Fi Networks is in progress. After it is completed, there is a list of all available networks
- Select a Wi-Fi network from the list and press Connect soft key
- Enter password and press Save soft key
- WorkForce is now connected to the Wi-Fi network; the LED indicator blinks with fast short blue flashes during data transfer
WPEHS – Wireless Headset Adapter
Packing list
- 1 x EHS Adapter
- 1 x RJ45 cable
- 1 x RJ12 cable
- 1 x RJ9 spiral cord
Compatibility
- Compatible with WP480G/ WP490 2015/ WP490G/ WelcomeConsole
- Compatible with Jabra, Poly (formerly Plantronics) and Sennheiser wireless headsets
Compatible models:
- Jabra: PRO 9450, GN 9350e, GN 9330e, GN 9125
- Poly (formerly Plantronics): Savi 700 Series (710, 720, 730, 740, 745), CS500 Series (510, 520, 530, 540), Voyager Legend CS
- Sennheiser: DW Office (running firmware version 96 or later), SD Office
Features
- Answer and hangup calls remotely
- Powered by Wildix phone
Port description
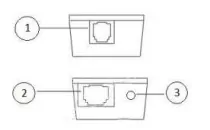
- 1 x RJ12 port (port 1 on the picture) to connect to Wildix phone
- 1 x RJ45 port (port 2 on the picture) to connect to Jabra headsets
1 x 3.5 mm Jack (port 3 on the picture) to connect to Poly (formerly Plantronics) headsets
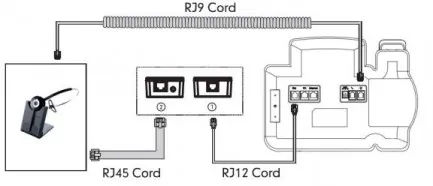
Connection
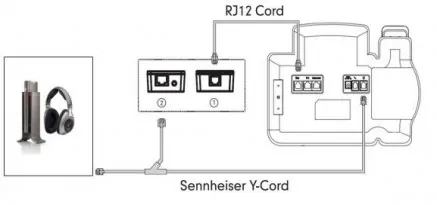
Note: In case you connect two extension modules + 1 WPEHS, it’s necessary to connect the power adapter to the 2nd extension module.
Jabra (GN Netcom):
Poly (formerly Plantronics):
Sennheiser:
Firmware Upgrade (WelcomeConsole-EXT and WPEHS)
WelcomeConsole-EXT
Firmware update is included into provisioning and there is no need to do it manually.
WPEHS
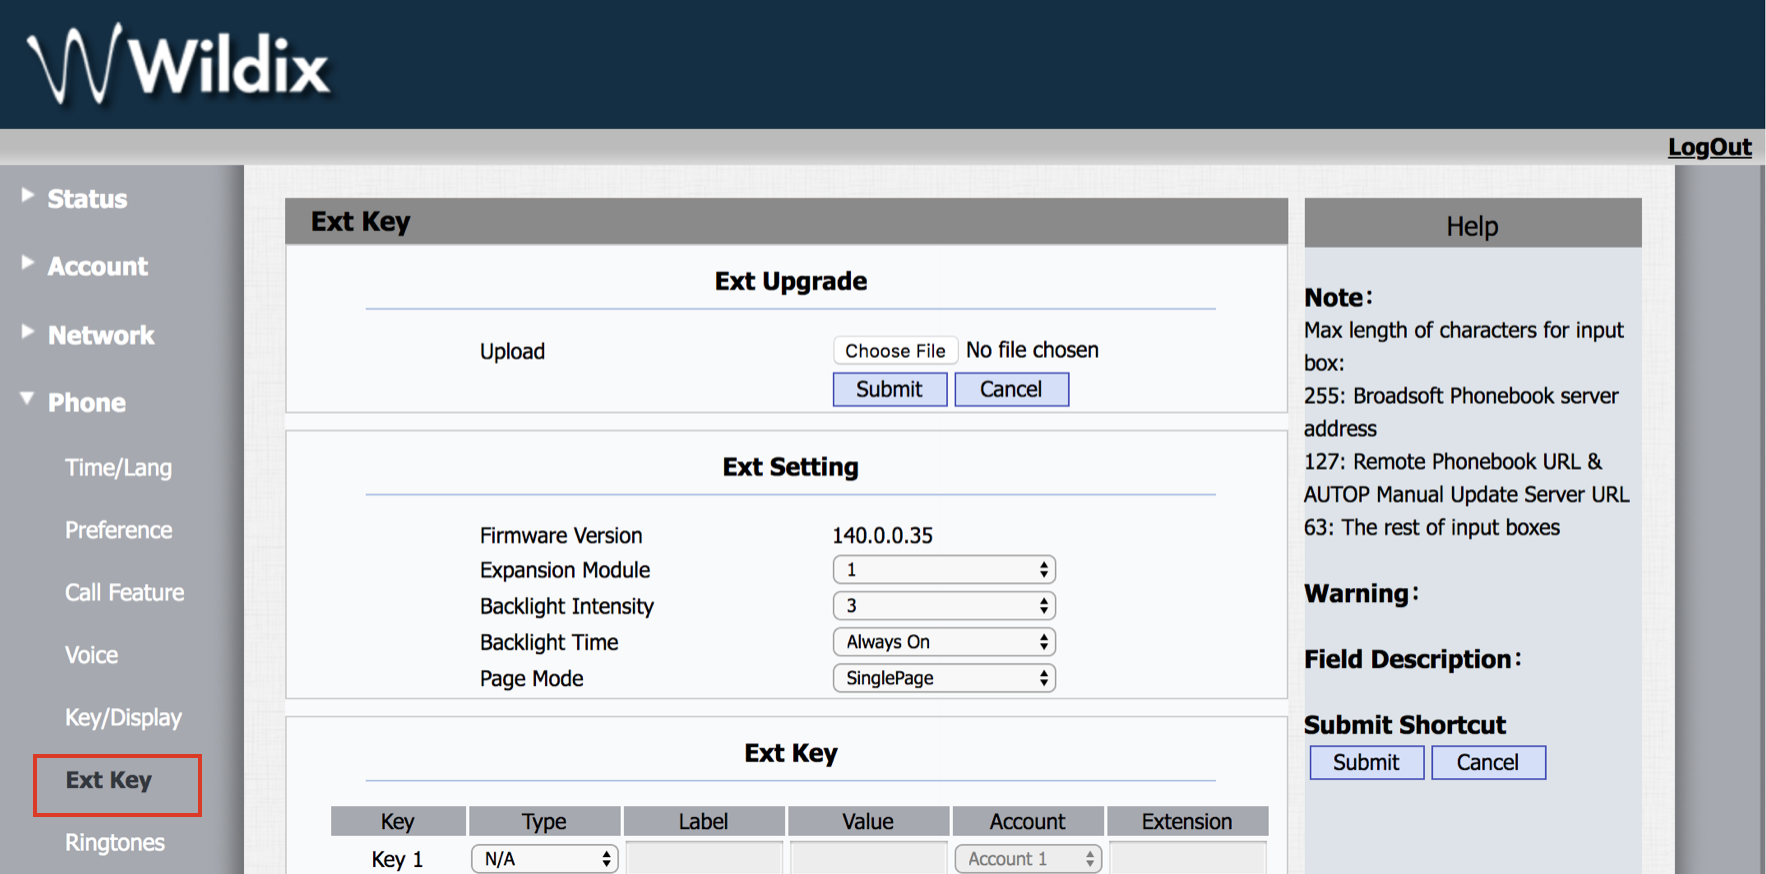
WPEHS firmware upgrade is performed via WP web interface.
Proceed as follows:
- Download the firmware file from the corresponding folder: https://drive.google.com/open?id=0B4EVs-56WfKZOV9NMmlVdmJiQlk (file with *.rom extension)
- Access the WP web interface
- Go to the menu Phone -> Ext Key -> Ext Upgrade -> choose the firmware file
- Click Submit
- Click Ok to confirm
After the upgrade is completed, the version is indicated in Firmware Version field:
