x-bees Videoconference
- Tatiana Bieliakova
- Ksenia Babych
The document describes how to start a conference in x-bees and use x-bees conference features.
x-bees documentation: link.
Updated: February 2025
Permalink: https://wildix.atlassian.net/wiki/x/AQACCg
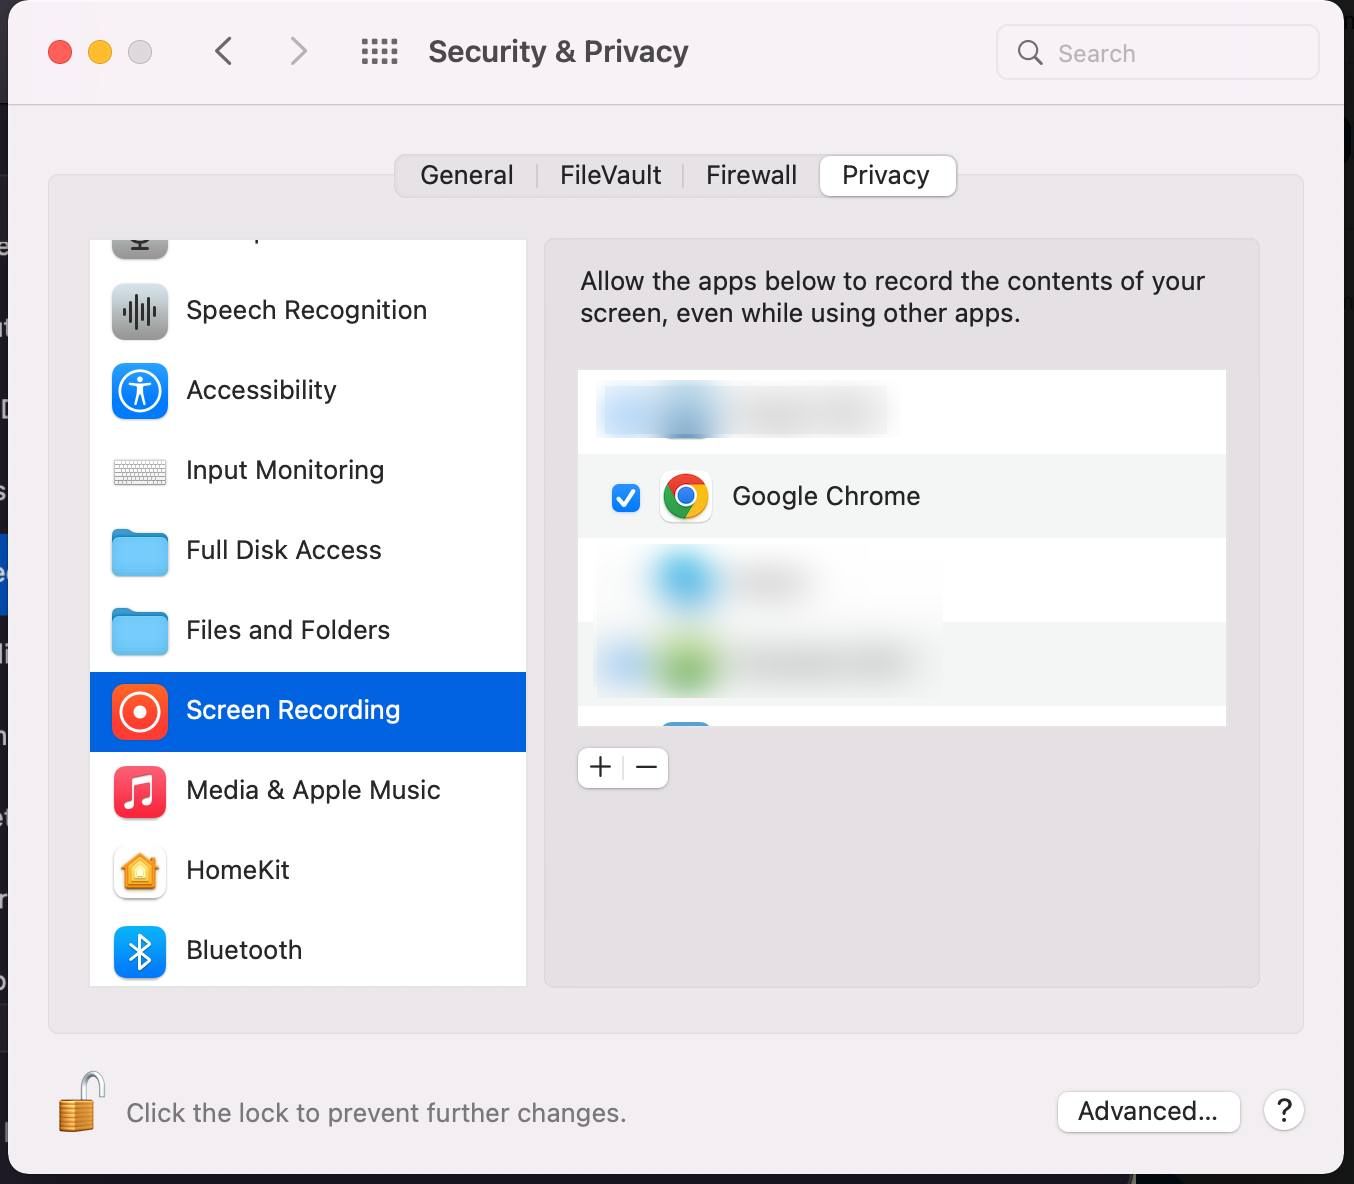
Screen sharing issue on macOS using Google Chrome
Due to detected issues in Google Chrome, it might be impossible to use screen sharing.
To resolve the issue, take the following steps:
- Update Chrome to the latest version
- Refresh permissions: go to macOS System Preferences -> Security & Privacy -> Screen Recording -> uncheck and check Google Chrome checkbox
Temporal limitation for macOS users:
for the video conference to work on Safari web browser, please follow the steps below:
- Open Safari web browser -> Preferences -> Privacy tab
Make sure the option Website tracking: Prevent cross-site tracking is unchecked

This limitation concerns only PBX users. External participants using Safari web browser are not affected.
Requirements
Browser
Google Chrome
Chromium
Safari 12.1.X and higher
Microsoft Edge 79.0.309 and higher
Firefox
For Screen Sharing:
- Chrome v. 72
- Firefox v. 66+
Wildix licenses:
- At least x-bees-Basic license for PBX each user who needs to be able to create a conference room (more information: x-bees Admin Guide)
Ports to open on firewall
Check here: Ports used by Wildix services.
Bandwidth requirements
The bandwidth used by Wildix Videoconference is adaptive and varies to provide the best experience on participants’ network.
Minimum bandwidth required:
Outbound from the participant: 300 kbps
Inbound to the participant: 300 kbps
Ideal bandwidth:
Two-person video calls:
Outbound from the participant: 2.6 mbps
Inbound to the participant: 2.6 mbps
Group video calls:
Outbound from the participant in all situations: 2.6 mbps
Inbound to the participant with 5 participants: 3.2 mbps
Inbound to the participant with 10 participants: 4.0 mbps
It is possible to decrease bandwidth consumption by selecting a lower video quality level in options, see the chapter Video quality.
Number of participants in a conference
- Video: Currently the number of users who can share their videos is not limited – it's possible to see all the users who are sharing their videos in Tiles view, however for the optimal performance we do not recommend to exceed 70 users in case all of them share their videos
Additional equipment
To ensure efficient collaboration during videoconferencing in small and large meeting rooms, Wildix offers some additional equipment:
- Wizyconf Huddle-Room: for 2-3 people sitting in front of PC/ laptop – a speakerphone with a 120° wide angle Full HD webcam and 360° microphone. More information: /wiki/spaces/DOC/pages/30281361
- Wizyconf Conference Room - the first professional easy-to-use web conference – a fully equipped conference room: Wizyconf Conference Room - Documentation
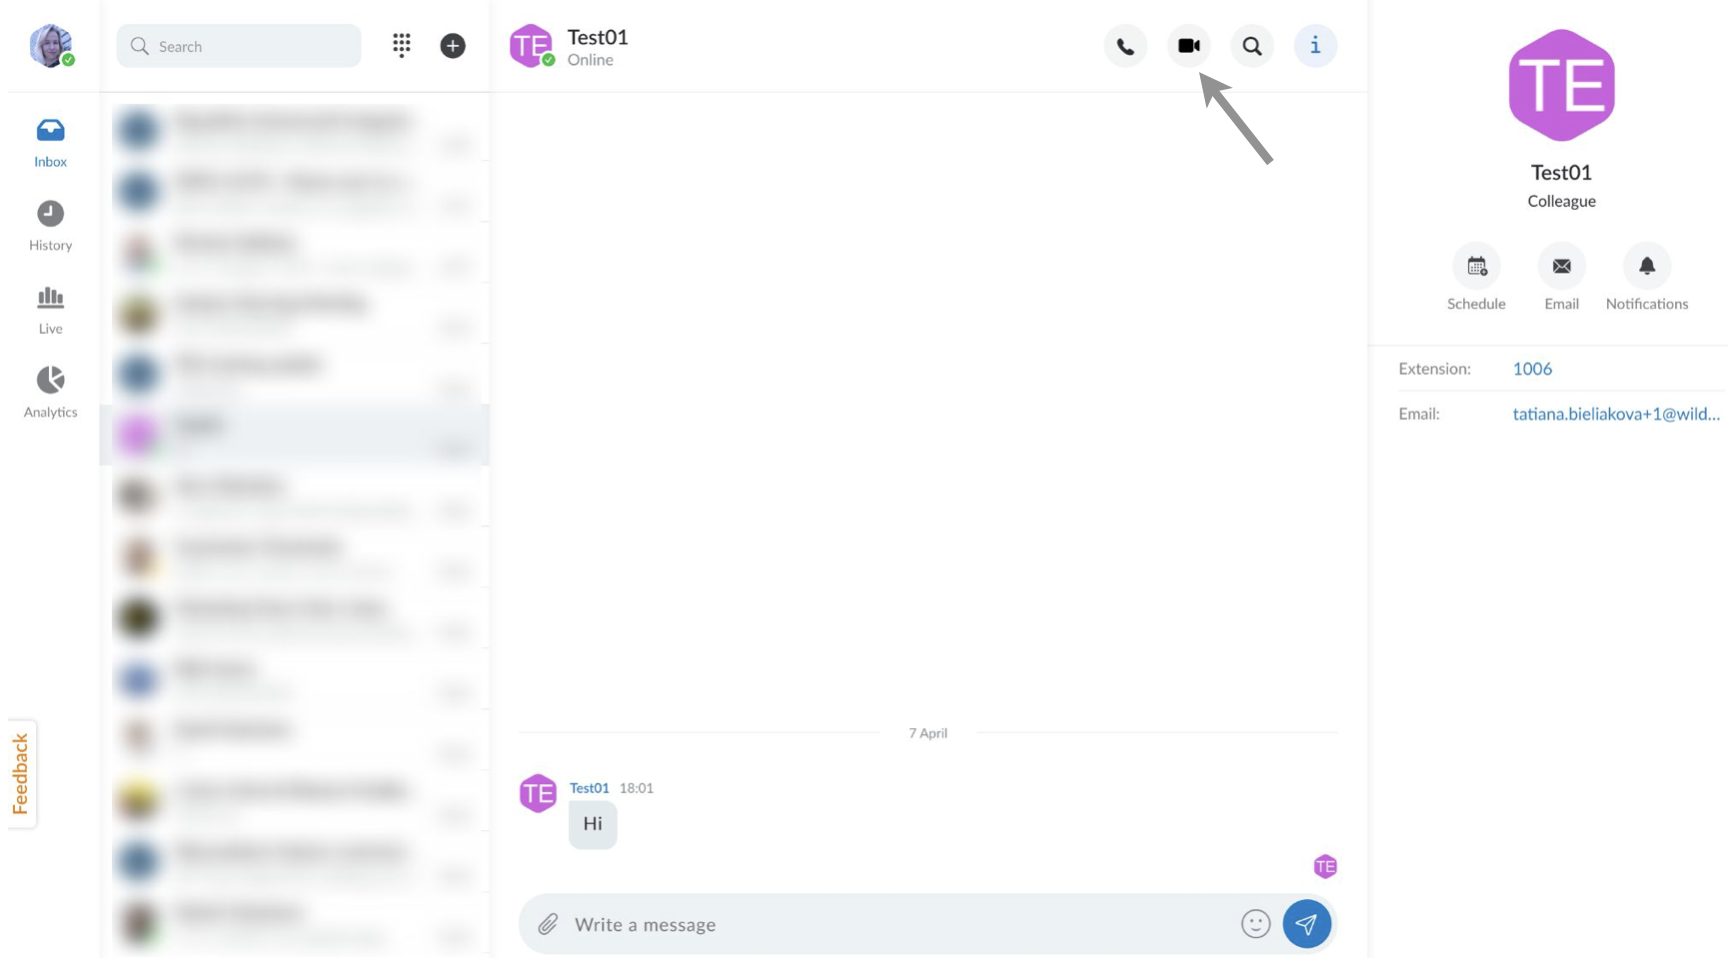
Start a conference
- Open conversation with a user/ group of users
- Click on the Video icon at the top of the conversation screen:
Conversation is deleted automatically after 30 days of inactivity.
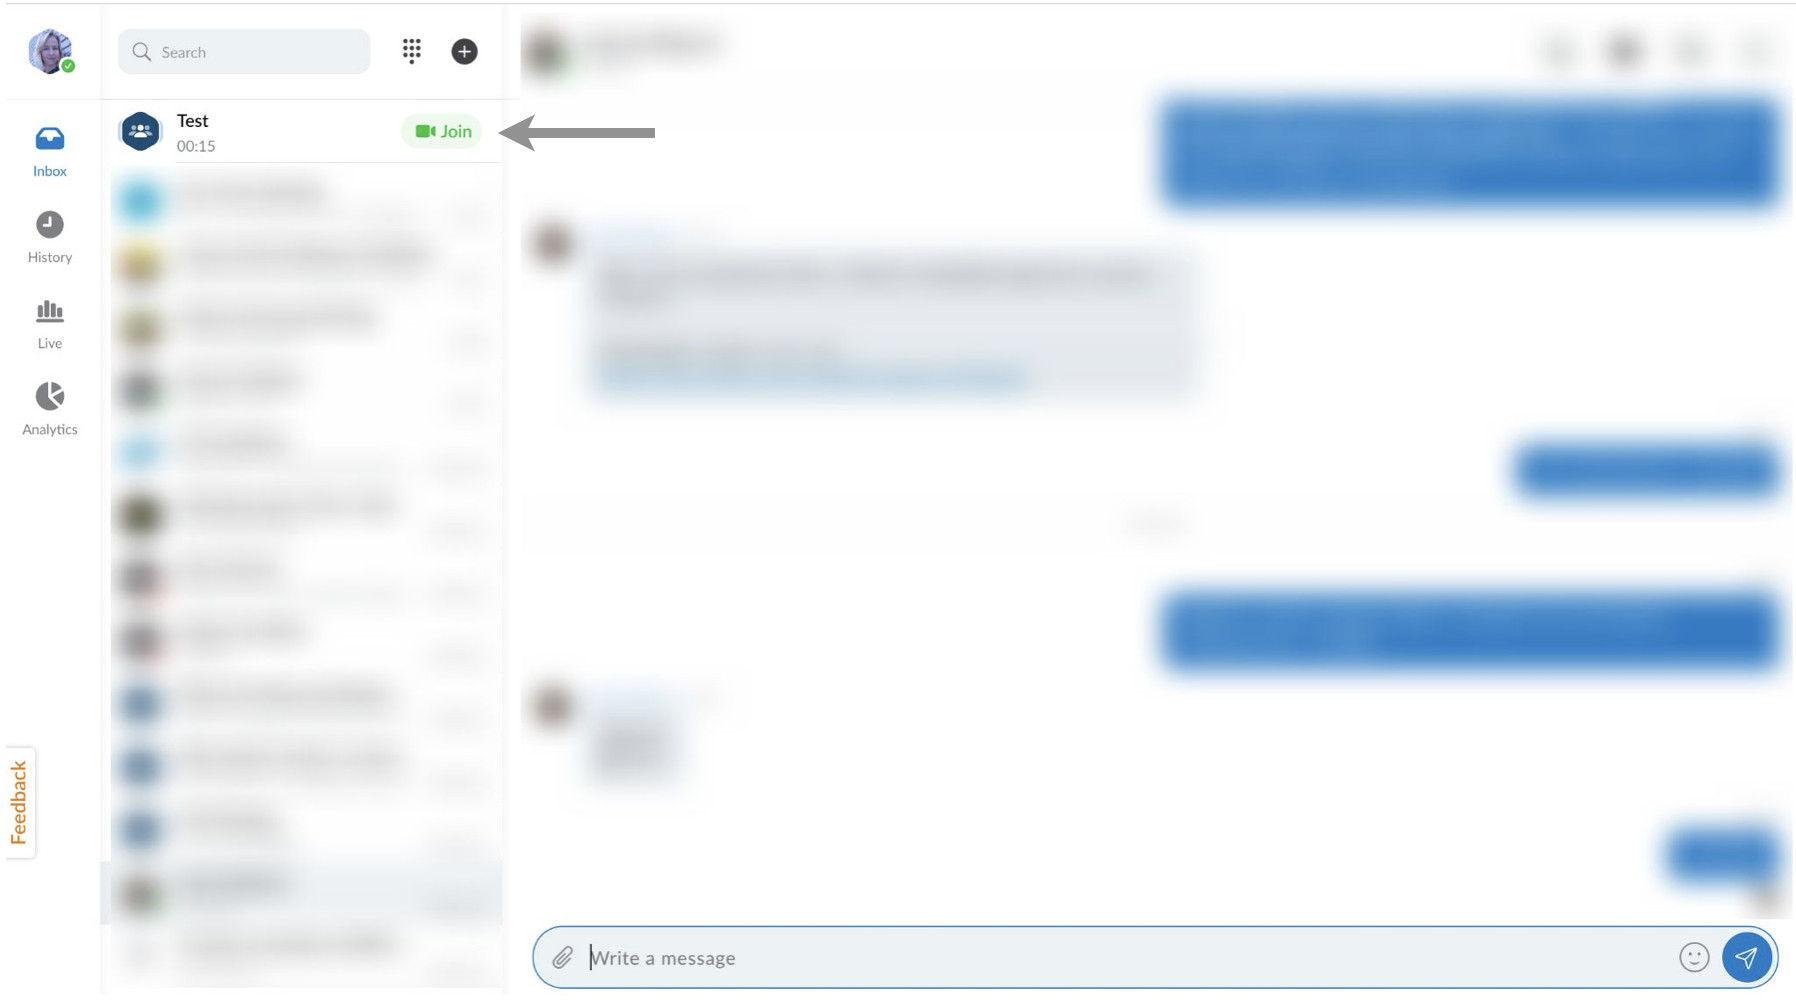
Join a conference
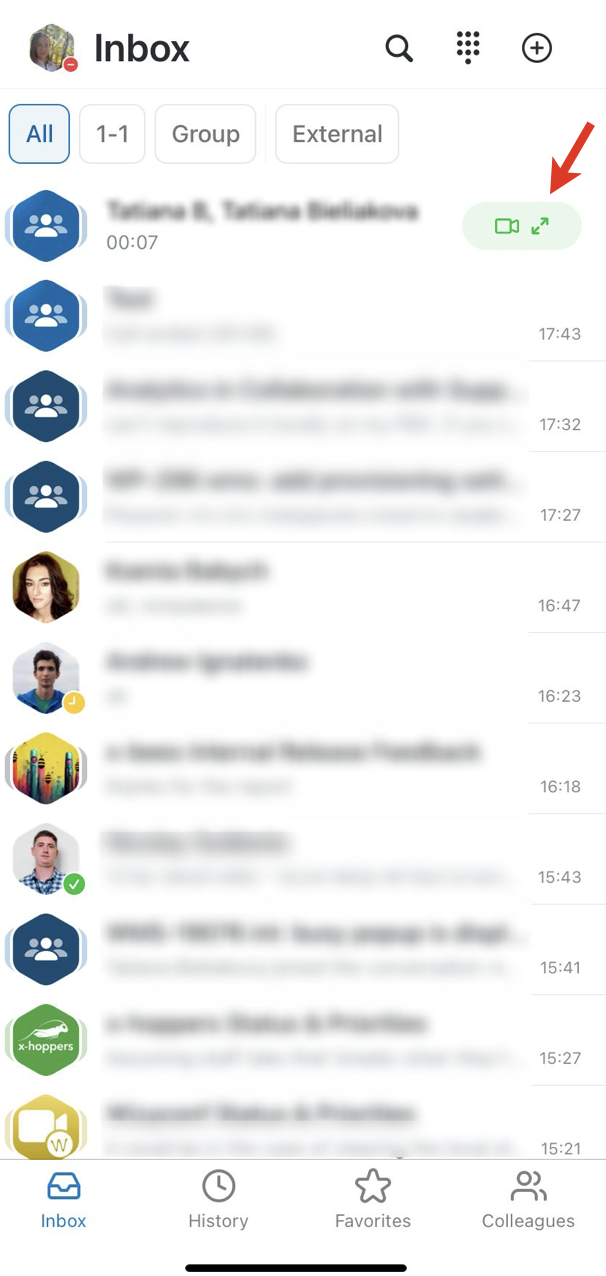
When conference starts, other participants of the conversation can see the green Join button on the Inbox tab (the conversation with the conference automatically jumps to the top of the conversations list):
Also, users hear a sound notification when a conference starts
Notes:
- Notification is played once, for 7 seconds, unless user opens Inbox. Notification is played even to users with DND/ Away presence status.
- Notification is NOT played if:
- user has an active call or conference
- user is on the Inbox tab
- x-bees tab is closed
- If there are several simultaneous calls, the notification is played one time.
- Sound notifications for Kite are currently not supported.
You can find additional information at the news blog.
Starting from WIService v. 3.6.1, it is possible to join/ leave a conference via MonoLED/ DuoLED headset by pressing the Call button. You can also mute/ unmute in the conference via the headset.
Note:
- You can join a conference via MonoLED/ DuoLED headset within 30 seconds after its start in case there is only one active conference.
- If there is an active conference and an incoming call, the call has higher priority.
Manage sound notifications
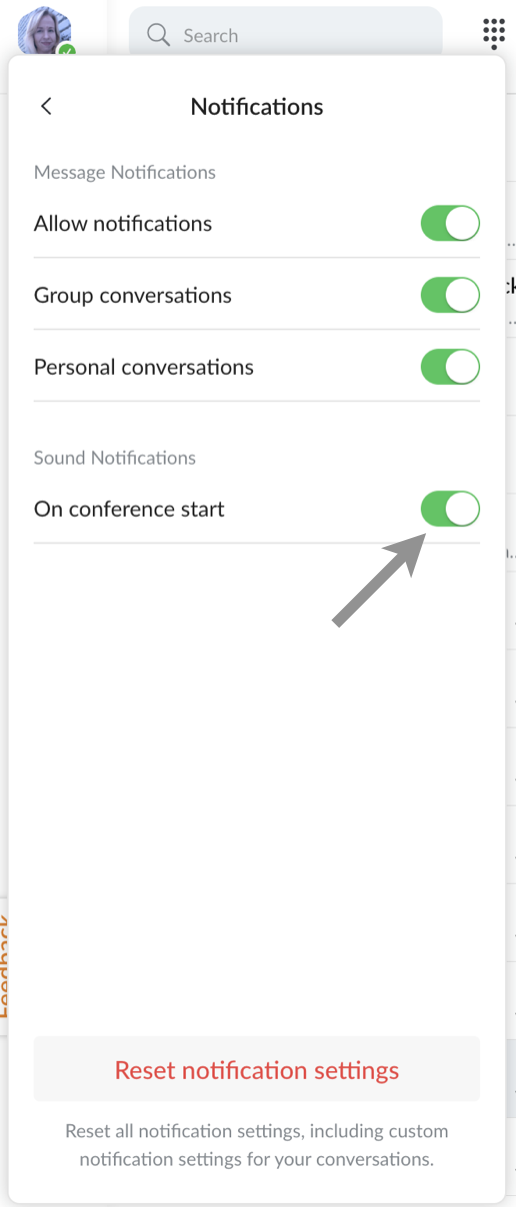
Sound notifications at the conference start are enabled by default. To manage the sound notifications settings:
- Go to Settings -> Notifications
- Proceed to section Sound notifications:
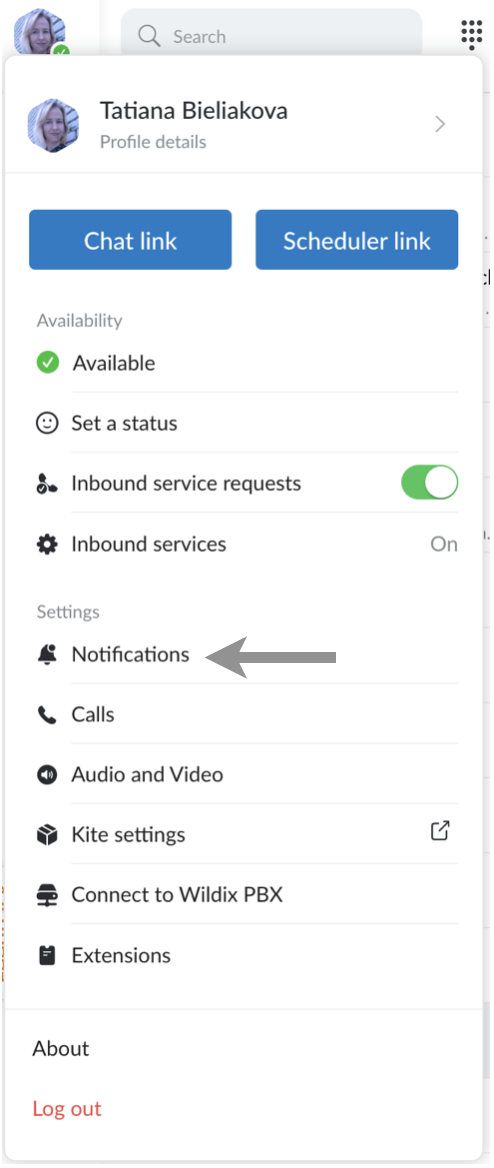
- Use the toggle next to the On conference start option:
Schedule a conference
In case there is Google/ Microsoft calendar integration enabled, you can schedule a conference via the Schedule button in the Info frame: 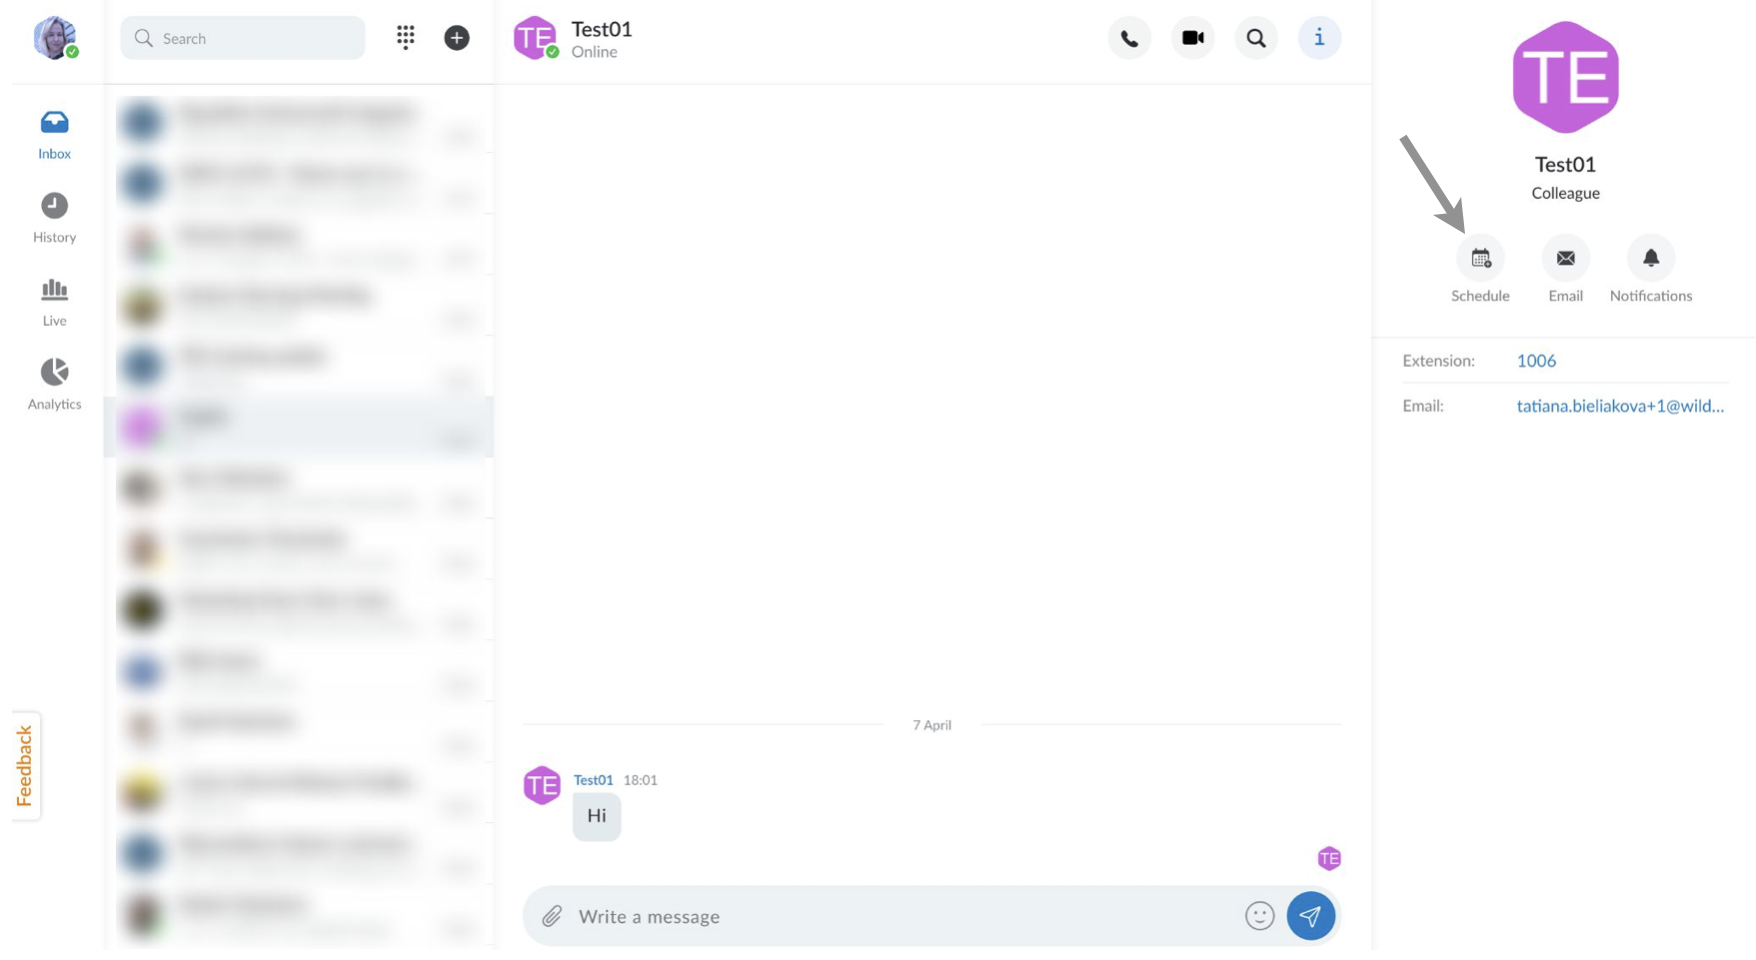
When you click the button, calendar opens enabling you to schedule a conference in the participants' calendars: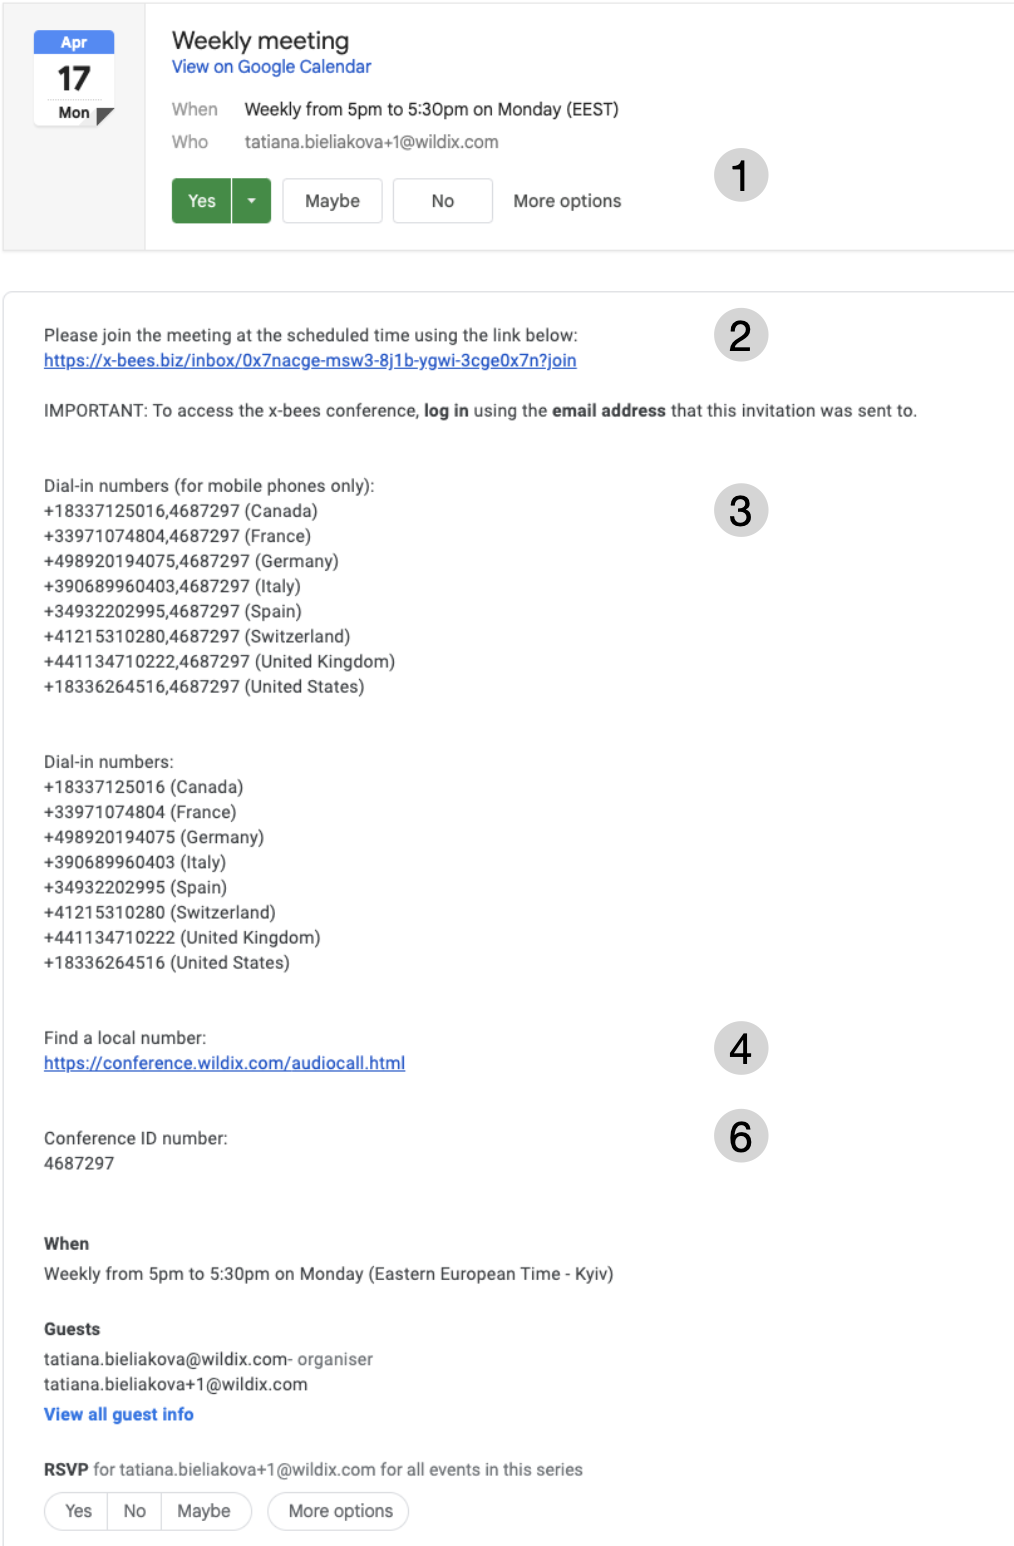
1 - Scheduled event is automatically added to your calendar
Note: According to the new Google settings, you need to turn on specific options in order to guarantee that scheduled events are automatically added to you calendar.
Follow these instructions:
Go to Gmail Settings -> See all settings
Go to General tab and scroll to Smart features and personalization
Turn on Smart features and personalization if you use Gmail email client or Smart features and personalization in other Google products if you use other mail clients, (Outlook, Apple Mail etc) under Gmail account
More information is available here: https://support.google.com/mail/answer/10079371?hl=en&ref_topic=3394219.
- 2 - You can access the conference via the link provided in the email
- 3 - You can also access the conference in the audio-only mode, by using dial-in numbers. This is the option for mobile phones, which allows you to join the conference without manually entering the conference ID (as it is already included in the dial-in number)
- 4 - This option is not restricted to mobile phones. It also lets you access the conference in the audio-only mode by calling the local number for your country. Click Find a local number to view the full list
5 - This is the ID number of the conference
PBX user
When a PBX user is invited to a conference, they receive an invitation via email with a link to join the conference via web and a phone number, allowing them to join the conference in audio-only mode from their Wildix device.
External user
All invited users receive an invitation via email with a link to join the conference via web and a local phone number that they can dial to join the conference in audio-only mode.
Access from Wizyconf station
To access x-bees conference from Wizyconf station, select Wizyconf at the top -> enter the Conference ID (available in x-bees conference -> More actions -> Dial-in & Wizyconf Station).
More information about Wizyconf station in Wizyconf Station Quick Start Guide.
Access in audio-only mode
PBX users can access the conference in the audio-only mode by calling the number 98XXXXXXX, where 98 is the Feature code Conference (by default) and XXXXXXX is the conference ID number (Conference ID is provided in the email invitation).
Note: you can set an alternative code/ prefix instead of Feature code "Conference" 98. After it is changed, it is also displayed in email / chat invitations.
You can view dial-in numbers in x-bees conference -> More actions -> Dial-in & Wizyconf Station:

External users can access the conference in the audio-only mode by calling the local phone number provided in the email invitation: use the option Dial-in number or Dial-in number (for mobile users only).
To access the conference:
Call the provided phone number
External users are requested to enter the conference ID number and say their name (Conference ID number is provided in the invitation email), after which they access the conference (other participants present in the conference are notified when audio-only users are connected and disconnected).
Note: Mobile phone users can choose the option Dial-in number (for mobile users only) for joining the conference without entering conference ID (conference ID is already included in the dial-in number).
Current limitation: no visual indication for muted users who access a conference in audio-only mode.
Tutorials and updates
The basics tutorial
The basics tutorial is a great way for new users to explore x-bees video conference functionality in a convenient and interactive way. When reaching the tutorial for the first time, a yellow dot appears next to More actions in the bottom menu and you can see Tutorials and updates, highlighted in yellow.
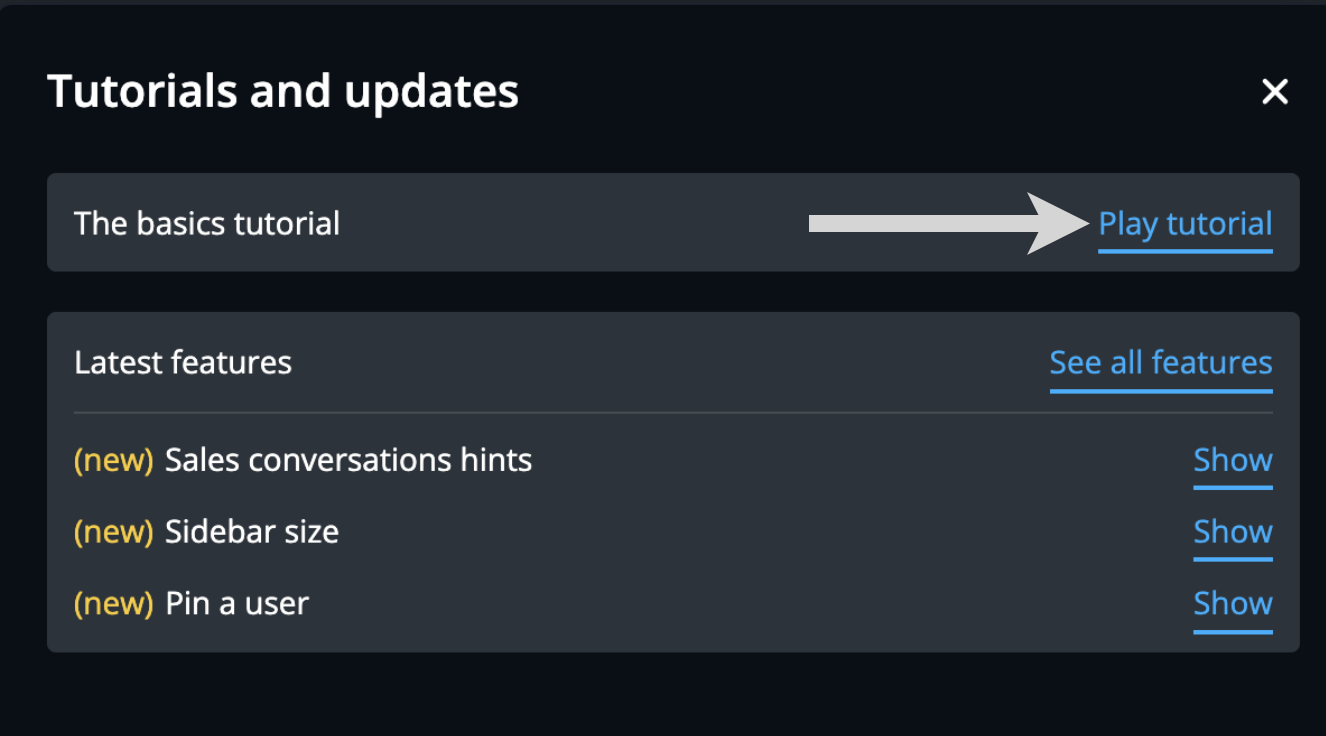
- Click on the More actions (1) button (three dots) and proceed to Tutorials and updates (2):

- Next to The basics tutorial, press Play tutorial:
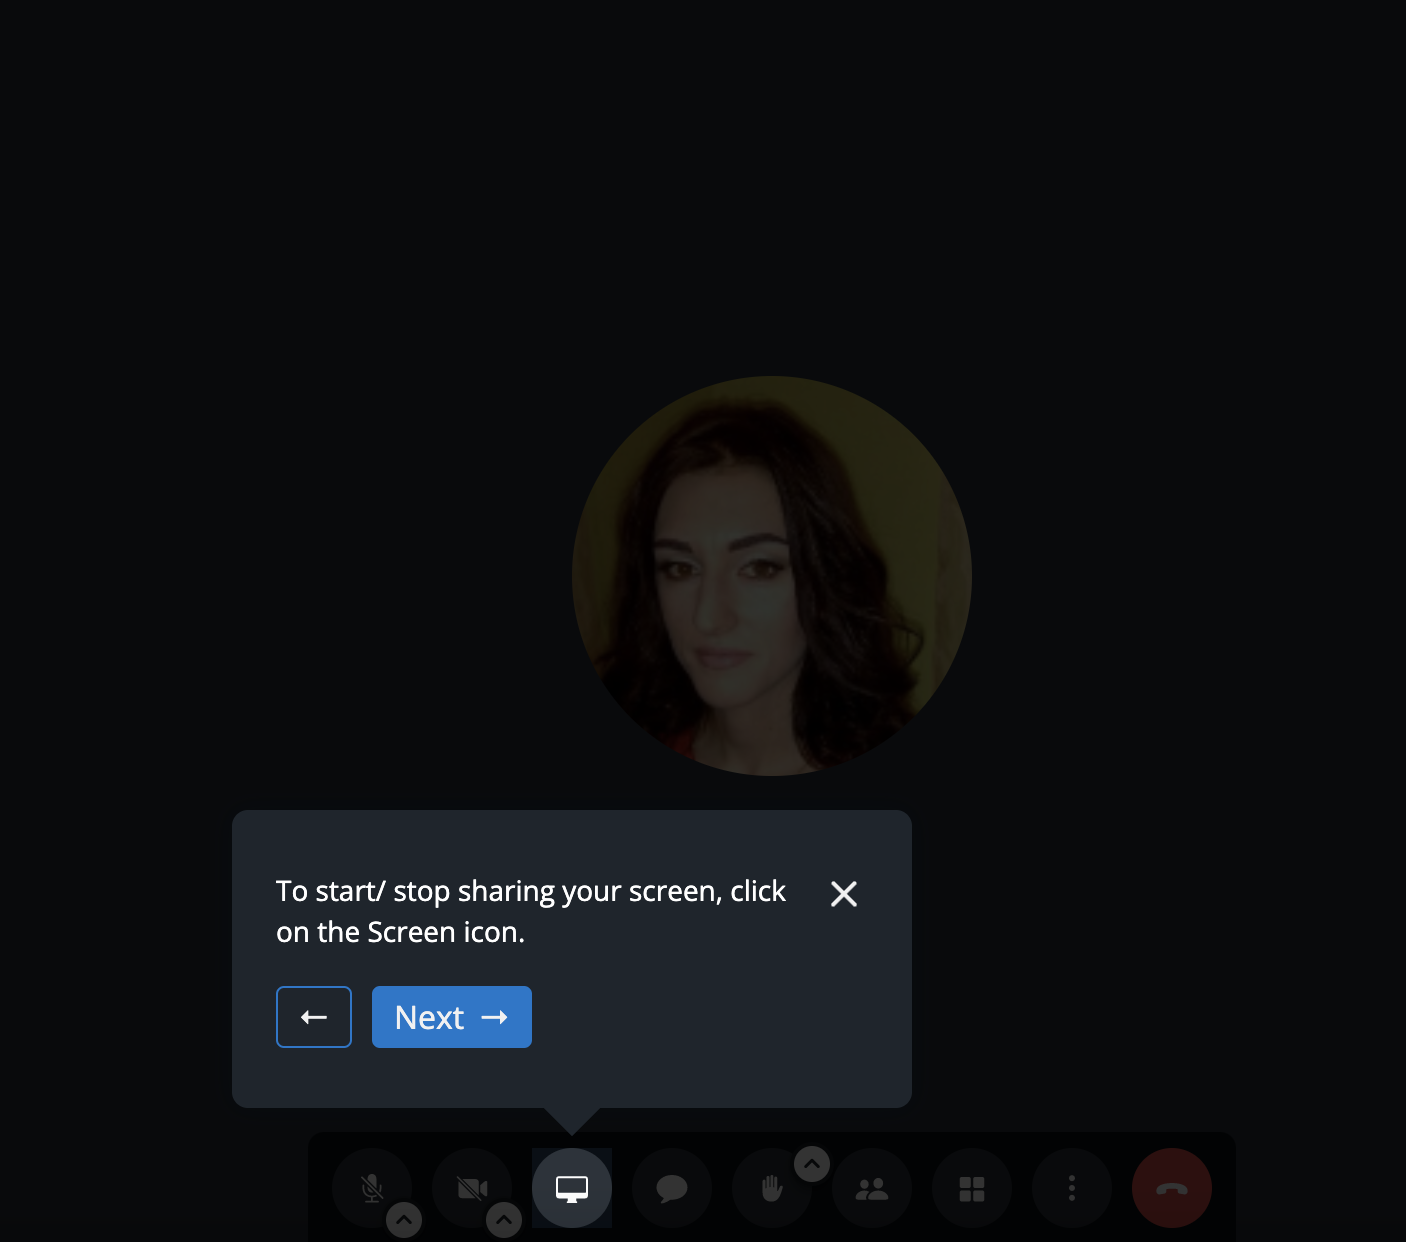
- The tutorial opens up and guides you through the main features of the conference. Click Next to proceed to another feature or back arrow to return to the previous one:
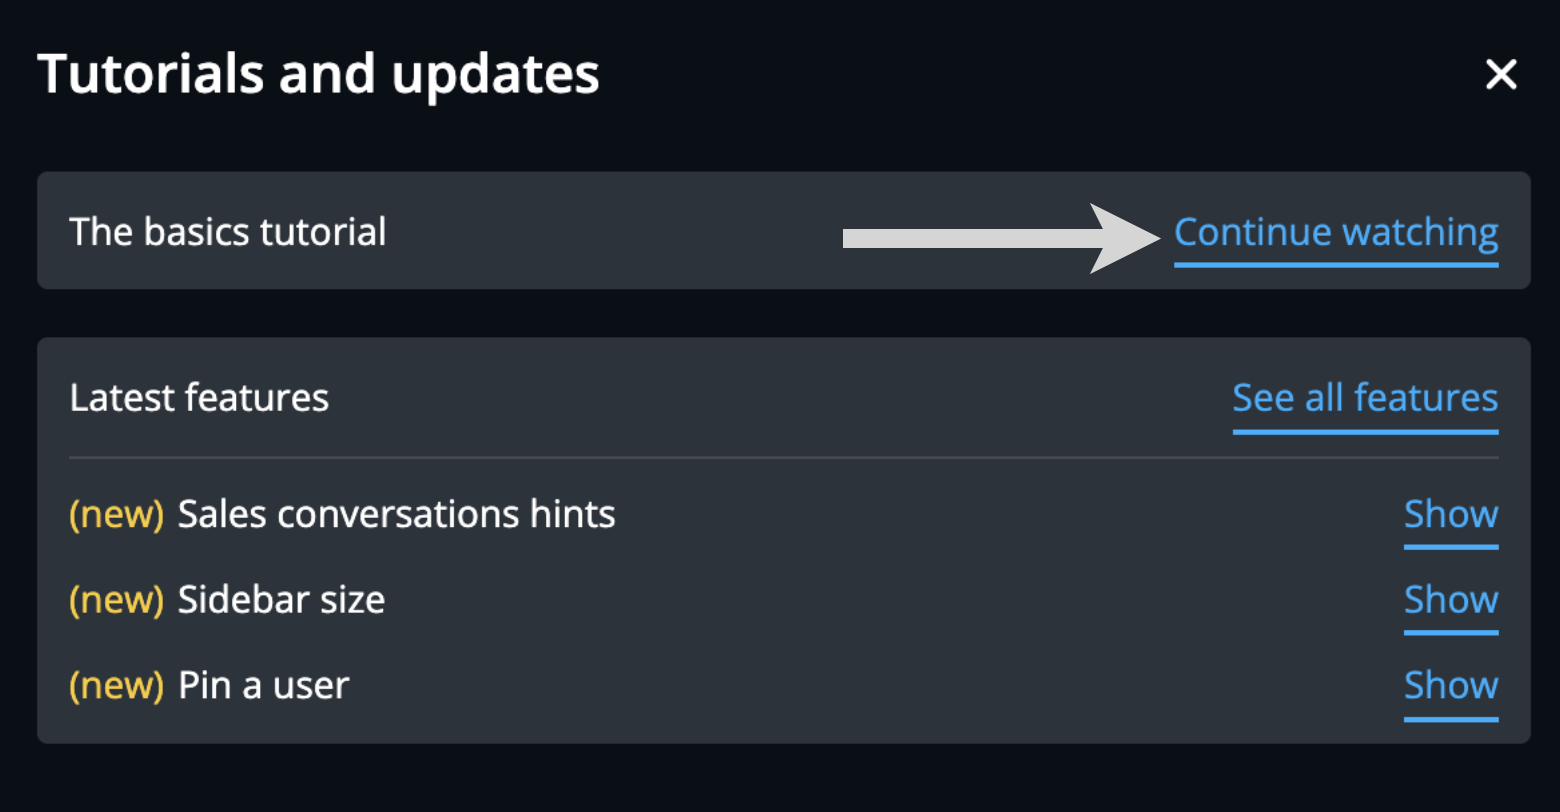
If you close the tutorial, you can continue from the moment you stopped. Go to More actions -> Tutorials and updates -> click Continue watching:
New features
When there are new features available, a yellow dot appears next to More actions (1) and the Tutorials and updates (2) in the More actions list is highlighted in yellow:
Note: The yellow dot remains until you click Tutorials and updates and view the new features.
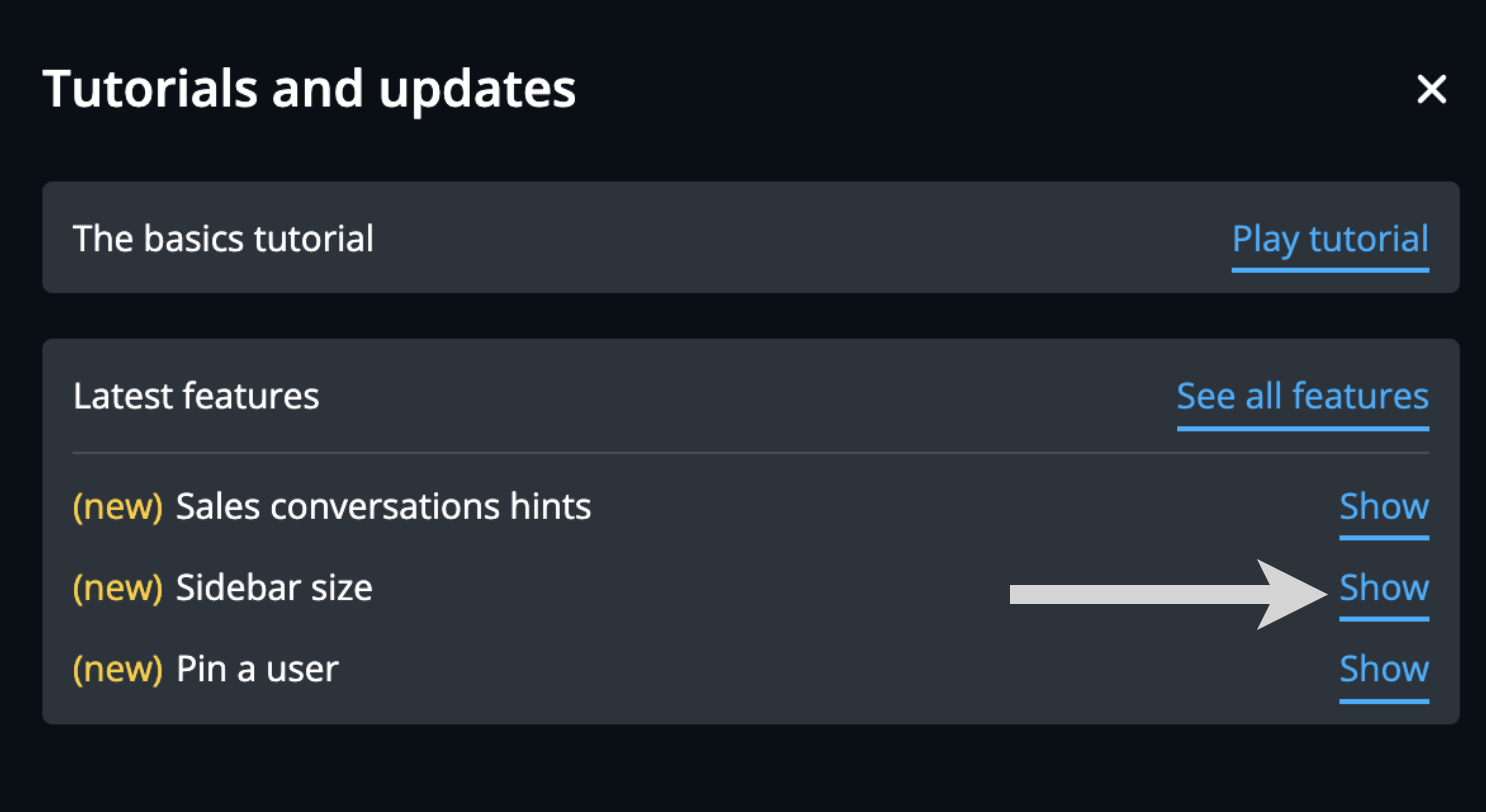
When you click on Tutorials and updates the following pop-up screen appears, which includes The basics tutorial and the list of latest features:
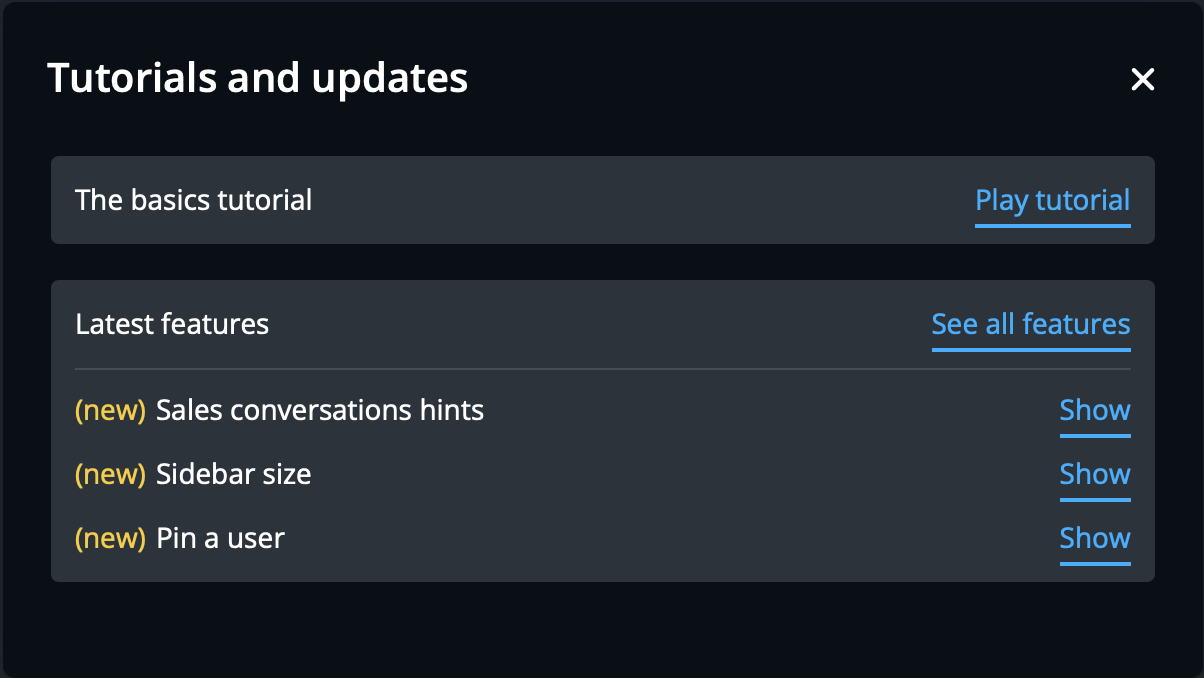
When you click Show, a pop-up screen appears demonstrating how the new feature works:
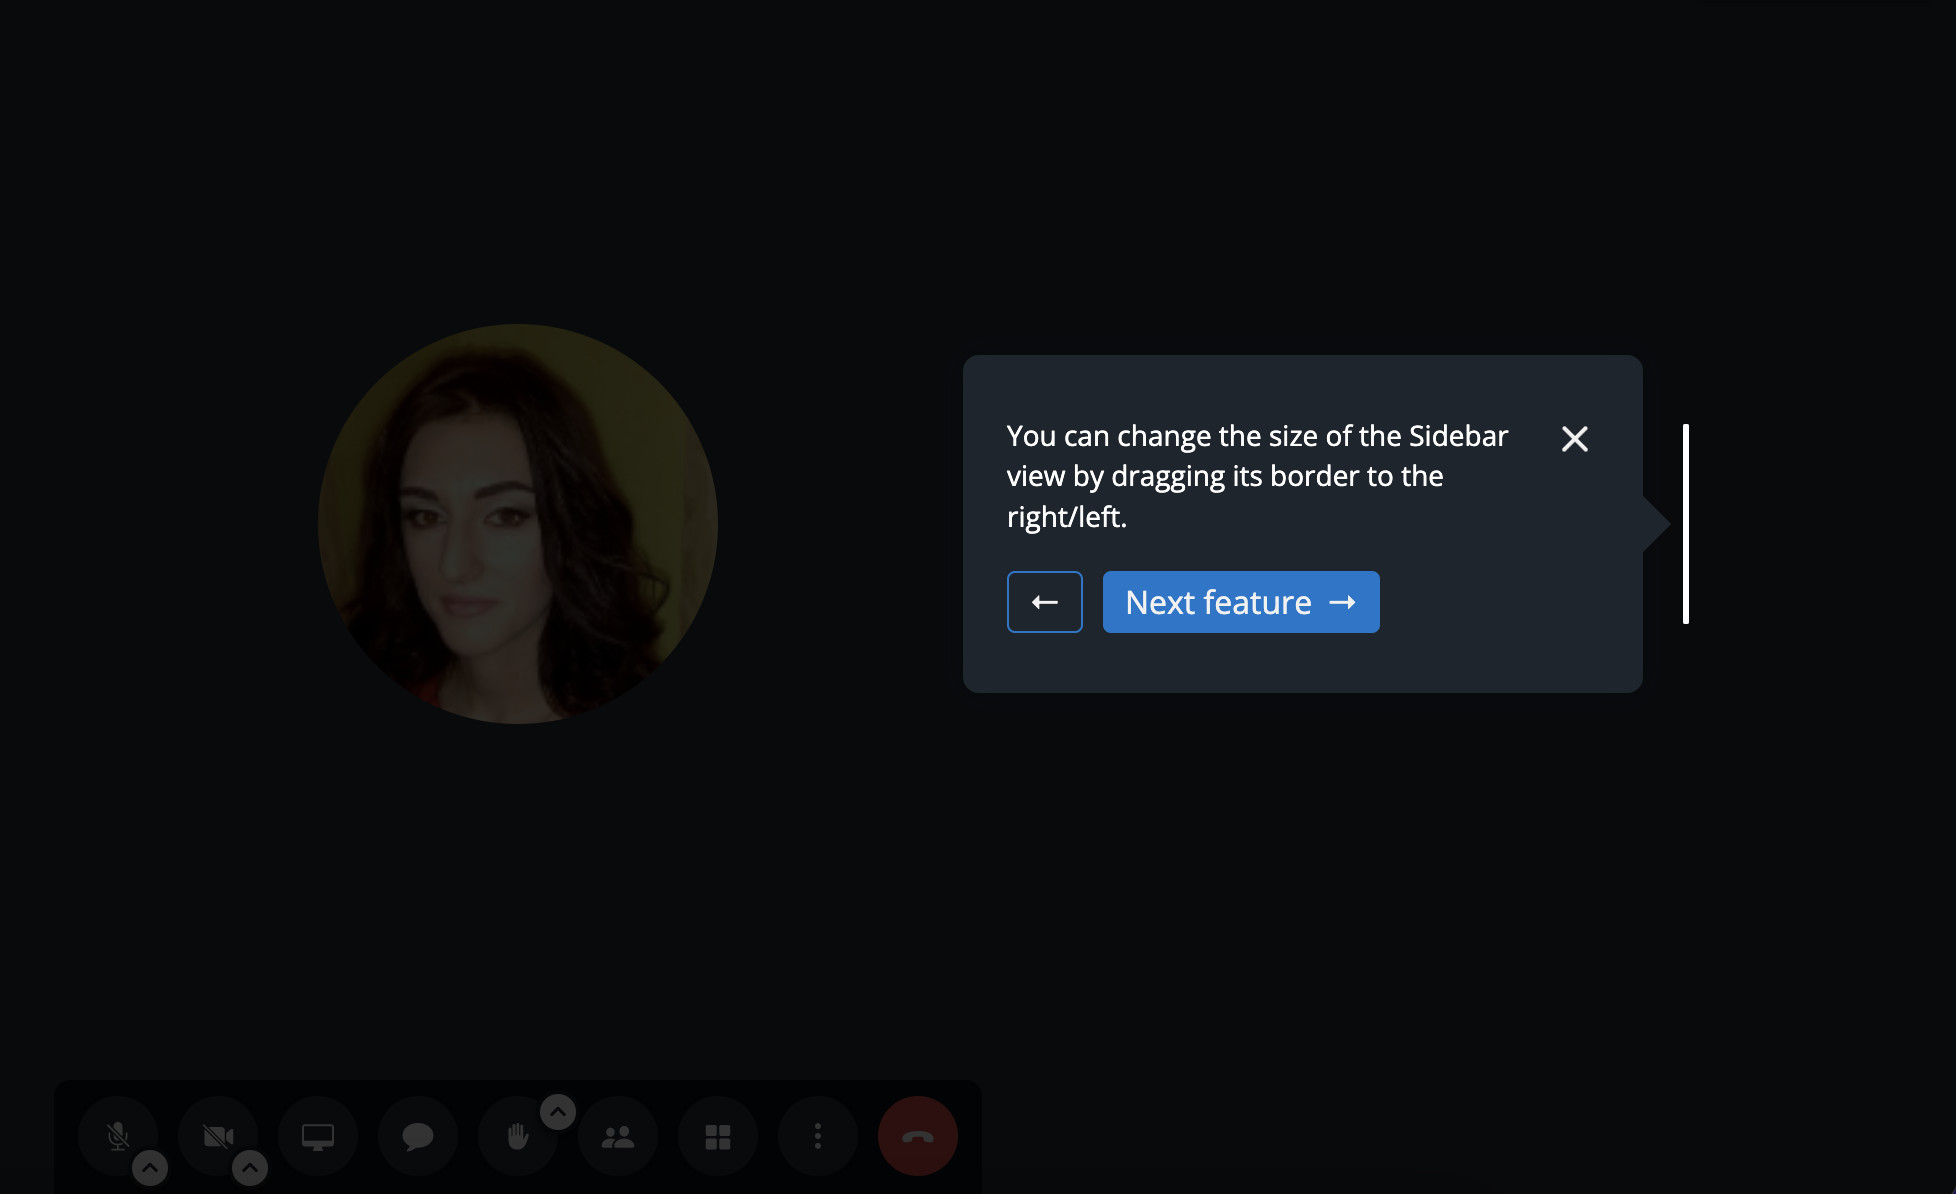
Click Next feature to move further or X to close the pop-up screen.
Conference controls
Users start with mic/ cam off
This option is reserved for PBX users only.
By default all users access the conference with their microphones enabled and cameras disabled.
Note: In case you change mic or camera settings, they are preserved upon the next time you enter a conference.
Example: If you enable the camera in the current conference, it remains enabled in all future meetings you participate in.
The option to decide whether users should access the conference with their webcams enabled/ microphones disabled is reserved to the conference moderator:
- Click the More actions (three dots) button
- Click Settings
Click on Moderator tab:
- Everyone starts with mic off (cam on): users join the conference with their webcams enabled and microphones disabled
- Everyone starts with cam off (mic on): users join the conference with their microphones enabled and webcams disabled
- Everyone follows me: users see on the screen what the moderator shows (tiles view/ sidebar view with selected user)
- Mute reaction sounds for everyone: users do not hear reaction sounds inside the conference
- Tick off the the options and click on OK to apply

Tick off both Everyone starts with mic off and Everyone starts with cam off if you would like users to access the conference with both their webcams and microphones disabled.
Microphone, Speakers and Camera settings
- 1 - Click to Mute/ Unmute your microphone or click the small Arrow up icon to access your microphone and speakers settings:
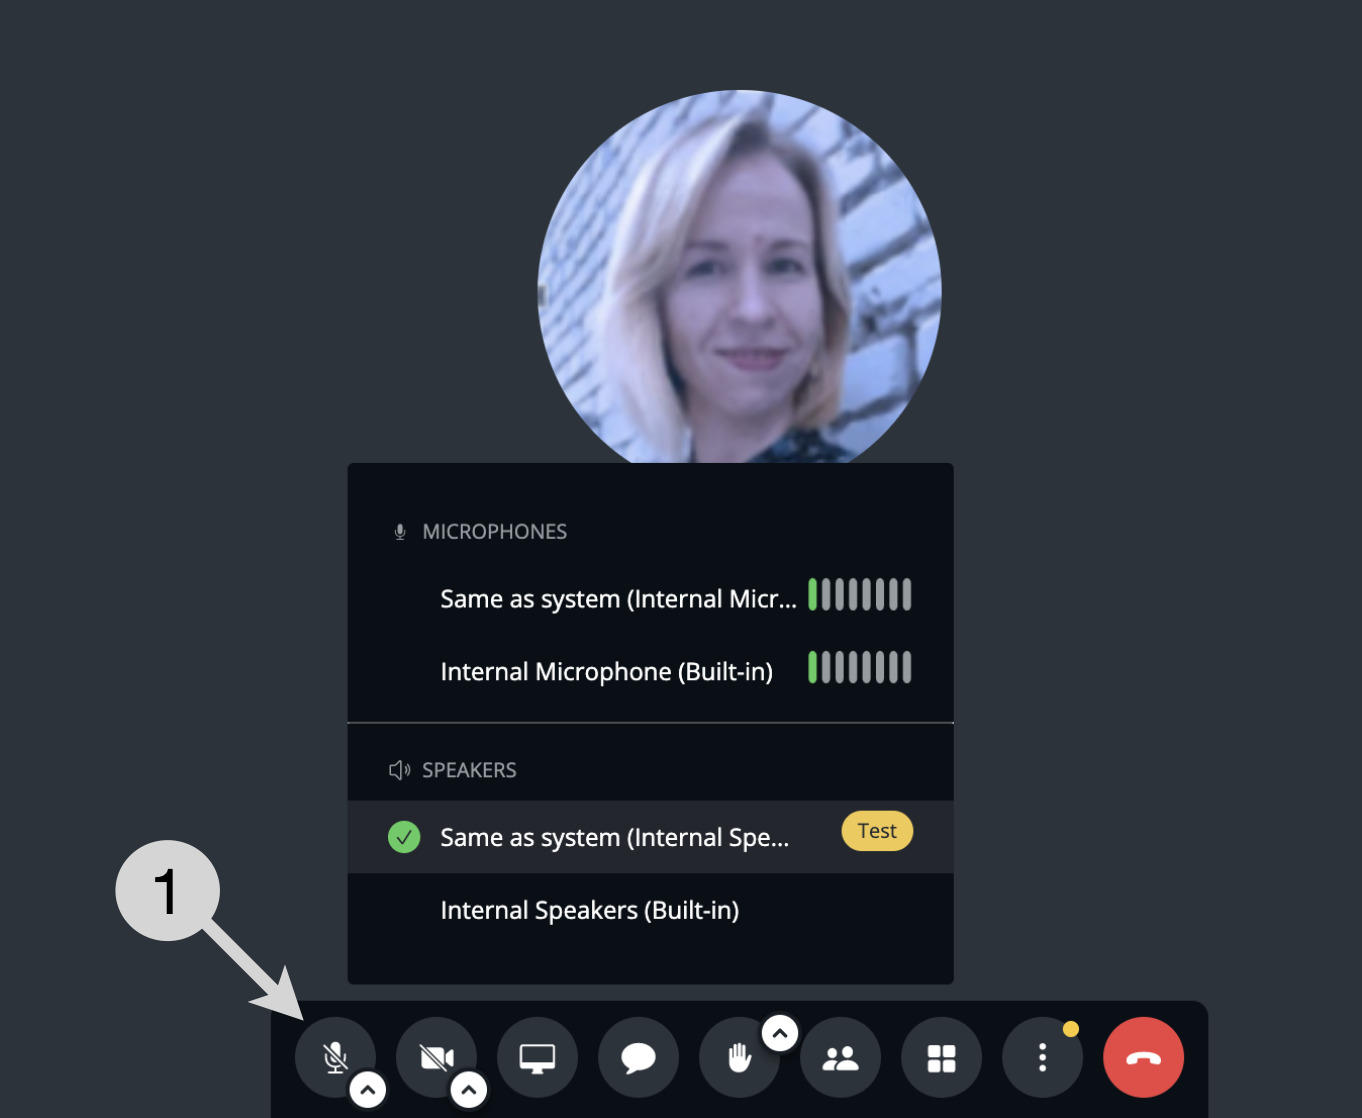
- 2 - Access Microphone/ Speakers/ Camera settings
- Click three dots (More actions) in the lower central side of the screen
Click Settings: on the settings screen, you can navigate between the necessary tabs (Audio, Video, Virtual backgrounds)
On the Audio tab you can choose your devices as well as play a test sound and enable noise suppression

On the Video tab you can select camera, whether you want to mirror your video, and choose desktop sharing frame rate:

- On the Virtual backgrounds tab, you can select a virtual background from the list of available ones or add your own background:

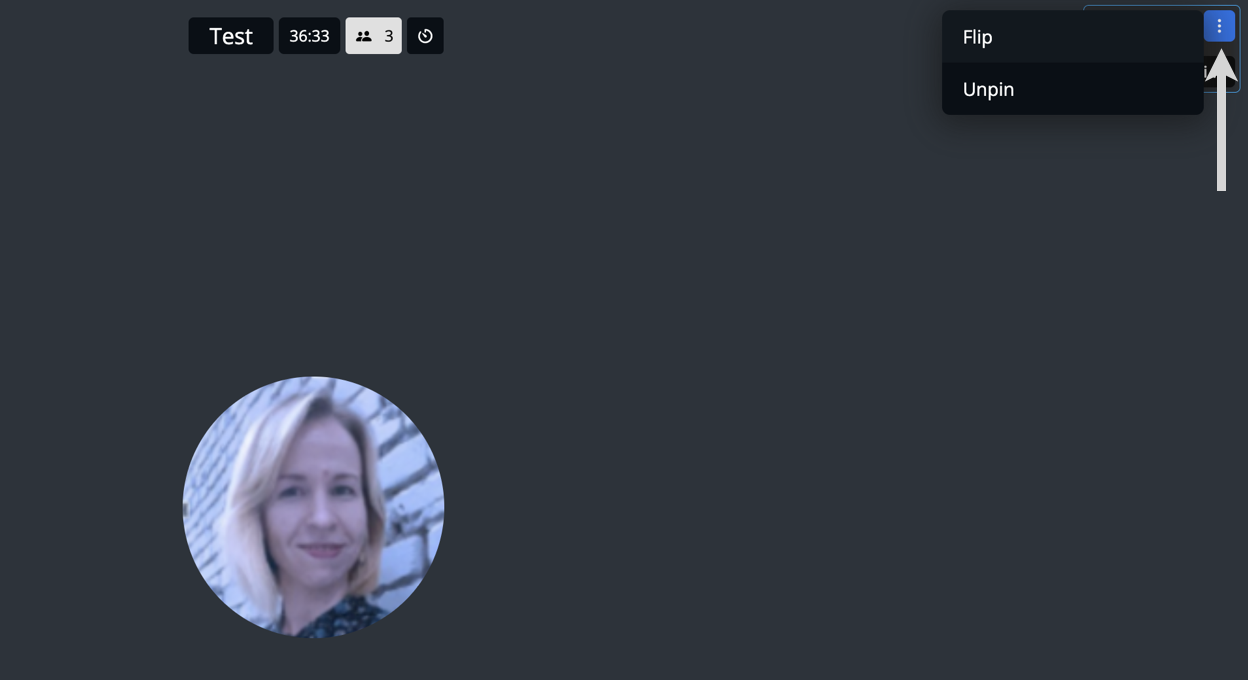
You can locally flip your video or hide your video preview, for other conference participants your video remains regular. To achieve this, hover the mouse cursor over three dots in the upper right-hand side of your video preview (both Sidebar and Tiles views) and select Flip or Unpin/ Pin to stage (you can manage this option in Settings -> More -> Hide self view):
Set a background picture
Additionally, you can set a virtual background picture:
- Click three dots (More actions) in the lower central side of the screen. Alternatively, you can click Select background
Proceed to the Virtual backgrounds tab
- Select a picture from the list or upload your own background and click OK
To upload your own backgrounds, click Add background:

Push-to-talk
In case you prefer to keep your microphone muted and unmute only when you speak, you can use Push-to-talk option:
- (When you are muted) Make sure your mouse cursor is on browser tab in which the web conference is running
- Press Space on your keyboard
- Your microphone is unmuted and you can now speak
- Release the Space button as soon as you finish speaking to mute your microphone again
Otherwise you can use M shortcut to Mute/ Unmute your microphone:
- Press M to toggle between mute/ unmute
Read more in the chapter Keyboard shortcuts.
Video Preview
It is possible enable Video preview screen, which is displayed to a user before joining the conference and which allows to configure mic, video settings, select background, access Dial-in numbers.
To enable it:
- Click three dots (More actions) in the lower central side of the screen
Click Settings
- Navigate to Advanced tab
- Activate the option Video preview and click OK

Note:
- For guest users, Video preview is enabled by default.
- In some cases, Video preview settings may switch to default, e.g. if browser's local storage was cleared or after user logged out of x-bees and logged back in.
When enabled, each time before joining a conference, you will see the following screen. Configure video, mic settings and press Join meeting:

Noise suppression
The feature reduces background noise and echo. Ideal for cases when several participants are in the same meeting room.
- Click three dots (More actions) -> Settings
- Proceed to the Advanced tab and scroll down to Noise suppression, where you can enable/ disable the feature

Note:
- Noise suppression is disabled by default.
- Noise suppression settings are saved separately for different audio devices.
Example: If you connect a Bluetooth headset and disable noise suppression, this preference is stored specifically for that headset. The next time you connect that headset, noise suppression remains disabled. If you switch to a different audio device, noise suppression is enabled by default until you manually disable it.
You can also access manage Noise suppression Settings by clicking on the Noise suppression icon at the top:
![]()
Video quality
You can adjust the quality for your video streaming.
1. Click on the icon in the upper central side of the screen:
![]()
2. Choose the preferred level of performance settings:

Performance settings chosen for the current conference are saved and automatically applied for future conferences.
Get Conference ID and Dial-in numbers
You can access Dial-in and Conference ID for Wizyconf Station by clicking More actions -> Dial-in & Wizyconf Station:
Alternatively, you can click the Participants icon in the lower central side of the screen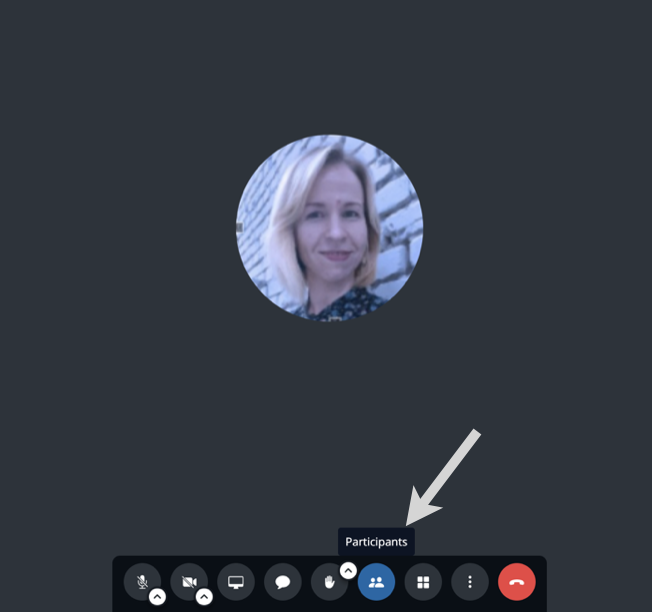
On the panel that opens at the right side of the screen, click Conference ID and Dial-in numbers:
To view more numbers, click More numbers at the bottom of the screen:
Toggle between Tiles view and Sidebar view
Tiles view: 
Sidebar view: 
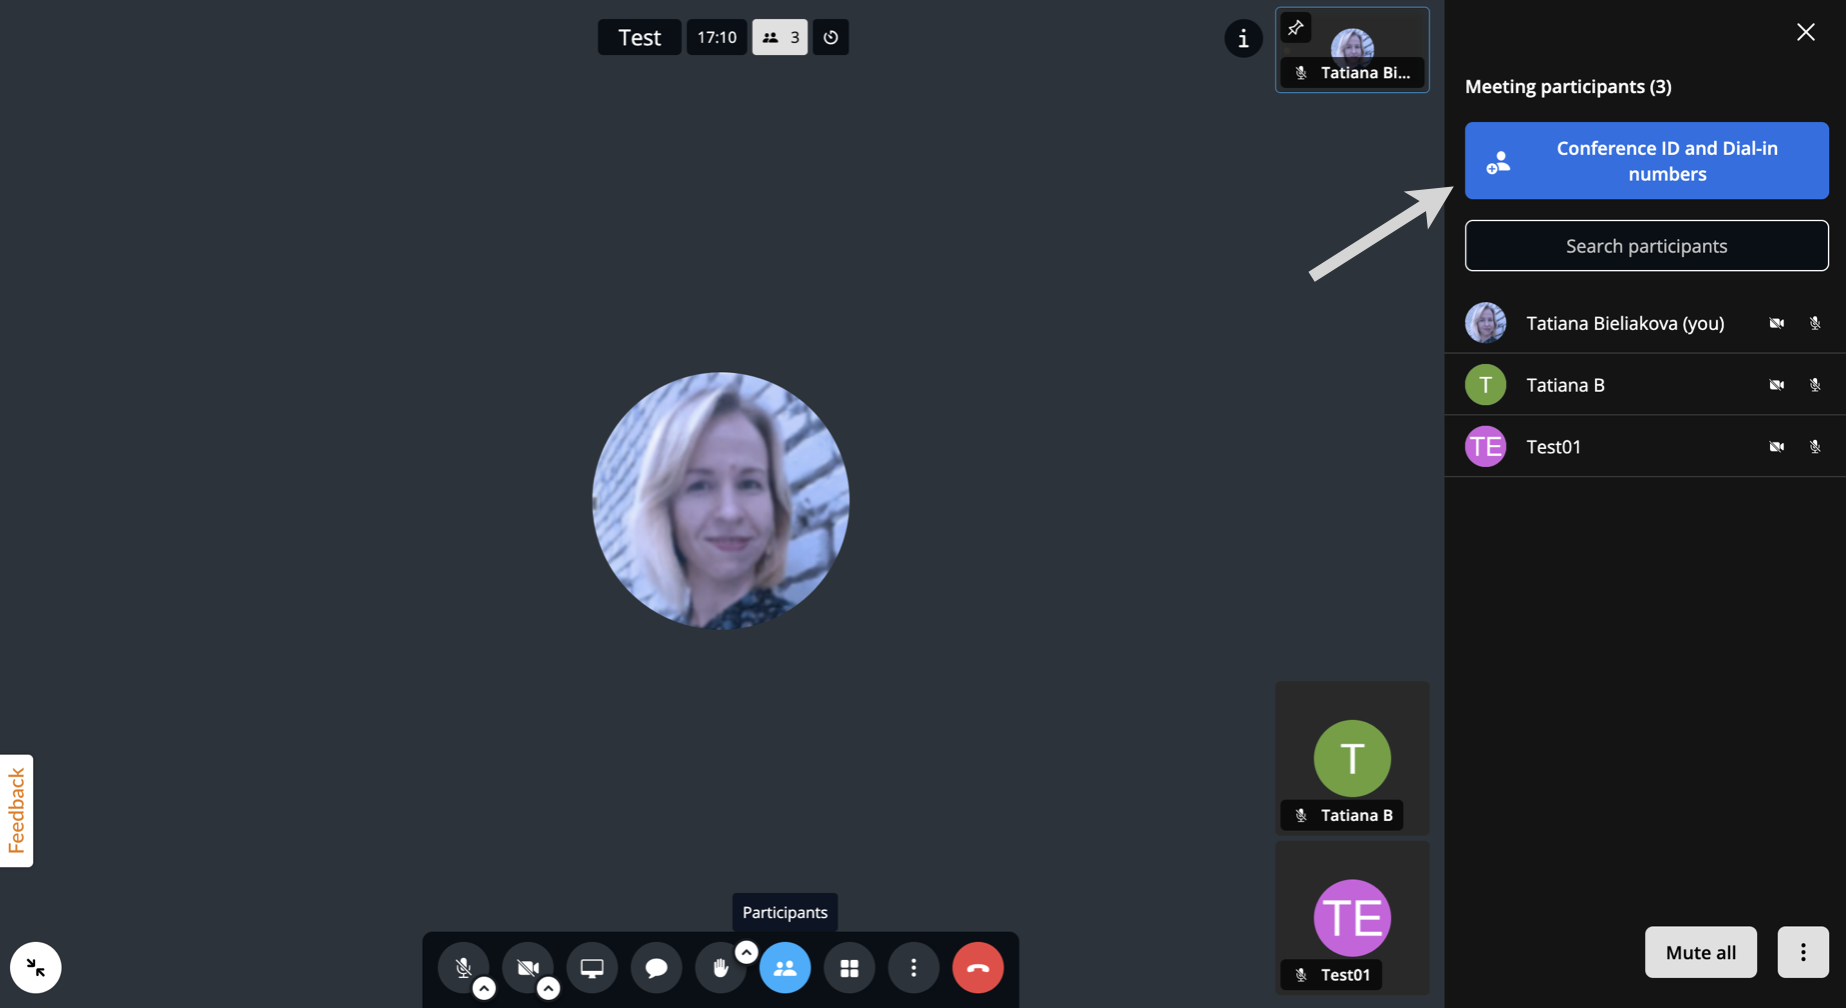
- Click Toggle tile view (Tiles icon) in the lower central side of the screen to switch between Tiles view and Sidebar view:
If required, you can change size of Sidebar view by dragging its border to the right/left: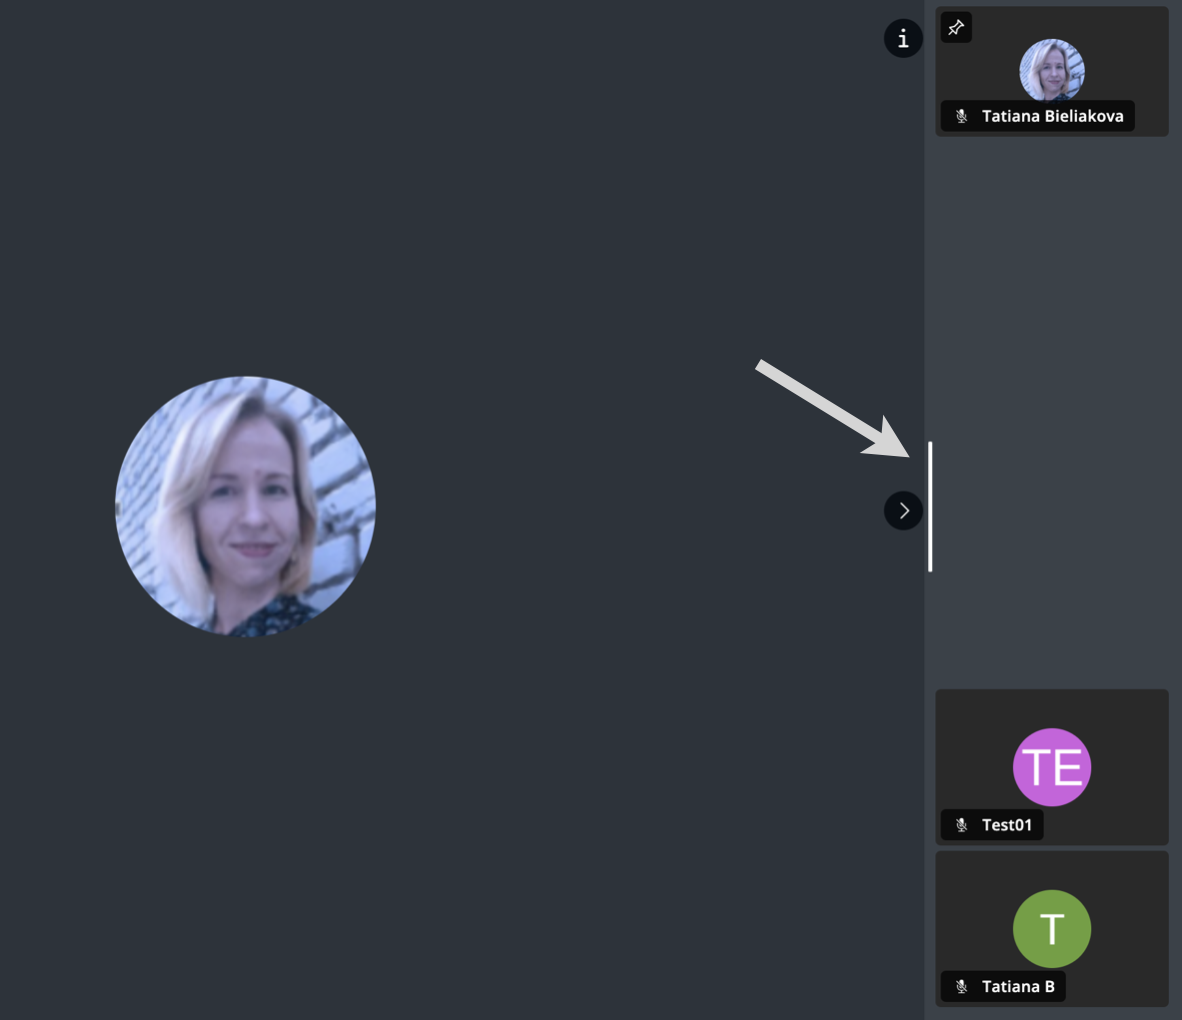
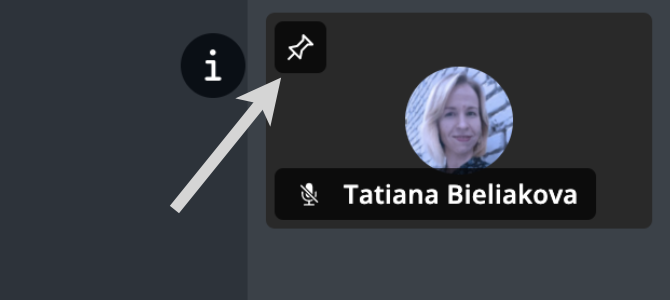
Pin a user
To have a particular participant visible at all times, regardless of who is speaking, you can pin a user. For this, just click on the relevant user during the conference. Pinned user is displayed with the following icon:
To unpin a user, simply click on them a second time.
To choose how many participants can be pinned on the main screen:
- Go to More actions -> Settings
- Proceed to the General tab and set the max number of participants to be pinned:

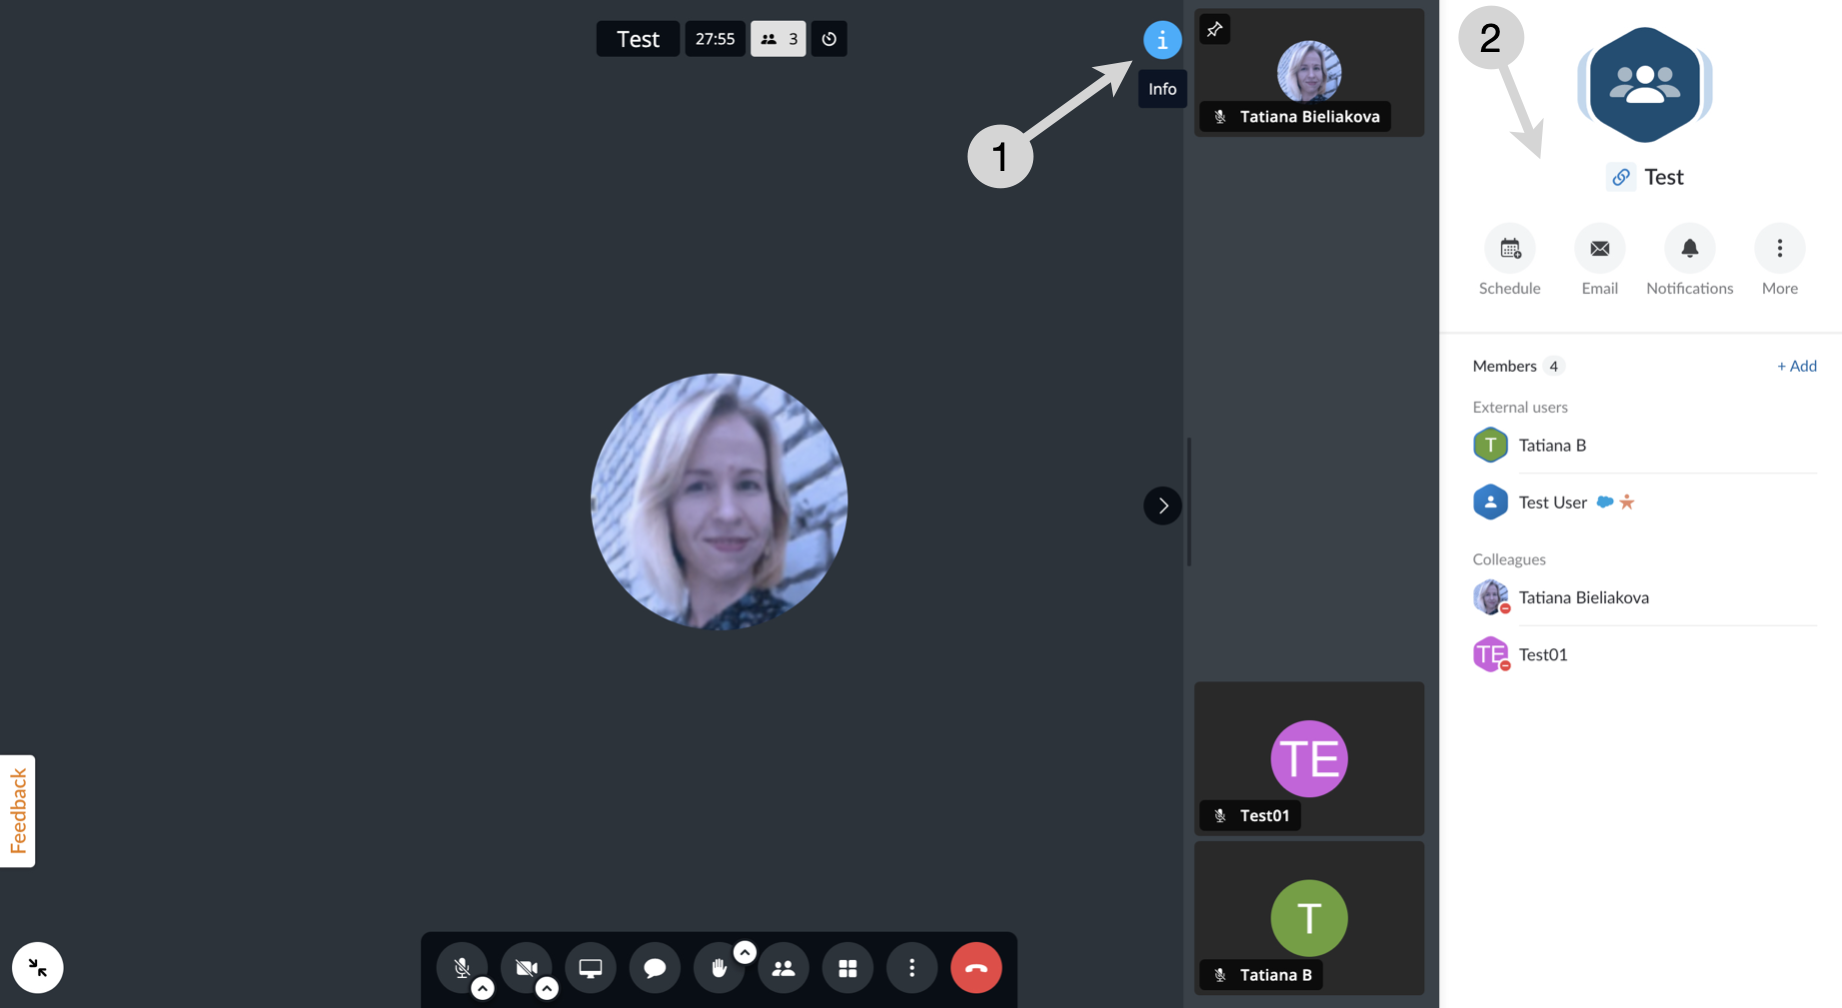
View Info panel
Click on the info icon in the upper right side of the screen (1) to open Info frame (2):
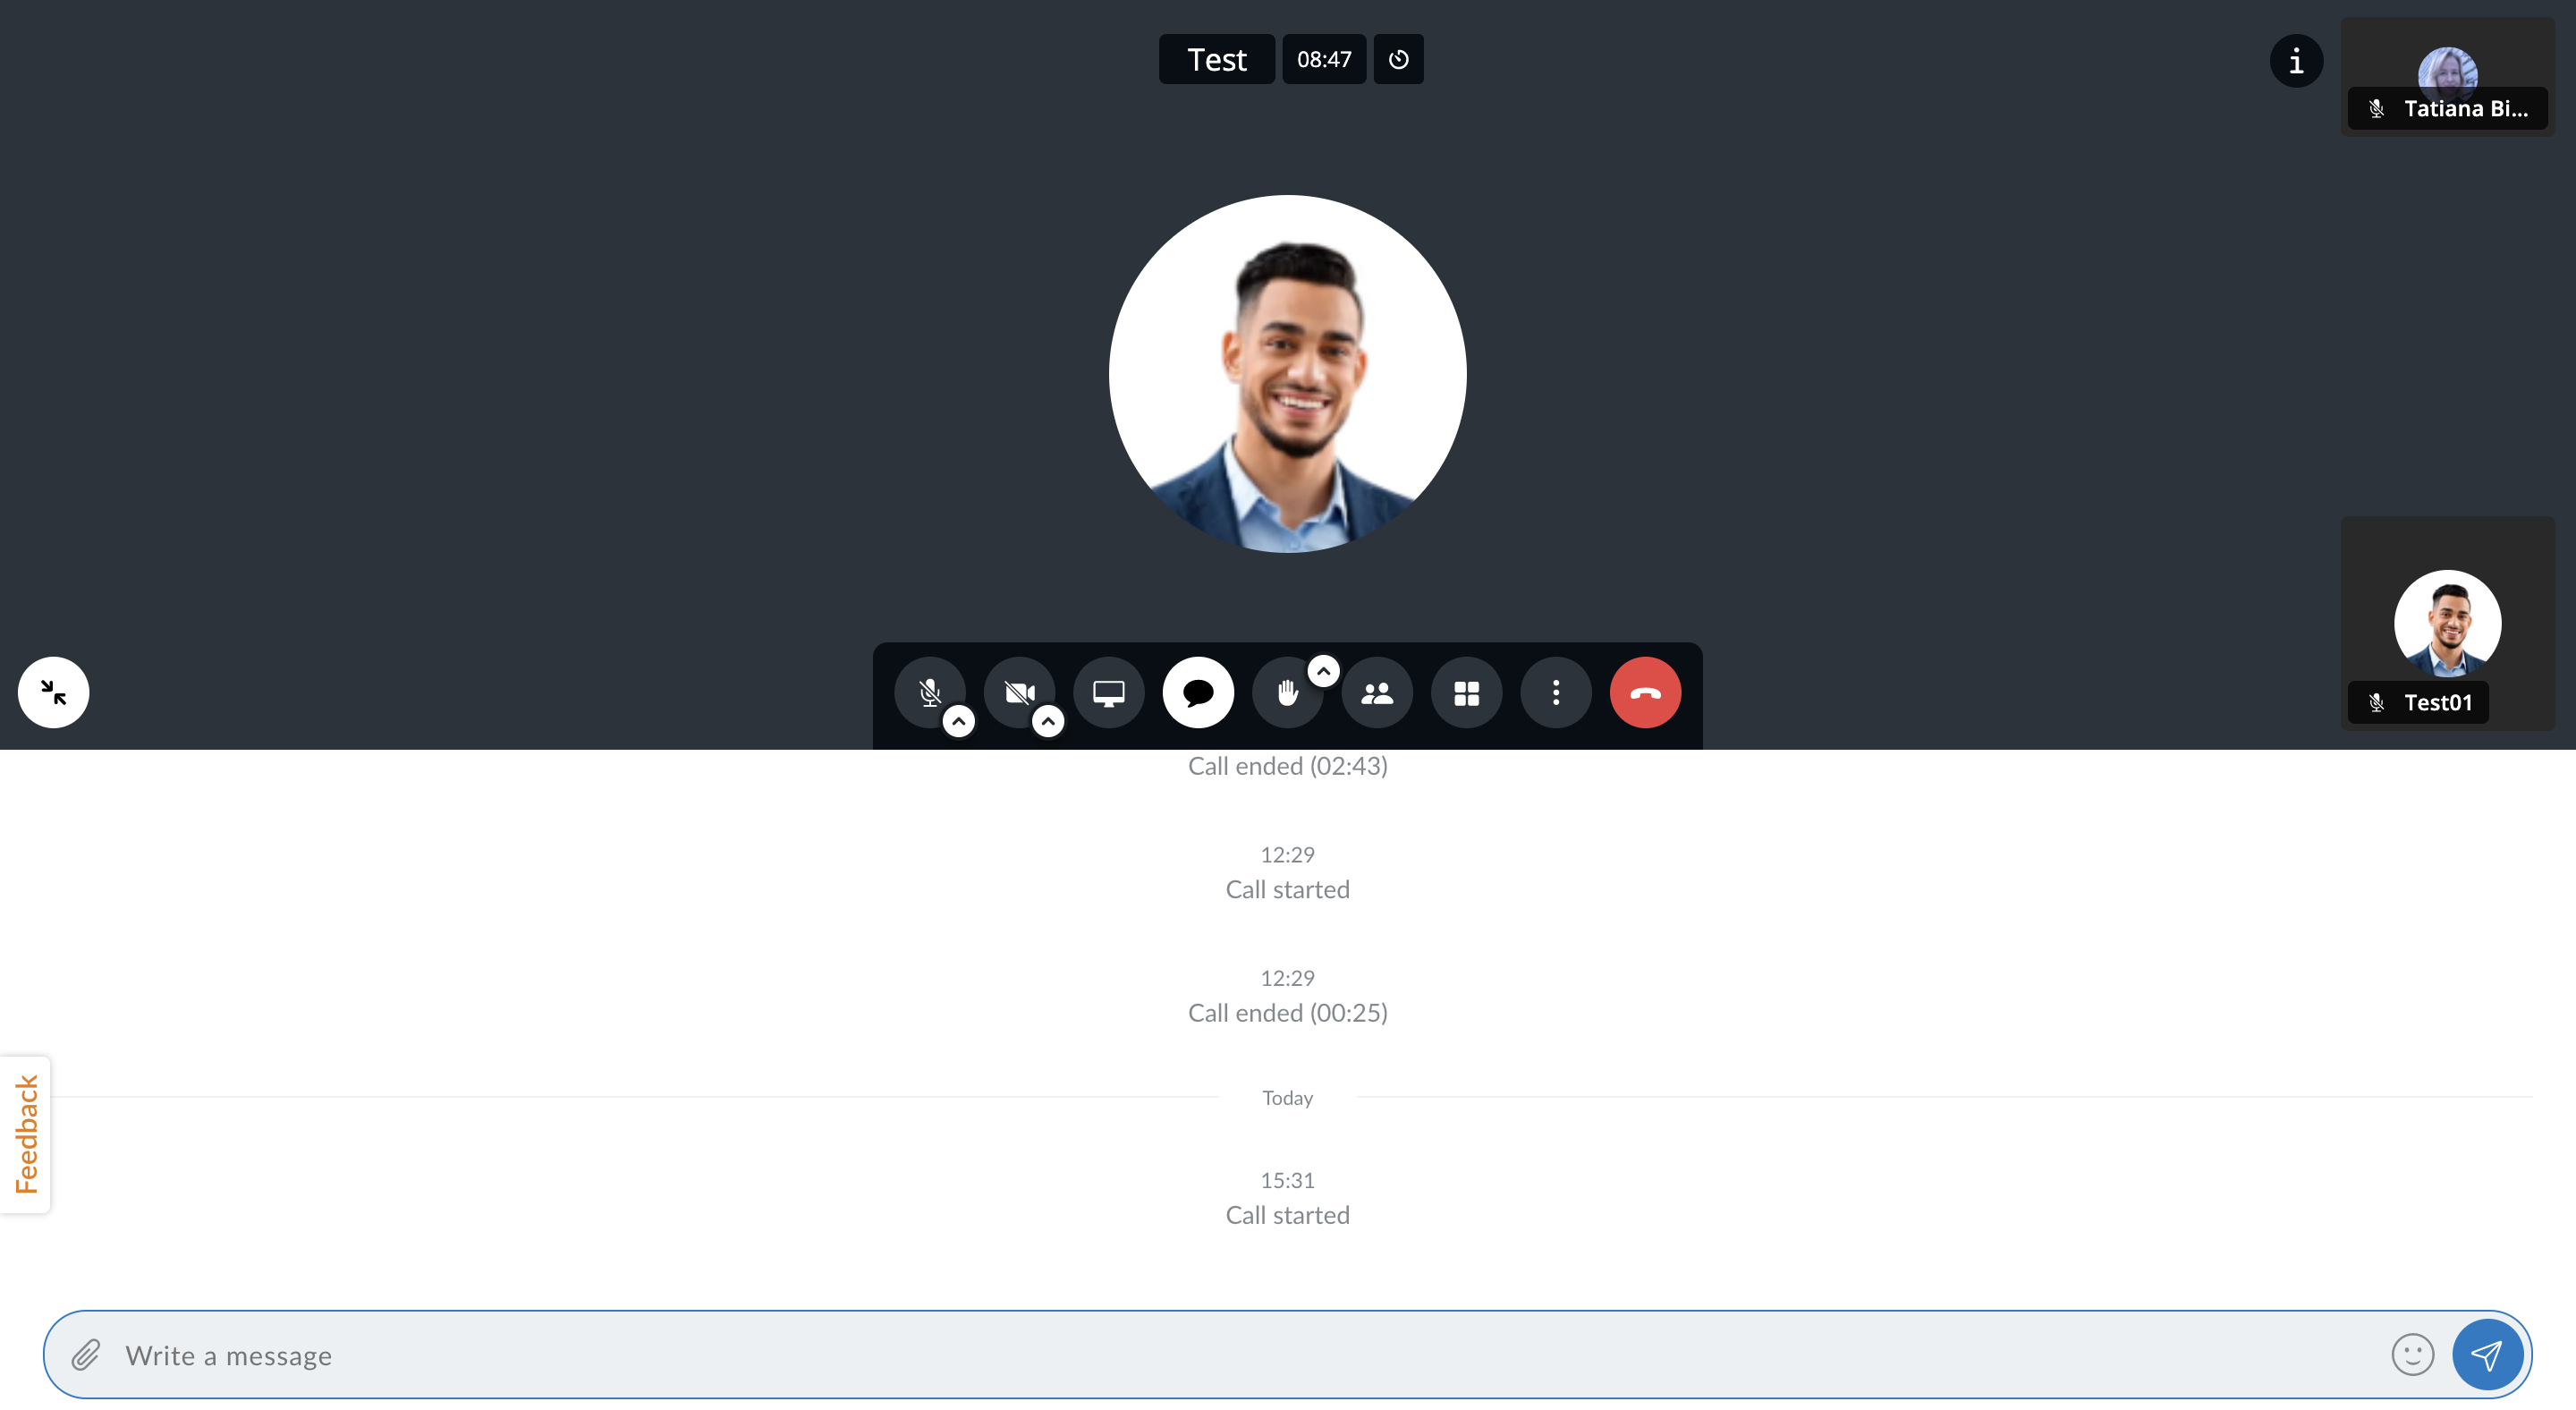
Chat
To enter group chat (with all the users):
Click on the Open chat button (bubble icon) in the lower central side of the screen
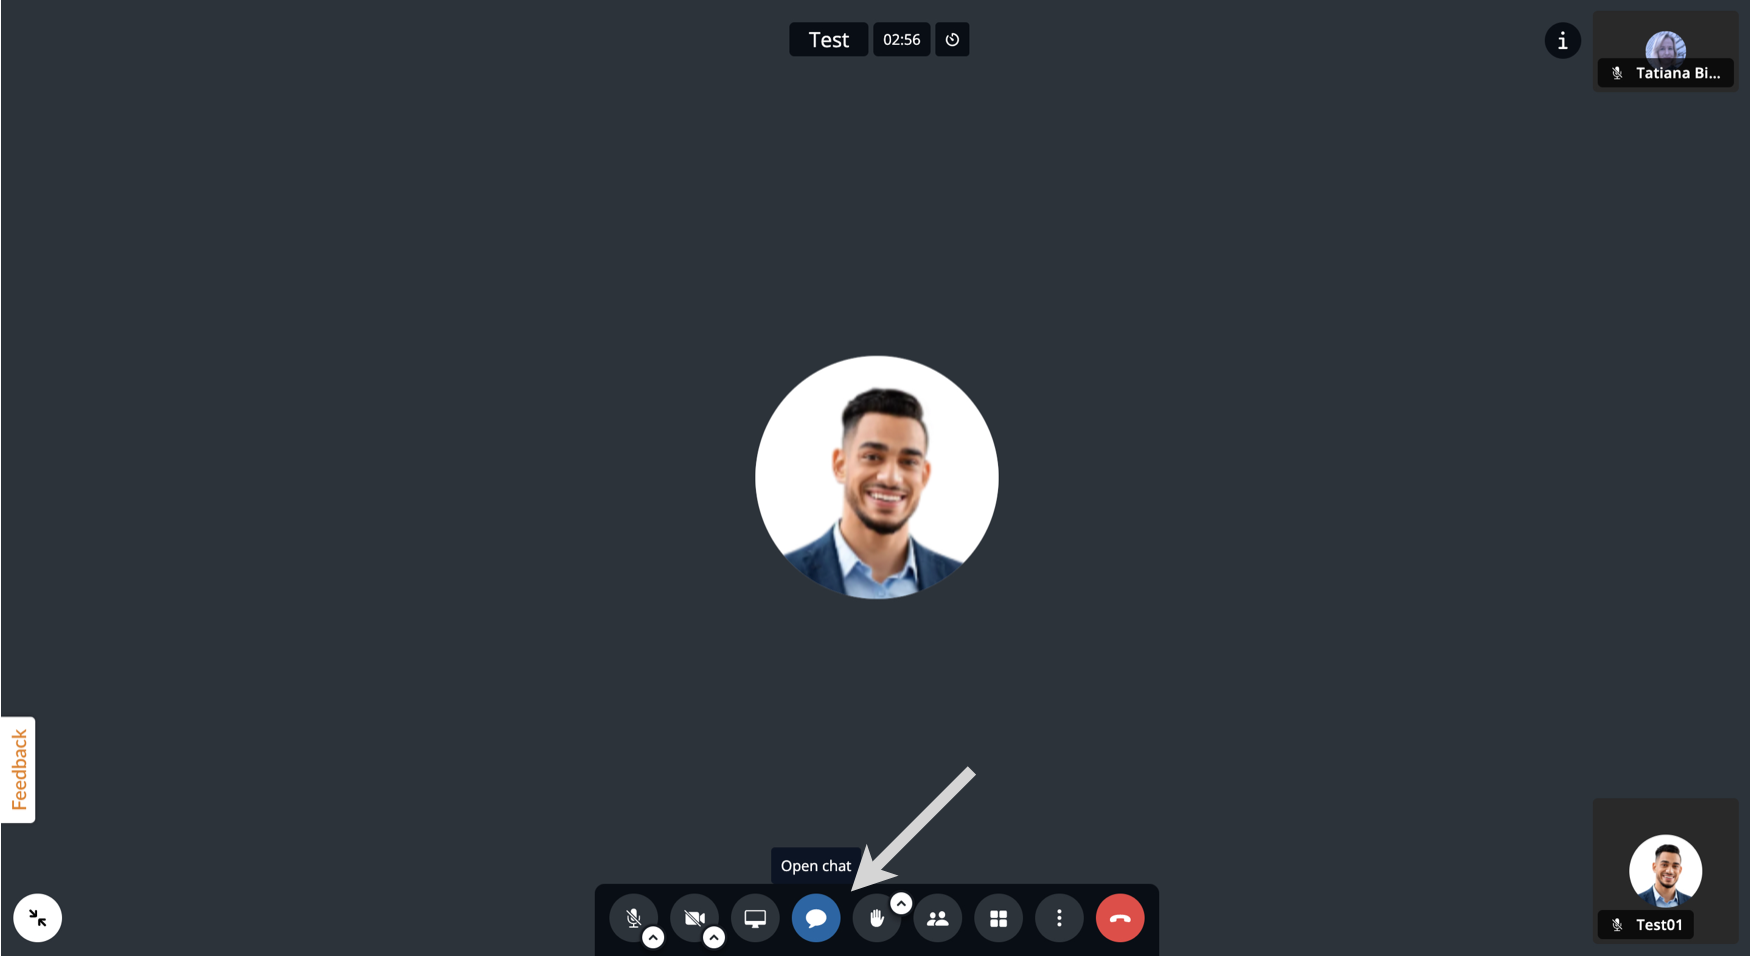
- The chat panel opens below:
To close the chat, click on the Open chat button (bubble icon) again.
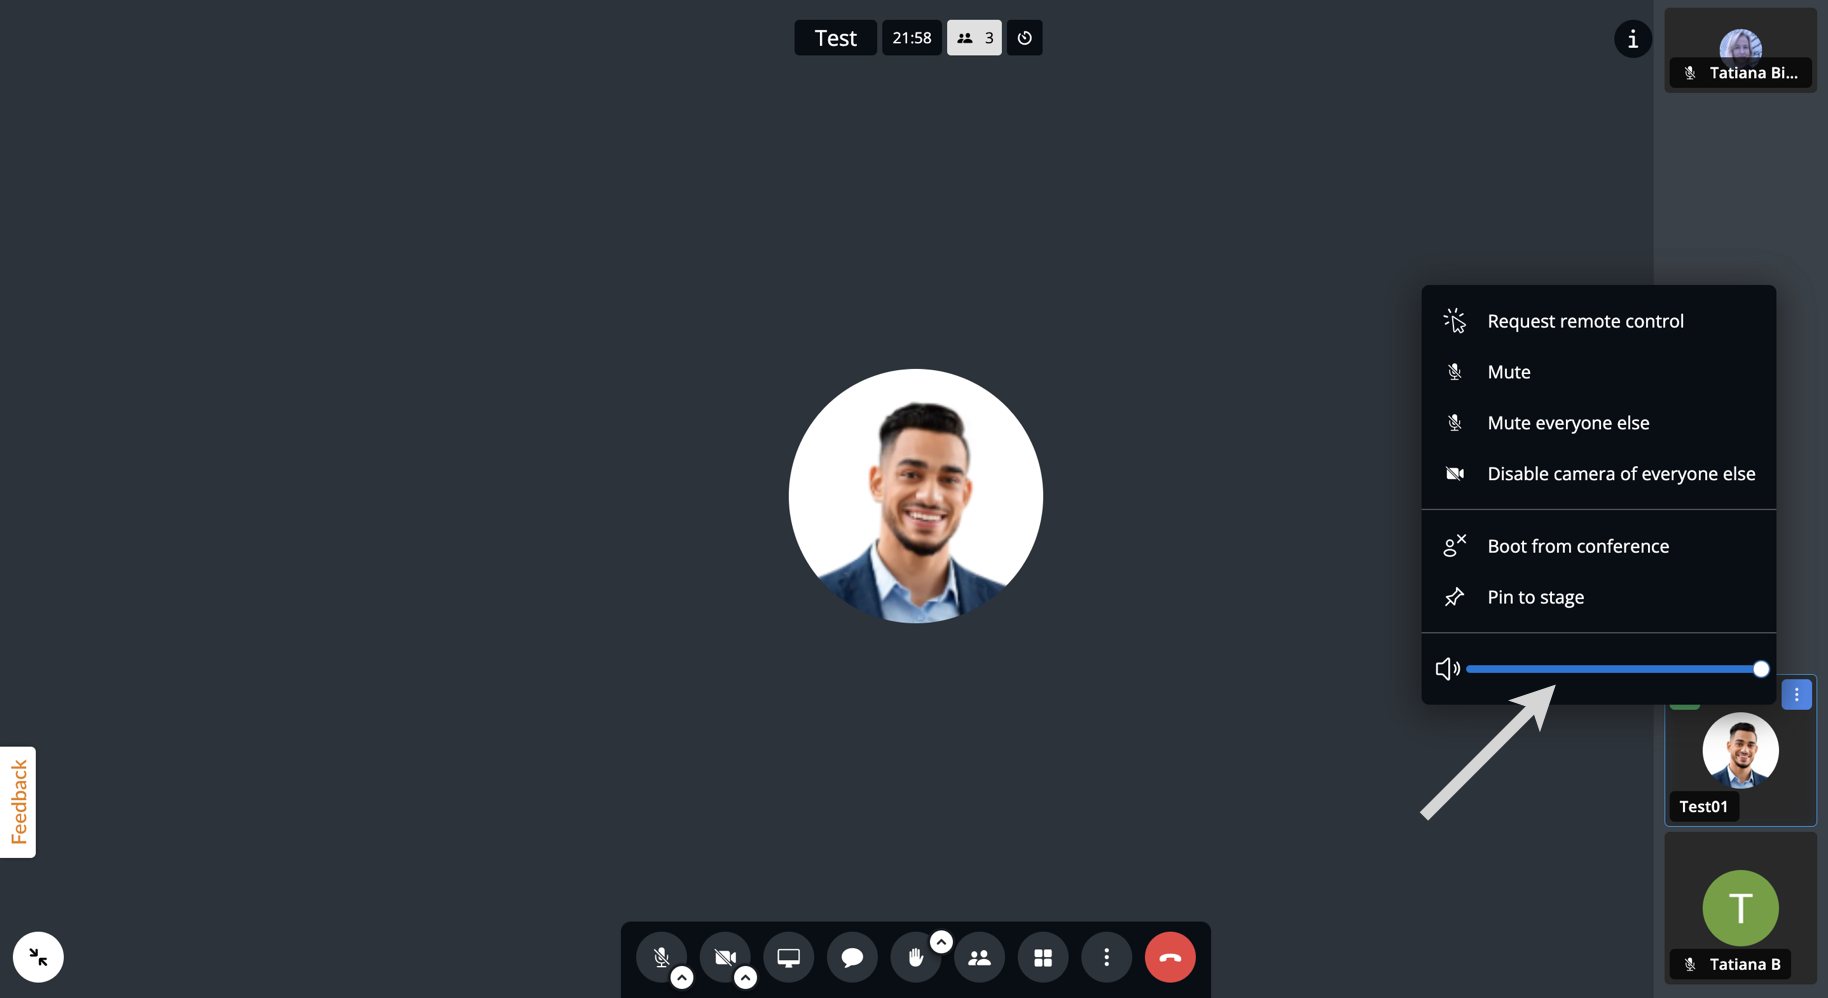
Adjust microphone volume of certain participants
You can decrease mic volume for separate users or completely mute them (for yourself):
- Find the user whose microphone volume you wish to adjust
- However the mouse cursor over three dots in the upper right-hand side of the user's preview
Move the blue indicator to the left to decrease the volume / to the right to increase the volume:
Screen sharing
Supported browsers:
- Chrome v. 72+
- Firefox v. 66+
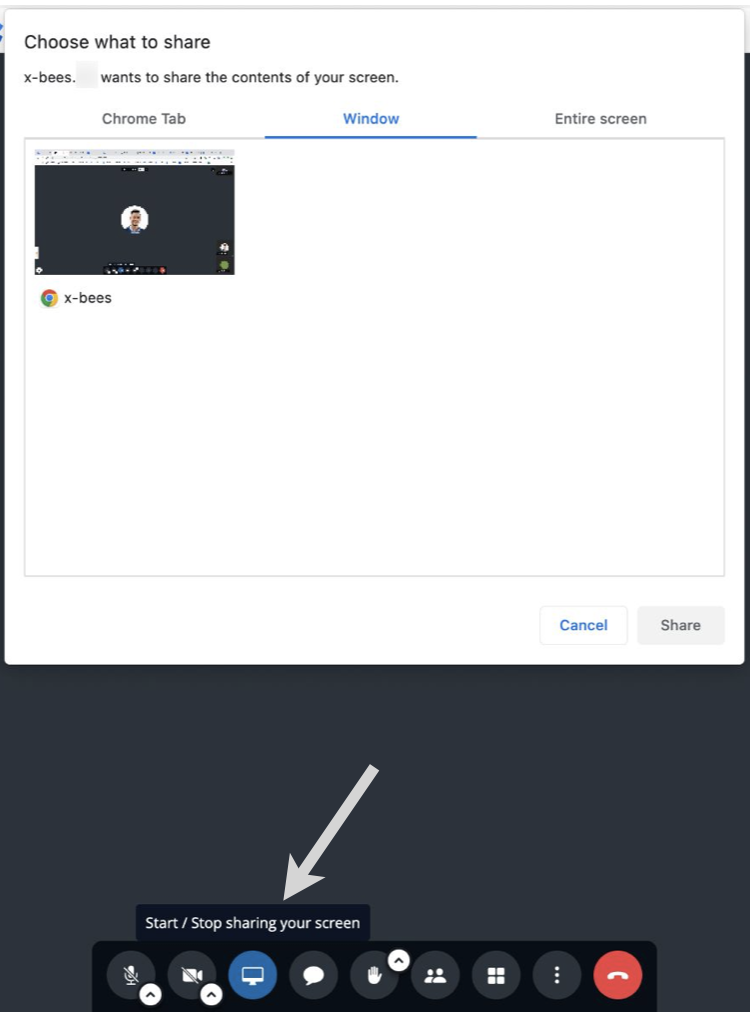
To share your screen:
Click on the Screen icon (Share your screen) in the lower central side of the screen
Select the content you want to share: the entire screen, separate application windows or your browser's tab and click Share button
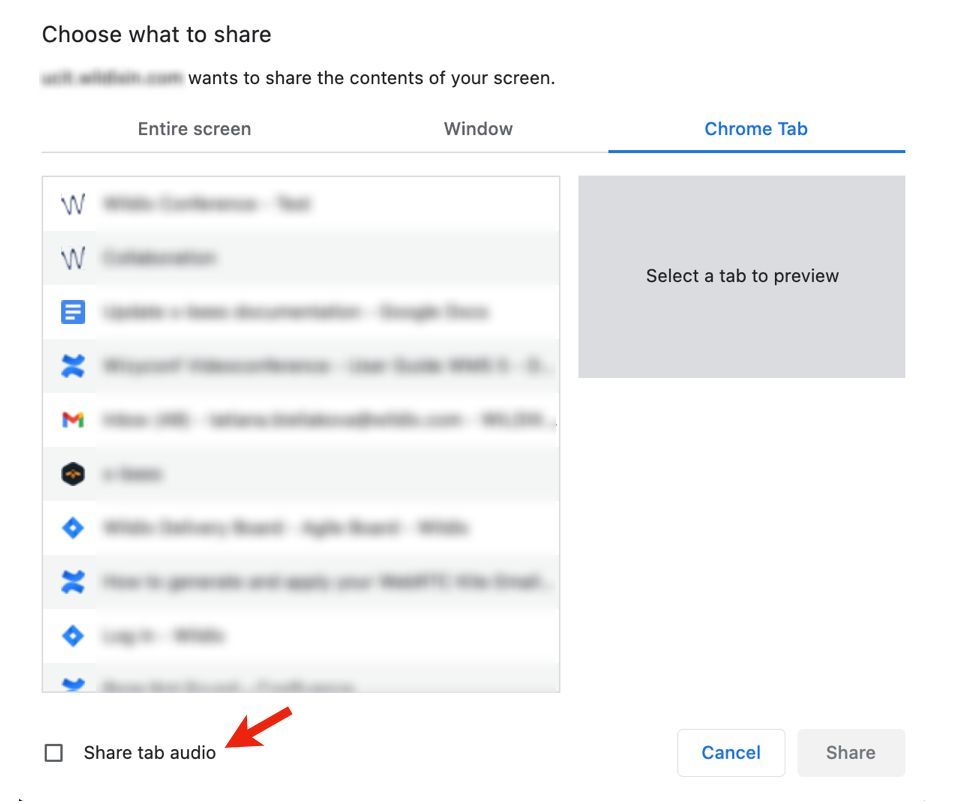
Note: When sharing Chrome tab with a muted mic, there may be an issue with unmuting. To avoid it, make sure to disable the option “Share tab audio” (enabled by default) before you start the screen sharing.
When user shares the screen, the screen shared is displayed as a separate participant with the name "User's screen".
To terminate the screen sharing session:
- Click Stop sharing button
Otherwise, you can click again the Screen icon (the icon turns white again when the screen sharing session is terminated).
Remote control
During screen sharing, it is possible to request or provide remote control of the shared screen.
Notes:
- Remote control is available only if users have WIService version 3.10.4 or higher
- WIService should be run on the side of the user whose laptop is being controlled
- To run Remote control, user should share Entire screen or Window. Remote control of screen shared tab is not supported
- Firefox browser is not supported
- If the original screen shared is removed from the screen (e.g. if another user started screen sharing), remote control is disabled till the original screen is back
Give remote control
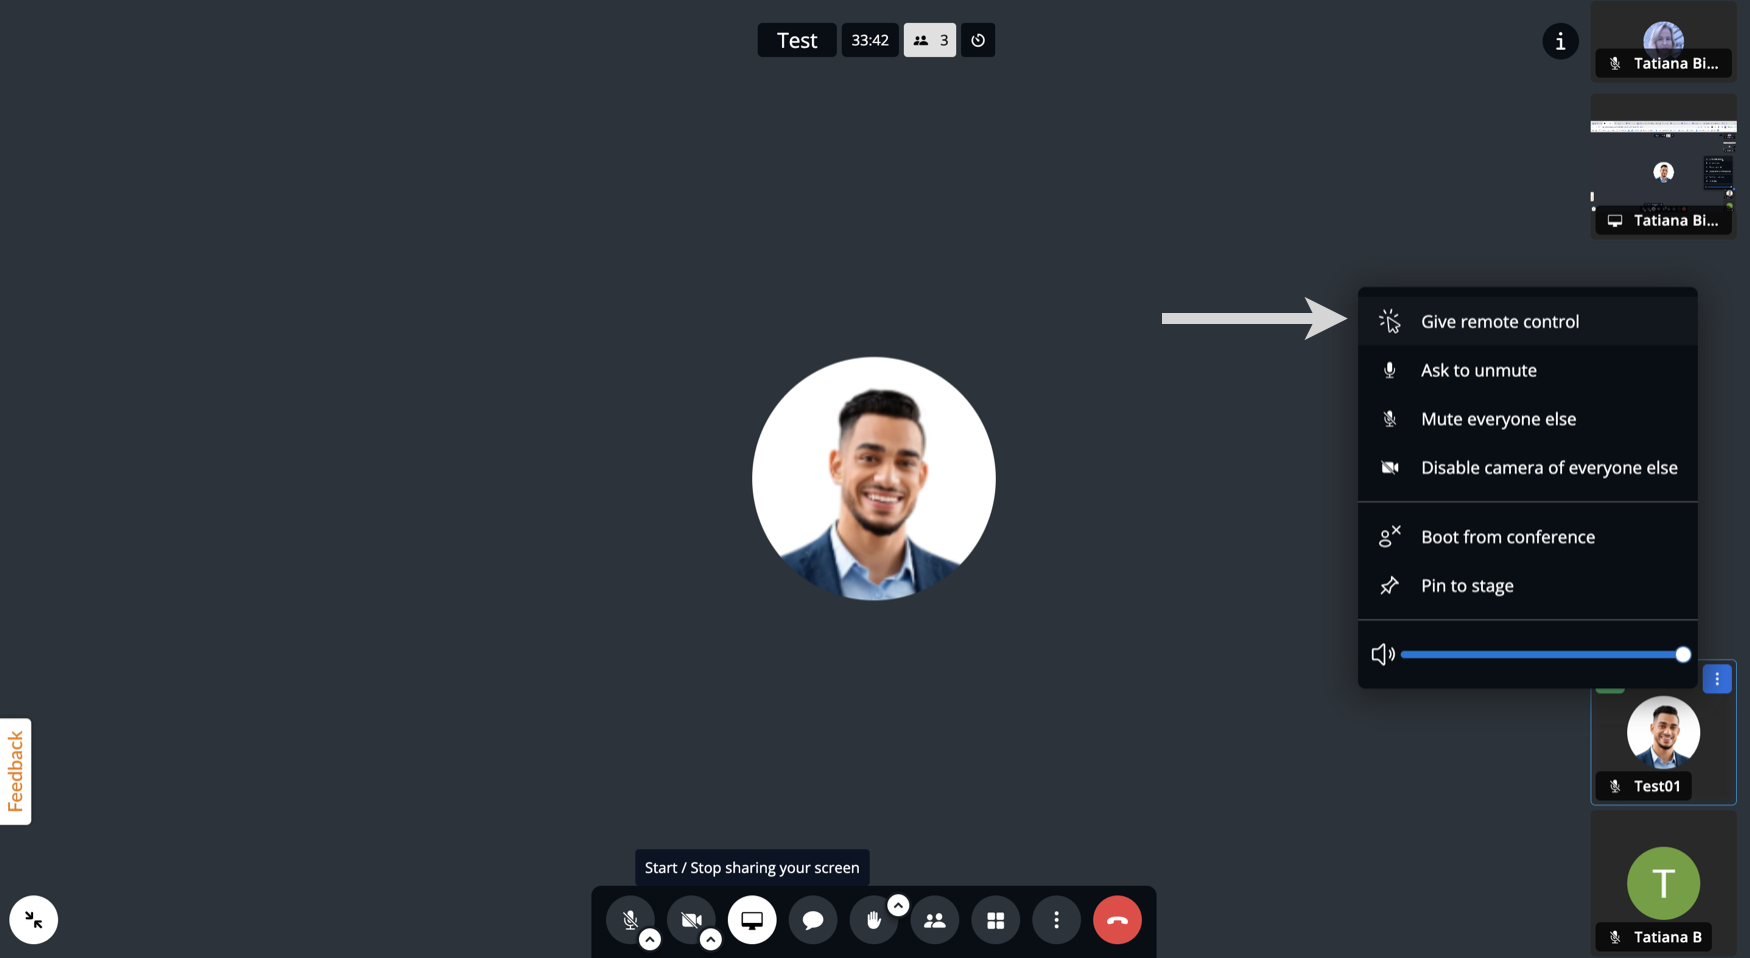
To give remote control of the screen you’re sharing:
- Hover the mouse cursor over three dots in the upper right-hand side of the user's preview
- Click Give remote control:
User, whom you are giving remote control to receives the following notification:
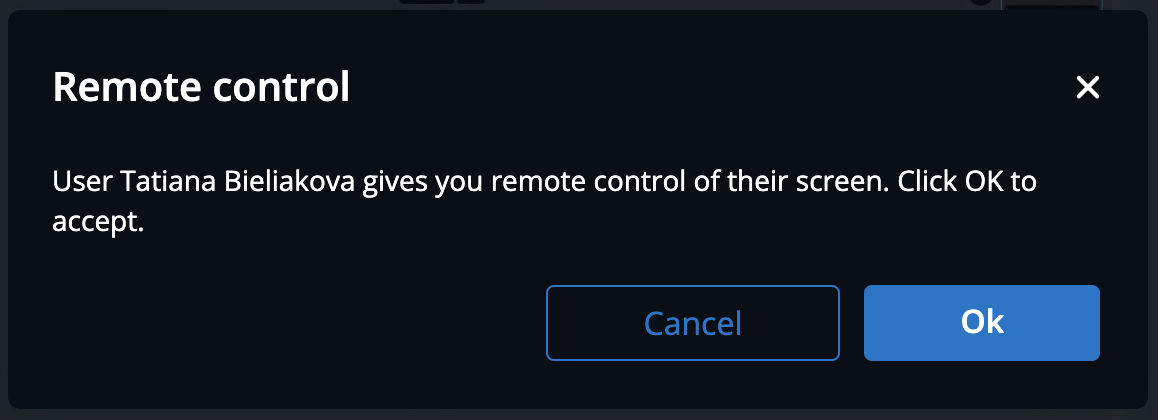
Once user clicks Ok, remote control gets enabled and the user can manage the mouse cursor on the screen shared.
Request remote control
a) Via Participants panel
To request remote control:
- Find the necessary participant
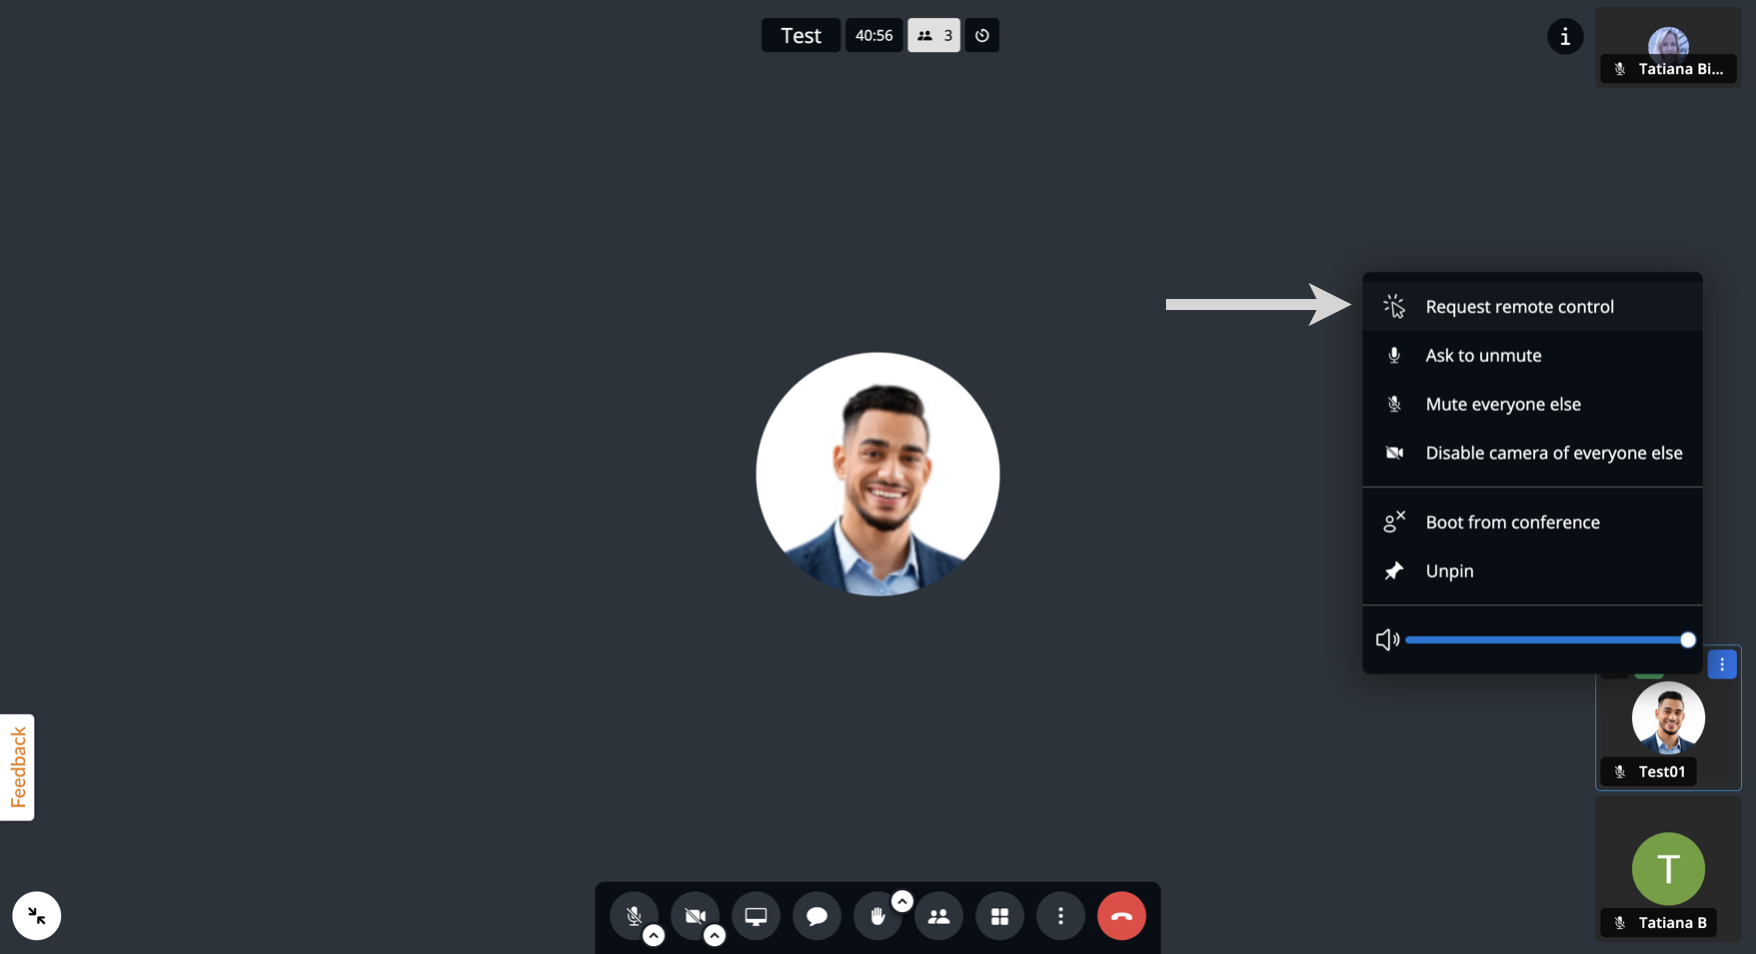
- Hover the mouse cursor over three dots in the upper right-hand side of the user's preview
- Click Request remote control:
User, from whom you are requesting remote control receives the following notification:
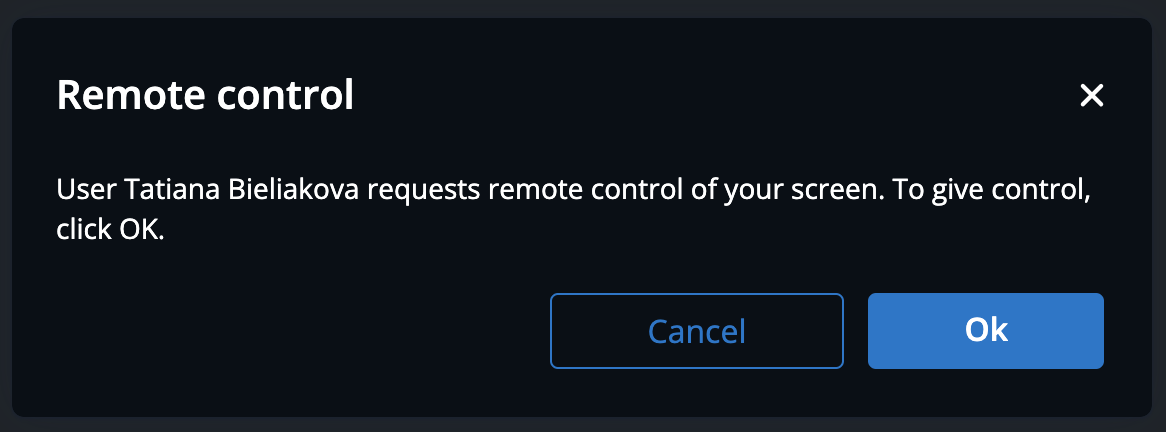
To accept the request and give control, click Ok. If you are not sharing your screen yet, you are suggested to start screen sharing now. Once you've enabled screen sharing, user can manage the mouse cursor of the screen you’ve shared.
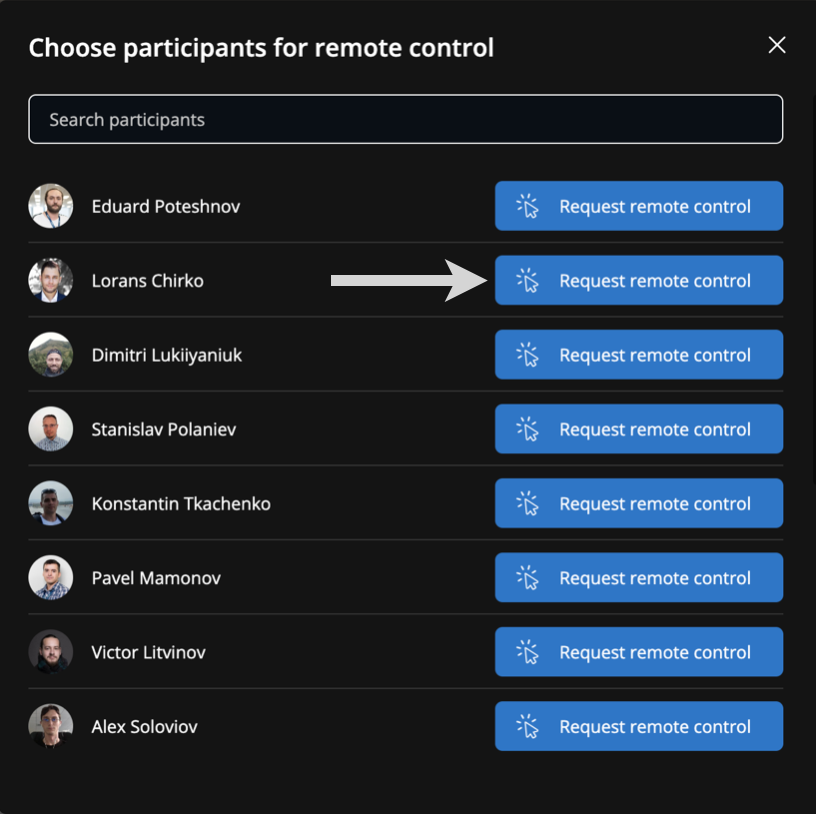
b) Via More actions:
1. Click on the More actions (three dots) icon and select Remote control:

2. A window with the list of participants pops up. Choose the user you want request remote control from and click Request remote control button in front of the necessary user:
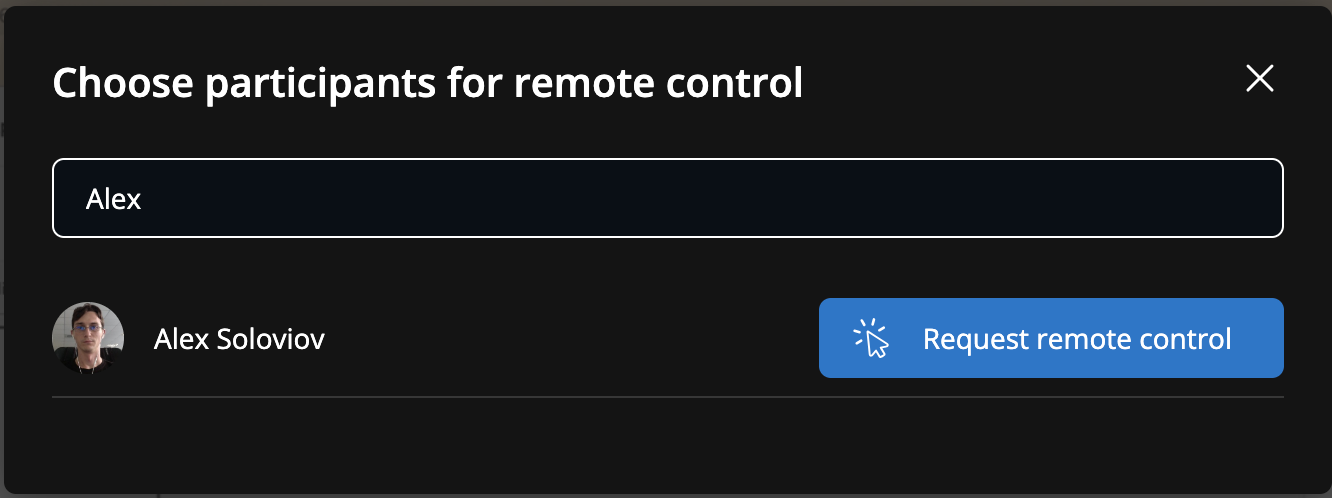
To easily find the necessary participant, you can enter the participant name in the Search field:
Disable remote control
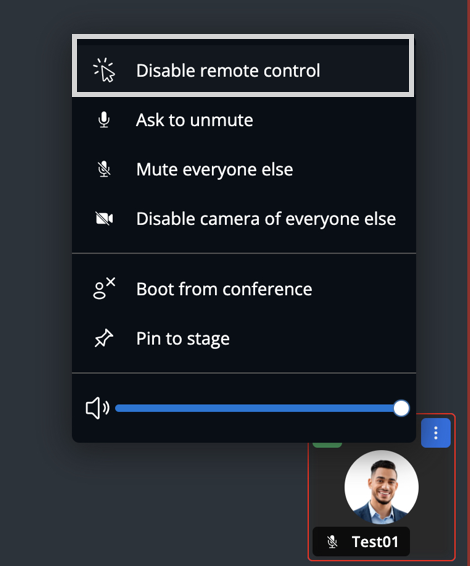
Remote control can be disabled either by the user who is sharing the screen, or by the user who has control. To disable remote control, hover the mouse cursor over three dots of the preview of user and click Disable remote control:
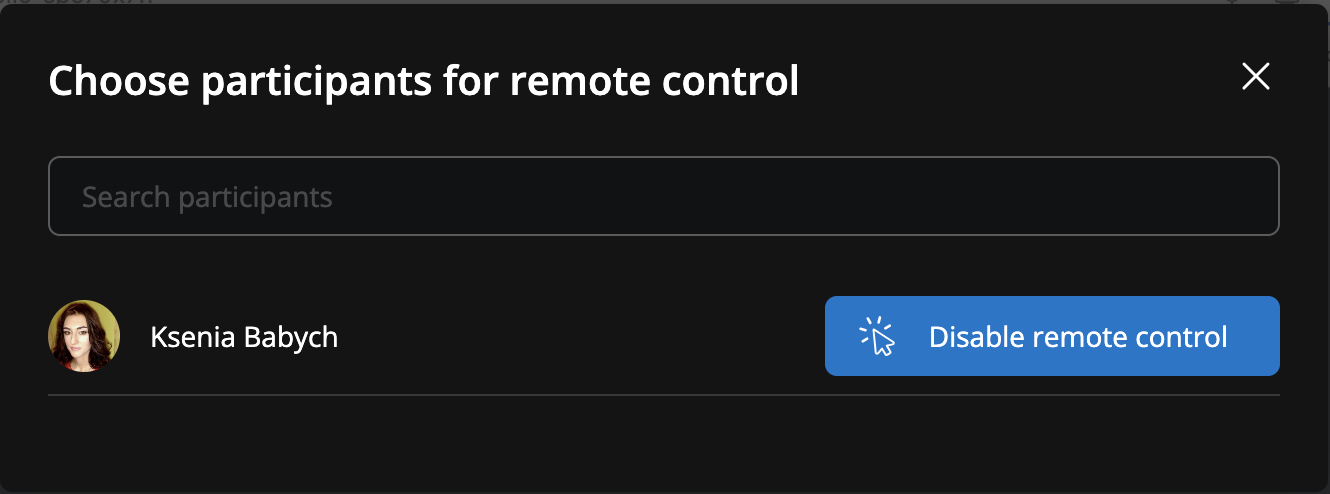
You can also disable remote control via More actions -> Remote control -> click Disable remote control next to the relevant user:
Share a YouTube video
To start sharing a YouTube video:
- Click three dots (More actions) in the lower central side of the screen
- Click Share a YouTube video
A new dialog opens; paste the link to the YouTube video and click on Share

To stop sharing the video:
- Click again three dots (More actions) in the lower central side of the screen
- Click Stop video, the video sharing is stopped

Raise your hand/ Send reactions
To raise your hand:
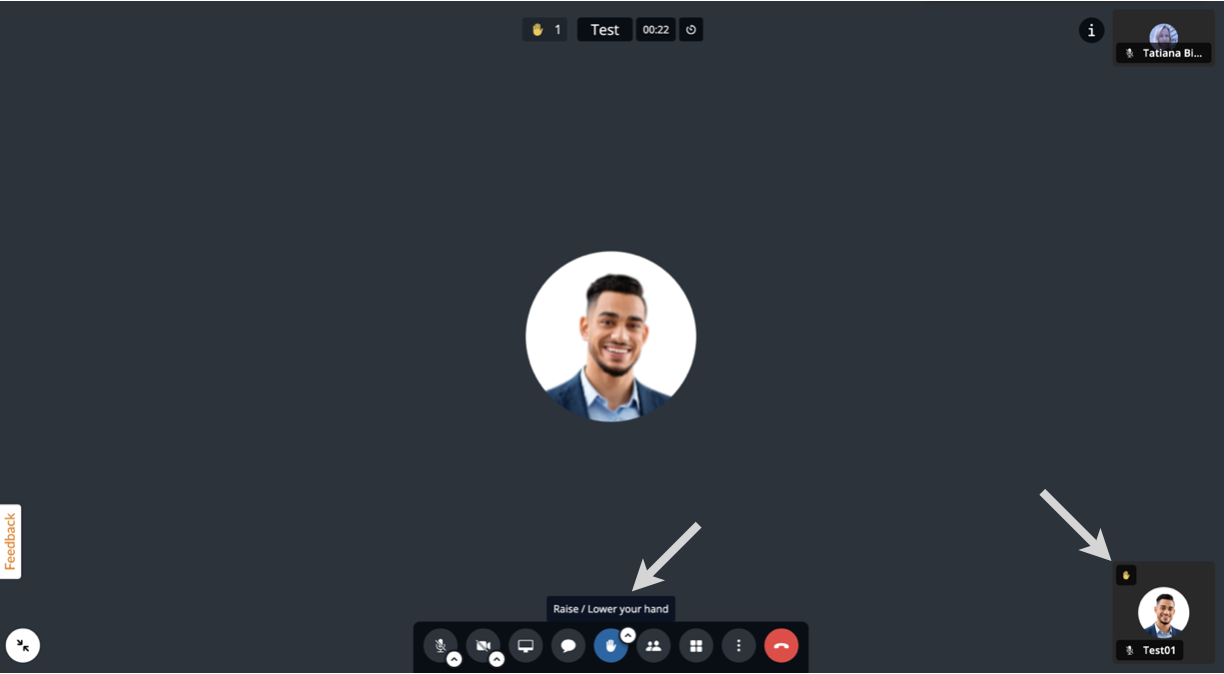
- Click on the Hand icon (Raise/ Lower your hand) in the lower central side of the screen
- The Hand icon turns yellow for the user who has raised the hand. A yellow Hand icon is displayed in the upper part of the preview of the user who has raised the hand:
User who has raised a hand can click the Hand icon once again to lower the hand (in this case the Hand icon will turn white again).
Note: The Hand is automatically lowered if a participant starts talking.
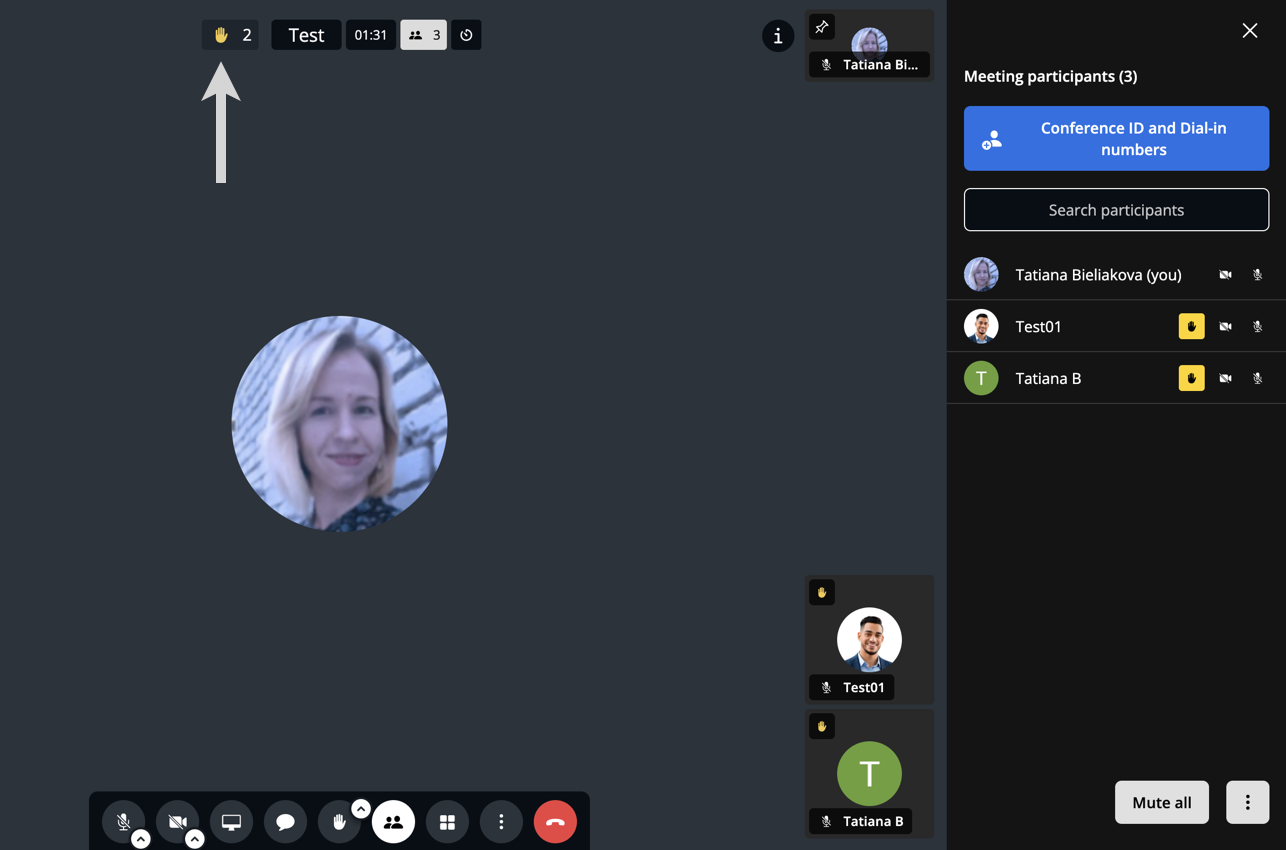
To view all users who raised their hands:
- Click on the Yellow Hand icon in the upper central side of the screen:
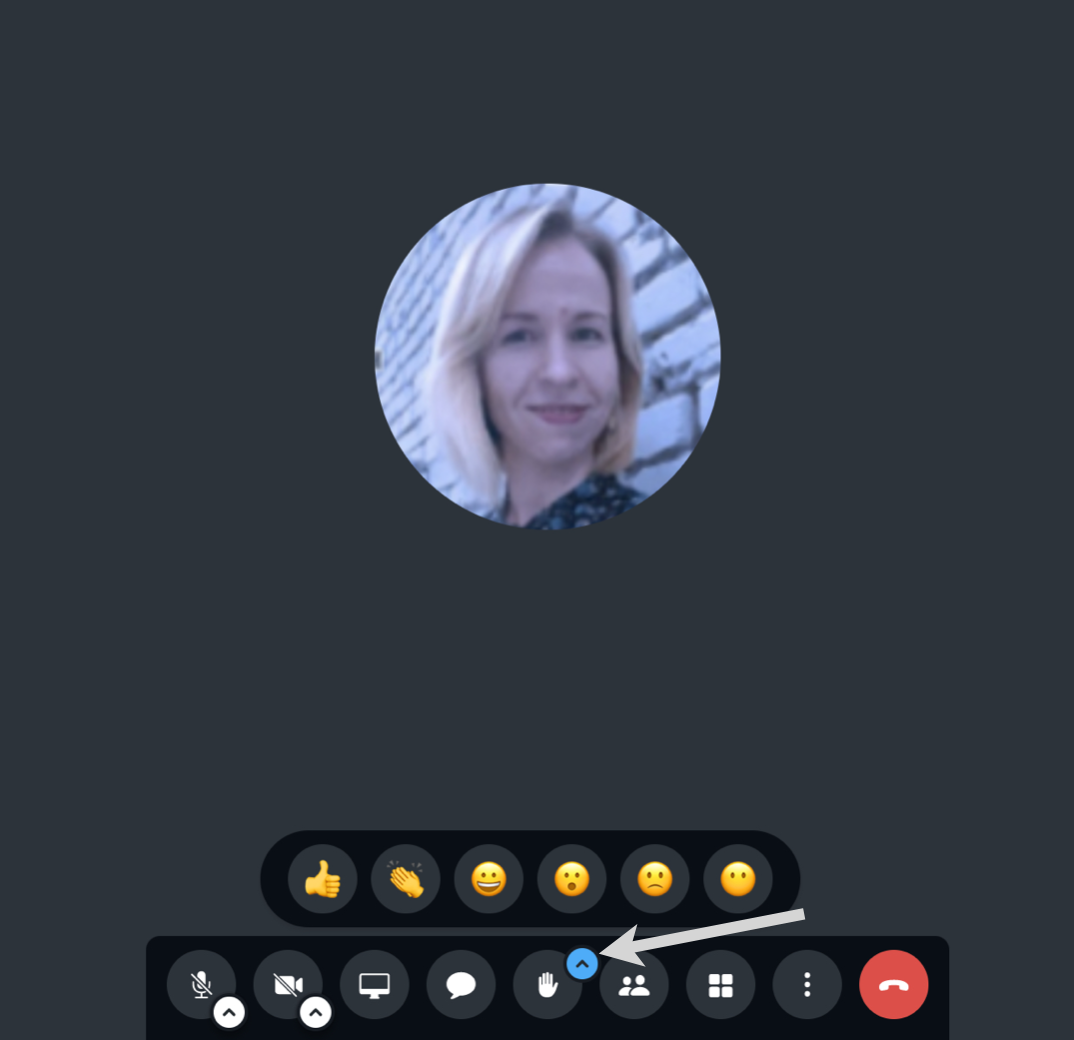
To send a reaction:
- Click on the Arrow up icon (Open reactions menu) and click on a reaction
Use Whiteboard
Whiteboard feature includes a set of tools to draw different shapes, elements, add text, which allows to share your ideas with other participants in a visual way.
Note: Whiteboard can be started by a PBX user.
For guests, this option is greyed until a PBX user enables Whiteboard.
- To use the feature, click three dots (More actions) -> Show whiteboard:

2. Use the available tools to visualize your ideas (draw line, rectangle, diamond, ellipse, arrow, add text, etc.)
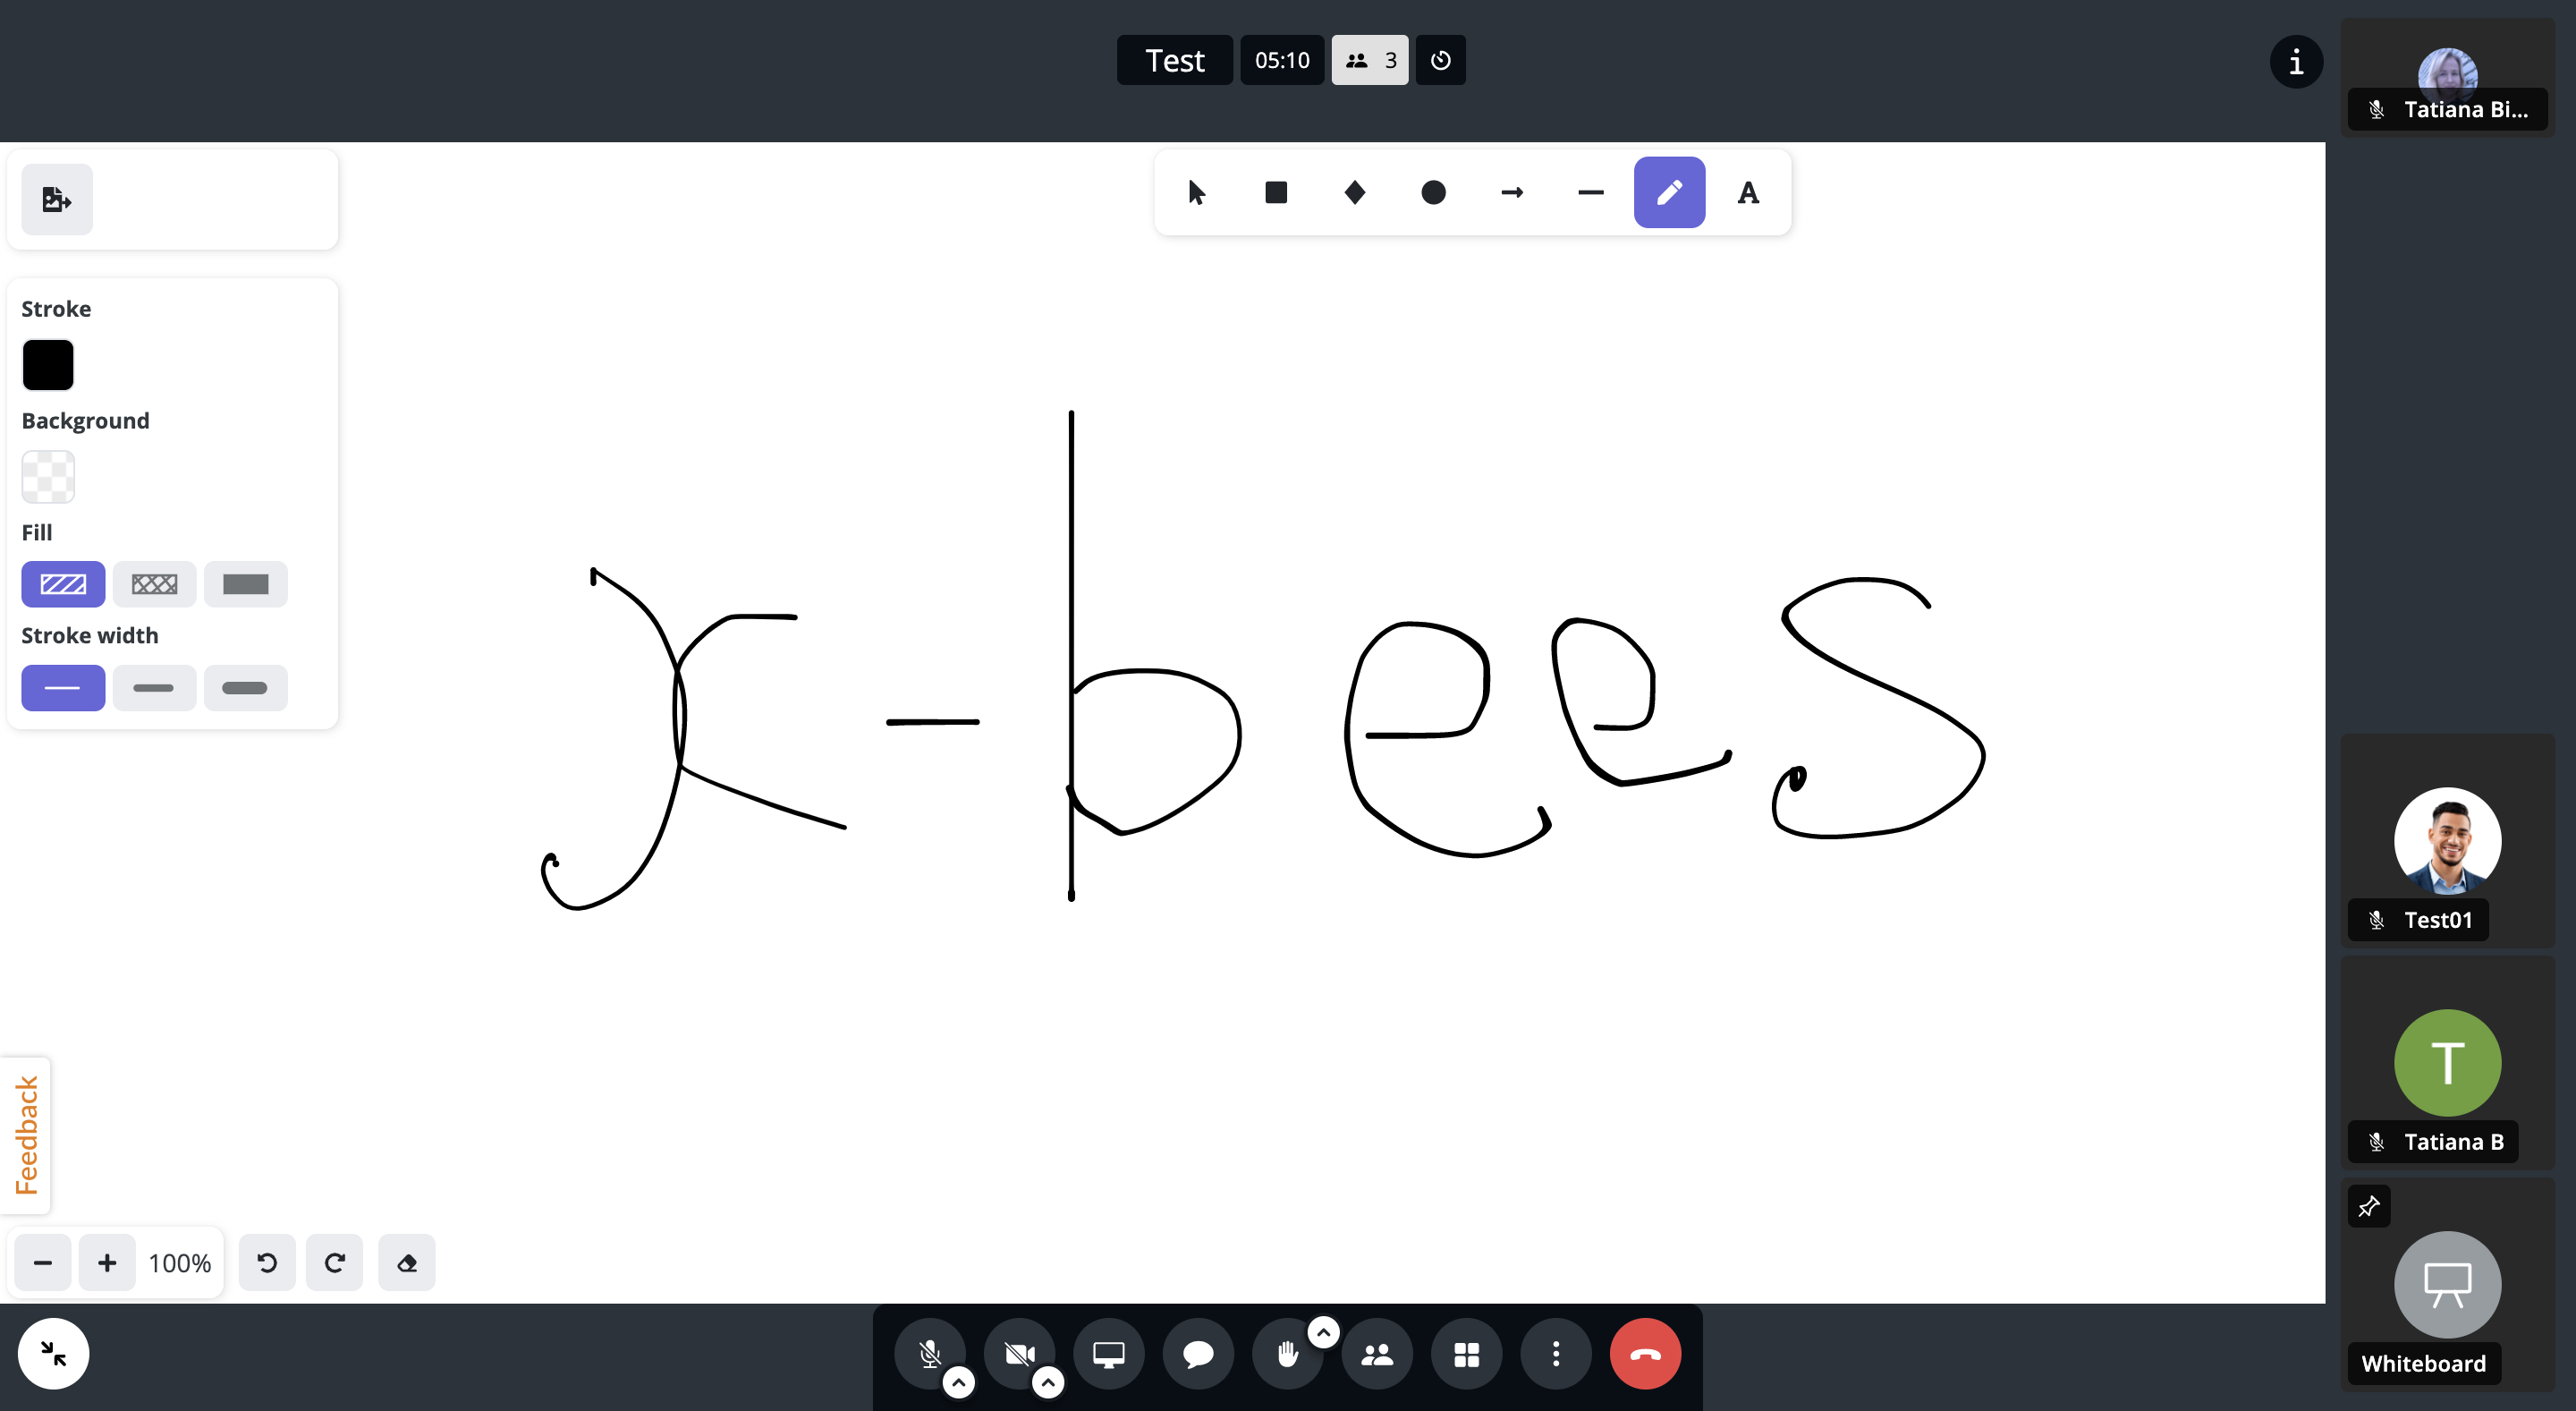
- On the Whiteboard, at the top of the screen, you can choose the tool you want to work with (1), modify the selected tool on the left-side panel (2), zoom in/ zoom out, turn the Whiteboard or use eraser at the bottom (3):
- The Whiteboard can be used by any participant simultaneously.
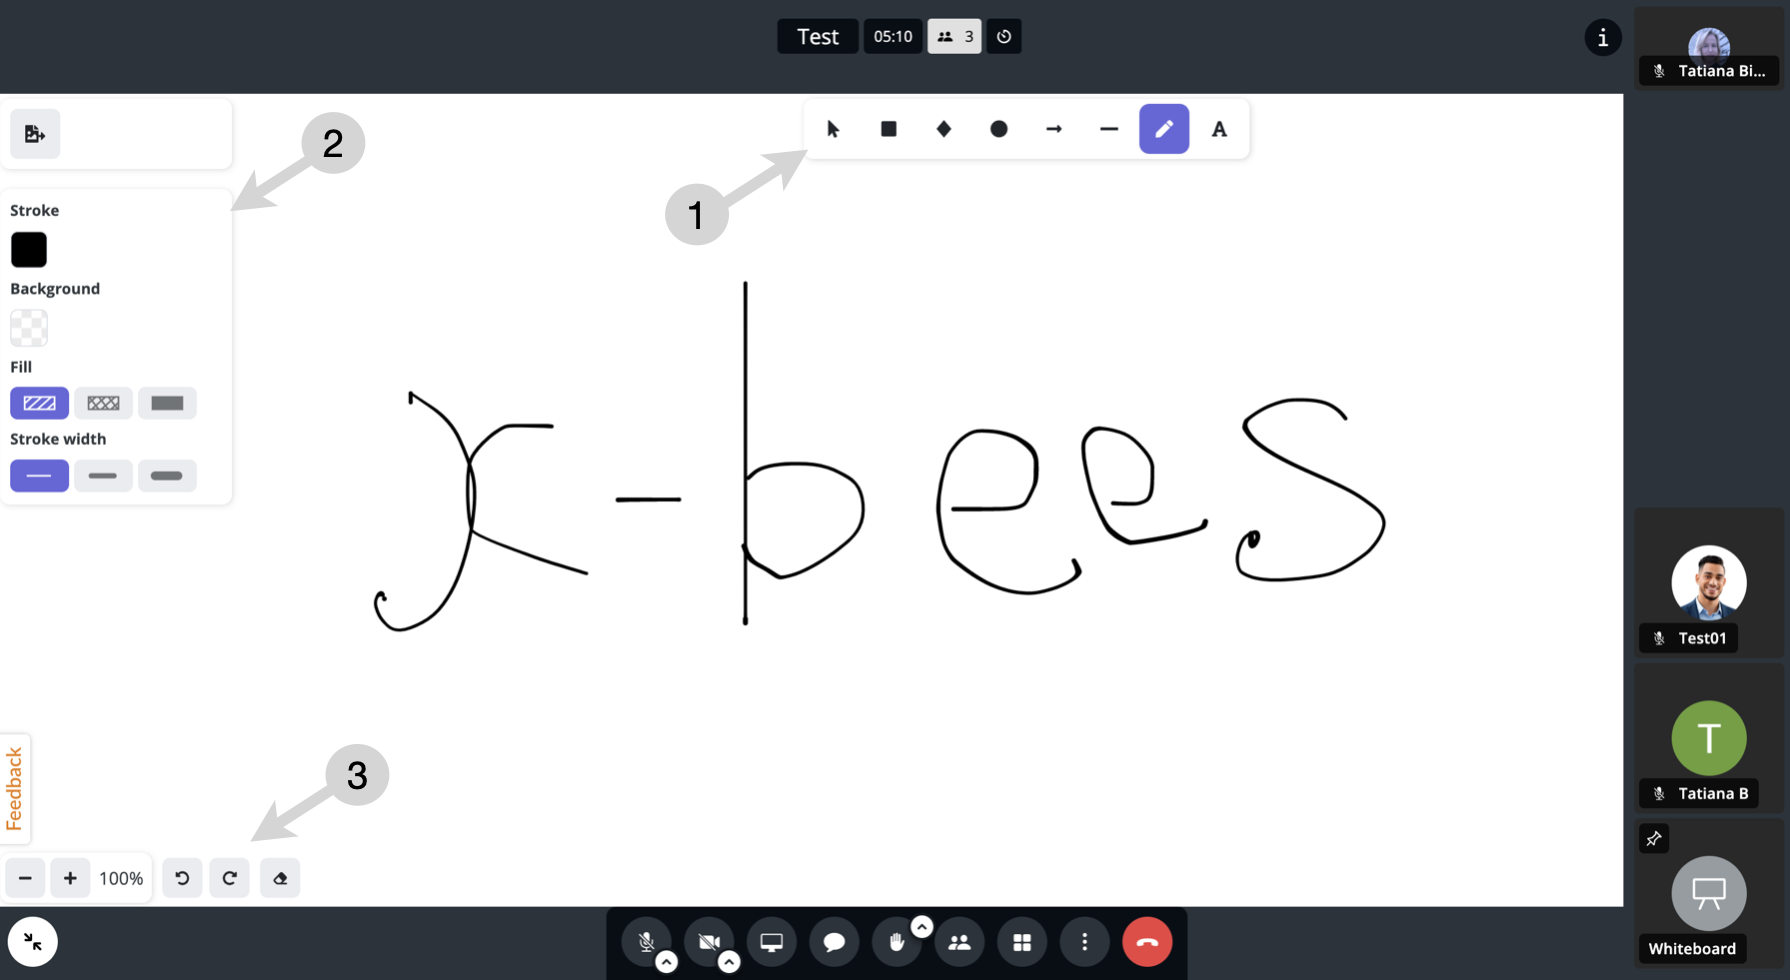
- 3. If needed, you can save the Whiteboard image in png or svg format:
- 1) Click on the Save as image button in the top left corner:
- 2) Enter file name and choose the desired format:
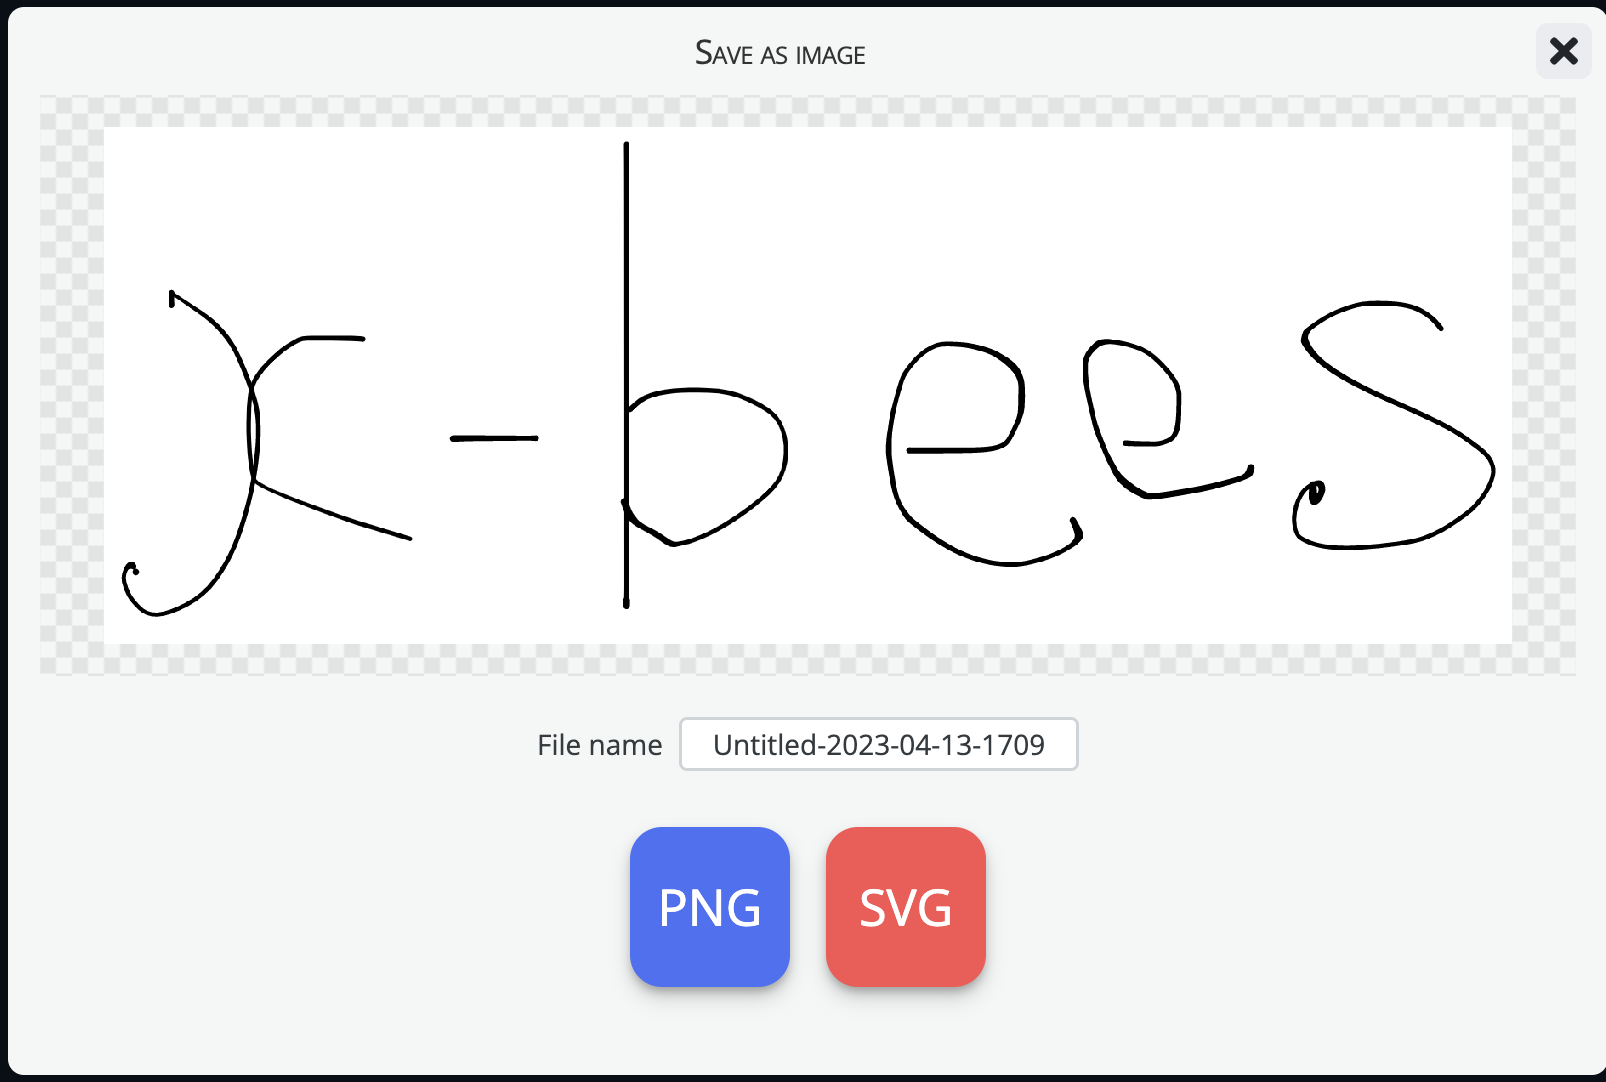
- 3) Enter name of the file, where to save to and click Save.
- 4. To hide Whiteboard, click three dots (More actions) -> Hide whiteboard:

Note: When user clicks Hide whiteboard, the Whiteboard gets hidden for this user only and not all participants of the conference.
Other users, who want to hide the Whiteboard, also need to click More actions -> Hide whiteboard.
Enable Picture-in-Picture
Note: Currently, only Google Chrome browser is supported.
Picture-in-Picture functionality lets you navigate between other tabs and keep track of what is going on in the conference at the same time. Picture-in-picture view gets enabled automatically when switching browser tabs.
- To manage the feature, click three dots (More actions) -> Enable / Disable Picture-in-Picture:

2. When on, picture-in-picture view of the selected / active user stays on top of your other windows. Hovering the mouse over the picture-in-picture screen, you have the following options:
- Mute/ unmute
- Start/ stop video
- Leave conference
- Back to tab (returns you to the x-bees tab with the conference and disables the Picture-in-Picture option)

Also, on the picture-in-picture view, you can see:
- if microphone of a user is enabled or not
- raised hands: names of the first three users who raised hands as well as how many more raised hands there are
- preview of videos
Limitation:
- When you or another user disable the video, the avatar displayed in PiP view is not the one uploaded by the user, but the default one (with user initials).
Other control options
In addition to being able to decide whether participants should start with their webcams and microphones enabled/ disabled, there are other options available for PBX users:
- Mute separate users or ask them to unmute
- Mute all users except for one
- Disable camera of separate users
- Disable camera of all users except for one
- Remove users from the conference
- End meeting for all
- Conference recording
- Live streaming
Mute users
This option is reserved for the PBX users only.
To mute a user:
- Find the user you want to mute
- Hover the mouse cursor over three dots in the upper right-hand side of the user's preview
- Click Mute
- A new dialog opens, click on Mute to confirm
Note: Users who joined in audio-only mode are notified once they are muted.
You can ask a user to unmute:
- Find the user you want to be unmuted
- Hover the mouse cursor over three dots in the upper right-hand side of the user's preview
- Click Ask to unmute
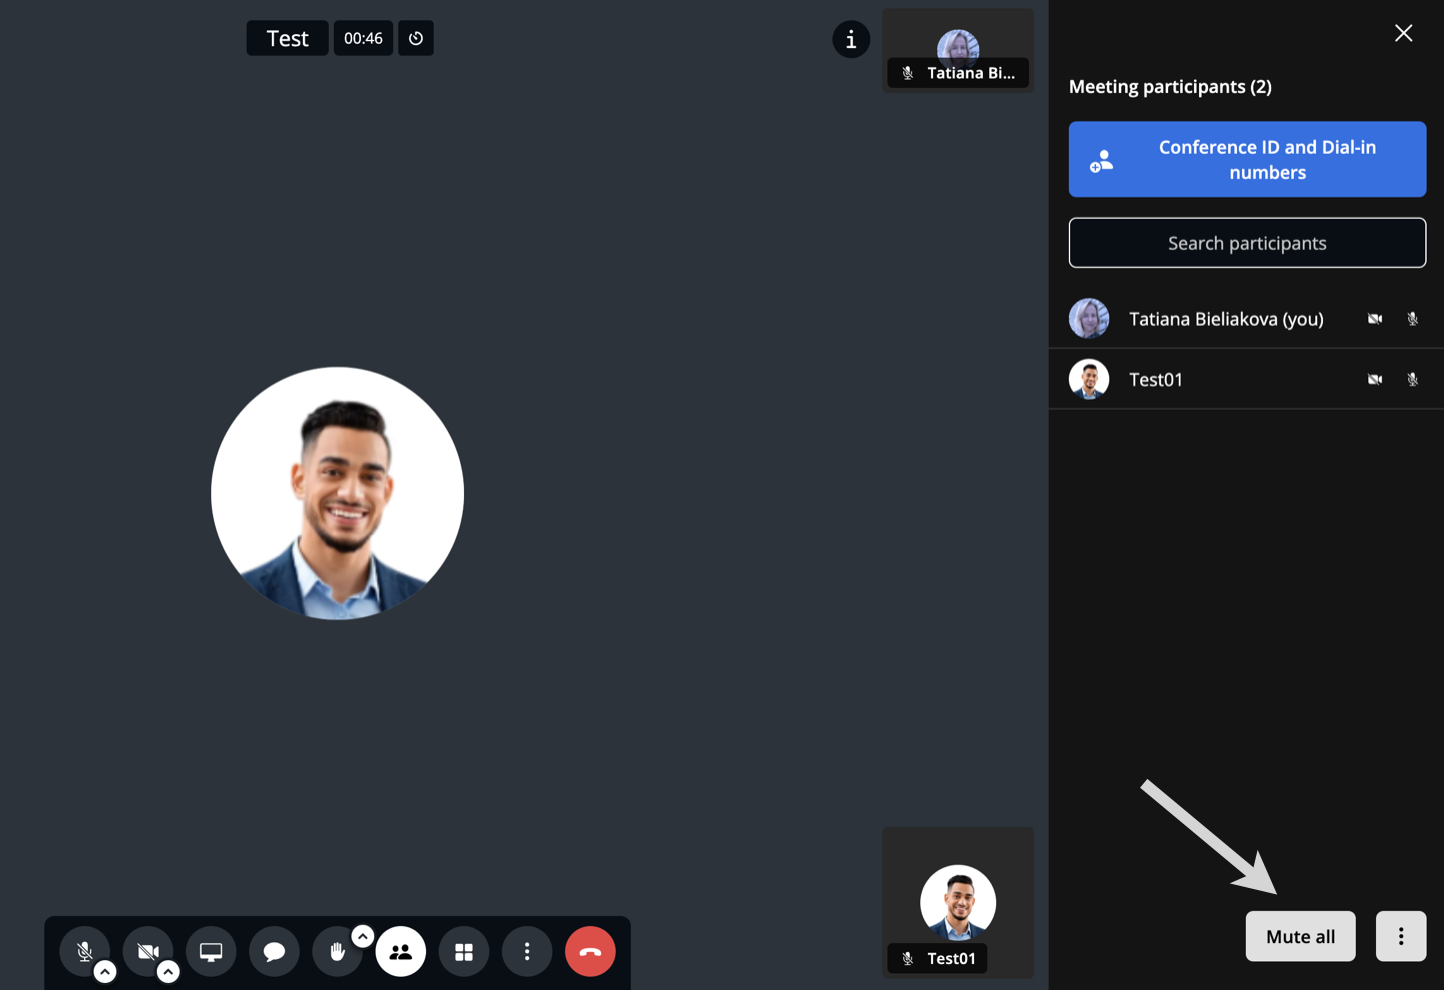
To mute everyone:
- Click the Participants icon in the lower central side of the screen
- On the panel that opens on the right side of the screen, click Mute all:
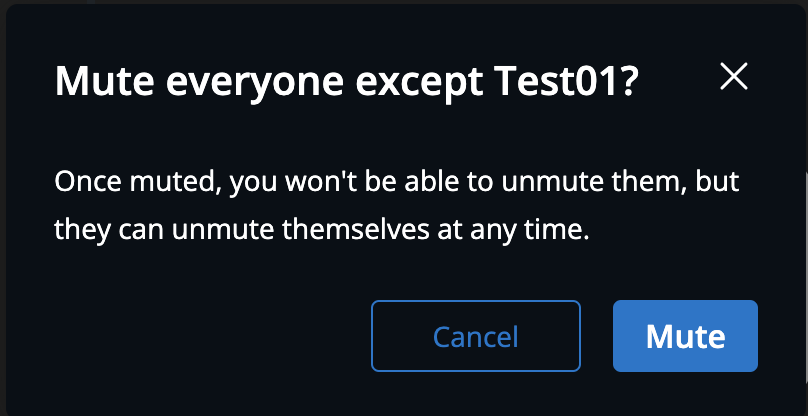
3. A new dialog opens, click on Mute to confirm:
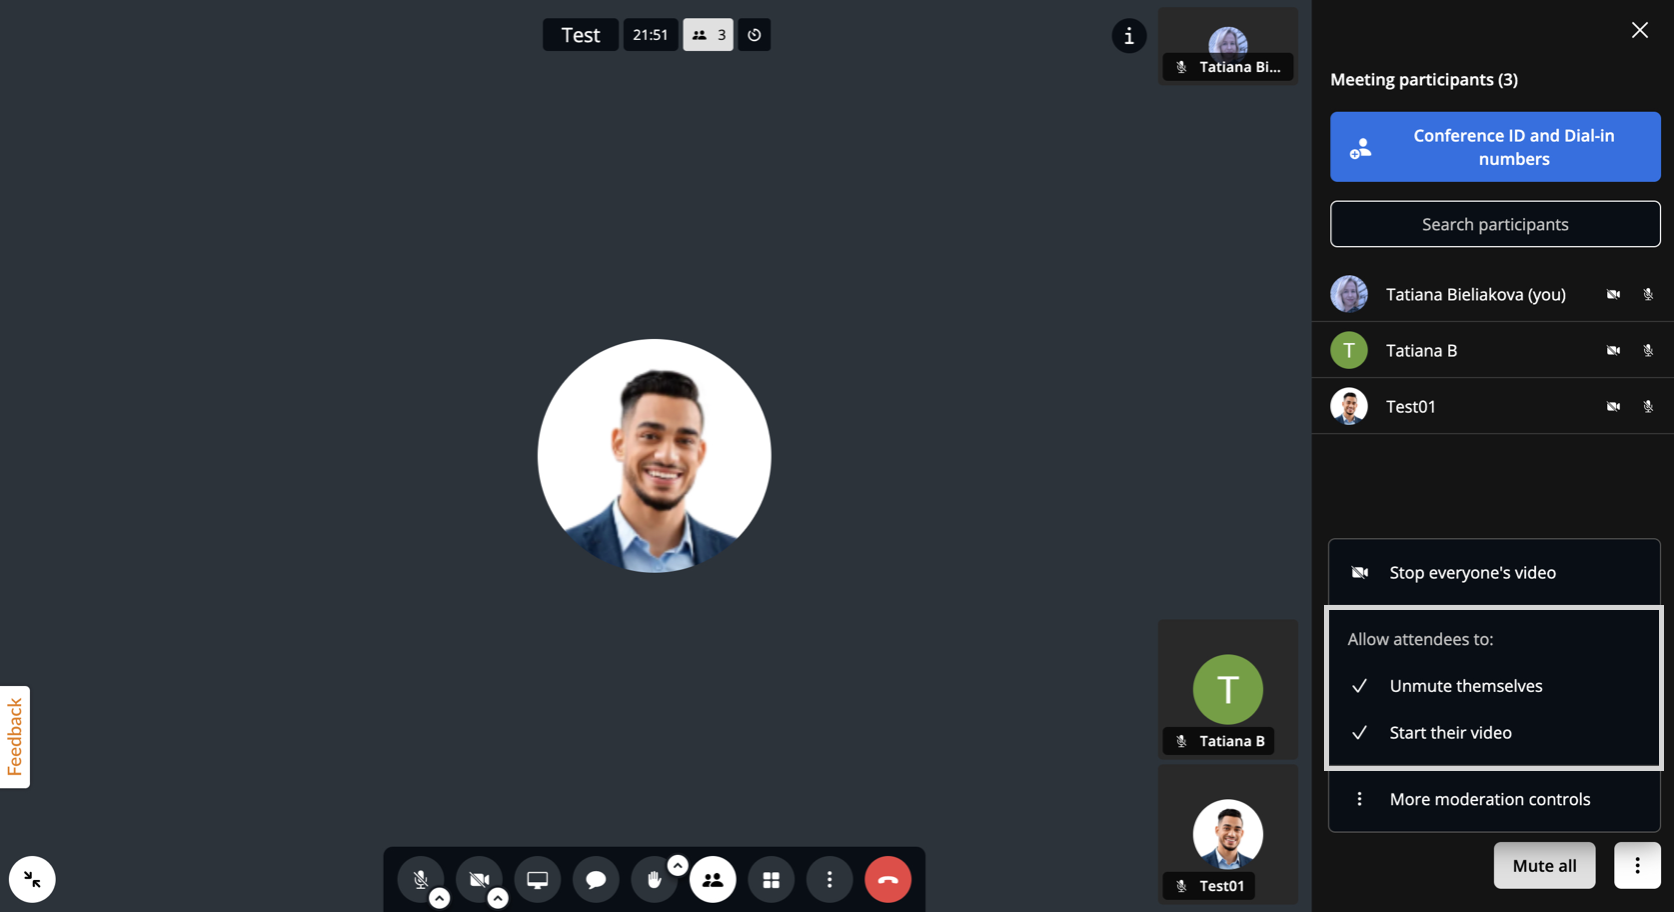
Here, you can also choose if you want to allow attendees to unmute themselves:
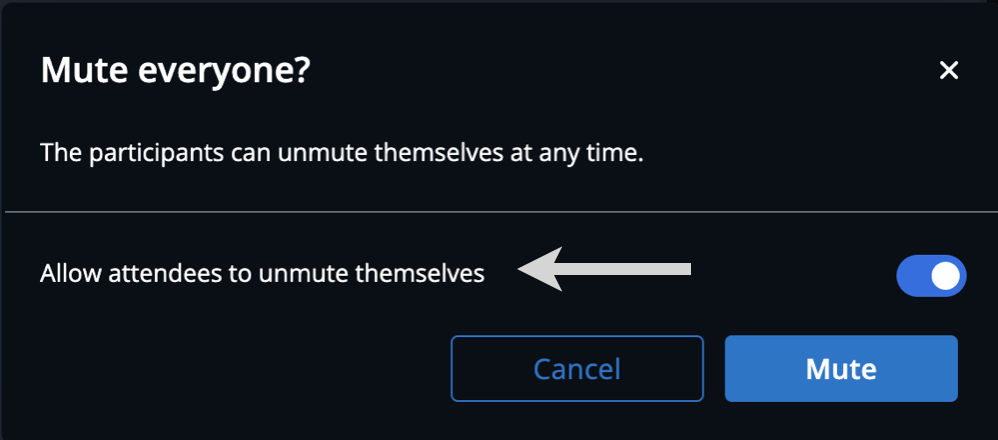
In this way you can mute everyone except yourself. You cannot unmute other users, but they can unmute themselves.
To mute everyone else except for one user:
Via Meeting participants panel
- Click the Participants icon in the lower central side of the screen
- Click three dots next to the user that should stay unmuted (1) and press Mute everyone else (2):
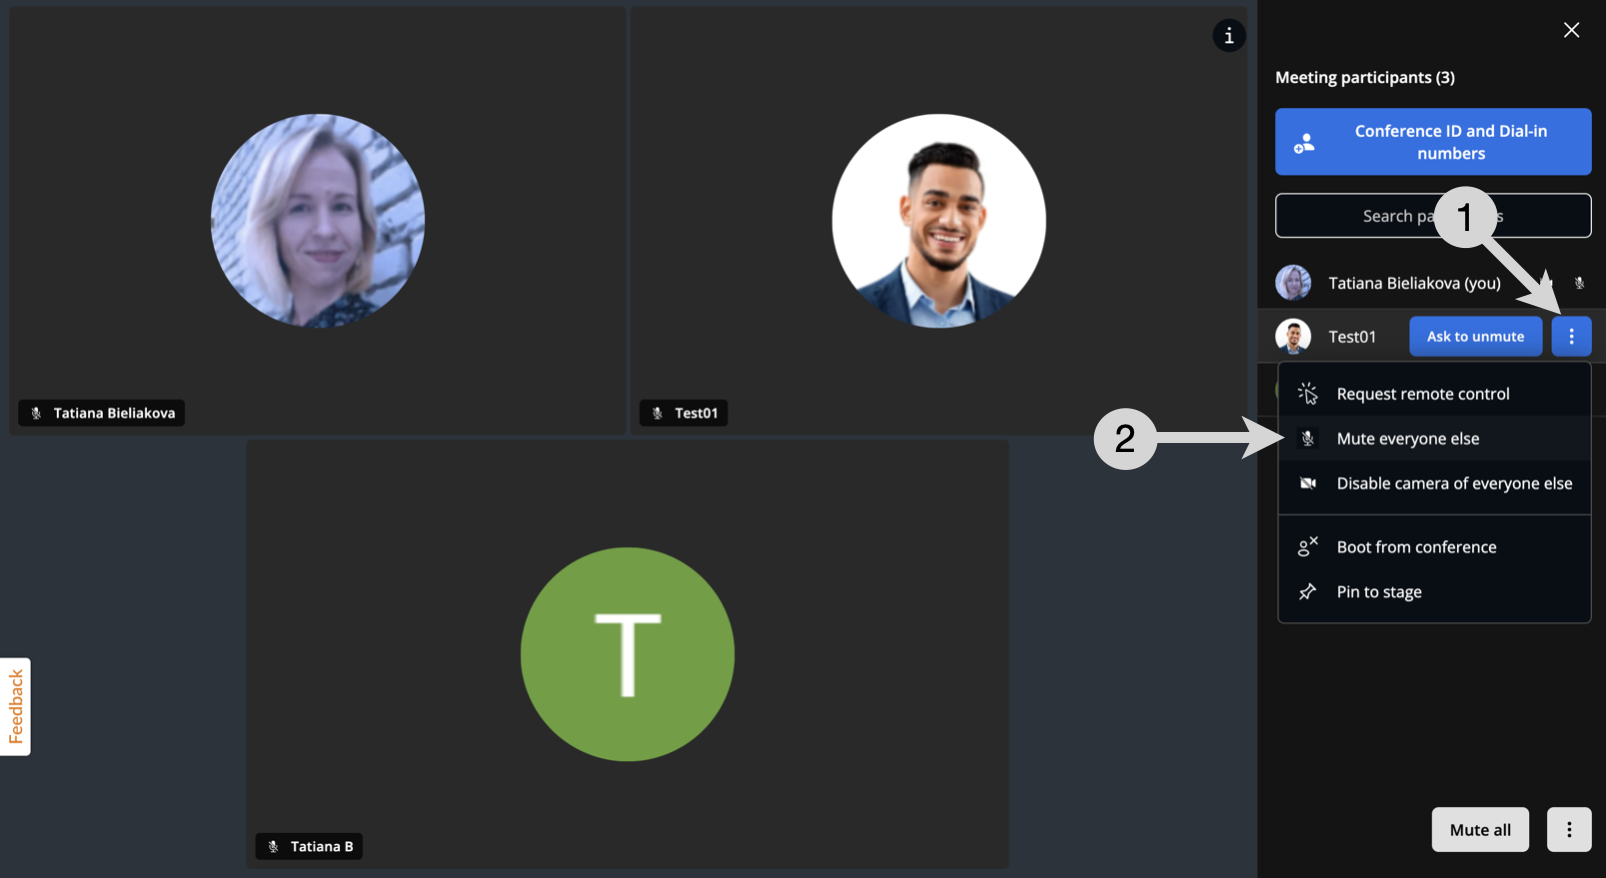
- A new dialog opens, click Mute to confirm:
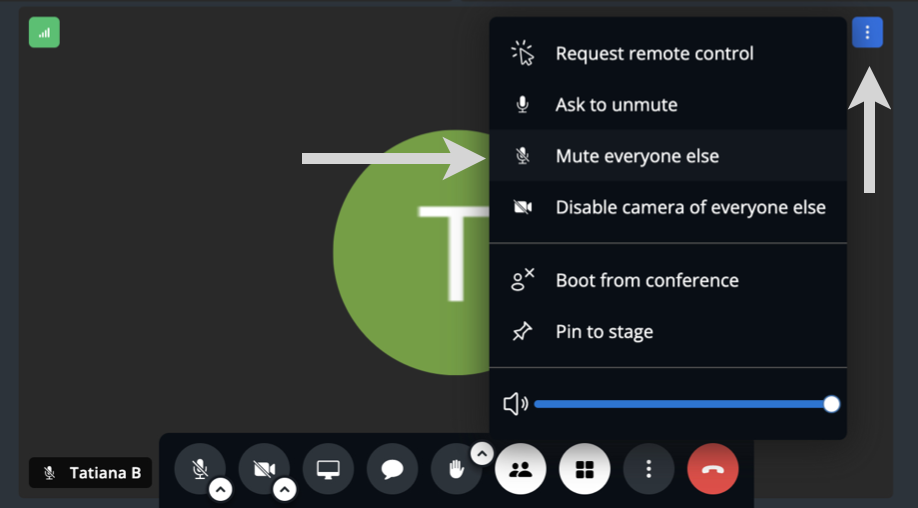
Via user's preview
- Hover the mouse cursor over three dots in the upper right-hand side of the user's preview
- Click Mute everyone else:
- A new dialog opens, click on Mute to confirm
Disable users' camera
This option is reserved for PBX users only.
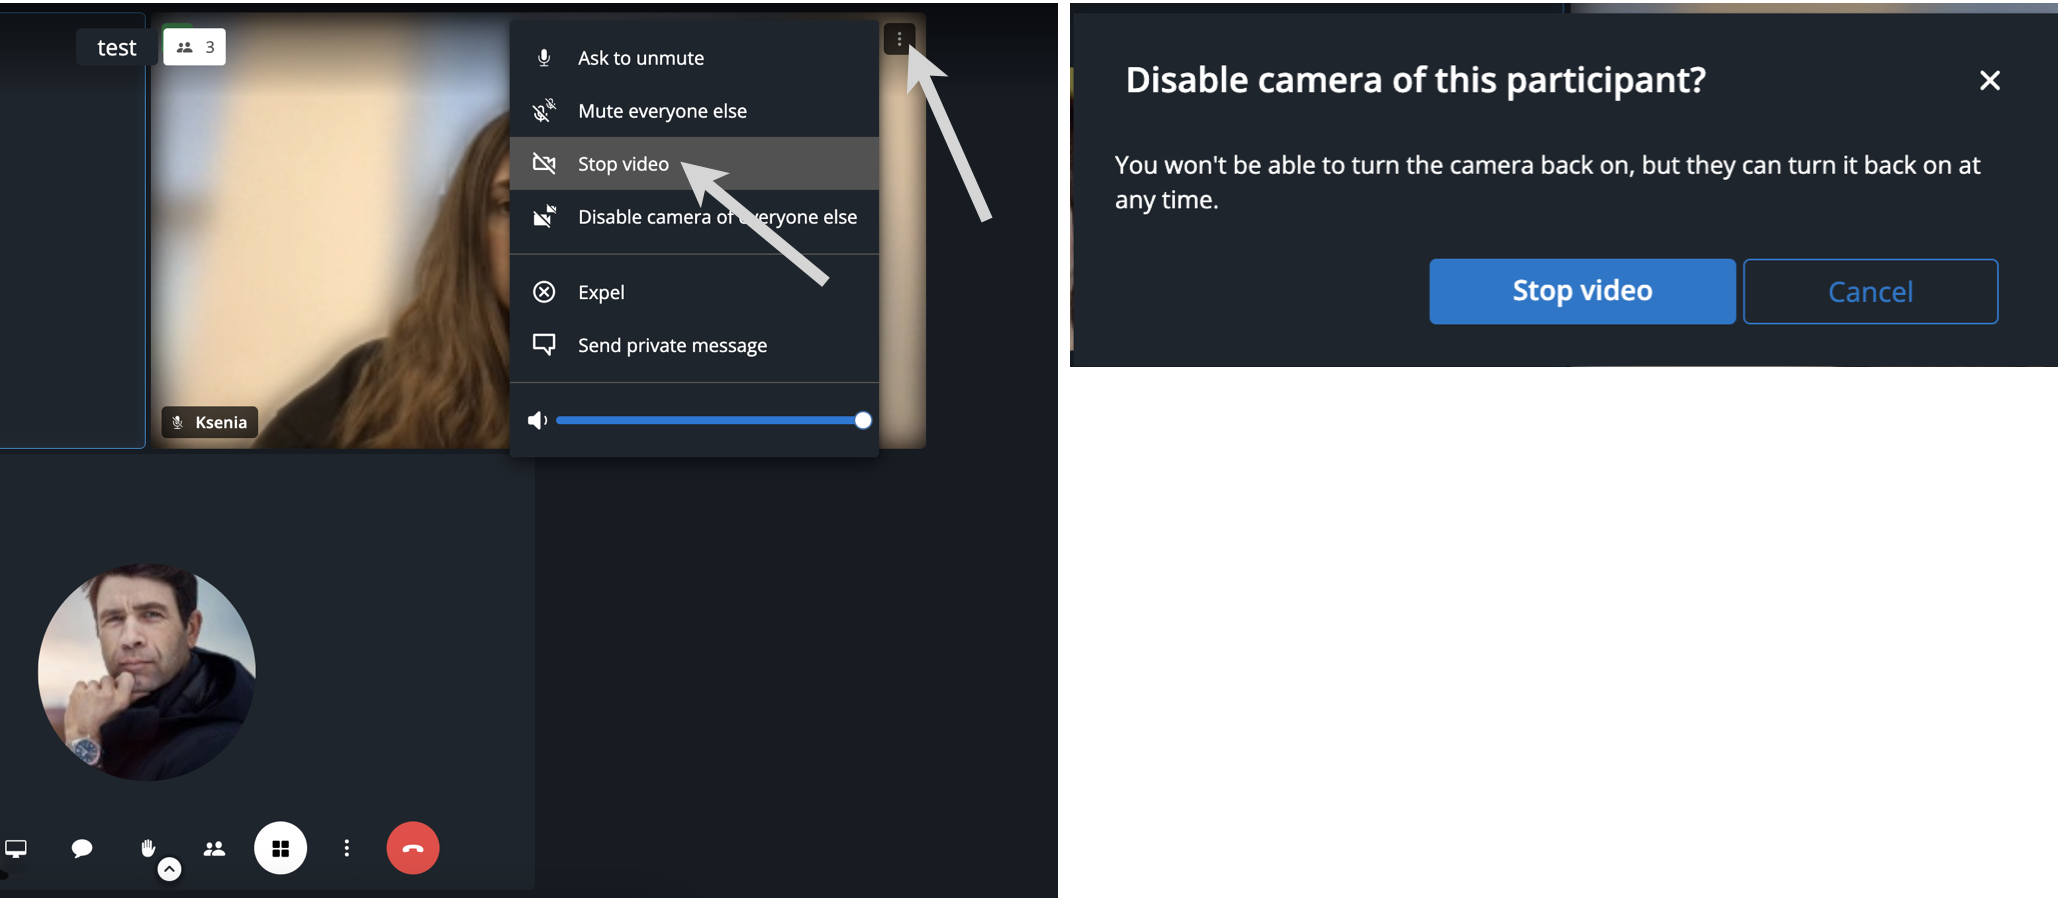
To disable user's camera:
- Find the user you want to disable camera for
- Hover the mouse cursor over three dots in the upper right-hand side of the user's preview
- Click Stop video
- A new dialog opens, click on Stop video to confirm
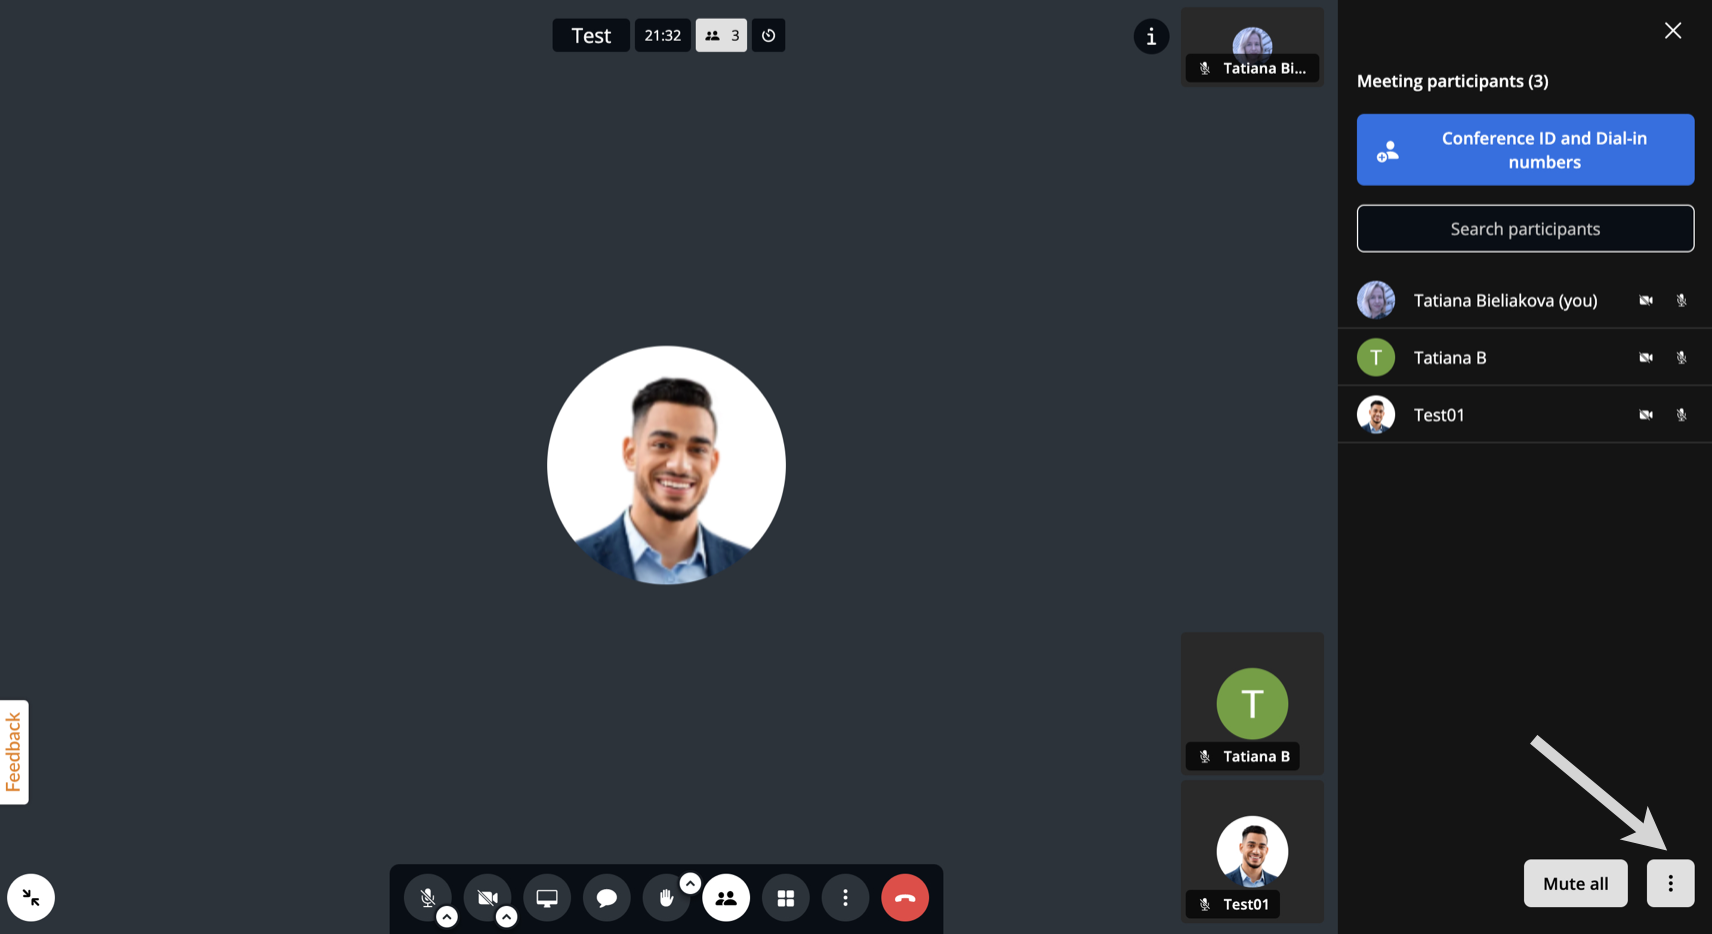
To disable everyone's camera:
- Click the Participants icon in the lower central side of the screen
- Click three dots next to the Mute all button (1) and press Stop everyone's video (2):
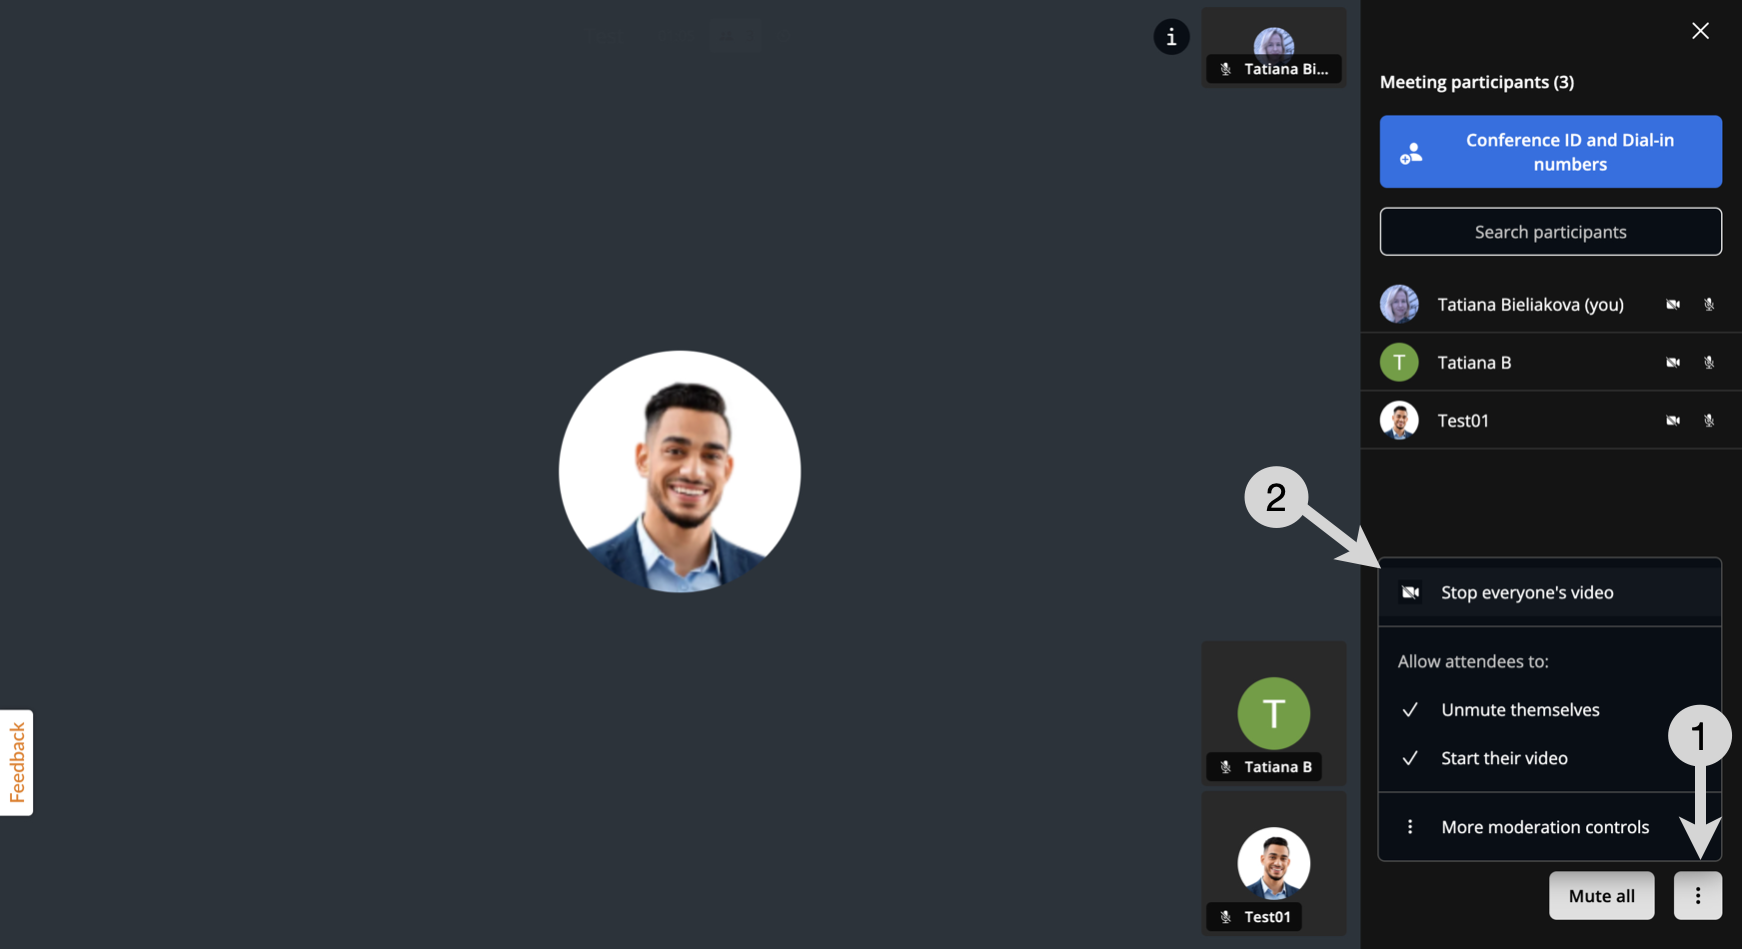
A new dialog opens, click on Stop video to confirm
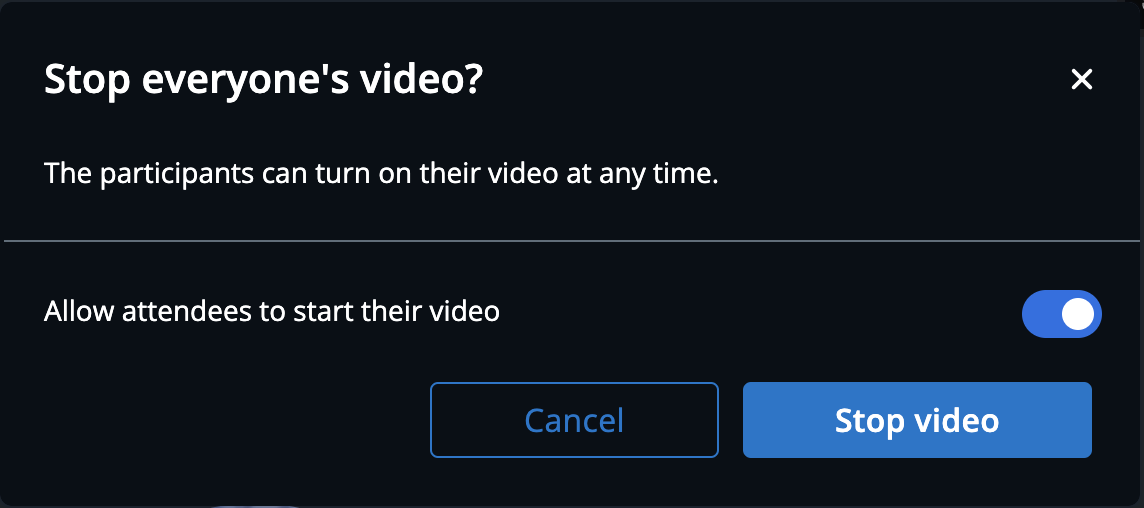
Here you can also choose if you want to allow attendees to start their video or not.
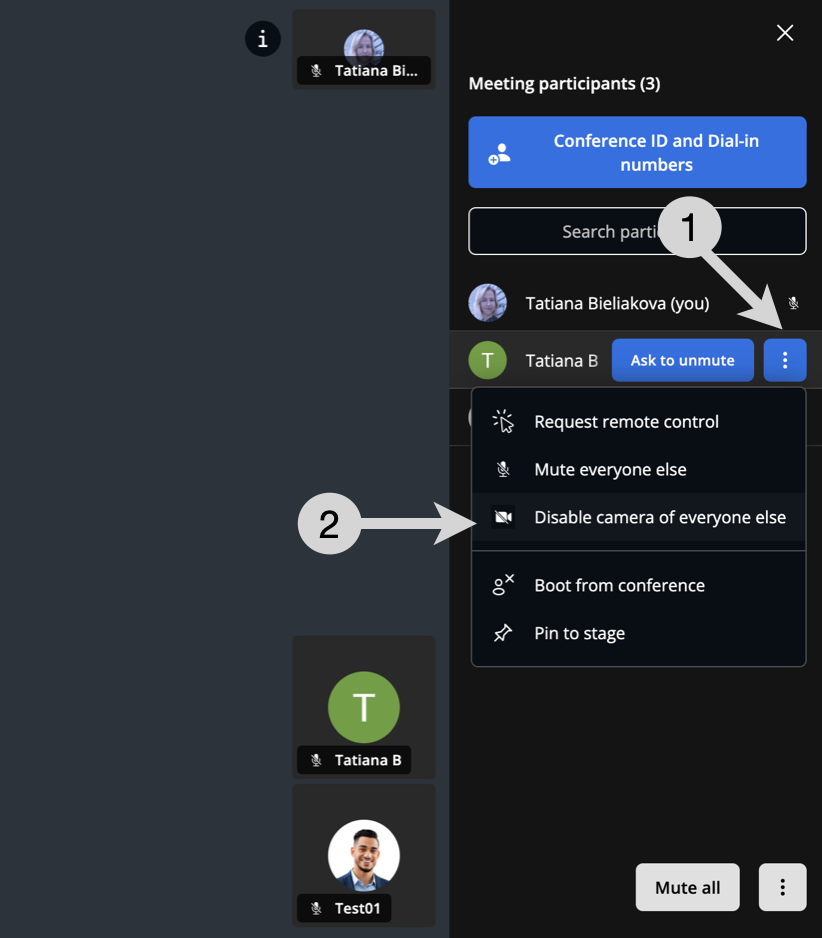
To disable everyone's camera except for one user:
Via Meeting participants panel
- Click the Participants icon in the lower central side of the screen
- Click three dots next to the user that should stay with enabled video (1) and press Disable camera of everyone else (2):
- Hover the mouse cursor over three dots in the upper right-hand side of the user's preview
- Click Disable camera of everyone else
- A new dialog opens, click on Stop video to confirm
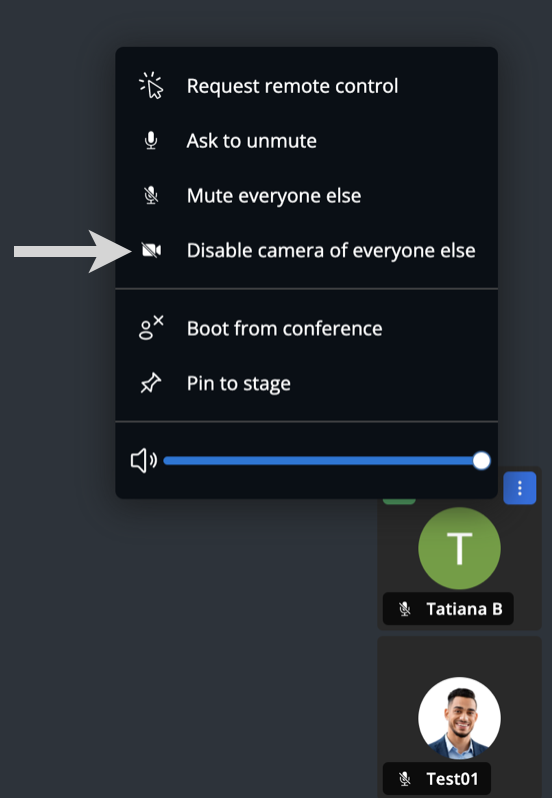
Via user's preview
- Hover the mouse cursor over three dots in the upper right-hand side of the user's preview
- Click Disable camera of everyone else:
Allow users to unmute/ enable video
By default, meeting participants can mute/ unmute themselves and enable/disable camera when they want. But if required, you can disallow them to unmute or to enable video:
- Click the Participants icon in the lower central side of the screen
- Click three dots next to the Mute all button:
- Under Allow attendees to, tick on/off the options below:
- Unmute themselves
- Start their video
Note: In case unmuting/enabling video was disallowed, to unmute themselves or to enable video, meeting participants should raise a hand -> user should press Ask user to unmute -> the participants gets possibility to unmute/ enable video.
Remove users from a conference
This option is reserved for PBX users only.
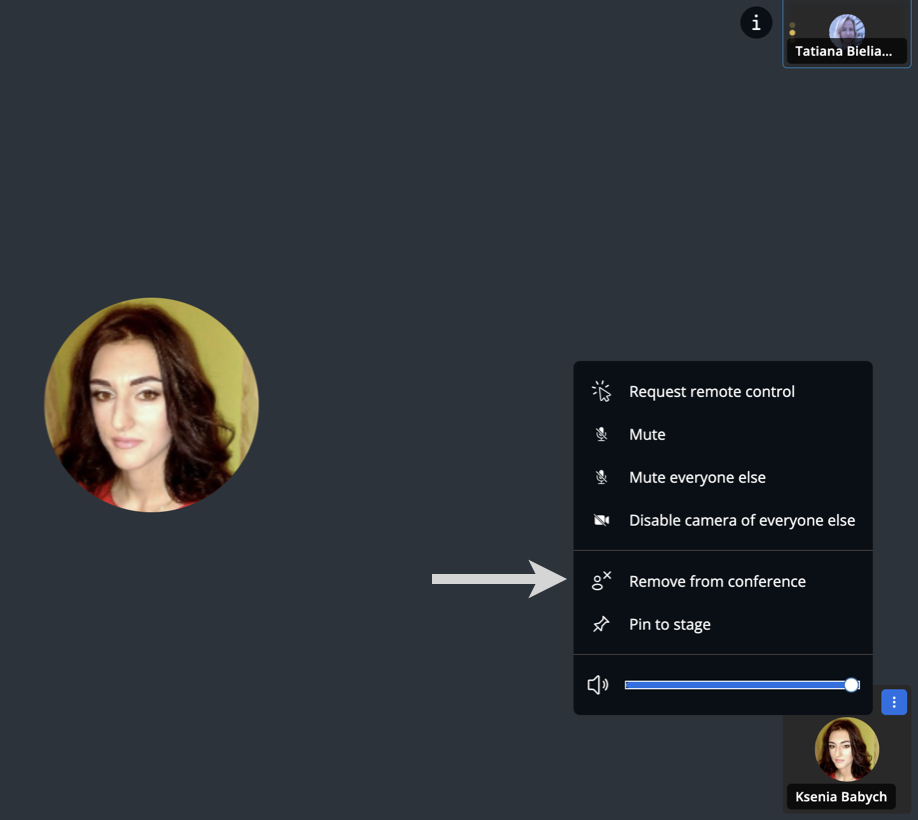
To remove a user:
- Find the user you want to remove
- Hover the mouse cursor over three dots in the upper right-hand side of the user's preview
- Click on Remove from conference
End meeting for all
- Click three dots (More actions) at the bottom menu
- Press End meeting for all:

Conference recording
Only users within a PBX can manage recordings (start, stop, access the list of recordings); not unavailable for external users.
Limitation: a recording is automatically stopped after reaching 2 hours or if a file size exceeds 2 GB. Once it is stopped, you can start it again.
Note, that live streaming option is disabled when conference recording is running.
To start recording:
- Click on three dots (More actions) in the lower central side of the screen
- Click Start recording
- A new dialog opens, click Start recording to confirm
Recording starts in several seconds. Red REC icon is displayed in the upper right-hand part of the screen when the recording is running.
Note: watermark and list of participants are now not included in recordings.

To stop recording:
- Click again on three dots (More actions) in the lower central side of the screen
- Click Stop recording
- A new dialog opens, click Confirm

To download or watch the recording files:
a) In the conference:
- Click again on three dots (More actions) in the lower central side of the screen
- Click View Recordings
- A new dialog Recordings list opens, click on the file(s) to download
- Click Done to close the dialog

b) In the conversation:
After the conference ends, the links to the recording appear in the chat. Here, you have two options:
- Watch the recording: the recording opens in a separate tab where you can watch it
- Download the recording

Note: The link to the recording is temporary. If you copy the link to the recoring, it is valid for 1 hour only.
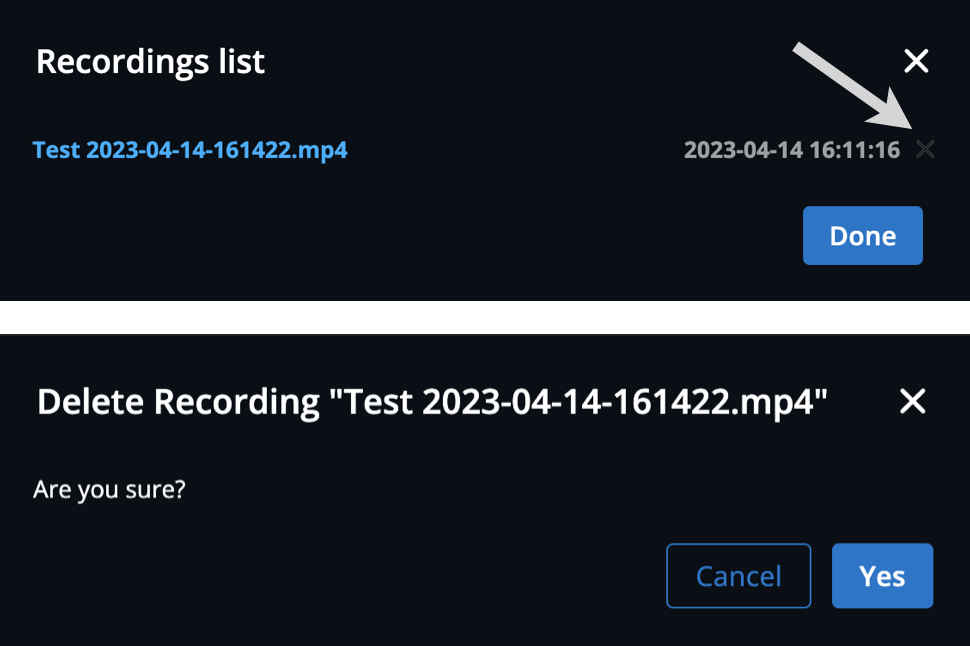
To delete recording files manually:
- Access Recordings list as described above
- Click on X next to a recording you to want to delete (you can only delete your own recordings, recordings started by other participants cannot be deleted):
- To confirm, click Yes
Important:
- Files are automatically deleted after 6 months or in case conversation is manually deleted.
- Please take into account that conversation is automatically deleted after 30 days of inactivity.
- In case there was a recording file in the conference, the conversation was deleted due to inactivity and 6 month time has not yet passed, the recording file can be accessed upon request to Customer Care team.
Live streaming
Only users within a PBX can start or stop live streams; not unavailable for external users.
Limitation: a live streaming is automatically stopped after reaching 2 hours or if a file size exceeds 2 GB. Once it is stopped, you can start it again.
Note, that conference recording option is disabled when live streaming is running
This feature allows you to make live streaming of your conference to YouTube and Facebook.
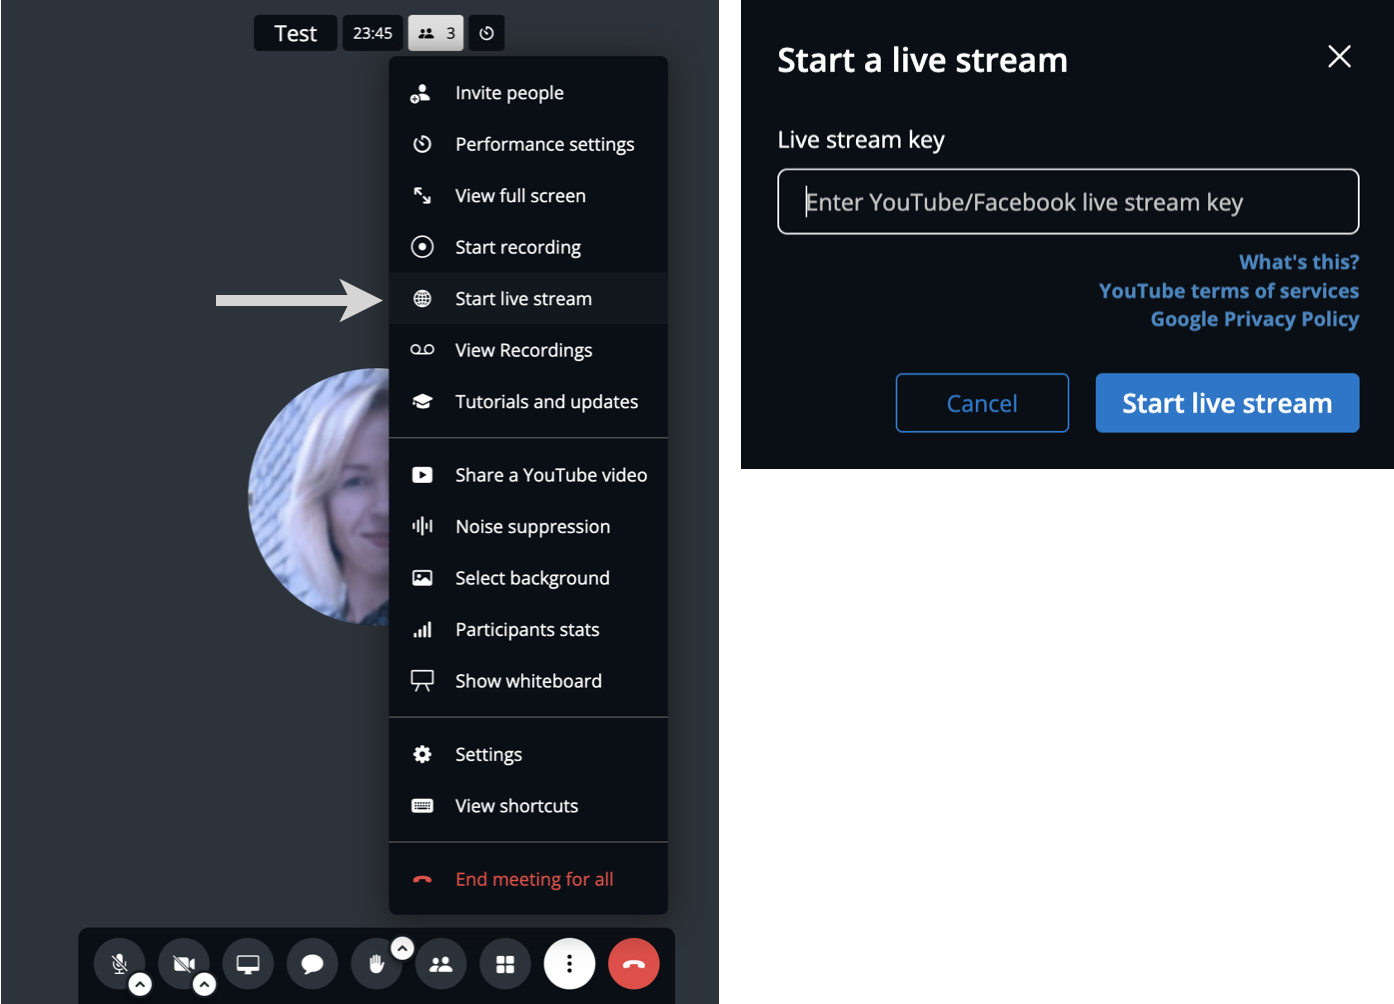
To start live streaming:
- Click on three dots in the lower central side of the screen
- Click Start live stream
- New dialog opens; enter the Live stream key and click Start live stream
Blue LIVE icon is displayed in the upper right-hand part of the screen when the live streaming is running.
For information on how to retrieve the Streaming Key for Facebook and YouTube, refer to Live Streaming Guide.
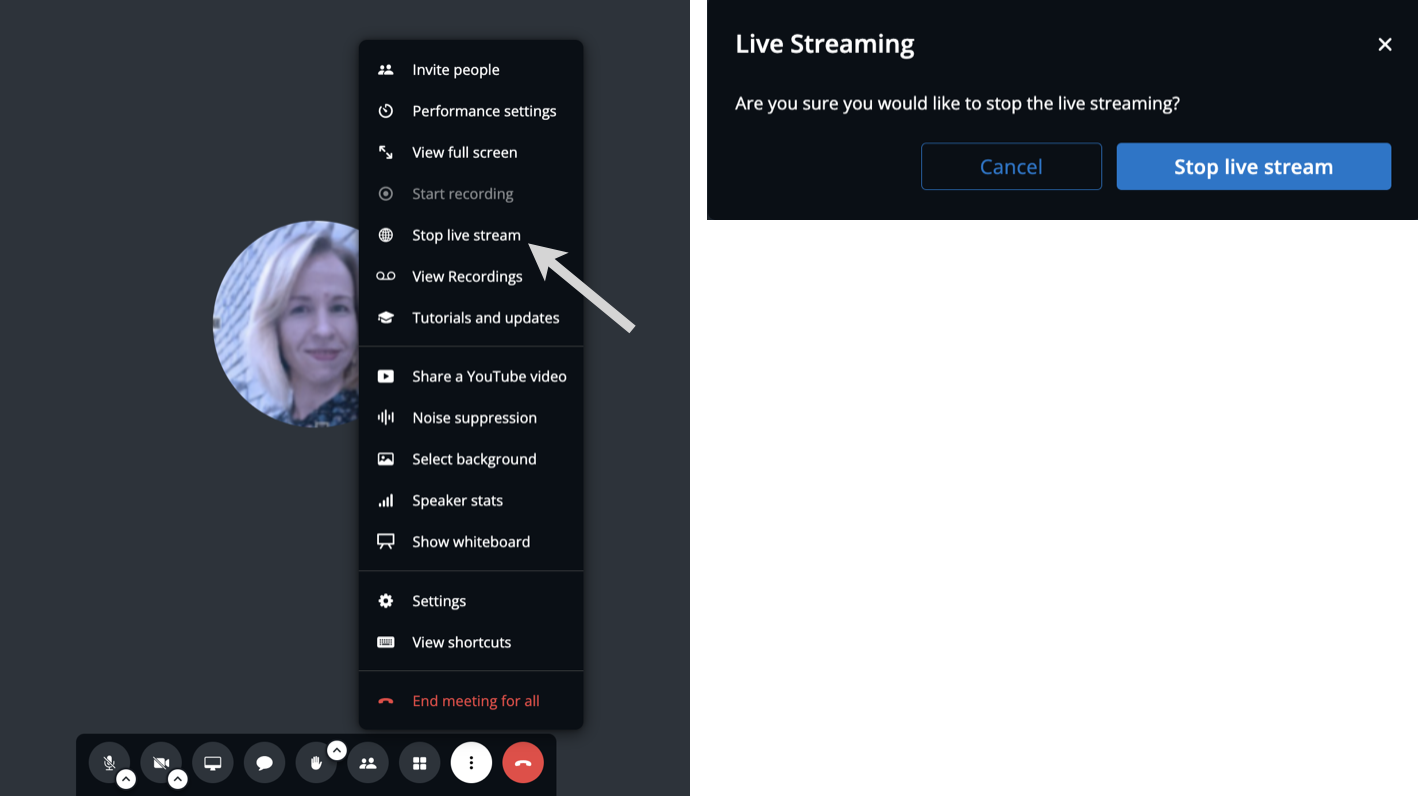
To stop live streaming:
- Click once again on three dots in the lower central side of the screen
- Click Stop live stream
- New dialog opens; click Stop live stream to confirm
Leave the meeting
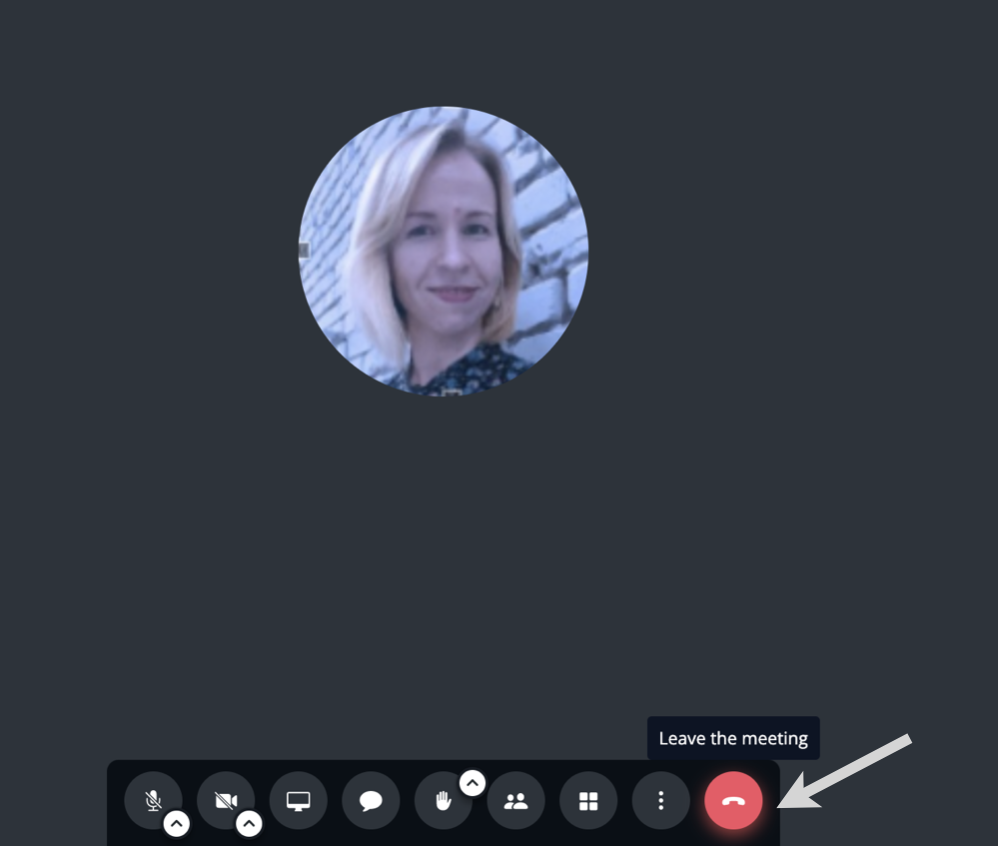
To leave the conference:
- Click the red handset icon (Leave the meeting) in the lower central side of the screen to leave the conference:
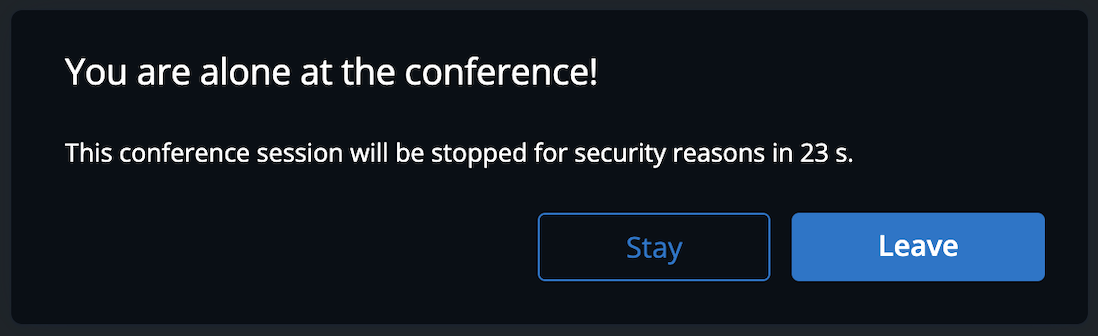
If a user is left alone in a conference for more then a minute, the relevant notification is displayed and the conference session is stopped automatically within 30 seconds:
Miscellaneous
Participants stats
You can view speaker statistics, to understand how much time each user spoke during the conference:
- Click on three dots in the lower central side of the screen
- Click Participants stats
- New dialog Participants Stats opens:

The same dialog can be also opened when you click on the number of participants in the top of the conference (displayed if there are at least 3 participants in the conference):

Participants stats gets reset each time you leave/ access again the conference room or in case you refresh the browser tab.
Talk ratio and Hints
x-bees conference offers functionality, especially useful for sales people, that allows to monitor the talk ratio, duration of the longest monologue and shows hints to agents during the conference.
Note: The functionality is available for PBX users only.
Note: Currently, there are some conditions that can influence talk ratio data:
- If the user speaks quietly, talk ratio may be not counted correctly.
- When the user was talking and then mutes himself, talk ratio continues to be counted for the user.
Talk ratio is shown in participants stats, after at least two conference participants have talked in the conference. You can see the monologue time and the percentage of talk time compared to other participants:

Enable Hints
You can enable real-time sales coaching hints to be shown to agents during the conference. To activate hints, go to More actions -> Settings -> Advanced -> tick off Real-time hints:

If you want hints to be accompanied with sound, tick off Sound for hints. In Talk ratio section, choose one of the below options:
- Agent over Customer 40 / 60 % (for discovery calls)
- Agent over Customer 60 / 40 %
- Agent over Customer 80 / 20 % (for demos)
In case the chosen talk ratio is not kept, hint is shown to agent displaying information about agent’s talk ratio and duration of the longest monologue: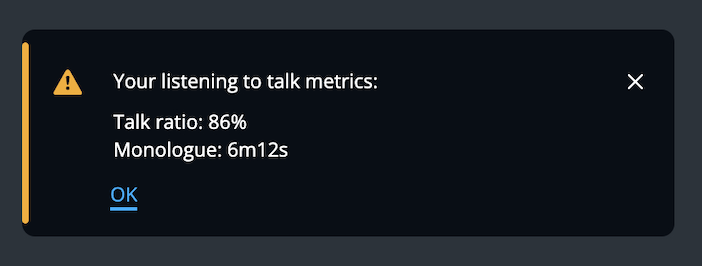
Note: The first notification is shown not earlier than in 5 minutes after the conference start. Further notifications are displayed in the following intervals: after 3 minutes, 7 minutes, 15 minutes.
Transcription & Subtitles
x-bees videoconference offers the Transcription feature, that performs speech-to-text transcription of what is being said during the conference. To enable:
- Click on More actions (three dots) in the lower central side of the screen
- Click Transcription
- The new dialog Transcription opens, where you can choose the language for the transcription (transcription gets enabled as soon as you click on the selected language):

If you want subtitles to be displayed when participants talk in the conference, you need to enable Subtitles:
1. Click More actions (three dots)
2. Press Enable subtitles:

When enabled, subtitles are displayed at the lower part of the screen:

Note:
- By default, Subtitles are disabled.
- To enable Subtitles, Transcription should be turned on. If Transcription is disabled, the Enable subtitles button is inactive.
Transcription is enabled in English by default, if there are external users in the conference.
- The languages that are currently supported are: English (US), English (British), Spanish (Spain), Italian, French, German, Portuguese (Brazilian), Portuguese (Portugal), Arabic (United Arab Emirates), Arabic (Saudi Arabia), Dutch (Netherlands), German (Swiss), Afrikaans (South Africa), Basque (Spain), Catalan (Spain), Chinese (Simplified), Chinese (Hong Kong), Chinese Mandarin (Traditional, Taiwan), Croatian (Croatia), Czech (Czech Republic), Danish (Denmark), English (Australian), English (India), English (Ireland), English (New Zealand), English (Scottish), English (South Africa), English (Welsh), Persian (Iran), Finnish (Finland), French (Canadian), Galician (Spain), Greek (Greece), Hebrew, Hindi, Indonesian (Indonesia), Japanese, Korean, Latvian, Malay (Malaysia), Norwegian Bokmal (Norway), Polish (Poland), Romanian (Romania), Russian, Serbian (Serbia), Slovak (Slovakia), Somali, Spanish (United States), Swedish (Sweden), Tagalog (Filipino), Thai, Ukrainian (Ukraine), Vietnamese (Vietnam), Zulu (South Africa).
The language of the transcription is the same for all participants of the conference. In case any participant changes the language, it automatically gets changed for the rest participants of the conference. The language is stored for future usage.
Example: The conference starts, someone starts transcription in English and for all people in the conference the language is set to English (for future conferences as well). Somebody changes the transcription language to German -> for all participants of the conference the language is set to German (for future conferences as well, unless changed otherwise).- In case one PBX user turns off transcription during a conference, it gets disabled for all conference participants.
- In case all participants of the conference left and didn’t stop the recording and transcription, the conference automatically ends in up to 30 seconds.
Summary of the conference and transcription are sent to emails of the PBX users participating in the conference, if Transcription was enabled:
![]()
- The recording of the conference with external members may be started automatically if Transcription is enabled. This allows agents to easily view the meeting data whenever required and never miss out anything important. To manage if you want the transcription and recording to be started automatically, go to Settings -> Advanced and choose the preferred options:

Face expression analysis
You can monitor participants' mood during the conference with the Display emotions feature.
- Open Participants stats
- Turn the toggle on next to the option Display emotions:
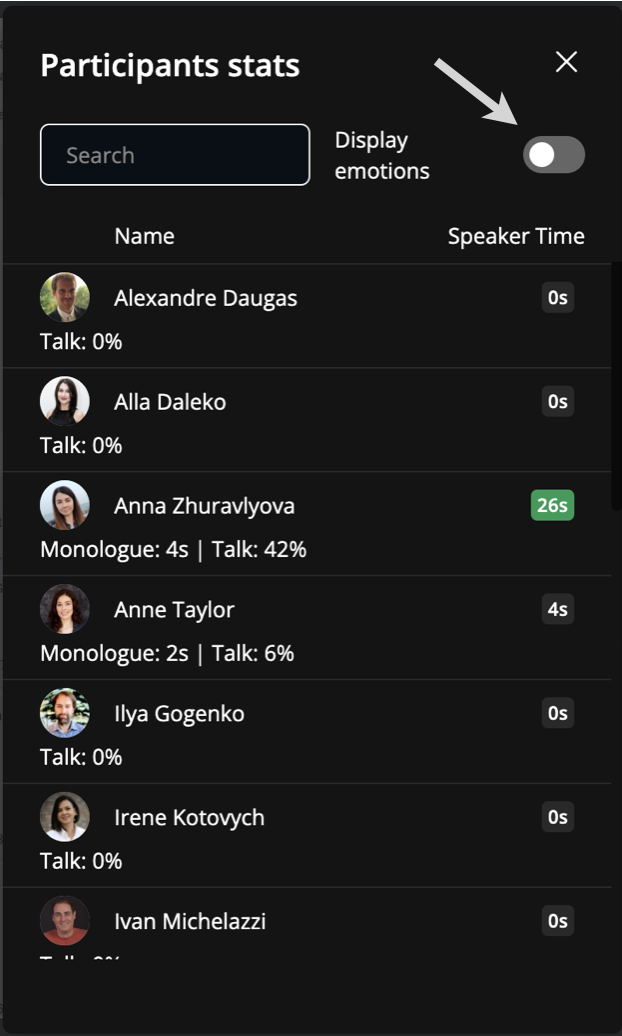
When the feature is enabled, you can see the list of emotions with corresponding colors at the top (1) and the emotions displayed in real time next to users who have camera on (2):
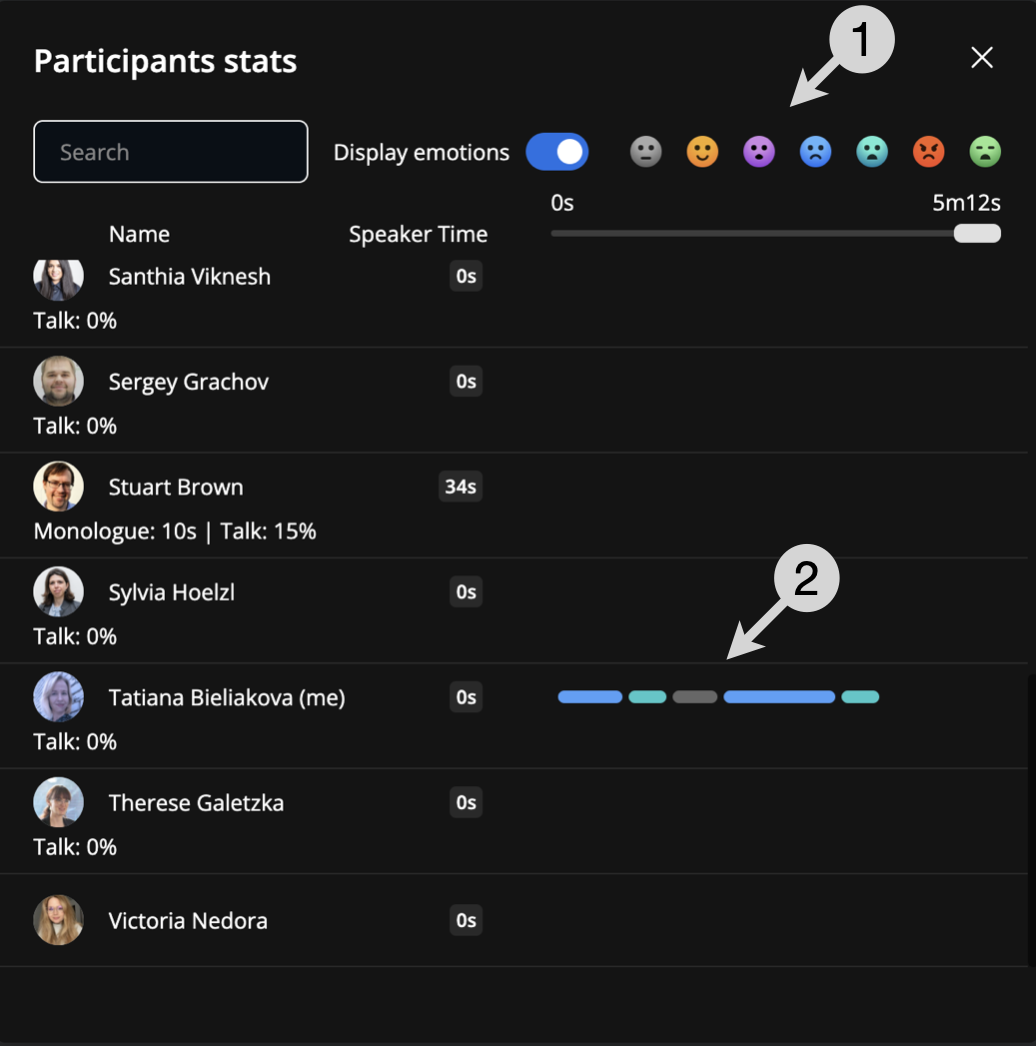
Note: The following emotions are displayed, with the corresponding colors: neutral (grey), happy (yellow), surprised (violet), sad (blue), fearful (light blue), angry (red), disgusted (green).
Connection quality indication
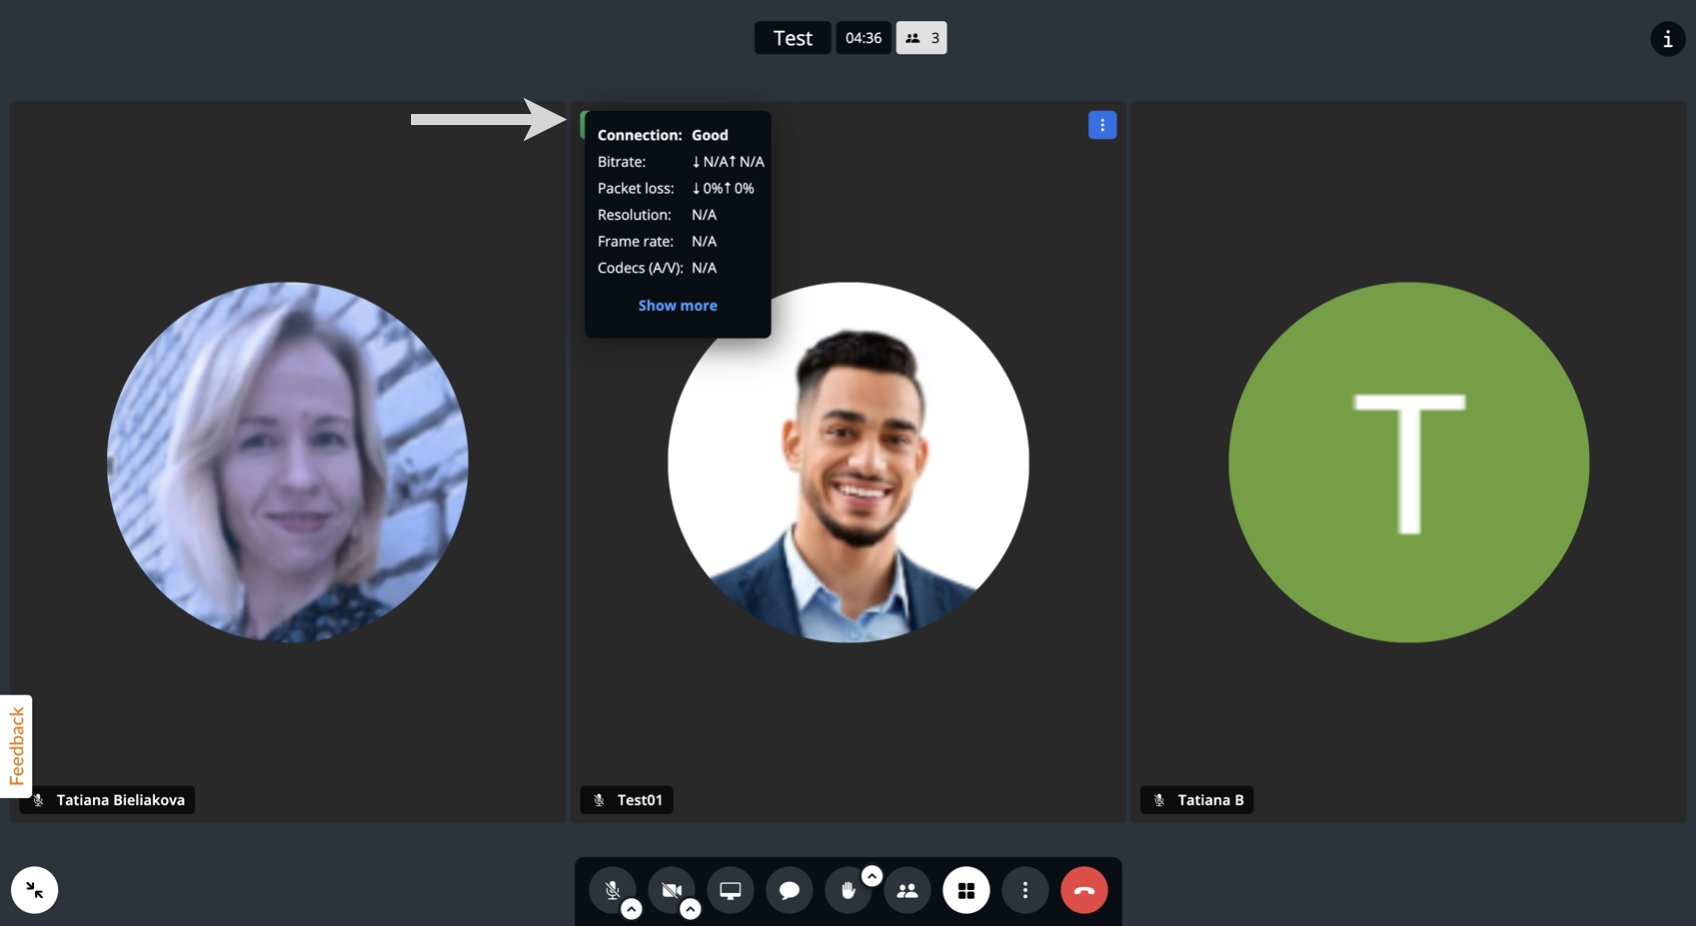
You can see the current connection quality for each user participating in the conference:
- Hover the mouse cursor over the user whose connection status you would like to check
- Hover the mouse cursor over the green or yellow Connection quality icon (color depends on the current connection quality) in the upper left-hand corner of the preview
- New dialog is displayed with the information on connection, bitrate, packet loss etc
- Click Show more in that dialog to see more details about your own connection quality
Manage sound settings
By default, you hear a system sound whenever a user joins or leaves a conference, etc. You can manage these sounds in Settings:
- Click three dots (More actions) in the lower central side of the screen and click Settings
- On the Settings screen, navigate to the Notifications tab and choose on which occasions you want the sound to be played:
- Meeting reactions
- Incoming message
- Participant joined
- Participant left
- Talk while muted
- Click OK

The sound settings are saved and used for your future conferences.
Keyboard shortcuts
For your convenience you can use keyboard shortcuts: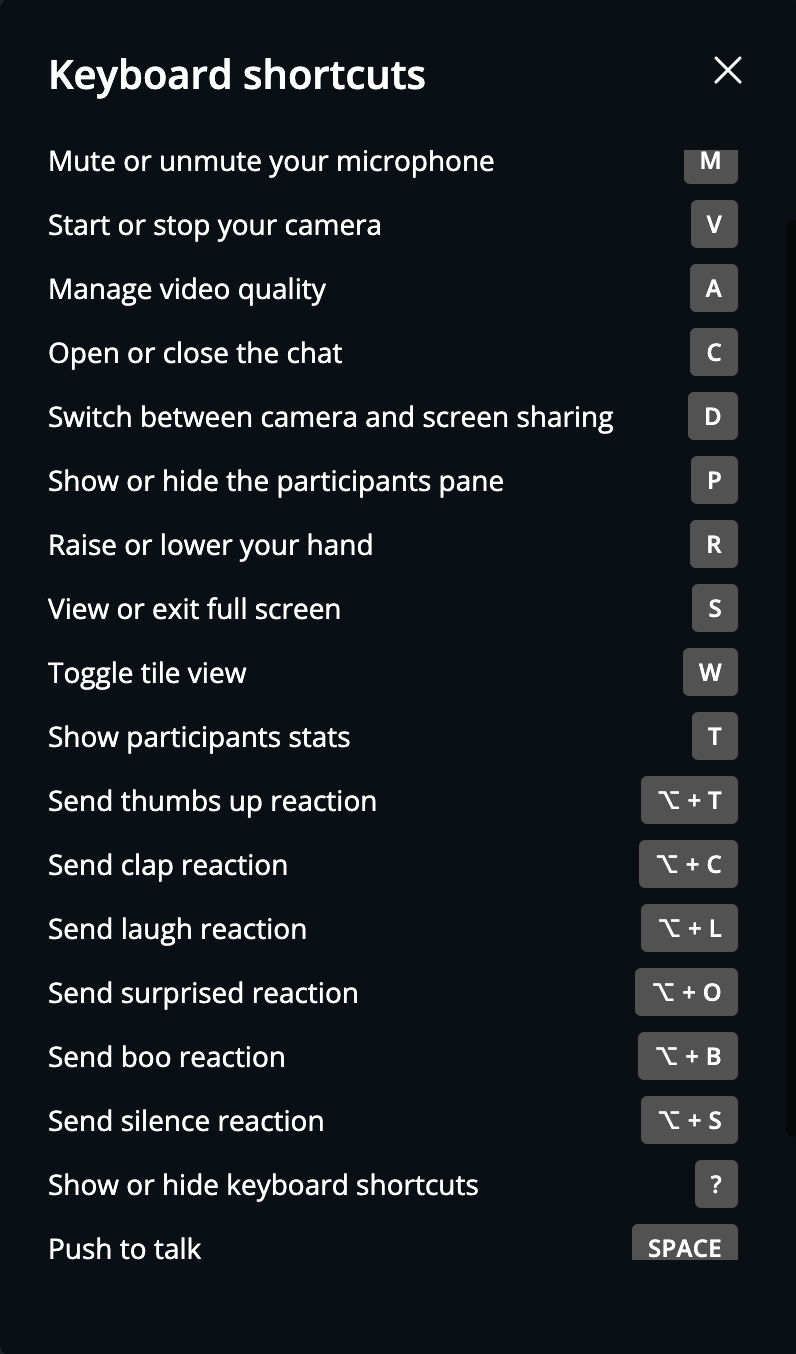
Visitor Mode
In case there are more than 30 participant in the conference, Visitor mode is used, to boost conference performance. Visitor mode suggests there are Speakers and Visitors in the conference. First 30 members who join the conference are automatically added as Speakers, while the rest participants join as Visitors.
When in Visitor mode, you can see the following notification:

Visitors have access to a limited conference functionality compared to Speakers:
- Visitors are muted and do not have Start/ Stop camera buttons
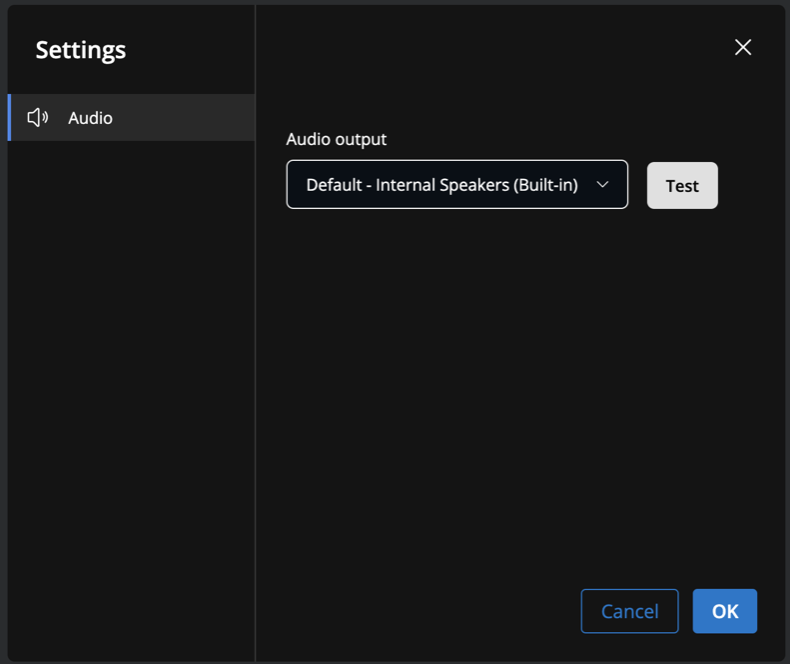
- In Settings, Visitors can only choose the audio output:
Moving Visitors to Speakers
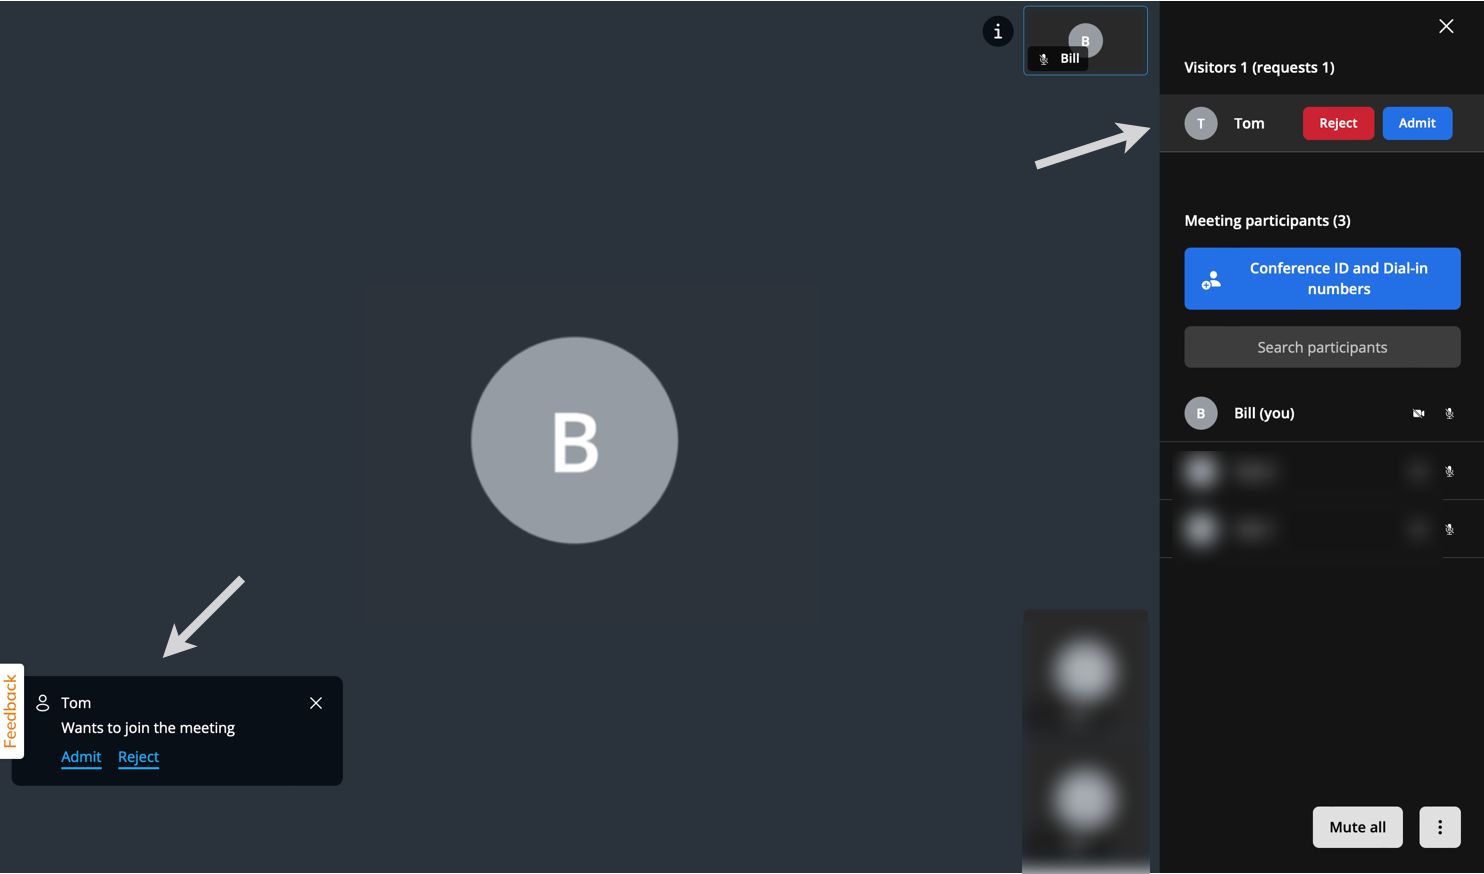
- If a Visitor wants to speak in the conference, they should press the Unmute button (1) or raise a hand (2):

- Speaker can admit or reject the request via push notifications or via the Participants panel:
When the request is admitted, Visitor is moved to Speakers. There is no restriction to the number of Visitors that can be moved to Speakers.
Note: It is currently not possible for speakers to manage visitor requests via mobile.
View the Visitors list
At the top, next to the conference title, there are two separate counters that display the number of speakers and visitors in the conference:

To view the list of Visitors, Speakers can click on the Visitors counter at the top:

A pop-up window with the list of visitors in the conference opens:

x-bees conference on mobile
Starting from x-bees app v. 1.53.1.192083 on iOS and v. 1.53.1.192083 on Android, conferencing feature is built into x-bees mobile app.
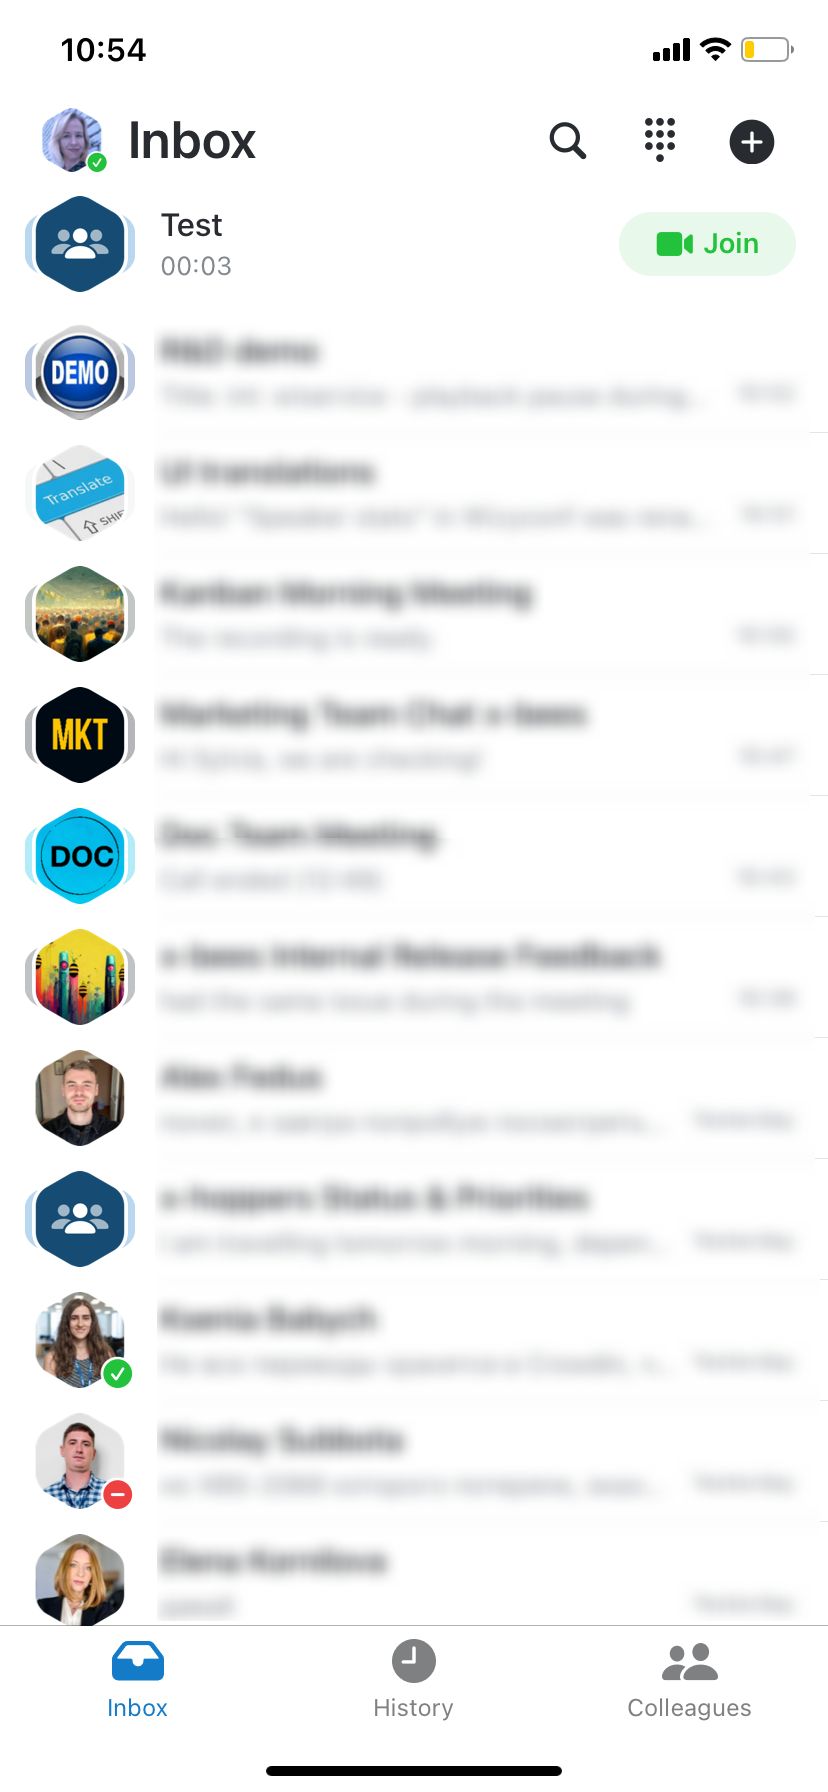
When the conference starts, the green Join button appears on the Inbox tab. To join the conference, tap Join:
Note: You can either join the conference from x-bees web or from mobile. If, say, you joined from web and then join from mobile, you are automatically removed from the conference on x-bees web.
After tapping the Join button, x-bees conference automatically opens:
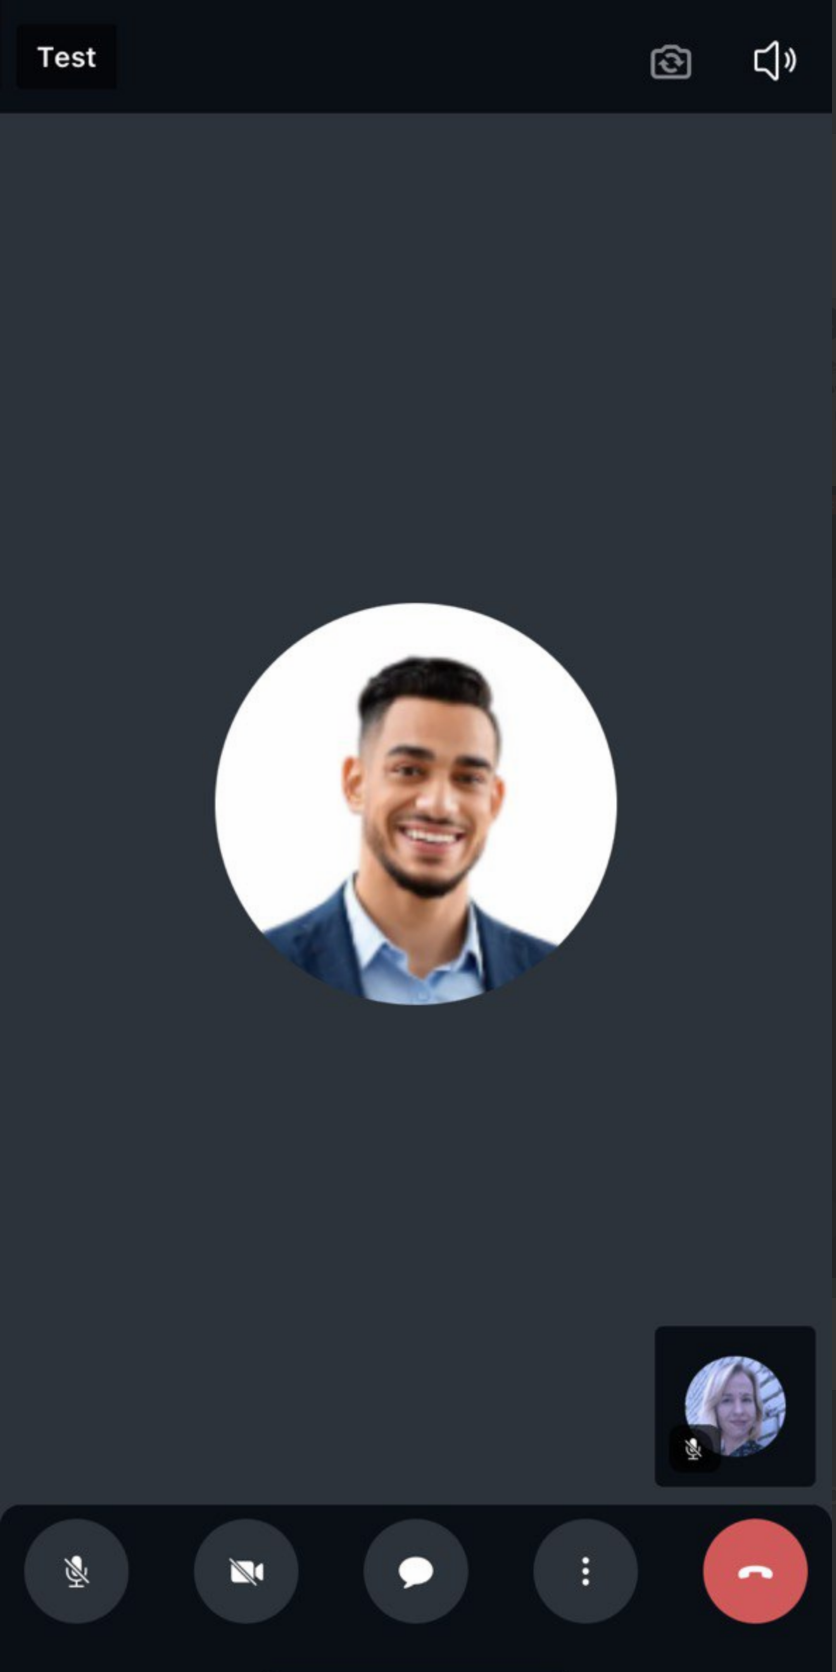
Once in the conference, you have the following conference controls:
- Mute/unmute yourself
Enable/ disable camera
Note: To be able to unmute yourself and enable camera, you need to allow x-bees conference access to Microphone and Camera in your smartphone settings.

- Open chat: When you tap the Chat button, you are directed to x-bees app with the relevant conversation
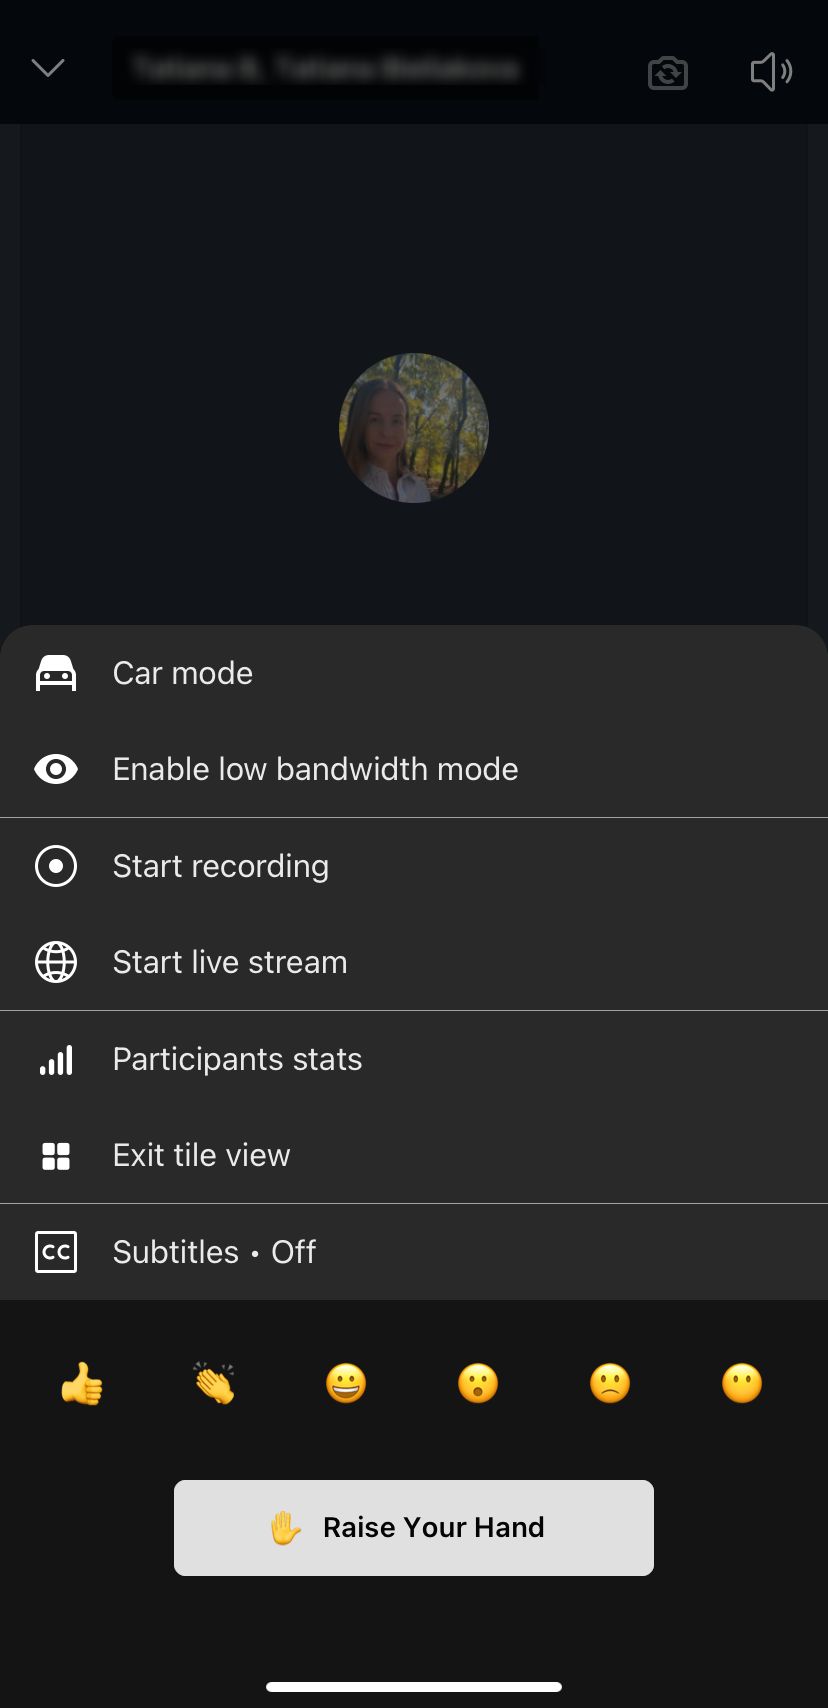
- Settings: The Settings section provides the following options:
- Car mode
- Enable low bandwidth mode
- Start recording
- Start live stream
- Participants stats
- Enter/ Exit tile view
- Subtitles
- Send reactions
- Raise Your Hand
Current limitation:
The following features are currently not available in conferences inside x-bees app: sharing a YouTube video, starting screen sharing
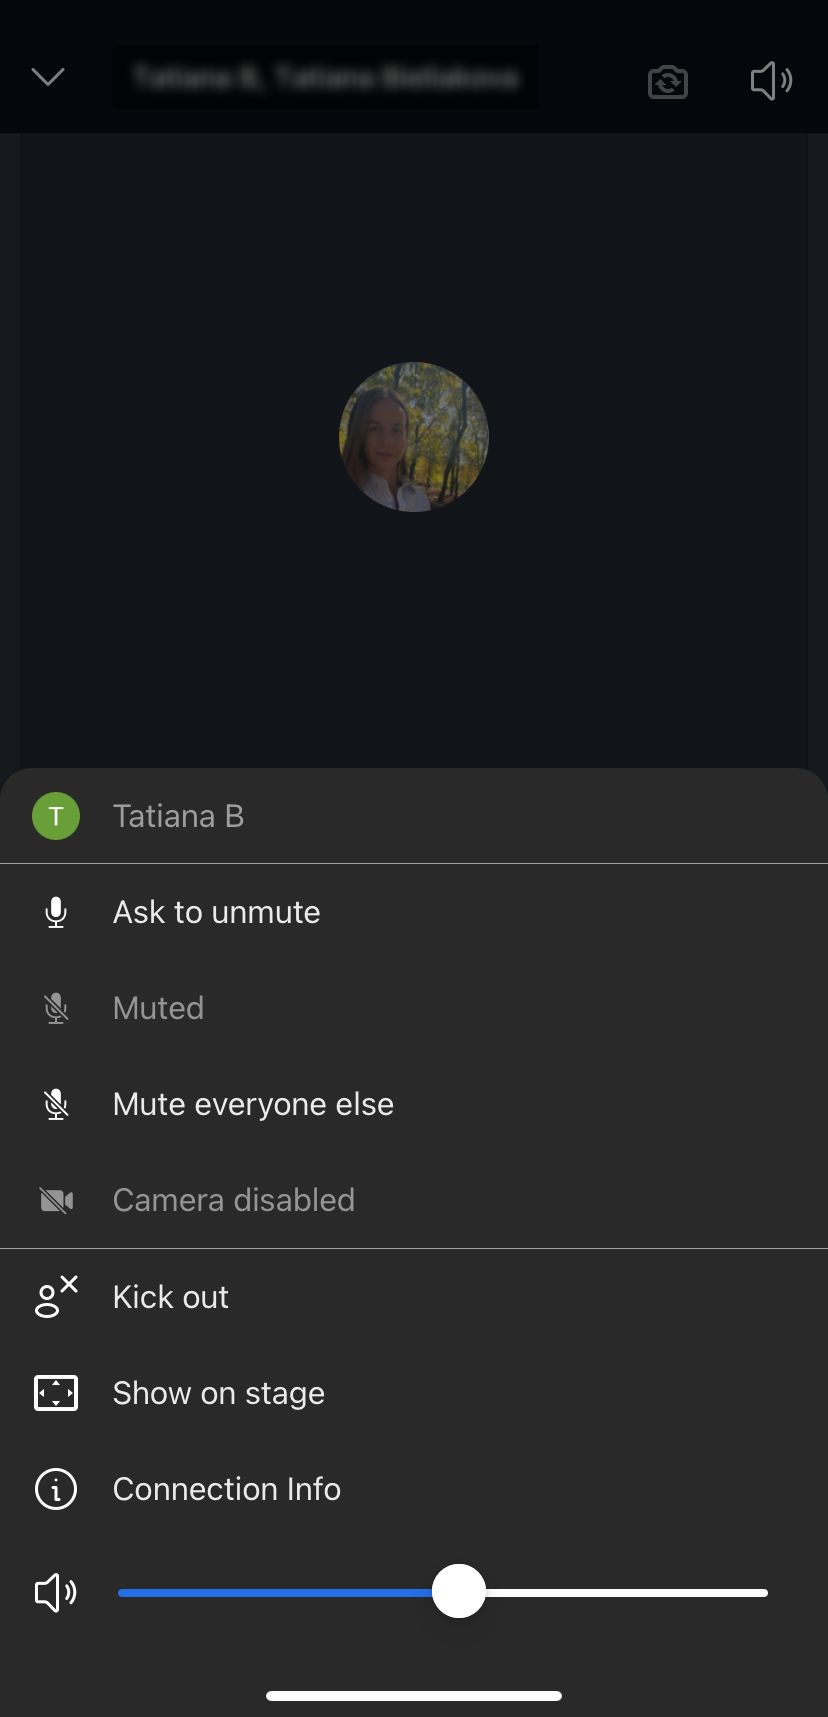
- When you tap on a conference participant, you get the following options:
- Ask to unmute
- Mute
- Mute everyone else
- Disable camera
- Kick out from conference
- Connection Info
- Show on stage
- Manage volume
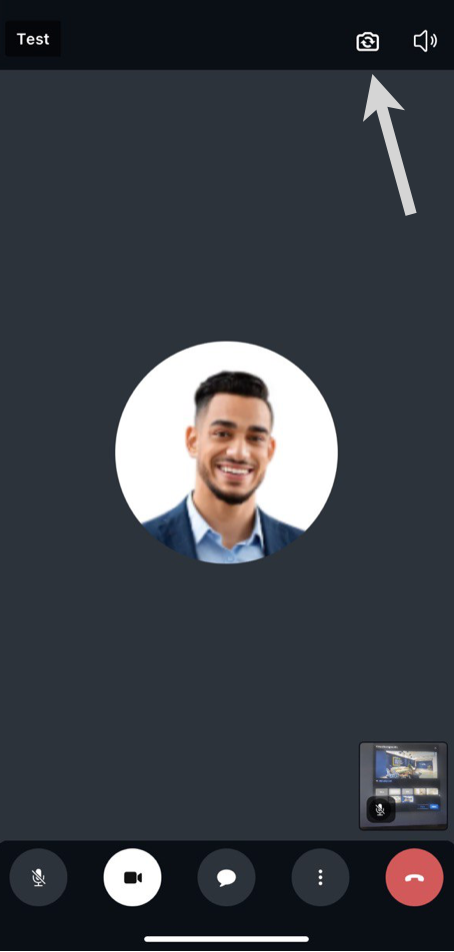
- To switch between between front and rear camera when you enable video, tap on the camera icon at the top:
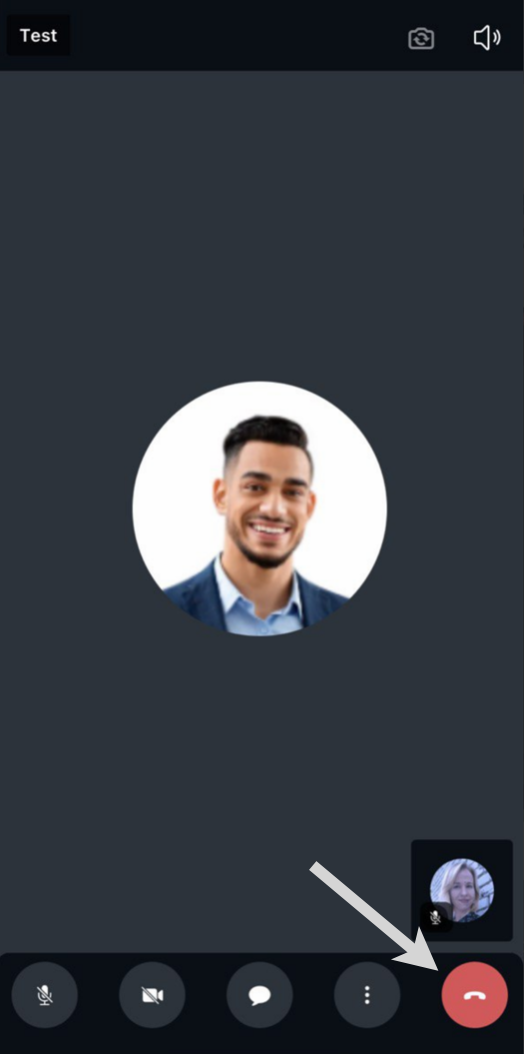
- To leave the conference room, tap the red handset icon:
- When you switch to other x-bees tabs (e.g. Inbox), without tapping the button Leave the conference, you remain in the conference. To open the conference, click on the Expand icon on the Inbox tab: