Import of Contacts and Users - Admin Guide
- Ksenia Babych
- Tatiana Bieliakova
- Anna Zhuravlyova
- Elena Kornilova
This guide explains how to import contacts and users from external databases / servers into a Wildix PBX.
WMS Version: 5.0X / 6.0X
Updated: January 2025
Permalink: https://wildix.atlassian.net/wiki/x/0xnOAQ
General info
For import of users:
- Go to WMS -> Users
- Click Import (the option is available only for admin user)
For import of contacts:
- Go to WMS -> Users -> Phonebooks
- Select an existing phonebook or click + to add a new Phonebook
- Click Import
Note that in case of WMS network, each PBX has its own Phonebooks, which must be imported separately
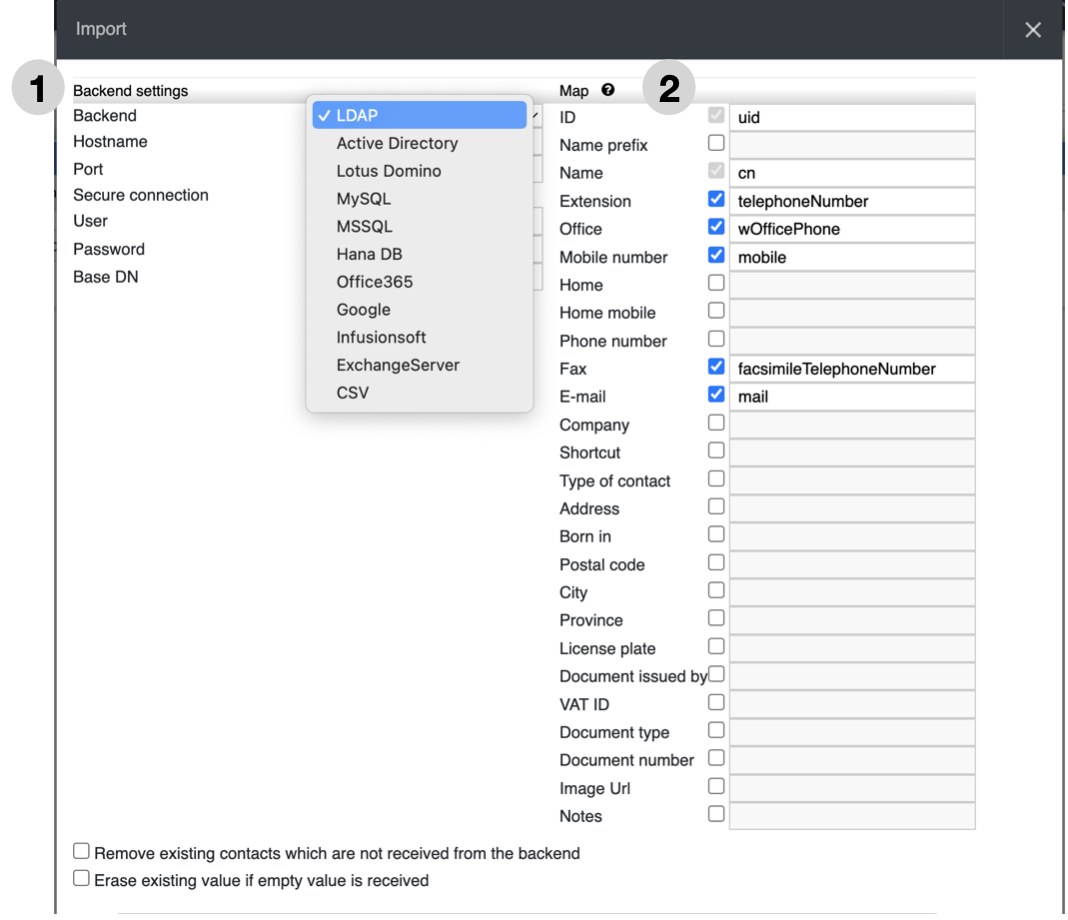
1 - Backend settings: settings for the synchronization of PBX phonebooks with an external database / server.
Import of contacts and users is possible from:
- LDAP
- Active Directory (+users sign-on)
- Lotus Domino (+users sign-on)
- MySQL
- MSSQL
- Hana DB (import of contacts)
- Office 365
- Exchange Server 2010-2013 (supports only import of contacts)
- Infusionsoft (import of contacts)
- Zoho CRM / Bigin (import of users)
- CSV file
- Outlook (read the chapter Outlook contacts lookup and call generation)
2 - Map: in this section you can set up parameters for the correct association of the Collaboration Phonebook fields to the ones of the external database. Leave the checkboxes of only those fields which can be imported from the external database.
“ID” and “Name” are required fields, since they are used as unique identifier of the contact / user.
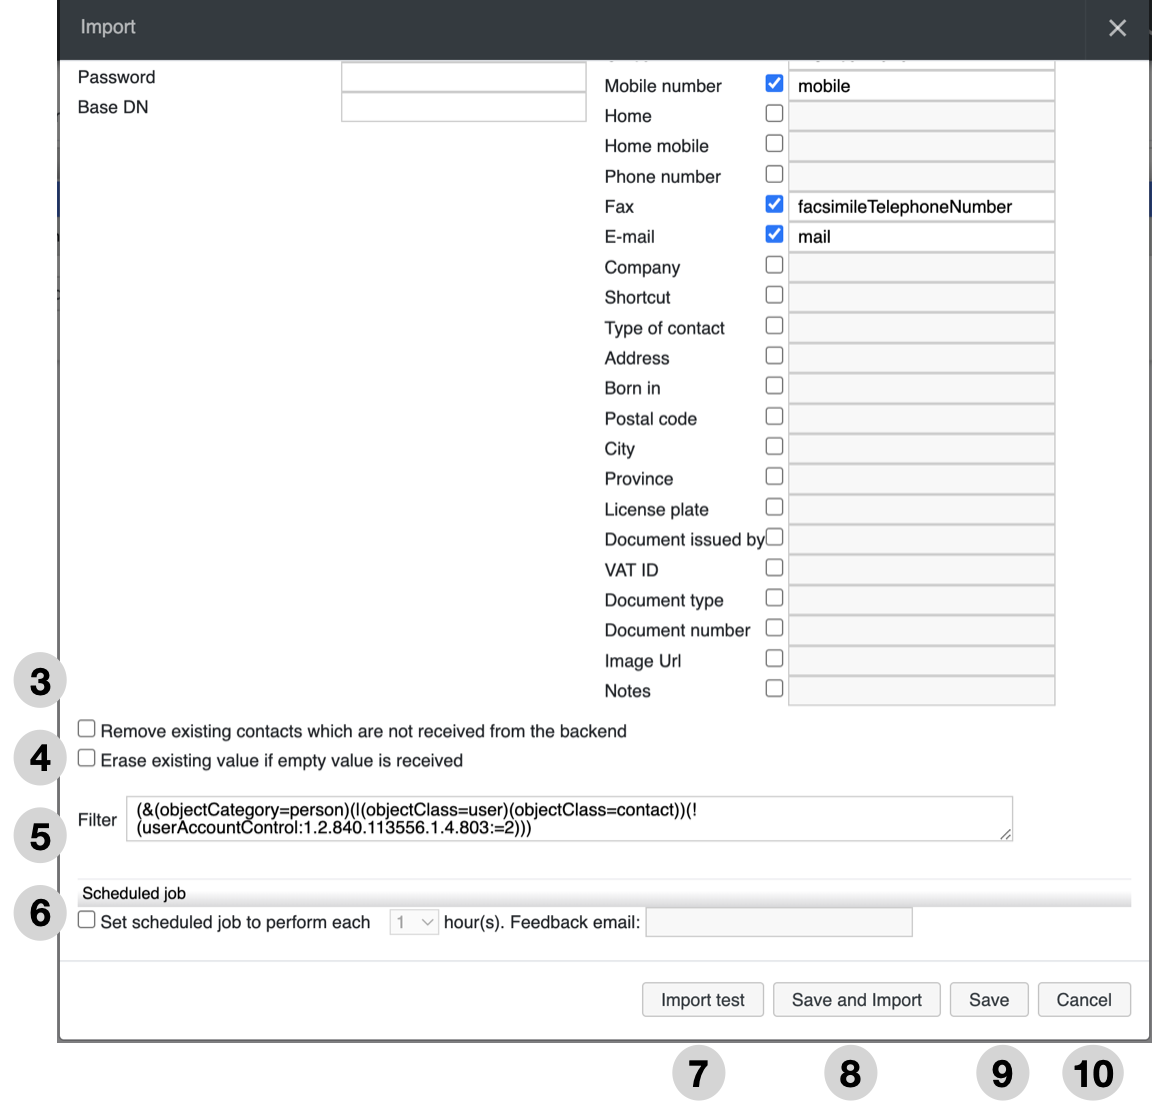
3 - Remove existing contacts which are not received from the backend: if enabled, during the next sync, existing contacts which are no longer present in the database are deleted.
4 - Erase existing value if empty value is received: if enabled, during the next sync, fields which are empty, are deleted.
5 - Filter (available for LDAP, AD, Lotus Domino, MySQL/ MSSQL): here you can write a special SQL Select statement.
6 - Scheduled job: settings of the synchronization (if disabled, the sync must be done manually each time). Set the period for performing the sync (1/ 2/ 6/ 12/ 24 hours) and enter the email of a user who will receive notifications each time the scheduled job is done:

7 - Import test button: make a test to check if the entered parameters are correct
8 - Save and Import button: save the parameters and perform the import right away
9 - Save button: save the parameters
10 - Cancel button: close the window without saving parameters
Language choice for imported users
The following logic is applied:
- For Active Directory: use preferredLanguage value from AD, if not empty
- If empty, or if another backend is used: use the language based on the Country Code selected in WMS Settings -> PBX -> Language and region
- If the official language of the country is not supported as user interface language, or if the country has several official languages (e.g. Switzerland), then Language selected in Language and region settings is applied
LDAP
Backend settings:
- Backend: select LDAP
- Hostname: IP address or domain name of remote server
- Port: specify the port (389 by default)
- Secure connection: enable encryption during the connection
- User: user with the rights to access to the server
- Password: password of user to access to the server
- Base DN: Distinguished Name of the base depends on customer’s database structure (e.g. dc=wildixad,dc=local)
Map:
- Check off only those fields that can be imported from AD
Filter:
- Example: (&(objectCategory=person)(objectClass=user)(!(userAccountControl:1.2.840.113556.1.4.803:=2)))
In this example only those users whose category is “person” or “user” and whose status is “not disabled” from the “Map” section will be imported.
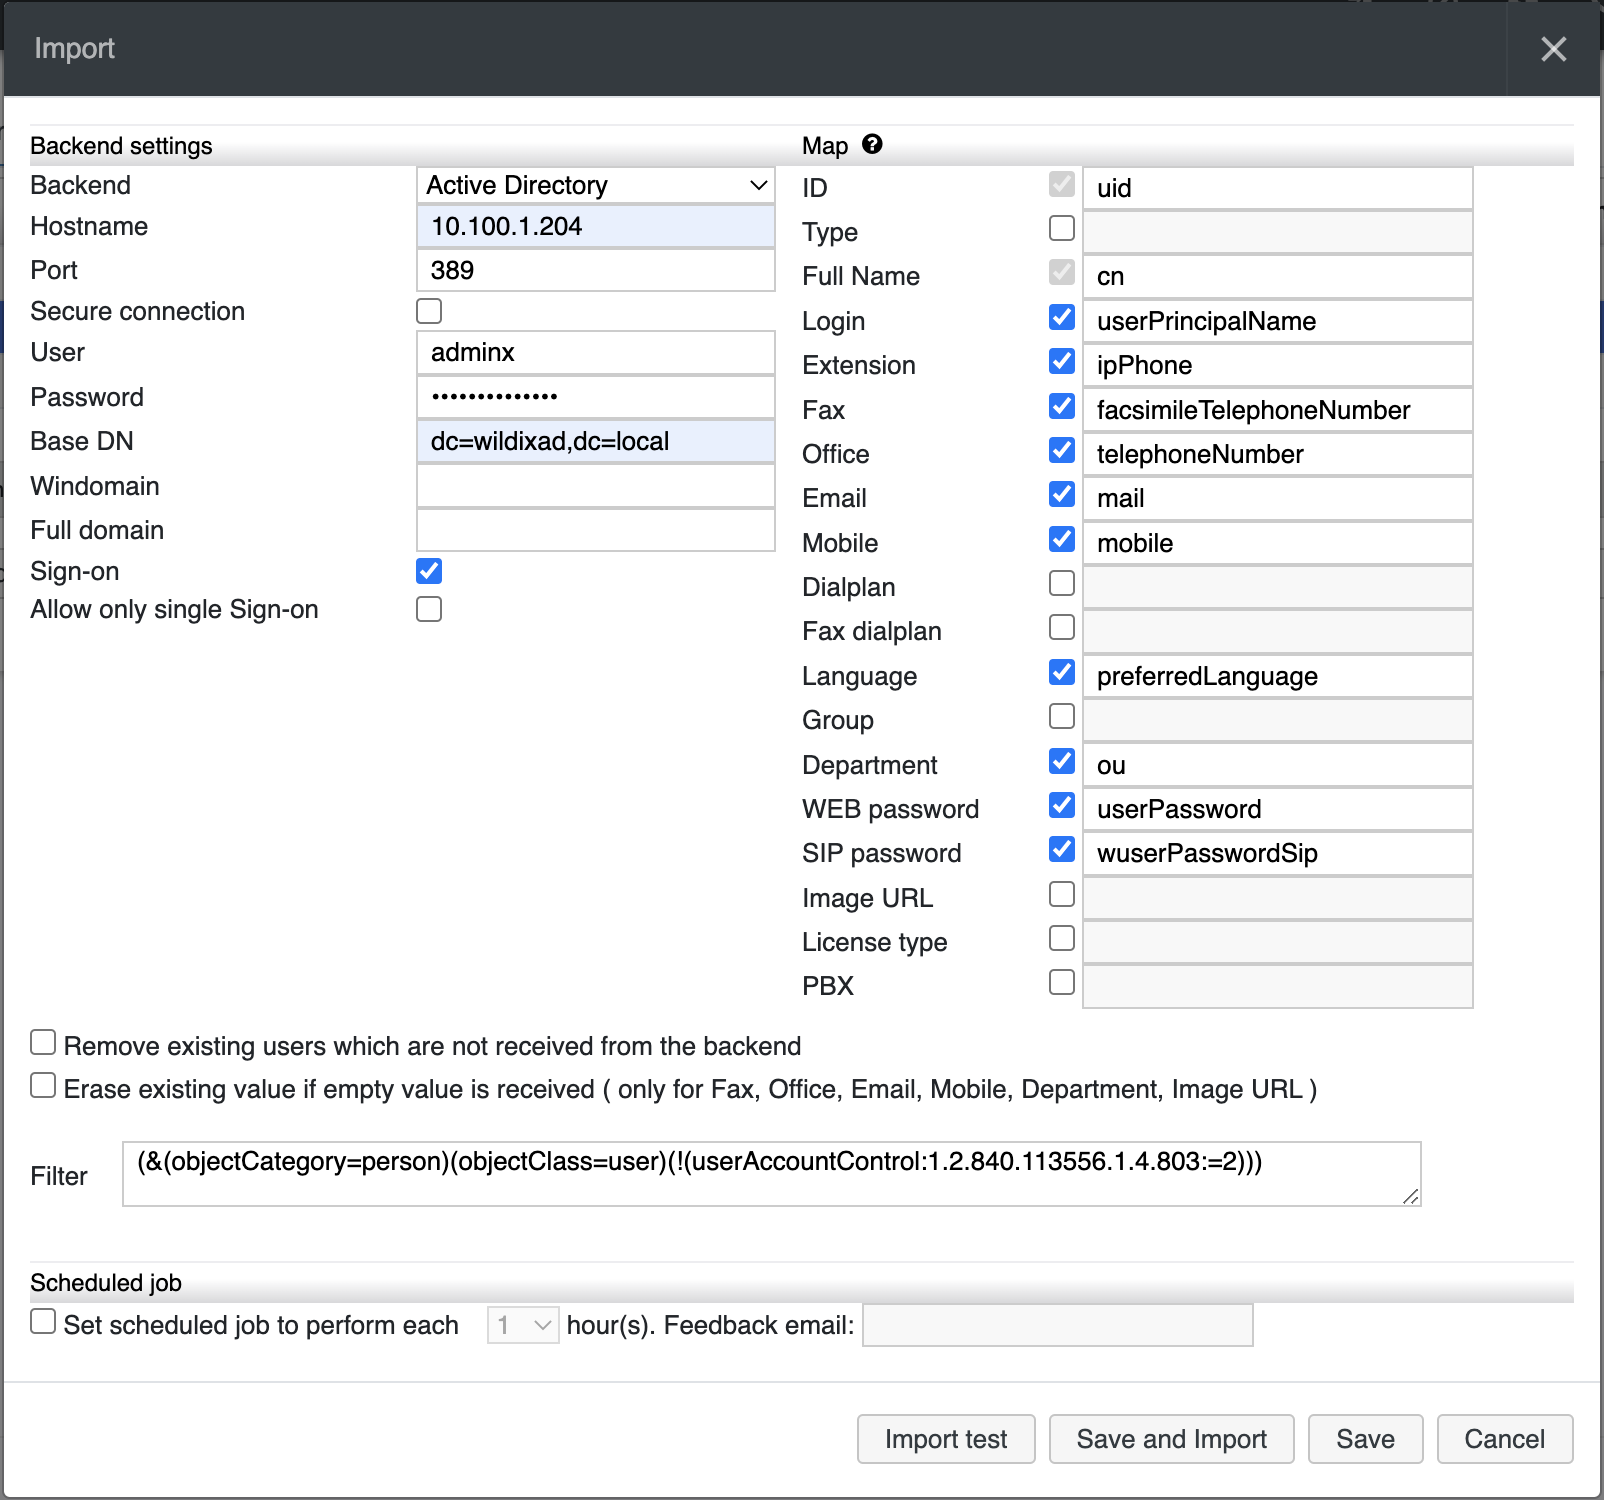
Active Directory
Backend settings:
- Backend: select AD
- Hostname: IP address or domain name of remote server
- Port: specify the port (389 by default)
- Secure connection: enable encryption during the connection
- User: user with the rights to access to the server
- Password: password of user to access to the server
- Base DN: Distinguished Name of the base depends on customer’s database structure (e.g. dc=wildix,dc=local)
Windomain (import of users): the domain name that user name is connected to and which is required for Active Directory authentication
Note: The Windomain field is available starting from WMS 5.04.20220425.1
In case the Windomain field is empty, the data is taken from Base DN.
Full domain (import of users): the field allows to add a custom domain
Note: The Full domain field is available starting from WMS 5.04.20220819.1.
Sign-on (import of users): enable the option to allow sign-on with AD credentials for imported users
Note: Automatic AD Single Sign-on is available. Consult Active Directory Single Sign-On for details.
- Allow only single Sign-on (import of users): enable the option to allow only single sign-on. If the option is enabled, login of users to Collaboration with WEB password is not possible
Map:
Login: userPrincipalName/ sAMAccountName (“Login” field in WMS -> Users)
Note: When enabling "Allow only single sign-on" option, you can import users as:
- userPrincipalName as LOGIN and log in on PBX via: username@domain
- sAMAccountName as LOGIN and log in on PBX via: domain\username
LOGIN must be the same as stored in local LDAP.
- Extension: telephoneNumber
- Office: ipPhone
- Department: department
- Disable “Language”, “WEB password” and “SIP password” as they are not used
Filter:
- Example: (&(objectCategory=person)(objectClass=user)(!(userAccountControl:1.2.840.113556.1.4.803:=2)))
In this example only those users whose category is “person” or “user” and whose status is “not disabled” from the “Map” section will be imported:
Lotus Domino
Backend settings:
- Backend: select Lotus Domino
- Port: port for connection to the server
- Hostname: IP address or domain name of remote server
- User: user with the rights to access to the server
- Password: password of user to access to the server
- Sign-on (import of users): enable the option to allow sign-on with Lotus Domino credentials for imported users
- Allow only single Sign-on (import of users): enable the option to allow only single sign-on. If the option is enabled, login of users to Collaboration with WEB password is not possible
Default map:
- Full Name: cn
- Login: userPrincipalName
- Extension: ipPhone
- Fax: facsimileTelephoneNumber
- Office: telephoneNumber
- Email: mail
- Mobile: mobile
- Language: preferredLanguage
Department: ou
WEB password: userPassword
SIP password: wuserPasswordSip
MySQL / MSSQL
Backend settings:
- Backend: select the backend (MySQL or MSSQL)
- Hostname: IP address or domain name of remote server
- Port: specify the port (3306 – default for MySQL / 1433 – default for MSSQL)
- User: user with the rights to access to the server
- Password: password of user to access to the server
- Database name: name of the remote database
- Timeout: connection timeout
Map:
- Сheck off only those fields that can be imported from the remote database
Filter:
- Example: SELECT ${MAP} FROM `export_csv_user_10000` WHERE `type`="user"
- Example for query for import of of contacts from SAP Business One: select '' as empty, OCRD.CardCode, CardName, Name, Tel1, OCPR.Fax, Cellolar, E_mailL, Title from OCRD INNER JOIN OCPR ON OCRD.cardcode = OCPR.cardcode where cardtype = 'S' (More information on SAP B1 integration: https://www.wildix.com/sap-business-one/
In this example only those fields from the “Map” section will be imported, which are present in “export_csv_user_10000” table and only for contacts whose type is “user”.

Note: It is also possible to enable connection to MSSQL instance.
Requirement: SQL Server browser must be running on MSSQL host. Please check the Microsoft documentation for detailed information on SQL browser.
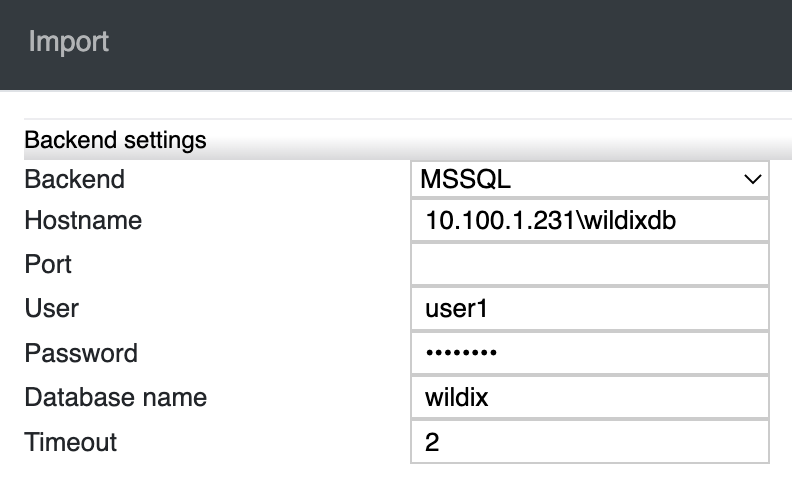
Backend settings:
- Hostname: specify MSSQL instance in the form of ip_adress_of_SQL_server\instance_name. For example, 10.100.1.231\wildixdb
- Port: there is no need to specify the port when connecting to MSSQL instance. By default MSSQL itself listens on TCP port number 1433, but for instances the TCP port is dynamically configured
- User and Password: enter the credentials to access to MSSQL Server
- Database name: the name of database to be imported
- Timeout: specify connection timeout
Map
- Check off the field that can be imported from MSSQL instance
Filter
- Use the field to create a special select query if needed
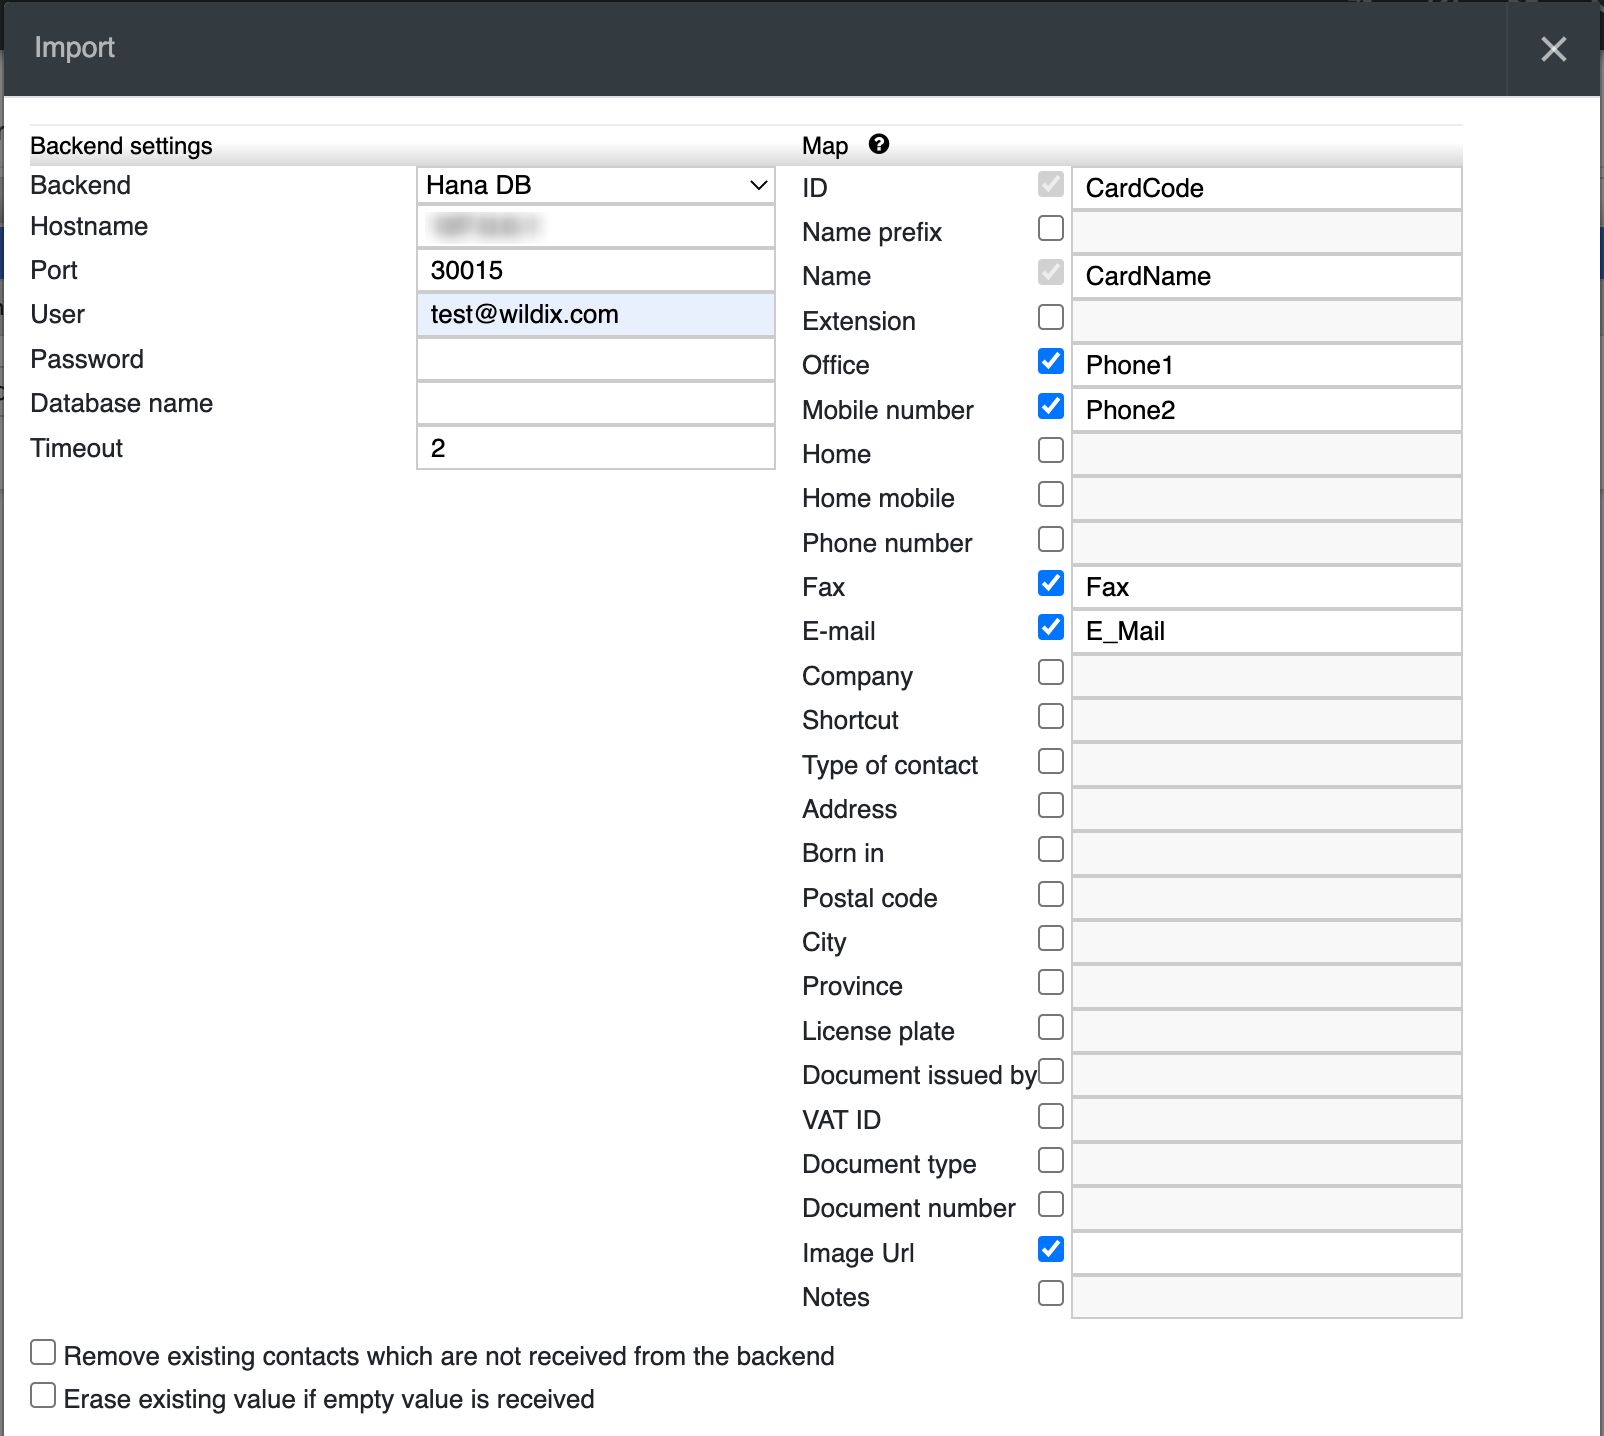
Hana DB
Note:
- Import of contacts only.
- The support starts from WMS 5.04.20220506.5.
Backend settings:
- Backend: select Hana DB
- Hostname: IP address or domain name of remote server
- Port: specify the port (30015 – default for Hana DB)
- User: user with the rights to access to the server
- Password: password of user to access to the server
- Database name: name of the remote database
- Timeout: connection timeout
Map supported fields:
- Сheck off only those fields that can be imported from the remote database
Click Save and Import.
Office 365
Backend settings:
- Backend: select Office 365
Check off Access to organizational contacts to provide access for import of organizational contacts.
Click Login and perform login with your Windows account, after which you can select the categories of contacts that must be imported (folders). For example:
- Organizational contacts
- Contacts
Click Available fields to see a drop-down list with all available fields which can be imported.
Map supported fields:
- businessPhones
- displayName
- givenName
- jobTitle
- mobilePhone
- officeLocation
- preferredLanguage
- surname
- userPrincipalName
- department
- extensionAttribute1-15
Note: The support of the field 'extensionAttribute1-15' starts from WMS 6.01.20230123.2. It allows to sync Custom attributes. The necessary attribute needs to be entered in the Extension field.
You can insert two values separated by "|" (or) – in this way you can enable the import of the first value, in case it is not filled out, the second value will be imported/ by "+" (concatenation) - in this way you can unite two values present in 1 field.
For example:
- Name: name | company
In this way value present in the “Name” field of the remote server/ database will be imported into the "Name" field of Collaboration Phonebook, in case absent, value present in the “Company” field will be imported.
- E-mail: email1 + email2 + email3
In this way all values present in the "E-mail" field of the remote server/ database will be imported into the "E-mail" field of Collaboration Phonebook.

If you need to synchronize only certain users from O365, it is required to add custom Attribute (set on O365 side) to Extension field.
If extension is present, user is imported from O365.
Starting from WMS v. 6.06.20240425.1, it is possible to enable user match via both extension and email. To do this, tick off the option Merge users by matching Email and Extension at the bottom:

When enabled, user import is performed based on the match of extension and email rather than ID only.
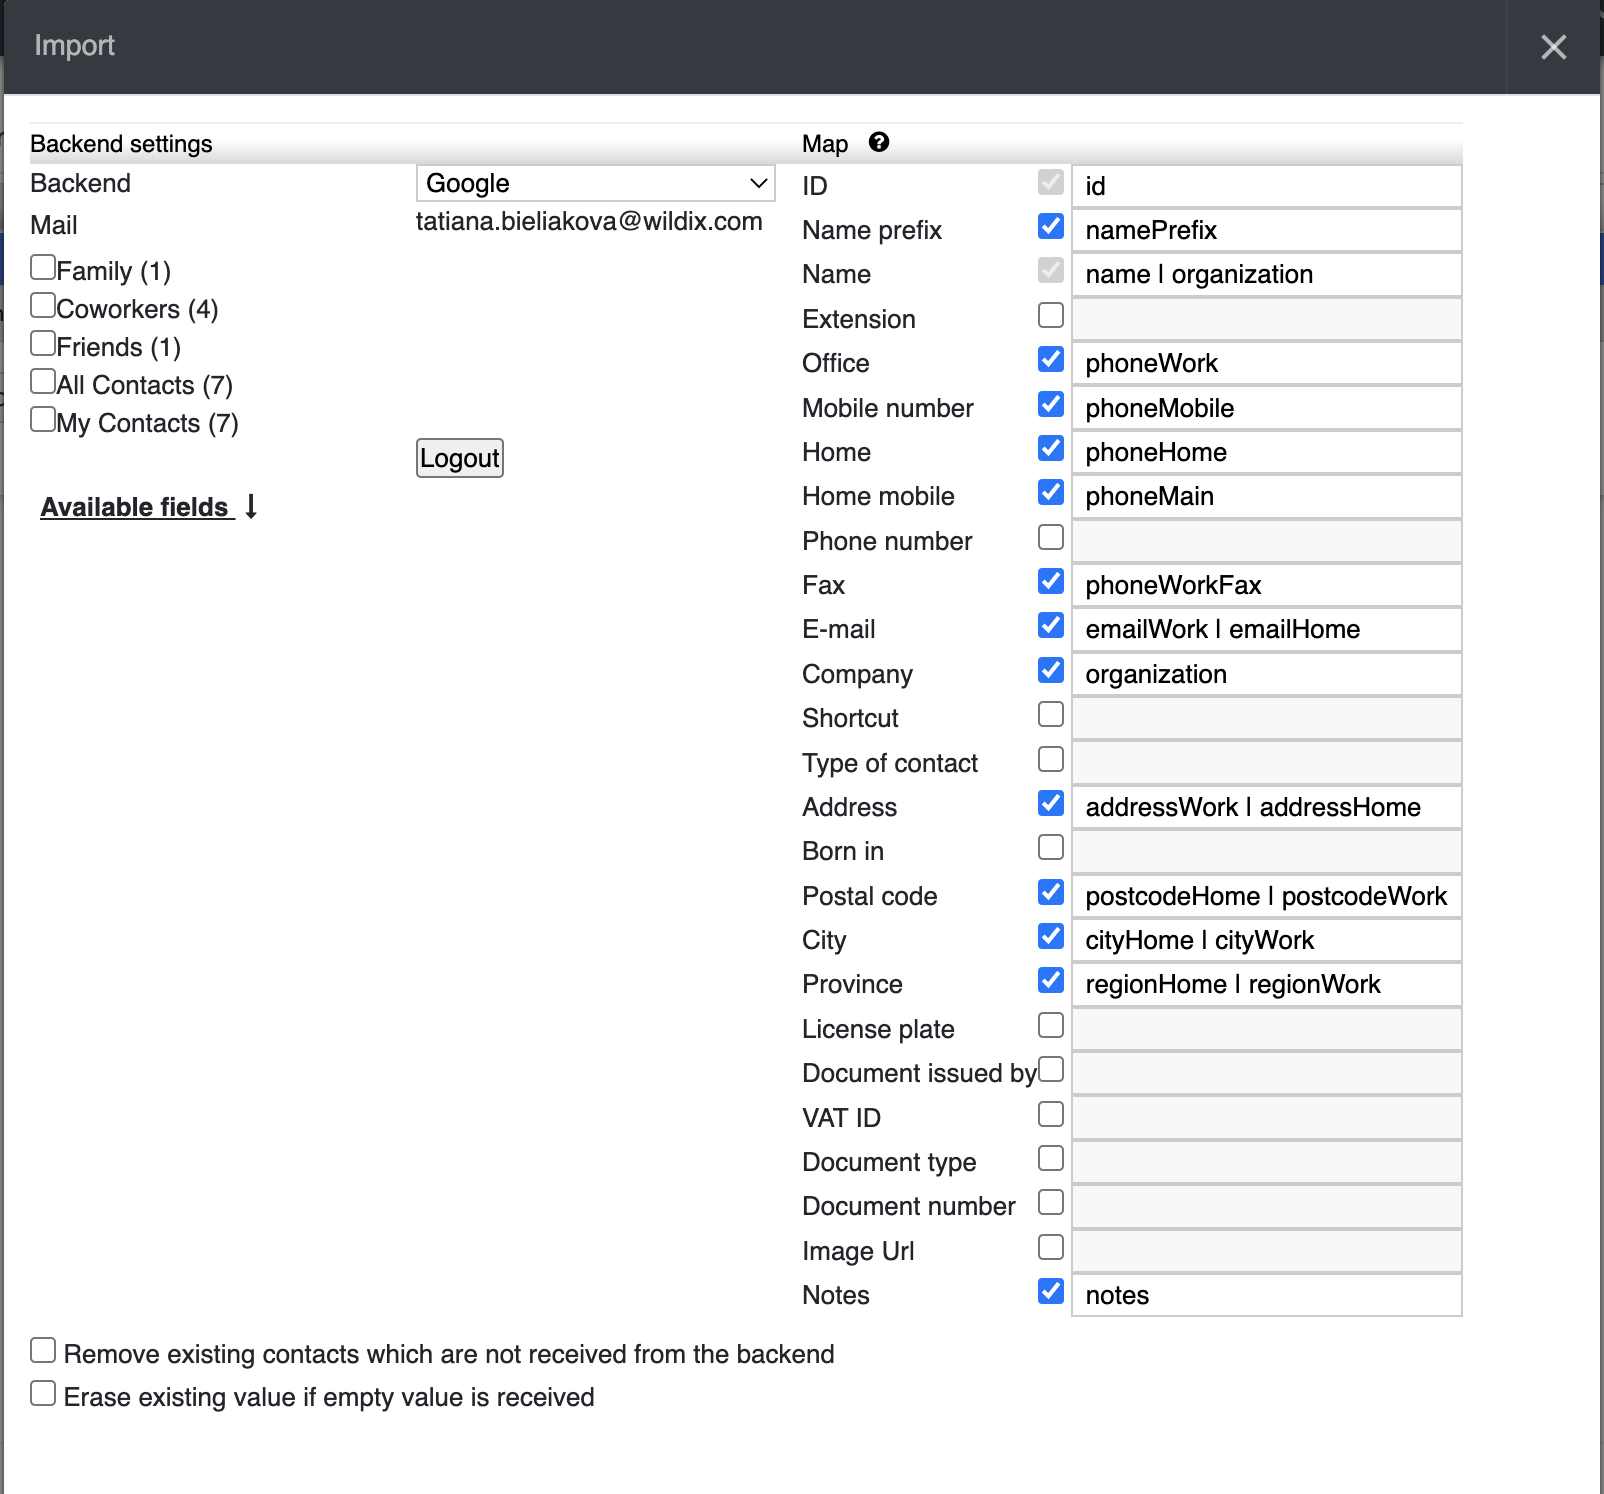
Backend settings:
- Backend: select Google
Custom fields (for import of users only):
- Access to custom fields (admin view): the option allows to import custom fields from Google.
Note: The support of custom fields starts from WMS 6.02.20230328.2 and requires admin rights to be enabled.
You can set up the import of contacts with any Google account, but for import of users you must possess a special corporate (business) Google account.
Click Login and perform login with your Google account, after which you can select the categories of contacts that must be imported:
- My Contacts
- Friends
- Family
- Coworkers
- Starred in Android
Click Available fields to see a drop-down list with all available fields which can be imported.
Map:
- Check off only those fields that can be imported from Google contacts
You can insert two values separated by "|" (or) – in this way you can enable the import of the first value, in case it is not filled out, the second value will be imported/ by "+" (concatenation) - in this way you can unite two values present in 1 field.
For example:
- Name: name | organization
In this way value present in the “Name” field of the remote server/ database will be imported into the "Name" field of Collaboration Phonebook, in case absent, value present in the “Organization” field will be imported.
- Address: addressWork + addressHome
In this way all values present in the "Address" field of the remote server/ database will be imported into the "Address" field of Collaboration Phonebook.
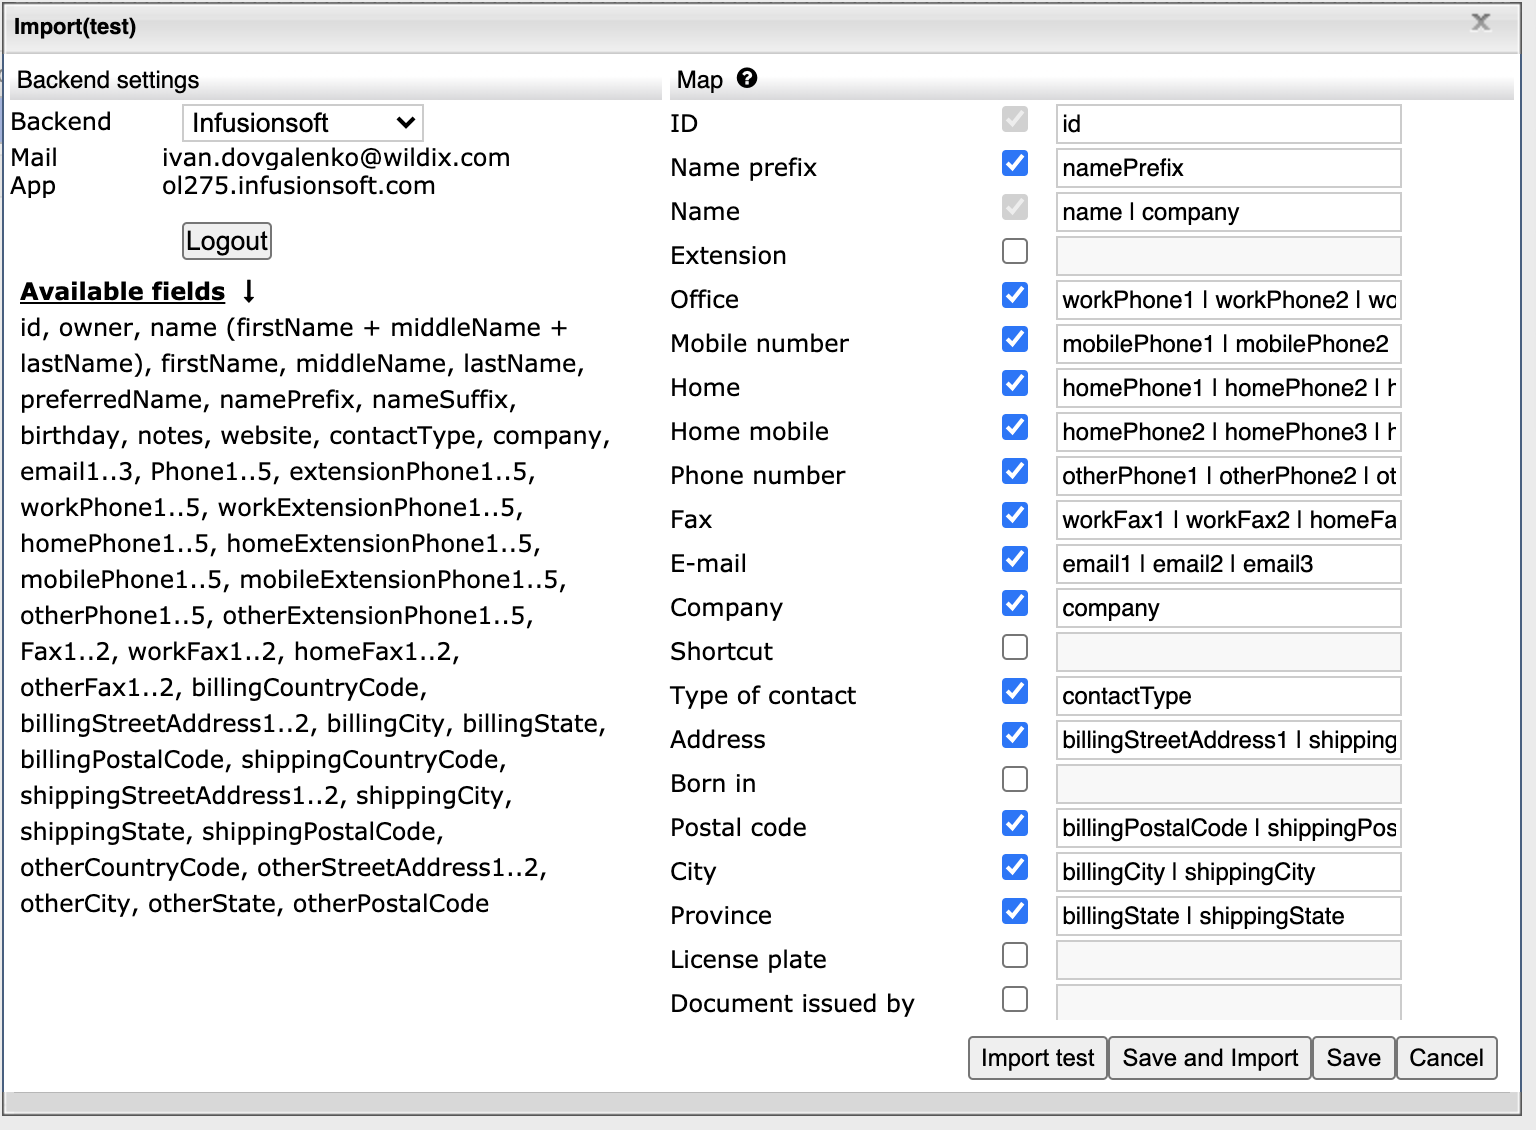
Infusionsoft
Import of contacts only.
Wildix integrates phone calls to Infusionsoft. You can import your Infusionsoft contacts to Wildix PBX and set up automatic routing of calls to contact owners. Consult the Document for details.
Import of Infusionsoft contacts
- Go to WMS -> Users -> Phonebooks
- Select a phonebook you want to import contacts to and click Import (available only for admin user)
- Select Infusionsoft from the list of backend options -> Log in to your account
- Click Save and Import
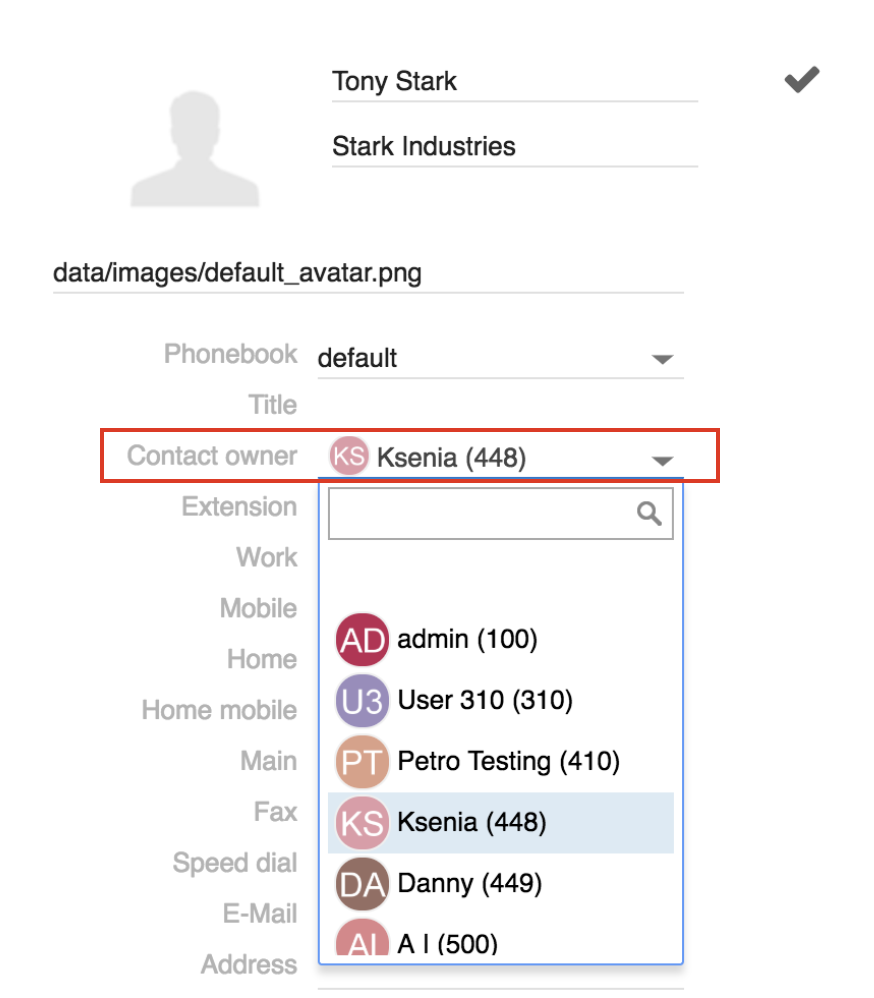
After the import is completed, Infusionsoft contacts appear in the phonebook you have selected. If imported contacts have "Owner" (specified in Infusionsoft) and owner's email address is present both in Infusionsoft and local LDAP, then the owner is automatically assigned to the imported contacts in Collaboration. Owners can be changed when editing contacts (Collaboration -> Phonebook -> Edit -> "Contact owner" field).
Important: During the import, a contact owner is looked up via the email address. Make sure the email address is present both in Infusionsoft and local LDAP.
You can now set up the Dialplan to route calls from known callers to their account managers, read the document How to automatically route calls to contact owners.
Exchange Server
Backend settings:
- Backend: select ExchangeServer
- Hostname: IP address or domain name of remote server
- User: user with the rights to access to the server
- Password: password of user to access to the server
Click Login to perform login with your account, after which you can select the categories of contacts that must be imported (folders). For example:
- /Public Folders/Sistec S.r.l./Contatti Fatture
- /Public Folders/Sistec S.r.l./Contatti Pubblici
Click Available fields to see a drop-down list with all available fields which can be imported.
Map:
- Check off only those fields that can be imported from Exchange Server
You can insert two values separated by "|" (or) – in this way you can enable the import of the first value, in case it is not filled out, the second value will be imported/ by "+" (concatenation) - in this way you can unite two values present in the same field.
For example:
- Name: name | companyName
In this way value present in the “Name” field of the remote server/ database, will be imported into the "Name" field of Collaboration Phonebook, in case absent, value present in the “Company” field will be imported.
- Address: addressBusiness + addressHome + addressOther
In this way all values present in the "Address" field of the remote server/ database will be imported into the "Address" field of Collaboration Phonebook.

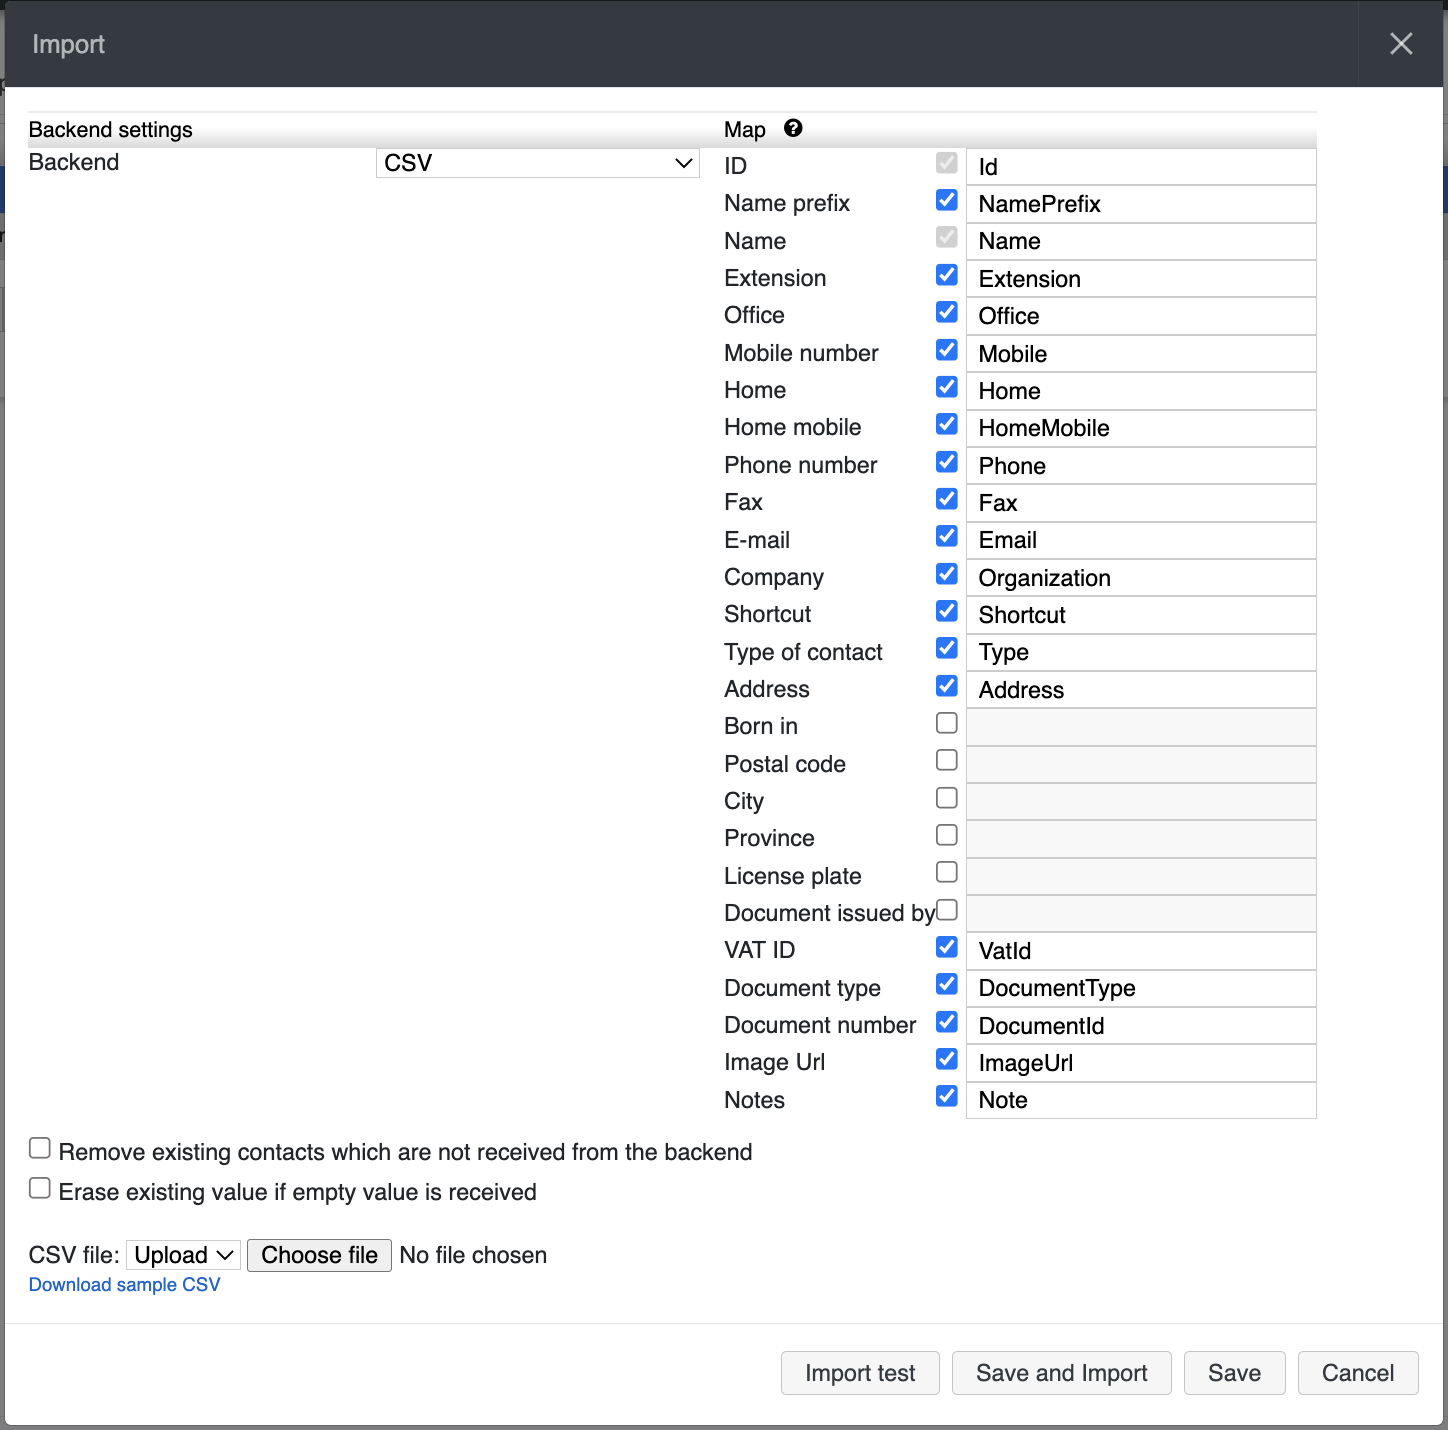
CSV
Backend settings:
- Backend: select CSV
Map:
- Check off the fields that can be imported from a CSV file
Click Choose File to upload a CSV file from your PC.
The values in the file should be separated by coma (,) and enclosed into the quotation marks (“). You can download a sample CSV file by clicking Download sample CSV when importing contacts in WMS -> Devices -> Phonebooks.
Zoho
Import of users only.
Depending on whether you want to import users from Zoho CRM or Zoho Bigin, read the relevant document:
Outlook contacts lookup and call generation
Import of Outlook contacts cannot be done via WMS.
However, thanks to Outlook Integration (check Outlook integration for Microsoft Windows documentation) it is possible to search Outlook contacts in real time from Wildix Collaboration search field and to see the Caller ID from Outlook contacts upon receiving an incoming call.
It is also possible to import Outlook contacts using an external Wildix utility. You can download it from Google Drive (for your Windows system type: 32 or 64 bit): LINK.
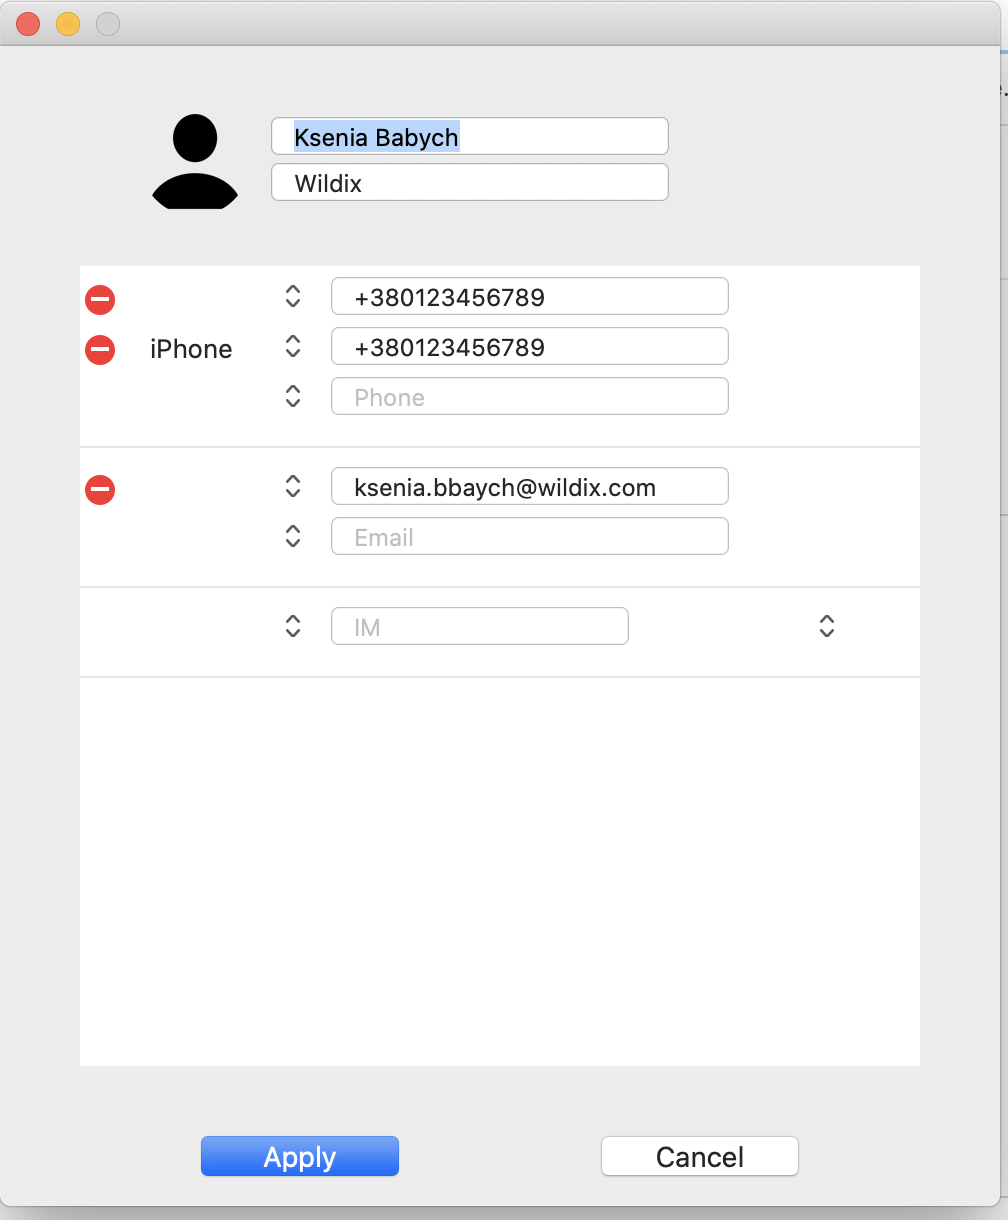
macOS contacts lookup and call generation
Requirements
- WMS version starting from 4.01.43713.08
- WIService version starting from 2.9.9
- MacOS starting from High Sierra (10.13.2)
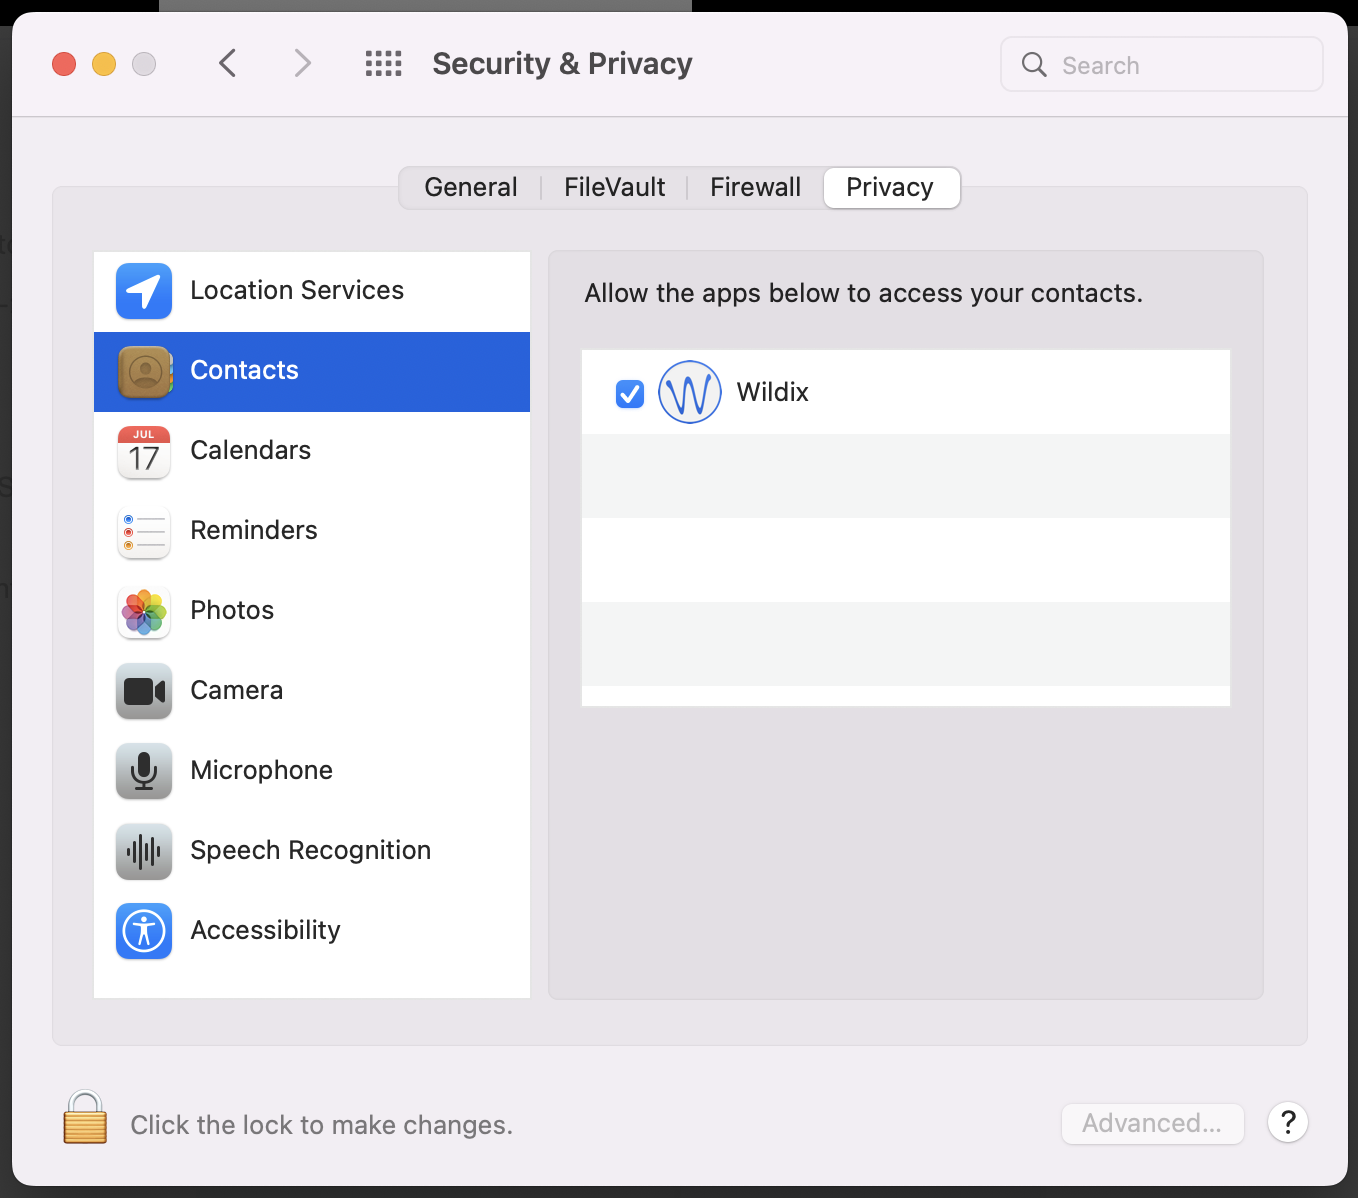
In order to allow access to Mac OS Contacts, you need to add WIService to your your laptop's permissions:
- Go to System Preferences -> Security & Privacy -> Contacts:
If all the requirements are met, the integration with Mac OS contacts is enabled automatically.
It allows you:- To call users from your Mac OS Contacts: find a contact via Collaboration Search field)
- To view/ edit a contact: click Show contact:
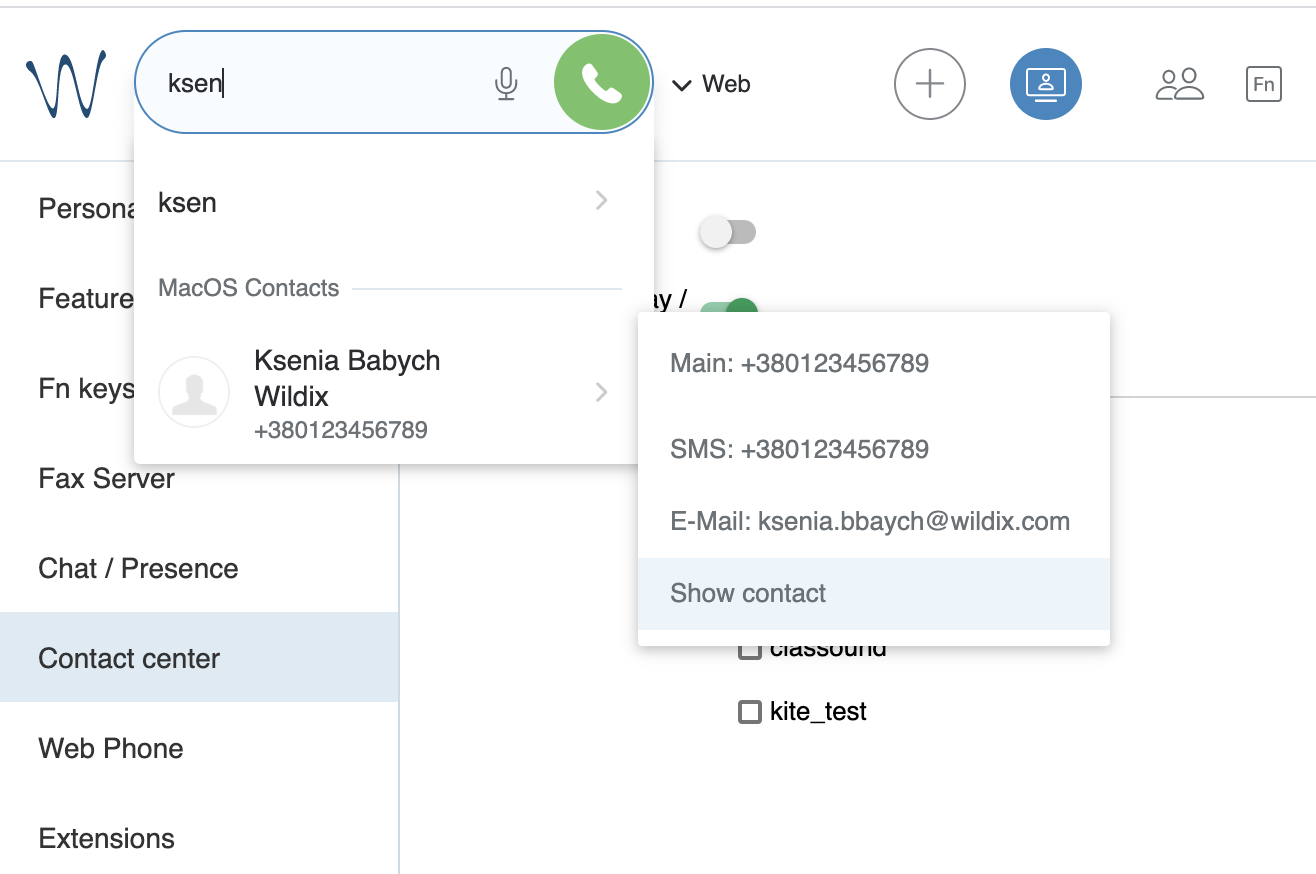
- To save the changes: click Apply