Wizyconf Station Quick Start Guide
This Quick Start Guide explains how to provision Wizyconf Station via WMP and how to access and participate in conferences.
Before proceeding to this Guide, please make sure you have assembled Wizyconf Stand (you can order it separately, it is free of charge), installed Wizyconf Core and connected all the hardware components. Find the Guides on this page: Wizyconf Installation Documentation.
Created: September 2019
Updated: May 2022
Minimum WMS version: 4.01.44034.20
Permalink: https://wildix.atlassian.net/wiki/x/ZATOAQ
Prerequisites
Note: Wizyconf Station is available as HWaaS only. Wizyconf Stand is optional and free of charge.
Wizyconf Station can be found by the following codes in WMP:
- With stand: R-With-Stand-Wizyconf-1m/1y/5y
- Without stand: R-Without-Stand-Wizyconf-1m/1y/5y
Wizyconf Room license is automatically added to the PBX with the Wizyconf Station purchase.
Refer to the Wizyconf Installation Documentation to connect all the components to the Wizyconf Core and install the Wizyconf Stand if you ordered it.
- Before you start, make sure you update WMS to the latest stable version (rel60/ rel50)
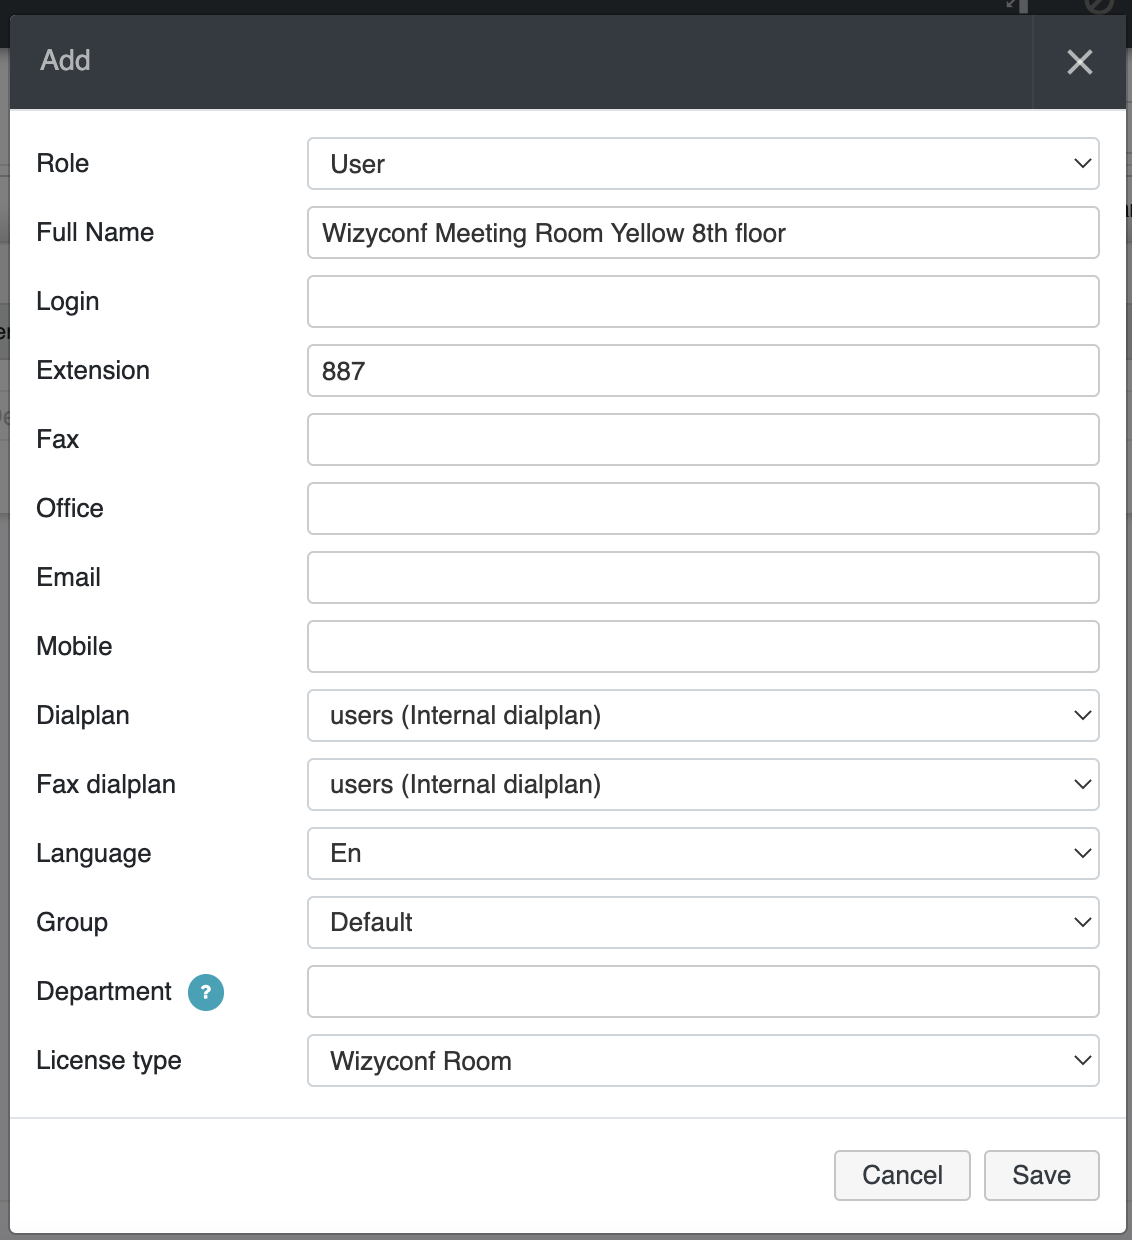
- To use Wizyconf, you need to create a new user in WMS -> Users and assign the License type "Wizyconf Room" (license is added to PBX automatically with Wizyconf Station purchase):
Provisioning and configuration
Starting from Wizyconf App v. 1.1.2 there is a possibility to re-provision the device to a different PBX. Follow the steps from How to re-provision Wizyconf to a different PBX to complete the procedure.
WMP Provisioning
Prerequisite: you must have an available Wizyconf which you had previously ordered and had it shipped to you.
- Go to WMP -> select a customer
Select the PBX -> click Options button (three dots) and choose Devices from the drop-down list:

Click + to add Wizyconf:

The list of all your available devices opens; select Wizyconf and click Add to assign it to the PBX:

Go to WMS -> Devices: provisioned Wizyconf appears on the list:

Important: After Wizyconf is provisioned, its status in WMS -> Devices stays grey, no IP and firmware version is indicated. The password is used by Wizyconf for PBX authentication. Ongoing upgrade procedures are not displayed in WMS.
Assign Wizyconf to user
Note: Wizyconf Station is available as HWaaS only and Wizyconf Room license is automatically added with Wizyconf Station purchase.
- Go to WMS -> Devices
Select Wizyconf and click Assign to user
- Choose a user and click Save

Note: Once the user is assigned, it is impossible to delete it, you can just re-assign Wizyconf to another user. After re-assigning, turn on/ off Wizyconf via Power key on Wizyconf Core.
Important: 1 Wizyconf user can only be used with 1 Wizyconf. You cannot assign it to another Wizyconf.
Remote control overview
Make sure you have inserted the dongle of the Wizyconf Remote into the Wizyconf Core, as described in the document.
Optionally you can use a keyboard and a mouse to control the conference.

- Power on/ off: turn on/ turn off Wizyconf Core
- Cursor control: press the button and use the Navigation keys to control the cursor
- Volume up/ down: adjust the volume level
- Navigation keys Up/ Down/ Right/ Left: navigate between different menu options; rotate PTZ cam (Up/ Down/ Right/ Left), change focus of 4K cam (first press the key Camera Control)
- Back key: go back to the previous page
- Camera options: press the key once to switch between the following states: Camera off/ Switch to 4K camera/ Switch to PTZ camera/ Switch to the next camera (if available)
- LED Indicator: blinks red when you press any key; no blink means there is no connection (check that the USB dongle is installed correctly or move closer to the Wizyconf Core) or the battery of the remote control is down
- Camera control: press the key to be able to activate auto tracking mode for the PTZ cam and auto framing mode for the 4K cam. Check Camera controls for details
- Camera zoom in/ out: adjust the zoom of the PTZ cam
- Mute on/ off: mute/ unmute your microphone
- Central Navigation key: confirm different operations
- Home key: press to leave the conference
- Micro-USB interface: connect the charging adapter to charge the remote control unit
The upgrade
Prerequisites:
- DHCP Server (if not available, set up a static IP address as described in Chapter Set up static IP address on Wizyconf)
- Stable internet connection
- Wizyconf must be able to reach the PBX via its public IP (even in case the PBX is local)
The first upgrade
Upon the first launch, Wizyconf automatically upgrades its firmware. The notification about the upgrade is displayed. It takes up to 10 minutes to complete the upgrading process (depends on the Internet connection). Then Wizyconf is rebooted automatically.

Notes:
- Wizyconf is upgraded from firmware.wildix.com server
- Port used by Wizyconf: tcp:443
Further upgrades
Wizyconf is distinguished by updates from 3 different branches:
- Wizyconf app via Chromium OS (automatic upgrade). The system checks for updates once an hour. If there is a new version, it is downloaded and installed upon the next start. To upgrade:
- Power the device off/on by pressing Power button on Wizyconf Core or put it into a standby mode by pressing Power On/ Off button on Remote Control
- To check the App version, press Home button on a keyboard -> go to Wizyconf Settings menu (Google chrome icon)-> click on Main menu (three lines) -> select About Chromium OS (a mouse and a keyboard are required)
- WMS interface (manual upgrade). To upgrade:
- Upgrade WMS to the latest version from rel60beta or rel60 / rel50beta or rel50 repositories
- Conference server: no need to upgrade, the changes are available right away
You can check Wizyconf Station updated in the Wizyconf Changelog.
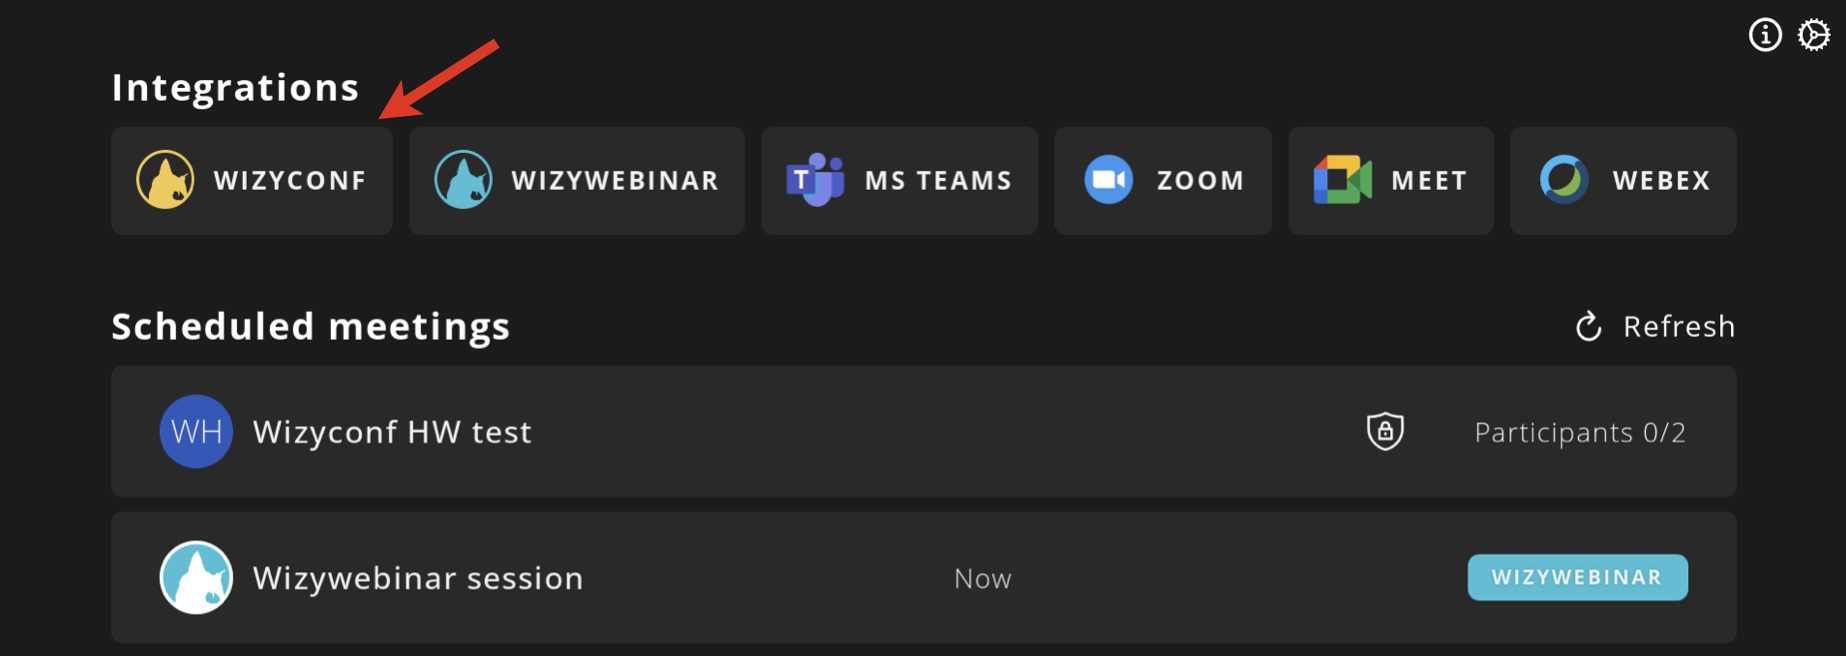
Access the conference
By design, conferences cannot be created from Wizyconf. It is only possible to participate. Add the Wizyconf user to an existing conference room before proceeding or join using the conference ID.
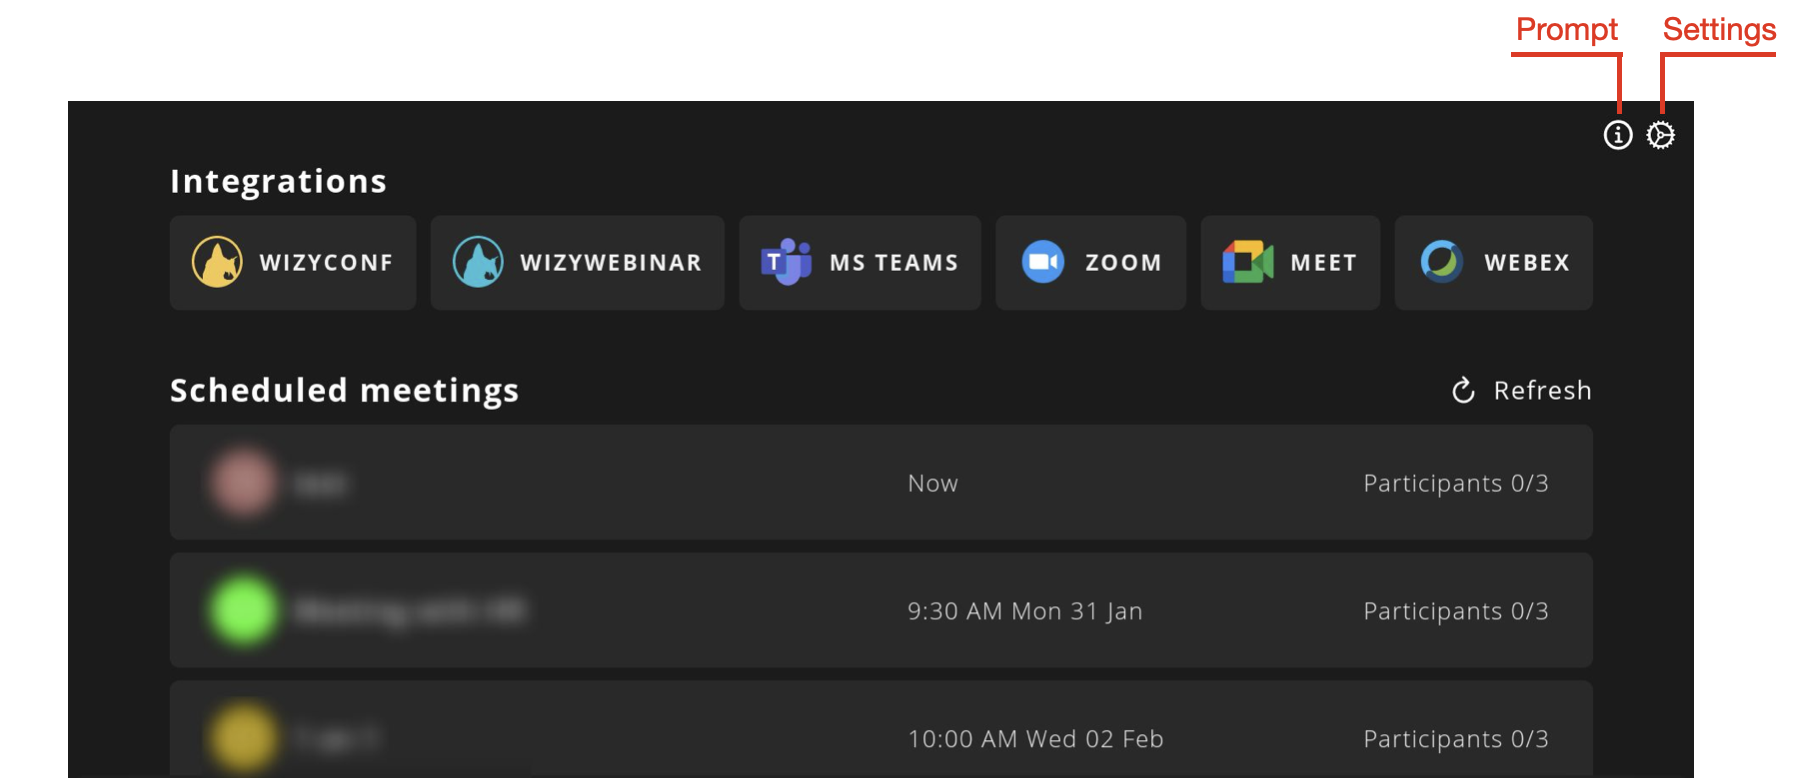
When Wizyconf is launched, the Conference List can be accessed. If a Wizyconf user has previously participated in conferences, they are displayed here:
Note: Apart from conferences, it is possible to display Wizywebinar sessions in the Conference List. Check the documentation Wizyconf Station integration with Wizywebinar and third party conference providers for details.
Before entering a conference, you have an option to:
- View the Prompt:

- Open general Settings:
- Select the Time Zone: default value is United Kingdom
- Adjust Anti-flicker: default value is 50 Hz (60 Hz for the USA)
- Adjust the microphone gain level
- Flip PTZ camera image: use the option to flip the image during ceiling mounting of PTZ camera

Enter a conference
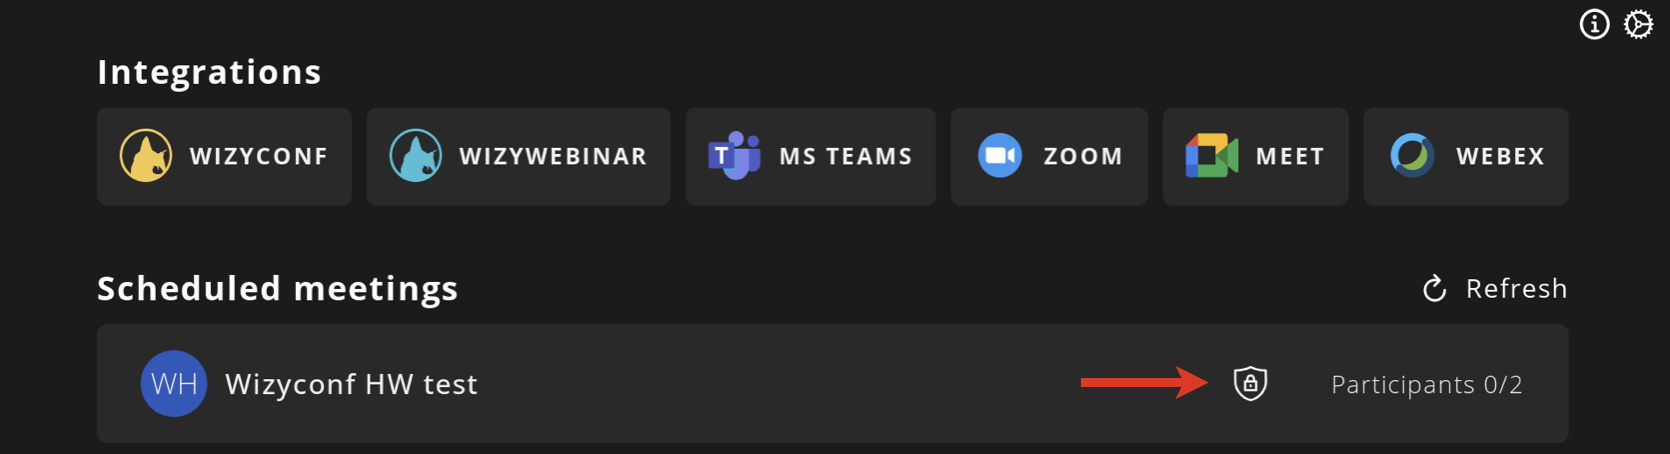
You can join a conference from the Conference List or using the Conference ID. Conferences protected with a password (available from Wizyconf App v. 1.2.14) are labeled with a security icon.
Join a conference from the Conference List
After the Wizyconf user has been added to a new conference room, press Refresh to update the Conference List:
- Use Navigation keys on the Remote control or the keyboard Arrow keys to select the conference from the list
Press the Central Navigation key on the Remote control or the keyboard key Enter to confirm
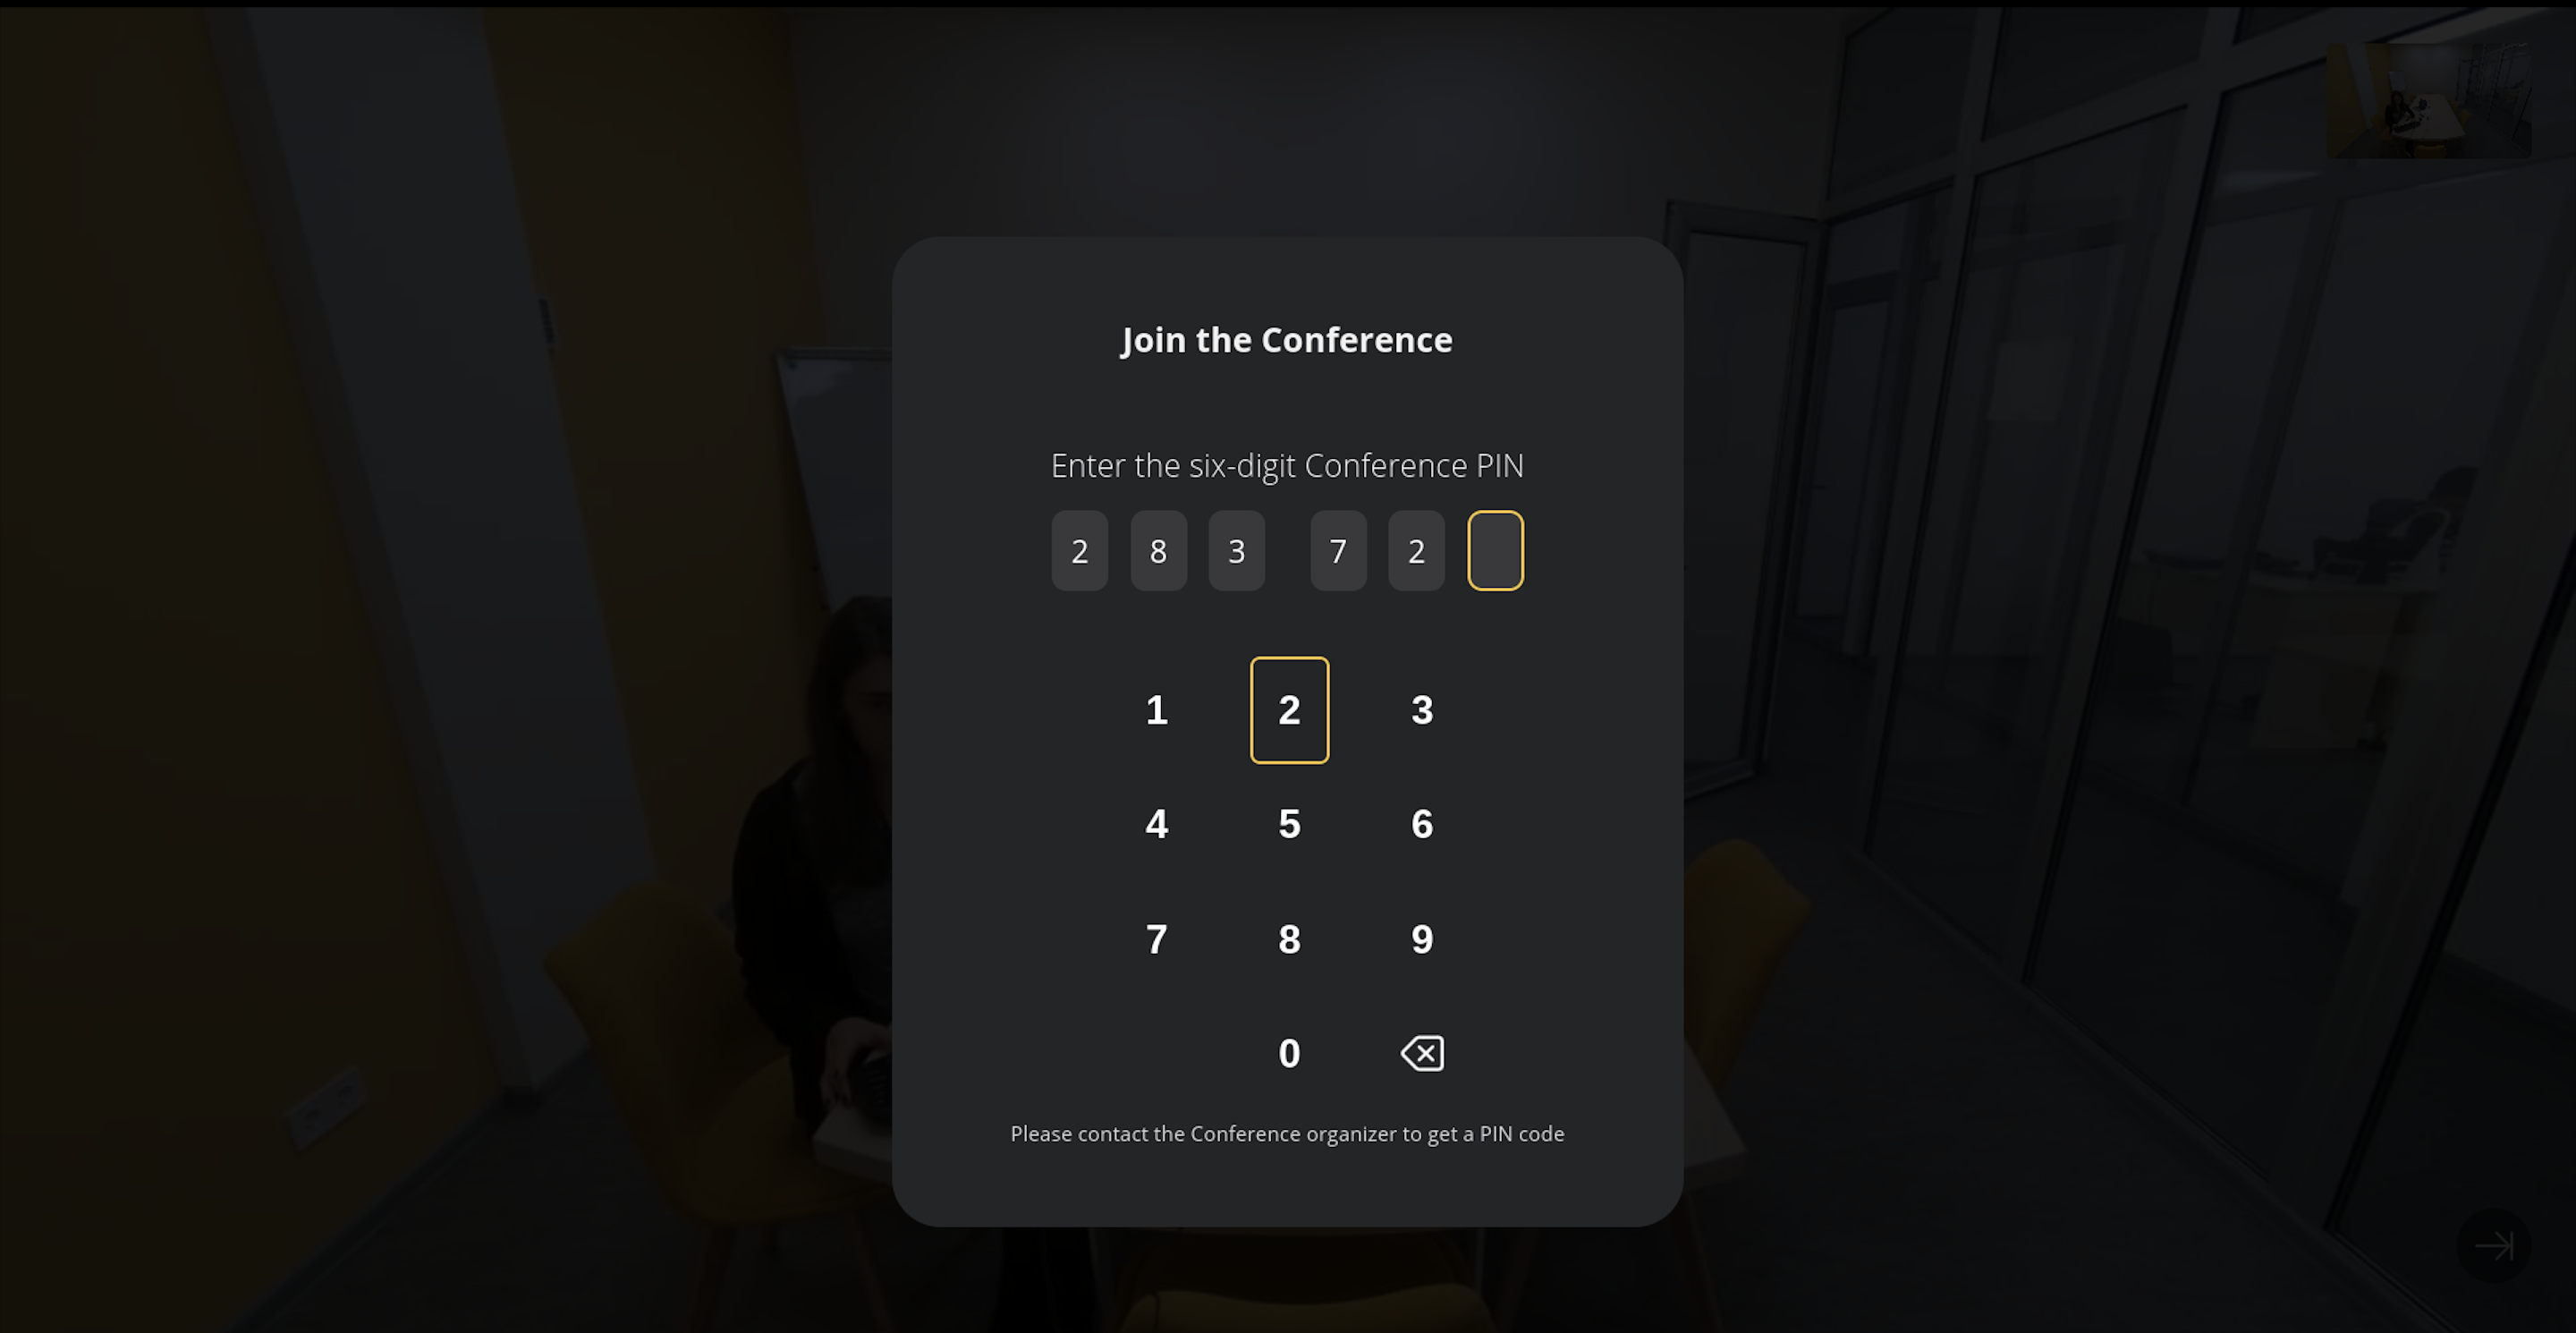
If the conference is protected with a password, you need to enter 6-digit Conference PIN (check the password in an invitation or ask a conference moderator for it; consult Wizyconf Videoconference Guide for more details). Use Navigation keys on the Remote control or the keyboard Arrow keys to enter the password
- Once you enter the password, you are forwarded to the conference
Join a conference using the Conference ID
The feature support starts from Wizyconf App v. 1.2.7.
If you join a conference using the ID number, this conference isn't added to the List.
Select Wizyconf to open a key pad for entering the ID:
Enter the seven-digit Conference ID number (you can find it in the invitation or inside the conference itself, see Wizyconf Videoconference User Guide):

- After entering the ID, you are automatically redirected to the conference
Conference controls
If you access a conference from both Collaboration and Wizyconf at the same time, it is recommended to mute the microphone in Collaboration in order to prevent echo issues.
For more information about conference controls, refer to Videoconference - User Guide.
Conference controls allow you to:
- Raise a hand
- View chat messages
- Mute/ unmute mic and start/ stop camera
- Switch between Tiles and Sidebar views
- Pin/ unpin a user
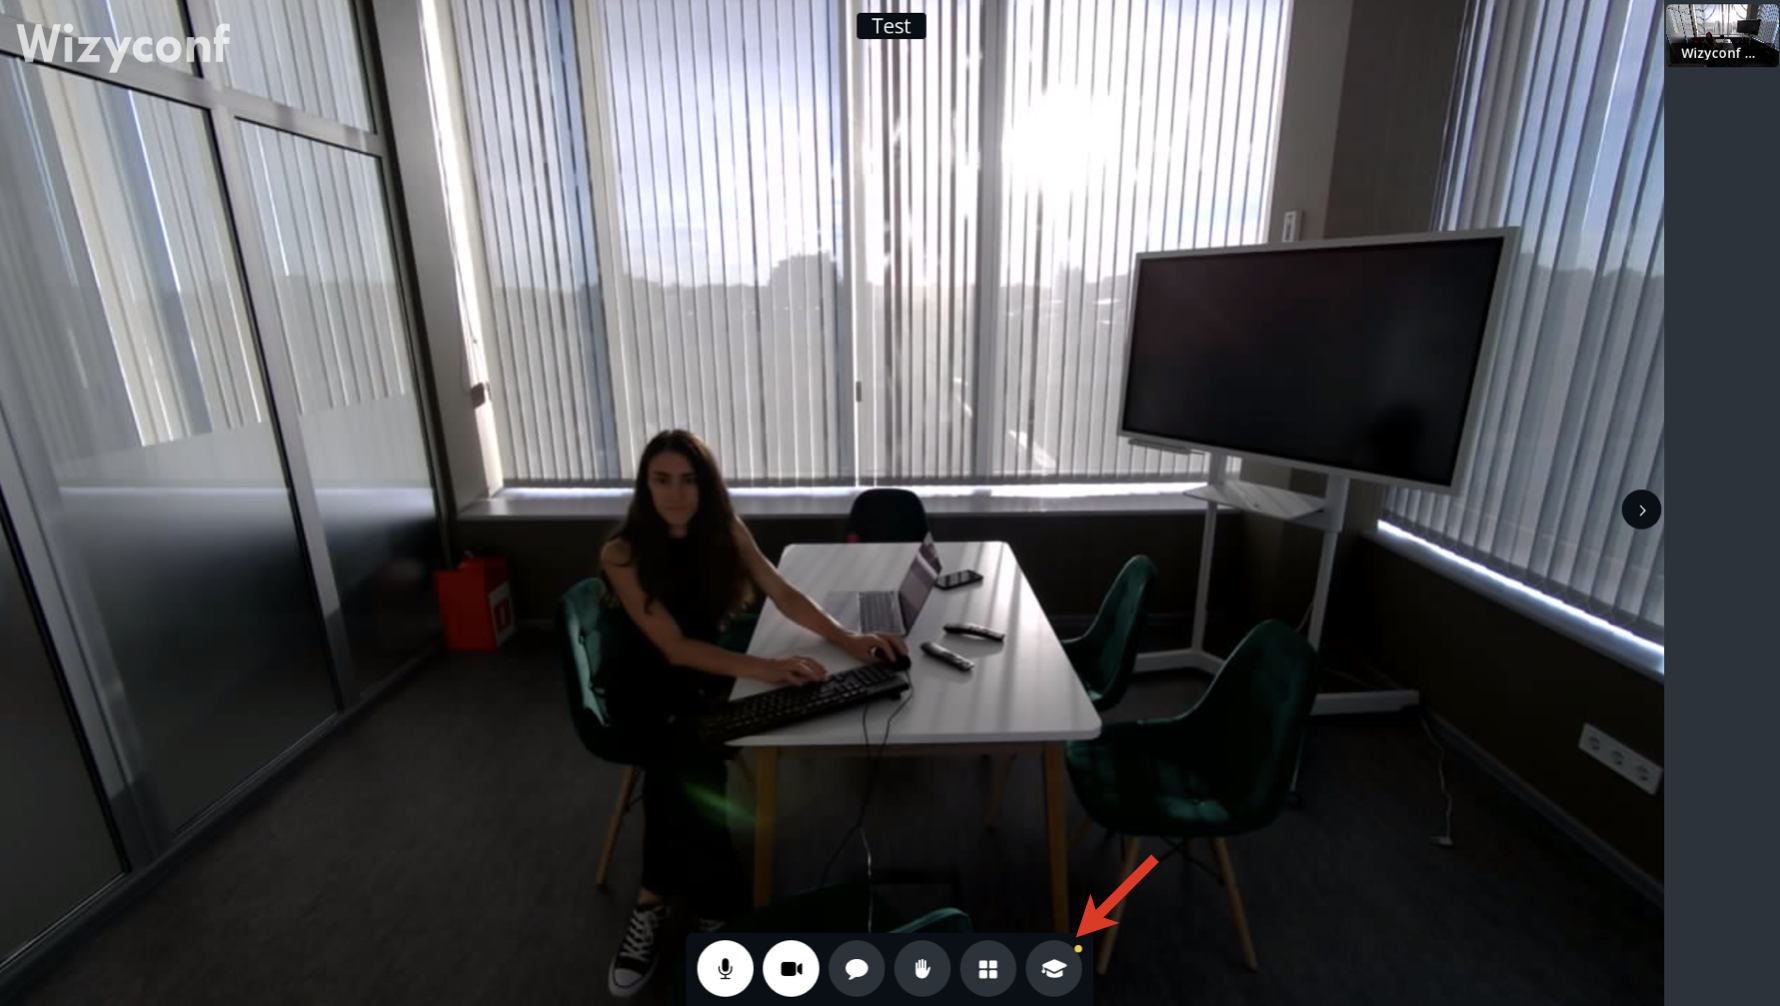
Wizyconf offers a tutorial right in the app, that can guide you through the features mentioned above. See the Tutorials and updates section of this documentation.
Use Navigation keys on the Remote control to manage conference controls.

Pin/ unpin a user
Pinning a user lets you fix them as an “active” speaker regardless of who is actually talking. To pin a user, just click on the relevant participant.
To unpin a user, there are several options:
- Click on the pinned user again
- Use the special Unpin icon next to the Show/Hide button
Note: In case of Wizyconf Station with several screens, where users are pinned on more than one screen, the Unpin button unpins all users.
Camera controls
Press Camera options key on Wizyconf Remote to switch between the PTZ and 4K cameras to control them.
The last selected camera and control mode are saved to Camera controls and are automatically used for the next conference.
PTZ cam
Before using camera controls, you need to upgrade Wizyconf PTZ cam. Follow the instructions: How to upgrade Wizyconf PTZ and 4K Cameras.
You can activate auto tracking mode starting from Wizyconf App version 1.2.1 or use the manual mode for camera rotation.
To switch between modes, use Camera control key on Wizyconf Remote:
- Control mode: auto - enables audio tracking. If it is enabled, the camera auto rotates once external audio is detected
- Control mode: on - enables manual control of camera rotation (use Navigation keys to rotate)
- Control mode: off - disables camera rotation
4K cam
You can activate manual or auto (means that camera responds to human movements) framing modes starting from Wizyconf App version 1.2.2.
To switch between modes, use Camera control key on Wizyconf Remote:
- Control mode: auto - enables auto framing mode. Once it is enabled, the camera auto focuses on speakers as they move
- Control mode: on - enables manual control of camera focus (use Navigation keys to manage focus)
- Control mode: off - disables auto framing mode
Displaying participants on several screens
In case of Wizyconf Station with 3 screens, the following screen prioritization and the logic of displaying participants are applied:
Screen prioritization:
- Central screen
- Left screen
- Right screen
The logic of displaying participants:
- Screen sharing is always pinned on the central screen. If there is another screen shared, it can be set on any other screen.
- Participants displayed on the screens are selected in the following priority order:
- pinned user
- most recent screen shares
- dominant speaker
- most recent speaker
- most recent participant, who joined the conference with video
- most recent participant, who joined without video
- local user
Limitations:
- If there are three users and the user from the center screen leaves the conference, the center screen remains blank
- If there are three users and the user from the left screen leaves the conference, the user from the right screen is moved to the left screen
Tutorials and updates
Wizyconf offers an interactive tutorial that can guide you through its main features and inform when there's new functionality available. To view tutorial, click on the following button:
Note: The button is displayed until you view the tutorials, after which it gets hidden.
On the Tutorials and updates screen, you can see The basics tutorial and the Latest features list:
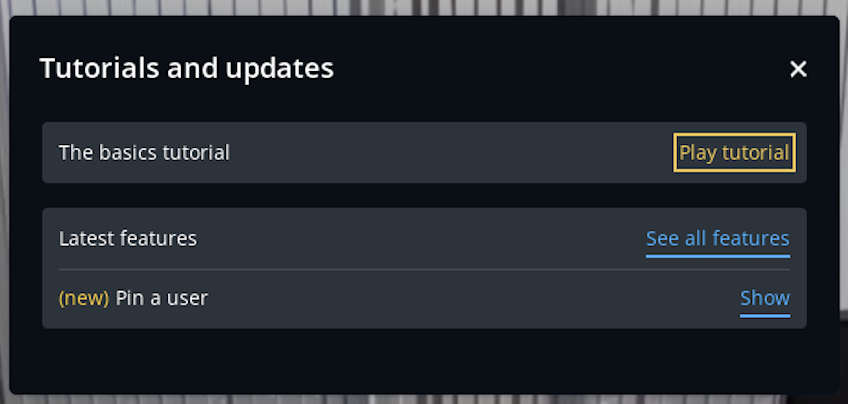
The basics tutorial provides an overview of Wizyconf functionality. To run the tutorial, click Play tutorial.
Under Latest features, there's a list of new functionality that appeared since the latest release. To view what's new, click Show.
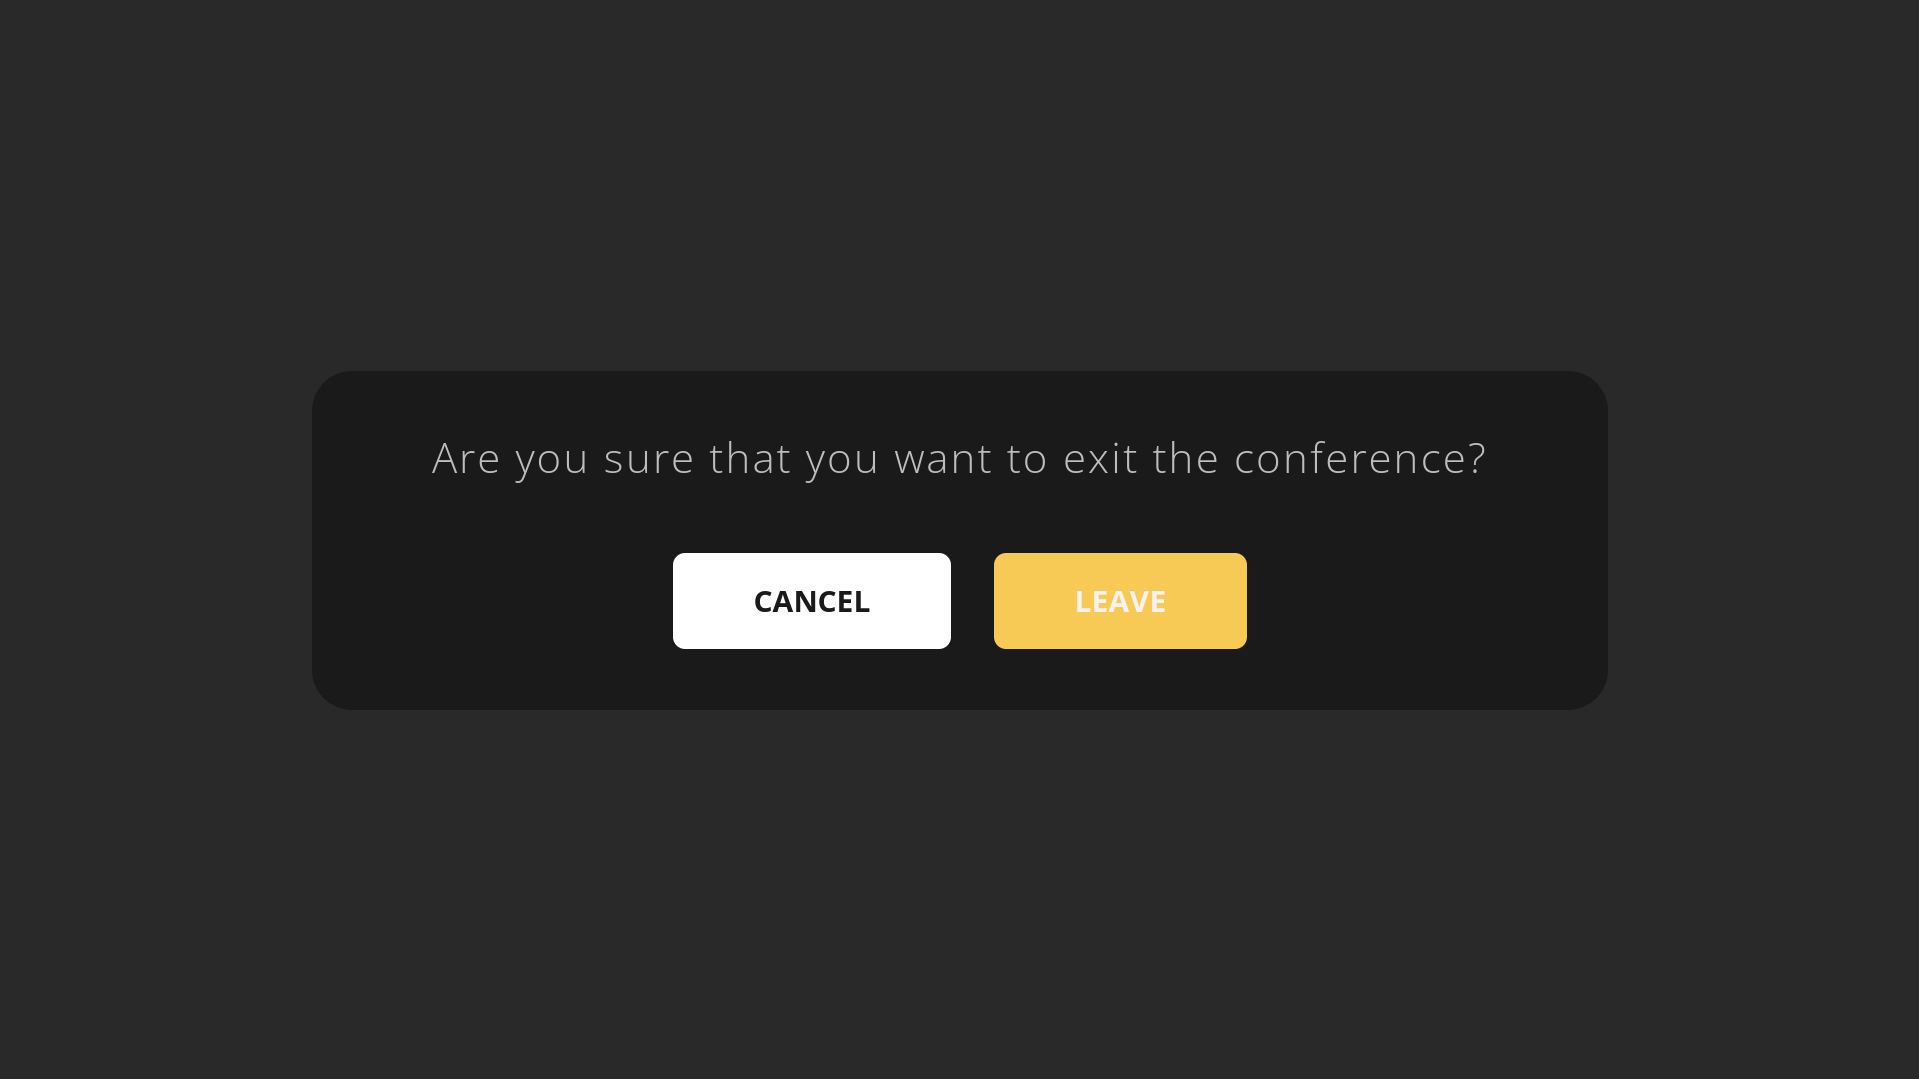
Leave a conference
- To leave a conference, press Home key on the Remote control or on a keyboard
- Use Navigation keys on the Remote control or keyboard Arrow keys to select Leave
- Press Central Navigation key on the Remote control or Enter on the keyboard to confirm
Integration with Wizywebinar and third party conference providers
Wizyconf Station integrates with Wizywebinar and third party conference providers (Google Meet, Webex, MS Teams), consult this documentation for details.
Appendix 1. Troubleshooting
Set up static IP address on Wizyconf
If DHCP is not available, it's possible to set up Static IP:
- Press Home button; Press Google chrome icon -> tap on three dots in the upper right part of the screen -> tap Settings
- Tap arrow down icon near Network
- Disable the switch "Configure IP address automatically" and then specify the IP address, the Routing prefix (the subnet mask) and the Gateway (the IP address of your router)

Notification "Connection Error" is displayed on Wizyconf
Reasons:
- There is no Internet connection
- The device is not assigned/ provisioned on WMP
- The PBX is unreachable
Solution: Check all the above mentioned points and press Retry to access the Conference List.
Impossible to access Wizyconf after applying backup on the PBX
Reason: The old password is used instead of the new one.
Solution: Authorize Wizyconf via Collaboration.
- The following notification is displayed on Wizyconf. To authorize the device, enter the code via Collaboration: it can be entered by any user from the PBX to which Wizyconf is assigned:

Go to Collaboration -> click on the Video Conference icon in the top menu
Click Wizyconf Authentication and enter the code:
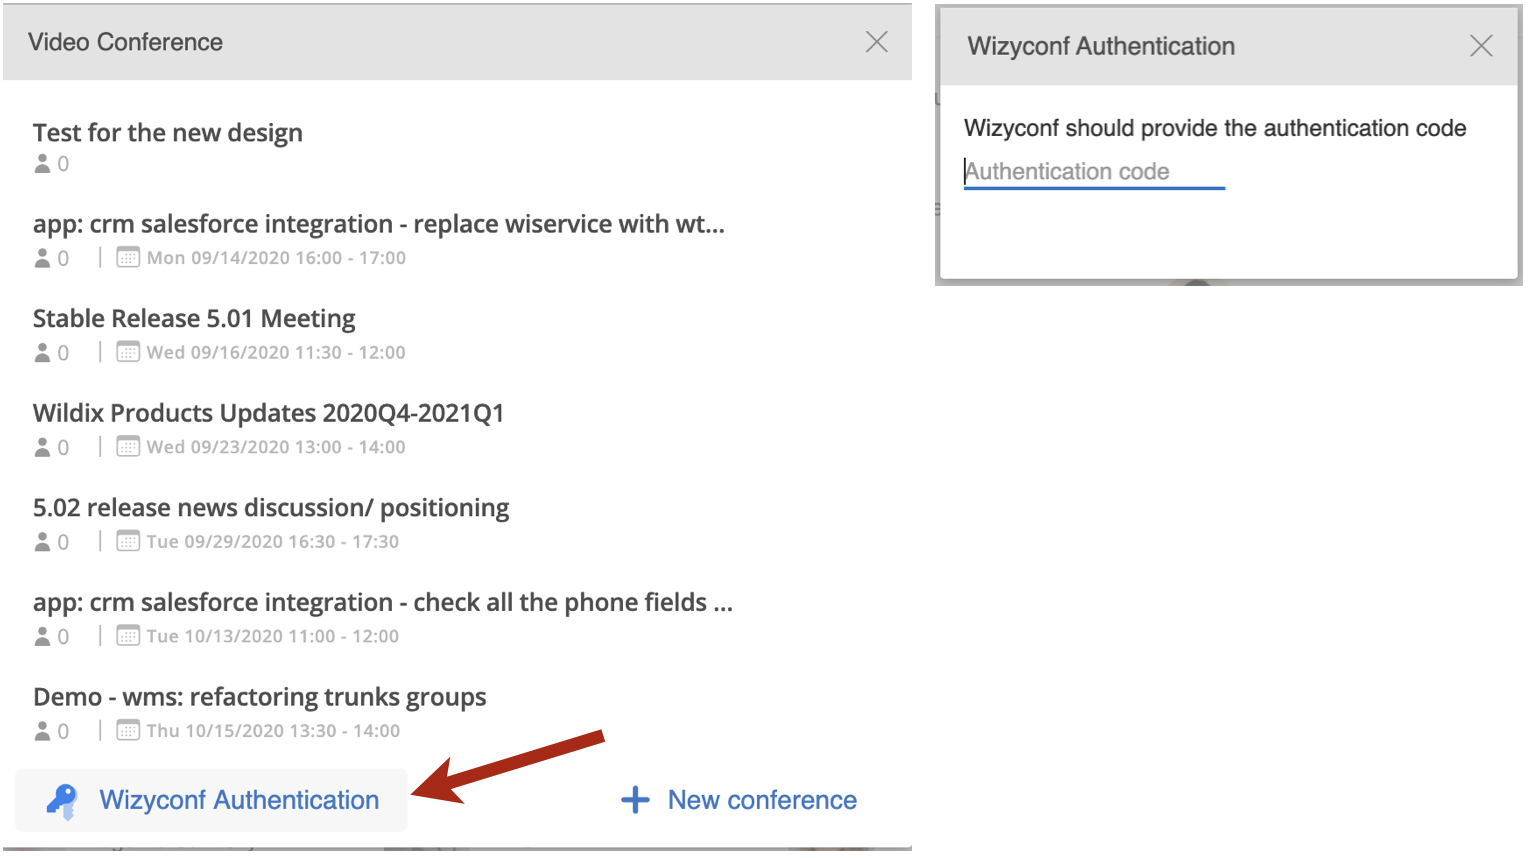
- Press Retry on Wizyconf
After entering a conference, there is infinite loading
Solution:
- Press Home key to exit the conference
- Enter the conference one more time
How to grab logs from Wizyconf
Available only for the stable version.
You need to connect a keyboard to be able to collect logs.
- Start Wizyconf as usual
- Press the shortcut: Ctrl+Alt+F2
- Type the login: chronos
- Type the password: wiz19chrom

- Type the command: sudo tar -zcvf ~/Downloads/logs.tar.gz /var/log/ and press Enter
Type the password: wiz19chrom and press Enter:

Type the command: tar -zcvf ~/Downloads/chrome.tar.gz ~/log/chrome and press Enter:

Type the command: ls -lah ~/Downloads/ and press Enter:

- Press the shortcut: Ctrl+Alt+F1
- Press button Windows and open the app Files
- You can see the folder Downloads with two files, named “chrome.tar.gz” and “logs.tar.gz"
- Insert the USB flash drive into the USB port of your Wizyconf-Core
- Copy both files and eject the USB flash drive
- Insert the USB flash drive into the USB port on your computer
- Send an email to wizyconf_feedback@wildix.com and attach both files to it
How to re-provision Wizyconf to a different PBX
Go to WMS -> Devices and delete Wizyconf from PBX:
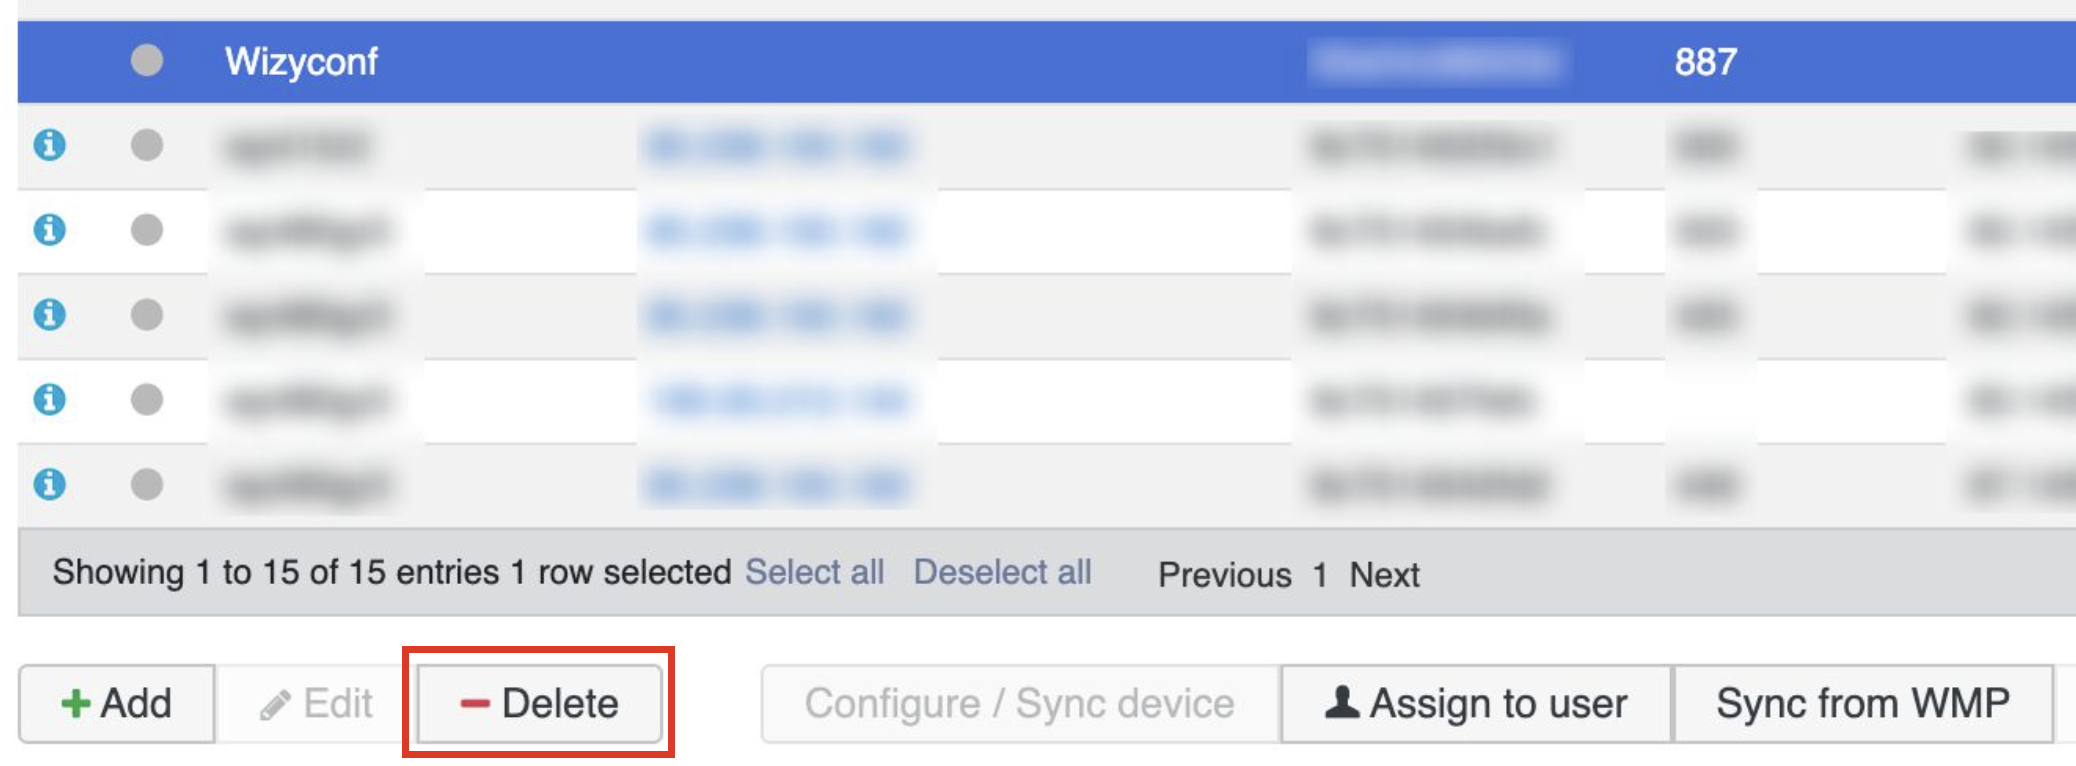
Then go to WMP -> select PBX from which you have previously deleted Wizyconf -> click Options button (three dots) and choose Devices from the drop-down list:

Delete the device from WMP:

- Select a new customer and PBX: go to PBX Devices and add Wizyconf back
- Turn off/ on Wizyconf via Power key
- Wizyconf is re-provisioned to a new PBX