Vision User Guide
This User Guide explains how to use Vision and Wildix Phone App.
Other useful links:
- End user brochures: VoIP Phones and Accessories - End User Brochures
- Datasheets: VoIP Phones - Datasheets, VoIP Phones Accessories - Datasheets
- Vision Changelog: Vision Changelog
HW Version: 49.145.5.81
Android app Version: 3.07.51
Created: September 2022
Updated: November 2022
Permalink: https://wildix.atlassian.net/wiki/x/Qw-OAQ
Vision pre 2022 Documentation: https://drive.google.com/drive/u/0/folders/17IOsP7ghS6GY0US8hOs9oTb2qstlqrvN
Notes:
- It is not possible to create a new conference room from the App, it is only possible to enter a conference if you were invited
- No Google Play services
- Apps can be downloaded from Aurora Store
Packing list
- 1 x Vision
- 1 x handset
- 1 x handset cord
- 1 x stand
Additionally you can purchase handsets, headsets, power adapter in WMP cart.
Phone overview
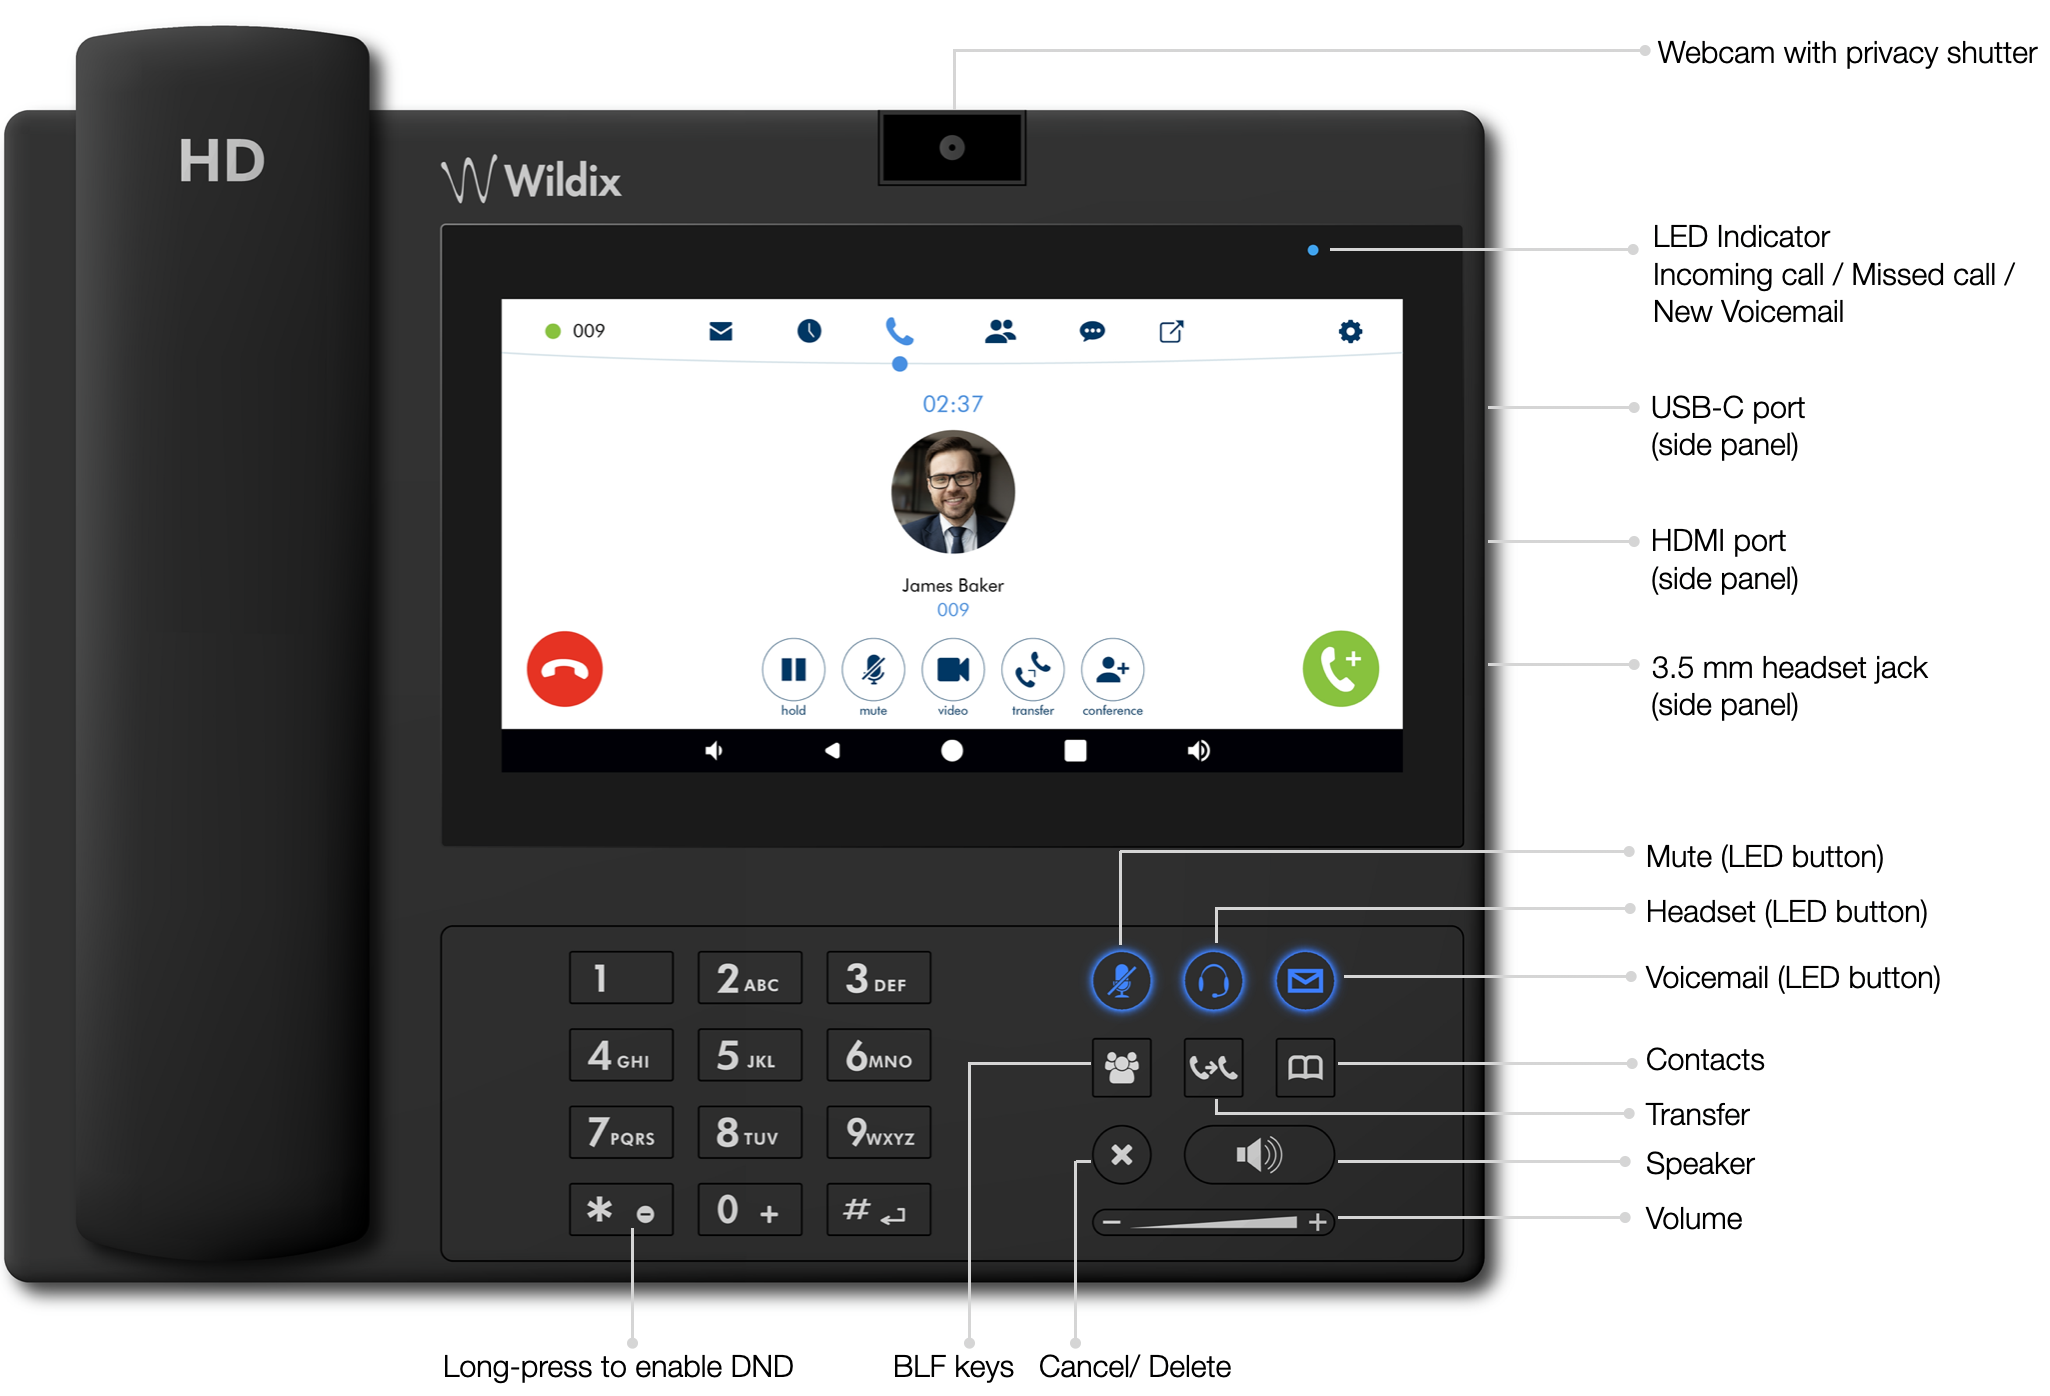
LED Indicator: New Voicemail / Incoming call / Missed call (blinking blue)
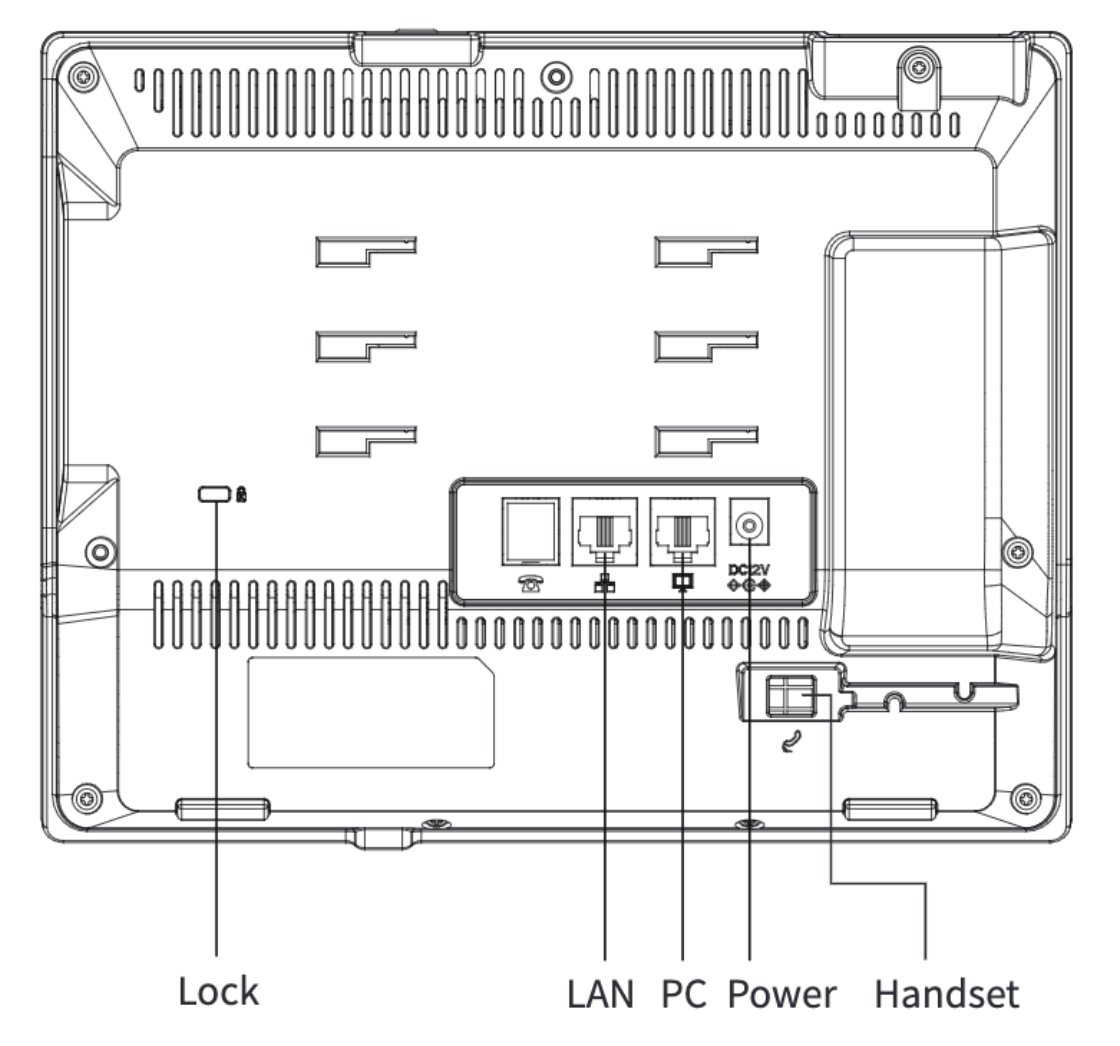
Rear Panel:
 Home screen:
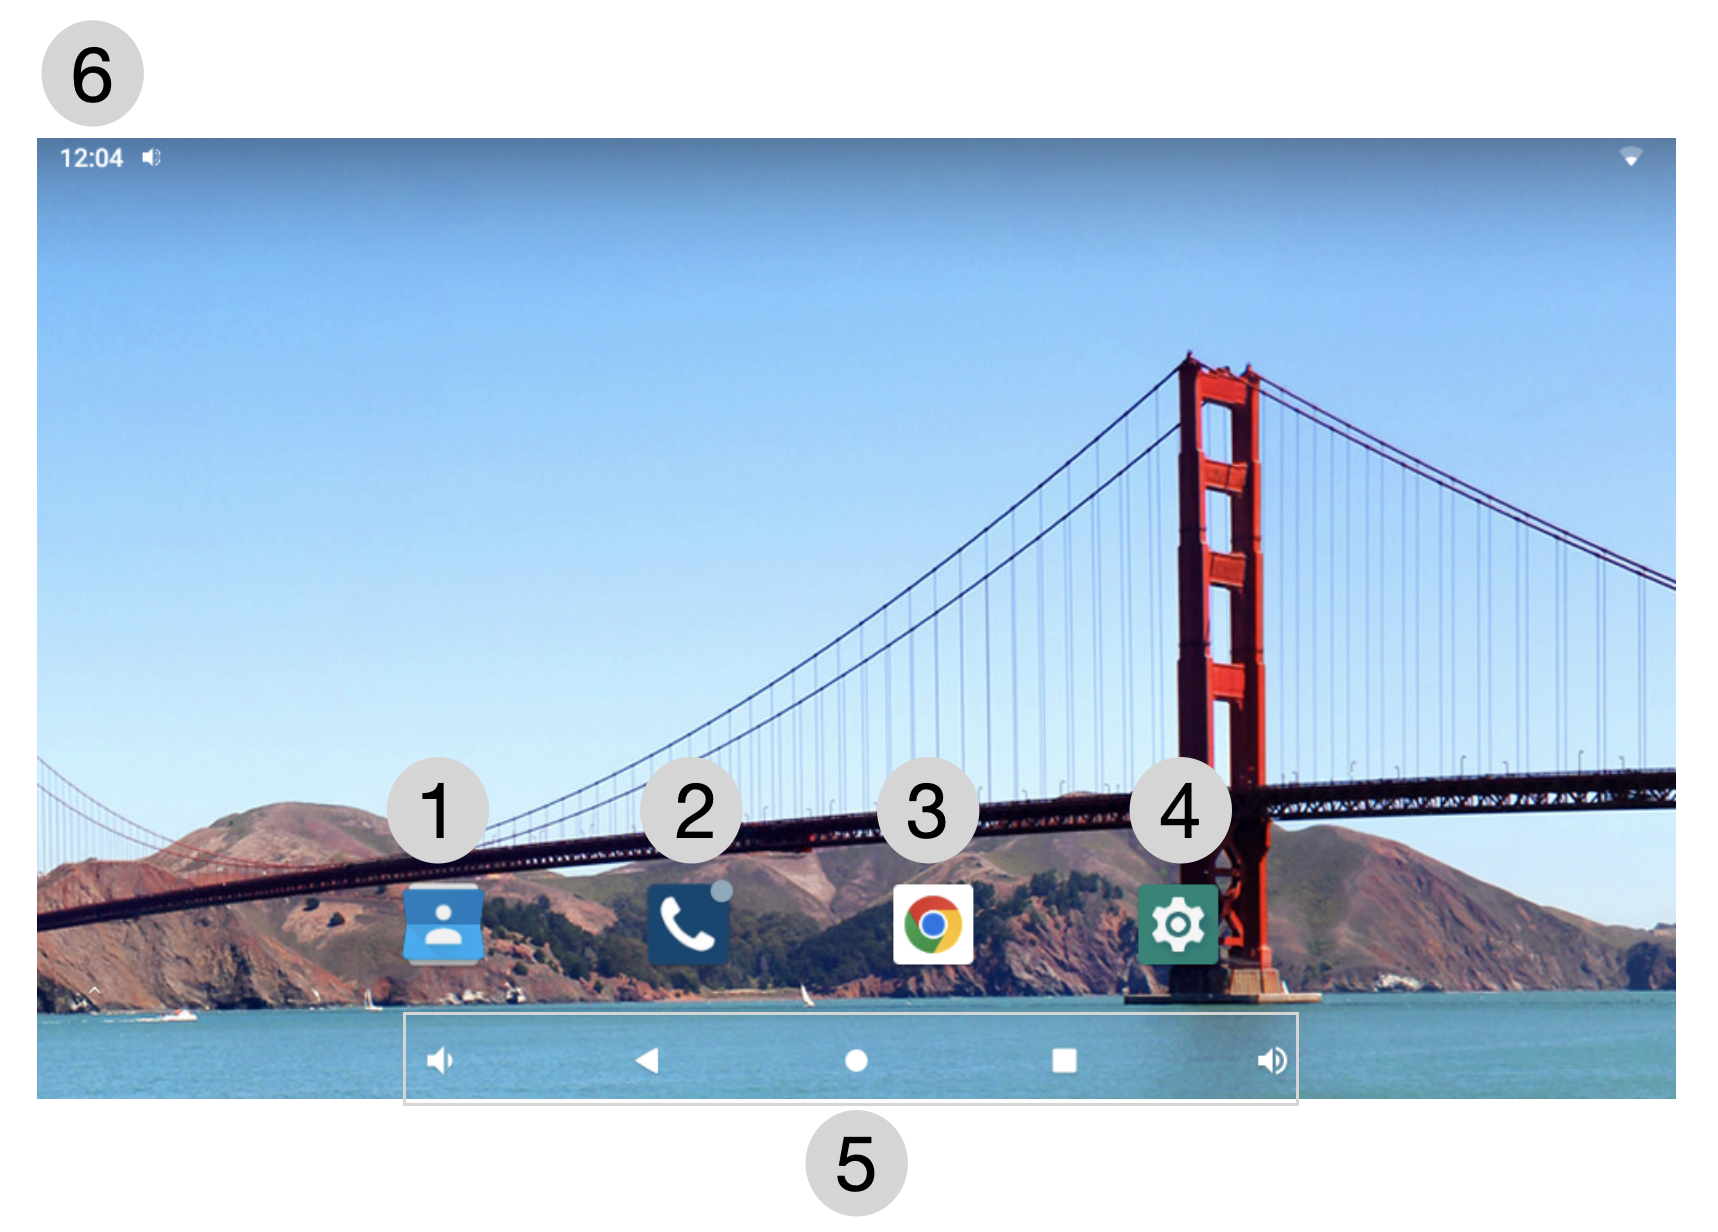 1 – Contacts (personal phonebook)
2 – Wildix Phone app
3 – Chrome browser
4 – Phone settings
5 – Navigation bar
6 – Notification drawer and status bar
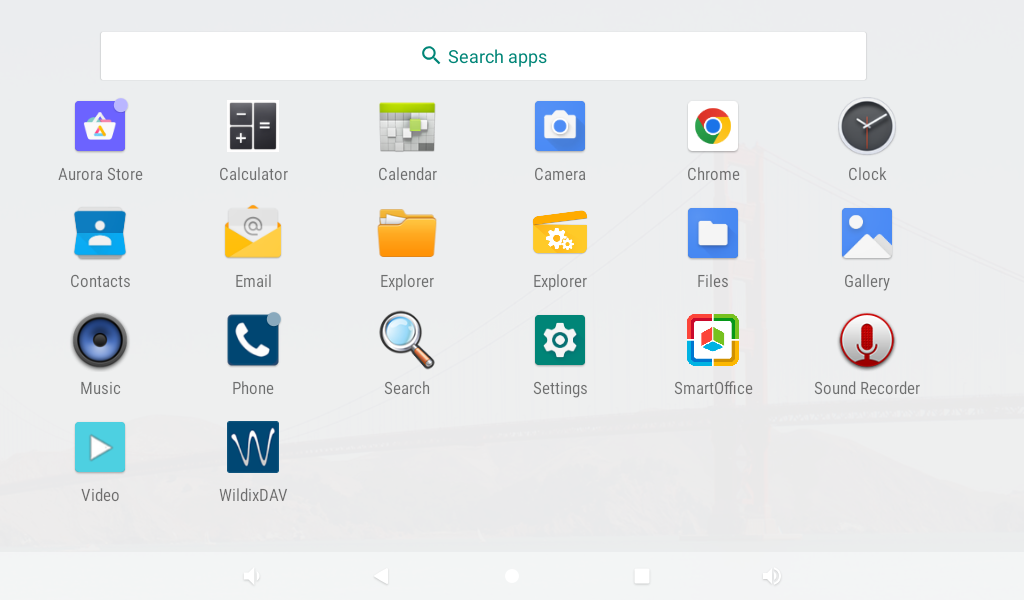
To open Application folder, swipe up from the bottom of the screen:
First time login
Change language
- Go to Vision Settings -> System -> Language & input
- Tap Languages
- Tap Add a language and select it from the list
Network connection
- Go to Vision Settings -> Network & internet
- Select the network:
- Ethernet
- Wi-Fi
Ethernet
- Ethernet -> enable the option
- IP address: the phone automatically receives the IP address from the DHCP Server
In case the phone has not received an IP address automatically, you can set up the Static IP:
- Go to Ethernet Ip mode -> select static
- Enter the IP address manually
Wi-Fi
- Wi-Fi -> enable the option
- Select the Network from the list and enter the password (if necessary)
- Tap Connect
Login to Wildix Phone application
Note: After the phone has booted, the Phone app opens automatically.
Use your Collaboration credentials to access the App:

Domain: PBX IP address or domain name
Note: You can enter the PBX name, wildixin.com domain is added automatically; if you leave this field blank, auto.wildixin.com is automatically added.
- User name: extension number or email address of user (login via user name is not supported)
- Password: user WEB password
Or
You can either use Google/ Office 365 credentials for single sign-on.
Go to App Settings -> Advanced -> Check for Updates. In case there is a new version available, follow the instructions on the screen to update.
Wildix Phone application

1 – Status
2 – Voicemail
3 – History
4 – Dialpad
5 – BLF Keys
6 – Chat
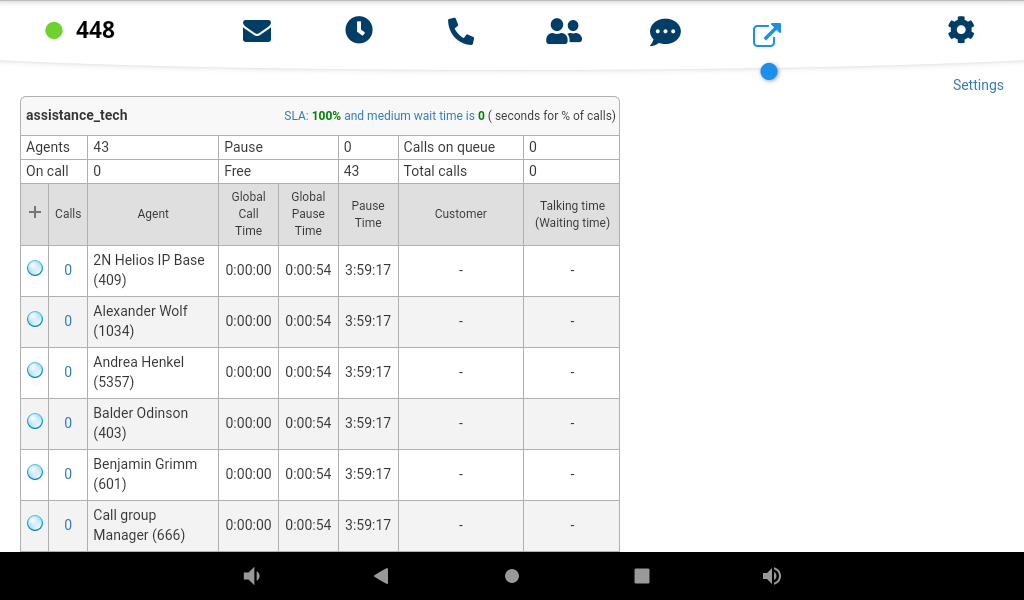
7 – Web application Integration (this menu becomes visible only if you have configured it in App Settings -> Advanced -> Integration URL). More details in Web application Integration
8 – Settings
Note: You can swipe between the Phone app menu tabs by swiping with the finger on the phone screen to the right / to the left.
Status
Tap user status to:
- Set your status to DND / Away and set expiry time for this status (optional)
- Set the status message (optional)

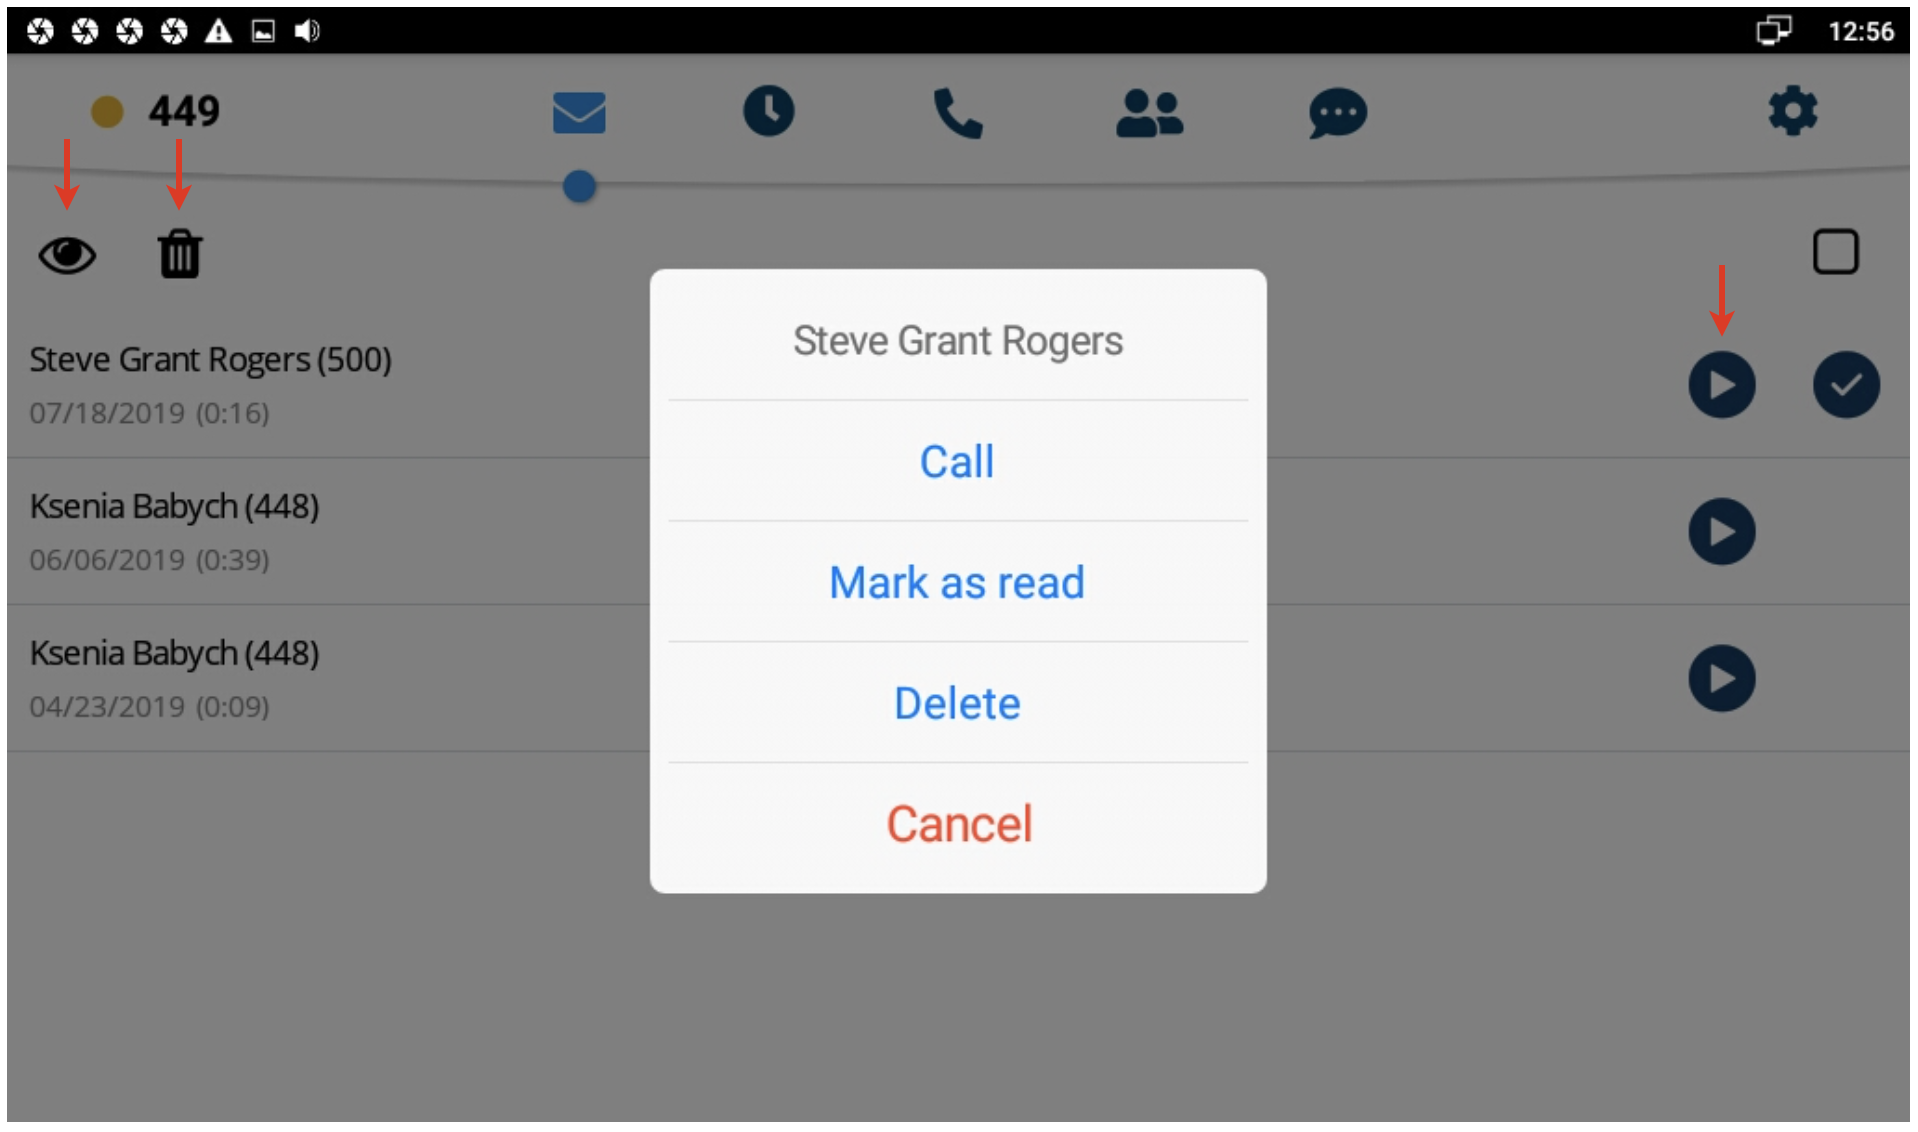
Voicemail
This menu allows you to:
- Listen to Voicemails: tap Play icon
- Mark Voicemails as Read: tap Eye icon
- Delete Voicemails: tap Trash icon
You can also tap on a voicemail message to display the drop-down list: call a user who left a message, mark as read or delete it.
History
This menu allows you to:
- See the list of all calls and call duration (synced with Wildix PBX)
- View user contact details including status
- Listen to call recordings/ view faxes
- Make calls/ start chats
- Archive/ delete calls
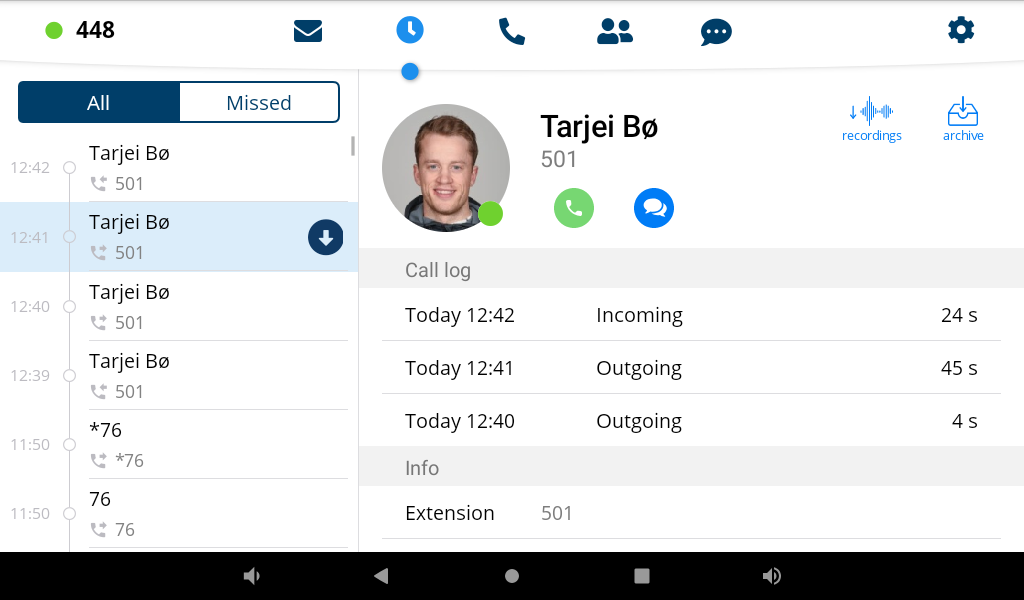
You can also tap and hold an entry to display the drop-down list: call the user, archive or delete the call.
Dialpad
This menu allows you to search for contacts in PBX phonebooks, place and manage calls.
Live search
Live search is performed in all the shared phonebooks; first colleagues that match the searched criteria are displayed, then phonebook contacts.
Start entering a number or a name into the Search field:

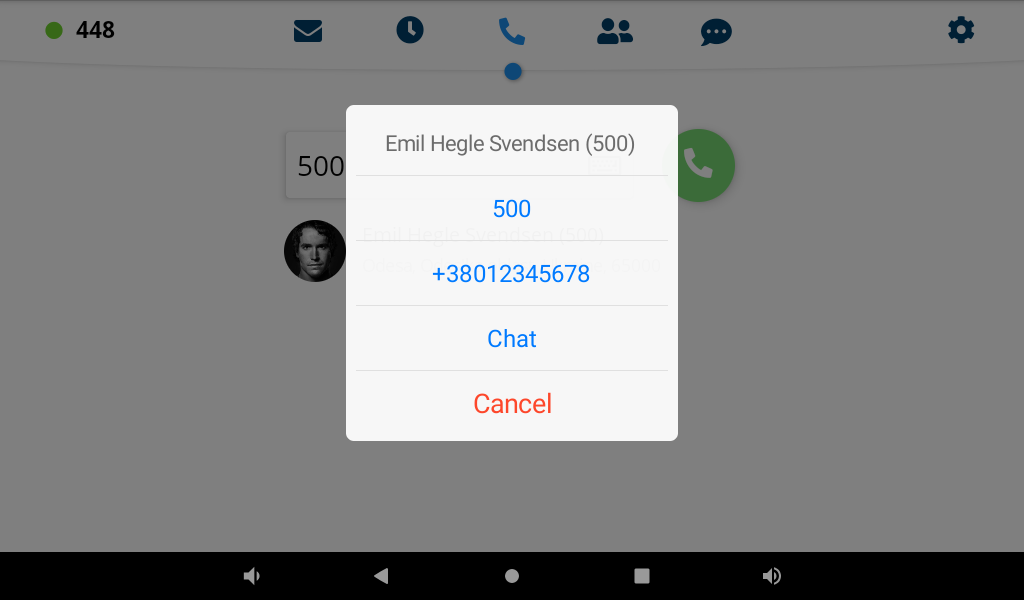
Place a call
Enter the number and tap the green button
Note: The number you entered is automatically dialed after the timeout of 5 seconds, if the handset is in off-hook position.
- Otherwise start entering a number or a name into the Search field, then tap on the contact that appears below the Search field. Tap on a number you wish to call:
Call management
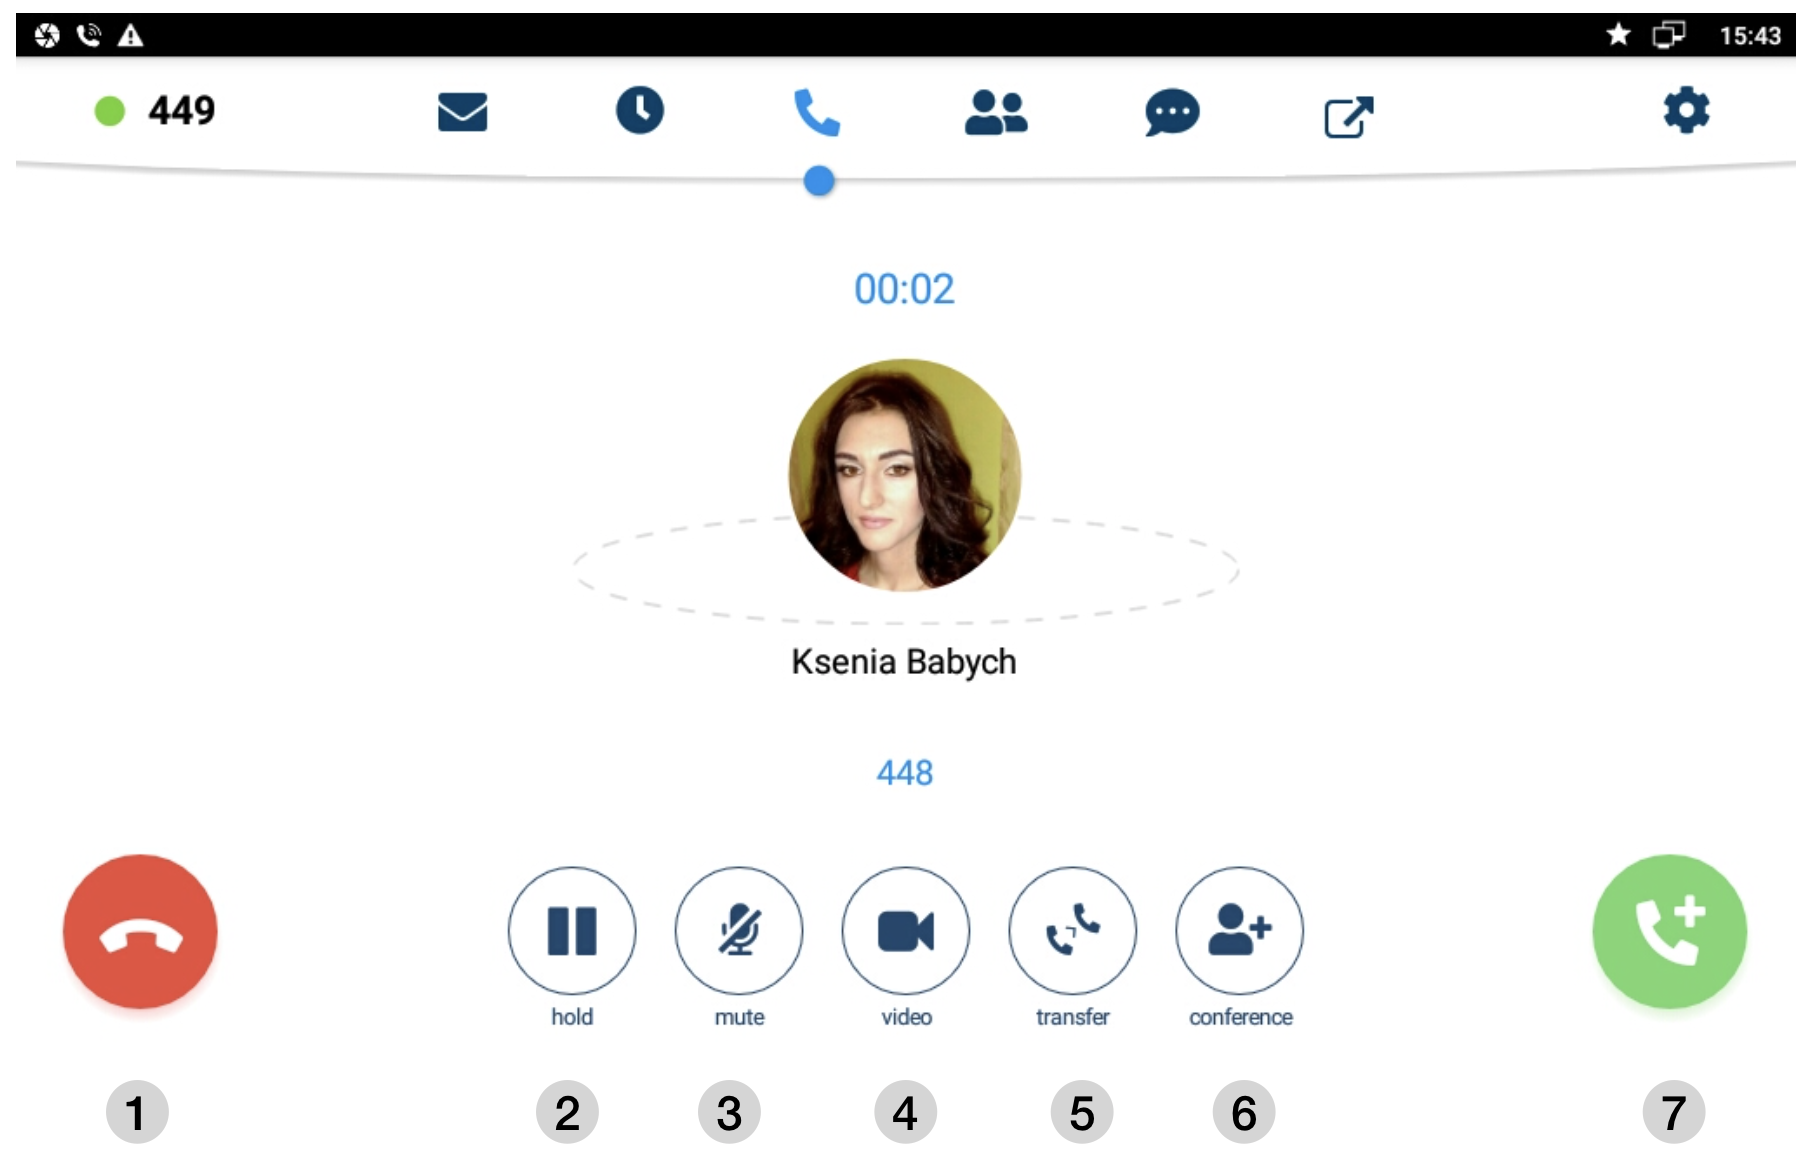
1 – Hang up
2 – Hold / Resume
3 – Mute / Unmute
4 – Video
5 – Transfer
6 – Conference (in case there are more than one active calls)
7 – New call
Note: You can also use keypad buttons to mute/ unmute, hang up and transfer. Refer to Phone overview.
Blind / Attended call transfer
- During a call tap Transfer
- Enter the number for the transfer into the Search field:
![]()
1 – Tap for Attended transfer (call recipient is notified): new call starts, tap Transfer button again from Call window to complete the transfer
2 – Tap for Blind transfer (call recipient is not notified)
3 – Tap to cancel transfer
Blind / Attended call transfer via BLF keys
Transfer a call to a colleague / a call group configured as BLF key
- During a call, go to BLF keys menu
- Tap the BLF key of a colleague / call group
- Tap Transfer for blind transfer (without notification)
- Tap Call for attended transfer (with notification): new call starts, tap Transfer button again from Call window to complete the transfer
![]()
BLF keys
Monitoring and management of colleagues and features.
Note: Max 120 elements can be added for monitoring (features and colleagues). Swipe on the screen to the left/to the right to move between the pages of Function keys.
You can customize the size of the BLF keys in this menu in Phone App -> Settings > Advanced Settings “X keys per page”. (More info: Advanced Settings).
BLF keys must be configured in Collaboration -> Settings -> Fn keys / or in WMS (more info: Collaboration User Guide).
Example of BLF keys configuration in Collaboration:
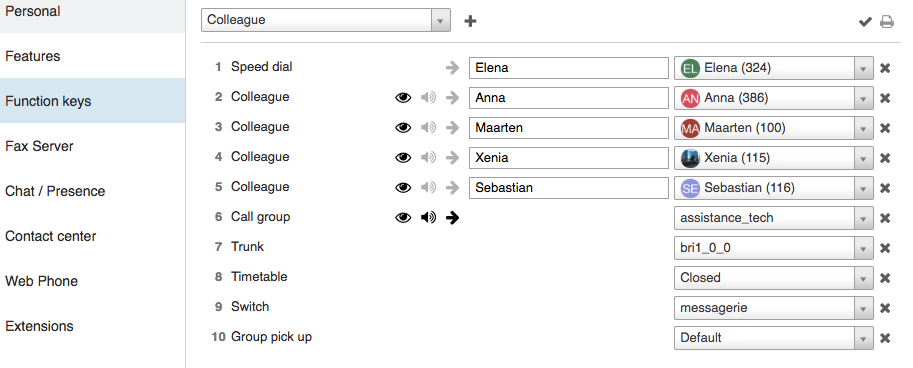
Supported BLF Keys
- Colleague
- Monitor status (ringing/in call; dnd/away)
- Call (tap the element and select Call)
- Call pickup (no possibility to check who is calling and audio notification, tap the element while the status is “ringing” and select Pickup)
- Transfer a call (tap the element and select Transfer during a call)
- Speed Dial
Call number configured as speed dial
Note: you can use any shortcut based on Feature codes with Speed Dial function key, example: enter the value “cgmanager*2*[call_group_ID]” into the field for dynamic call group login / logout.
- Trunk
- Monitor status for BRI/FXO/GSM (green/red)
- Call through this trunk (if green)
- Timetable
- Monitor status (green/yellow/red)
- Change status (tap the element and select Call)
- Switch
- Monitor status (green/red)
- Change status (tap the element and select Call)
- 3 state switch
- monitor status (green/yellow/red)
- change status (tap the element and select Call)
- Group Pick up
- Pickup a ringing call of user belonging to your ACL group on the same PBX
- Call group
- Monitor status (red=incoming call; green=idle)
- Call a call group (tap the element and select Call)
- Pickup a ringing call (no possibility to check who is calling and audio notification, tap the element and select Pickup if red)
- Send DTMF
Chat
This menu allows you to:
- Start a chat
- Send files and Post-It messages
- Monitor presence status / location of colleagues
- Place a call
You can disable / enable visual new chat messages notifications in Phone App Settings -> Advanced.
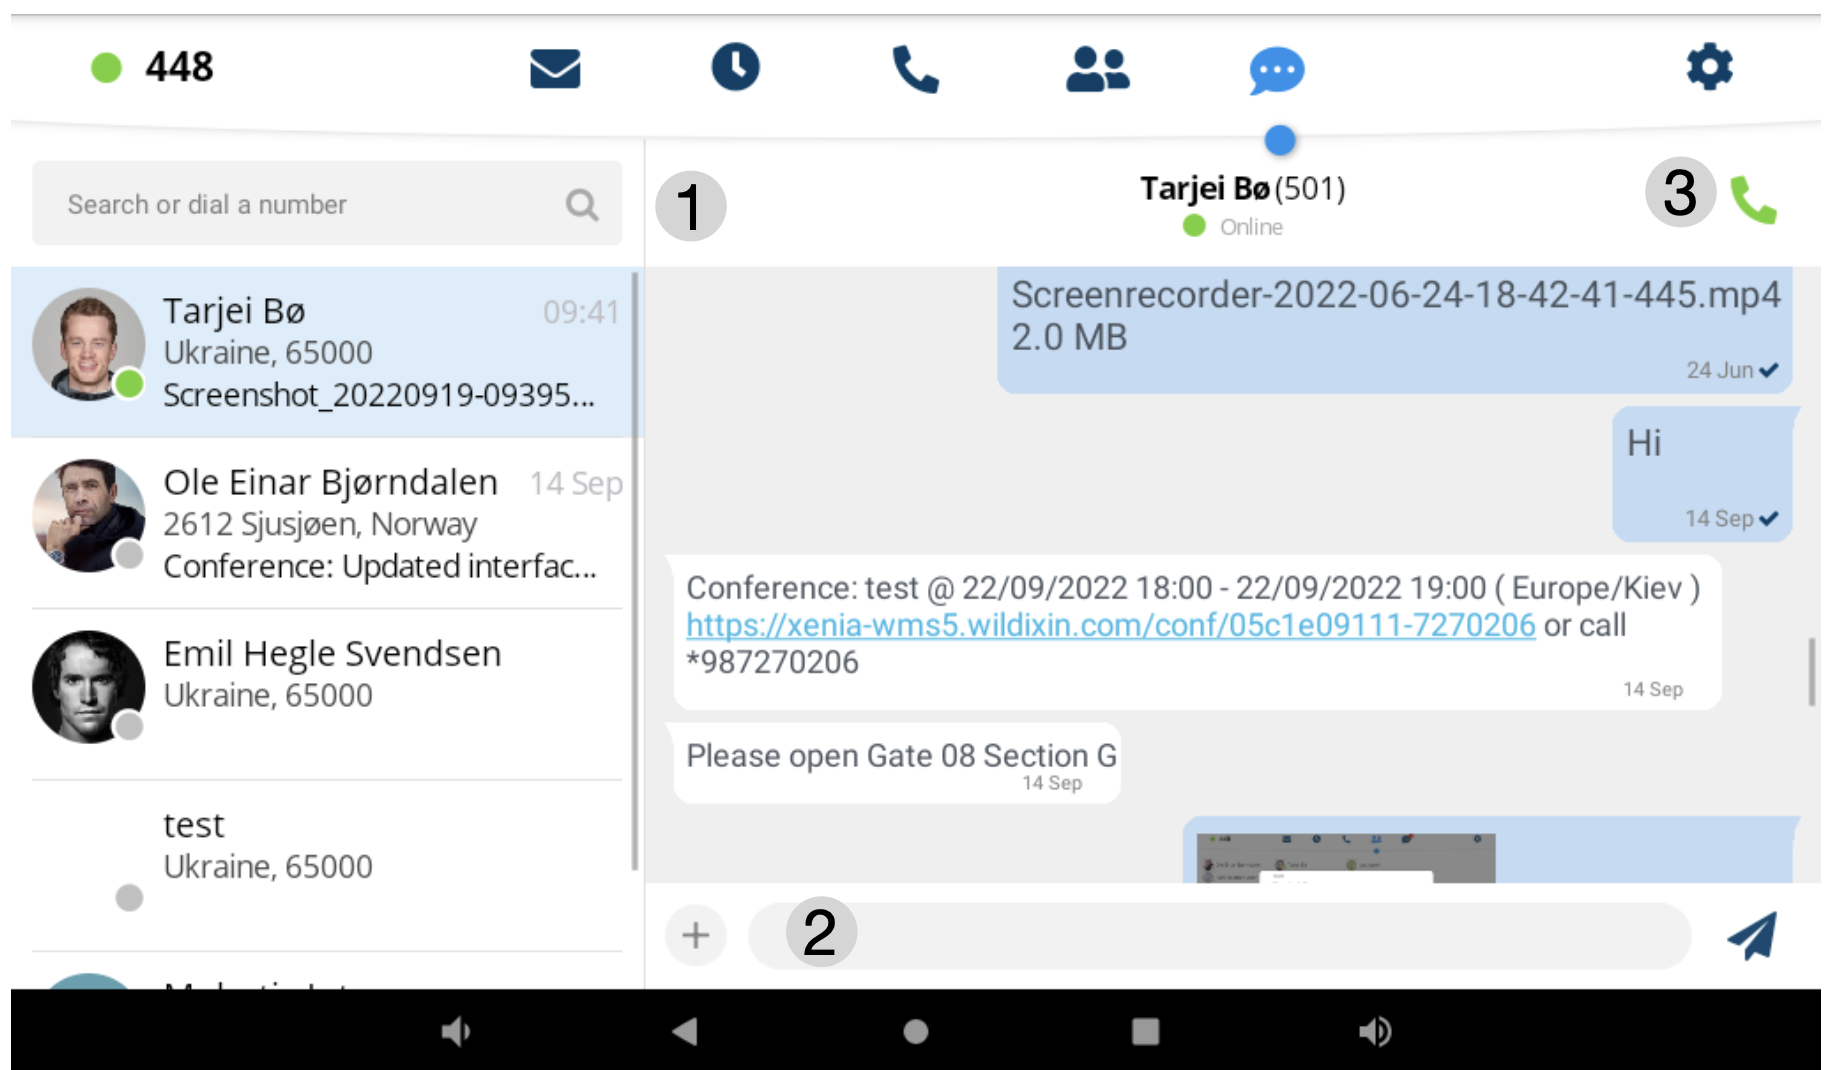
1 – Search field
2 – Tap to write a message, send a file, a photo (up to 100Mb) / Post-It
3 – Call
Note: You can also start a chat form live search results and History.
Important Post-It
Important Post-it note sent via Collaboration is displayed as a modal window above all the menus and blocks access to the app:
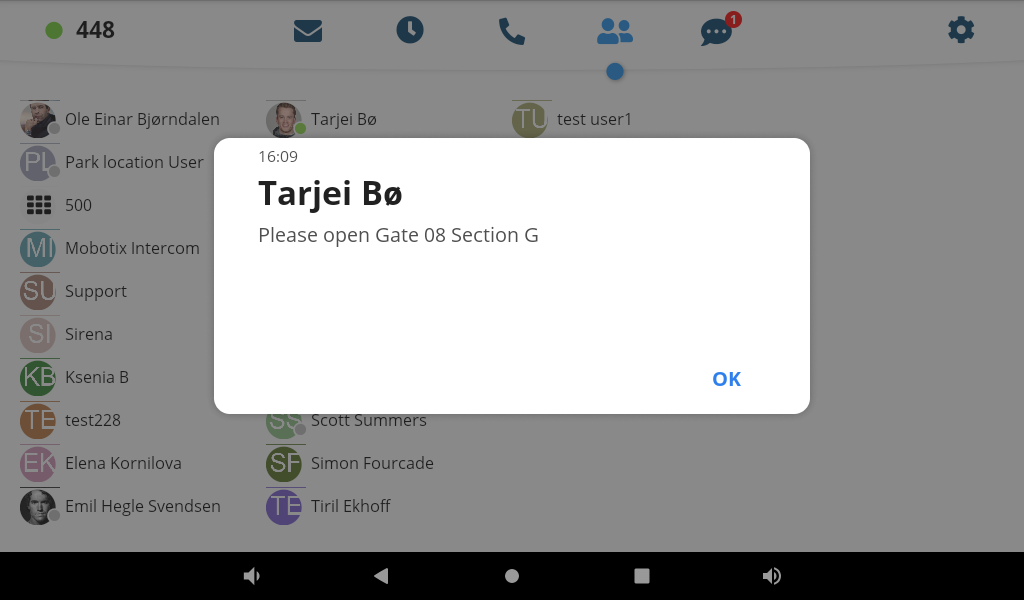
It is only possible to answer/ hang up a call:
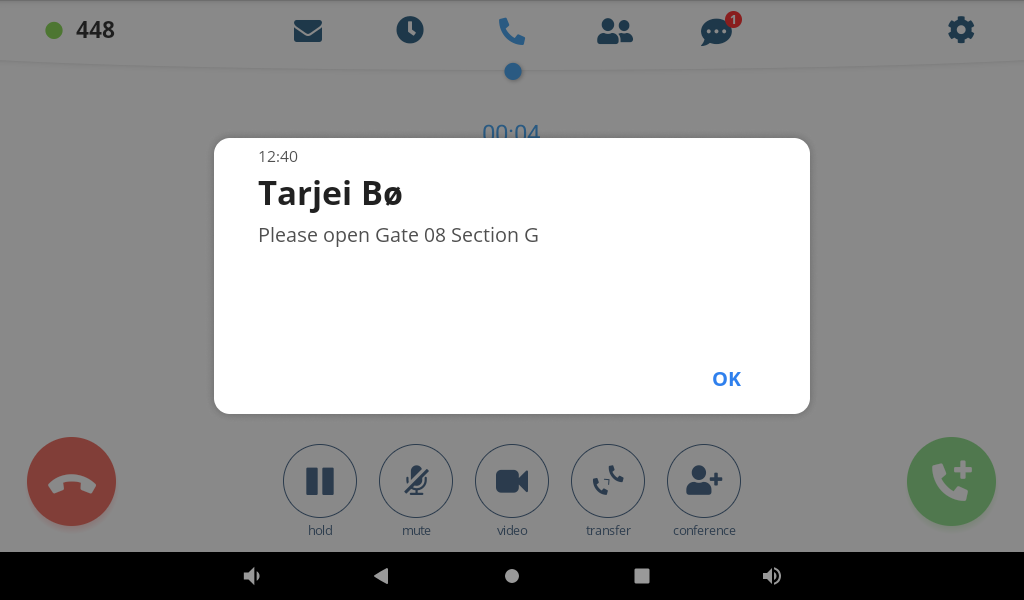
- To unblock, you need to respond by tapping OK
Join Wizyconf Videoconference
It is impossible to start Wizyconf videoconference from Vision, you can only participate (you must be invited).
- To participate in a conference, you must be invited by a PBX user. You receive the invitation to chat
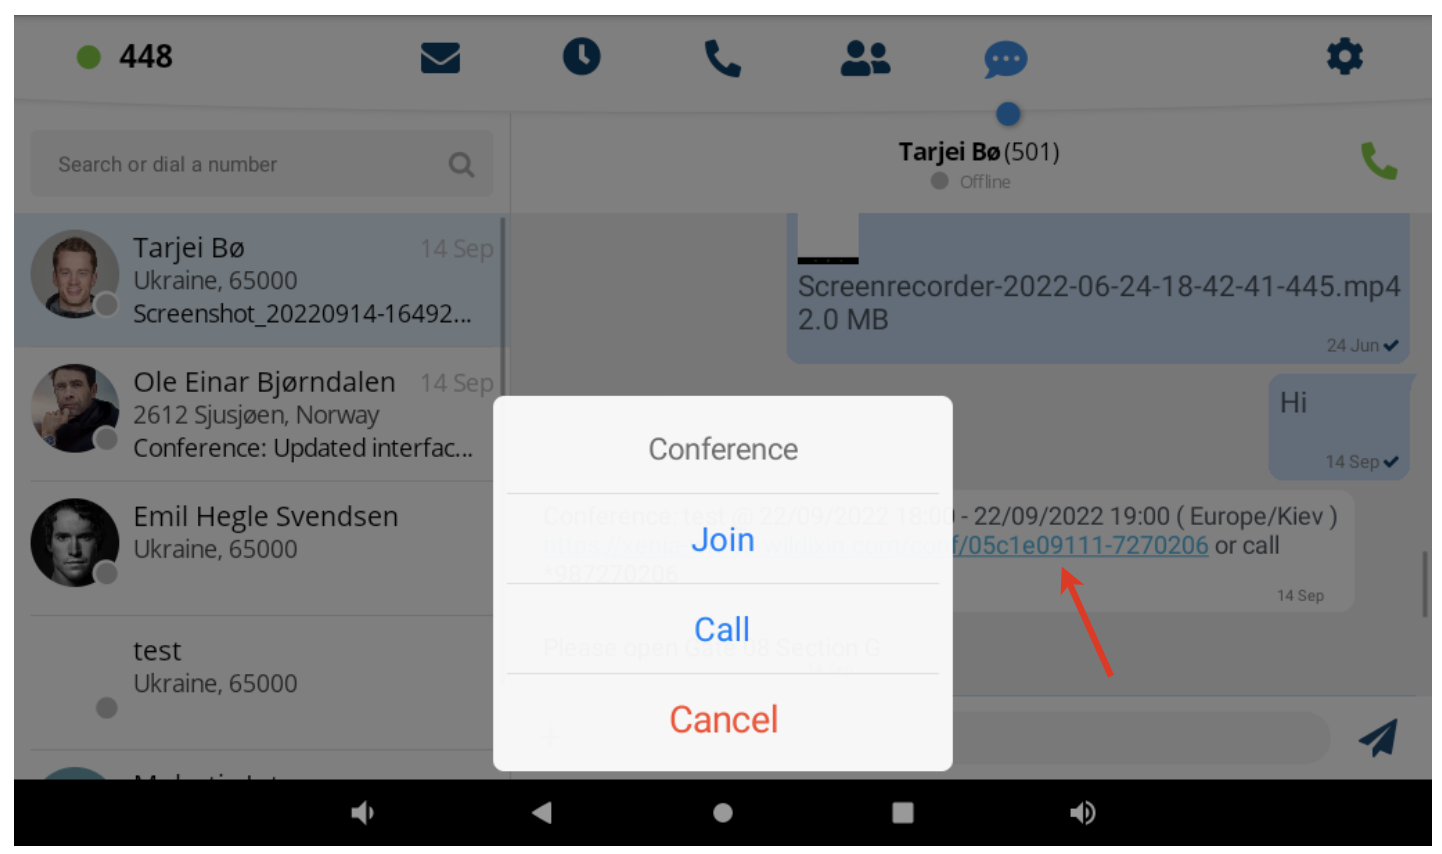
- Tap the invitation link to access the conference
- Select Join to enter the conference room or Call to access the conference in audio-only mode. Follow Wizyconf Videoconference User Guide for details
- To leave the conference room, tap Exit the conference (X)
In order not to be distracted by calls received via Phone app, go to Phone App Settings -> Advanced -> Allow usage of other VoIP Apps = ON (in this case Phone app does not open automatically during an incoming call).
Web application Integration
Web application integration can be configured in App Settings -> Advanced -> Integration URL. It allows opening a web application inside Wildix Phone App.
You can also select the web application to be opened automatically in App Settings -> Advanced -> Default tab and specify timeout after which an application is automatically opened (the default timeout is 120 sec).
Settings
Personal and Call features for each Call class is synced with the PBX.
Personal and Account settings
- Account: Login to Wildix Phone application
- Personal:
- Mobile
Ringtone: Ringtone playback and selection. A ringtone chosen in this menu is applied to all call classes. In case you want to choose separate ringtones for each call class, you can do it in Call classes settings (consult Call features for each call class, External / Blacklist / Whitelist section)
Note: You can also upload audio files to this menu and use them as ringtones. Check Upload the ringtone for details.
Supported audio formats: mp3 and wav.
- Ringtone volume: Adjust the volume level
Upload the ringtone
To upload your own audio file to Phone App:
- First, upload an audio file (mp3 or wav format) you want to use as a ringtone to Vision's memory. You can rather download it via Chrome browser or upload via USB flash drive
- Go to Vision Music (located in Applications folder)
- Tap and hold the audio file for a second
- Drop-down list appears: tap Use as phone ringtone
- The audio file is added to App's Ringtone menu. Now you can select it as a ringtone
Call features (Call forwarding, call waiting, mobility) for each call class
Internal
- Call reject: tap the switch to set On/ Off
- Call forward Busy / Call forward No Answer / Call forward All. To enable:
- Switch On
- Tap on the destination field underneath
- Enter the number using the phone keyboard or the pop-up keyboard on the screen or enter VOICEMAIL
- Call waiting (receive more than one call at a time): tap the switch to activate / deactivate
- Mobility with timeout (receive incoming calls also to your mobile number). To enable:
- Tap the Switch to activate
- Tap the timeout field underneath and enter the numeric value in seconds
Make sure Mobile number is entered in Settings -> Account -> Personal -> Mobile.
External / Blacklist / Whitelist
Same Features as for Internal class, in addition, this menu allows you to select the Ringtone for each Call Class.
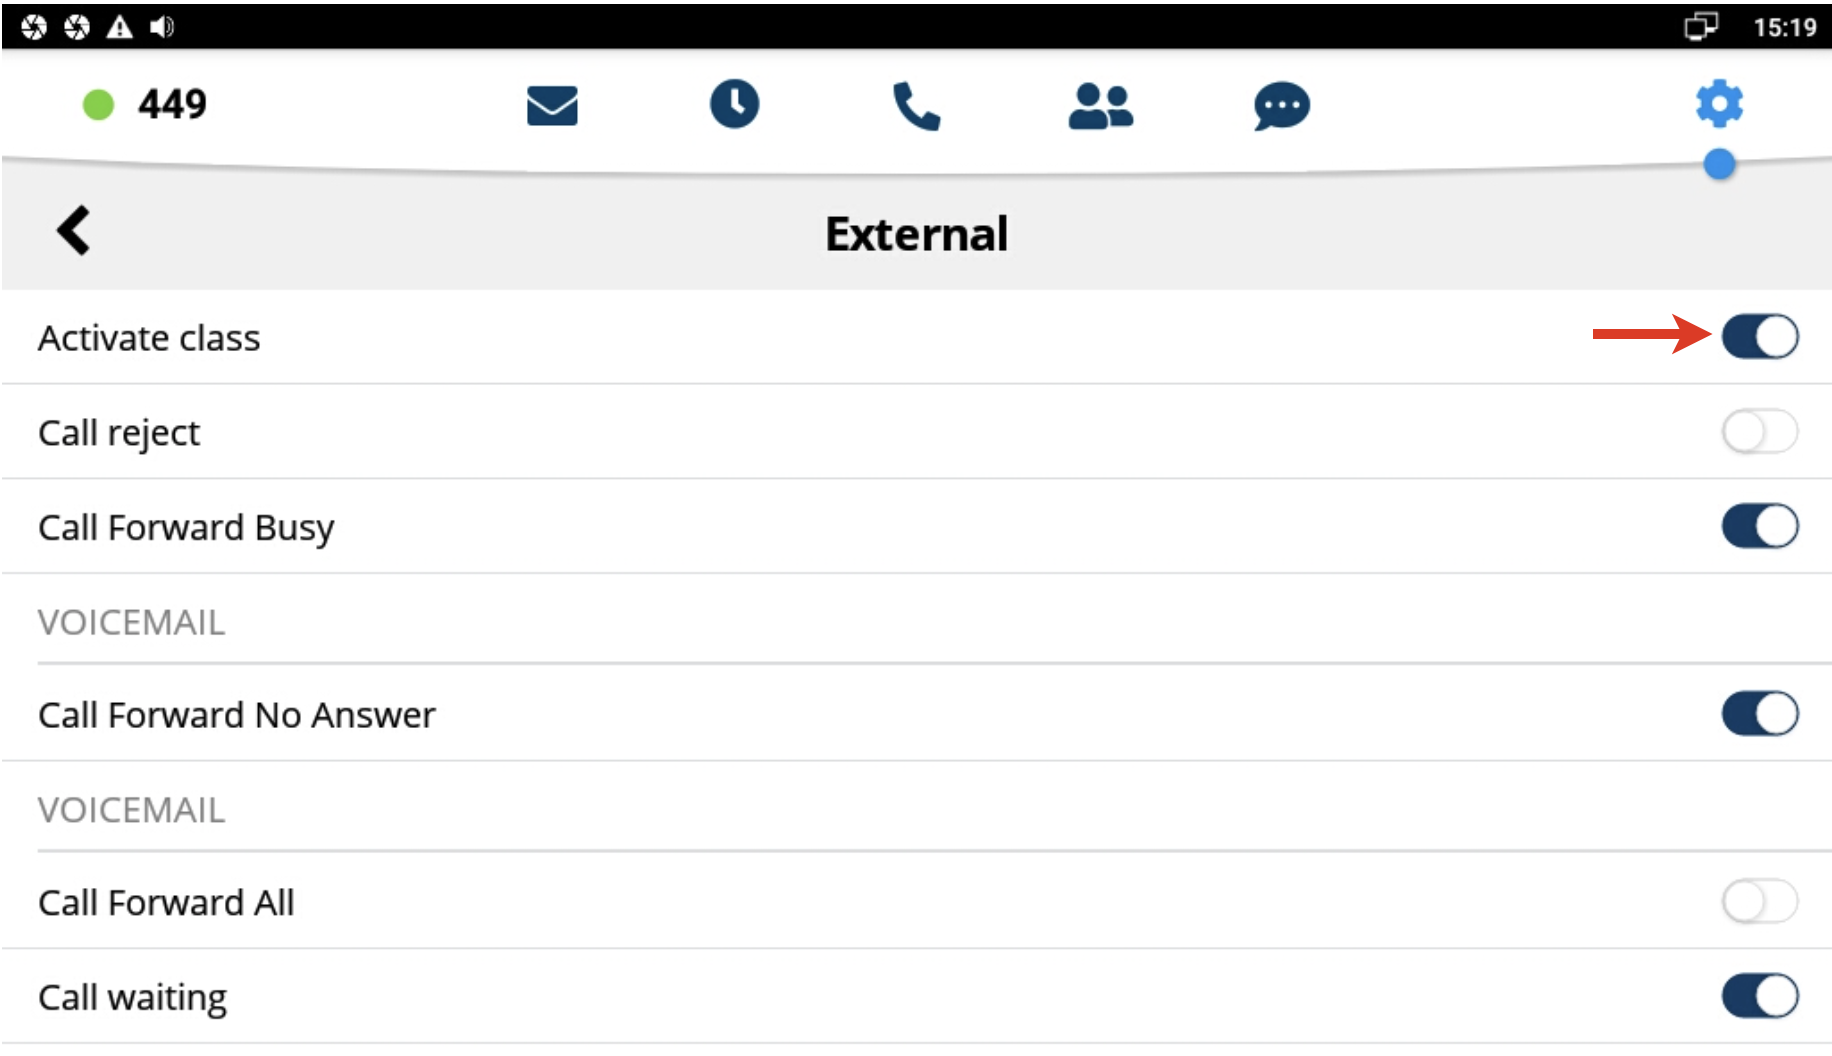
Tap the Switch to activate the class, then you can change other settings.
Advanced Settings and Phone upgrades
Advanced:
- Update source: allows installing “beta” versions (changelog and upgrade instructions: Vision Changelog)
Check for Updates: tap to search for new versions; in case the new version is available, follow the instructions on the screen to upgrade
In cases when the phone cannot get firmware from firmwares.wildix.com server (for example, connection to the server is blocked from the phone; PBX doesn't have access to the server), you can deploy a local upgrade server and indicate it in WMS Settings-> Tools and utilities -> Upgrade -> Custom firmware server. Please contact Wildix Support for details.
- Ringtone: select the ringtone playback mode in case headset is connected: Headset / Speaker / Headset+Speaker (ringtone is played one time to headset and then to speaker)
Initiate video calls (On / Off): when On, video is automatically started upon starting an audio call
- Audible DTMF (On / Off)
Automatic upgrades (On / Off); when Off, an additional option Notify of new versions – On/Off is displayed.
- auto upgrades = On
New Android FW is installed during the night, no confirmation is needed; Phone App is automatically downloaded but need your confirmation to be installed - auto-upgrades = Off
notify of new versions = On
Only notification about new version (Android FW / Phone App) is displayed, new version is not installed automatically - auto-upgrades = Off
notify of new versions = Off
No auto-upgrade and no notification about new versions
- auto upgrades = On
Allow usage of other VoIP Apps (On / Off): when On, Phone app does not open automatically during an incoming call
Note: We recommend to enable this option for Wizyconf Videoconference.
- EU volume limit (On/ Off): enable/ disable the volume limit
- Show chat notification (On/Off): enable / disable visual new chat message notifications
- Mute notifications during calls (On/Off, enabled by default): disable/ enable sound notifications from third-party apps during a call
- Number of BLF keys:
- 4 keys per page (supported in case 12 or less keys are configured: 3 pages x 4 keys)
- 18 keys per page (supported in case 54 or less keys are configured: 3 pages x 18 keys)
- 40 keys per page (default: 3 pages x 40 keys)
- Preferred video size: the default size is VGA, you can switch to QVGA, 720p
- Integration URL: insert a web application link to allow opening it inside the App
- Default tab: configure to which page application is moved after an idle timeout specified in Timeout (seconds). The default page is Function keys. You can change it to Dialpad, Function keys, Integration URL or disable at all
- Timeout (seconds): adjust the timeout after which Default tab is automatically opened. The default timeout is 120 sec
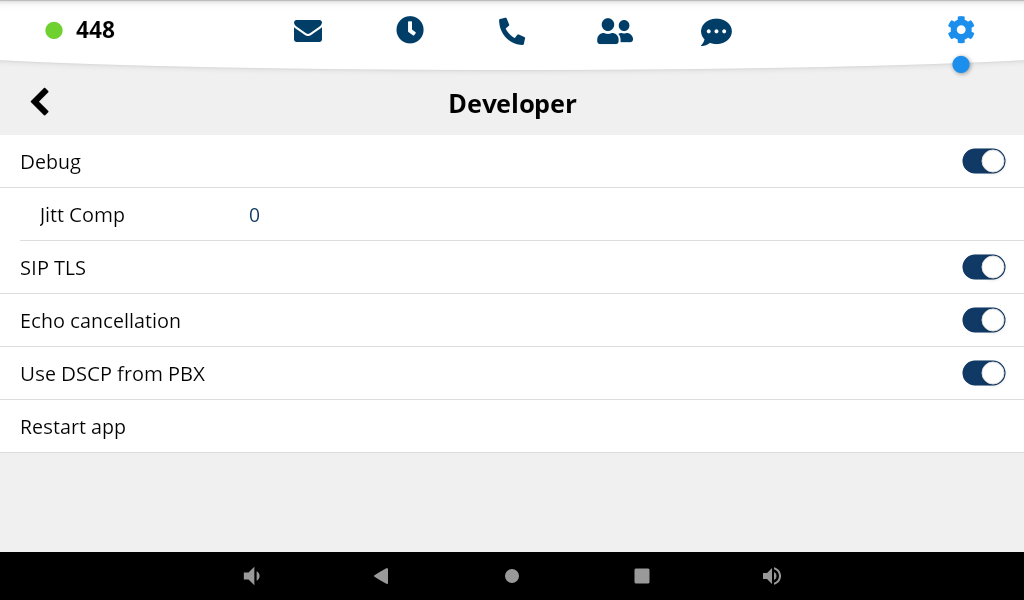
Developer Settings
- Debug: enable/ disable additional debug info in phone log
- Jitt Comp: set Jitter Buffer interval in ms. By default, it is 0 - automatic
- SIP TLS: enable/ disable encrypted SIP over TLS signaling
- Echo cancellation: enable/ disable adjusting voice quality by preventing or removing echo
- Use DSCP from PBX: if enabled, value from SIP-RTP page (WMS -> Settings -> PBX -> SIP-RTP) is applied only when WI-FI is used
- Restart app: tap to reset the App
About
Check the information about Phone application and current version.
Appendix 1. Phone settings
Network & internet
Ethernet: On / Of Use DHCP or tick off “Use static IP” and enter the parameters manually
Wi-Fi: On / Off. Scan for networks, view the list of available networks, add a new one
Data usage. Check how much data your phone uploads or downloads using data
Portable hotspot: On / Off. Use your phone's mobile data to connect another phone, tablet, or computer to the internet
Airplane mode: On / Off. When you enable airplane mode, you disable your phone's ability to connect to cellular or WiFi networks or to Bluetooth
Advanced:
VPN. Connect your phone to a private network
Private DNS. Select Private DNS Mode
Proxy VLAN. Select PC/ LAN Port Settings
Connected devices:
- Search for devices, view the list of paired devices, unpair devices
Apps and notifications:
- See the list of Recently opened apps
- Set up Notifications and Default apps
- Manage App permissions
Display:
- Brightness level. Adjust the brightness level
- Wallpaper. Select the wallpaper
- Sleep. Adjust the timeout for screen sleep mode
- Font size. Select the font size
- Advanced:
- Display size. Set up the display size
- Screen saver. Select and enable screen saver
- Device theme. Select your phone's theme
- HDMI. Enable HDMI, select the Resolution, adjust the Screen Zoom
Sound
- Volumes: adjust Media volume, Ring and Alarms volume
- Also vibrate for calls: enable/ disable vibration
- Do Not Disturb. Customize DND settings
- Phone ringtone, Default notification sound and Default alarm. Select sounds
- Advanced: Screen locking sound, Touch sound
Screenshot
- Select delay time to capture the screen and show the screenshot button in the statusbar
Storage:
- Сheck the information about memory usage
Security:
- Enable screen lock, device administration, credentials storage
Accounts:
- Add and manage accounts
Accessibility:
- Manage special needs settings (Text-to-speech output, Large text, Magnification, remove animation etc)
System:
- Languages and input: select the language from the list
- Date & time: allows you to enable automatic time and date settings or to set up time and date manually, select the time zone, select the format of time and date, set up the SNTP Server
- Reset option: reset Wi-Fi, mobile and Bluetooth data, app preferences or restore the phone to the factory defaults
About device:
- Get information about system update, status, model, Android and Kernel version, legal information
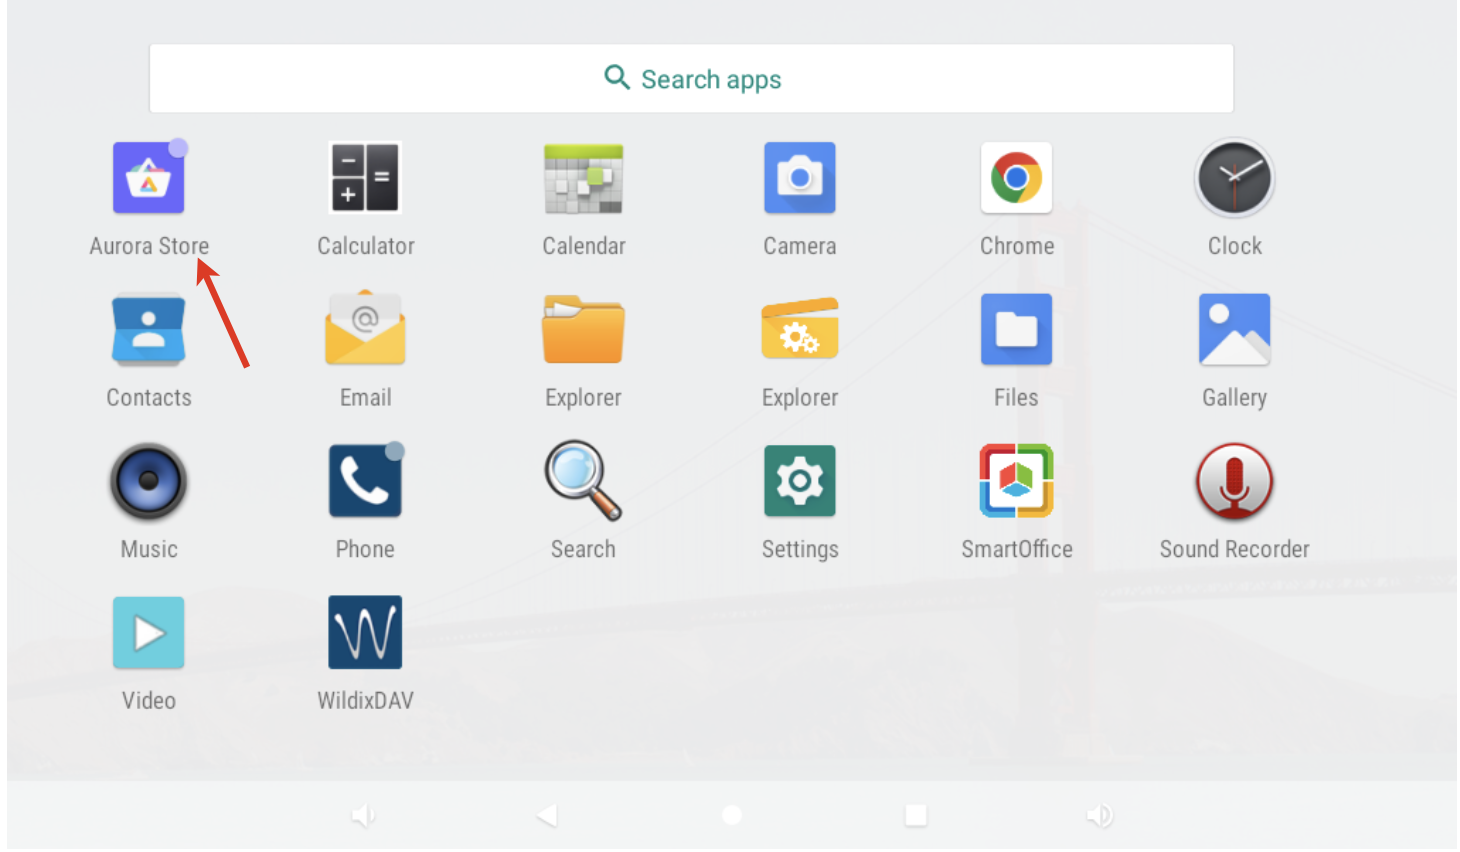
Appendix 2. Aurora Store Authorization
Aurora Store is pre-installed starting from firmware v. 49.145.5.81.
Before this version, you can manually download and install it through a web browser.
Aurora Store is an alternate to Google's Play Store, allowing users to search, download and update Android apps.
It is pre-installed on Vision, but requires authorization. To authorize:
- Open Application folder by swiping up from the bottom of the screen
- Tap Aurora Store
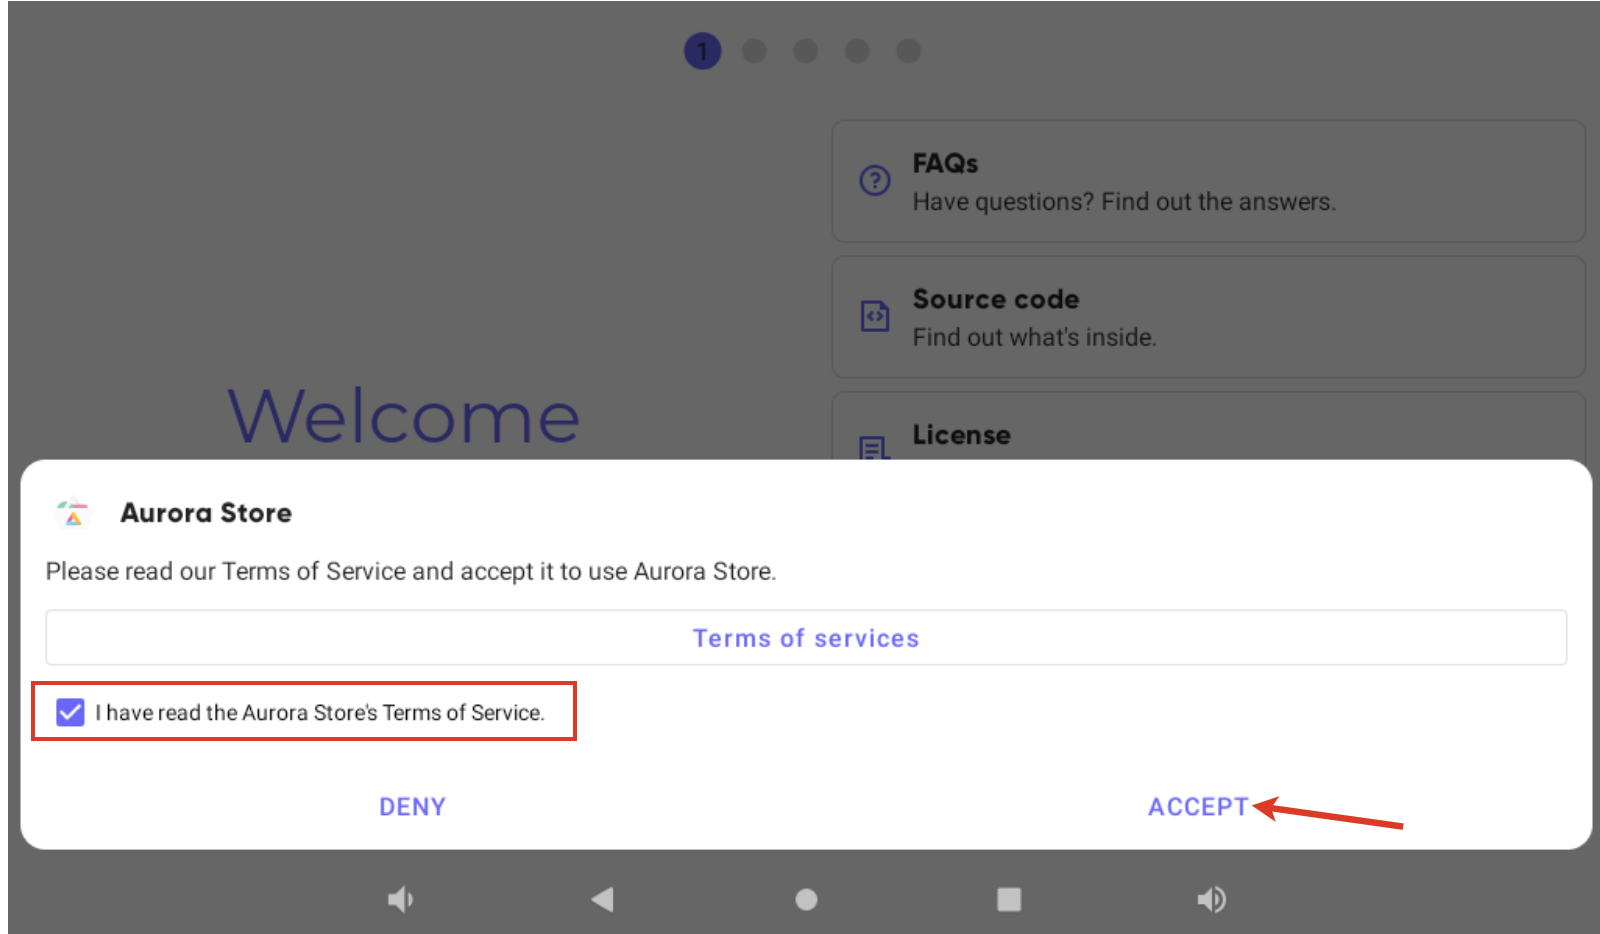
- Read and confirm Terms of services and tap ACCEPT
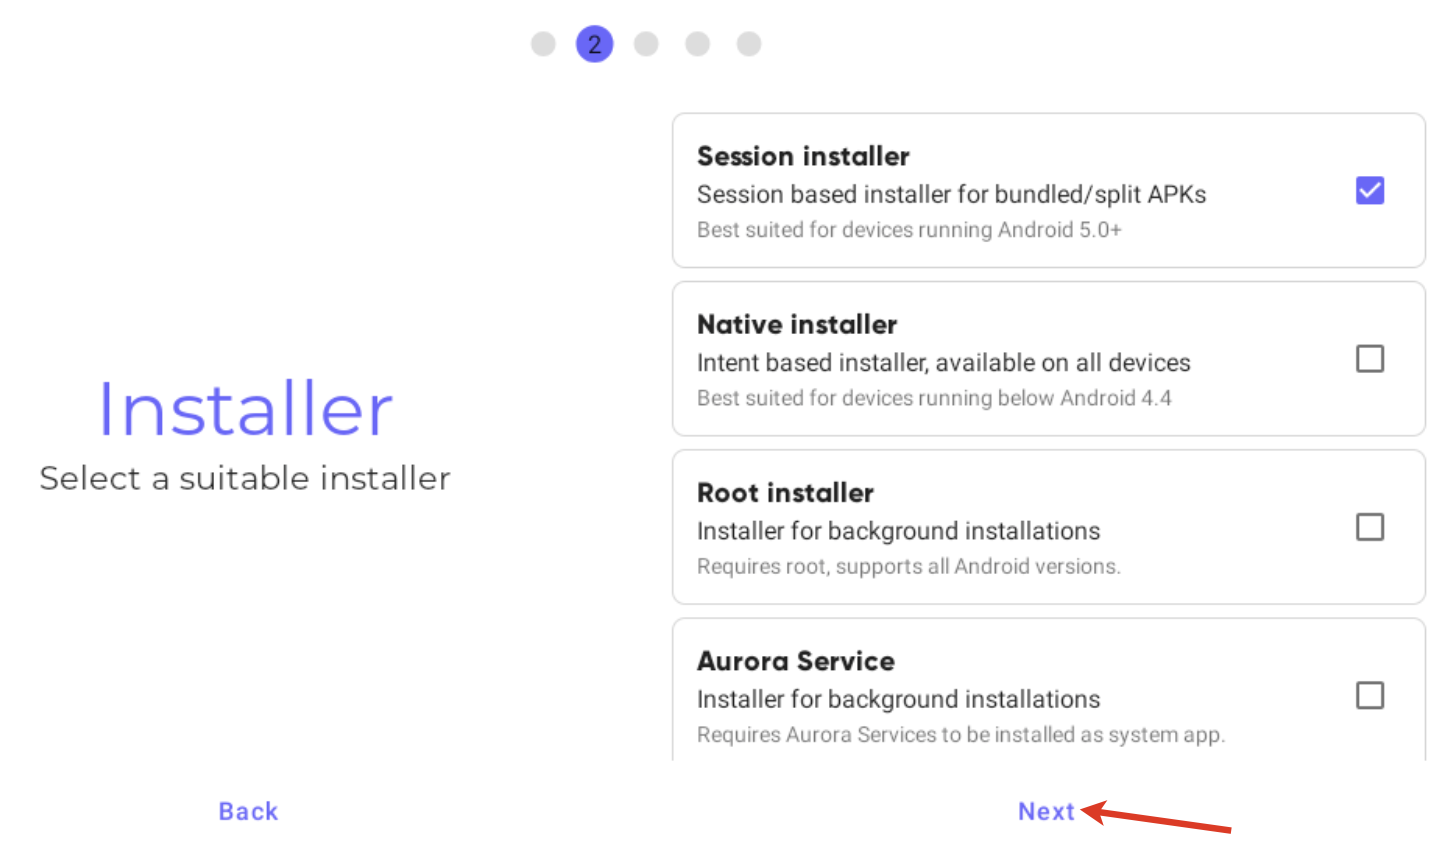
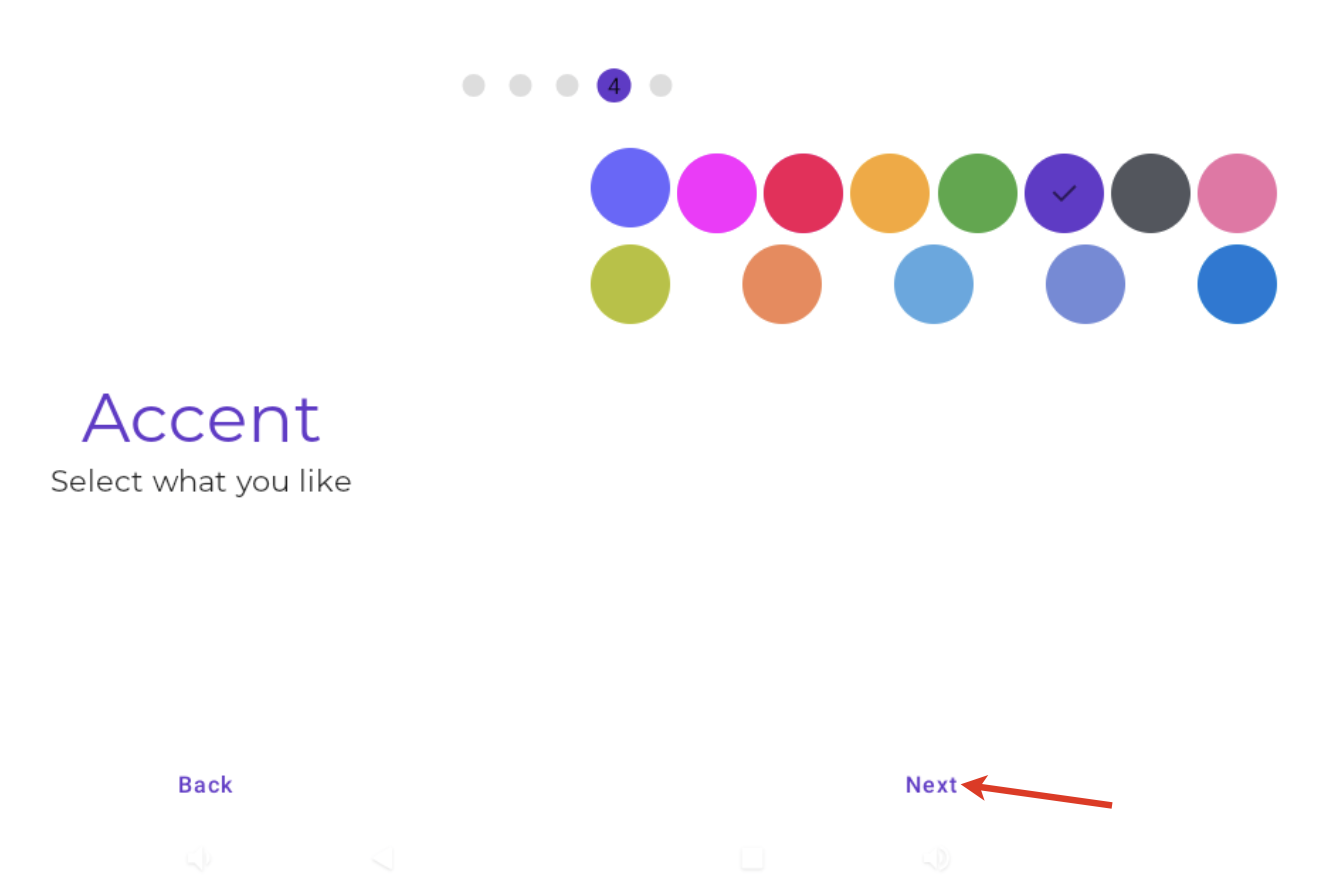
- The following settings are preset, but you can change them at your own discretion. To proceed further, tap Next
- Suitable apps Installer
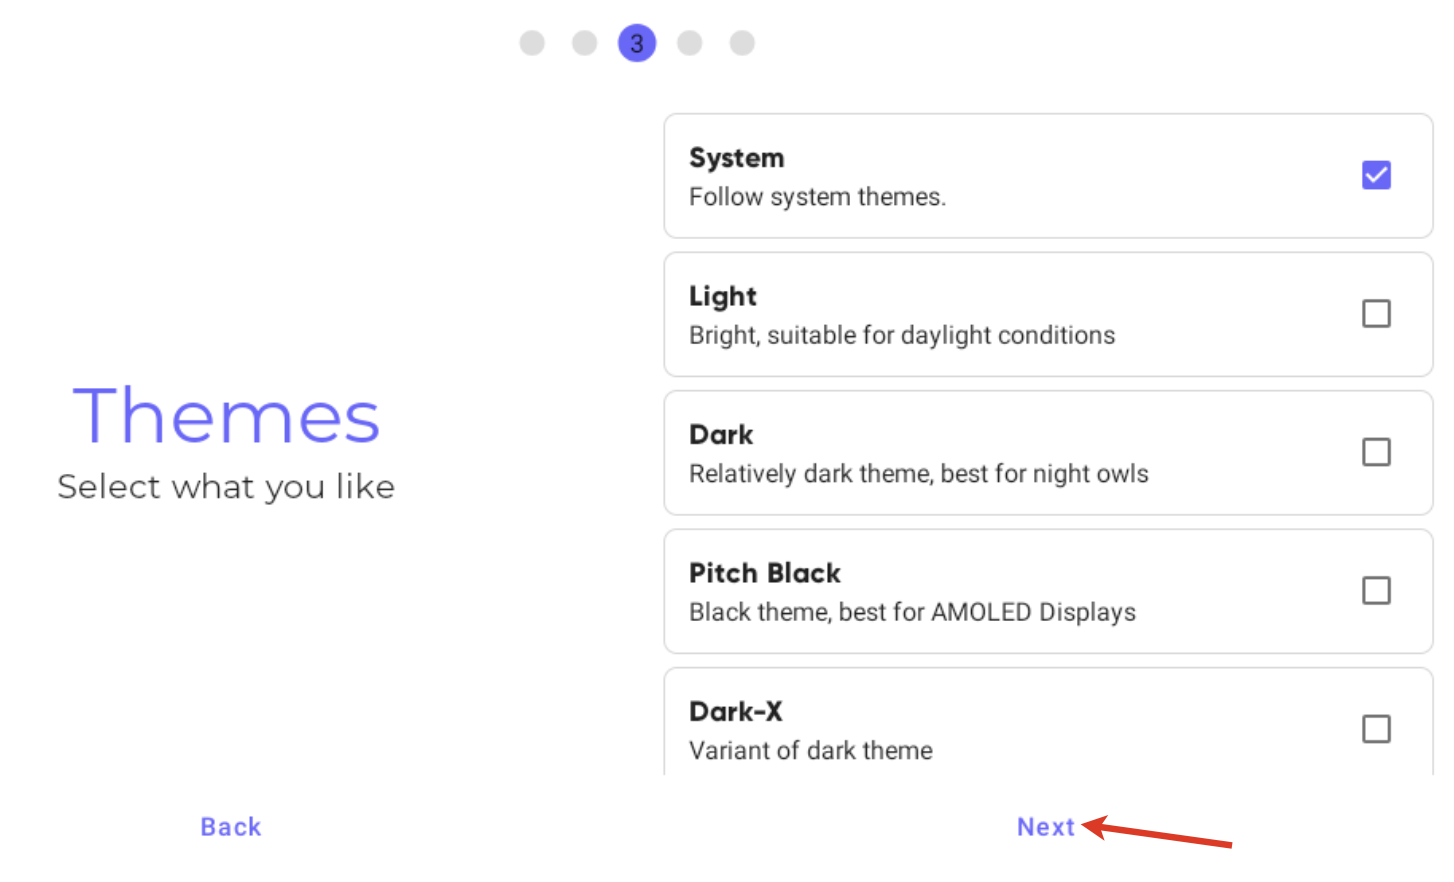
- Theme and color
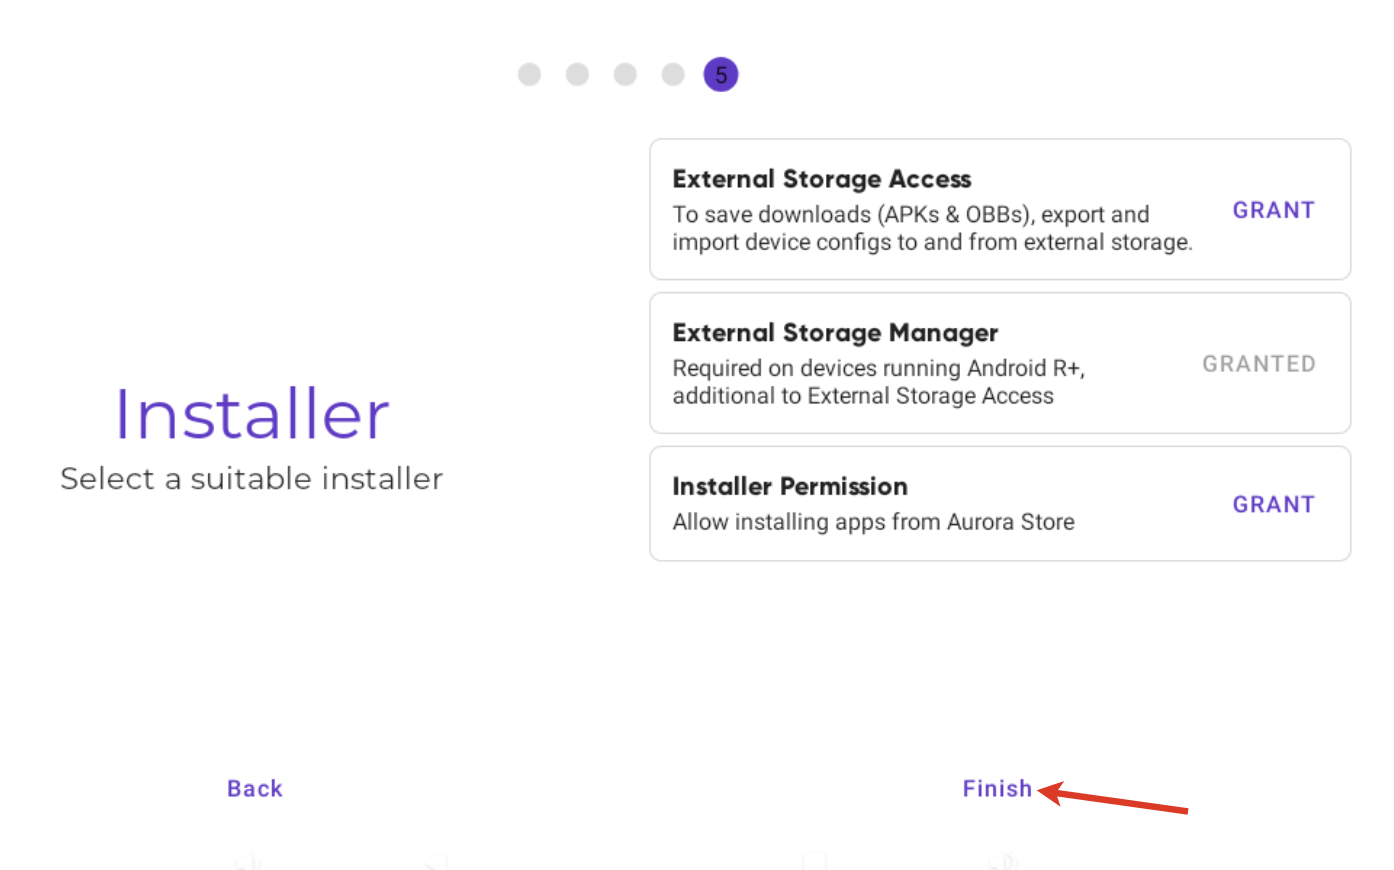
- Suitable apps Installer
- Grant specific permissions and tap Finish to complete authorization
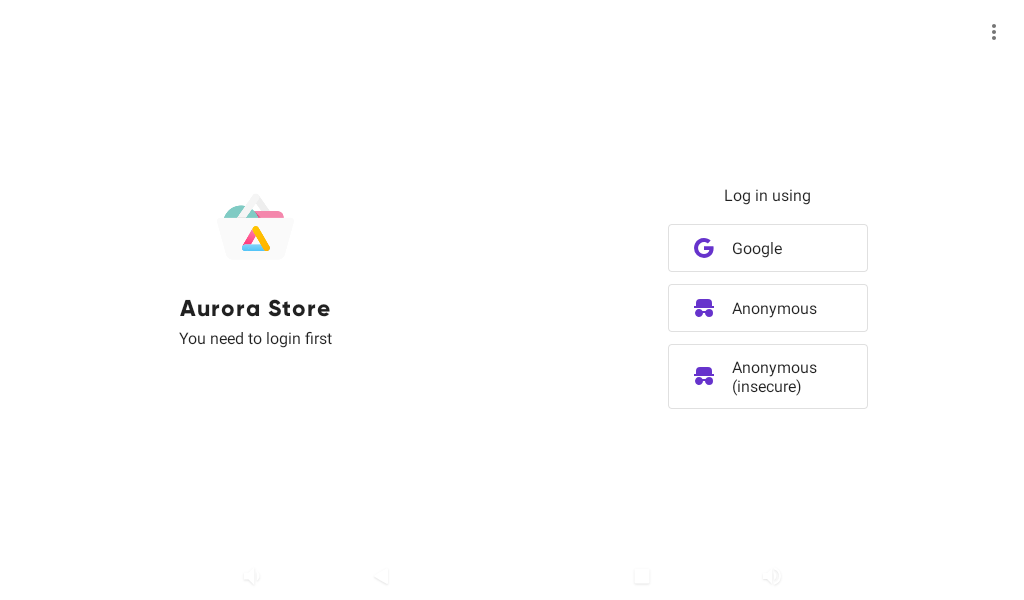
- Log in to the Store using your email or anonymous account
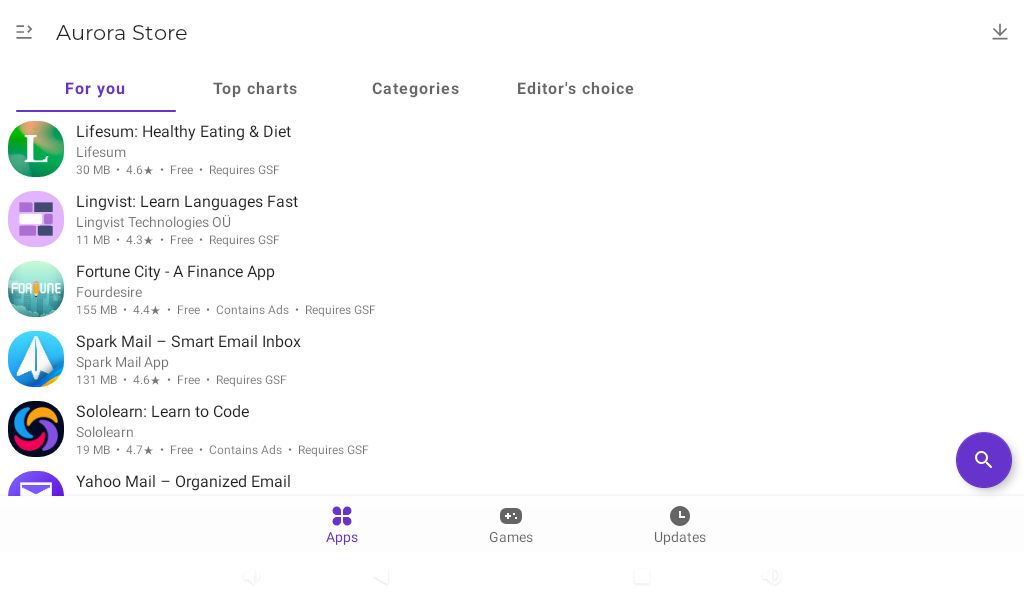
- Once you are logged in, you can download apps
Appendix 3 Supported Headsets
Supported Headsets
Wildix Headsets compatible with Vision: monaural (WHS-MONO), binaural (WHS-DUO), MonoLED/ DuoLED, MonoLED-BT/ DuoLED-BT. For connection, check Phones Accessories Quick Start Guide.
Third-party headsets integrated with Wildix: Wildix Compatible Headsets – Jabra, Plantronics, Sennheiser, JPL.
Appendix 4. Integration with intercoms
Info on intercoms which are fully integrated with Wildix system: https://www.wildix.com/integrations/
User Guides on Integration with some Intercoms are available on Doorphone integrations.
Configuration of intercoms for sending video stream before answer and adding an unlock button: Intercoms integration with Wildix - Video before answer and Unlock button.
Appendix 5. Sync of contacts
To be able to access your Wildix PBX corporate phonebooks from Vision, you need to set up CardDAV sync: CardDAV Sync of Contacts.
Appendix 6. Use Contacts menu
Customize personal phonebooks
- Go to Contacts -> tap More options (Hamburger icon) button
- Select Settings
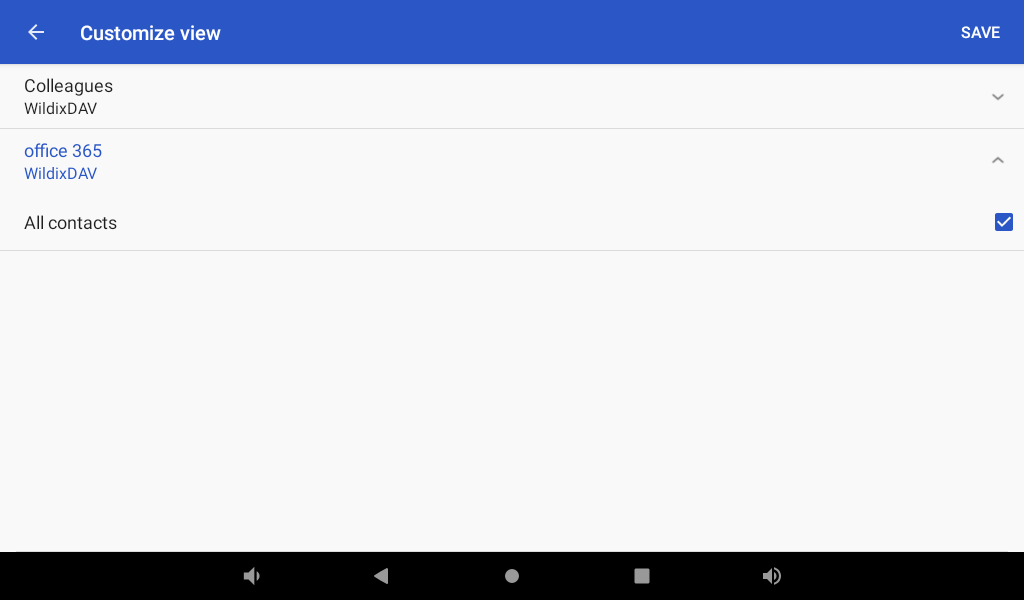
- Select Contacts to display
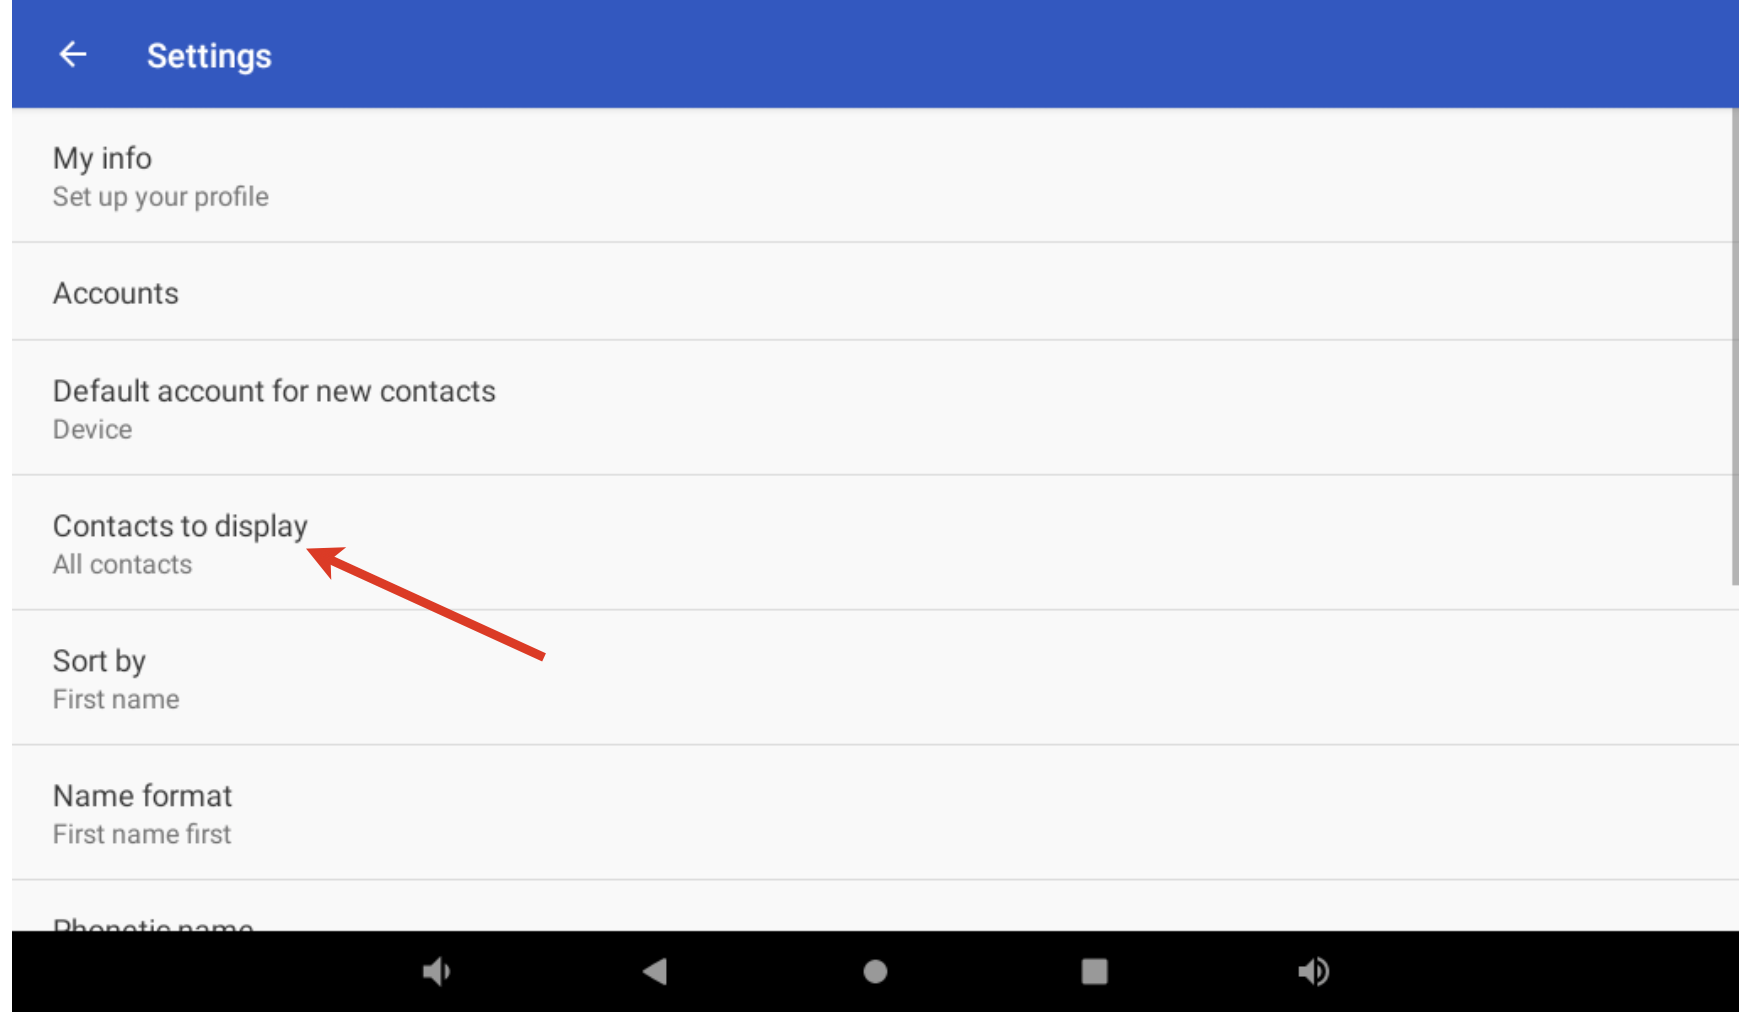
- Tap Customize and tick off the phonebooks that you wish to display in this menu, tap Save to finish:
Call a personal phonebook contact
- Tap the contact to display the contact data:
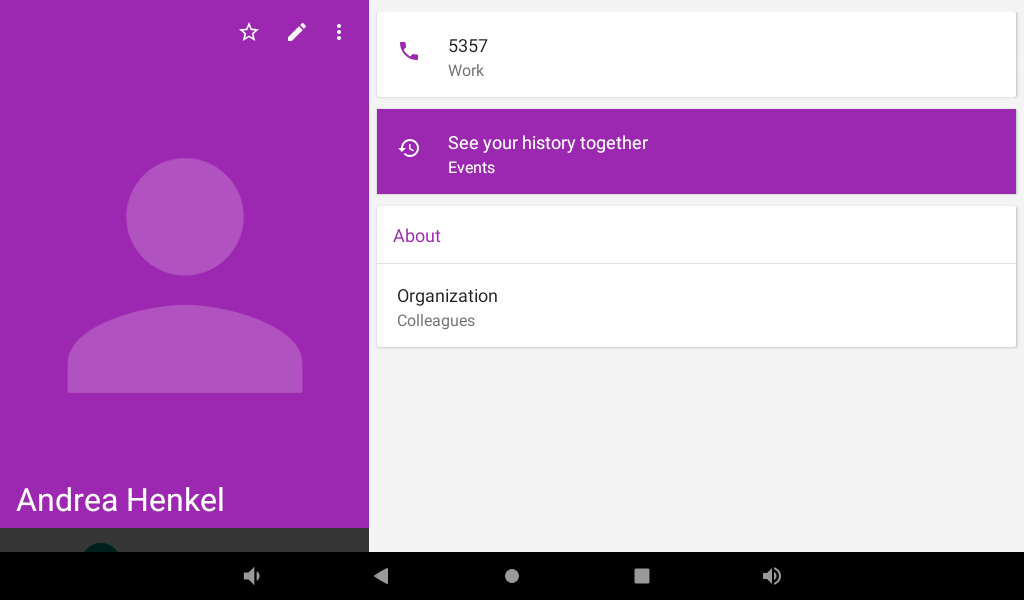
- Tap the phone number that you wish to dial
The call starts right away from Wildix Phone application.
Appendix 7. Phone recovery
NOTE: THIS OPERATION MUST BE MADE BY THE SYSTEM ADMINISTRATOR.
How to perform a factory reset:
- If your phone is on, turn it off
- Press and hold the Voicemail button and turn on power (using power adapter or PoE)
- Release Headset button after 5 seconds
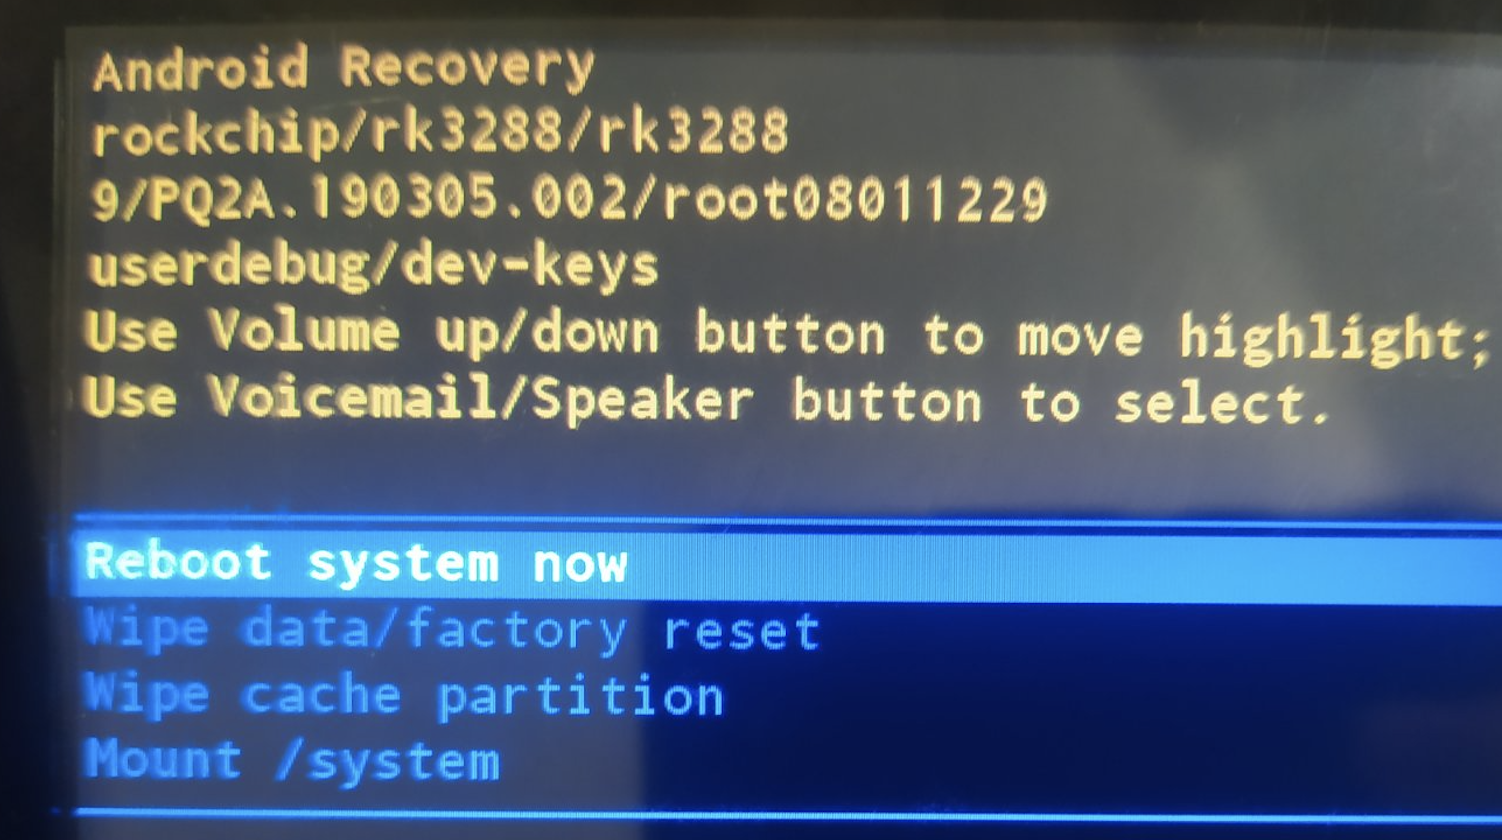
- The Wildix logo appears on the display and then the recovery menu
Select Wipe data/ factory reset using Volume Up/ Down buttons and press Voicemail button to confirm
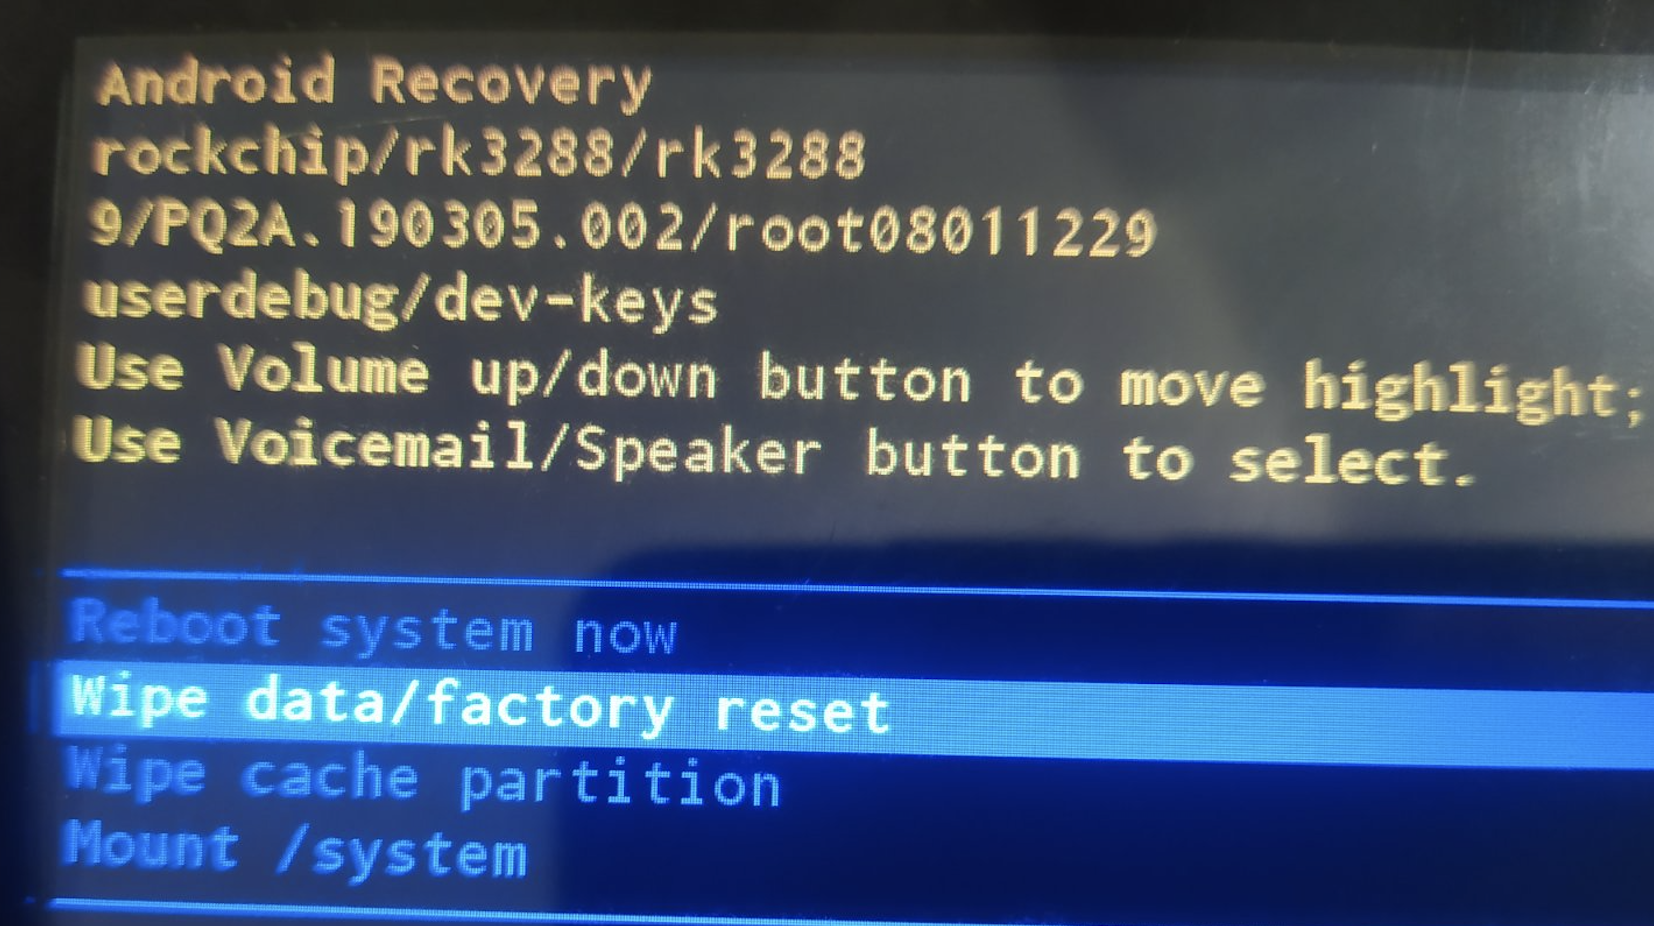
To proceed with the factory reset, select Yes option and press Voicemail button to confirm

Select Reboot system now and press Voicemail button to start the reset
- After reset procedure, update Phone app to the latest version