Wildix VoIP Phones - User Guide
- Ksenia Babych
- Tatiana Bieliakova
- Anna Zhuravlyova
- Elena Kornilova
This guide provides all the necessary information connecting and using Start (ex WP410), WorkForce, WP480G, WP490G (End Of Life) and WelcomeConsole.
Useful links:
- Wildix VoIP Phones - Datasheets
- Phones Accessories Datasheet
- Wildix VoIP Phones and Accessories - End User Brochures
- Wildix VoIP Phones 5 User Guide
Updated: October 2023
Permalink: https://wildix.atlassian.net/wiki/x/ChDOAQ
Important: WP490G is End Of Life!
To use WorkForce, PBX must be updated to the latest WMS 4.03 Stable version that includes firmware v. 65.145.0.172.
Note that WorkForce is not supported on WMS 3.88 (End Of Life).
Packing list
- 1 x Start, WorkForce, WelcomeConsole Phone
- 1 x handset
- 1 x handset cord (Start)/ 2 x handset cords, 2,5 m and 3,5 m (WorkForce, WelcomeConsole)
- 1 x stand
- 1 x extension module (WelcomeConsole)
- 1 x RJ12 cord (WelcomeConsole)
Additionally you can purchase handsets, headsets, EHS adapter, keypad extension, power adapter in WMP cart.
Phone overview
Connecting the phone
Rear panel:
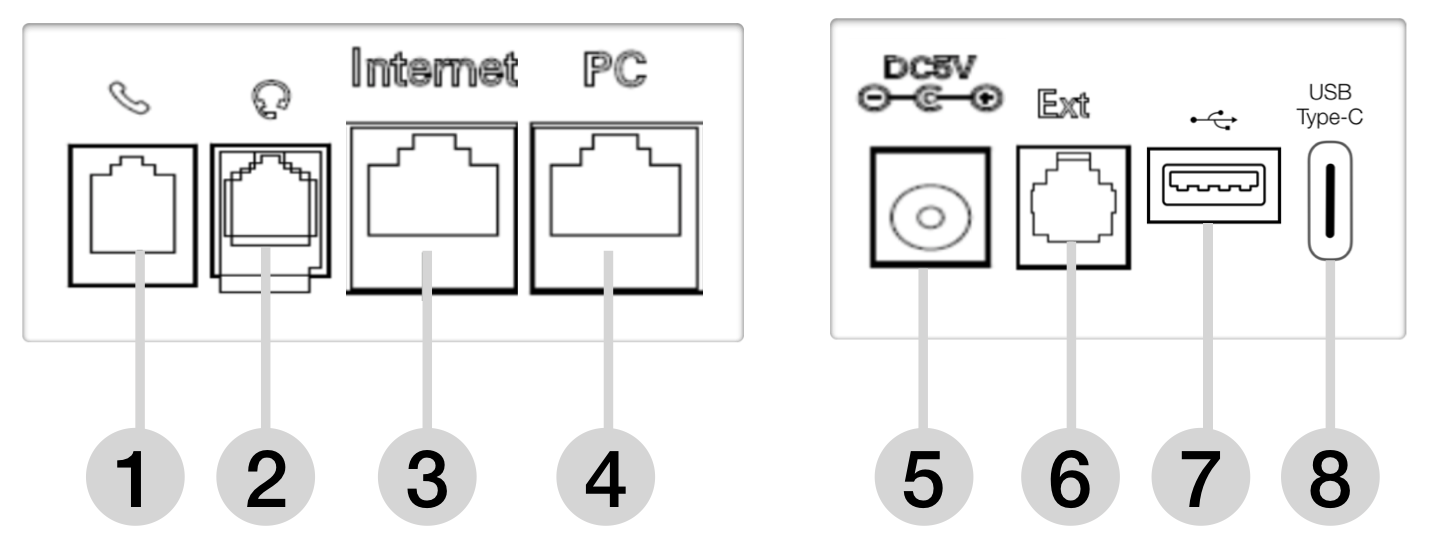
1 – handset port
Attach the handset using the handset cord.
2 – headset port
Attach the headset (optional; we recommend Wildix Headsets WHS-MONO, WHS-DUO).
3 – Internet port
Connect the phone to the Wildix PoE Switch using Ethernet cable.
4 – PC port
Connect to PC (optional).
5 – AC power jack
If Power Over Ethernet is not used: connect the phone to AC power using an External Power Adapter (check WP datasheet for compatible adapters) and connect the phone’s Internet port (3) to the Internet using Ethernet cable.
6 – Ext port (WP480G/WP490G/ WelcomeConsole)
Used to connect wireless headset adapter WPEHS (WP480G/ WP490G/ WelcomeConsole) / keypad extension module WelcomeConsole-EXT (WP490G/ WelcomeConsole); online guide: Phones Accessories Quick Start Guide.
7 – USB port (WelcomeConsole)
Connect USB Headset (optional, we recommend Mono/ DuoLED, WMP codes: MonoLED, DuoLED).
8 - 2 x USB Type-C ports (WorkForce)
Connect USB Headset (optional, we recommend Mono/ DuoLED, WMP codes: MonoLED, DuoLED) and WorkForce WiFi Dongle (can be purchased as a HWaaS item).
Note: for provisioning of Start, Workforce, WelcomeConsole, WP4X0, read WMS Start Guide.
Mounting instructions
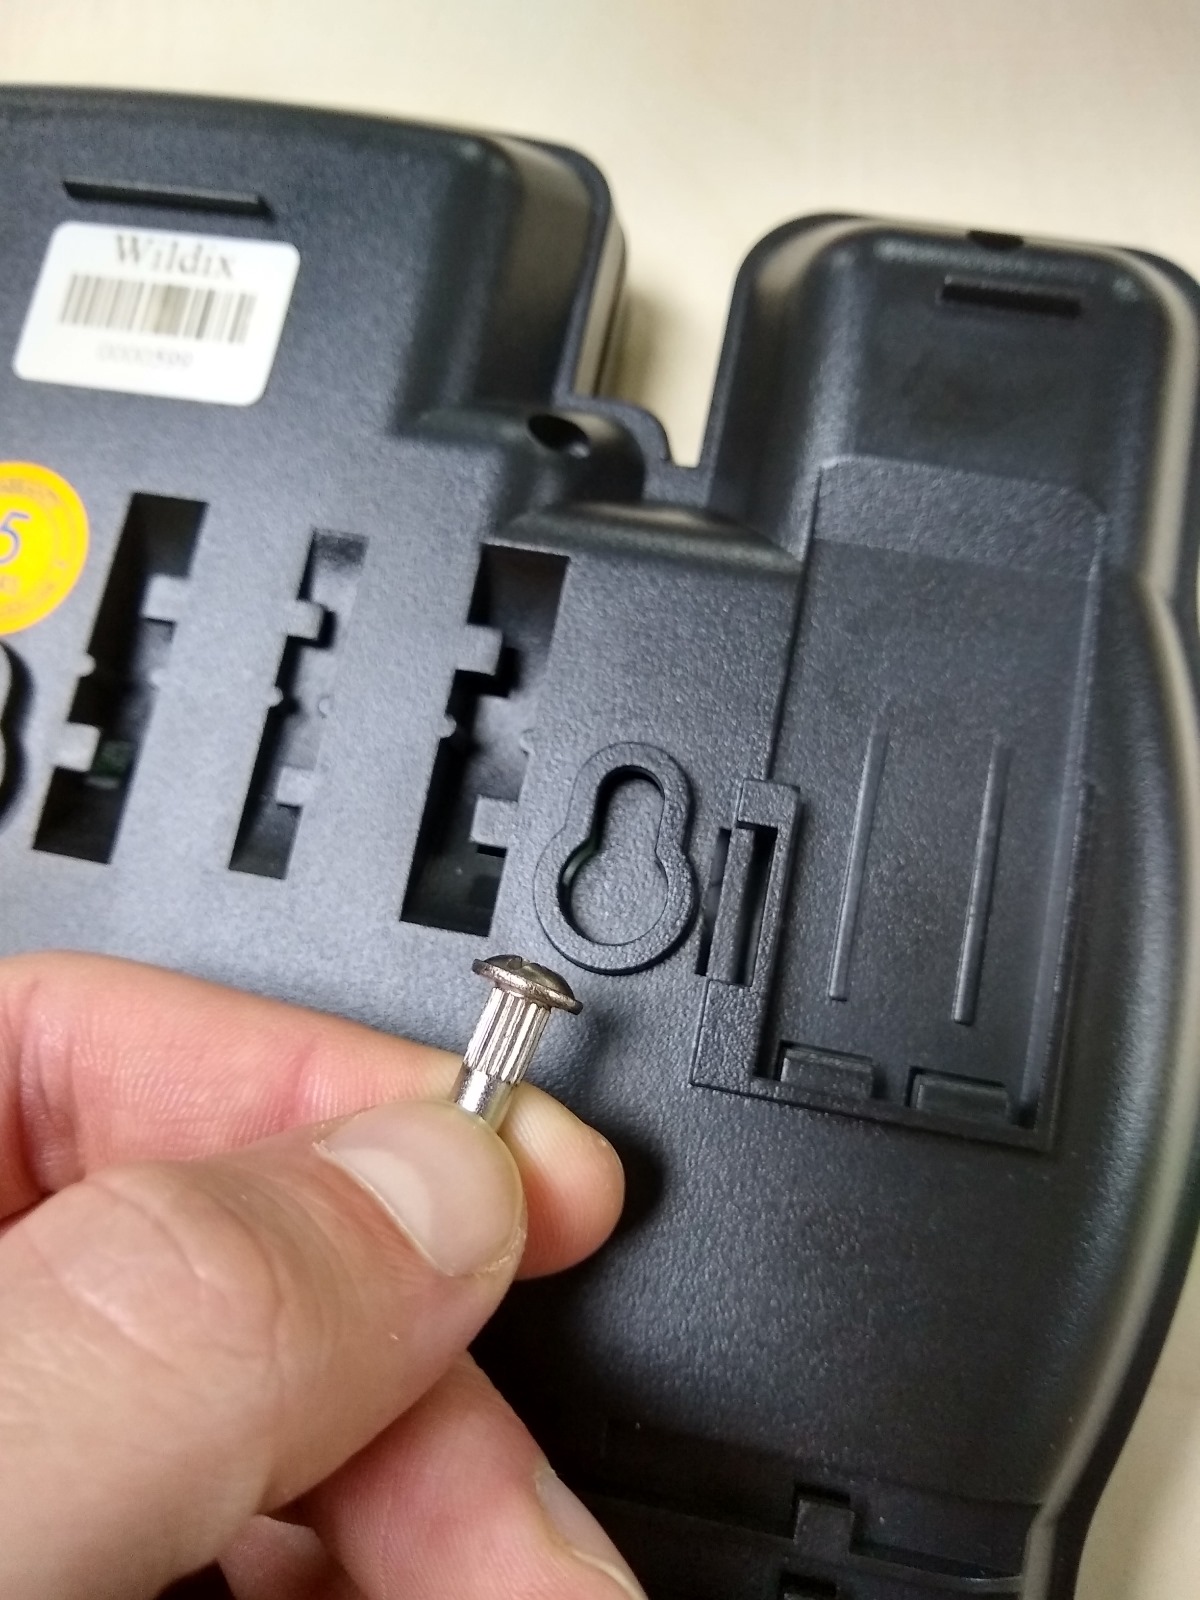
Start (ex WP410): attach the stand to the phone (desk mounting) or hang the phone on the wall (without attaching the stand).
Recommendations for Start wall mounting:
- Round (convex) screw head type of max 10 mm diameter
- Any screw drive type
- Any screw thread type depending on wall material
Example:
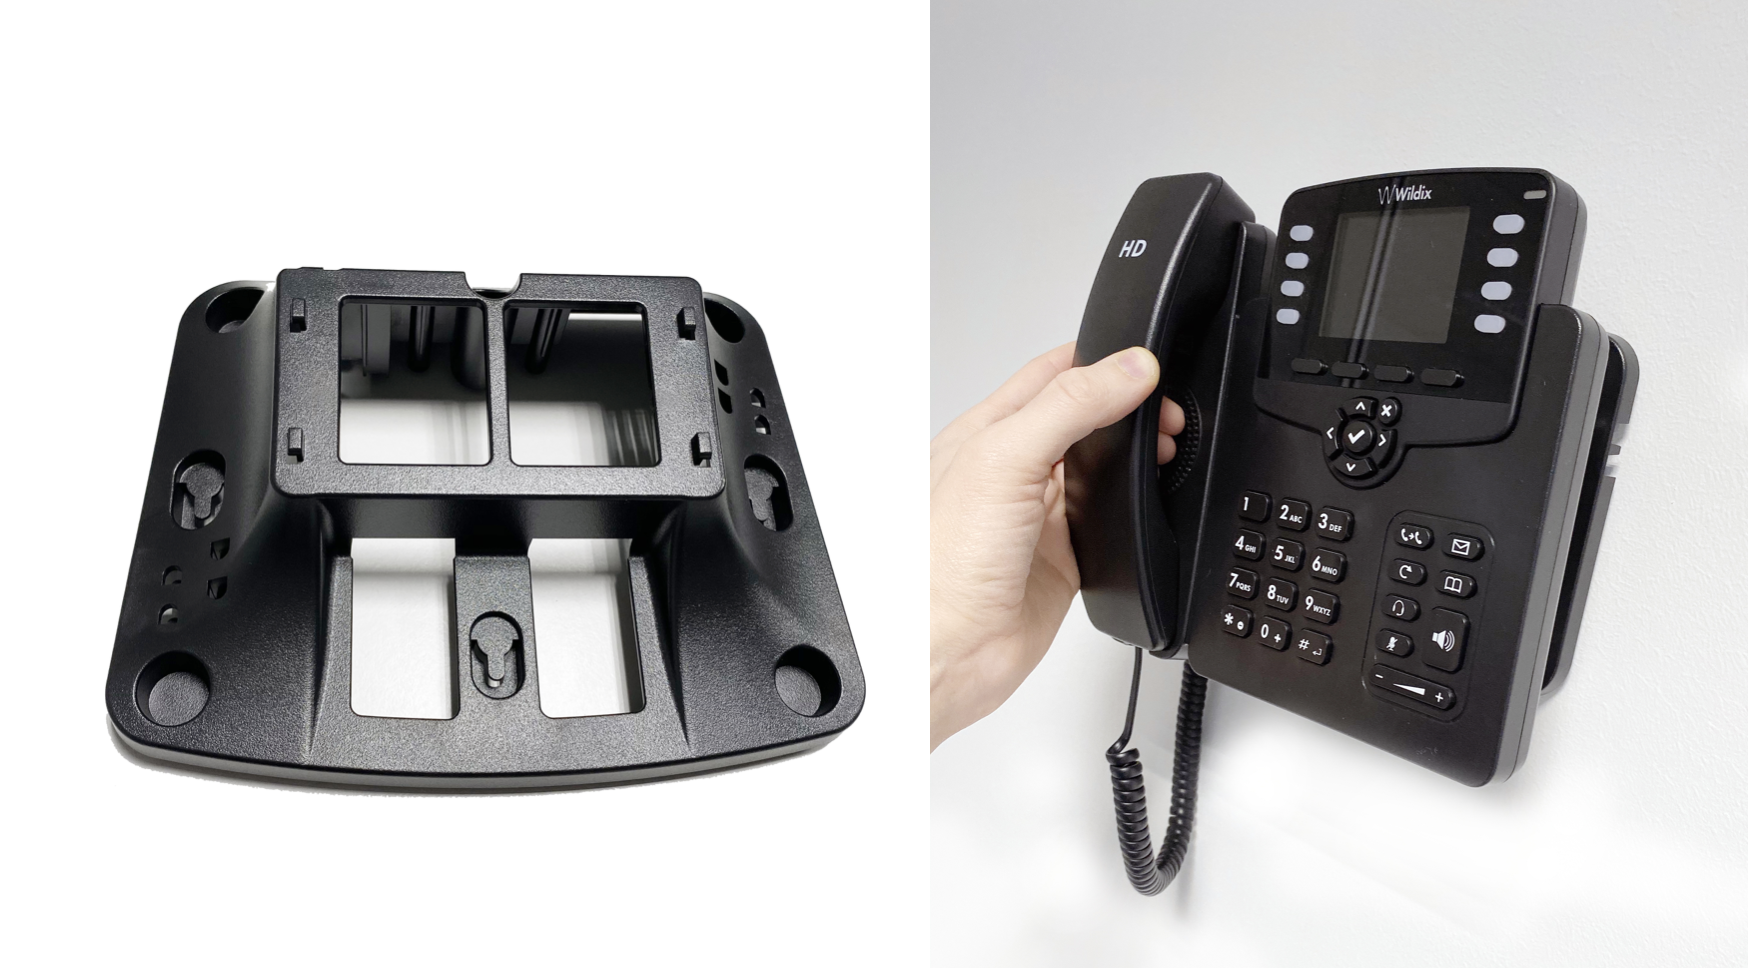
WorkForce, WP480G / WP490G / WelcomeConsole: attach the stand to the phone (desk mounting); for wall mounting (WorkForce, WP480G only), use wall mount bracket (article can be purchased separately, code: WallMount for WP480G; WorkForce-WallMount for WorkForce)
WorkForce, WP480G wall mount bracket:
Keypad instruction
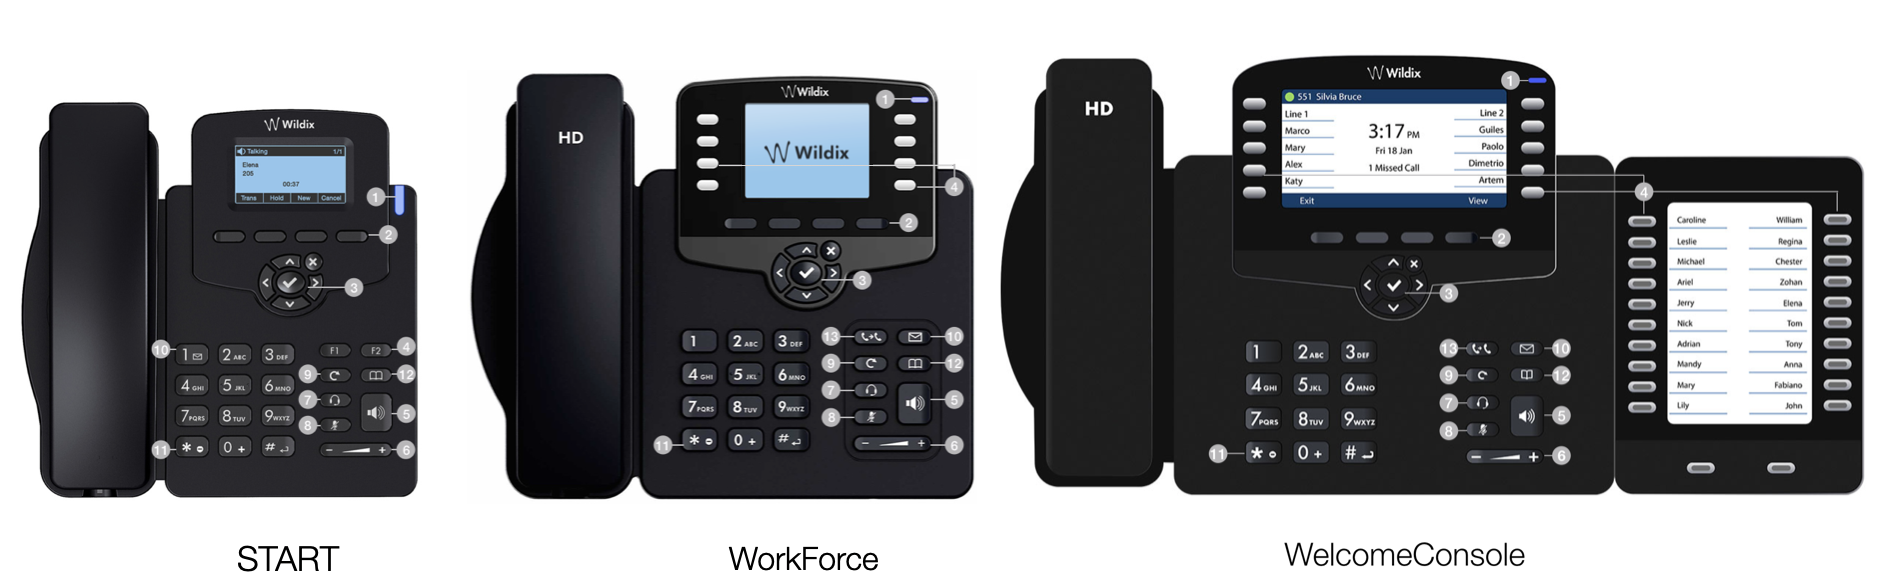
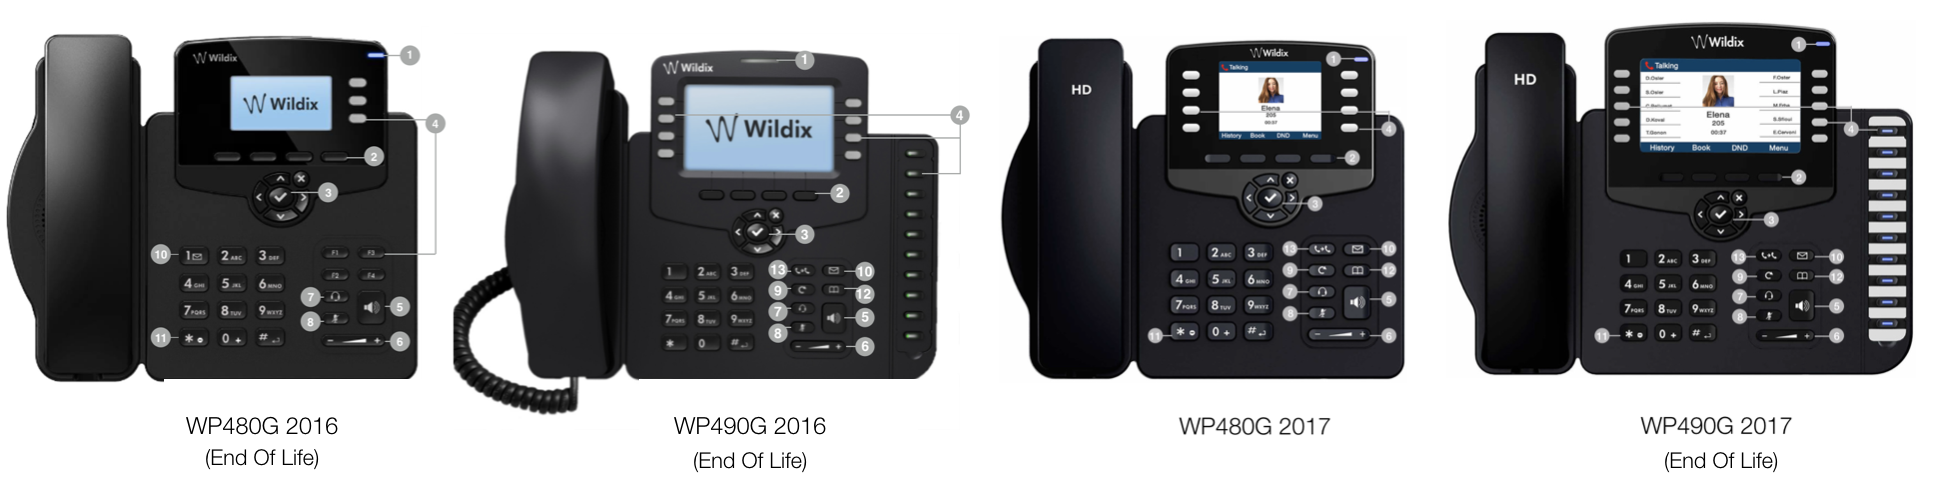
Note: keypad instruction for WP410 sept 2016 is equal to Start.
1 – LED indicator
- Flashing: Incoming call / Missed call / New VM message
- Off: In the standby mode
System administrator can control the behavior of the LED indicator using Provisioning Custom Settings.
2 – Soft keys
Used to confirm different operations indicated on the screen above the corresponding soft keys.
On the idle screen soft keys provide access to phone’s menus: History; Phonebook; Features; Menu:
- History: access call history and call from history
- Phonebook: access to shared PBX phonebooks and call from phonebooks
- Features: call features, read Appendix 2: Call features for details
- Menu: phone settings, read Appendix 3: Menu for details
3 – Navigation keys
Use Navigation keys to select and the central key to confirm different menu options; Use Navigation keys to move between the pages of BLF keys
4 – BLF / function keys
Monitor users and features
5 – Speaker key
Press to place a call / answer a call in speaker mode or press during a call to switch between speaker / handset mode
6 – Volume keys
Use to adjust the audio volume (during a call), the ringer volume (in the standby mode or while receiving an incoming call), the speaker volume (in the speaker mode)
7 – Headset key
Press to place a call / answer a call in headset mode (when headset is connected) or press during a call to switch between speaker / headset / handset mode
8 – Mute key
Press during a call to disable / enable the microphone
9 – Redial key
Press twice to redial the last called number
10 – Voicemail key
Access Voicemail graphical menu (long press on Start / WP480G 2016)
11 – Quick DND key
Long press enables / disables “Do not disturb”
12 – Phonebook key
Press to access the PBX shared phonebooks
Note: phonebooks must be set up by the PBX administrator on WMS side.
13 – Transfer key
Log in
Dial 99 from the phone (“Login” feature code) and follow the audio instructions:
- Enter your extension number
- Enter the password (PIN - it is sufficient to enter first five symbols of user WEB password)
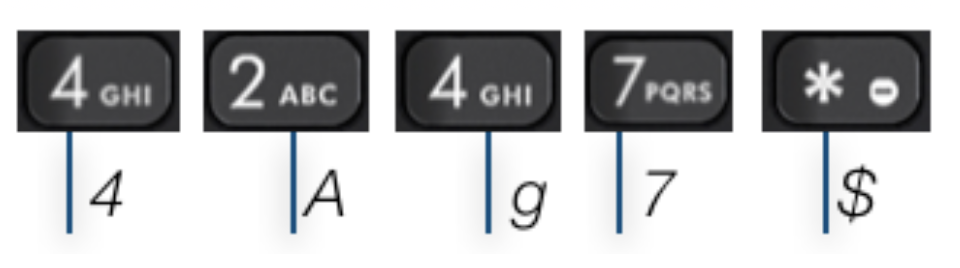
To enter the user password from the phone’s dialpad, take into account the following:- To enter any lowercase and uppercase letter, press ONCE a corresponding digit (E.g. to enter A, a, B, b, C or c, press once 2)
To enter special characters (%, ^, &, etc), press the star key (*)
Note: A phone will be blocked in case of invalid entering of a password: 5 attempts - 30 seconds, 10 attempts - 30 seconds, every next - 60 seconds.
Example: if user password is 4Ag7$Zl@, then you have to dial 4247*
Dial 1 to use this phone
After a few seconds, extension is displayed on the phone’s screen; the phone is now assigned and can be used to make and receive calls.
If you perform logout via Feature Code 99 on a phone, you are automatically logged out of all the phones phones assigned to your account. To change the behavior, use Custom Dialplan variable "MULTILOGIN_SUPPORT=yes", consult Custom Global Dialplan Variables List for details.
Statuses and notification icons overview
WelcomeConsole, WorkForce
Before starting
| Icon | Explanation |
|---|---|
| IP obtaining is in progress |
| Under provisioning |
| Provisioned and ready to be assigned |


User statuses
| Icon | Explanation |
|---|---|
| Online |
| Away |
Reachable by phone (user is not connected to Collaboration/ x-bees but has an active device) | |
| DND (Do Not Disturb) |
Call related icons
| Icon | Explanation |
|---|---|
| Incoming call |
| Call in progress |
| Missed call |
| Outgoing call |
| Call on hold |
| Muted microphone |
| Speaker activated |
| Connected headset |
| Call is established via Opus codec |
| Call is established via SRTP |
| Voicemail |
Other icons and labels
| Icon | Explanation |
|---|---|
| Silent mode activated |
| CFN:destination number/ voicemail -> Call Forwarding activated |

Start
| Icon | Explanation |
|---|---|
| IP obtaining is in progress |
| Under provisioning |
| Provisioned and ready to be assigned |
| Online |
| Away |
| DND |
| Incoming call |
| Call in progress |
| Missed call |
| Outgoing call |
| Call on hold |
| Muted microphone |
| Speaker activated |
| Connected headset |
| Call is established via SRTP |
| Voicemail |
| Silent mode activated |
| CFN:destination number/ voicemail -> Call Forwarding activated |


BLF / Function keys
BLF / Function keys allow you to monitor users and features, make a call, transfer a call, pick up a call, park a call, change status of features.
BLF / Function keys must be set by user in Collaboration Settings -> Function keys or by PBX administrator via WMS. Detailed information on setting Function keys: Collaboration - User Guide.
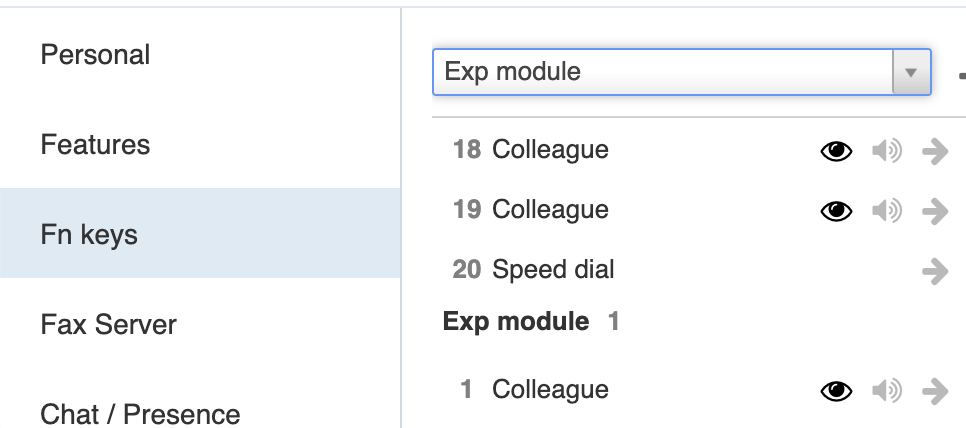
For WP490 with extension module/ WelcomeConsole, you can additionally set up up to 40 BLF keys on each extension module (up to 3 modules are supported). Detailed information: Phones Accessories Quick Start Guide.
Note: To use the keypad extension, add "Exp module" BLF key after having added 20 keys.
Start supports up to 4 BLF keys distributed on 2 pages, WorkForce and WP480G supports up to 16 BLF keys distributed on 2 pages, WP490G supports up to 30 BLF keys distributed on two pages, WelcomeConsole supports up to 60 Function keys including extension module. Refer to Appendix 1 - BLF keys for detailed information on BLF key distribution for each phone.
List of function keys:
- Colleague: monitor call status (incoming call / in call), monitor user status (available, DND, away), make a call, transfer a call, pick up a call, check who is calling (see the chapter below for more details)
- Park Location: park a call and resume (see the chapter below for more details)
- Line: press to use this line (to place a new call)/ press to make a call with user's identity extension (see the chapter below)
- Speed Dial: press to call a speed dial number; additionally you can set up shortcuts in combination with Feature Codes supported by the system, read Feature Codes notes for more information
- Trunk: monitor status of trunk (except for SIP trunks) and place a call via this trunk
- Timetable / Switch / 3 state switch: monitor the status of switch / timetable, press to change status
- Group pick up: press to pick up a ringing call of a user from your ACL group (feature works for users registered to the same PBX and normally allows you to answer a ringing call for another user located in the same office)
- Call group: monitor call status (incoming call / in call), make a call, transfer a call, pick up a call, check who is calling
Send DTMF: press to send DTMF tone
- Contact center: log into Call groups as a dynamic user (see the chapter below)
- Identities: press to change the identity of numbers for outgoing/ incoming calls (see the chapter below)
- Voicemail: press to access shared voicemail of another user (see the chapter below)
Colleague BLF
List of supported features/ actions:
monitor call status (incoming call/ active call); additionally you can see who is calling and enable a beep or a ringtone when a monitored colleague receives an incoming call (details in Collaboration - User Guide)
monitor user status (available/ DND/ away) (available with min. Essential license)
- press BLF key to place a call (when idle) or to transfer a call (during a call), to pick up a call (when monitored user is receiving an incoming call)
Park Orbit
Video:
More details in the guide: How to implement the Parking feature.
Contact center BLF
It is possible to log into Call groups as a dynamic user via "Contact center" BLF on VoIP phones. Detailed information can be found in Call distribution in Call groups Guide.
Identities
Allows you to change the Caller number and name for internal and external outgoing/ incoming calls. Detailed information can be found in Identities Feature guide.
Video:
Shared voicemail and Call Group notifications manager BLF
Important: The feature is supported only on WorkForce, WP480G/WP490G 2017 and WelcomeConsole. It works only for users of the same PBX!
Shared voicemail
Shared voicemail feature allows you to monitor and listen to voicemail messages of other users via a configured "Voicemail" Function key. The feature is disabled by default. To enable it, PBX admin must add ACL ability "Can" - "See voicemail" - "Group". After that, Function key can be configured in WMS (Users -> Edit preferences -> Settings -> Function keys) or Collaboration (Settings -> Function keys).
When a monitored user receives a new voicemail message, LED indicator becomes steady blue. You can listen to / delete / dial a user who left the message.
Note: ACL restrictions "Can/ cannot" - "Use Voicemail" and “Can/ cannot” - “View group” have higher priority than “Can/ cannot” - “See Voicemail”. Read ACL rules & Call classes management Guide for details.
Well-known issue: in failover scenario (TCP / 443), BLF subscription is sent only once.
Call Group notifications manager
Call Group notification manager feature allows users to view missed calls and voicemails notifications for specific Call groups. Follow the Guide How to set up the Call Group notifications manager feature to check the setup.
BLF key Prefix
Starting from WMS 6.01.20221019.4, it is possible to configure BLF key Prefix, which allows to add a certain predefined value to a dialled phone number or BLF on WorkForce and WelcomeConsole. To learn more about the feature, check out documentation How to Configure BLF type Prefix and the video tutorial below.
Video:
Call management
Place a call
- Lift the handset
- Dial the number and press Send Soft key or wait till the call is placed automatically
Notes:
- Press Speaker key to start a call in Speaker mode
- Press Headset key to use the headset (if connected)
Call from Phonebook:
- Press Phoneb Soft key or Phonebook key
- Press Filter Soft key and select a phonebook
- Press Search Soft key then type the name/ number
- Press Enter Soft key to confirm
- Press Dial Soft key
Note: in Colleagues phonebook users are displayed with their realtime status (available / offline / busy / incoming call / absent / dnd). Refer to this chapter for detailed information.
Call from History
- Press History Soft key
- Select a colleague from the list
- Press Dial Soft key
- Lift the handset
Call via BLF Keys
- Lift the handset
- Press a BLF key assigned to a colleague / group you would like to call
Answer a call
Lift the handset or press the Speaker key.
Answer a second incoming call
Press Answer Soft key.
Note: it is possible to receive more than one call at a time, in case "Call Waiting" feature is enabled in Collaboration Settings -> Features.
Mute the ring of an incoming call without answering
Press Silence Soft key.
Forward a call without answering
- Press Fwd Soft key, dial the number
- Press OK Soft key
Decline a call
Press Reject Soft key.
Hold / Second call
- Press Hold Soft key during a call
- Press Resume Soft key to resume
If you have several calls on hold: use Navigation keys to select the call, then press Resume.
Make a second call:
- Press New Soft key
- Dial a number or press Select Soft key to search for a contact in History or in Phonebook
Transfer
Blind transfer
Transfer without notifying the person who receives the call transfer:
- Press Trans Soft key or Transfer key during a call (the call is put on hold)
- Dial the number
- Hang up or press Trans Soft key
Blind transfer via BLF keys:
Prerequisite: BLF key "Colleague" or "Call group" with "Direct Transfer" option enabled must be configured:
Read the Collaboration User Guide (Settings -> Function Keys) for more information about setting BLF keys.
- Press the BLF key configured as "Colleague" or "Call group" during a call
Attended transfer
Transfer with notification to the person who receives the transfer:
- Press Trans Soft key or Transfer key during a call (the call is put on hold)
- Dial the number and wait till the person answers
- To complete the transfer, hang up or press Trans Soft key or Transfer key
Attended transfer to Phonebook contact / contact from Call history:
- Press Trans Soft key or Transfer key during a call (the call is put on hold)
- Press Select Soft key
- Select History / Phonebook and press Enter Soft key
- Select the contact, press Dial Soft key and wait till the person answers
- To complete the transfer, press Trans Soft key or Transfer key again
Attended transfer via BLF keys:
Prerequisite: BLF key "Colleague" or "Call group" ("Direct Transfer" option disabled) must be configured:
Read the Collaboration User Guide (Settings -> Function Keys) for more information about setting BLF keys.
- Press the BLF key configured as “Colleague” or "Call group" during a call
- Wait till the second party answers
- To complete the transfer, hang up or press Trans Soft key
Conference
- Press New Soft key during a call (active call is put on hold)
- Make a second call to the contact you wish to invite to the conference call
- When the third party responds, press Conf Soft key
Press Split Soft key to split the two calls or hang up to end the conference.
Record a call
Note: Only users with certain permissions can record calls; to enable the option, the PBX admin must add ACL ability "Can use" - "Personal recording" (WMS -> Users -> Groups).
- Press *1 during a call to start / stop call recording
Pick up a ringing call / see who is calling
Pick up a ringing call
Note: Only users with certain permissions can pick up calls; to enable the option, the PBX admin must add ACL ability "Can" - "Call Pickup" (WMS -> Users -> Groups).
- Press a BLF key "Colleague" / "Call group" assigned to a colleague or a call group who is receiving an incoming call
See who is calling
Note: Only users with certain permissions can see who is calling other users; to enable the option, the PBX admin must add ACL ability "Can" - "View calls of users" (WMS -> Users -> Groups).
You see who is calling and receive an audio notification when there is an incoming call:
- See who is calling: View calls (eye icon) option must be enabled in Collaboration for this function key:

- Get audio notification when there is an incoming call: Audio notification (speakerphone icon) option must be enabled in Collaboration for this function key:

Note: It is possible to configure a ringtone to be played instead of a standard audio notification (a beep). To enable the feature, add "MelodyBLF=yes" to the file /rw2/etc/provision.conf. More details: Provisioning Custom Settings.
Demo video
Park a call
Note: Detailed information about the parking feature can be found here: How to implement the Parking feature.
Prerequisite: BLF key "Park Location" must be configured.
- Press a BLF key configured as Park Location during a call to park a call / press it again to resume the call
Call intrusion / Intercom
Call intrusion and Intercom features are available for users with certain permissions (ACL abilities "Can" - "Intrusion" / "Intercom"). Check Feature Codes Admin Guide for more information.
Listen to Voicemail messages
- Press Voicemail key to access the graphical Voicemail menu (long press on key “1” on Start / WP480G 2016)
- If requested, enter the first five characters of your password
Select the message and press Play Soft key to listen to the message; press Info Soft key for more information (Name, Number, Date, Duration) and then Delete to delete the message
Note: Voicemail messages can be forwarded to multiple users. Consult Forward a Voicemail to another user.
Useful links:
- Detailed information about Voicemail service: Voicemail Guide
- For the information on how to set up your Voicemail greetings, please refer to Feature Codes Admin Guide
- For the information on how to set up call forwarding to Voicemail, please refer to Appendix 2 - Call features
It is possible to enable PIN protection by adding ACL ability "Cannot use" - "Voicemail without pin code".
Note: This ACL restriction is present by default for the USA and Canada.
Demo video
Presence status monitoring
Presence statuses of colleagues can be monitored directly via BLF keys on WorkForce, WP480/ 490 r3 and WelcomeConsole.
Requirement:
- Essential license and higher
The following colleague statutes can be monitored:
- "available" (green circle icon)
- "away" (clock icon)
- "dnd" (brick icon)
Note: if a colleague doesn't have a registered device, no icon is displayed.
You can also monitor full presence status of users in Phonebook (available only for users with Essential license or higher):
Press Phoneb Soft key or Phonebook Key
Press Filter Soft key and select a phonebook
- Press Search Soft key then type the name/ number
- Press Enter Soft key to confirm
It possible to monitor the following colleague statuses via Phonebook:
- "available" (green circle icon)
- "offline" (no icon)
- "busy" (handset icon)
- "incoming call" (arrow icon)
- "away" (clock icon)
- "dnd" (brick icon)
Troubleshooting
For reset and recovery of Wildix Phones 2015-2017, refer to Reset and Recovery of VoIP Phones Manual.
Custom provisioning settings
You can set custom parameters to change different settings. For example, enable sidetone or display detailed hangup reasons. Consult Provisioning Custom Settings for details.
Custom config parameters
These parameters allow changing various settings in config files, for example, enable Direct SDES-SRTP. Refer to Custom config parameters List for details.
VLAN configuration
For VLAN configuration over DHCP 176 option, refer to DHCP Server in WMS Settings Guide.
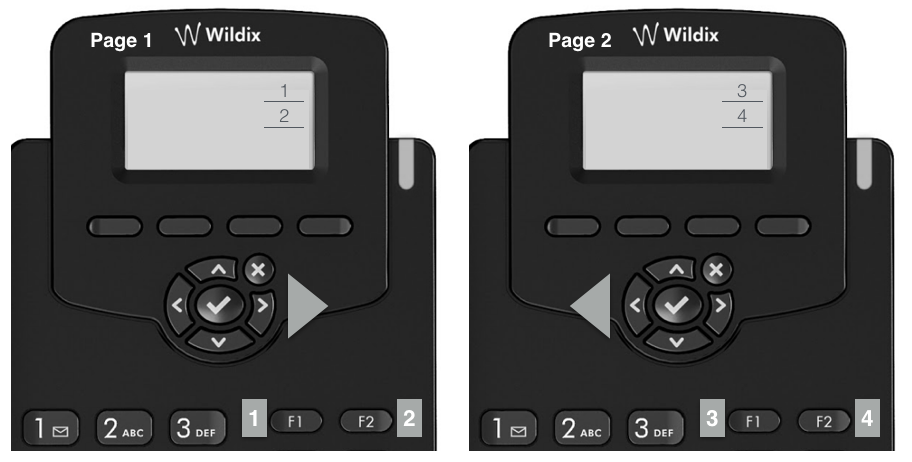
Appendix 1 - BLF keys distribution scheme
Note: BLF keys are set up by a user via Collaboration or by PBX administrator via WMS. Refer to the section Function keys of Collaboration User Guide for more information.
- 4 BLF keys (2 pages) for Start (use Navigation keys to move between the pages):
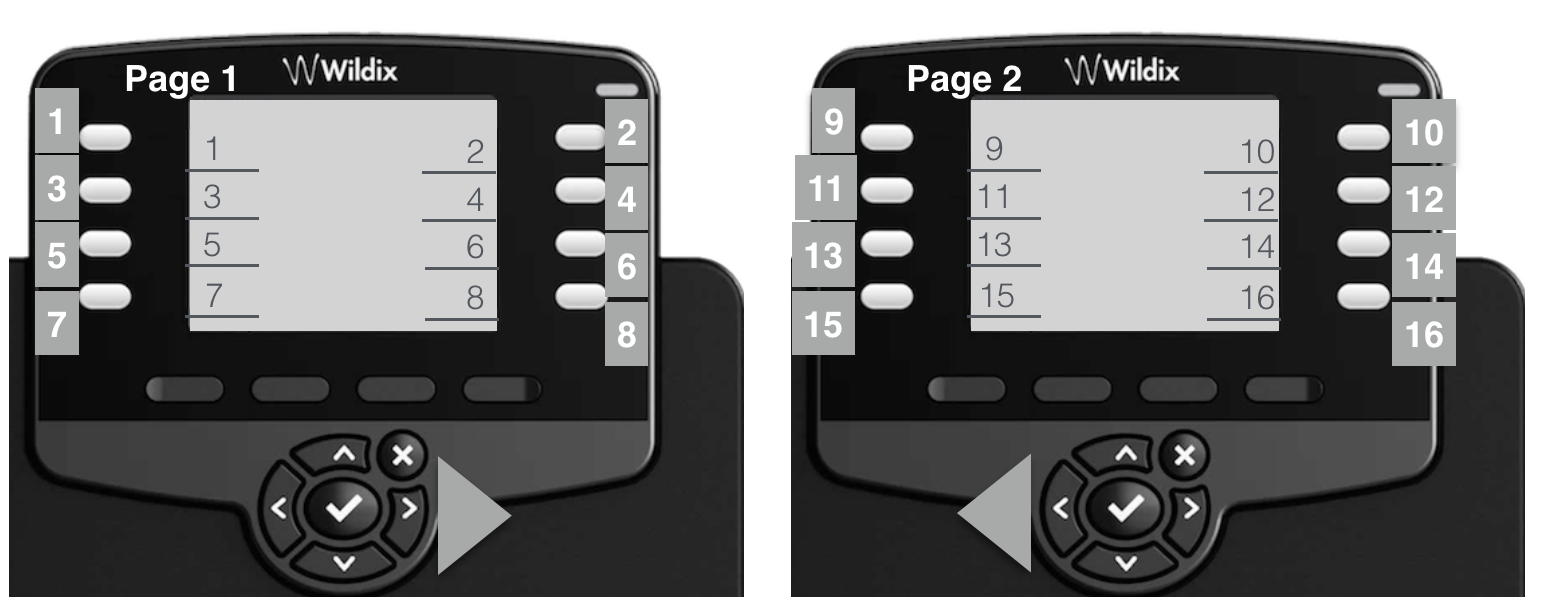
16 BLF keys (2 pages) for WorkForce (use Navigation keys to move between the pages):

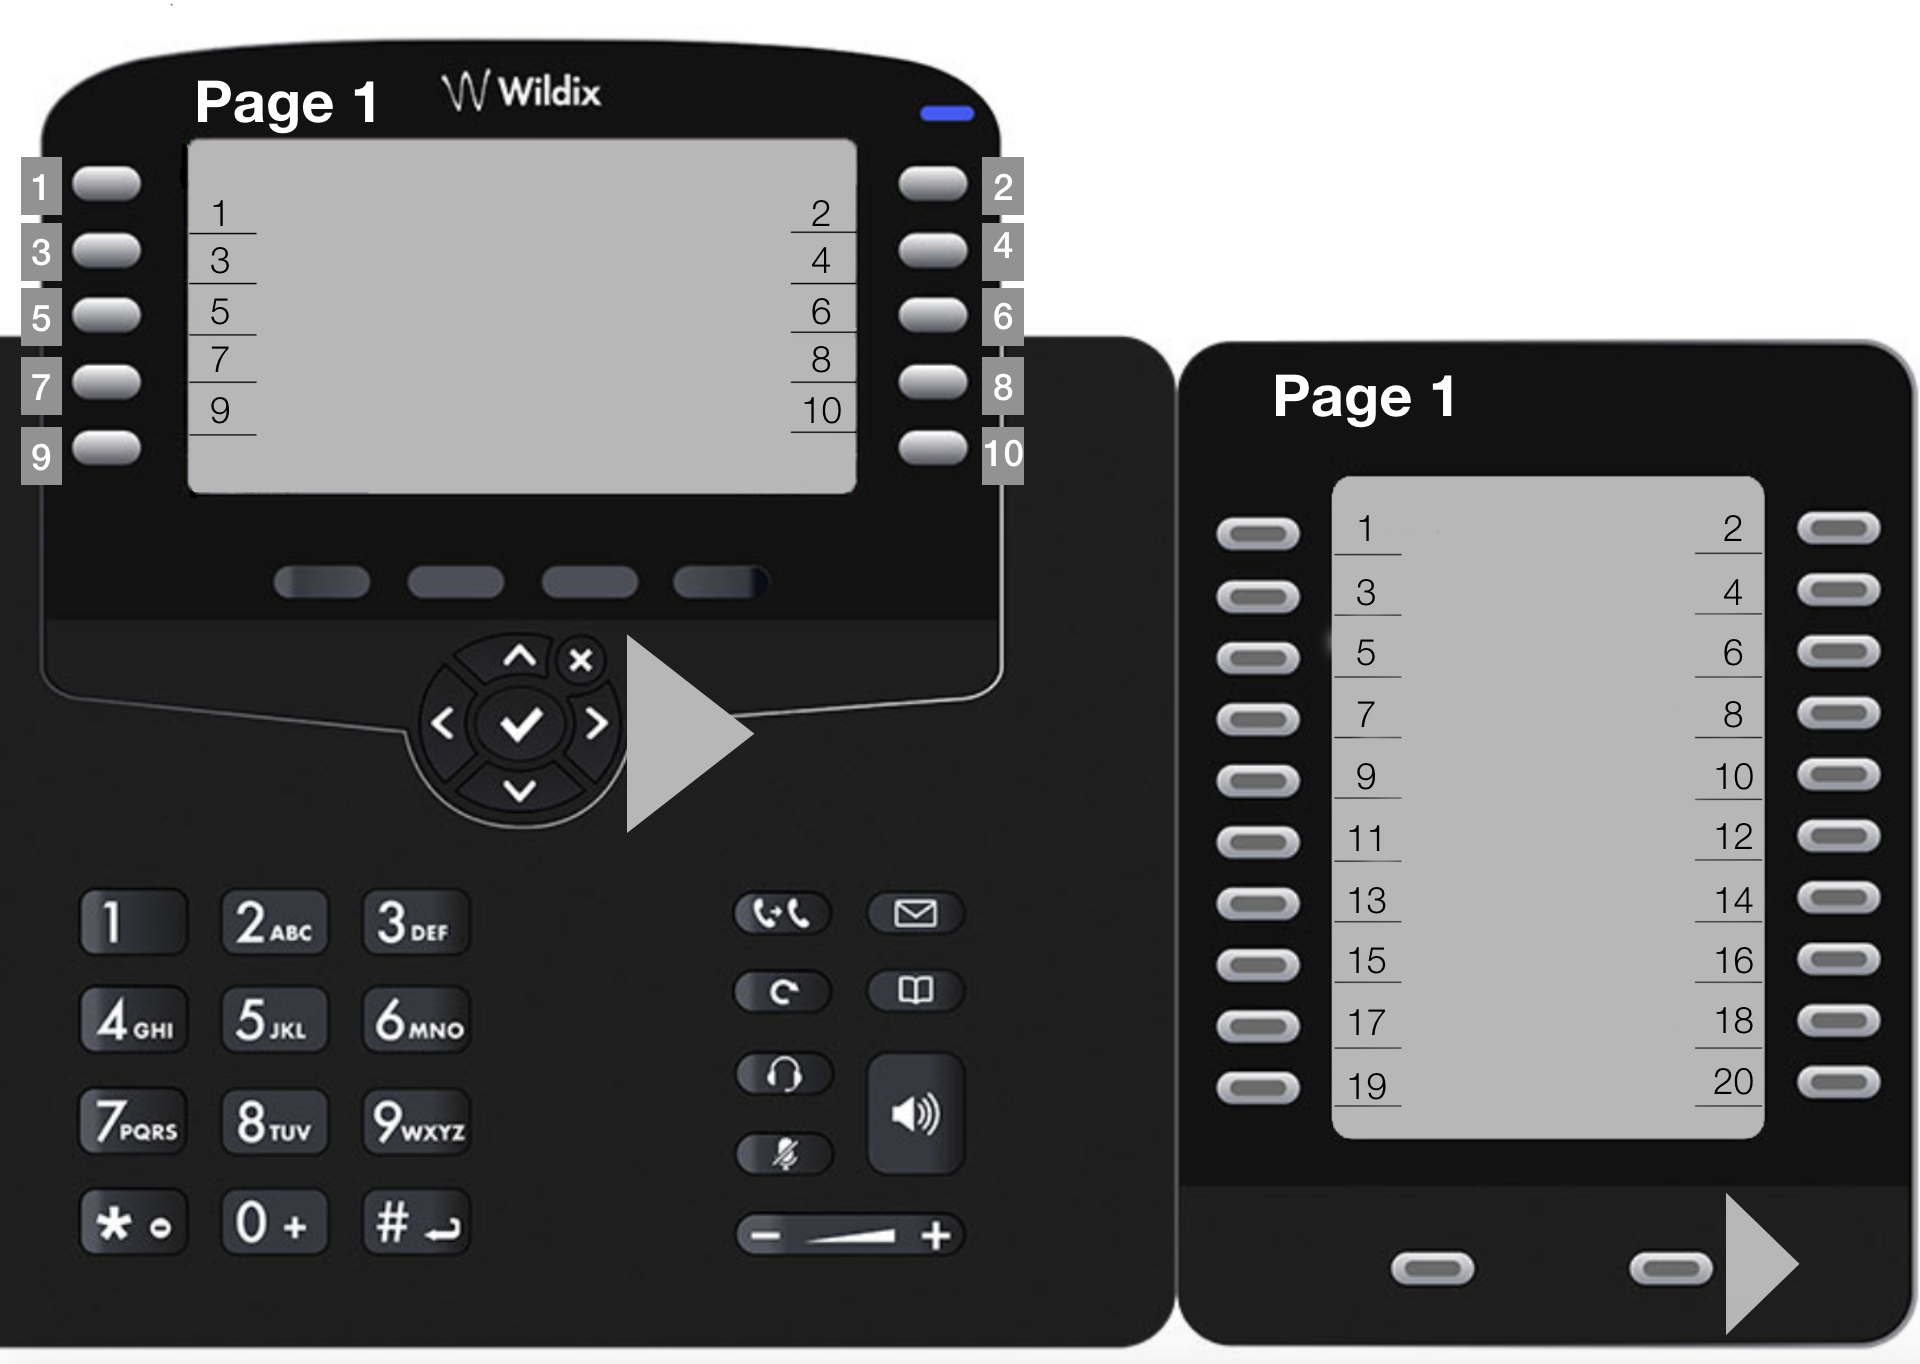
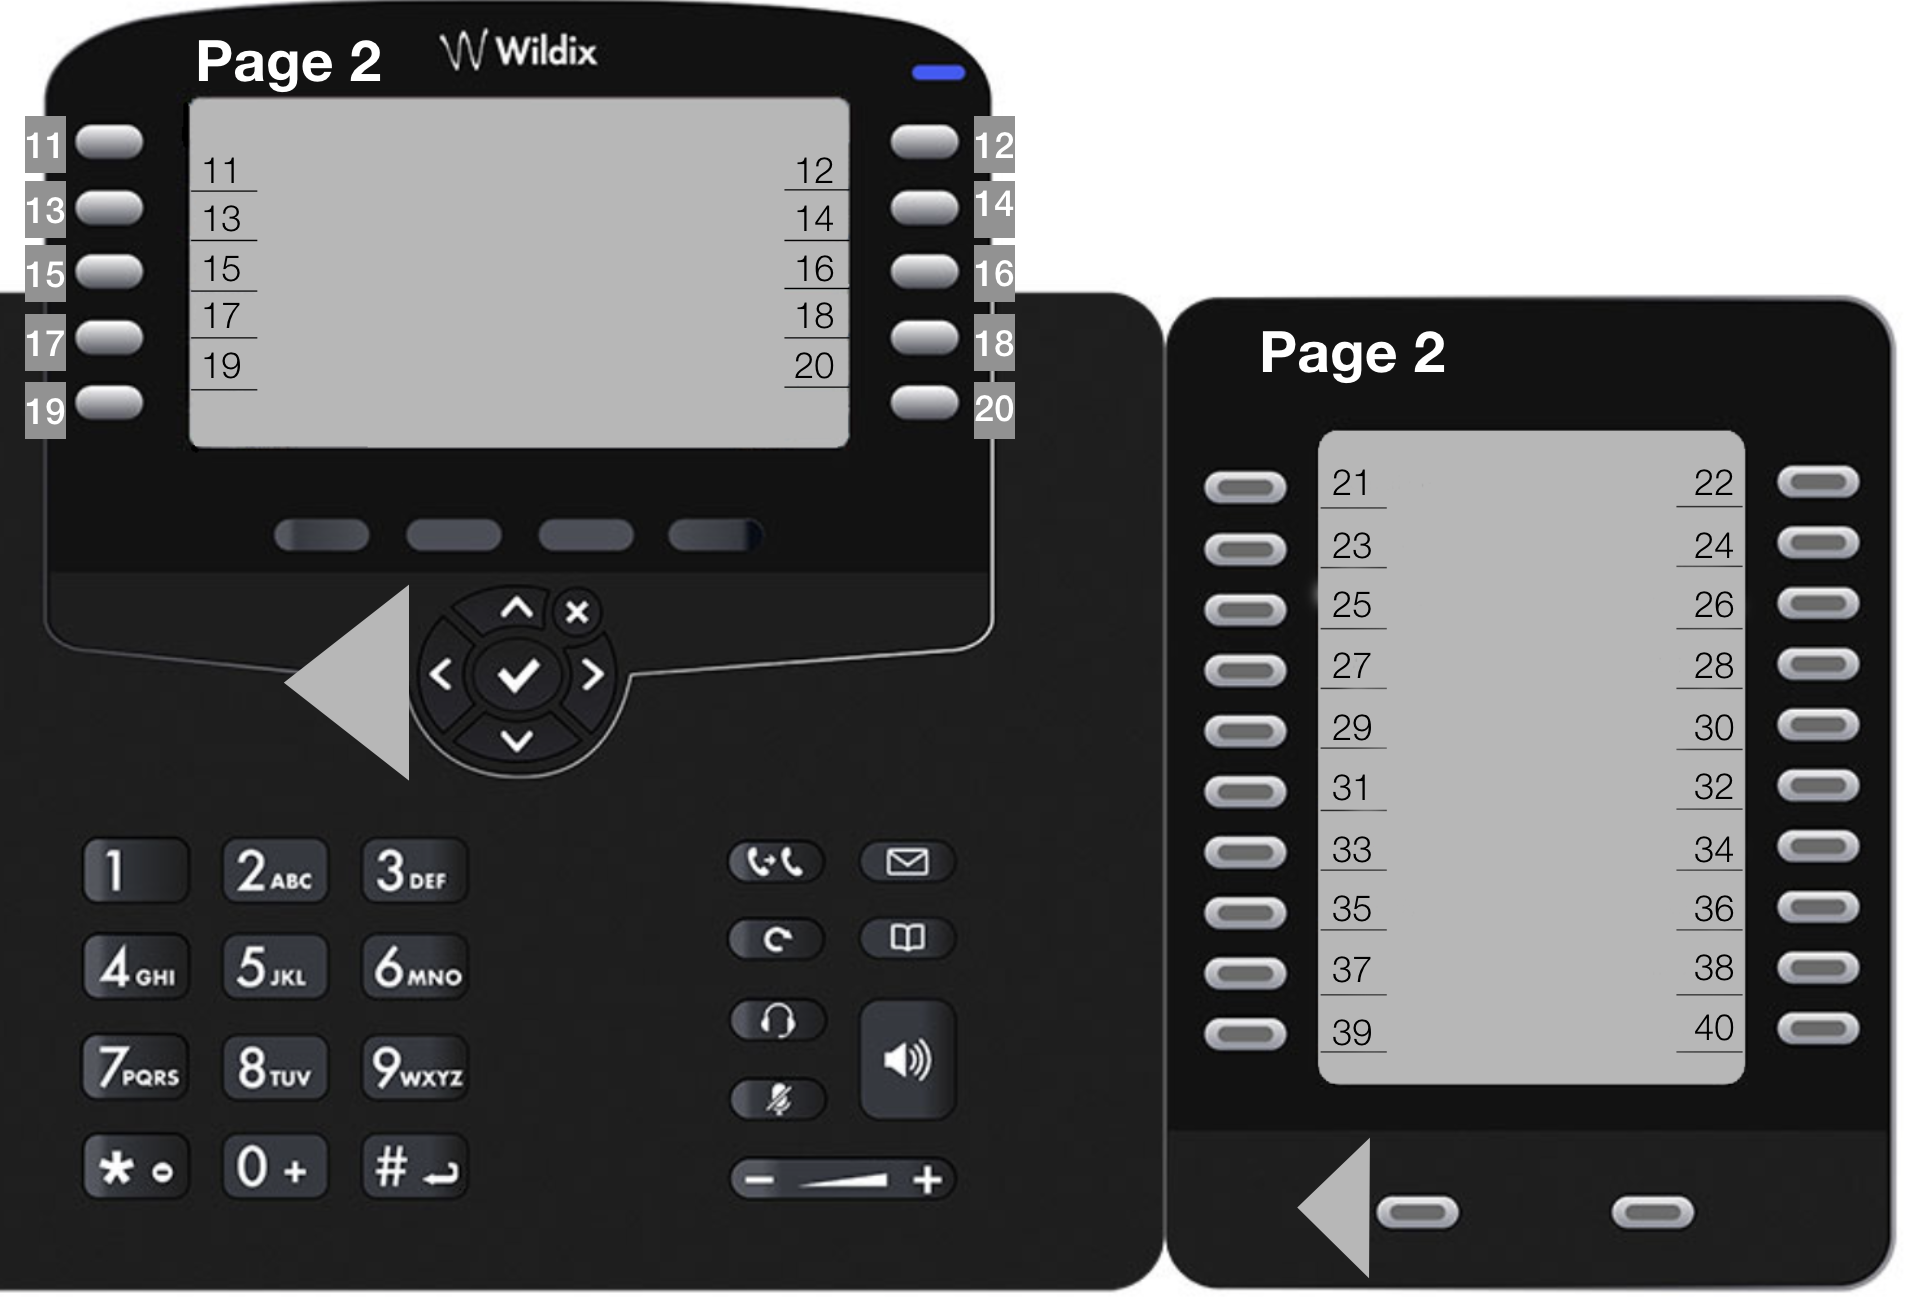
- 60 BLF keys: 20 keys (2 pages) on WelcomeConsole + 40 keys (2 pages) on extension module (use Navigation keys to move between the pages):
- 16 BLF keys (2 pages) for WP480G 2017 (use Navigation keys to move between the pages):
- 30 BLF keys (2 pages) for WP490G 2017 (use Navigation keys to move between the pages):

17 BLF keys (3 pages) for WP480G 2016 (use Navigation keys to move between the pages):
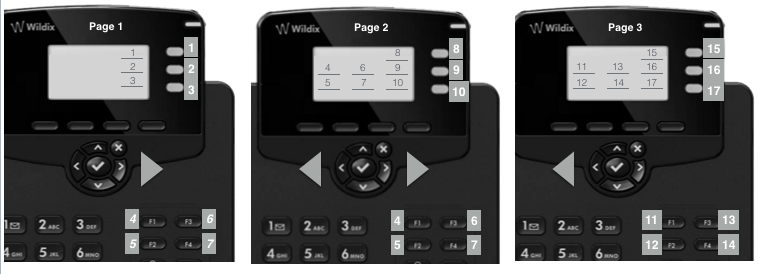
Note: keys 4-7 are not displayed on the screen of the Page 1, however they can be used for Speed Dial.
18 BLF keys (2 pages) for WP490G 2016 (use Navigation keys to move between the pages):
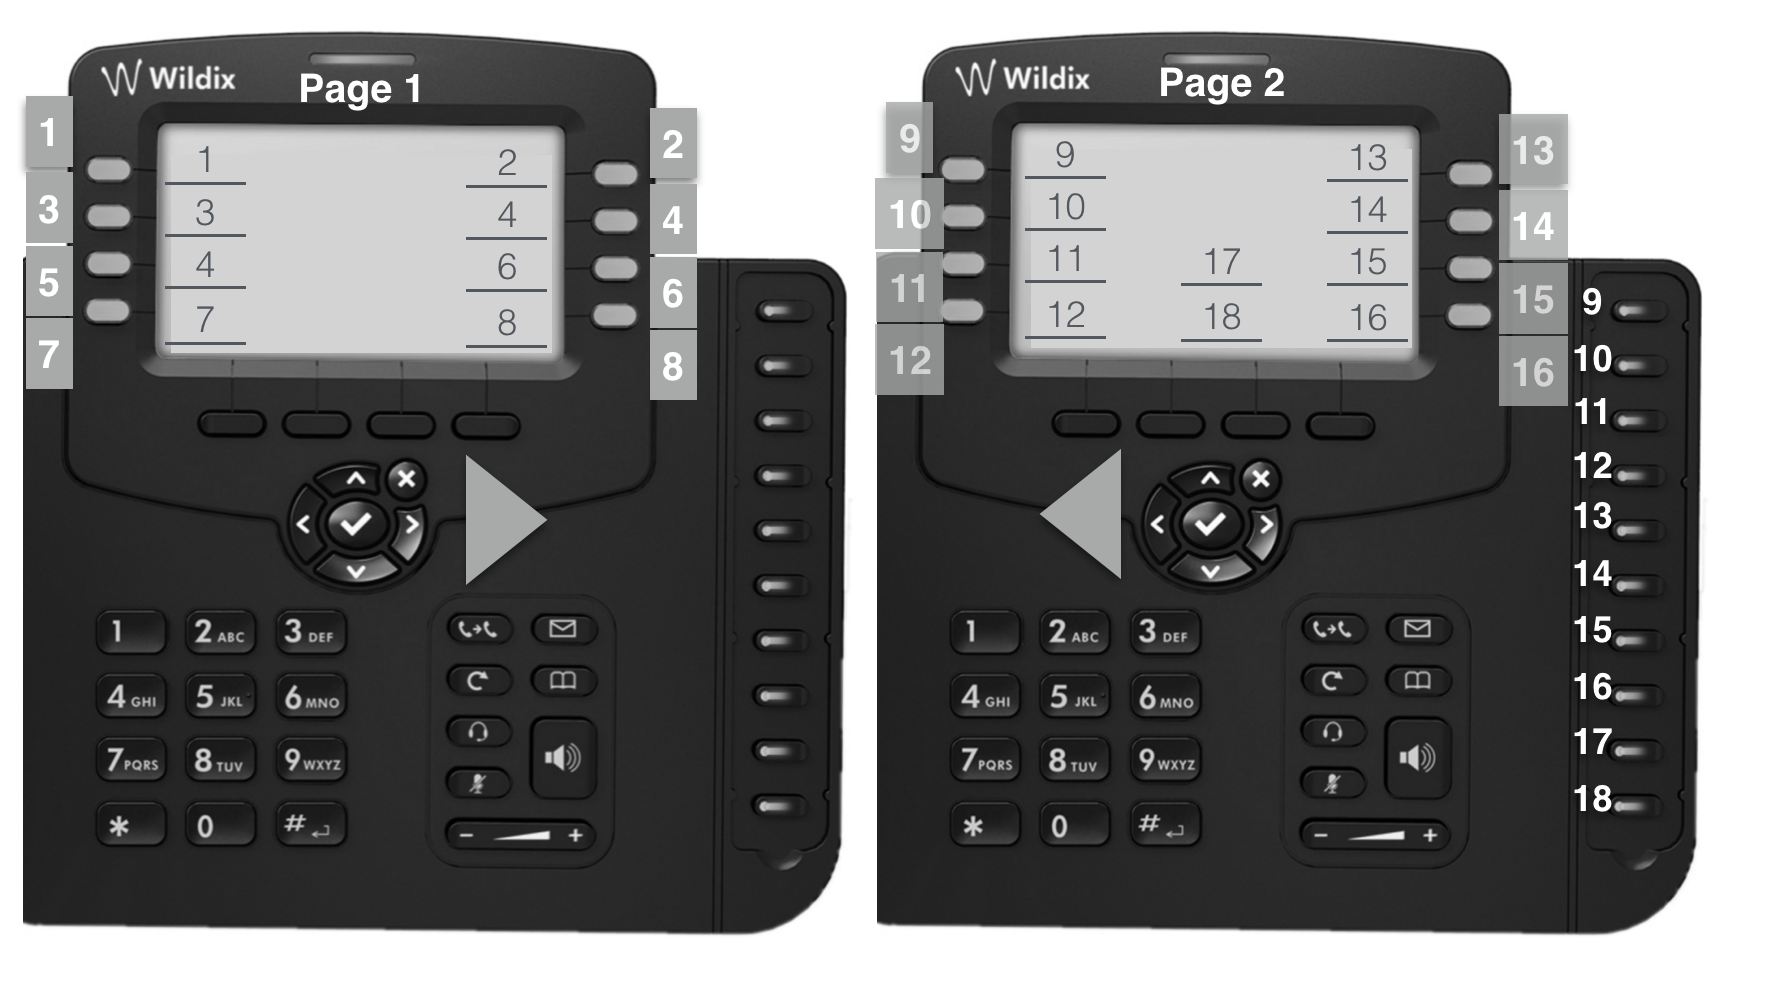
Note: keys 9-18 are duplicated on the Page 2.
Note: this operation must be made by the system administrator!
In case you have problems with your phone, please contact the PBX administrator.
Appendix 2 - Call features
Press Featur. Soft key from the standby mode to access the menu. This menu allows you to change call features for each type of call (Internal / External / Whitelist / Blacklist) based on user status (available / DND / away):
Note: call features are synced between all the devices of a user and can be also set from Collaboration / WMS / Vision/SuperVision / iOS/Android app.
Status: Available / DND / Away
Note: all the features below are applied only for the selected user status.
- Until (only for DND / Away): Time / Date - set expiry time and date for DND / Away user status
- Activate (only for DND / Away): On / Off - when disabled, call features for DND / Away statuses cannot be changed
Call type: Internal / External/ Blacklist / Whitelist
Note: all the features below are applied only for the selected call class.
- Call reject: On / Off - if enabled, all calls are rejected
- Call forwarding - call forwarding settings
- busy: On / Off - enable / disable call forwarding when busy
- unavailable: On / Off - enable / disable call forwarding in case of no answer
forced: On / Off - enable / disable forwarding of all calls
Note: When Call forwarding is activated for all calls for internal or external call class, CFN label (Call Forwarding Number) indicating the destination (extension number/ external number/ Voicemail) and the arrow icon is displayed on the screen; in case call forwarding of both internal and external call class is activated, call forwarding number for internal calls is displayed on the screen.
You can set the destination for each type of call forwarding: enter the phone number or the value VOICEMAIL.
- Call waiting: On / Off - enable call waiting to be able to receive more than one call at a time
Mobility: On / Off - if enabled, after a timeout, incoming calls are routed also to your mobility extension number; phone number and timeout can be specified in Collaboration Settings
Ring Tone: select the ringtone
Appendix 3 - Phone Settings
To access Phone Settings, press Menu soft key from idle:
- Status: view IP, Mac, Firmware of your phone
Backlight settings: set the backlight level of the screen and select the timeout (min - 20 sec, max - 1 hour or Always On) after which the phone's screen should turn off
Note: The backlight settings of WelcomeConsole-EXT extension module are synced with WelcomeConsole/ WP490G 2016-2017.
Audio settings: adjust Talk, Tone, Mic, Key, Ring Volume,
Headset Ring Mode: allows you to decide whether ringtone should be played via Headset or via Handsfree when Headset is connected
Handsfree sound input: allows you to select the active microphone in handsfree mode when the handset is lifted (either handset's microphone or phone's microphone)
- Network: access to this menu is recommended for PBX administrator
- Autoprovision: access to this menu is recommended only for PBX administrator
Note: It is possible to forbid access to Network and Autoprovision settings by adding ACL rule "Cannot use - Advanced phone settings menu". Consult the documentation: ACL rules and Call classes management Guide.
Appendix 4. Supported Headsets
Supported Headsets
Wildix Headsets compatible with Start, WelcomeConsole, WorkForce, WP4X0: monaural (WHS-MONO), binaural (WHS-DUO), Mono/ DuoLED, Mono/ DuoLED-BT.
For detailed information, read the guide: Phones Accessories Quick Start Guide, LED Headsets User Guide.
Third-party headsets integrated with Wildix: Wildix Compatible Headsets - Jabra, Plantronics, EPOS Sennheiser, JPL, Axtel, Orosound.