How to get location of W-AIR Base Station in case of emergency alarm
This Guide explains how to get the location of the nearest W-AIR Base Station in W-AIR Network in case of emergency alarm triggered on W-AIR Handset.
- Min W-AIR firmware: 0501b5
- Min WMS version: 5.02.20201207.3
- W-AIR documentation: Link
Created: December 2020
Updated: April 2022
Permalink: https://wildix.atlassian.net/wiki/x/VxLOAQ
Description
Thanks to this feature, the operator who receives the alarm triggered by a W-AIR handset can additionally receive information about the closest Base Station and the type of alarm triggered (e.g. Man Down, Alarm Button). This information is passed using Messaging protocol supported on W-AIR starting from the firmware indicated in this document.
To differentiate between the types of alarms and the base stations you can record your own system prompts or use the Text-To-Speech (TTS) service.
The PBX passes the information about the closest base station based on the RPN of the base station and the RSSI levels passed by the handset. RSSI levels indicate which base station is currently the closest one to the handset.
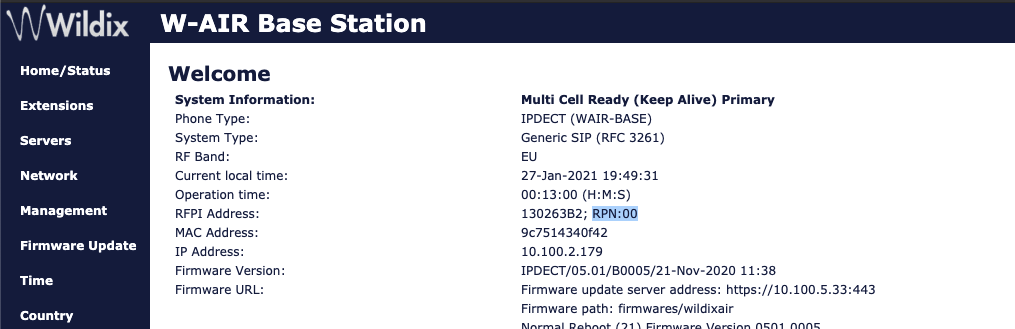
What is the RPN of the base station?
RPN can be found on the W-AIR base station's interface → Home/ Status tab, RFPI Address; in the example below the RPN of the base station is "00":
Video:
Requirements
- Hardware/ Virtual PBX starting from WMS v 5.02.20201207.3
- Cloud PBX starting from WMS v 5.04.20211108.3
- W-AIR Network set up on the PBX
- Alarms configured on the W-AIR base (More information about alarms configuration in the base station's manuals: W-AIR Network Admin Guide - Sync over the air, W-AIR Network Admin Guide - Sync over LAN)
- W-AIR firmware starting from v. 0501b5
Enable Text Messaging on W-AIR base
Step 1: Enable Text Messaging:
- Go to the web interface of the Primary W-AIR Base Station -> Management
- Enable Text Messaging
- Set PBX as Text Messaging & Alarm Server
- Change Text Messaging Port to 9300
- Save and Reboot the W-AIR base
_censored.jpg?version=1&modificationDate=1607359650000&cacheVersion=1&api=v2&width=447&height=187)
Step 2: Set Alarm Signal as Message in Alarms Profiles
- Go to the menu Alarms of the base station's interface
- In each alarm profile that you configured (Man Down, Alarm Button, etc), change Alarm Signal from Call to Message and click Save
PBX configuration
- Open the terminal from WMS and edit the call file template config located in the file /var/lib/callweaver/dialplan/alarm.template
Follow the prompts in the template to edit it:
# Call file template. Supported values (should be in {{}}):
# ID1, ID2 ... - RFPI Addresses, 10 hex digits, in descending signals level order, check it on the web interface of a base, Home/Status page
# SHORTID1, SHORTID2 ... - 2 last digits of IDs
# LEVEL1, LEVEL2 ... - corresponding signal levels, optional
# EXTENSION - extention of alarmed device
# NAME - user name of alarmed device
# TYPE - type of alarm, one decimal digit, check it on the web interface of a base, Alarm page, Idx column
Channel: Local/alarms@alarm-wair
Callerid: "{{NAME}}" <{{EXTENSION}}>
WaitTime: 60
MaxRetries: 3
RetryTime: 30
Context: alarm-wair, specify Dialpan procedure used for managing W-AIR calls here
Extension: {{SHORTID1}}{{TYPE}}
Priority: 1
Setvar: base={{ID1}}
Start W-AIR alarms service on the PBX and enable it permanently:
# systemctl start wairmsg
# systemctl enable wairmsg
Dialplan configuration
Add the new Dialplan context "alarm-wair". This is the default Dialplan specified in the template file, use this name if you haven't changed it.
In this "alarm-wair" dialplan add the following called numbers:
- alarms: (this called number is used by default in the template) under this called number specify where the alarm should be routed (e.g. use the Dialplan application Dial the phone or Call group)
- XXX: (e.g. 00X, 04X) specify your base stations' RPNs as called numbers in the format XXX, where the first two digits correspond to the RPN of the base station, the last digit can be used to specify the alarm type.
The following IDs correspond to the alarm types:
- 0: Man Down
- 1: No Movement
- 2: Running
- 3: Pull Cord
- 4: Red Key
Here is an example of how you can specify called numbers:
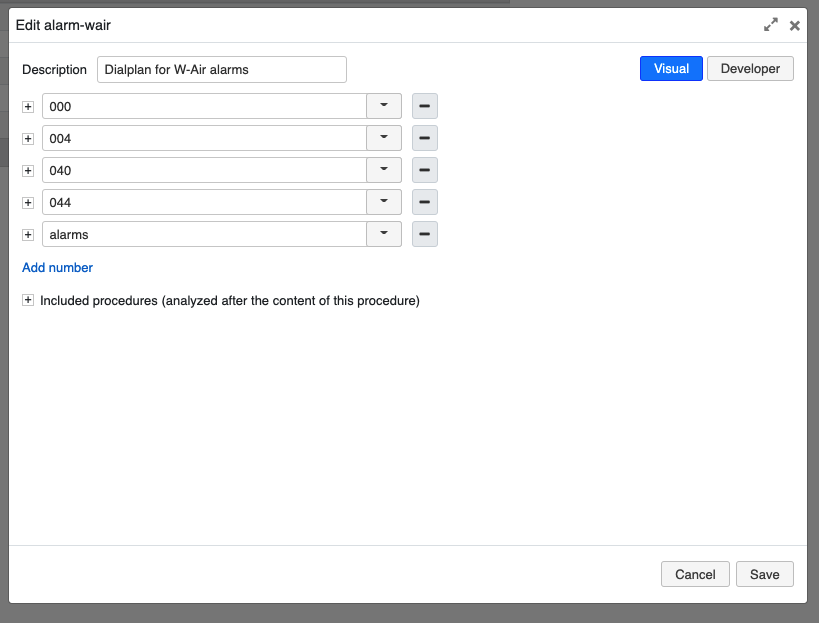
In this example:
- 000 and 004 are called in case the handset is located close to the base station with RPN 00:
- 000 - in case it is a Man Down alarm,
- 004 - in case it is a Red Button alarm.
- 040 and 044 in their turn, are called in case the handset is located close to the base station with RPN 04
For each XXX called number, you can use Dialplan application Play sound and specify the phrases that should be pronounced using the TTS service. For example:
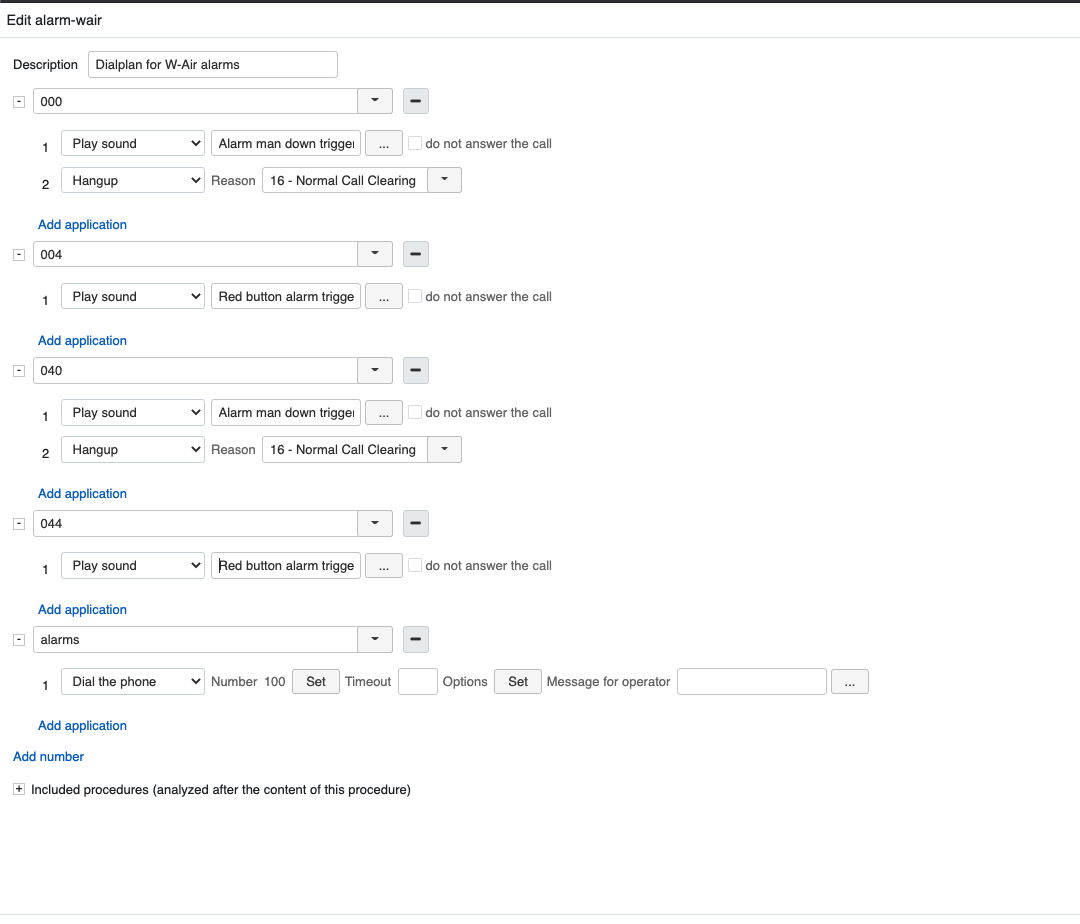
In this example the following phrases are used:
- "Alarm man down triggered in the marketing office" for 000; "Red button alarm triggered in the marketing office" for 004 - the base station with RPN 00 is located in the marketing office.
- "Alarm man down triggered in the conference room" for 040; "Red button alarm triggered in the conference room" for 044 - the base station with RPN 04 is located in the conference room.
Keep in mind, that for other languages you need to use the "Set" application to manually set the language in case you use the dynamic TTS service. More information on TTS: Wildix Business Intelligence - Artificial Intelligence services.
Note that Auto answer option is automatically enabled on the W-AIR handset after an alarm was sent from it. This option enables the handset to automatically answer the call after five seconds. More information about the Auto answer feature can be found in the W-AIR DECT Handset User Guide.
Notes for Cloud PBX
To set up the feature on Cloud PBX, you need to:
- establish WMS Network between Cloud PBX and Virtual/ Hardware PBX
- provision W-AIR Bases on Cloud PBX and set up W-AIR Network
- assign a user from Cloud PBX to W-AIR Headset (this user will trigger an alarm)
- assign a user from VM/ HW PBX to any device (this user will receive an emergency call)
- configure Alarm and Text Messaging & Alarm Server on Main W-AIR Base using VM/ HW PBX IP
- run PBX configuration and create Dialplan on VM/ HW PBX IP