Emergency On-call Voicemail notification
- Ksenia Babych
This Article describes how to configure Emergency On-call Voicemail notification for emergency after hour services.
Created: April 2020
Permalink: https://wildix.atlassian.net/wiki/x/OBfOAQ
Introduction
Scenario
To have one or a group of on-call agents for emergency after hour services, as where a caller can leave a voicemail and the on-call agents get notification by phone call (on mobile app and mobile phone). The system will use one or multiple call groups to deliver voicemail to on-call agents.
Example:
Emergency Notification
- Caller calls a DID/TN that is answered by an IVR
- Caller selects IVR option for emergency on-call services
- Caller leaves a voicemail in On-Call Mailbox
- When Caller is disconnected, system then starts calling members of the associated on-call call groups
- When agent answers the call, the PBX states “This is an Emergency Services Notification”
- PBX then puts the agent directly into the On-Call Voicemail for message retrieval
Additional Features
- Missed call notification by email per user
- Message retrieval by calling IVR from external number and dialing #4000
- Message retrieval from Mobile App by dialing #4000
Configuration
Step 1. Create Virtual Mailbox
Detailed instruction on how to create users and edit preferences: WMS Start Guide - English.
1. Create an “OnCall” user (for this example we will use Ext. 4000)
- Go to WMS Users -> Users
- Click + to add a new user
- Full Name: OnCall Mailbox
- Login: 4000
- Extension: 4000
- Email: Email address for On-Call notification
2. Set Password
Agent/User Preferences
Edit User preferences for on-call agents
- Internal – Timeout – Disabled or extend timer to match the Call Group Timeout
- Enable Mobility – 50% or less of total Call Group Timeout (in this example we will be using 15 seconds)
- Enable Mobility Confirmation
- Enable Missed Call Notification via Email
Step 2. Add Call Groups
The detailed instruction on how to create Call groups: Call distribution in Call groups.
1. Create one or more call groups (for this example, we will be using two call groups):
- Go to Dialplan -> Call Groups
- Click + to add a new call group
- Name the Call Group (For this example we will use “OnCall” & “OnCall_Fallover”)
- You may add member to the group or use Contact Center for Log In/Out
- Take note of the ID number/s as they will be utilized in the Dialplan “OnCall_In”
2. Edit Strategy of call groups
- Timeout = Set to the total ring time per member (Example: 60)
- Announce frequency = no
- Announce hold time = no
- Priority = 1
- Seconds before recalling all the members again = (Example: 120)
- Wrap up time = 0
- Call waiting = no
- Auto pause on no answer = no
- Auto pause on no answer timeout = 5
- Auto pause delay = 0
- Max length = 99
- Dialplan = “OnCall_CBK”
- Strategy = Linear
Step 3. Create separate Dialplan procedures
Consult Dialplan applications Admin Guide for the detailed instruction.
Create 4 Dialplan procedures with the following rules:
OnCall_CBK
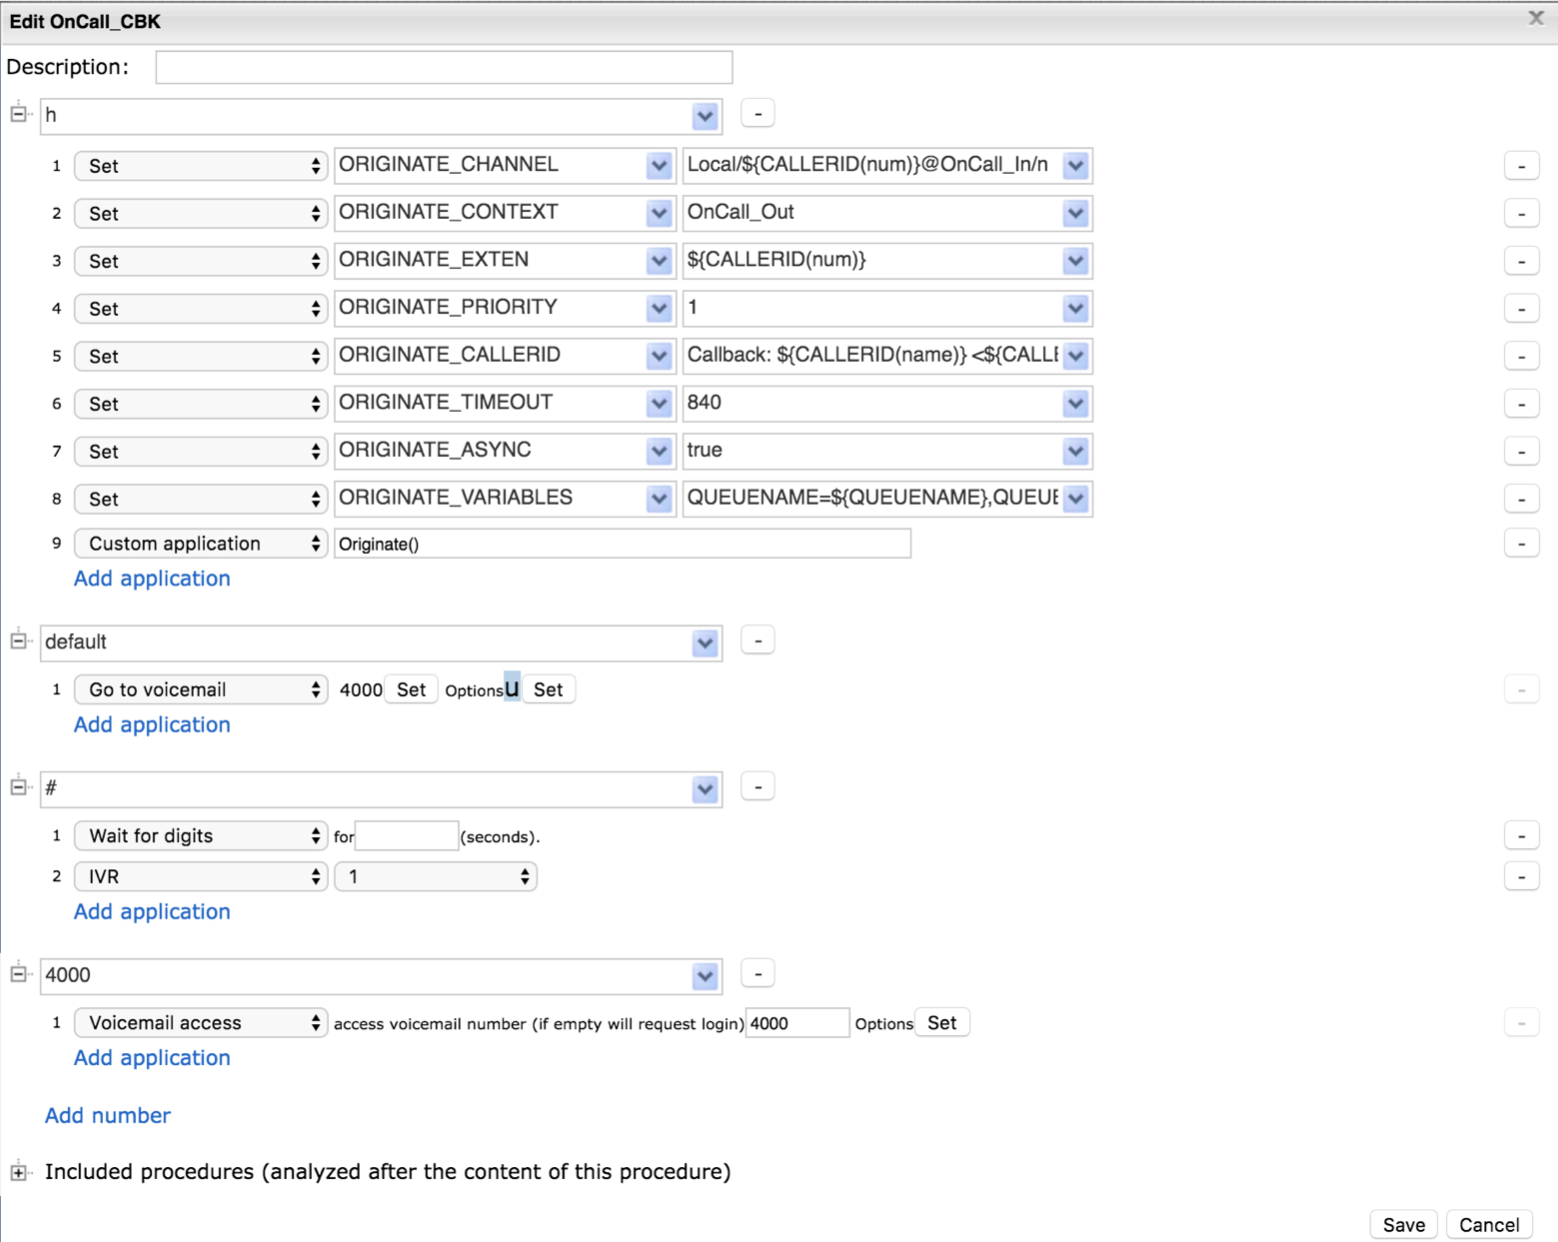
h
- Set – ORIGINATE_CHANNEL – Local/${CALLERID(num)}@OnCall_In/n
- Set – ORIGINATE_CONTEXT – OnCall_Out
- Set – ORIGINATE_EXTEN – ${CALLERID(num)}
- Set – ORIGINATE_PRIORITY – 1
- Set – ORIGINATE_CALLERID – Callback: ${CALLERID(name)} <${CALLERID(num)}>
- Set – ORIGINATE_TIMEOUT – 840 (Note: Set to max time for TOTAL agent notification, to include the failover call groups)
- Set – ORIGINATE_ASYNC – true
- Set – ORIGINATE_VARIABLES – QUEUENAME=${QUEUENAME},QUEUEPOSITION=${QUEUEPOSITION}
- Custom application – Originate()
default
- Go to Voicemail Set - Custom: 4000 Go to voicemail options: u – Play unavailable message
#
- Wait digits 3
- IVR (Input the IVR that will have the On-Call option)
4000
- Voicemail access 4000 Option C (DO NOT skip the pin)
OnCall_Confirm
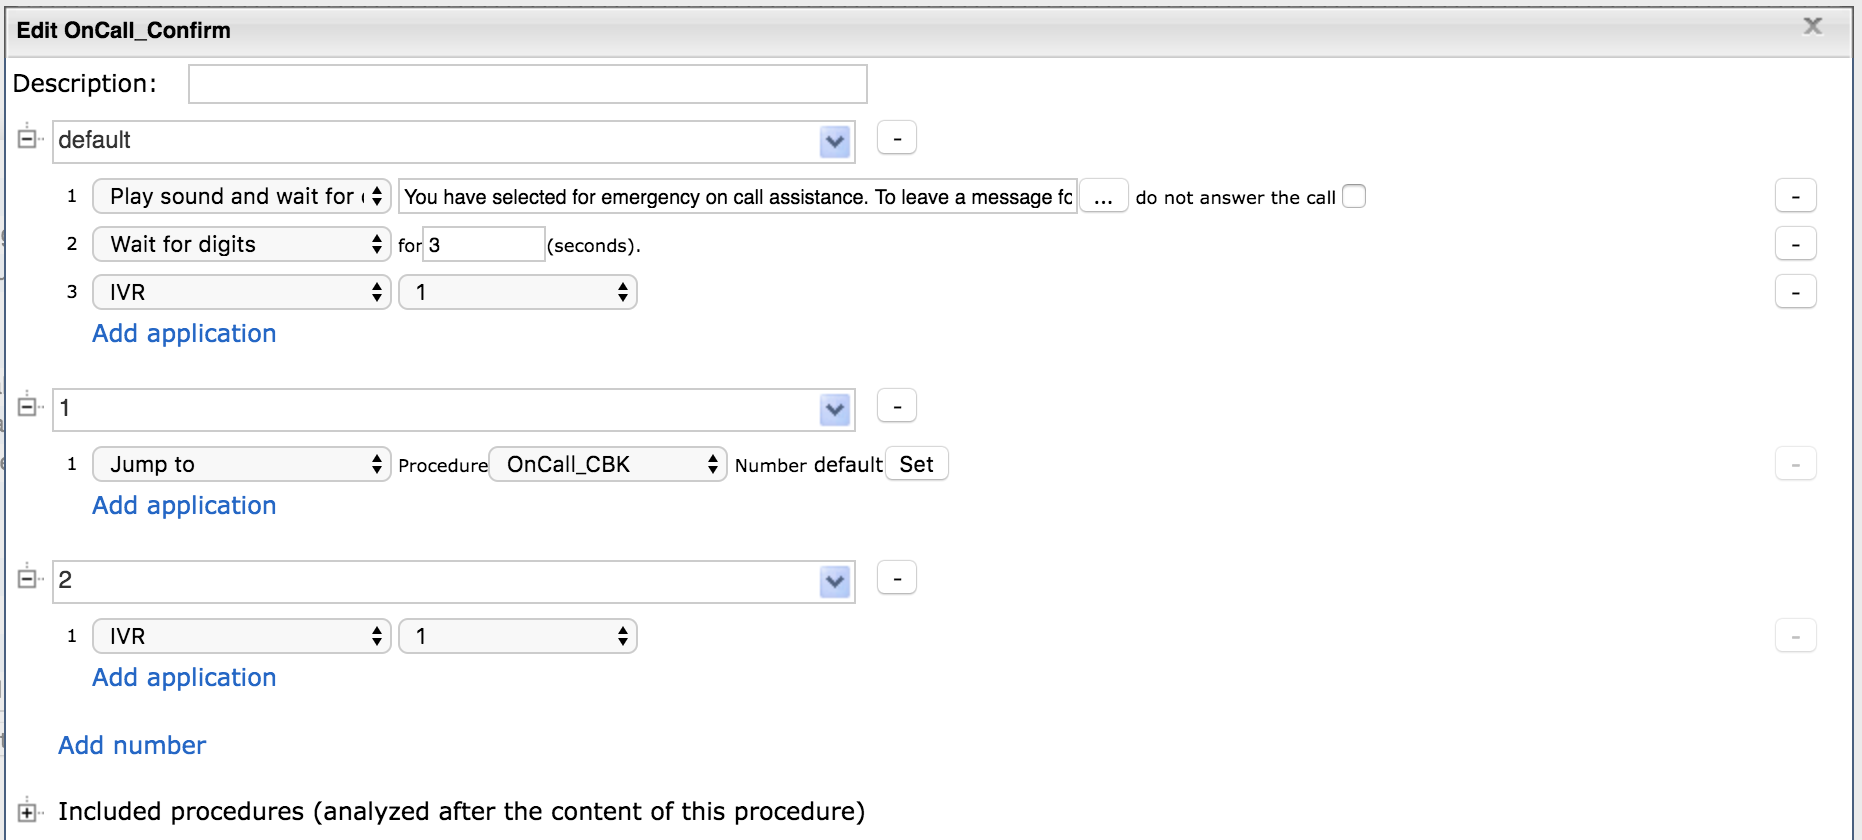
default
- Play sound and wait for digits – “You have selected for emergency on call assistance. To leave a message for an on call agent to return your call, please press 1. To return to the main menu, please press 2 or remain on the line.”
- Wait for digits – 3
- IVR – (Enter the name of the IVR you are using. Example: Night_Main)
1
- Jump to – OnCall_CBK – set as custom “default”
2
- IVR - (Enter the name of the IVR you are using. Example: Night_Main)
OnCall_In
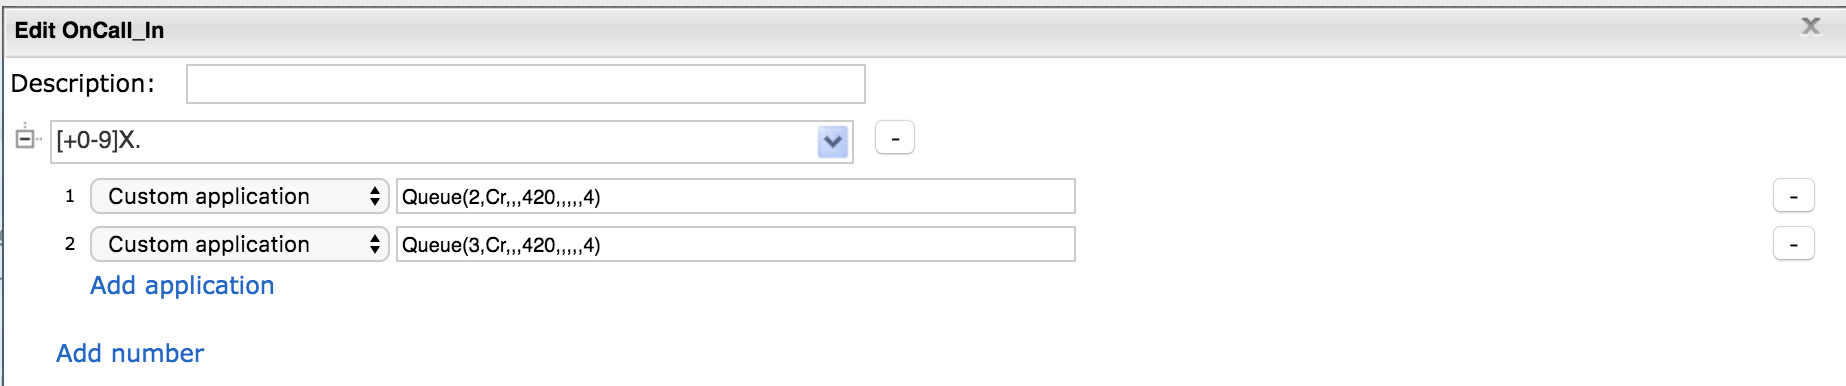
[+0-9]X.
- Custom application – Queue(2,Cr,,,420,,,,,4)
- Custom application – Queue(3,Cr,,,420,,,,,4)
Note:
- “2” & “3” - the Call Group ID’s for the call groups used for agent notification
- “420” - the Timeout for the Call Group referenced
- The follow sequence is as follows: Queue(queuename[,options[,URL[,announceoverride[,timeout[,AGI[,macro[,gosub[,rule[,position]]]]]]]]])
OnCall_Out
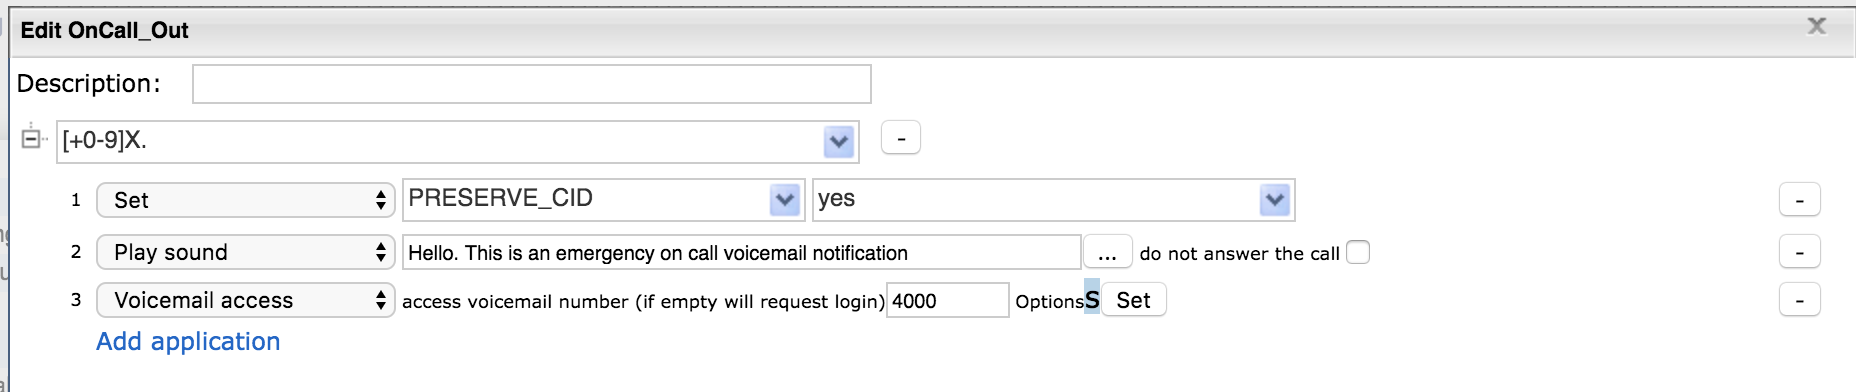
[+0-9]X.
- Set – PRESERVE_CID – yes
- Play Sound – “Hello. This is an emergency on call voicemail notification.”
- Voicemail access – 4000 – Option – S – skip pin
You also need to edit "users" Dialplan Procedure:
#4000
- Voicemail Access – 4000 – Skip Pin
Step 4. Configure IVR
The detailed instruction on how to configure IVR trees: WMS Start Guide.
1. Set an Emergency/On-Call IVR Option (for this example, we will be using option 9):
- Number – 9
- Item Action – Action
- Dialplan Prodecure – OnCall_Confirm
- Called Number – default
2. Set Message Retrieval from External:
- Number – #
- Item Action – Action
- Dialplan Prodecure – OnCall_CBK
- Called Number – #