Large-Scale Deployment on Windows
This document provides all the necessary information for large-scale deployment of Wildix Collaboration on Windows.
Created: June 2018
Updated: January 2025
Permalink: https://wildix.atlassian.net/wiki/x/gxXOAQ
Large-Scale deployment using Microsoft Windows Installer
Wildix offers MSI (Microsoft Windows Installer) packages for large-scale deployment on Per-Machine basis (multiple users on the same machine) for Windows, suitable in the deployments using Citrix, SCCM and Microsoft Terminal Server. You can use MSI packages to install Wildix applications across your enterprise using Windows system management software such as Systems Center Configuration Manager (SCCM).
Collaboration Native App
Collaboration native app offers the same features of web-based Collaboration.
Limitations:
- no support for text-to-speech in live search, chat
- no possibility to change the default webcam (in case more than one webcams are available) for video call in Collaboration and Wizyconf web conference
MSI file for Windows: (silent installation mode for Collaboration Windows app – no pop-up confirmation windows during the app installation)
Example of the installation command:
> Collaboration-x64.msi /qn host=yourhostname.wildixin.com hidePreferences=1 secondaryHost=yourhostname2.wildixin.com callControlMode=1 callBringToFrontMode=1 allowInsecureConnections=1
Parameters (stored in the register)
- host - host installation for all users on the computer
- hidePreferences (optional) - disable the settings menu for all users
- secondaryHost (optional) - Failover custom domain host
- callControlMode (optional) - login to Collaboration in call control mode
- callBringToFrontMode (optional) - open minimized or closed in system tray/ menu bar Collaboration on incoming calls
- allowInsecureConnections (optional) - allow non-secure connections in case of invalid SSL/TLS certificates
This sets the default settings for all users (note: if the user installs his/her host through the settings menu, the priority will be given to user settings and the admin will not be able to change them through the command line until the user removes the host).
Key path in the registry
- x64 - HKEY_LOCAL_MACHINE\SOFTWARE\Wildix Collaboration
Integration Service
Wildix Integration Service (WIService) is required by CDR-View, Popup App in Collaboration, WebRTC Phone Direct RTP and it includes the following components:
- Headset integration: Support for remote call answer / hangup and volume control from headset via USB connector on Windows. Supported Wildix Headsets: WHS-BT (only with USB dongle from Jabra / Plantronics / Sennheiser); Supported 3rd party headsets matrix: Wildix Compatible Headsets - Jabra, Plantronics, EPOS Sennheiser, JPL, Axtel.
- Screen sharing component: Screen sharing from Wildix Collaboration and Wizyconf WebRTC-based conference, and remote desktop control.
- Fax Printer: Send faxes from Windows applications that support "Print" option. Documentation: Fax Printer for Microsoft Windows and Mac OS X.
- Outlook Integration: Features: Outlook calendar sync with Collaboration, user presence, pictures sync with Outlook, click2call, IM, call popup, caller name lookup, live search in outlook contacts, URL to create / edit contact during a call. Documentation: Outlook integration for Microsoft Windows.
Documentation: What is WIService.
MSI file for Windows:
https://files.wildix.com/integrations/win/wiservice/WIService.msi
Requirements:
- Windows 10 (64-bit) and higher
- Microsoft .NET Framework v.4.0
Silent installation mode
To set the silent installation mode, run the command:
msiexec /i "WIService.msi" wiserviceSilentMode=true
- To reset the silent installation mode, run the command:
msiexec /i "WIService.msi" wiserviceSilentMode=false
To have the application launched when system starts, run the command:
launchAtStartup=1
After Collaboration native app is opened for the first time on Windows, the app is automatically added to the startup.
Key path in the registry:
- x64 - HKEY_LOCAL_MACHINE\SOFTWARE\Wildix\WIService\SilentMode
Auto update option
To enable the option, tick off the box "Keep Wildix Integration Service up to date" when completing WIService setup. Windows Task Scheduler checks for updates every day at 01:00-06:00 or after starting PC. If a new version is available, it downloads a new installation package and runs it in silent mode.
You can also pass enableAutoupdate parameter during installation via cmd:
msiexec /i WIService.msi enableAutoupdate=true/false /qn
Default values:
- enableAutoupdate=true (enabled) / false (disabled)
- wiserviceSilentMode=false
If wiserviceSilentMode is set to true, auto update is not started up.
TAPI Driver
TAPI driver provides computer telephony integration and enables PCs running Microsoft Windows to manage calls and use other telephone services of a Wildix PBX. Documentation: TAPI driver.
Requirement:
- Installed Microsoft Visual C++ 2015-2022 Redistributable (x86) / (x64)
MSI file for Windows:
Silent installation mode
- To set the silent installation mode, run the command:
msiexec /i WildixTAPI-1.4.1.x64.msi /qn
- To uninstall silently, run the command:
msiexec /x WildixTAPI-1.4.1.x64.msi /qn
Native Collaboration App and WIService deployment using Microsoft Intune
You can enable large-scale deployment of Collaboration Native App and WIService using Intune and System Centre Configuration Manager
Check the details in the dedicated documentation Deploying Wildix Native Collaboration App and WIService using Microsoft Intune.
Quality of Service Policy for Windows
You can use Quality of Service (QoS) Policy as a central point of networking bandwidth management across your entire Active Directory (AD) infrastructure by setting QoS profiles. Learn more about Setting QoS Policy for Windows.
Citrix / Microsoft Remote desktop (Windows Terminal Server)
Wildix TAPI driver works in:
- Citrix environments with standalone server
- Citrix environments with more than one srv using load balancing
- Windows Terminal / Server environments
Documentation: TAPI driver.
Citrix integration: https://www.wildix.com/citrix/.
Browser content redirection - deploying Chrome extension using Group Policy
Browser Content Redirection can be enabled to achieve point to point audio and video with the PBX reducing latency and moving CPU usage to the client: https://docs.citrix.com/en-us/citrix-virtual-apps-desktops/multimedia/browser-content-redirection.html
To use browser content redirection with Chrome, add the browser content redirection extension from the Chrome Web Store. Click Add to Chrome in the Citrix Virtual App and Desktop 7 1808 environment (the extension is not required on the user’s client machine – only in the VDA).
System requirements
- Chrome v66 or higher
- Browser content redirection extension
- Citrix Virtual Apps and Desktops 7 1808 or higher
- Citrix Workspace app 1809 for Windows or higher
This method works for individual users. To deploy the extension to a large group of users in your organization, deploy the extension using Group Policy:
- Import the Google Chrome ADMX files into your environment. For information about downloading policy templates and installing and configuring the templates into your Group Policy Editor, see https://support.google.com/chrome/a/answer/187202?hl=en.
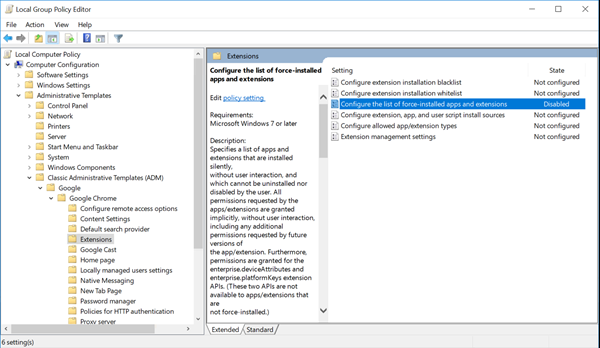
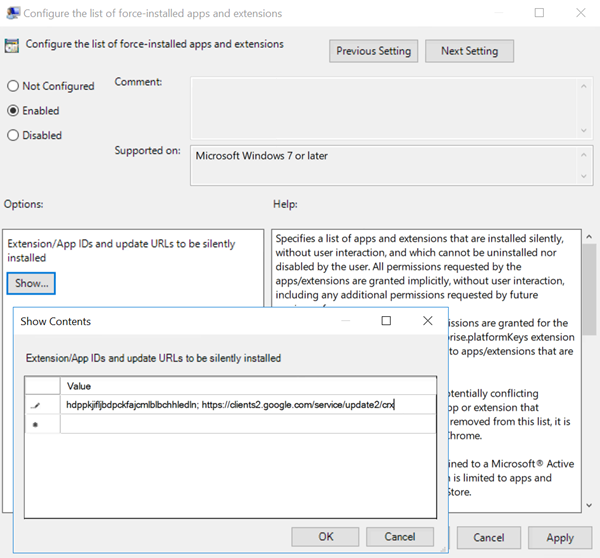
Open your Group Policy Management console and go to User Configuration \ Administrative Templates\Classic Administrative Templates (ADM) \ Google\ Google Chrome \ Extensions. Enable the Configure the list of force-installed apps and extensions setting.
Click Show and type the following string, which corresponds to the extension ID. Update the URL for the browser content redirection extension.
hdppkjifljbdpckfajcmlblbchhledln; https://clients2.google.com/service/update2/crx
Apply the setting and after a gpudate refresh, the user automatically receives the extension. If you launch the Chrome browser in the user’s session, the extension is already applied and they cannot remove it.
Any updates to the extension are automatically installed on the users’ machines through the update URL that you specified in the setting.
If the Configure the list of force-installed apps and extensions setting is set to Disabled, the extension is automatically removed from Chrome for all users.
Import of users and single Sign-on with Active Directory and Office 365
Single Sign-on with Active Directory and Office 365 is supported.
To enable single sign-on on Active Directory and for import of users, read documentation: Import of Contacts and Users