How to install certificate from an SSL Certificate Provider to PBX
In case you've decided to use specific SSL certificate or PBX has no access to Wildix certificate-updater service.
Created: February 2020
Updated: August 2020
Permalink: https://wildix.atlassian.net/wiki/x/QBDOAQ
Important: in WMS 5.0X Custom certificates are accepted only with signature algorithm not lower than SHA256.
Intro: What is SSL and an SSL Certificate
Secured Socket Layer (SSL) is the technology that ensures that data between two machines (in our case – a browser/ phone and PBX) is transmitted securely in an encrypted connection (HTTPS).
An SSL Certificate is a digital certificate that confirms the identity of a website. It is usually represented as a pair of small text files with encrypted data (Certificate *.crt and Private Key *.key).
To implement SSL on your PBX in the absence of access to Wildix certificate-updater service, you need to:
- submit a CSR (Certificate Signing Request) to an SSL Certificate Provider (Certification Authority) and get an SSL Certificate
or
- create /wiki/spaces/DOC/pages/30283909 by you own. These certificates are easy to make and they are free. However, they do not provide all of the security properties that certificates signed by a CA aim to provide.
Then you need to import certificate and private key to PBX.
Step-by-step guide
Step 1.
You can rather request a certificate from a Certification Authority or generate a self-signed certificate.
Get a certificate from a Certification Authority
- Select one of Certificate Providers that suit your requirements. For instance, SSL.com, Namecheap, TheSSLStore, GoDaddy, GlobalSign, DigiCert, Thawte, GeoTrust, Entrust, Network Solutions, etc.
Create a CSR (Certificate Signing Request) either using a Linux shell (PBX shell preferred) or Certificate Provider tools:
Linux shell command to create CSRopenssl req -new -newkey rsa:2048 -nodes -keyout server.key -out server.csr
CSR configuration requires the details as follows below:
- Common Name (the domain name of PBX). It is highly recommended to use sub-domain wildcard ( *.<yourdomain>.<com> )
- Country (two-letter code)
- State (or province)
- Locality (or city)
- Organization
- Organizational Unit (Department)
E-mail address
- Common Name (the domain name of PBX). It is highly recommended to use sub-domain wildcard ( *.<yourdomain>.<com> )
Keep resulting key and csr files. Its content should include encrypted data and headers :
-----BEGIN CERTIFICATE REQUEST-----
...some data...
-----END CERTIFICATE REQUEST-----
and
-----BEGIN PRIVATE KEY-----
....some data...
-----END PRIVATE KEY-----
- Order a certificate from one of Certificate Providers and provide them the CSR file
Validate domain ownership with CA using one of three validation types: Domain Validated (DV), Organization Validated (OV), Extended Validation (EV)
Please note that some sub-types require internet connection.
Generate self-signed certificate
Generate certificate on LINUX system using the command:
openssl genrsa -des3 -out server.key 2048
openssl rsa -in server.key -out server.key
openssl req -sha256 -new -key server.key -out server.csr -subj “/C=IT/ST=TN/L=My City/O=My Company/CN=examplecompany.com”
openssl x509 -req -sha256 -days 3650 -in server.csr -signkey server.key -out server.crt
Use your country instead of IT (Italy) and your region instead of TN (Trento) in the string “/C=IT/ST=TN/L=My City/O=My Company/CN=examplecompany.com”
Output:
server.crt server.csr server.key
Step 2. Configure internal DNS
Configure internal DNS. PBX domain name should correspond IP of PBX.
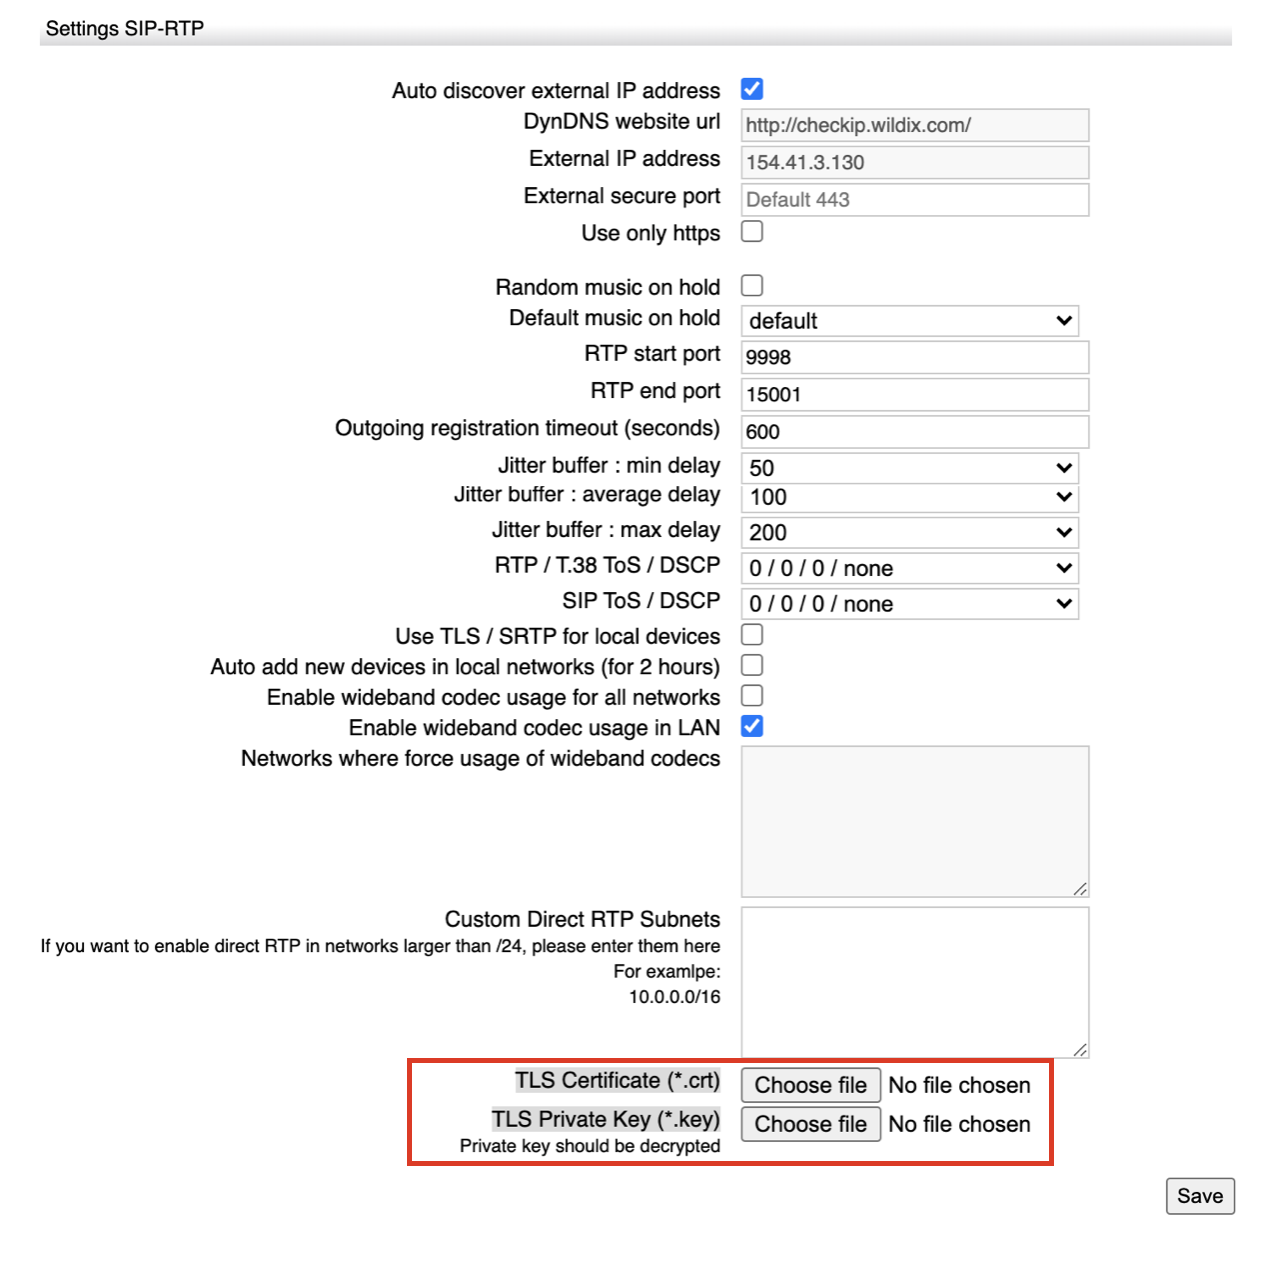
Step 3. Import the certificate
To import the certificate:
- Login PBX web interface with administrative account
- Go to WMS Settings -> PBX -> SIP-RTP
- Upload certificate files: Certificate *.crt and Private Key *.key
- Click Save