How to enable Callback feature for Call groups
- Eugenio Patrev
- Tatiana Bieliakova
- Ksenia Babych
- Elena Kornilova
This Article explains how to enable Callback feature for Call groups.
Created: September 2018
Permalink: https://wildix.atlassian.net/wiki/x/Ch7OAQ
Dialplan configuration
This feature allows customers to request a callback instead of waiting for operators' response in case they are busy on the phone.
To implement this functionality, you need to configure 6 Dialplan procedures.
Note: For convenience, you can easily import all 6 Dialplan procedures from the attached file (WMS Dialplan -> Dialplan rules -> click Import and upload the file).
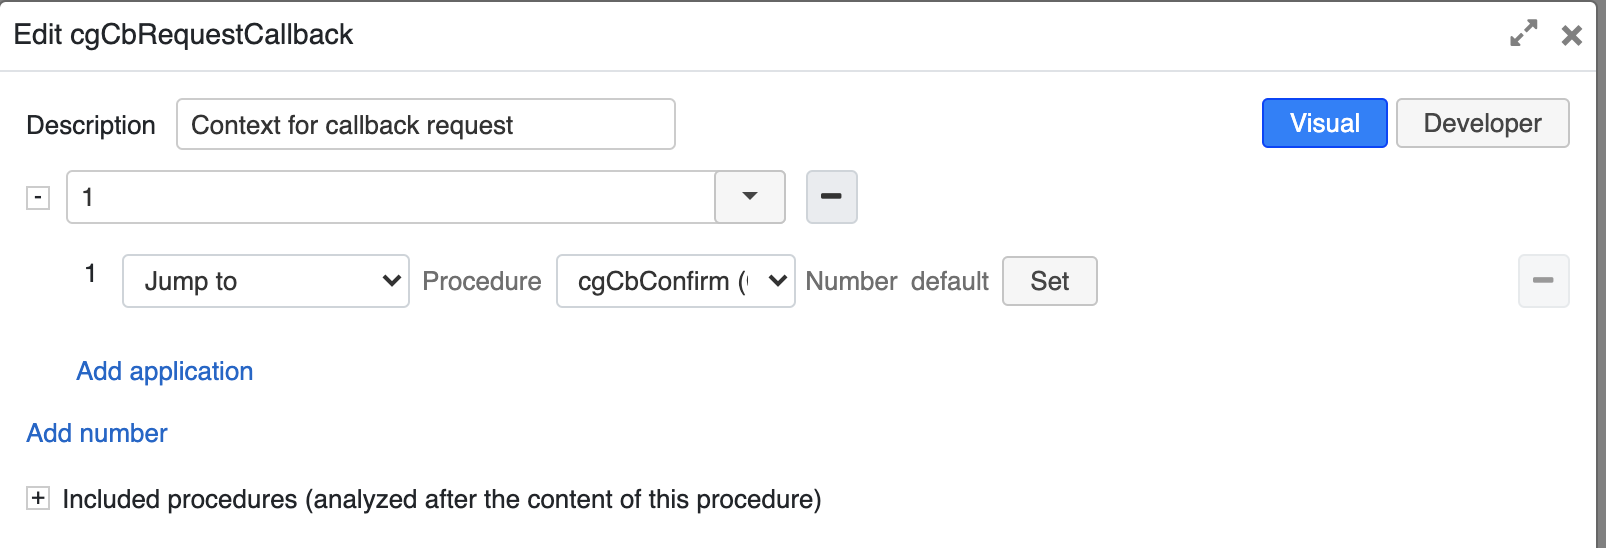
Procedure 1: cgCbRequestCallback
The procedure is used to exit a queue and go to IVR confirmation:
Procedure 2: cgCbConfirm
The procedure confirms a phone number/ entering another number/ returning to the queue/ etc:
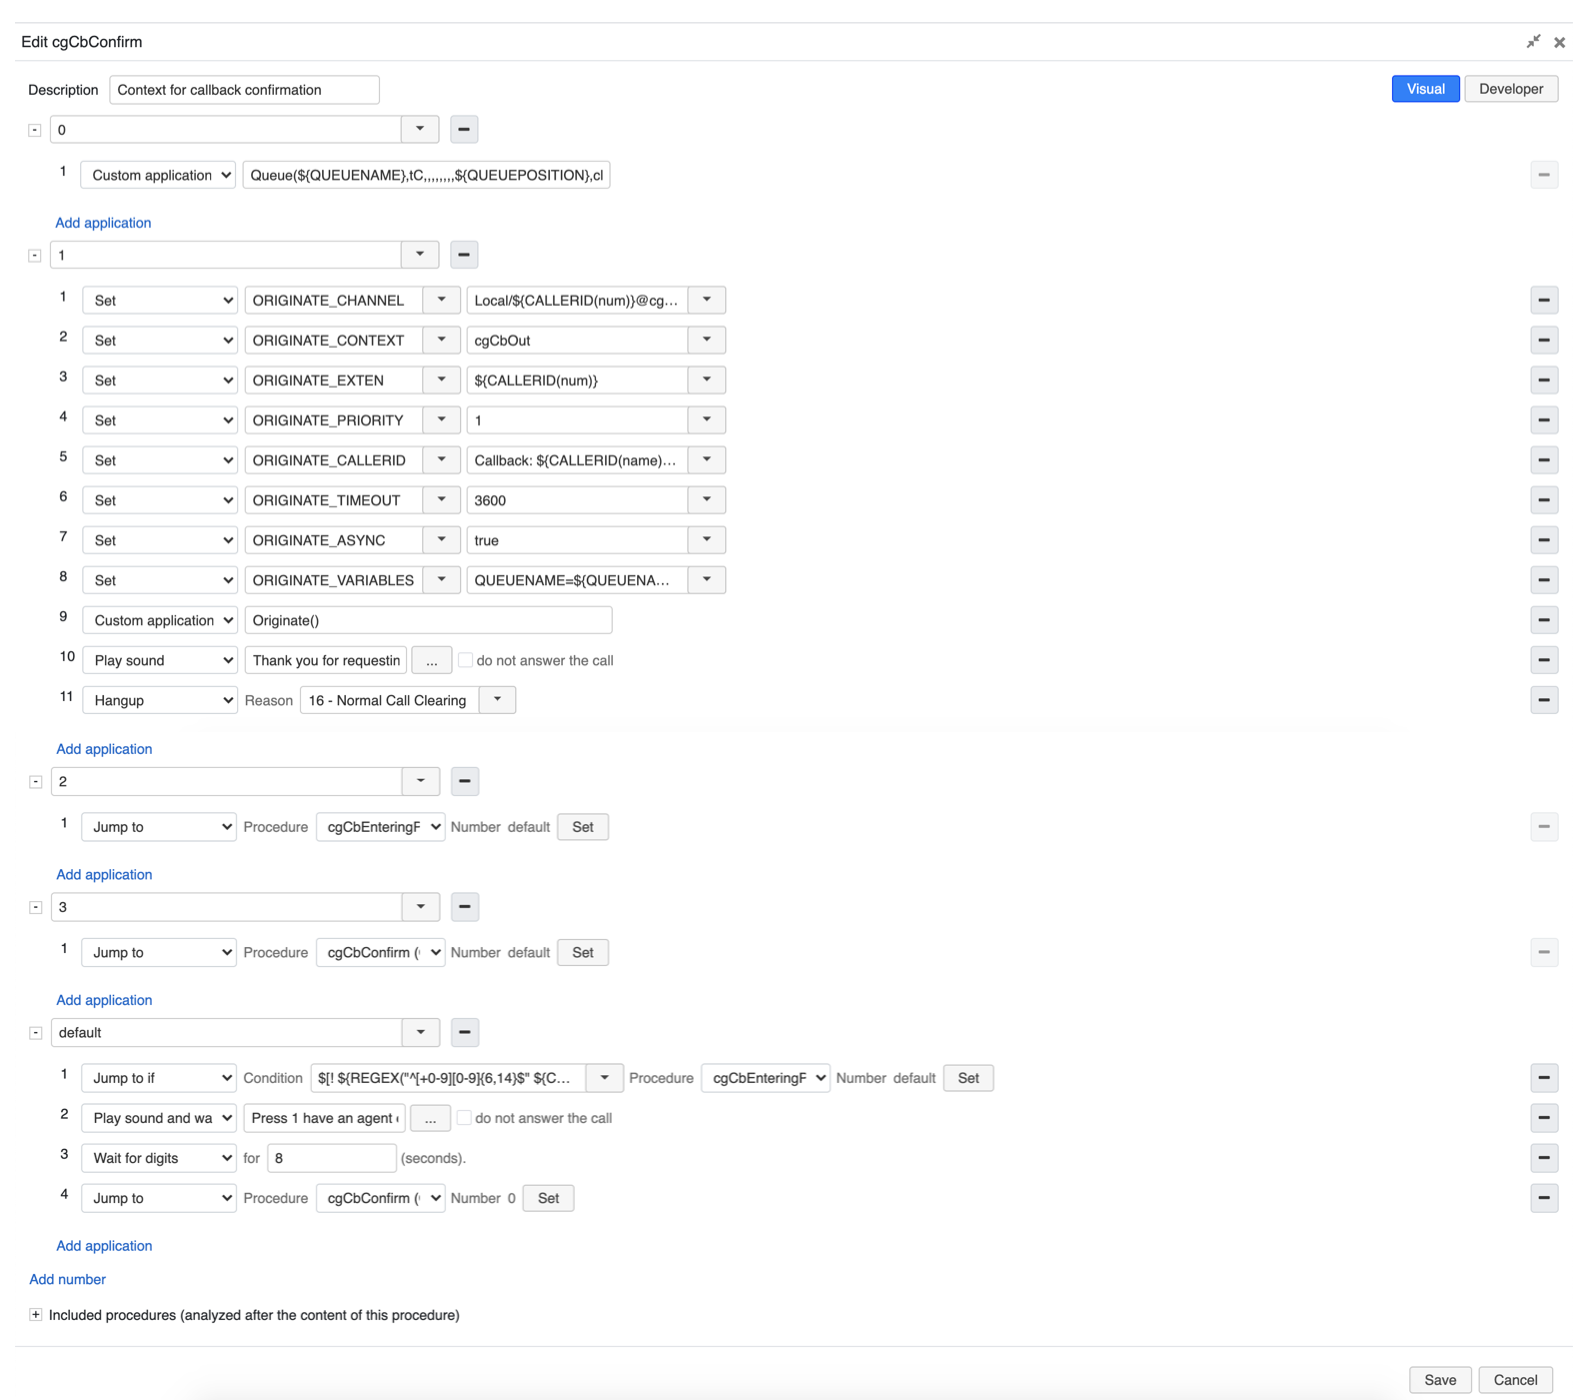
Where:
0 - the number to return to the queue at the same position as the caller before pressing 1.
To return to the queue with the music on hold, use the following custom application:
| Example |
|---|
| Queue(${QUEUENAME},C,,,,,,,,${QUEUEPOSITION},class2) |
Where "class2" is the name of the MoH class.
To return to the queue without music on hold, use the following custom application variant:
| Example |
|---|
| Queue(${QUEUENAME},Cr,,,,,,,,${QUEUEPOSITION}) |
1 - the number to create a new call instead of the current one.
To execute Originate(), you need to set the following channel variables:
| Variable | Value | Comments |
|---|---|---|
| ORIGINATE_CHANNEL | Local/${CALLERID(num)}@cgCbIn/n | cgCbIn is the name of Procedure 5 |
| ORIGINATE_CONTEXT | cgCbOut | cgCbOut is the name of Procedure 6 |
| ORIGINATE_EXTEN | ${CALLERID(num)} | The number to callback |
| ORIGINATE_PRIORITY | 1 | |
| ORIGINATE_CALLERID | Callback: ${CALLERID(name)} <${CALLERID(num)}> | Setting the caller's number and name |
| ORIGINATE_TIMEOUT | 3600 | Waiting time (in seconds) for an operator's response before timeout. In the example - 1 hour |
| ORIGINATE_ASYNC | true | Enabling asynchronous mode. If it's "true" - Dialplan will continue execution without waiting for an operator's response |
| ORIGINATE_VARIABLES | QUEUENAME=${QUEUENAME},QUEUEPOSITION=${QUEUEPOSITION} | Setting in a new channel variables that we need further |
and execute Custom application -> Originate(). After that, playback "Thank you for requesting a callback. You may now hang up and wait for our call. Goodbye".
2 - the number for entering a different callback phone.
3 - the number for repeating the message.
default - the number for checking the original Caller ID. If the number is valid, then the system offers a customer to order a call to this number, or enter another:
"Press 1, have an agent call you back to the phone number <say-as interpret-as='telephone'>${CALLERID(num)}</say-as>. Press 2, to enter a different callback number. Press 3, to listen again. Press 0 to return to the queue on hold".
| Example |
|---|
| $[! ${REGEX("^[+0-9][0-9]{6,14}$" ${CALLERID(num)})}] |
Procedure 3: cgCbEnteringPhone
The procedure is used to enter another phone number:
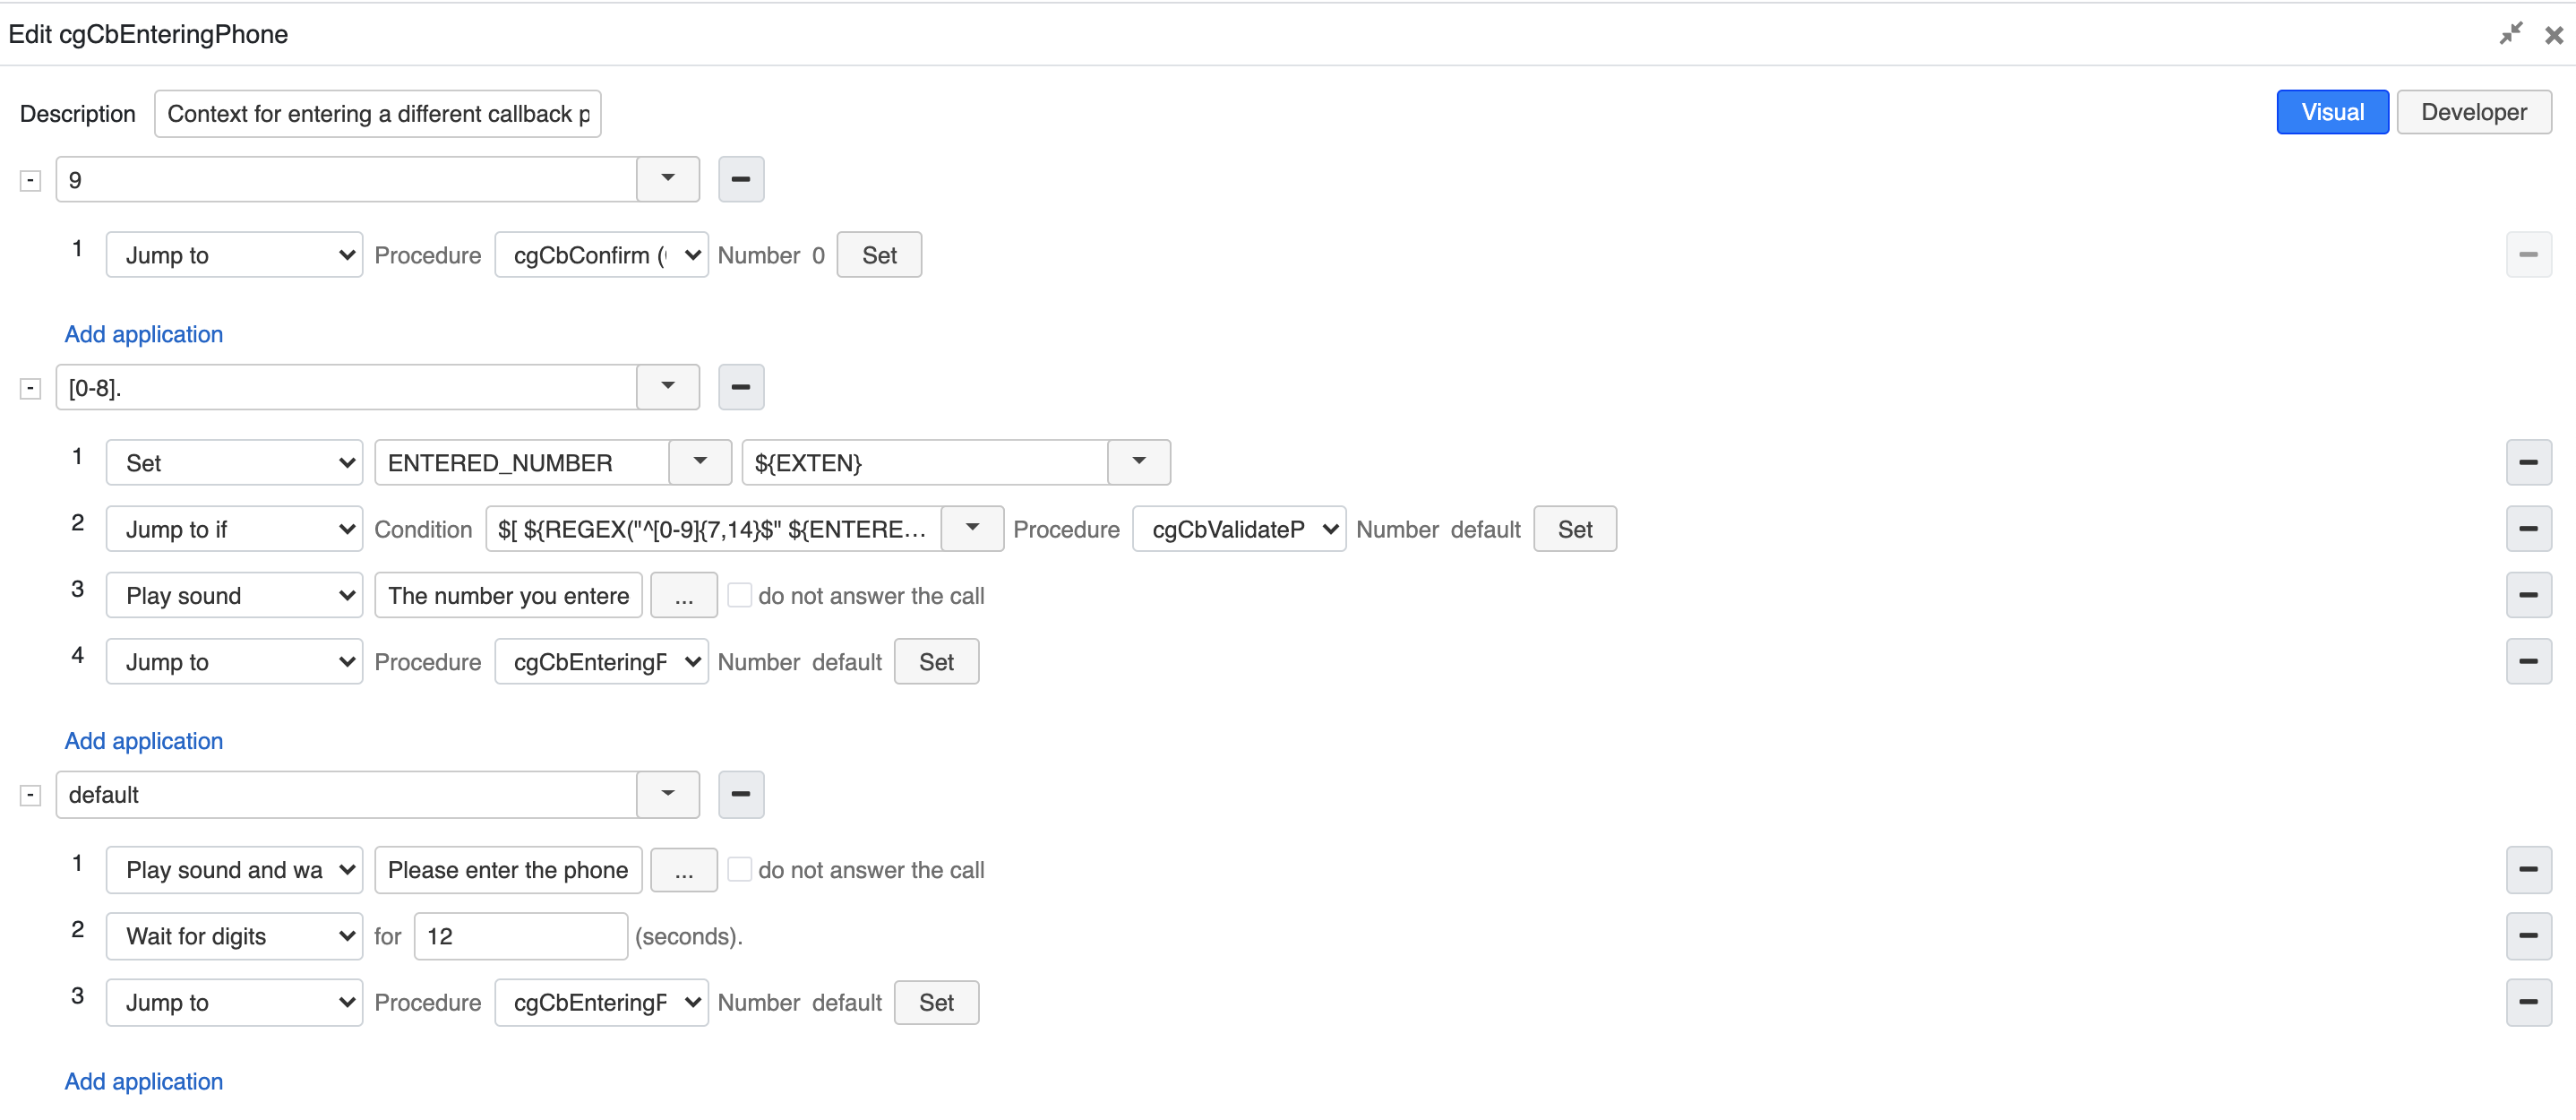
where:
9 - the number to return to the queue at the same position as the caller before pressing 9.
[0-8]. - the number to verify the input. If the entered number does not start from zero, the second digit is not zero and its length is not 7-15, then playback "The number you entered: <say-as interpret-as='telephone'>${ENTERED_NUMBER}</say-as> is incorrect" and go to the default number. Otherwise, go to Dialplan procedure "cgCbValidatePhone":
| Example |
|---|
| $[ ${REGEX("^0[1-9][0-9]{5,13}$" ${ENTERED_NUMBER})}] |
default - play message "Please enter the phone number. Otherwise you may press 9 to return to the queue on hold" and wait for the response.
Procedure 4: cgCbValidatePhone
The procedure checks the callback number:
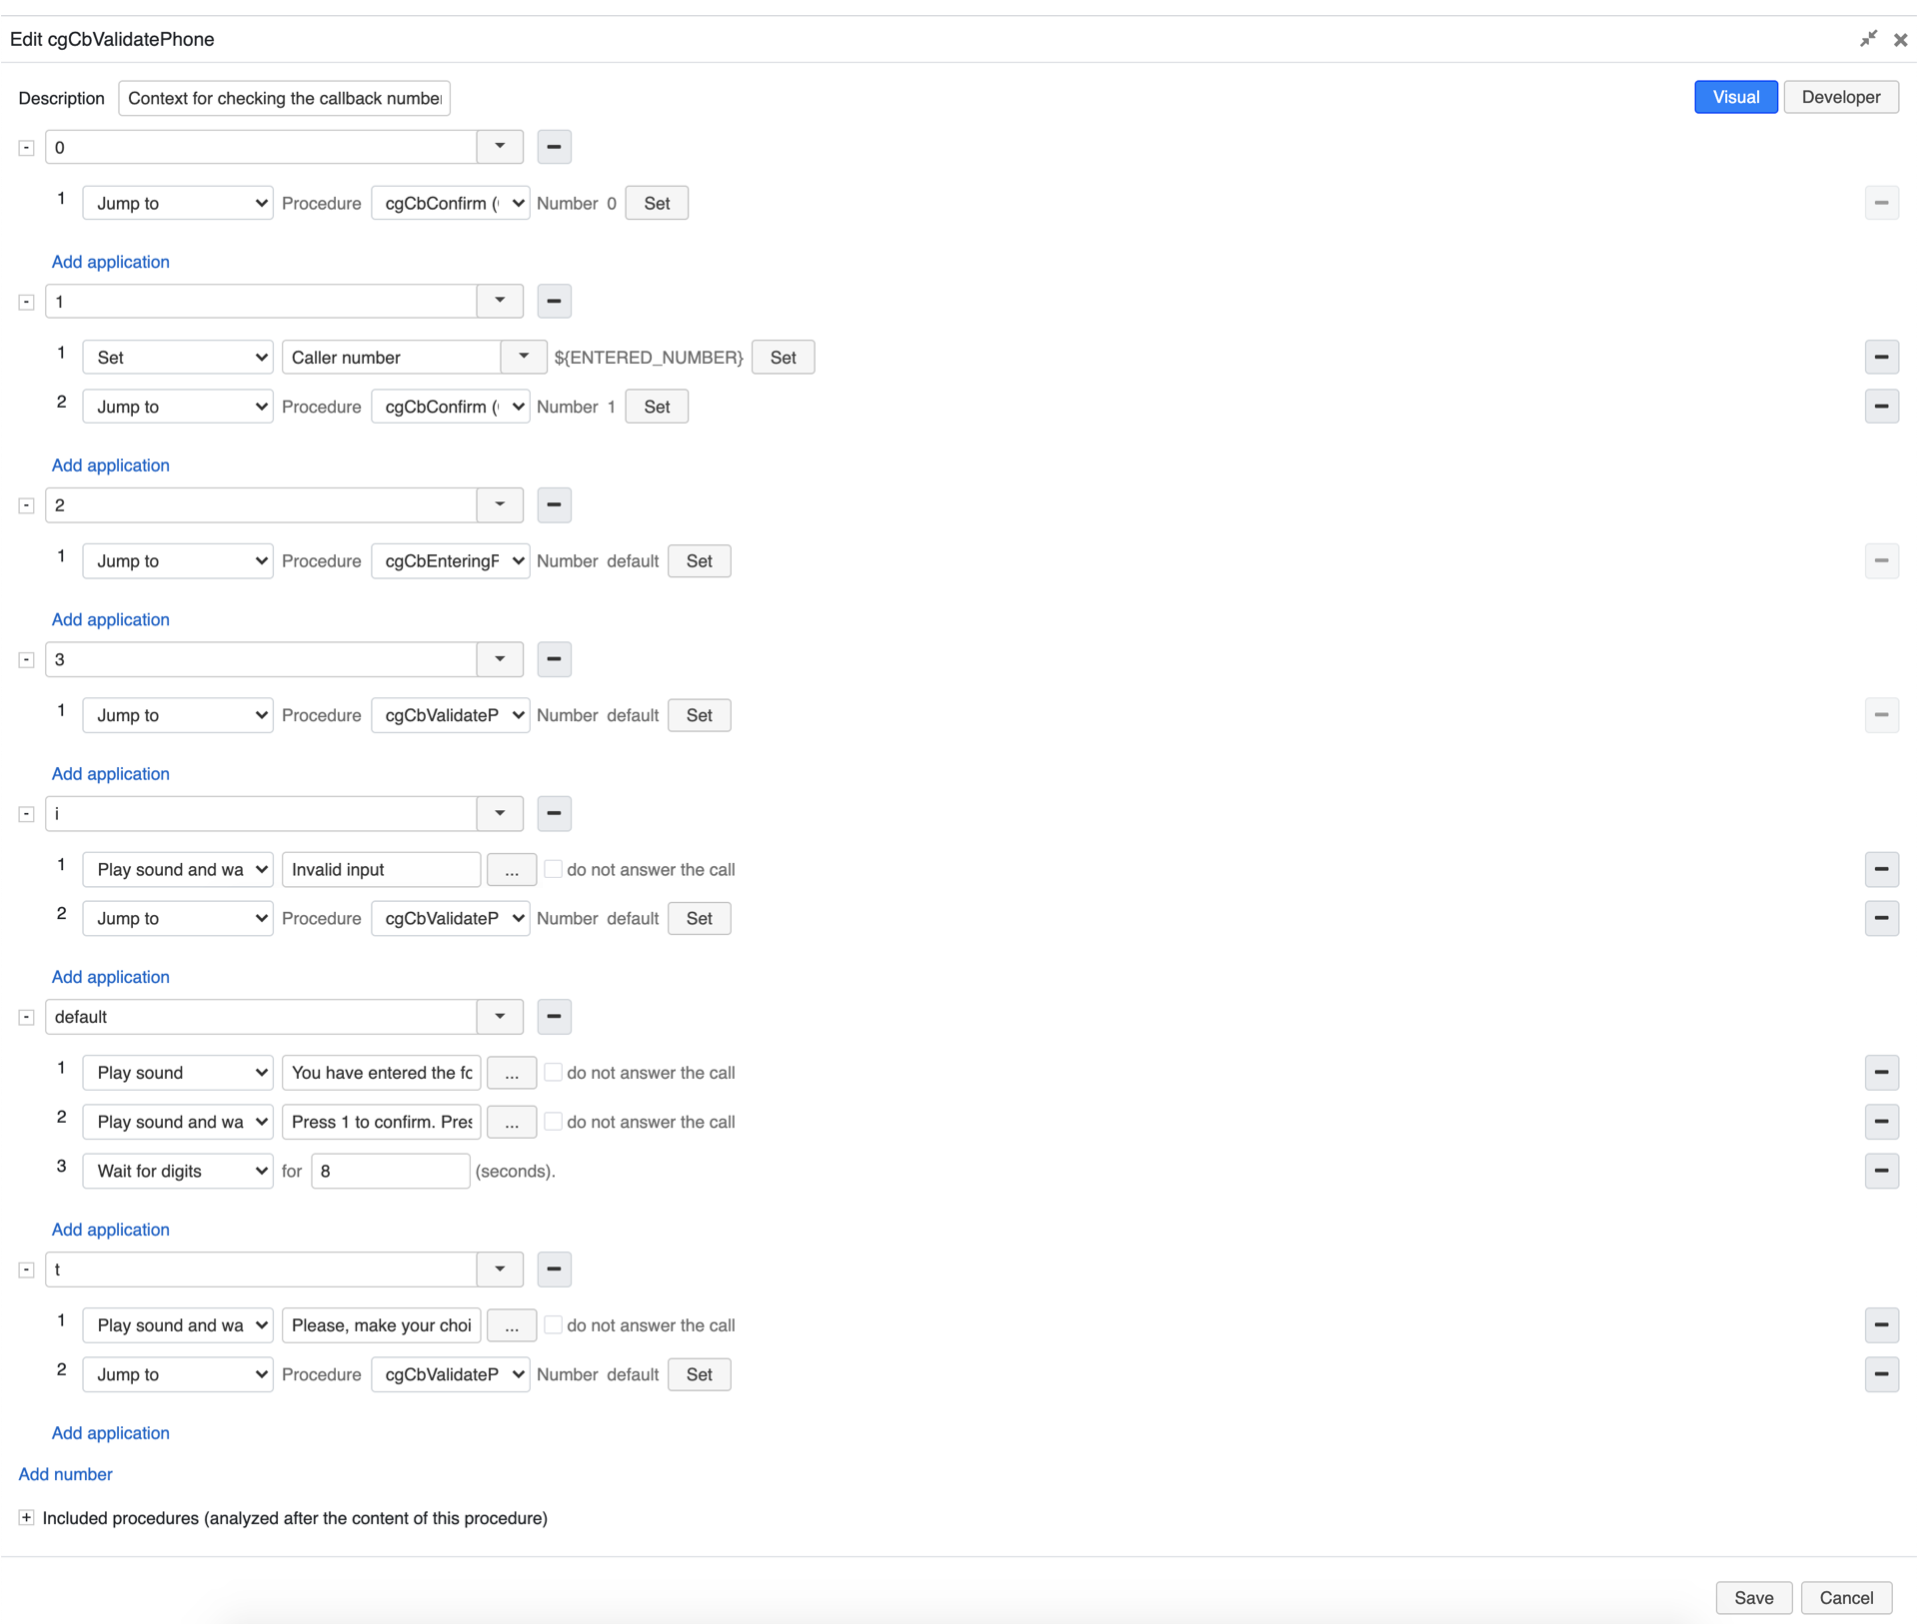
Where:
0 - the number to return to the queue at the same position as the caller before pressing 0.
1 - the number to confirm phone number.
2 - the number to re-enter phone number.
3 - the number to repeat the message.
i, t - numbers for processing timeout and invalid input.
default - the number to playback the client's phone number which he entered: "You have entered the following phone number: <say-as interpret-as='telephone'>${ENTERED_NUMBER}</say-as>", "Press 1 to confirm. Press 2 to try again. Press 3 to listen again. Press 0 to return to the queue on hold".
Procedure 5: cgCbIn
The procedure is used for adding a callback to the queue for the same position:
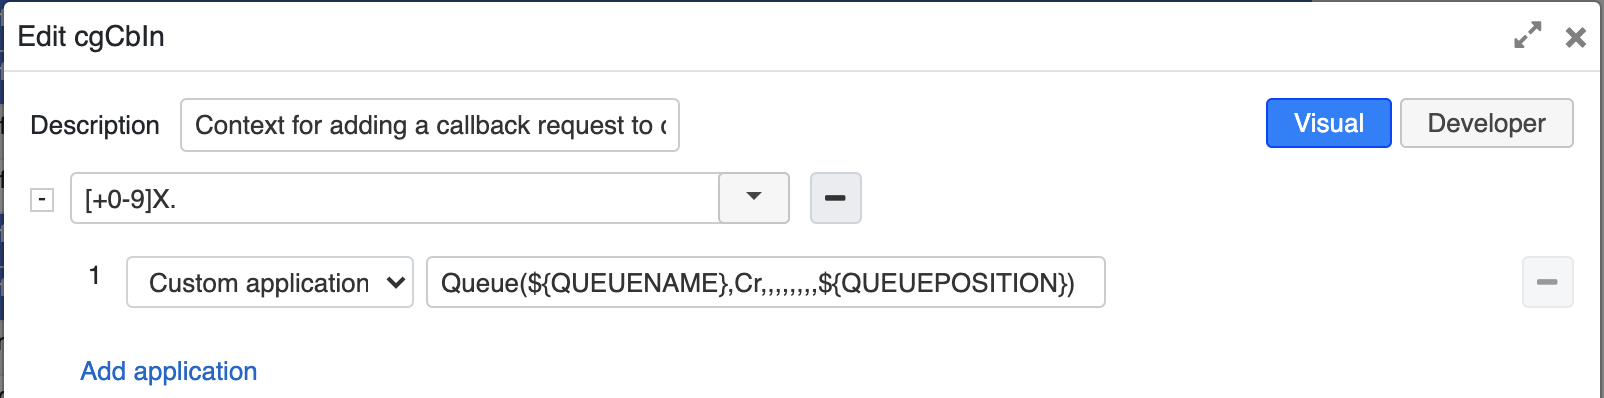
Example |
|---|
| Queue(${QUEUENAME},Cr,,,,,,,,${QUEUEPOSITION}) |
Procedure 6: cgCbOut
The procedure is executed when an operator answers a call. It is used for making outgoing call to customers and handling error/ notifications:
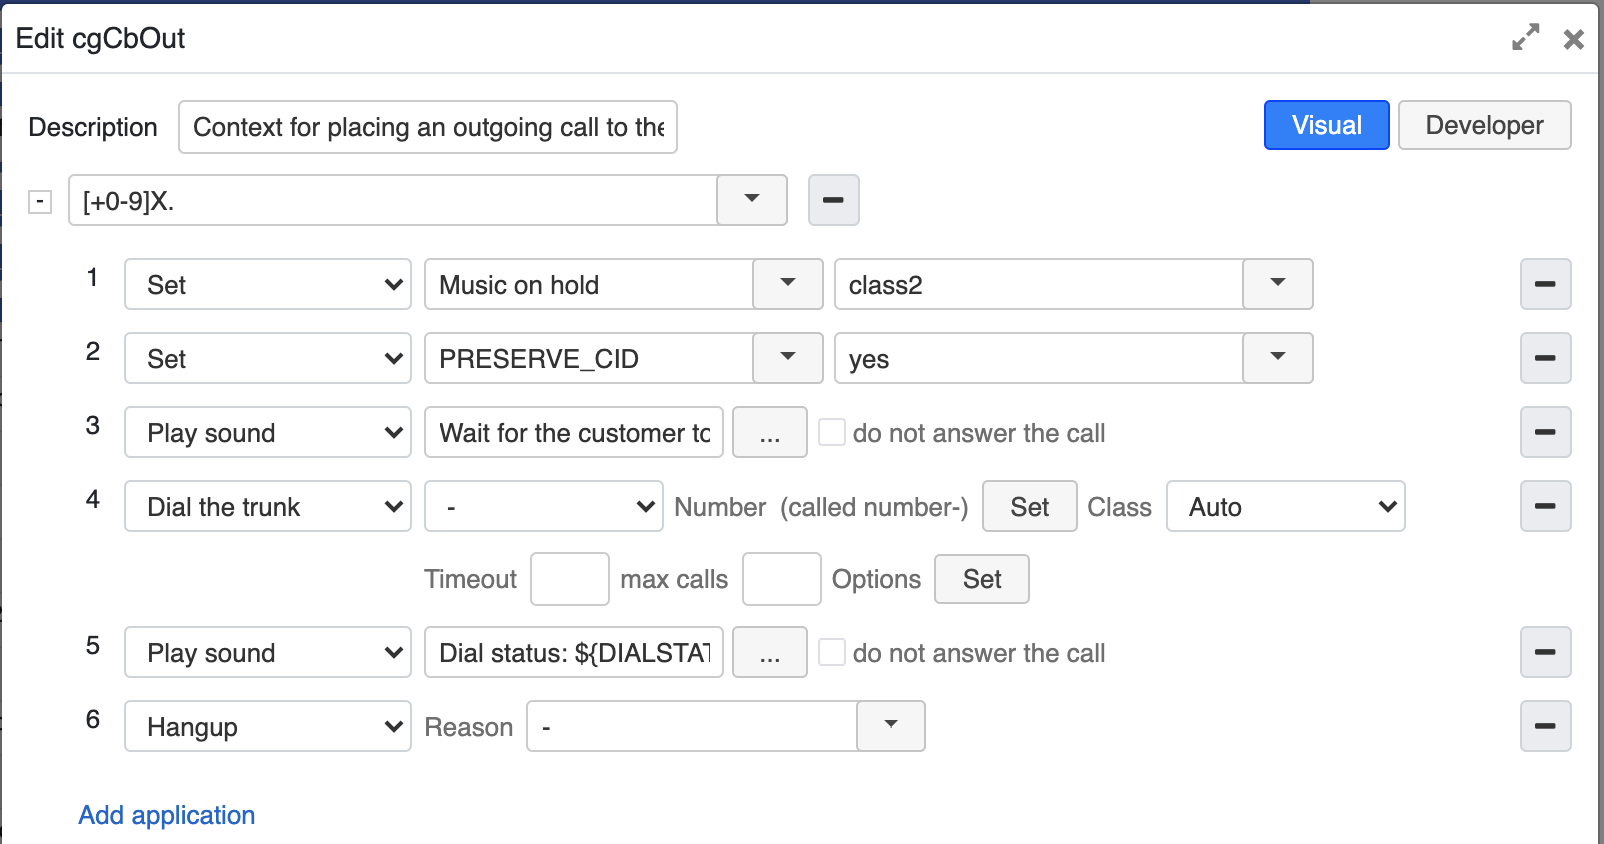
Setting the variable "PRESERVE_CID" allows you to save the Caller ID name of the original call.
In case of using non-English language, need to manually set the desired language using the Set application at the begining of the procedure.
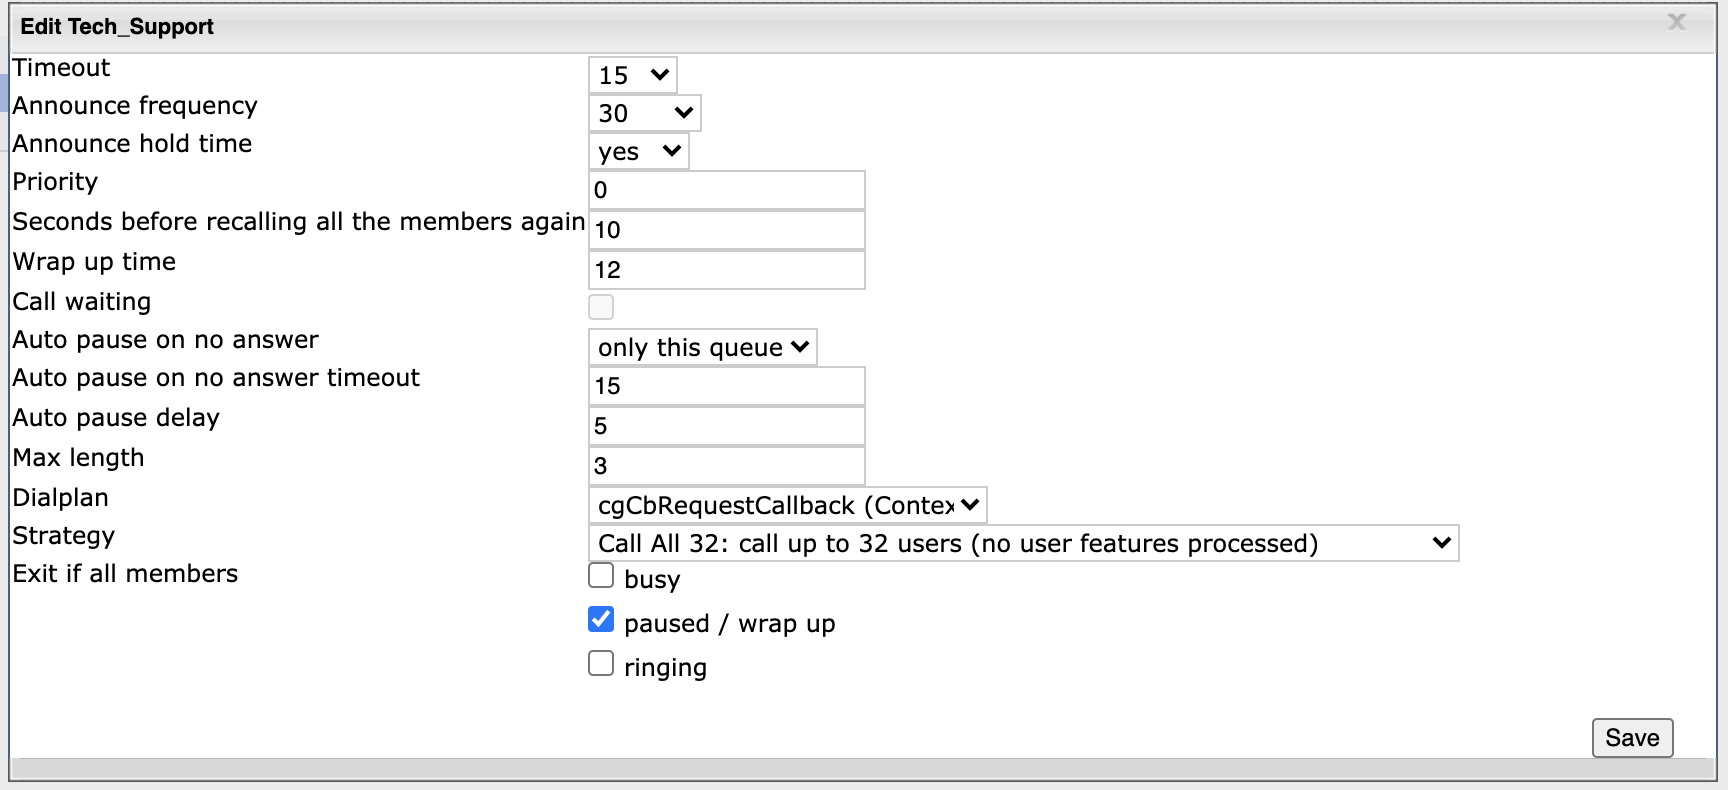
Enable Callback for Call groups
To enable the callback for Call groups, in the queue settings in the dialplan parameter,
- Go to WMS Dialplan -> Call Groups
- Select the Call group and click Edit strategy
- Change Dialplan procedure for the Group -> Select cgCbRequestCallback (Procedure 1):
Note: To notify customers about the callback possibility, you have to playback the callback announcement before entering the Call group. The announcement (or a custom music-on-hold in the Call group) is also required to process DTMF.
Note: The possibility to enable periodic announcements is coming in the next versions.
APPENDIX 1. How to tag Callback calls
In CDR-View Callback calls usually appear as 3 separate entry:
- An original call from a caller to aCall group
- A local channel - after submitting a Callback, PBX calls a Call group first and this call goes to CDR-View as a separate entry/ row
- A connected (external) channel - after a Callback call is answered by an agent in a queue, PBX calls an original caller and this call also gets its own entry row in CDR-View
It is possible to pass tags from the original call (1) to both other channels (2 and 3) by customizing ORIGINATE_VARIABLES. Change Dialplan rules in the following way:
- in the Dialplan procedure "cgCbConfirm" replace:
Set -> ORIGINATE_VARIABLES QUEUENAME=${QUEUENAME},QUEUEPOSITION=${QUEUEPOSITION}
with
Set -> ORIGINATE_VARIABLES -> QUEUENAME=${QUEUENAME},QUEUEPOSITION=${QUEUEPOSITION},TAGS="${TAGS}"
- in the Dialplan procedure "cgCbIn" add the following rule to the called number [+0-9]X. :
Set -> Tags -> ${TAGS} - place it prior to the Custom application
- in the Dialplan procedure "cgCbOut" add the following rule to the called number [+0-9]X. :
Set -> Tags -> ${TAGS} - place it prior to the Dial the trunk application
To set some other tags for the local and connected channels:
- Use Set -> Tags -> newCustomTag in the Dialplan procedures "cgCbIn" and "cgCbOut" (instead of the above) to replace the original call’s tags
- Use Set -> Tags -> ${TAGS}, newCustomTag in the Dialplan procedures "cgCbIn" and "cgCbOut" to add more tags preserving the old ones