Debugging and troubleshooting of Media Gateways
- Ksenia Babych
- Tatiana Bieliakova
- Elena Kornilova
This Admin Guide describes how to debug and troubleshoot various issues with Wildix Media Gateways.
Note that BRI/ PRI Media Gateways are EOL.
Created: April 2018
Updated: May 2022
Permalink: https://wildix.atlassian.net/wiki/x/pw3OAQ
Introduction
This Guide provides information about various ways of solving Media Gateways issues and analyzes the most typical problems with the help of examples.
Consult the Guide in case you have provisioning, network and call issues.
Some useful links
Refer to these Quick Installation Guides for reminding how to connect and configure Media Gateways:
SIP Trunk Settings Guide describes trunk settings and can be helpful in configuring various parameters of Media Gateways:
Debugging of W04FXO Gateways
To debug W04FXO device, access the Gateway on its IP address (e.g. 192.168.1.16) via telnet protocol:
- Use the command line (on Windows) or Terminal (on Unix and other systems) to enter the Gateway telnet IP (e.g. 192.168.1.16):
telnet <DEVICE IP>
Where:
<DEVICE IP> is the IP adress of W04FXO
- Log in using your admin access credentials (admin / wildix)
- To start the debug, use the following string:
debug -o
- To stop the debug, use this string:
debug -c
- To disconnect from the device:
quit
Troubleshooting of W01/ W02 FXS 2014
Special behavior
Custom encryption is enabled on W01/ W02 FXS for SIP signaling (implemented in WMS version 3.82.32840.35). Starting from WMS version 3.85.35394.9, alternative SIP port for remote registration of W01FXS / W02FXS is used for SIP registration (the first port from RTP range).
In some scenarios, for example, when iptables forwarding is not available, port redirect doesn't work. As a result, W01/ 02 FXS can loss SIP registration.
Solution
Disable the encryption for devices located behind NAT/ Firewall. To implement, you need to apply the following custom parameters to [wildixfxs] section of /rw2/etc/provisioning.conf file:
- SIPTransportRemote = UDP
- SIPServerPortRemote = 5060
Note: Consult Provisioning Custom Settings Guide for details.
Troubleshooting of BRI Gateways in case of provisioning or network issues
Issues:
- The gateway is not identified by the network
- The gateway appears to cause the calls’ interruption
- The gateway appears to affect the quality of the conversation
- The gateway is not available for provisioning on the WMS
- The gateway appears not to work correctly (the ports are not functional, the signal lights blink in a strange way)
Reason:
Provisioning, network or functioning of BRI devices is not correct
Solution:
The Reset procedure of the Gateway.
Reset operation resolves some problems related to the Gateway (strange blinking of LEDs, connectivity problems) and some problems related to LAN connection, access to the configuration page via http etc. Follow these steps to perform the correct operation procedure:
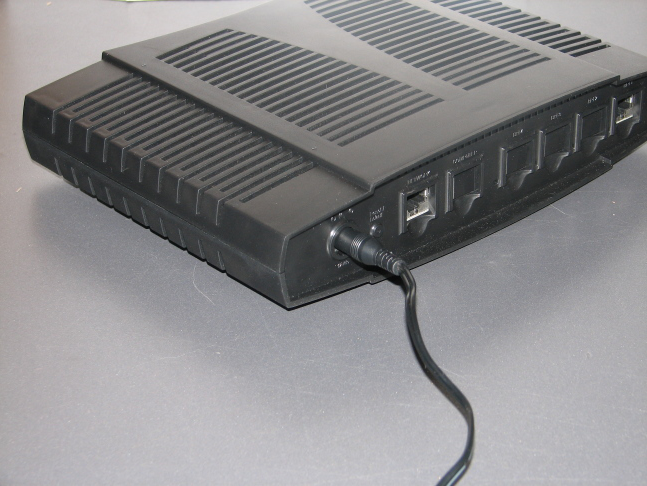
- The Gateway should be connected only to the power :
- Press the button signed as reset/default on the backside of the Gateway, using paperclip or the object of a similar shape:
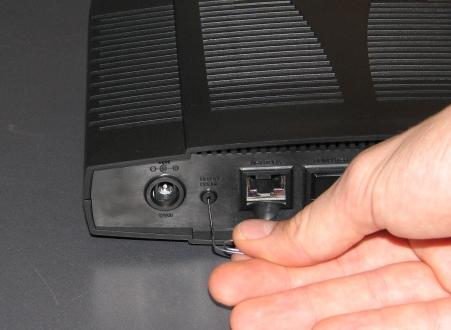
- Hold the reset button. After a few moments the four LEDs of the display will start to blink. Only when all the four LEDs stop blinking, release the reset button and wait for the light of the LEDs to go out. Then unplug the power and retest the device.
In case the operation was not successful, repeat it again.
Test procedure (performed after the device is reset)
For the test performance you need:
- 1 PBX with a user (you can create a new user especially for the test or use an existing one)
- 1 provisioned phone associated to this user
- 1 Dialplan procedure
- 1 provisioned BRI device (which was previously reset and upgraded to the latest version of firmware)
- 1 network cable to connect the ports involved in the test
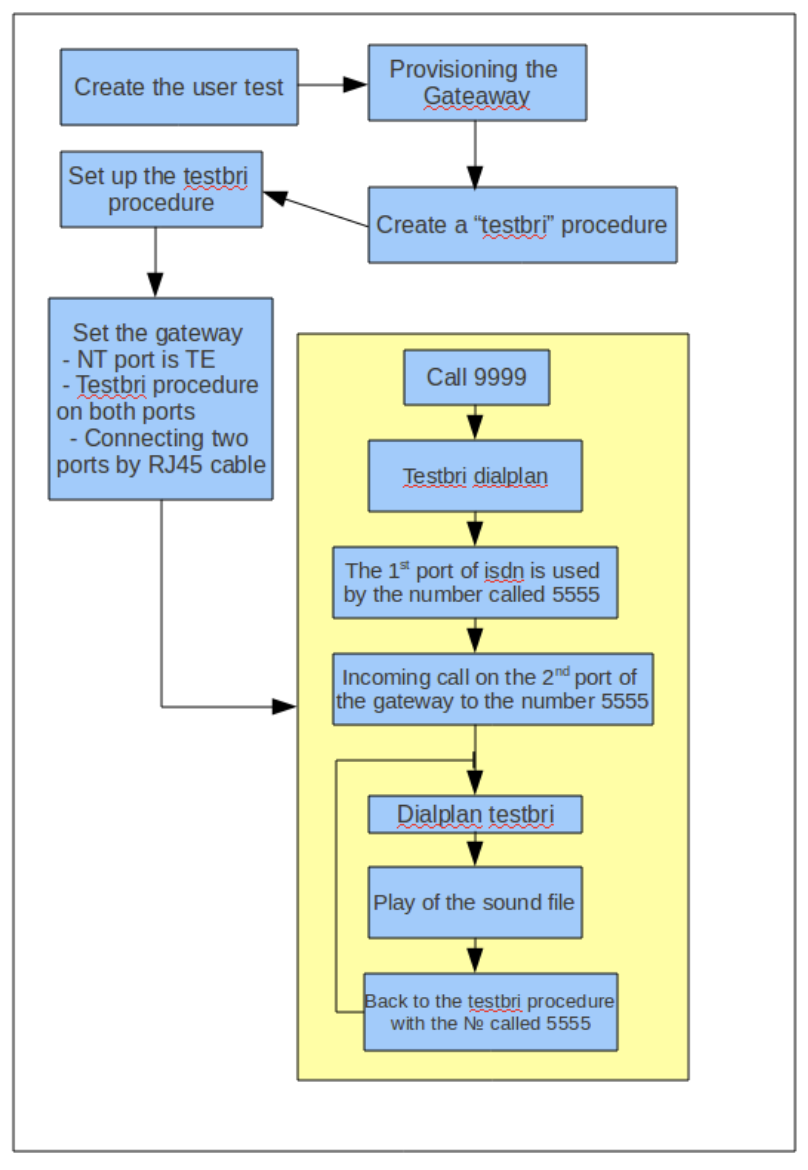
The test
The test consists of a call with two ports involved, one used as outgoing, another one – as incoming.
The PBX plays the audio file in loop to keep the call running and give the possibility to test the device.
It is recommended to perform this operation in a specifically designed test environment in order to exclude the problems caused by some external factors, that could influence the result (the problems related to the operator, lines, configuration etc).
The following logical scheme demonstrates the procedure. In this case W02BRI is used (in case W01BRI is tested, you need another BRI device, to set up the second port):
To perform the test:
- Create a user or use an existing one to perform the test. In this example the user “test2” with the extension number 103 is used:

- Connect the Gateway to the Wildix test PBX and make the provisioning (refer to the online Guide if needed); connect the needed ports using the network cable RJ45:

- Create a dialplan procedure to perform the test of the ports:

The procedure, while calling the number 9999, occupies the line corresponding to the predetermined BRI port and calls the number 5555.
The number is checked by the same procedure, and the selected music file starts to play.
Due to the loop that is generated, it’s possible to check all the eventual lines interruptions and the conversation quality, taking the necessary time to perform the test.
Once the procedure is entered into the Dialplan, it should be associated to the user:

- Go to WMS -> Trunks -> select BRI device and click Edit to configure. Set up TE as one port, NT as the second port (by choice) and associate "testbri" Dialplan procedure with both of them. Here, in the example, W01BRI is tested and another BRI device is used to set up the second port:
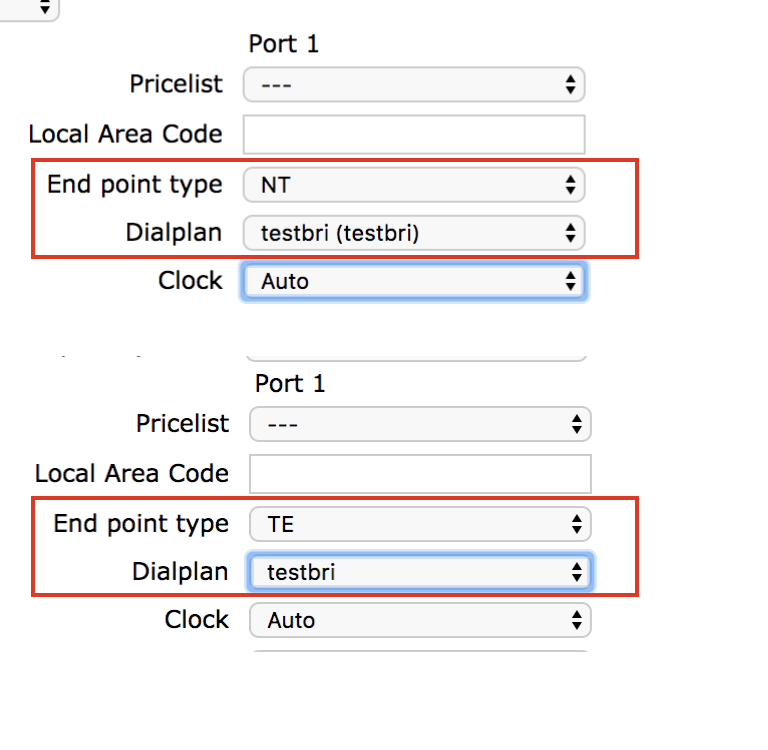
Here is what we have after ports configuration: 
The setting is ready for the test procedure. Dial the number 9999 and check the work of the BRI device by listening to the sound file.
Troubleshooting of BRI/ PRI Gateways in case of call issues
Issue:
PRI or BRI Gateway fails to make/ receive calls.
Reason:
Connection of BRI/ PRI Gateway to the ISDN operator’s line or to the PBX Legacy/ other devices should be checked.
Solution:
- Access PRI/ BRI Gateway web interface
- Go to ISDN menu. Now you can see the list of all the ISDN interfaces and the state of the physical link
“Up” indicates that the service works correctly, while “Down” indicates the problem on the line and/ or in the Gateway configuration:

Resolving issues with ISDN operator’s line connection
Issue 1.1. The physical link is not active
How to solve:
- Check/ substitute the wiring
- Check that the following wiring scheme is used (“straight” wiring):
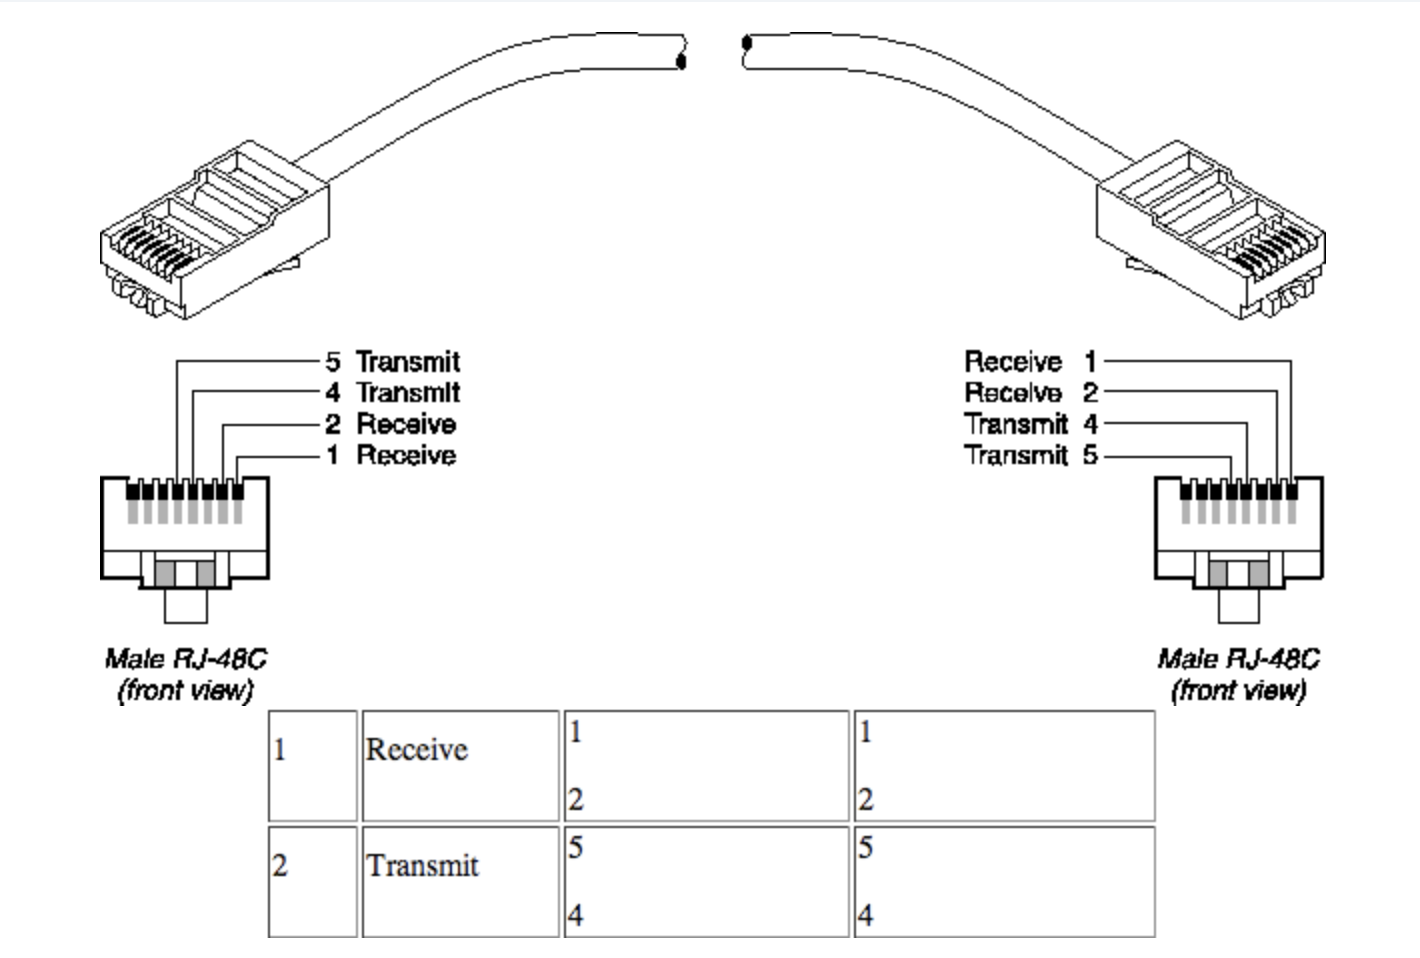
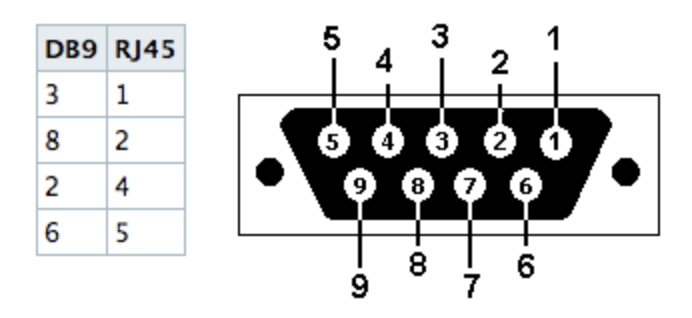
- In case of the wiring to the network terminal Selta with DB9 connector, the correct scheme of the wiring is the following one:
Issue 1.2. The signal is not active
How to solve:
- Make sure that “Clock” is set up to “Use provided clock” in WMS -> Trunks, under the configuration menu of BRI/ PRI trunk
- Request an operator to check the line’s state
Resolving issues with PBX legacy/other devices connection
Issue 2.1. The physical link is not active
How to solve:
- Check/ substitute the wiring
- Check the mode in which the ISDN interface of the PBX Legacy operates:
- If it operates in TE mode with "Use provided clock" , the Wildix PRI Gateway should operate as NT with the clock set up to "Generate clock"
- If it operates in NT mode with "Generate clock", the Wildix PRI Gateway should operate as TE with the clock set up to "Use provided clock"
Issue 2.2. The signal is not active
How to solve:
- Check the protocol type used by the legacy PBX (DSS1 or QSIG), align consequently the settings of the Wildix PRI Gateway in WMS -> Trunks -> BRI/PRI trunks
Issue 3. In case of connection to Cisco router provided by Fastweb operator, the BRI Gateway has problems both with incoming and outgoing calls
How to solve:
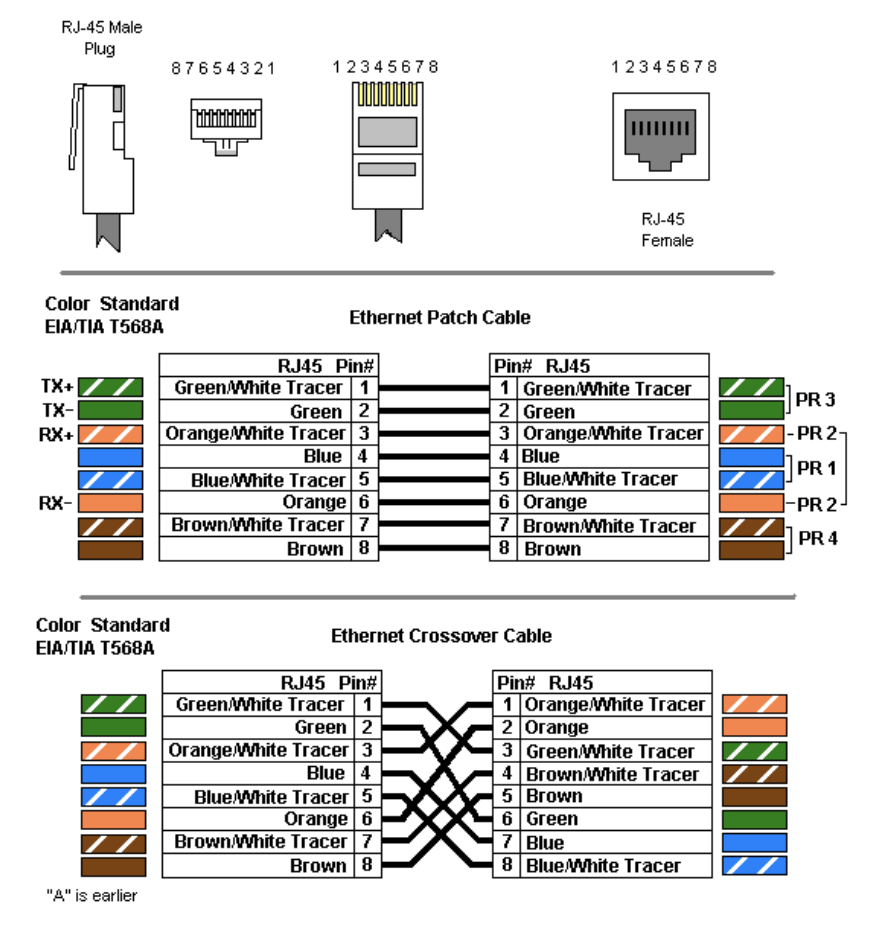
- Make sure that the gateway ports are set up in TE mode. Connect Cisco device to the Media Gateway ports using the crossover cables:
Debugging of BRI/ PRI Gateways using PCM trace
PCM traces record all analog signals sent or received on the side of the Wildix media gateway. The data will be sent once a call is being established or is in progress. No data will be sent if the gateway if there are no calls in progress.
This debugging tool helps you to identify the following problems:
- Echo or noise in your network
- Voice quality issues
- Analog signals
Step 1. Connect to BRI/ PRI Media Gateway
Connect to BRI/ PRI via SSH using the following command:
ssh -l admin <DEVICE IP>
Where:
<DEVICE IP> is the IP adress of BRI/ PRI Media Gateway.
Launch the following commands :
Mipt.PcmCaptureEnable = "Enable"
Mipt.PcmCaptureEndpoint = "BRI/PRI port-channel"
Mipt.PcmCaptureIpAddr = "PBX IP"
Where:
"BRI/PRI port-channel" is BRI/ PRI port and channel from which the PCM trace will be taken. For example, "BRI1-1" is BRI port 1, channel 1.
"PBX IP" is the IP address of your PBX where the PCM traffic will be sent.

Step 2. Enable pcap trace on PBX
- Go to WMS Settings -> Tools and utilities -> Generate trace
- Enable "Custom tcpdump" option and enter the following string:
-v -s0 -i any port "5001" or port "6001"
Where:
"5001" (incoming) and "6001" (outgoing) are ports and channels to be specified. For example:
5002, port 1 - channel 2
5003, port 2 - channel 1
5004, port 2 - channel 2
Note: Pcap trace can be enabled only for one particular channel.
- Click Start to generate a file
- When the file is generated, click Stop
- Click on the file to download it

Step 3. Convert a pcap file using Wireshark packet analyzer
To convert a pcap file to a PCM file (*.au format), use Wireshark:
- Select UDP packet -> Analyze -> Decode as RTP
- After the decoding is completed, go to Telephony -> RTP -> RTP Analysis
- Select Save Payload As
- Name the file and select a folder to save it
- Choose Format : .au and Channels : forward (or both)
- Click OK to save the file

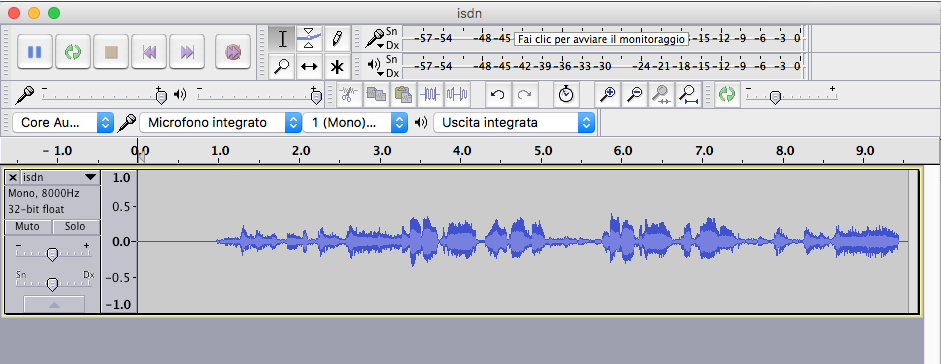
Step 4. Open a PCM file using Audacity program
After you converted a pcap file to a PCM one, you can open it using Audacity program.
With the help of Audacity, you can listen to each RTP stream that the PCM file contains and identify the reasons of echo or noise in your network or any other analog and voice quality issues.
Debugging of BRI/ PRI Gateways using PCAP trace
PCAP tracing feature is available starting from BRI/ PRI firmware v. 43.1.1264.
- Access the Gateway's web interface -> System -> Packet Capture
- Fill in the following fields:
- URL: file://test.pcap, where "file://" is the path to save a file, "test.pcap" - its name
- Link Name: eth1
- To start the trace, click Apply & Start Capture -> the status is changed to "Requested"
- Make a call
- After completing it, click Apply & Stop Capture -> the status is changed to "Completed"
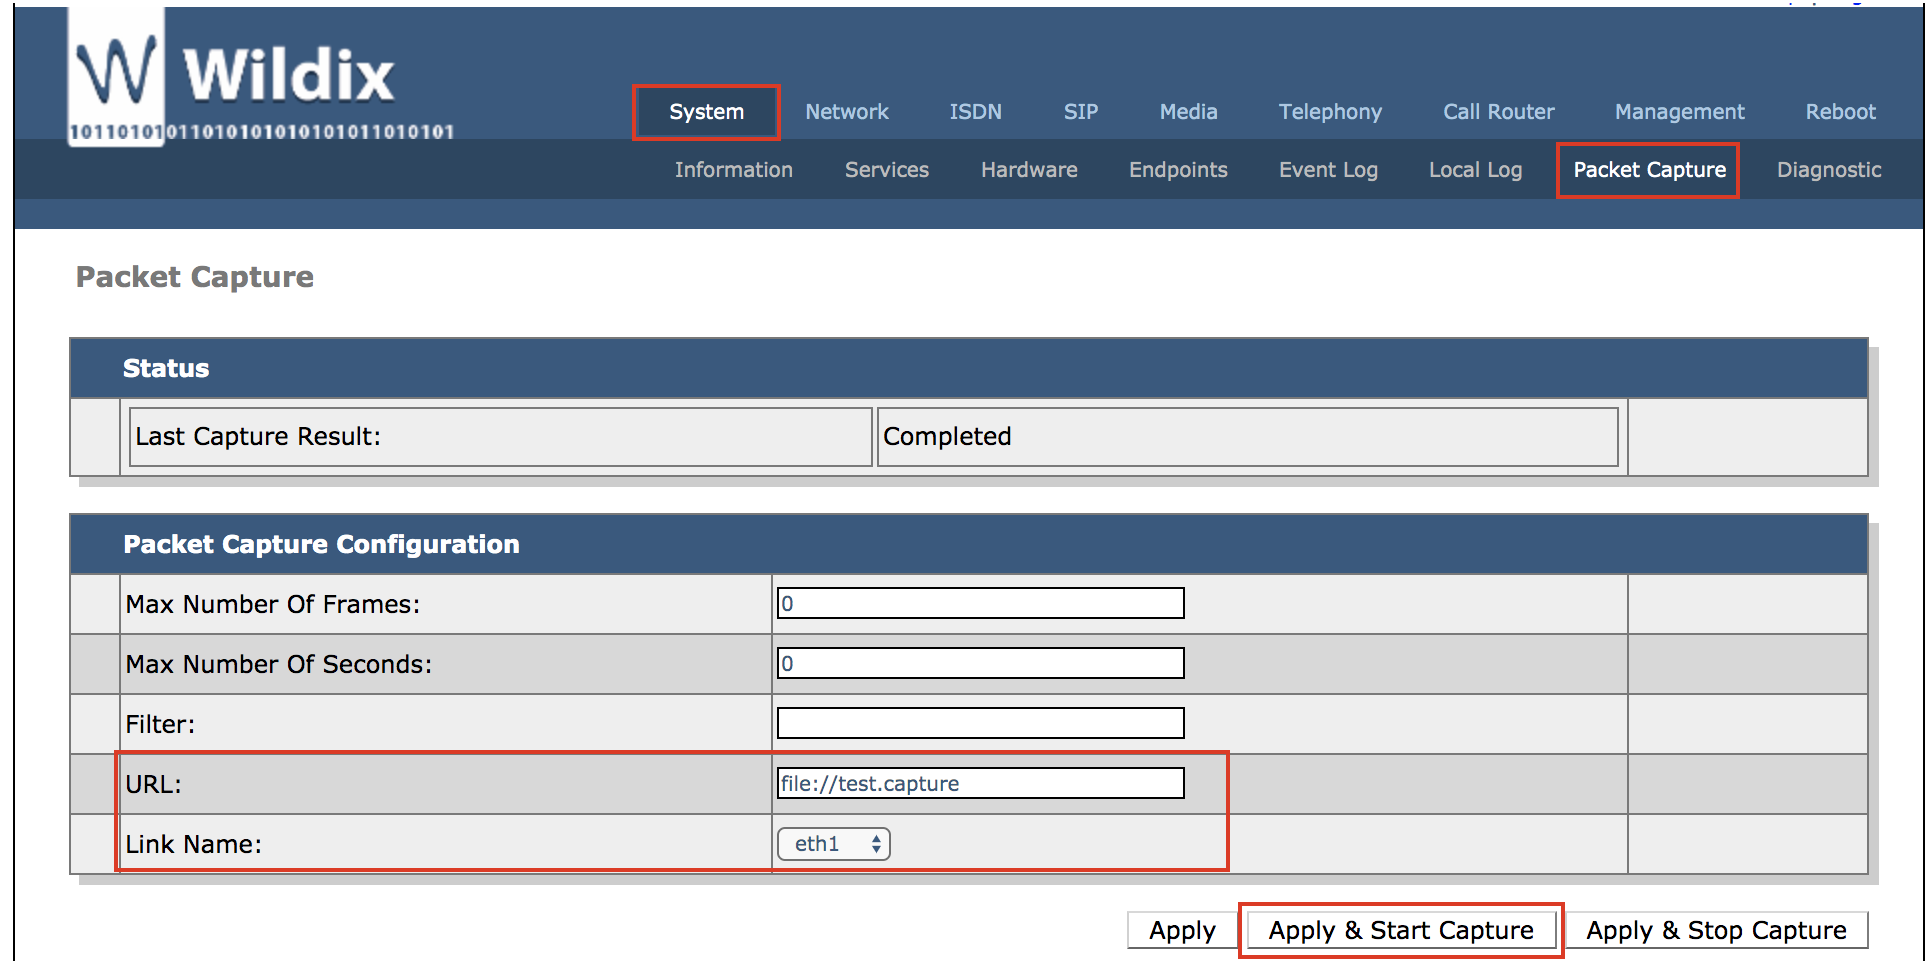
- Go to Management menu -> File -> click on the file to download it:
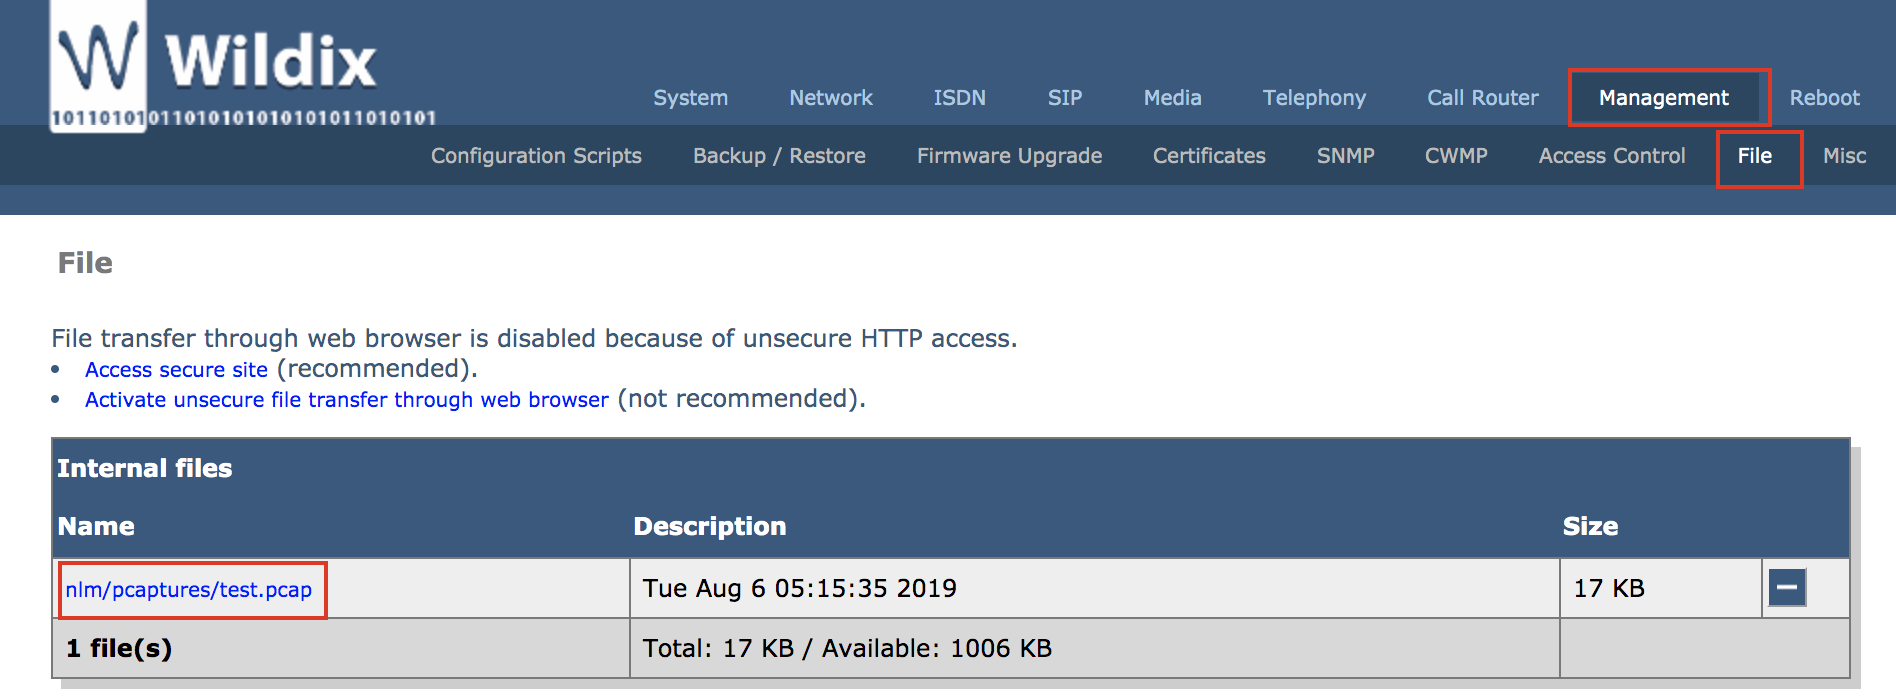
Open the trace with Wireshark program.
Debugging of ISDN Gateways using Syslog
Collecting and analyzing syslog can be useful in order to debug various issues.
For the information on how to collect syslog without Remote syslog server, read the Guide: Collecting Syslog from Wildix Devices.
It is also possible to enable remote syslog on Wildix devices: go to WMS -> Devices, double click on a provisioned device to edit it and select “Syslog Server” (enter the address of the remote server). Starting from WMS version 3.88, it is possible to enable Remote Syslog without installation of a remote server. Refer to Remote Syslog Guide for detailed information.
ISDN Gateways:
- Connect to the Gateway via SSH (on Windows you can use “putty” or other SSH clients) using the same credentials you used for access to web interface
Use the string to begin the session:
logs on
To finish the session, use the string:
logs off
- Make a test call
The logs help you to understand eventual issues, here is what happens when a user places an outgoing call to a trunk:
- PBX receives a request from the user and forwards it to the BRI/ PRI Gateway
- The Gateway forwards the call to the operator
- The operator responds to the Gateway with the status “Call Proceeding” to confirm the reception of the request
- The operator responds with the status “Call Progress” to indicate that the call has been routed to the destination
- The operator responds with the status “Alerting” to indicate that the destination is available
- The operator responds with the status “Setup Confirm” to indicate that the call has been responded
In case the call could not be connected or the call was hang up by the operator, the Media Gateway receives the following message: “Unicast RECV Disconnect”
Check the field indicating the reason of the call disconnection, for example: “Cause: Normal call clearing (16)”. Check the codes of disconnection reasons: https://en.wikipedia.org/wiki/ISDN_User_Part#Cause_codes