W-PA SIP Public Announcer - Admin Manual
This guide explains how to install and use W-PA SIP Paging Gateway and provides a description of its basic functions.
Available from WMS Version 3.88.
Updated: January 2022
Permalink: https://wildix.atlassian.net/wiki/x/YAnOAQ
W-PA SIP Public Announcer Introduction
W-PA SIP Public Announcer is used to broadcast emergency messages and communication in large environments such as shopping malls, supermarkets, airports, hospitals. The device has 10 Watt audio output and it still allows you to connect external loudspeakers and microphones. It can also act as a relay for activating door release switches or door locks via 1 embedded short-in detect port and 1 short-out control port. See W-PA Datasheet in Media Gateways Datasheet document for detailed technical characteristics .
Before using W-PA
Please read the following safety notices before installing or using this W-PA. They are crucial for the safe and reliable operation of the device:
- Before using the device, make sure that the environment temperature and humidity requirements are within these ranges:
- Operating temperature: -30 ~ 70 ℃
- Storage temperature: -40 ~ 70 ℃
- Relative humidity: 10% - 95%
- Do not put any foreign objects into the ports of the device. It may cause electric shock or injury accident. If any foreign object gets inside the device, please stop using it
- Do not let non-technical staff to remove or repair the device. Consider that improper repair may lead to injury accident or cause damage of the device
Packing list
Before you start to install W-PA, please verify that your package contains the following items:
- 1 x W-PA SIP Public Announcer
- 1 x ground screw
W-PA Overview
Front panel
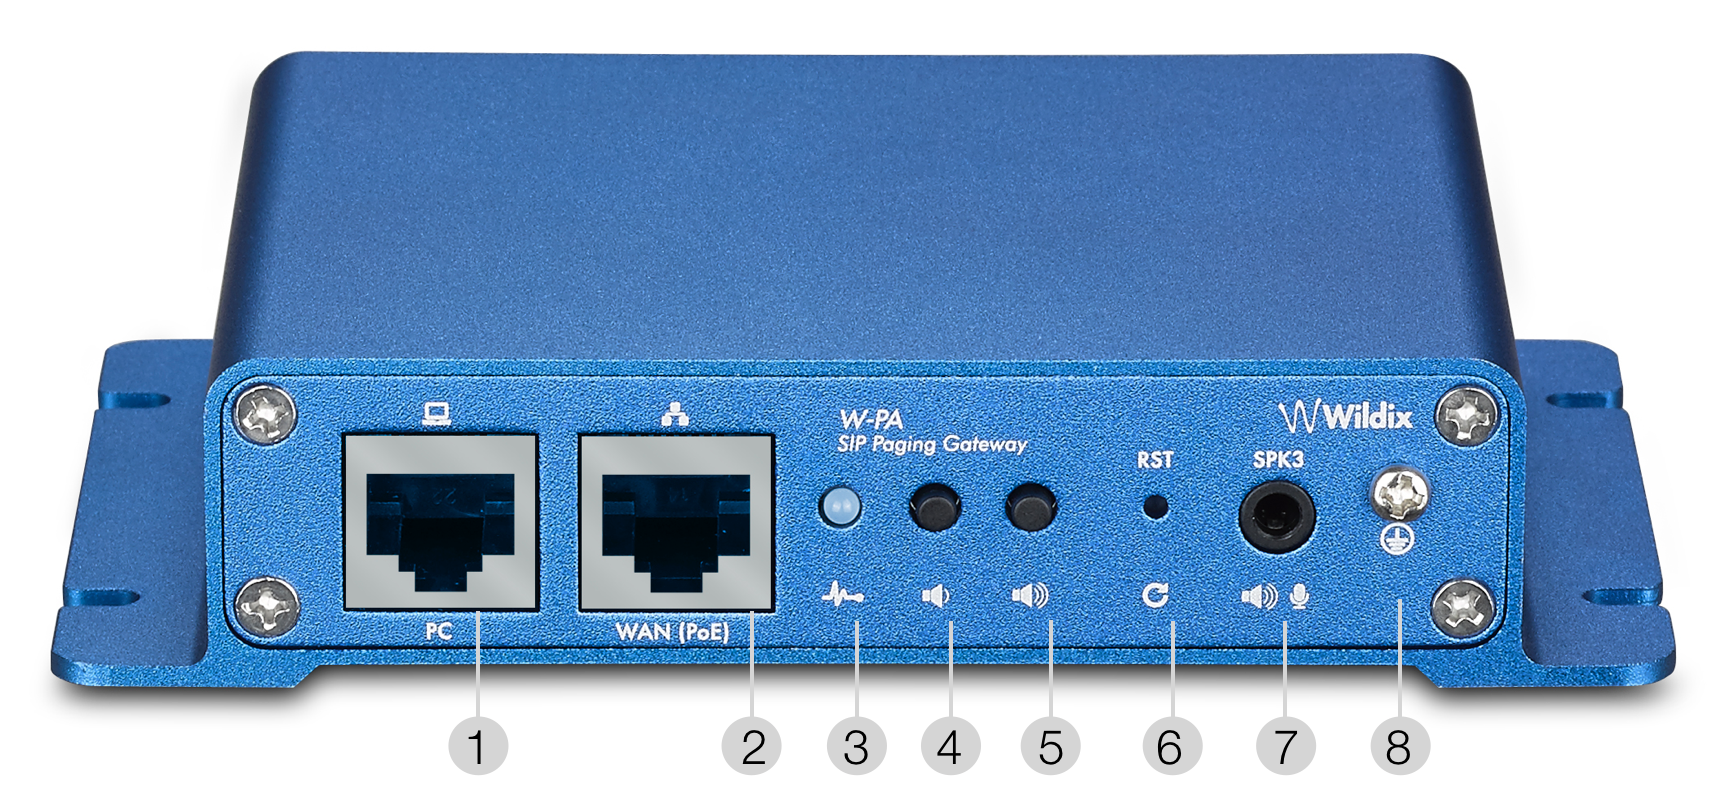
1 - PC interface: connect the device to PC (optional)
2 - Ethernet interface: WAN (PoE) port, standard RJ45 interface, 10/ 100M adaptive, it is recommended to use Cat 5 or Cat 5e cable to connect the device to the network
Note: W-PA is powered by the network cable.
3 - Registration/ Network LED: indicates registration, network and call statutes
- fast blue flashing: network anomaly or SIP account exception
- slow blue flashing: during a call
- solid blue: successful registration
4 - Volume - key
5 - Volume + key
6 - Reset key
7 - Speaker output interface: connect external speakers or microphones
8 - Ground screw: connect external parts with metal housing to this interface to prevent static electricity and other interference caused the equipment to work abnormally
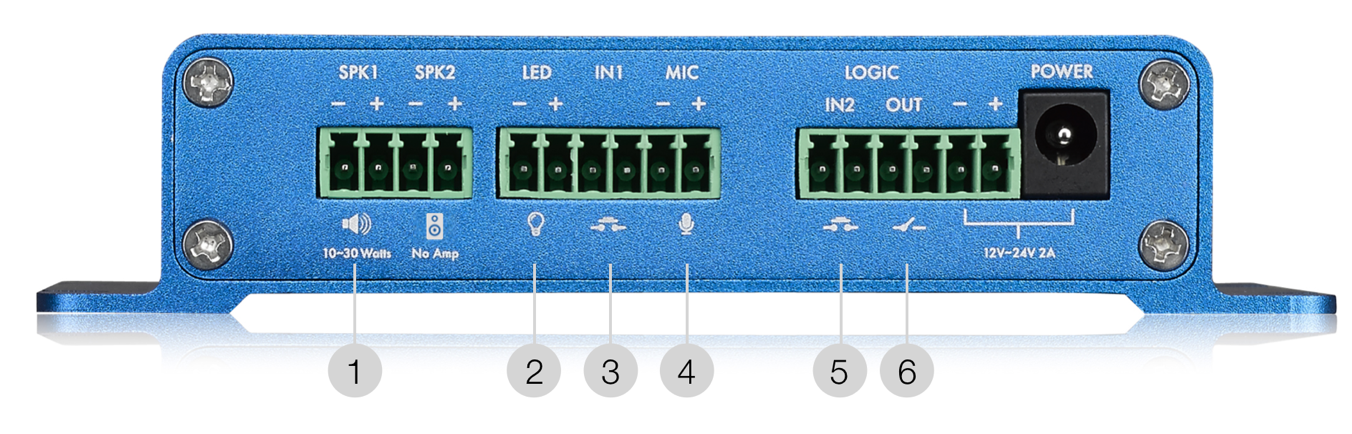
Rear panel
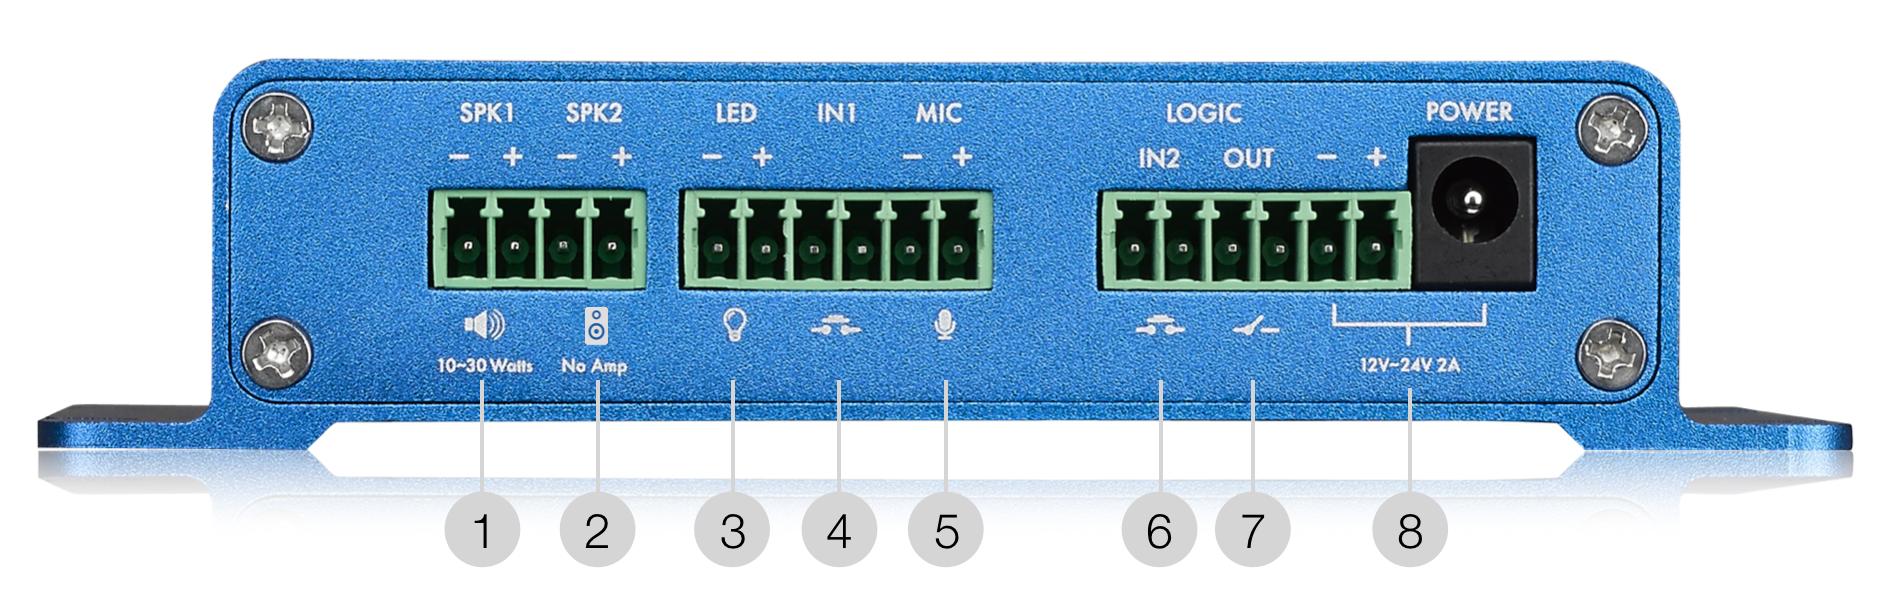
1 - Speaker interface: according to the device input voltage adaptive output maximum power; 4Ω speaker, POE / 8W, 12V / 10W, 18V / 20W, 24V / 30W. The greater the horn impedance, the smaller the output power. Suggested wire diameter: 18AWG or larger diameter
2 - Headset interface: connect external headsets or active speakers
3 - LED interface: 5V output, connect an external LED, indicating the network, call and registration statuses
4 - Function key interface: connect switch components to this interface
5 - Microphone interface: it is recommended to use an electret condenser microphone (sensitivity: -38dB, bias voltage: 2.2V) and connect it with a shielded cable to the grounding screw to improve anti-interference
6 - Switch input interface: connect emergency switches, door sensors and other switch components to this interface
7 - Switch output interface: corresponds to the short-circuit input interface, allows to control electric locks, alarm lights and other equipment
8 - Power input interface: 12~24V 2A input, according to the input voltage, determine the maximum W-PA output power amplifier
Note: a power adapter is optional and used for power supply of any external connected equipment.
Installation of W-PA SIP Public Announcer
Connecting W-PA
- Use five or super five network cable to connect your W-PA to the network
- Connect the cable to WAN (PoE) port
Note: When connecting the W-PA to the local LAN, W-PA should pick up a local IP address (W-PA is set by Default to DHCP). If the device is returning an IP address of 192.168.1.128 after connected to the local LAN (you can check the assigned IP address by pressing and holding the + Volume button for 2 sec), the W-PA seems to be stuck on a Static IP address. If this happened, assign IP address of 192.168.1.130 on the local PC and browse to 192.168.1.128. If presented with Login screen, use the First time login credentials (admin/ admin) to login to the W-PA and change the Network Settings from Static (192.168.1.128) to DHCP, save the changes and reboot the device. After the reboot, the W-PA should return a local IP address, when checked. If when trying to browse to the W-PA, the WEB connection is refused (you never get to Login Screen), then create an RMA.
Provisioning of W-PA
Wildix supports different provisioning modes:
- Auto-provisining: for local devices (cannot be used for Cloud PBX and for remote devices behind NAT / Firewall)
- Remote provisioning: this mode can be used for Cloud PBXs and for connecting remote devices behind NAT / Firewall
- Provisioning via Salesforce Partner Community: can be applied for devices ordered to stock via SFPC, for assigning to Customer PBX
- WMP provisioning: (for devices that were ordered via WMP) can be applied also for Cloud PBX and for connecting remote devices (assign devices to the PBX from the Portal)
WMP or Auto-provisioning: refer to the chapter WMP Provisioning and Auto-Provisioning of the guide Provisioning of Wildix devices.
For provisioning via SFPC, refer to the document Assign Devices to Customer PBX via Salesforce Partner Community.
Remote provisioning: refer to the chapter W-PA provisioning of the guide Remote provisioning of Wildix devices.
Assign to user
To assign a user to your W-PA SIP Public Announcer:
- Go to WMS -> Devices
- Choose your W-PA from the list of available devices and click Assign to user
- Enter the extension number of a user you want to assign the device to
Note: you can assign W-PA to an existing user or create a new one in WMS -> Users.
Note: In case you have configured failover PBX for your main PBX, the W-PA will have 2 SIP accounts.
Public Announcer function via Intercom/ Paging
Note: to use the device for broadcasting purposes, any external speakers/ microphones should be connected to it.
Once the device is installed and configured, you can use it as a Public Announcer for broadcasting purposes.
To broadcast a message via W-PA:
First, you need to set up a Dialplan to enable the device to answer calls automatically. For this purpose, use Intercom/ Paging group Dialplan applications. The detailed information about Dialplans can be found here: Dialplan applications Admin Guide
Note: W-PA SIP Public Announcer supports Paging over RTP multicast. Consult Paging Admin Guide for detailed information.
Example of Dialplan configuration:
where 112 - the extension number of W-PA user

After you set up a Dialplan, you can call the extension number you've assigned the device to from any Wildix IP phone/ Collaboration/ Mobile app
W-PA will auto answer and play back your voice over connected speakers/ a microphone
Note: You can also configure W-PA to automatically play back pre-recorded messages at the fixed time. Refer to Online Documentation for details.
If you want to finish broadcasting, press a Hang up button on the device you use for placing a call to hang up
Ringtone Amplifier function
Starting from W-PA firmware version 2.1.1.3664, the device can be used as a ringtone amplifier.
Proceed with the following:
- Assign W-PA to a user (Consult Assign to user section)
- Each time the user receives a call (Collaboration/ WP4X0/ Vision/ W-AIR Handsets/ Android, iOS apps), W-PA simultaneously plays back an amplified ringtone
Factory reset
In case you need to reconfigure your W-PA, you should perform a reset procedure.
To restart and restore the factory settings of W-PA SIP Public Announcer:
- Press the Reset key with a paperclip and hold it for 3 seconds
Recovery procedure
It is possible to perform recovery procedure for W-PA. Consult W-PA Recovery Procedure documentation.
Appendix 1: W-PA Intercom function
Additionally, W-PA SIP Public Announcer can be used as the intercom system for unlocking doors. For this purpose, you need to connect and configure external switch components. You can connect such switch components as door release switches, door locks, intercom panels etc.:
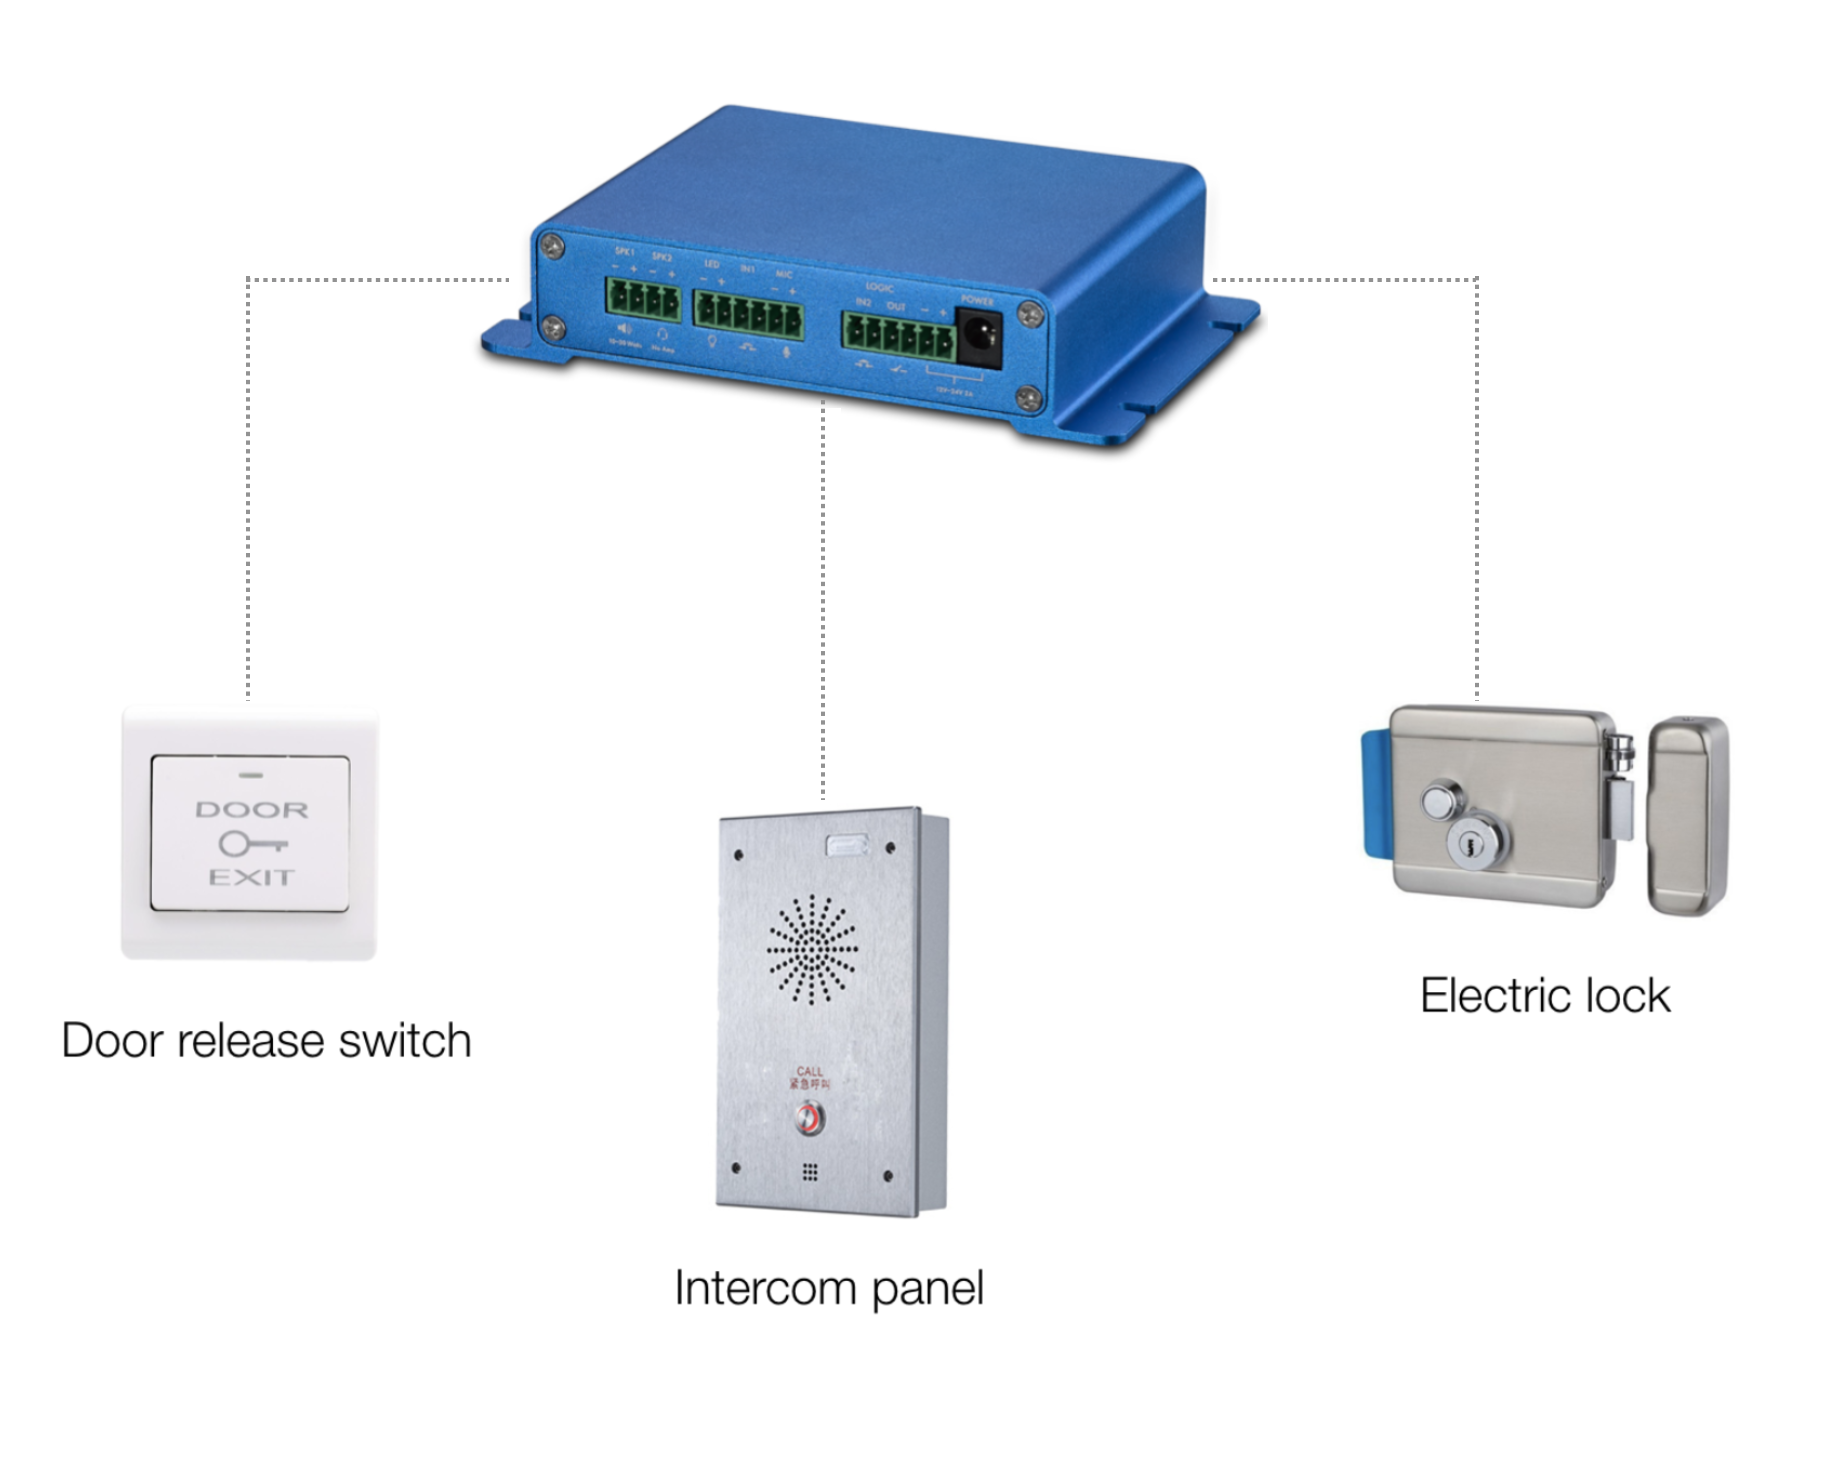
The intercom function itself is implemented by placing calls from/ to the connected switch components.
Note: W-PA and Viking W-100 Handsfree Doorbox
To use W-PA with Viking W-1000, disconnect the circuit board and use 8 Ohm speaker, microphone and switch.
Connection of switch components
1-4 - Connect an intercom panel to Speaker, LED, Function key and Microphone interfaces
5 - Connect a door release switch to Switch input interface
6 - Connect an electric lock to Switch output interface
Switch components configuration
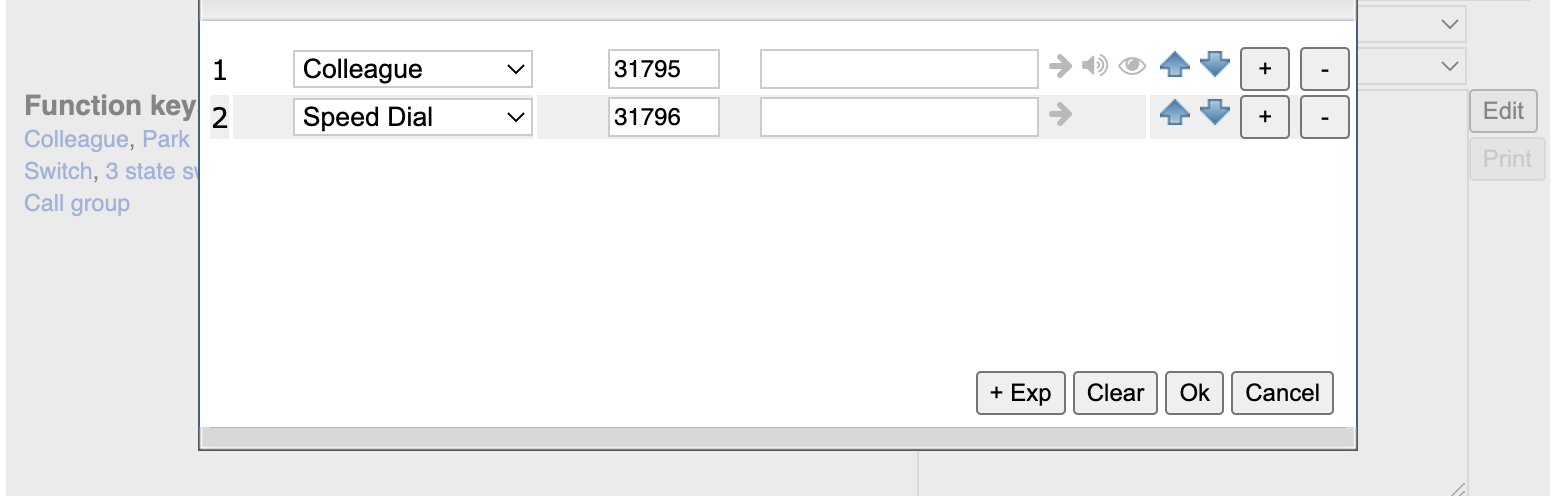
Configure Function keys to be able to place calls from/ to connected switch components:
Note: you can set up only 2 Function keys: "Colleague" or "Speed Dial".
- Go to WMS -> Users
- Select the W-PA user and click Edit preferences
- Go to Settings -> Function keys and click Edit
Click Edit to add "Colleague" or "Speed Dial" Function key and enter extension numbers
Important: W-PA uses only first 2 Function keys. In case you have other Function keys set up in the first 2 lines, please change their order:
- Click Save
Note: you can also set up Function keys in Collaboration -> Settings -> Fn keys.
After you set up Function keys, you can move on to the next section.
Placing calls
Unlocking doors with an incoming call
To unlock the door with an incoming call to W-PA:
- Call the extension number you've assigned the device to from any Wildix IP phone/ Collaboration/ Mobile app
- Use DTMF code 11 to open the door
- Press a Hang up button on the device you use for placing a call to hang up
Unlocking doors with an outgoing call
To unlock the door with an outgoing call from W-PA:
- Press the connected switch component, for instance, the door release switch
- A call will be placed to one of the extension numbers set up in Function keys section
- A user who receives a call uses DTMF to enter 11 code to unlock the door
- To hang up a call, press a Hang up button on the device you use for placing a call