W24FXS - Quick Installation Guide - English
W24FXS Quick Installation Guide explains the steps that help you to connect and configure the FXS gateway. FXS gateway allows you to connect analog phones and fax machines to your IP PBX.
The instructions are applicable both for W24FXS 2015 (EOL) and W24FXS 2023 (the support starts from WMS 6.0X).
FXS Gateways Datasheet: Media Gateways Datasheet.
Other FXS Media Gateways Guides:
Updated: January 2024
Permalink: https://wildix.atlassian.net/wiki/x/Qh3OAQ
Overview and LED indications
Rear panel
- ON/OFF Switch
- Power supply jack AC 110V~240V, 50-60Hz
- RJ21 Port for patch panel connection
Front panel
- 1 WAN port RJ45 10/100 base-T
- 1 Console port RJ45 with RS232 standard to connect DB9
- 1 RST switch to perform the factory reset
- 1 PWR LED:
- solid green indicates that the gateway is powered on
- 1 RUN LED:
- turns solid green for a few seconds once the gateway is powered on;
- fast blinking indicates that all ports are registered successfully
- slow blinking indicates that ports failed to register
- off (when connected to power) indicates that the gateway doesn’t boot up
- 1-24 ports for connection of analog devices
- 1-24 LEDs:
- solid green indicates that the port is in use
- off (when connected to power) indicates that the port is idle
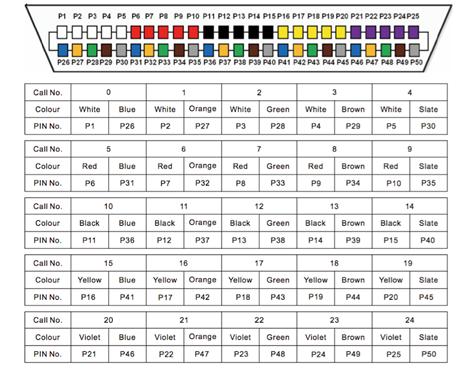
RJ21 Wire Sequence (W)
One RJ21 cable has 25 pairs of wires. The 25th pair is vacant, which means that one RJ21 interface supports up to 24 calls.
Connection to power supply
- Connect the gateway to the Power Supply using the cable provided
- Turn the switch situated on the rear panel into “ON” position
Connection to the network
Connect the gateway’s WAN port to Wildix Switch using Ethernet cable
Notes:
- The gateway should be connected via Ethernet cable to the same network as the PBX or an external DHCP server (for instance Router)
- As soon as the DHCP server assigns an IP address to the gateway, you can pass to the next step of the gateway configuration
- In case the PBX is used as a DHCP server, the gateway is detected on the network automatically
- In case an external DHCP server is used, check the list of the active leases to detect the IP address assigned to the gateway
Connection of analog phones
- You can connect analog devices directly to ports marked 1-24
- Otherwise connect the patch panel to the RJ21 port situated on the rear panel using the connector provided
Configuration of the FXS gateway
- Follow our online Guide to provision the media gateway
- For remote/unreachable media gateways behind NAT/Firewall, follow our online Guide to remote provisioning
- Follow our online guide to assign the ports of the FXS gateway: Assign analog ports of FXS to users
Known limitation: It is not recommended to set TCP/ TLS protocols when using W24FXS as the device can not receive more than 3 calls simultaneously.
To overcome the limitation, you can set UDP as a transport protocol via the custom provisioning parameter:
- Add "SIPTransportRemote=UDP" to [wildixfxs2] section. Consult the Guide Provisioning Custom Settings for detailed information
Reset of the gateway
The switch marked as “RST” is situated on the front panel of the gateway.
- Use the paper clip or the object of the similar shape to press the button
- Hold the button pressed for more than 7 seconds to restore the gateway to the factory settings.
- Reboot the gateway for the changes to take the effect
Note: keep the button pressed for just 3-5 seconds, to restore the default IP and user name / password (in this case all the other configurations are kept); it is necessary to reboot the device to apply the changes.
Control calls using Flash button
Read the document: How to control calls using Flash button on FXS Media Gateways.

