Integration of 2N intercom Helios IP with Wildix
- Elena Kornilova
- Tatiana Bieliakova
- Ksenia Babych
This document explains how to set up the integration of 2N intercom Helios IP with Wildix IP PBX.
Updated: May 2025
Permalink: https://wildix.atlassian.net/wiki/x/CgjOAQ
Step 1: WMS Configuration
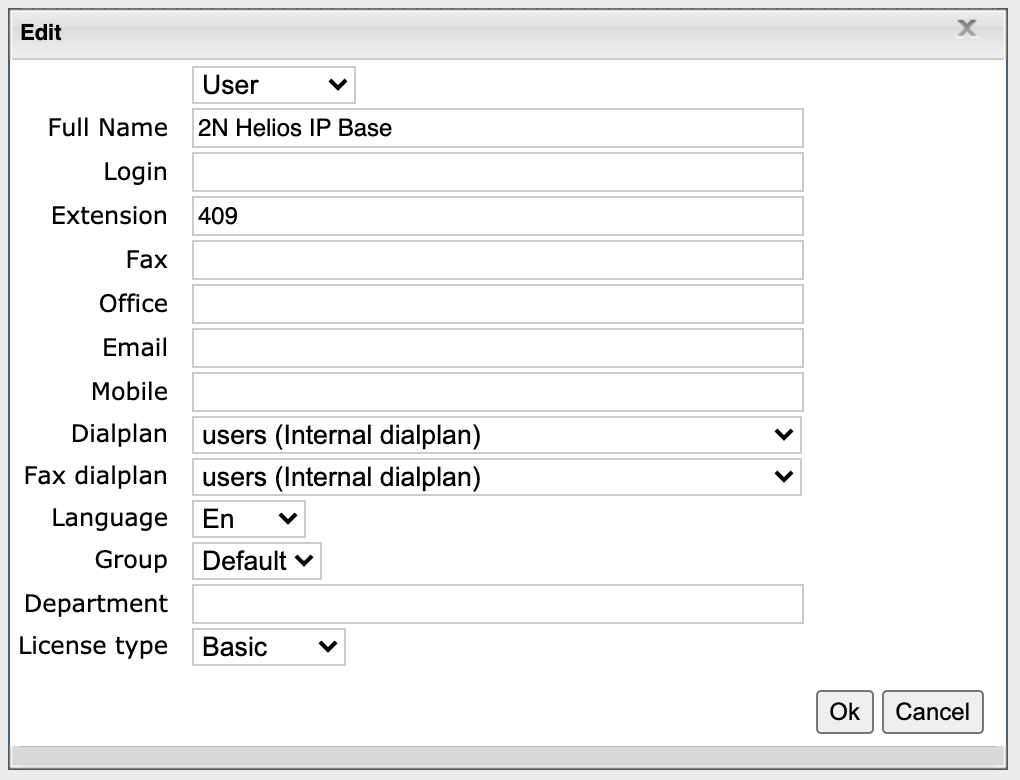
1. Add a new user (intercom user)
Go to WMS -> Users and click on + to add a new user:
- Fill in the fields:
- Full name: name of the user
- Extension: extension number used by the intercom
- Dialplan: select the Dialplan procedure used by the intercom* (“users” by default)
- License type: select Basic
2. Create a Dialplan procedure to manage calls from the intercom
- Go to WMS -> Dialplan -> Dialplan rules and add a new procedure, example:

Where:
- 500: is the phone number called from the intercom
Call group (support): is the call group that receives calls from the intercom (it can be an extension, several extensions, or several call groups…)
Note: you can also add "Dial the phone" application instead of "Call group" and set a specified extension.
- Go to WMS -> Users, select the intercom extension and select the newly created Dialplan procedure to be used for outgoing calls
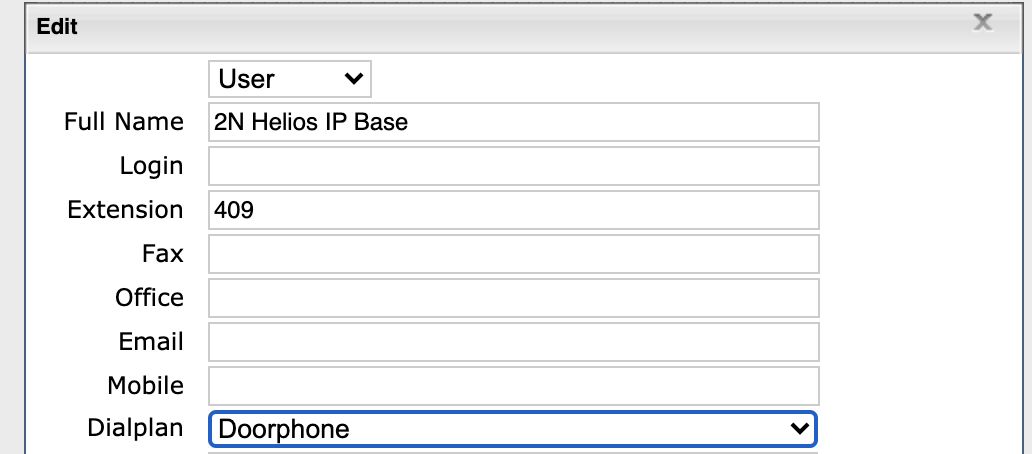
Note: In case you don’t want to create a new procedure, you can add Number and Application to the Dialplan procedure used by the intercom (“users” for example).
Step 2. Intercom configuration
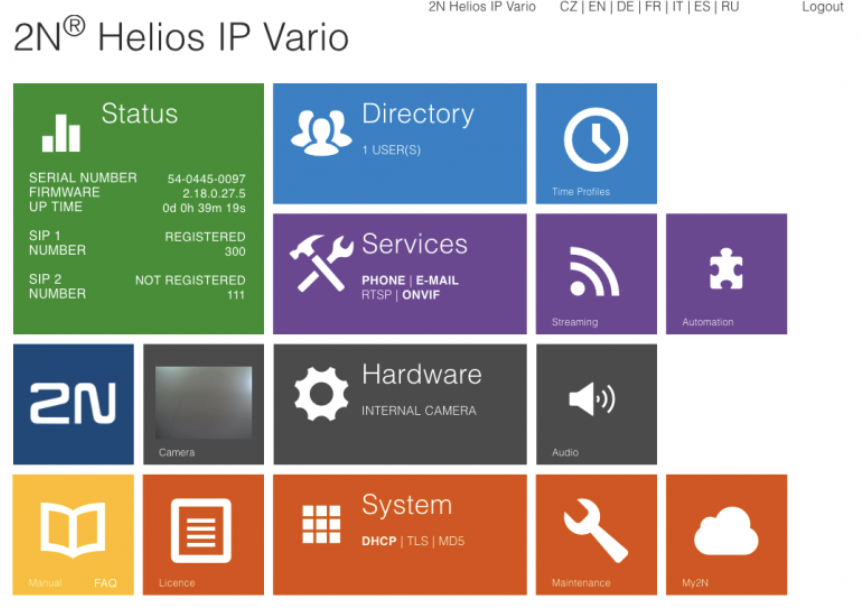
1. Connect to the web interface
Recommended browsers: the latest version of Chrome, Firefox or IE 9+.
To be able to connect, you have to know the IP address released to the intercom by the DHCP server used in your network (router or PBX).
First time access credentials: admin : 2n.
Note that upon your first login you are advised to change the default password.
2. Check for updates
- Go to System -> Maintenance
- Click Check Now (Check Firmware Online) to check if there is a new firmware version available and to update the intercom:
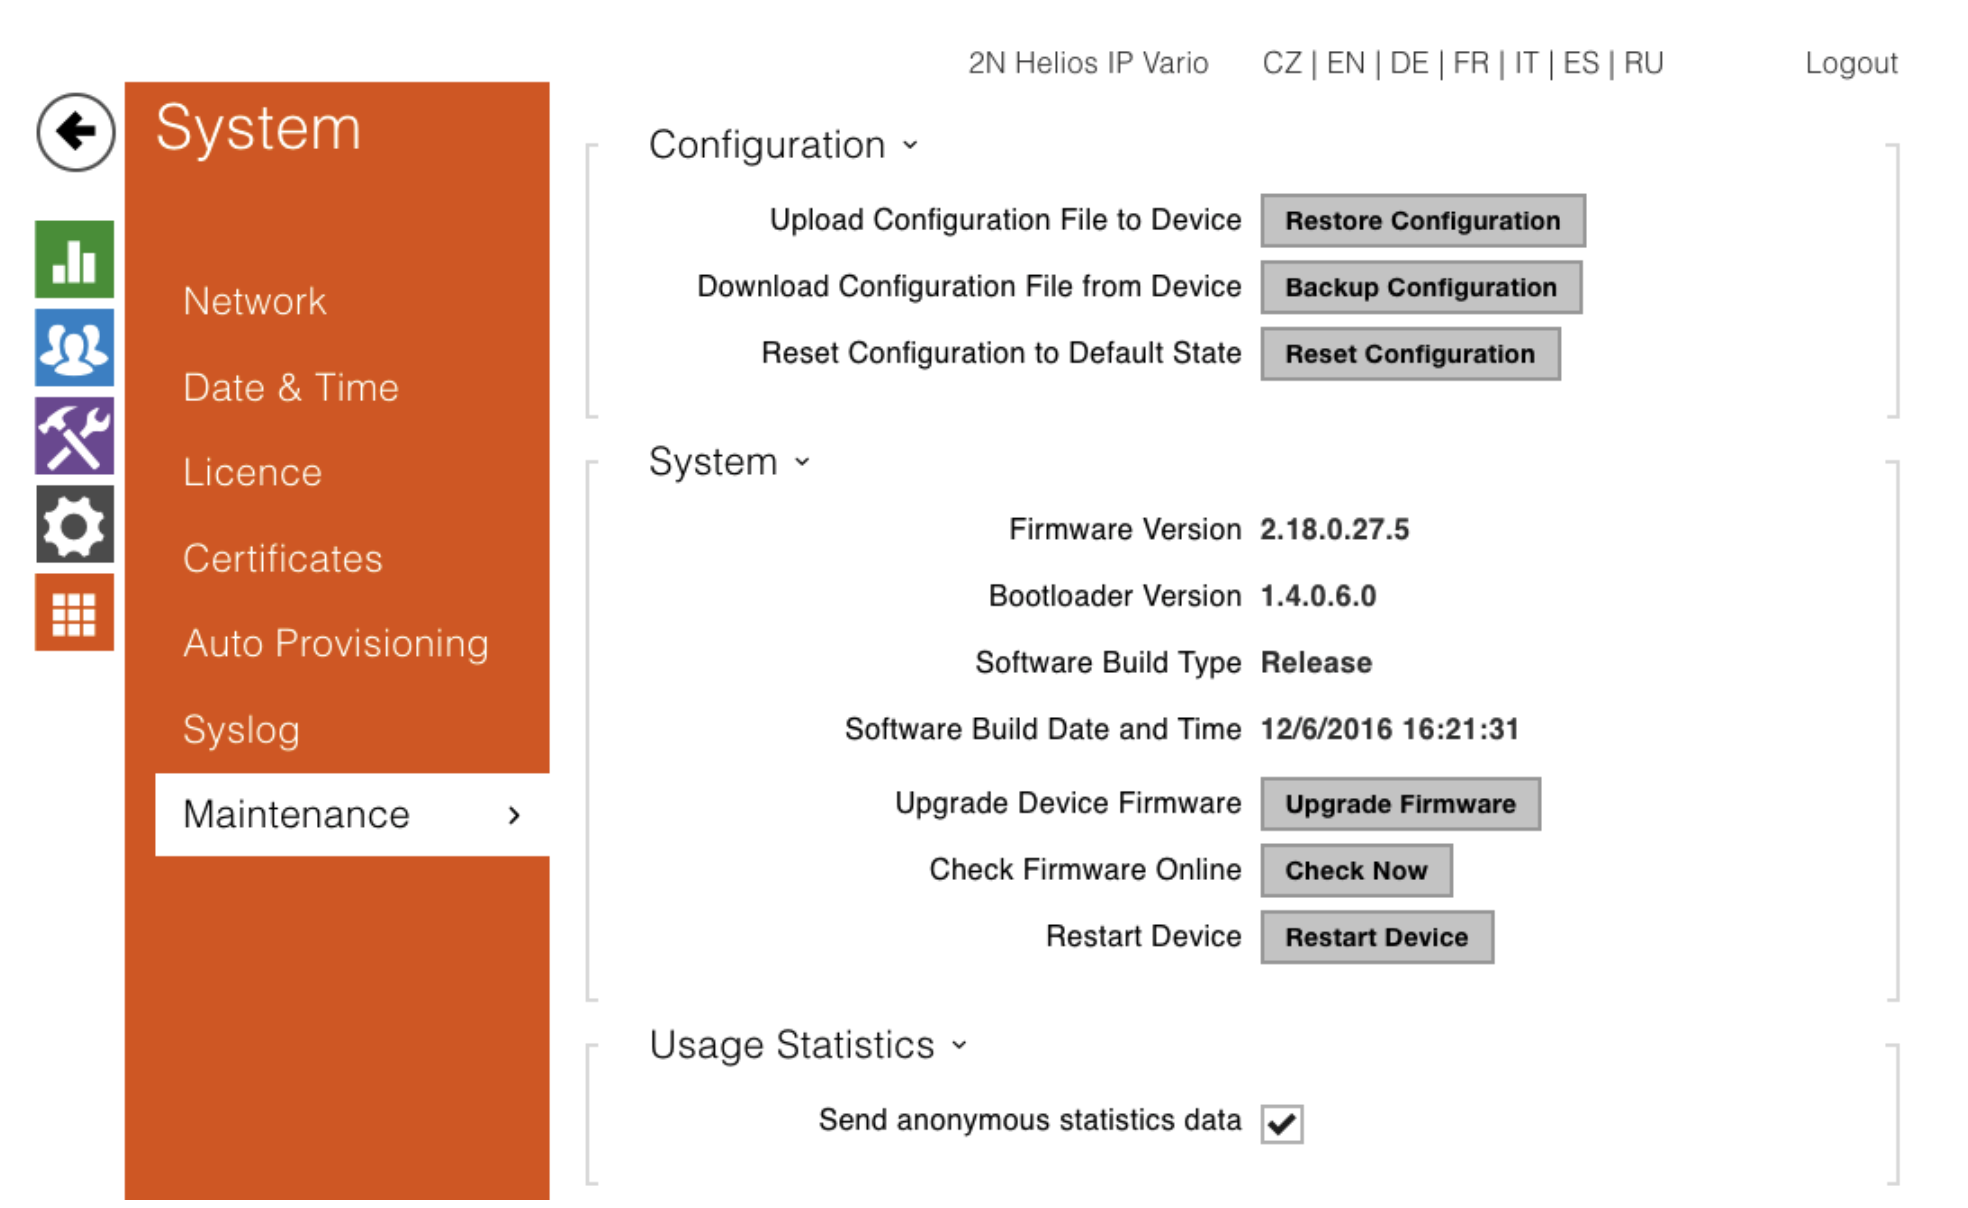
Note: Update process takes around 30 seconds. During the update procedure the intercom is restarted.
3. SIP Server Setting
- Go to Services -> Phone -> SIP 1
- Fill out the fields as described below:
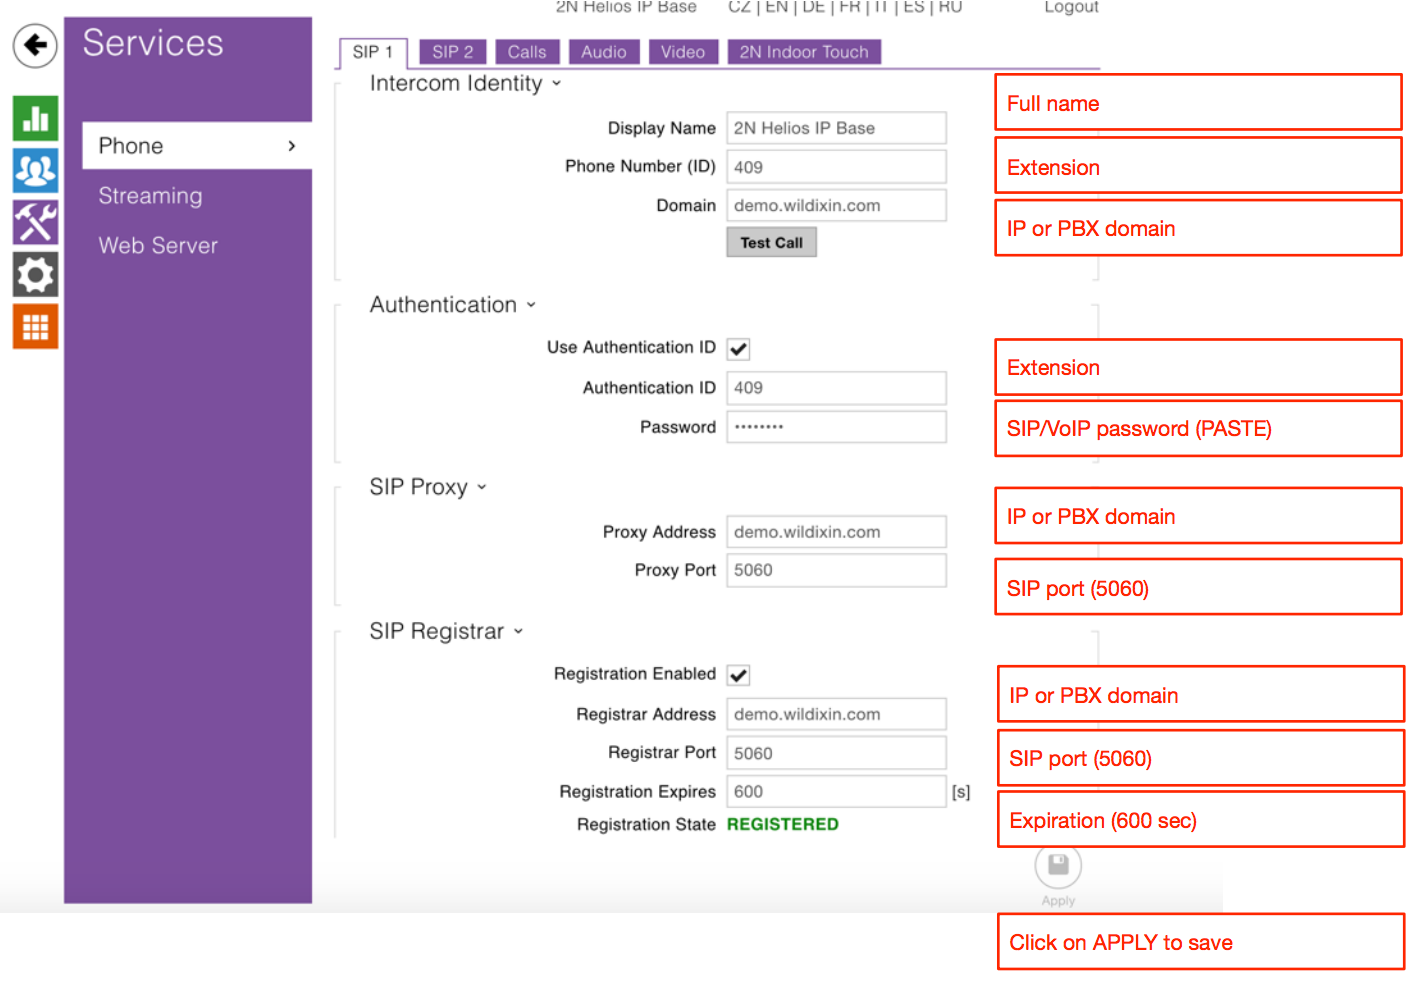
Important: use the SIP password of intercom extension, not the WEB password!
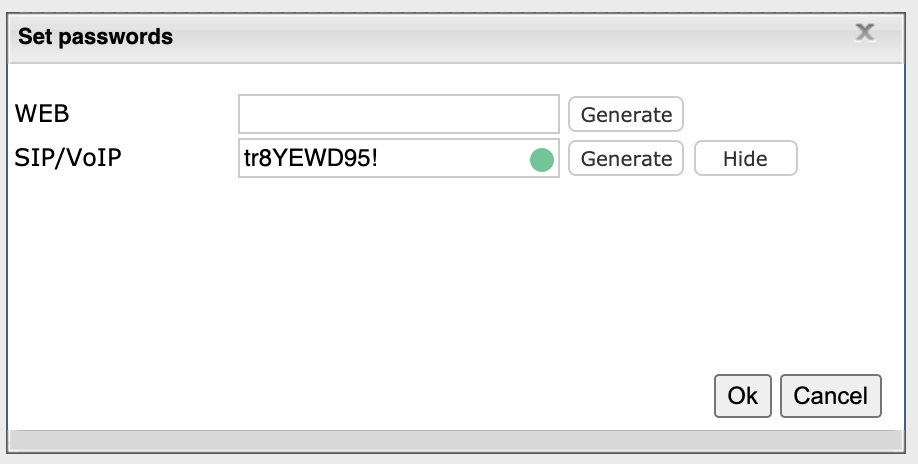
How to generate the SIP Password:
- Go to WMS -> Users and select the intercom extension (409 in our example)
- Click Set passwords
- Click on Generate near SIP/VoIP, then click Ok (copy this password from WMS and paste it into the field SIP/VoIP Password)
- Go to WMS -> Users
Check that the intercom is successfully registered to the system:
Note: status of the user is green which means that the intercom is successfully registered; focus the mouse on the status to see device’s name, IP address and the transport method.
- Go back to the intercom web interface, Services -> Phone -> Audio:
Enable the option SIP INFO (RFC-2976) in DTMF Receiving section and click Save: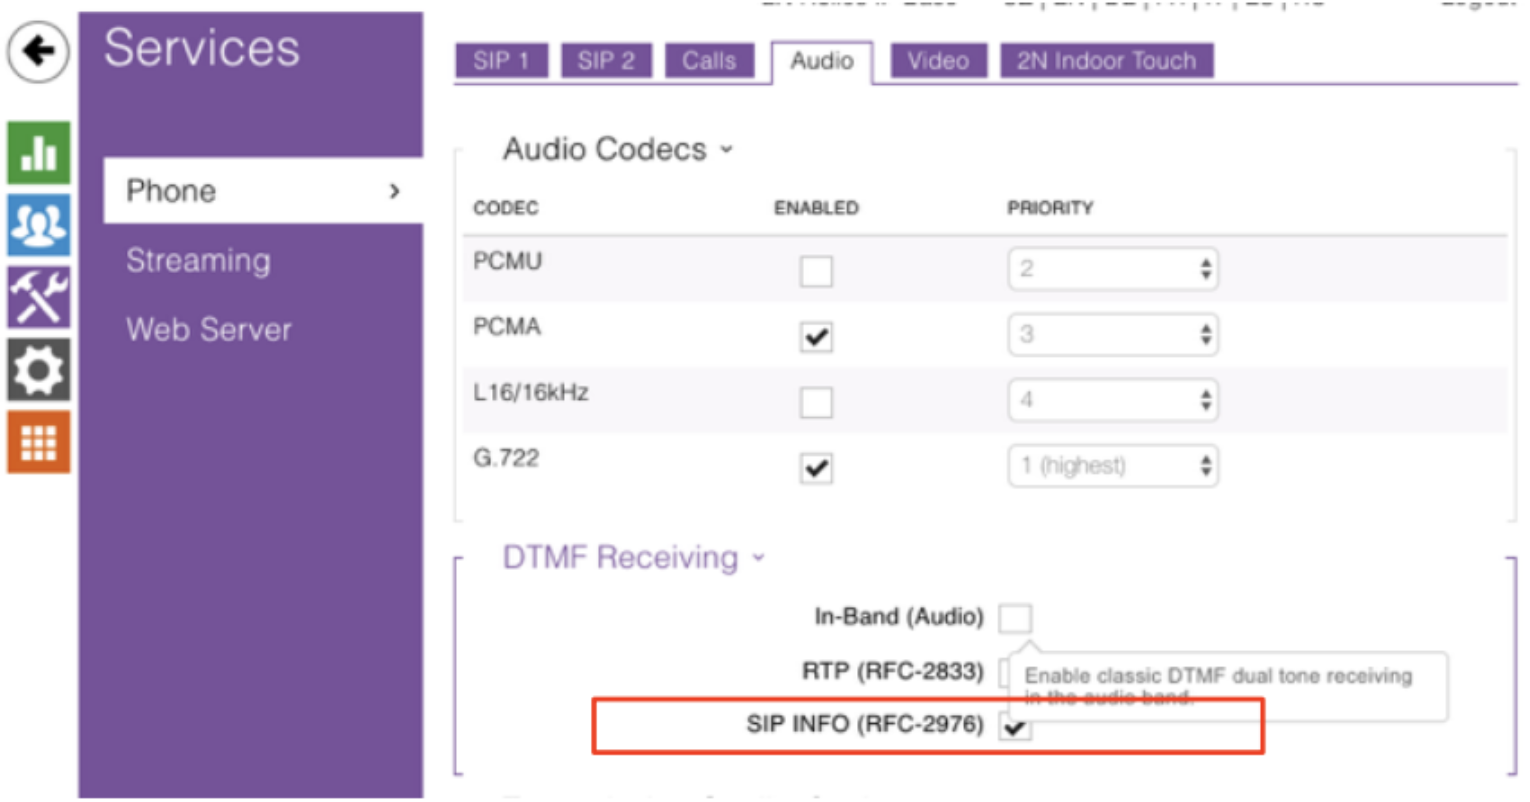
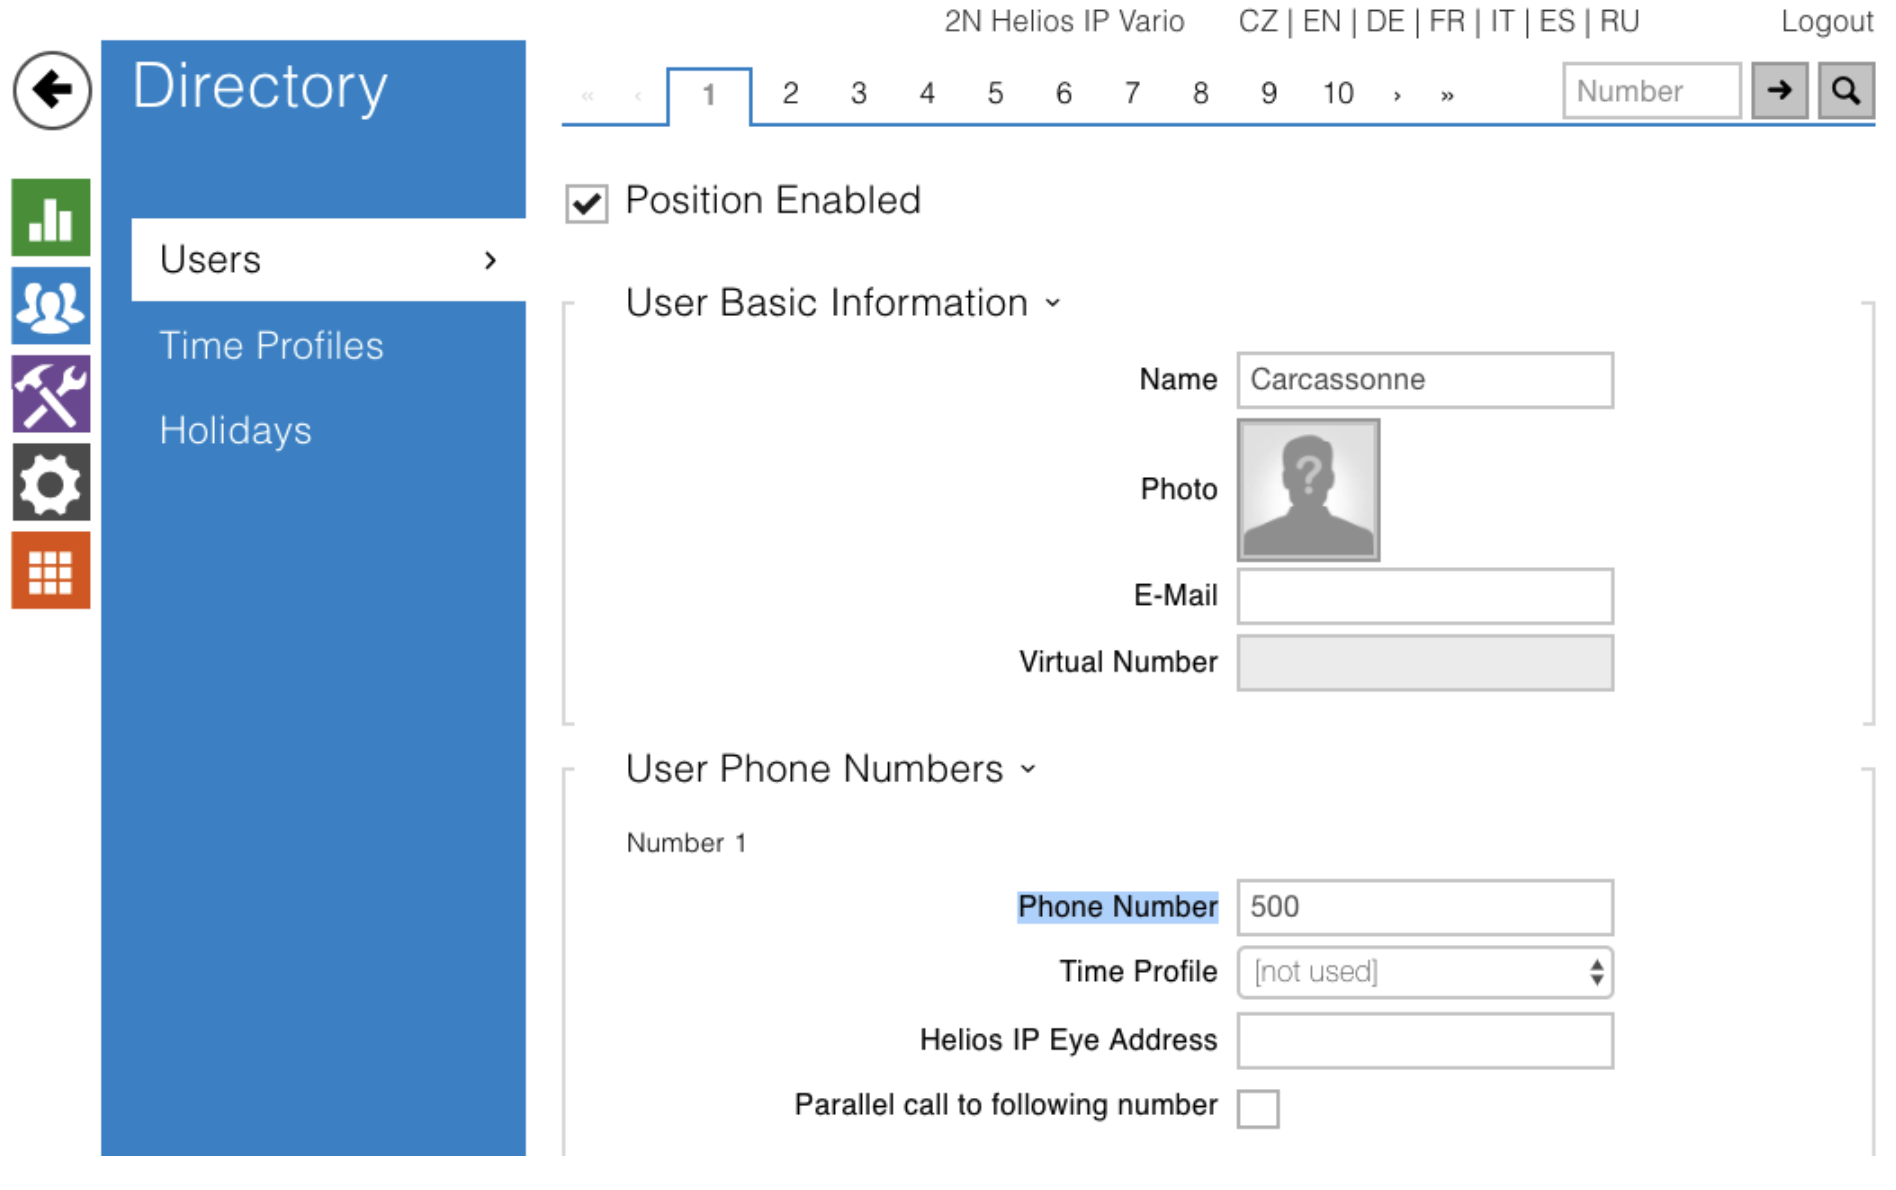
4. Quick Dial Button Setting
The intercom is equipped with quick dial buttons. Pressing a quick dial button places a call to the specified phone number.
- Go to Directory -> Users -> Position 1 (position 1 corresponds to quick dial button 1)
- Fill the fields Name and Phone Number and click Save:
5. Electric Lock Switching Settings
An electric lock can be attached to the intercom and controlled by a code dialed from Wildix IP phones.
- Go to Hardware -> Switches -> Switch 1
- Enter the code, for example “1234” under Switch Codes section and click Save:
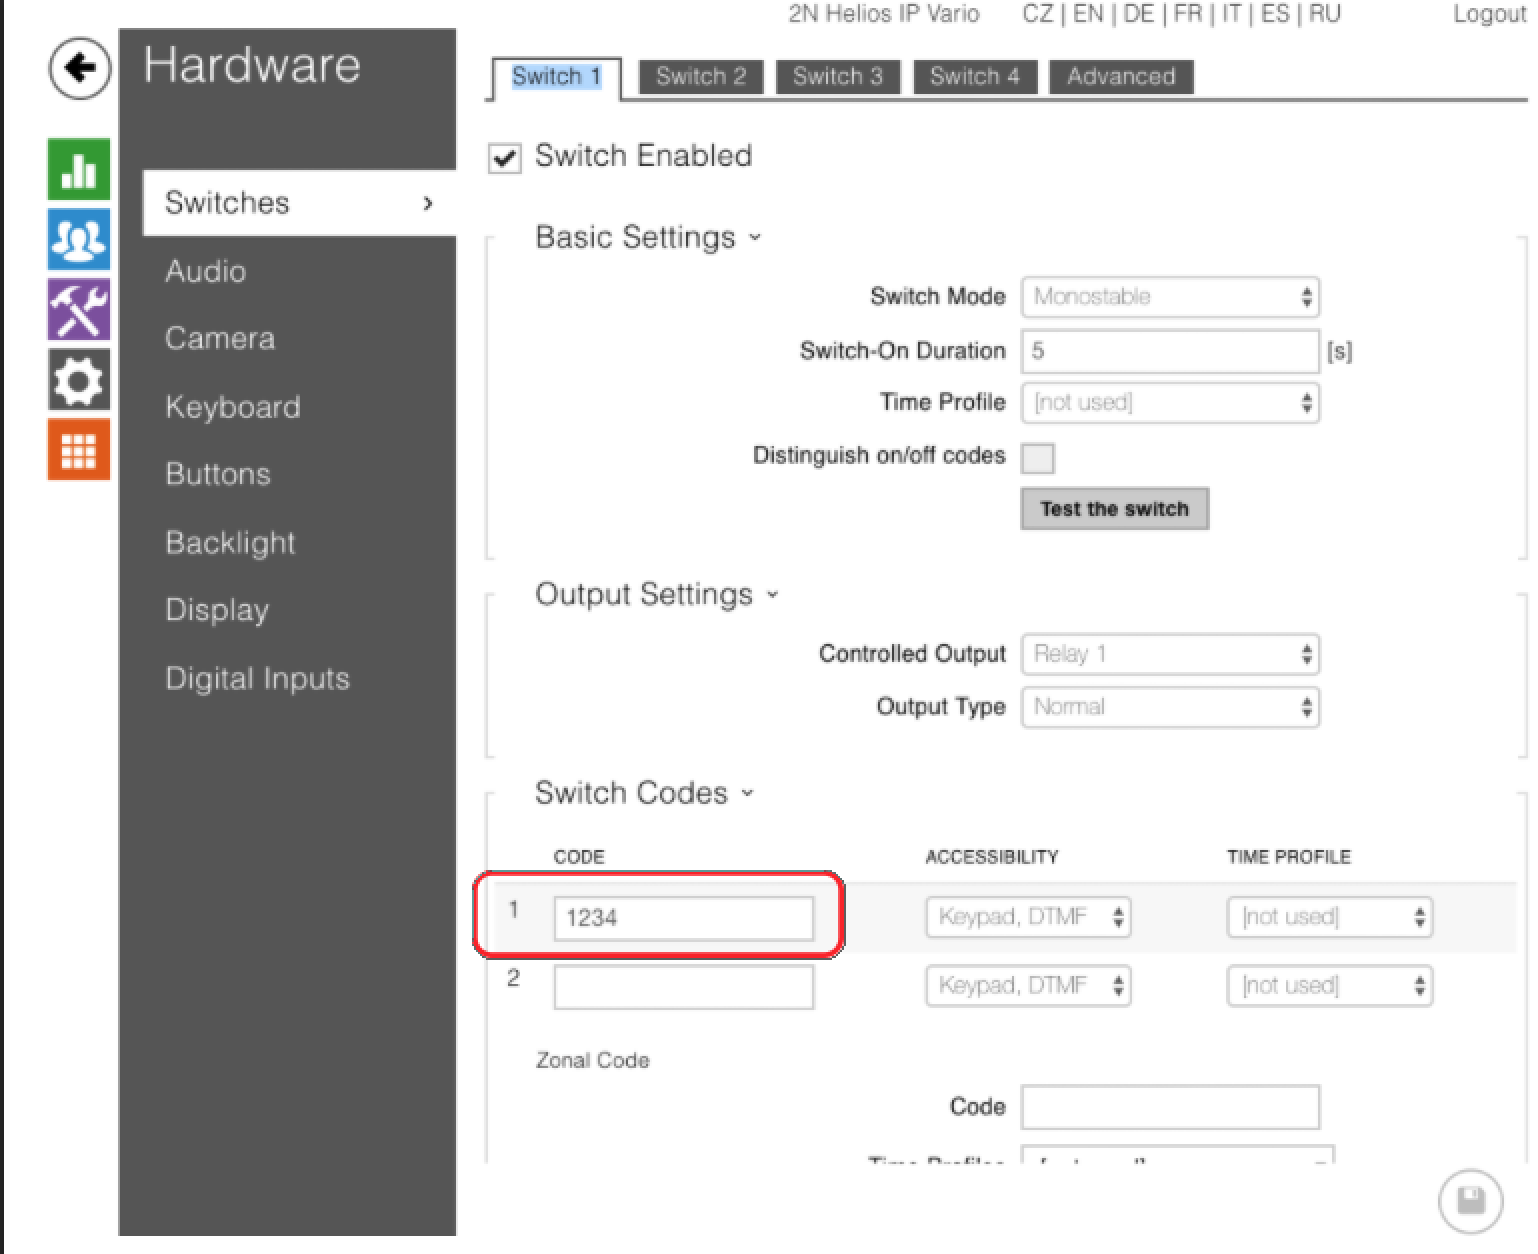
Make sure the box “Legacy Switch Code” is activated in Advanced Settings section. When this box is checked, the first code listed above does not require confirmation by pressing “*” from the phone. If the box is not check, it might be necessary to press “*” from the phone to confirm the door opening.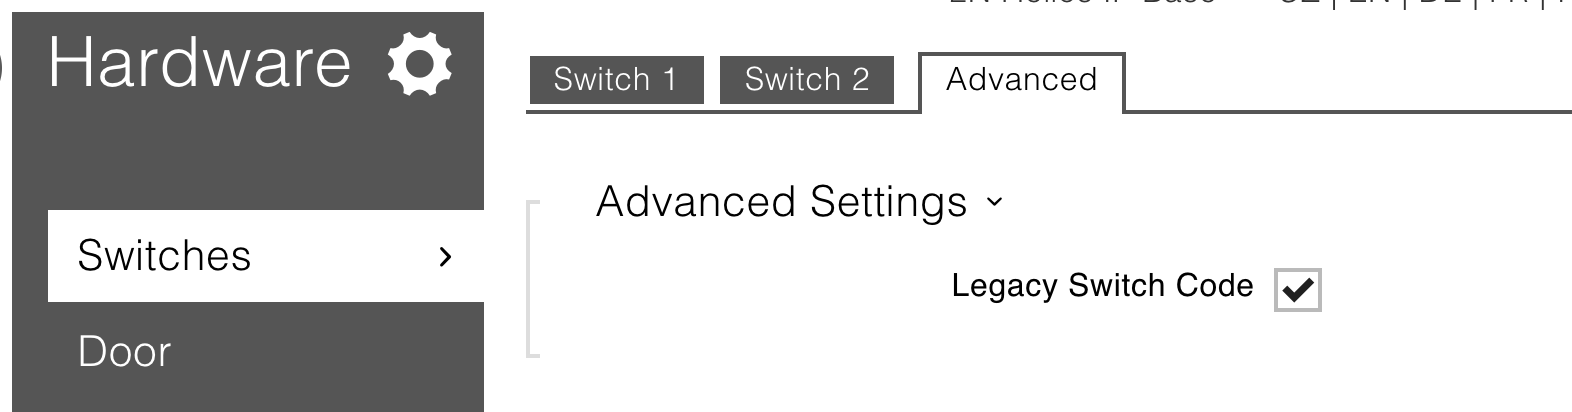
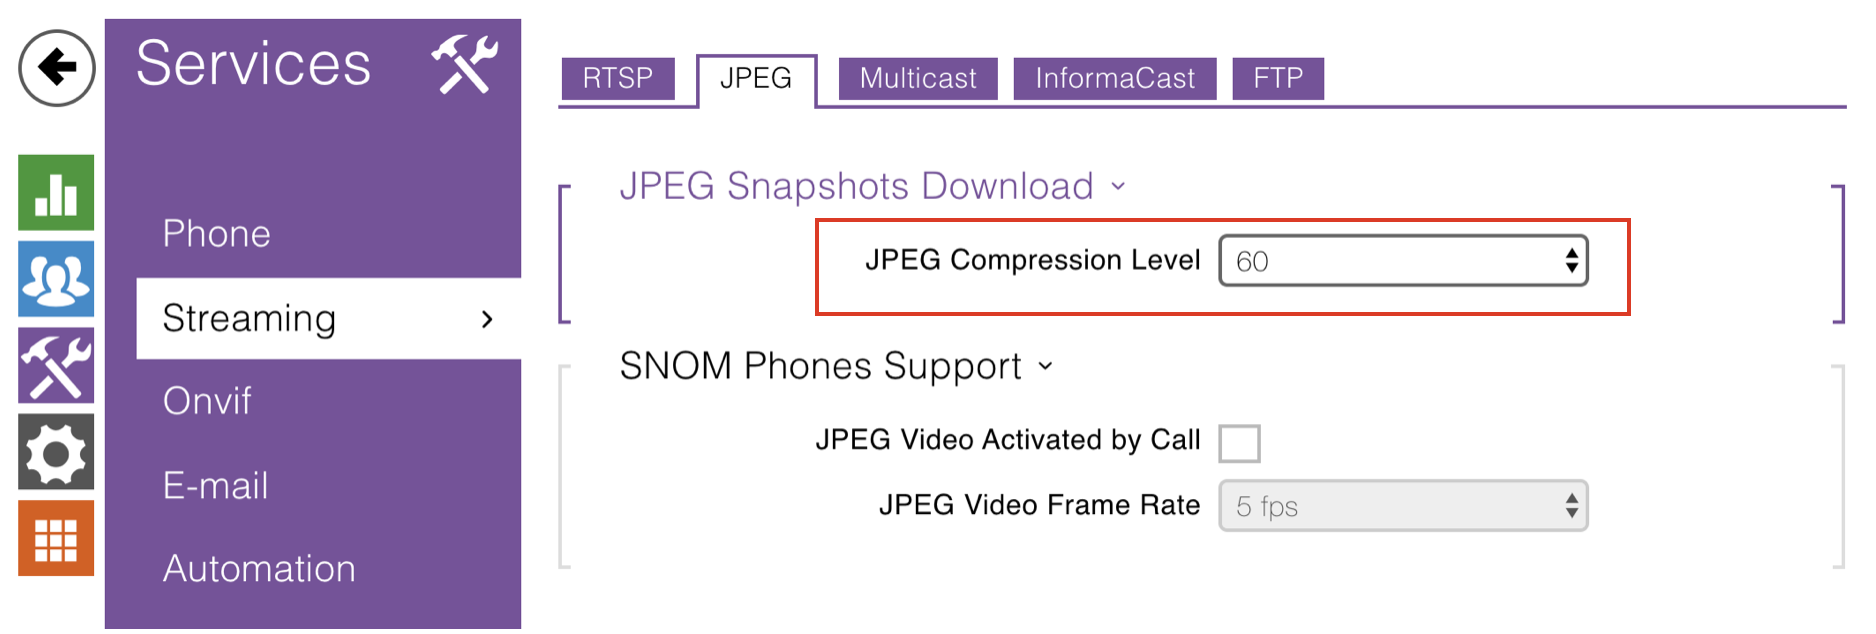
6. JPEG Streaming Settings (required only for W-AIR Handsets)
Configure the compression level of jpeg streaming to download images from the intercom.
- Go to Services > Streaming > JPEG > set JPEG Compression Level to 60:
Step 3. Door open function from Wildix IP phones/ Wildix Unified Communication
Go to WMS > Dialplan, select the procedure used for outgoing calls by the intercom extension (“doorphone” in our example).
You can open the door from any Wildix device, including WP, W-AIR, Web phone by answering a call and entering a code specified in Electric Lock Switching Settings of the intercom, in the format: *[code]#, in our example: 1234.
Unlock button for WP600AXX / Vision/ SuperVision/ Collaboration
You can add an unlock button on WP600AXX/ Vision/ SuperVision/ Collaboration, allowing you to open the door from the call management window.
- Go to WMS -> Dialplan and add Custom Application to the Dialplan procedure used by the intercom SIPAddHeader(Unlock-Button:), for example:
SIPAddHeader(Unlock-Button:*1234#), where “1234” is DTMF.
Here is what Unlock button looks like on Vision and in Collaboration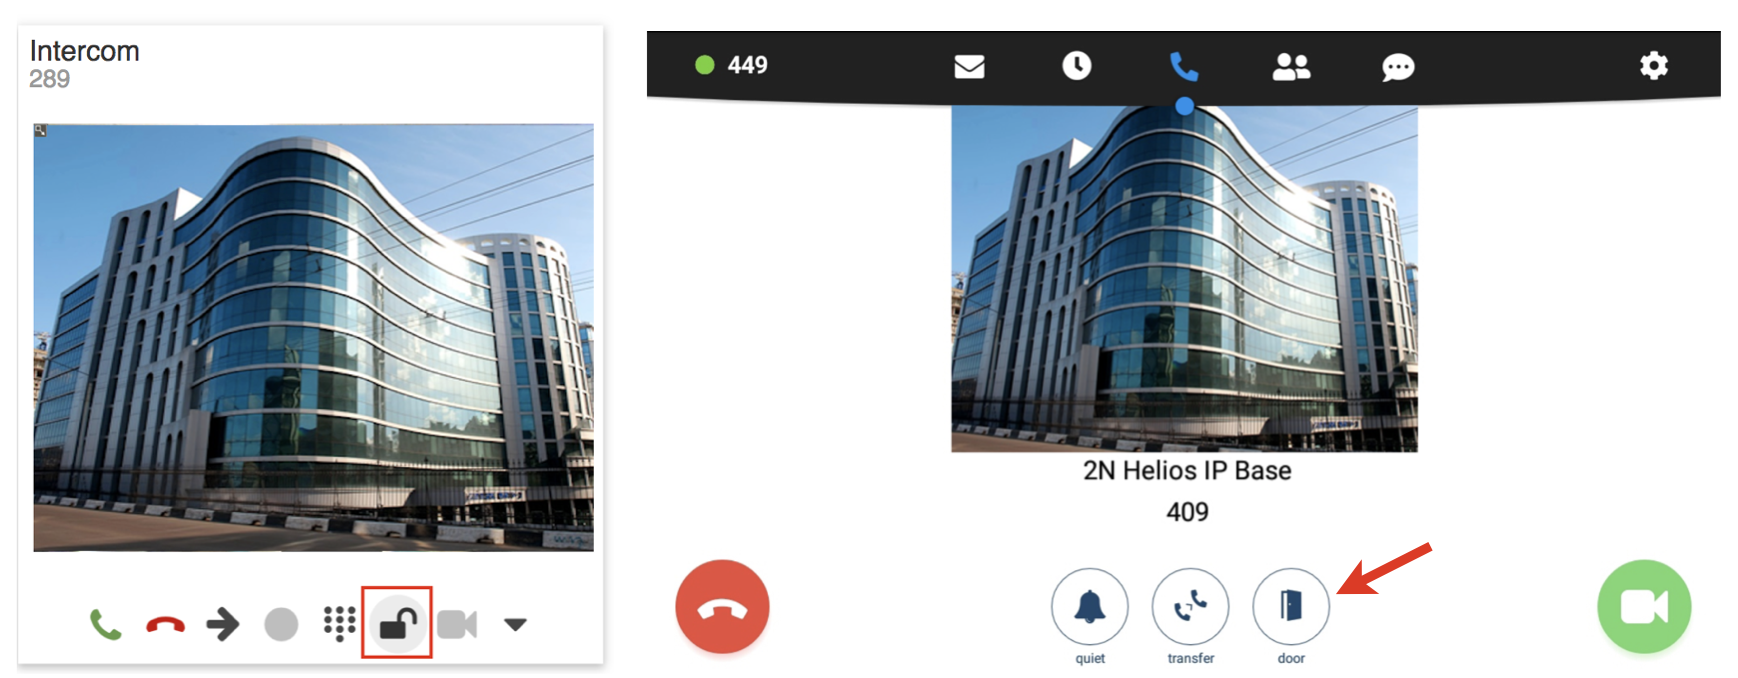
Note: On x-bees and Collaboration 7 Unlock button is not available. After answering the call, it is possible to open the door using DTMF to enter the code.
Video streaming before answer on WP600AXX / Vision/ SuperVision/ Collaboration / Android App
Note: Video streaming before answer is not supported on x-bees and Collaboration 7.
You can display an incoming video stream before answer on WP600AXX/ Vision/ SuperVision/ Collaboration/ Android mobile application:
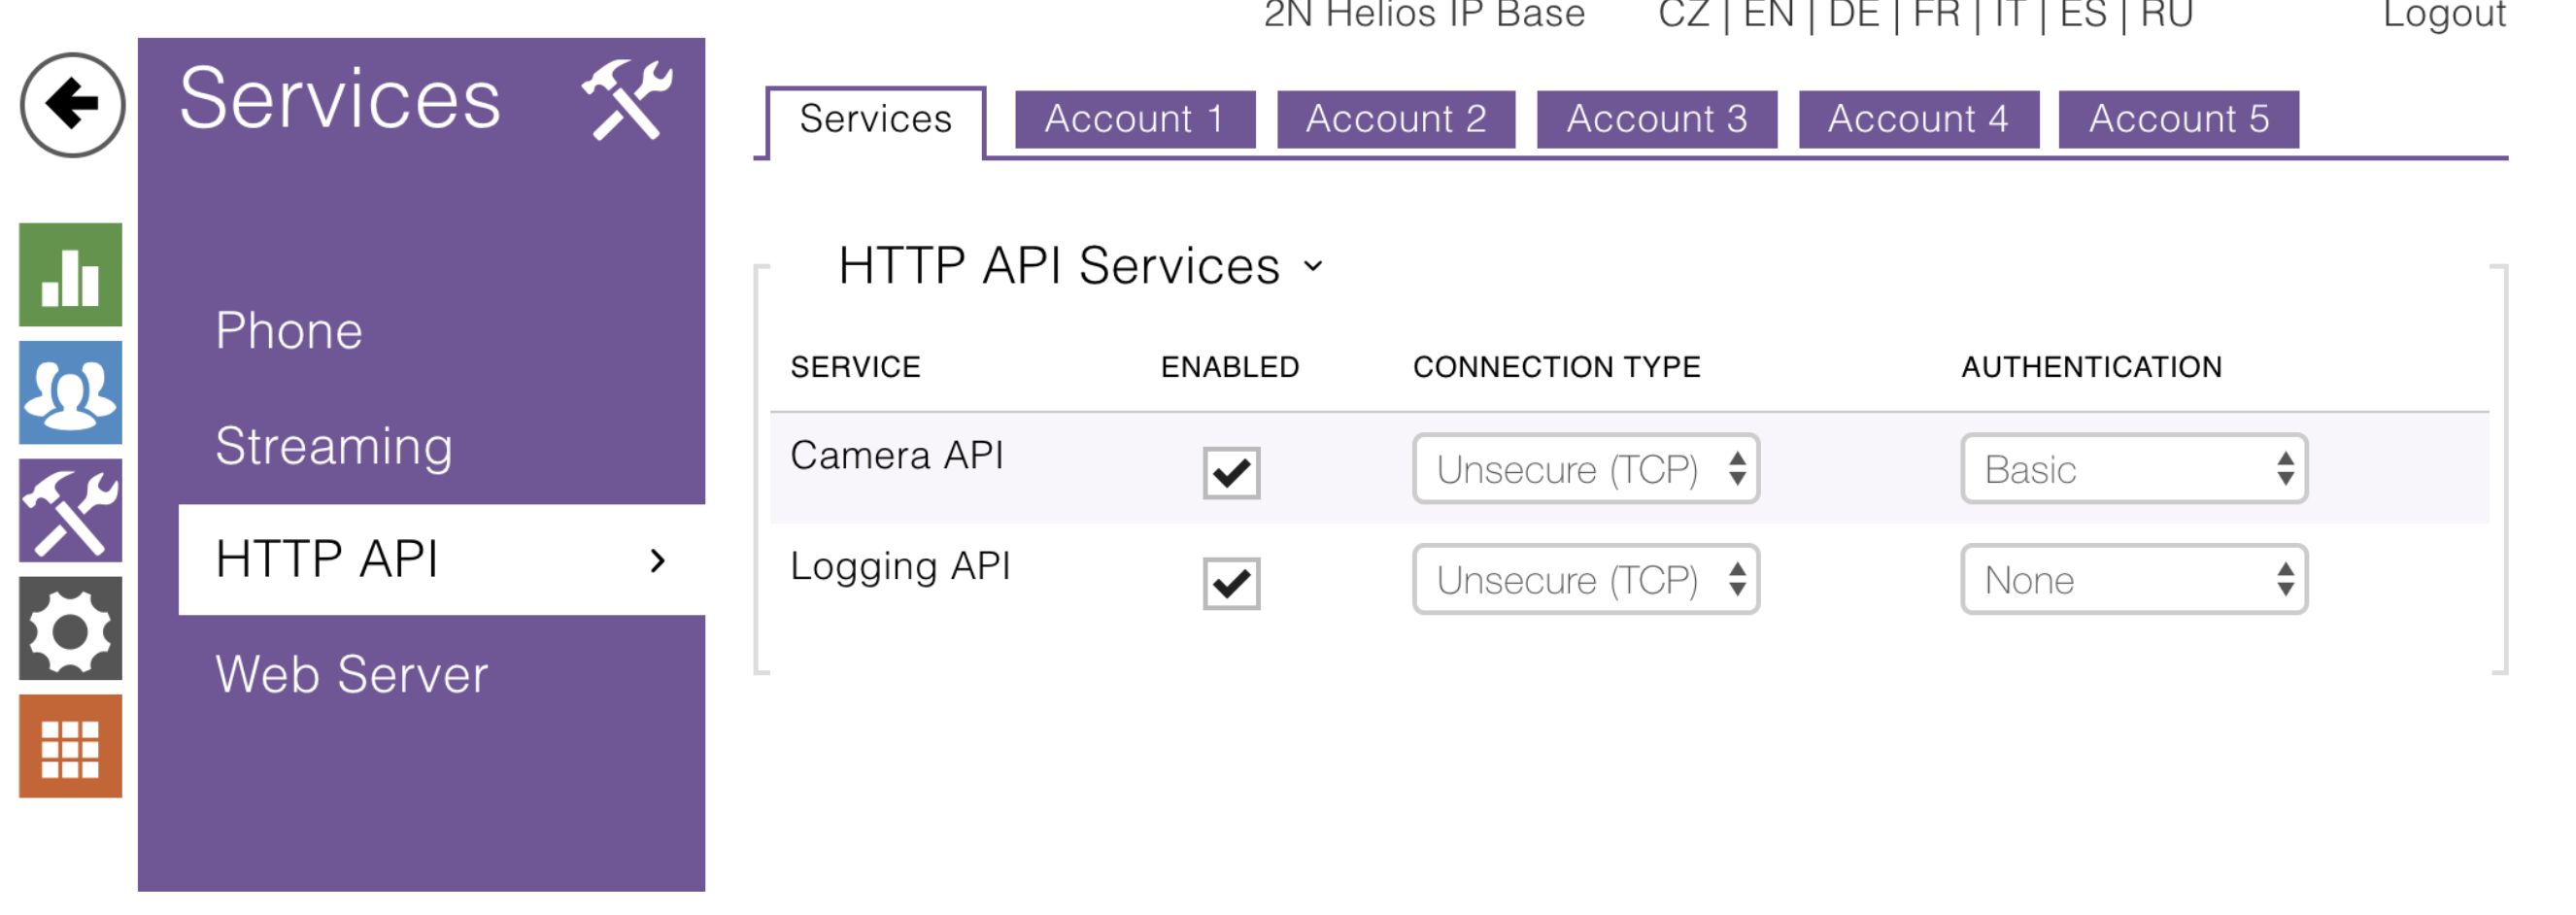
- Go to Services > HTTP API (2N® Helios IP web interface)
- Enable Camera API and choose Unsecure (TCP) Connection type and Basic authentication, click Save:
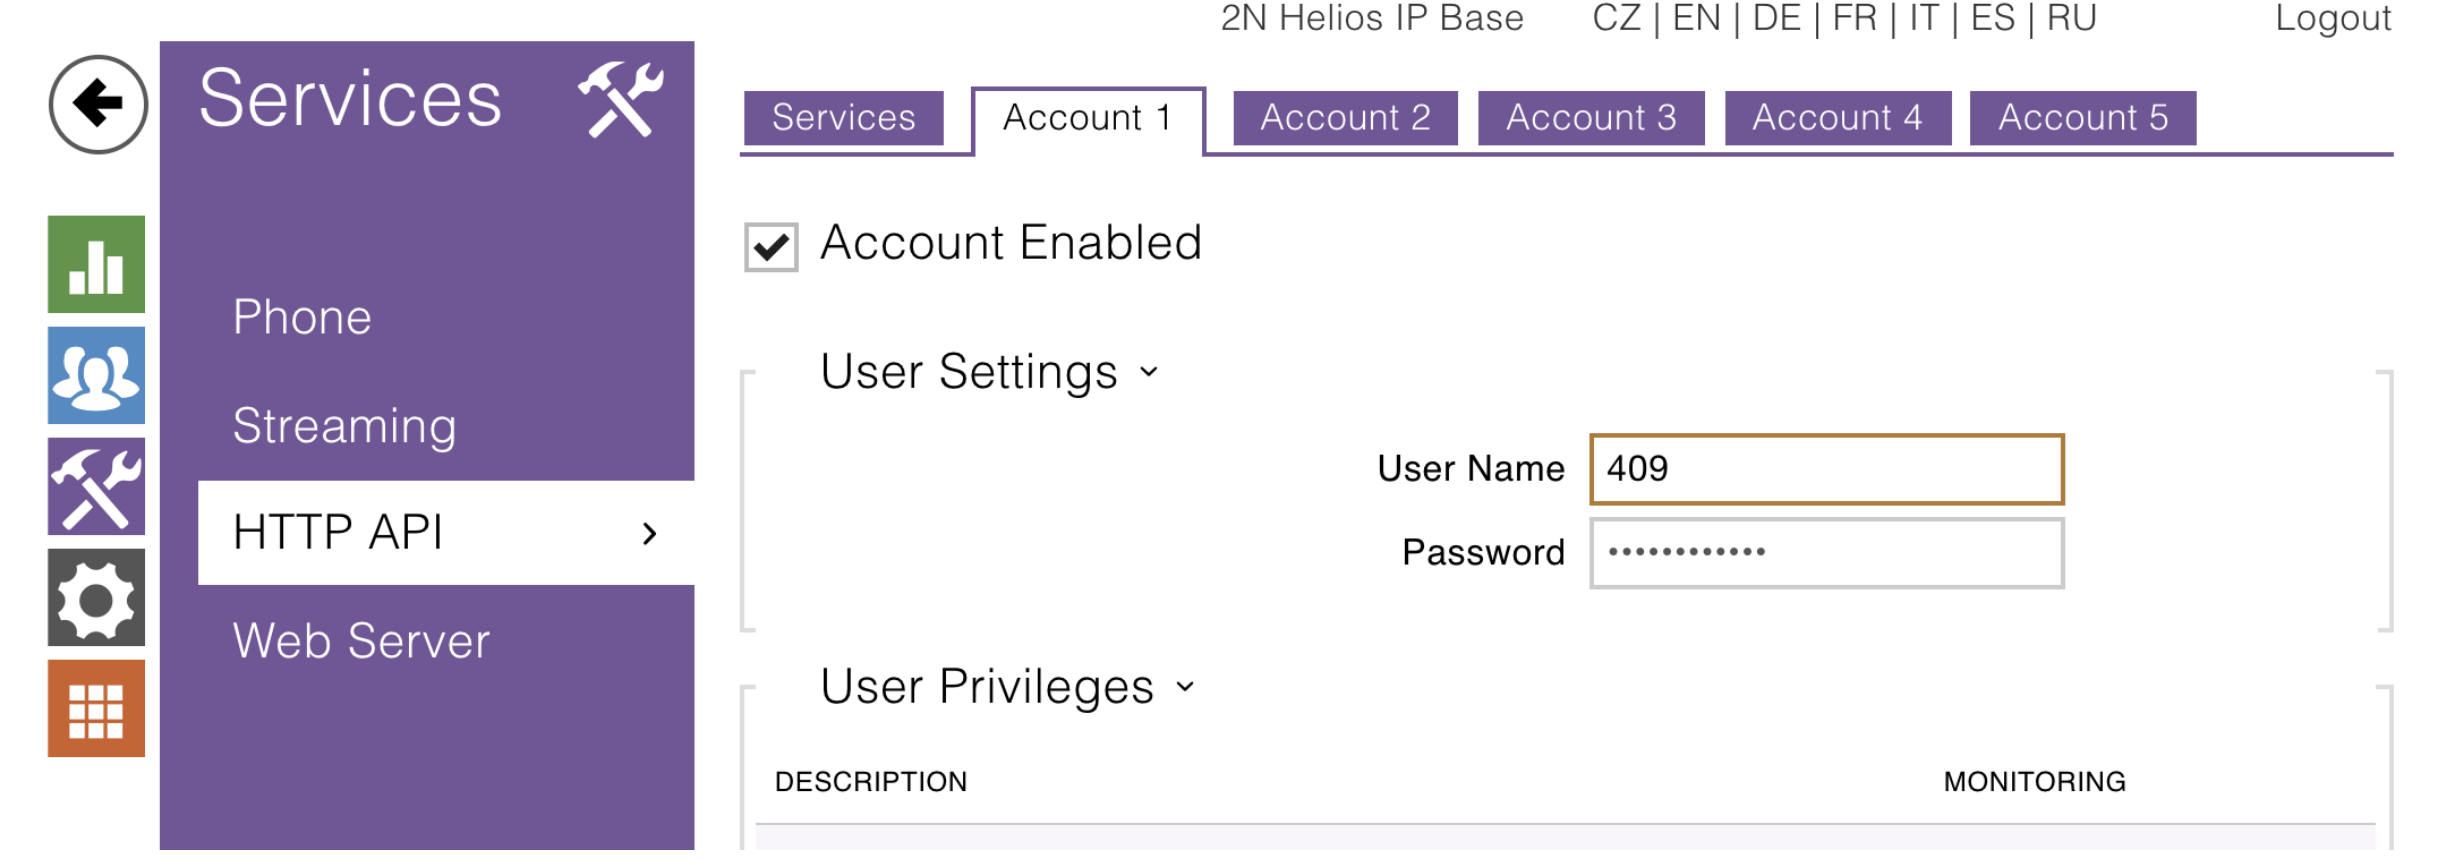
- Go forward to the next tab Account 1 and check the box “Account Enabled”
- Fill in User settings: User name and password and click Save
- Go to WMS -> Dialplan and add Custom application to the Dialplan procedure used by the intercom SIPAddHeader(Camera:), for example:
SIPAddHeader(Camera:http://409:admin@10.100.4.133/api/camera/snapshot?width=1280&height=960)
Where:
- 409:admin – User name and password for access to the intercom, set up in Services > HTTP API > Account 1
10.100.4.133 – IP address of the intercom
Note in case of a Cloud PBX: If the callee's device is on the same local network as the intercom, use the intercom's private IP address, otherwise replace it with the intercom’s public IP address.
Also, redirecting the port 80 towards the intercom will be needed if public IP address is used.
- /api/camera/snapshot – function which allows downloading images from an internal or external IP camera connected to the intercom
width=1280&height=960 – video resolution
Dialplan example with Unlock button and Video streaming before answer
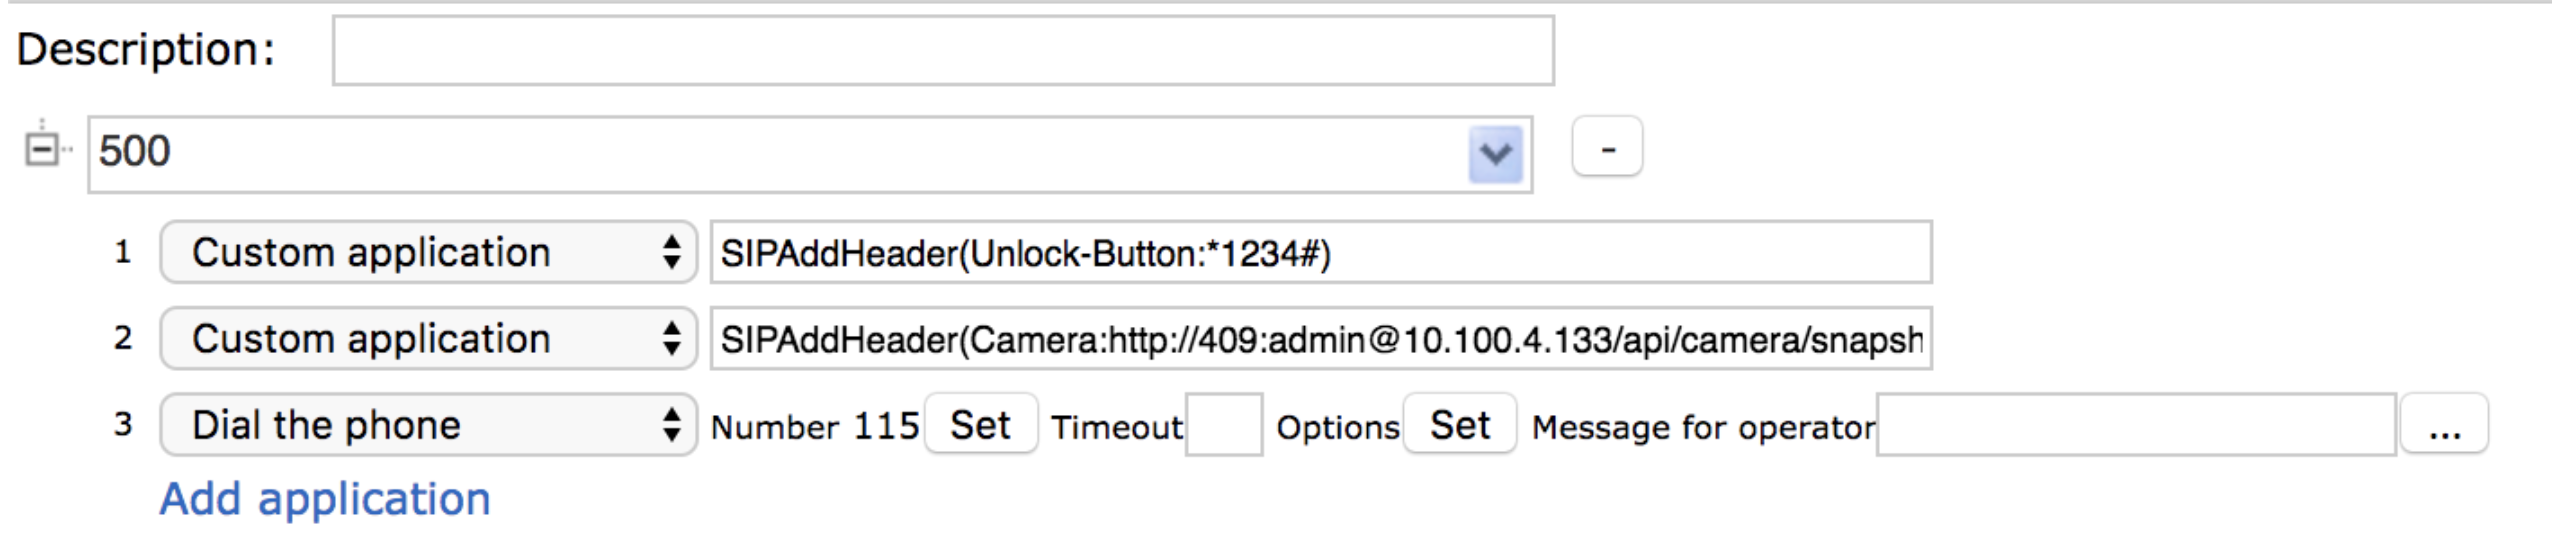
Where:
- “500” – is the number specified in the quick dial button menu of the intercom (the number called by the intercom)
- “Custom application” – SIPAddHeader(Unlock-Button:*1234#) – adds unlock button to call dialog
- “Custom application” – SIPAddHeader(Camera:http://409:admin@10.100.4.133/api/camera/snapshot?width=1280&height=960) – enables video preview before answer
NOTE: use “http” connection mode, not “https”!
- “Dial the phone” – 115 – is the call destination for answering calls from the doorphone; you can specify your own destination (an extension, several extensions, a call group…)
JPEG streaming on W-AIR Handsets
Supported handsets: W-AIR LifeSaver, W-AIR LifeSaver-EX, W-AIR Office and W-AIR Med.
- Before proceeding, make sure you set the necessary compression level in JPEG Streaming Settings
- Modify the Dialplan procedure used by the intercom by adding the Custom application:
- SIPAddHeader(Call-Info: icon="<http://10.100.4.133/api/camera/snapshot?width=160&height=120&source=internal&pic=cam.jpg>")
Where:
10.100.4.133 – IP address of the intercom
Note in case of a Cloud PBX: If the callee's device is on the same local network as the intercom, use the intercom's private IP address, otherwise replace it with the intercom’s public IP address.
Also, redirecting the port 80 towards the intercom will be needed if public IP address is used.
- /api/camera/snapshot – function which allows downloading images from an internal or external IP camera connected to the intercom
- width=160&height=120 – video resolution
- source=internal – parameter defining that the video source is from internal camera
It is also possible to set Refresh soft button that can update the jpeg image preview upon receiving a call from the doorphone.
For this purpose, set Custom applications:
- Custom application -> SIPAddHeader(Alert-Info: info=doorbell:*120) - adds Refresh button
- Custom application -> SIPAddHeader(Call-Info: icon="<http://10.100.4.133/api/camera/snapshot?width=160&height=120&source=internal&pic=cam.jpg>")
The configuration can also be set for 2N Helios IP Verso/ Solo/ Vario/ Force/ Video Kit.
Dialplan example: 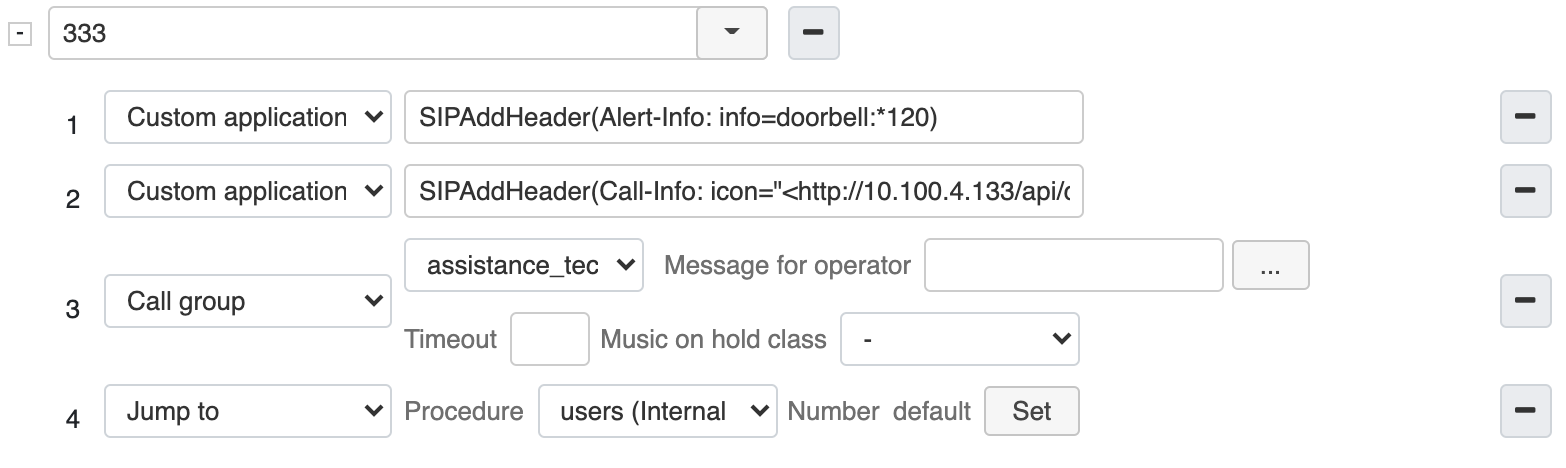
Troubleshooting
No video in case of external call to intercom 2N
Problem: no video for calls made from device whose IP is not in the same network with the intercom
Solution: disable DirectRTP via Dialplan for such calls (Dialplan application "Set" - "DirectRTP" - "no")