Integration of Mobotix T25 IP Video Door Station with Wildix IP PBX
The Guide explains how to connect Mobotix T25 IP Video Door Station to a Wildix PBX and configure an unlock button with a video preview before answer.
Created: October 2018
Updated: January 2020
Permalink: https://wildix.atlassian.net/wiki/x/NQ7OAQ
WMS Configuration
Create a Dialplan procedure
To be able to manage calls from the intercom, you need to create a separate Dialplan procedure:
- Go to WMS -> Dialplan -> Dialplan rules
- Click + to add a new procedure
- Specify the called number ("333" in the example) and a number/ numbers (e.g. Call group) of users who can receive calls from the intercom

Note: You can also add a Called number used for managing calls from the Intercom to the existing procedure used for incoming calls ("users" for example).
Add an Intercom user
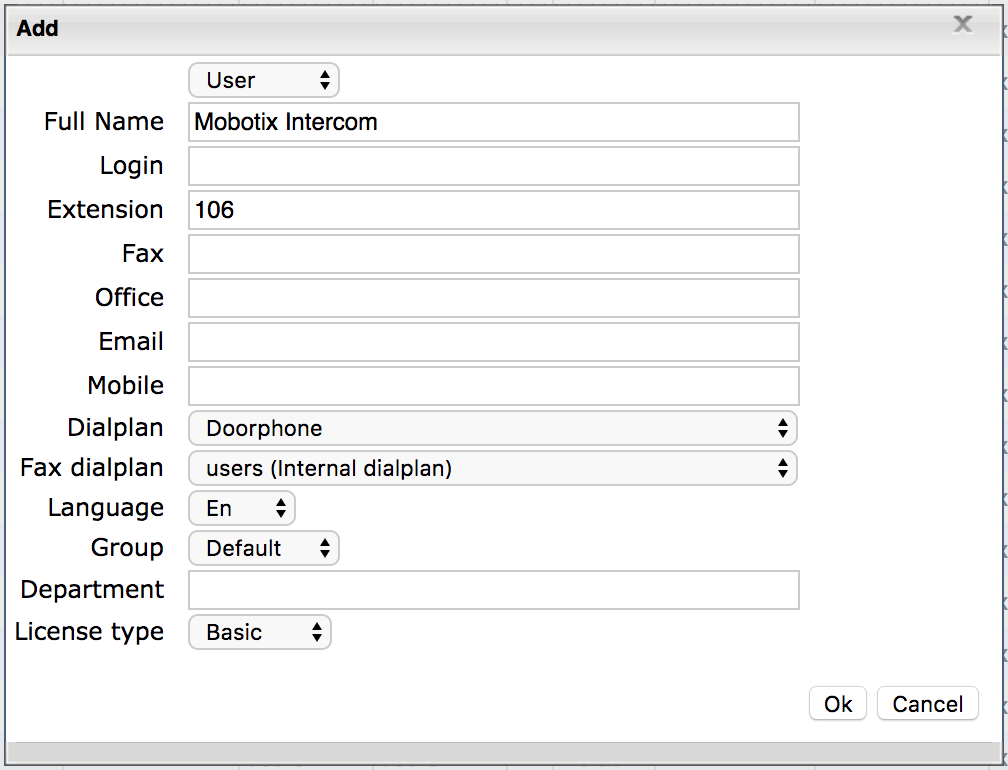
- Go to WMS -> Users
- Click + to add a new user
- Fill in the following fields:
- Full name: name of the intercom user
- Extension: extension number used by the intercom
- Dialplan: select the Dialplan procedure used by the intercom
- License type: select Basic
Mobotix Configuration
Access the web interface
To be able to connect to the web interface, you need to know the IP address released to the intercom by the DHCP server used in your network (router or PBX).
First time access credentials: admin : meinsm
SIP Client Settings
Go to Admin menu -> Audio and VoIP Telephony -> SIP Client Settings.
Fill in the following fields in SIP Accounts:

- SIP Address: enter the extension number of the Intercom user and IP address/ domain name of PBX
Authentication: enter the extension number and SIP Password
How to generate the SIP Password:
- Go to WMS -> Users and select the intercom extension (106 in our example)
- Click Set passwords
- Click on Generate near SIP/VoIP, copy this password from WMS
- Click Ok to confirm
- Server: enter IP address/ domain name of your PBX
- Available as proxy and Use as Registrar should be checked off
- Click Set to save the settings
Outgoing Calls Settings
Go to Admin menu -> Audio and VoIP Telephony -> Outgoing Calls Settings.
Add a new profile:
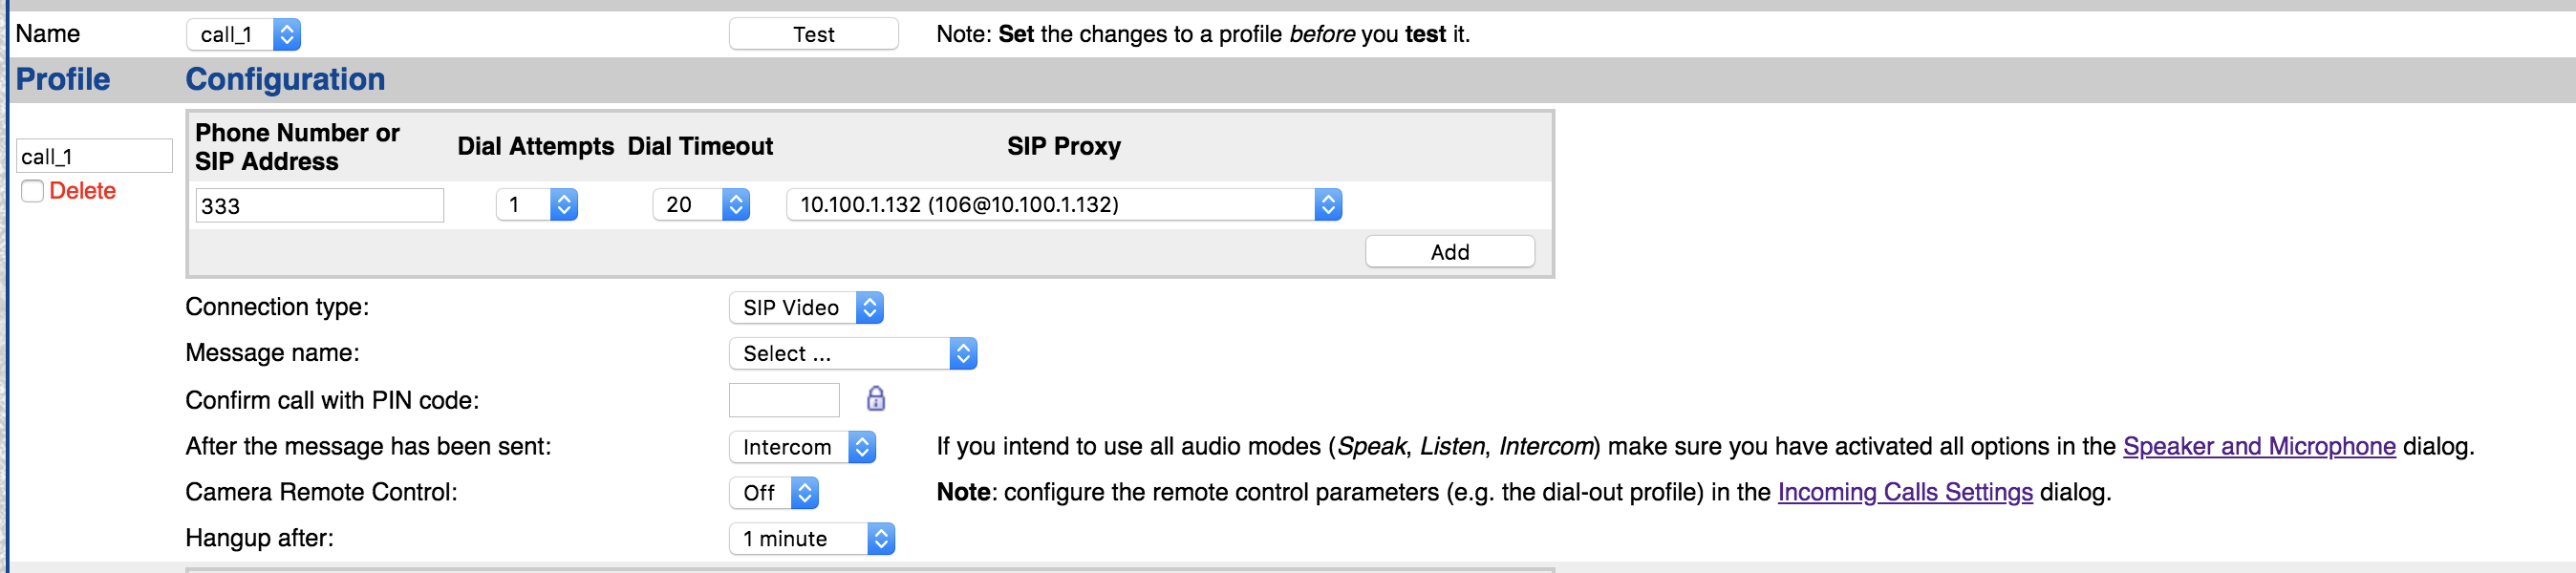
- Phone number or SIP Address: specify the number of user/ users who can receive calls from the Intercom
- Dial Attempts and Dial Timeout: specify the number of dial attempts and timeout
- SIP Proxy: select your PBX
- Connection type: select SIP Video
- After the message has been sent: select Intercom
- Click Set to save the settings
Incoming Calls Settings
- Go to Admin menu -> Audio and VoIP Telephony -> Incoming Calls Settings
- Make sure that VoIP is activated in Phone Call-In

Remote Control Settings
Note: Before configuration, you need to connect external modules (e.g. MX-OPT-IO1 for door opening). The menu becomes available only after the connection.
Setting these parameters allows using an unlock button (described in the next chapter).
- Go to Admin menu -> Audio and VoIP Telephony -> SIP Client Settings
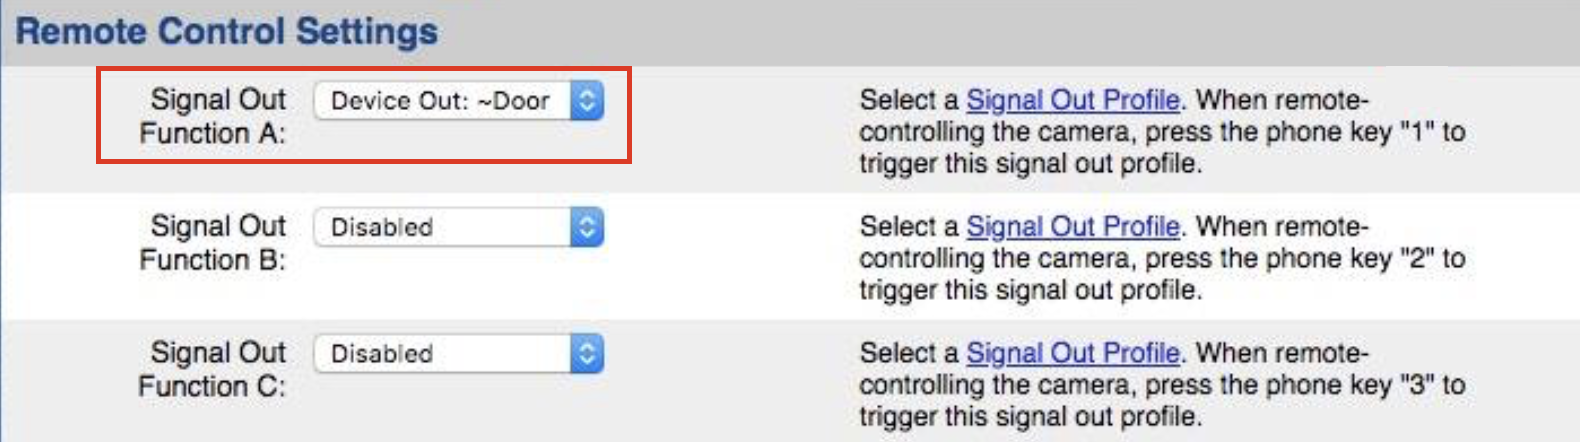
- Access Remote Control Settings
- Select an external module used as a door opener, for example, IO Module in Signal Out Function A
- Click Set
- DTMF code "1" can be used to open the door
Jpeg Streaming Settings (required only for W-AIR Handsets)
Configure a camera image settings located on the top of the intercom home page:
Frame rate: 2fps
Image size: PDA (160x120)

Image Quality: Normal

JPEG Quality: 20%(Low)

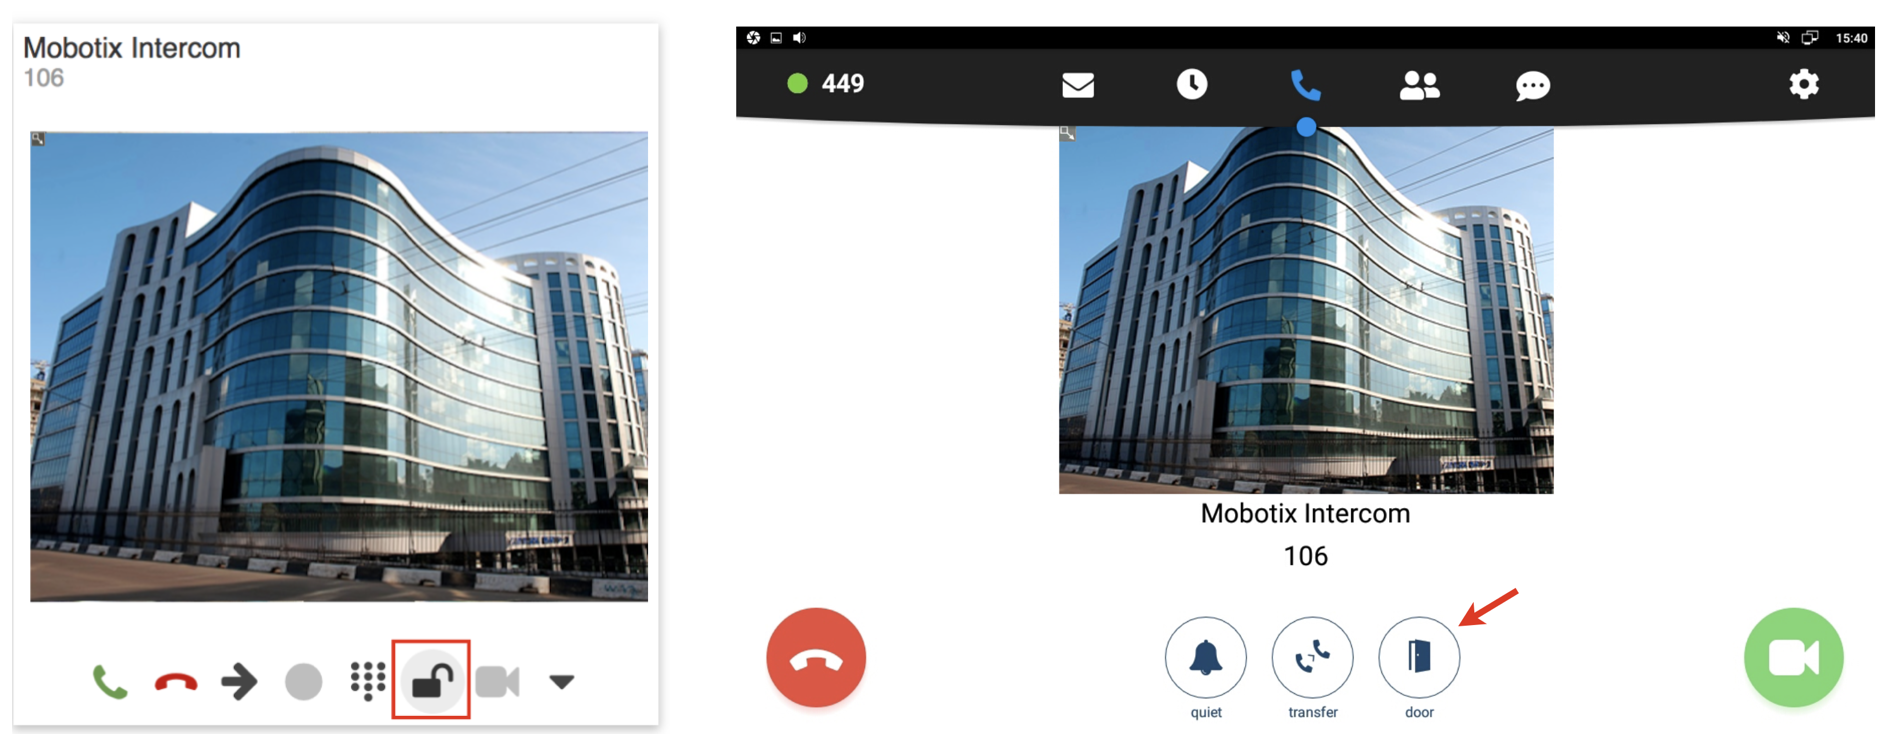
Door open function from Wildix IP phones/ Collaboration
Video preview before answer and an unlock button
Note: Video preview is supported by Collaboration/ Vision/ SuperVision/ WP600AXX/ Android mobile app (iOS app is not supported).
The possibility to add an unlock button can be implemented only for Collaboration/ Vision/ SuperVision. On other devices, you need to manually press the specified DTMF to open the door.
- Go to WMS -> Dialplan -> Dialplan rules and select the Dialplan procedure used for managing intercom calls
Add 2 Custom applications:
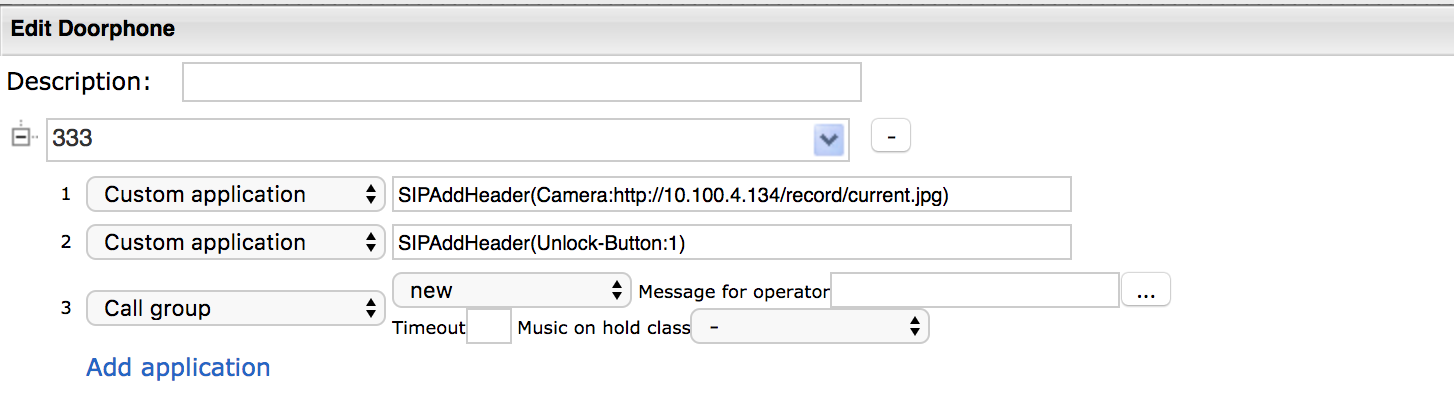
- SIPAddHeader(Camera:http://10.100.4.134/record/current.jpg) adds a video preview
where:
10.100.4.134 – IP address of the intercom
/record/current.jpg - picture URL - SIPAddHeader(Unlock-Button:1) adds an unlock button
where:
1 - DTMF code to unlock the door
- SIPAddHeader(Camera:http://10.100.4.134/record/current.jpg) adds a video preview
Example of video preview with an unlock button:
JPEG streaming on W-AIR Handsets
Supported handsets: W-AIR LifeSaver, W-AIR Office and W-AIR Med.
- Before proceeding, make sure you set the necessary jpeg settings in Jpeg Streaming Settings
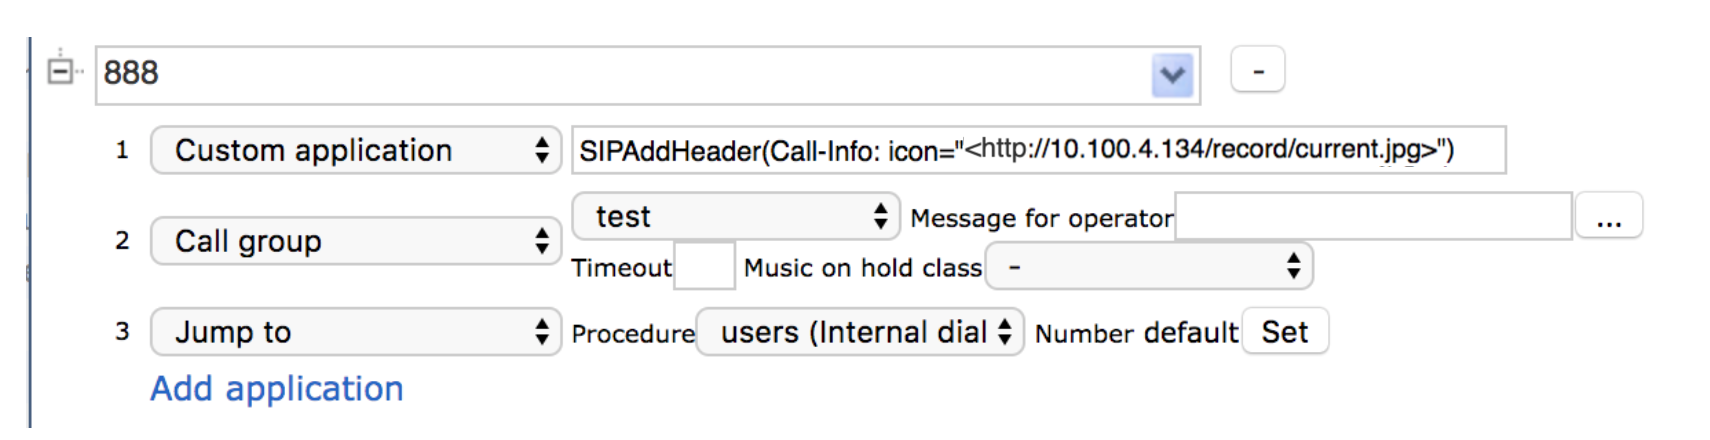
- Modify the Dialplan procedure used by the intercom by adding the Custom application -> SIPAddHeader(Call-Info: icon="<http://10.100.4.134/record/current.jpg>")
where:
- 10.100.4.134 – IP address of the intercom
/record/current.jpg– function which retrieves a camera image
Note: the Custom application works only for W-AIR Handsets and on local PBXs.
Dialplan example: