Scroll export button
| Scroll export button | ||||||||
|---|---|---|---|---|---|---|---|---|
|
| Info |
|---|
This step-by-step guide leads you through the process of activation and configuration of the Wildix system. WMS version: 56.0X / 45.0X 0X Updated: August 2022May 2024 Permalink: https://wildix.atlassian.net/wiki/x/hhbOAQ |
| Note |
|---|
Note: Starting from WMS 6.02.20230228.2, WMS interface has been updated. Current documentation includes the UI/UX changes. In case of WMS version prior to WMS 6.02.20230228.2, you can use older version of this guide: WMS Start Guide - old interface.pdf |
| Table of Contents |
|---|
Introduction
...
User interface for access to UC&C, completely web-based and accessible via the browser; requires at least Essential license. Additionally, you can download mobile apps for iOS/ Android from App store / Google play market.
WMP
Accessible at https://my.wildix.com/. Wildix PBXs should connect to the WMP server for:
...
Per User licensing (available for Hardware / Virtual / Cloud PBX): add as many users of each profile as you need. Some users may have only basic telephony features, others may have access to UC&C features, and others may have access to advanced features. Pay recurring fees per user / per period of time. Add more users of each type at any time.
More information on user profiles: https://www.wildix.com/licensing/.
- More about x-bees licenses: x-bees Admin Guide
- More about x-hoppers licenses: x-hoppers Admin Guide
In this guide it will be explained how to activate a Hardware PBX Per User and a Cloud PBX.
More information on Wildix licensing and licenses activation:https://confluence.wildix.com/x/twM8AQ. PBX Licensing and Activation.
Useful links:
Tech Wizards FB group (please add yourself to the group): https://www.facebook.com/groups/wildixtechwizards/
Official website: www.wildix.com
WMP (activation, licenses, orders, tickets): https://my.wildix.com/
- Wildix Partner Community Guide
- eLearning platform: https://trainingwww.wildix.com/join-e-learning
Blog: https://blog.wildix.com/
DOCUMENTATION: https://confluencewildix.wildix.com/atlassian.net/wiki/spaces/DOC
| Note |
|---|
Starting from October 1, 2021, Wildix provides partners with a read-only ValuePartnership (former SKit) demo PBX for the training. The following licenses on 1 year subscription are available within the PBX:
To continue using free licenses on a demo PBX after the grace period, you'll need to sign the yearly Partnership Agreement during the annual Summit in Jan 2023. |
...
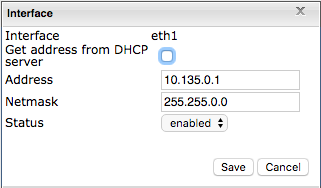
In this scenario the PBX is used as the DHCP server for telephone (voice) network and releases the IP addresses to all the devices (phones, media gateways) belonging to its network; eth0 interface is set up as DHCP client, eth1 must be set up with static IP and as DHCP server. Default settings of ETH1 interface is 10.135.0.1. 

Go to PBX Settings -> System -> Network:
Select the WAN eth0 interface and make sure the option Get the address from the DHCP server is enabled:

Select the LAN eth1 interface, set the static IP (Default: 10.135.0.1/16):


- Click Apply the network settings
- Check the address of the WAN eth0 interface to know the new IP address of the PBX
...
- Connect the second Switch to the LAN2 port of the PBX
Select the WAN eth0 interface and enable the option Get the address from the DHCP server:

Select the LAN eth1 interface, set the static IP (Default: 10.135.0.1/16):

- Click Enable traffic shaper eth0-eth2
- Click Apply the network settings
The bridge between WAN eth0 and LAN eth2 interfaces is created, with a dedicated separated network on the LAN eth1 interface
The interfaces eth0 and eth2 are no longer present on the page, the interface wbr0 is used as WAN which keeps the same settings of the eth0 interface (either static IP or DHCP client)
Select the WAN wbr0 interface and set up the bandwidth limits for Downlink and Uplink:


- Click Apply the network settings
Check the address of the WAN wbr0 interface to know the new IP address of the PBX
PBX Activation and first time WMS access
Creation of
...
PBX on WMP
Proceed as follows:
Connect to WMP using your credentials
Go to Customers tab; to create a new PBX, you first need to add a customer (if it does not exist yet); click Add:

Create a new customer (company): fill in the fields and click Save:

You need to create at least one contact: fill in the fields and click Add:
Now you can proceed with adding a new PBX: go to PBXs tab:

You are now under PBXs tab, click + to add a new PBX:

Fill in the fields:
Model: select WPBX-CLOUD for Cloud / WPBX-VM/HW for Virtual or Hardware
Region (only for Cloud PBX): select the datacenter region
Name: PBX domain name by which your PBX is accessible via the browser; in the example provided below, the PBX can be accessed by URL https://elenatest2.wildixin.com
Expire: select the recurring billing period: monthly / yearly / 5 years / lifetime (lifetime is not available for Cloud PBX)
PBX-BASIC / UC-Essential / UC-Business / UC-Premium / UC-Wizyconf Room / UC-Wizywebinar / PBX-Service: add the number of users of each profile (more about each profile: https://www.wildix.com/licensing/)
Storage size and enable Static IP (only for Cloud PBX): increase Cloud instance storage size. For more details, refer to the chapter: Increase storage on Cloud PBX
Note Note: Starting from July 1 2021 onward, all PBXs will get a dynamic IP address by default. If you need to reserve static IP for your Cloud PBX, there are several options:
- Switch to CLASSOUND to provide a more modern service
- Ask your provider to switch from the IP-based authentication to the password/login one
- Buy the storage (If you have previously purchased an extra storage, the IP is reserved)
- x-caracal: tick the option to activate x-caracal ACD stats service on this PBX. Important: make sure you add at least 10 Business/ Premium + 1 Premium licenses on this PBX to be able to activate x-caracal. More information on how to activate x-caracal on the WMS side: x-caracal documentation. Important: x-caracal is supported only on Cloud or Virtual PBXs, Hardware PBXs are not supported. Make sure you have the min. required WMS version
MS-PhoneSystem: this is an extension of the teams4Wildix (integration of Microsoft Teams with Wildix PBX). It requires the CLASSOUND service to be activated on the PBX. Important: Make sure you have the min. required WMS version
Click Add; your PBX has been created:

...
| Note |
|---|
For Virtual PBX: before proceeding, follow the guide to deploy PBX image: PBX image: |
Proceed as follows:
- Open the web browser (recommended browser: Google Chrome updated to the latest version)
Type the PBX IP address (https mode is recommended), example: https://10.135.0.1/ (for LAN1) or PBX name set on WMP (Cloud PBX), example: https://mycompany.wildixin.com
Note Note: For access by default local IP 10.135.0.1 where your PC is connected to the LAN1 port, your PC must be in the same network segment as the PBX.
Enter the credentials for the first time access:
user : admin
password : wildix


| Note |
|---|
Note: To change the language of the WMS interface, double click on the “admin” user and select the language from the list. |
| Warning |
|---|
Important! Before proceeding, it is necessary to change the admin password. This admin user is the “super admin” - the only user with full access to all the levels of the system management. |
Change admin password
| Warning |
|---|
Important! On Cloud PBXs, a default admin password is reset after 7 days of uptime. Make sure to change it. In case you face any issues with reset, contact Wildix Support. |
- Select admin user and click Set passwords
- Generate or create a new WEB password, click OkSave
Current password: enter the current password (wildix)
New password: click Generate (green icon) to automatically generate a strong password (click Show to (eye icon) to view the password generated by the system)
 Confirm password: enter the new password again to confirm it
| Note |
|---|
Note: You can also compose your own strong password, consisting of at least 8 symbols, at least 1 uppercase, 1 lowercase, 1 digit, 1 special character. |
| Note |
|---|
Note: This password is used by the admin user to access the WMS interface, while SIP/VoIP password is used to register and assign remote devices. |
- Enter the email address of the admin user to be able to receive email notifications: double click on the admin user and fill in the field Email:


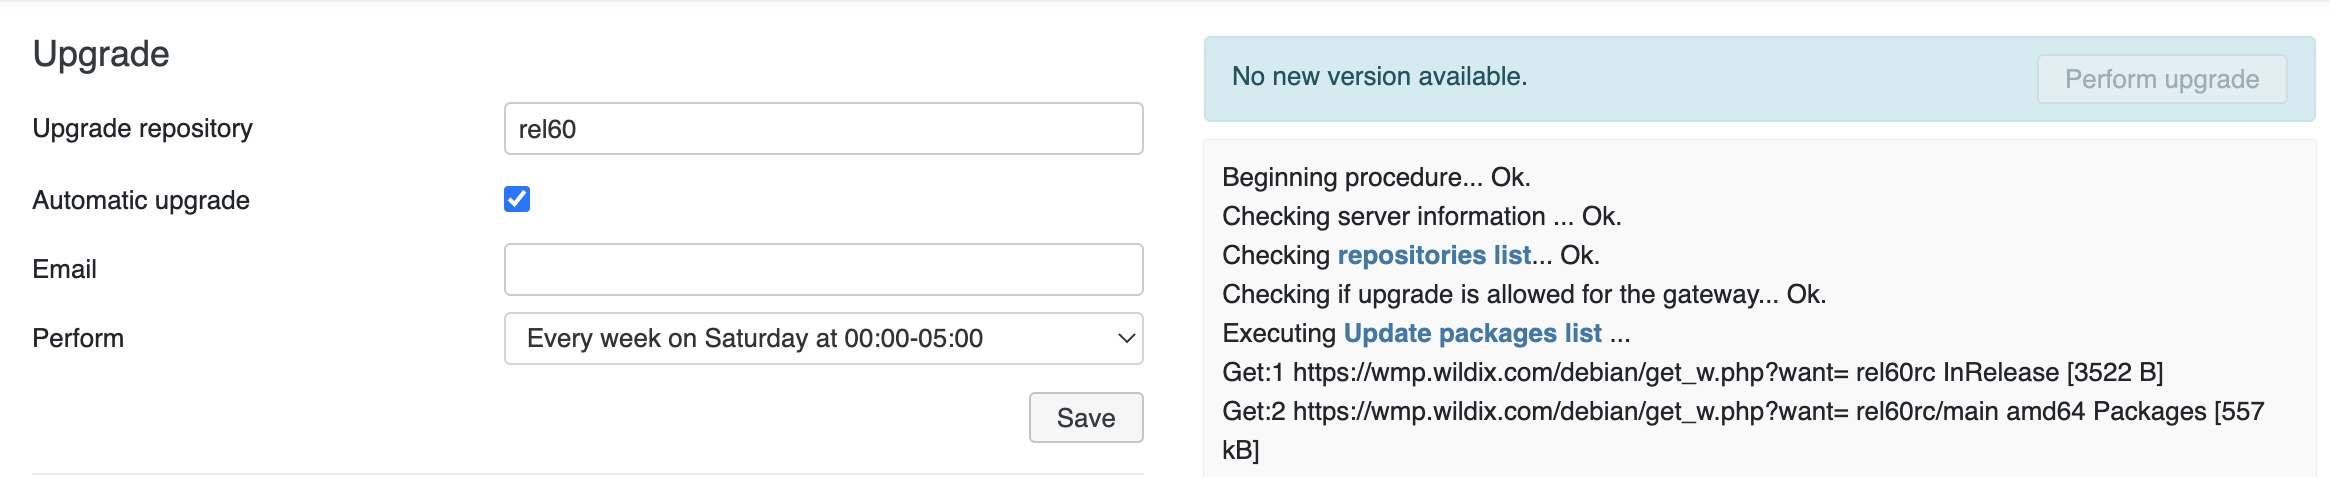
Upgrade WMS to the latest stable release
Go to WMS Settings -> Tools and utilities (1) -> Upgrade .(2):

To upgrade the system, proceed as follows:
The system checks whether there is a new version available in the selected repository: rel50 rel60 / rel40rel50:


| Note |
|---|
Note: Starting from WMS 5.0420220819.1, to be able to upgrade to the next major WMS version in case of WMS Network, e.g. from WMS 5 to WMS 6, WMS Network has to be configured correctly, matching the licences ordered on the Wildix Management Portal. |
| Note |
|---|
For Hardware/ Cloud PBXs: you need to first upgrade your PBX to the latest WMS4 WMS5 version and then update it to WMS5WMS6:
|
In case there is a new version available, click Perform upgrade
As a rule, the Upgrade procedure takes several minutes:


As soon as the update procedure is over, the button Reboot is shown:


Click Reboot and wait till the system is being rebooted:

- As soon as the PBX has been rebooted, the login page appears
- Log in to the WMS, the current WMS version is shown in the upper bottom right part corner of the screen:


PBX Activation (Hardware, Virtual PBXs)
| Note |
|---|
Cloud PBXs are automatically activated after they are created in WMP (see chapter Creation of Per User PBX on WMP). |
- Copy PBX key from WMP:
Go to the tab PBX per user, select your company, then select the PBX that you have created on step 1
Click Copy PBX key to clipboard

Insert the PBX key on WMS side:
Go to WMS Settings -> Tools and utilities -> Activation / LicensesPaste Licenses
In the License actions section, paste the PBX key copied on the previous step into the field User Mode and click PBX Key field:

- Click Activate:


Your PBX is now activated:

Introduction to WMS
After you have successfully activated the PBX and changed the admin password, let’s take a closer look at the WMS interface.
Main menu:
1 - Users: add users, change preferences and passwords, move users from one PBX to another one in WMS network, set up permissions of ACL groups, import phonebooks
2 - Trunks: add VoIP trunks, set up parameters of media gateways, create huntgroups (groups of trunks), import pricelists
3 - Devices: provision devices, assign WP phones and ports of analog devices to users, create W-AIR networks
4 - Dialplan: set up the strategy for call routing, create timetables, switches, create call groups, create IVRs, set up the general Dialplan parameters
- 5 - Settings: system and network configuration PBX: set up WMS Network, set language and region, configure call and chat history settings, SIP-RTP, security settings, and integrations
6 - System: configure LDAP server, SMTP client, FAX/SMS server, NTP server, Remote syslog
- 7 - Tools and utilities: perform system backup, upgrade, see Activation/ Licenses info, generate trace
- 8 - Collapse sidebar: hide the left sidebar panel

Secondary (top) menu:
6 9 - Port blocks: notification (red=error; yellow=warning) in case ports needed for remote trunks / phones are not open (consult the document: Ports used by Wildix services):


7 10 - SIP blocks: click to see the list of temporarily banned IP addresses (in case of unsuccessful login attempt). The icon is visible only in case there are banned devices:


When you click on the button a pop-up window appears displaying if there are any IP bans:
| Note |
|---|
Ability to view the list of blocked IPs and unblock them is limited to the "admin" user |
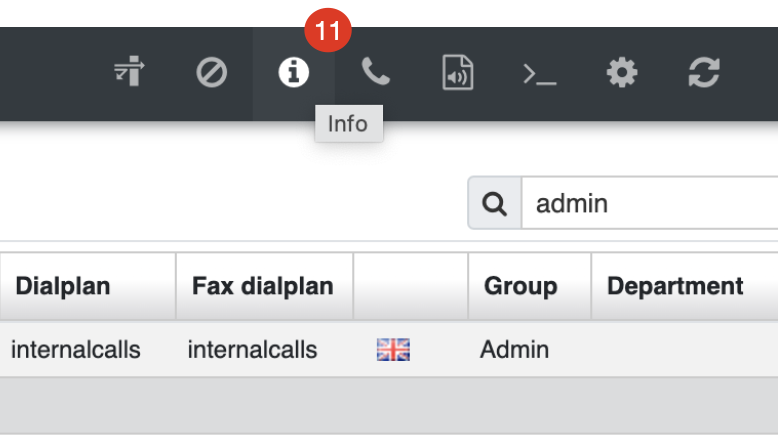
8 11 - Info (available only for the admin user!) : click to open monit application that provides the information on the system performance, the current processes, the resources engaged, etc:


9 12 - Generate call: click to perform a test call or an echo test using a selected Dialplan procedure (you must specify the extension in the input field and you can select the Dialplan procedure to follow for this call):

...

- 10 13 - Sounds: via this menu you can upload music on hold and ringtones, record the messages for operator (More information in chapter Record and playback audio messages); you can generate audio files using TTS (Text-to-Speech), more information: Wildix Business Intelligence - Artificial Intelligence services
- 11 14 - Terminal: access to the console (enabled only for the admin user)
- 12 15 - Debug: click to view the simple log simple log of each call generated on the PBX (More information in chapter Dialplan debug)
- 13 16 - Reboot / Power Off
- 14 - Logout

- 17 - Profile icon: click on the arrow icon next to the user name to access the Logout option

Basic WMS settings
In this chapter we will see the basic settings which you should pay attention to before proceeding with PBX configuration.
| Info |
|---|
For the basic settings of a PBX residing in the USA, please refer to Basic PBX Settings USA. |
Time & date
Go toWMS Settings System -> System -> NTP Server.
Make sure that the time and the date of the PBX are correct and are synced with the NTP server.


Language & Region
Go to WMS Settings -> PBX -> Language & Region.
...
Language: (not to be confused with WMS interface language, which can be selected for the current user in WMS -> Users -> select the user, click Edit) select the default language for this PBX, which means by default all the system sounds are pronounced in this language in case there’s no sound package installed for the language selected by user (e.g. PBX default language is “Italian”, user selected “Dutch”, in case Dutch sound package is not installed, all the system sounds are played back in Italian for this user)
Default Tone Zone: select your country / region
Country Code: select your country code
Time zone: select your time zone
Sounds packages: select the sound packages to be installed (maximum three sound packages can be enabled at a time)


Click Save to apply the changes.
...
| Note |
|---|
Important: Remote support is not available for Cloud PBXs is removed starting from WMS 4.0X. |
Go to WMS Settings -> Tools Tools and utilities -> Remote support.
...
Activation & Licenses
Go toWMS Settings -> Tools and utilities -> Activation / Licenses.
Make sure that the PBX and the Additional services are activated:
Activation System section -> Status: Activated
Additional licenses sectionLicense usage section: Yes in front of each a service


To refresh the licenses you enabled on WMP, click Refresh via Internet.
Storage services (Hardware, Virtual PBX)
Go toWMSSettings -> System -> Storages.
The USB key you have inserted into the PBX serves to store such data as Voicemail messages, call recordings, faxes, CDR, CTI data, etc. It is recommended to store the Backups on another USB drive or on a Windows / NFS Share, to be able to restore the system in case of the primary USB drive’s failure.
The first section Storage Device displays the storage devices mounted at the system startup with the relative table of the partitions and the usage of the specified partition.

Click Initialize under Action column to start the partition and formatting procedure of the storage device.
...
Each time before proceeding with the system upgrade, it is necessary to create a backup.
Go to WMS Settings -> Tools Tools and utilities -> Backup system.
...
Click Generate and download backup to save the backup to your PC
Otherwise click Generate backup to save a backup on the PBX (or on the USB key):

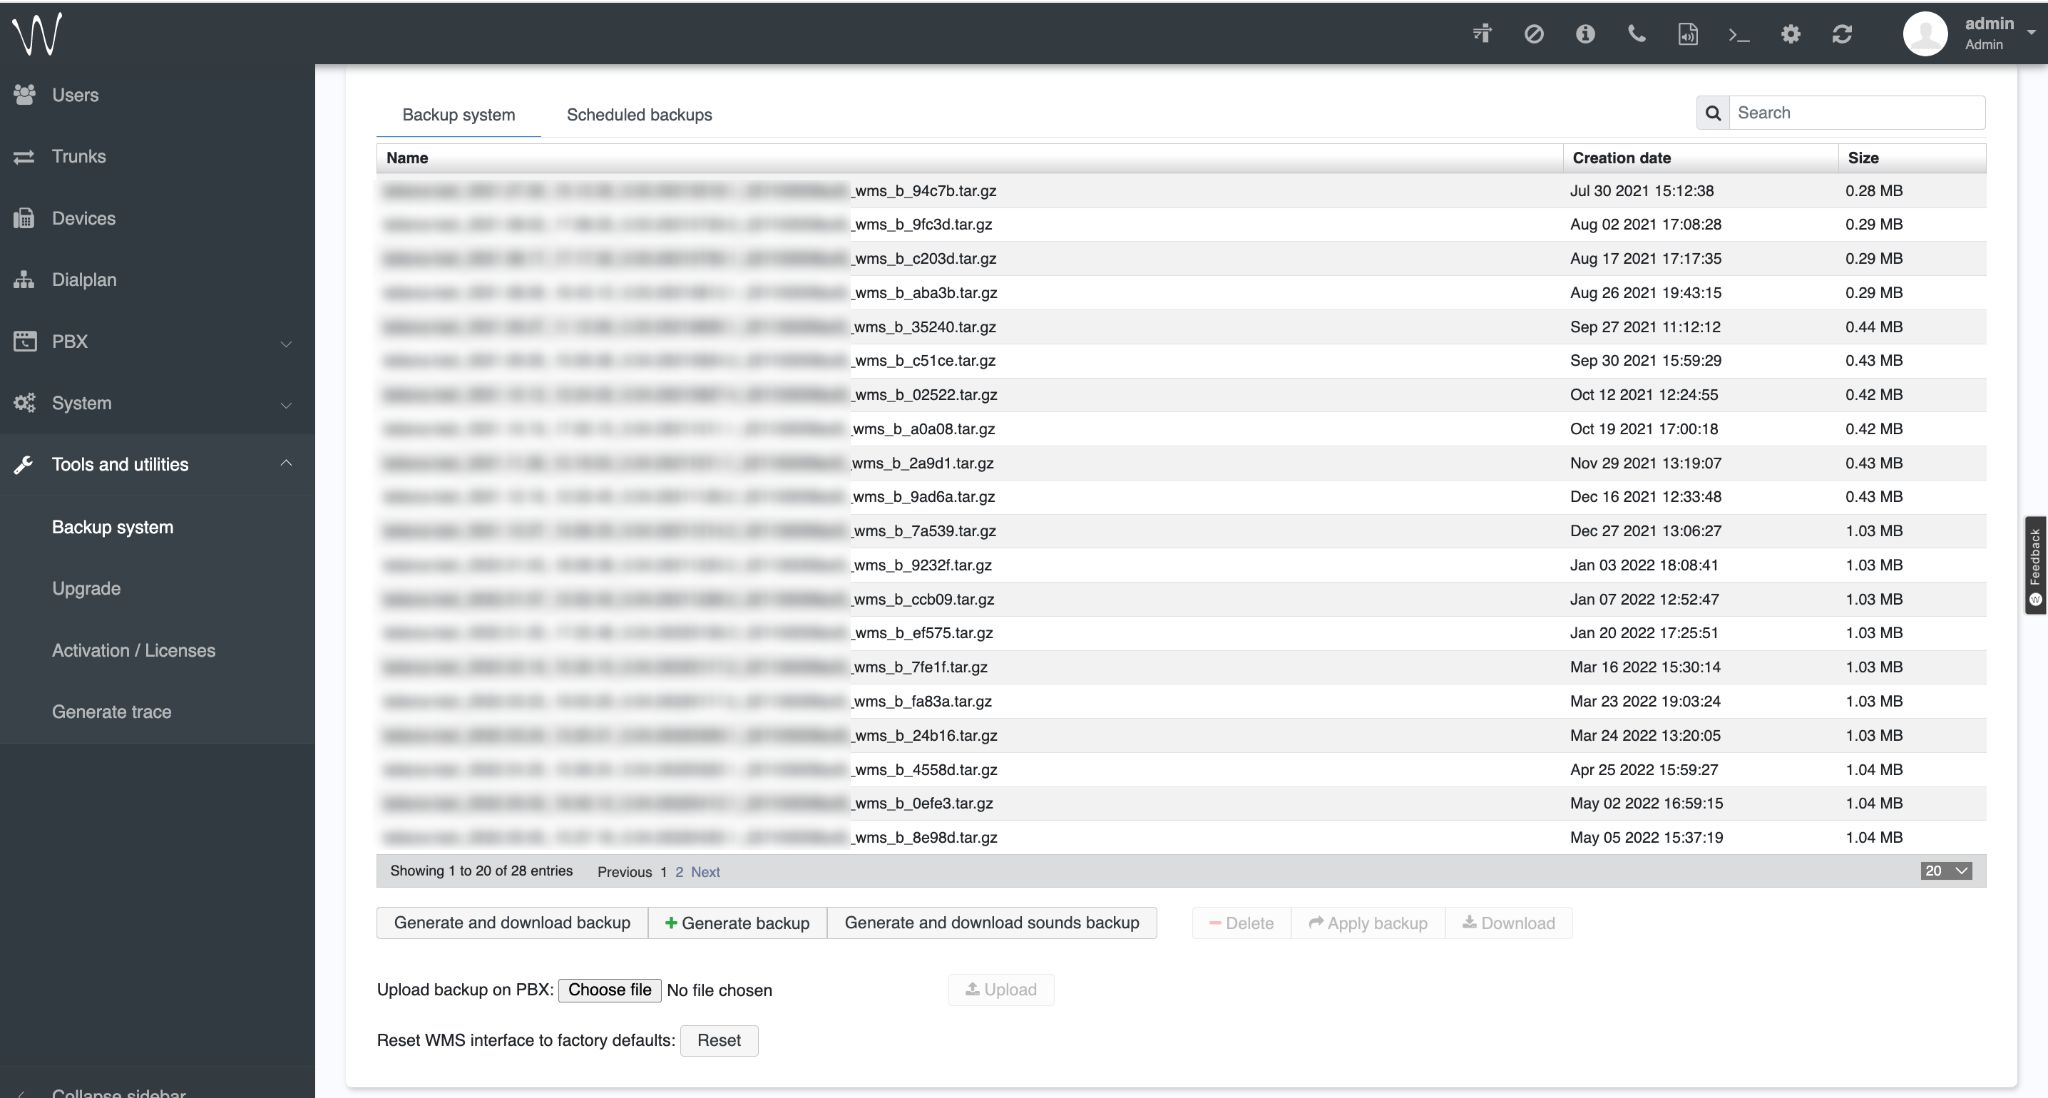
The tab Scheduled backups allows you to set up a scheduled system backup (daily / weekly / monthly) to share, FTP, SFTP or mail. Configuration example:

More details: WMS Settings Menu Guide.
...
| Note |
|---|
Starting from WMS 5.02.20201207.3, weekly automatic upgrade for the Stable repository is enabled by default. You can disable it, but it is re-enabled again after each new upgrade. |
Go to WMS Settings -> Tools and utilities -> Upgrade.
...
Available repositories for upgrade:
- rel60 / rel50 / rel40: stable version, it is recommended to upgrade customers PBXs from this source; changelog: WMS Stable Changelog rel50rel60; /wiki/spaces/DOC/pages/30279960WMS Stable Changelog rel50
- rel60beta / rel50beta / rel40beta: beta version, available for Wildix Partners for tests in the lab before this version becomes stable; changelog: WMS Beta Changelog rel60beta; WMS Beta Changelog rel50beta; /wiki/spaces/DOC/pages/30279395
| Warning |
|---|
Downgrade is not supported! |
DHCP Server (Hardware, Virtual PBXs)
Go to WMSSettings -> System -> DHCP server.
If in the chosen network scenario PBX is used as the DHCP server to assign IP addresses to devices, check that the options of the service are enabled with the correct settings:
DHCP server is integrated for auto provisioning of supported devices. It’s possible to enable the server for the initial configuration of the devices and successively disable it, otherwise to enable the parameter Deny unknown clients.
...
Detailed information can be found in WMS Settings Menu Guide.
SMTP Client
Go to WMSSettings -> System -> SMTP client.
SMTP client enables the PBX to send email notifications about new voicemails, missed calls, chat requests, call recordings, faxes, etc.
...
To add a new SMTP profile, proceed as follows:
Select Default and click EditUncheck the checkbox next to Default settings
Fill in the fields:
Email from: address to be used by PBX to send emails
Note Note: Starting from WMS 5.03, in case of using SMTP client w-smtp.wildix.com, the following email is by default used in the “From” field: no-reply@wildix.com
SMTP mail server: server’s postal address used by the company
Port: listening port of the SMTP server
- SMTP authentication method: choose the authentication method for the SMTP server
- Timeout: select the timeout for the SMTP server to send notifications
User: user name to access the server
Password: password to access the server
HELO domain: domain defined for sending emails. Default value is “localhost”, change it in case anti-spam filters of the SMTP server block sending the message
Enable TLS: TLS protocol enabled for the security of the connection to the server
Enable STARTTLS: STARTTLS option enabled if provided by SMTP
...

Click Save
To make sure that the entered parameters are correct, enter the email address into the field located in the upper right section and click Test
The logs are displayed in the field below and you receive the following email:
...

| Note |
|---|
Note: in case you are encountering problems while creating an SMTP profile using Gmail client, read the guide: WMS Settings Menu. |
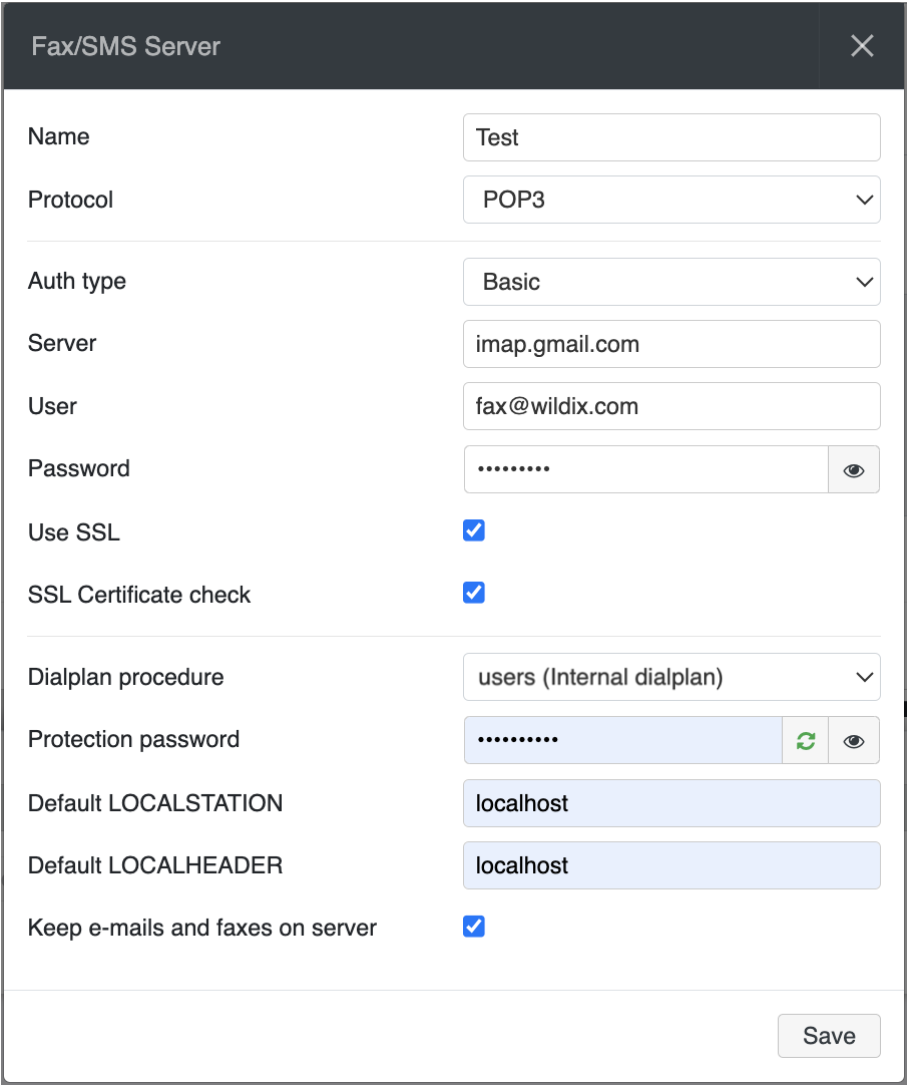
Fax server
Go to WMS Settings -> System -> FAX/SMS Server.
...
| Note |
|---|
Note: SMS sending is possible either through a third-party provider using CURL SMS sending, or using a W01GSM media gateway. More details: WMS Settings Menu. |
To enable FAX/SMS server, proceed as follows:
Enter the email address into the field Send a copy of sent and received faxes and sent SMS to this e-mail:


Click + to add a new FAX Server profile
Fill in the fields:
- Name: enter the name (identifier)
- Protocol: select the protocol of communication with your email server (POP3 or IMAP)
Auth type: select the preferred authorization type, Basic or OAuth2 (the support of OAuth2 for Fax/SMS Server starts from WMS 6.01.20221019.4). Depending on the chosen type, fill out the following fields:
a) In case of Basic Auth type:- Server: settings of your email server to access incoming messages
Use SSL: enables secure connection to the server (required by some email servers)
- User: email address of user to access to the server
- Password: password to access to email address of user specified in the field above
Keep e-mails and faxes on server: enables storing of messages on the server
Dialplan procedure: the Dialplan procedure which manages faxes sent by users (“users” by default)- Use SSL: enables secure connection to the server (required by some email servers)
- SSL Certificate check: allows to disable SSL certificate check, e.g. in cases when the mail server uses a self-signed certificate. The parameter is enabled by default. Note: The support starts from WMS 6.03.20230630.3.
- Auth provider: choose auth provider (Google or Office 365) -> click Login and perform the login
- Dialplan procedure: select the Dialplan procedure to manage faxes sent by users
- Protection password: security password for MAIL2FAX service
- Default LOCALSTATION: sender’s
- sender’s fax machine ID, appears at the top of each page of outgoing fax, if not specified the default value “Fax Server” is used
- Default LOCALHEADER: fax
- fax header to identify the sender, appears at the top of each page of outgoing fax, if not specified the default value “Wildix PBX” is used
- Keep e-mails and faxes on server: enables storing of messages on the server


Click Save
The PBX checks the mailbox and once any new email corresponding to Mail2Fax, Mail2SMS or Fax2Mail parameters are found, the system forwards it to the specified destination.
More information on Fax Server: FAX/ SMS Server Quick Admin Guide.
Call & chat history
Go to WMS Settings -> PBX -> Call and chat history.
To be able to store call and chat history, you must enable a CDR backend. You can also enable contact notes and set up different options that allow auto-deleting of old calls, chats, voicemails and recordings after a specified number of months. Detailed information can be found in WMS Settings Menu Guide.
For Cloud PBXs you don’t need to specify a backend, just make sure that the box Enabled is checked:


| Note |
|---|
Note: Starting from WMS Beta WMS 6.01.20220721.1, it is possible to set up backend for storing chat and call history (CDR) for Cloud PBX. |
...
Configure at least one CDR backend: go to one of the tabs CDR MSSQL, CDR MySQL, CDR Sqlite and enable connection to the server; example of MSSQL/MySQL configuration:
Enabled: Check the box to enable the backend
Hostname: The name or the IP address of the remote server
Database name: The existing database where the CDR must be saved
CDR Table name: The name of the table that the PBX creates on the remote database
User: The user to access to the server
Password: The password to access to the server
Port: specify the port used


Click Save
Go to the first tab CDR Settings and select the backend used for displaying CDR statistics:
CDR-backend: select here the CDR backend (more information on other fields can be found here: WMS Settings Menu Admin Guide)

Click Save
For each backend there is a log shown in the right part of the screen, with the actual status and eventual errors.
...
Calls history can be accessed from Collaboration, WP, iOS / Android apps (W-AIR shows only local call history).
| Note |
|---|
Note: It is possible to configure SSL connection for sending CDR data to external MySQL server. See the following guide for instructions: Custom config parameters List: Enable SSL connection to remote MySQL server. |
SIP-RTP
Go to WMS Settings -> PBX -> SIP-RTP
The default parameters present on this page are set up in accordance with VoIP protocol.
...
Auto discover external IP address (Hardware / Virtual PBX): enable to automatically discover the public IP address using DynDNS website url entered into the field below
DynDNS website url (Hardware / Virtual PBX): the URL of the service used to discover the public IP address (http://checkip.wildix.com/ by default)
External secure port (Default 443) (Hardware / Virtual PBX): this option allows you to enter a different port used for TLS connections
Auto add new devices in local networks (Hardware / Virtual PBX): must be enabled to allow auto-configuration of Wildix devices via auto.wildixin.com (the option is enabled for 2 hours after which it is automatically disabled)


Click Save to apply changes. More information on SIP-RTP settings can be found here: WMS Settings Menu Admin Guide.
...
Park call timeout: timeout in seconds for return from park orbit. Make sure you define the value for a call to return from Park Orbit; more information about parking feature: How to implement the Parking feature
Prefix for external line: prefix to get the outside line (0 by default)
International Prefix: prefix to call abroad (00 by default)
National Prefix: prefix to call within your country (0 by default)
Internal call default timeout: timeout after which the call to another user is forwarded (if forwarding is enabled in user preferences) or terminated
First digit timeout (secs): timeout after which the call is terminated in case there is no input (time countdown starts if the handset is raised)
Interdigit timeout (secs): timeout in seconds after which the number is dialed automatically unless the user presses the Send call key on the phone
Send call key: it’s possible to select #, *, or None as a send key
Playback tones while entering number: if enabled, DTMF tones are played
Quality of recorded voicemails / recordings: choose the optimal quality and file size
Send mail notification after the record is complete: if enabled, users receive notification by email after the record is complete
Attach files with records to emails: if enabled, users receive recording files attached to email notification
Convert Voicemails to text and send by email: if enabled, Voicemails are converted to text and sent to user by email (read the guide Wildix Business Intelligence - Artificial Intelligence services for more information)
Notify by email in case SIP trunk registration status is changed: if enabled, the PBX admin receives notification about SIP trunks changing their registration status
Announce date, time and caller phone number for Voicemail messages: if disabled, user is invited to press a key in Voicemail IVR menu in order to hear date, time and caller phone number for each Voicemail
Set dialplan variables: this field allows setting Custom Dialplan variables; documentation: Custom Global Dialplan Variables List
Set quick dial patterns: this field is used only for the first generation of WP phones (pre 2015)!


WMS Network
Introduction to WMS Network
...
Multisite environment: you need to enable flawless communication between different offices of the company
Failover / redundancy or load sharing: one PBX is the primary, another PBX is the secondary (backup PBX), which works in idle mode and receives all the updates from the primary PBX; in case of the primary PBX failure, the secondary PBX takes on, ensuring the continuity of the service. In this case all the devices have a double SIP registration (both to the Primary and the Secondary PBX). Read the guide: Failover Read Failover - Admin Guide.
Wildix system supports Hybrid scenarios, where Hardware, Cloud and Virtual PBXs can be connected in the same WMS Network.
Sharing of Wildix licenses is possible in WMS network. More information: https://confluence.wildix.com/x/twM8AQnetwork. More information: PBX Licensing and Activation - Admin guide.
In this guide we will show how to deploy the WMS Network for a multisite scenario.
...
Presence status of users and internal communication free of charge (pay only for Internet connection)
Users database resides on a distributed LDAP server; each user added to the system is immediately visible and can be contacted by other users of the system
Roaming profile: users can move between the sites of the company while keeping the same number and user preferences
One PBX in the network is assigned as the Server: any change that take place on a Client PBX first is passed to the Server and then from the Server to other Clients
Auto sync of users, call groups and ACL configuration between the PBXs in the WMS Network allows for significant time savings on configuration and maintenance
Direct peer-to-peer communication between PBXs, in case direct connection between two Clients is impossible, they can use Server as a proxy
WMS Survivability: continuity of internal and external calls in case one PBX in the network (including the Server) becomes unavailable
WMS Auto-recovery: in case of Server failure, another PBX in the WMS Network dynamically takes up all the functions of the Server
Local survivability: a Client disconnected from the network continues to operate, but without the possibility to receive the users database updates
Each PBX has its own local lines, users, IVRs and Dialplan procedures, however it’s possible to set up the Dialplan to route calls via a different PBX in the WMS Network, thus using its local lines (even in a different country
- Up to 1000 nodes in WMS 5 (256 in WMS 4)
- Up to 5000 users on one PBX in WMS 5 (1000 in WMS 4)
- Up to 500 concurrent calls
- Up to 100k users in WMS network
...
If PBXs are remote and communicate via Internet, it’s necessary to allow outgoing traffic on 443 TCP (or custom secure port) and 1194 UDP on firewall / router on the side of the Client PBX towards the Server PBX.
Go to WMS Settings -> PBX -> WMS Network.
Server configuration:
PBX modeData Sync Role: select Server
MTU: specify the size of the largest protocol data unit that the can be passed on VPN (MTU = maximum transmission unit)
Login: set up the Login (must be the same on Server and Clients)
Password: set up the Password (must be the same on Server and Clients)
Click Start to enable WMS Network:


Client configuration:
Data sync modeSync Role: select Client
Server PBX IP: specify the WAN IP of the Server PBX (or the *.wildixin.com domain name)
MTU: same as on Server PBX
Login: same as on Server PBX
Password: same as on Server PBX
Click Start to enable the Client mode on this PBX:


Go to WMS Users -> PBXs: now you can view all the PBXs in your WMS network and click on the Host name to connect to any of these PBXs.


| Note |
|---|
Notes:
|
Adding / importing users and phonebooks
| Warning |
|---|
Starting from WMS version 4.01.44168.28, it It is required to set licenses per each user! Consult Assign correct license type to each user for detailed information. In case the number of licenses used was exceeded, users do not lose access to any functionality, but the system administrator is informed with the notification:
The system administrator can also check the number of licenses bought and used in WMS Settings -> Tools and utilities -> Activation / Licenses. |


...
To add a user, click + and enter the parameters into the table:
UserRole: select type User
Full Name: enter the user’s full name
Note name
.Login: this field is used for login with Active Directory credentials (read more: Import of Contacts and Users Guide/ Active Directory)
Extension: the extension number (normally in format 1XX, 2XX)
Fax and : DID number for faxes
Office: DID number for faxes and calls
Email: personal email address for notifications (Voicemail, call recordings)
Note Important: user's email should be unique. The same email cannot be used twice.
MobilityMobile: personal mobile number for mobility extension management (mobility feature allows making and receiving calls to mobile number via the company PBX)
Dialplan: dialplan procedure for outgoing calls, by default “users”
Fax dialplan: dialplan procedure for sending faxes from Wildix Collaboration, by default “users”
Language: language of the interface and system sounds
Group: ACL group, by default “default”
Department: in Collaboration web interface, users are by default grouped by their Group (ACL group) in roster; however if Department field is specified, users are grouped by Department field.
| Warning |
|---|
Difference between Group and Department fields:
|
- License type: assign a license based on needed functionalities, more information: https://www.wildix.com/licensing/
Click OkSave to save a new user:


Users are displayed in the table:


The first column displays an icon representing the user type:
...
Description of parameters:
1 - +Add: add user
2 - Edit: change the same parameters, which are available upon adding a user
3 - -Delete: delete one or multiple users
Note Note: It is possible to remove user's personal data (calls, chats, voicemails, phonebooks, recordings, faxes) when deleting this user. Refer to section Delete user data
Limitations:
- the feature works for standalone PBXs or for WMS Networks PBXs which share the same MySQL or MSSQL DB
- if a user to be deleted is an owner of contacts in shared phonebooks, than contacts remains without an owner
- voicemails left via FC "Voicemail: 81 are not reset (but it is possible to reset them via Terminal, consult this Article)
4 - Set passwords: change user passwords; for security reasons only the admin user can set passwords for other admins of the system; by default strong passwords are automatically created by the system, read more about changing user passwords in chapter Set user passwords
5 - Edit preferences: manage user preferences and phone features, for details, see chapter User preferences
6 - Send Welcome Message: send a message to newly created users with details of access to Wildix Collaboration (URL, login, password); for security reasons, only the admin user can send welcome messages to other admins of the system
7 - the system, read more about changing user passwords in chapter Set user passwords
5 - Edit preferences: manage user preferences and phone features, for details, see chapter User preferences
6 - Invite to Collaboration: send a message to newly created users with details of access to Wildix Collaboration (URL, login, password); for security reasons, only the admin user can send welcome messages to other admins of the system
7 - Export CSV (available only for the admin user): save a CSV file containing users information in *.csv format to your PC
8 - Import: import users from MySQL / MSSQL, LDAP / AD, Google, Office 365, Exchange Server, CSV file, Zoho CRM, other resources; more information in chapter Import of users and phonebooks
- 9 - Search field. Note: results may be displayed in non-alphabetical order.
- 10 - Filter: choose the fields that should be displayed on the Users tab:

Clicking on the field names (e.g. Extension, Mobile, Group, etc.) you can sort users. Starting from WMS 6.03, the following sorting rules applied:- Empty values are placed at the end of the list while ascending sorting.
- Sorting by user registration is not available.
In case of WMS Network, there are also the following options:
- 11- Move users to another PBX: in case of WMS Network, you can select one or more users and move them to another PBX in the network
8 - Export CSV (available only for the admin user): save a CSV file containing users information in *.csv format to your PC
9 - Import: import users from MySQL / MSSQL, LDAP / AD, Google, Office 365, Exchange Server, CSV file, Zoho CRM, other resources; more information in chapter Import of users and phonebooks
10 - 12 - Select PBX: in case of WMS Network, you can select to view users of a different PBX in the Network or to view all the users registered to all the PBXs in the WMS Network 11 - Search field

Set user passwords
The first time you connect to the WMS, you are required to change the generic admin password.
...
To set user passwords, select a user in WMS -> Users and click Set passwords:
WEBNew password: password used to access WMS/Collaboration
SIP/VoIP - password to assign and provision non-Wildix devices

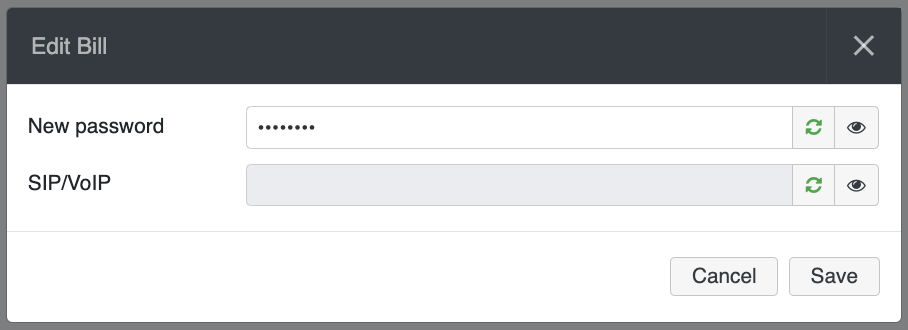
For security reasons, this configuration window allows only setting new passwords, but it doesn’t display previously created passwords.
Click Generate to (the green icon) to automatically generate a strong password
Click Show (the eye icon) to see the newly generated password
Otherwise enter your own strong password into the fields, consisting of at least 8 symbols, at least 1 uppercase, 1 lowercase, 1 digit.Click Ok to apply the changes.1 digit.
Click Ok to apply the changes.
| Note |
|---|
Note: Starting from WMS 6.01.20221019.4, when admin changes password of a user via WMS (WEB/ SIP password), all active sessions of the user are dropped and user is logged out. In case of changing SIP password, automatic logout is applied for web Collaboration only. |
User preferences
To edit user preferences, select a user and click Preferences -> Edit preferences from WMS -> Users.
| Note |
|---|
Note: Many of the settings present in this menu, can be modified directly by user from Collaboration -> Settings; Call features can be also modified from WP and via Feature Codes (more information on system feature codes: Feature Codes and Pre answer Services Guide). |
To copy preferences from user(s) and apply them to other users:
| Note |
|---|
Note: Copying user preferences is available starting from WMS 6.03.20230424.1. |
- Choose user(s) you want to copy preferences to
- Click the Preferences -> Copy preferences from user

- Select the source user whose preferences you want to apply to the selected user(s) and click Save:

Features: call features for different call classes
...
| Note |
|---|
Call classes can be set for Contacts in Collaboration -> Phonebook, more information in Collaboration user guide (Phonebook chapter): Collaboration 5.0X / Collaboration 4.0XUser Guide. It is also possible to set the call class via Dialplan applications Set / Jump to if call type is, more information in Dialplan applications guide: Dialplan applications Admin Guide. |
...
- Activate the class: by default, all the settings are applied for Internal call class; to set up call Features for a different call class, first select the needed call classes, then enable the checkbox for the selected call class
Call reject: reject all callsReject all calls: if enabled, calls are rejected
Call Forward Busy / No Answer / All: you can enable call forwarding in case user is busy / does not answer or unconditional call forwarding; enter the destination number or the VOICEMAIL into the field
Call waiting: enable the option to be able to receive more than one call at a time
Call timeout: if enabled, the call is terminated in case there is no answer within the specified timeout; enter timeout in seconds into the field
Mobility extension management: if enabled, the call is forwarded also to the user mobile phone number (mobile phone number must be specified for this user in WMS -> Users -> Edit) after the specified timeout; enter timeout in seconds into the field
Mobility confirmation: if enabled, the user is notified on who the caller is once he receives the call to mobility extension number, and is invited to enter the digit to accept the call
Notify missed calls via email / via sms: enable missed calls notification to email / via SMS
Custom Ring: enable the option and select the ringtone; ringtones selected here are applied to WP4X0, WelcomeConsole and Collaboration; Custom ringtones can be uploaded via Sounds menu (more information in chapter Record and playback audio messages)
...
Shared voicemail: enable this option to subscribe to the Voicemail of another user; enter the extension number to subscribe to; user receives notification to Collaboration / WP about new Voicemails arrived to the mailbox he/she is subscribed for and can listen to it
Hotline: if enabled, the number entered into the field is automatically dialed once the user lifts the handset (supported on WP4X0 2015, FXS gateways 2014-2015); indicate the timeout in seconds in the field
Call waiting tone: if enabled, phone user receives audio notification in case of second incoming call
Ring only active device: read more in Collaboration User Guide -> Settings -> Personal: Collaboration 5.0X / Collaboration 4.0X User Guide.
- Notify unread messages via email: if enabled, user gets notifications about unread messages via email (disabled by default)
Two-factor authentication: read more in Collaboration User Guide -> Settings -> Personal: Collaboration 5.0X / Collaboration 4.0X User Guide.
Phonebooks: select the Phonebooks which can be accessed by user from Collaboration and WP; move the phonebooks from Available to Selected section
Date format / Time format: date and time format to be displayed in Collaboration (Messaging, History pages, CDR-View etc) and on Wildix devices except W-AIR Headsets (must be set up on device)
Function keys: set up the BLF keys for WPNote Note: Wildix devices support 2 date formats: "www dd mmm" and "www dd mmm". Depending on the selected format in Collaboration (European: "dd/mm/yyyy", "dd mmm yyyy", "dd-mm-yyyy", "dd.mm.yyyy" or US: “mmm dd yyyy”/ “mm/dd/yyyy”/ “mm-dd-yyyy”), the date can be displayed as, for example, "Tue 6 Nov" or "Tue Nov 6".
Popup URL: allows specifying the URL to open upon receiving / placing a call; read more in Collaboration User Guide -> Settings -> Personal: Collaboration 5.0X / Collaboration 4.0X
6".
Popup URL: allows specifying the URL to open upon receiving / placing a call; read more in Collaboration User Guide -> Settings -> Personal: Collaboration User Guide.
Function keys: set up the BLF keys for WP; read more in Collaboration User Guide -> Settings -> Function keys: Collaboration User Guide.
Predefined statuses: temporary user statuses (Do not disturb / Away) defined here can be later on set by user from Collaboration, read more in Collaboration User Guide -> Settings -> Chat / Presence: Collaboration User Guide.
- Limit call groups: if enabled, call groups to which users can dynamically log into are limited (Contact center feature in Collaboration/ on desk phones and via Feature code), read more in Dynamically added call group members
Contact Center: if enabled, users are dynamically logged into Call groups; read more in Collaboration User Guide -> Settings -> Personal: Collaboration User Guide.
Company / Fax machine id / Fax header / Company logo: Fax cover settings; read more in Collaboration User Guide -> Settings -> Function keysFax Server: Collaboration 5.0X / Collaboration 4.0X
Predefined statuses: temporary user statuses (Do not disturb / Away) defined here can be later on set by user from Collaboration, read more in Collaboration User Guide -> Settings -> Chat / Presence: Collaboration 5.0X / Collaboration 4.0X
- Limit call groups (WMS 4.0X): if enabled, call groups to which users can dynamically log into are limited (Contact center feature in Collaboration/ on desk phones and via Feature code), read more in Dynamically added call group members
Contact Center: if enabled, users are dynamically logged into Call groups; read more in Collaboration User Guide -> Settings -> Personal: Collaboration 5.0X / Collaboration 4.0X
Company / Fax machine id / Fax header / Company logo: Fax cover settings; read more in Collaboration User Guide -> Settings -> Fax Server: Collaboration 5.0X / Collaboration 4.0X
- Сall groups / Pickup groups (WMS 4.0X): define call and pickup groups to allow users to pick up call group calls: Call and Pickup Groups
- Identities (WMS 4.0X): specify identities of numbers for outgoing calls: Identities Feature
...
- Сall groups / Pickup groups: define call and pickup groups to allow users to pick up call group calls: Call and Pickup Groups
- Identities: specify identities of numbers for outgoing calls: Identities Feature
- Web CRM (available starting from WMS 6.04.20230731.1): allows opening a web application inside Collaboration; read more in Collaboration User Guide -> Settings -> Personal: Collaboration User Guide.
Roster: select the users which appear in Wildix Collaboration -> Colleagues; move users from Available to Selected section.
Delete user data
Starting from WMS 6.01.20221019.4, there is possibility to choose which user data (personal data, voicemails, etc.) has to be deleted.
1. In WMS -> Users, choose a user or group of users and click - Delete
2. Select the data to be deleted:
a. You can either choose All data:

b. Or untick All data and choose which data needs to be removed. The list of options you can choose from:
- User (without deleting user data)
- Remove user avatar
- Personal data (avatar, mobile phone, email, new passwords)
- Voicemails
- Voicemail greetings
- Calls (history, records, faxes)
- Chat history
- Phonebooks
- Call group member
- Missed call manager
- Paging group member
- Applications (s2s, simple token)
- Unassign devices

3. Once necessary data is selected, click Delete:

Import of users and phonebooks
...
For more information about configuration of each backend read the guide Import of Contacts and Users.
Provisioning of devices
...
Wildix PBX
...
Wildix PBX supports different provisioning modes:
...
Wildix gateways (PRI, BRI, DaySaver, FXO, FXS)
WP4X0, WelcomeConsole, WorkForce
- Start 5, WelcomeConsole 5, WorkForce 5, ForcePro 5
W-AIR base stations
For provisioning of Vision/ SuperVision, see chapter Provisioning and login of Vision / SuperVision.
...
Go to WMP -> PBX per user -> select the customer -> select the PBX -> click Devices icon:


Click +:


The list of all your available devices is displayed; select only those devices that you want to assign to this PBX and click Add:
...

Power on / connect devices (WP phones, media gateways, W-AIR bases) to the network
Go to WMS -> Devices: the added devices are displayed in the table:


How to understand that devices have been provisioned:
...
Watch the video tutorial:
| Scroll only inline |
|---|
https://youtu.be/kAvKgv1Rz3Y |
| easy-html-macro |
|---|
<div class="container">
    <div class="video">
<iframe width="560" height="315" src="https://www.youtube.com/embed/kAvKgv1Rz3Y?rel=0" frameborder="0" allow="autoplay; encrypted-media" allowfullscreen></iframe>
</div>
</div> |
...
Make sure the option in WMS Settings -> PBX -> SIP-RTP, Auto add new devices in local networks is enabled: when it's enabled, devices are added and provisioned automatically in local networks.
...
Auto-provisioning mode is available for Wildix devices connected to the local LAN or remote network (VPN)remote network (VPN).
| Note |
|---|
Note: Auto-provisioning is supported on old generation Wildix Phones (pre 2024) only. The new Wildix Phones 5 (2024) are not supported. |
Proceed as follows:
Power on / connect WP4X0 / media gateways / W-AIR base stations to the network
Make sure that all the devices have received the IP address from the DHCP server of the network (PBX or external DHCP)
Go to WMS Devices -> Devices
Click +Add
Select Automatic mode and click Next


Click Scan; you can specify the IP range in the Search field located just above the table:


Select your device(s) on the list and click Next
Wait till device(s) Status changes from Provisioning to Provisioned


Provisioned devices are displayed in the table
...
Power on / connect WP4X0 Wildix phones media gateways to the network.
Make sure that all the devices have received the IP address from the DHCP server of the network (PBX or external DHCP).
Go to WMS Devices -> Devices
Click +Add to add a new device
(Hardware, Virtual PBX) Select Semi-Automatic mode and click
Click Next:


Enter the device’s Mac Address (Mac address can be normally found on the backside of each device):


The provisioning link has been generated:
Copy the link address of the Provisioning URL
Provisioning link format:
http://[PBX_IP]/?action=setaps&config=xml (W01GSM)
http://[PBX_IP]/?action=setaps (other devices)


Access the web interface of the device and insert the provisioning link
In this specific example we are provisioning a WP4X0G phone: enter credentials for the first time access: admin : admin
Go to the menu Upgrade -> Advanced:


- Click AutoP Immediately
- Device is now rebooting (the phone screen indicates that the device is rebooting
- After the reboot, date and time, BLF keys and login0X are displayed on the screen
- Go to WMS -> Devices: provisioned device is now displayed in the table:
...
All the devices connected to the PBX (provisioned or not) are displayed in the table:


- 1 - + Add: add a new device via Auto-provisioning or Semi-provisioning mode
2 - Edit: edit device settings for one or multiple devices:
Comment: unique identifier, displayed in the Comment column of Devices table
Default zone / Tone zone (FXS/FXO): select the country / the geographical area for the correct tone recognition
DNS Server / Secondary DNS / NTP Server / NTP Zone: allows setting DNS and NTP settings, which can be useful in some network scenarios, e.g. with remote devices
Use DST: enables automatic switching to DST
Voice VLAN ID / CoS voice priority / Data VLAN ID / CoS data priority: allows setting priority for Voice and Data traffic and assign VLAN IDs
Use received IP: enables static IP
Syslog Server: you can specify the server IP address to which you would like to send syslog (Documentation: How to collect syslog from Wildix devices)
SNMP Access (BRI, PRI, W-PA, some of WP4X0): authorizes SNMP monitoring on devices (it is also possible to authorize SNMP monitoring of the PBX in WMS Settings -> System -> SNMP Server)
Disable SIP Firewall (BRI, PRI, FXO, W-PA, GSM): it is necessary to enable this parameter in some complicated network scenarios, where a SIP Firewall is present between the PBX and the connected devices
3 - - Delete: delete one or multiple devices
4 - Configure / Sync device: send new configuration to one or multiple devices
5 - Assign to user: assign WP4X0 and W01FXS to users; more information in chapter Assign WP4X0 to users
6 - Sync from WMP: sync devices, assigned to this PBX from WMP; more information about WMP provisioning in chapter WMP Provisioning (Hardware, Virtual, Cloud PBX)
7 - Reset password: in case there is a risk that the provisioning password (displayed in the column Password) of one or several devices has been compromised, it’s possible to reset it without resetting the device: select one or multiple devices, click Reset password to reset the password, then click Configure / Sync device to assign a new password to the device
8 - i: the blue icon indicates that there is a new firmware version available; more information about firmware upgrade in chapter Update firmware
9 - Status icon: displays the device status, hover over it to see additional information (SRC port, transport used):
Green: device is registered (connected via SIP)
Grey: device is not registered
10 - Model: for provisioned devices, the model is indicated correctly (e.g. wp480gr3), for not provisioned devices, only the device type is indicated (e.g. phone) in this column
11 - Connect: enable / disable direct access to device (available for non-Cloud PBXs for devices which are in the same network as the PBX); more information is available in the guide Provisioning of Wildix devices
12 - Extension: available for WP4X0 and W01FXS, displays the extension, this device is assigned to; displays loginX in case device is not assigned
13 - Firmware: the current firmware version
14 - Password: password to access device’s web interface after provisioning; password is displayed only for provisioned devices
15 - Search field
...
| Note |
|---|
Note: a new FW notification is not indicated for BRI/ PRI media gateways. To update their firmware, upgrade your PBX to the latest version. Within half an hour after the procedure is over, media gateways are automatically updated. |
| Note |
|---|
Note: Starting from WMS 6.05, all devices’ firmwares was moved from PBX to CDN (content distribution network). In case of Hardware/ Virtual PBX, make sure to grant access to wps.wildix.com and firmwares-cdn.wildix.com via port 443. No changes required for Cloud PBX. When the PBX gets firmware, local cache is created, after which the device starts upgrading. |
Assign WP4X0 to users
After you have provisioned WP phones, proceed with assigning phones to users.
...
Go to WMS -> Devices
Select a provisioned WP phone
Click Assign to user
Select the user from the list (the option Unknown allows you to log out a phone that had been previously assigned):

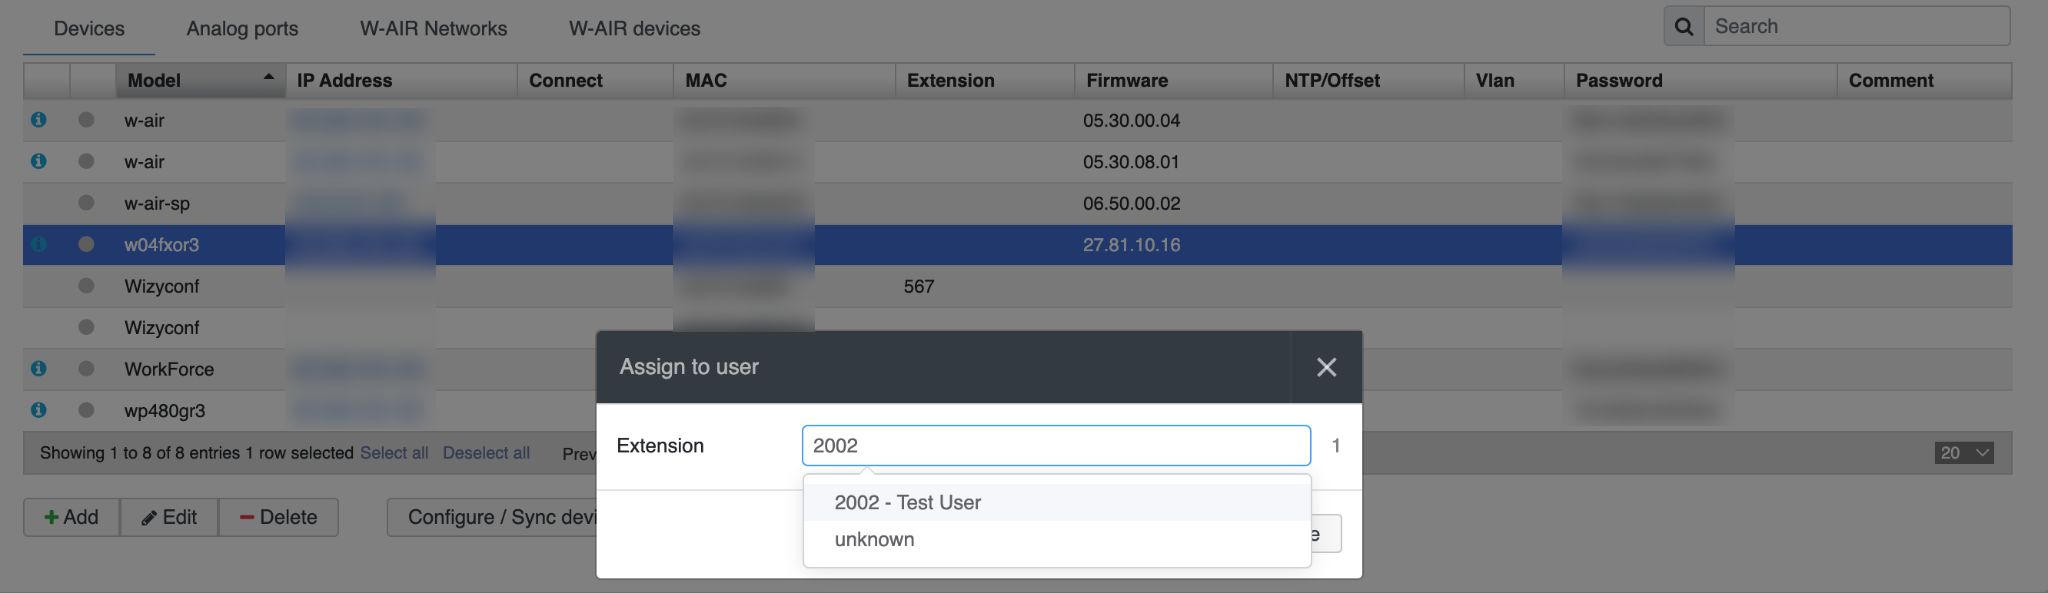
After a few seconds, loginX, previously displayed under Extension column has changed to the extension number of user:
...
To enter any lowercase and uppercase letter, press ONCE a corresponding digit
To enter special characters (%, ^, &, etc), press the star key (*)
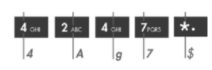
Example: if user password is 4Ag7$Zl@, then you have to dial 4247*

Dial 1 to use this phone, when requested
After a few seconds, extension is displayed on the phone’s screen; the phone is now assigned can be used to make and receive calls
...
To correctly install FXS media gateways and connect analog devices, read Quick Installation Guides:
- W02FXS 2018: https://confluence.wildix.com/x/7wBOAgW04FXS 2020: https://confluence.wildix.com/x/FYK5Aw W02FXS 2018 Quick Installation Guide
W24FXS 2015: https://confluence.wildix.com/x/gwg8AQW24FXS 2015 Quick Installation Guide
After you have provisioned FXS media gateways, proceed with assigning analog ports to users.
...
- Double-click on the gateway
- Assign analog ports to users and click Save:


Assigned ports are displayed in the table:


| Warning |
|---|
Known limitation: It is not recommended to set TCP/ TLS protocols when using W24FXS as the device can not receive more than 3 calls simultaneously. To overcome the limitation, you can set UDP as a transport protocol via the custom provisioning parameter:
|
...
Connect the phone to the network
After the phone has booted, Login page of the Wildix Phone application is displayed
Enter your credentials:
Domain: PBX IP address or domain name
User name: extension number (user name or email address are also accepted)
Password: user’s WEB password


Click the Login icon (arrow), situated in the upper right part of the screen
Go to Phone application Settings -> Advanced and click Check for Updates
In case there is a new version available, follow the instructions on the screen to perform the update
Video tutorial:
| Scroll only inline |
|---|
https://wildix.wistia.com/medias/z6n4lhesqn |
| easy-html-macro |
|---|
<div class="container"> <div class-="video"><div align="center"> <iframe src="https://fast.wistia.net/embed/iframe/z6n4lhesqn" title="Wistia video player" allowtransparency="true" frameborder="0" scrolling="no" class="wistia_embed" name="wistia_embed" allowfullscreen mozallowfullscreen webkitallowfullscreen oallowfullscreen msallowfullscreen width="560" height="315"></iframe> <script src="https://fast.wistia.net/assets/external/E-v1.js" async></script> </div></div> </div> |
...
Base station: the basic component of the DECT infrastructure
W-AIR Sync Plus / W-AIR Sync Plus Base Outdoor: multicell, up to 4000 bases, up to 16000 users, up to 8 concurrent calls per base, up to 8 handovers
W-AIR Small Business (SB): single cell, up to 20 users, up to 10 concurrent calls
Repeaters: this optional component allows extending the signal coverage of the base station
Wireless handsets / headset: choose one of the models of handsets W-AIR Basic Basic2 / W-AIR 100 (End Of Life)/ W-AIR LifeSaver/ W-AIR Med/ W-AIR Office and W-AIR Headset. Detailed documentation: W-AIR DECT Handset - User Guide, W-AIR Headset User Manual
...
Go to WMS -> Devices -> W-AIR Networks
Click +Add
Enter the name of the network into the field Name; do not edit the field Code to avoid problems with adding repeaters to the system
Select the MAC address of the base station from the left section and move the selected item to the right section using the arrow button
For W-AIR Sync Plus: check off "Sync Plus via Ethernet" option to enable sync over cable
Note Note: The option can be enabled only for W-AIR Sync Plus Base stations. If you add W-AIR Base Outdoor to the Network, the option is disabled automatically.

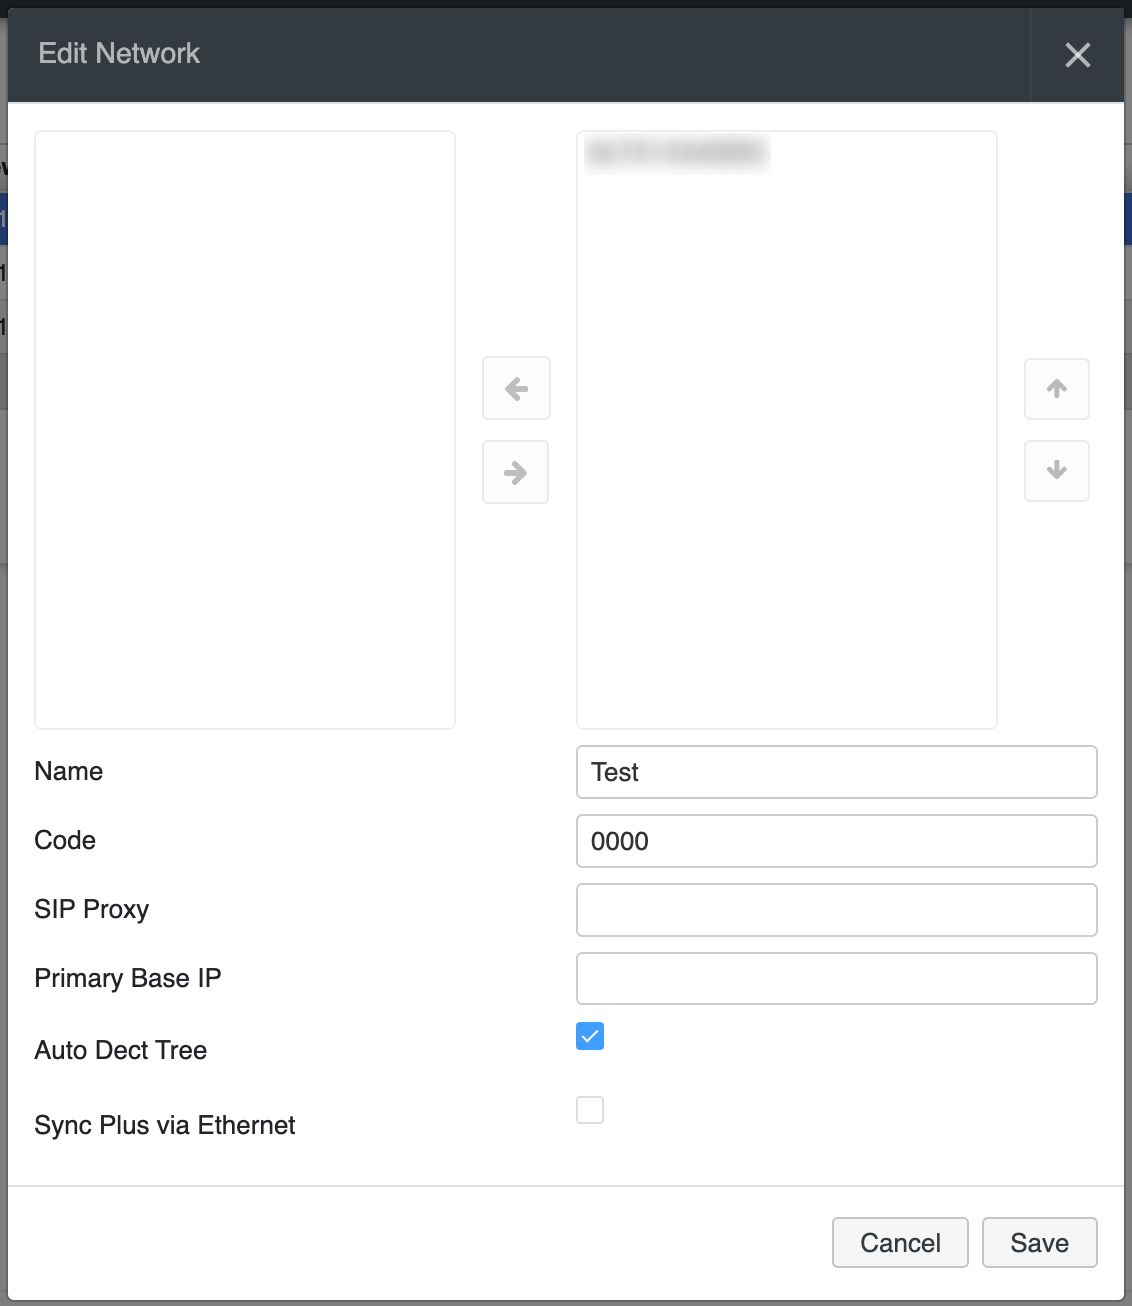
Click Save
W-AIR Network is created:


Go back to WMS -> Devices
Select the same base station and click Configure / Sync device
| Warning |
|---|
For CLOUD PBXs, you need to power the base station down and then power it up again (reboot the base station) to apply the new parameters! |
| Note |
|---|
Note: Base station is displayed with grey status in the table of devices, unless you register at least one handset / headset. |
...
Wait till unknownX is displayed on the screen
Registered handset(s) are now displayed in WMS -> Devices -> W-AIR Networks, in the column GW Users:


- Handset is now ready for login procedure.
...
| Note |
|---|
Note: Starting from WMS 5.04.20220309.1, it is possible to assign registered W-AIR handsets/ headsets to users via WMS -> Devices -> W-AIR Devices. See the section: Assigning W-AIR handsets/ headsets via WMS |
...
- Put the Headset in the registration mode by pressing Call, Volume+ and Volume- buttons at the same time for more than 5 seconds. The Headset is in subscription mode when the LED indicator blinks with short blue flashes and voice prompt announces “Registering”
- The Headset now connects to the Base Station. When the Headset is subscribed, you will hear voice prompt announcing “Headset subscribed”
| Note |
|---|
Note: if the registration fails, the voice prompt will announce “Headset not subscribed”. Before trying to register the Headset again, please check if it is within range of W-AIR Base station and voice prompt announces “Registering”. |
...
| Note |
|---|
Note: Starting from WMS 5.04.20220309.1, it is possible to assign registered W-AIR handsets/ headsets to users via WMS -> Devices -> W-AIR Devices. See the section: Assigning W-AIR handsets/ headsets via WMS. |
Assign a W-AIR Headset to user:
...
| Note |
|---|
Notes:
|
...
- Choose the headset/ handset on the W-AIR devices tab -> click Assign to user
- Enter a different extension and click Save
To deassign a device:
- Choose the headset/ handset -> click Assign to user
- Enter a different extension and click Save
To deassign a device:
- Choose the headset/ handset -> click Assign to user
- Select “unknown” in the Extension field and click Save
- Select “unknown” in the Extension field and click Save
View battery level and firmware version
Starting from WMS 6.06.20240227.1, you can check W-AIR Headsets battery level in WMS -> Devices -> W-AIR Devices page -> Battery column. There, you can find information about the battery level of the headsets and if the headset is charging, the relevant icon is displayed next to the battery level indication:

In the column Version you can see the firmware version of the devices.
Introduction to Wildix Unified Communication
...
Collaboration first time access video:
| Scroll only inline |
|---|
https://wildix.wistia.com/medias/cnl8s726wi |
| easy-html-macro |
|---|
<script src="https://fast.wistia.com/embed/medias/cnl8s726wi.jsonp" async></script><script src="https://fast.wistia.com/assets/external/E-v1.js" async></script><span class="wistia_embed wistia_async_cnl8s726wi popover=true popoverAnimateThumbnail=true" style="display:inline-block;height:315px;position:relative;width:560px"> <> </span> |
Collaboration User Manual: Collaboration 5.0X / Collaboration 4.0XUser Guide.
Apps for Android / iOS
Wildix offers free of charge mobile application for iOS / Android.
...
Search wildix in Google play market / Collaboration in App store and download the application
Launch the application
Enter your credentials or use your Google/ Office 365 credentials for single sign-on:
Domain: PBX IP or domain name of the Wildix PBX
User name: Extension or User name or Email address
Password: WEB password of user


Tap the Check icon situated in the upper right part of the screen
...
CDR-View allows detailed analysis of call activity of users and groups, costs, usage of trunks, duration and type of all the calls made and received, missed callsof all the calls made and received, missed calls.
| Note |
|---|
Note: Starting from WMS 6.03.20230630.3, Cloud Analytics (CDR-View 2.0) was introduced, which replaces the functionality of CDR-View. See documentation for more details: Cloud Analytics (CDR-View 2.0) in Collaboration. |
First time access to CDR-View:
...
For more information on CDR-View, refer to https://www.wildix.com/monitoring/.
CDR-View User Guide: CDR-View User Guide.
...
To add pricelists, go to WMS -> Trunks -> Pricelists.
Example of a *.csv file:


Where
- dialprefix: verification prefix (the longest prefix matching criteria applies)
- destination: country of the call destination
- rate: price per call unit
- min_duration: minimum duration of the call without billing in seconds
- billing_block: call unit
- connect_change: connection fee
- start_day: start day of the week (1 = Monday, 7 = Sunday)
- stop_day: end day of the week
- start_time: start time in seconds from midnight (example: 25200 = 7am; from 0 to 86400)
- stop_time: end time in seconds from midnight
...
Connected SIP trunks and ISDN / FXO gateways are displayed in WMS -> Trunks:


| Note |
|---|
Note: Wildix offers its own built-in VoIP trunk CLASSOUND: |
...
| Note |
|---|
Note: SIP trunks must be added manually. BRI / PRI / GSM / FXO lines are displayed in the corresponding tables once the media gateways have been connected to the system and provisioned as described in chapter Provisioning of devices. Starting from WMS 6.03.20230424.1, BRI / PRI / GSM / FXO trunks can only be deleted with the removal of the device. The corresponding trunk is cleaned up automatically. |
Each trunk is displayed in the corresponding section of the page with the following information:
...
Supported VoIP trunks with configuration examples: https://manuals.wildix.com/wildix-supported-voip-operators/ List of Wildix Supported VoIP Operators.
Make a test of SIP trunking between 2 PBXs
...
Address or host name: dynamic


Outgoing trunk (Client PBX):
Address or host name: IP or domain name of the first PBX
Enable registration: yes
Make sure password and selected codecs (Advanced settings) are the same on both PBXs

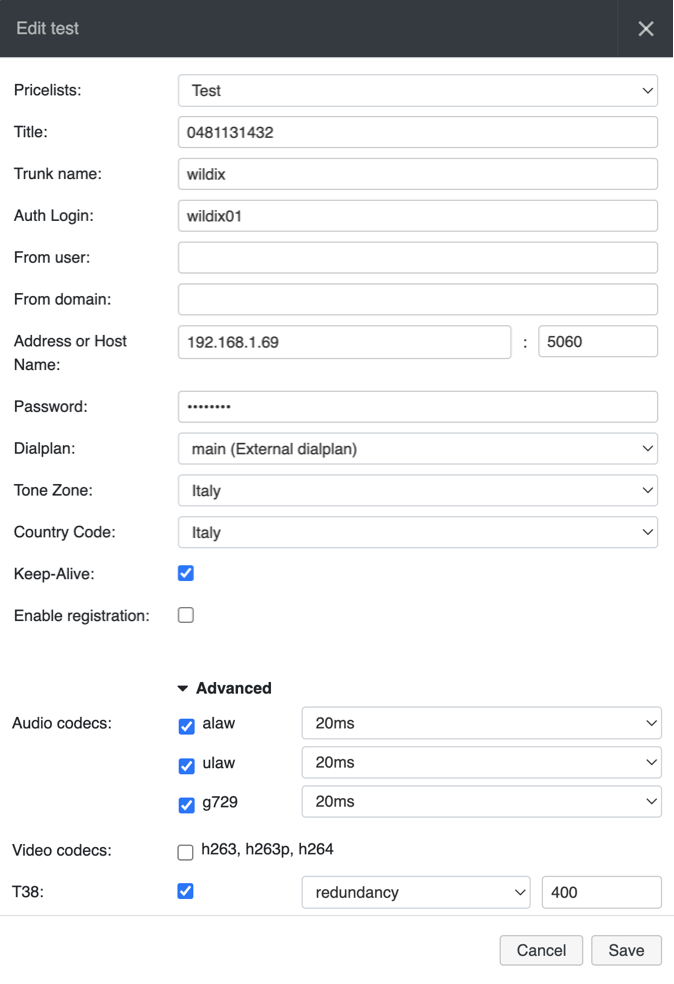
SIP trunk statuses on both PBXs have changed to green, it means that parameters entered for trunk configuration are correct and you can place a call from Client to Server:


ISDN lines (BRI/PRI media gateways)
...
Status column -> green light indicates that the trunk SIP registration is active, hover over it for more information (status of connection to the Wildix system)
Port X Dialplan column -> status of Layer 1 and Layer 2 (status of connection to ISDN lines; hover over it for more information)


To edit the trunk parameters, double-click on the media gateway.
...
- Connect antennas to the rear panel of the gateway
Insert the SIM card to the slot
Note Note: Make sure the PIN code of the SIM card is disabled.
Connect the WAN interface of the gateway to the Wildix Switch
Provision the gateway as described in chapter Provisioning of devices
Once you have provisioned the gateway, a new trunk automatically appears in the corresponding section in WMS > Trunks -> GSM/UMTS section
The status is green, which means the media gateway is registered
Note Important: Status of signal quality is currently not supported!

Double click on the trunk to edit the trunk parameters:
Default Tone: select the country where the trunk is used
Country Code: select the country where the trunk is used for correct number normalization; select Custom country to manually enter the country code
Dialplan (main by default): Dialplan procedure used for calls via this trunk
Number of SIM: called number, which should be present in the Dialplan procedure, used for calls via this trunk; more information on Wildix Dialplan to follow, in chapter Wildix Dialplan
Enable SMS receiving: enable incoming SMS messages to the SIM card; specify the e-mail address in the field below
SMS2EMAIL service e-mail: e-mail address used for new messages notifications
...
Users: go to WMS -> Users, double-click on a user and edit the field Dialplan

Trunks: go to WMS -> Trunks, double click on a trunk and edit the field Dialplan


Each time an entity (user, trunk) generates a call, the system checks the Dialplan procedure associated to the entity. For example, a user starts a call, in case the match for this called number is found inside the Dialplan procedure associated to this user (users by default) the system starts to execute Dialplan applications defined for this called number in the specified order.
...
As already said, by default you can find two the following procedures in WMS -> Dialplan:
main (associated to media gateways and VoIP trunks)
users (associated to users)
kite (this procedure is dedicated to Kite service, described in chapter Wildix WebRTC Kite)
- classound (this procedure is dedicated to CLASSOUND service, described in How to configure and use CLASSOUND)


You can edit these procedures or add new ones and later on associate them to users, to trunks, or to other Dialplan procedures.
...
Click +
Enter Procedure name and Description (optional)


To edit a procedure, double-click on it:.
Adding Called numbers:
Click Add number to enter manually a called number or click the arrow to open a drop-down list of destinations, including default:


Enter a Called number (which can be a phone number, a pattern or the word default):
...

You can add multiple Called numbers to the same Dialplan procedure, click Add number again to add more Called numbers to the same Dialplan procedure:


- To add comment to a Dialplan entry, enter the necessary text into the comment field:

To delete a called number and all the relative Dialplan applications, click - in front of the Called number:


At this point you can start adding Dialplan applications: click Jump to to open the drop-down list:

To add more Dialplan applications, click Add applicationlist:

To add more Dialplan applications, click Add application

- To collapse/ expand all Dialplan entries, click Collapse all/ Expand all:

Dialplan applications
Dialplan applications are the operations which are executed in a sequence defined by the PBX administrator after the match to the called number is found inside the associated Dialplan procedure.
...
| Note |
|---|
Note: Starting from WMS v. 5.01.20200522.1, it is possible to edit Dialplan applications via Developer option (JSON editor):
|


Modify called number
...
add the Dialplan application Dial the phone and click Set near Number (called number) to edit the Called number


The following menu opens allowing you to change the called number:
Custom: tick the field and enter your phone number (in our example, 100)


Here is another example of the Dialplan application Dial the phone with DID (Direct Inward Dialing).
...
add called number 0212345XX in main Dialplan procedure (XX means any two digits)
add the Dialplan application Dial the phone and click Set near Number (called number) to edit the Called number
Remove: allows removing a number of digits (specified in the input field) from the beginning of the called number; in our example 7 ditis are removed, called number is modified: 0212345XX -> XX
Prepend digits: allows prepending digits to the called number; in our example the digit 1 is prepended, called number is modified XX -> 1XX


As a result an incoming call to number 0212345XX is routed to number 1XX: for example incoming to 021234532 is routed to user 132.
...
- edit the main procedure and add the application Verify Timetable for your office phone number and add a jump to another procedure created at the previous step (Offices_closed) in our example:


In case your offices are closed, the Dialplan routes the call to another procedure called “Offices_closed”. You must separately create this Dialplan procedure in which, for example, you enable the system to play the audio message to the caller and send the call to Voicemail.
...
Open users procedure, go down to Included procedures and click to extend it: pbxinternal (Users and call features/services dialplan) is already present there, which by default enables the users to call each other and to use the Feature Codes of the system and which is analyzed only after the content of the Dialplan procedure:


This is just one of the cases where Included procedures are used.
...
Example: you would like to route the calls to mobile numbers via GSM trunk, however you would like to have the opportunity to place a call via a different trunk, in case GSM trunk is occupied:


In this case call is routed via GSM trunk, if it’s busy, call is routed via the ISDN trunk.
...
Add the French prefix as a called number and add the Dialplan Application “Call through remote PBX” (“client.wildixin.com” in our example is the name of the French PBX, “users” is the name of the procedure present on the French PBX):


the call is routed through the French PBX, so inside the indicated “users” procedure on French PBX, the match for the indicated called number “00033.” must be present.
...
Add the same called number 00033. and click Set to modify this called number:


Here is the result that we get: the call is routed to the French PBX, before dialling the trunk local – 22 the system removes the first 5 digits from the called number (the number is normalized), so the number dialled in the international format (for example, 000331234567890), becomes a local French number (1234567890):
...
An example of Dialplan configuration for outgoing calls:


+XXXX. : Check if the called number is an international phone number (e.g. +39.). In this case “0” is added as the default prefix for the outgoing line selection
00039. : Check if the called number is an Italian phone number. In our example, the enterprise has an office in Italy and one of the PBXs in the WMS Network is installed in Italy. In this case, it is possible to take advantage of the trunks present on the remote PBX: the call is routed via the remote PBX installed in Italy, following the users procedure present in the Dialplan on that PBX.
0X. : Check if the called number is the landline number (any number starting with any digit). In this case the call is routed via the trunk classound. The first digit (0 for the external line selection) is removed from the called number
01[567]. : Check if the called number a mobile number (any number starting with 15, 16 or 17 for Germany, check the guide ACL rules and Call classes management for your country). In this case the call is routed via the trunk group gsm_calls. The first digit (0 for the external line selection) is removed from the called number
...
- Click on + to add a new Call group
- Enter the Name of the call group into the field
- Select the agents from the box on the left and move them to the box on the right
- Click Save

...
- Start selecting users
- Once done, click Save


| Note |
|---|
You can add the same call agents to different groups. You can add users from all your PBXs in WMS Network to call groups. |
...
Now you can edit the main procedure to enable the Dialplan to route the incoming calls to your tech support phone number to the call group assistance_tech.
Example:

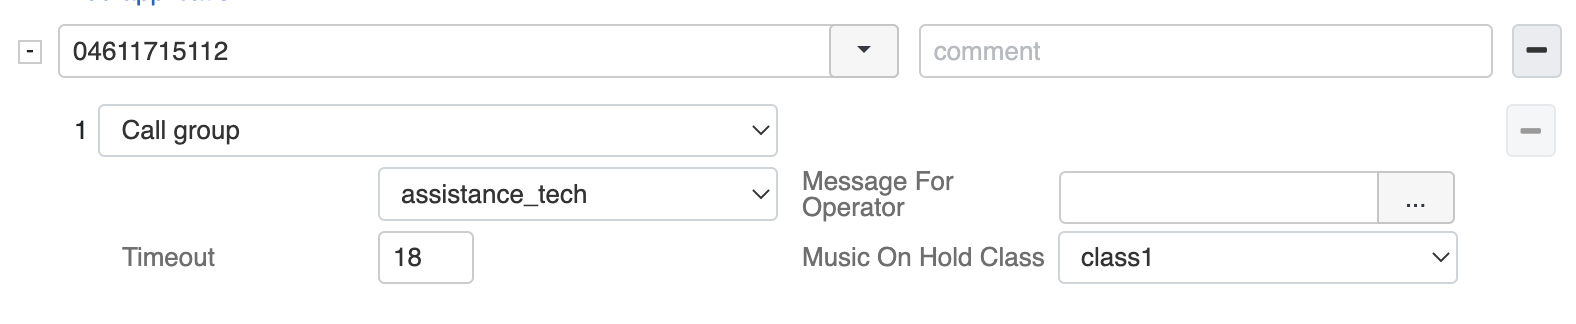
You can:
set the Timeout, after which next Dialplan application is executed
select the Message for the operator providing more information about the call (example of an audio message that the operator who is present in different call groups, hears: “technical support call”)
select the Music on hold class
...
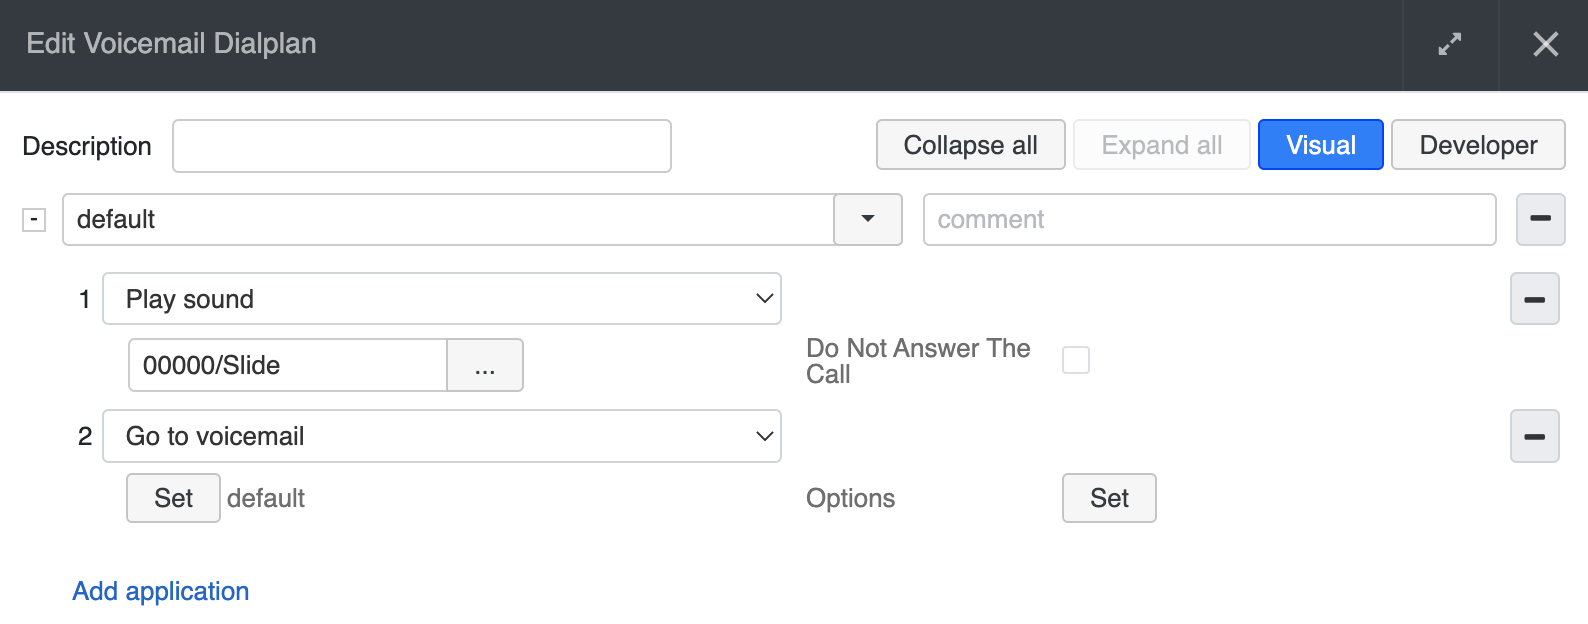
Example: you have set up the Dialplan to check the timetable and to route the incoming calls to another Dialplan procedure in case the offices are closed. In this case you can enable the system to playback the audio file to the caller and then to route the calls to Voicemail:


To record the sound to be played to the caller, click the ... button to open Sounds menu and then click Record button:
- Enter the name for your message into the field Filename and your extension number into the field Extension:


- Click Record button: the call arrives to Collaboration/ the device registered to your account (e.g. a Wildix phone)
- Answer the call and pronounce your message (e.g. “Our offices are closed. Your call will be forwarded to Voicemail”)
- Hang up to save your message:


Via this menu it is possible to upload and play audio files:
...
WMS supports all the common audio formats: mp3, wav, alaw.
| Note |
|---|
Note: Starting from WMS version 4.03.44606.45, all
|
Playing the audio files back:.
...
You can also use TTS (Text-to-speech) in this menu to create audio messages by transforming text into speech (restricted by license, read more: Wildix Business Intelligence - Artificial Intelligence services); watch the video:
| Scroll only inline |
|---|
https://www.youtube.com/watch?v=ljHQPyi2bSs |
| easy-html-macro |
|---|
<div class="container">
    <div class="video"><iframe width="560" height="315" src="https://www.youtube.com/embed/ljHQPyi2bSs?rel=0" frameborder="0" allow="autoplay; encrypted-media" allowfullscreen></iframe>
</div>
</div>
|
Create a switch
| Note |
|---|
Note: Starting from WMS 5.02, there is no limit in the number of created switches and timetables. Prior to this version, you can create no more than 255. |
...
Three state switch - this switch has three states (on / off / extra) and allows you to route the calls to different Dialplan procedures in each case.
Go to WMS Dialplan -> Timetables Timetable / SwitchesSwitch.
Click + under Switch table to add a new switch (click + under 3 states switch to add a new three states switch).
...
Step 1. Create a switch to forward calls to Voicemail:
- Click +Add in the Switches section section
- Enter the name for the switch and select the State enabled (you can change the state of the switch from the phone or by calling a feature code)


Step 2. Create a Dialplan procedure to be executed if the switch is on:

Step 3. Modify the main procedure to check the status of the switch before routing the call:


Change the state of the switch
...
- Select the user and click Edit preferences
- Go to the section Settings -> Function keys and click on Switch to add Switch to the list of function keys
- Type the ID number of the Switch (Switch ID can be checked in WMS -> Dialplan -> Timetables / Switches)
- Click Save


In the same way you can configure 3 state switch or Timetable function key.
...
Create the working hours timetable for your office:
- Click +Add in the section Timetable
- Enter the Timetable Name and select State check time (Check time state means that the PBX determines whether the timetable is active, based on the PBX time at the moment of the Dialplan execution)
- Select the timetable and click Edit and specify the working hours:


In the same way as we did for the Switch, you must create a separate procedure to be executed in case the office is closed according to this timetable.
You can then enable the Dialplan to jump to another procedure in case the offices are closed: another procedure in case the offices are closed:

Export/ Import a Timetable
Starting from WMS 6.05.20240119.1, it is possible to export and import timetables. To export a timetable, go to WMS -> Dialplan -> Timetable / Switch, choose the timetable(s) you want to export and click Export:

The timetable gets exported in .json format.
To import a timetable:
1. On WMS -> Dialplan -> Timetable / Switch tab in the section Timetables, click Import:

2. Choose the necessary .json file with the timetable and press Upload:

| Note |
|---|
Note: In case the imported timetable file has the same name as an existing timetable, the timetable is overwritten. |
Create an IVR tree
IVR (Interactive Voice Responder) is a technology that allows humans interacts with telephone system by entering DTMF tones. An example of IVR is when a caller hears “Press 1 for English, press 2 for German” and call is routed to a different destination based on the choice made by the caller.
...
Go to WMS -> Dialplan -> IVR
- Click +Add to create a new IVR tree and give it a name. Click Save:


- Double click the IVR to edit it:


At this step we can create levels (nodes) of our IVR tree.
...
Dialplan procedure: set up to route the call to a different Dialplan procedure in case caller pressed nothing within the specified timeout
Called number: this option allows you to modify the caller number (match must be found in the specified Dialplan procedure)


Nodes of the second level
...
Number: the number that the caller must enter in order to arrive to this node


Nodes of the third level
(Routes the call to the final destination (user or group))
Click + in front of the corresponding second level node, to add a new level, for example:


All of these nodes terminate the execution of the IVR tree:
...
Called number: extension number


Where 123 and 224 are English speaking operators (tech support and sales)


Where 111 and 222 are the called numbers present in the procedure IVR that we must create separately. 


According to this procedure, incoming calls to 111 are routed to tech support call group, incoming calls to 222 are routed to sales call group:


Called number 111: call is routed to Tech_Support call group (in case of no response within 20 seconds, call is routed to Voicemail)
Called number 222: call is routed to Sales call group
...
Now we can use it inside our main procedure:


Incoming faxes management
...
Answers an incoming call using FAX Server and forwards fax to one or multiple fax numbers / users:


If you indicate an extension number (e.g. 101), a copy of fax is sent to the user email address, and a link to fax download appears in Wildix Collaboration → History menu and in CDR-View.
You can enter several extension numbers / email addresses into the field, separated by spaces, in this case the copy of received faxes is sent to multiple destinations:


All received and sent faxes are permanently saved on the storage device defined in WMS Settings -> System -> Storages.
...
Fax detect time: enter the timeout for fax detection in seconds (usually 3 seconds are enough)
Continue the execution: if enabled, the Dialplan execution continues without waiting for the number of seconds specified in fax detect time field before the fax is detected (to avoid silence while the fax is being detected)
Procedure: select the procedure to route the call in case the fax is detected
Set Number: modify called number (the match must be present in the specified Dialplan procedure)

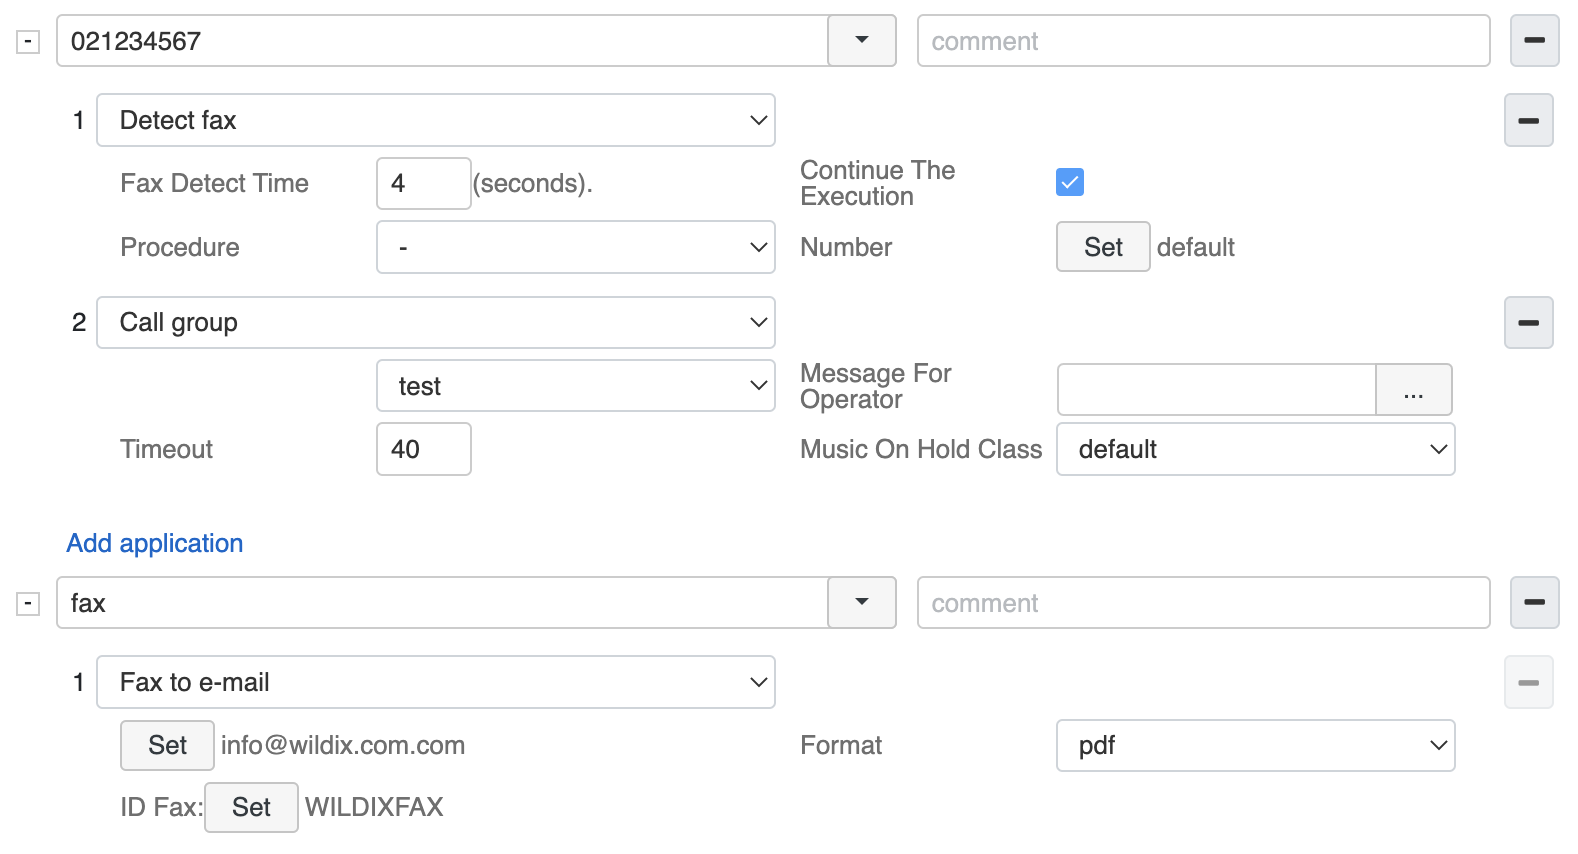
In our example in case within 4 seconds fax is detected, the system stops the execution of the application Call group and the call is forwarded to the called number fax (present inside the same Dialplan procedure main), in which the fax is being sent to email.
...
- Tick custom and enter the string 90*101 (where 101 is fxs user extension number), example:


Where
pbxfeatures / pbxservices are procedures that are present by default on Wildix PBX for recognition of PBX services and features (including feature codes)
90 is the feature code Fax relay; 101 is the fxs user extension number (read more about Feature codes: https://confluence.wildix.com/x/RQU8AQFeature Codes and Pre answer Services Guide)
DID & DISA
DID and DISA services enable the caller to reach PBX users directly by dialing their extension numbers.
Example of DID (Direct Inward Dial) configuration:


First 8 digits are removed from the called number. Depending on the last two digits of the called number (1XX) incoming call is routed to the extension, examples:
...
Example of DISA configuration:


- Called number default:
- The message is played inviting the caller to enter the extension number
- The system waits for digits for 5 seconds
- In case of no input within the specified timeout, call is routed to call group
...
If the caller number corresponds to the mobile number of one of PBX users, Dialplan jumps to the procedure predefined for the outgoing calls of this user.


- Set - caller number: allows you to modify the caller number to match the one present in the procedure for the outgoing calls for this user, e.g. users
Set - Options - d: hangs up a call and makes a call back to the user (in this way call is free of charge for the user)
...
Mobility extension lookup. In case the phone number from which the call arrives is present in the field Mobility of one of the users of the system, the call is hanged up and the system makes an automatic callback to the caller
Check the timetable Working_hours, in case the call has arrived at the time when the office is closed, another Dialplan procedure Working_hours is executed
Check the switch Voicemail, in case the switch status is enabled, another Dialplan procedure Voicemail is executed
The call is routed to IVR

In case of incoming call to +4904611715111, the following operations are executed:
Check the timetable Working_hours, in case the call has arrived at the time when the office is closed, another Dialplan procedure Working_hours is executed
Check the switch Voicemail, in case the switch status is enabled, another Dialplan procedure Voicemail is executed
The call is routed to the call group Tech_support Support
In case no one responds within 20 seconds, another Dialplan procedure, Voicemail Dialplan is executed

In case of incoming call to +4904611715112, the following operations are executed:
Check the timetable Working_hours, in case the call has arrived at the time when the office is closed, another Dialplan procedure Working_hours is executed
Check the switch Voicemail, in case the switch status is enabled, another
Dialplan procedure Voicemail is executed
The call is routed to the call group Sales
In case no one responds within 20 seconds, another Dialplan procedure, Voicemail is executed


Wildix WebRTC solution
...
An example of Kite implementation can be found here: www.wildix.com/contacts.
One of the advantages of Kite is that it’s fully integrated into the Wildix telephony system:
Chat requests are managed by PBX users via Wildix Collaboration interface
Audio calls can be answered from any Wildix devices (WP, W-AIR, mobile apps, Collaboration)
Wildix Kite uses a separate Dialplan which makes it easy to customize the service
Chat requests and calls from Kite service can be routed to separate call agents or to call groups
Check Documentation: https://confluence.wildix.com/x/xQY8AQ.Wildix WebRTC Kite Admin Guide.
WebRTC-based Wizyconf videoconference
...
Access for internal and external users via invitation by email, via link, audio call
Multi user chat, audio and video conference
Screen sharing
Document sharing / application sharing / link sharing
Recording
Conference scheduling
Mute/unmute participants
Dynamic video allocation
Documentation: Wizyconf Videoconference.
Debugging and troubleshooting
...
To analyze call logs: select the entry 1 (Connect to PBX engine)
To analyze the syslog: select the entry 5 (Open Syslog)
To start recovery procedure: select the entry 9 (Recover System)
Warning Important: possibility to run Recovery procedure on Virtual / Cloud systems has been blocked!
For other advanced operations: select the entry 11 (Shell)
Example:

| Note |
|---|
Note: Direct access to SSH port on Cloud PBXs on WMS 4.0X is blocked for security reasons. It is possible to temporarily enable/ disable SSH port 2222 via WMP. Refer to the chapter Enable SSH port on Cloud PBXs. |
Dialplan debug
| Note |
|---|
Note: Dialplan debug is always active by default. |
...
Now you can see the basic log of ongoing (section Active Calls) or terminated (section History) calls, click on a call to view details (in the right part of the screen):


Trace generation
...
- Use the RS-232 cable to connect your PC to the serial port of the PBX
- Open the RS-232 terminal (such as PuTTY for Windows or ZetaTerm for Mac) and set up the baud rate to 19200


- Connect the PBX to the power
...