W-AIR Headset - User Guide
The Guide describes the features and functionalities of W-AIR Headset and provides the necessary details needed for its proper operation.
Created: December 2018
Updated: May 2025
WMS Version: 6.0X
Useful links:
Permalink: https://wildix.atlassian.net/wiki/x/GwvOAQ
Before using the Headset
Unboxing
Examine the package for evidence of physical damage prior to opening. If there is a proof of mishandling, report it to your certified Wildix Partner.
Make sure that all the components are present in the shipping package:
W-AIR Headset:
1 x Headset
- 1 x Headband
W-AIR Headset Charger is ordered separately in Salesforce Partner Community (A/C adapter is supplied with the Charger). You can order Single Charger (available for purchasing and through HWaaS) for one Headset or MultiCharger (available only through HWaaS, in Salesforce Partner Community, when creating a Quote, you can find it in Additional Items -> W-AIR -> Product: WAIR-Headset-MultiCharger) for six Headsets.
Additionally, you can order the following accessories: WAIR-Headset-Cushion (replacement cushion), WAIR-Headset-NeckBand (neckband accessory) and WAIR-Headset-EarHook (earhook accessory).
Using the Charger
W-AIR Headset is charged through the use of a charger. The charger is powered by AC supply from 110-240VAC that supplies 5.5VDC at 600mA.
When charging the battery for the first time, it is necessary to leave the Headset in the charger for at least 10 hours before the battery is fully charged, and the Headset is ready for use.
For correct charging, ensure that the room temperature is between 5°C and 25°C / 41°F and 77°F. Do not place the Headset in direct sunlight when charging. If it is turned off when placed in the charger, the Headset automatically turns on.
W-AIR Headset Overview

1 - Microphone
2 - Mute button
3 - Call button
4 - Volume+ button
5 - LED Indicator
6 - AUX Function button (Power On)
7 - Volume- button
8 - Speaker
Note: There are 2 button combinations that have to be pressed at the same time:
- Register - Call, Volume+ and Volume-
- Power off - AUX function, Volume+ and Volume-
Charger Overview
Single Charger
MultiCharger
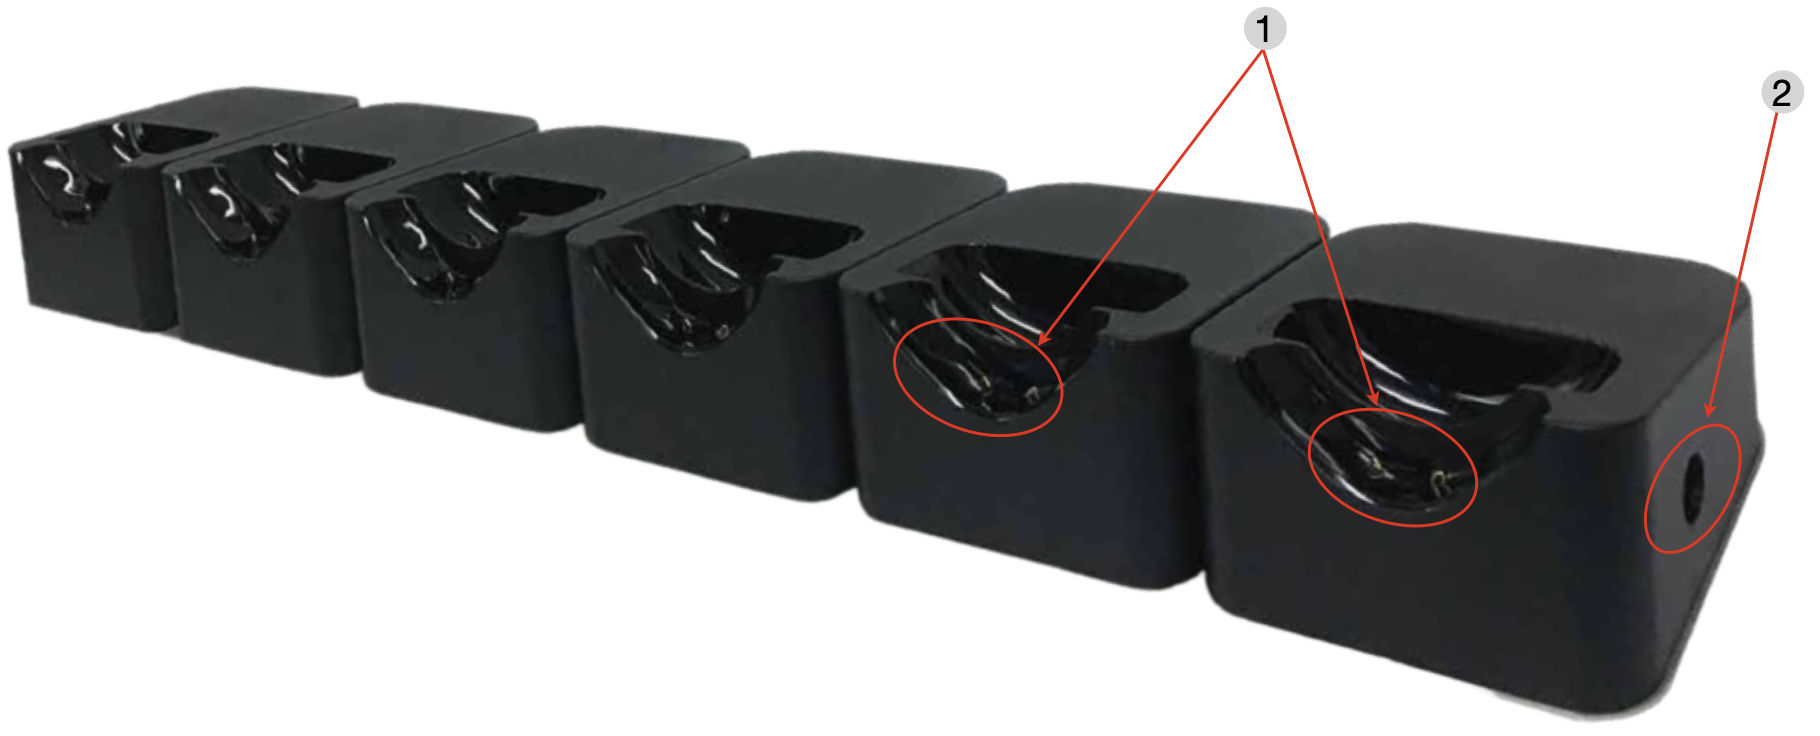
1 - Charging pins
2 - Charger connection
W-AIR Headset Single and MultiCharger:

LED indicators Overview
Color | LED indication | Status |
Green | Short blink followed by long blink | Power Up |
Fast short blink, repeated | Incoming call | |
Fast short blink, repeated | 2nd incoming call, call active, Silent mode on | |
Single short blink. Notification of call only via audio in HS | 2nd incoming call, call active, Silent mode off | |
Single short blink | In call | |
Long blink | Battery charging | |
Steady on | Battery charging, full | |
Red | Long blink followed by short blink | Power Down |
Fast, short blink | Low battery | |
Steady on | Battery charging, low battery | |
Long blink | Registration failed | |
Single short blink repeated slow | Idle, out of range | |
Blue | Short blink repeated fast | Registration, ongoing |
Long blink | Registration completed | |
Single short blink repeated slow | Idle, connected | |
Purple | Steady on | Menu |
None | Deregistered |
Registration of W-AIR Headset
To use your W-AIR Headset, you need to register it to W-AIR Base Station:
Limitation: it is impossible to register a W-AIR Headset if the code of W-AIR network set up in WMS -> Devices -> W-AIR Networks is different from "0000" (default code).
Workaround: you can temporarily change the code to default one ("0000") on the page W-AIR Networks, register and assign the Headset(s), and then change it back to custom one.
Note: in case you have several W-AIR networks (for example, in test environment), the Headset might register to a Base station belonging to another network. In such situation it’s recommended to hold the Headset closer to the Base station you would like to register it to.
- Put the Headset in the registration mode by pressing Call, Volume+ and Volume- buttons at the same time for more than 5 seconds. The Headset is in subscription mode when the LED indicator blinks with short blue flashes and voice prompt announces “Registering”
The Headset now connects to the Base Station. When the Headset is subscribed, the voice prompt announces “Headset subscribed”
Note: if the registration fails, the voice prompt will announce “Headset not subscribed”. Before trying to register the Headset again, please check if it is within range of W-AIR Base station and voice prompt announces “Registering”.
To check if the Headset is registered to the Base station, go to W-AIR Base Station web interface -> Extensions. If the registration is successful, the device appears in the list of available extensions with the state SIP Registered@RPN00
Note: refer to W-AIR Network Admin Guide - Sync over the air or W-AIR Network Admin Guide - Sync over LAN for detailed information.
Update of the Firmware
After successful registration, put the Headset into the charger to update the Firmware.
You can see the progress of the upgrade procedure of W-AIR Headset on the web interface of the W-AIR base.
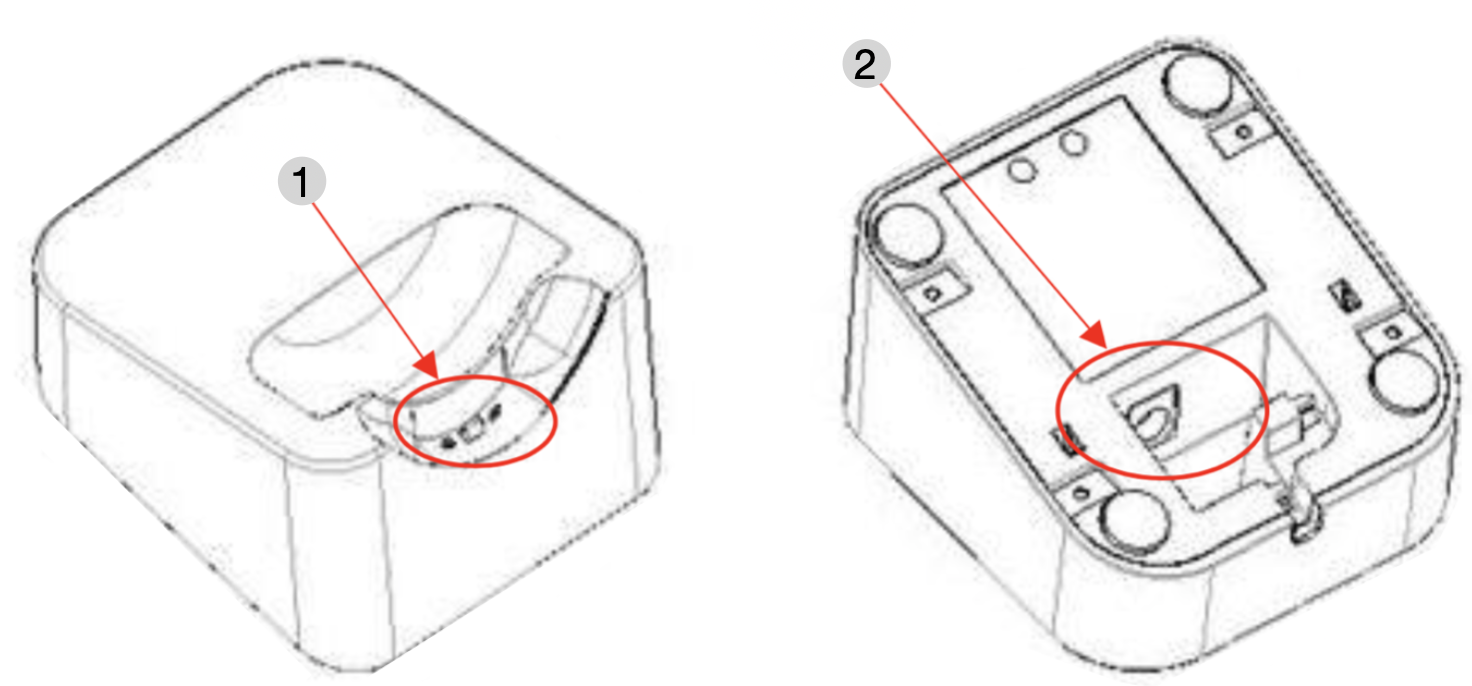
Note: you can find W-AIR Headset on the base's interface by its IPEI, to check IPEI, detach the microphone from the Headset, as shown on the picture:

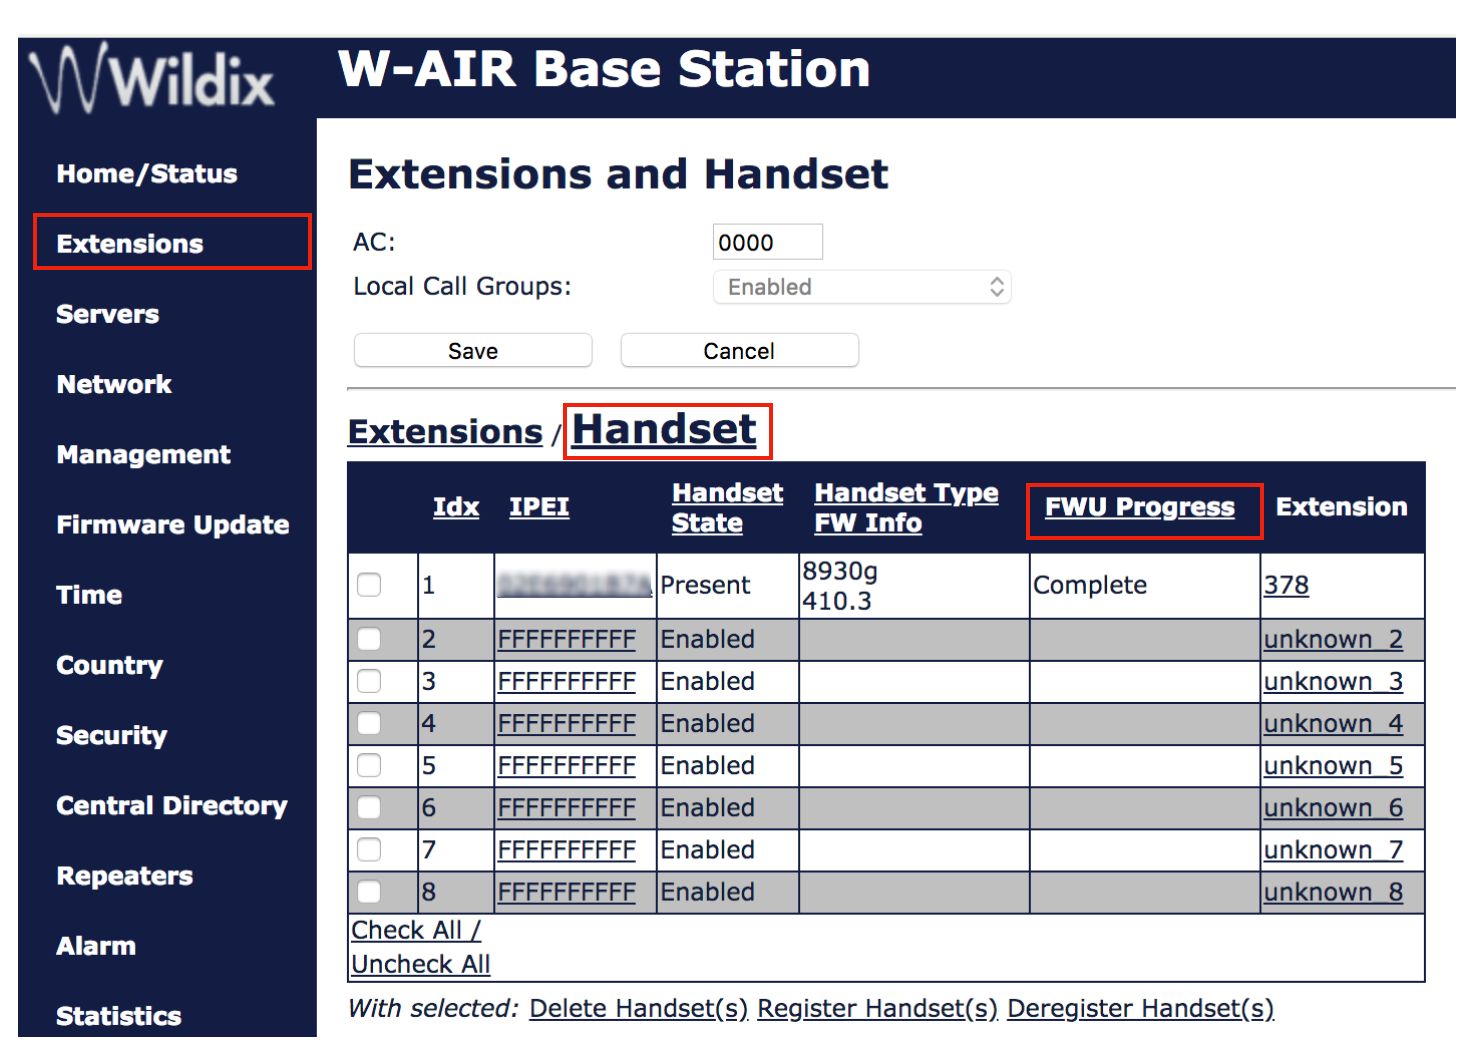
W-AIR Base (Small Business)
- Go to Extensions -> Handset
- Find your W-AIR Headset in the list using IPEI and check FWU (Firmware Update) Progress Status:
W-AIR Base (multicell)
- Go to Extensions
- Find your W-AIR Headset in the list using IPEI and check FWU (Firmware Update) Progress Status:
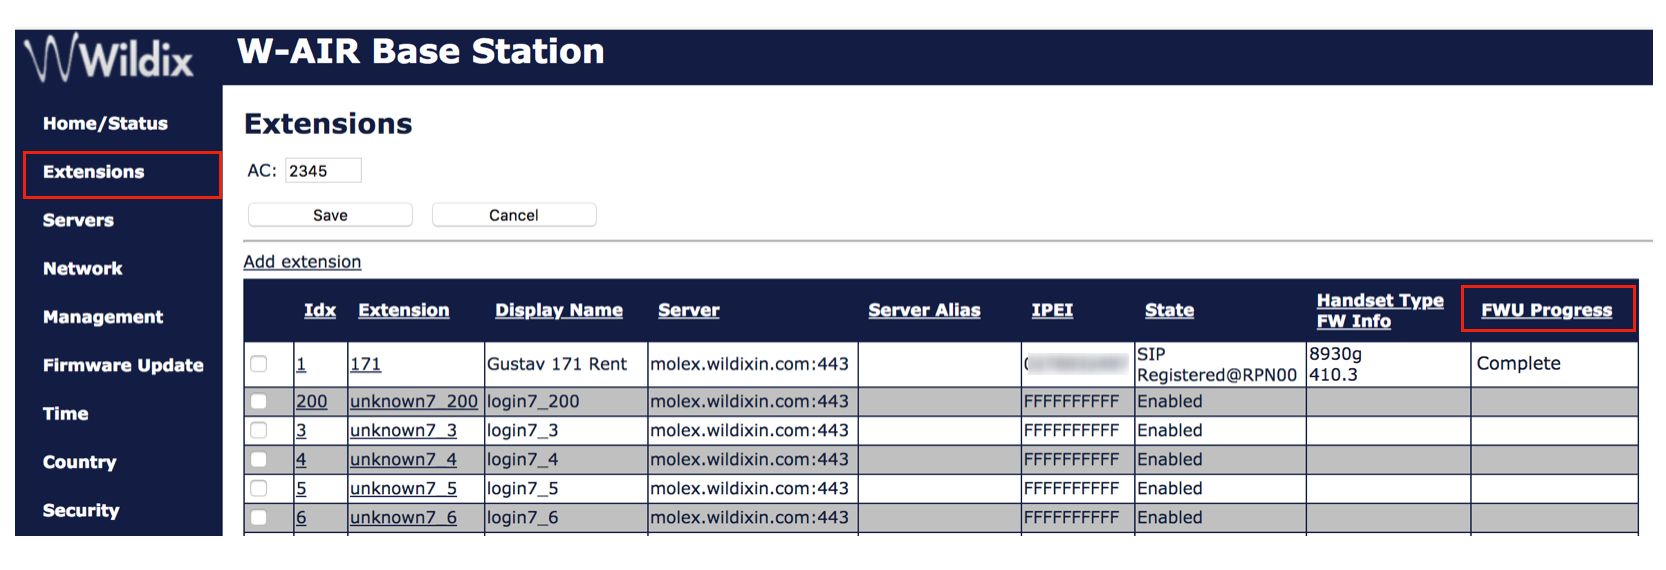
FWU Progress Status Overview
| Parameter | Description |
|---|---|
| Off | Firmware version is specified to 0 and FWU is off |
| Initializing | FWU is starting and the progress is 0% |
| X% | FWU is ongoing |
| Verifying X% | FWU is done and now verifying before swap |
| Waiting for charger | Headset should be restarted |
| Complete | FWU is completed |
| Error | Not able to update, file not found, file not valid etc |
Assignment of W-AIR Headset to a user
After you registered your Headset to the Base station, you need to assign a user for handling calls:
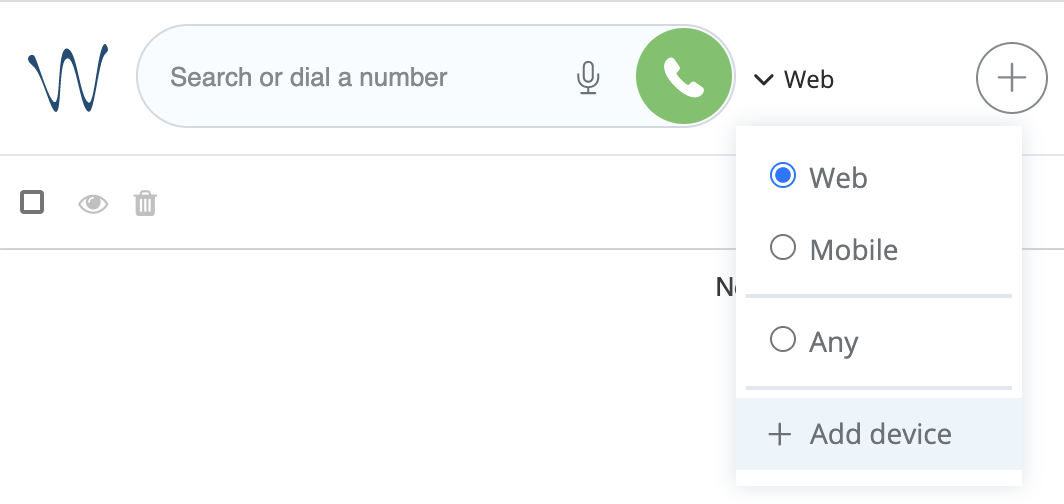
- Go to Collaboration top menu -> Device selection
- Expand Device selection list and click + Add device:
Press Call button on your W-AIR Headset to get the pairing code:
Note: a pairing code always consists of 4 digits.
Enter the code into the field Pairing code:
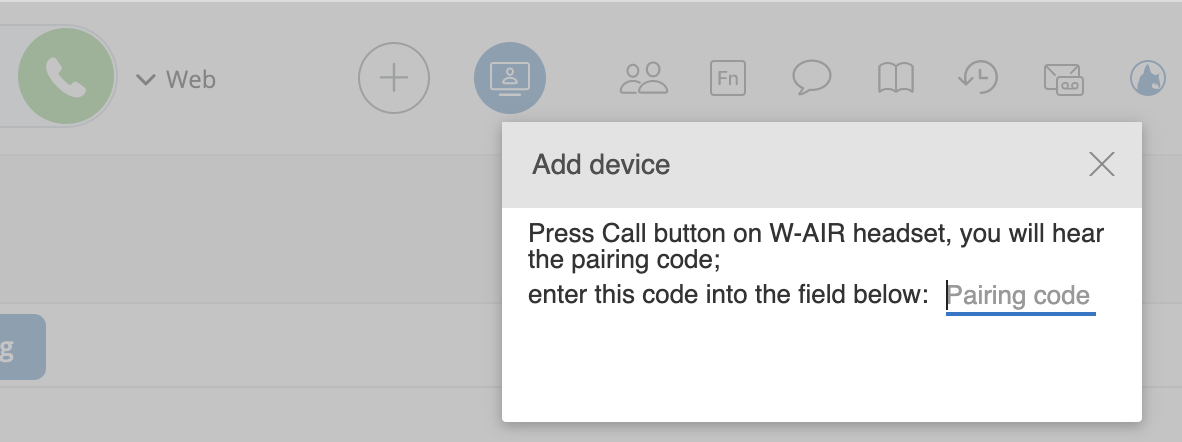
Note: the code is repeated 3 times. If authentification fails, press Call button one more time to get the new code.
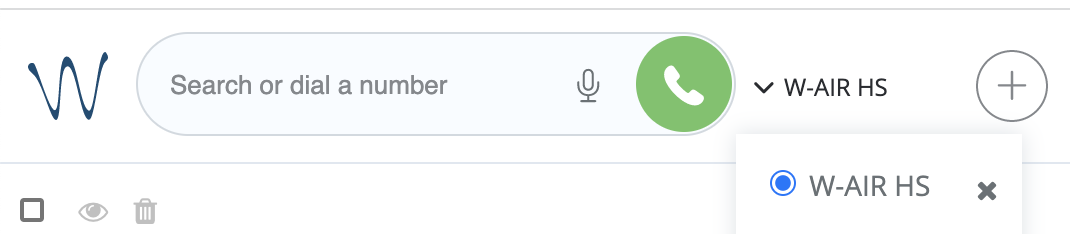
- After the Headset has been successfully assigned, the voice prompt announces "Activated, thank you!"
- The Headset appears in the list of available devices in Collaboration within few seconds:
Deassignment of W-AIR Headset
To delete the Headset from the list of available devices:
- Go to Collaboration top menu -> Device selection
- Expand Device selection list and click x near W-AIR HS to delete the Headset
- The automatic call to feature code 99-0 is placed and the voice prompt will announce "Deactivated, thank you!"
- After you delete the Headset, it disappears from the list of active devices
W-AIR Headset idle state
When the assignment is completed, the Headset is in the idle state and ready to handle calls.
In this state you can:
- Enable/ disable Silent mode:
Press Volume+/ Volume- button for 2 seconds to enable/ disable the mode. The voice prompt announces "Silent mode on/ off"
- Increase/ decrease ringer volume:
Press Volume+/ Volume- button to increase/ decrease ringer volume
Enter Menu mode:
Press AUX function button to enter Menu mode
Call Control
Outgoing call
Outgoing call via Collaboration
- Make sure W-AIR HS is selected in the Device selection list in Collaboration/ Collaboration 7/ x-bees
- Place a call
The call is placed via W-AIR Headset.
Outgoing call via dial by name using ASR
Important!
Feature is available only for systems with recurrent licenses (feature not available for Lifetime and Per Service PBXs) with at least one Premium user.
The feature works in English, Italian, French, German languages.
How to dial:
- Press Call button when there is no active conversation and say the name
Demo video
Configuration tips to start calls from W-AIR Headset using Automatic Speech Recognition
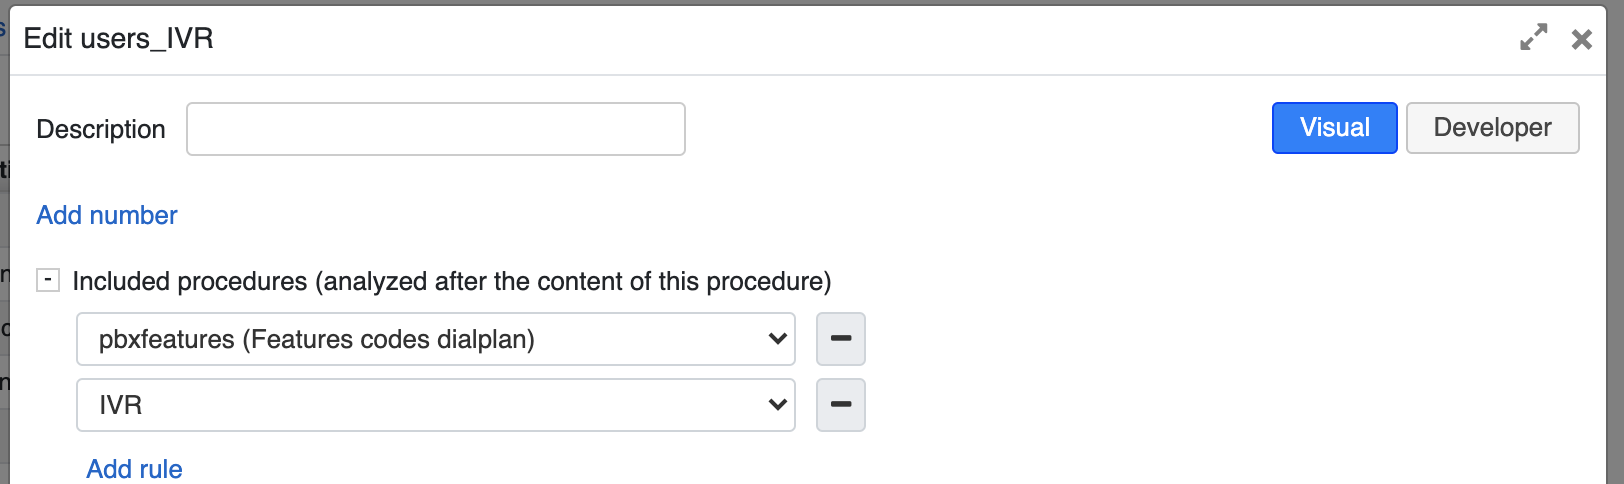
- Make sure the procedure for calling Feature Codes "pbxfeatures (Features codes dialplan)" is present in the "Included procedures" of the Dialplan used for outgoing calls (it is present by default in the "users" procedure), e.g. "pbxinternal". This enables you to place calls from W-AIR Headset via "Dial by name" service, by pressing the "Call" button in case there is no active call.
- You can override custom voice prompts used in "Dial by name" service via Custom Dialplan variable DIALBYNAME_PROMPT=custom string, more information: Wildix Business Intelligence - Artificial Intelligence services
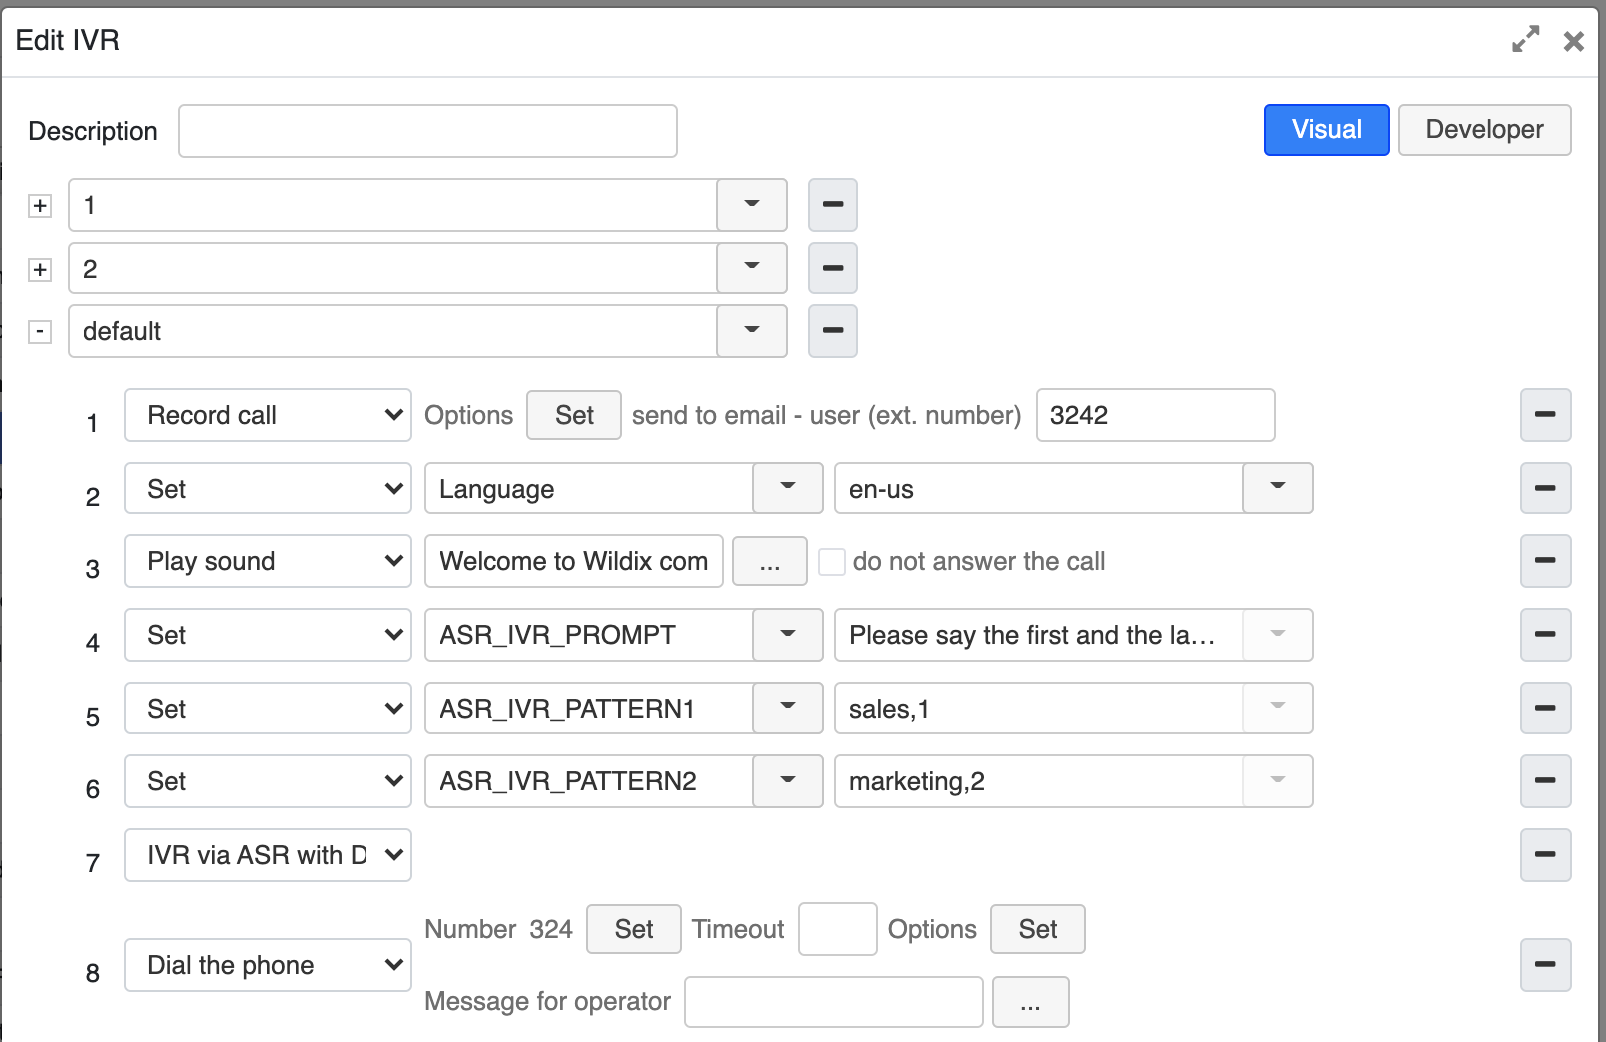
- If, for some reason, you would like to use the IVR via ASR feature (How to configure IVR via ASR with Directory in Dialplan) from W-AIR Headset, you can modify the procedure used for outgoing calls to route the calls to the "IVR" procedure, e.g.:
Outgoing call via iOS/ Android app
- Tap Dialpad icon
- Tap W-AIR HS
- Type the phone number
- Tap the green Handset button
Video:
Incoming call
When you receive an incoming call, the LED indicator starts blinking with fast short green flashes and you hear a ringer (in case you enable "Silent mode", only LED indicator blinks)
Answer an incoming call
Press Call button to answer an incoming call
Answer a second incoming call
Press Call button for 2 seconds to answer a second incoming call and put an active call on hold
Swap between two active calls
Press Call button for 2 seconds to swap between two active calls. The voice prompt announces "Call swapped"
Note: you can switch active device during a call by clicking on Continuity button in a call dialog window (refer to Collaboration Guide, chapter Switch active device during a call or to the Manage calls chapter in Collaboration 7/ x-bees user guides).
Reject an incoming call
- Double press Call button to reject an incoming call. The voice prompt announces "Call rejected"
Increase/ decrease a call volume
Press Volume+/ Volume- button to increase/ decrease a call volume
Mute/ unmute the microphone
Press Mute button to mute/ unmute the microphone during a call. The voice prompt announces "Mute on/ off"
Hold
Put a call on hold/ Retrieve a call:
Press Call button for 2 seconds to put a call on hold/ retrieve a call. The voice prompt announces "Call on hold"/ "Call retrieved"
End a call
End an active call:
Press Call button to end a call
W-AIR Headset Menu mode
How to access and navigate through the Menu
When the Headset is in the Idle state, a user can enter the main Menu and its submenus to change different settings.
- Enter the main Menu: Press AUX function button
- Move between submenus or submenu options: Press Volume+ / Volume- buttons
- Enter the submenu: Press AUX function button
- Select the submenu option: Press AUX function button
- Return back to the main Menu: Double press AUX function button
- Exit the main Menu: Press AUX function button for 2 seconds
Menu structure
Silent mode: When enabled, the ringer is silenced. Does not affect the stored value of ringer volume
On
Off
Language: Two languages are available on the Headset: English and another language, selectable for a user
English
Native
Registration: Announces the registration to a W-AIR Base station
Register
- Deregister
Audio feedback: Choose between beeps or voice prompts (where available) as user feedback. Where no voice prompts are available, beeps will be played and this setting is ignored
Voice prompts
Beeps
Note: the menu always uses voice prompts.
Tone Protection: Automatic protection against loud noises and protection from too high volume settings with prolonged use of the Headset
Off
Office
Quiet
Noise reduction: Enable or disable digital noise reduction
On
Off
Equalizer: Choose between three different equalizer settings:
Normal
Bass
Treble
Auto mode: The Headset automatically answers an incoming call when removed from the charger
On
Off
Silent charging: The Headset makes no call indication (neither ringer nor LEDs) while charging
On: Only LED indication while charging
Headset Deactivated: The Headset is disconnected and can’t receive calls while charging
Off: Normal mode with LED indication and audio while charging
Factory reset
To reset the customized settings back to the factory default, press Mute and Call buttons for 5 seconds. After the reset is completed, you will hear a tone signal confirming it.