W-AIR Small Business - Admin Guide
- Ksenia Babych
- Tatiana Bieliakova
- Elena Kornilova
This Guide leads you through installation and provisioning of W-AIR Small Business solution.
Useful links:
- W-AIR Network Admin Guide - Sync over the air
- W-AIR Network Admin Guide - Sync over LAN
- /wiki/spaces/DOC/pages/30279971
- W-AIR System Datasheet
Created: January 2021
Updated: May 2025
Permalink: https://wildix.atlassian.net/wiki/x/2BrOAQ
Description
System architecture
W-AIR is a Wildix cordless solution. The system supports auto-provisioning enabling instant connection to the Wildix PBX. Due to high scalability, new components are quickly and easily integrated to guarantee the better performance.
Wildix W-AIR system uses the wireless technology CAT-iq (Cordless Advanced Technology – Internet quality).
The architecture consists of three components:
1. Base station - an essential component of a DECT system. Wildix W-AIR base stations:
- Multicell base stations: W-AIR Base Sync Plus, W-AIR Sync Plus Base Outdoor. Documentation: W-AIR Network Admin Guide - Sync over LAN
- Single Cell base station: W-AIR Base Small Business
2. Repeater - extends the signal coverage of the base station.
3. Cordless endpoints:
Wildix W-AIR handsets: W-AIR Basic2, W-AIR LifeSaver, W-AIR LifeSaver-EX, W-AIR Med, W-AIR Office and W-AIR Headset. Follow the online Guides to get detailed information: W-AIR DECT Handsets Guide, W-AIR Headset Guide.
W-AIR Small Business solution
Supports of PoE IEEE 802.3af Class 2
- Up to 20 users per system
- Up to 10 concurrent calls*
- Up to 10 channels using G.711 codec
- Up to 4 channels using G.729 codec
- Up to 6 repeaters per base
- No multicell
- Base station indoor range: 50 m; outdoor range: 300m
.png?version=1&modificationDate=1671801513188&cacheVersion=1&api=v2&width=350&height=350)
*Enabling PTT feature (Push-to-talk) on W-AIR handsets reduces the number of available channels to 6.
Base station and repeaters connection and overview
Packing lists
W-AIR Small Business Base
- Base station unit x 1
- Cat. 5 Ethernet cable x 1
Power supply adapter is not included (item can be ordered separately, code: PS-5V2A)
W-AIR Repeater:
- Power adapter x 1
- Repeater unit x 1
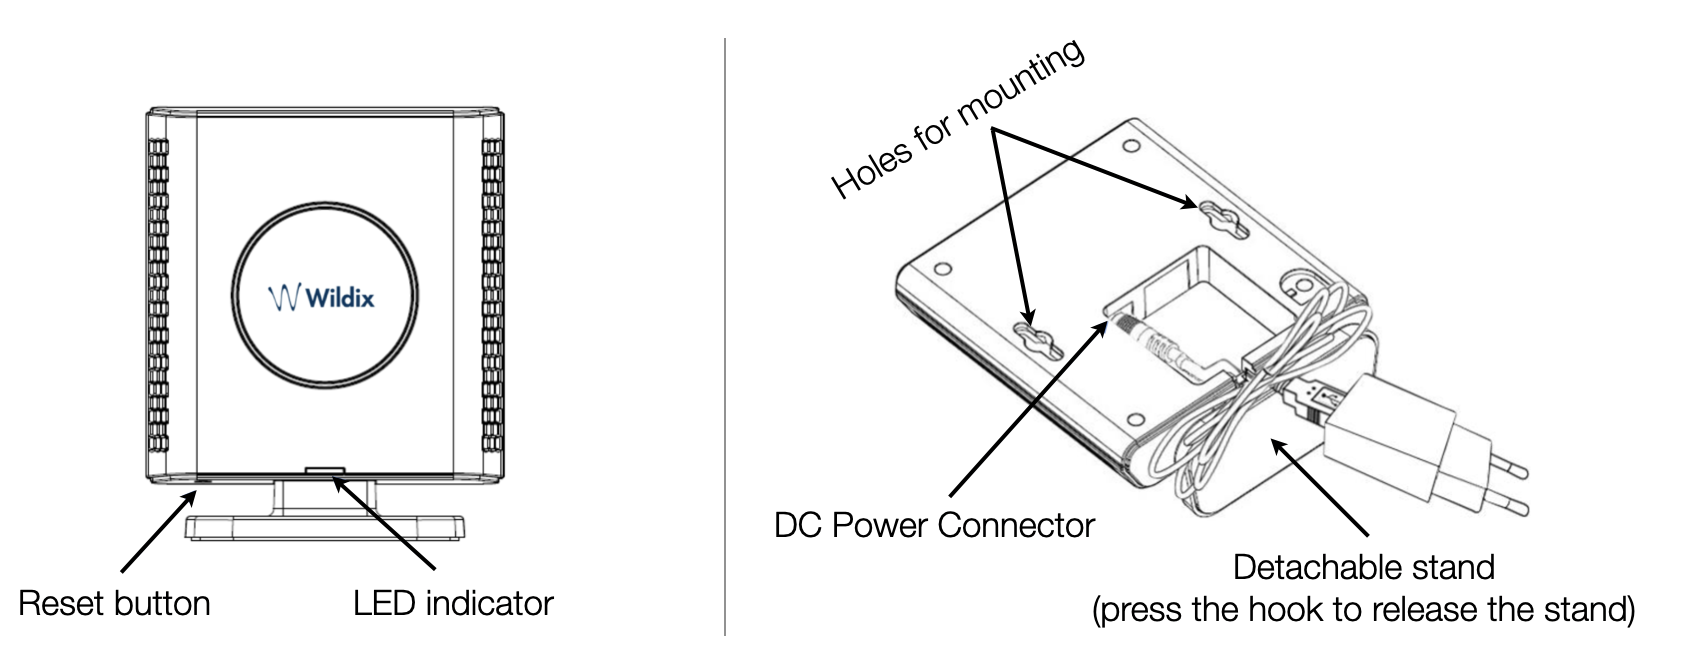
Base station connection and reset
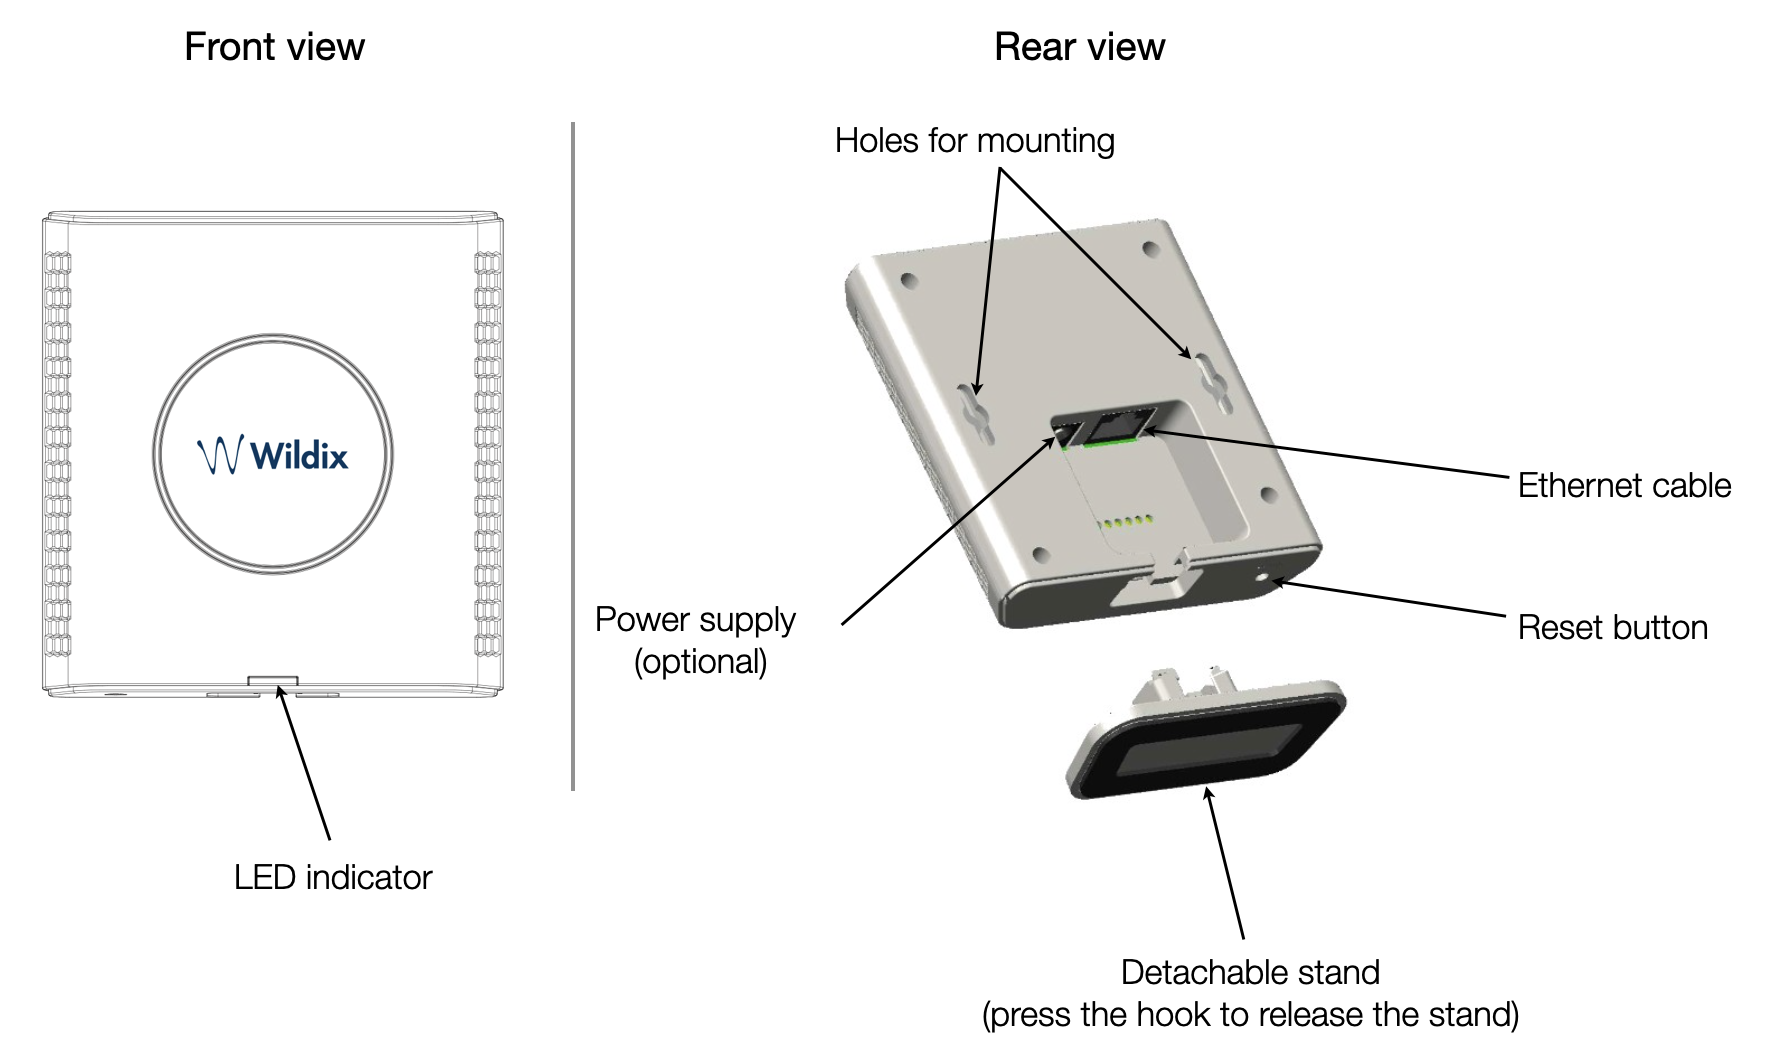
Reset a base station: press the Reset button for more than 2 seconds.
LEDs of the Base Station
LED INDICATION | STATE |
UNLIT | No power in unit |
UNLIT/SOLID RED | Error condition |
BLINKING BLUE | Initialization |
SOLID RED | Factory reset warning or long press in BS reset button |
BLINKING RED | Factory setting in progress |
SOLID BLUE | Ethernet connection available (Normal operation) |
BLINKING RED | Ethernet connect not available OR handset de/registration failed |
SOLID RED | Critical error |
ORANGE | Press reset button of base station |
BLINKING ORANGE | No IP address received |
Mounting instructions
First determine the best location that will provide an optimal coverage taking account the construction of the building, architecture, and choice of building materials.
Next, mount the Base Station on a wall to cover range between 50 –300 meters (i.e. 164 to 984 feet), depending whether it’s an indoor or outdoor installation.
It is recommended to mount base station at an angle other than vertical on both concrete/ wood/ plaster pillars and walls for optimal radio coverage. Avoid mounting the base unit’s upside down as it significantly reduces radio coverage.
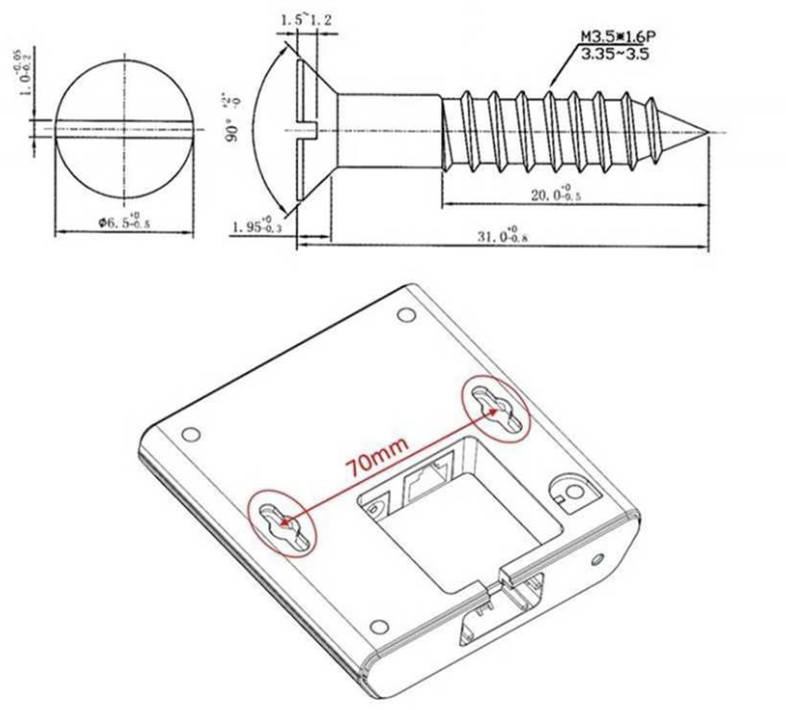
Mount the base unit as high as possible to clear all nearby objects (e.g. office cubicles and cabinets, etc.).
Use screws M3.5 x 31mm. The distance between them is 70mm (please see the images below). Make sure that when you fix the base stations with screws, the screws do not touch the PCB on the unit. Avoid all contacts with any high voltage lines. The height of wall mount is suggested to be less than or equal to 2 meters.
Find Base station IP
On the handset press Menu key followed by the keys: *47* to get the handset into find bases menu. Depending on the amount of powered on bases with active radios and the distance to the base it can take up to minutes to find a base.
- Use the cursor down/up to select the base MAC address for the base
- The base IP address will be shown in the display
The feature is also used for deployment.
Repeaters connection and overview
Repeater connection and reset
Reset a repeater: press and hold the Reset button on the back side for more than 2 seconds (LED turns solid RED and then GREEN with a double pulsation).
LEDs of the Repeaters
| GREEN BLINKING WITH A DOUBLE PULSE | Registration/subscription mode and searching for open base station |
| GREEN BLINKING | Unregistered, searching for a base station |
| SOLID GREEN | Registered to a base station and ready for use - idle |
| SOLID RED | Failed to connect to a base station |
| BLINKING RED | Handset relayed by repeater |
| RED/GREEN BLINKING | Repeater is in recovery mode for one of the following reasons (try to re-assign Repeater to Base station):
|
Set up W-AIR Small Business Solution
Step 1. Provision base stations
For detailed instruction, refer to Provisioning of Wildix devices - Admin Guide.
Go to menu Devices of the WMS, click +Add and provision the gateway. Provisioned base stations appear in the table of Devices.
For Base Station SB the W-AIR Network is created automatically with the default Pin Code 0000” (the Pin is used to register handsets).
You can change the default PIN code via Custom Provision parameters. Consult the document Provisioning Custom Settings.
Step 2. Register a W-AIR Handset
To register the handset:
- Verify that there is only one active W-AIR Network
- Go to the handset’s main menu
- Select Connectivity
- Select Deregister, enter 0000 as PIN, then press Yes
- Select Register, enter 0000 as Access code, then press OK
- The cordless phone is ready for a new login procedure
To unregister the handset:
- Log out (register to “unknown” account) by calling the Feature Code “Login” (“99” by default)
- Select Deregister in the Connectivity menu of the handset
- Enter the Pin Code “0000”, then press Yes
How to delete a handset and reuse the slot?
a) Via WMS:
Note: The option is available starting from WMS 6.08.20241101.1
- Go to WMS -> Devices -> W-AIR devices
- Choose the device you want to unregister and click Delete W-AIR slot:

- To apply the changes, go to Devices tab, select the relevant W-AIR base station and click Configure/ Sync device:

b) Via W-AIR SB web interface:
To delete a handset and reuse the slot, proceed as follows:
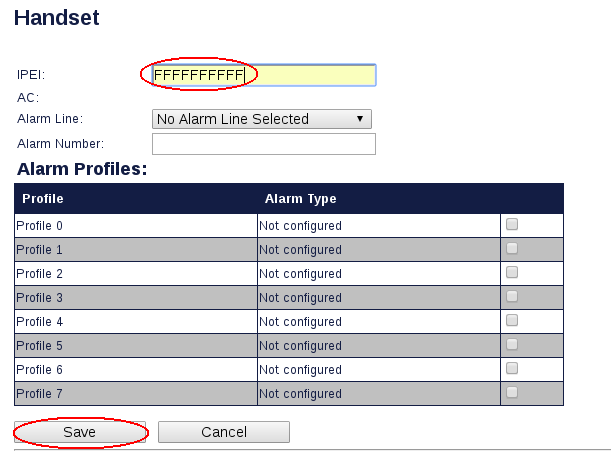
Open W-AIR SB web interface -> Extensions menu and select the handset you want to remove (click on the IPEI value):
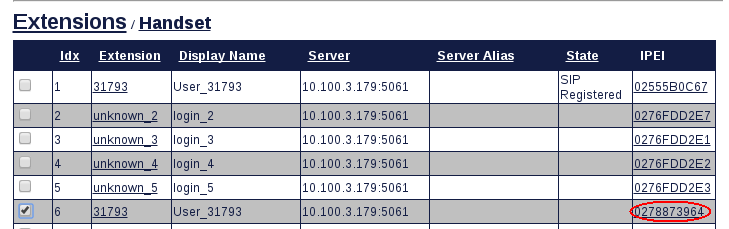
The Handset menu opens; enter the value “FFFFFFFFFF” into the field “IPEI” and click Save:
- Register a new handset to the W-AIR base station: on the handset open the menu Connectivity -> Register; after the new handset is registered, it appears on the W-AIR SB web interface -> Extensions menu
- Access the PBX via SSH and add PBX parameter “ResetHandset=yes” to the [wildixair] section of the /rw2/etc/provision.conf. Documentation: Provisioning Custom Settings
- Perform logout procedure: dial 99 from the handset and follow the prompts
- Remove PBX parameter “ResetHandset=yes” from the [wildixair] section of the /rw2/etc/provision.conf[wildixair]
Step 3. Assign a W-AIR Handset to User
You can assign W-AIR handset to a user via the handset itself or via WMS.
Assigning via the handset
- Switch on your phone and wait till the system assigns you an “unknown account” and the coverage indicator turns active
- Dial the Login Feature Code (“99” by default)
- Enter an extension number and PIN (= the first five symbols of the user WEB password)
How to enter the PIN:
- The keys are alpha-numeric, they allow you to enter both letters and digits, to enter letters: press only once the key corresponding to the letter you need to enter (there is no difference between lowercase and uppercase letters)
- Press * (the star key) to enter any special characters present in the user password, including the symbol "#"
Example: PIN is 4Ag7$Zl@, you have to dial 4247*

Follow W-AIR DECT Handset - User Guide to get more details.
Admin password is also accepted.
Assigning via the WMS
Go to WMS -> Devices -> W-AIR devices
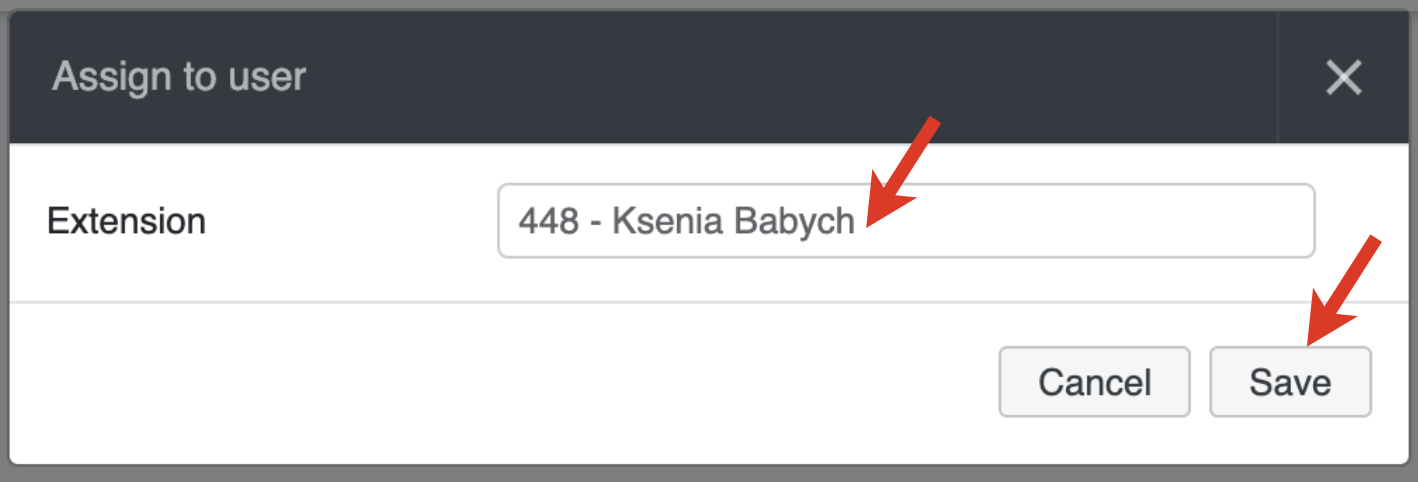
Choose the handset and click Assign to user

Enter user extension and click Save
Note: To figure out which handset received the assigned extension, you can dial this extension and see which handset rings.
To assign W-AIR handset to a different user:
- Choose the handset on the W-AIR devices tab -> click Assign to user
- Enter a different extension and click Save
To deassign a W-AIR handset:
- Choose the handset -> click Assign to user
Select “unknown” in the Extension field
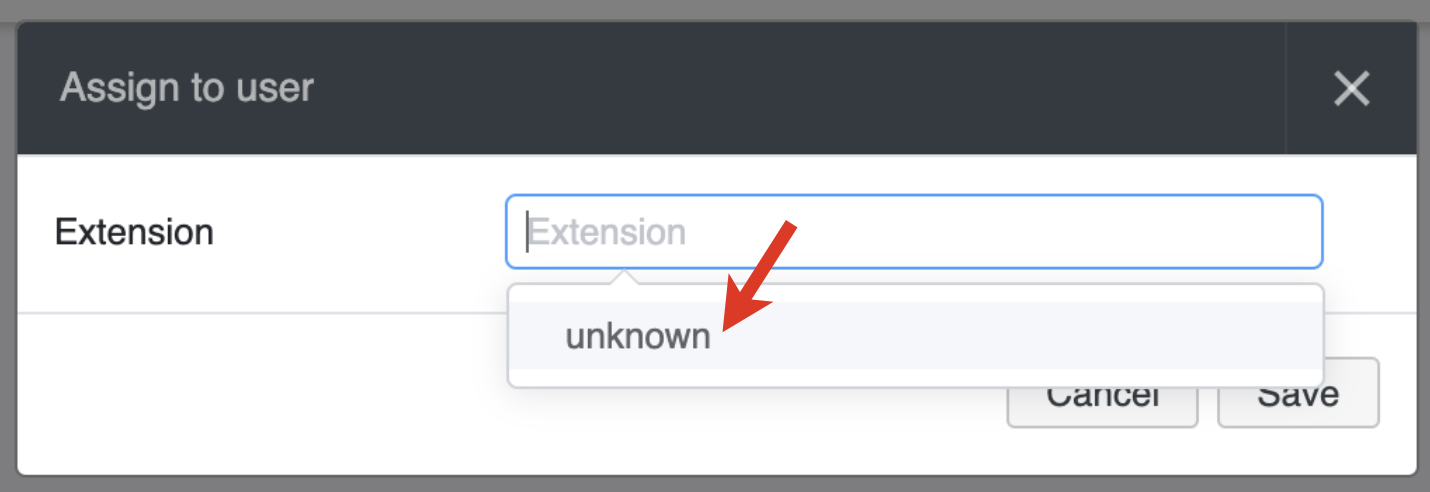
- Click Save
To delete W-AIR slot:
Note: The option is available starting from WMS 6.08.20241101.1
- Go to WMS -> Devices -> W-AIR devices
- Choose the device you want to unregister and click Delete W-AIR slot:

- To apply the changes, go to Devices tab, select the relevant W-AIR base station and click Configure/ Sync device:
Step 4. Set up Repeaters
Proceed as follows:
- Find the IP of the base station that you want to repeat (on the WMS devices list)
- Access the base station's web interface, enter a username “admin” and a password that you can find in the WMS Devices menu in the “Password” field of the given base station
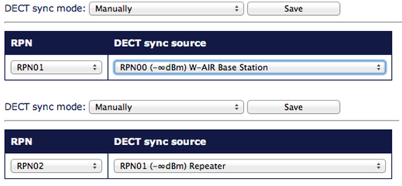
- Select Repeaters in the menu and click on Add Repeater
- Select Manually from the drop-down menu if it is present, then choose the Station ID (DECT sync source) where you want to connect the Repeater and confirm by pressing the Save button
- Reboot the Base station (go to Management menu and click Save and reboot). After the system reboots, go back to the base station’s interface
- Select Repeaters in the menu
- Select a Repeater(s) you want to add to the chain and click on Register Repeater(s)
- Now you have 5 minutes to turn on the Repeater(s)
- LED of the Repeater should turn solid green in several seconds, if it fails (solid RED) please repeat the steps after the reboot of the base station
Notes:
- If you have any problems with registering Repeater(s), reset it by pressing the Reset button on the back side for more than 2 seconds (LED turns solid RED and then GREEN with a double pulsation). Start the registration procedure again by following the last three points above
- Repeater should be placed on a distance not less than 10 meters from its Base station
- For a good conversation and a correct handover between Bases and Repeaters the dBm value should be between -75 and 0.
Call Features
DND, Call forwarding, Paging, Call intrusion, Intercom
All the Call Features can be set up in WMS or Wildix Collaboration -> User Settings or via Collaboration 7/ x-bees -> Settings -> Calls, or otherwise, directly from the handset, by dialing the Feature Codes of the system.
Consult the guide Feature Codes and Pre answer Services - Admin Guide.
Ring tones
Ring tones set in Collaboration are not applied to W-AIR handsets. You can set ring tones via Dialplan "Set" application.
Consult Dialplan applications Admin Guide.
Call transfer, hold, call swap, conference call
These operations can be performed directly from W-AIR handset, consult the guide W-AIR DECT Handset for details.
W-AIR Handsets support only 2 calls/ channels, this means, when you have one active call and one call on hold, you can only perform a transfer of the active call to the party which is on hold, or vice versa. You cannot transfer a call to some third party, because no more channel can be opened.
If you need to transfer a call to some third party when you have one active call and one call on hold, you can use in-call Feature codes (since it doesn't require opening a new channel): #8 for attended transfer and #9 for blind transfer. Consult Feature Codes and Pre answer Services Guide for detailed information.
Upgrade Procedure of W-AIR system
W-AIR System is upgraded according to the following policies:
- there is 4 hours timeout for W-AIR upgrade
- if all base stations are upgraded earlier than the timeout is reached, handsets and headsets upgrade is started immediately
- after 4 hours if some base stations are still not upgraded, devices will be upgraded in any way
FW upgrade of Base Stations
When there is the new FW available, the notification "Firmware available" appears in WMS -> Devices.
To upgrade the FW, select one or multiple base stations, and click Configure/Sync. Wait for several minutes, during the FW upgrade, devices are rebooted. As soon as the upgrade procedure is finished, the new FW version appears in the Devices menu of the WMS, the base stations are no longer marked with the blue color.
FW upgrade of Repeaters and Handsets
After the upgrade of the base stations, Repeaters and Handsets connected to the system download the new FW automatically. You can monitor the process of the FW upgrade from the base station’s web interface.
Repeaters
- Repeaters must be connected to be able to perform the upgrade procedure
- Do not turn off or reboot repeaters manually during the upgrade: they restart automatically
Go to the Base Station interface, menu Repeaters: during the reboot you can see the progress of the upgrade of the repeaters in the field “FWU Progress”. As soon as it’s finished, the “FWU Progress” displays “Complete”.
Handsets
New FW is downloaded automatically after the Base Stations have been upgraded. To complete the FW upgrade procedure of the handsets, the handsets must be placed into the charger.
During the procedure you can see the status of the upgrade of the phones, the procedure takes about 30 minutes. Go to the Base Station interface, menu Extensions -> Handset: during the reboot you can see the progress of the upgrade in the field “FWU Progress”. As soon as it’s finished, the “FWU Progress” displays “Complete”.
Alarms setting
Types of alarms
Alarm Button
This alarm is triggered by long-pressing (3 seconds) the red button on top of the handset.
Pull Cord Alarm
The Pull Cord alarm can be triggered by pulling a cord containing a magnet from the pull cord hole on the right side of the handset.
Running Alarm
To trigger the Running Alarm the handset needs to be shaken up and down for several seconds.
Man Down Alarm
The Man Down alarm is triggered if the handset remains in the position with an angle over 60 degrees with respect to the horizontal. The time for the handset to be still before the alarm is triggered can be set on base station web interface (read the next chapter 7.3. Set up emergency profiles)
No Movement Alarm
To trigger the No Movement alarm the handset needs to be in no movement. The timeout after which No Movement alarm is triggered is set on the base station web interface.
Set up emergency profiles
Go to the menu “Alarms”. In this menu eight different alarm profiles can be configured. The parameters that can be configured are:
- Profile Alias: A user friendly name to help identify the different profiles when selecting which one to enable for individual handsets
- Alarm Type: The type of event that triggers an alarm. The options are: Disabled, Man Down, No Movement, Running, Pull Cord, Emergency Button
- Alarm Signal: Call. The alarm is made as an outgoing call to the emergency number preconfigured for the extension
- Stop Alarm from Handset: Enable/Disable. The possibility to cancel an alarm from the handset
- Trigger Delay: The timeout before the phone starts showing pre-alarm warning. If set to 0, the alarm is sent immediately (max. value is 255 sec.).
For Man Down alarm, add the default delay of 6 seconds which is the time needed for the alarm detection (e.g. if set to “0”, alarm is triggered after 6 sec, if set to “30”, alarm is triggered after 36 sec.)
- Stop Pre-Alarm from Handset: Enable/Disable the possibility to cancel the pre-alarm from the handset
- Pre-Alarm Delay: The timeout during which the pre-alarm warning is displayed until the actual alarm is sent (max. value is 255 sec.)
- Howling: Enable/Disable the howling of the handset when the alarm is triggered
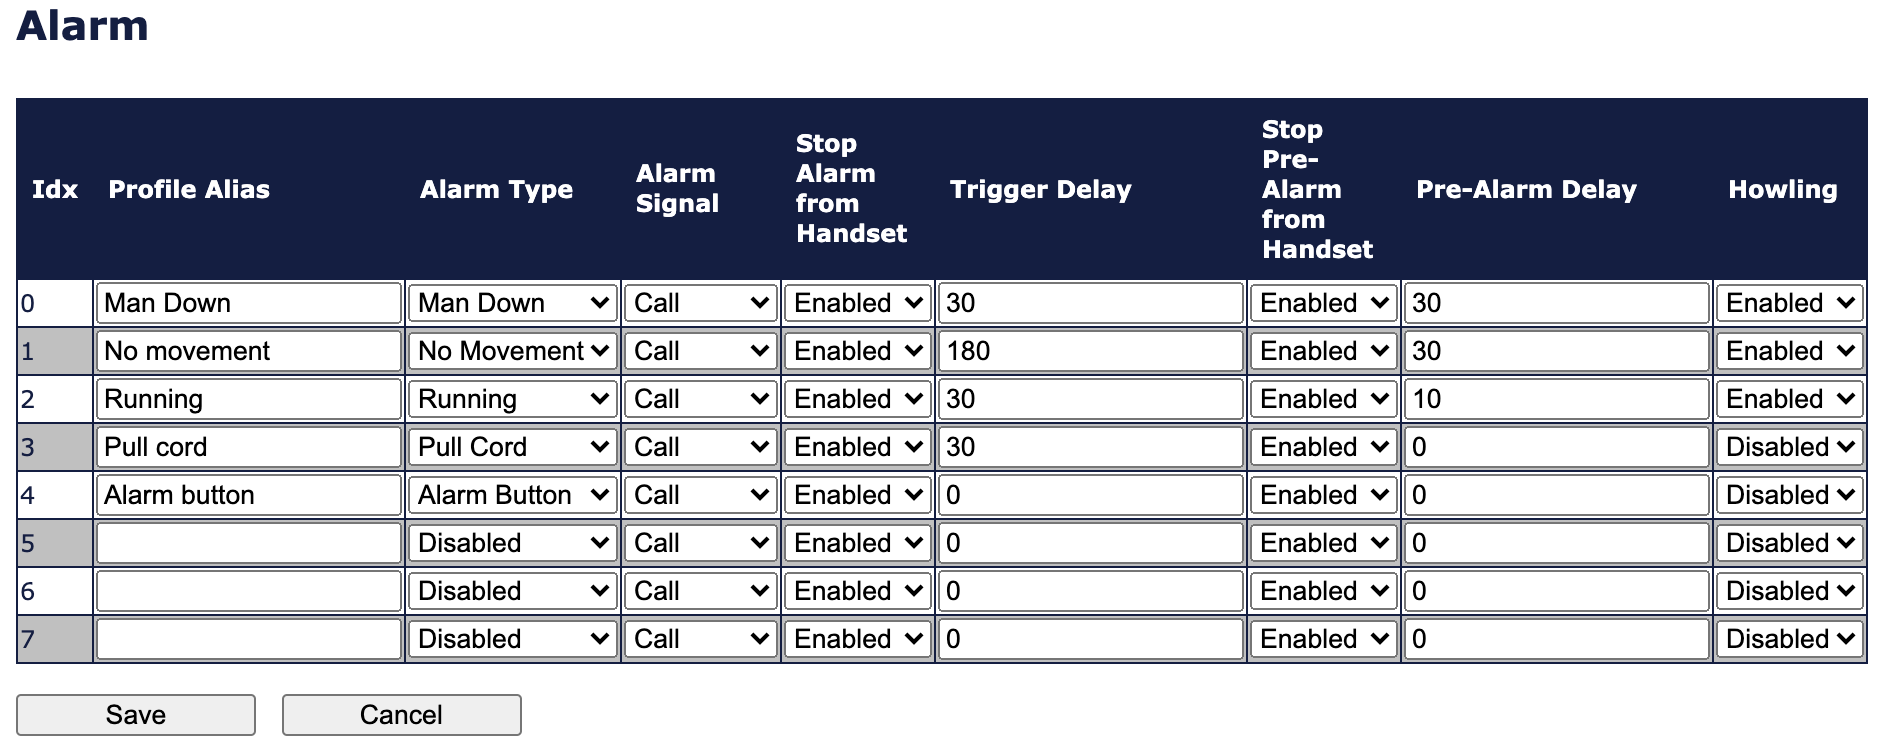
After you have defined the Emergency profiles, click Save to apply.
Assign emergency profile to handsets
- Go to the menu Extensions
Click on the “IPEI” of the handset:
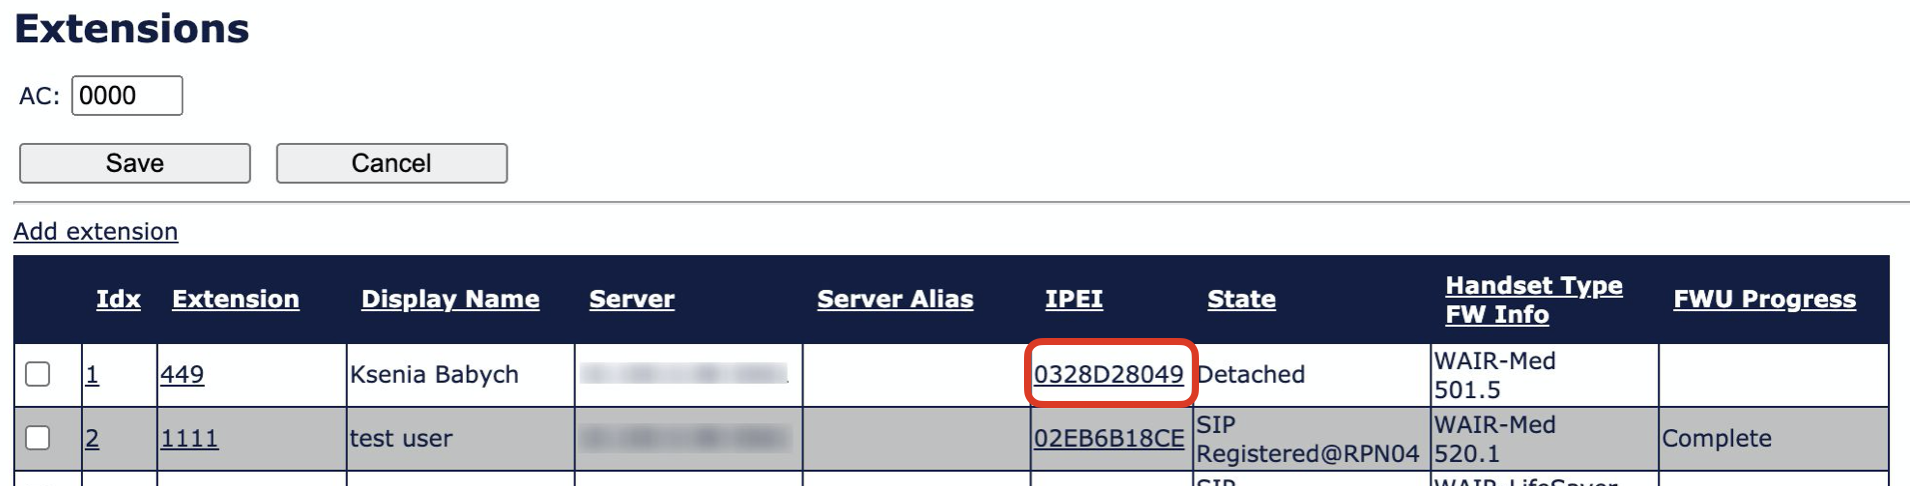
The following window is displayed, allowing you to set up emergency settings:
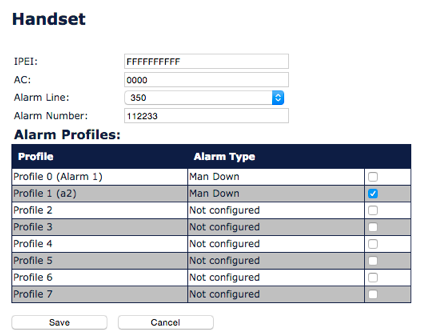
Modify the parameters:
- “Alarm Line”: select the handset’s extension number
“Alarm Number”: Enter the number to be called when the alarm is triggered from the handset
You can enter an extension number that must be called or customize the service by modifying the Dialplan in the WMS and to add the “Alarm Number” as a Called number into a Dialplan procedure.
Tick off the Profiles that you wish to enable for this handset
Click Save on the bottom of the page
Go to Management menu and click Save and reboot to reboot the base station and apply the new parameters