| Scroll export button | ||||||||
|---|---|---|---|---|---|---|---|---|
|
...
| Info |
|---|
WMS Settings Menu Guide provides the basic information on the Settings options and explains how to set up various parameters. Updated: October 2023April 2024 Permalink: https://wildix.atlassian.net/wiki/x/mBfOAQ |
Table of Contents
PBX
WMS network
Set up the connection between Server and Client PBXs.
...
- Move all users from Client (future Server)
- Disable WMS network on this Client
- Delete this Client from PBXs page on Server
- Make a backup on Server
- Apply this backup on Client
Language & region
Specify the PBX language and region settings:
...
| Note |
|---|
Each user can select a preferred language in Collaboration Settings -> Personal. This language is applied for Collaboration web interface, WP4X0 interface. All the System sounds (audio prompts) are also played in the language selected by the user, but only if the corresponding Sound package is installed. Otherwise, System sounds are played in the default Language of the PBX. |
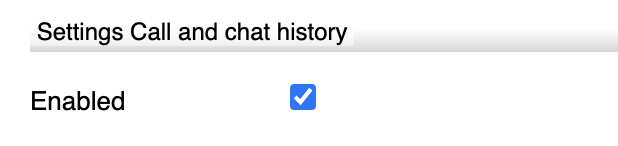
Call and chat history
On Cloud PBX you can simply disable / enable the PBX to save chat and call history (CDR):
| Note |
|---|
Note: Starting from WMS 6.01.20221019.4, it is possible to set up backend for storing chat and call history (CDR) on Cloud PBX. |
On Hardware / Virtual PBX, you can set up and select the backend used for storing the CDS tab, you can see statistics of CDS space usage in WMS and configure data rotation settings.
The tab displays the total number of space used and a bar graph visualises the space distribution between backups, recordings, voicemail and free space.

| Note |
|---|
Note:
|
Hovering the mouse over a section on the bar graph, the number of used space is displayed for the relevant section.
In the section Data retention period you can select how long the data should be stored:

| Note |
|---|
Note:
|
Above the Data retention period section you can find expected number of months the data might be stored in CDS taking into account the current rotation policy and data usage:

| Note |
|---|
Note: Expected data retention time is displayed at least one day after any data has been added to Company Data Storage. The data is updated every day. To make a rough calculation of time the data will be stored, first the average MB usage is calculated. The average MB usage for X days is calculated by the following formula:
Example: The minimum expected retention time that can be displayed is 1 month. E.g. if there are 10 days or 20 days left – in both cases “less than 1 month" will be displayed in the “Expected retention time”. |
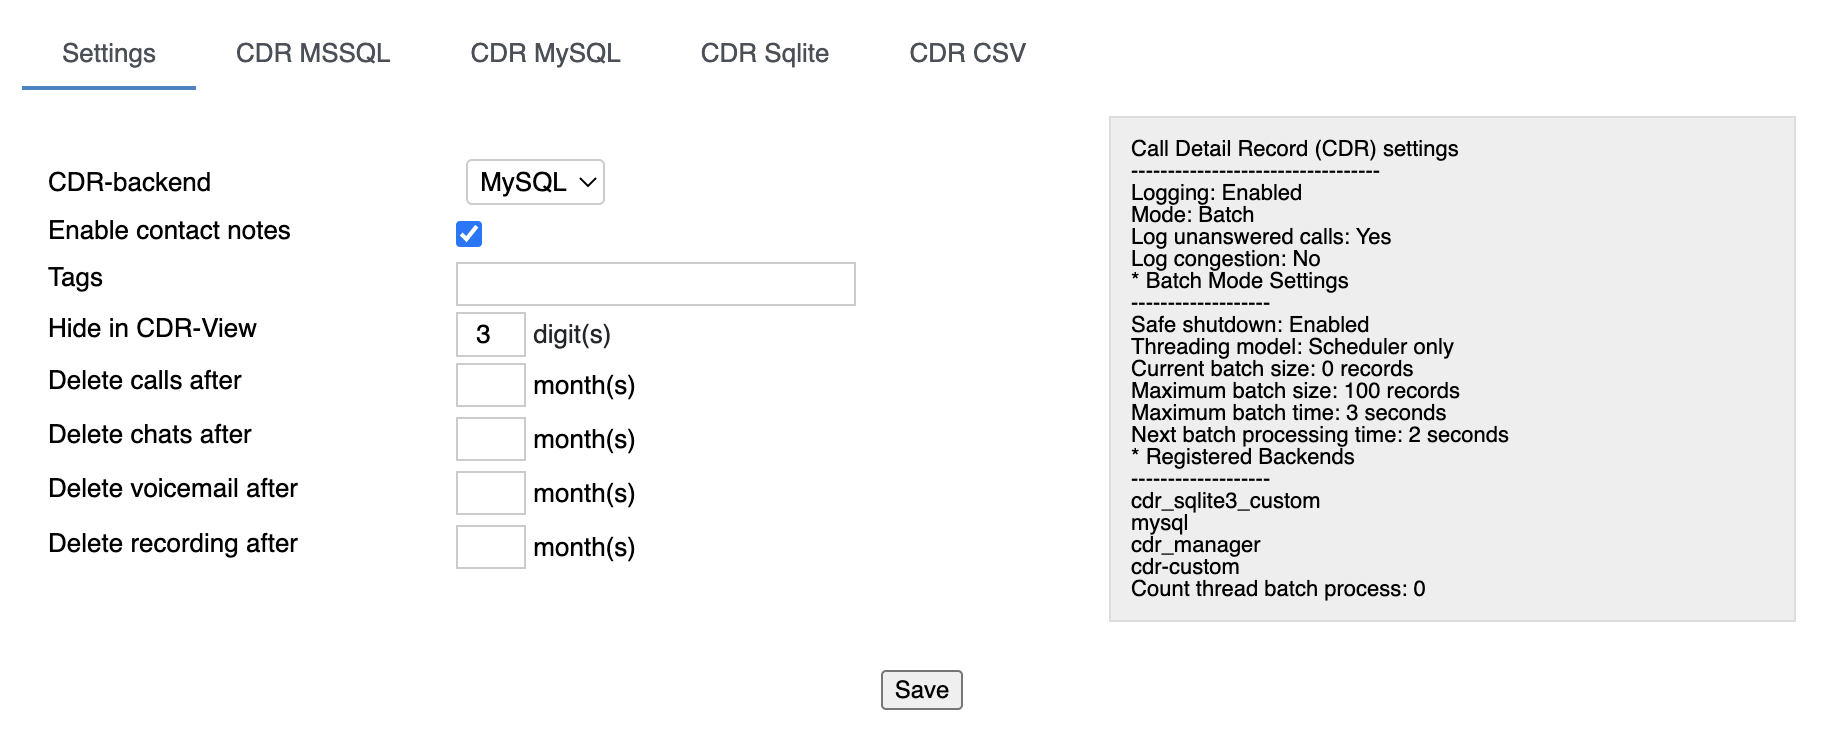
On the Settings tab, you can set up and select the backend used for storing chat history and call history (CDR). Hardware / Virtual PBX supports three The following CDR storage modes are supported:
External server Microsoft SQL: MySQL or MSSQL. The server must be previously installed and must be reachable by the PBX
Internal database: CDR Sqlite. In this case CDR is stored on the PBX (on the backend specified for CDR storage). This backend is recommended for PBXs with 40 users and less
CSV file (Hardware / Virtual PBX): file can be saved to a storage device (USB or network share)


Other Settings:
...
- Hide in CDR-View: allows hiding last X digits in CDR-View from phone numbers consisting of more than 7 digits. Must be used together with ACL “Can/cannot see full number in CDR-View” (see ACL rules and Call classes management Guide)
Delete calls / chats / voicemail / recording after: these options allow auto-deleting old calls, chats, voicemails and recordings after a specified number of months
Note Notes:
- By default, the system clears data older than 12 months, if other values are not specified. Clearing of old data is run at 4 am every day.
- Deleting chat history in WMS Network.
In case WMS Network is enabled, chat history from CDR-backend will be deleted using the minimum value. For example, "Delete chats after 2 month" is set on Server PBX and "Delete chats after 1 month" is specified on Client PBX -> chats will be deleted after 1 month (the value of Client PBX is applied).

| Warning |
|---|
Limitation: in case of applying backup, empty icons for Call recordings and Voicemails that had been deleted, are still present in CDR-View (also on History page for call recordings). |
...
Step 1. Enable connection to the database (Hardware, Virtual PBX)database
Go to tabs CDR MSSQL / CDR MySQL / CDR Sqlite - you must enable connection to at least one database (however all the modes - CDR MSSQL, CDR MySQL, CDR Sqlite and CDR CSV - can be enabled at the same time).
...
For each backend there is a log shown in the right part of the screen, with the actual status and eventual problems and errors:
SIP-RTP
General PBX parameters and parameters for the voice transport:
...
| Note |
|---|
Note: Starting from WMS 5.04.20220309.1, Wideband codec is forced for all devices (g711 always has higher priority compared to g729). If you want to enforce g729, this can be done via Dialplan configuration (Set application -> Codecs -> choose the preferred option). With wideband codecs, the following priorities apply:
|
Hotel integration
Enable integration with Oracle / Fidelio PMS and other hotel management systems that support FIAS protocol.
Refer to the Hotel Integration Guide for detailed information.
Integrations
Callback URLs
Callback URLs allow opening Zoho CRM or other CRM systems upon receiving or placing a call and pass parameters (static parameters or supported variables).
Refer to How to set up web application integration via Popup URLto the Hotel Integration Guide for detailed information.
Verify certificate (optional)
You can enable the validity verification of the CRM server. Enter your credentials for basic authentication.
...
Limitations:
...
Integrations
Cloud integrations
| Note |
|---|
Note: In case of WMS version lower than 6.05.20240119.1, the tab is named Calendars. |
Enable integration with:
- Google Calendar: refer to the guide How to set up and use Google Calendar integration for more information
- Microsoft Teams Presence: for detailed information, check the guide teams4Wildix - integration of Microsoft Teams with Wildix PBX - Documentation
Webhook: refer to the document How to set up Webhook integration for more information
- HubSpot and Salesforce integrations (x-bees): refer to x-bees Admin Guide for more details
- x-bees Client integrations (x-bees): for detailed information, check the document How to set up x-bees Client integrations
Zoho Integration
Enable integration with Zoho CRM. Refer to Zoho Products CRM integration with Wildix PBX for detailed information.
...
Simple Token authorization is a simplified method of Wildix PBX API integration via access key (token) that does not expire.
Documentation is available on your PBX: https://<pbx_host>/api/v1/doc/#section/Authentication/Token
Analytics
...
Calendars
Enable integration with:
...
not expire.
Documentation is available on your PBX: https://<pbx_host>/api/v1/doc/#section/Authentication/Token
Analytics
Enable x-caracal ACD Stats. Refer to x-caracal Guide for detailed information.
Callback URLs
Callback URLs allow opening Zoho CRM or other CRM systems upon receiving or placing a call and pass parameters (static parameters or supported variables).
Refer to How to set up web application integration via Popup URL for detailed information.
Verify certificate (optional)
You can enable the validity verification of the CRM server. Enter your credentials for basic authentication.
| Warning |
|---|
Limitations:
|
Features
Manage such PBX Features as:
Cloud Analytics (available from WMS 6.03.20230630.3): enables events sending/ data gathering for Cloud Analytics (CDR-View 2.0) in Collaboration and x-bees. It t is automatically activated if a PBX or whole WMS Network are running in the Cloud. Also, enabled Cloud . Analytics is required for Webhook integration (for more information, check the document How to set up Webhook integration).
In case of a standalone Virtual/ Hardware PBX, or if there is a mix of Cloud and Virtual/ Hardware PBXs in a WMS Network, Cloud Analytics should be enabled manually by admin.
Documentation: Cloud Analytics (CDR-View 2.0) in CollaborationNote Note: If sending of the events was enabled and then disabled, the old data is still stored in the data base. For the old data be removed, a ticket to customer care has to be opened.
| Warning |
|---|
Important: If you need to disable Cloud Analytics on a PBX with x-bees licenses, please contact Wildix Technical Support, as the Cloud Analytics setting may affect presence sync in x-bees. On a PBX with Collaboration licenses Cloud Analytics can be turned off without additional configuration from the Technical Support side. |
Collaboration call control (available from WMS 6.03.20230630.3): enables Call control mode for Collaboration. By default, only 1 active Collaboration session is permitted. However, there is an option to allow the second Collaboration tab – in Call Control mode. This can be used, for example, for media devices when connecting via remote desktop. The option is particularly practical for teams4Wildix integration. Once the feature is activated, an additional option appears on the Collaboration login window – Call Control only.
Note Use case: User can set "Call control only" mode to be automatically enabled by adding a parameter in the URI (useful when it is needed to share the link among all employees or bookmark the page)
How-to: add ?sip=no to PBX domain name -> https://pbxname.wildixin.com/collaboration/?sip=no
- (available from WMS 6.04.20231020.2): enables location-based MFA on the PBX, which uses users' location (determined by the IP address) to confirm their identity. If the IP address appears to be from an unfamiliar location, users need to confirm the IP address via email. Read more in the documentation: Security Policy at Wildix

Security
CORS
Configure domain whitelist to protect PBX from cross-site request forgery (CSRF) attacks.
...
Refer to Active Directory Single Sign-On for detailed description.
System
Network (Hardware, Virtual PBX)
Set up the network parameters based on the selected network scenario: you can keep the data and voice networks separated or shared.
...
If you modify the DNS server, click Apply DNS service to apply the new parameters.
HTTP proxy client (Hardware, Virtual PBX)
Allows you to enter the data for connection to a proxy server.
Parameters:
- Enable HTTP proxy for Support VPN: this option allows you to activate remote support and connection to Wildix server in case HTTP proxy is used
- Proxy host: IP address of the proxy server
- Port: listening port of the proxy server
- Proxy authentication method: authentication method used by server (None, Basic, NTLM)
- Login: user name (if required by authentication method)
- Password: password (if required by authentication method)
LDAP server
Set up connection to LDAP server. This feature allows you to use a PBX as an LDAP server for users sync.
...
- Enable external connections to LDAP: enables access for external connections to the PBX
- Allowed host(s): security parameter allowing access only to the subnets entered here (e.g.: 192.168.0.0/24, 10.0.0.0/8); when using Overlay solution, enter here the IP of the Overlay Core
- Password: allows you to set up a password for connection to the server
DHCP server (Hardware, Virtual PBX)
If the chosen network scenario uses the service of the DHCP server of the PBX, make sure that the options of the service are enabled with the correct settings.
DHCP server is integrated for auto provisioning of supported devices. It’s possible to enable the server for the initial configuration of the devices and successively disable it, otherwise, enable the parameter Deny unknown clients.
...
- To delete a lease, click - button
- To set up this IP address as static, click Edit button
- To release the previously assigned addresses, click Purge leases button
SMTP client
Enable the PBX to send notifications of the new voicemails, missed calls, chat requests, call recordings, faxes, etc.
...
| Note |
|---|
Note: in case you are having problems setting up SMTP client with Google account, proceed as below:
|
FAX/SMS server
Allows you to enable Mail2Fax and Mail2SMS services and specify the general parameters for FAX/SMS management.
...
- Click + to add a new Fax/ SMS server profile
- Enter the following parameters:
- Name: enter the name (identifier)
- Protocol: select the protocol of communication with your email server (POP3 or IMAP)
Auth type: select the preferred authorization type, Basic or OAuth2 (the support of OAuth2 for Fax/SMS Server starts from WMS 6.01.20221019.4). Depending on the chosen type, fill out the following fields:
a) In case of Basic Auth type:- Server: settings of your email server to access incoming messages
User: email address of user to access to the server
Note Note: don't use here an email of a user who must send faxes via Fax2Mail service.
- Password: password to access to email address of user specified in the field above
- Use SSL: enables secure connection to the server (required by some email servers)
SSL Certificate check: allows to disable SSL certificate check, e.g. in cases when the mail server uses a self-signed certificate. The parameter is enabled by default.
Note Note: The support starts from WMS 6.03.20230630.3.
- Auth provider: choose auth provider (Google or Office 365) -> click Login and perform the login
- Dialplan procedure: select the Dialplan procedure to manage faxes sent by users
- Protection password: security password for MAIL2FAX service
- Default LOCALSTATION: sender’s fax machine ID, appears at the top of each page of outgoing fax, if not specified the default value “Fax Server” is used
- Default LOCALHEADER: fax header to identify the sender, appears at the top of each page of outgoing fax, if not specified the default value “Wildix PBX” is used
- Keep e-mails and faxes on server: enables storing of messages on the server
...
For more information about Fax/ SMS Server, read FAX/ SMS Server Quick Admin Guide.
SNMP server (Hardware, Virtual PBX)
Start the SNMP server integrated into the PBX to allow remote monitoring of system resources.
Parameters:
- SNMP Server: enables the access to the SNMP server
- Community: enter the server identifier
- Port: external port of access
- Trusted IP: enter the list of the clients that can connect to the server
Storages (Hardware, Virtual PBX)
Configure a backend to store all the data of the PBX (Voicemail, call records, faxes, CDR, backups, etc).
For an on-premise PBX, the USB drive inserted into the PBX serves as a backend for storing all the data. It is recommended to store the Backups on another USB drive or on a Windows share, to be able to restore the system in case of the primary USB drive’s failure.
...
- Type: select NFS/ Windows share
For NFS:- Host: IP address or host name of the server
- Path: name of the NFS share created at the host
- Service: select the service to be saved to the NFS share (Call recording/ Voicemail/ Call generation/ Backups/ Faxes/ CDR CSV)
- Host: IP address or host name of the server
- Path: name of the Windows share created at the host
- Domain: domain name of the host machine
- User name: user name to access to the resource
- Password: password to access to the resource
- SMB version: select the Server Message Block version
- Service: select the service to be saved to the Windows share (Call recording/ Voicemail/ Call generation/ Backups/ Faxes/ CDR CSV)
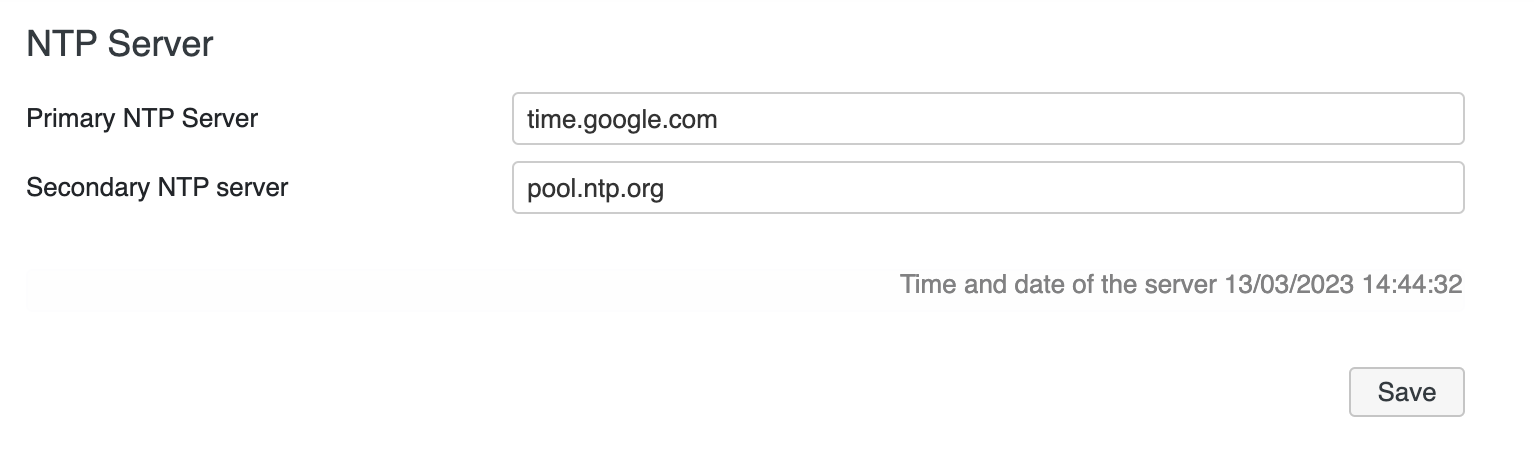
NTP server
Synchronize the PBX with an external NTP server.
...
- Primary NTP server: enter the primary server address. For example, time1.google.com
- Secondary NTP server: enter the secondary server address. For example, time2.google.com
Remote syslog
Enable remote syslog for log processing in addition to local syslog.
Refer to the online documentation Remote Syslog Guide for details.
Tools and utilities
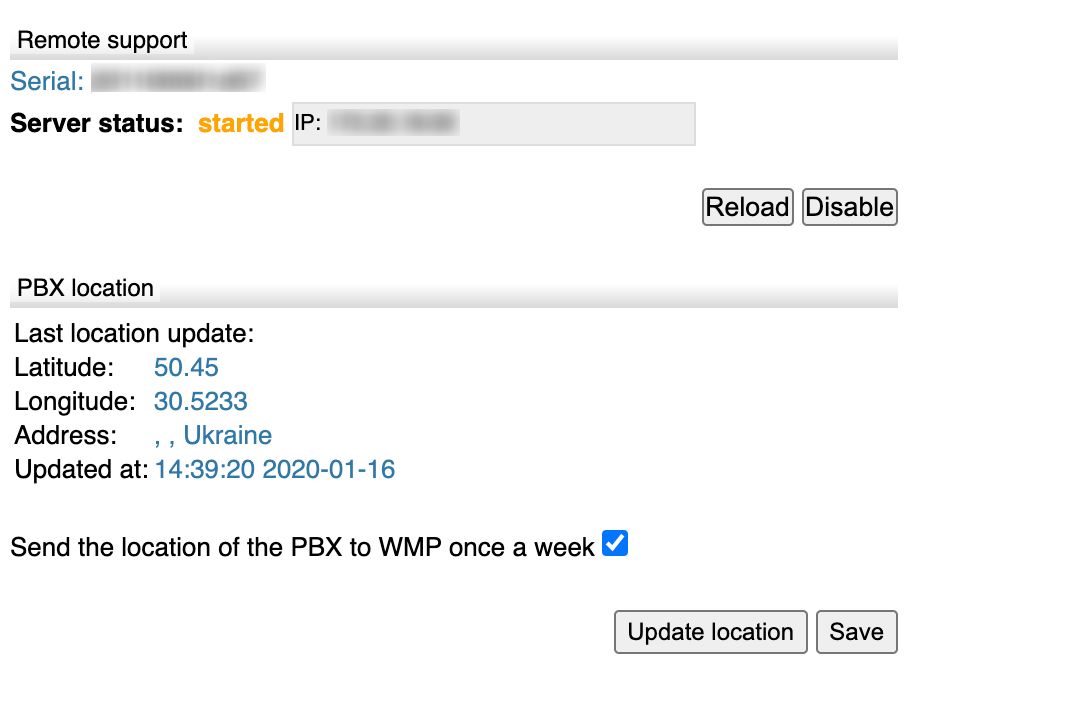
Remote support
| Note |
|---|
Important: Remote support for Cloud PBXs is removed starting from WMS 4.0X. |
...
The following IP ranges are used by Remote Support server (make sure they don’t collide with your internal network ranges):
172.16.0.0/16
172.20.0.0/16
172.25.0.0/16
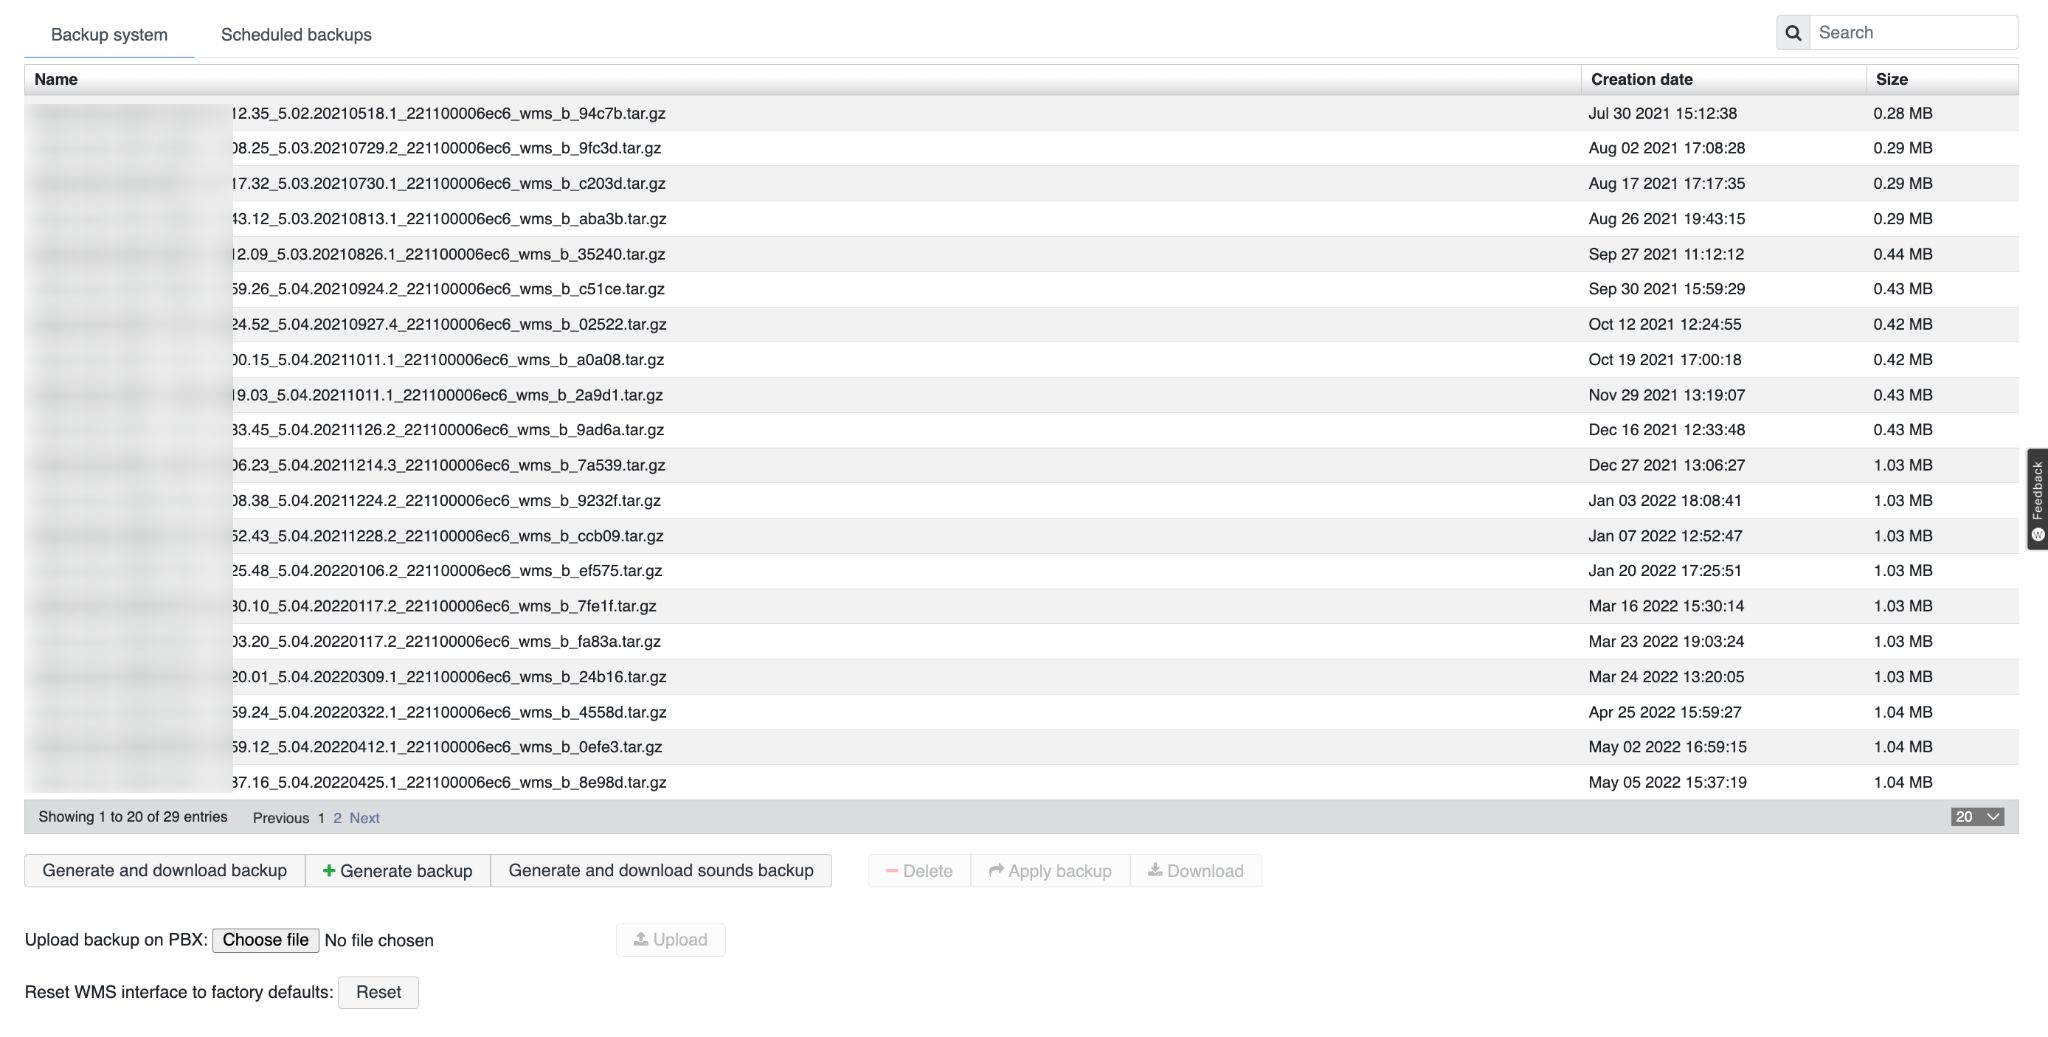
Backup system
Create and download the system backup and set up a scheduled system backup.
You can create the copies of PBX configuration on the Windows share or on the USB storage device (defined in System -> Storages (Hardware, Virtual PBX), otherwise the backup can be created and downloaded directly on your PC.
...
...
Starting from
...
WMS 6.
...
05, files are moved from local storage to Company Data Storage (CDS). For more information, read Company Data Storage Flow.
To perform the backup procedure:
...
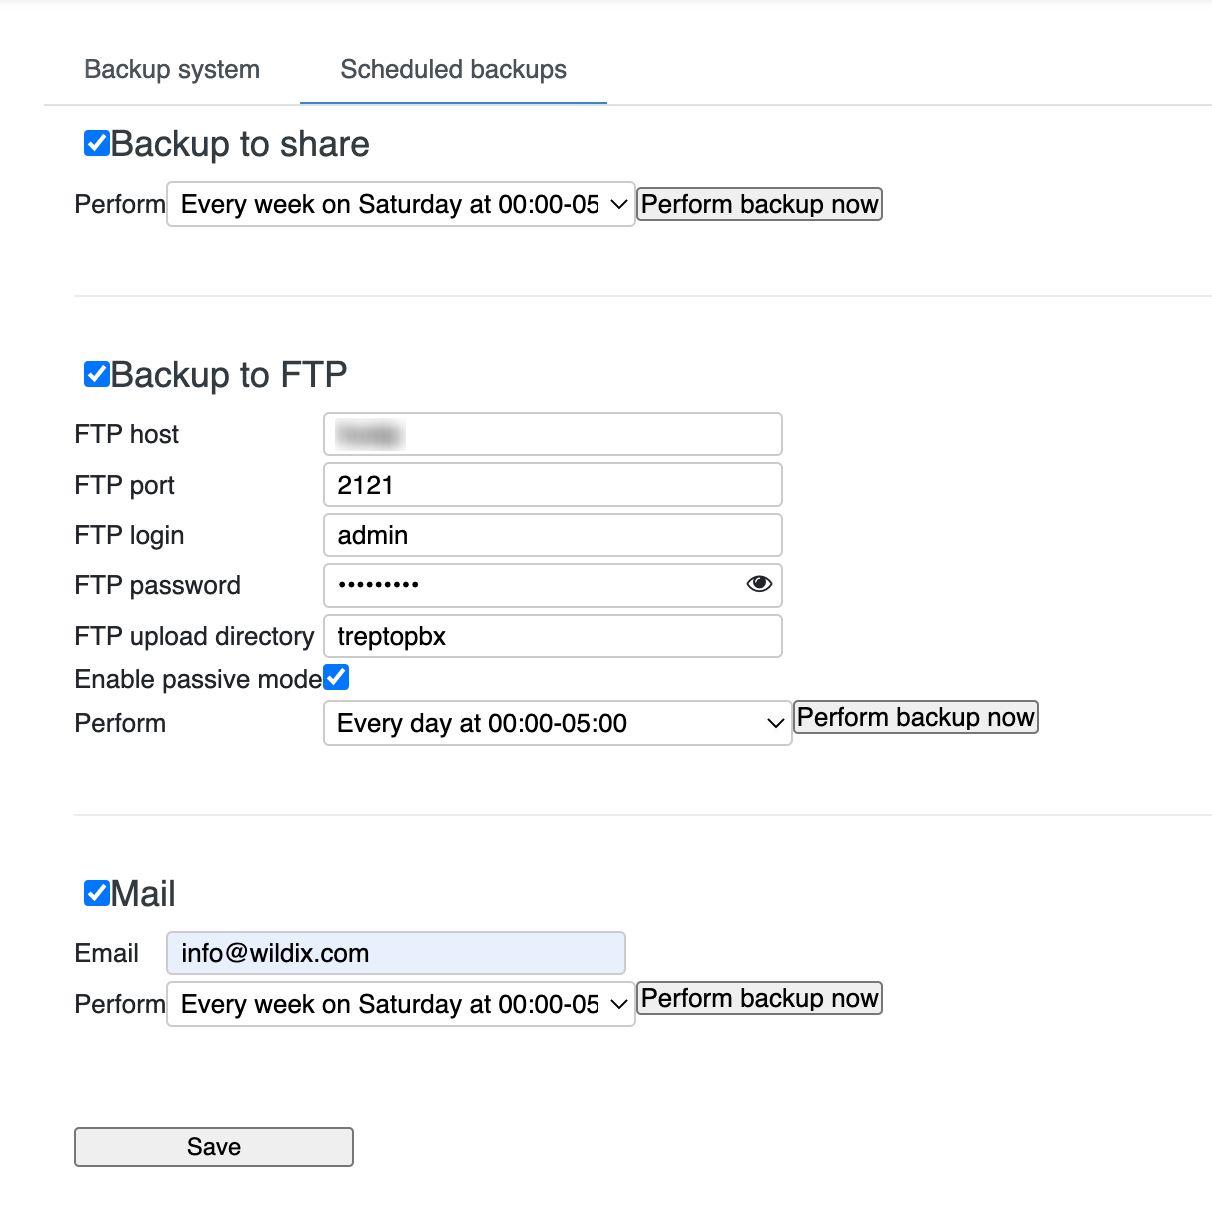
You can set up a scheduled backup to shareFTP, FTP SFTP or email which will be performed daily/ weekly/ monthly.
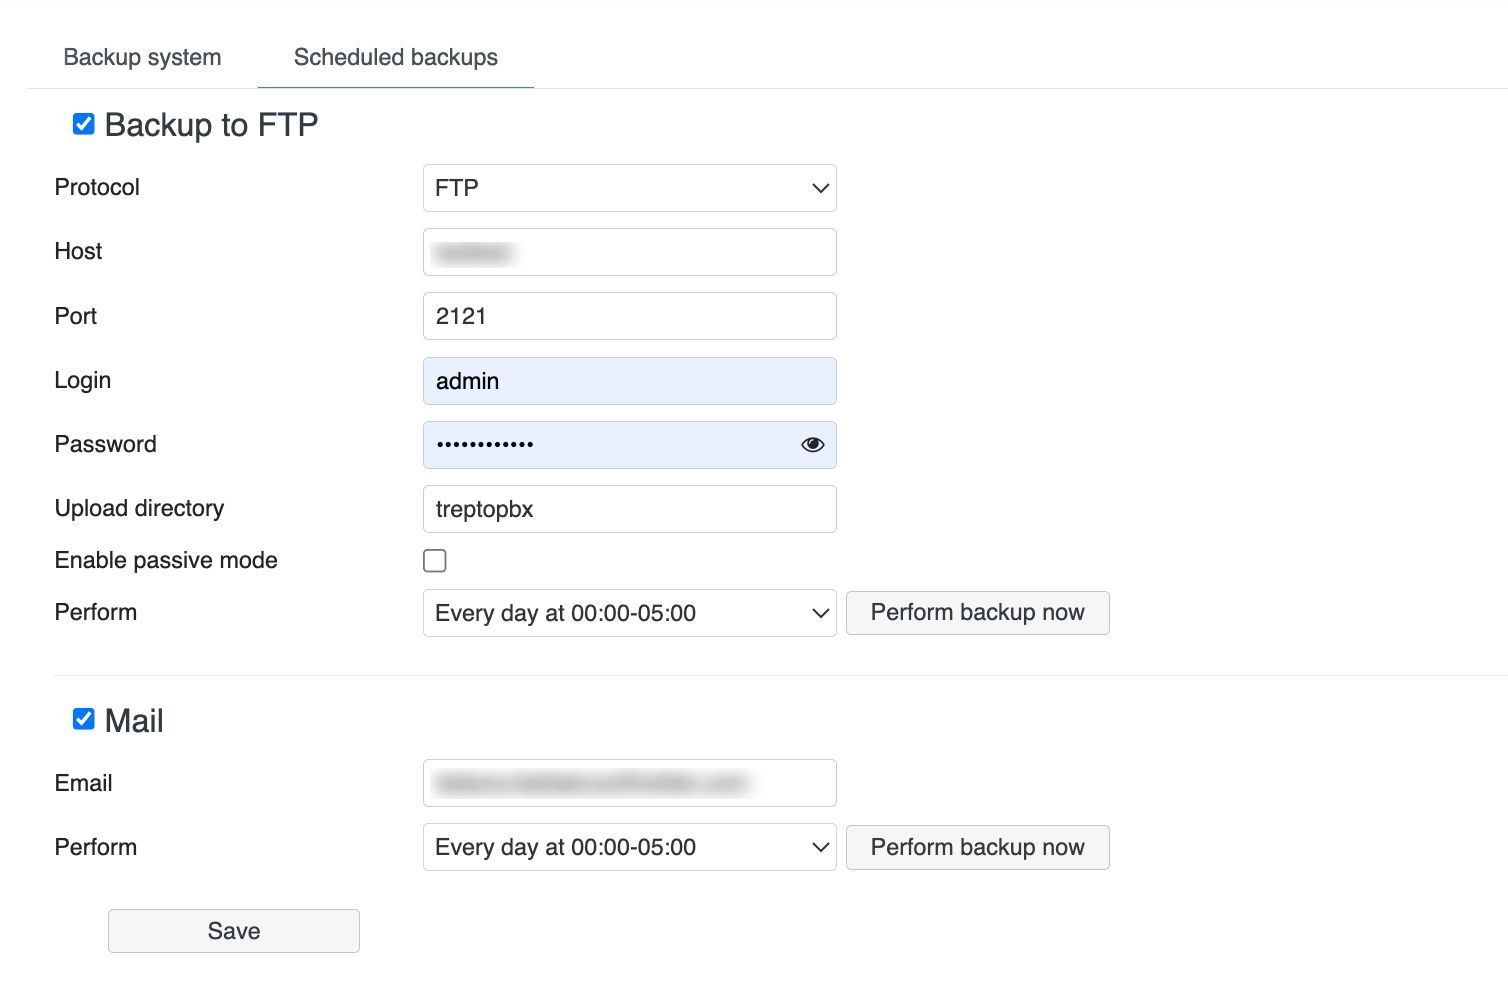
Enable one of the options for the scheduled backup:
- Backup to share (Hardware, Virtual PBX):
- Perform: enable the system to perform the backup every day/ week/ month
- Backup to FTP:
- FTP host
Protocol: choose FTP or SFTP
Warning Important: Support for backups to FTP will be removed by January 01, 2025. If you are using FTP, you need to reconfigure the settings using SFTP by the mentioned date.
SFTP option is available starting from WMS 6.05.20240119.1.
- Host: host address of FTP/ SFTP server
- FTP portPort: enter FTP/ SFTP port
- FTP loginLogin: user name
- FTP passwordPassword: user password
- FTP upload Upload directory: directory IP adress address or domain name for uploading of backup files
- Enable passive mode: tick off to enable
- Perform: enable the system to perform the backup every day/ week/ month
- FTP host
...
Click Save to save the changes.
Click Perform backup now
Upgrade
Check if there is a new version available and perform the upgrade.
...
Deploy a local upgrade server for Vision/ SuperVision and PRI/ BRI media gateways (starting from WMS v. 5.01.20200508.1) and indicate the server URL to update firmware in cases when devices cannot get it from firmwares.wildix.com server (for example, connection to the server is blocked from the device; PBX doesn't have access to the server). Please contact Wildix Support for details.
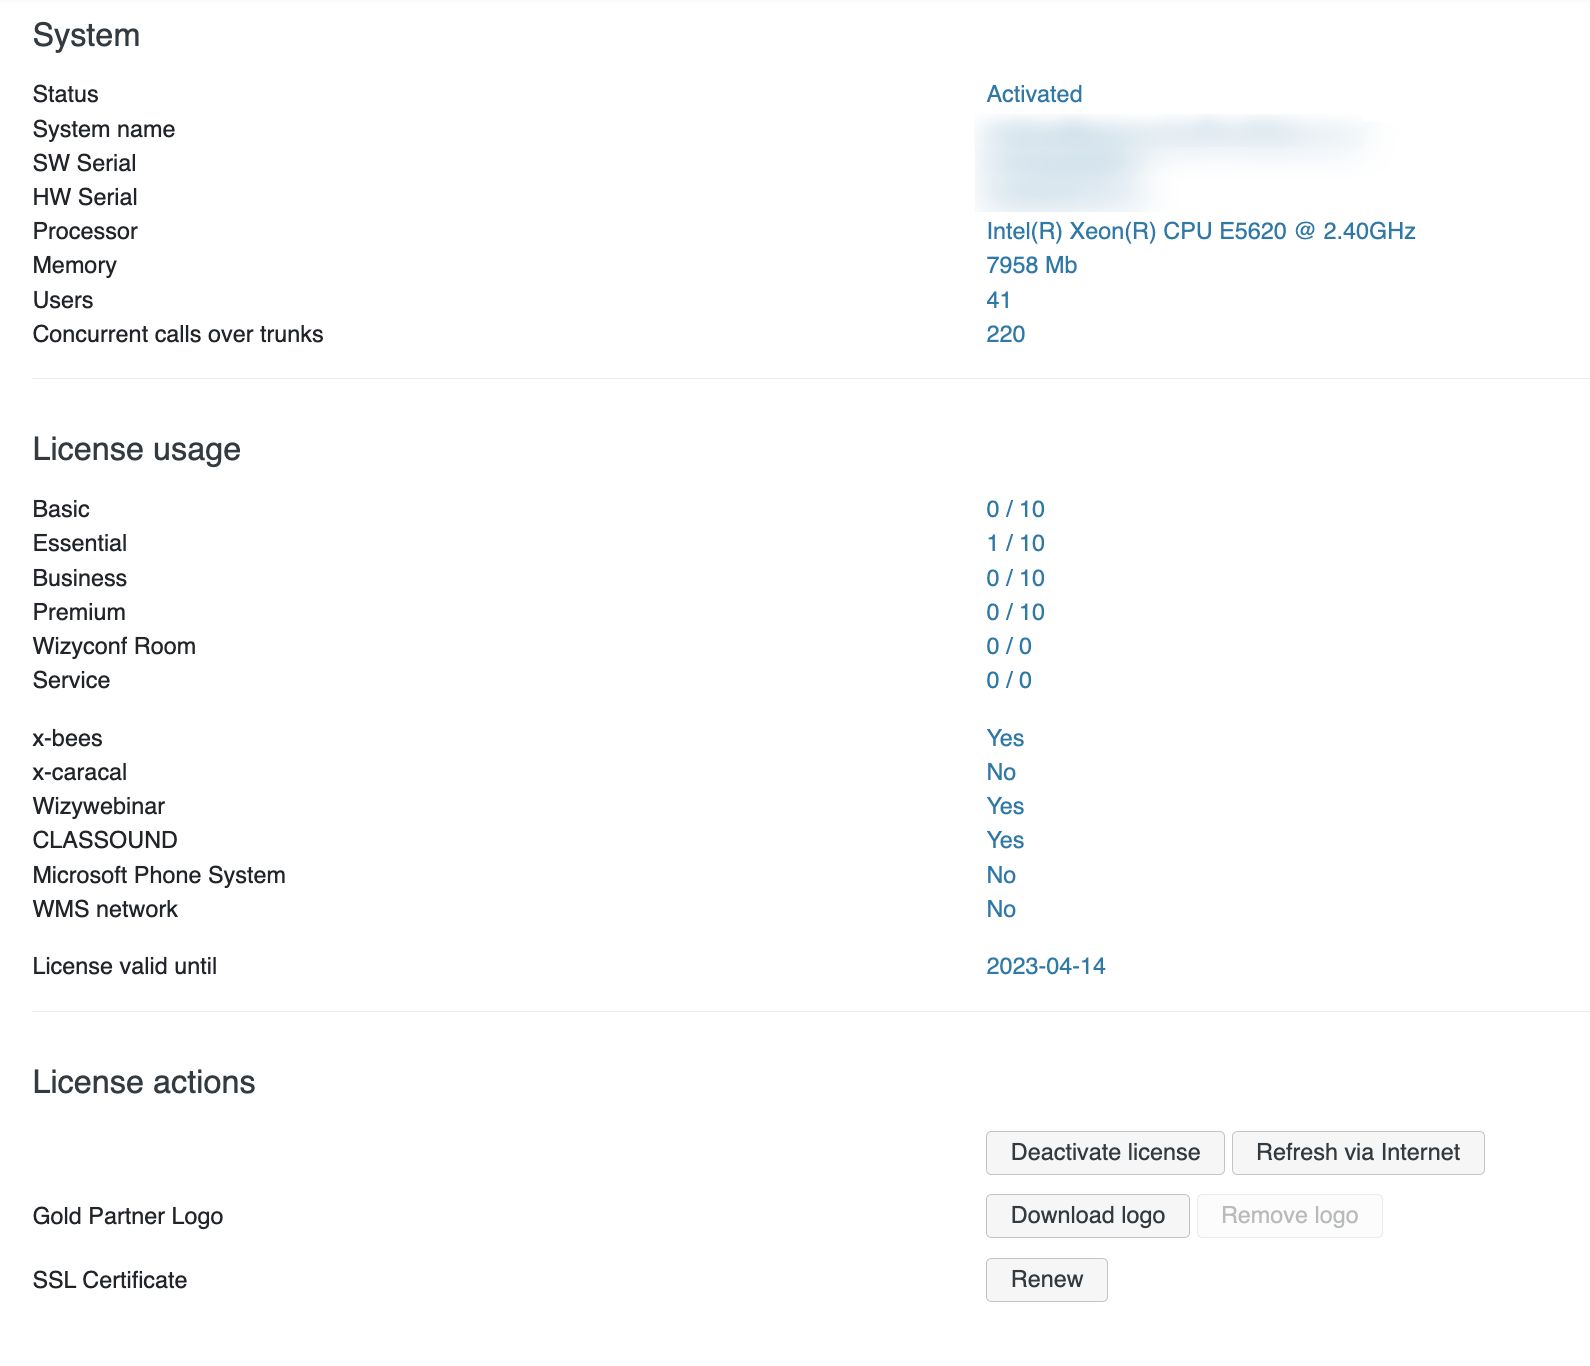
Activation / Licences
Activate PBX and Wildix licenses.
Read the guide PBX Licensing and Activation for the information about PBX activation and activation of other licenses.
...
Click Renew to update SSL Certificate.
Generate trace
Generate a *.pcap trace which allows you to debug and analyze problems with VoIP traffic.
There are several ways to generate a trace:
...
Please find more information on using *.pcap trace generation feature in this Guide on debugging and troubleshooting VoIP problems.
Other
Add custom prompts
Starting from WMS 6.04.20230731.1 3, it is possible to upload custom prompts via WMS -> Sounds:
1. In WMS -> Sounds, add the directory named "custom":
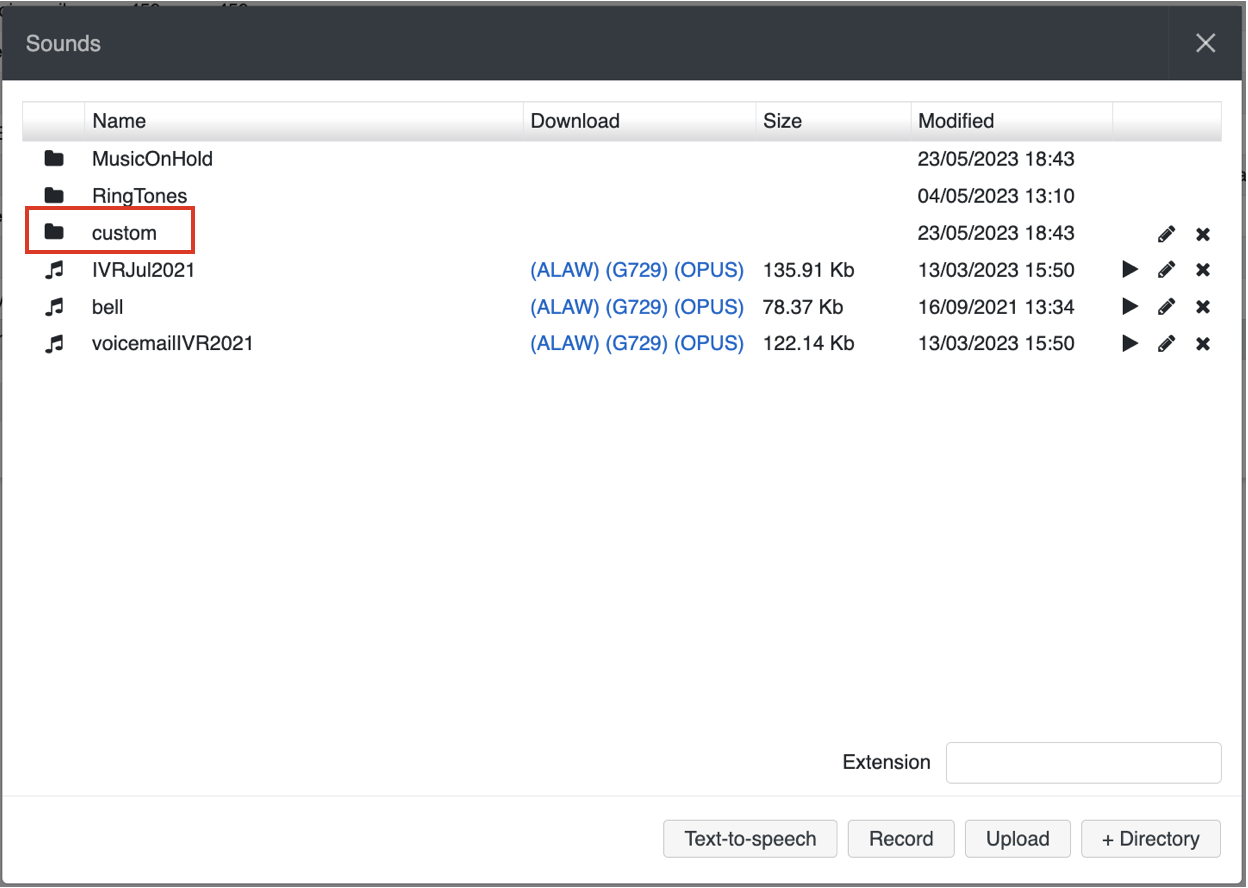
2. Upload the custom files to the directory
...