| Scroll export button | ||||||||
|---|---|---|---|---|---|---|---|---|
|
| Info |
|---|
This step-by-step guide leads you through the process of activation and configuration of the Wildix system. WMS version: 6.0X / 5.0X Updated: September 2023May 2024 Permalink: https://wildix.atlassian.net/wiki/x/hhbOAQ |
| Note |
|---|
Note: Starting from WMS 6.02.20230228.2, WMS interface has been updated. Current documentation includes the UI/UX changes. In case of WMS version prior to WMS 6.02.20230228.2, you can use older version of this guide: WMS Start Guide - old interface.pdf |
| Table of Contents |
|---|
Introduction
...
User interface for access to UC&C, completely web-based and accessible via the browser; requires at least Essential license. Additionally, you can download mobile apps for iOS/ Android from App store / Google play market.
WMP
Accessible at https://my.wildix.com/. Wildix PBXs should connect to the WMP server for:
...
Tech Wizards FB group (please add yourself to the group): https://www.facebook.com/groups/wildixtechwizards/
Official website: www.wildix.com
WMP (activation, licenses, orders, tickets): https://my.wildix.com/
- Wildix Partner Community Guide
- eLearning platform: https://trainingwww.wildix.com/join-e-learning
Blog: https://blog.wildix.com/
DOCUMENTATION: https://wildix.atlassian.net/wiki/spaces/DOC
...
Proceed as follows:
Connect to WMP using your credentials
Go to Customers tab; to create a new PBX, you first need to add a customer (if it does not exist yet); click Add:

Create a new customer (company): fill in the fields and click Save:

You need to create at least one contact: fill in the fields and click Add:
Now you can proceed with adding a new PBX: go to PBXs tab:

You are now under PBXs tab, click + to add a new PBX:

Fill in the fields:
Model: select WPBX-CLOUD for Cloud / WPBX-VM/HW for Virtual or Hardware
Region (only for Cloud PBX): select the datacenter region
Name: PBX domain name by which your PBX is accessible via the browser; in the example provided below, the PBX can be accessed by URL https://elenatest2.wildixin.com
Expire: select the recurring billing period: monthly / yearly / 5 years / lifetime (lifetime is not available for Cloud PBX)
PBX-BASIC / UC-Essential / UC-Business / UC-Premium / UC-Wizyconf Room / UC-Wizywebinar / PBX-Service: add the number of users of each profile (more about each profile: https://www.wildix.com/licensing/)
Storage size and enable Static IP (only for Cloud PBX): increase Cloud instance storage size. For more details, refer to the chapter: Increase storage on Cloud PBX
Note Note: Starting from July 1 2021 onward, all PBXs will get a dynamic IP address by default. If you need to reserve static IP for your Cloud PBX, there are several options:
- Switch to CLASSOUND to provide a more modern service
- Ask your provider to switch from the IP-based authentication to the password/login one
- Buy the storage (If you have previously purchased an extra storage, the IP is reserved)
- x-caracal: tick the option to activate x-caracal ACD stats service on this PBX. Important: make sure you add at least 10 Business/ Premium + 1 Premium licenses on this PBX to be able to activate x-caracal. More information on how to activate x-caracal on the WMS side: x-caracal documentation. Important: x-caracal is supported only on Cloud or Virtual PBXs, Hardware PBXs are not supported. Make sure you have the min. required WMS version
MS-PhoneSystem: this is an extension of the teams4Wildix (integration of Microsoft Teams with Wildix PBX). It requires the CLASSOUND service to be activated on the PBX. Important: Make sure you have the min. required WMS version
Click Add; your PBX has been created:

...
| Note |
|---|
Cloud PBXs are automatically activated after they are created in WMP (see chapter Creation of Per User PBX on WMP). |
- Copy PBX key from WMP:
Go to the tab PBX per user, select your company, then select the PBX that you have created on step 1
Click Copy PBX key to clipboard

...
- 13 - Sounds: via this menu you can upload music on hold and ringtones, record the messages for operator (More information in chapter Record and playback audio messages); you can generate audio files using TTS (Text-to-Speech), more information: Wildix Business Intelligence - Artificial Intelligence services
- 14 - Terminal: access to the console (enabled only for the admin user)
- 15 - Debug: click to view the simple log of each call generated on the PBX (More information in chapter Dialplan debug)
- 16 - Reboot / Power Off

- 17 - Profile icon: click on the arrow icon next to the user name to access the Logout option
...
The tab Scheduled backups allows you to set up a scheduled system backup (daily / weekly / monthly), FTP, SFTP or mail. Configuration example:

More details: WMS Settings Menu Guide.
...
The upgrade procedure is described in chapter Upgrade WMS to the latest stable release.
Available repositories for upgrade:
...
To add a new SMTP profile, proceed as follows:
Select Default and click EditUncheck the checkbox next to Default settings
Fill in the fields:
Email from: address to be used by PBX to send emails
Note Note: Starting from WMS 5.03, in case of using SMTP client w-smtp.wildix.com, the following email is by default used in the “From” field: no-reply@wildix.com
SMTP mail server: server’s postal address used by the company
Port: listening port of the SMTP server
- SMTP authentication method: choose the authentication method for the SMTP server
- Timeout: select the timeout for the SMTP server to send notifications
User: user name to access the server
Password: password to access the server
HELO domain: domain defined for sending emails. Default value is “localhost”, change it in case anti-spam filters of the SMTP server block sending the message
Enable TLS: TLS protocol enabled for the security of the connection to the server
Enable STARTTLS: STARTTLS option enabled if provided by SMTP

...
To be able to store call and chat history, you must enable a CDR backend. You can also enable contact notes and set up different options that allow auto-deleting of old calls, chats, voicemails and recordings after a specified number of months. Detailed information can be found in WMS Settings Menu Guide.

| Note |
|---|
Note: Starting from WMS 6.01.20220721.1, it is possible to set up backend for storing chat and call history (CDR) for Cloud PBX. |
...
Go to the first tab CDR Settings and select the backend used for displaying CDR statistics:
CDR-backend: select here the CDR backend (more information on other fields can be found here: WMS Settings Menu Admin Guide)


Click Save
For each backend there is a log shown in the right part of the screen, with the actual status and eventual errors.
...
Calls history can be accessed from Collaboration, WP, iOS / Android apps (W-AIR shows only local call history).
| Note |
|---|
Note: It is possible to configure SSL connection for sending CDR data to external MySQL server. See the following guide for instructions: Custom config parameters List: Enable SSL connection to remote MySQL server. |
SIP-RTP
Go to PBX -> SIP-RTP
...
Data Sync Role: select ServerMTU: specify the size of the largest protocol data unit that the can be passed on VPN (MTU = maximum transmission unit)
Login: set up the Login (must be the same on Server and Clients)
Password: set up the Password (must be the same on Server and Clients)
...
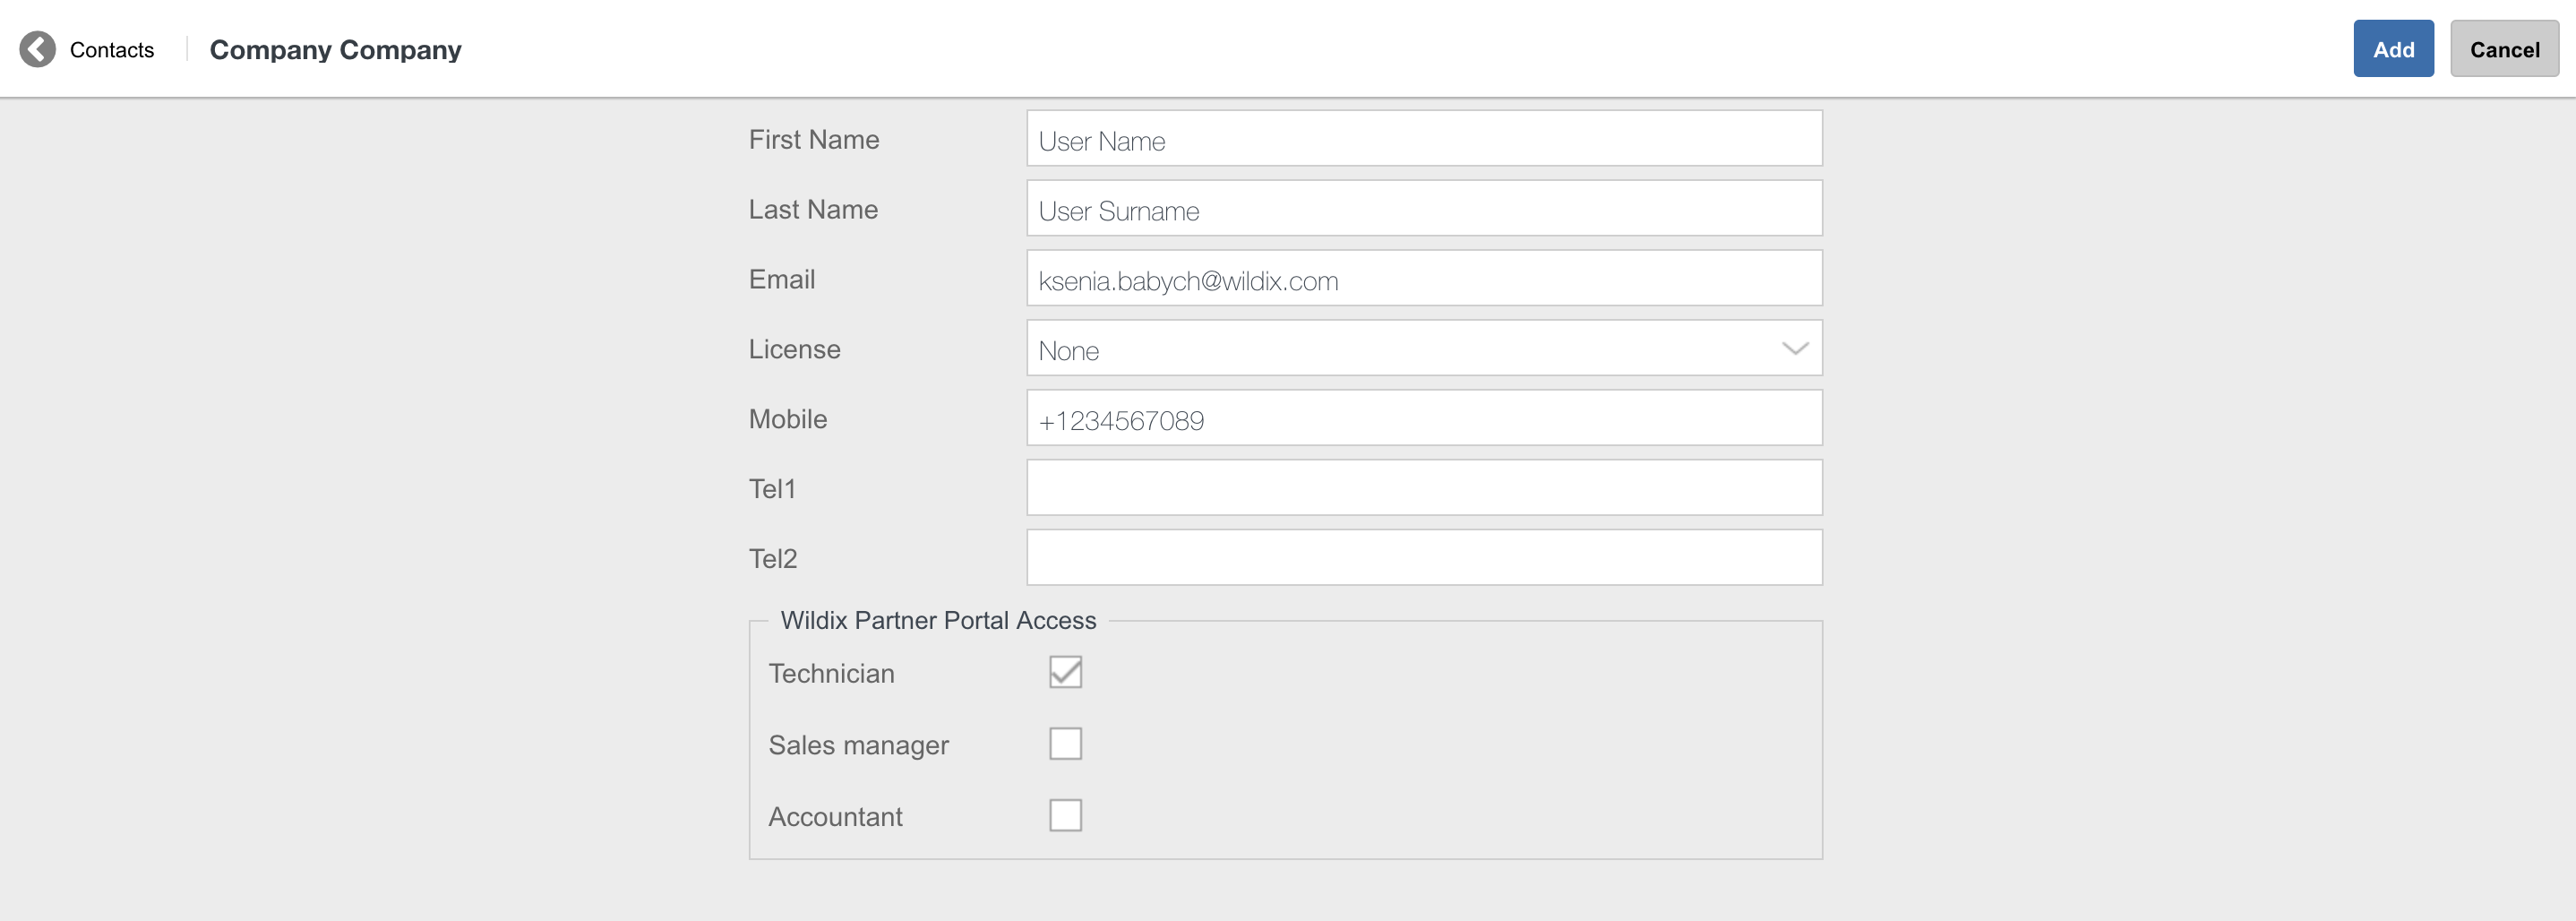
Role: select type User
Full Name: enter the user’s full name
Login: this field is used for login with Active Directory credentials (read more: Import of Contacts and Users Guide/ Active Directory)
Extension: the extension number (normally in format 1XX, 2XX)
Fax: DID number for faxes
Office: DID number for calls
Email: personal email address for notifications (Voicemail, call recordings)
Note Important: user's email should be unique. The same email cannot be used twice.
Mobile: personal mobile number for mobility extension management (mobility feature allows making and receiving calls to mobile number via the company PBX)
Dialplan: dialplan procedure for outgoing calls, by default “users”
Fax dialplan: dialplan procedure for sending faxes from Wildix Collaboration, by default “users”
Language: language of the interface and system sounds
Group: ACL group, by default “default”
Department: in Collaboration web interface, users are by default grouped by their Group (ACL group) in roster; however if Department field is specified, users are grouped by Department field.
| Warning |
|---|
Difference between Group and Department fields:
|
- License type: assign a license based on needed functionalities, more information: https://www.wildix.com/licensing/
...
1 - +Add: add user
2 - Edit: change the same parameters, which are available upon adding a user
3 - -Delete: delete one or multiple users
Note Note: It is possible to remove user's personal data (calls, chats, voicemails, phonebooks, recordings, faxes) when deleting this user. Refer to section Delete user data
Limitations:
- the feature works for standalone PBXs or for WMS Networks PBXs which share the same MySQL or MSSQL DB
- if a user to be deleted is an owner of contacts in shared phonebooks, than contacts remains without an owner
- voicemails left via FC "Voicemail: 81 are not reset (but it is possible to reset them via Terminal, consult this Article)
4 - Set passwords: change user passwords; for security reasons only the admin user can set passwords for other admins of the system; by default strong passwords are automatically created by the system, read more about changing user passwords in chapter Set user passwords
5 - Edit preferences: manage user preferences and phone features, for details, see chapter User preferences
6 - Invite to Collaboration: send a message to newly created users with details of access to Wildix Collaboration (URL, login, password); for security reasons, only the admin user can send welcome messages to other admins of the system
7 - Export CSV (available only for the admin user): save a CSV file containing users information in *.csv format to your PC
8 - Import: import users from MySQL / MSSQL, LDAP / AD, Google, Office 365, Exchange Server, CSV file, Zoho CRM, other resources; more information in chapter Import of users and phonebooks
- 9 - Search field. Note: results may be displayed in non-alphabetical order.
- 10 - Filter: choose the fields that should be displayed on the Users tab:

Clicking on the field names (e.g. Extension, Mobile, Group, etc.) you can sort users. Starting from WMS 6.03, the following sorting rules applied:- Empty values are placed at the end of the list while ascending sorting.
- Sorting by user registration is not available.
...
| Note |
|---|
Note: Copying user preferences is available starting from WMS 6.03.20230424.1. |
- Choose user(s) you want to copy preferences to
- Click the Preferences -> Copy preferences from user

- Select the source user whose preferences you want to apply to the selected user(s) and click Save:

...
- Activate the class: by default, all the settings are applied for Internal call class; to set up call Features for a different call class, first select the needed call classes, then enable the checkbox for the selected call class
Reject all calls: if enabled, calls are rejected
Call Forward Busy / No Answer / All: you can enable call forwarding in case user is busy / does not answer or unconditional call forwarding; enter the destination number or the VOICEMAIL into the field
Call waiting: enable the option to be able to receive more than one call at a time
Call timeout: if enabled, the call is terminated in case there is no answer within the specified timeout; enter timeout in seconds into the field
Mobility extension management: if enabled, the call is forwarded also to the user mobile phone number (mobile phone number must be specified for this user in WMS -> Users -> Edit) after the specified timeout; enter timeout in seconds into the field
Mobility confirmation: if enabled, the user is notified on who the caller is once he receives the call to mobility extension number, and is invited to enter the digit to accept the call
Notify missed calls via email / via sms: enable missed calls notification to email / via SMS
Custom Ring: enable the option and select the ringtone; ringtones selected here are applied to WP4X0, WelcomeConsole and Collaboration; Custom ringtones can be uploaded via Sounds menu (more information in chapter Record and playback audio messages)
Settings: user personal settings
...
b. Or untick All data and choose which data needs to be removed. The list of options you can choose from:
- User (without deleting user data)
- Remove user avatar
- Personal data (avatar, mobile phone, email, new passwords)
- Voicemails
- Voicemail greetings
- Calls (history, records, faxes)
- Chat history
- Phonebooks
- Call group member
- Missed call manager
- Paging group member
- Applications (s2s, simple token)
- Unassign devices
...
3. Once necessary data is selected, click Delete:

Import of users and phonebooks
...
For more information about configuration of each backend read the guide Import of Contacts and Users.
Provisioning of devices
Provisioning modes supported by Wildix PBX
Wildix PBX supports different provisioning modes:
...
| Note |
|---|
Note: It is possible to assign unprovisioned devices to users. Available only for devices added via Remote Provisioning (Semi-automatic mode) or WMP. Refer to this chapter for detailed information about assigning to users. |
...
Wildix gateways (PRI, BRI, DaySaver, FXO, FXS)
WP4X0, WelcomeConsole, WorkForce
- Start 5, WelcomeConsole 5, WorkForce 5, ForcePro 5
W-AIR base stations
For provisioning of Vision/ SuperVision, see chapter Provisioning and login of Vision / SuperVision.
WMP provisioning (Hardware, Virtual, Cloud PBX)
...
Auto-provisioning mode is available for Wildix devices connected to the local LAN or remote network (VPN).
| Note |
|---|
Note: Auto-provisioning is supported on old generation Wildix Phones (pre 2024) only. The new Wildix Phones 5 (2024) are not supported. |
Proceed as follows:
Power on / connect WP4X0 / media gateways / W-AIR base stations to the network
Make sure that all the devices have received the IP address from the DHCP server of the network (PBX or external DHCP)
Go to WMS Devices -> Devices
Click +Add
Select Automatic mode and click Next
...
- 1 - + Add: add a new device via Auto-provisioning or Semi-provisioning mode
2 - Edit: edit device settings for one or multiple devices:
Comment: unique identifier, displayed in the Comment column of Devices table
Default zone / Tone zone (FXS/FXO): select the country / the geographical area for the correct tone recognition
DNS Server / Secondary DNS / NTP Server / NTP Zone: allows setting DNS and NTP settings, which can be useful in some network scenarios, e.g. with remote devices
Use DST: enables automatic switching to DST
Voice VLAN ID / CoS voice priority / Data VLAN ID / CoS data priority: allows setting priority for Voice and Data traffic and assign VLAN IDs
Use received IP: enables static IP
Syslog Server: you can specify the server IP address to which you would like to send syslog (Documentation: How to collect syslog from Wildix devices)
SNMP Access (BRI, PRI, W-PA, some of WP4X0): authorizes SNMP monitoring on devices (it is also possible to authorize SNMP monitoring of the PBX in WMS Settings -> System -> SNMP Server)
Disable SIP Firewall (BRI, PRI, FXO, W-PA, GSM): it is necessary to enable this parameter in some complicated network scenarios, where a SIP Firewall is present between the PBX and the connected devices
3 - - Delete: delete one or multiple devices
4 - Configure / Sync device: send new configuration to one or multiple devices
5 - Assign to user: assign WP4X0 and W01FXS to users; more information in chapter Assign WP4X0 to users
6 - Sync from WMP: sync devices, assigned to this PBX from WMP; more information about WMP provisioning in chapter WMP Provisioning (Hardware, Virtual, Cloud PBX)
7 - Reset password: in case there is a risk that the provisioning password (displayed in the column Password) of one or several devices has been compromised, it’s possible to reset it without resetting the device: select one or multiple devices, click Reset password to reset the password, then click Configure / Sync device to assign a new password to the device
8 - i: the blue icon indicates that there is a new firmware version available; more information about firmware upgrade in chapter Update firmware
9 - Status icon: displays the device status, hover over it to see additional information (SRC port, transport used):
Green: device is registered (connected via SIP)
Grey: device is not registered
10 - Model: for provisioned devices, the model is indicated correctly (e.g. wp480gr3), for not provisioned devices, only the device type is indicated (e.g. phone) in this column
11 - Connect: enable / disable direct access to device (available for non-Cloud PBXs for devices which are in the same network as the PBX); more information is available in the guide Provisioning of Wildix devices
12 - Extension: available for WP4X0 and W01FXS, displays the extension, this device is assigned to; displays loginX in case device is not assigned
13 - Firmware: the current firmware version
14 - Password: password to access device’s web interface after provisioning; password is displayed only for provisioned devices
15 - Search field
...
| Note |
|---|
Note: a new FW notification is not indicated for BRI/ PRI media gateways. To update their firmware, upgrade your PBX to the latest version. Within half an hour after the procedure is over, media gateways are automatically updated.indicated for BRI/ PRI media gateways. To update their firmware, upgrade your PBX to the latest version. Within half an hour after the procedure is over, media gateways are automatically updated. |
| Note |
|---|
Note: Starting from WMS 6.05, all devices’ firmwares was moved from PBX to CDN (content distribution network). In case of Hardware/ Virtual PBX, make sure to grant access to wps.wildix.com and firmwares-cdn.wildix.com via port 443. No changes required for Cloud PBX. When the PBX gets firmware, local cache is created, after which the device starts upgrading. |
Assign WP4X0 to users
After you have provisioned WP phones, proceed with assigning phones to users.
...
- W02FXS 2018: W02FXS 2018 Quick Installation GuideW04FXS 2020: /wiki/spaces/DOC/pages/30283991
W24FXS 2015: W24FXS 2015 Quick Installation Guide
After you have provisioned FXS media gateways, proceed with assigning analog ports to users.
...
For W-AIR Base Small Business: after you have provisioned the base station, proceed to chapter Register and assign W-AIR handsets to users.
For W-AIR Sync Plus / W-AIR Sync Plus Base Outdoor: after you have provisioned W-AIR base station, proceed as follows:
...
Go back to WMS -> Devices
Select the same base station and click Configure / Sync device
| Warning |
|---|
For CLOUD PBXs, you need to power the base station down and then power it up again (reboot the base station) to apply the new parameters! |
| Note |
|---|
Note: Base station is displayed with grey status in the table of devices, unless you register at least one handset / headset. |
...
To assign W-AIR handset to user, follow procedure of phone login via Feature Code, described in chapter Assign WP4X0 to users.
| Note |
|---|
Note: Starting from WMS 5.04.20220309.1, it is possible to assign registered W-AIR handsets/ headsets to users via WMS -> Devices -> W-AIR Devices. See the section: Assigning W-AIR handsets/ headsets via WMS |
Register and assign W-AIR Headsets to users
...
| Note |
|---|
Note: Starting from WMS 5.04.20220309.1, it is possible to assign registered W-AIR handsets/ headsets to users via WMS -> Devices -> W-AIR Devices. See the section: Assigning W-AIR handsets/ headsets via WMS. |
Assign a W-AIR Headset to user:
...
| Note |
|---|
Notes:
|
...
- Choose the headset/ handset -> click Assign to user Select “unknown” in the Extension field and click Save
- Select “unknown” in the Extension field and click Save
View battery level and firmware version
Starting from WMS 6.06.20240227.1, you can check W-AIR Headsets battery level in WMS -> Devices -> W-AIR Devices page -> Battery column. There, you can find information about the battery level of the headsets and if the headset is charging, the relevant icon is displayed next to the battery level indication:

In the column Version you can see the firmware version of the devices.
Introduction to Wildix Unified Communication
...
| Note |
|---|
Note: Starting from WMS 6.03.20230630.3, Cloud Analytics (CDR-View 2.0) was introduced, which replaces the functionality of CDR-View. See documentation for more details: Cloud Analytics (CDR-View 2.0) in Collaboration. |
First time access to CDR-View:
...
For more information on CDR-View, refer to https://www.wildix.com/monitoring/.
CDR-View User Guide: CDR-View User Guide.
...
Each trunk can be then associated to a pricelist (the first line in trunk configuration window). Read more about associating pricelists to trunks in the next chapter: Configuring SIP trunks and lines.
Configuring SIP trunks and lines
...
| Note |
|---|
Note: SIP trunks must be added manually. BRI / PRI / GSM / FXO lines are displayed in the corresponding tables once the media gateways have been connected to the system and provisioned as described in chapter Provisioning of devices. Starting from WMS 6.03.20230424.1, BRI / PRI / GSM / FXO trunks can only be deleted with the removal of the device. The corresponding trunk is cleaned up automatically. |
Each trunk is displayed in the corresponding section of the page with the following information:
...
Each trunk is associated to a Dialplan procedure (main by default), more information on Dialplan in chapter Wildix Dialplan.
Each trunk can have an associated Pricelist, this allows the system to calculate call costs, which can be later on viewed in CDR-View.
...
- Connect antennas to the rear panel of the gateway
Insert the SIM card to the slot
Note Note: Make sure the PIN code of the SIM card is disabled.
Connect the WAN interface of the gateway to the Switch
Provision the gateway as described in chapter Provisioning of devices
Once you have provisioned the gateway, a new trunk automatically appears in the corresponding section in WMS > Trunks -> GSM/UMTS section
The status is green, which means the media gateway is registered
Note Important: Status of signal quality is currently not supported!

Double click on the trunk to edit the trunk parameters:
Default Tone: select the country where the trunk is used
Country Code: select the country where the trunk is used for correct number normalization; select Custom country to manually enter the country code
Dialplan (main by default): Dialplan procedure used for calls via this trunk
Number of SIM: called number, which should be present in the Dialplan procedure, used for calls via this trunk; more information on Wildix Dialplan to follow, in chapter Wildix Dialplan
Enable SMS receiving: enable incoming SMS messages to the SIM card; specify the e-mail address in the field below
SMS2EMAIL service e-mail: e-mail address used for new messages notifications
...
As already said, by default you can find two the following procedures in WMS -> Dialplan:
main (associated to media gateways and VoIP trunks)
users (associated to users)
kite (this procedure is dedicated to Kite service, described in chapter Wildix WebRTC Kite)
- classound (this procedure is dedicated to CLASSOUND service, described in How to configure and use CLASSOUND)
...
- create a new timetable in WMS -> Dialplan ->Timetable / Switch, and set up the state check time (it means that each time this Timetable is verified by the Dialplan, the system checks if your offices are closed at the moment, according to this timetable)
- create a new procedure in WMS -> Dialplan, add default as Called number and add Dialplan application Go to Voicemail
| Note |
|---|
In the chapter Create a timetable it is explained how to create a Timetable and to work with it. |
...
However, users procedure must cover all the destinations called by users of the system (national, international, mobile calls etc), and this is why it is recommended to use patterns, described in chapter: Matching called numbers.
The most common Dialplan applications used in users procedure are Dial the trunk / Trunk group. Dial the trunk allows you to select the trunk which is used to place a call.
...
- Select the user and click Edit preferences
- Go to the section Settings -> Function keys and click on Switch to add Switch to the list of function keys
- Type the ID number of the Switch (Switch ID can be checked in WMS -> Dialplan -> Timetables / Switches)
- Click Save


In the same way you can configure 3 state switch or Timetable function key.
...
You can then enable the Dialplan to jump to another procedure in case the offices are closed:

Export/ Import a Timetable
Starting from WMS 6.05.20240119.1, it is possible to export and import timetables. To export a timetable, go to WMS -> Dialplan -> Timetable / Switch, choose the timetable(s) you want to export and click Export:

The timetable gets exported in .json format.
To import a timetable:
1. On WMS -> Dialplan -> Timetable / Switch tab in the section Timetables, click Import:

2. Choose the necessary .json file with the timetable and press Upload:

| Note |
|---|
Note: In case the imported timetable file has the same name as an existing timetable, the timetable is overwritten. |
Create an IVR tree
IVR (Interactive Voice Responder) is a technology that allows humans interacts with telephone system by entering DTMF tones. An example of IVR is when a caller hears “Press 1 for English, press 2 for German” and call is routed to a different destination based on the choice made by the caller.
...
Where 123 and 224 are English speaking operators (tech support and sales)


Where 111 and 222 are the called numbers present in the procedure IVR that we must create separately. 

...
| Note |
|---|
Make sure SMTP client is defined in WMS Settings -> System -> SMTP client (see the chapter SMTP Client). |
Fax to e-mail
Answers an incoming call using FAX Server and forwards fax to one or multiple fax numbers / users:
...
An example of Kite implementation can be found here: www.wildix.com/contacts.
One of the advantages of Kite is that it’s fully integrated into the Wildix telephony system:
...
Access for internal and external users via invitation by email, via link, audio call
Multi user chat, audio and video conference
Screen sharing
Document sharing / application sharing / link sharing
Recording
Conference scheduling
Mute/unmute participants
Dynamic video allocation
Documentation: Wizyconf Videoconference.
Debugging and troubleshooting
...
| Note |
|---|
The admin user can access the Terminal directly from WMS, see chapter Introduction to WMS (Terminal). |
To connect via SSH you can connect to the PBX via console (on Windows you can use “putty” or other SSH clients) or click on “terminal” icon in WMS upper menu (“admin” user)
...