| Scroll export button | ||||||||
|---|---|---|---|---|---|---|---|---|
|
| Info |
|---|
This guide explains how to access and to use Wildix Collaboration and describes the basic operations: call, chat, video call, conference, fax, SMS. WMS Version: 5.0X, 6.0X Other Collaboration related documentation: Collaboration and Mobile Apps Documentation. Created: June 2020 Updated: May June 2024 Permalink: https://wildix.atlassian.net/wiki/x/zhDOAQ |
...
Quick menu introduction
Top menu:


1 - Device selection: active device to place and answer calls using Collaboration
2 - Search field with speech recognition and call button: search for colleagues and contacts and perform quick actions from drop-down list: call, chat, send a fax/ Post-It etc:

2 - Device selection: active device to place and answer calls using Collaboration
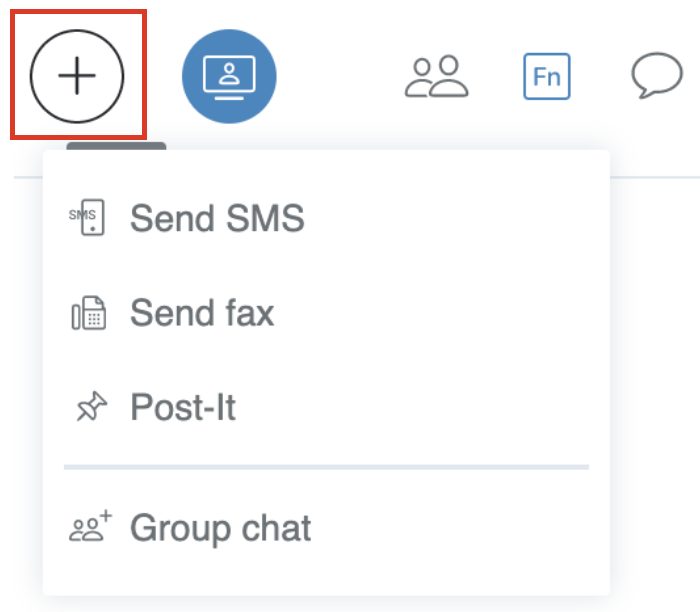
3 - 3 - Add option: access to 30282225 SMS / Fax / 30282225 Post-It / Group chat dialog window:

4 - Video conference: create and manage videoconferences based on WebRTC. Read the Guide for the detailed description: Wizyconf Videoconference User Guide
5 - Other tabs of Collaboration:
30282225Colleagues: list of colleagues with presence status and geolocation
Fn keys: monitoring / management of colleagues / features (same as BLF keys of phone)
Note Note: this menu becomes visible only if you have configured these keys in Settings -> Function keys.
Chat: active chat sessions
History: history of calls (synced with other Wildix devices), faxes, notes
Voicemail: access to Voicemail messages
30282225Analytics: CDR-View 2.0, monitoring of call activity of employees and getting reports related to the number of calls, costs, call duration, usage of trunks, etc
- Webinar (displayed if user has access to Wizywebinar): browser-based webinar solution fro sales. Read the Guide for the requirements and detailed description: Wizywebinar User Guide
Web CRM: allows opening of a web application inside Collaboration. Refer to the section 30282225Personal in Settings for more information
Note Note:
- This menu becomes visible only if you have configured it in Settings -> Personal -> Web CRM.
- Starting from WMS 6.04.20230731.1, it is possible to configure Web CRM via WMS -> Users -> Preferences -> Edit preferences -> Settings section -> Web CRM field
Documentation: WMS Start Guide - English
30282225Settings: user settings, call features, feature keys settings and more
Note Note: Settings is not displayed in the top menu if user has access to Wizywebinar. In this case, Wizywebinar icon is displayed in the top menu and Settings can be accessed via User profile -> Settings:

6 - Other More (expanded):
CDR-View access (if not restricted by license)
- x-caracal: contact center analytics solution. Read the Guide for the detailed description: x-caracal documentation
- Map view: geographical map with location of colleagues
- Edit Colleagues
Show / hide offline users
Post-It History
Manage PBX: access to WMS (restricted to users of “admin” type)
Screen sharing manager
Open Attendant Console (if not restricted by license)
Outgoing faxes: outgoing faxes queue
Help: link to the Wildix Collaboration Guide (this Guide)
- License: shows the license assigned to a user and provides details on each user profile: https://www.wildix.com/licensing/
Version: current WMS version
7 - User name, extension, location (if available), User status, status message (if available), picture and logout option
User status
User status and status message
You can quickly To change your user status:
- Click on your current user statusSelect user profile

- Click on your current status in the menu that opens and select a different user status from the list of available ones:


To add a status message:
- Click on your user status profile in the top menu
- Click + Advanced Set a status

- Enter the status message into the field
Click OK:


To set up Do Not Disturb (DND) / Away status:
- Click on available on your user profile in the top menu
- Click Set a status
- Select DND (Do not disturb) or Away from the list
- Select Until date and time (“until” value is optional while setting Away/ DND status. If it is not defined, user status switches back to Available after one hour)
Click OK:

Additionally, you can change user status via Change status option:
...

| Note |
|---|
It is possible to disable/ enable call/ chat/ voicemail popup notifications when in DND: go to Collaboration Settings -> Chat/ Presence -> Show notifications in DND status. |
...
| Note |
|---|
It is possible to set up the system to manage incoming calls based on your current user status (available, DND, away) and on call type (internal, external, whitelist, blacklist). See chapter: Call features. |
| Note |
|---|
It is possible to add Custom statutes with predefined status message and duration period (read chapter Chat/ Presence). After you add them, they will be available for quick selection in the drop-down list in the menu of user status setting: |


User picture
Users who have not set up their user picture, are displayed with initials (default avatar).
To set up / edit user picture:
- Expand Click on your user status profile in the top menu
- Click Edit picture
 on the default user picture
Choose the File on your PC (the picture is loaded)
- Resize the picture (optional)
Click Save:


It is also possible to take a picture using a web camera, instead of loading it from PC:
...
It is possible to manually define geolocation:
- Click on your user status profile in the top menu and select Advancedmenu
- Click Set a status
- On the Change status screen, proceed to the Set location tab

- Select Custom to set up your location manually: enter the address into the field or move the red indicator (otherwise select Auto detect to enable the browser to automatically detect your location)Click Save:


| Note |
|---|
Note: Maps in Collaboration are available only via .*wildixin.com domain. |
...
To add/ remove a user from your roster:
1. Select Other in More in the top menu -> Edit Colleagues:
...

2. Select the colleagues (or work teams) that you want to add to your roster:
...

3. Click the Tick icon to save
Other options to add / delete colleagues from roster
...
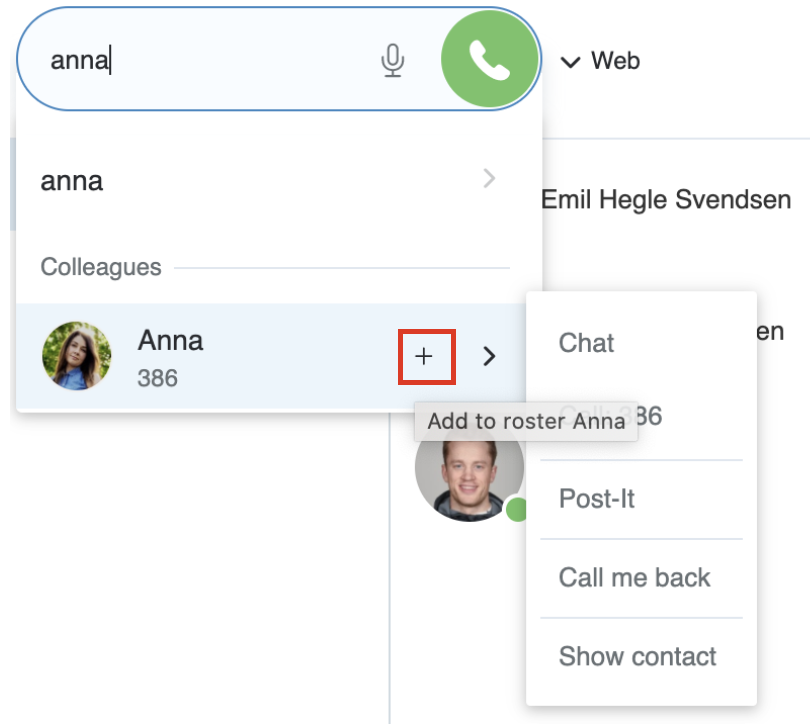
Find a colleague by name / number and click on + icon:

Delete colleagues via the Colleagues tab:
Mouse over a colleague, click on Options button (three dots) and select Remove
Or right-click on a colleague and select Remove:


User status icons explanation
...
It is possible to view all the colleagues who are connected to Wildix Collaboration and who have enabled location sharing in their browsers, on the geographical map.
From the top menu
Select OtherMore from the top menu -> Map View. All colleagues who enabled location sharing are indicated on the map:

Note Note: Maps in Collaboration are available only via .*wildixin.com domain.
...
Сlick on a colleague’s geolocation in Messaging tab to open a geographical map where the geolocation of that user is indicated:


Instant Messaging
...
Open a chat session with a user
Click on More actions (three dots) button -> Screen


Screen sharing launches (screen sharing icon is displayed on the menu bar of your PC) and a red border around the screen indicates its start
The other party must accept incoming screen sharing stream:
...
See who is connected and stop screen sharing:
1. Select Other More in the top menu -> Screen sharing manager: 
...
2. You can see the viewers who are currently connected:
...
Click on Add button -> choose + Group chat from the list:


Edit the conference title (optional)
Add participants
Click the Tick icon to create a group chat


Participants receive conference invitation via chat.
...
Any chat participant can add and remove users. Open the group chat management section by clicking on its the participants counter under the title.
Add user: start typing a participant's name/ extension number in the field and click the Tick icon to confirm
Remove user: mouse over a participant and click on the x icon in front of the participant’s name


Close the group chat:
...
Click on Logout icon in the group chat management section
Click OK to confirm


Post-It & Call me back
...
Click on Add button in the top menu and select Post-It:


To: select the Post-It recipient
...
Input field: enter your text
Send Post-It as SMS: option is available for Post-It to user and requires a GSM media gateway
Normal / Important: select the color based on importance:
Green (Post-It to user) / Yellow (personal reminder): normal
Red: important
Click the Paper plane icon to post a note


From Search field:
...
Show / Hide Post-It
Select Other More in the top menu -> Hide Post-It / Show Post-It
Post-It History
Select Other in More in the top menu -> Post-It History


It is possible to:
...
Select the active device for making and receiving calls in the top menu: 

| Note |
|---|
Note: when selected device becomes unavailable, “Web phone” is automatically selected. |
...
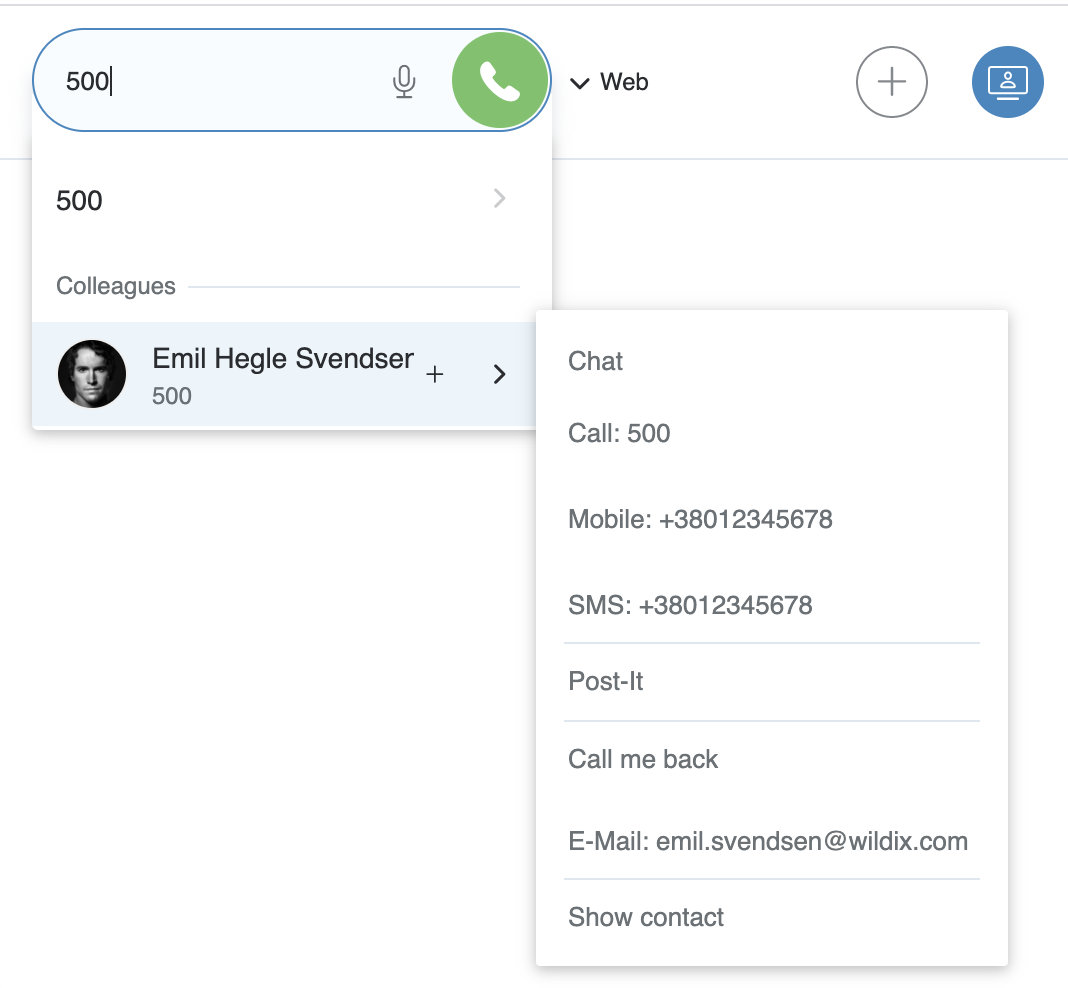
Enter the name (user name or contact) or phone number (extension number or any external phone number) and select Call: [number] from the drop-down menu:


It is possible to use speech recognition for search: click on the Microphone icon (make sure the microphone is connected to your PC or your PC has a built-in microphone) and start talking, the system automatically transforms your speech into text.
...
Enter the name/ number/ company name and select a number you'd like to call:


From Colleagues:
Mouse over a colleague and click on the Handset icon
- Or mouse over a colleague, click on Options button (three dots) and select Call
- Or right-click on a colleague and select Call


From Fn keys:
- Mouse over a colleague and click on the Handset icon
- Or mouse over a colleague, click on Options button (three dots) and select Call
Or right-click on a colleague and select Call


From Messaging:
...
Right-click on an entry and select Call / Call the mobile


From Phonebook:
Find a contact and click on the number you wish to call


Otherwise right-click on a contact from the right section of the screen and select Call


From Voicemail:
- Right-click on an entry and select Call
...
You can set up automatic call forwarding based on user status (available, DND, away) and call type (internal, external, whitelist, blacklist). See chapter: Features.
Call management
You can manage a call directly from call dialog window:
...
| Note |
|---|
| Note: if you were looking for chat conference in Collaboration, read more: Multiuser group chat. |
Video tutorial:
| Scroll only inline |
|---|
https://wildix.wistia.com/medias/wvj6o9wvjo |
...
For more information about Intercoms integration, check documentation in the section Doorphone integrations.
For the details of how to configure intercoms for sending video stream and adding an unlock button, check the online documentation: Intercoms integration with Wildix - Video before answer and Unlock button.
...
Video icon is available in the Messaging menu (upper right corner). By clicking Video, audio call is started automatically with video:


Record a call
During a call click Call recording icon to start / stop call recording.
...
Attendant Console is an extension for call agents allowing them to monitor and manage of up to 20 lines simultaneously using a mouse or a keyboard.
| Note |
|---|
| Note: Attendant Console supports assistive hardware and software for visually impaired users, for detailed information, read the brochure: https://drive.google.com/drive/u/1/folders/1JCqn4EhaqGsRToeacUjqkPs0TnGdz-gH |
...
Click Other from the top menu and select Open attendant console:
...
a keyboard.
| Note |
|---|
| Note: Attendant Console supports assistive hardware and software for visually impaired users, for detailed information, read the brochure: https://drive.google.com/drive/u/1/folders/1JCqn4EhaqGsRToeacUjqkPs0TnGdz-gH |
Open Attendant Console:
Click More from the top menu and select Open attendant console:

Attendant Console is opened in a separate tab.
| Note |
|---|
Note: Starting from WMS 6.06.20240425.1, it is possible to use attendant console inside Collaboration, without opening a separate browser tab. For this, follow the below steps:
Once added to Web CRM, the attendant console gets available on the Web CRM tab in Collaboration.
|

Set up a shortcut to open Attendant Console:
...
4. Click on the Paper plane icon to send a fax:


| Note |
|---|
Notes:
|
...
| Note |
|---|
Note:
|
...
Two-factor authentication: you can enable 2 factor authentication (2FA), which adds an extra layer of security to your account. In case you enable it, you will have to provide two pieces of information each time you login: your login and password + the code generated by an external application of your choice (Google Authenticator, Windows Authenticator, Free OTP or other). Read more in chapter Two-factor authentication (2FA)
Web Push: enable/ disable web push notifications (only for Chrome browser). This option is enabled by default for new users:
...
Call Forward No Answer: enable the option and enter the number into the field or select VOICEMAIL to enable call forwarding in case of no answer
Call Forward All: enable the option and enter the number into the field or select VOICEMAIL to enable the forwarding of all the incoming calls
Call waiting: if enabled, you receive more than one call at a time
Call timeout: if enabled, the incoming call is terminated in case there is no answer within a specified timeout
Enable mobility with timeout: if enabled, you receive incoming calls also to your Mobility extension number (mobile number) after the specified timeout; mobile number must be configured in Collaboration Settings -> 30282225 Personal
Mobility confirmation: if enabled, the user is notified on who the caller is when he receives the call on mobility extension number
Missed calls notification via email / via SMS: enable to receive missed calls notifications
Custom ring: select the ringtone for WP4X0, WorkForce, WelcomeConsole and Collaboration
...
Select the Fn key from the list and click +


Change the order of BLF keys:
...
Select Exp module from the list
Click +
Move those BLF keys that you would like to monitor from the Expansion module to the corresponding section of the table (Exp. module 1)
In the same way you can add more expansion modules


The following additional options in Collaboration -> Fn keys and on WP4X0, WorkForce and WelcomeConsole are available for BLF keys Colleague, Call group, Speed Dial, Park Location:
...
| Warning |
|---|
In case you are using Call groups or Pickup groups feature (this feature can be enabled only by the system administrator in WMS; feature is enabled when at least one value is present in "Call groups"/ "Pickup groups" field in WMS -> Users -> Edit preferences -> Settings): BLF "Group pick up" does not work. Instead of the BLF, you can use the BLF "Speed dial" and indicate 88*<call_group_name>:   In this scenario, 88 is Pickup Feature Code, while <call_group_name> is the value (call group name, e.g. "sales"), specified in the field "Call group" in the preferences of one or more users in WMS, and the same value ("sales") must be specified in the field "Pickup groups" in WMS, in the preferences of the user who picks up the call of this Call group. |
...
- Press to access shared voicemail of another user or subscribe for a Call Group notifications manager to view missed calls and voicemails. Consult Shared voicemail feature and How to set up the Call Group notifications manager feature for detailed information
Prefix
Used to configure a certain predefined value that will be added to a dialled phone number or another BLF on WorkForce and WelcomeConsole. Consult How to Configure BLF type Prefix for more information.
Note Note: The support of BLF type Prefix starts from WMS 6.01.20221019.4.
...
Notify unread messages via email: enable / disable email notifications about new chat messages (disabled by default)
- Show notifications in DND status: enable / disable chat / call popup notifications in DND status
Auto away status: if enabled, your status automatically switches to “away” after minutes of inactivity on local PC, specified in the field next to the checkbox
Custom statutes: you can add custom Available / Away / DND user statuses with predefined duration period and status message; custom statuses added in this menu appear then for selection in the menu of user status setting. To add a custom Available / Away / DND status, proceed as follows:
Click on “available”: you can select to add a custom duration period for “available”, “away” or for “DND”
Add a status message that will be visible for other users (optional)


Select the duration period for this status (if you don't need duration, disable the switch next to the time duration)
Note Note: When the duration of the custom Away or DND status ends, the user is automatically switched to Available. In case of custom Available status, when its duration ends, the user remains Available.
...
Integration service (WIService): this component is required by CDR-View, Popup App, includes headset integration, screen sharing, as well as adds support for additional features (separate documentation about WIService):
Headset integration (merged into WIService starting from v 3.2.2 on Windows and from v 3.2.17 on macOS): adds support for remote call answer/ hangup and volume control from headset via USB connector on Mac OS X / Windows.
Fax Printer (merged into WIService starting from v. 3.7.1): this component allows sending faxes from Windows / Mac OS X applications
Read the guide: Fax Printer for Microsoft Windows / Mac OS X
Also adds support for Kuando Busylight (https://www.wildix.com/portfolios/kuando-busylight/)Warning Important:
- Headset integration is not compatible with SfB (skype for business).
- If you are using a Wildix compatible third-party headset (Jabra, Plantronics, Sennheiser), uninstall the software provided by the third-party vendor and use Wildix Integration service.
- Screen sharing component (merged into WIService starting from v 3.4.1 on Windows and macOS): lets you share your screen and provide remote access to your desktop.
See chapter: Screen Sharing and remote control Mac OS X:
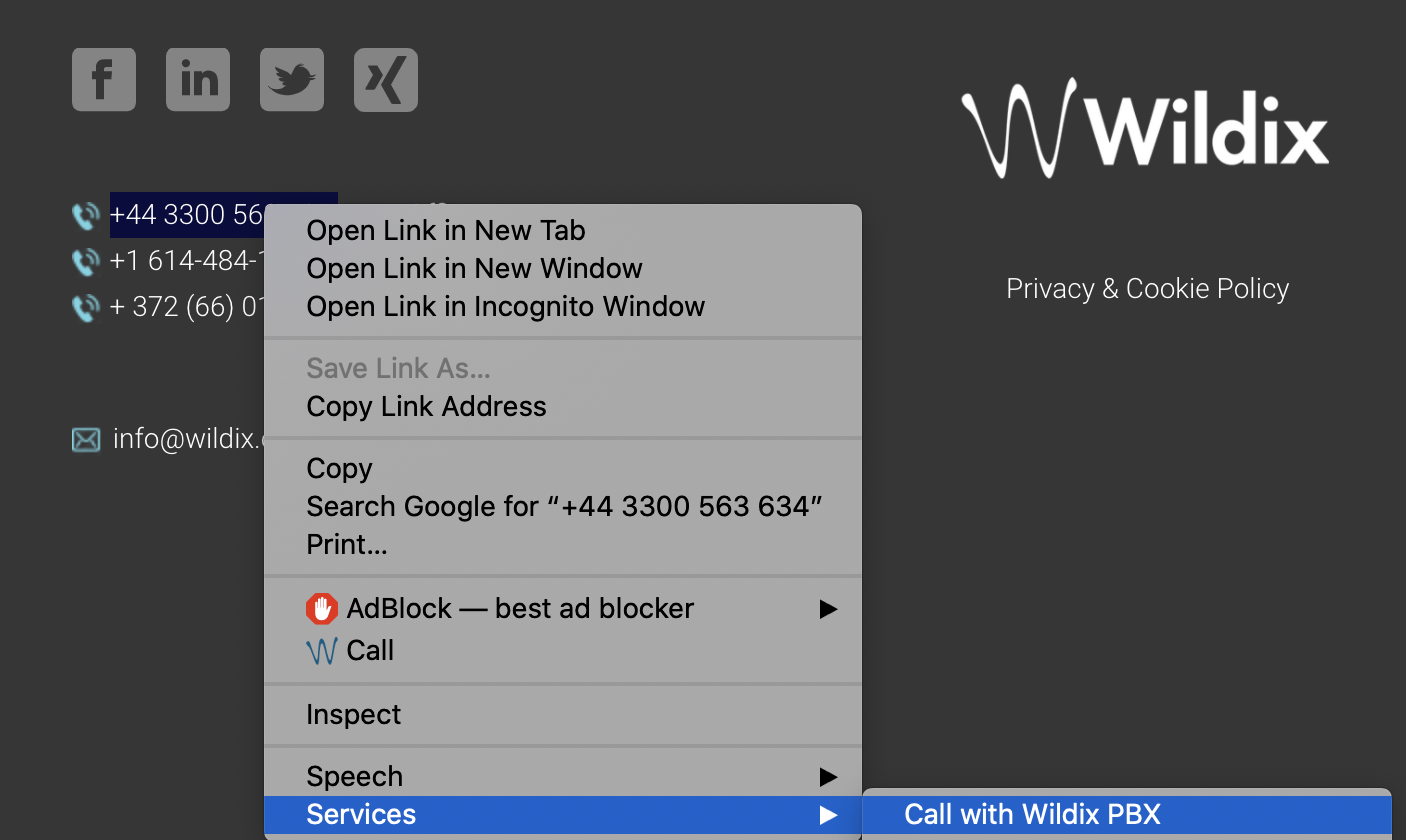
call generation by clicking on a web page link containing a phone number (support of “sip:”, “wildix:” URI)
call generation by right-clicking on a phone number and selecting Services -> Call with Wildix PBX:
- Windows:
- URI support; call via shortcut (Dialing hot key, configured in Collaboration Settings -> 30282225). Note: WIService for Windows requires .NET Framework v.4.0
- Outlook Integration (merged into WIService starting from WIService v. 3.5.1): adds support for Calendar Sync, Presence, click2call, IM, call popup from Outlook
Check this guide for more info:Outlook integration for Microsoft Windows
...
Create/ edit a contact
| Note |
|---|
Note: only users with certain permissions can modify public phonebooks; to enable the option, the PBX admin must add ACL ability "Can" - "Modify public phonebook". |
Go to Collaboration -> Phonebook:
...
Type of contact (internal / external / whitelist / blacklist): in case contact type is defined, the rules of call features selected in Collaboration Settings -> Features is applied for calls from this contact (it is also possible to define rules for call routing based on call type in WMS -> Dialplan)
Custom ring: it is possible to select a custom ringtone for the contact
Notes: notes entered here are visible and can be edited by other PBX users
Warning Important: these notes can be consulted only from Phonebook; for contact notes that can be displayed and added to contact during a call, see chapter: Contact notes.
3. Click on the Tick icon (Save):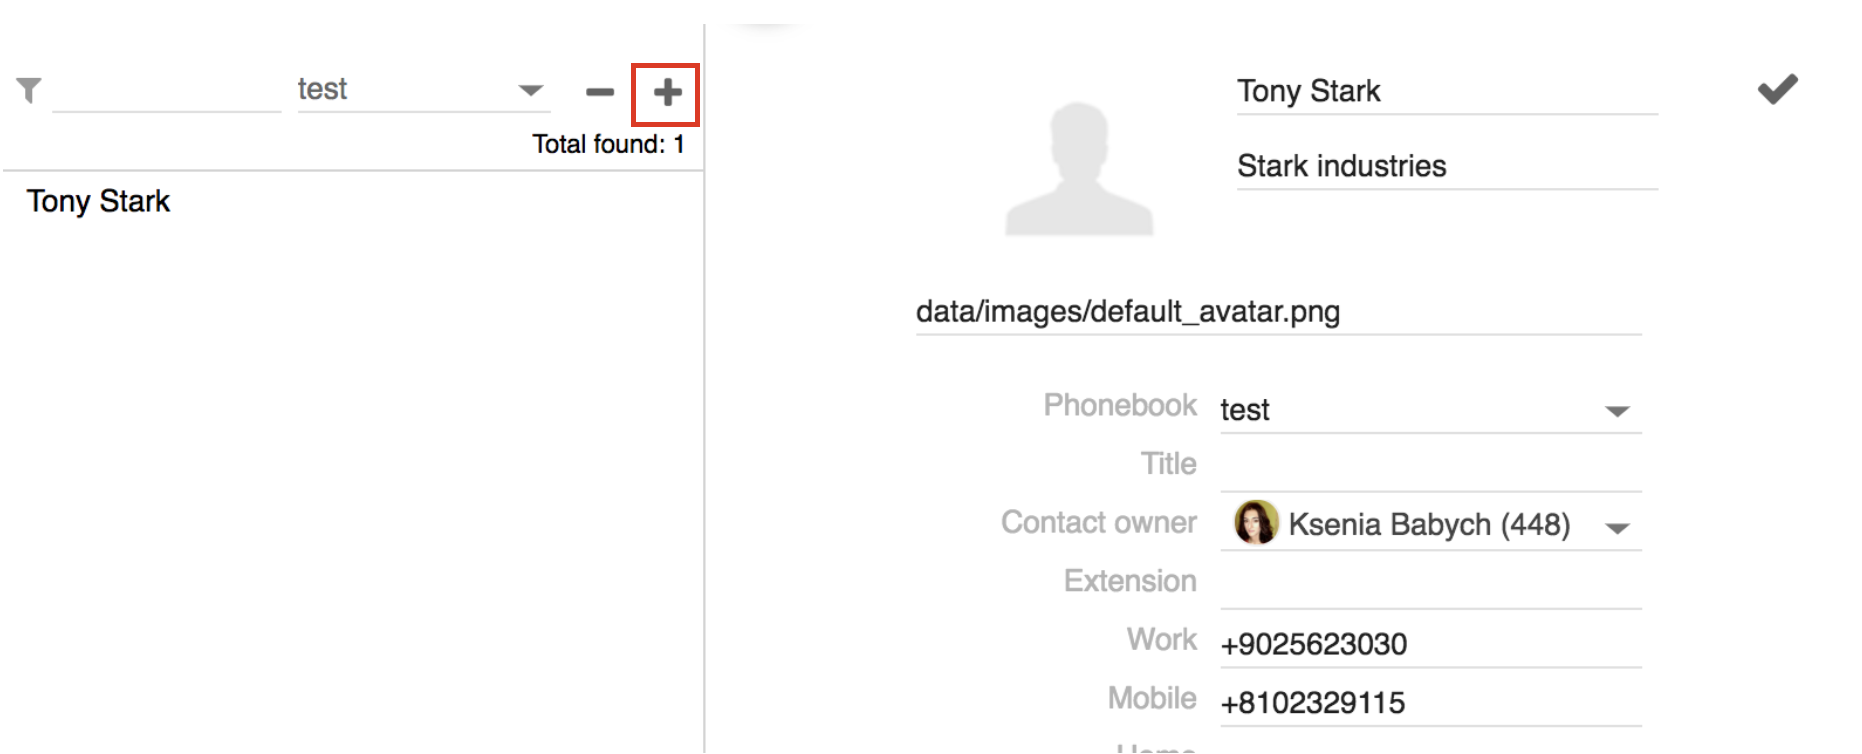
...
Enter a number into the search field
Select Add contact from the drop down menu
Add a new contact


Add a new contact after a call:
Go to Collaboration -> History
Right click on the number and select Add contact
Add a new contact


Delete a contact:
Go to Collaboration -> Phonebook
Find the contact using Search
Click - in the upper left section to delete the contact and click OK to confirm (otherwise click x to close the window)

Otherwise right-click on a contact and select Remove:


Edit a contact:
...
Analytics
Starting from WMS 6.03.20230630.3, users with UC-Premium license and necessary ACL rules set in WMS, can access Analytics (CDR-View 2.0):
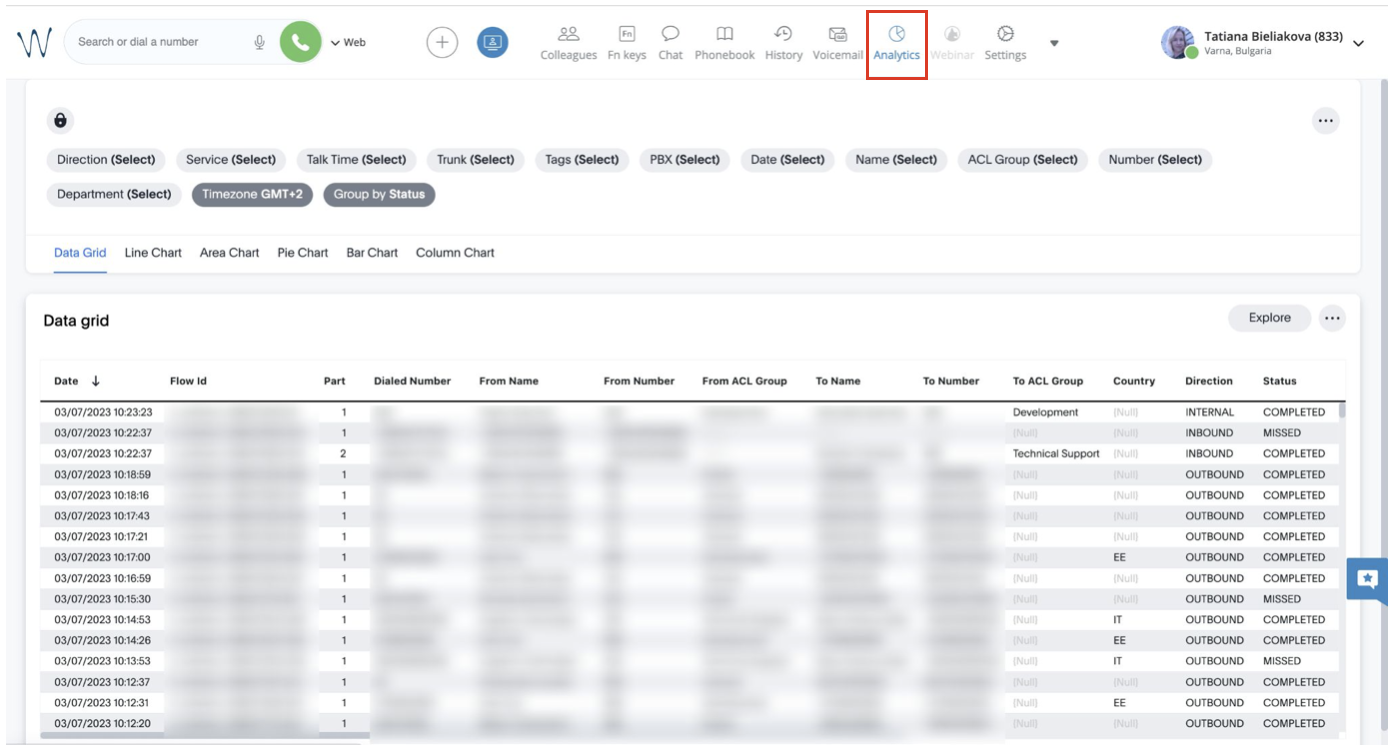
For requirements and how to use the feature, see the documentation Cloud Analytics (CDR-View 2.0) in Collaboration.
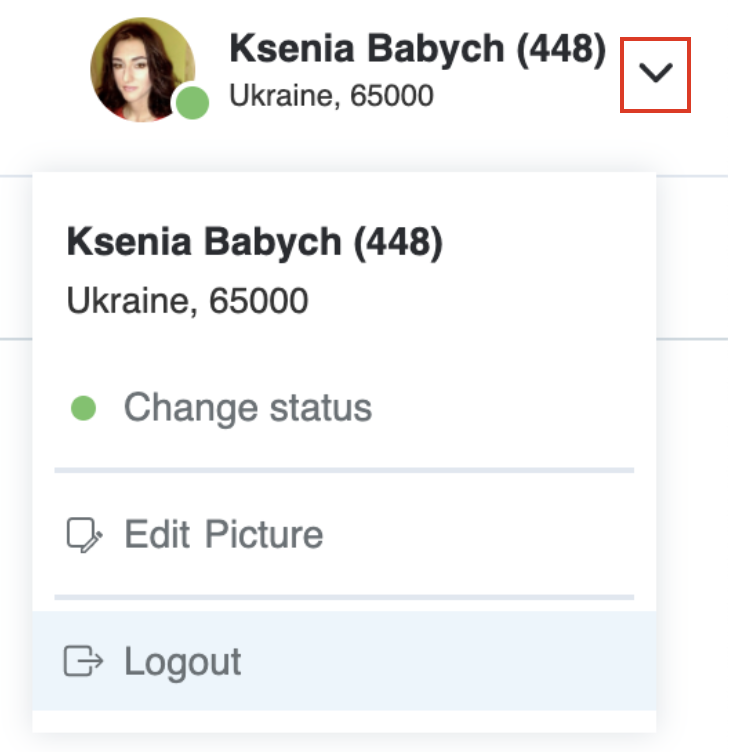
Logout
To log out :
- Expand your user status in the top menu
- Click Logout
Macrosuite divider macro dividerType text dividerWidth 70 emoji {"id":"smile","name":"Smiling Face with Open Mouth and Smiling Eyes","short_names":["smile"],"colons":":smile:","emoticons":["C:","c:",":D",":-D"],"unified":"1f604","skin":null,"native":"😄"} textColor #000000 dividerWeight 2 labelPosition middle textAlignment center iconColor #0052CC fontSize medium text Not finding the help you need? Join the Facebook group to ask a question! emojiEnabled false dividerColor #DFE1E6 dividerIcon bootstrap/CloudsFill Button macro buttonText Facebook isButtonShadowOn true emoji {"id":"smile","name":"Smiling Face with Open Mouth and Smiling Eyes","short_names":["smile"],"colons":":smile:","emoticons":["C:","c:",":D",":-D"],"unified":"1f604","skin":null,"native":"😄"} buttonBorderColor #4267b2ff buttonColor #4267b2ff buttonNewTab false buttonFontColor #ffffff buttonSize medium buttonIconColor #ffffff buttonWidthDetection 46 buttonHoverColor #ffffff buttonIcon font-awesome/FacebookSquare buttonType icon_left buttonLink {"link":"https://www.facebook.com/groups/wildixtechwizards","source":"direct"} buttonNewLink buttonRadius 3 buttonShadow 0 id 228 emojiEnabled false buttonWidth 20