This User Guide explains how to access and use x-bees and describes the basic operations: how to manage calls, create conversations, schedule conferences etc.
Other x-bees documentation: x-bees partner program documentation.
Created: February 2022
Updated: March 2023
Permalink: https://wildix.atlassian.net/wiki/x/ngrOAQ
Introduction
x-bees is the customer management communication solution you need for managing leads, improving customer service and increasing sales.
x–bees focuses on:
- Real–time customer communications
- Sales enablement
- Customer retention and satisfaction
Prerequisites
Supported browser
- Chrome
Mobile apps
- Android 9 or higher
- iOS 13.3 or higher
Chrome extension
- Install extension from here: https://chrome.google.com/webstore/detail/x-bees/olejekejjhgimnlliplaiodgmbpcflhi
Notes:
- No way to send SMS messages and Faxes via x-bees
- No way to listen to Voicemails and Call recordings, but you receive a copy via email
- Access to the web version and mobile apps of x-bees is available starting from the x-bees-Basic license
Login
Users of the PBX receive an invitation via email with the link to join x-bees and download mobile apps. The invitation email should be sent by the PBX admin from WMS.
Follow the steps:
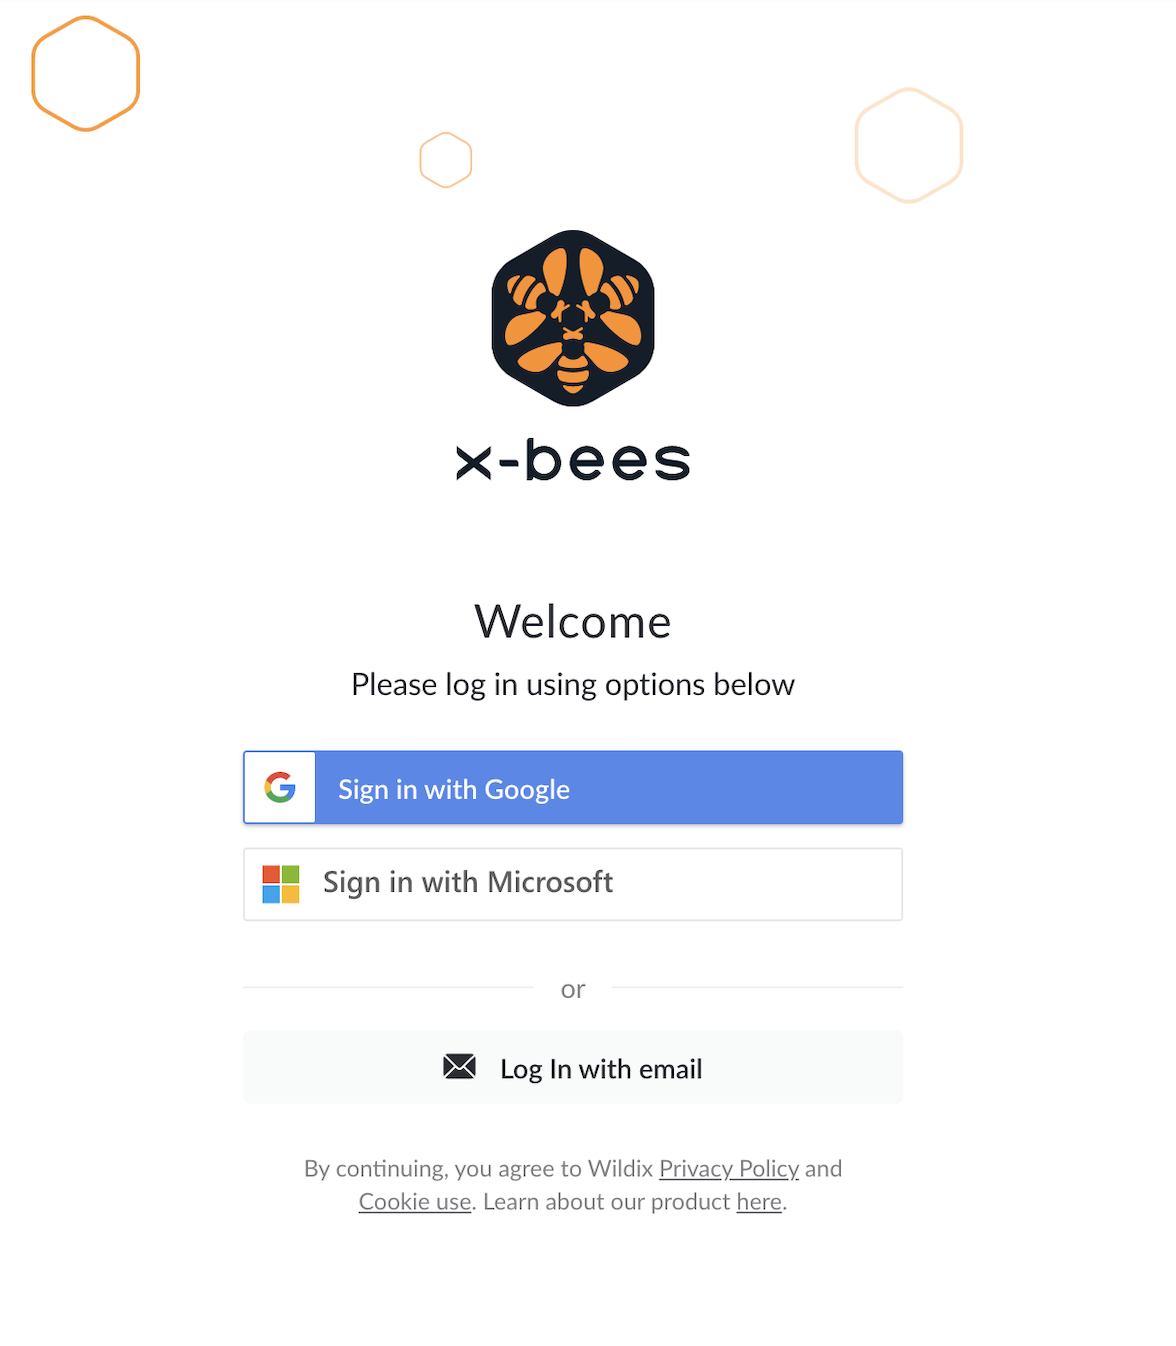
- Click on the link in the email invitation to join x-bees
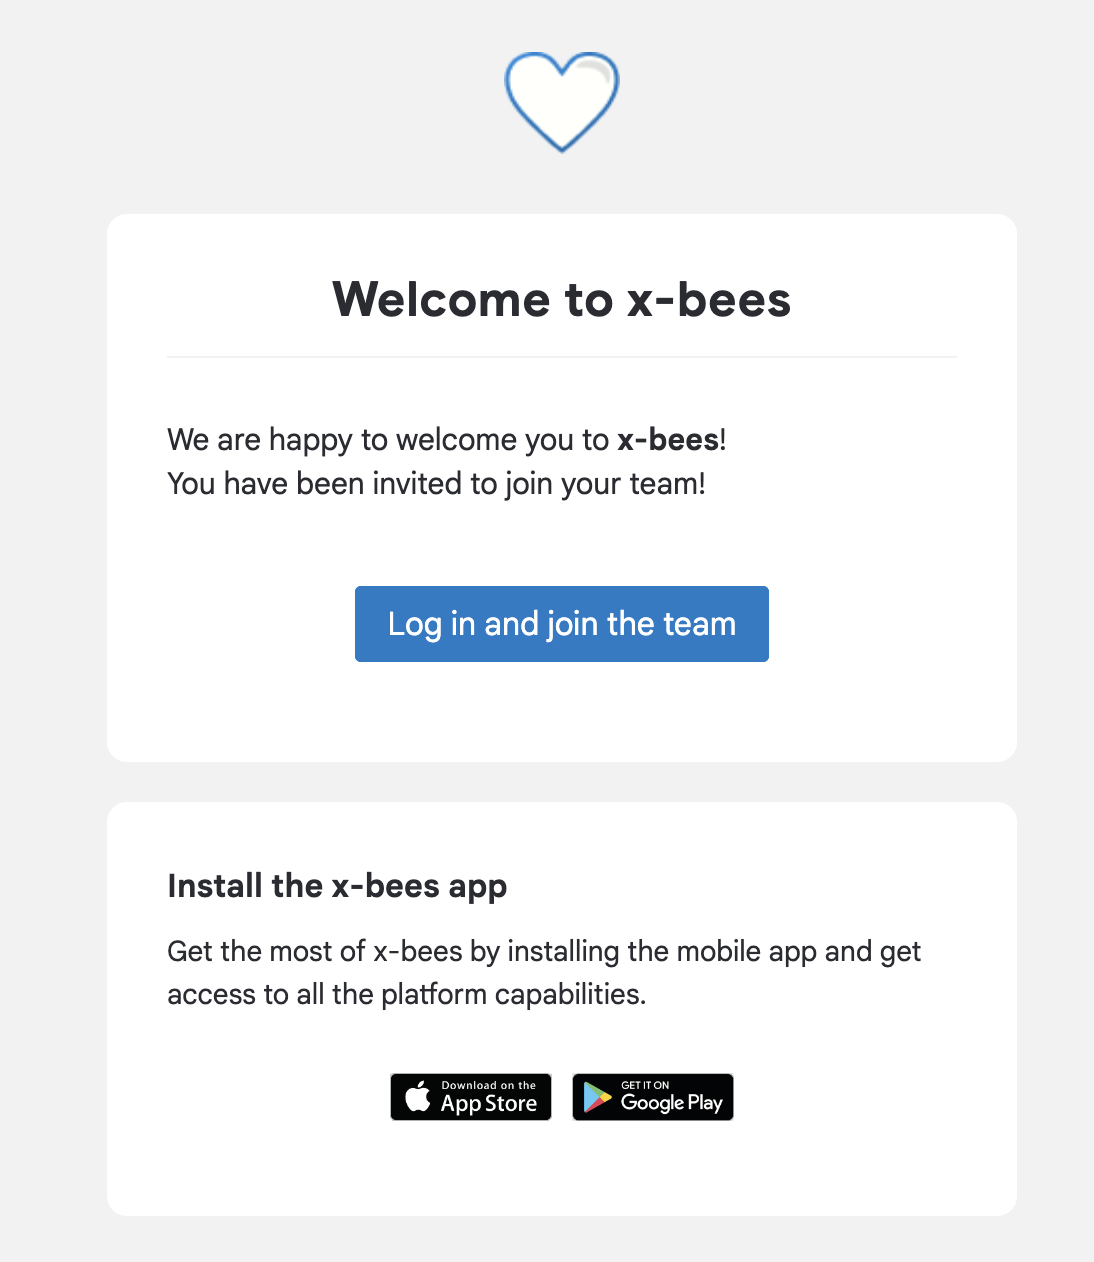
- Log in using Google or Microsoft SSO or with email
PBX users who joined x-bees via email invitation sent by the system administrator are automatically connected to the correct Wildix PBX. To make sure you are connected to the Wildix PBX, follow the steps below:
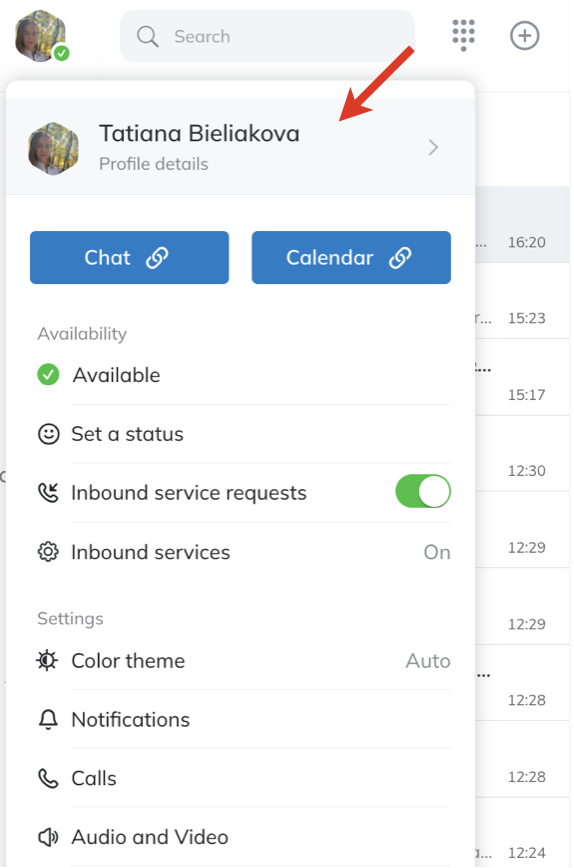
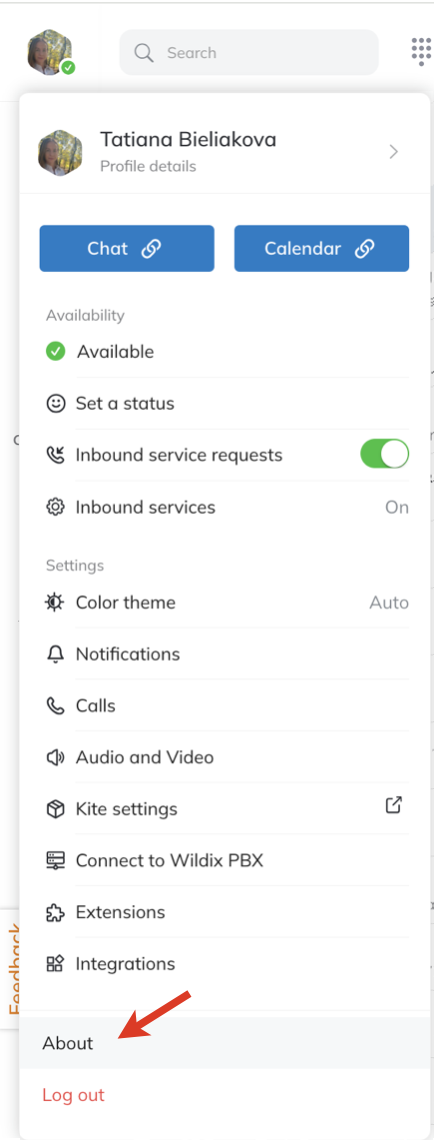
- Click on your user picture from the upper left-hand part of the screen
- Under Settings, click Connect to Wildix PBX

- Make sure the Wildix PBX domain name is entered into the field Domain

Note: if you are not sure, what your Wildix PBX domain is, please check with your system administrator.
Settings
User picture
In case you were previously using Collaboration, your user picture is synced with Wildix Collaboration.
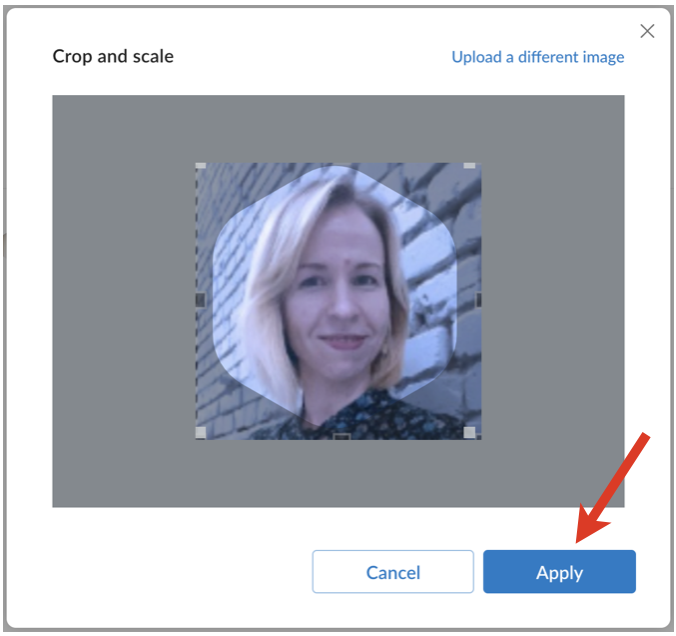
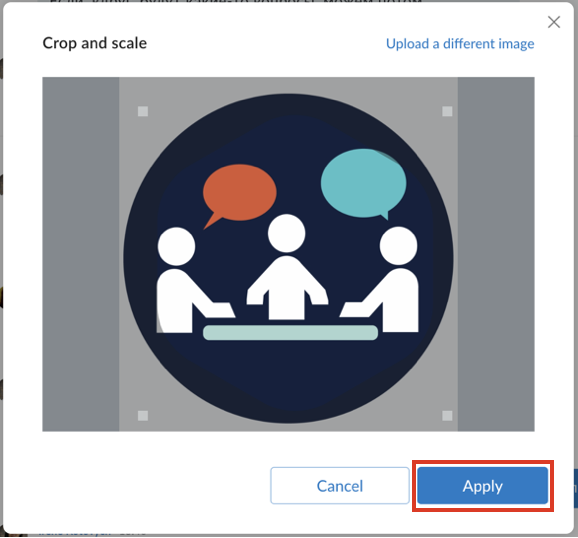
To set up/ change the picture:
- Click on your user picture in the upper left-hand part of the screen to open Settings
- Click on your user picture to open profile information
- Click Upload image and select a new picture
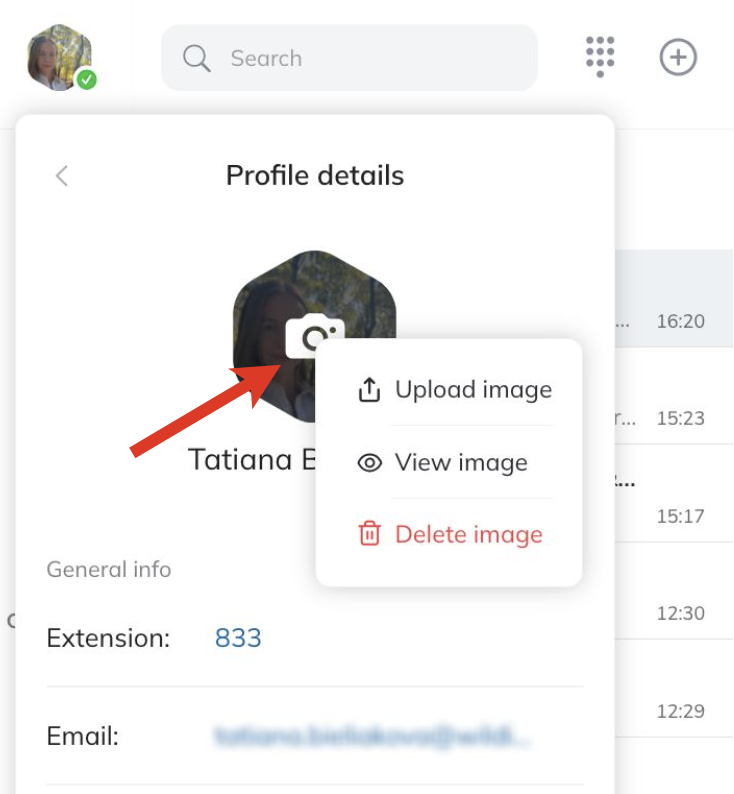
- Crop and scale and click Apply
Language
Language is currently selected based on your Browser language.
Note: professional translation is currently available in Italian, German, Spanish and French.
User status and status message
The following user presence statuses are available in x-bees:
- Green: available
- Yellow: away
- Red: do not disturb
Notes:
- User presence status and call status are synced with Wildix Collaboration
- Geolocation services are currently not available
To change user status:
- Click on your user picture in the upper left-hand part of the screen to open Settings
- Under Availability, click on your current user status (e.g. Available)
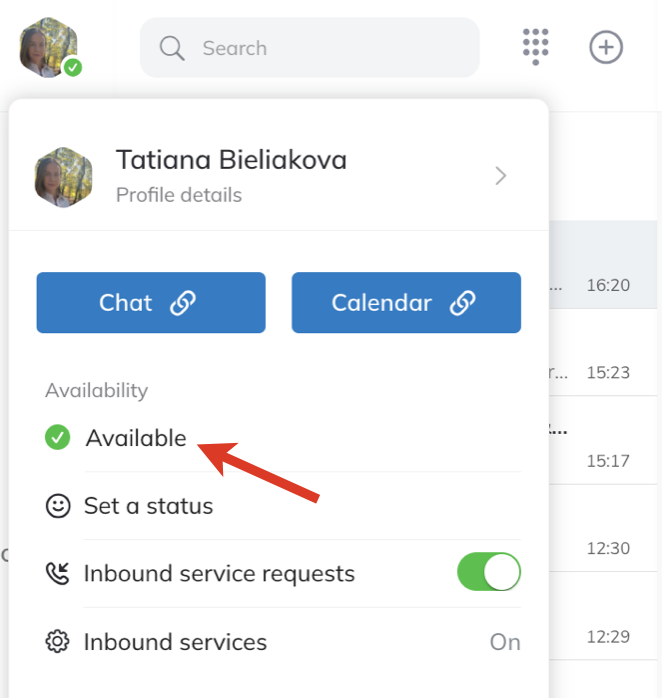
- Select the new status

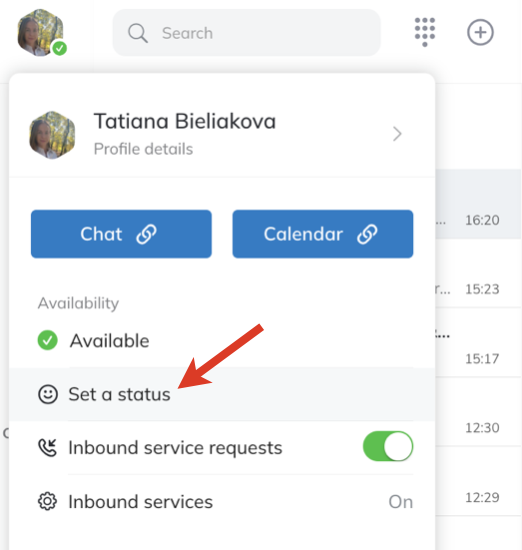
To add a status message:
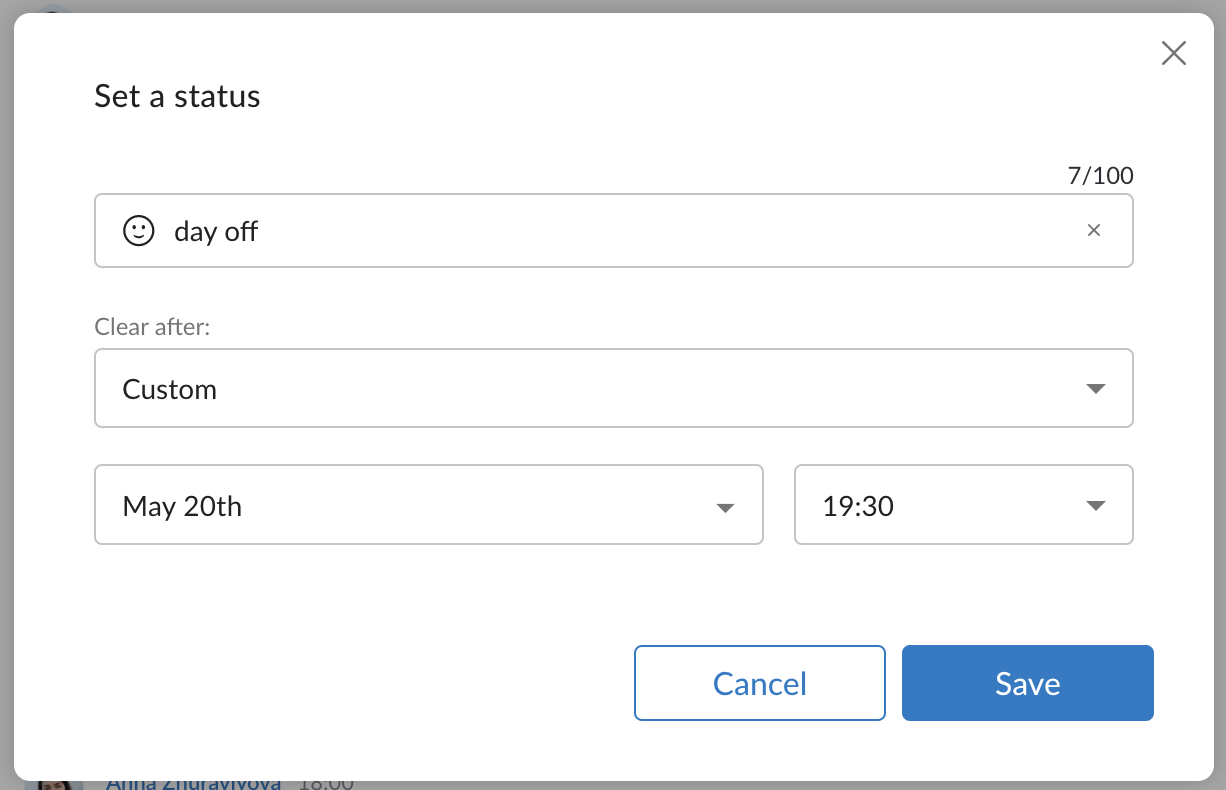
Notes:
- The status message should be no longer than 100 characters
- When busy in a conference, user status automatically changes to the default one (e.g. “in conference | until 14:00”)
- Click on your user picture in the upper left-hand part of the screen to open Settings
- Under Availability, click on Set a status
- Enter the status message into the field, set date and time to clear the status after (optional)
- Click Save
To check the status message, click on your user picture in the upper left-hand part of the screen to open Settings. Under Status, check the message
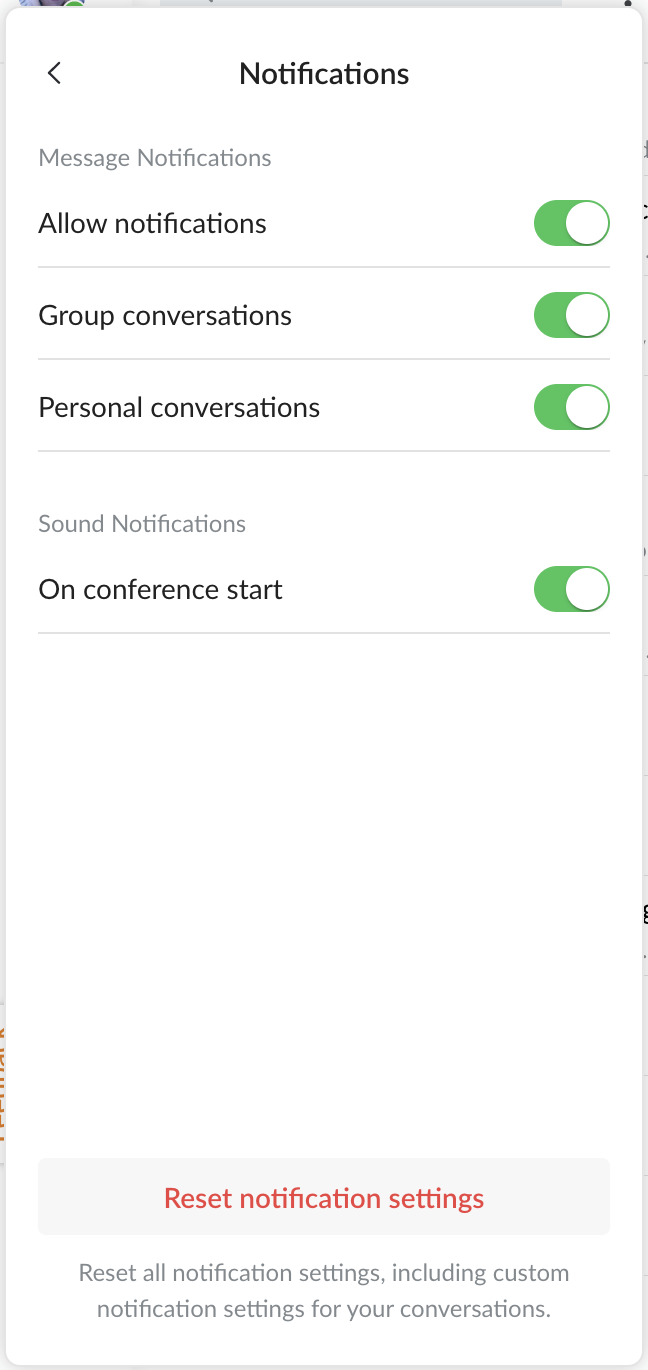
Notifications
To enable/ change notifications settings:
- Click on your user picture in the upper left-hand part of the screen to open Settings
- Under Settings, click Notifications

- Enable Notifications:
- Here you can enable notifications in personal and group conversations. It is recommended to enable all of them, in case you decide to mute a particular conversation, you can do it from the settings of this particular conversation. Note, that Web and Mobile notifications are managed separately and there is no sync between them, to enable notifications on Mobile, consult x-bees Mobile User Guide
- Here you can enable notifications in personal and group conversations. It is recommended to enable all of them, in case you decide to mute a particular conversation, you can do it from the settings of this particular conversation. Note, that Web and Mobile notifications are managed separately and there is no sync between them, to enable notifications on Mobile, consult x-bees Mobile User Guide
Note: audio notifications about new chats are currently not available.
Call forwarding settings
To enable/ change call forwarding settings:
- Click on your user picture in the upper left-hand part of the screen to open Settings
- Under Settings, click Calls

- Set up call forwarding rules for every Call class:

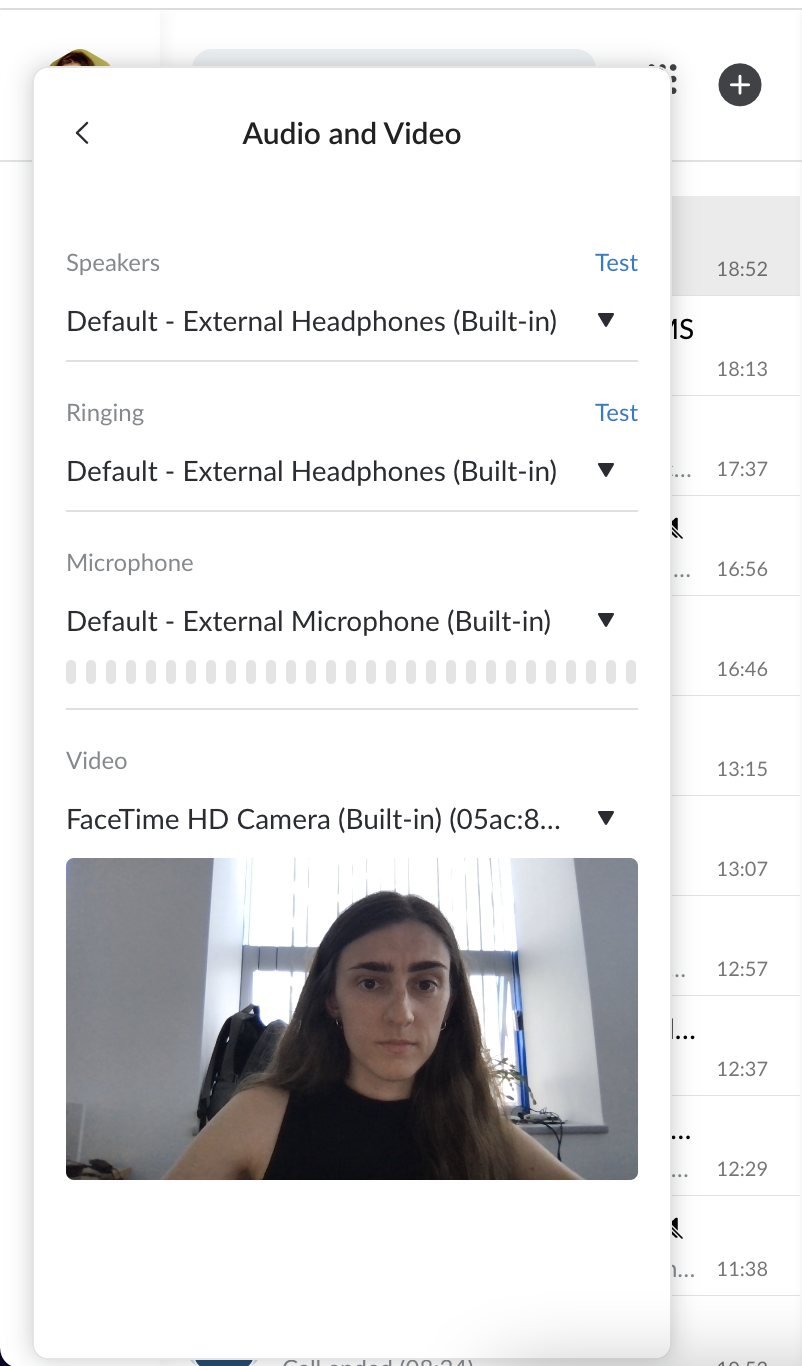
Audio and video device settings
To change the active devices for audio/ video:
- Click on your user picture in the upper left-hand part of the screen to open Settings
- Under Settings, click Audio and Video

- In this menu, you can select and test the active device for Speakers, Ringing, Microphone and Video:
Kite settings
Kite settings let you create a professional email signature with contact-me button, which allows recipients to reach out to you via x-bees, website widgets and set up calendars for Kite Meeting Scheduler.
Click on your user picture in the upper left-hand part of the screen to open Settings.
Under Settings, click Kite settings
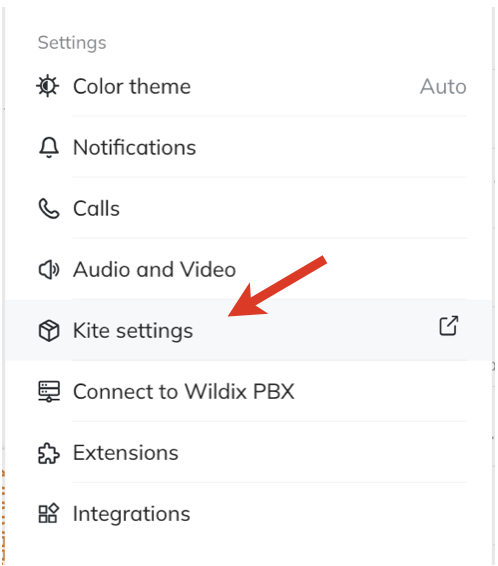
- You get redirected to this portal: https://x-bees.biz/kite/console
Email signature
- Fill out the form which includes the following fields:
- Full Name
- Company
- Job title
Additional information: - Phone
- Address
- Custom link
- Title for custom link
- Custom text field
Under Email signature preview, click Copy to clipboard or Download file to further apply the signature in your email client

Documentation: How to apply your x-bees email signature.
Note: If you change avatar/ name/ or other data, a new signature with the updated info should be created.
Website widgets
Using x-bees Kite widget, website visitors can communicate with agents via chat, video conference, share data, all in just a few clicks. And the chat requests from website visitors are easily managed by PBX users via x-bees interface.
Documentation: x-bees website widget configuration.
Calendar settings - Google Calendar/ Microsoft 365 integration
Thanks to Google Calendar and Microsoft 365 integrations, it is possible for external users to schedule meetings with Agents using Kite Meeting Scheduler.
Documentation: x-bees Kite Meeting Scheduler.
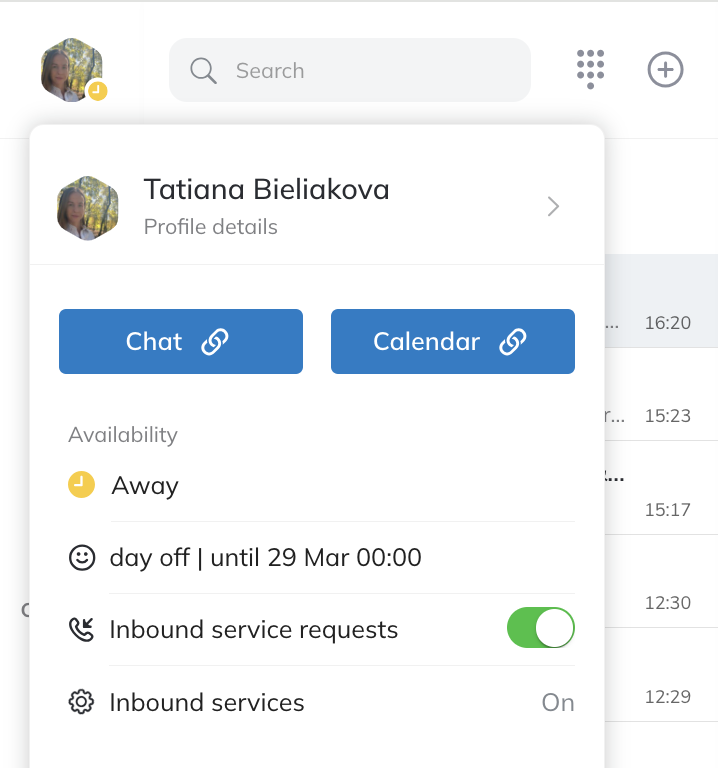
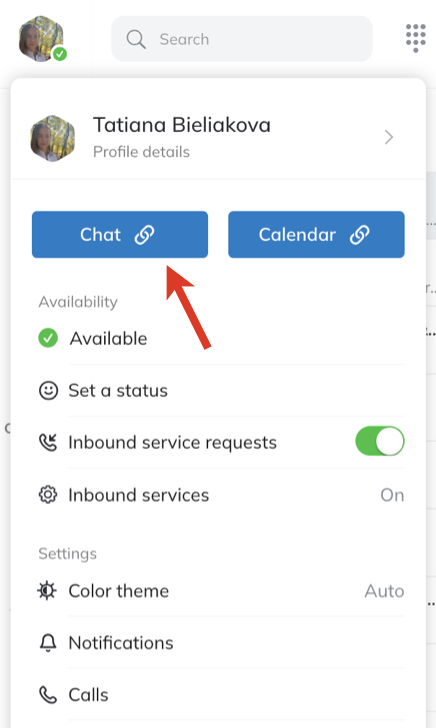
External profile link (WebRTC Kite link)
To get your profile link, by which external users can contact you, click on the Chat link button under Profile details section in Settings:
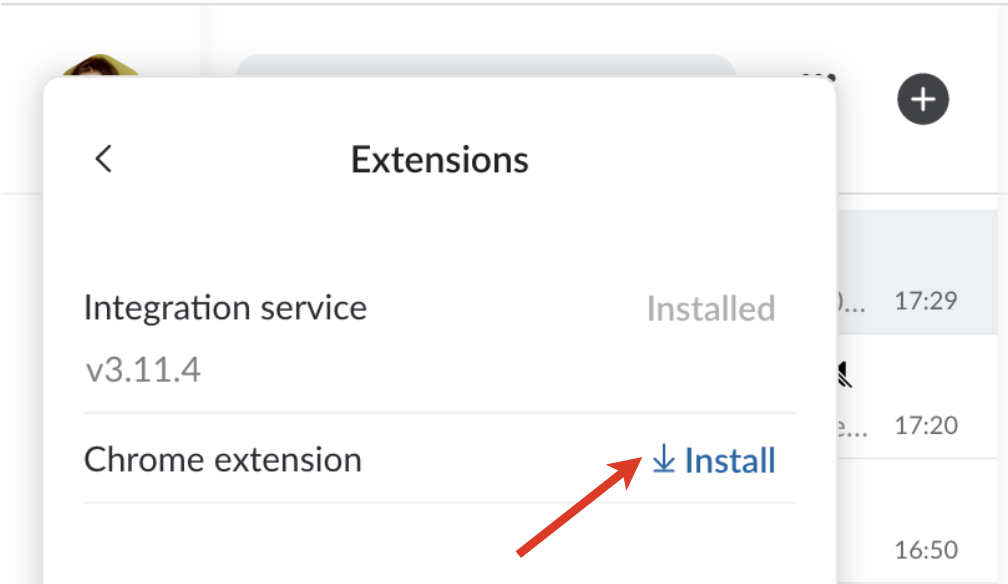
Extensions
In this menu, you can install the Wildix Integration Service (required for Headset Integration) and x-bees Chrome extension:
- Click on your user picture in the upper left-hand part of the screen to open Settings
- Under Settings, click Extensions
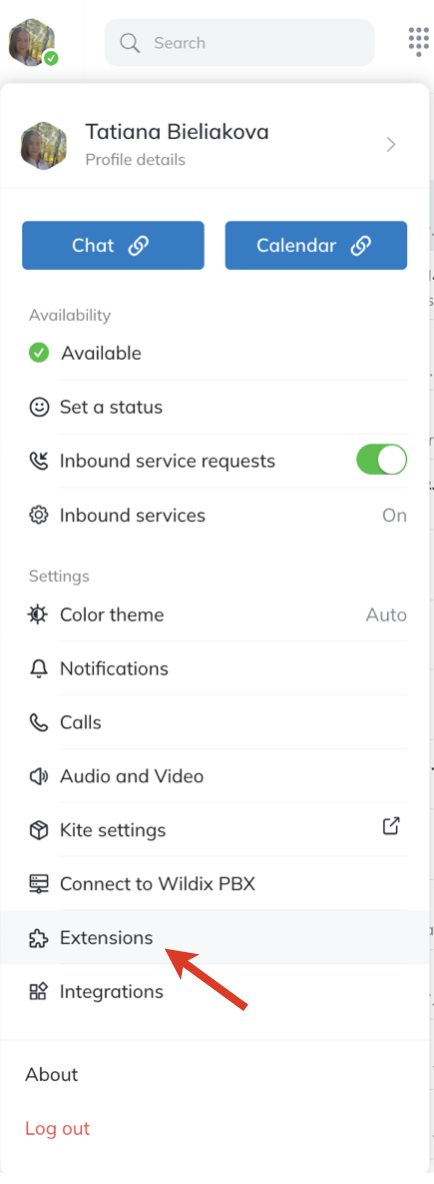
- Install the Integration service/ x-bees Chrome extension
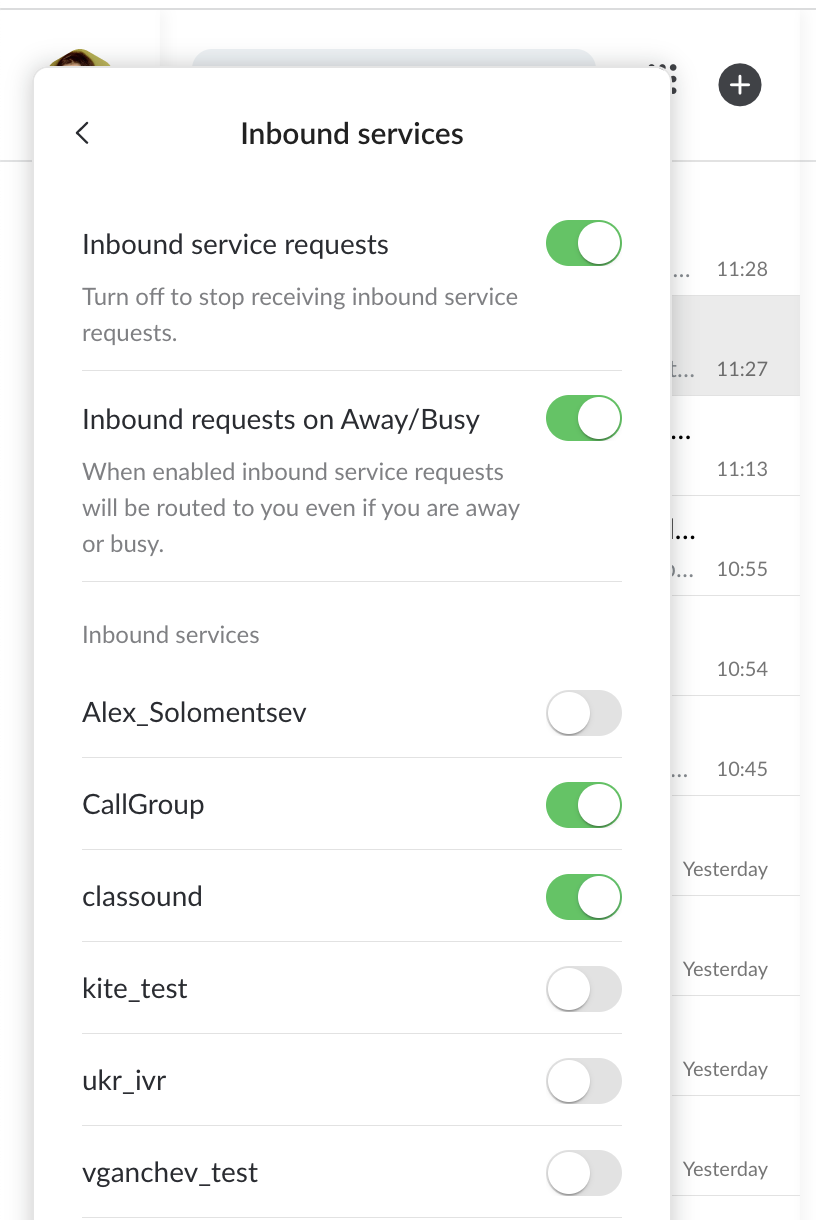
Inbound services ("Contact center")
The contact center feature present in Wildix Collaboration is available in x-bees and allows you to view the available services (call groups) and dynamically log in/ log out from them:
- Click on your user picture in the upper left-hand part of the screen to open Settings
- Under Availability, enable Inbound services

- Enable the switch next to Inbound service requests: the switch allows you to dynamically join the inbound services (call groups)
- Under Inbound Services: enable those services (call groups from your PBX) that you would like to join as a call agent (in this menu you cannot change the status in services, to which you were added statically via WMS)
Updates
Updates of the x-bees web interface are available out of the box and do not require any steps from the PBX admin or user.
You can check all the latest changes in x-bees Changelog.
Check the current version:
- Click on your user picture in the upper left-hand part of the screen to open Settings
- At the bottom of the screen, click About
Logout
- Click on your user picture in the upper left-hand part of the screen to open Settings, then click Log out

Feedback
You are invited to send us feedback, provide suggestions and report problems!
To send your feedback, click on the Feedback button at the left of the screen:

Conversations
Group conversations
Important: Conversations (chats) on x-bees are not synced with Wildix Collaboration!
Create a new conversation
- Click on + from the top panel

- Enter conversation name and description (optional) and click Next:

If you want the conversation to be available by link, turn the toggle on in front of Available by link option.
When conversation is available by link, the relevant link icon is displayed next to conversation name on the Info frame. Clicking on the icon and sending the URL to other users, you can invite them to the conversation: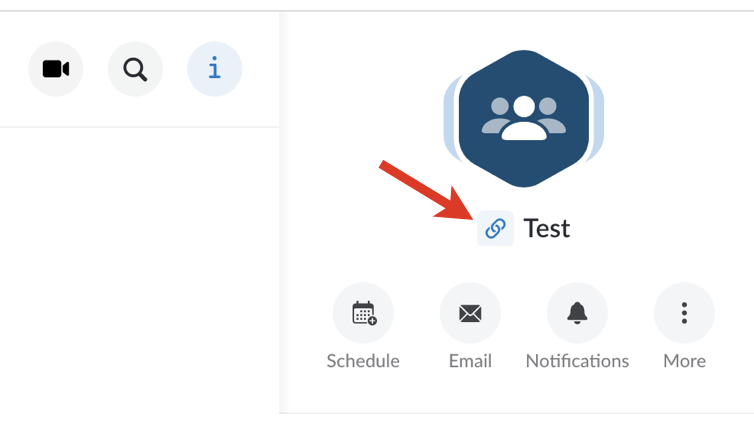
- Add participants and click Invite and create:
You can add PBX users, Salesforce or HubSpot leads and contacts, Phonebook contacts, email addresses
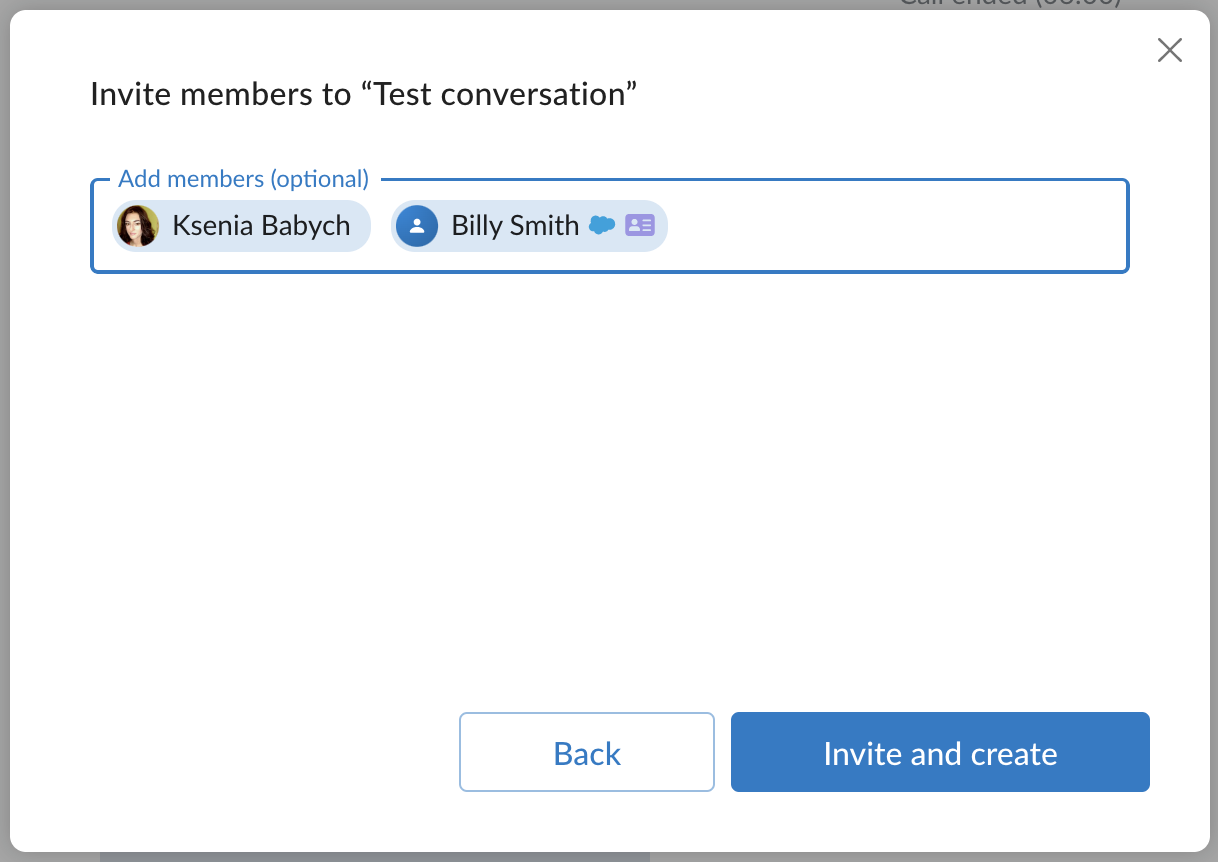
Note:
- The maximum number of users that can be added to a conversation is 1000.
- Participant should have an email address to be added to a conversation.
Set conversation picture
In x-bees, you can set custom pictures for conversations.
- Open Conversation Info and hover mouse over the conversation avatar

- Drag and drop a picture or click Select image button and upload the picture
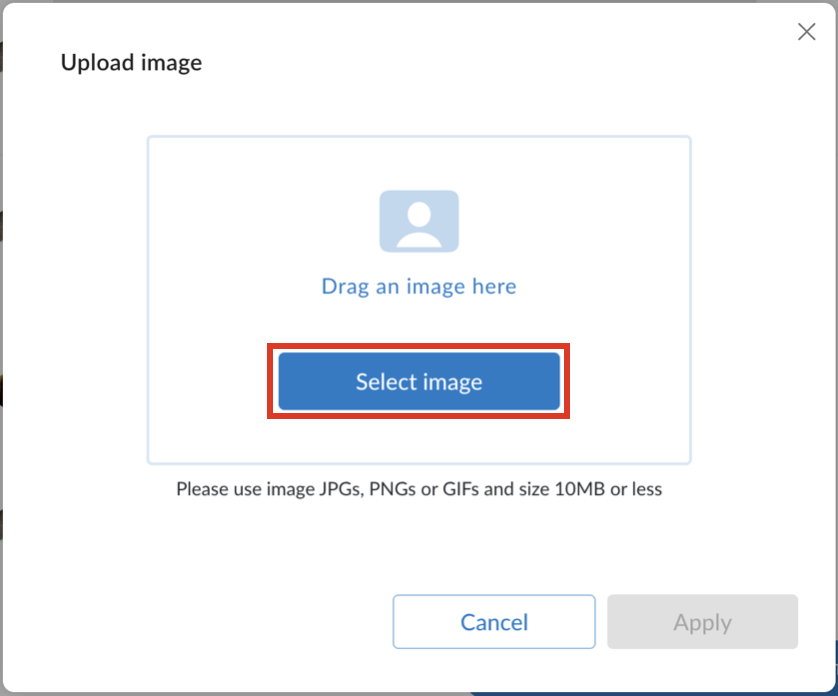
- Crop and scale the uploaded image and click Apply
- The uploaded image is displayed as conversation avatar
![]()
Replace conversation picture
To replace image:
- Click on the existing conversation picture -> press the button Upload image and upload a new picture
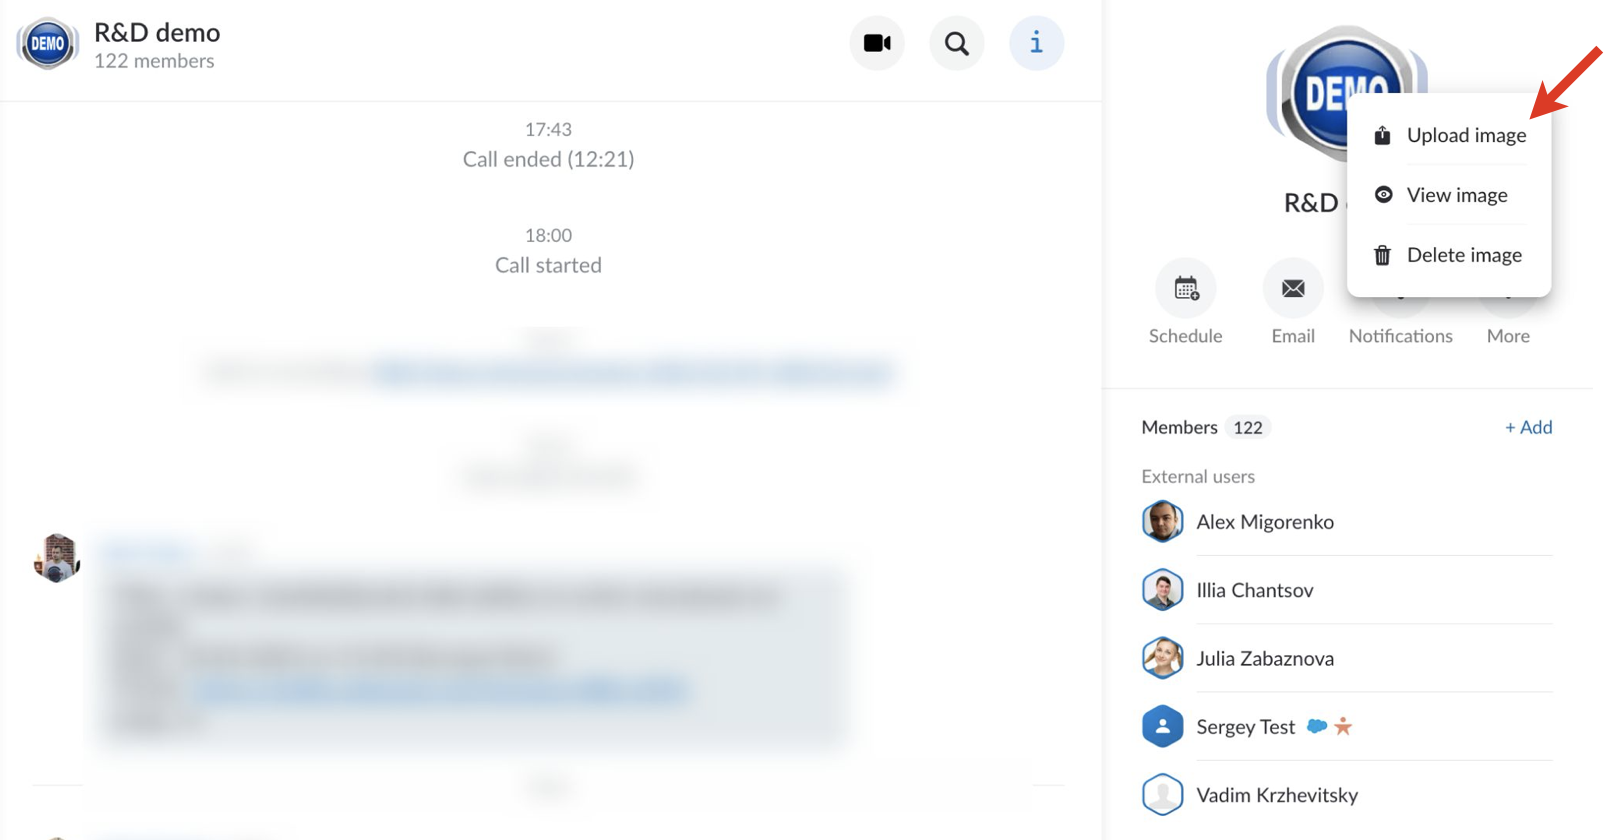
- Alternatively, you can click View image
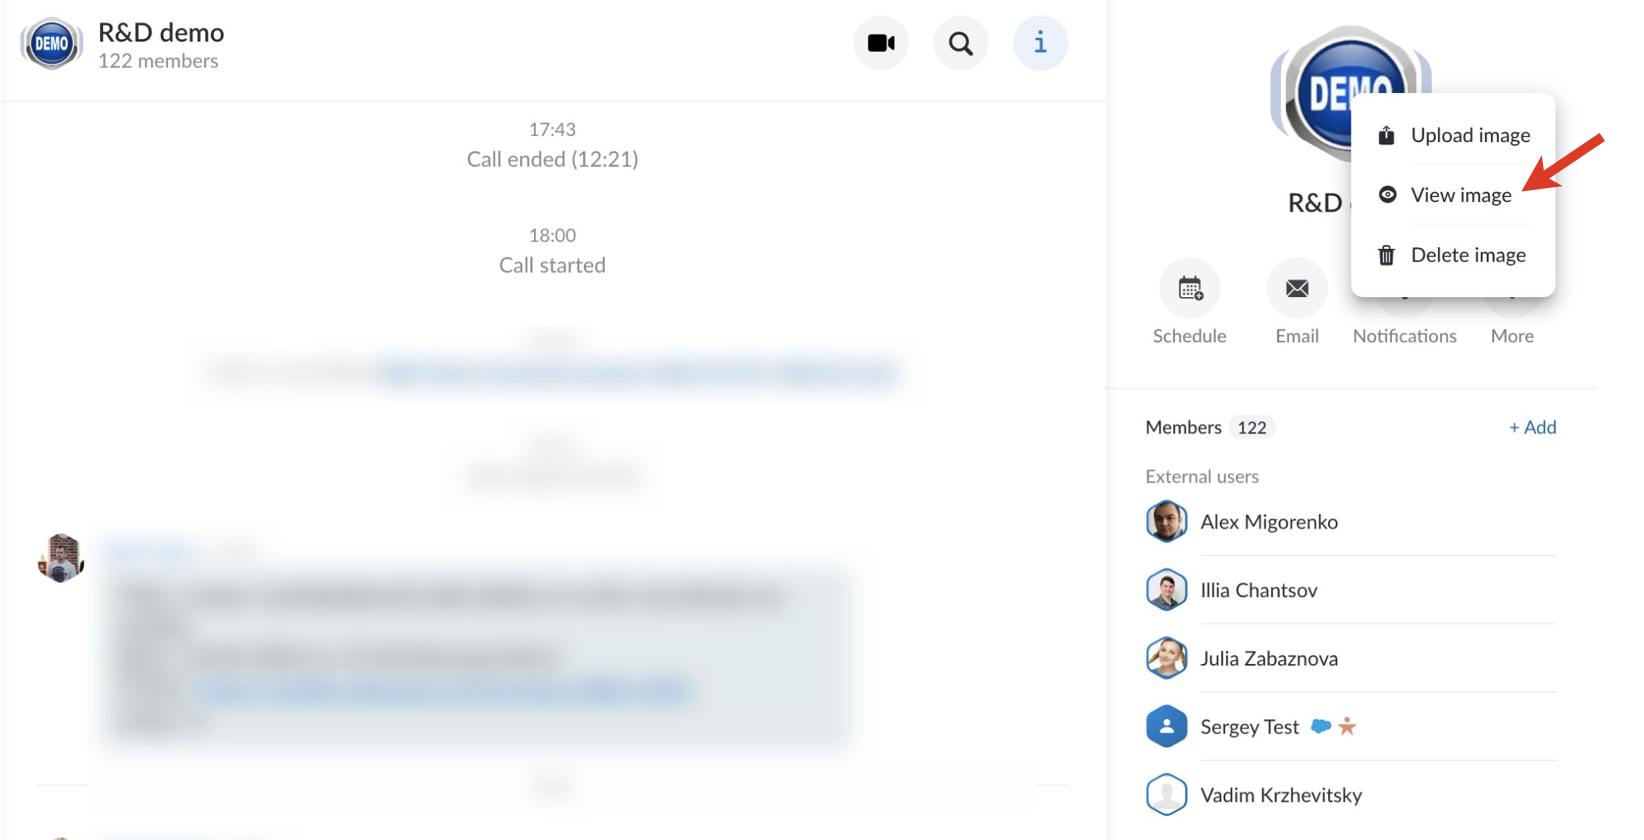
- And on the View image screen, click Replace
![]()
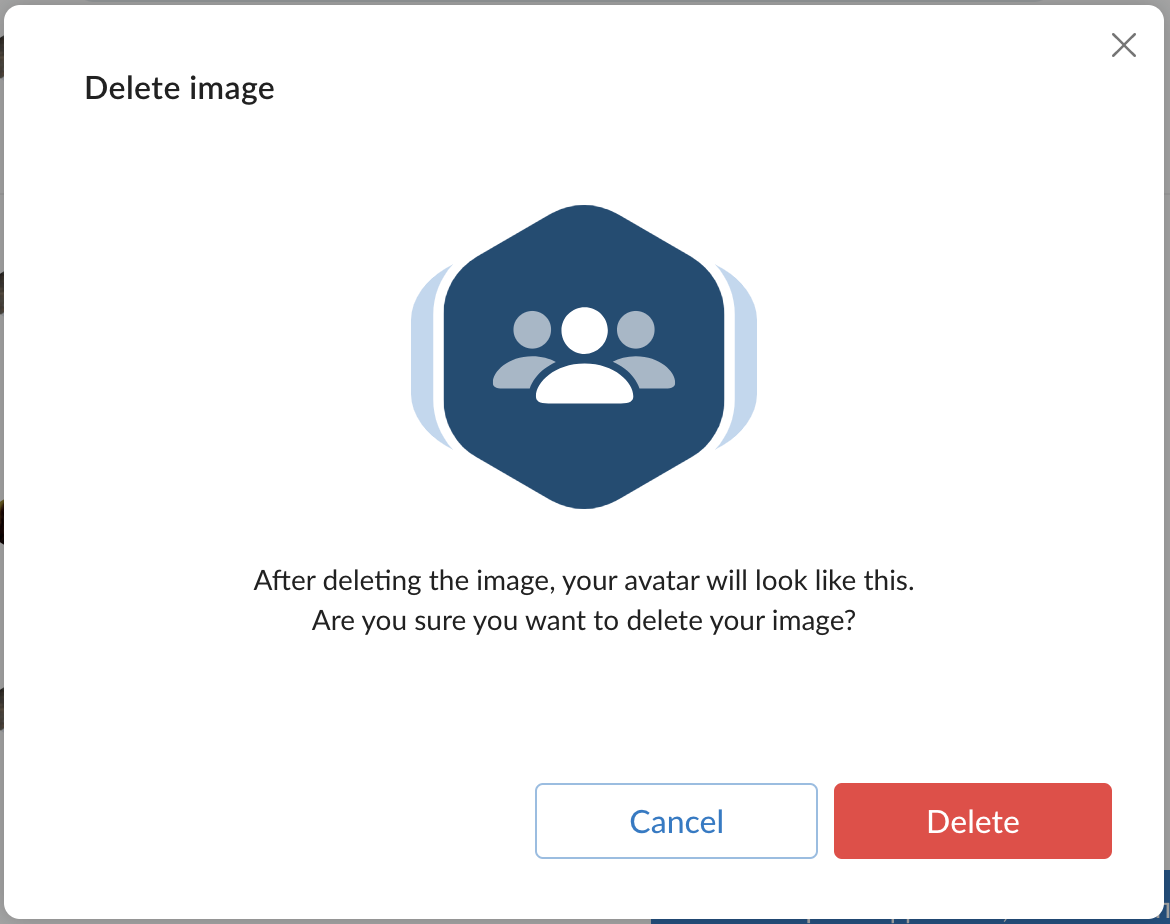
Delete conversation picture
To remove image:
- Click on the conversation picture Delete image
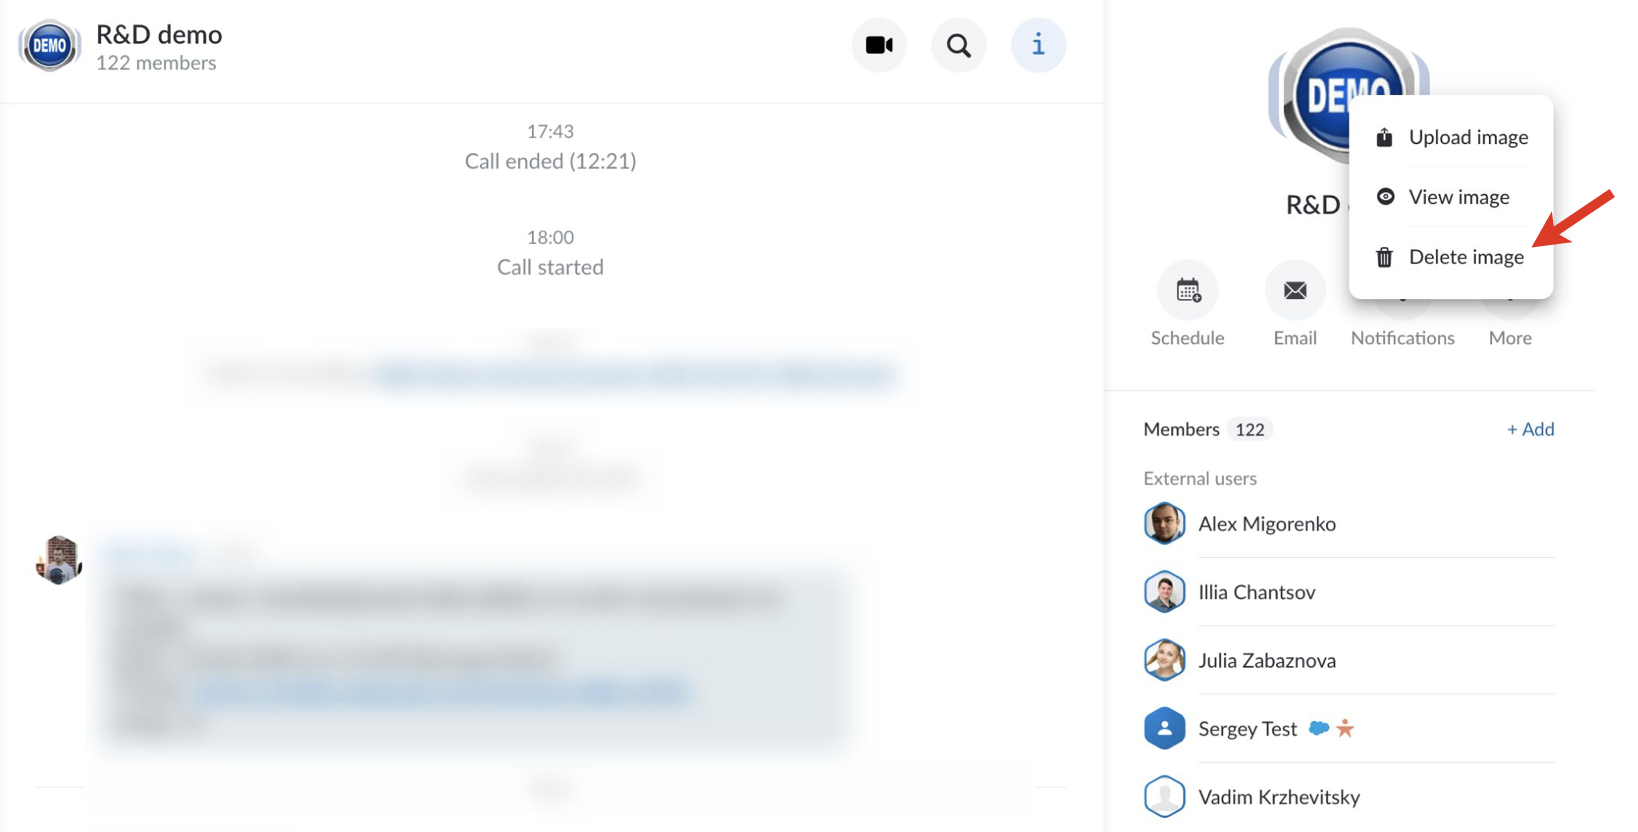
- A screen informing that after image deletion your conversation avatar will be returned to the default one. Confirm deletion by clicking Delete
Manage a conversation
Once a conversation has been created, click on the Info icon from the upper right-hand part of the screen to open the Conversation Info frame.
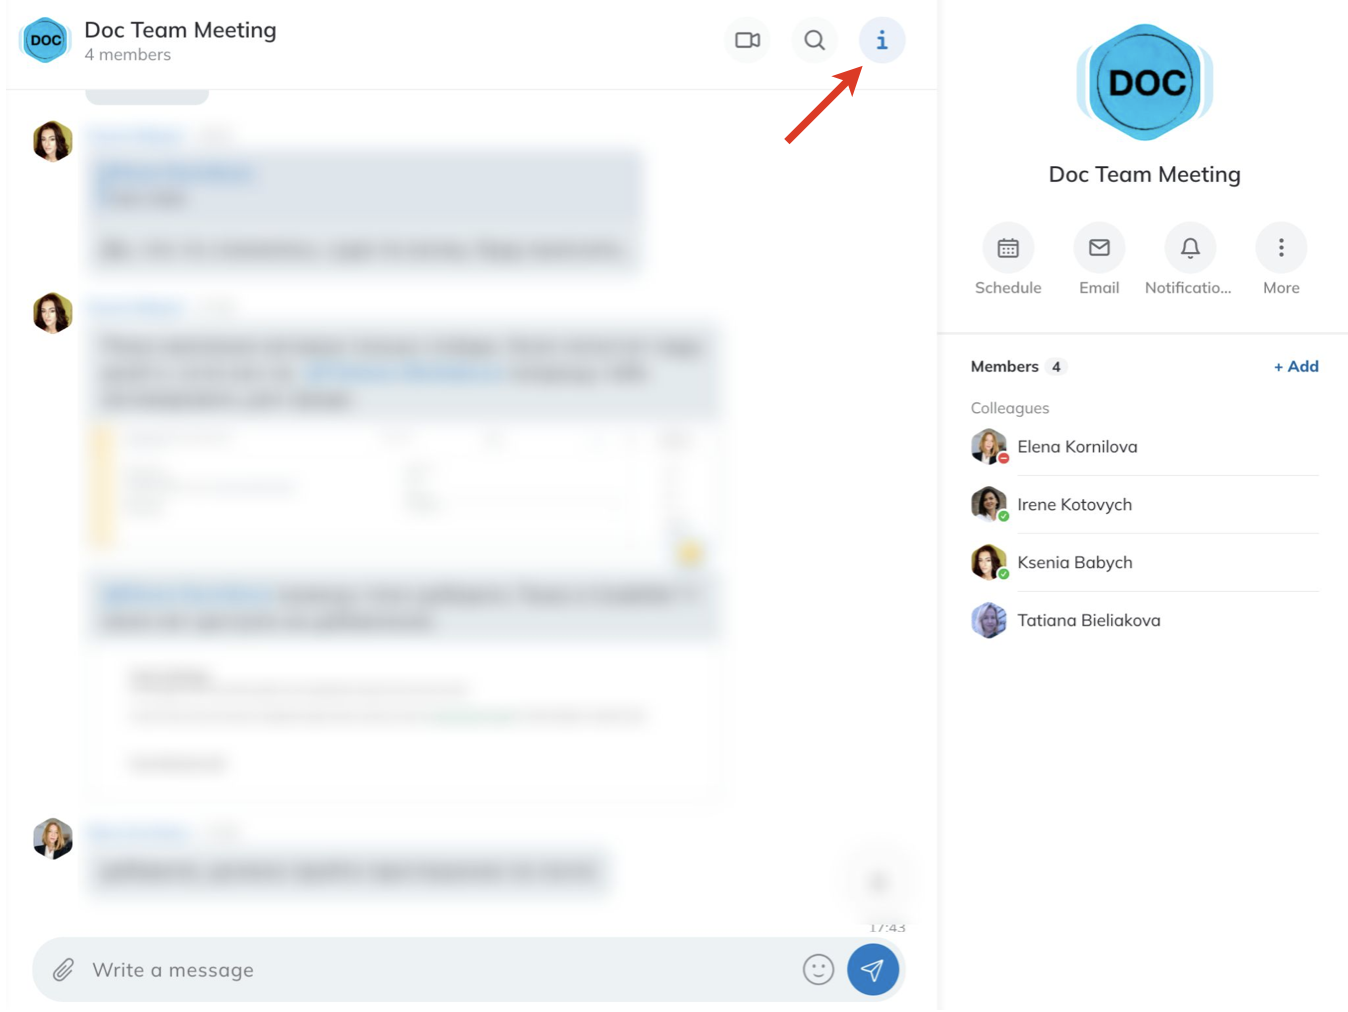
In this frame you can:
- Mute the conversation for a period of time
- View the list of conversation members
- Add more participants
- Delete member or Send email invitation to a member
- Schedule an event
- And more

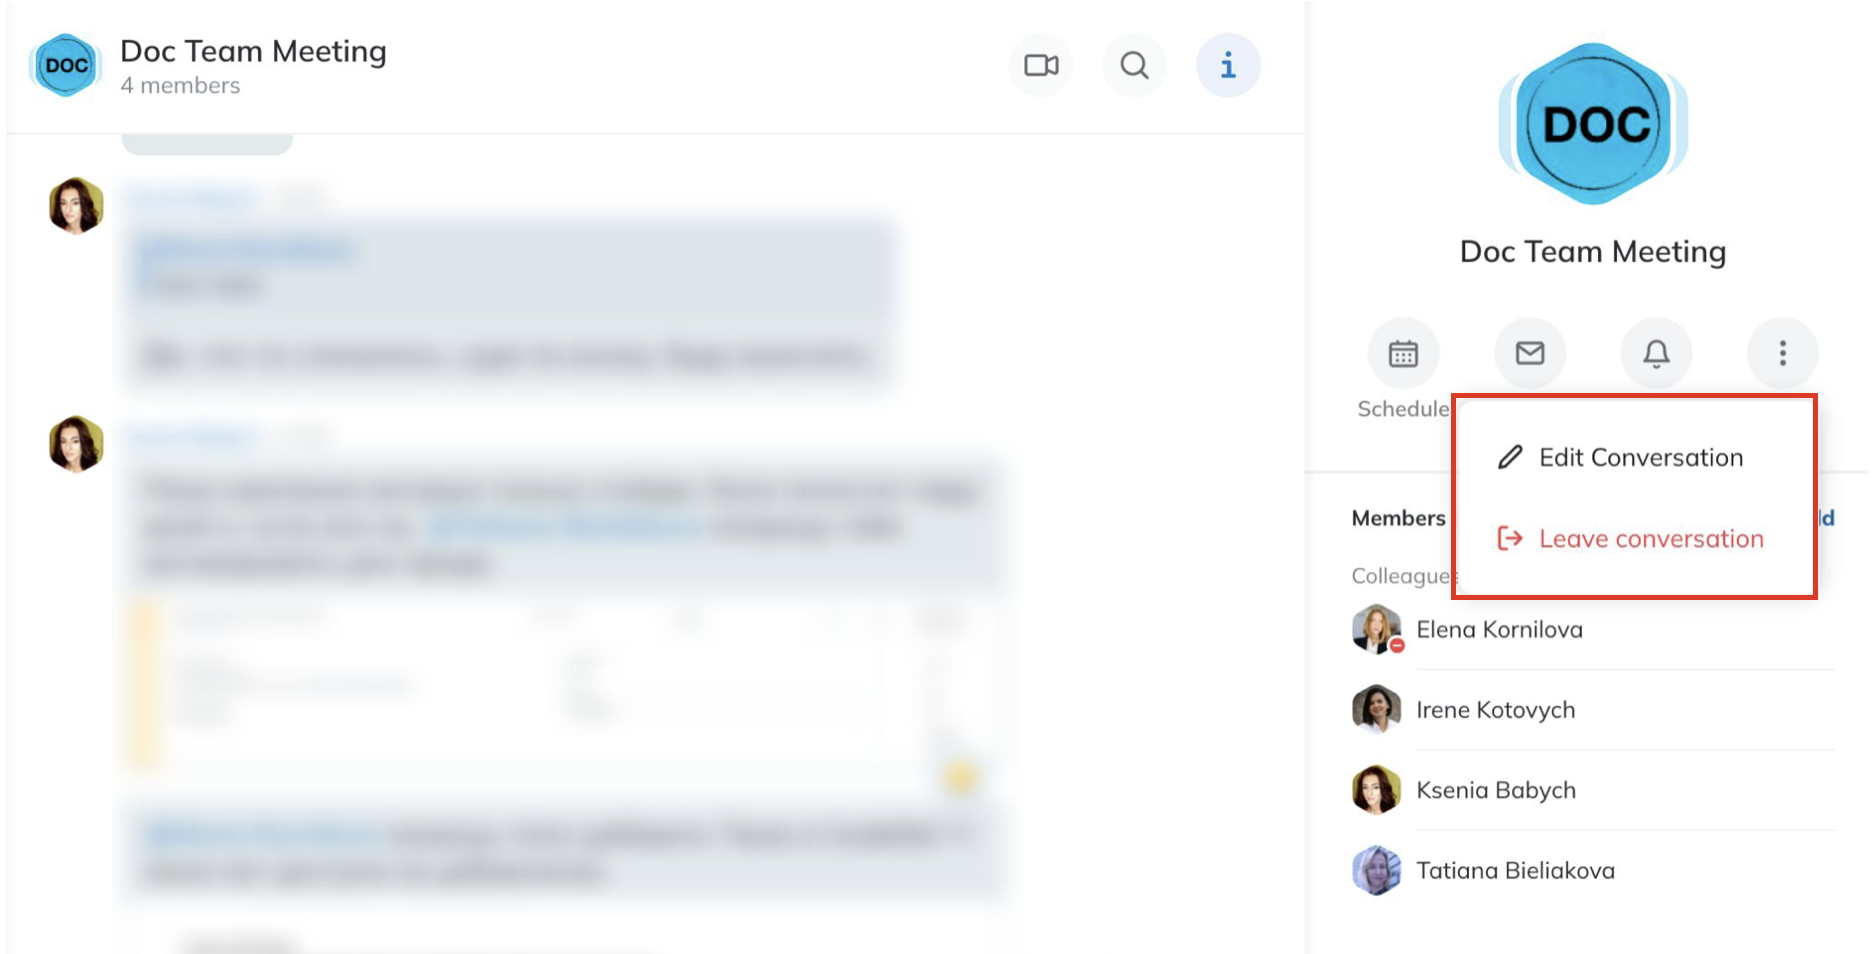
Under the Conversation avatar and conversation, you can find the following buttons:
- Schedule: calendar opens enabling you to schedule a conference in the participants' calendars
- Email: your email client opens enabling you to send a customized email invitation to all the members
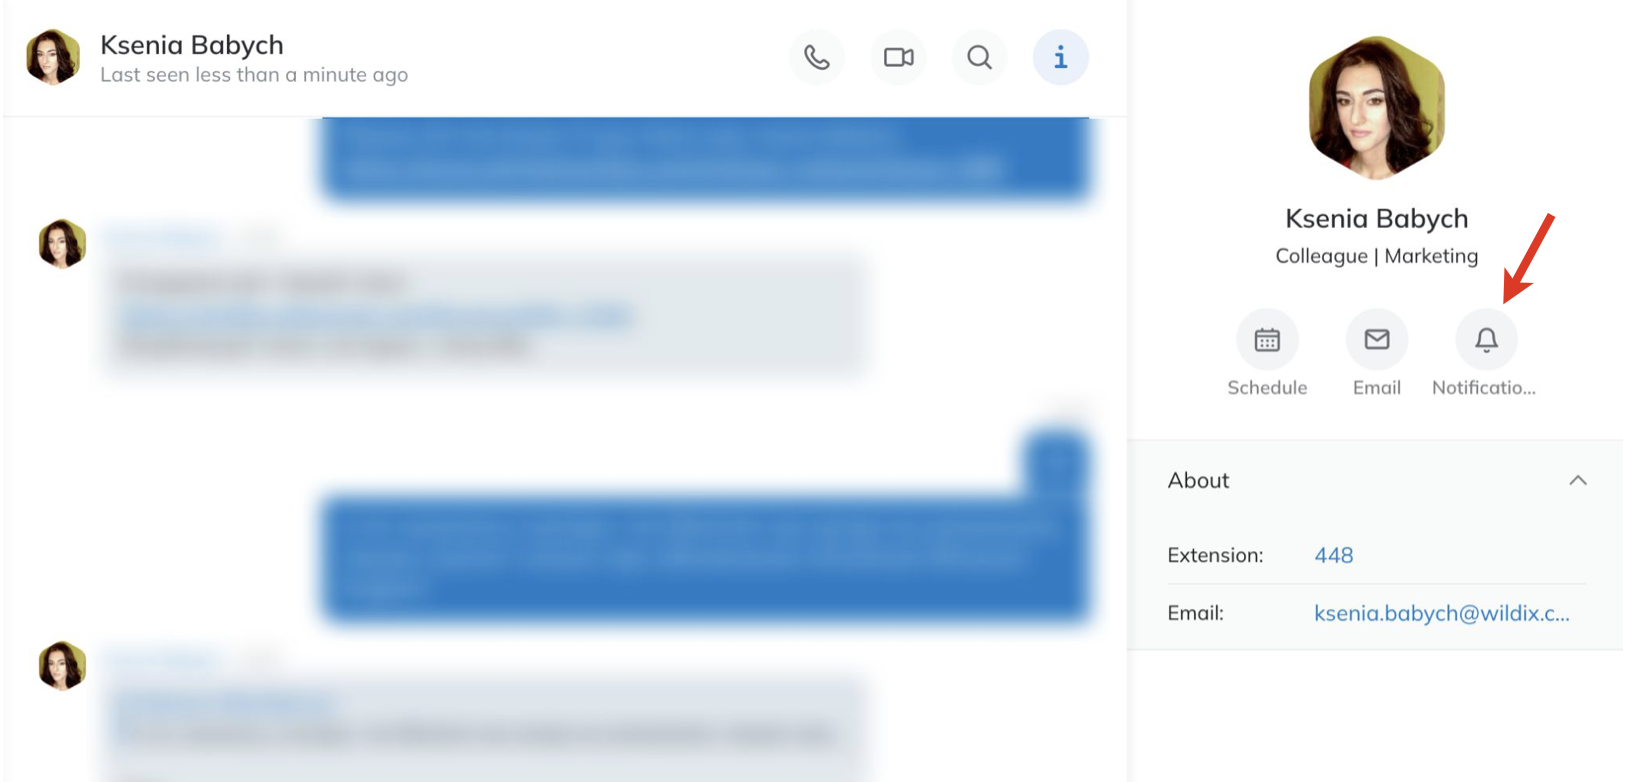
- Notifications: lets to mute conversation for 1/ 2/ 4 hours or forever
- More: provides the options to Edit conversation or Leave conversation

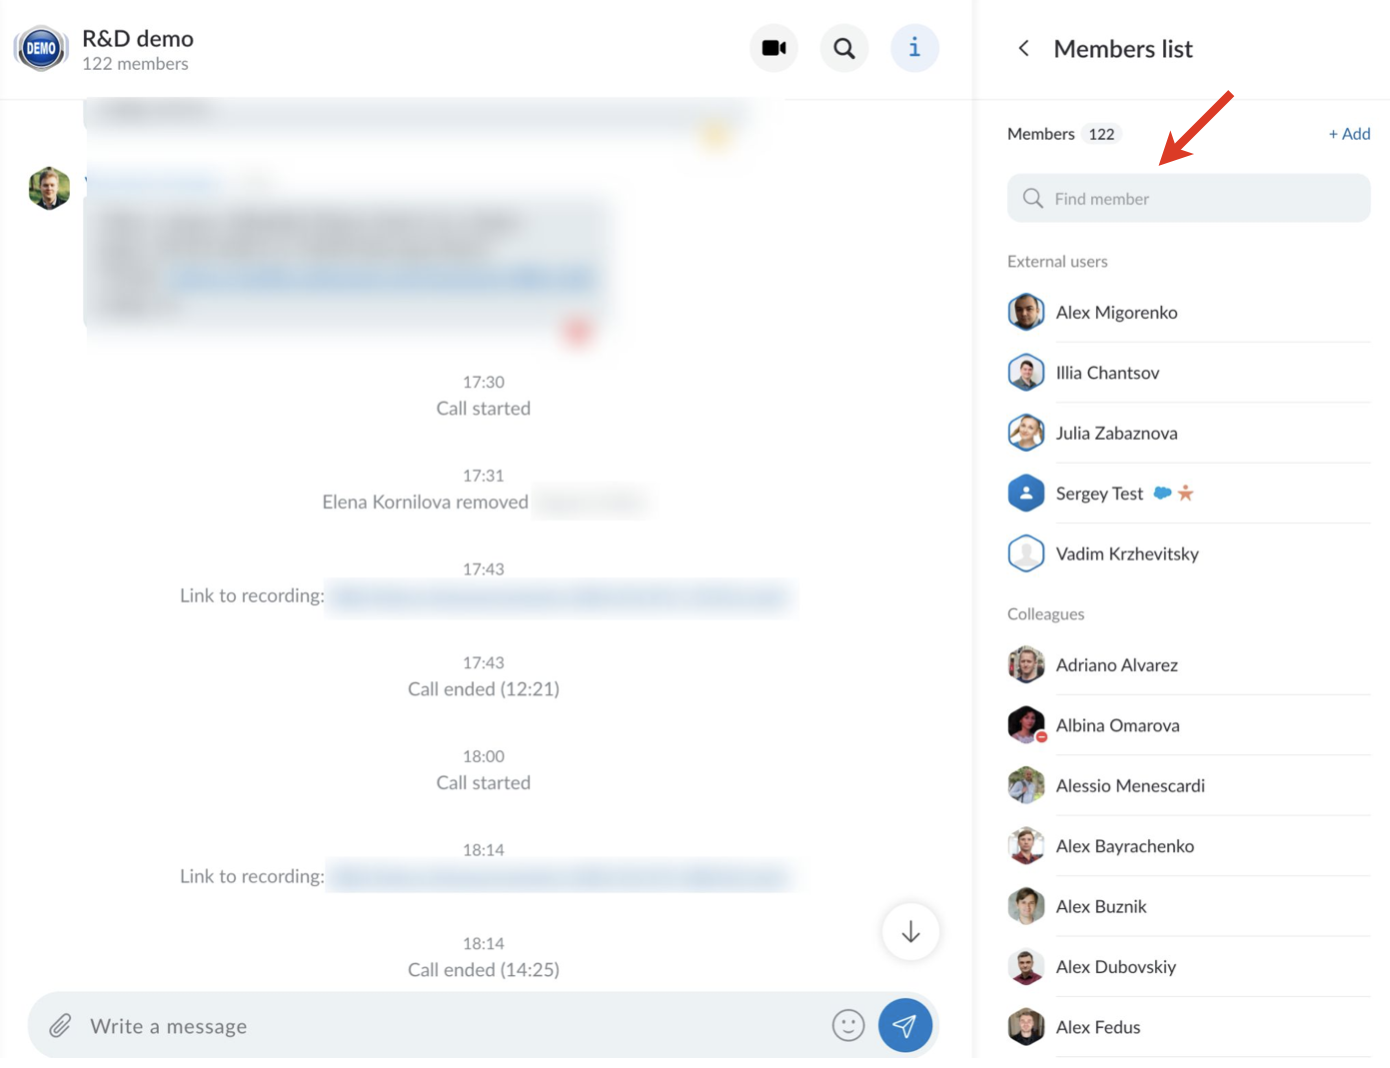
Members of the conversation
The list of members includes both external users and colleagues, displaying them separately, in the relevant sections - External users (1) and Colleagues (2).

External user avatars are highlighted in blue:

To view the full list of users, scroll down to the bottom and click Show more:

On the Members list panel, you can see the list of all members of the conversation, and use the Search field if required:
Start a conference or schedule an event
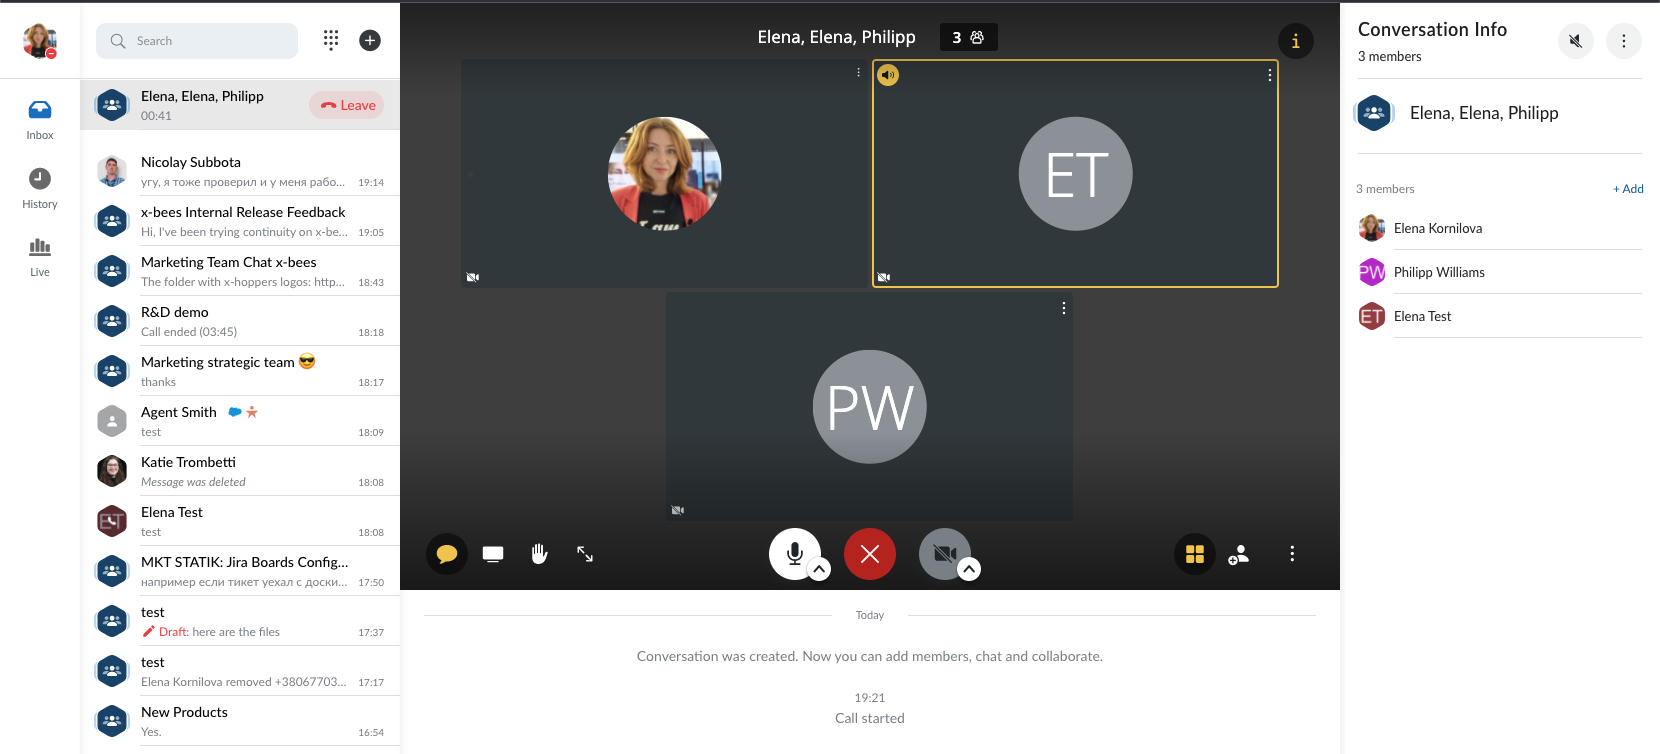
Start a call with all the participants: click on the Video icon from the upper right-hand part of the conversation screen

Participants of the conversation can see the green Join button next to the conversation name on the left side panel and can join the conference by clicking the button. Hovering a mouse over the Join button (1), there is a popup window with the list of users participating in the conference (2). When a conference starts, participants are notified with a sound notification:
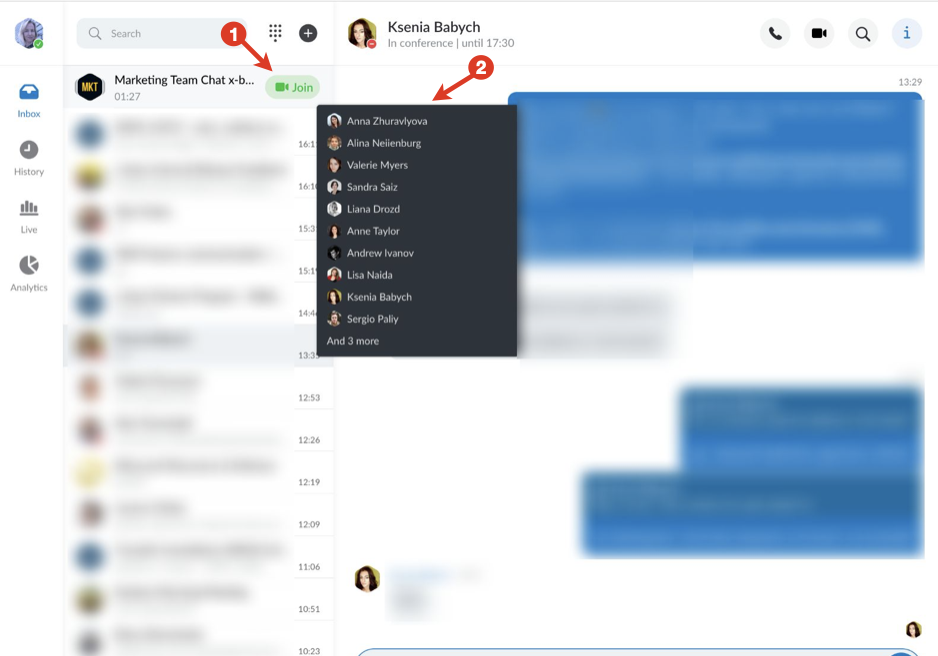
Notes:
- The maximum number of participants displayed is 10
- The list of participants isn’t updated while you are viewing it. To update the data, move the mouse outside the button and hover it again
- Notification is played once, for 7 seconds, unless user opens Inbox. Notification is played even to users with DND/ Away presence status
- Notification is not played if:
- user has an active call or conference
- user is on the Inbox tab
- x-bees tab is closed
- If there are several simultaneous calls, the notification is played one time
- Sound notifications on mobile and for Kite are currently not supported
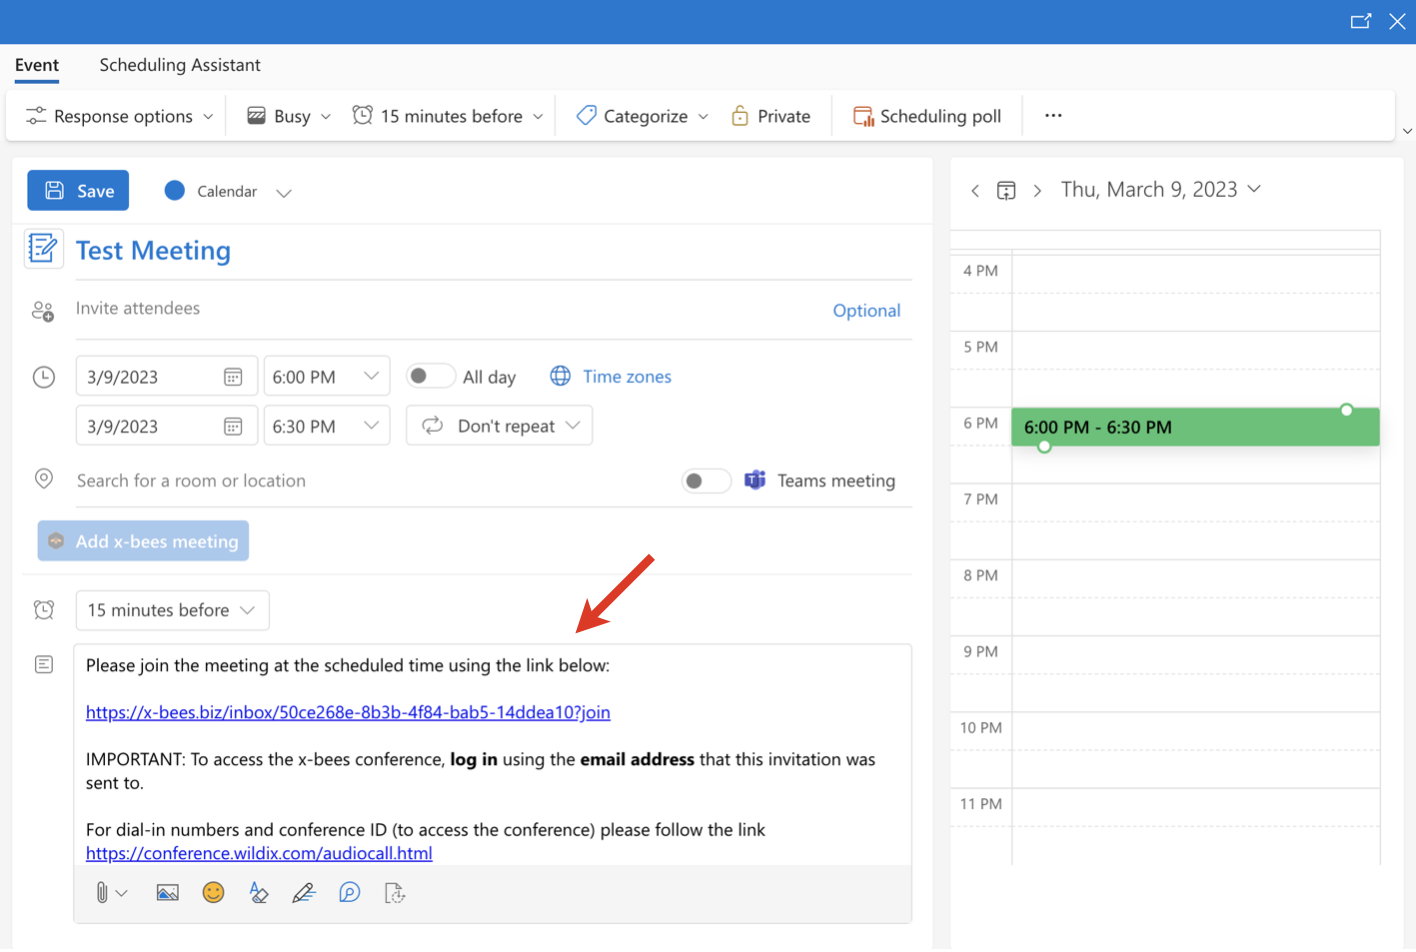
Schedule event via Google/ Microsoft:
- Click on the Info icon from the upper right-hand part of the conversation to open the Conversation Info frame
- Click on the Schedule button: calendar opens enabling you to schedule a conference in the participants' calendars

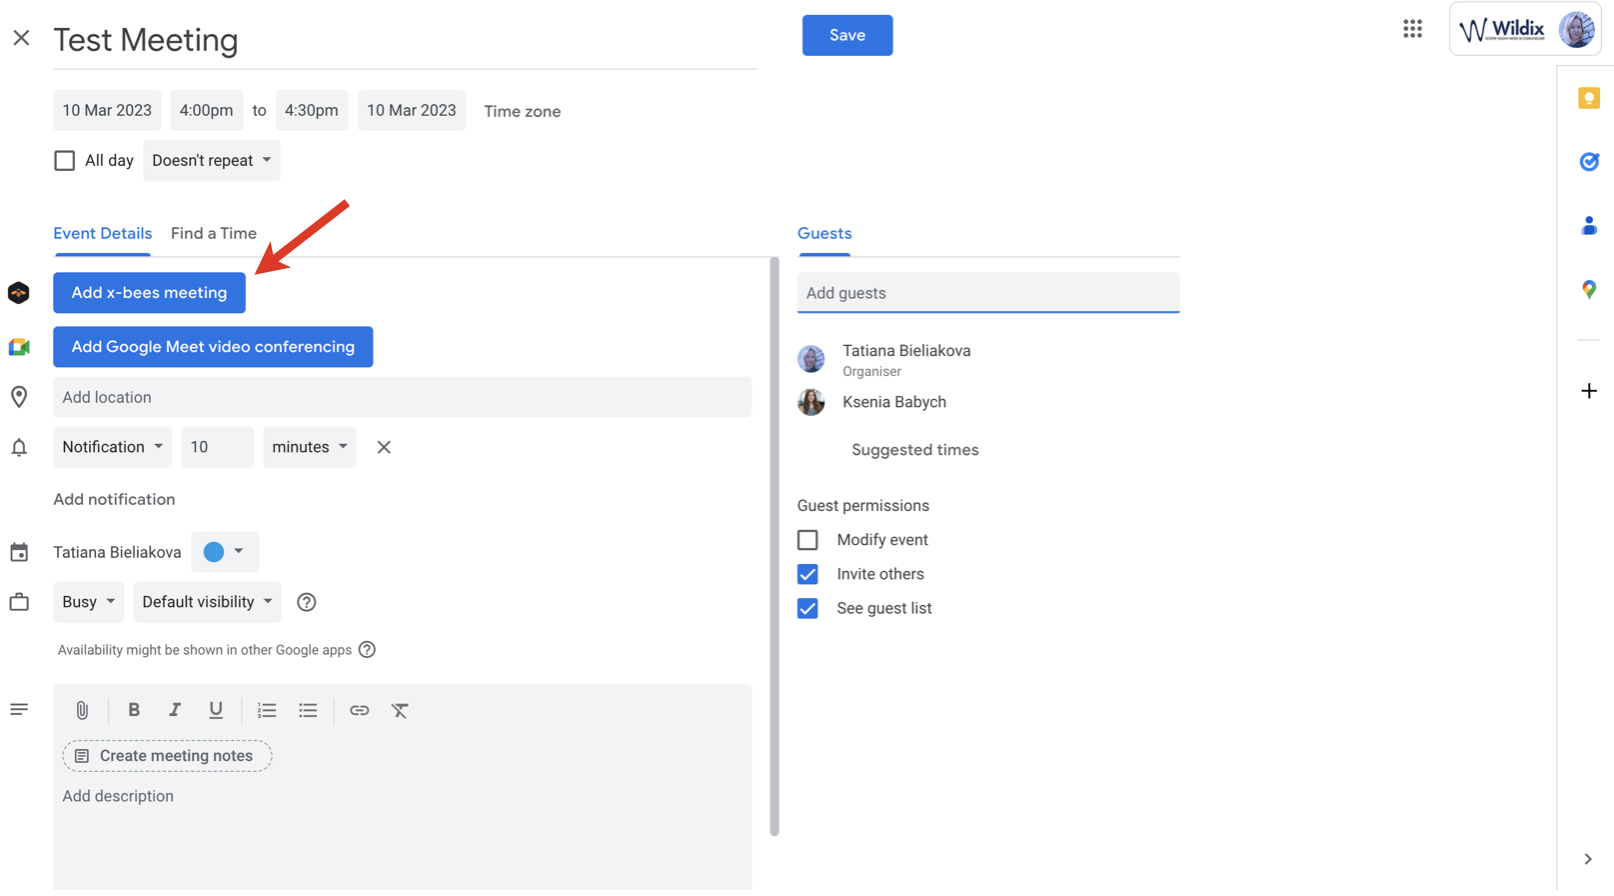
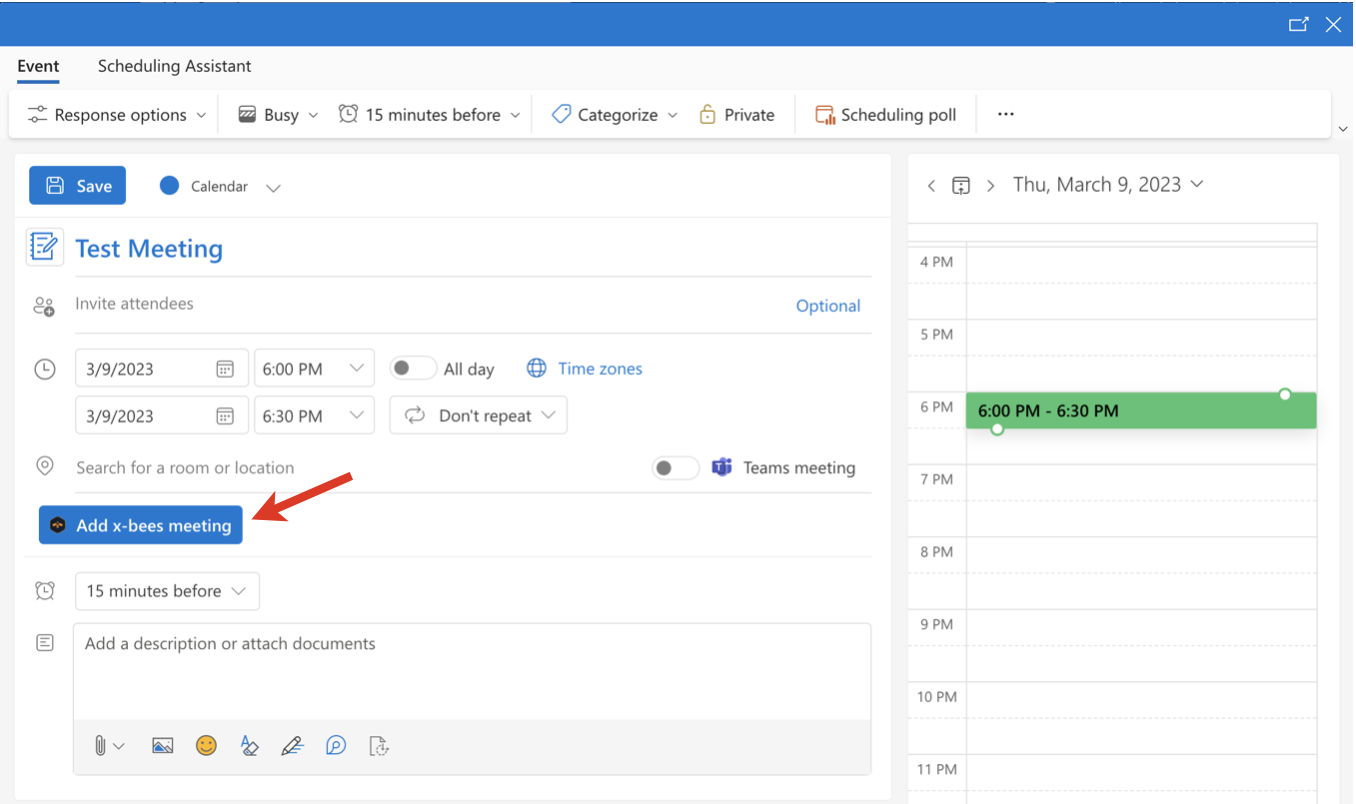
Schedule event in Google/ Microsoft 365 calendars
It is also possible to schedule x-bees meetings right in Google/ MS 365 calendars. When creating an event in Google/ MS 365 calendar, click Add x-bees meeting button
Requirements:
- min. x-bees Chrome extension v. 1.0.3
- min. WIService v. 3.13
- x-bees running in Chrome or as a desktop app
Google:
Microsoft 365:
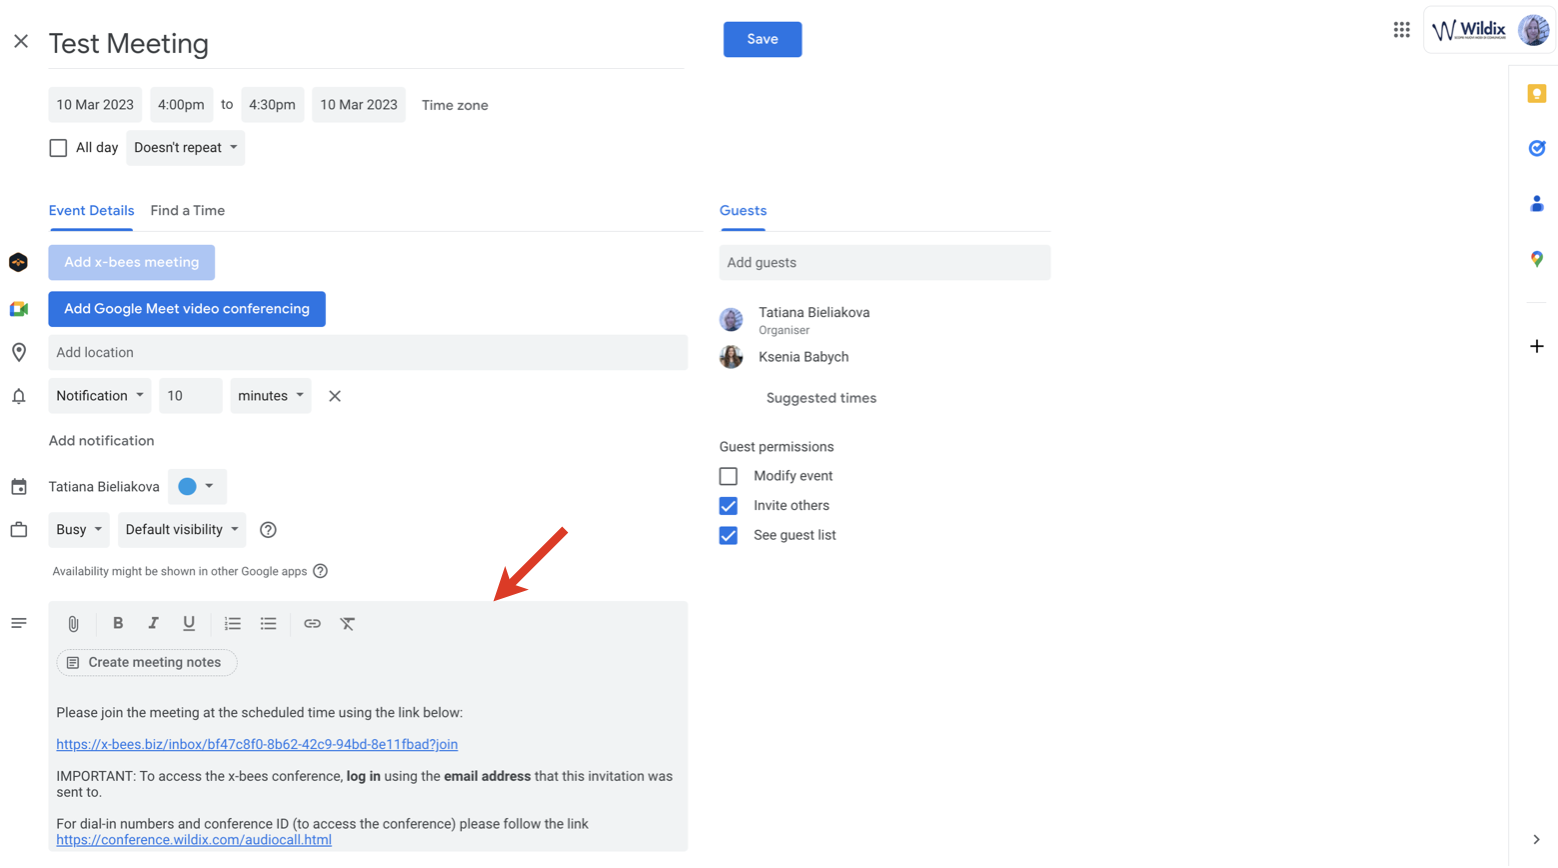
Link to x-bees conversation is automatically added in the event description:
Google:
Microsoft 365:
Add participants and save the event. When the event is saved, a dedicated conversation with the added participants is created in x-bees.
Participants can join a meeting in any of the following ways:
- via the link sent in an email invitation
- by clicking "Join x-bees meeting now" in the relevant calendar event
- directly in x-bees conversation
Note: If participants' emails don't match with those in x-bees, the participants are not automatically added to the conversation, but they can still join via the link.
One-on-one conversations
Important: Conversations (chats) on x-bees are not synced with Wildix Collaboration.
On x-bees you can start a one-on-one conversation (chat) with any match found in the Search field. It can be a colleague, a phonebook contact, a Salesforce/ HubSpot lead or contact, or any external person present in your conversations.
- Start typing a name or a phone number into the Search field in the upper left-hand part of the screen
Click on the match to open a conversation
Note: The ability to mute the chat/ Other actions appears only after you have exchanged the first chat.
If you need to copy any user information (e.g. extension, email), hover the mouse over the relevant field and click on the Copy icon:

If it is not a PBX user, then you need to invite this person to x-bees. They will receive the invitation via email and then they will be able to join your conversation on x-bees:

Note: From one-on-one conversations, same as from group conversations, you can start a conference or schedule it via Google or Microsoft 365.
Conversations features: reactions, quote, forward, edit, delete, tagging, file sharing
The features described below are available both in one-on-one and in group conversations.
Hover the mouse over a message to view the available options (options are described from the left to the right):
- Leave a reaction
- Quote: respond to a particular message
- Forward: forward a message to another conversation
- Copy: copy a message
- Edit: edit your message (available only for your messages)
- Delete: delete your message (available only for your messages)

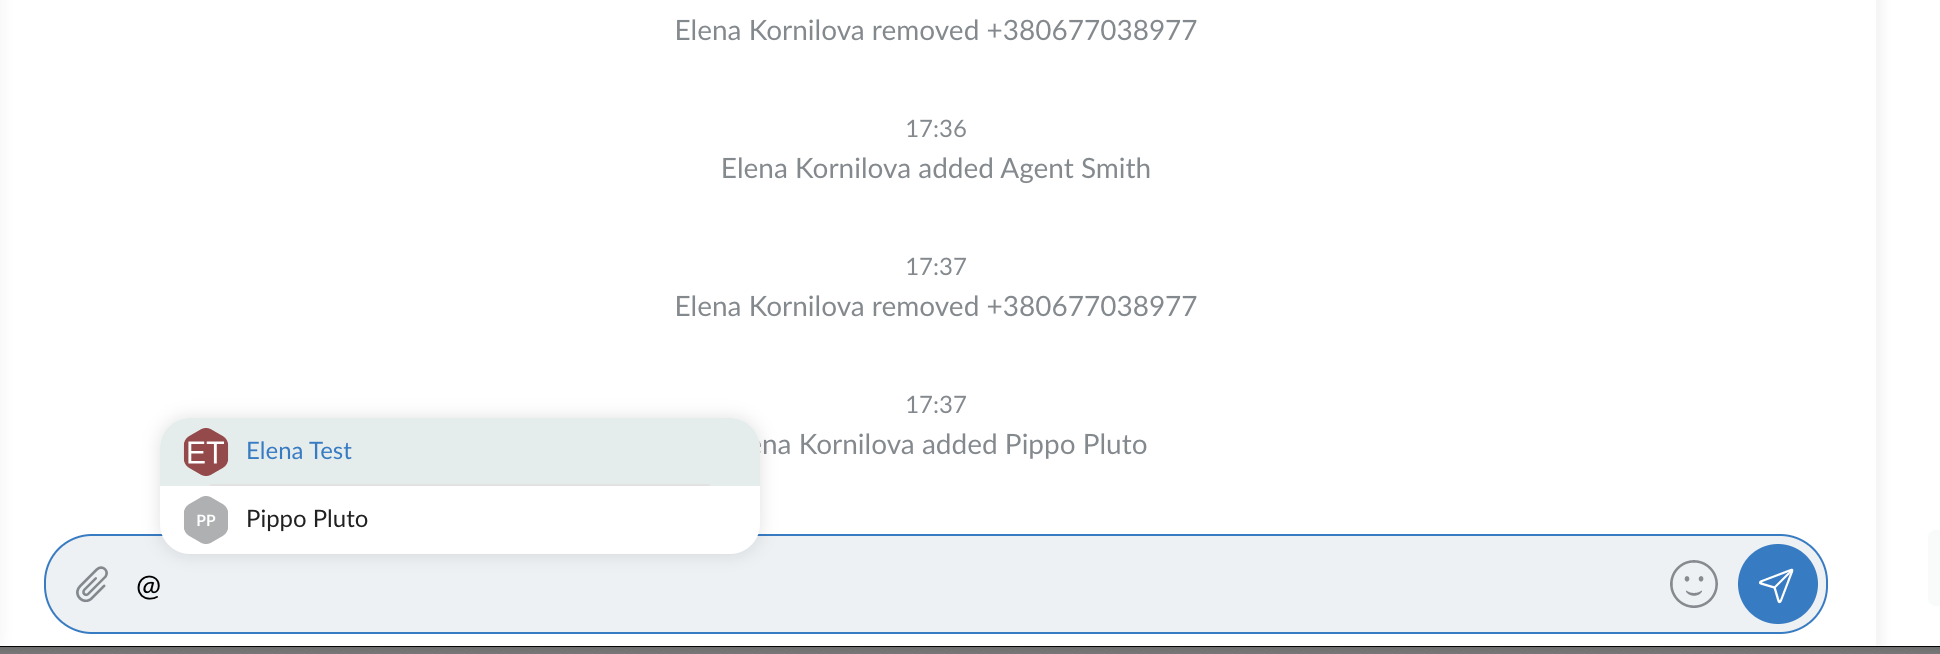
- Tag a particular participant in a conversation: type "@" and then select the participant to tag:
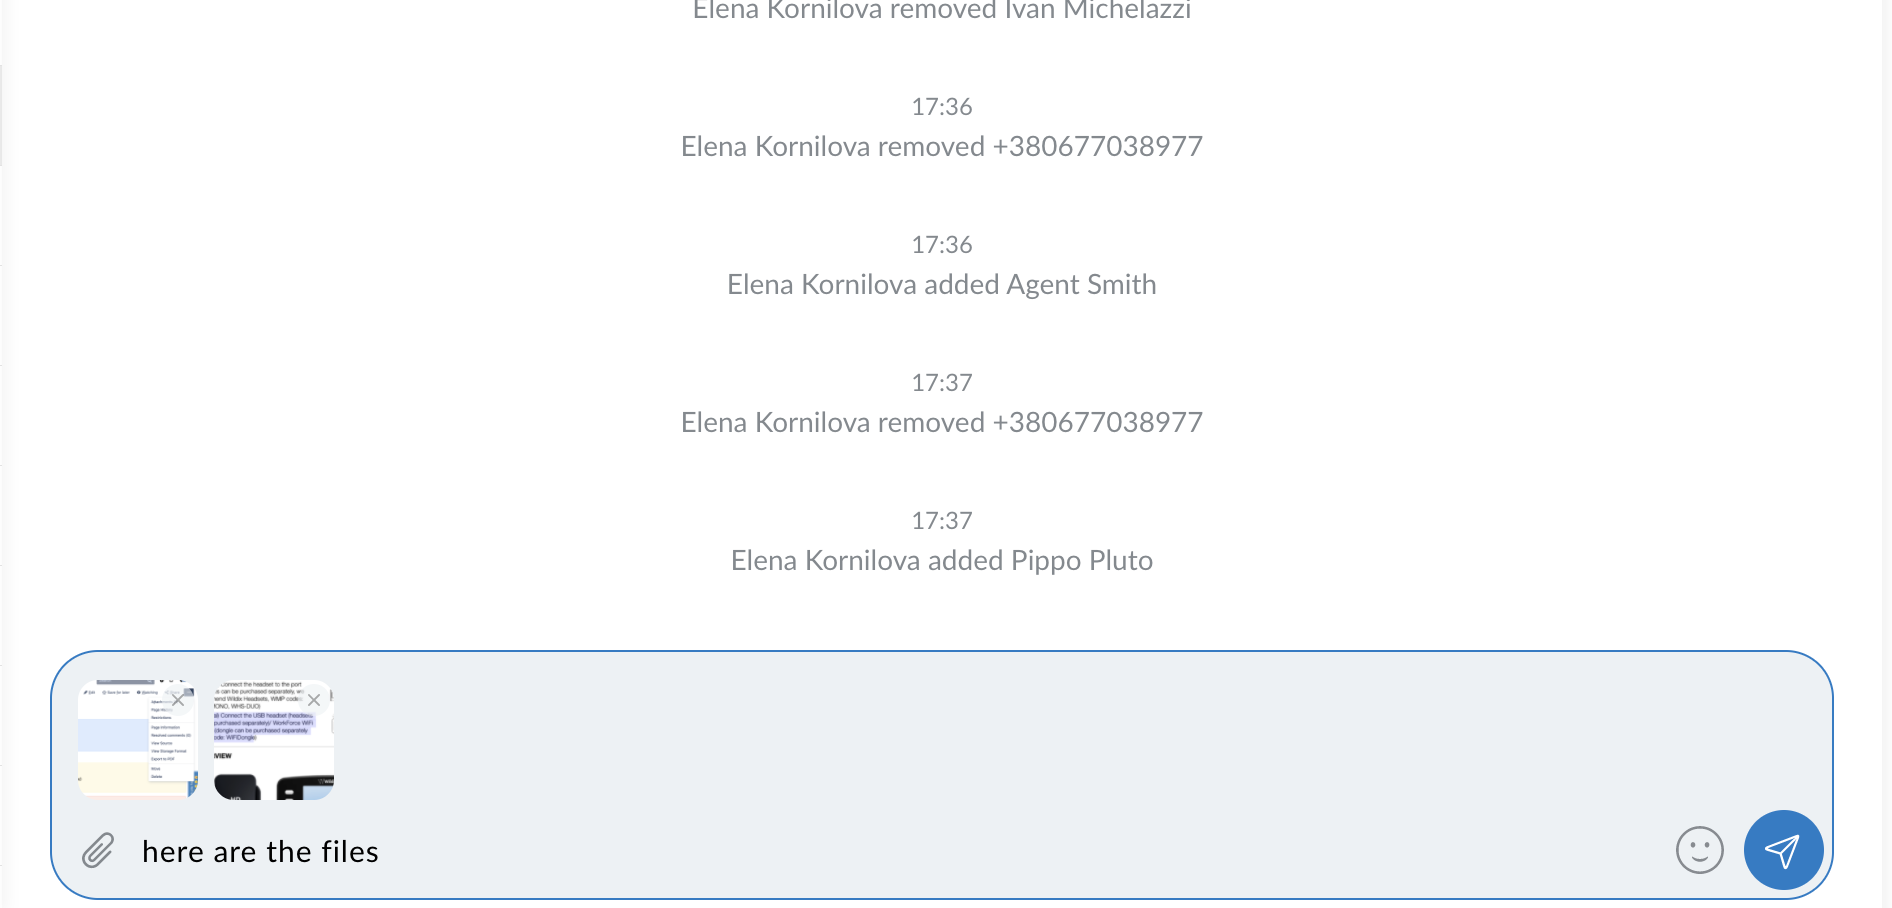
- Send one more multiple files: click on the paper clip icon from the input field or use drag and drop to add your files:
Screen sharing
From a conference:
To start screen sharing, you need to start a conference in a conversation:
- Click on the Video icon from the upper right-hand part of the screen to start a conference:

- Click on the screen sharing button inside the conference:
- From a call:
- When in a call, click on the screen sharing button:

- Audio call is automatically terminated and both participants are redirected to video conference with enabled screen sharing
Current limitation: In case a call is transferred to a device which doesn't support screen sharing (for example, WP phones, etc) the button "Screen Sharing" is not disabled. This will be fixed in further releases.
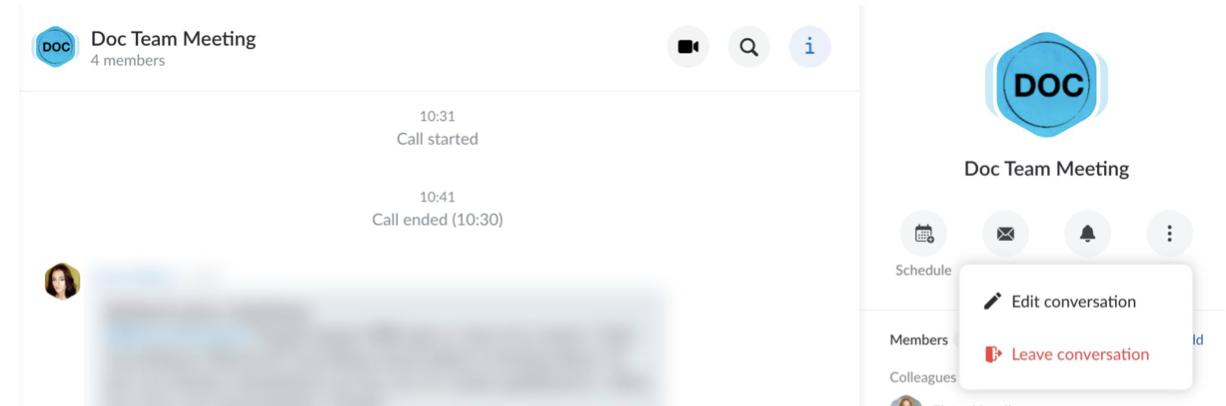
Hide or leave a conversation
- Right-click on a conversation from the list of active conversations and press Hide or Leave conversation:

- Alternatively, click on the More (three dots) button on the Conversation Info frame and click Leave conversation
Email notifications about unread messages
x-bees sends email notifications about unread messages so that you don't miss anything out. The emails include the name of conversations (maximum 5 latest conversations) and the number of unread messages, as well as “Open x-bees” button to proceed to the app.
Maximum 3 email notifications are sent per day:
- 1st email is sent within 10 seconds after receiving the message;
- the 2nd and 3rd one - with intervals of 4 hours.
During the interval, unread messages are accumulated and sent in one batch.
You can unsubscribe from emails via the unsubscribe button. System emails, e.g. with one time password, are still sent, even after unsubscribing.
Email notifications are not sent if:
- you logged in to x-bees mobile app, as you get push notifications on mobile;
- conversation is muted;
- you unsubscribed from email notifications.
For more details, check out this page on our news blog.
Calls
Active calls are synced between x-bees and Collaboration.
Important: in case you are using both x-bees and Collaboration at the same time, the logic is the following:
- The app (x-bees or Collaboration) that was last open, is the active one to receive incoming calls
- If you manually use another app to make or accept a call, then this app becomes the active one
- If you close the active app, then another tab becomes the active one
This means, if you want to change the active app (x-bees or Collaboration), then refresh the web page with that app.
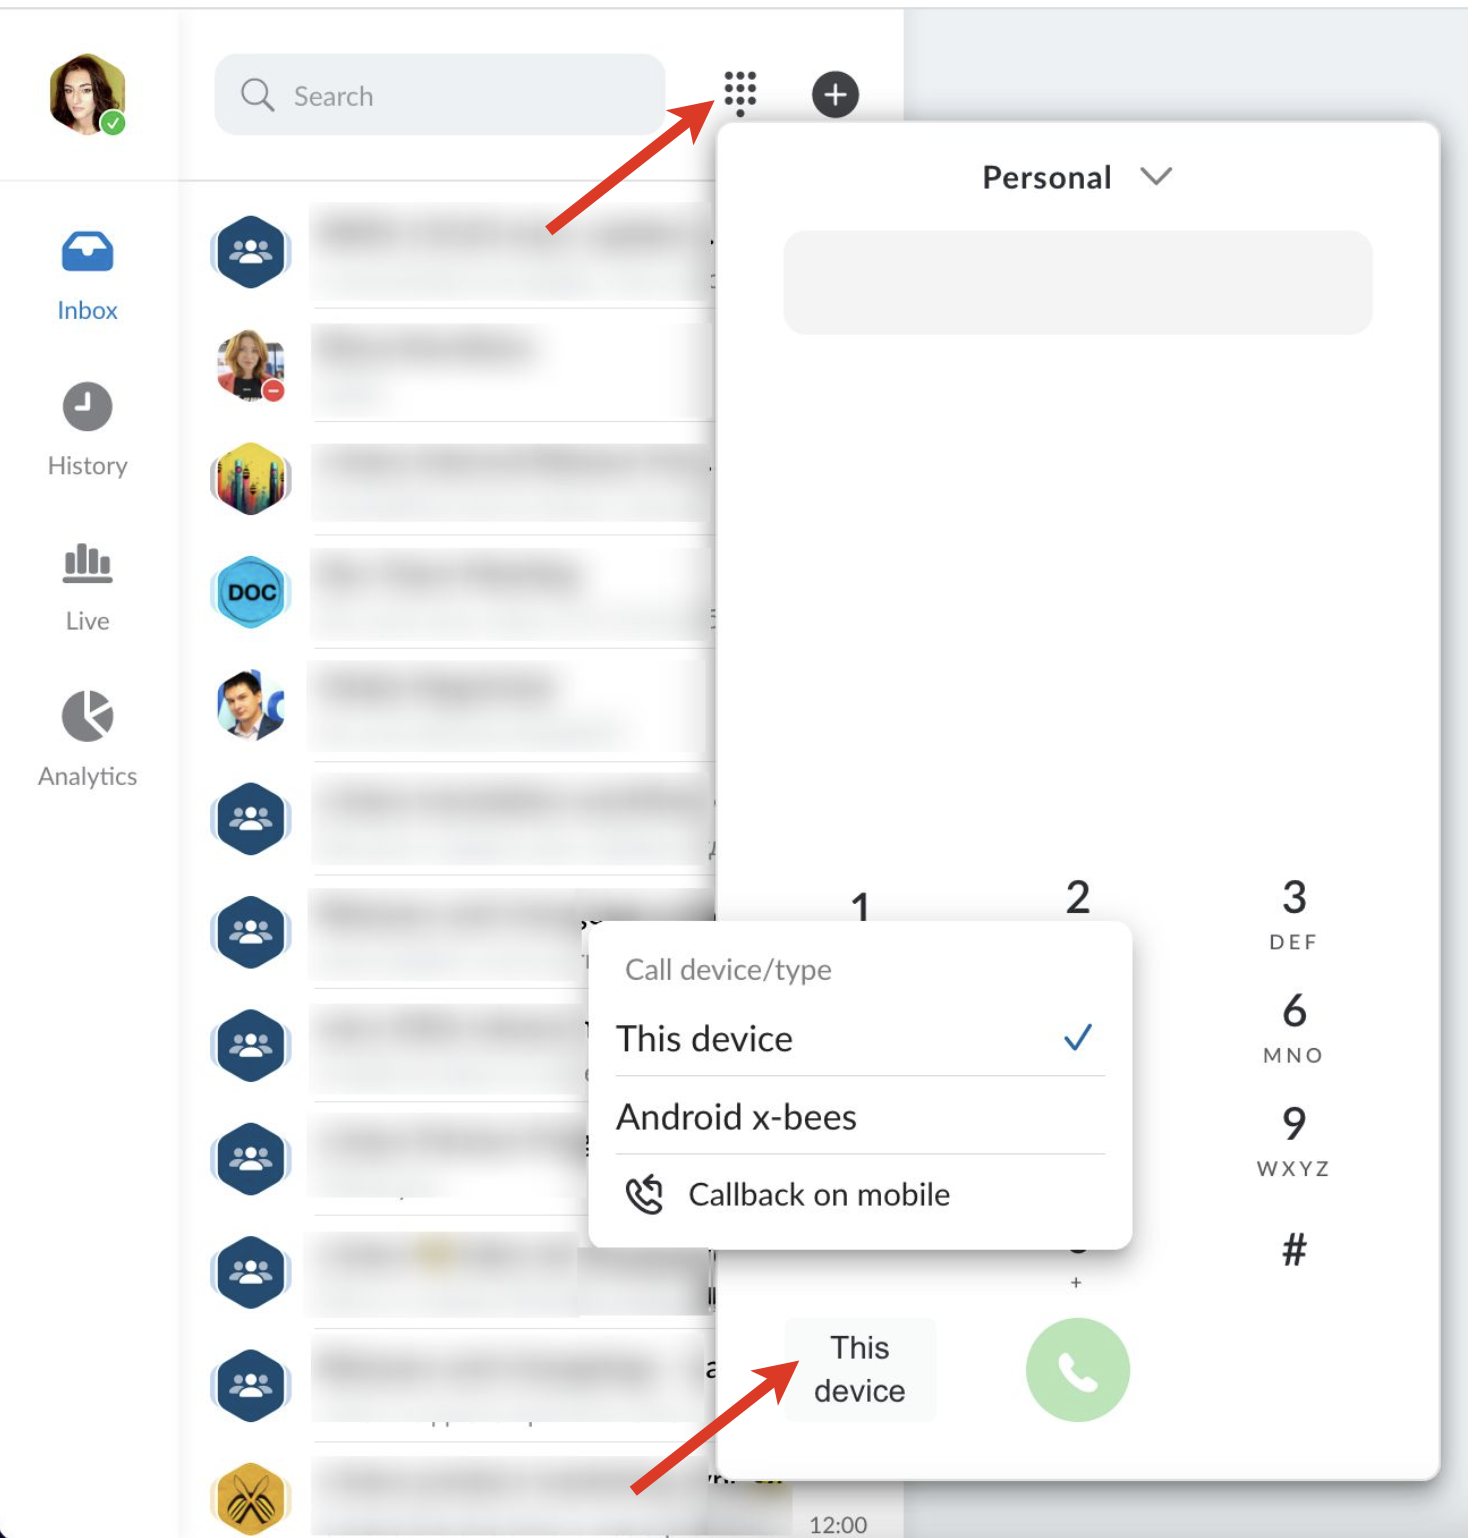
Select an active device for calls
You can make and receive calls directly from Collaboration or control other devices registered to your account, including hardware phones (WP, W-AIR), W-AIR Headsets, smartphone apps (iOS / Android) and mobility extension (mobile phone). The first available device is displayed to a user upon the first login.
To select the active device for making and receiving calls:
- Click the Dialpad icon from the top menu
- To the left of the green Call button, click This device
- Select the preferred option from the list (e.g. Android x-bees, iOS x-bees, etc.)
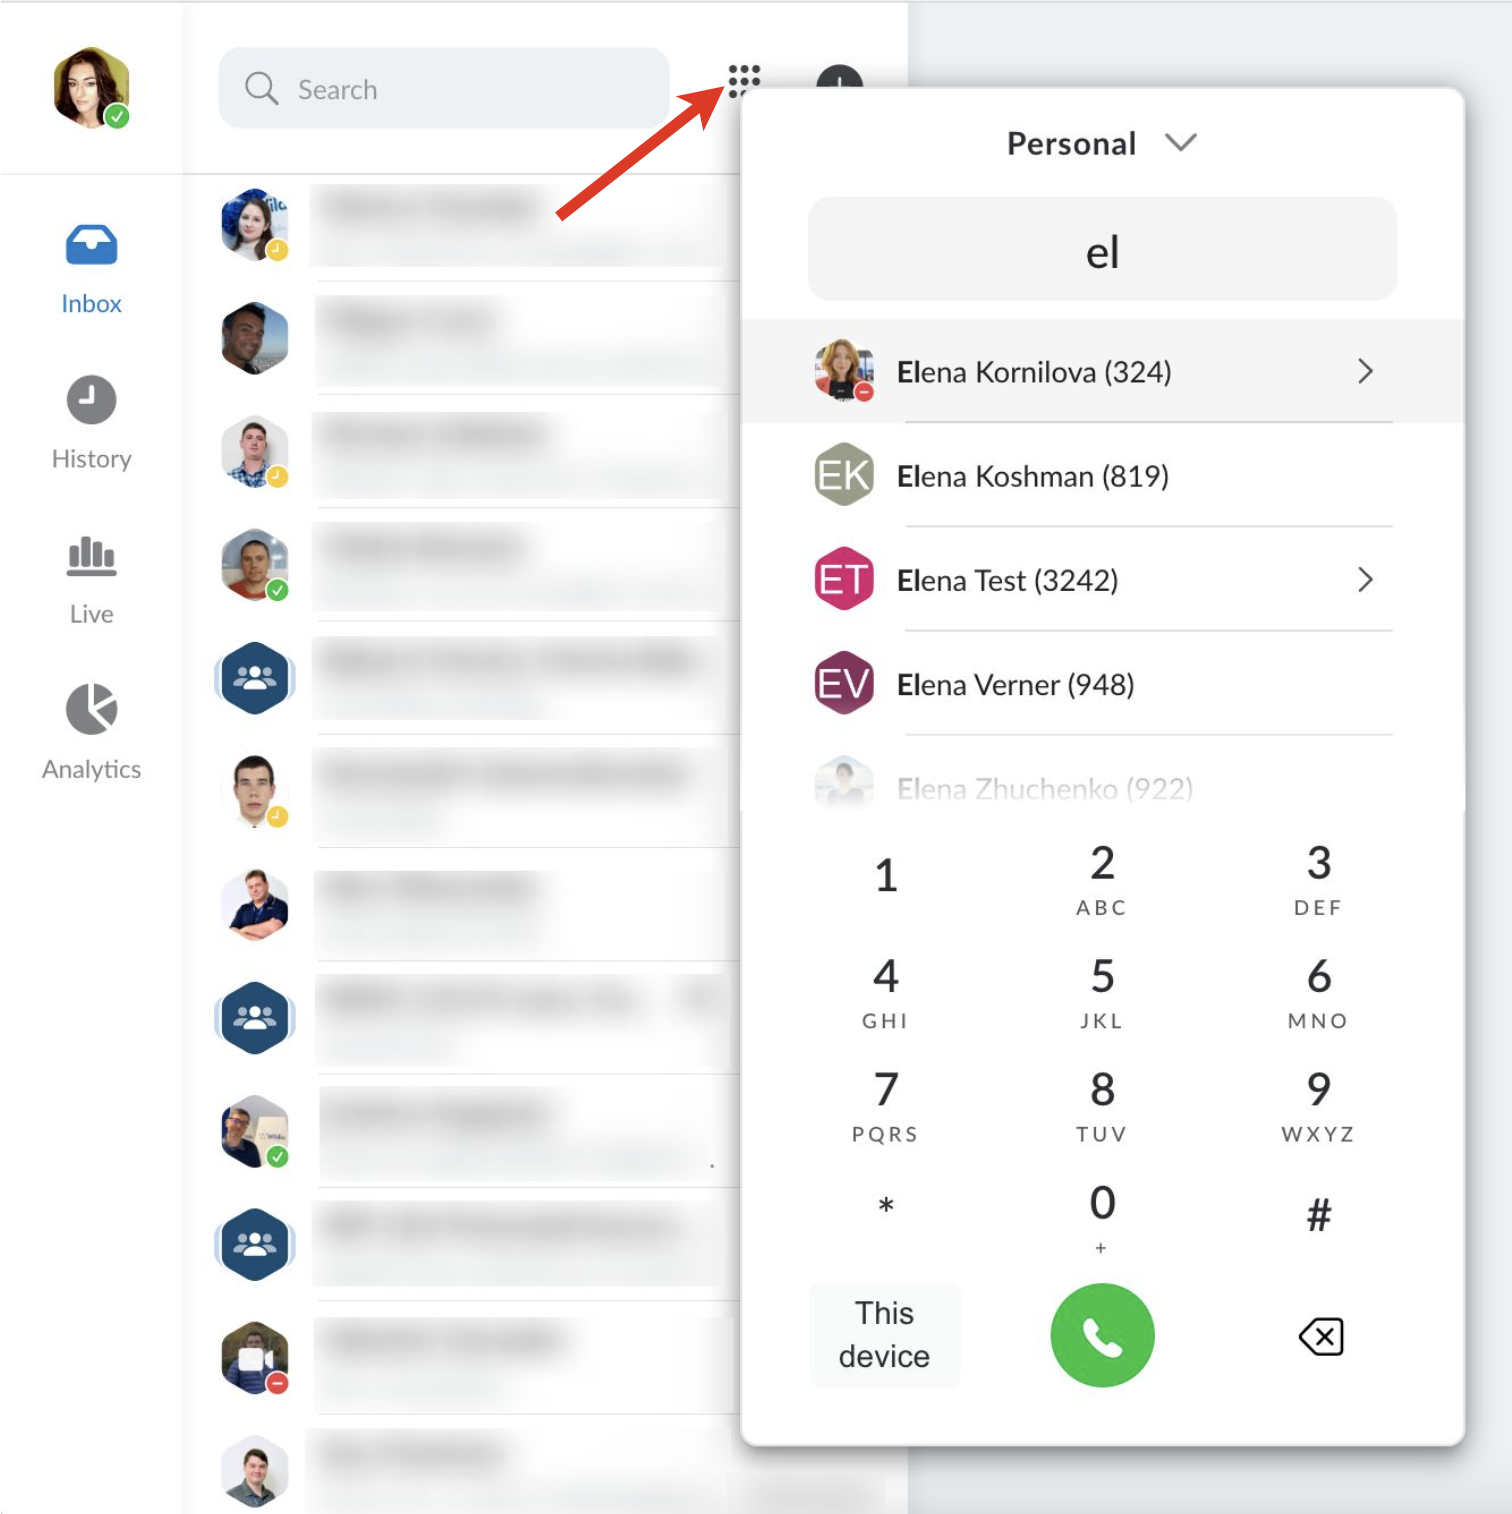
Start a call from Dialpad
You can start an internal or an external call from the Dialpad:
- Click the Dialpad icon from the top menu
- Type a name of a user, a phonebook contact, a Salesforce/ HubSpot lead or contact, or just enter a phone number into the field
- In case a contact has more than one number, click on the arrow next to the match, to view the available options
- Click on the green Call icon from the Dialpad to start a call
Selecting Caller ID for outbound calls
If you need to make an external call, but don’t want to show your office phone number, you can select the phone number of the relevant service (e.g. tech support, sales, accounting, etc.) before placing a call:
- Open the Dialpad
- Click on the drop-down list at the top
Select the service (Call group) and make a call

The call is performed using CID for outbound calls of the selected Call group (By default, the option “Personal” is displayed)
Note: To set up Caller IDs, go to WMS -> Dialplan -> Call groups -> select a group -> click Edit strategy and specify CID for outbound calls.
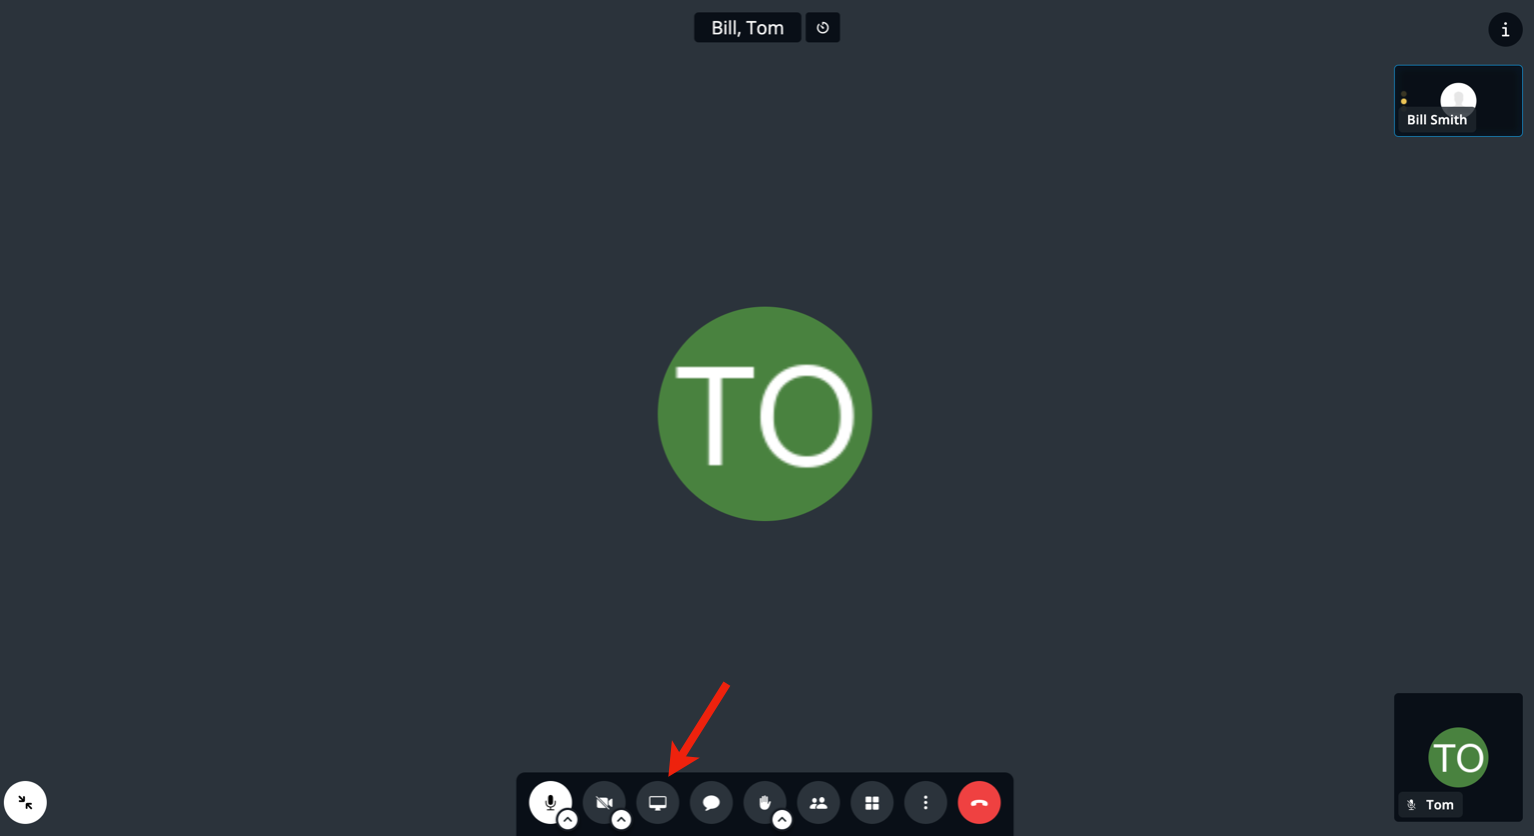
Call from Conversation
The Call option is only available in one-on-one conversations with other PBX users:
- Click on the Handset icon from the upper right-hand part of the conversation
![]()
Note: Currently there's no option to select an active device, calls are started via the x-bees interface.
Important: To have a full set of features (including video), it is recommended to start a call using the Video icon!
Choosing between the call option and video conference
If you need telephony features, such as:
- Transfer a call
- Put a call on hold
- Send DTMF
Then opt for the SIP call option. You can start a call from the Dialpad or from one-on-one conversations with colleagues.
If you need screen sharing, opt for the Video conference option from one-on-one or group conversations.
Manage calls
Note: Call recording is currently available only via the Feature code (*1 by default).
In case you have more than one active call, you can see them all from Active conversations and switch between them.
Switch active device: all active calls can be seen and managed both from the web version and from the mobile app. If you started a call on the mobile app, you can continue it on the web version of x-bees (and vice-versa):
From the Active call screen, the following options are available:
- Send DMTF
- Start/ stop video
- Mute/ unmute
- Hold/ resume
- End a call
- Transfer a call: click on three dots from the right-hand part of the call screen

- Add more participants to a SIP call

Note, that this option allows you to merge SIP calls into a conference call:
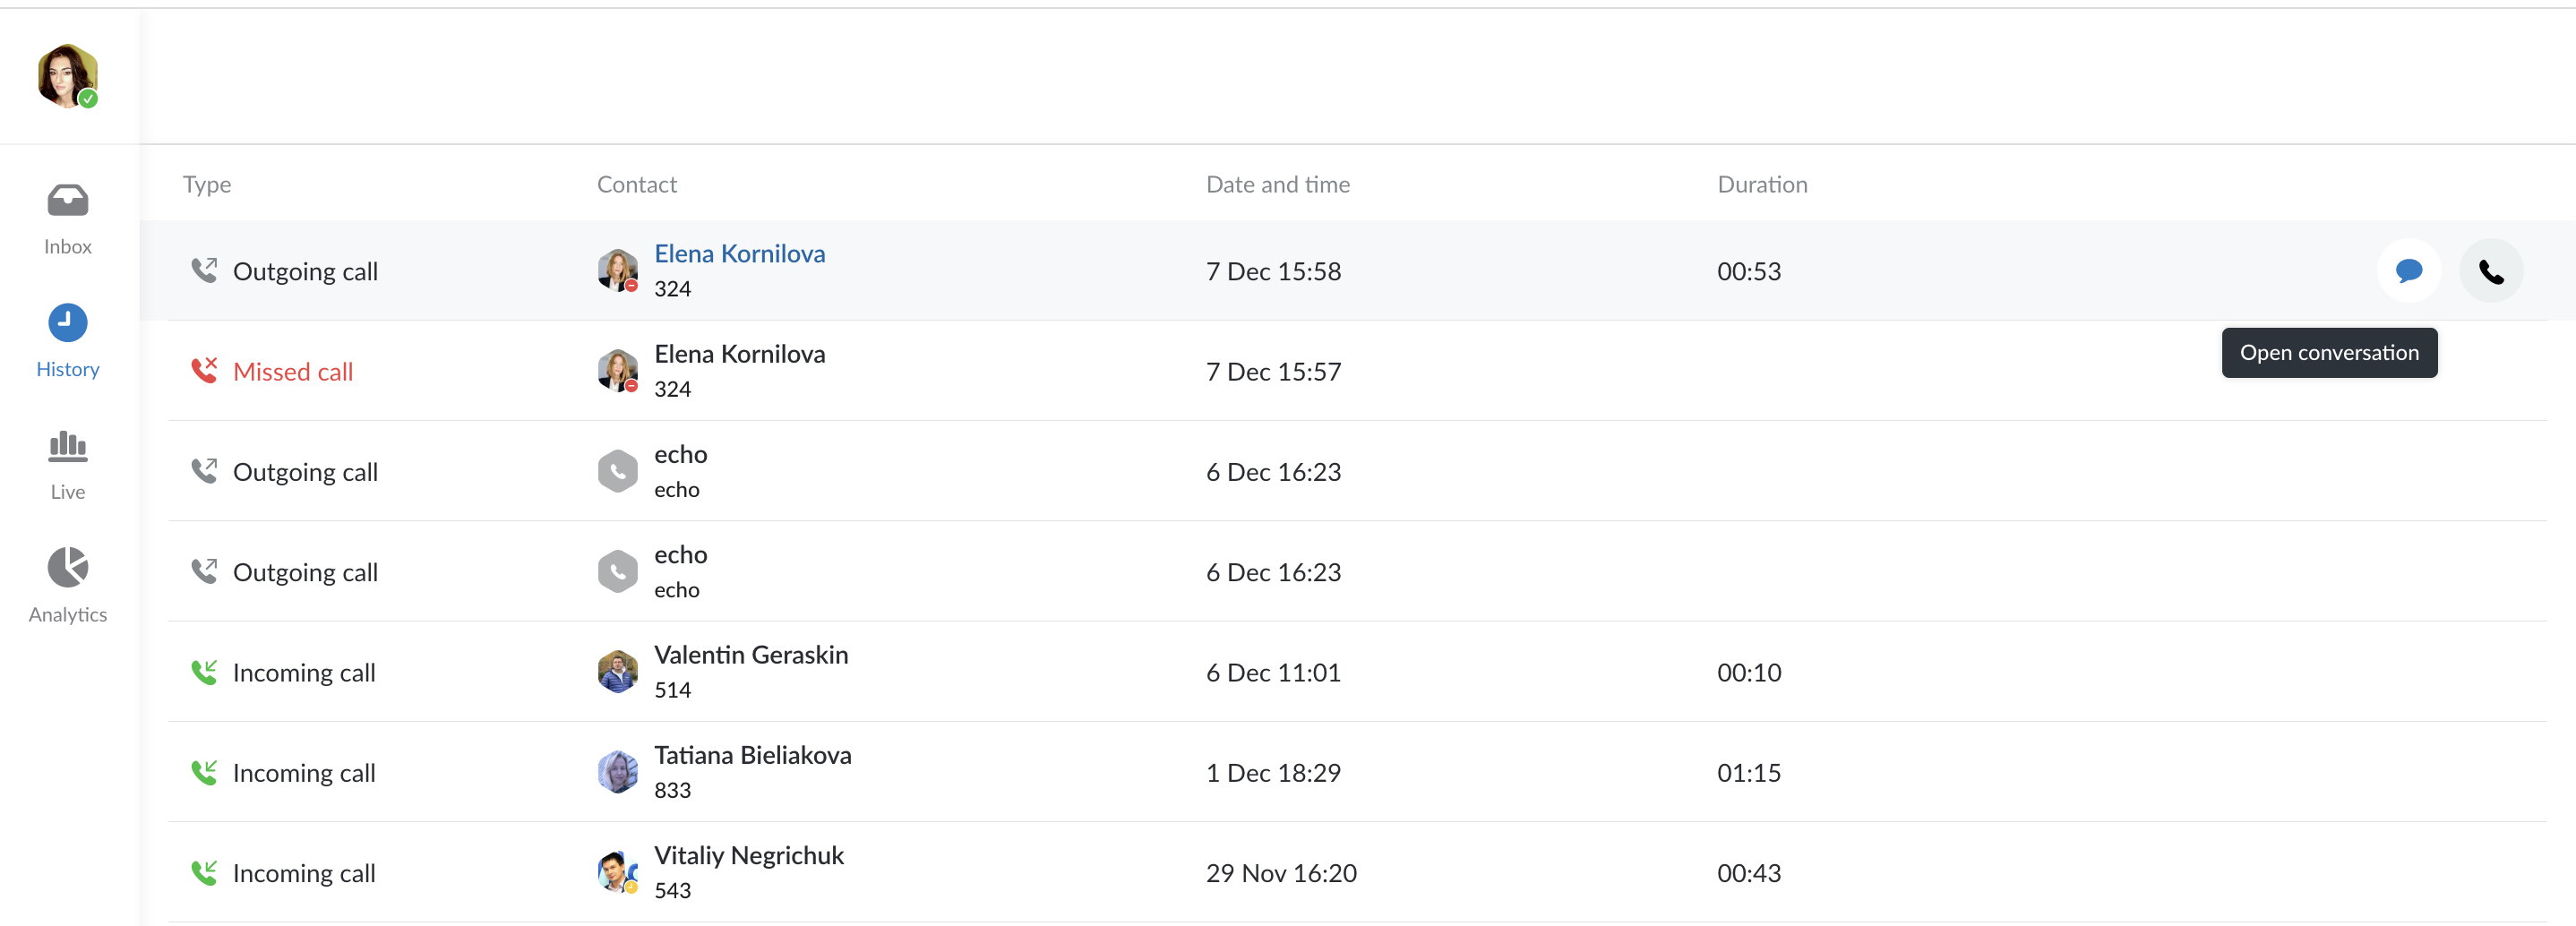
History
Notes:
- Call history on x-bees is synced with Collaboration
- Call recordings are currently not available in Call history. You receive a copy of call recordings via email
- Currently there's no ability to filter events in Call history
Hovering a mouse over an entry, you can open a conversation or call back a contact. Clicking on the user, you are automatically directed to a conversation with this contact:
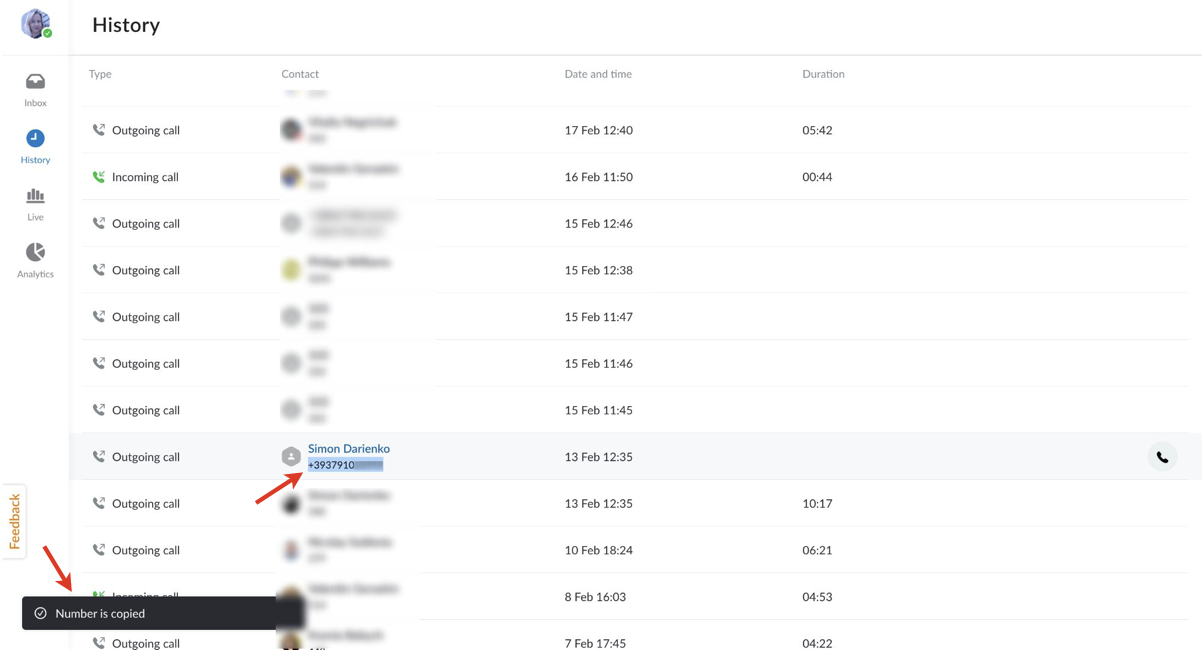
If you double-click on a number, the number is automatically copied to clipboard:
Live dashboard
Note: Live dashboard is available for users with x-bees-SuperBee license.
Live dashboard allows you to view all active conversations on the PBX, including calls and conferences. Here, you can see status and duration of the conversation:

Hovering a mouse over name of a user, you can see a tooltip which includes user email and extension. Clicking on the user, you are automatically directed to a conversation with this user:
Note: This option is currently available for 1-on-1 calls only.
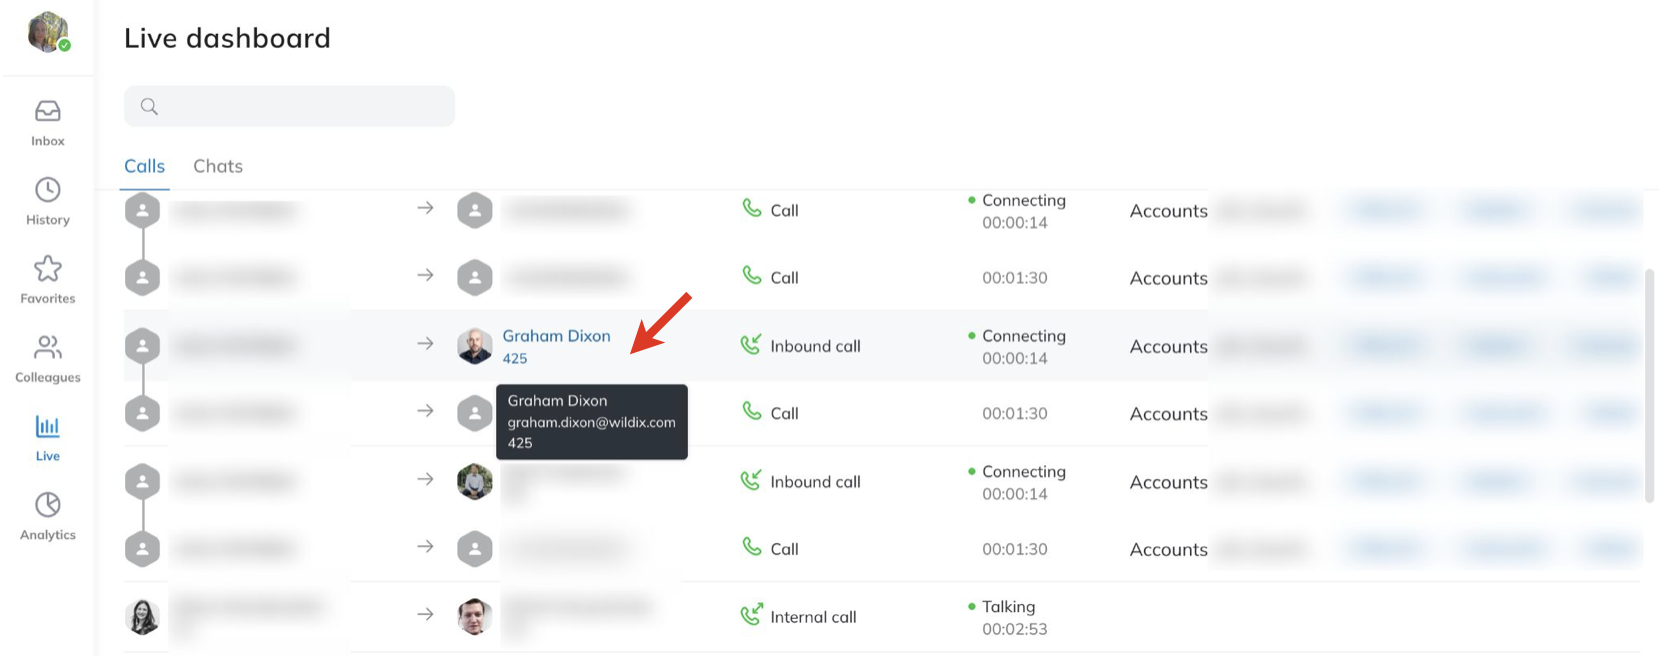
If a lead or contact has a match in Salesforce/ HubSpot, there is a relevant icon added and a company name, if available:
![]()
Conferences with at least one match in Salesforce/ HubSpot integration are also marked with logo of the relevant CRM integration.
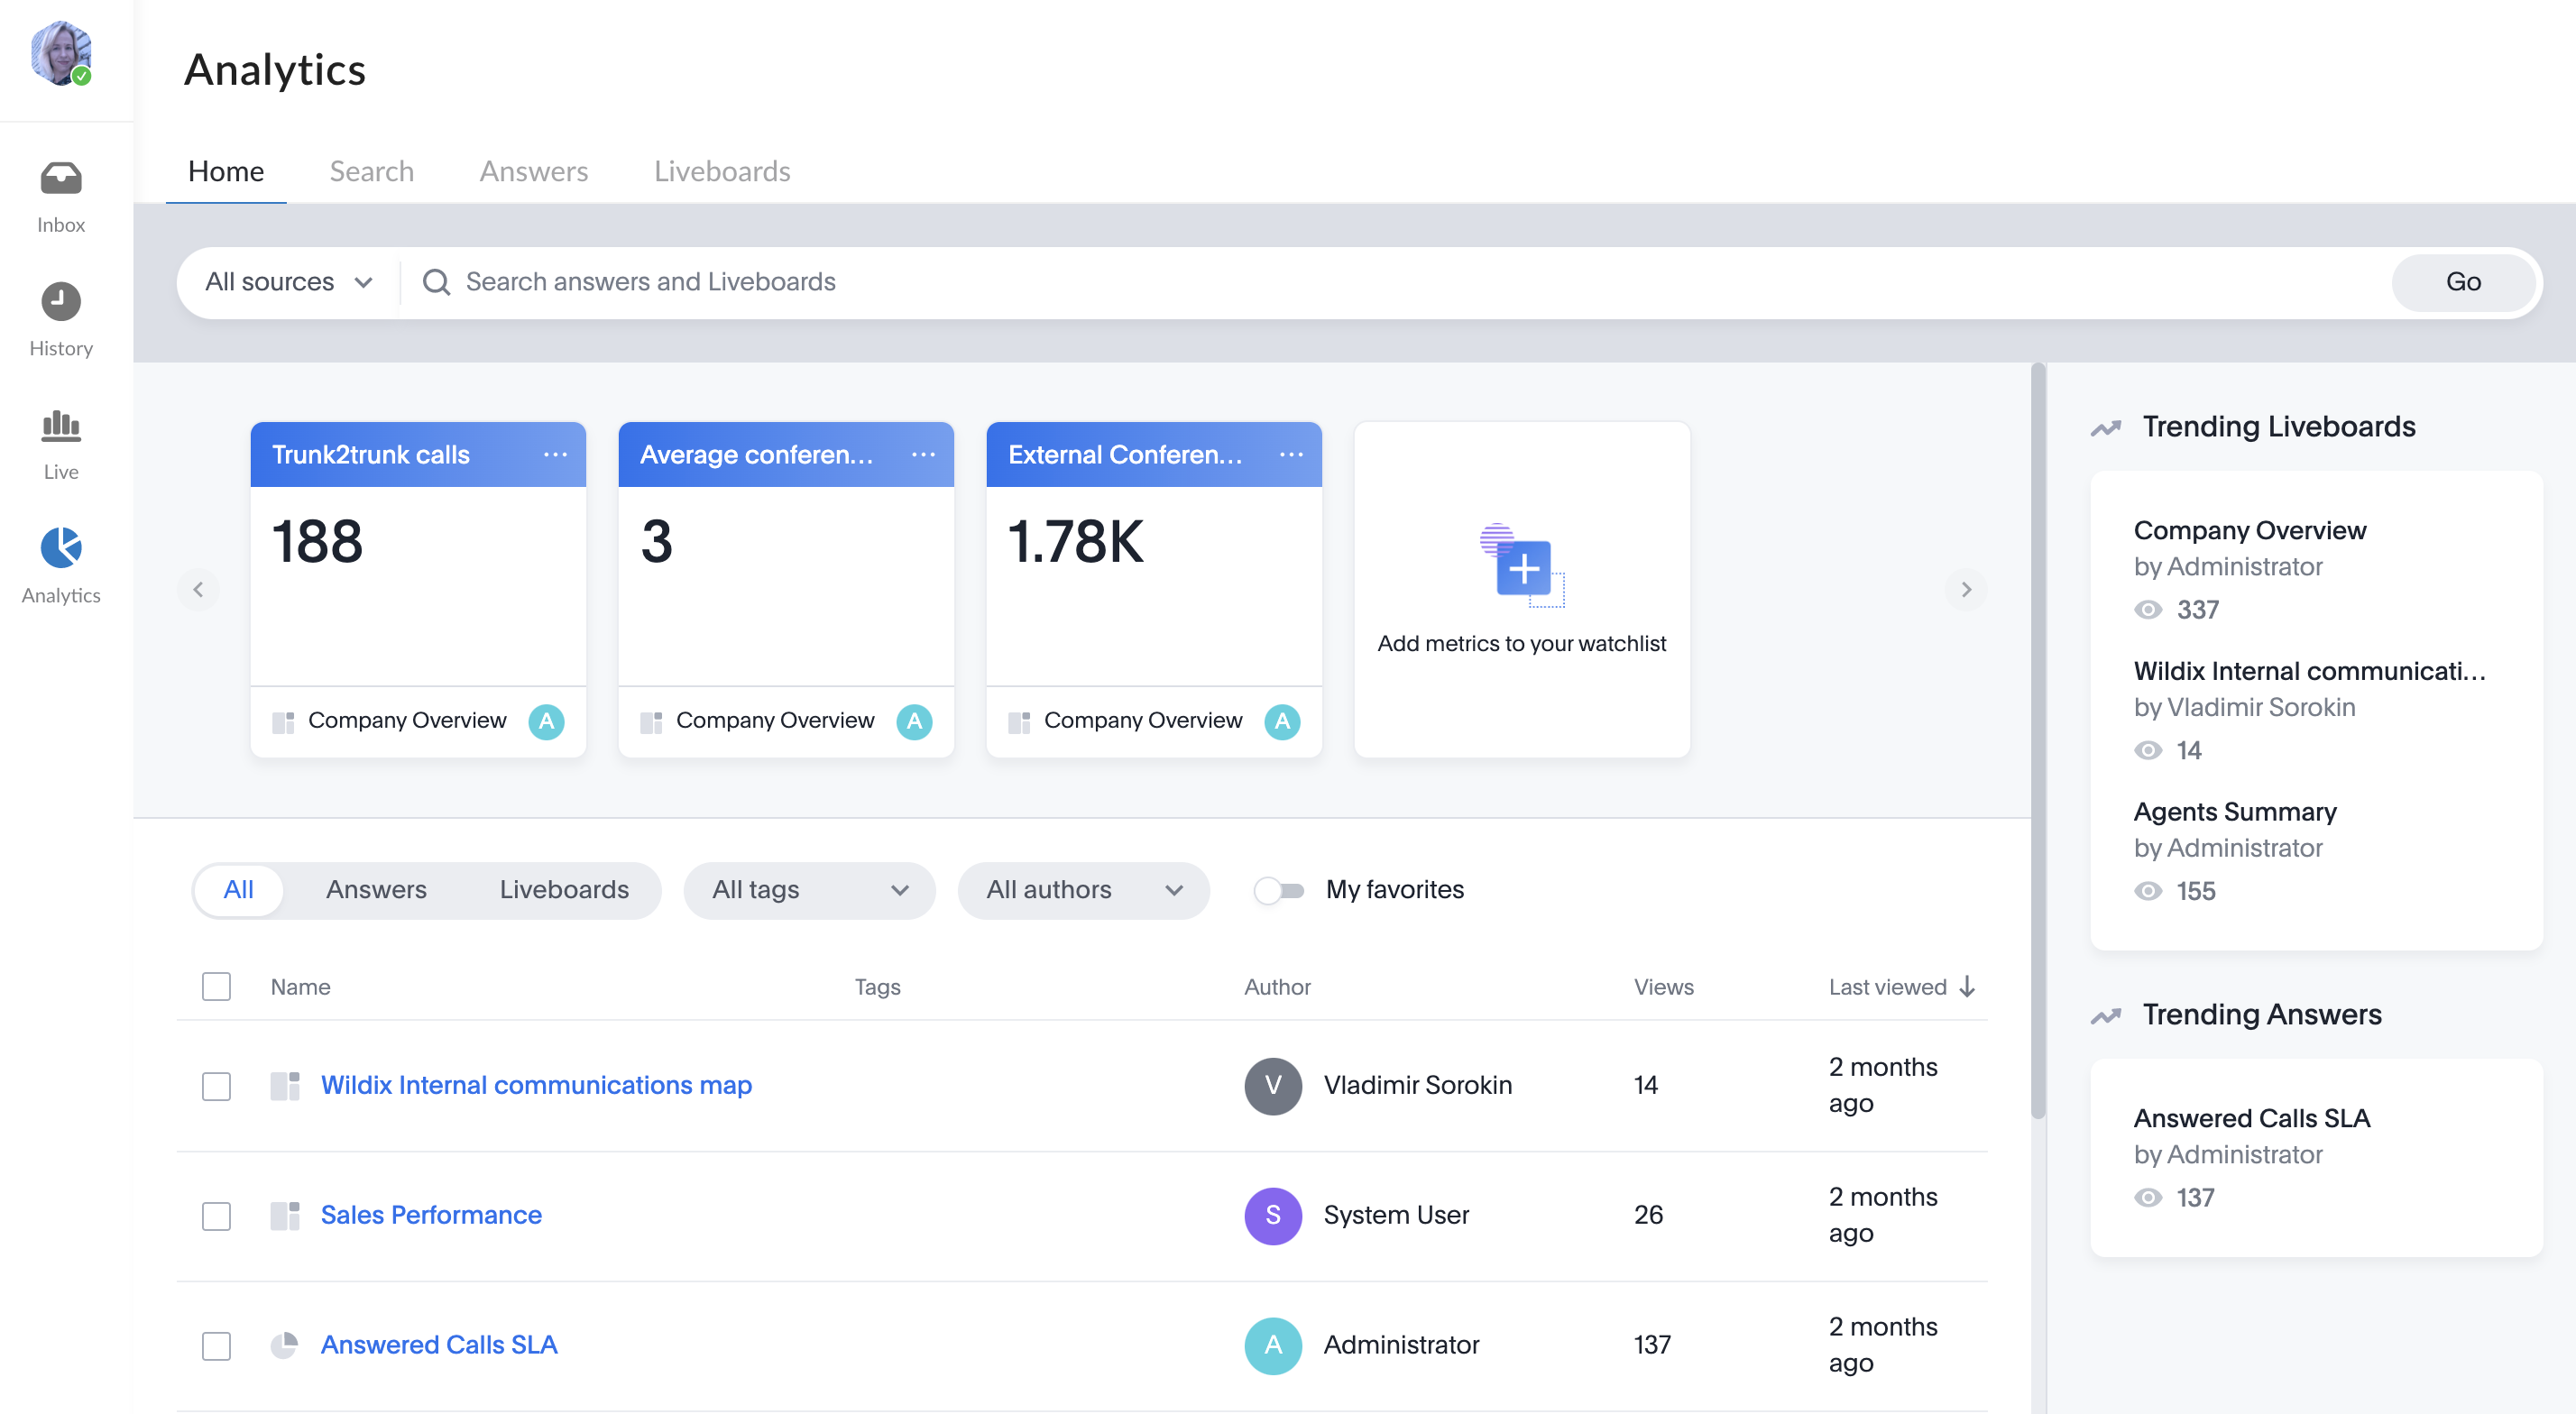
Analytics
x-bees Analytics is an advanced analytics tool which lets to monitor any data you need in a highly customizable manner.
See more in documentation: x-bees Analytics.
x-bees Chrome extension
Link to access the extension: https://chrome.google.com/webstore/detail/x-bees/olejekejjhgimnlliplaiodgmbpcflhi.
Features:
- Quick access to x-bees from Chrome toolbar: click the x-bees icon to instantly open browser tab with x-bees running
click2call functionality: right-click on a phone number on a web page, choose x-bees and select Call
Creating conversation: right-click on an email address from a web page, choose x-bees and click Create conversation
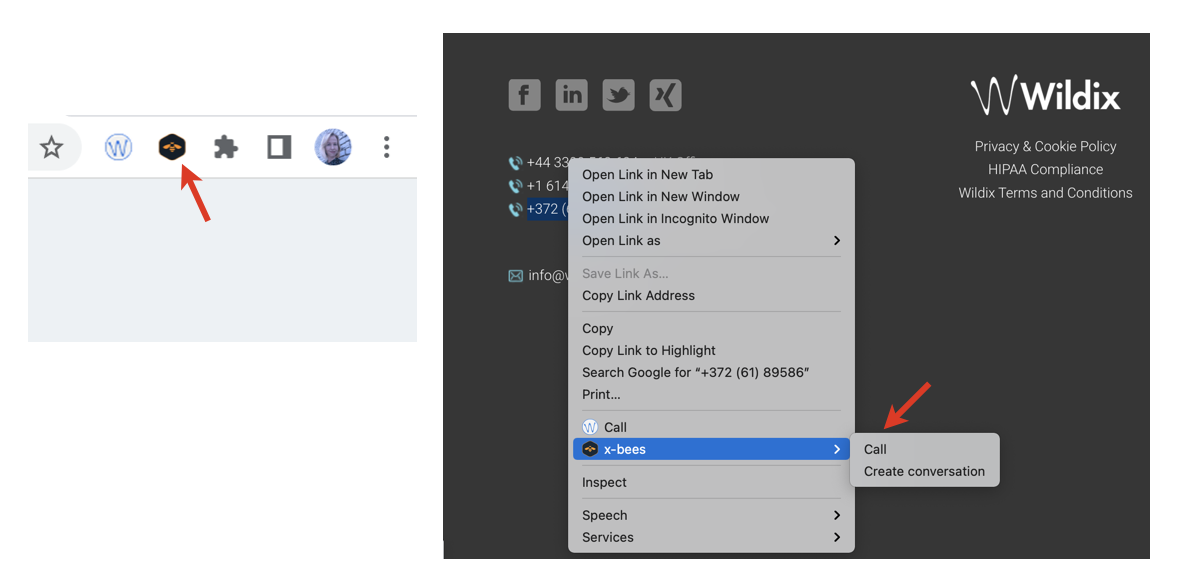
Note: In case you installed the extension manually, you need to remove it and reinstall it from the store to avoid issues with further auto-updates.