...
...
...
| Html |
|---|
<div id="fb-root"></div>
<script>(function(d, s, id) {
  var js, fjs = d.getElementsByTagName(s)[0];
  if (d.getElementById(id)) return;
  js = d.createElement(s); js.id = id;
  js.src = 'https://connect.facebook.net/en_US/sdk.js#xfbml=1&version=v2.11';
  fjs.parentNode.insertBefore(js, fjs);
}(document, 'script', 'facebook-jssdk'));</script> |
| Html |
|---|
<div class="fb-like" data-href="https://confluence.wildix.com/x/Ygo8AQ" data-layout="button_count" data-action="recommend" data-size="large" data-show-faces="true" data-share="true"></div> |
| Html |
|---|
 <div class="lang-box-pdf">
	<div>
		<div class="google-lang">
			<div id="google_translate_element">
			</div>
			<script type="text/javascript">
					function googleTranslateElementInit() {
						new google.translate.TranslateElement({pageLanguage: 'en', includedLanguages: 'de,es,fr,it,nl', autoDisplay: false}, 'google_translate_element');
						}
			</script>
			<script type="text/javascript" src="//translate.google.com/translate_a/element.js?cb=googleTranslateElementInit"></script>
		</div>

		<div class="pdf-button">
			<a href="https://confluence.wildix.com/spaces/flyingpdf/pdfpageexport.action?pageId=20712034" alt="Convert to .pdf" title="Convert to .pdf"><img src="https://confluence.wildix.com/download/attachments/14549012/pdf-button-download-wildix-documentation.png"></a>
		</div>
	</div>
</div> |
...
| Scroll export button | ||||||||
|---|---|---|---|---|---|---|---|---|
|
| Info |
|---|
In this Quick Start Guide you can find information on how to connect WHS headsets (WHS-MONO, WHS-DUO, WHS-BT), WP490EXT Mono/ DuoLED, DuoLED Bluetooth, WelcomeConsole-EXT – keypad extension module for WelcomeConsole/ WP490 2015/ WP490G, WiFi Dongle, WPEHS – Wireless Headset Adapter for WelcomeConsole/ WP490 2015/ WP490/ WP480G. Useful links:
Updated: May 2024 Permalink: https://confluencewildix.wildixatlassian.comnet/wiki/x/Ygo8AQFx-OAQ |
| Table of Contents |
|---|
WHS – Wildix Headsets
- WHS-MONO (one ear)
- WHS-DUO (two ears)
- WHS-BT (bluetooth, one ear)
Third party headsets integrated with Wildix phones: https://confluence.wildix.com/x/DASIAQWildix Compatible Headsets - Jabra, Plantronics, EPOS Sennheiser, JPL, Axtel, Orosound.
WHS-MONO / WHS-DUO
Packing list:
- 1 x headset WHS-MONO/ WHS-DUO
- 1 x RJ9 cable
- 1 x 3.5 mm cable
- 1 pair x foam ear pads
Compatibility
- WP4X0 2015/ WP4X0G/ WelcomeConsole/ Start pre 2024/ WorkForce pre 2024/ WelcomeConsole pre 2024
- WP600A/ ACG/ Vision/ SuperVision
- WP old series
- W-AIR Basic (ex W-AIR 70EOL)/ W-AIR 100 (End Of LifeEOL)/ W-AIR LifeSaver (ex W-AIR 150)/ W-AIR Med/ W-AIR Office
- Compatible with iPhone and Android phones
- Compatible with Apple Mac and Windows PC
Connection
- Use RJ9 cable for WP4X0/ WP4X0G/ Start/ Workforce/ WelcomeConsole and WP old series
- Use 3,5 mm cable for WP600A/ACG, Vision/ SuperVision, W-AIR Basic (ex W-AIR 70) / W-AIR 100 (End Of LifeEOL)/ W-AIR LifeSaver (ex W-AIR 150)/ W-AIR Med/ W-AIR Office
- Use USB cord for call answer / hangup and volume control from Collaboration (Apple Mac and Windows PC) and WelcomeConsole
WHS-BT
Compatibility
- WP600A/ WP600ACG, Vision/ SuperVision
- W-AIR LifeSave (ex W-AIR 150)/ W-AIR Med/ W-AIR Office
- Compatible with iPhone, Android phones, Apple Mac and many Windows PC models
Features
- Bluetooth version: V4.0
- Noise canceling
- Wideband Audio
- Monaural (One Ear)
- Flex, 360°
- Talk time: 12 hours
- Standby Time: 200 hours
- Working range: up to 20 meters
- Rechargeable time 3 hours
- Ergonomic design and adjustable headband for maximum comfort
- Light weight
- Answer / hangup / volume control on WP600AXX/ Vision/ SuperVision/ W-AIR LifeSaver (ex W-AIR 150)/ iOS app
- it works on Android app, only if “Native call support beta” feature is enabled; it works only on “pure” Android devices from Google
- it works on Collaboration on Mac OS / Windows only with USB dongle from Jabra / Plantronics / Sennheiser (e.g. Jabra 360 Link)
Packing list
...
Quick Start Guide
Description of buttons:
Charging
Use the USB cable provided to charge the headset:
...
Turn on
Proceed as follows:
...
Turn off
...
Connection to WP600A/ACG, Vision, SuperVision
Make sure the headset is switched on, then proceed as follows:
Press and hold the receiver button
 , until the blue LED starts flashing
- Go to the Wildix WP phone’s Settings menu -> Wireless & Networks > Bluetooth and move the switch to the position ON
- Select WHS-BT from the list of AVAILABLE DEVICES
When connected, the headset’s blue and green LEDs turn on for several seconds and a voice prompt says "Connected".
Connection to W-AIR LifeSaver
Make sure the headset is switched on:
- Press and hold the receiver button
 , until the blue LED starts flashing
 - Go to the Wildix W-AIR 150 handset’s Settings menu -> Bluetooth and select "Enable Bluetooth"
- Select Search for devices
- Select Wildix WHS-BT headset (the chipset number is shown) from the list of available bluetooth devices and select Pair
- Enter the PIN: 0000
When connected, the headset’s blue and green LEDs turn on for several seconds and a voice prompt says "Connected".
Answer / End a call
Proceed as follows:
- To answer or to end a call, press the receiver button on the headset
- The blue and green LEDs flash twice
- During the conversation the LED is off
WP490EXT – Extension module
Compatibility
- WP490 2015/ WP490G/ WelcomeConsole, iPhone and Android phones, Apple Mac and Windows PC
MonoLED, DuoLED Anchor ledheadset ledheadset
| ledheadset | |
| ledheadset |
| Note |
|---|
Note: It is required to install WIService (Collaboration -> Settings -> Extensions) to use the headset. Consult Collaboration Guide for details. |
Packing list
1 x MonoLED/ DuoLED headset
1 x table stand
1 x portable case
1 x spare ear pads
1 x USB Type-A adapter
Compatibility:
- WorkForce 5
- ForcePro 5
- WelcomeConsole 5
- WorkForce pre 2024 (full LEDs support starts from firmware v. 65.145.2.7)
- WelcomeConsole pre 2024 (full LEDs support starts from firmware v. 68.145.2.28)
- Vision, SuperVision
- Apple Mac, Windows PC
Features
- USB Type-C plug
- USB adapter included
- Answer/ Hangup/ Mute/ Volume control buttons
- Status LEDs: online, away, DND, on call, ringing, call held, missed call
- Table stand included
It is possible to enable sidetone feature on Windows, consult this Article for details.
Quick Start Guide
Headset Overview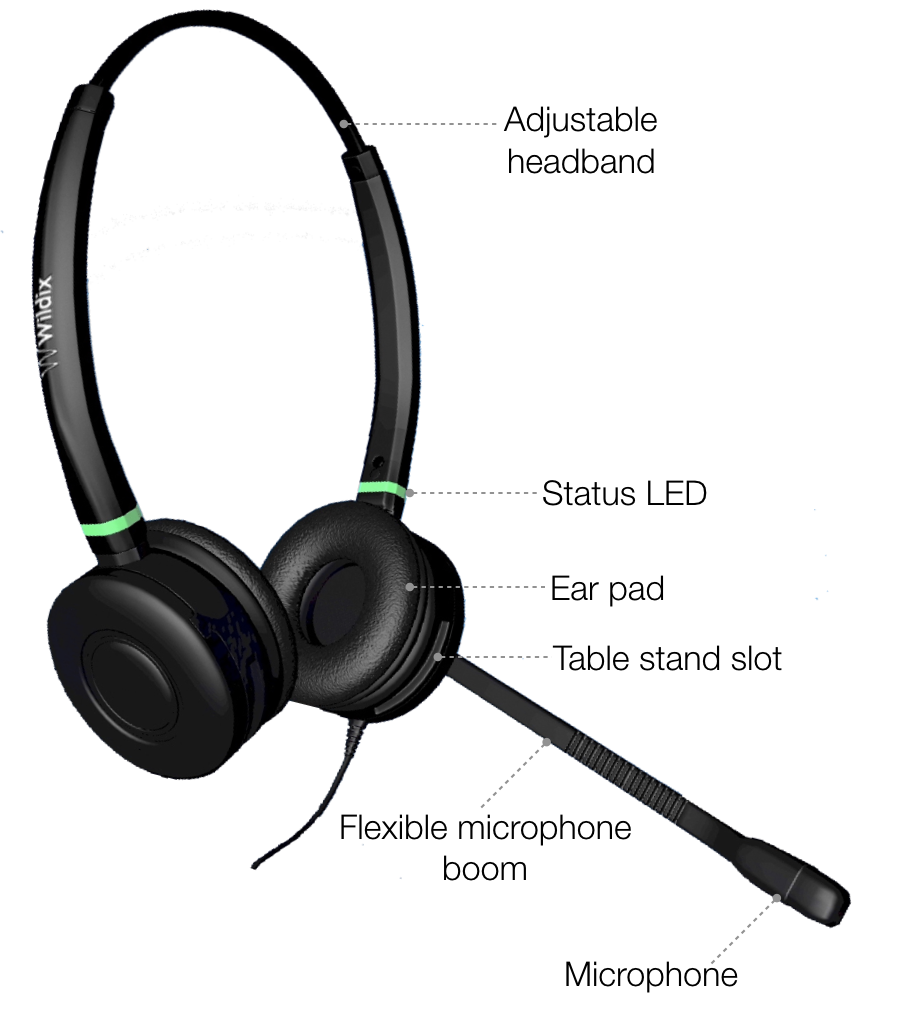
USB Connector Overview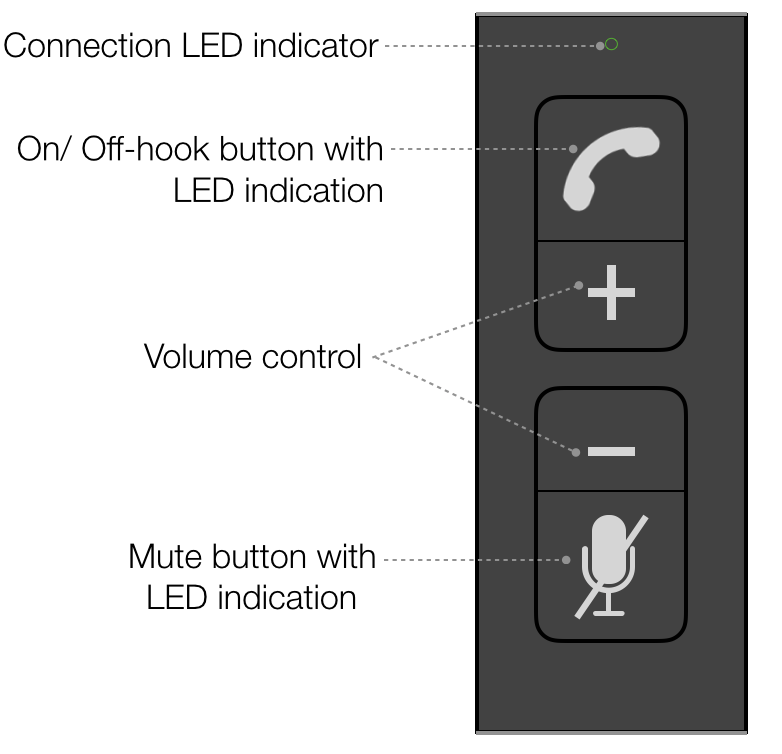 Connection
- Connect the Headset to the USB port on your phone using the USB type-A adapter
- Connect the Headset to the USB port on your PC or laptop using the USB Type-C plug
- Set “Wildix Mono/DuoLED” as audio device in Collaboration -> Settings -> Web phone

LED Indicators
Headset:
| Status | LED indication | Color |
|---|---|---|
Available | Steady on | Green |
Away | Orange | |
DND | Violet | |
Incoming call | Fast short blinks | Red |
Outgoing call/ In call | Long blinks | |
Hold | Two fast blinks, repeated | Status color + red |
Missed call | Long blinks followed by fast short blink |
USB Connector LED indication:
- Connection LED indicator: steady green when connected
- On/ Off-hook LED indication:
- Incoming call - fast red blinking
- Outgoing call/ In call - steady red
- Mute LED indication: steady red when muted
Answer/ end a call
- Press Off-hook button to answer/ end a call.
Adjust volume during a call/ ringer volume
Press Volume+/ Volume- Control during a call to adjust the volume/ from idle to adjust the ringer volume.
Note Note: it is possible to increase the volume level by +10 dB by upgrading the Headset firmware. Consult this Guide for details.
Mute the microphone during a call
- Press Mute button during a call to mute/ unmute the microphone.
Hold/ resume a call
Press and hold the On/ Off-hook button for several seconds during a call.
Enable/ disable DND status
- In idle state, press and hold the On/ Off-hook button for several seconds to enable/ disable DND (Do not disturb) status.
After disabling DND, the previous status of the user is set.
MonoLED-BT/ DuoLED-BT
| Warning |
|---|
IMPORTANT NOTE ABOUT CHARGING! Place the Headset on charge as shown in the following picture to avoid damaging the unit:
Warning! Placing the Headset in the other direction can lead to severe damage if the USB port output is higher than 1500 mA. |

| Note |
|---|
Notes:
|
Packing list
- 1 x MonoLED-BT/ DuoLED-BT Headset
- 1 x Base Station
- 1 x USB Type-C to Type-C cable
- 1 x USB Type-A to Type-C adapter
- 1 x portable case
Compatibility
The Headset supports dual (multipoint) wireless connection, which means it can be connected to two devices simultaneously:
- Via Base Station. Such connection provides full support of LED user and call statuses and compatible with:
- Apple Mac, Windows PC
- WorkForce 5
- ForcePro 5
- WelcomeConsole 5
- WorkForce pre 2024
WelcomeConsole pre 2024
Vision/ SuperVision (starting from v.3.07.51)
Warning Limitation on Vision/ SuperVision: To change volume on MonoLED-BT/ DuoLED-BT, use volume buttons on Vision/ SuperVision.
- Via Bluetooth module embedded in the Headset itself.
- Vision, SuperVision
- W-AIR LifeSaver
- W-AIR Med
- W-AIR Office
Android, iOS apps
Warning Limitation: Connection via embedded Bluetooth module doesn't provide:
- LED user statuses support, only call statuses
- Call control (it works only if connected via Base Station)
Features
- Status LEDs: online, away, DND/conference, on call, ringing, call hold, missed call
- Answer/ Hangup/ Mute/ Volume control buttons
- Wideband audio frequency
- Ultra noise canceling mic
- Up to 30m wireless range
- Talking time up to 15 hours
- High-performance 6th generation CVC technology
Quick Start Guide
Headset Overview

Base Station Overview

LED Indicators
Status LED
User/ call status | LED indication | Color |
Available | Steady on | Green |
Away | Yellow | |
DND/ in conference | Violet | |
Outgoing call/ In call | Red | |
Hold | Two fast blinks, repeated | Status color + red |
Missed call | Long blinks followed by fast short blink | Status color + red |
Incoming call | Fast short blinks | Red |
Headset status LED
| Headset status | LED indication | Color |
|---|---|---|
| Power on | One blink | Blue |
| Power off | Red | |
| Pairing mode | Fast short blinks | Blue |
| Pairing successfully | Long blinks | Blue |
| Answer a call | ||
| Charging | Steady on | Red |
| Fully Charged | Blue |
Base Station pairing LED
- Successful connection - long blue blinks
- Pairing - fast blue and red blinks
Power On/ Power Off
- Press Multi-function button for 3 seconds to turn the Headset on/ off
Charging
- Connect USB cable to the Base Station
- Plug the cable into a device USB port (use Type-A adapter if needed)
- Place MonoLED-BT/ DuoLED-BT into the Base Station
- When charging, the Headset status LED turns red
- When charged, the Headset status LED turns blue
Battery charging time
- Less than 60 minutes to charge 20%
- Less than 90 minutes to charge 50%
- Fully charged in less than 3,5 hours
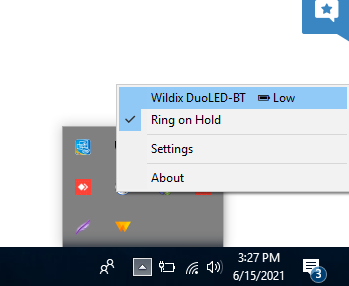
To check the battery level:
- On Windows, you can check the battery level using WIService tray. Go to Quick Launch Toolbar -> right-click on Wildix Integration Service icon and check the level of battery (Low, Medium, High):
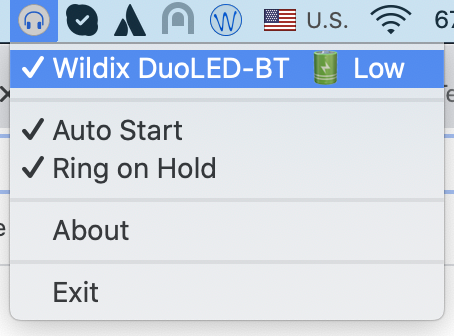
- On macOS, Go to Menu Bar -> click on WIService icon check the level of battery (Low, Medium, High):
Connection
Via the Base Station:
- Connect USB cable to the Base Station
- Plug the cable into a device USB port (use Type-A to Type-C adapter if needed)
- Turn the Headset on
- The Headset Status LED starts blinking and the voice prompt announces “Your Headset is connected”
- For Collaboration, set “Wildix MonoLED-BT”/ “Wildix DuoLED-BT” as audio device in Collaboration -> Settings -> Web phone

| Note |
|---|
The Headset and the Base Station are paired by default. If you accidentally unpair them, proceed with the following steps to pair them back:
|
Via Bluetooth embedded in the Headset:
- Unplug the Base Station and turn the Headset off
- Activate Bluetooth on a device you want to connect the Headset to
- Press and hold the Multi-function button for 3 seconds until you hear “Power on”. Keep pressing for 3 seconds more until you hear “Pairing”
Search for MonoLED-BT/ DuoLED-BT in Bluetooth devices list on your device and select it for pairing, for example, on Android device:
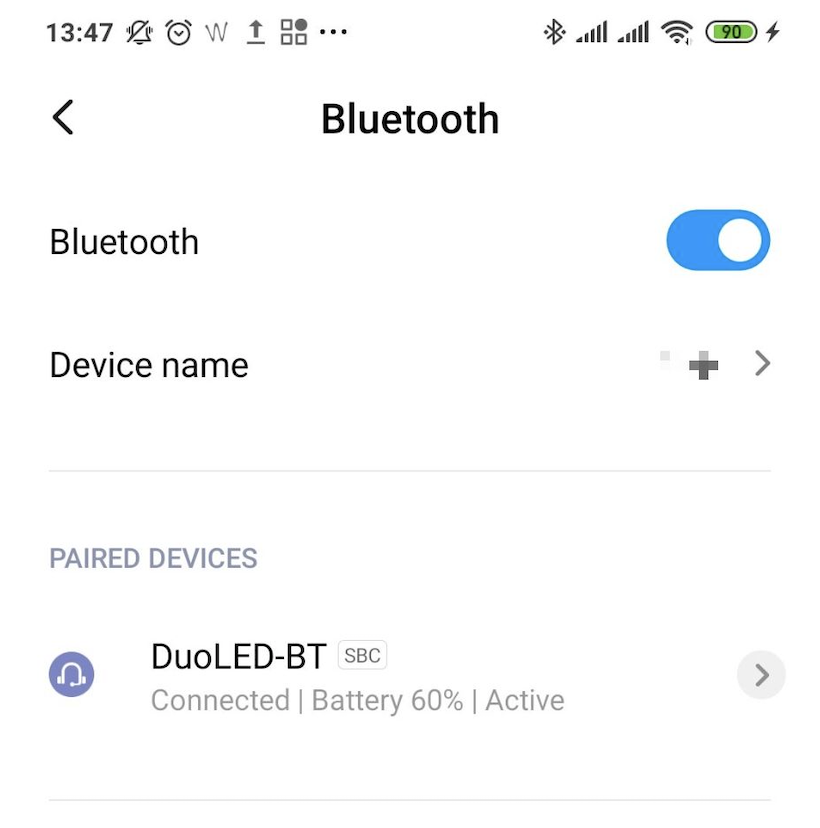
- The Headset Status LED starts blinking and the voice prompt announces “Your Headset is connected”
Answer/ End a call
- Press Multi-function button to answer/ end a call
Mute/ unmute a mic
- Press Mute button to mute/ unmute a mic
Put on pause/ resume a call
- Press Multi-function button for 2 seconds during a call to put a call on hold / resume
Adjust volume during a call/ ringer volume
- Press Volume Up to increase the volume
- Press Volume Down to decrease the volume
Reset the Headset
- Press and hold Mute button and then connect the Headset either to the charging cable or the Base Station
- Keep Mute button pressed for two seconds after connecting the cable
- These steps will lead to a reset of the Headset
WelcomeConsole-EXT – Extension module
Packing list
- 1 x Extension module
- 1 x RJ12 cable
Compatibility
- WP490 2015/ WP490G/ WelcomeConsole pre 2024
Features
- WP490EXT 2017: 40 Programmable BLF keys, 4.3” 272*480 COLOR Display
- WP490EXT pre 2017: 20 Programmable BLF keys; 4.3” 272*480 Graphical LCD with Backlight
- Powered by Wildix phone
- Up to 3 Modules Daisy-chain
Packing list
- 1 x Extension module
- 1 x RJ12 cable
Port description
- 2 RJ12 ports for data in and out
- AC Power Adapter jack: Input: AC 100-240V; Output: DC 5V/1A
Quick Installation Guide
Connection
Connect the EXT IN port of the extension module to the EXT port of the Wildix phone using RJ12 cable.
To connect another WP490EXT WelcomeConsole-EXT in chain, connect the EXT OUT port of the first extension module to the EXT IN port of the second extension module.
...
| Note |
|---|
Note: The backlight settings of WP490EXT of WelcomeConsole-EXT extension module are synced with WP490G 2016-2017, WelcomeConsole. |
Configuration
Configure the BLF keys via Wildix Collaboration Settings -> Function keys.
After having configured the Feature / BLF keys and Memory / BLF keys20 Function keys (BLF), proceed as follows:
Click Exp module to add one or several extension modules (Add several Exp modules in case you have more than one extension modules connected in chain):

- Add Feature Keys to be monitored via the expansion module and move them under the desired section (under Exp module 1 / Exp module 2 / Exp module 3…)
- Click Save
WiFi Dongle
| Note |
|---|
Notes:
|
Packing list
1 x WorkForce WiFi Dongle
- 1 x Type-C adapter
Compatibility:
- WorkForce
- WorkForce 5 (2024)
- WelcomeConsole 5 (2024)
Features
- IEEE802.11b/g/n/a/ac Wireless standard
- WPA-PSK/WPA2-PSK; WPA/WPA2 Encryption
- 2.4GHz and 5GHz Dual band frequencies
- Wireless speed up to 600 Mbps
Quick Start Guide
WiFi Dongle Connection
- Connect WorkForce WiFi Dongle to Type-C adapter
Plug the Dongle into WorkForce USB Type-C port

| Note |
|---|
Notes:
|
Network connection
To connect WorkForce to a Wi-Fi network:
- Press Menu soft key on WorkForce
- Go to Network menu and select WLAN option
- Enable Wi-Fi connection: use Navigation keys or press Switch soft key to change Wi-Fi connection status from Disable to Enable; press Save soft key
- Searching for Wi-Fi Networks is in progress. After it is completed, there is a list of all available networks
- Select a Wi-Fi network from the list and press Connect soft key
- Enter password and press Save soft key
- WorkForce is now connected to the Wi-Fi network; the LED indicator blinks with fast short blue flashes during data transfer
WPEHS – Wireless Headset Adapter
Packing list
- 1 x EHS Adapter
- 1 x RJ45 cable
- 1 x RJ12 cable
- 1 x RJ9 spiral cord
Compatibility
- Compatible with WP480G/ WP490 2015/ WP490G/ WP480GWelcomeConsole
- Compatible with Jabra, Poly (formerly Plantronics) and Sennheiser wireless headsets
...
- Jabra: PRO 9450, GN 9350e, GN 9330e, GN 9125
- Poly (formerly Plantronics): Savi 700 Series (710, 720, 730, 740, 745), CS500 Series (510, 520, 530, 540), Voyager Legend CS
- Sennheiser: DW Office (running firmware version 96 or later), SD Office
...
- Answer and hangup calls remotely
- Powered by Wildix phone
Packing list
- 1 x EHS Adapter
- 1 x RJ45 cable
- 1 x RJ12 cable
- 1 x RJ9 spiral cord
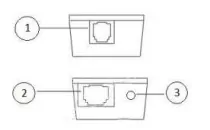
Port description
- 1 x RJ12 port (port 1 on the picture) to connect to Wildix phone
- 1 x RJ45 port (port 2 on the picture) to connect to Jabra headsets
1 x 3.5 mm Jack (port 3 on the picture) to connect to Poly (formerly Plantronics) headsets
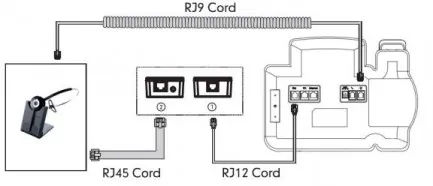
Connection
| Note |
|---|
Note: In case you connect two extension modules + 1 WPEHS, it’s necessary to connect the power adapter to the 2nd extension module. |
Jabra (GN Netcom):
Poly (formerly Plantronics):

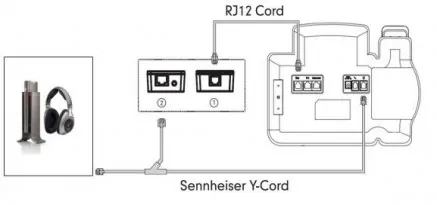
Sennheiser:
Firmware Upgrade (
...
WelcomeConsole-EXT and WPEHS)
WP490EXT
...
WelcomeConsole-EXT
Firmware update is included into provisioning and there is no need to do it manually.
WPEHS
WHEPS WPEHS firmware upgrade is performed via WP web interface.
...
- Download the firmware file from the corresponding folder (file with extension *.rom): : https://drive.google.com/open?id=0B4EVs-56WfKZOV9NMmlVdmJiQlk (file with *.rom extension)
- Access the WP web interface
- Go to the menu Phone -> Ext key, Exp upgrade, UploadKey -> Ext Upgrade -> choose the firmware file
- Click Submit
- Click Ok to confirm
...
After the upgrade is completed, the version is indicated in Firmware Version field:

| Macrosuite divider macro | ||||||||||||||||||||||||||
|---|---|---|---|---|---|---|---|---|---|---|---|---|---|---|---|---|---|---|---|---|---|---|---|---|---|---|
|
| Button macro | ||||||||||||||||||||||||||||||||||||||||
|---|---|---|---|---|---|---|---|---|---|---|---|---|---|---|---|---|---|---|---|---|---|---|---|---|---|---|---|---|---|---|---|---|---|---|---|---|---|---|---|---|
|