| Scroll export button | ||||||||
|---|---|---|---|---|---|---|---|---|
|
...
| Info |
|---|
WMS Settings Menu Guide provides the basic information on the Settings options and explains how to set up various parameters. Updated: November 2023March 2024 Permalink: https://wildix.atlassian.net/wiki/x/mBfOAQ |
...
Refer to the Hotel Integration Guide for detailed information.
Integrations
Callback URLs
Callback URLs allow opening Zoho CRM or other CRM systems upon receiving or placing a call and pass parameters (static parameters or supported variables).
Refer to How to set up web application integration via Popup URL for detailed information.
Verify certificate (optional)
You can enable the validity verification of the CRM server. Enter your credentials for basic authentication.
| Warning |
|---|
Limitations:
|
Zoho Integration
Enable integration with Zoho CRM. Refer to Zoho Products integration with Wildix PBX for detailed information.
Microsoft 365
Enable integration with Microsoft 365 including calendars and phonebooks Cloud integrations
| Note |
|---|
Note: In case of WMS version lower than 6.05.20240119.1, the tab is named Calendars. |
Enable integration with:
- Google Calendar: refer to the guide How to set up and use Google Calendar integration for more information
- Microsoft Teams Presence: for detailed information, check the guide teams4Wildix - integration of Microsoft Teams with Wildix PBX - Documentation
Webhook: refer to the document How to set up Webhook integration for more information
Zoho Integration
Enable integration with Zoho CRM. Refer to Zoho Products integration with Wildix PBX for detailed information.
Microsoft 365
Enable integration with Microsoft 365 including calendars and phonebooks sync. Consult Microsoft 365 Integration Guide for detailed instructions.
...
Enable x-caracal ACD Stats. Refer to x-caracal Guide for detailed information.
Calendars
Enable integration with:
...
Callback URLs
Callback URLs allow opening Zoho CRM or other CRM systems upon receiving or placing a call and pass parameters (static parameters or supported variables).
Refer to How to set up
...
web application integration via Popup URL for detailed information.
Verify certificate (optional)
You can enable the validity verification of the CRM server. Enter your credentials for basic authentication.
| Warning |
|---|
Limitations:
|
Features
Manage such PBX Features as:
...
Collaboration call control (available from WMS 6.03.20230630.3): enables Call control mode for Collaboration. By default, only 1 active Collaboration session is permitted. However, there is an option to allow the second Collaboration tab – in Call Control mode. This can be used, for example, for media devices when connecting via remote desktop. The option is particularly practical for teams4Wildix integration. Once the feature is activated, an additional option appears on the Collaboration login window – Call Control only.
Note Use case: User can set "Call control only" mode to be automatically enabled by adding a parameter in the URI (useful when it is needed to share the link among all employees or bookmark the page)
How-to: add ?sip=no to PBX domain name -> https://pbxname.wildixin.com/collaboration/?sip=no
- (available from WMS 6.04.20231020.2): enables location-based MFA on the PBX, which uses users' location (determined by the IP address) to confirm their identity. If the IP address appears to be from an unfamiliar location, users need to confirm the IP address via email. Read more in the documentation: Security Policy at Wildix
...
- Click + to add a new Fax/ SMS server profile
- Enter the following parameters:
- Name: enter the name (identifier)
- Protocol: select the protocol of communication with your email server (POP3 or IMAP)
Auth type: select the preferred authorization type, Basic or OAuth2 (the support of OAuth2 for Fax/SMS Server starts from WMS 6.01.20221019.4). Depending on the chosen type, fill out the following fields:
a) In case of Basic Auth type:- Server: settings of your email server to access incoming messages
User: email address of user to access to the server
Note Note: don't use here an email of a user who must send faxes via Fax2Mail service.
- Password: password to access to email address of user specified in the field above
- Use SSL: enables secure connection to the server (required by some email servers)
SSL Certificate check: allows to disable SSL certificate check, e.g. in cases when the mail server uses a self-signed certificate. The parameter is enabled by default.
Note Note: The support starts from WMS 6.03.20230630.3.
- Auth provider: choose auth provider (Google or Office 365) -> click Login and perform the login
- Dialplan procedure: select the Dialplan procedure to manage faxes sent by users
- Protection password: security password for MAIL2FAX service
- Default LOCALSTATION: sender’s fax machine ID, appears at the top of each page of outgoing fax, if not specified the default value “Fax Server” is used
- Default LOCALHEADER: fax header to identify the sender, appears at the top of each page of outgoing fax, if not specified the default value “Wildix PBX” is used
- Keep e-mails and faxes on server: enables storing of messages on the server
...
| Note |
|---|
Note: Starting from WMS 6.04.20231012.1, it is possible to enable the option to use company Cloud storage to store backups. For instructions, check out the documentation Custom config parameters List. |
To perform the backup procedure:
...
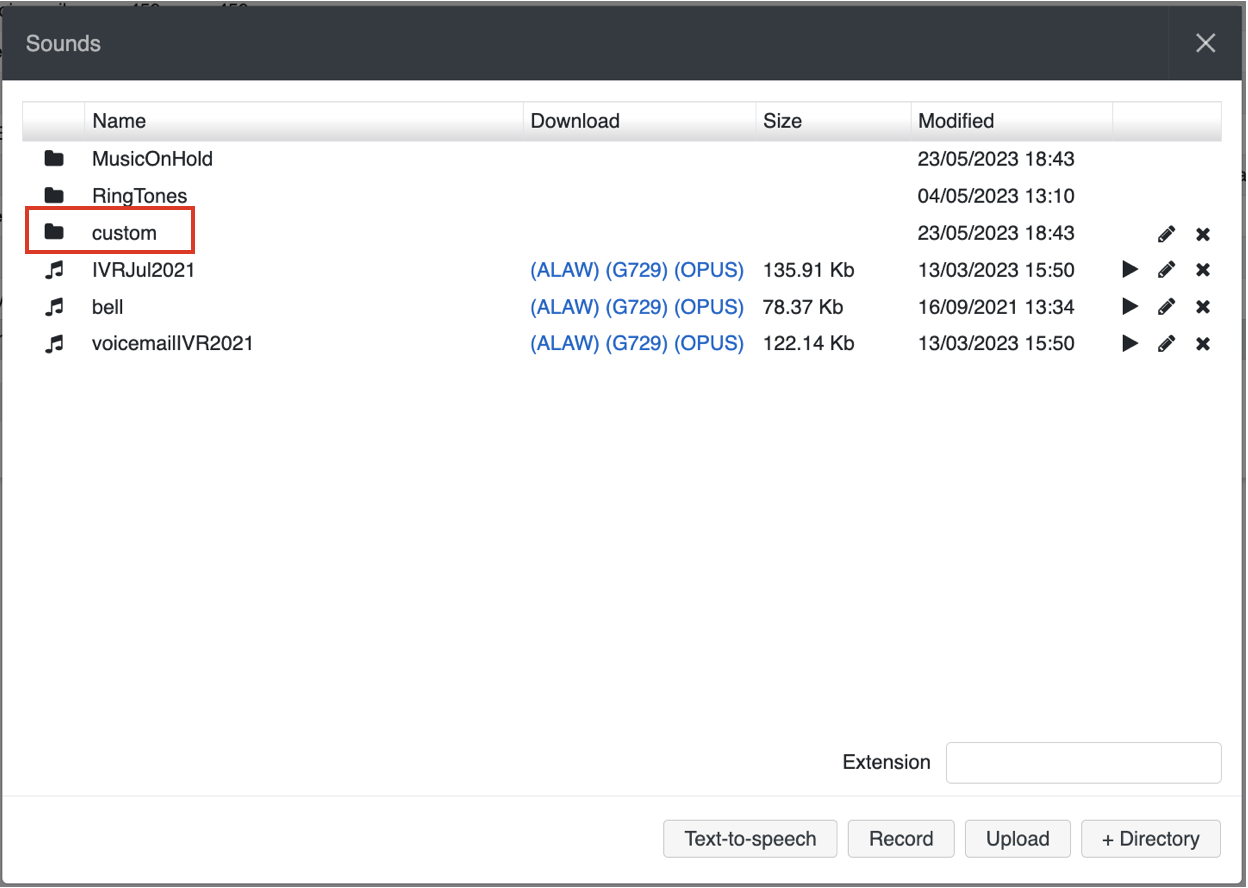
Starting from WMS 6.04.20230731.1 3, it is possible to upload custom prompts via WMS -> Sounds:
1. In WMS -> Sounds, add the directory named "custom":
2. Upload the custom files to the directory
...
