Wizyconf is the first professional easy-to-use video conference.
Min supported version: WMS 5
Created: June 2020
Updated: June 2022
Permalink: https://wildix.atlassian.net/wiki/x/_ALOAQ
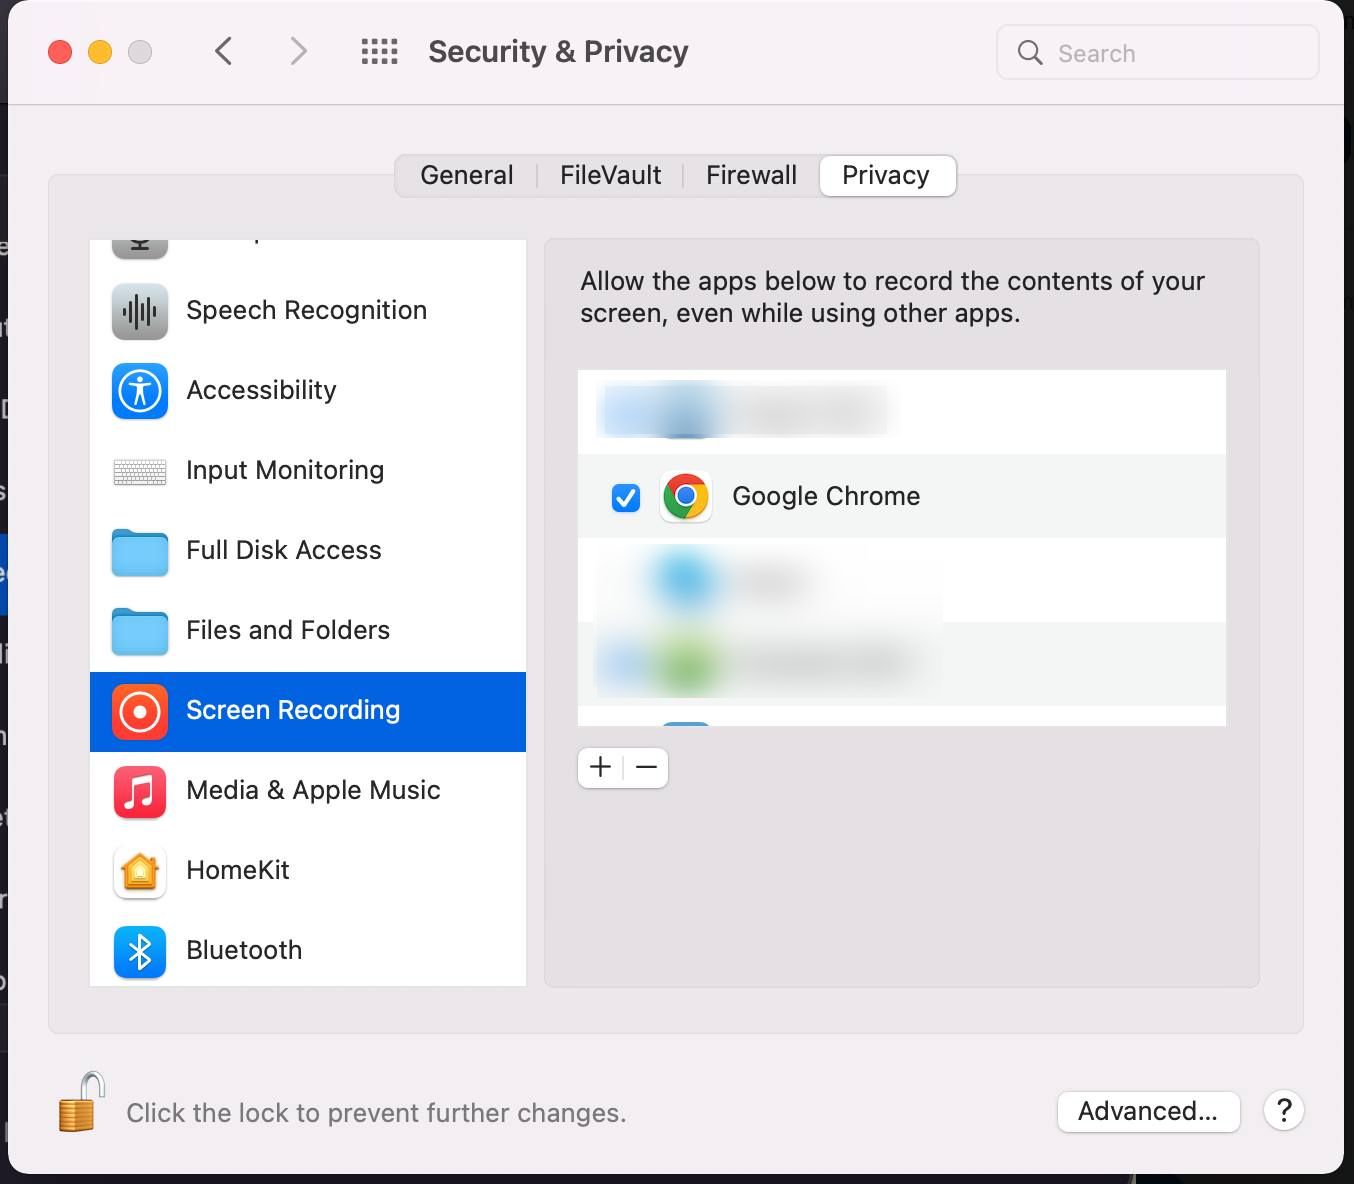
Screen sharing issue on macOS using Google Chrome
Due to detected issues in Google Chrome, it might be impossible to use screen sharing.
To resolve the issue, take the following steps:
- Update Chrome to the latest version
- Refresh permissions: go to macOS System Preferences -> Security & Privacy -> Screen Recording -> uncheck and check Google Chrome checkbox
Temporal limitation for macOS users:
for the Wizyconf to work on Safari web browser, please follow the steps below:
- Open Safari web browser -> Preferences -> Privacy tab
Make sure the option Website tracking: Prevent cross-site tracking is unchecked
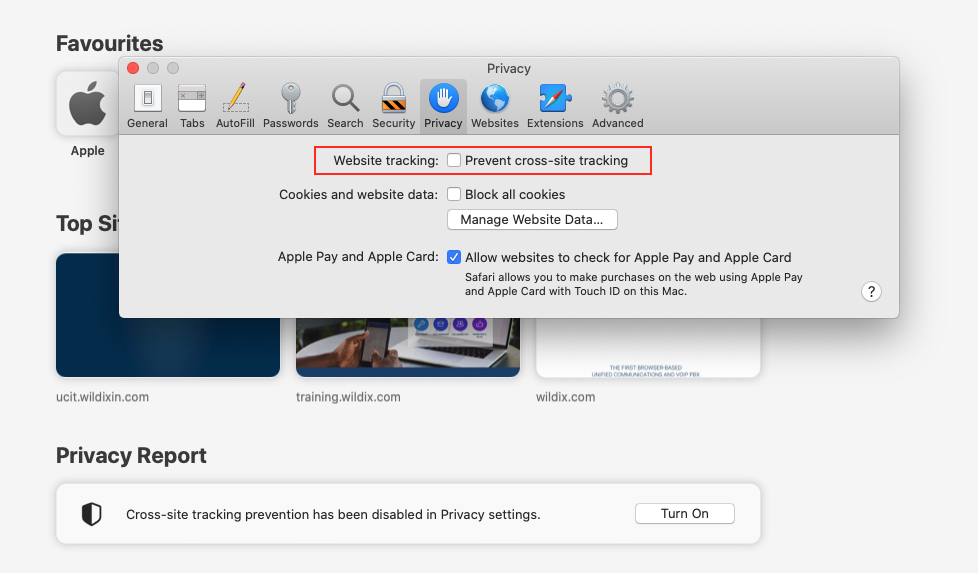
This limitation concerns only PBX users. External participants using Safari web browser are not affected.
Requirements
Browser
Google Chrome
Chromium
Safari 12.1.X and higher
Microsoft Edge 79.0.309 and higher
Firefox
For Screen Sharing:
- Chrome v. 72
- Firefox v. 66+
Wildix licenses:
- UC-Business or UC-Premium for each user who needs to be able to create a conference room (more information: https://www.wildix.com/licensing/)
Ports to open on firewall
Check here: Ports used by Wildix services.
Bandwidth requirements
The bandwidth used by Wildix Videoconference is adaptive and varies to provide the best experience on participants’ network.
Minimum bandwidth required:
Outbound from the participant: 300 kbps
Inbound to the participant: 300 kbps
Ideal bandwidth:
Two-person video calls:
Outbound from the participant: 2.6 mbps
Inbound to the participant: 2.6 mbps
Group video calls:
Outbound from the participant in all situations: 2.6 mbps
Inbound to the participant with 5 participants: 3.2 mbps
Inbound to the participant with 10 participants: 4.0 mbps
It is possible to decrease bandwidth consumption by selecting a lower video quality level in options, see the chapter Video quality.
Number of participants in a conference
- Video: Currently the number of users who can share their videos is not limited – it's possible to see all the users who are sharing their videos in Tiles view, however for the optimal performance we do not recommend to exceed 70 users in case all of them share their videos
You can also consider live streaming option--in this way you can create a conference only with those users who need to speak and stream their video, while others can watch and comment.
Limitations compared to Wizyconf web interface for WMS versions lower than 5
- Impossible to invite users directly from the Video conference web interface (it is possible to copy the link and send the invitation via email, but not via chat)
- No audio invitations (previously it was possible to call invited users right from the conference room)
- Impossible to start a screen sharing without entering a conference (currently impossible to start screen sharing to Wizyconf conference station without entering the conference)
- No link sharing option
- Audio/ video Settings dialog is no longer displayed when accessing a conference
Wizyconf additional equipment
To ensure efficient collaboration during videoconferencing in small and large meeting rooms, Wildix offers some additional equipment:
- Wizyconf Huddle-Room: for 2-3 people sitting in front of PC/ laptop – a speakerphone with a 120° wide angle Full HD webcam and 360° microphone. More information: /wiki/spaces/DOC/pages/30281361
- Wizyconf Conference Room - the first professional easy-to-use web conference – a fully equipped conference room: Wizyconf Conference Room - Documentation
Create a conference room
To be able to create a conference room, you need to be Wildix PBX user with a UC-Business or UC-Premium licence assigned.
Conference rooms can be created only from Collaboration interface.
To create a new conference room:
- Access Wildix Collaboration
Click on the blue Video Conference icon (Screen icon) in the top menu:

Video Conference dialog opens, click + New conference in the lower right-hand side of the screen:

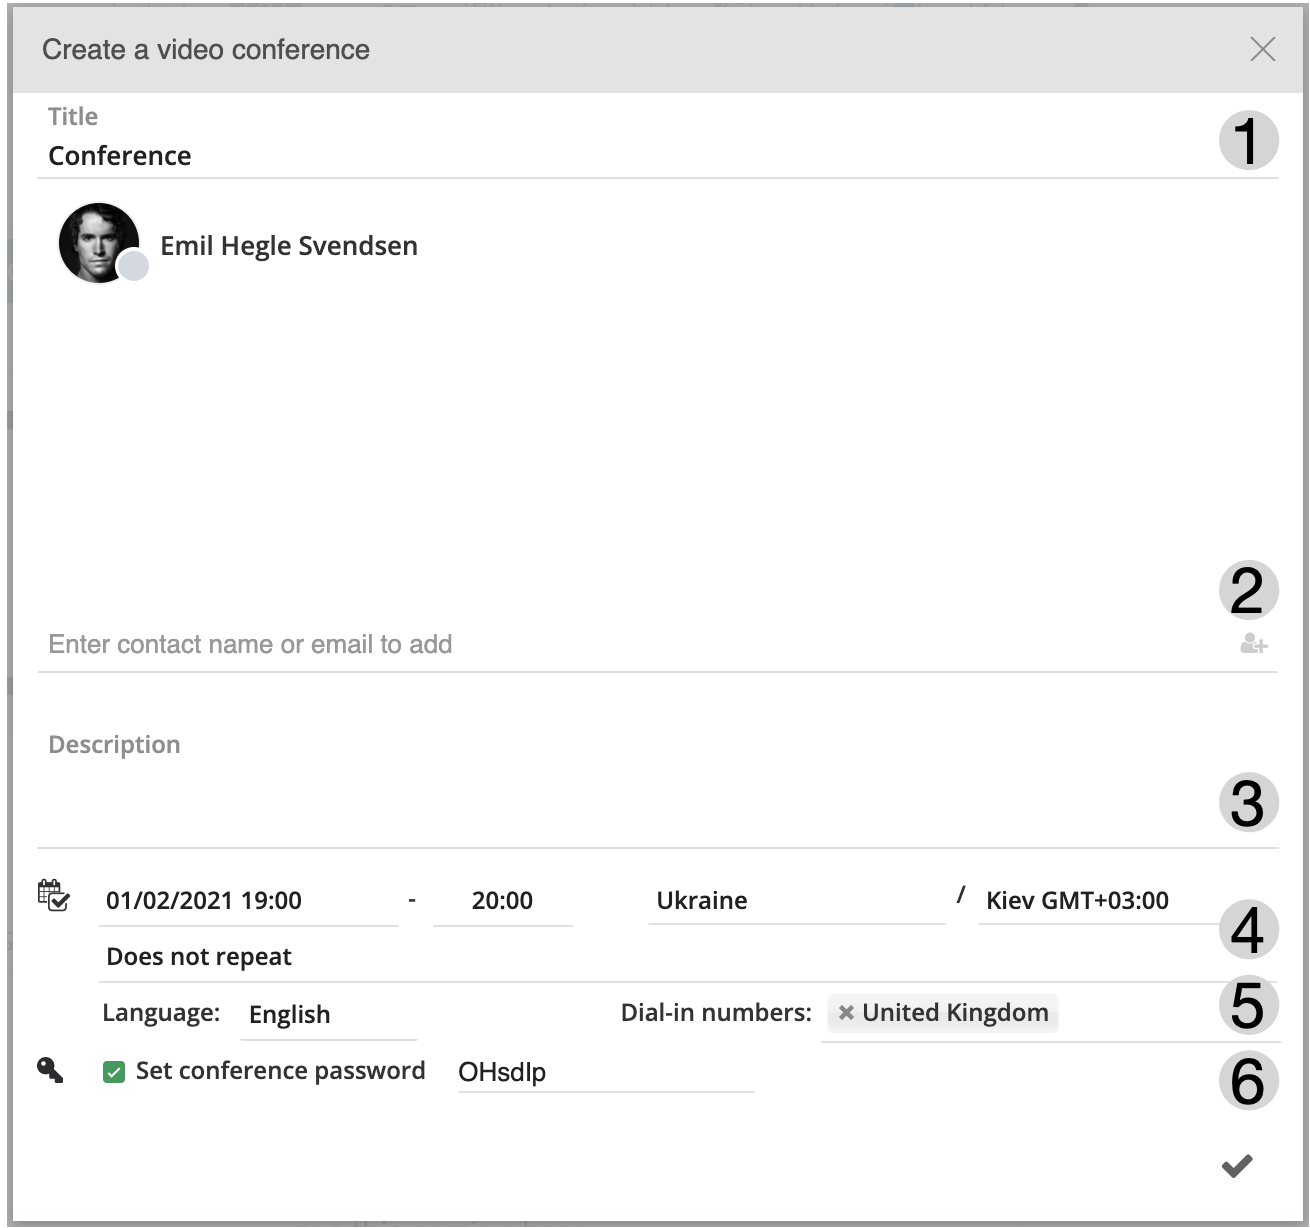
Fill out the following fields:
- 1 - Title: enter conference title
2 - Invite participants (optional): start typing a name into the search field to invite a user / a contact or enter the email address to invite any external user via email
- 3 - Description (optional): add a description of your event (if filled out, the description field will be present in the email invitation sent to participants)
4 - Conference scheduling (optional): tick off the Calendar icon, then select the date and the time of your conference, timezone and set up recurring video conferences (see the chapter Schedule a conference)
5 - Language (optional): change the language of an invitation email and separately select dial-in numbers (you can select 2 countries)
6 - Set conference password (optional, available starting from WMS v. 5.02.20201023.2): protect a conference with a password, 2 passwords are generated automatically: 1 - for a web conference (can be changed), 2 - for dial-in numbers and Wizyconf Station (cannot be changed). For a web conference access, a password length is from 6 to 10 symbols, including numbers, upper and lower case letters; for dial-in and Wizyconf Station access, password consists of 6 numbers
(After you have filled in the fields): Click Tick icon to save the room
The conference is added to the list and you can find it by its title:
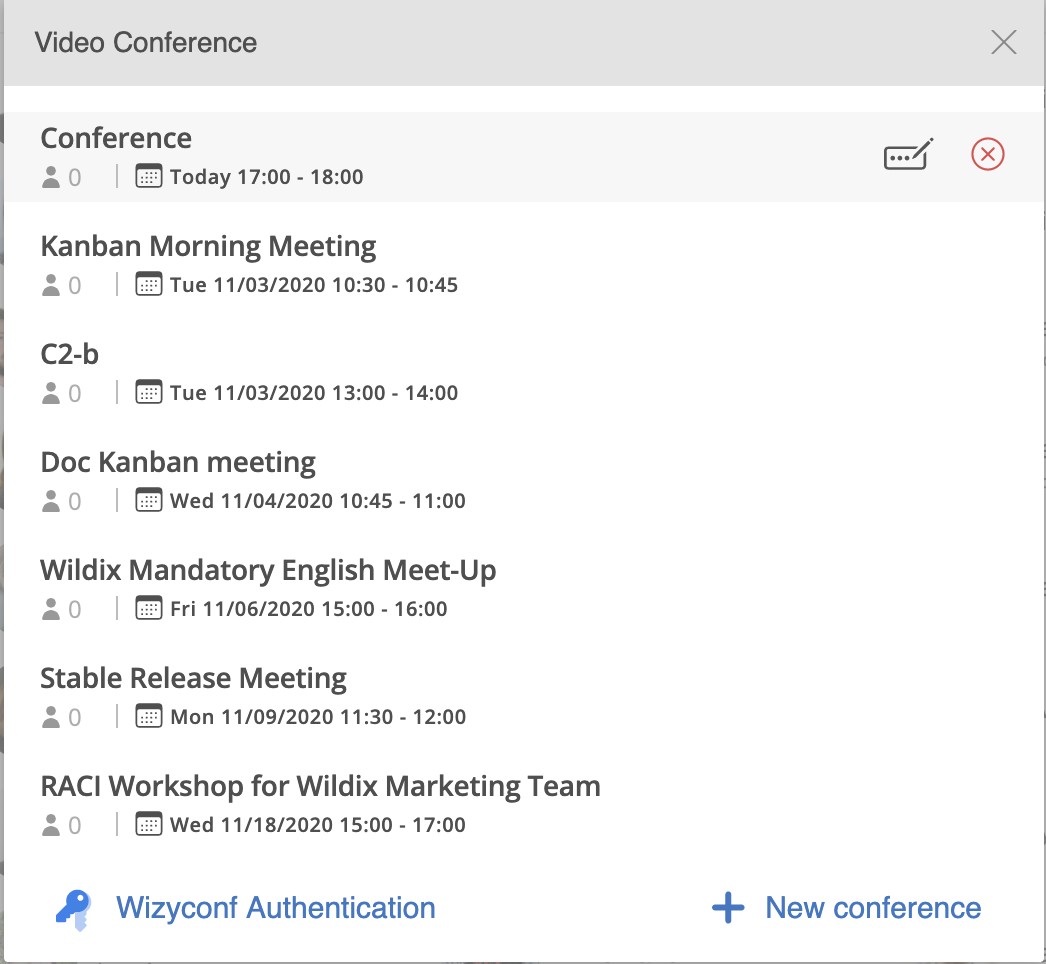
Now you can click on the conference to join it.
Conference room is deleted automatically after 30 days of inactivity.
Schedule a conference
It is possible to schedule the conference or set it up as a recurring event the moment when you create a new conference room, or any time by editing an existing conference room:
- Open the conference dialog from Collaboration
- Tick off the Calendar icon (Schedule) in the bottom of the dialog
- Select the date and the time of your conference, select the timezone
(If you wish to set up a recurrent event): click Does not repeat and set up the recurrence:
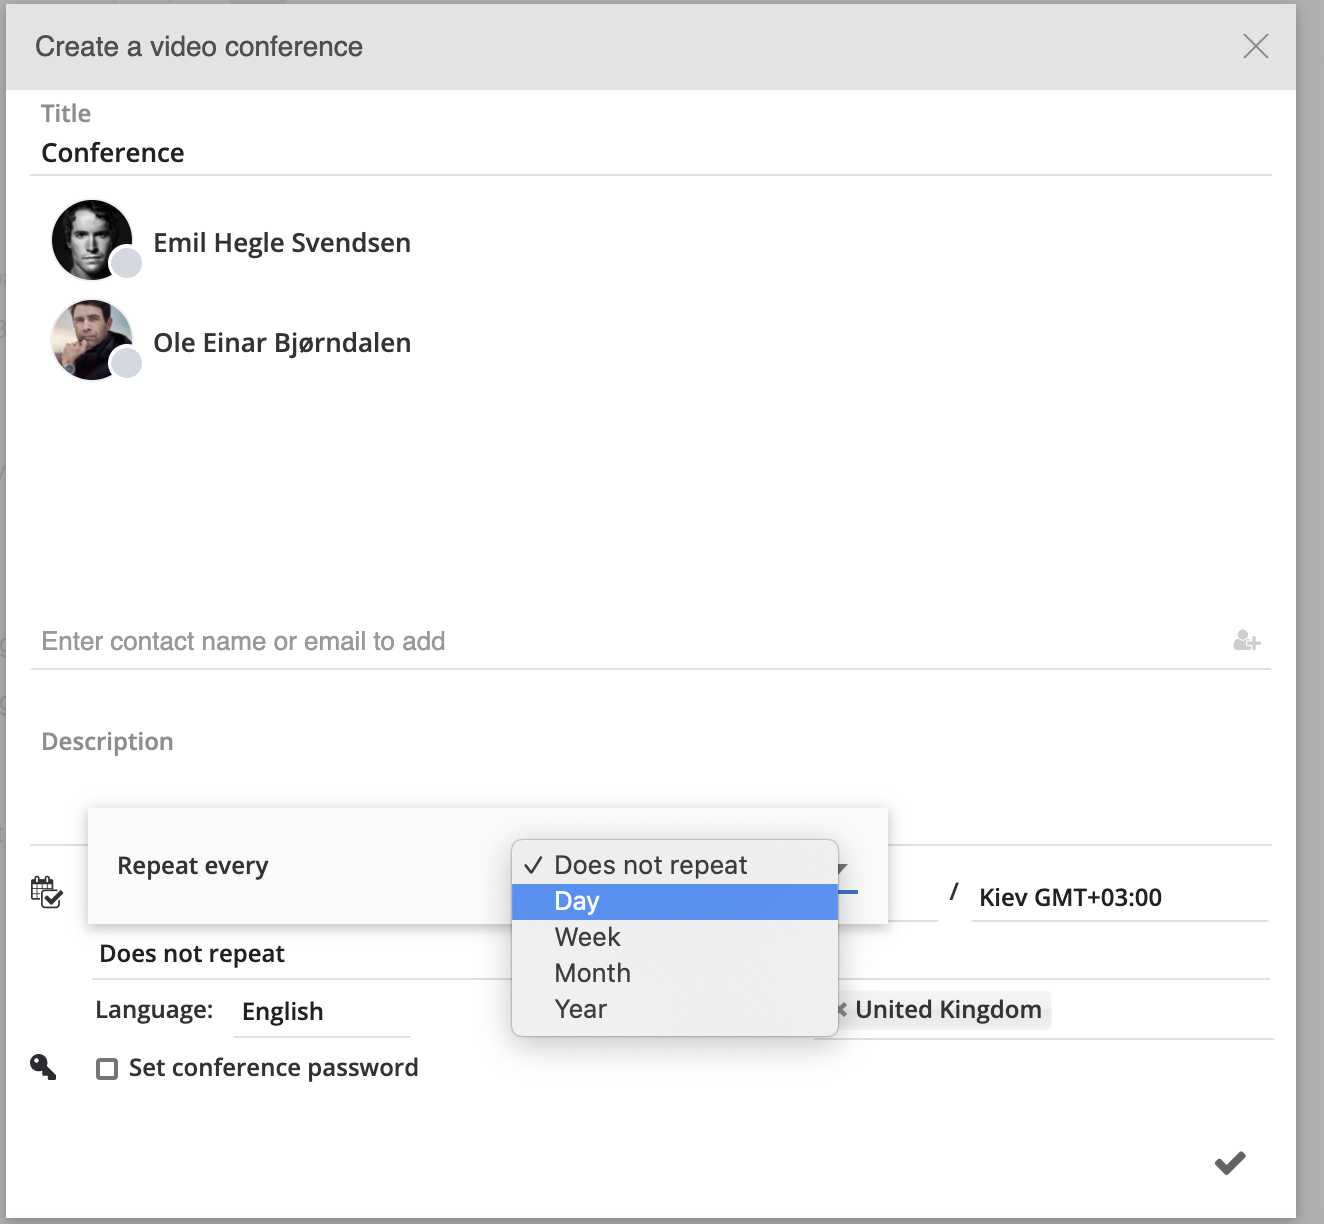
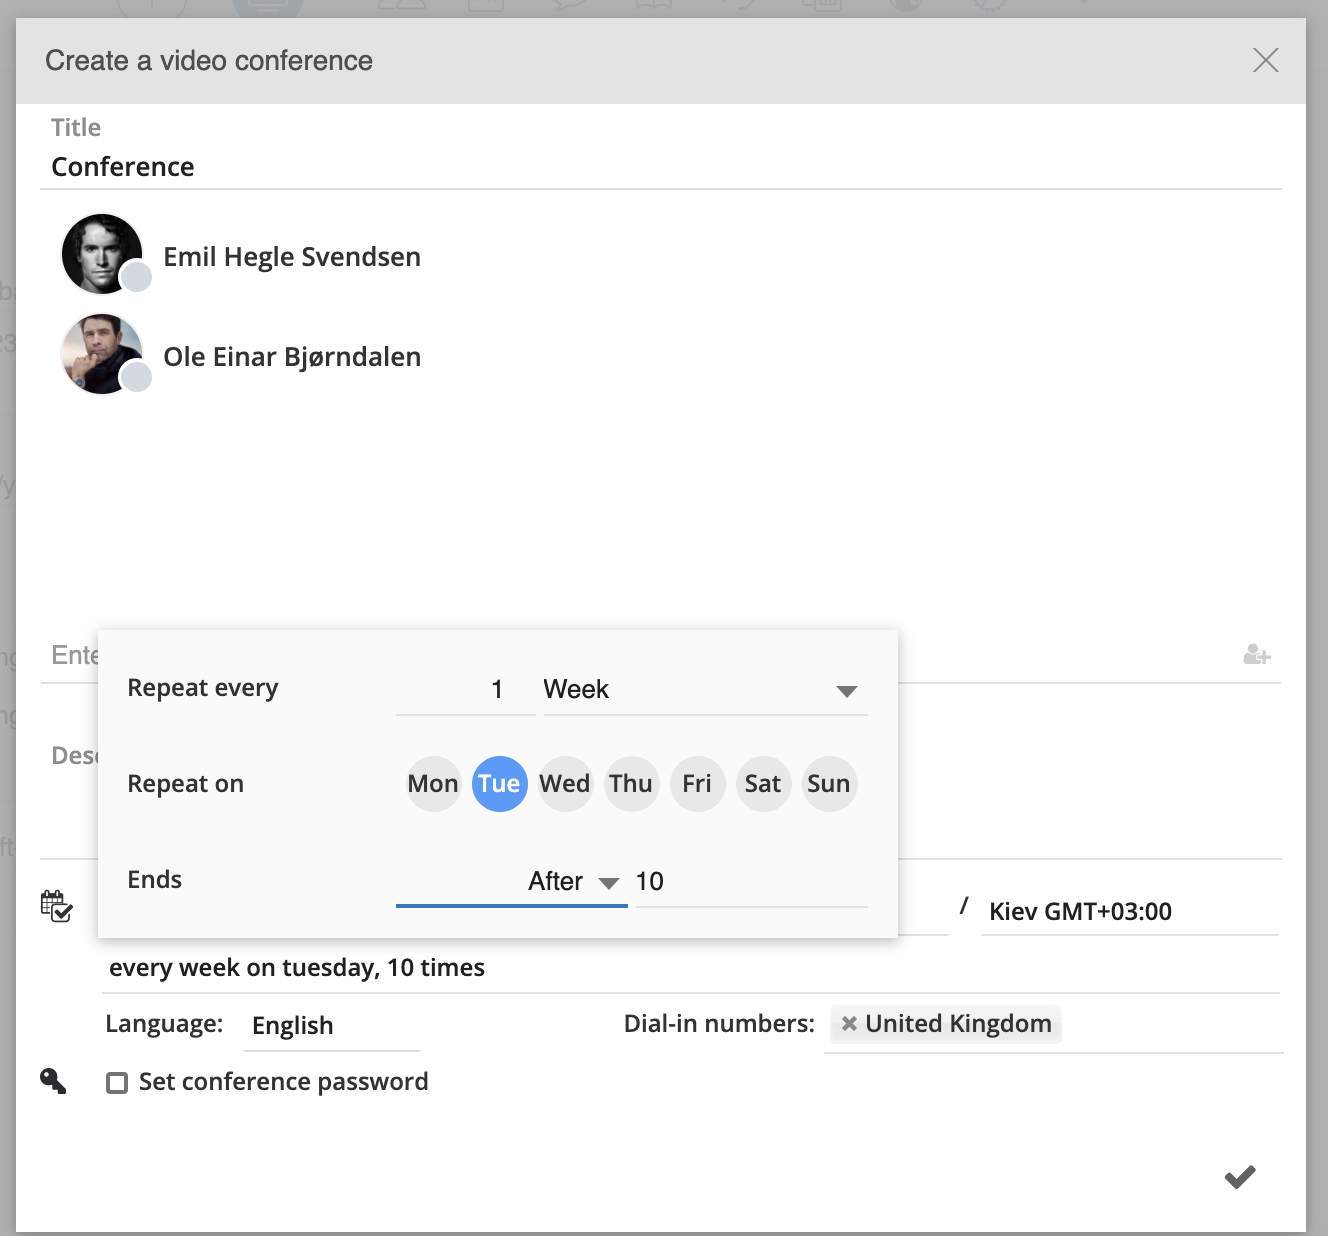
- Click Tick icon in the lower right-hand side of the Video Conference dialog to save changes
Scheduled/ recurrent event is automatically added to your calendar with the link to the conference.
Access a conference room
It is possible to access a conference room via web (via a link), or in audio-only mode (by calling the provided phone number). If a conference is protected with a password, a participant is required to enter it before joining the room.
Access from email invitation
All invited users receive an invitation via email: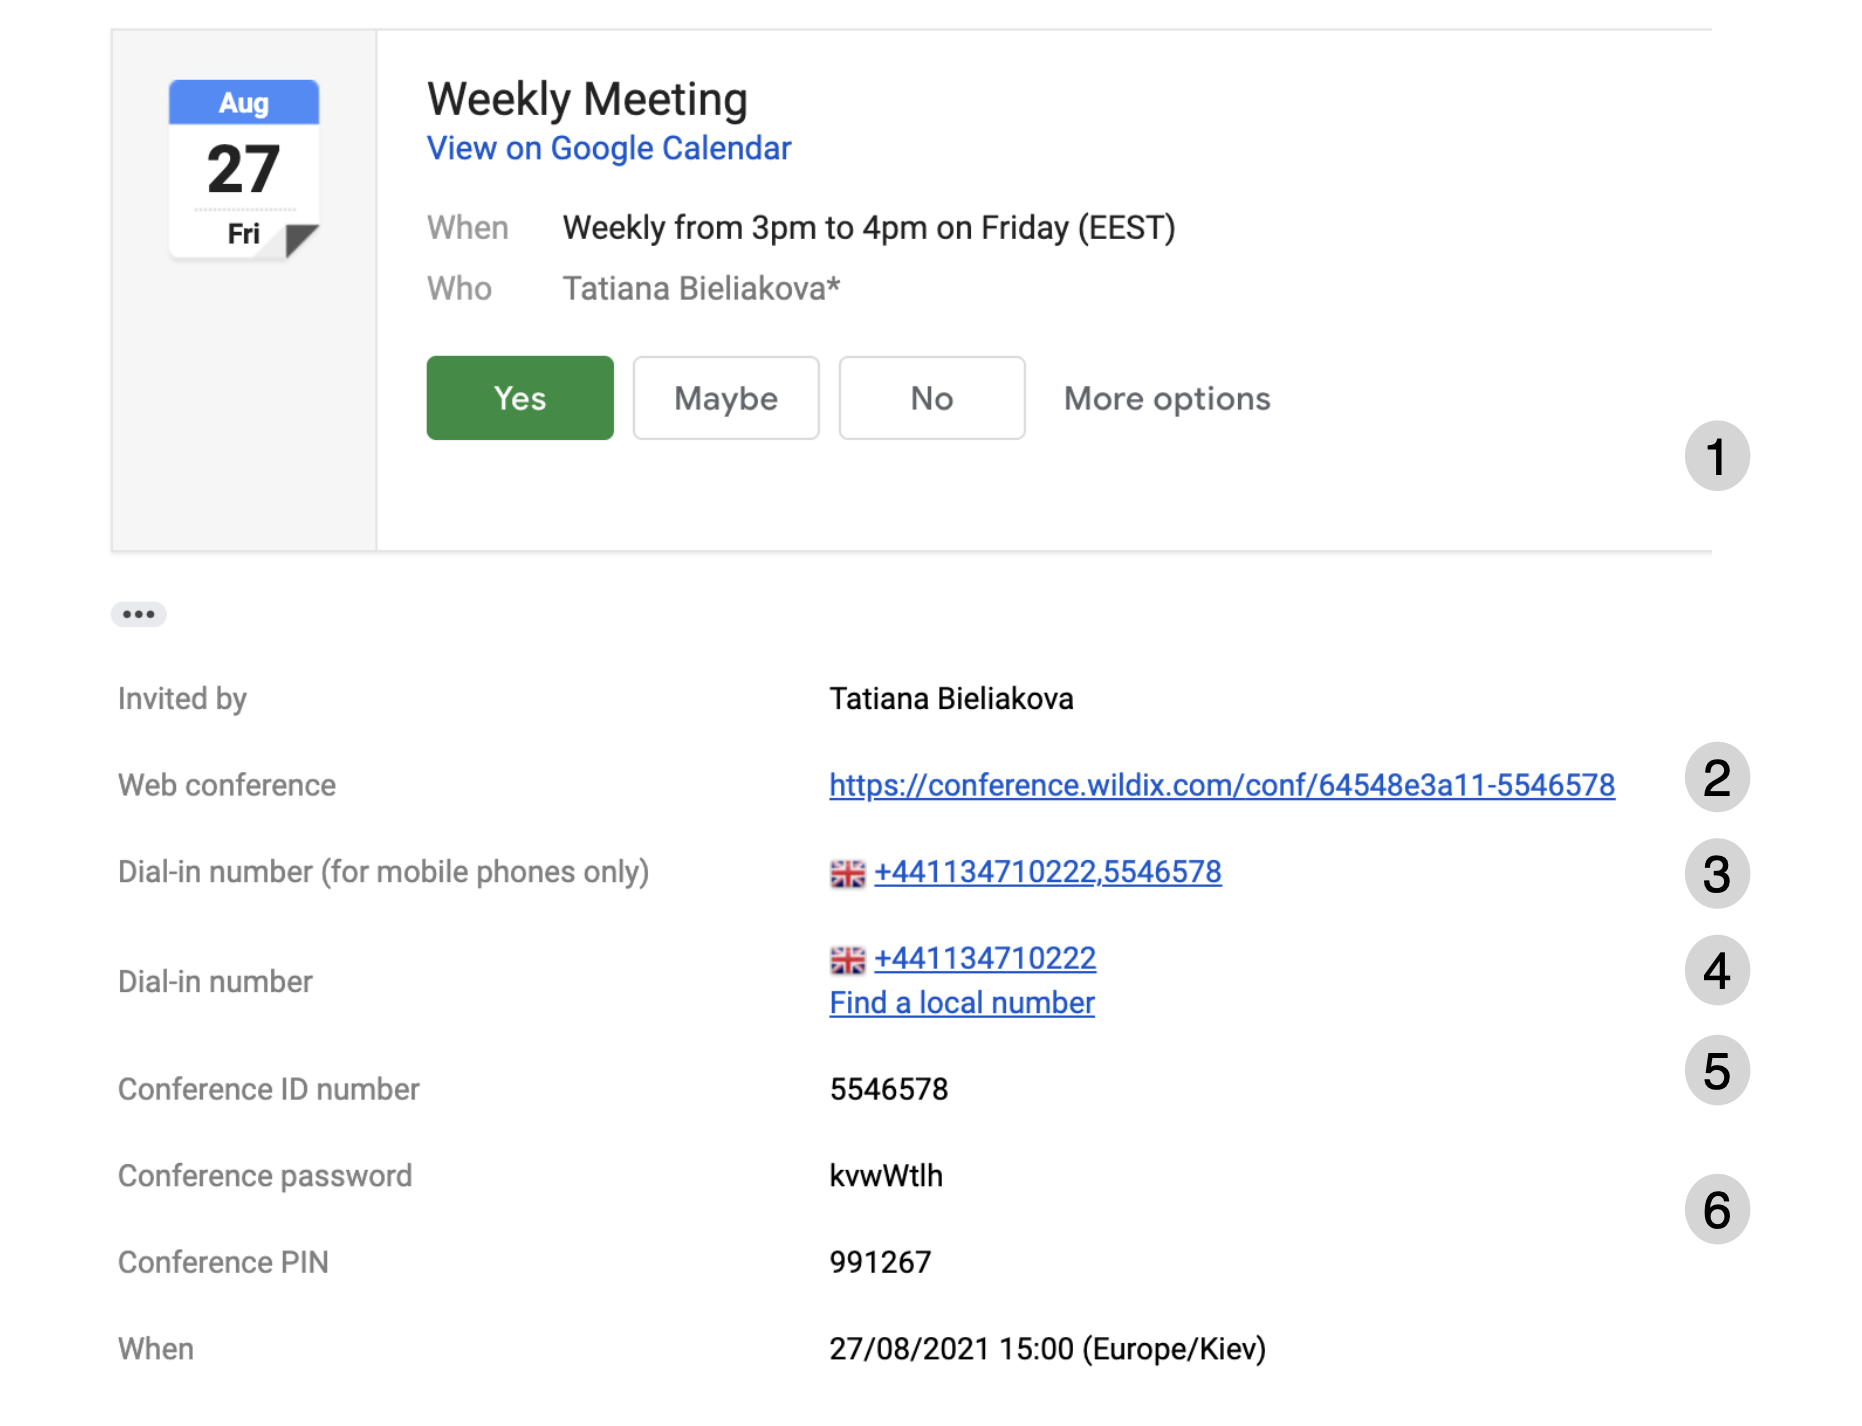
1 - Scheduled event is automatically added to your calendar
Note: According to the new Google settings, you need to turn on specific options in order to guarantee that scheduled events are automatically added to you calendar.
Follow these instructions:
Go to Gmail Settings -> See all settings
Go to General tab and scroll to Smart features and personalization
Turn on Smart features and personalization if you use Gmail email client or Smart features and personalization in other Google products if you use other mail clients, (Outlook, Apple Mail etc) under Gmail account
More information is available here: https://support.google.com/mail/answer/10079371?hl=en&ref_topic=3394219.
2 - You can access the conference via the link provided in the email
- 3 - You can also access the conference in the audio-only mode, by using dial-in numbers. This is the option for mobile phones, which allows you to join the conference without manually entering the conference ID (as it is already included in the click-to-call dial-in number)
- 4 - This option is not restricted to mobile phones. It also lets you access the conference in the audio-only mode by calling the local number for your country. Click Find a local number to view the full list
5 - This is the ID number of the conference
- 6 - Use conference passwords to access the conference: conference password is designed for web conference, conference PIN - for dial-in numbers and Wizyconf Station
Access for external users
When an external user clicks on the provided link, they need to enter their name and (optionally) their email or sign in via social networks: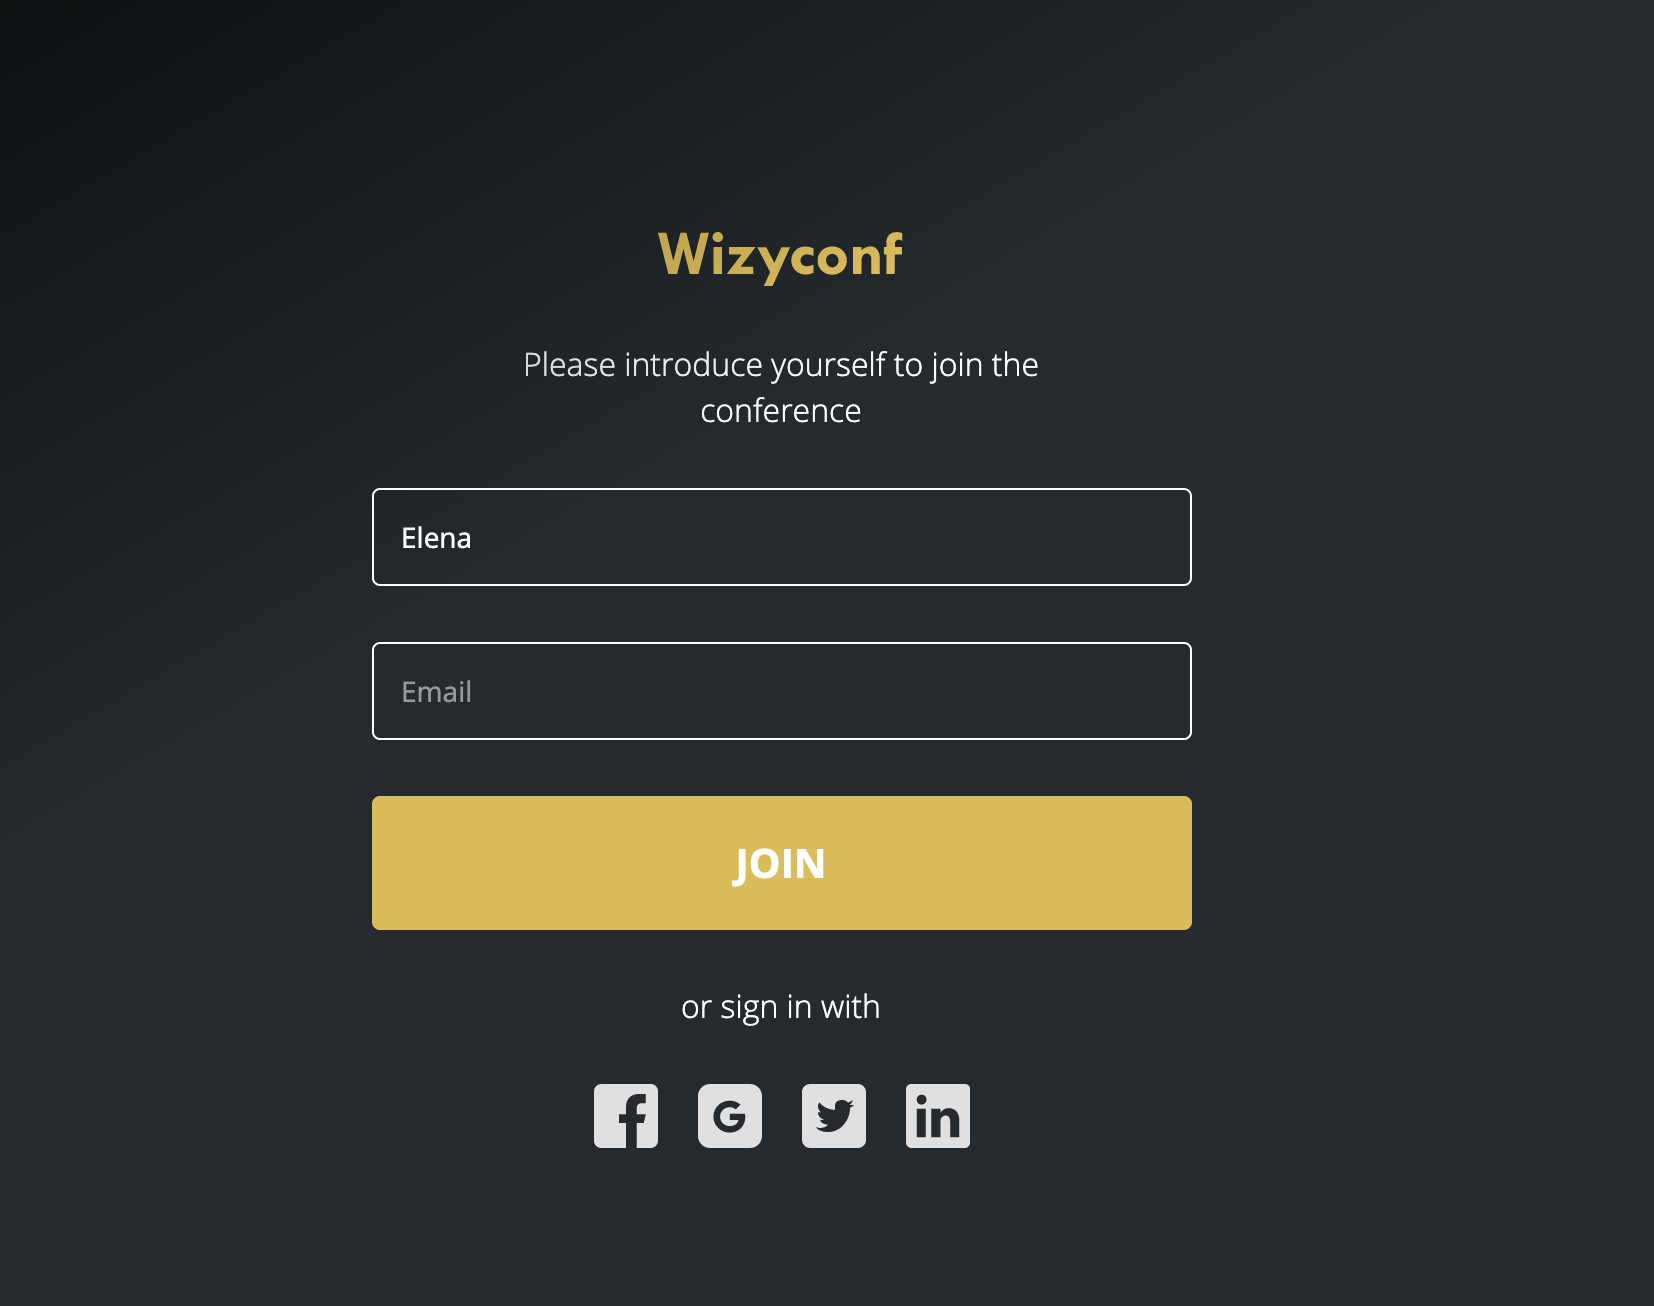
Conference room is locked for external users unless there is at least one PBX user inside.
A conference room can be unlocked by any PBX user:
- by joining via the web
- by joining in audio-only mode
Access from Collaboration
Video Conference dialog
PBX users can access any conference created previously by them and the ones to which they were invited, from the Video Conference dialog:
Click on the blue Video Conference icon in the top menu:
Find the conference by its title and click on it to join:
If the conference is protected with a password, you need to enter a conference password (check the password in an invitation or ask a conference moderator for it) and click Join

Conferences are sorted in the following order in Collaboration:
- conferences created in the last hour (unscheduled)
- scheduled conferences (starting from the ones scheduled for the nearest future)
- unscheduled conferences
- conferences scheduled in the past
Chat invitation
A PBX user invited to a conference receives an invitation via chat and can access it by clicking on the link (or by calling the indicated phone number from their Wildix device to access in audio-only mode):

A PBX user can access a conference room by clicking on the link received via chat, from:
- Collaboration
- Vision/ SuperVision desk phones
- iOS/ Android app
Access from smartphone
You cannot create a conference room from smartphone app, but you can access conference rooms to which you were invited.
More details on how to join a video conference from Wildix Collaboration smart phone apps can be found in:
PBX user
When a PBX user is invited to a conference, they receive an invitation via email/ chat with a link to join the conference via web and a phone number, allowing them to join the conference in audio-only mode from their Wildix device.
External user
All invited users receive an invitation via email with a link to join the conference via web and a local phone number that they can dial to join the conference in audio-only mode.
Access from Vision/ SuperVision phones
You cannot create a conference room from Vision/ SuperVision phones, but you can access conference rooms to which you were invited.
More details on how to join a video conference from Vision/ SuperVision can be found in:
Access from Wizyconf Conference Room (Wizyconf station)
You cannot create a conference room from Wizyconf Conference Room, but you can access conference rooms to which the Wizyconf user was invited.
More information in Wizyconf Station Quick Start Guide.
Access in audio-only mode
PBX users can access the conference in the audio-only mode by calling the number 98XXXXXXX, where 98 is the Feature code Conference (by default) and XXXXXXX is the conference ID number (Conference ID is provided in the email invitation).
Note: you can set an alternative code/ prefix instead of 30280807 "Conference" 98. After it is changed, it is also displayed in email / chat invitations.
External users can access the conference in the audio-only mode by calling the local phone number provided in the email invitation: use the option Dial-in number or Dial-in number (for mobile users only).
To access the conference:
Call the provided phone number
External users are requested to enter the conference ID number and say their name (Conference ID number is provided in the invitation email), after which they access the conference (other participants present in the conference are notified when audio-only users are connected and disconnected).
Note: Mobile phone users can choose the option Dial-in number (for mobile users only) and join the conference without entering the conference ID.
Current limitation: no visual indication for muted users who access a conference in audio-only mode.
Conference controls
Users start with mic/ cam off
This option is reserved for the conference moderator only.
By default all users access the conference with their microphones enabled and cameras disabled.
Note: In case you change mic or camera settings, they are preserved upon the next time you enter the same conference room.
The option to decide whether users should access the conference with their webcams enabled/ microphones disabled is reserved to the conference moderator:
- Click three dots next to the Leave the meeting button at the bottom of the screen
- Click Settings
Click on Moderator tab; here are the options available only for the Moderator:
- Everyone starts with mic off (cam on): users join the conference with their webcams enabled and microphones disabled
- Everyone starts with cam off (mic on): users join the conference with their microphones enabled and webcams disabled
- Everyone follows me: users see on the screen what the moderator shows (tiles view/ sidebar view with selected user)
- Mute reaction sounds for everyone: users do not hear reaction sounds inside the conference
- Tick off the the options and click on OK to apply

Tick off both Everyone starts with mic off and Everyone starts with cam off if you would like users to access the conference with both their webcams and microphones disabled.
Microphone, Speakers and Camera settings
- 1 - Click to Mute/ Unmute your microphone or click the small Arrow up icon to access your microphone and speakers settings:
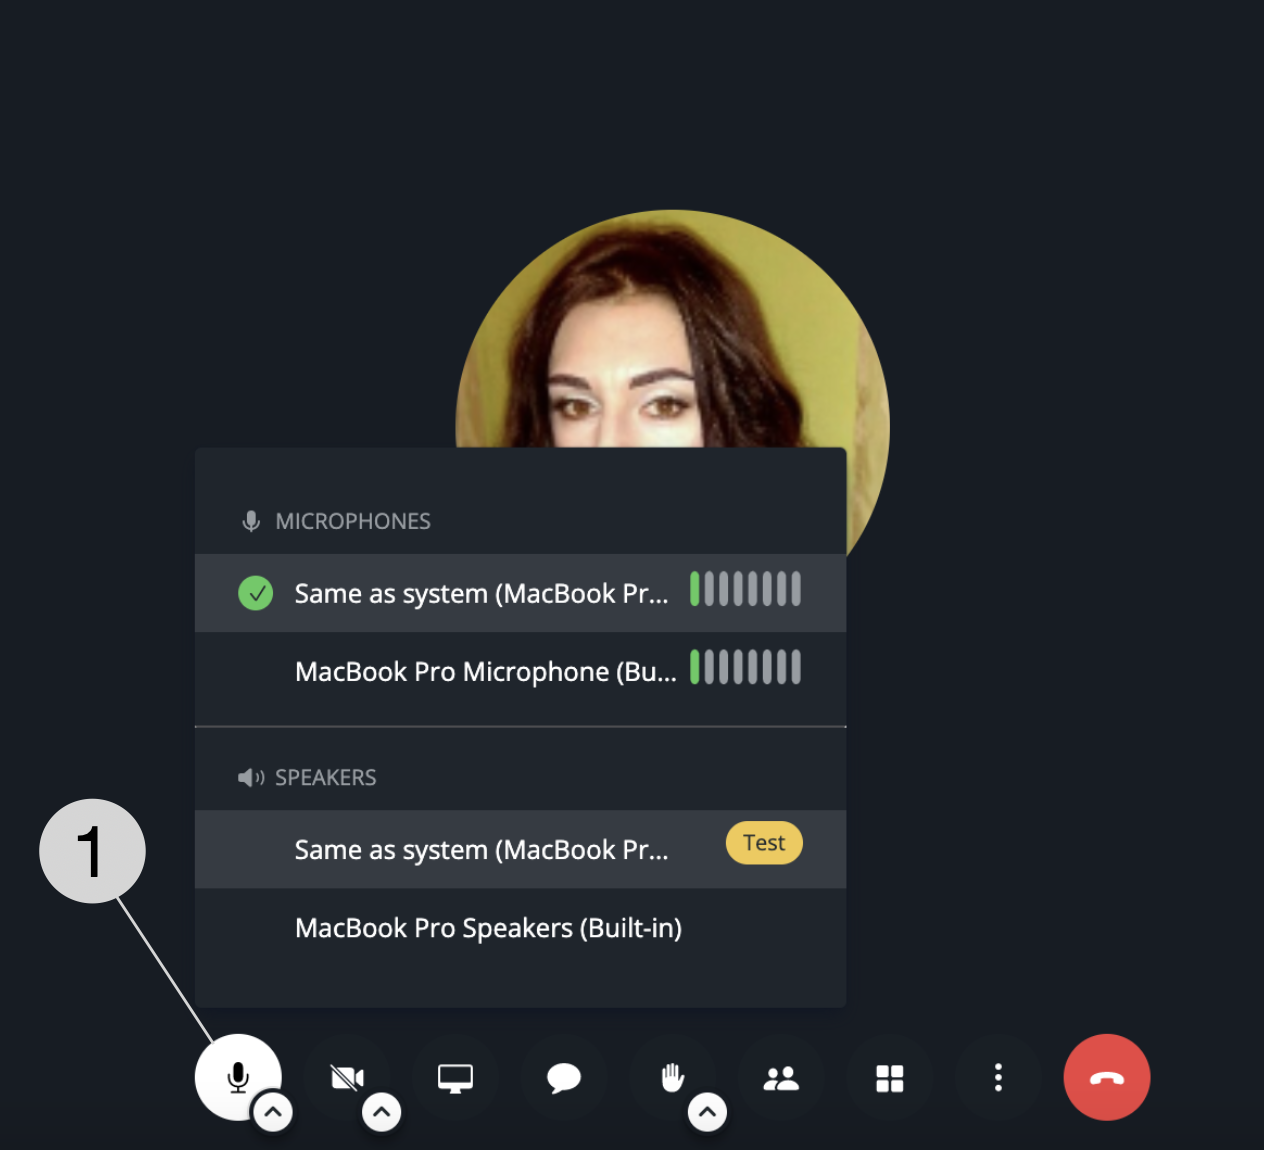
- 2 - Click to Start/ Stop camera or click the small Arrow up icon to access your webcam settings:

You can locally flip your video or hide your video preview, for other conference participants your video remains regular. To achieve this, hover the mouse cursor over three dots in the upper right-hand side of your video preview (both Sidebar and Tiles views) and select Flip or Hide self-view (you can manage this option in Settings -> More):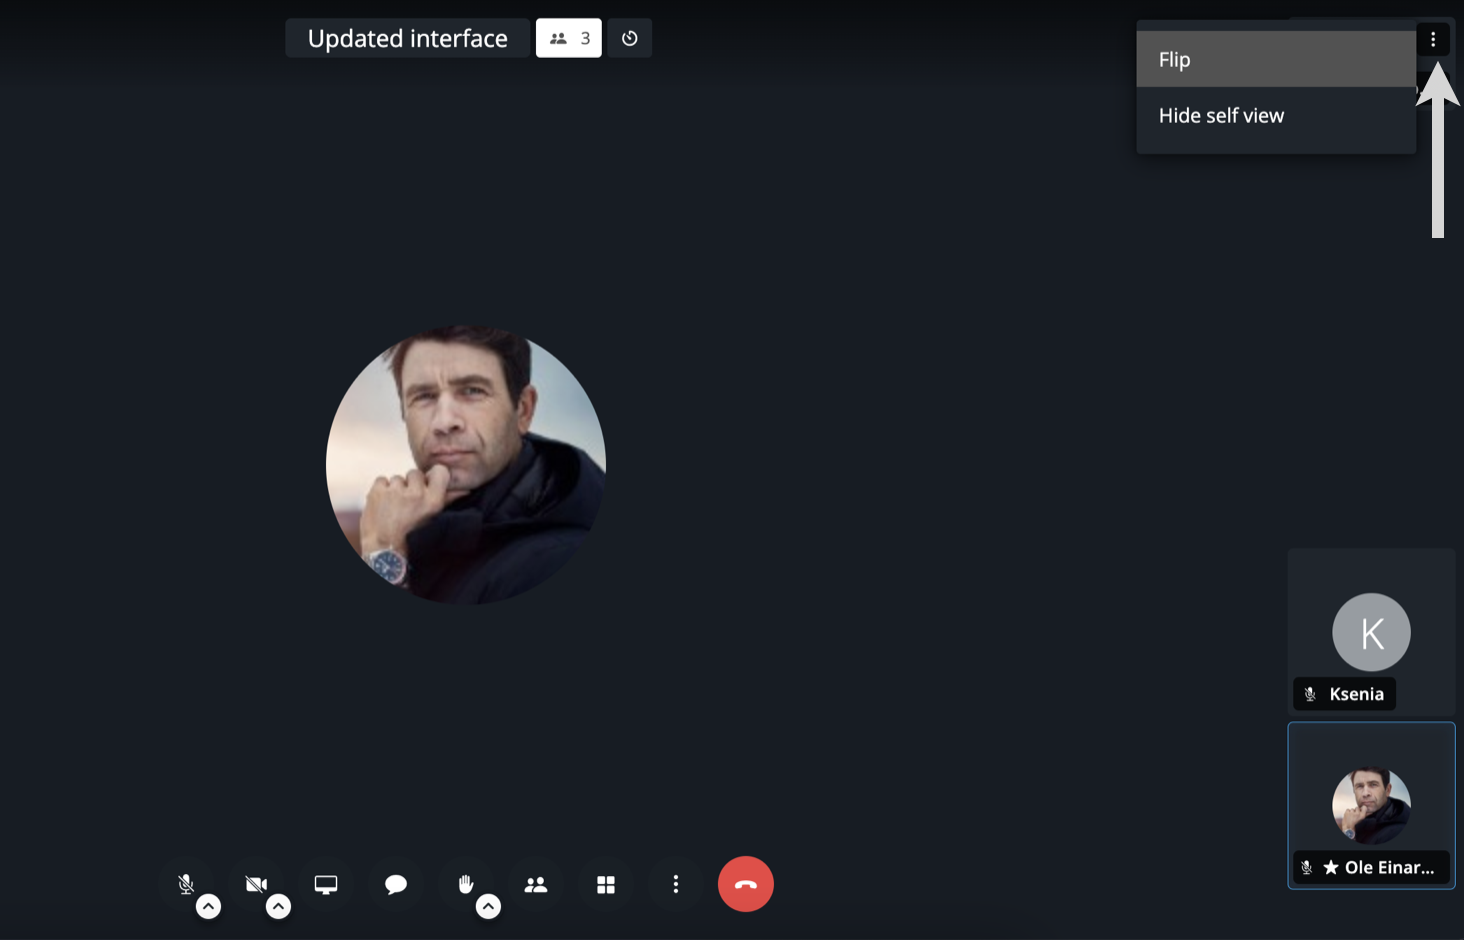
- 3 - Access Microphone/ Speakers/ Camera settings
- Click three dots (More actions) in the lower central side of the screen
Click Settings: in this dialog you can choose your devices as well as play a test sound

Set a background picture
Additionally, you can set a virtual background picture:
- Click three dots (More actions) in the lower central side of the screen
Click Select background
- Select a picture from the list or upload your own background and click Apply
To upload your own backgrounds, click Add backgrounds.
Push-to-talk
In case you prefer to keep your microphone muted and unmute only when you speak, you can use Push-to-talk option:
- (When you are muted) Make sure your mouse cursor is on browser tab in which the web conference is running
- Press Space on your keyboard
- Your microphone is unmuted and you can now speak
- Release the Space button as soon as you finish speaking to mute your microphone again
Otherwise you can use M shortcut to Mute/ Unmute your microphone:
- Press M to toggle between mute/ unmute
Read more in the chapter Keyboard shortcuts.
Video quality
You can adjust the quality for your video streaming.
- Click three dots (More actions) in the lower central side of the screen
Click Performance settings

Or click on the icon in the upper central side of the screen:

Language settings
To change the language of the interface:
- Click three dots (More actions) in the lower central side of the screen
- Click Settings
Settings dialog opens, click on the tab More
Select the language from the drop-down list and click OK to apply

Invite more participants / share the conference link
From within the conference
Click Invite people icon in the lower central side of the screen
Copy the meeting link and send it to people who you wish to invite, or click Share meeting invitation to send the invitation link via email. You can also view the local Dial-in phone numbers to enter the conference in audio-only mode (click More numbers):

From Collaboration
- Open the Video Conference dialog
- Find your conference room in the list and hover the mouse cursor over it
- Click the Pencil with three dots icon (Edit) next to it
Start typing a name into the search field to invite a user / a contact or enter the email address to invite any external user via email:
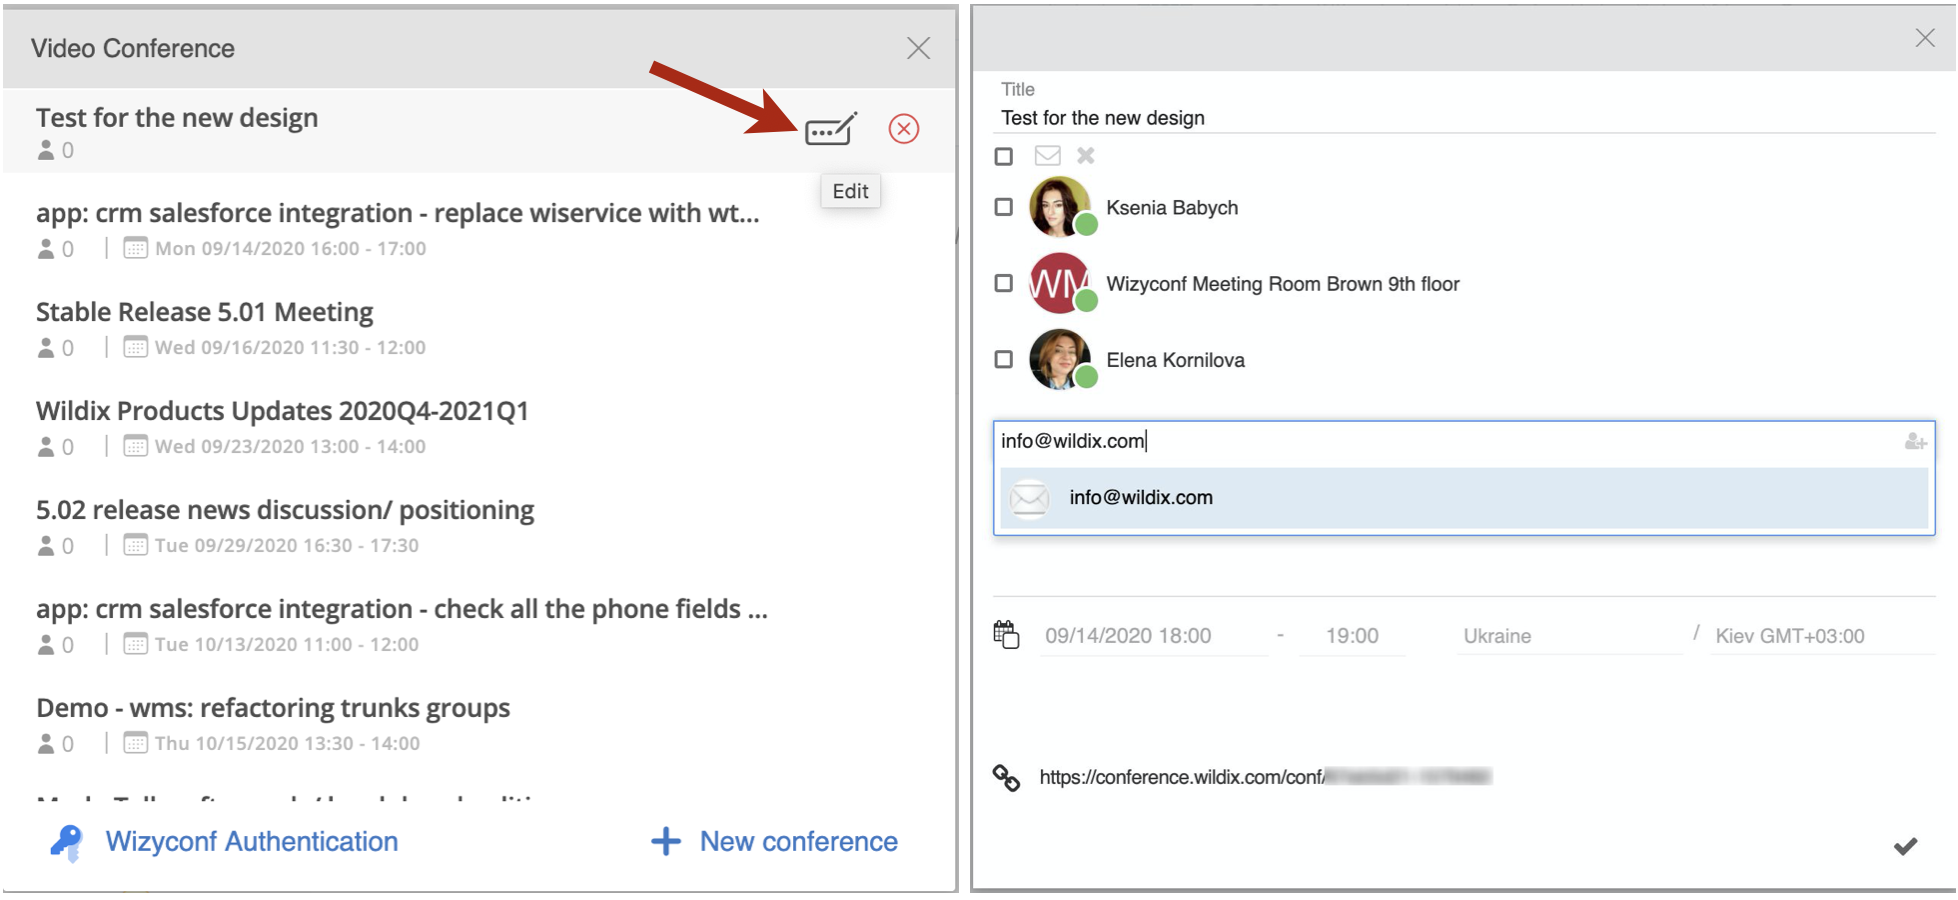
Click Tick icon in the lower right-hand side of the Video Conference dialog to save changes
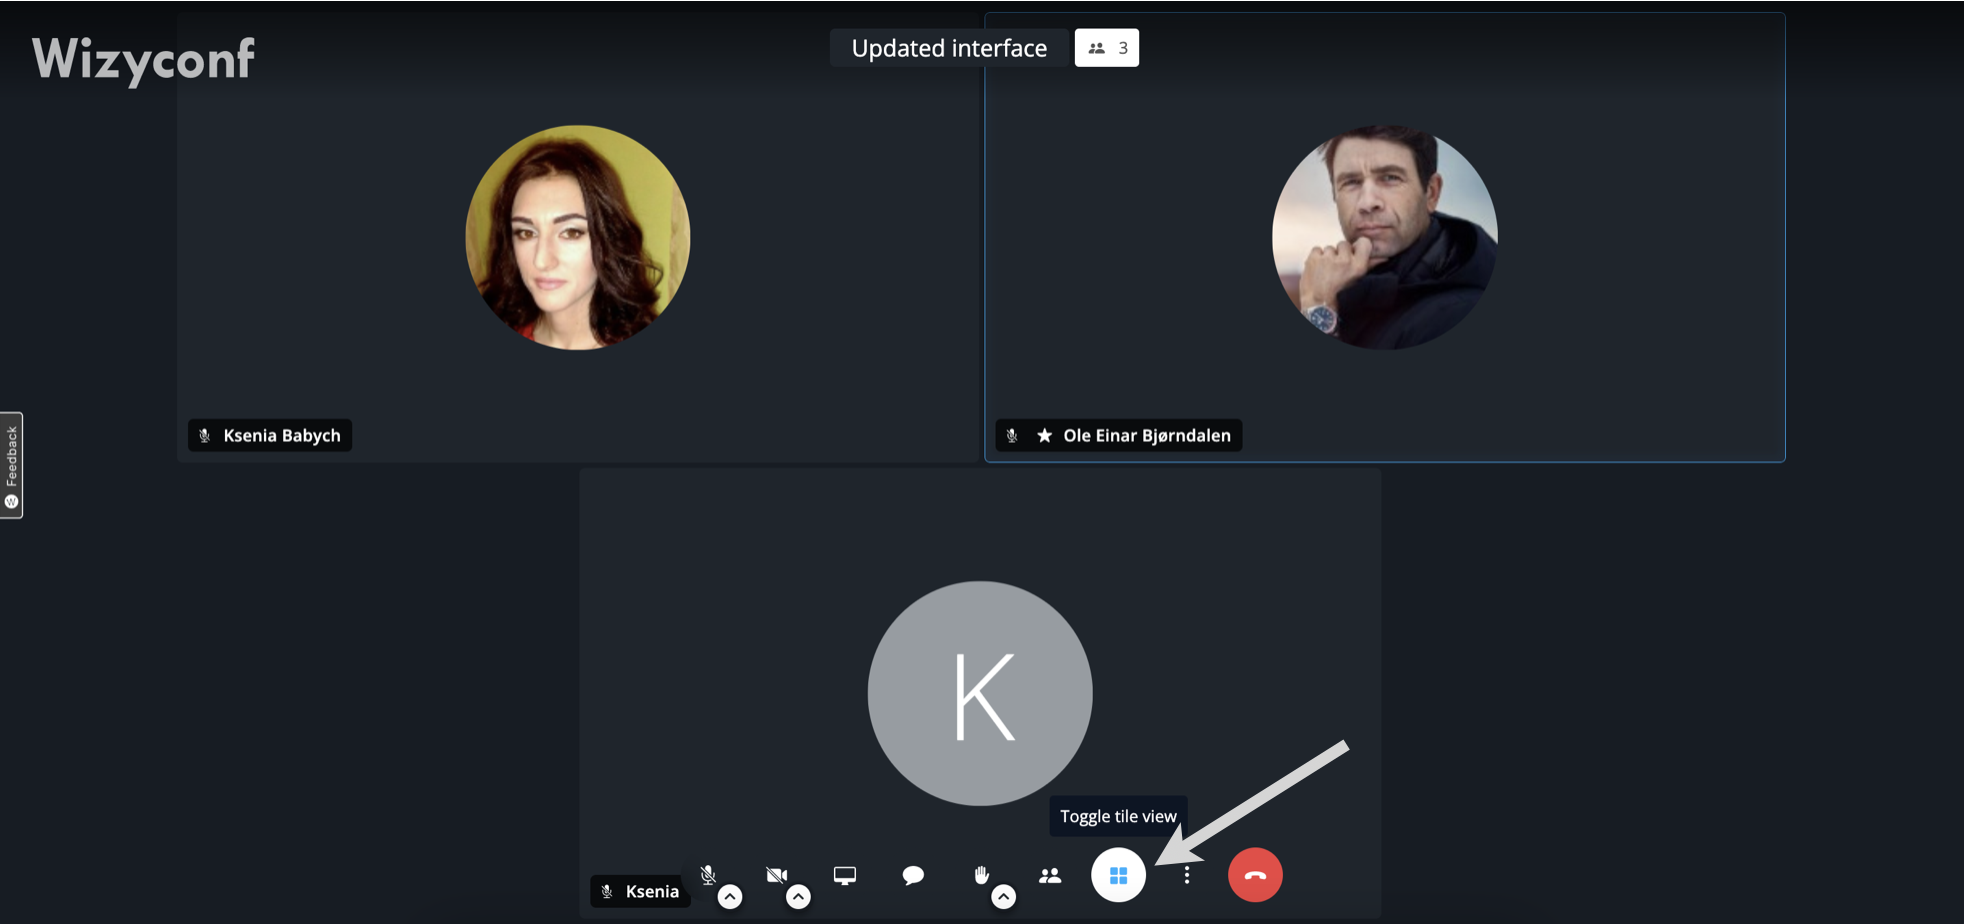
Toggle between Tiles view and Sidebar view
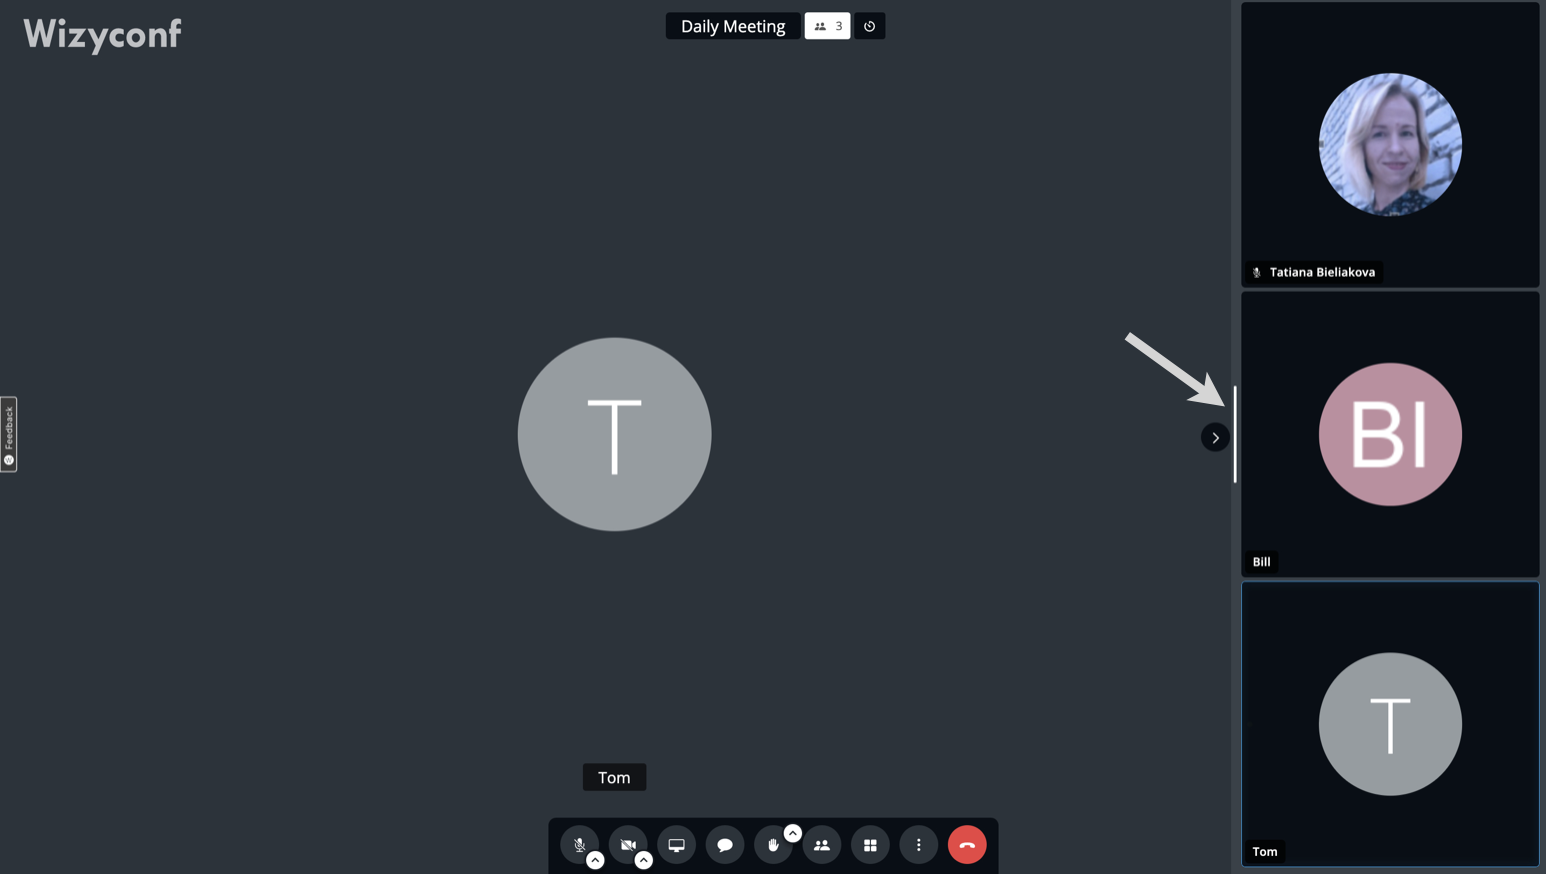
Tiles view (on the left) and Sidebar view (on the right):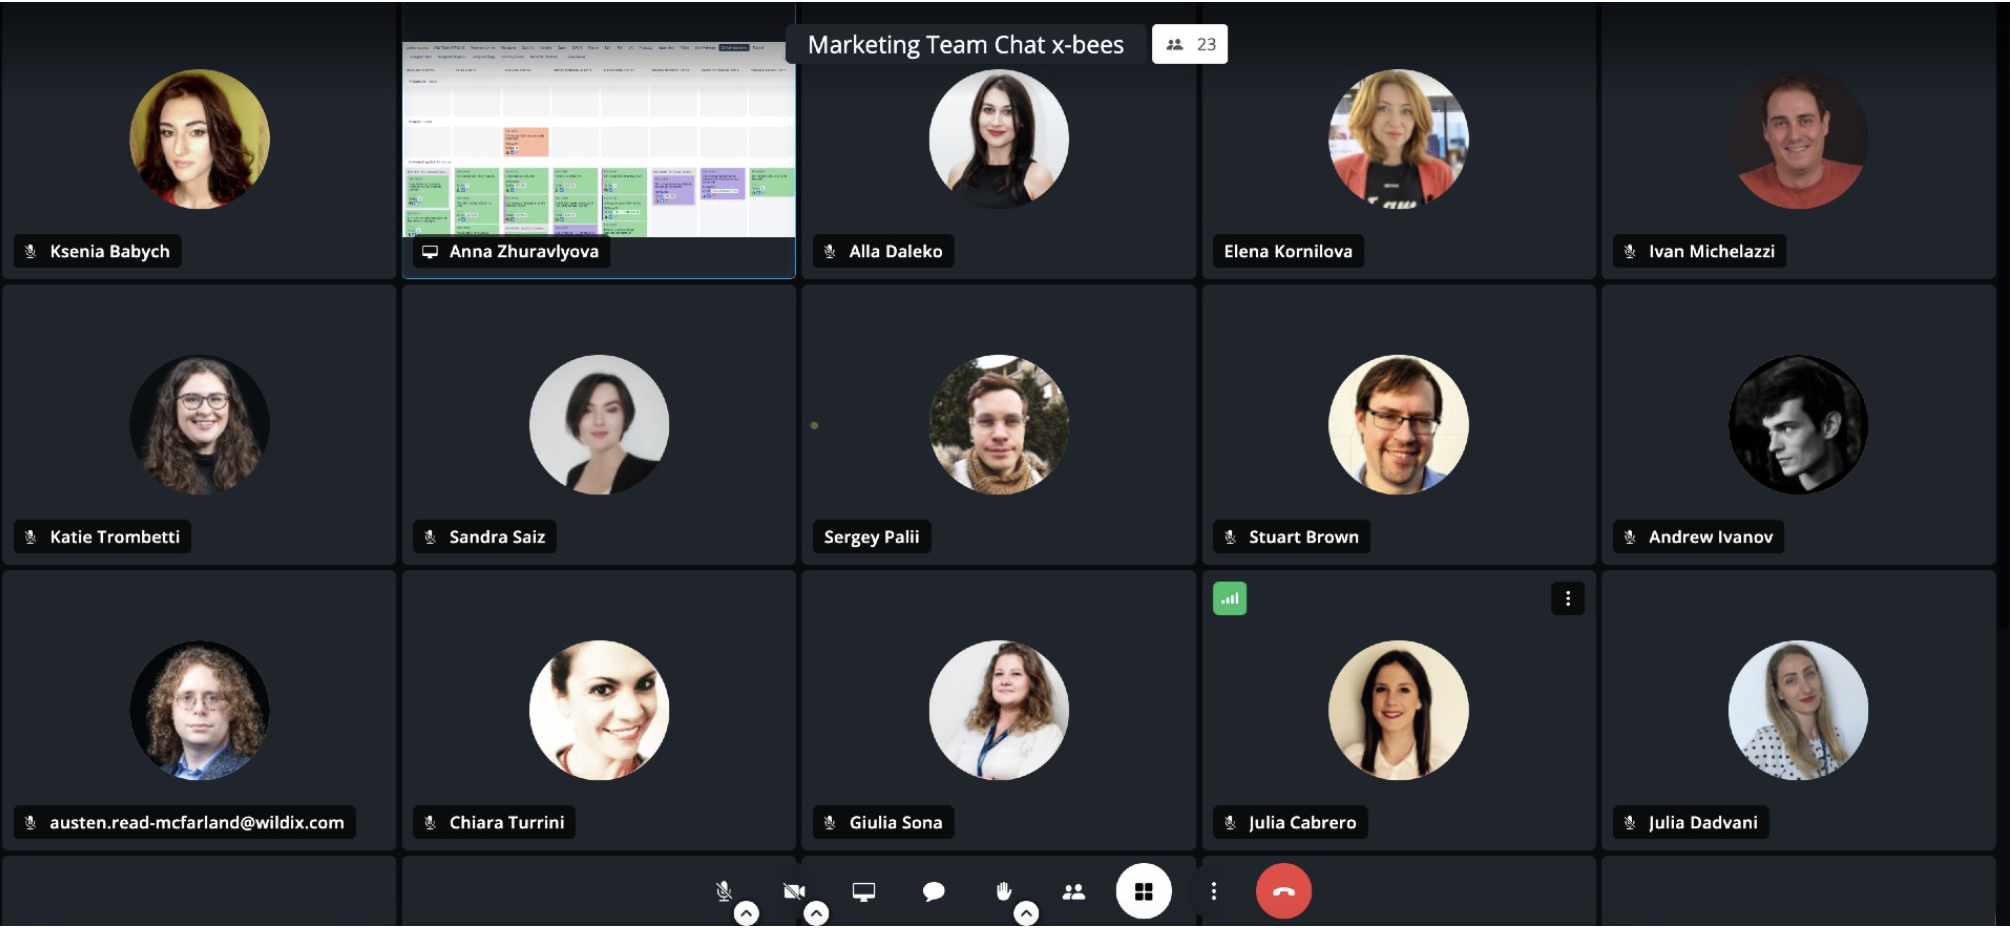

- Click Toggle tile view (Tiles icon) in the lower central side of the screen to switch between Tiles view and Sidebar view:
If required, you can change size of Sidebar view by dragging its border to the right/left:
Pin a user
To have a particular participant visible at all times, regardless of who is speaking, you can pin a user. For this, just click on the relevant user during the conference. Pinned user is displayed with the following icon:

To unpin a user, simply click on them a second time.
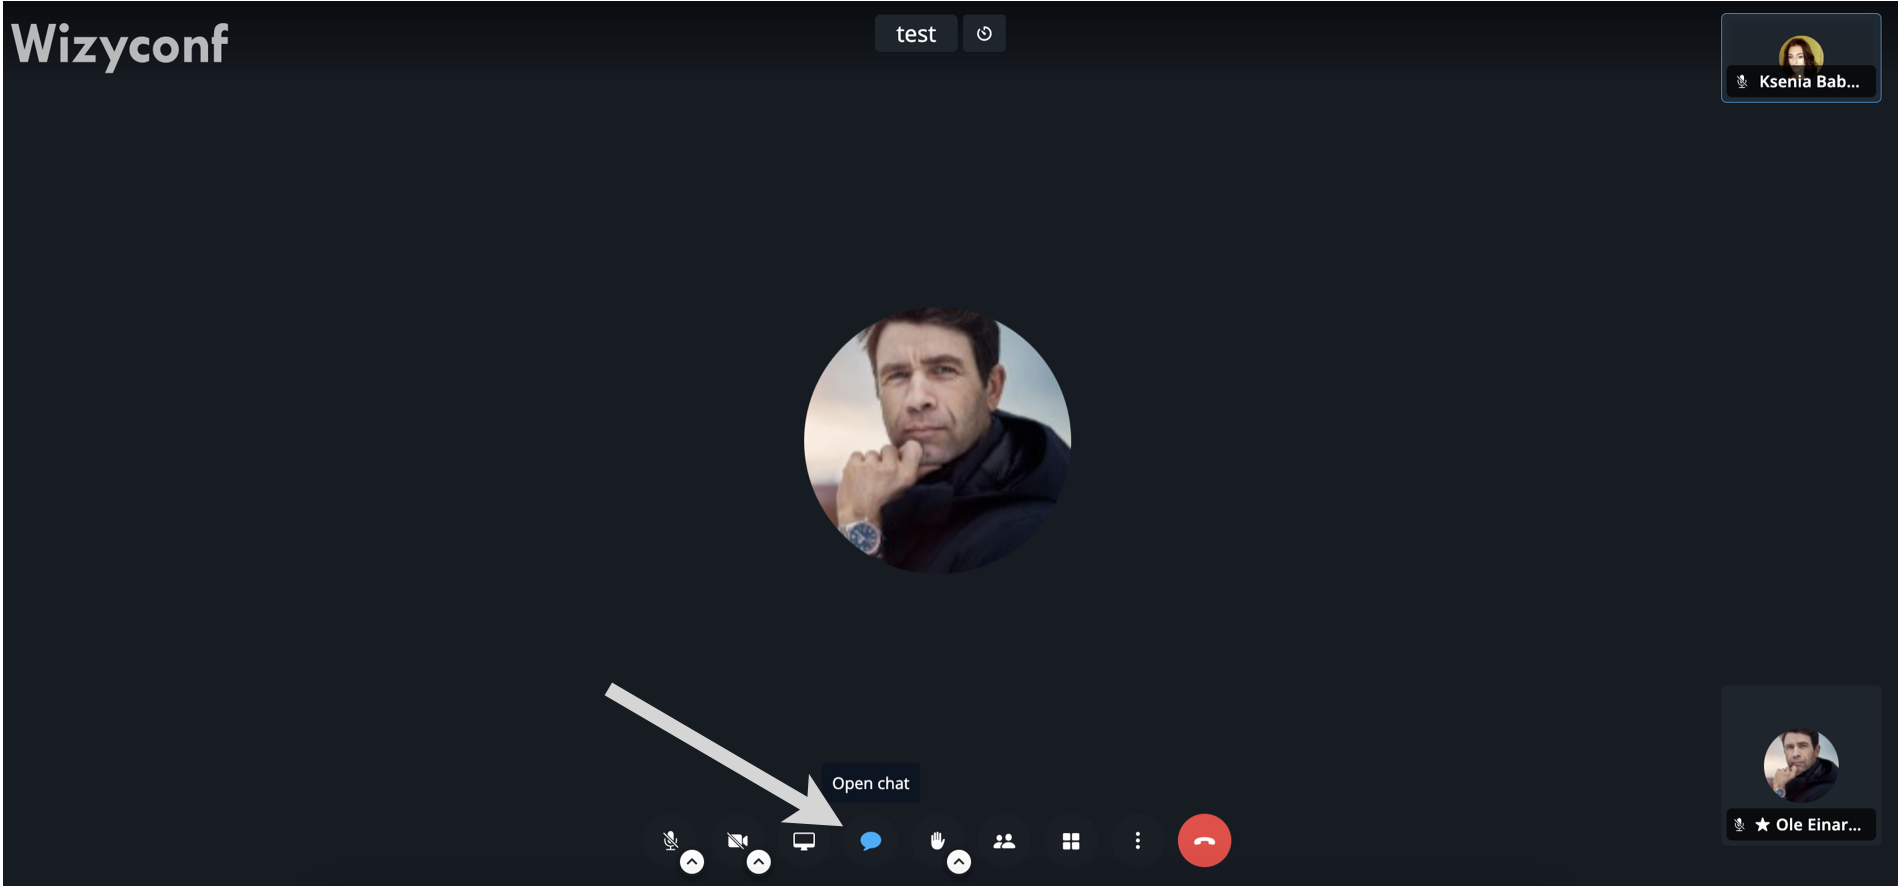
Chat and private messages
To enter group chat (with all the users):
Click on the Chat icon (Bubble icon) in the lower central side of the screen
- You can use emoticons and attach files (also via Drag&Drop)

To send a private message:
- Find the user who you want to send a private message to
- Hover the mouse cursor over three dots in the upper right-hand side of the user's preview
- Click Send private message
Private message is sent only to the selected user and can be viewed in the chat only by you and that user. Private messages are labeled as "Private message to" (in the bottom of the message):
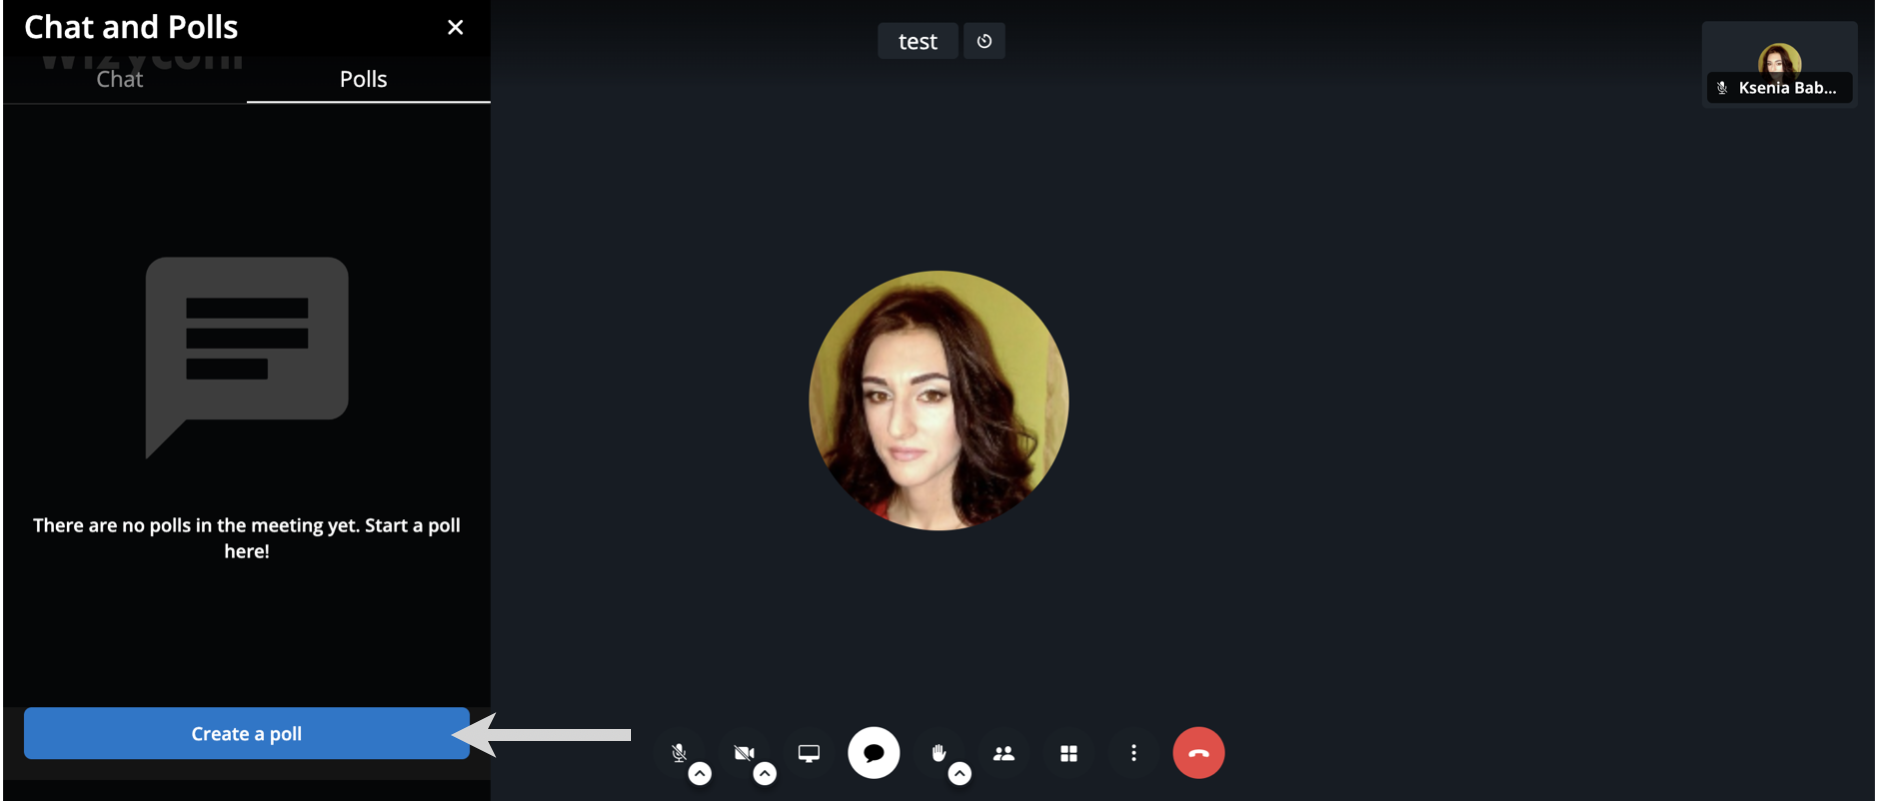
Polls
To create a poll:
- Open Chat, in Chat and Polls, go to the Polls tab
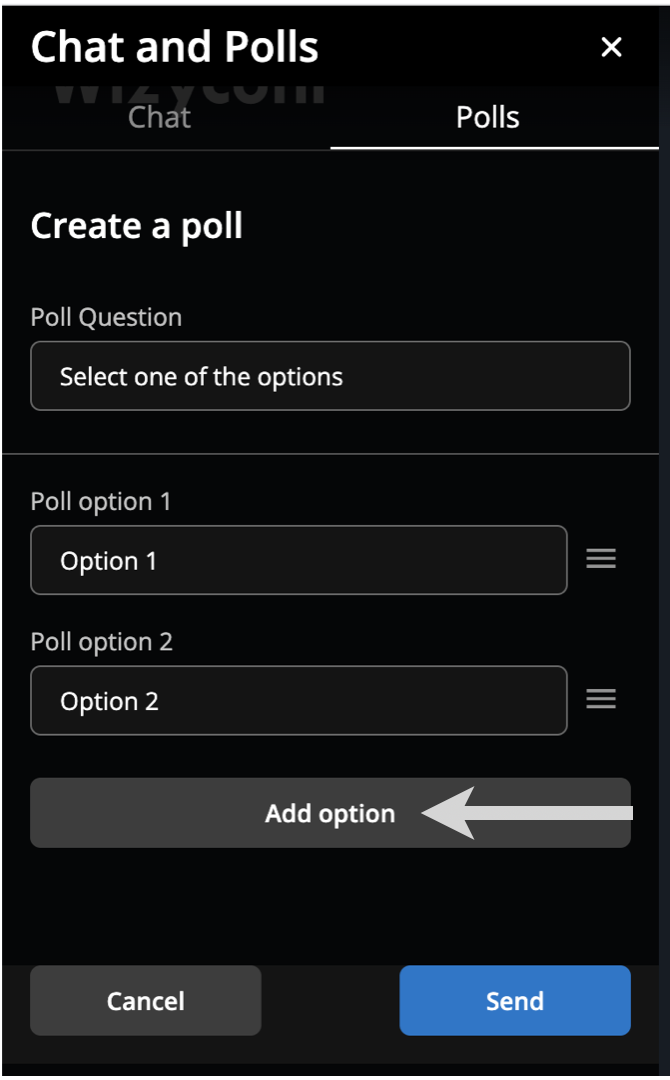
Click Create a poll:
Type your question into the field Poll Question and answer options – in the fields Poll option 1 and Poll option 2. If you need more options, click Add option:
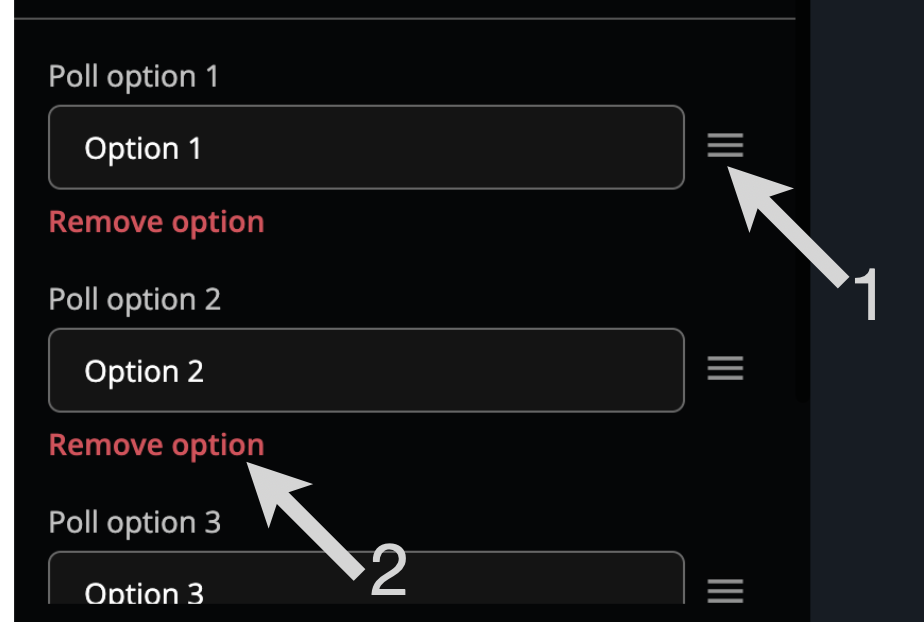
You can perform the following actions with poll options:
1) Reorder options. For this, click on the three-line button next to the necessary option and move it to the preferred place in the list.2) Remove options. If there are more than 2 options, the Remove option button appears. Click on it if you want to delete the option.
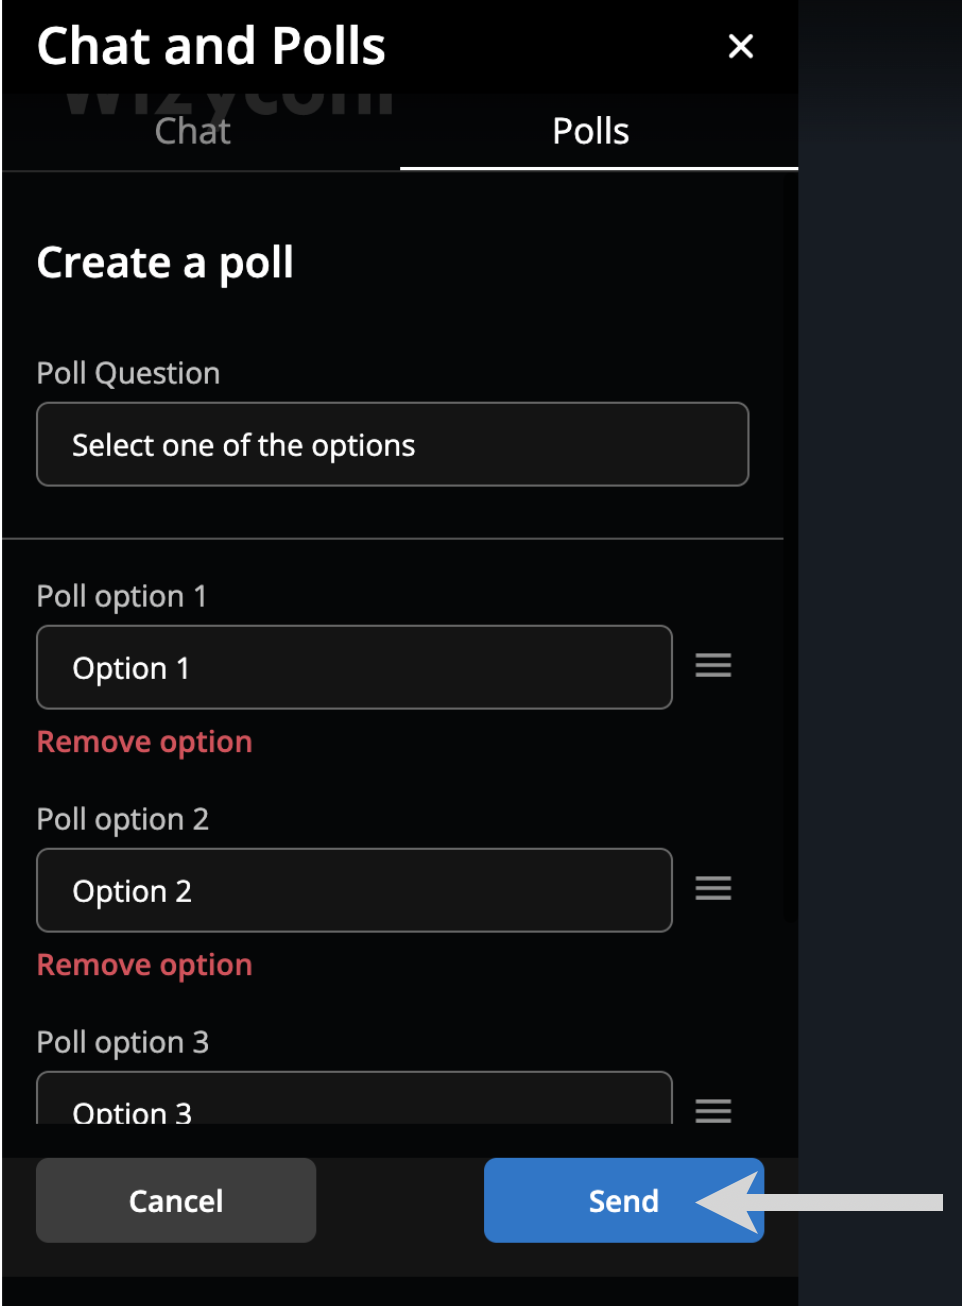
Once you’ve finished editing the poll, click Send:
The poll gets available for all members of the conference on the Polls tab of Chats and polls. To vote, select the necessary option and click Submit.
Note: By default, the poll supports multiple answers, so a user can choose and submit more than 1 option.
To change your decision, click Change vote. All users can view details of the poll by clicking the Show details button.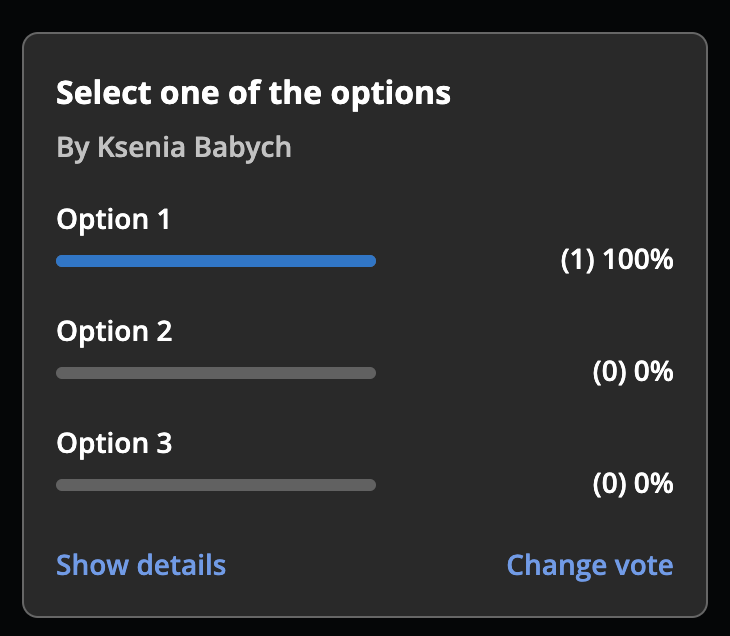
Adjust microphone volume of certain participants
You can decrease mic volume for separate users or completely mute them (for yourself):
- Find the user whose microphone volume you wish to adjust
- However the mouse cursor over three dots in the upper right-hand side of the user's preview
Move the blue indicator to the left to decrease the volume / to the right to increase the volume:

Screen sharing
Supported browsers:
- Chrome v. 72+
- Firefox v. 66+
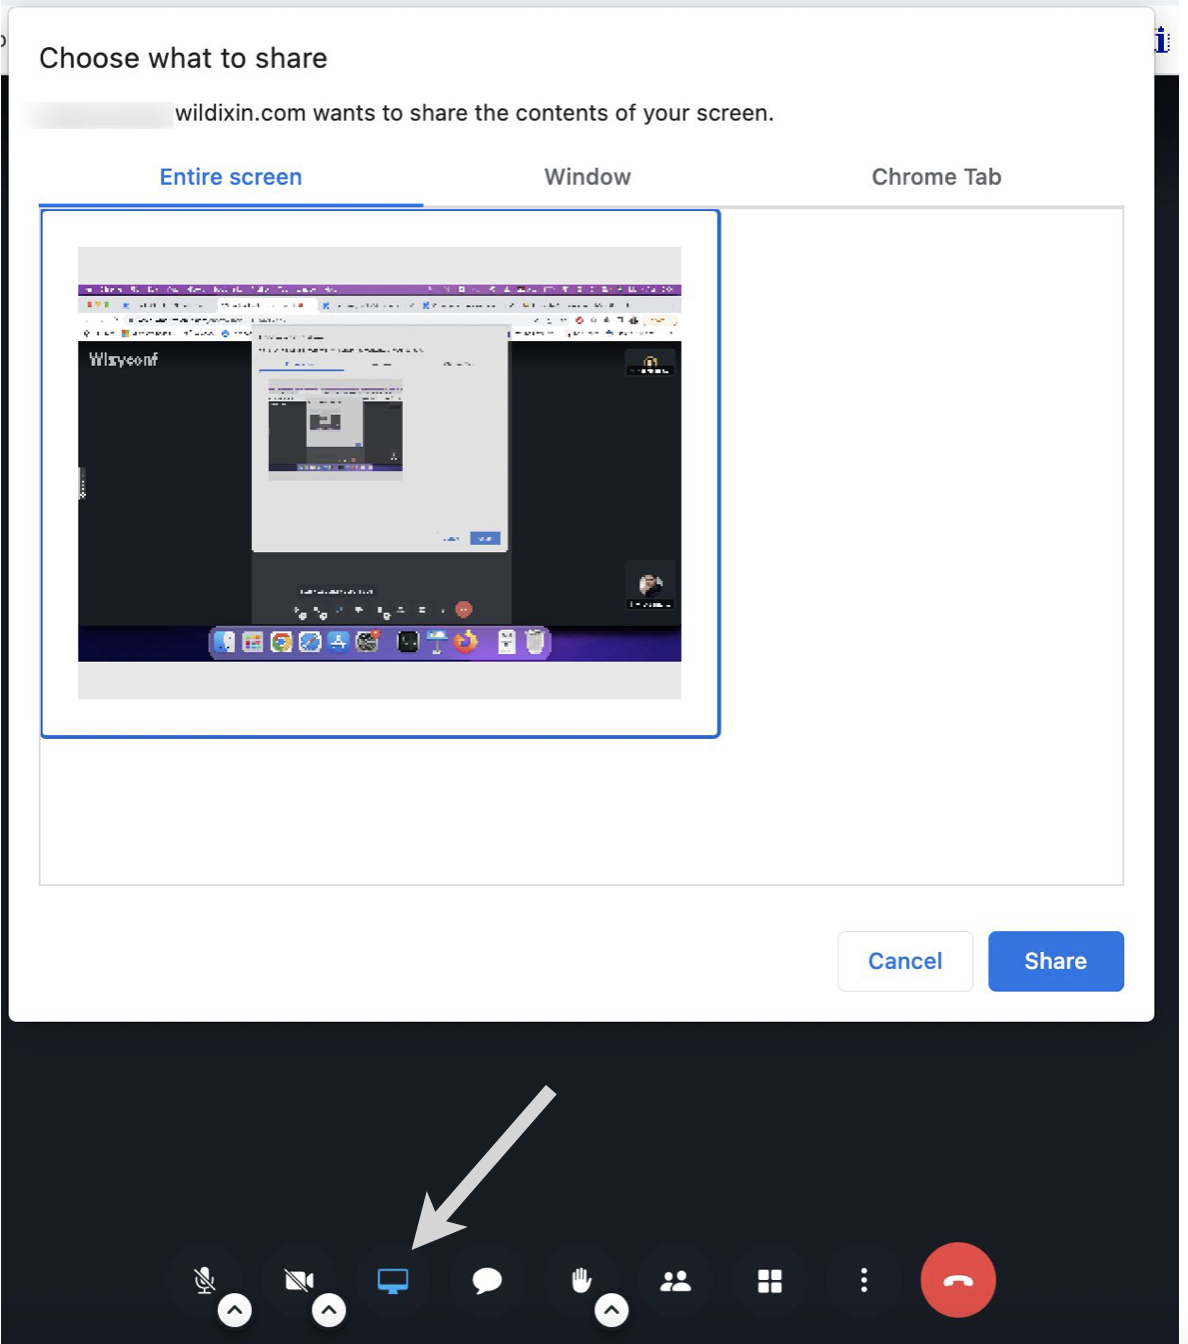
To share your screen:
Click on the Screen icon (Share your screen) in the lower central side of the screen
Select the content you want to share: the entire screen, separate application windows or your browser's tab and click Share button
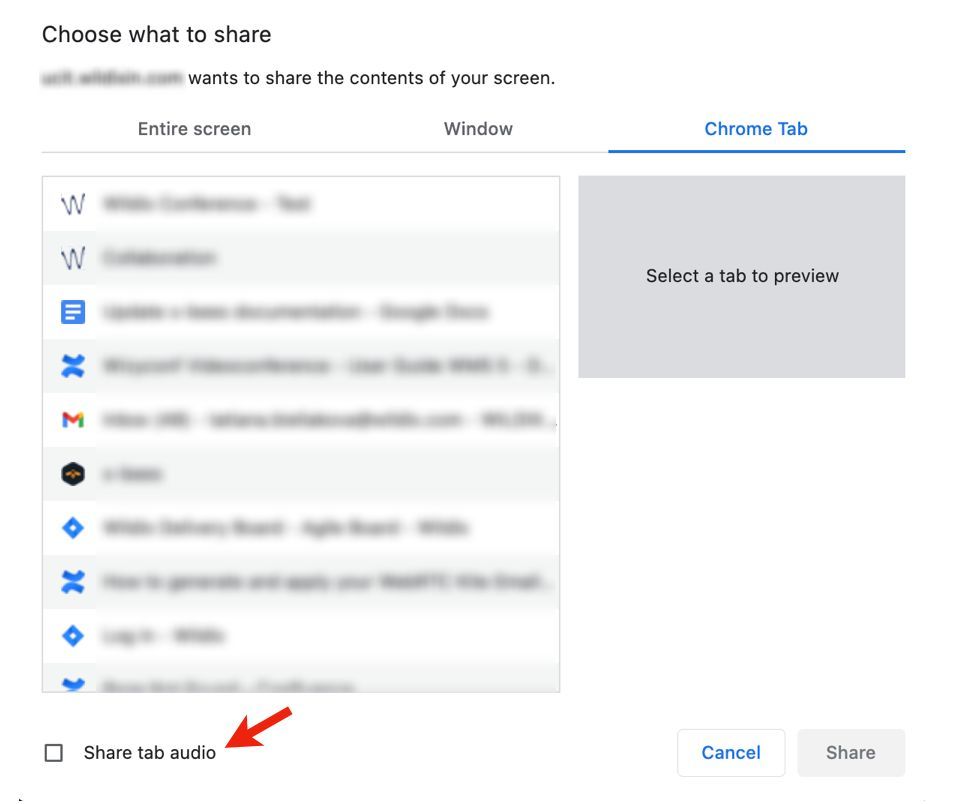
Note: When sharing Chrome tab with a muted mic, there may be an issue with unmuting. To avoid it, make sure to disable the option “Share tab audio” (enabled by default) before you start the screen sharing.
Screen icon in the lower central side of the screen turns yellow for the person who is sharing the screen.
To terminate the screen sharing session:
- Click Stop or Stop sharing button (depending on the content you are sharing)
Otherwise, you can click again the Screen icon (the icon turns white again when the screen sharing session is terminated).
Share a YouTube video
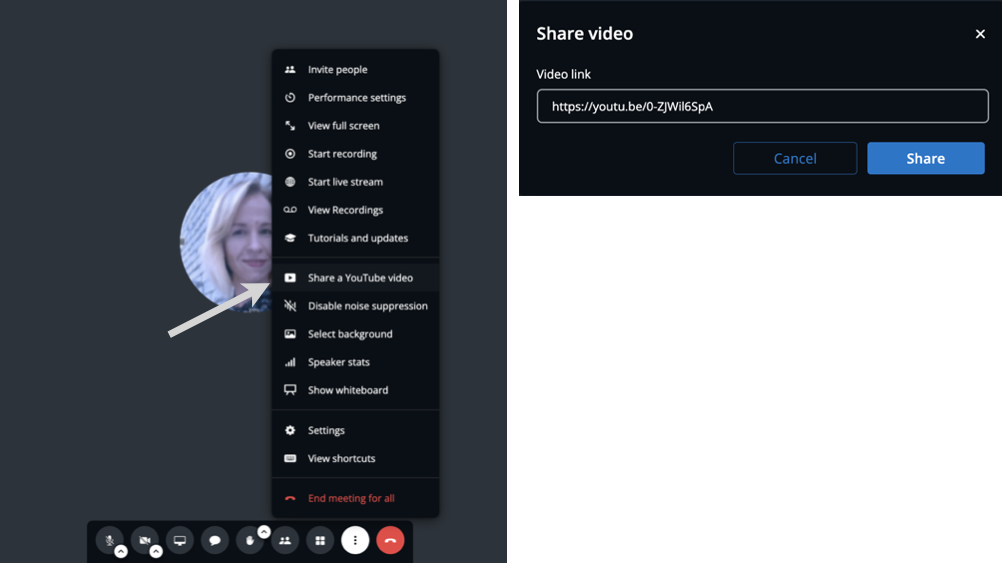
To start sharing a YouTube video:
- Click three dots (More actions) in the lower central side of the screen
- Click Share a YouTube video
A new dialog opens; paste the link to the YouTube video and click on Share
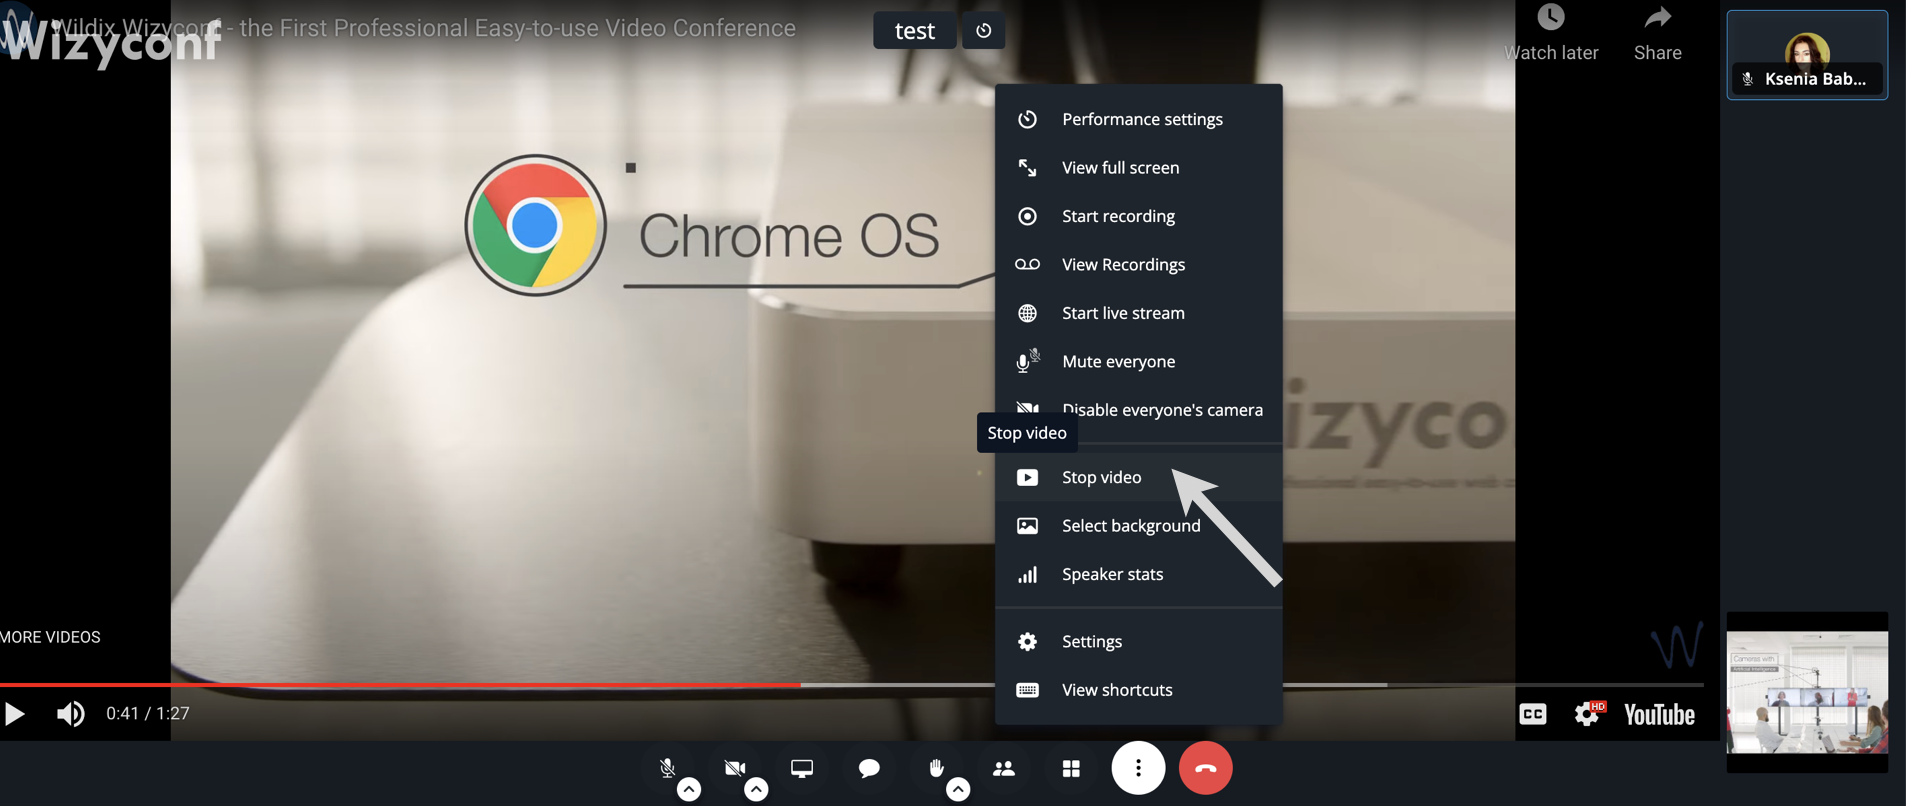
To stop sharing the video:
- Click again three dots (More actions) in the lower central side of the screen
- Click Stop video, the video sharing is stopped
Raise your hand/ Send reactions/gifs
To raise your hand:
- Click on the Hand icon (Raise/ Lower your hand) in the lower central side of the screen
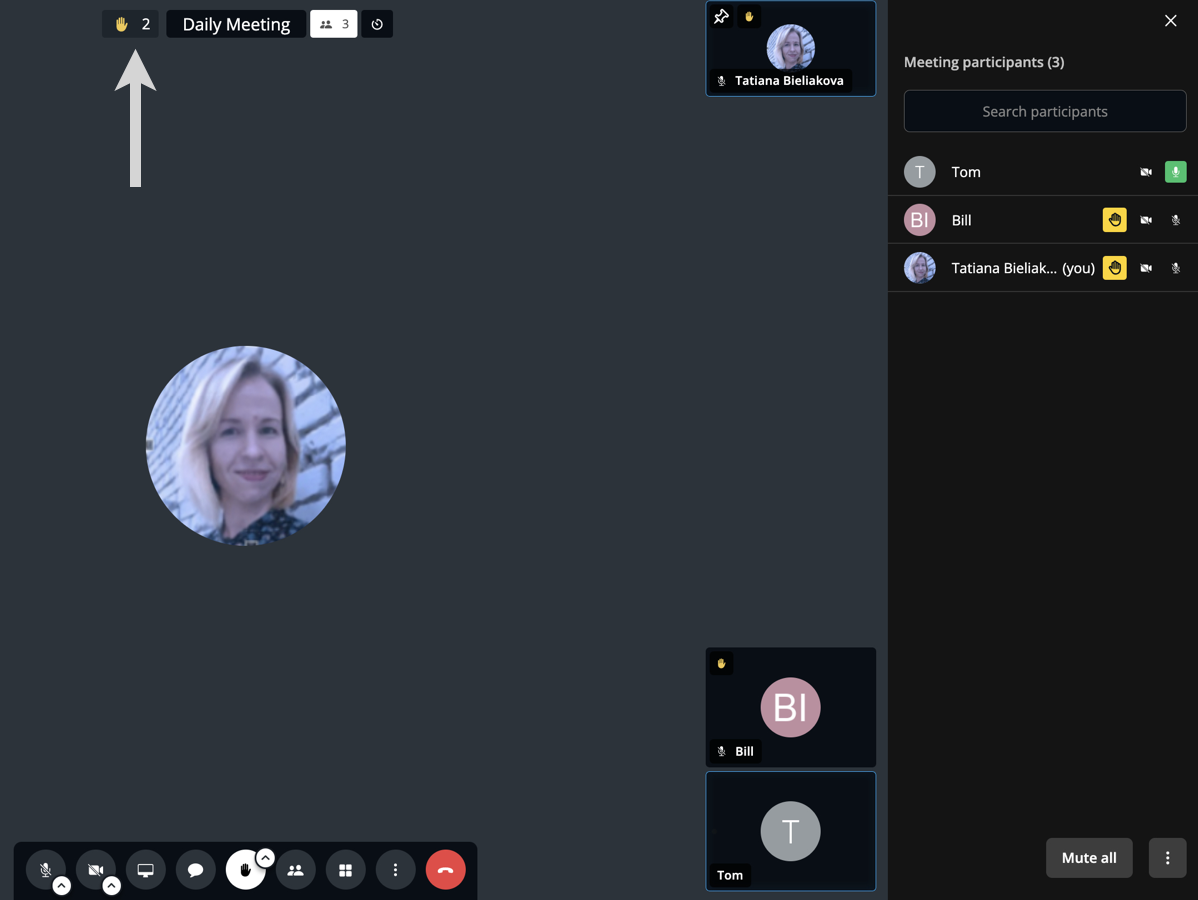
- The Hand icon turns yellow for the user who has raised the hand. A yellow Hand icon is displayed in the upper part of the preview of the user who has raised the hand:
![]()
User who has raised a hand can click the Hand icon once again to lower the hand (in this case the Hand icon will turn white again).
Note: the Hand is automatically lowered if a participant starts talking.
To view all users who raised their hands:
- Click on the Yellow Hand icon in the upper central side of the screen:
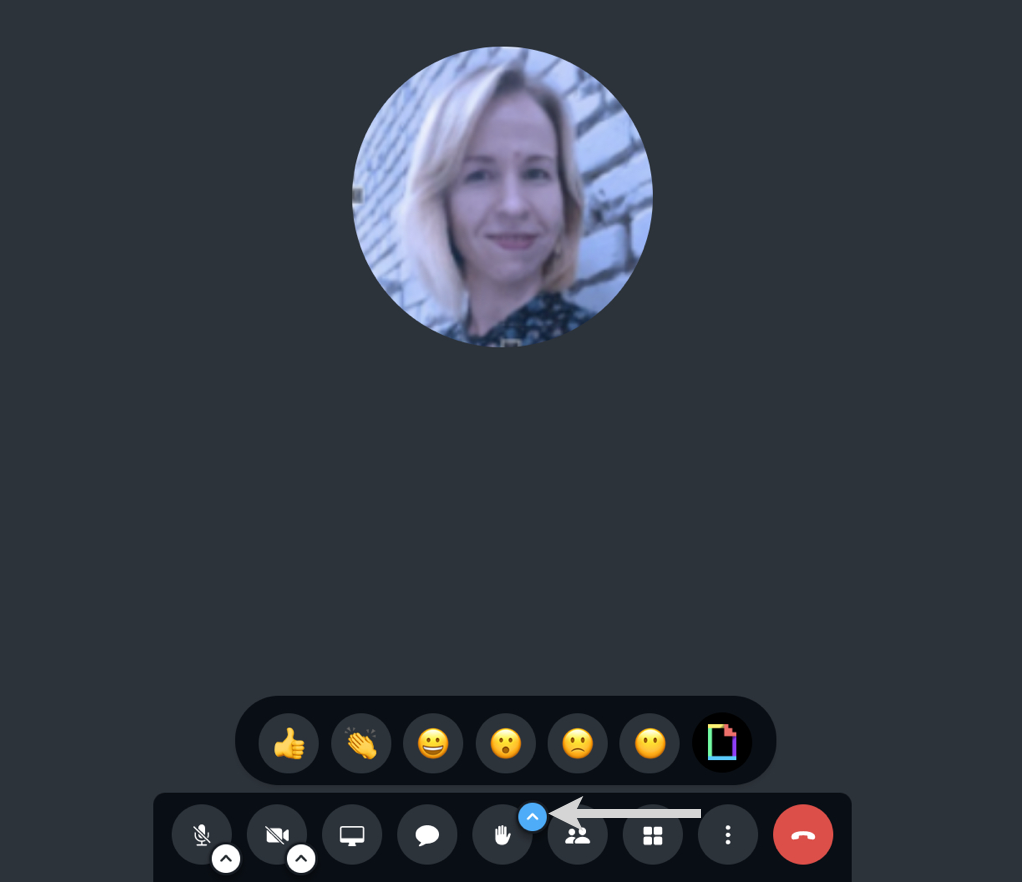
To send a reaction:
- Click on the Arrow up icon (Open reactions menu) and click on a reaction
To send a gif:
- Click on the Arrow up icon (Open reactions menu) -> click on a GIPHY icon -> choose a gif:
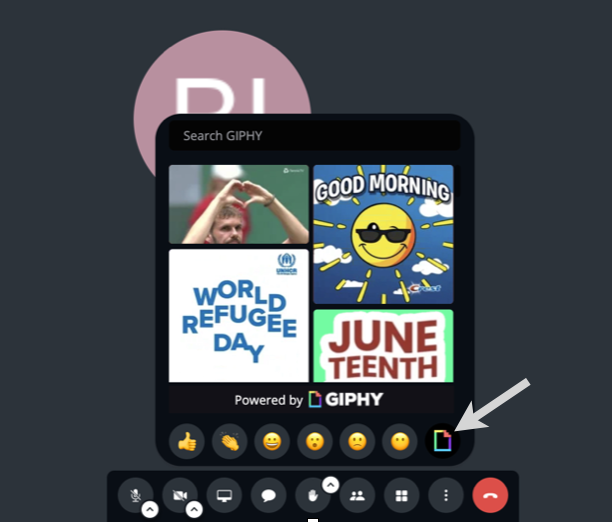
The gif you sent is displayed in the conference chat:

Moderator control options
In addition to being able to decide whether participants should start with their webcams and microphones enabled/ disabled, there are other options reserved for the conference moderator:
- Mute separate users or ask them to unmute
- Mute all users except for one
- Disable camera of separate users
- Disable camera of all users except for one
- Expel users from the conference
- Conference recording
- Live streaming
Mute users
This option is reserved for the conference moderator only.
To mute a user:
- Find the user you want to mute
- Hover the mouse cursor over three dots in the upper right-hand side of the user's preview
- Click Mute
- A new dialog opens, click on Mute to confirm
Note: Users who joined in audio-only mode are notified once they are muted.
You can ask a user to unmute:
- Find the user you want to be unmuted
- Hover the mouse cursor over three dots in the upper right-hand side of the user's preview
- Click Ask to unmute
To mute everyone:
- Click three dots (More actions) in the lower central side of the screen
- Click Mute everyone
A new dialog opens, click on Mute to confirm

In this way you can mute everyone except yourself. You cannot unmute other users, but they can unmute themselves.
To mute everyone else except for one user:
- Hover the mouse cursor over three dots in the upper right-hand side of the user's preview
- A new dialog opens, click on Mute to confirm

Disable users' camera
This option is reserved for the conference moderator only.
To disable user's camera:
- Find the user you want to disable camera for
- Hover the mouse cursor over three dots in the upper right-hand side of the user's preview
- Click Stop video
- A new dialog opens, click on Stop video to confirm

To disable everyone's camera:
- Click three dots (More actions) in the lower central side of the screen
- Click Disable everyone's camera
A new dialog opens, click on Stop video to confirm

To disable everyone's camera except for one user:
- Hover the mouse cursor over three dots in the upper right-hand side of the user's preview
- Click Disable camera of everyone else
- A new dialog opens, click on Stop video to confirm
Expel users from a conference
This option is reserved for the conference moderator only.
To expel a user:
- Find the user you want to expel
- Hover the mouse cursor over three dots in the upper right-hand side of the user's preview
- Click on Kick out
Conference recording
Only users within a PBX can manage recordings (start, stop, access the list of recordings); not unavailable for external users.
Limitation: a recording is automatically stopped after reaching 2 hours or if a file size exceeds 2 GB. Once it is stopped, you can start it again.
Note, that live streaming option is disabled when conference recording is running.
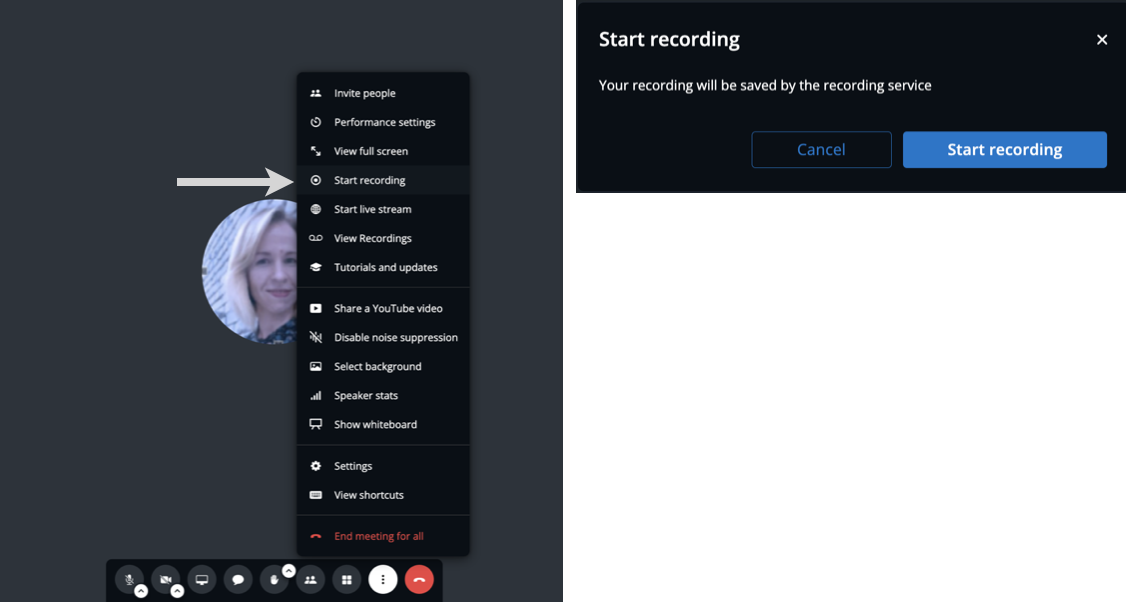
To start recording:
- Click on three dots (More actions) in the lower central side of the screen
- Click Start recording
- A new dialog opens, click Start recording to confirm
Recording starts in several seconds. Red REC icon is displayed in the upper right-hand part of the screen when the recording is running.
Note: watermark and list of participants are now not included in recordings.
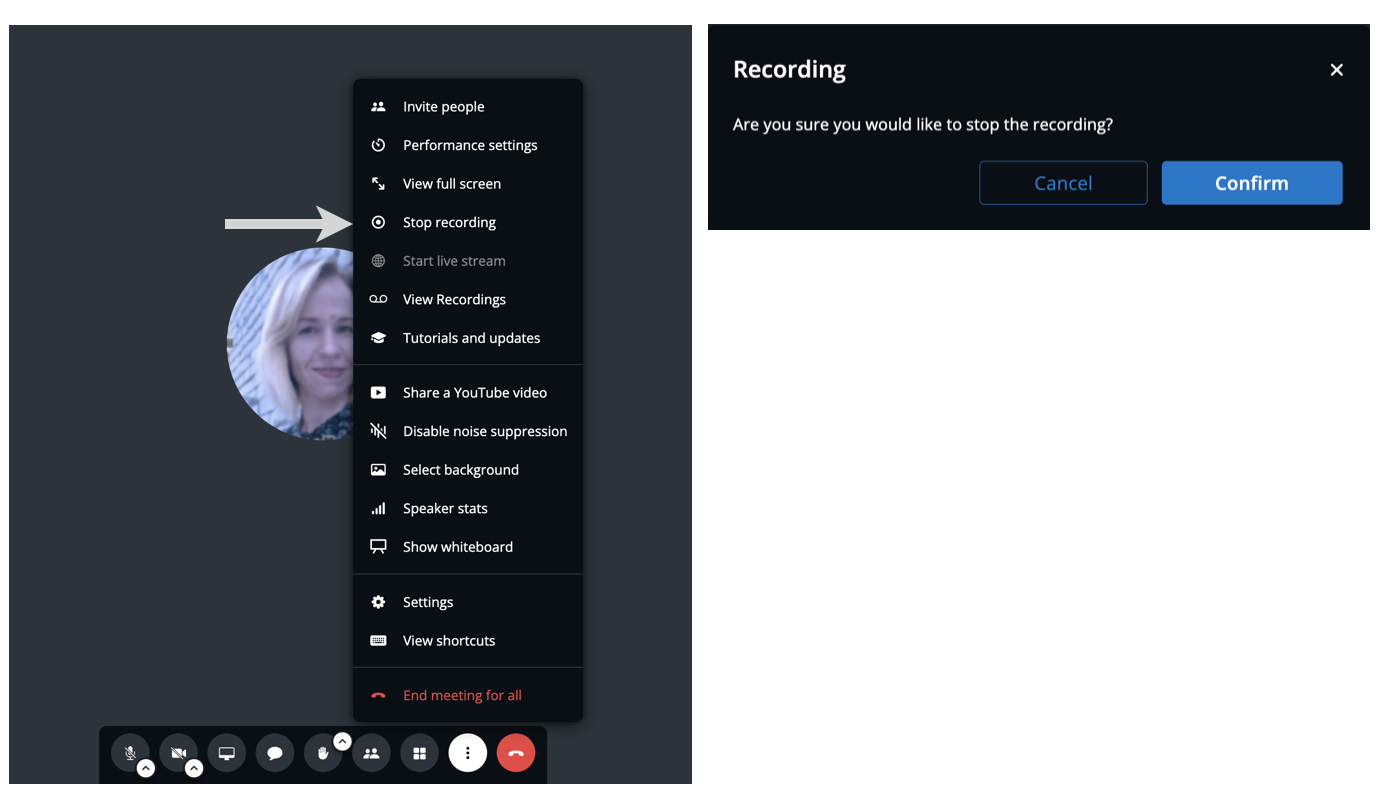
To stop recording:
- Click again on three dots (More actions) in the lower central side of the screen
- Click Stop recording
- A new dialog opens, click Confirm
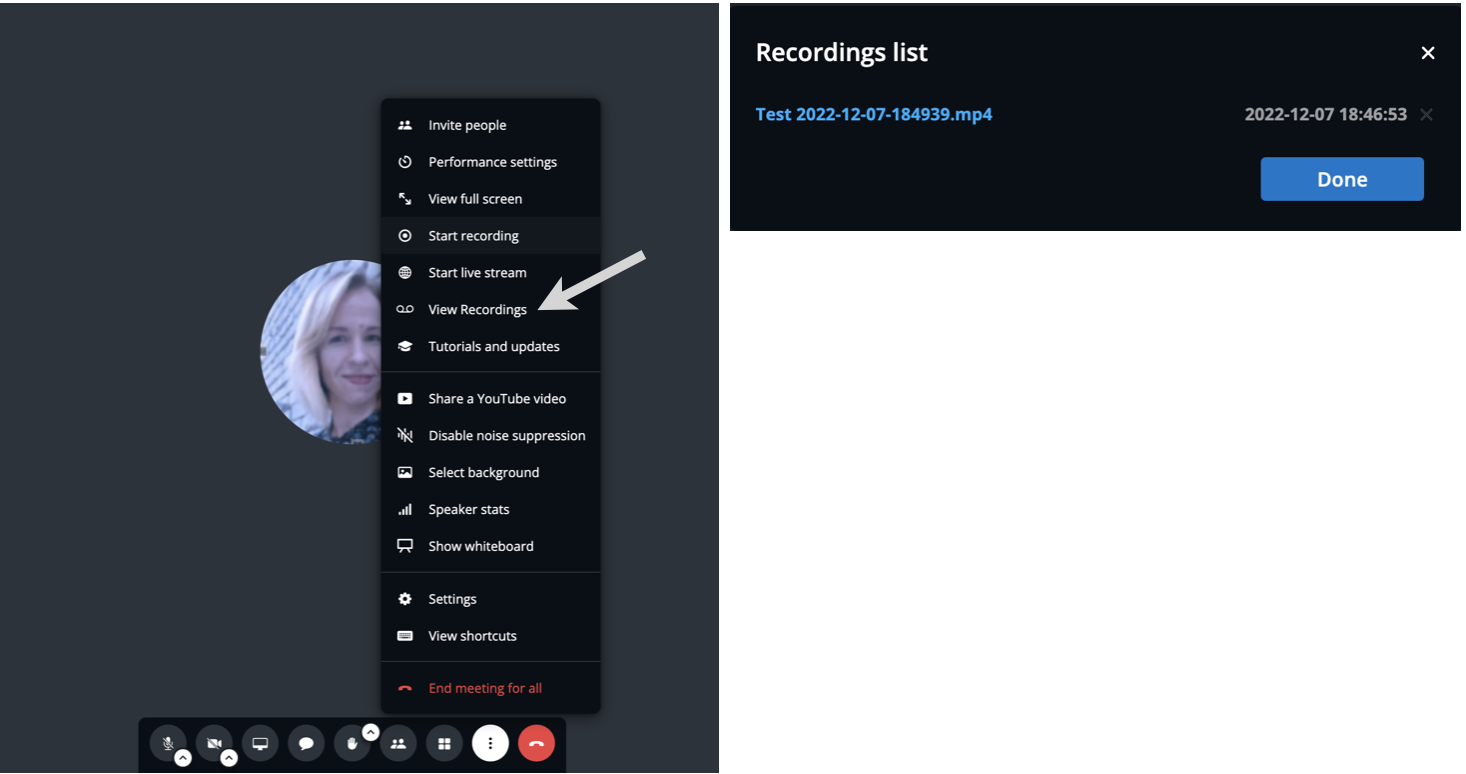
To download recording files:
- Click again on three dots (More actions) in the lower central side of the screen
- Click View Recordings
- A new dialog Recordings list opens, click on the file(s) to download
- Click Done to close the dialog
To delete recording files manually:
- Access Recordings list as described above
- Click on X next to a recording you to want to delete (you can only delete your own recordings, recordings started by other participants cannot be deleted):
- To confirm, click Yes

Files are automatically deleted after 6 months or in case conference room is deleted. Please take into account that conference room is automatically deleted after 30 days of inactivity.
Live streaming
Only users within a PBX can start or stop live streams; not unavailable for external users.
Limitation: a live streaming is automatically stopped after reaching 2 hours or if a file size exceeds 2 GB. Once it is stopped, you can start it again.
Note, that conference recording option is disabled when live streaming is running
This feature allows you to make live streaming of your conference to YouTube and Facebook.
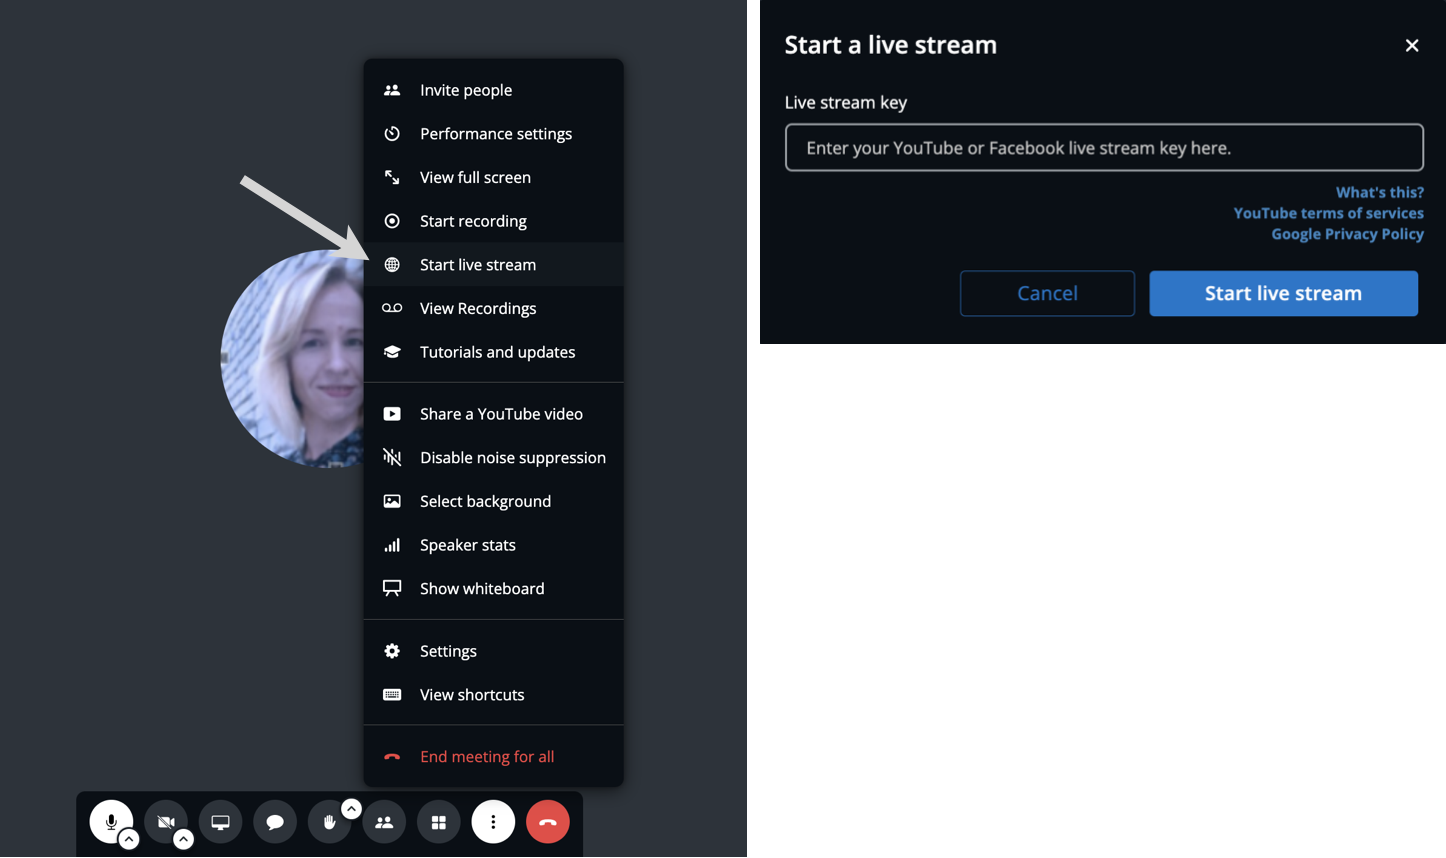
To start live streaming:
- Click on three dots in the lower central side of the screen
- Click Start live stream
- New dialog opens; enter the Live stream key and click Start live stream
Blue LIVE icon is displayed in the upper right-hand part of the screen when the live streaming is running.
For information on how to retrieve the Streaming Key for Facebook and YouTube, refer to Live Streaming Guide.
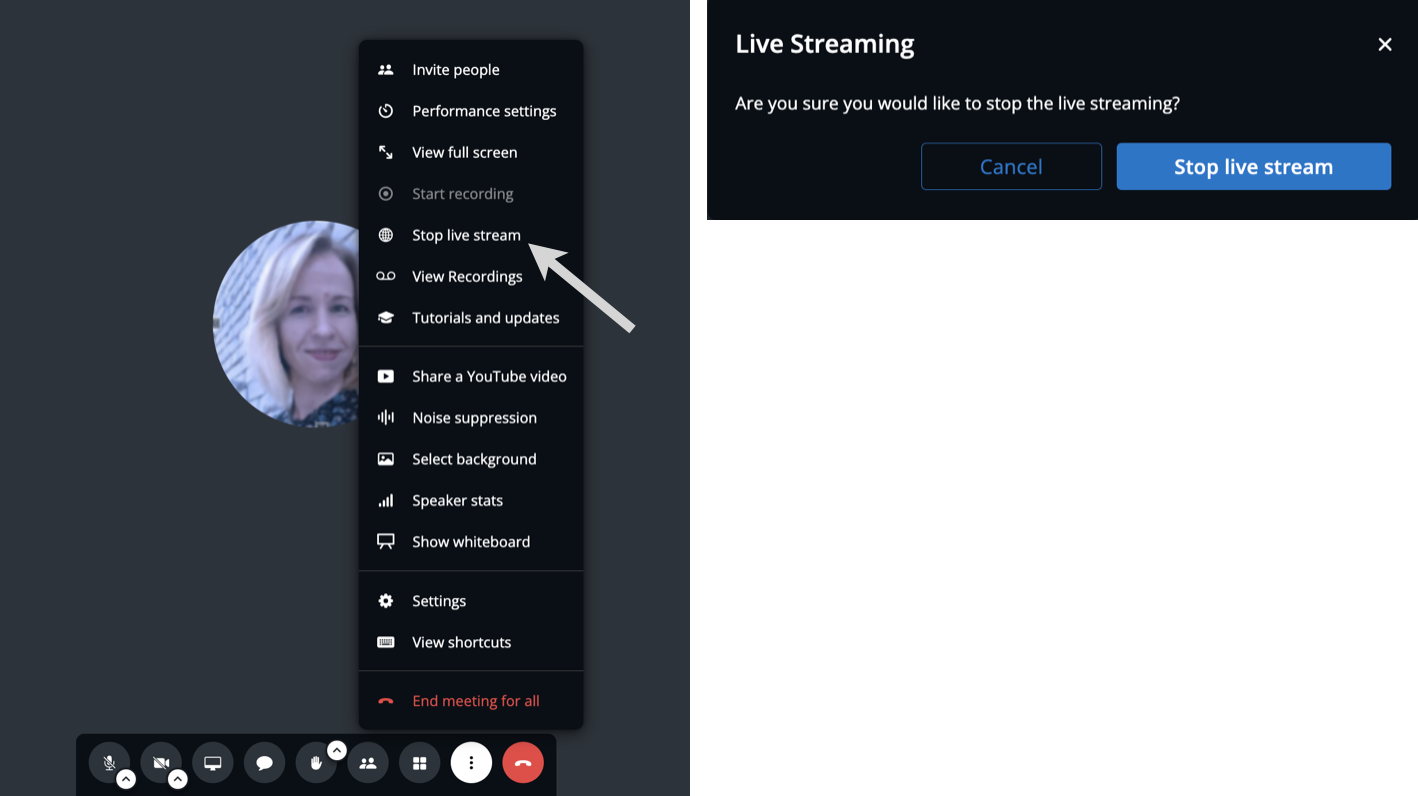
To stop live streaming:
- Click once again on three dots in the lower central side of the screen
- Click Stop live stream
- New dialog opens; click Stop live stream to confirm
Exit and delete a conference room
Only the conference moderator can delete a conference room. If you are an invited user, you can exit from the room. The room is removed from your list of conferences in Collaboration.
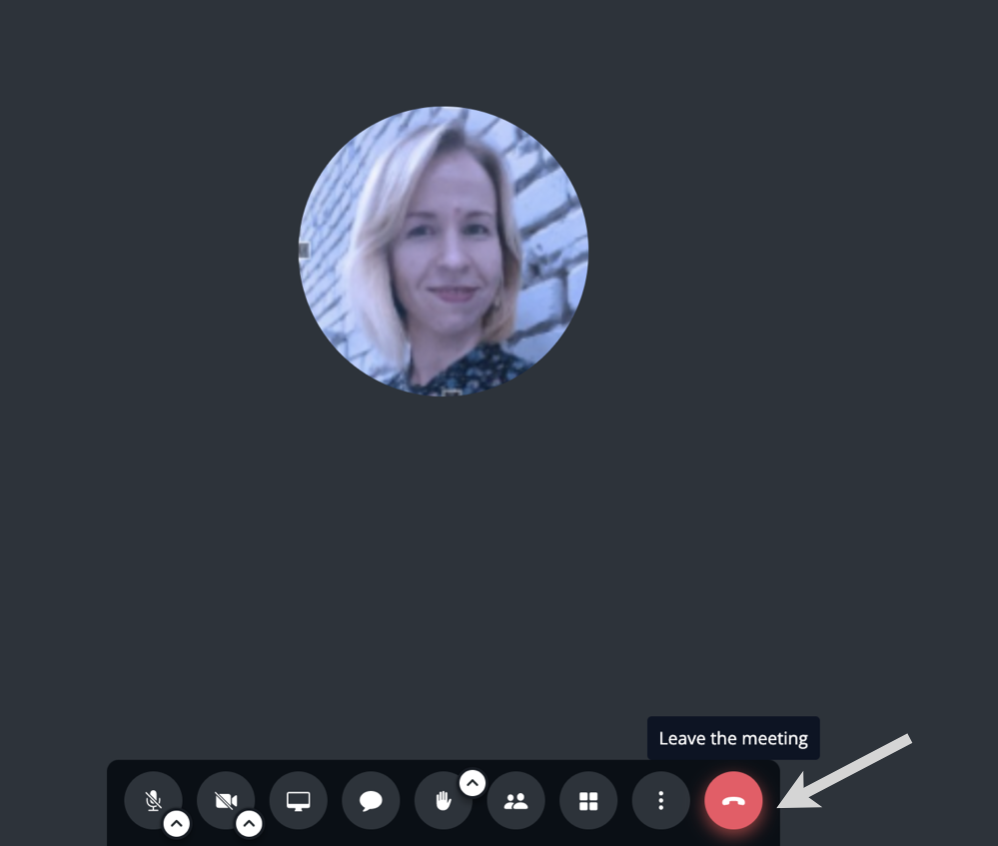
To leave the conference:
- Click the red handset icon (Leave the meeting) in the lower central side of the screen to leave the conference:
If a user is left alone in a conference for more then a minute, the relevant notification is displayed and the conference session is stopped automatically within 30 seconds:
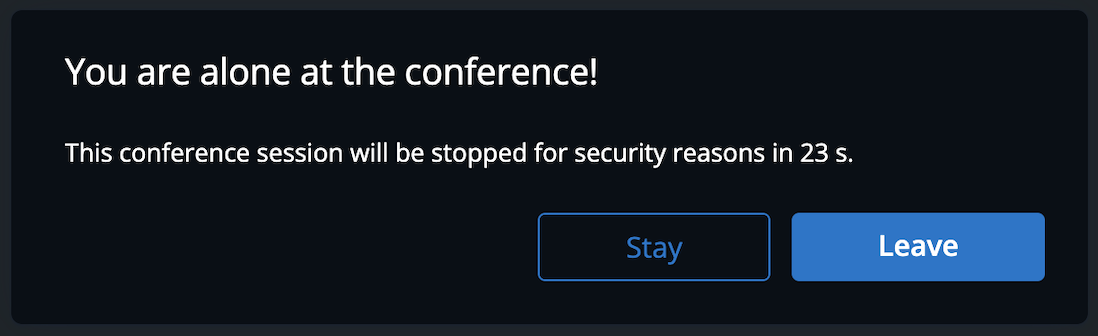
Note: Conference is stopped automatically if it had at least 2 participants.
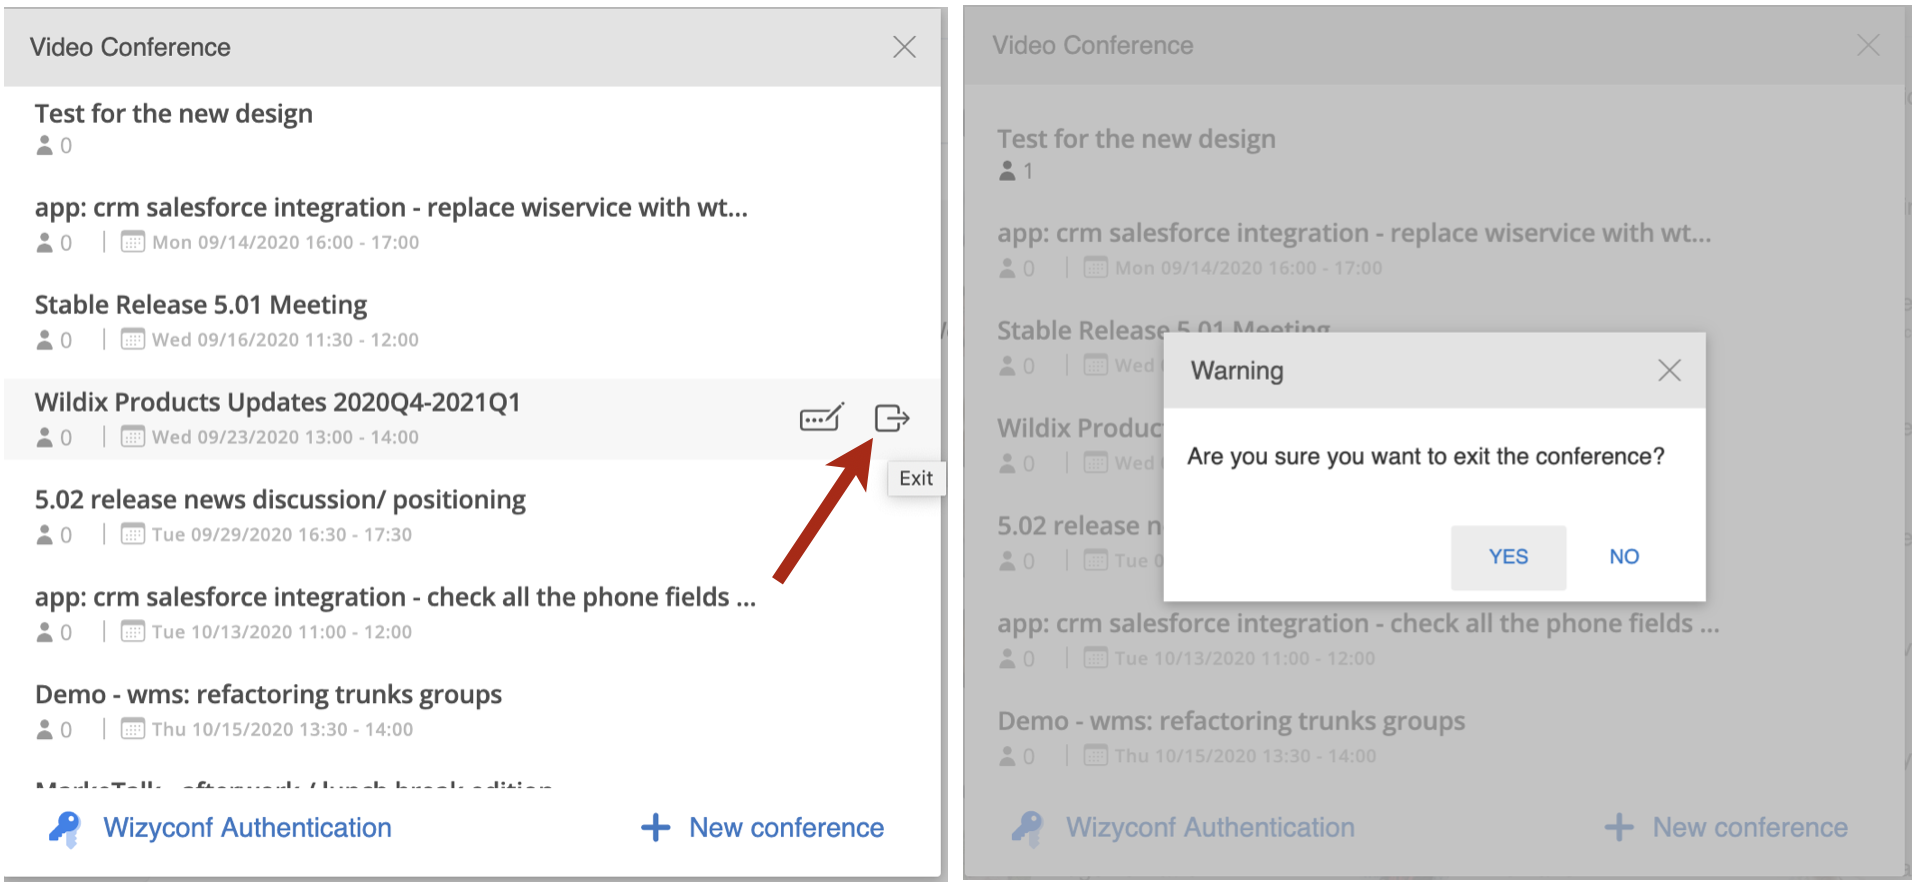
To leave the conference and remove it from the list of conferences in Collaboration:
- Open the Video Conference dialog in Collaboration
- Find the conference in the list and hover the mouse cursor over it
- Click on the Leave icon (Exit) on the right-hand side of the conference title
- Click YES to exit the conference (the conference will no longer appear in the list of conferences in Collaboration for you)
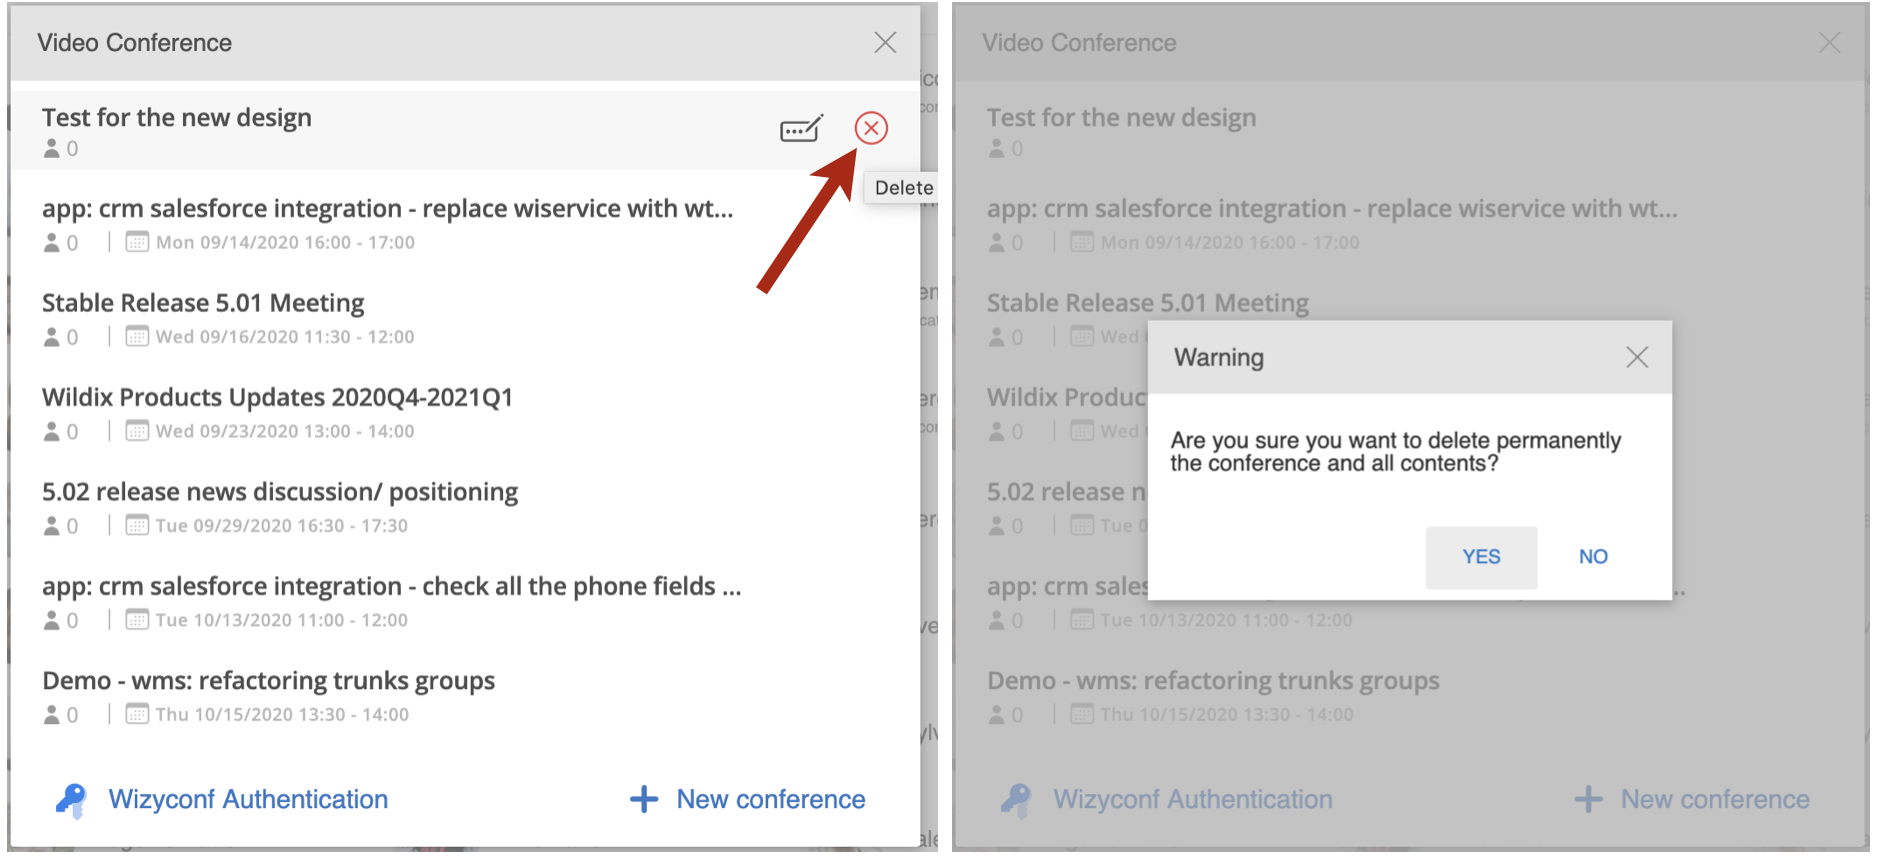
To delete the conference:
To delete:
- Open Video Conference dialog in Collaboration
- Find the conference in the list and hover the mouse cursor over it
- Click on the X icon (Delete) on the right-hand side of the conference title
Click YES to permanently delete the conference and all its contents (the conference will no longer be available)
Miscellaneous
Speaker stats
You can view speaker statistics, to understand how much time each user spoke during the conference:
- Click on three dots in the lower central side of the screen
- Click Speaker stats
- New dialog Speaker Stats opens:

The same dialog can be also opened when you click on the number of participants in the top of the conference (displayed if there are at least 3 participants in the conference):

Speaker stats gets reset each time you leave/ access again the conference room or in case you refresh the browser tab.
Talk ratio and Hints
Wizyconf offers functionality, especially useful for sales people, that allows to monitor the talk ratio, duration of the longest monologue and shows hints to agents during the conference.
Note: The functionality is available for PBX users only.
Talk ratio is shown at the top, next to the number of participants, after at least two conference participants have talked in the conference.
Click on it to see top 5 participants with the highest talk ratio:
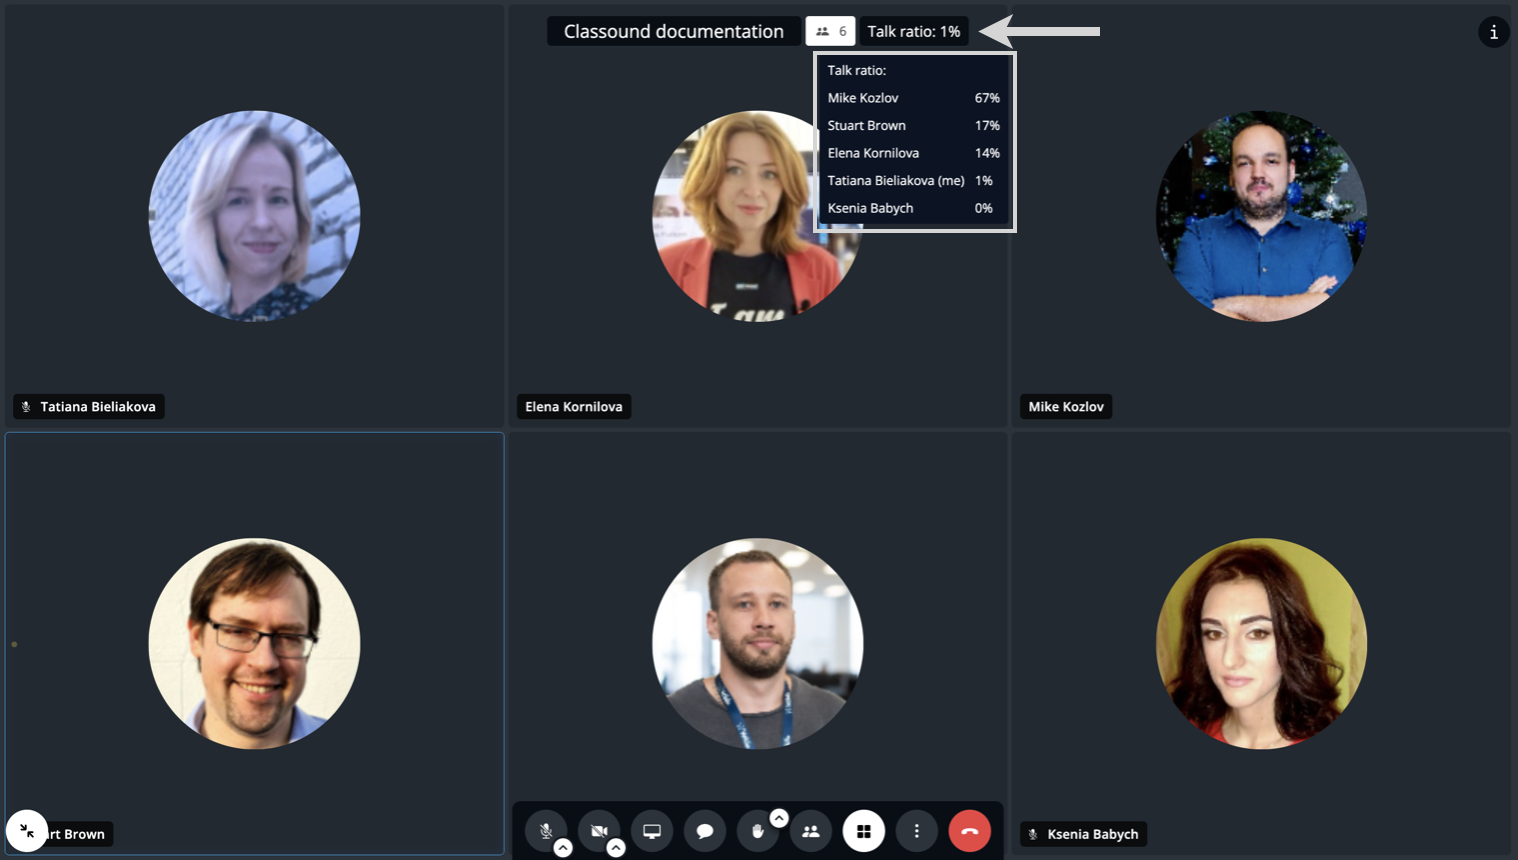
Talk ratio is also displayed on Speaker Stats window under Speaker Time, which includes total talk time | the longest monologue | talk ratio compared to other participants:

Enable Hints
You can enable real-time sales coaching hints to be shown to agents during the conference. To activate hints, go to More actions -> Settings -> Hints -> tick off Enable real-time hints:

If you want hints to be accompanied with sound, tick off Enable sound for hints. In Talk ratio section, choose one of the below options:
- Agent over Customer 40 / 60 % (for discovery calls)
- Agent over Customer 60 / 40 %
- Agent over Customer 80 / 20 % (for demos)
In case the chosen talk ratio is not kept, hint is shown to agent displaying information about agent’s talk ratio and duration of the longest monologue: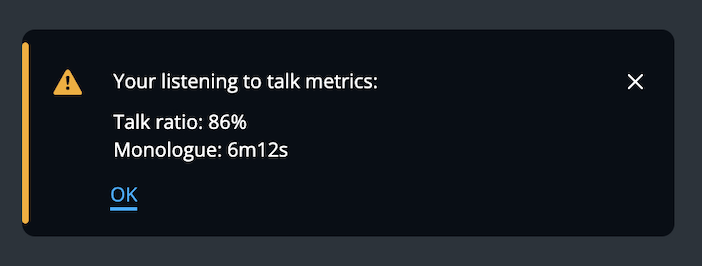
Note: The first notification is shown not earlier than in 5 minutes after the conference start. Further notifications are displayed in the following intervals: after 3 minutes, 7 minutes, 15 minutes.
Connection quality indication
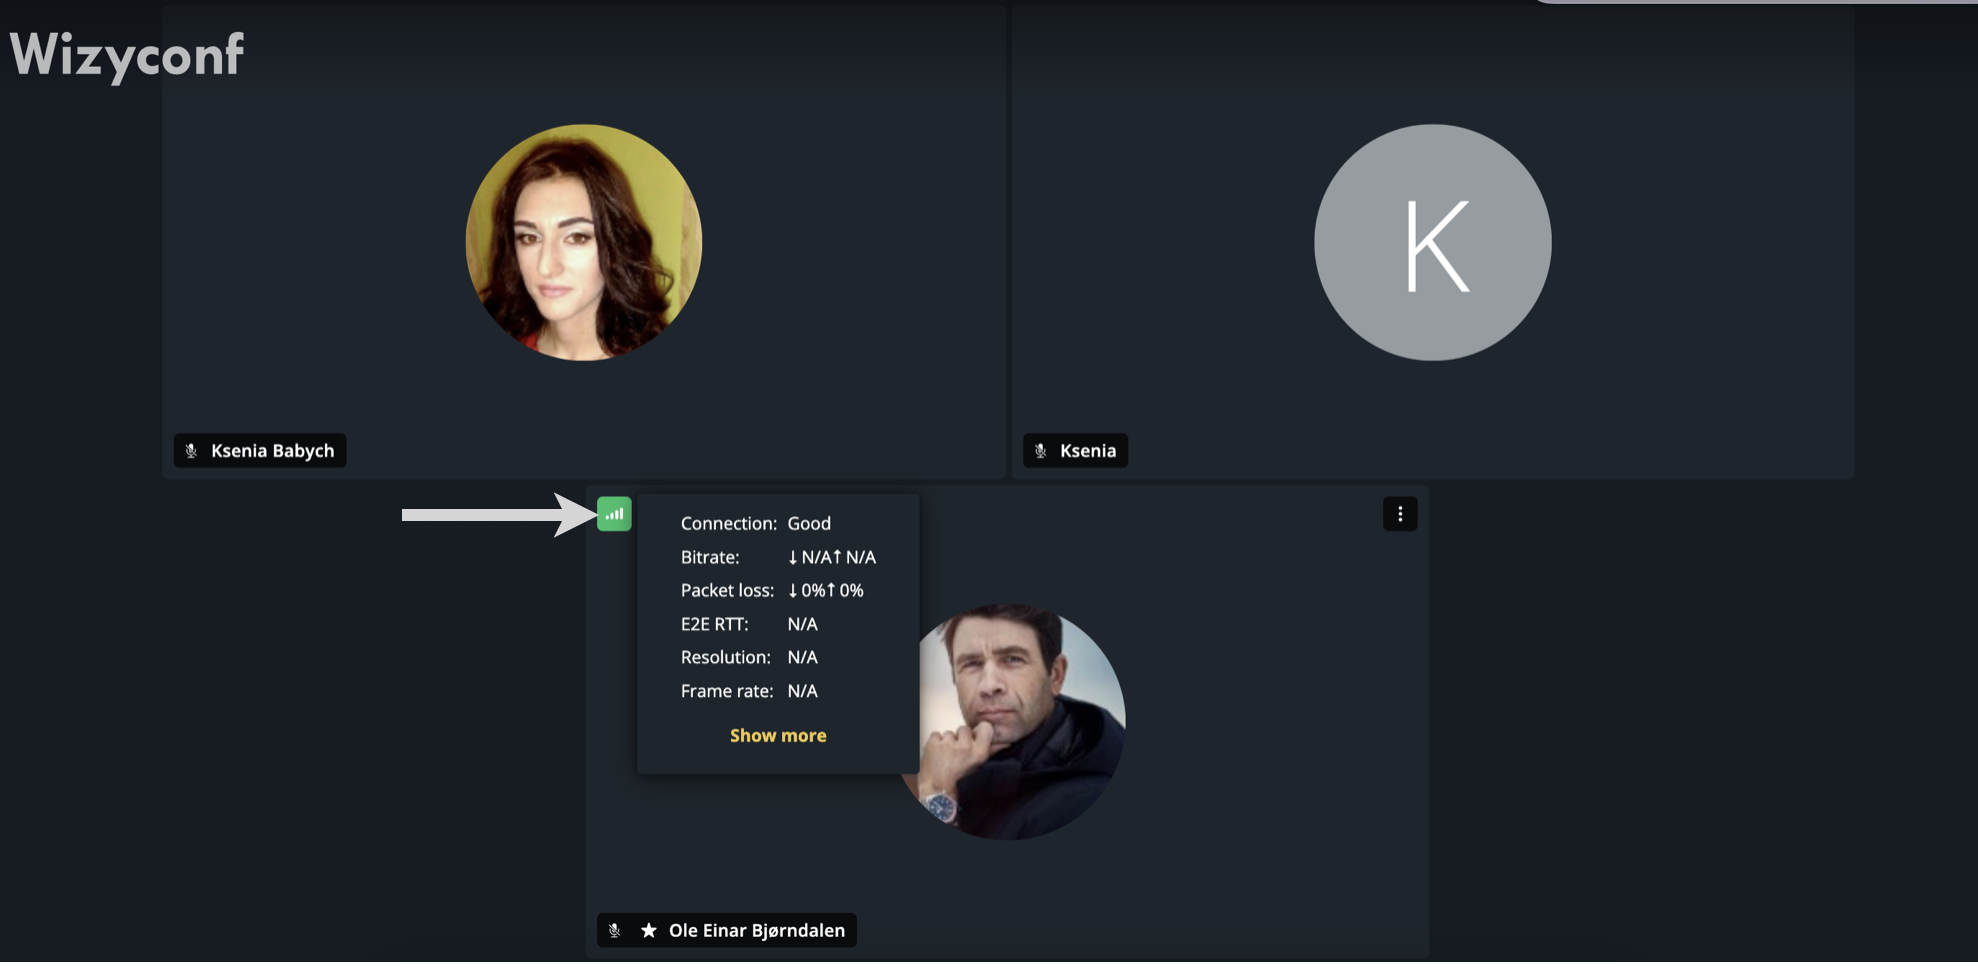
You can see the current connection quality for each user participating in the conference:
- Hover the mouse cursor over the user whose connection status you would like to check
- Hover the mouse cursor over the green or yellow Connection quality icon (color depends on the current connection quality) in the upper left-hand corner of the preview
- New dialog is displayed with the information on connection, bitrate, packet loss etc
- (available only if you hover the mouse cursor over your own preview) Click Show more in that dialog to see more details about your own connection quality
Manage sound settings
By default, you hear a system sound whenever a user joins or leaves a conference, etc. You can manage these sounds in Settings:
- Click three dots (More actions) in the lower central side of the screen and click Settings
- On the Settings screen, navigate to the Sounds tab and choose on which occasions you want the sound to be played:
- Meeting reactions
- Incoming message
- Participant joined
- Participant left
- Talk while muted
- Click OK

The sound settings are saved and used for your future conferences.
Edit a conference room
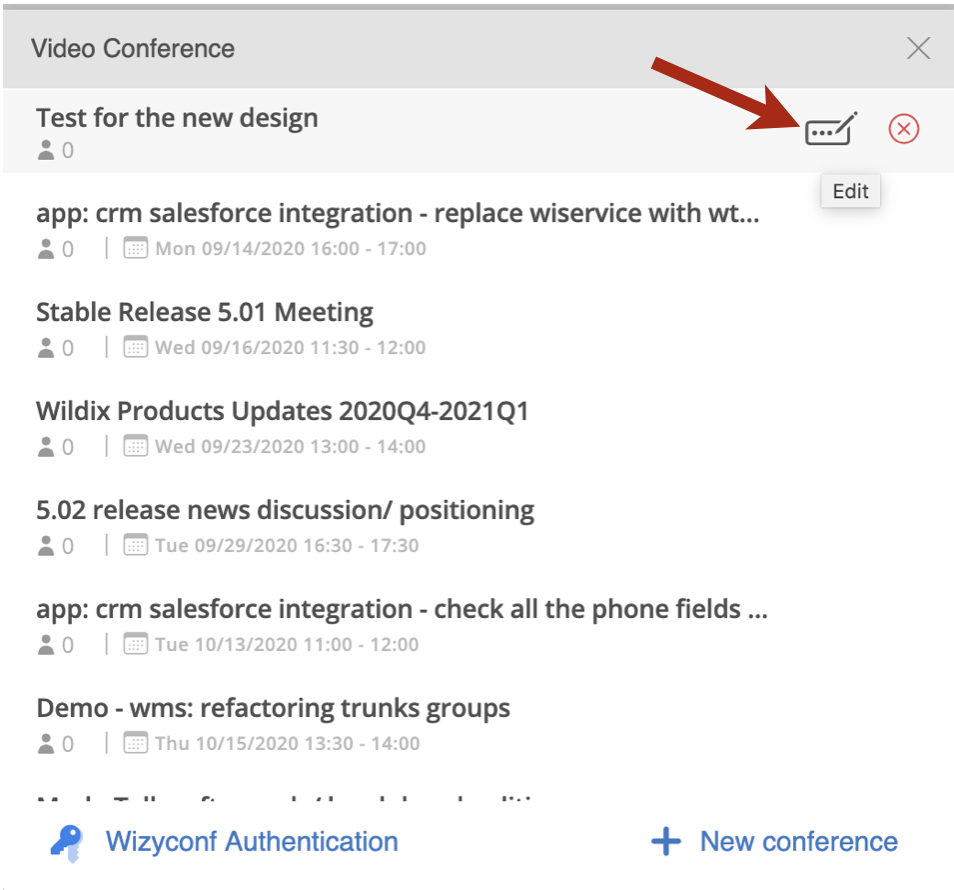
You can edit any existing conference rooms: edit the conference title, its description, the list of participants, schedule the conference, resend the email invitation, copy the conference link.
- Open the Video Conference dialog from Collaboration
- Find your conference in the list and hover the mouse cursor over it
- Click on the Pencil with three dots icon (Edit) on the right-hand side of the conference title:
Keyboard shortcuts
For your convenience you can use keyboard shortcuts.
To view the list of the available keyboard shortcuts:
- Click on three dots in the lower central side of the screen
- Click View shortcuts
- A new dialog Keyboard shortcuts opens:

