Hotel Manager Guide
Hotel Manager is a part of Wildix WebAPI library. This document explains how to configure and to use Hotel Manager extension.
Created: December 2018
Updated: March 2021
Permalink: https://wildix.atlassian.net/wiki/x/ERPOAQ
Introduction
Hotel Manager is a part of Wildix WebAPI library, but it can be used independently as a separate and ready-to-use extension. For more information on WebAPI library, read the document WebAPI Admin Documentation.
To be able to access Hotel Manager you need Wildix Collaboration license or UC-Business user profile (more information on Per User licensing: https://www.wildix.com/licensing/).
Features available with Hotel Manager:
- guests check-in, check-out (guest names are updated in WMS)
- wake-up calls scheduling
- room housekeeping status clean / dirty
- call billing per room
Wildix also offers an integration with hotel PMS, more information: Hotel Integration - FIAS protocol.
Add rooms
For managing restrictions and ACL for calls placed from hotel rooms, create a separate ACL group in WMS -> Users ->Groups:
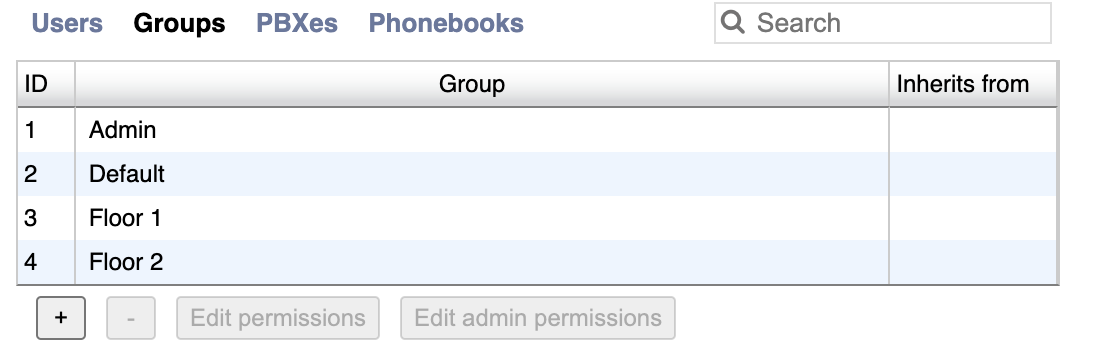
Note that rooms will be displayed in Hotel Manager interface by their ACL group. This means, in case you would like to group your rooms by, for example, floor they are located on, you should create several ACL groups. You can enable one ACL group to inherit from another one. More information on ACL groups in the document: ACL rules and Call classes management.
Now you can add rooms in WMS -> Users in the same way as you add users. For more information on adding users, please consult WMS Start Guide - Adding users manually.
When adding a room, specify user type - "Room", in this way you will be able to differentiate hotel rooms from normal PBX users and License type to Basic:
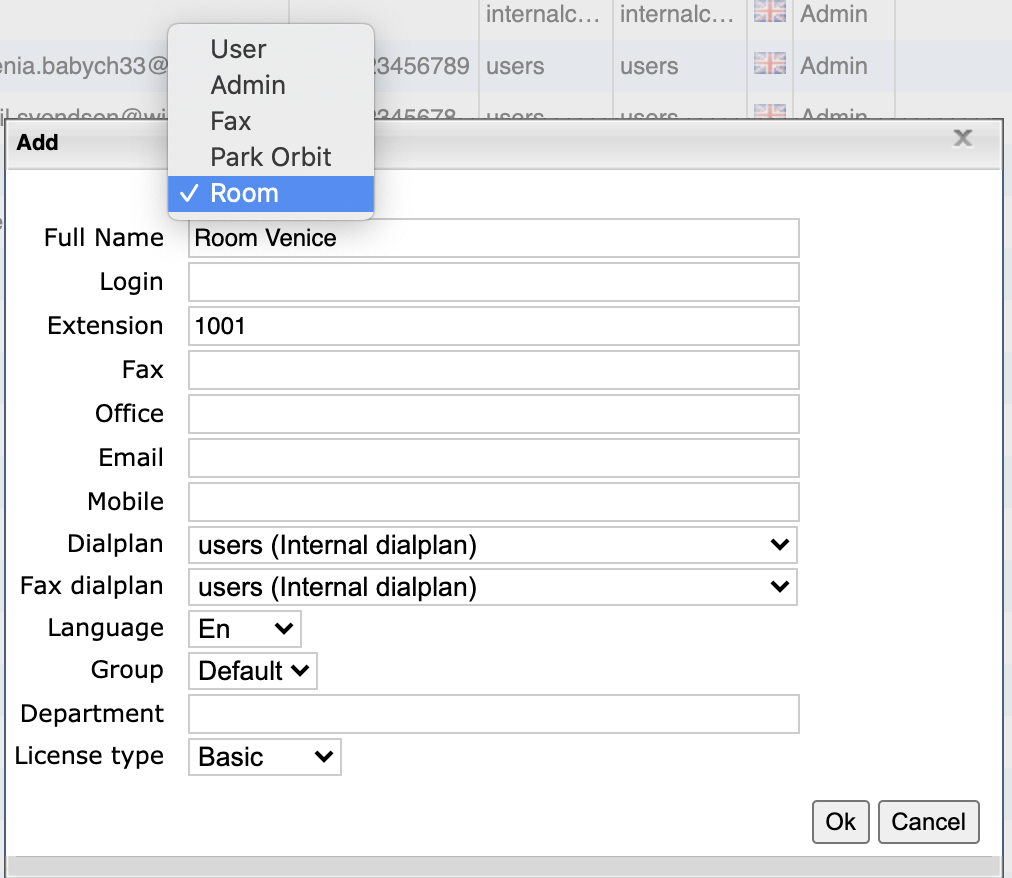
By default "users" Dialplan is assigned to each room, however you can create a separate Dialplan for managing calls placed from hotel rooms in WMS -> Dialplan and assign this Dialplan to each room in the field "Dialplan"
Here is an example of WMS -> Users configuration, where four hotel rooms are present, located on two floors:
Access Hotel Manager
To access the Hotel Manager interface, you can use our online demo available at https://webapi.wildix.com/v2/hotelManager/index.html (the new version, available starting from WMS 5.02.20201015.2)/ https://webapi.wildix.com/v1/hotelManager/ (the old version).
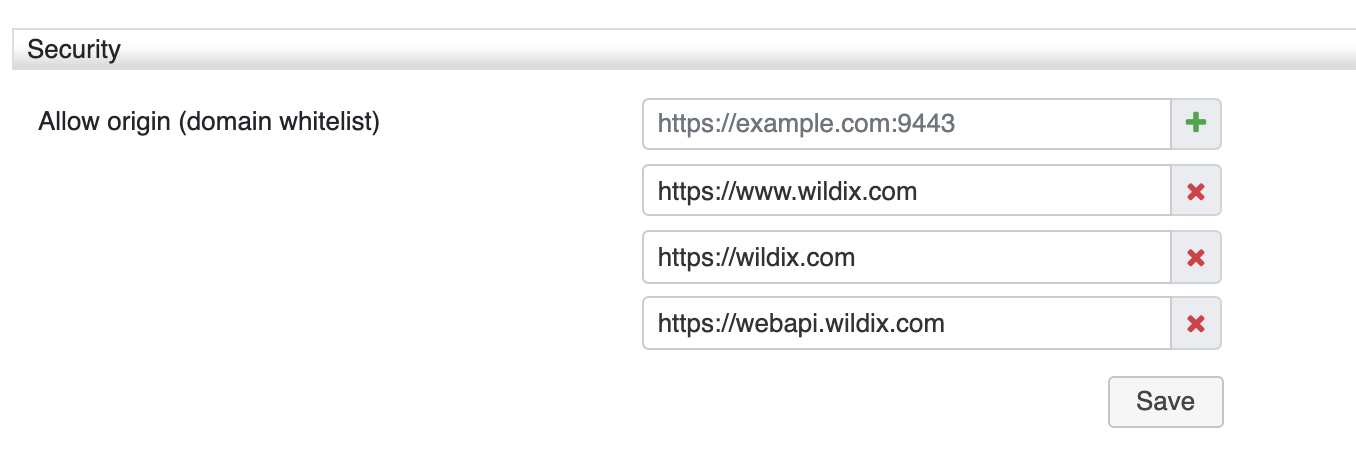
If you are using our online demo or if you have uploaded Hotel Manager on your server, you need to add the domain wildix.com (for the old version) and webapi.wildix.com to the whitelist in WMS Settings -> PBX -> Security; see documentation: Domain Whitelist (Allow Origin).
If you are having issues with accessing Hotel Manager, read the WebAPI document - Access WebAPI Demo.
You can also use Hotel Manager in the following ways:
- use Hotel Manager on your web server accessible via HTTP/HTTPS - download the JavaScript library from the dedicated server: the new version (starting from WMS 5.02.20201015.2)/ the old version and then upload the Hotel Manager folder on your server
- upload Hotel Manager on your Wildix PBX - follow the instructions published in WebAPI document: Access WebAPI Demo
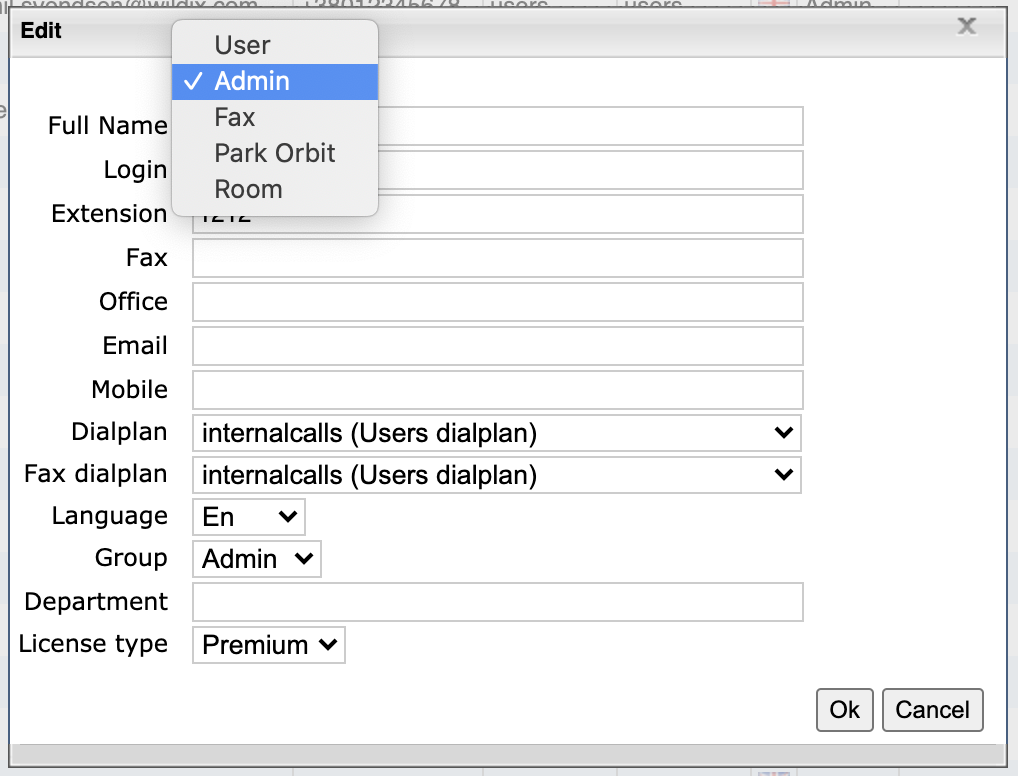
To access the Hotel Manager page, select the PBX user to use for access to the Hotel Manager interface (receptionist), and make sure that:
- Collaboration web page is open at the same time as the Hotel Manager for that user on the same PC in the same browser
This user is of "admin" type (otherwise you will not be able to update the guest's name upon check-in):
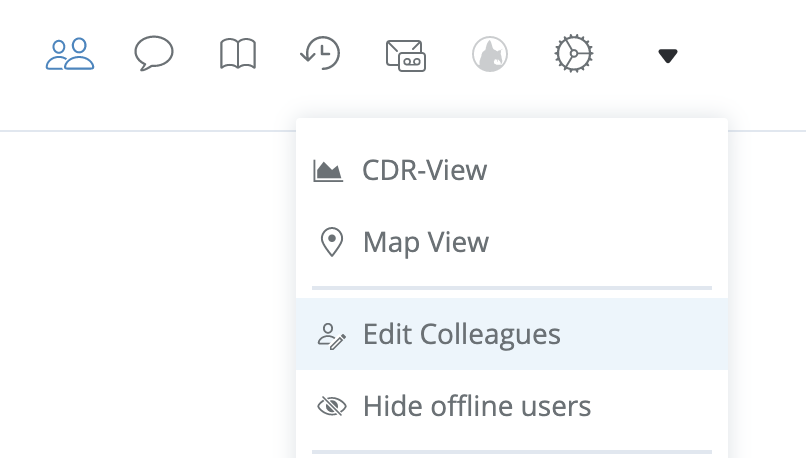
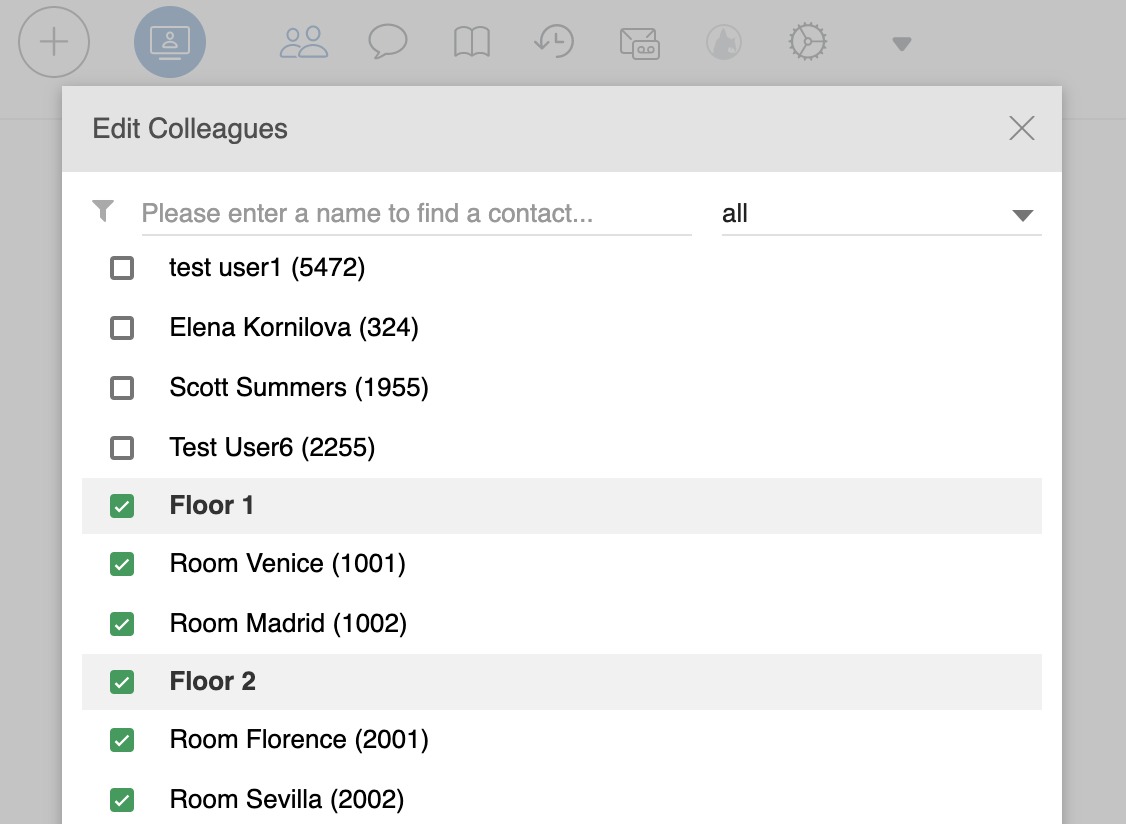
Hotel rooms are added to the roster of your user; you can add rooms to your roster from Collaboration -> Other -> Edit Colleagues (read Collaboration guide - Colleagues (roster) for more information) or in WMS -> Users -> select a user and click Edit preferences, then scroll down to Roster (read WMS Start Guide - User preferences for more information):
Now you are ready to access Hotel Manager interface. Go to https://webapi.wildix.com/v1/hotelManager/ or https://webapi.wildix.com/v2/hotelManager/ and click Settings icon ("Wheels" icon in the upper right corner) to enter your PBX credentials:
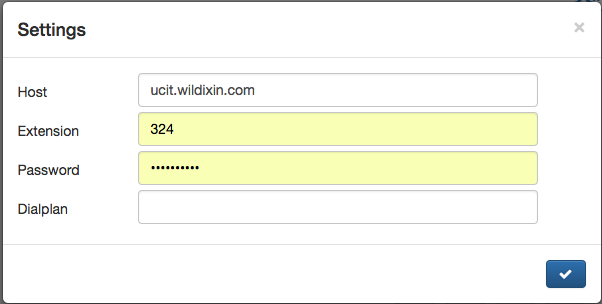
Credentials for the version 1:
- Host: URL of your Wildix PBX, example: elenacloud.wildixin.com
- Extension: extension of user* to access Hotel Manager
- Password: your Web password for access to Collaboration
- Click Tick icon to access
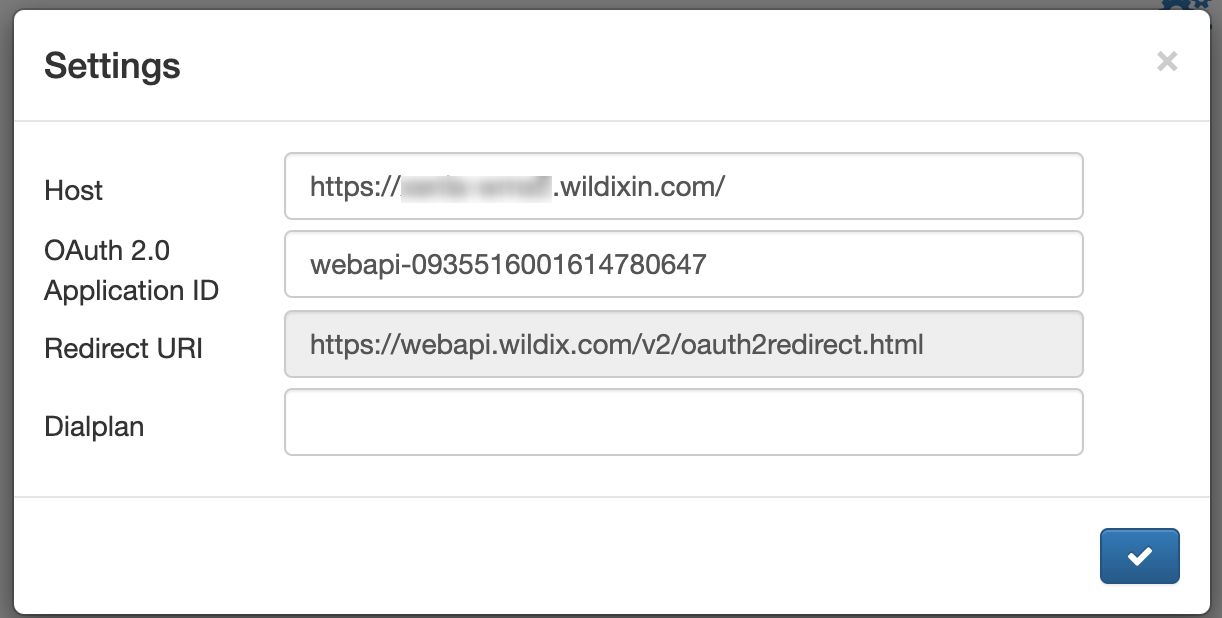
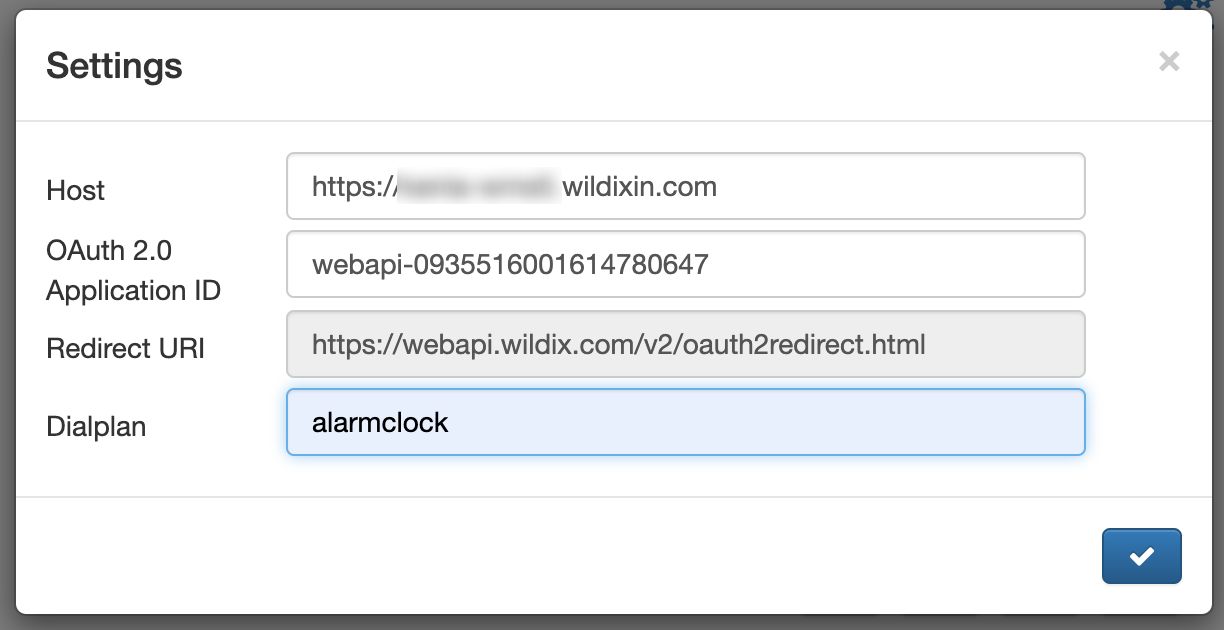
Credentials for the version 2:
- Host: URL of your Wildix PBX
- OAuth 2.0 Application ID: ID for authentication, it is generated in WMS Settings -> PBX -> Integrations -> OAuth 2.0 applications, more details in WebAPI Admin Documentation
- Redirect URI is hardcoded
- Click Tick icon to access
You should be able to view rooms subdivided by their "Group" field ("Floor 1" and "Floor 2" in our case):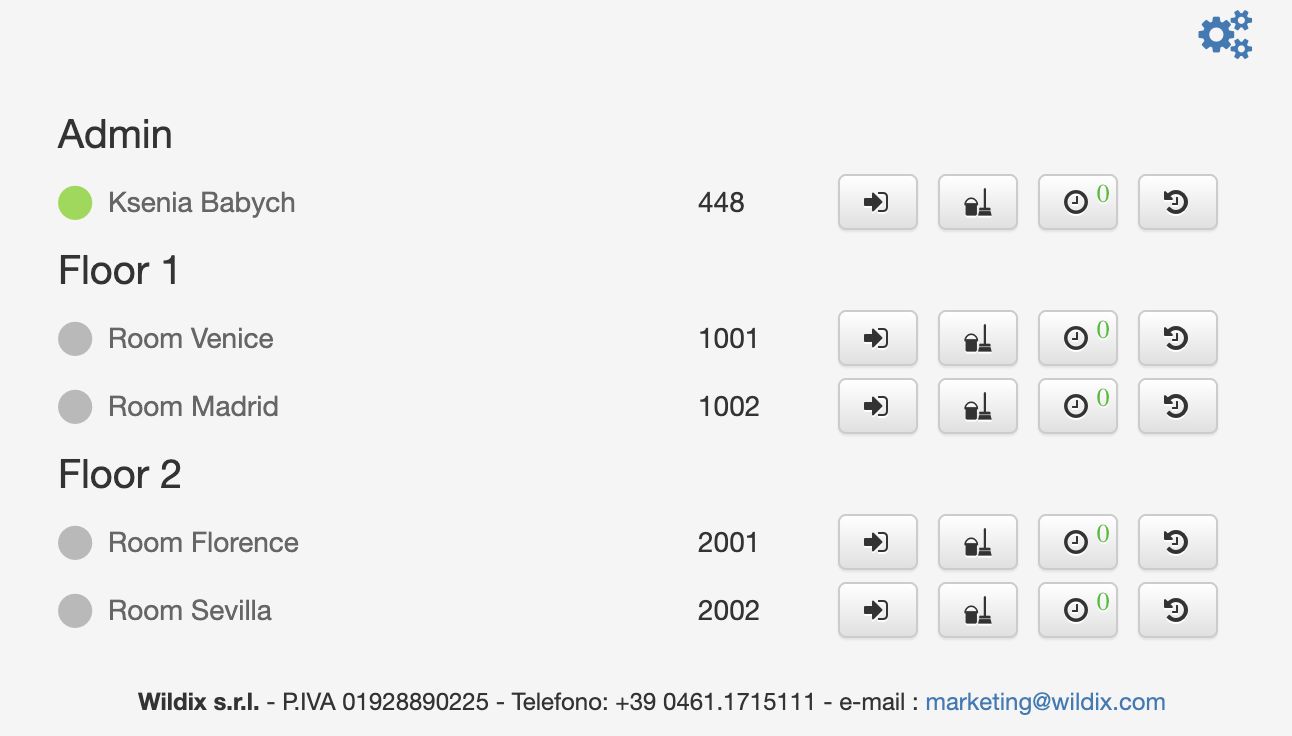
Hotel Manager services
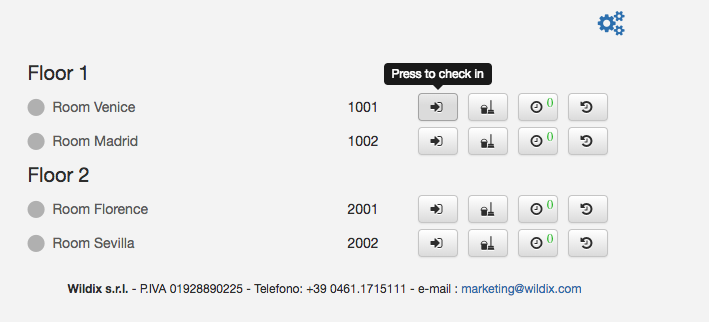
Check-in and Check-out
Press Check-in icon from the interface to check-in a guest
On the next step you can enter the guest's name
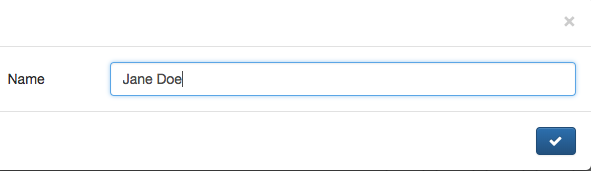
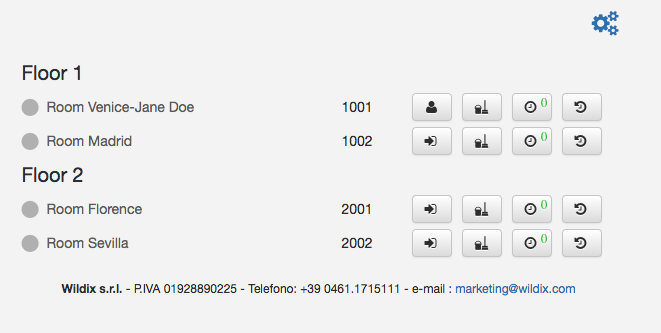
- Guest's name is updated both on Hotel Manager interface, in WMS interface, on the display of a WP4X0 series installed in the room
After you press Check-out icon, the guest information is updated in Hotel Manager interface, in WMS, on the phone's display--the guest is removed from the room.
Setting Wake-up calls
For the correct processing of wake-up calls you need to configure a new Dialplan procedure in WMS -> Dialplan.
Create a new procedure and name it "alarmclock": 
- Called number: X.
- Dial the phone -> wake-up call is placed to the room
- Set - Caller name - Failed Alarm Clock-${EXTEN} -> in case wake-up call failed (e.g. no answer / reject), caller name is changed to "Failed Alarm Clock-<room number>"
- Dial the phone - 324 (receptionist extension number) -> receptionist will receive a call in case of failed alarm clock and as caller name the following information will be displayed "Failed Alarm Clock-1001" (where 1001 is the room number)
- Called number: alarm
- Play sound - select the ring tone or upload a new one (this sound is played to the guest after they answer a wake-up call)
By default, Dialplan procedure "alarmclock" is used for managing wake up calls, if present on the PBX. In case you want to use some other Dialplan procedure to manage wake up calls, you have to specify it in Hotel Manager Settings - "Dialplan" field (click the "Wheels" icon in the upper right corner):
Current limitation: please note that in case you change the Dialplan procedure used to manage wake up calls, the change will not be applied automatically right away, you can force it, by rebooting the PBX by example.
Guests can set up wake up calls directly from the room: dial Feature code 773 and follow the audio instructions. In case a guest places a wake-up call request from the room, the information will be updated on the Hotel Manager web interface automatically.
Service make up room
From Hotel Manager interface you can change housekeeping status of the room: "make up room" / "clean"

Housekeepers can change the room status directly from the room phone: dial Feature code 771 and follow the audio instructions. In case a housekeeper changes the room status from the phone installed in the room, the information will be updated on the Hotel Manager web interface automatically.
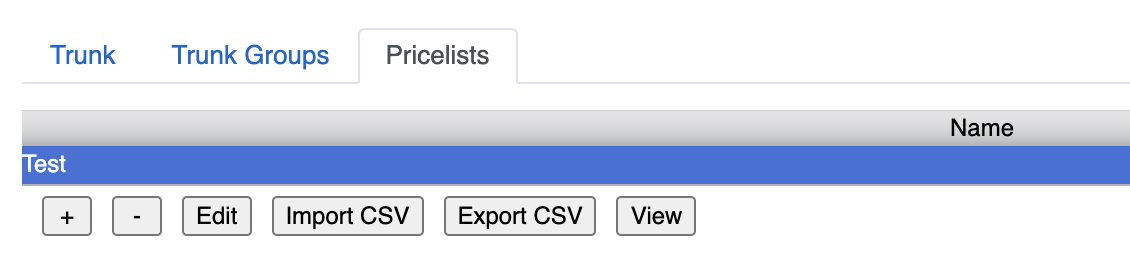
Call billing
For the correct charging of call costs, it is necessary to upload pricelists in WMS -> Trunks -> Pricelists. To download a pricelist template and for the information on how to upload pricelists on the PBX, please refer to the WMS Start Guide - Pricelists:
After you have uploaded a pricelist, do not forget to associate the trunk used for outgoing calls with the priceslist in WMS -> Trunks.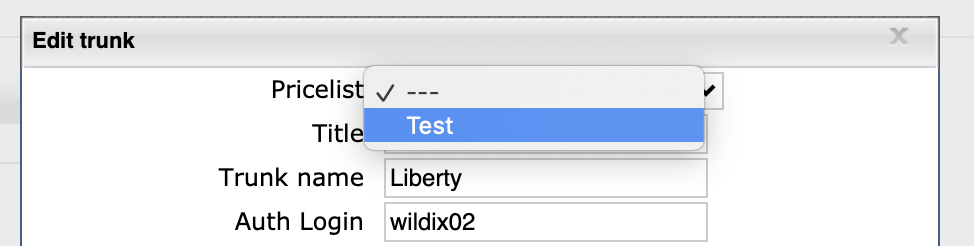
After you have uploaded a pricelist and associated the trunk with it, authorized users can view the call costs in CDR-View:
The information on call costs per room can now be viewed and printed via Hotel Manager interface. To view call costs, click "Call history" icon: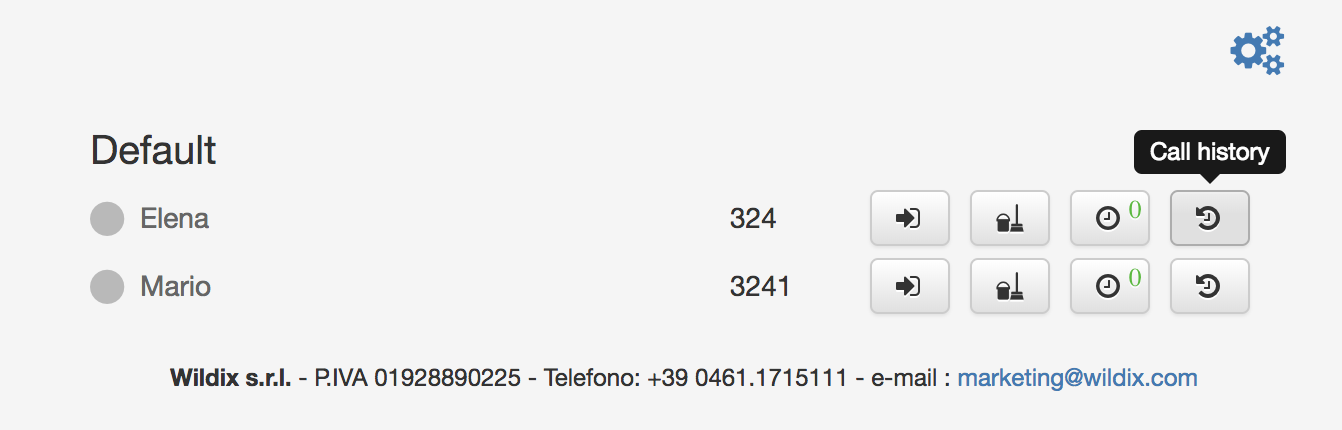
You can select the exact time period using the fields "From" and "To", and click the "Print" icon to print out the call billing information for the guest: 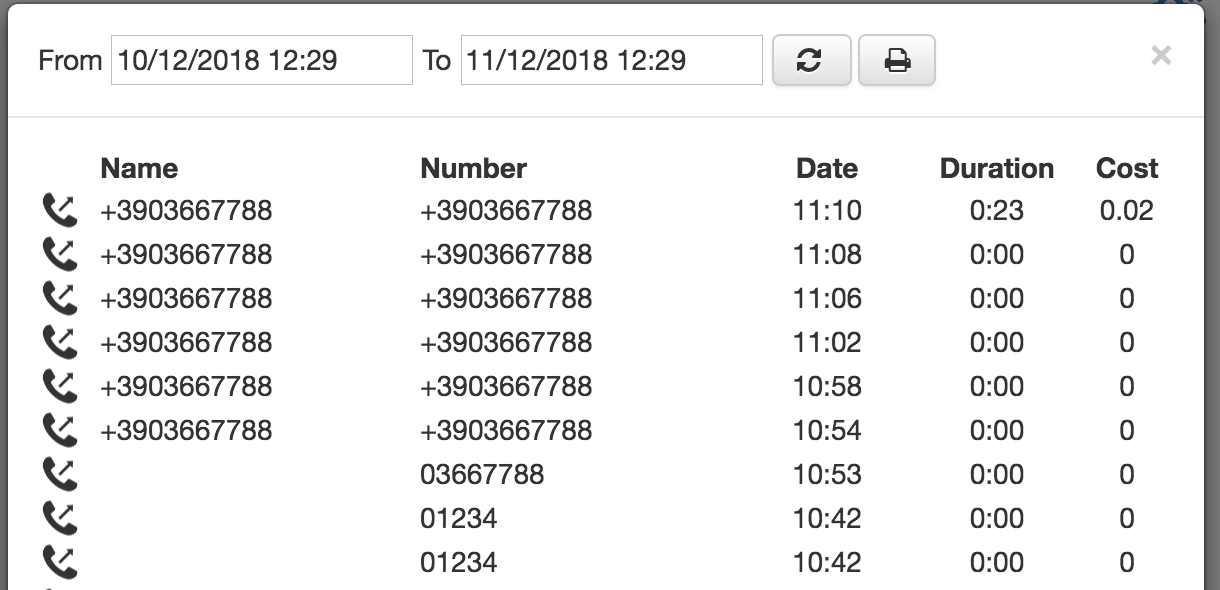
Dialplan and ACL settings
PBX differentiates national calls from foreign calls based on International Prefix in WMS -> Dialplan -> General settings. Country code in trunk settings is used for number normalization (number is not normalized if country code is empty). It is recommended to create a separate ACL group for hotel rooms, as explained in the chapter Add rooms. In this way you will be able to restrict calls to certain destinations. For more information on recommended ACL restrictions and call class management, please carefully read the document ACL rules and Call classes management.
Hotel rooms follow the procedure “users” or some other dedicated Dialplan procedure (indicated in WMS -> Users, Dialplan). Usually in this Dialplan procedure “Trunk group” or “Dial the trunk” application is used for processing external calls. Note than in both applications, call class is detected by the system automatically, however, it is possible to set up the call class manually.
Take into consideration, that you can set up caller ID name to some static value, otherwise real guest’s name is displayed while making a call through trunk. Example:
Block outgoing calls from hotel rooms
If you would like to block outgoing calls from vacant hotel rooms, you need to create a new Dialplan procedure in WMS -> Dialplan.
In this Dialplan procedure the variable "${DB(allowcalls/${CALLERID(num)})}" is applied, where "allowcalls/EXT" reflects the state of the room according to the Database (DB) value:
Occupied (checked in) = 1
Vacant (checked out) = 0
Here is the example of Dialplan configuration: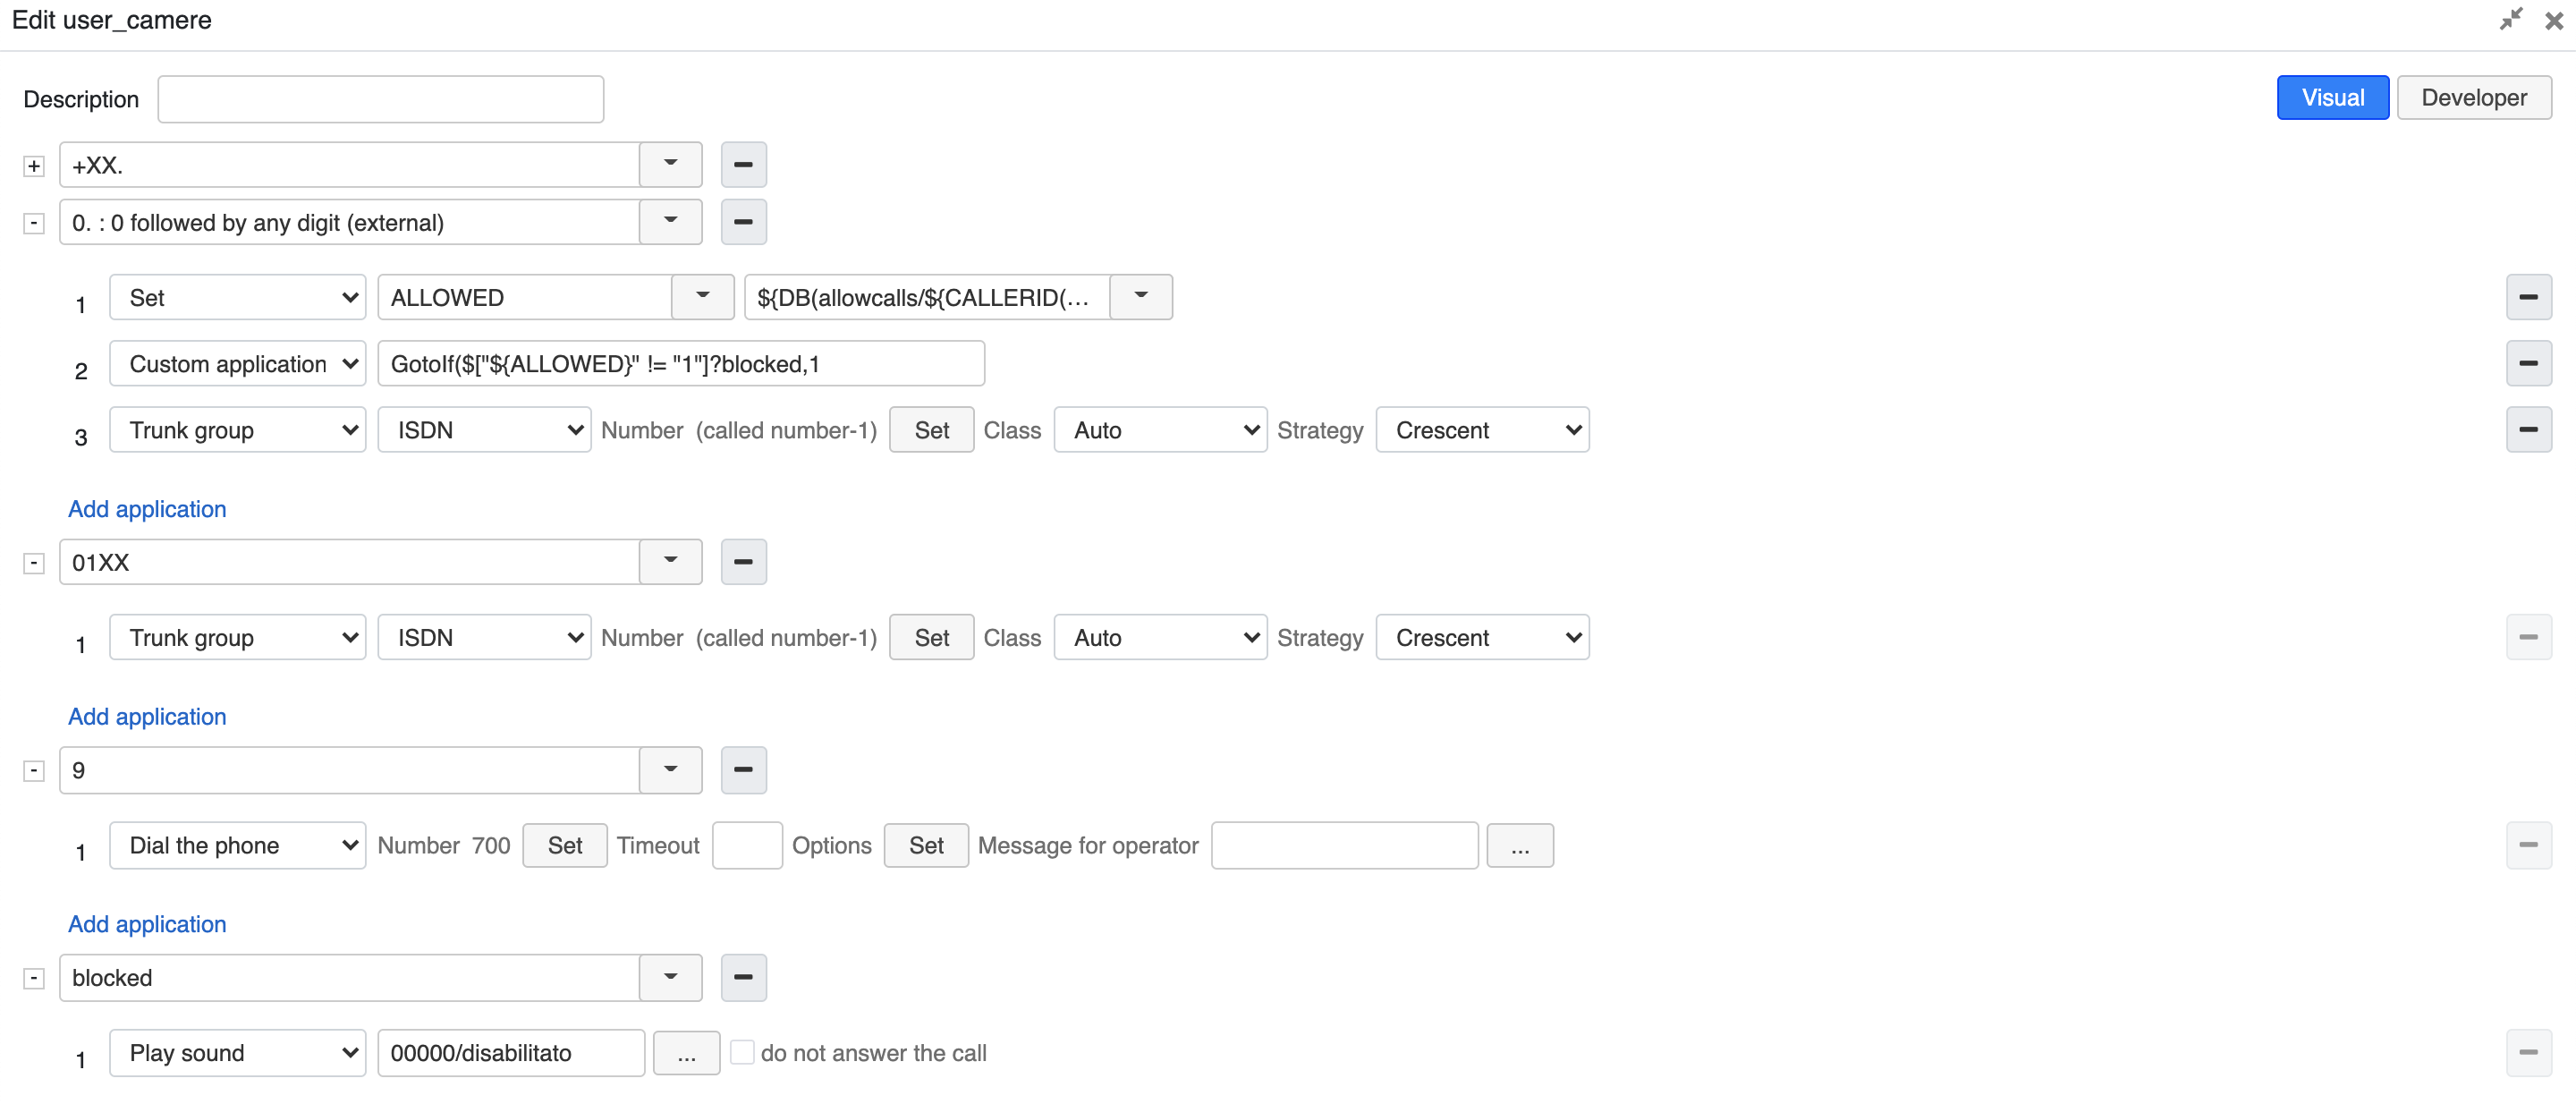
- 0. // this pattern is used for placing external calls
- Set - ALLOWED - ${DB(allowcalls/${CALLERID(num)})} // With the application Set we assign to the temporary local variable called ALLOWED the value inside the DB (checked in / checked out)
- Custom application - GotoIf($["${ALLOWED}" != "1"]?blocked,1) // The dialplan jumps to the match "blocked" if the database value is 0 (checked out), otherwise if the value is 1 (checked in) it proceeds to the next application
- Trunk group - ISDN // ISDN lines are used to place the outgoing call (if the value is 1 - checked in)
- 01XX // this pattern is used for calling emergency services
- Trunk group - ISDN // ISDN lines are used to place an outgoing call in case an emergency number is called. In this case there is no check of room status (checked in / checked out) to allow calls to this kind of services in all the cases
- 9 // this number is used to call reception
- Dial the phone - 700 // Which is the reception desk. No check of room status is performed.
- blocked // this match is added to process outgoing calls in case room status is checked out (DB value 0)
- Play sound - 00000/disabilitato // Play a warning message if someone tries to place an outgoing call while the room status is check-out (DB value 0)
After you have created this procedure, assign it to each hotel room in WMS → Users: double-click on the room and select this Dialplan procedure in the field "Dialplan":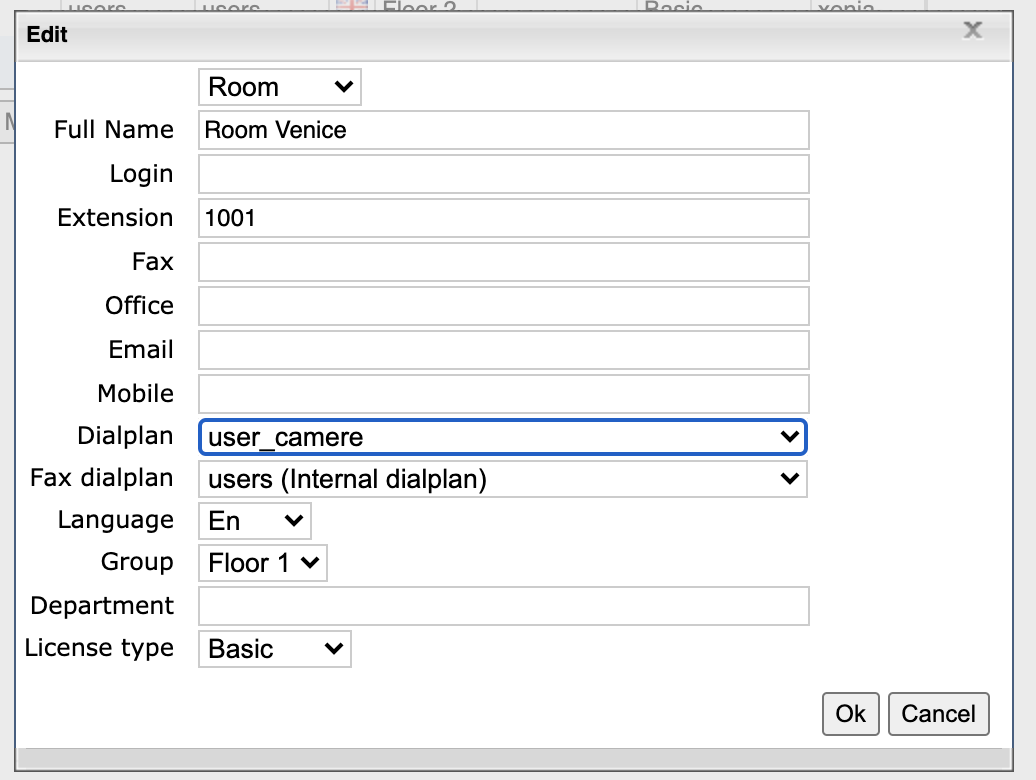
Allow placing calls from unassigned phones
You may want to allow placing calls to emergency services from unattended phones located in common areas. To do this, add a new Dialplan procedure called "login-emergency" and specify called numbers which can be dialed and Dialplan applications which must be executed for each called number, e.g.: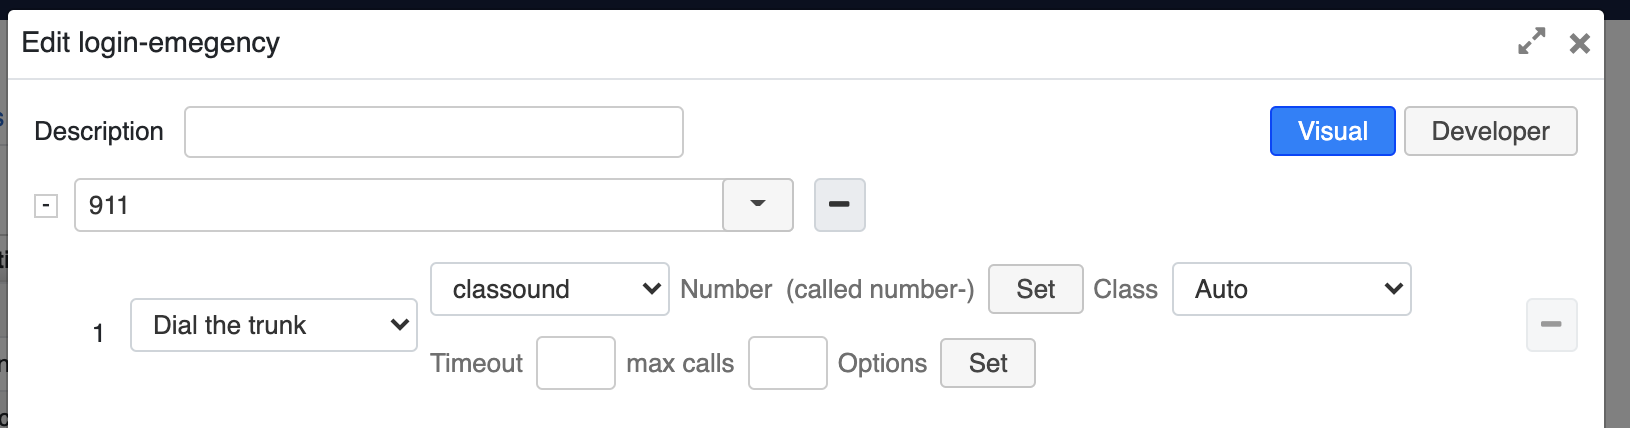
Enable PIN bypass for ACL restricted calls
This feature may often be applied to phones located in hotel common areas or in conference rooms. Here is an example:
User dials a number that is restricted on this phone (for example, international phone number)
User is prompted for the PIN since the call is not allowed from this phone normally
User enters the PIN and if allowed based upon the entered PIN, the system routes the call to the restricted destination
Read the guide: How to enable PIN bypass for ACL restricted Calls.
Enable announcement to reception of emergency calls placed from rooms
The following Dialplan configuration allows informing front desk or reception that someone has called emergency services, to ensure that if/when emergency responders arrive, someone can ensure they are taken to the correct location of the emergency.
Read the guide: Call to 911 announcement.