This document is a complete guide explaining how you can enable access to Wizywebinar and use it to schedule and run your webinars.
Created: January 2021
Updated: September 2022
Permalink: https://wildix.atlassian.net/wiki/x/ahLOAQ
Requirements and features
- Min. WMS version 5.02.20201207.3
- UC-Wizywebinar license + UC-Business (or UC-Premium) license for each user who needs access to Wizywebinar
Limitations per 1 UC-Wizywebinar license:
- Number of people who can speak: 1
- Number of simultaneous webinar sessions: 1
- Number of attendees: 100
- Number of recordings: 1
General Limitations:
- Max number of concurrent broadcasters/ speakers per webinar: 16
- Max number of attendees per webinar: 5000
Features:
- Fully cloud-based, fully web-based, no client. No hardware required
- Enterprise Security. Data is always protected with the highest level of SHA-256 with RSA Encryption
- HD video conferencing. Up to high definition video quality and content sharing in 1080p
- Record your meetings. Full MP4 recordings in HD with a single click, in the cloud
- Lobby. Set up a lobby for your video conference and let your participants join later
- Screen sharing
- Questions & answers. Let your participants ask questions during a video conference
- Spam control. Ban users straight from the chat or mute it temporarily
- Hand raise. Call on engaged students with a virtual hand raise for organized participation
- Content library. Upload and share files with your audience and other speakers
- Whiteboard mark-up. Annotate as you present right on your screen
- Broadcast live. On Facebook or YouTube, wherever your audience is
- Mobile friendly. Connect from any phone, tablet, or mobile device
Enable access to Wizywebinar
Wizywebinar Video Tutorial - Enable Access to Wizywebinar
Step 1. Purchase licenses
At the first step, you need to purchase a dedicated license for Wizywebinar access. One license is required for each user who needs to have access.
To purchase a license, proceed with the following steps:
- Go to WMP -> Customers
- Select your company and customer
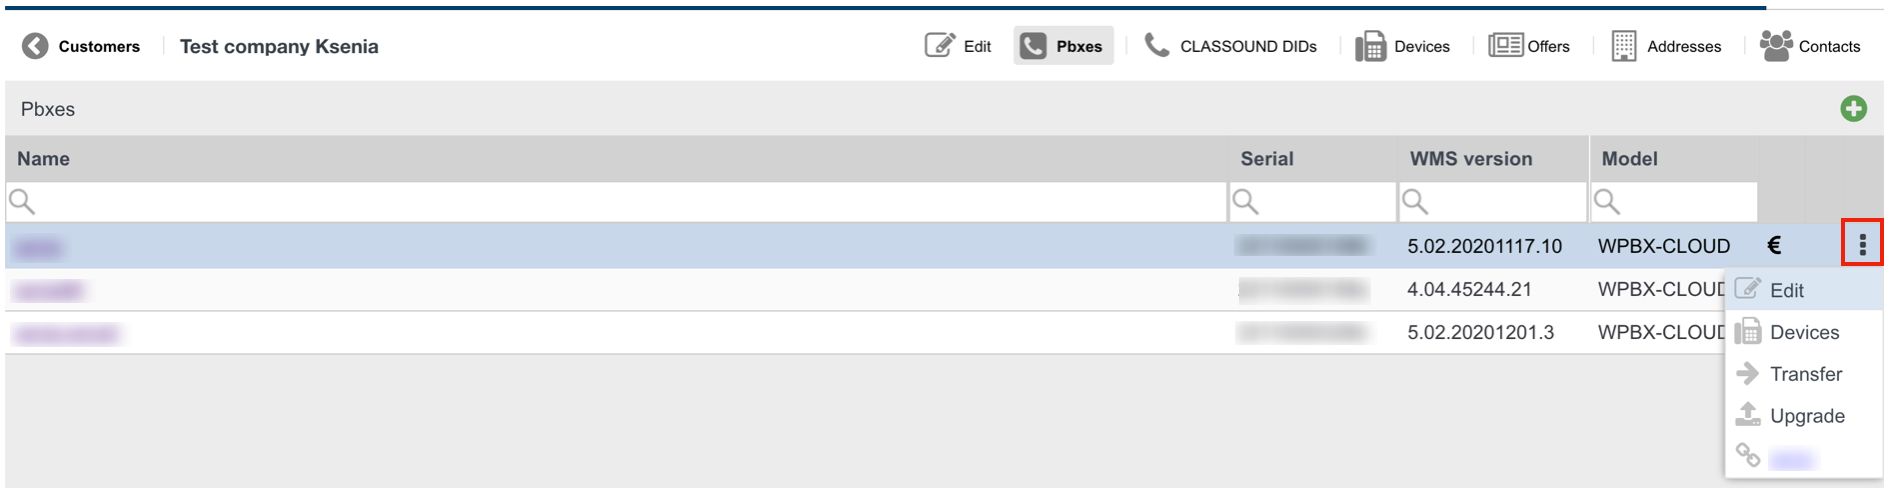
Go to PBXes tab -> Select the PBX -> click on More options (three dots) and select Edit:
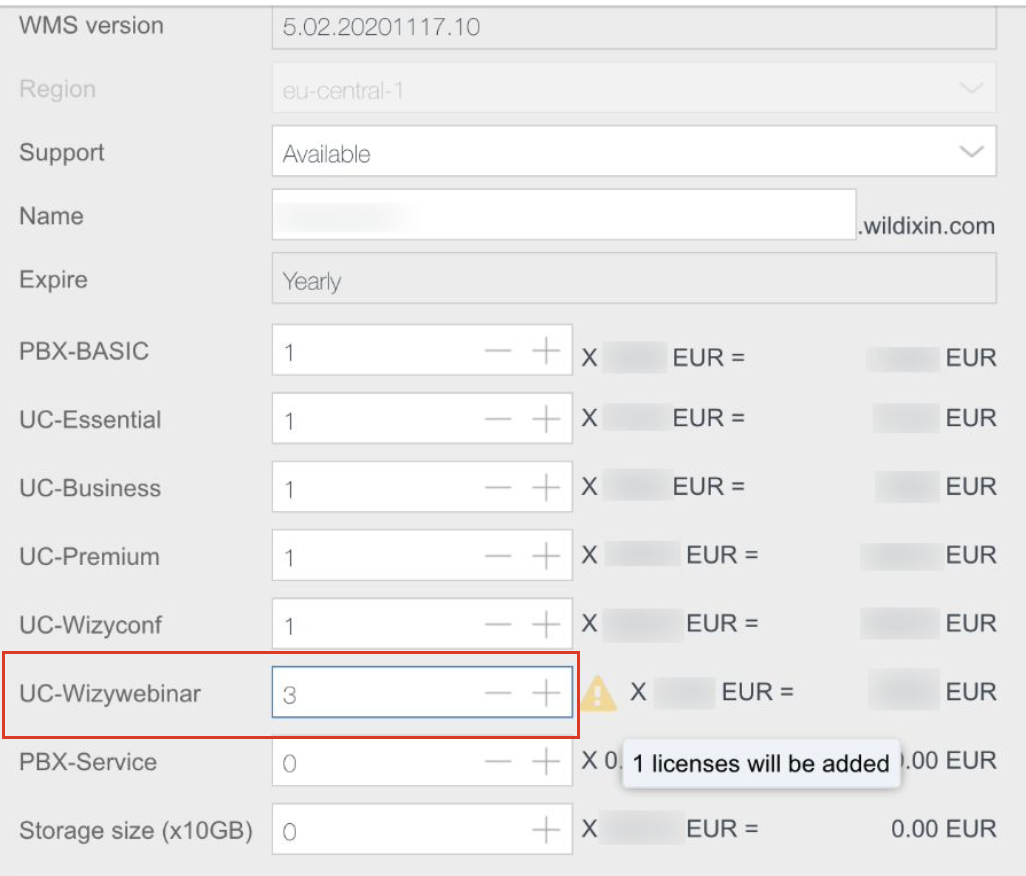
- Add the required amount of UC-Wizywebinar licenses and click Save:
Step 2. Create an associated contact
After you have purchased UC-Wizywebinar licenses, create a new associated contact for a user who needs Wizywebinar access.
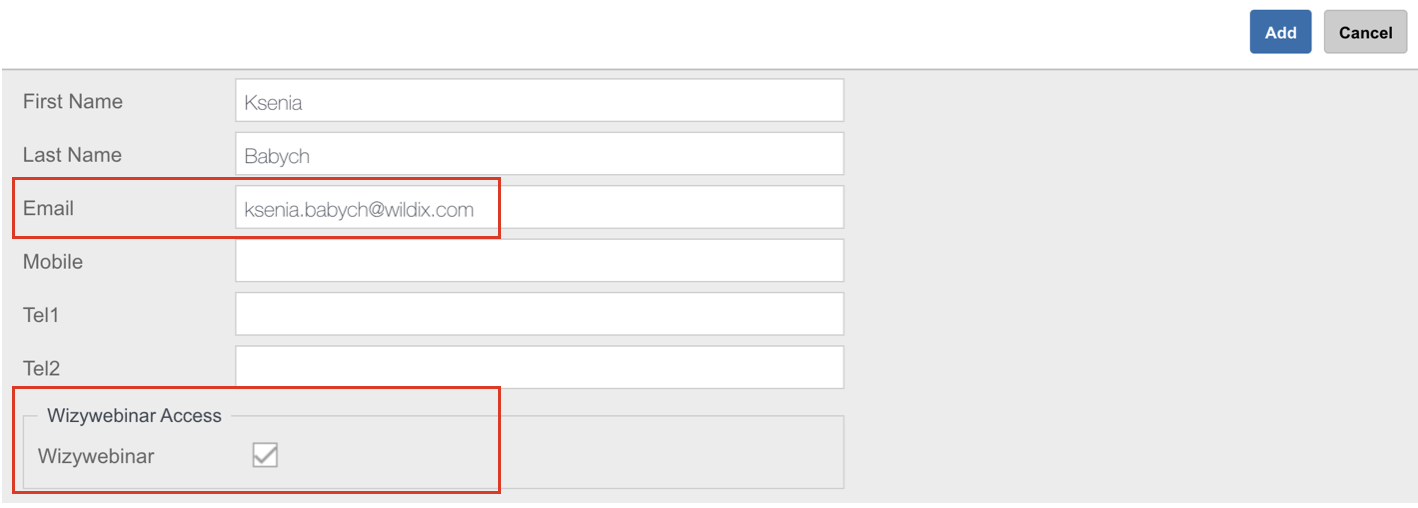
- Go to Contacts tab and click + to add a new contact:

- Fill in First and Last Names and specify Email
- Tick off Wizywebinar Access
- Click Add
After WMP configuration, associate the previously created contact on WMP and a user in WMS by using Email.
Important: The user email address that you have specified for the contact on WMP should be the same!
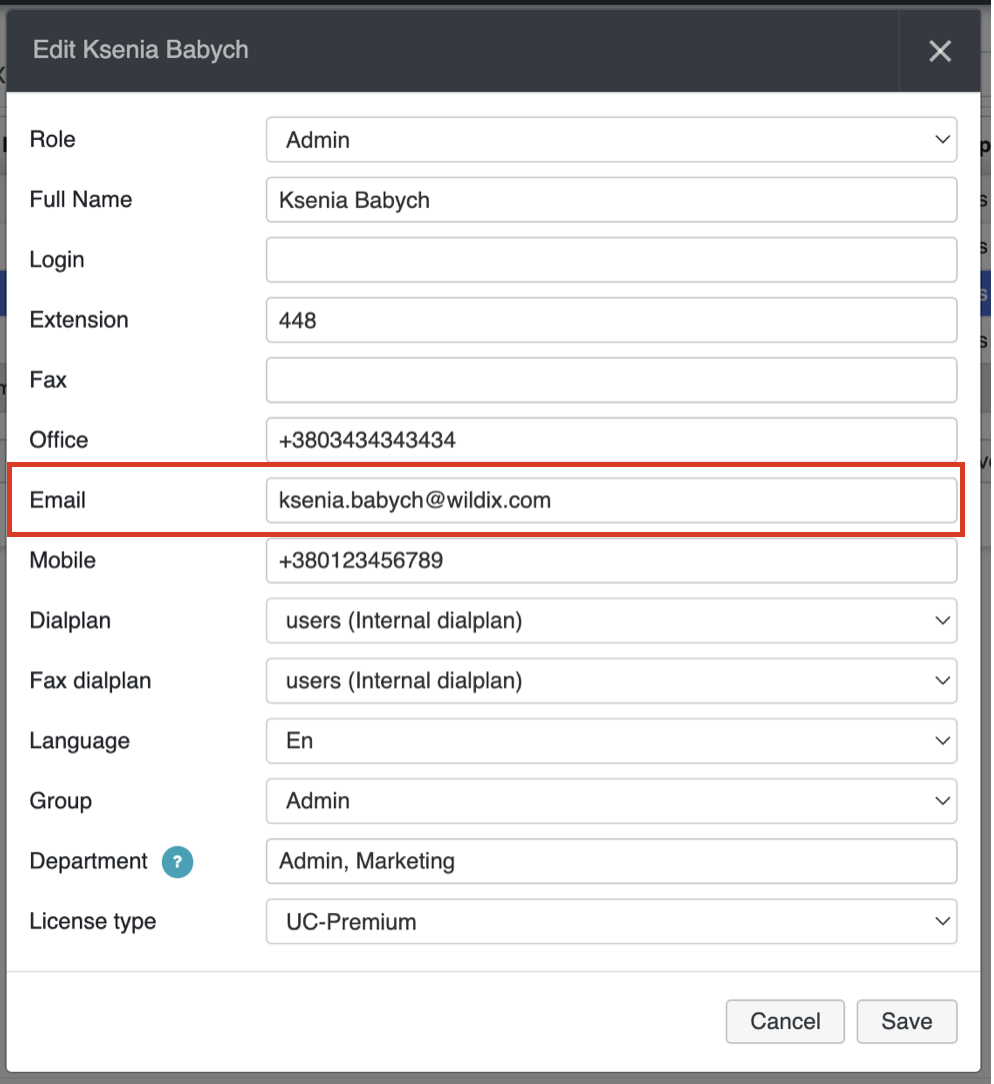
- Create a new user or modify the already existing one in WMS -> Users
- Make sure the Email is the same that you used on WMP for Wizywebinar access and make sure this user has at least a Business license:
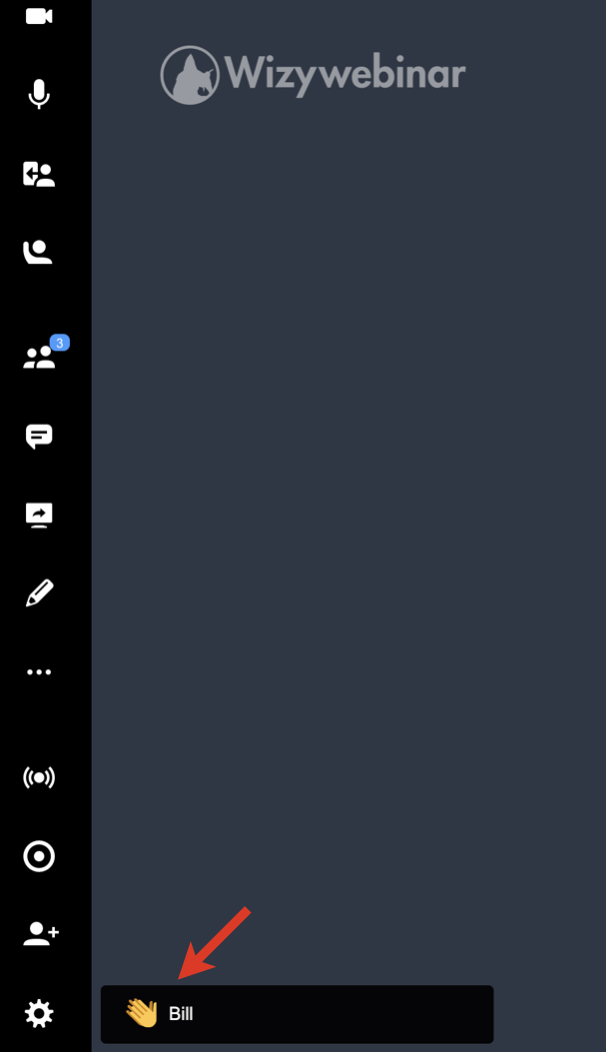
If all the conditions are observed, a user should have Webinar tab available in Collaboration:

Schedule a webinar session
Wizywebinar Video Tutorial - Schedule a webinar session
Settings
Before creating a webinar session, you can change the Wizywebinar web interface language and timezone settings:
- Go to Collaboration -> Webinar
- Click Welcome located in the top left-hand part of the menu and select My profile
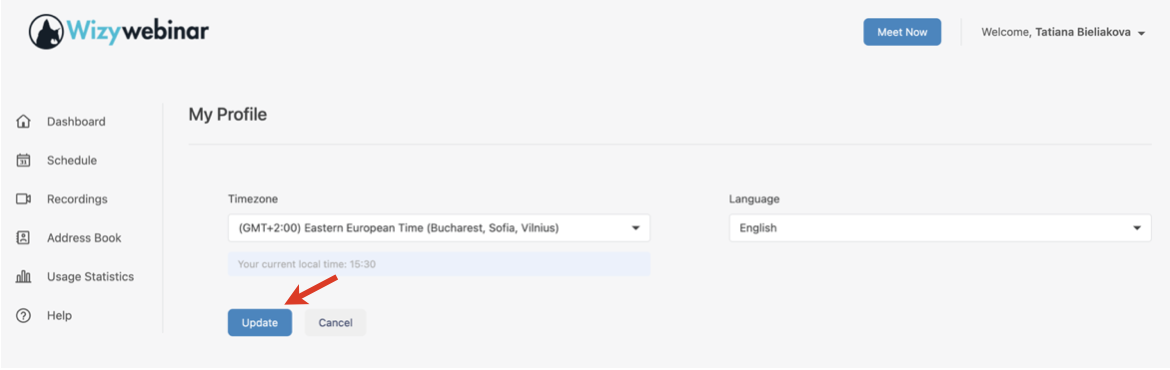
Change timezone/ language
Make sure the timezone corresponds to the one a webinar is going to take place in.
Click Update to save the changes:
Create a webinar
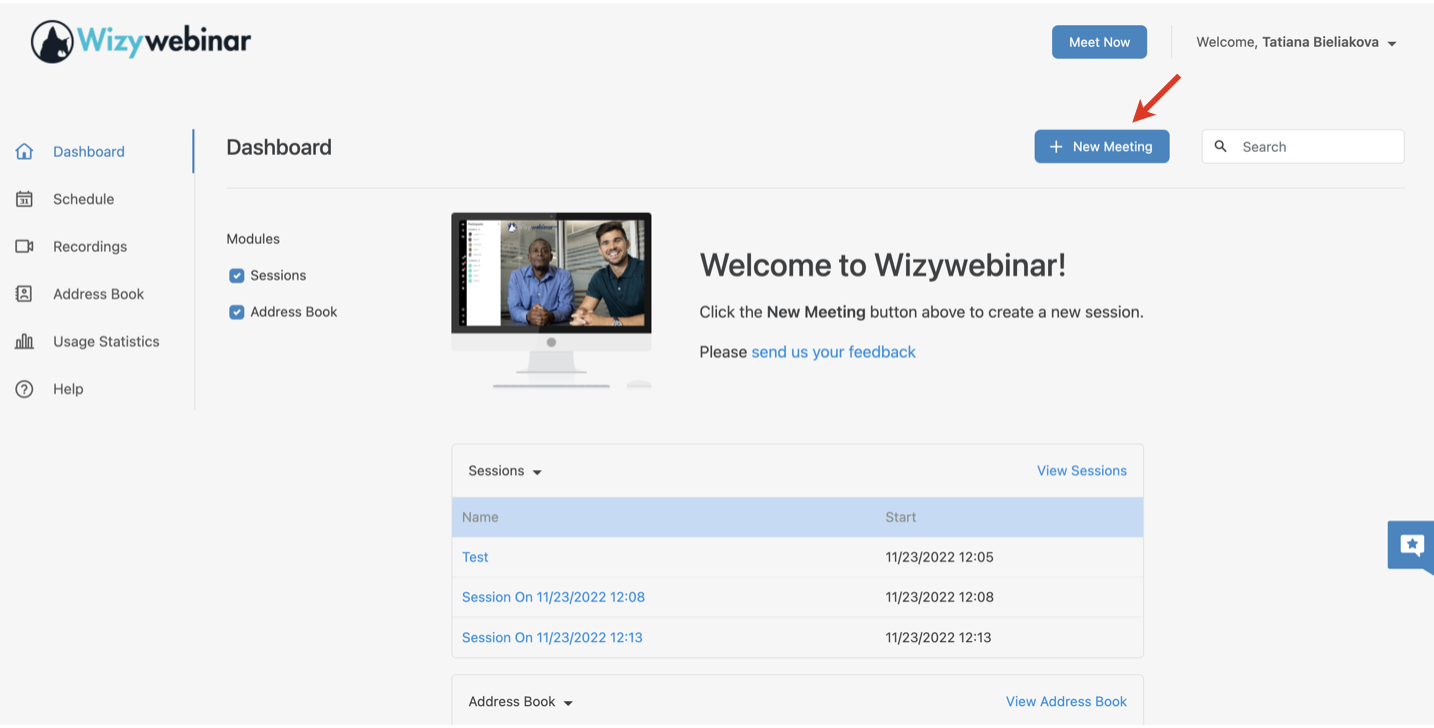
You can start a webinar in just several clicks: open Webinar tab in Collaboration and hit the Meet Now button located in the top right-hand part of the menu.
If you need more sophisticated scheduling options, keep on reading:
Click New Meeting button:
Fill out mandatory fields: Topic, Start date and Duration:
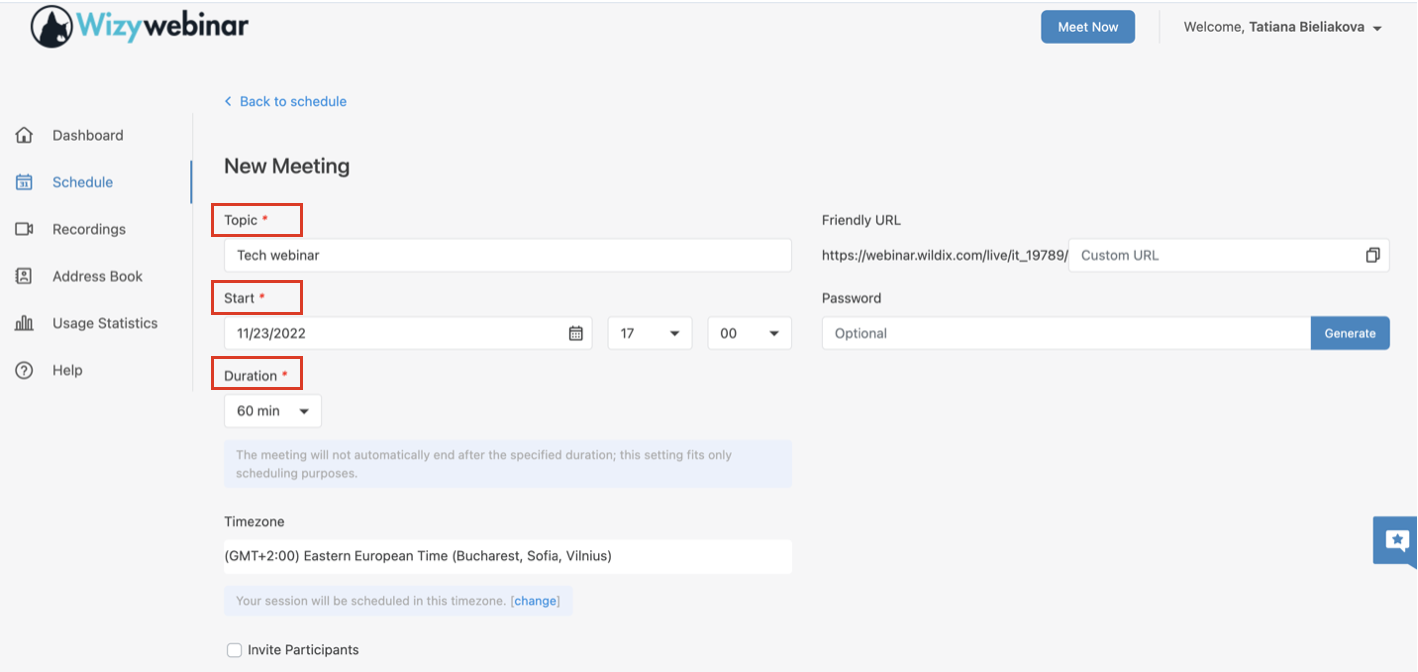
Important: When scheduling a webinar, please check the timezone and make sure it corresponds to the timezone the meeting is going to take place in. If you need to change the timezone, click change.
(Optional) Set Password and Friendly URL:
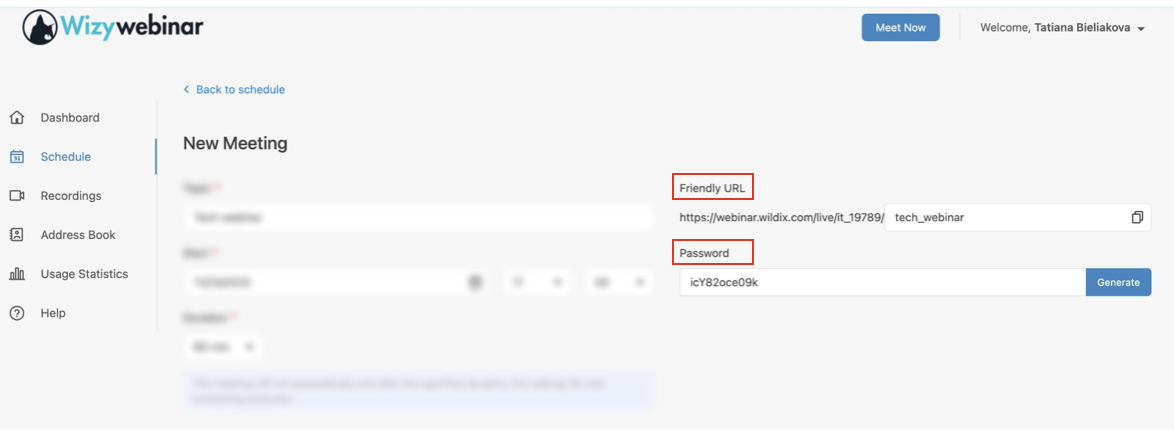
Password: If you would like your webinars to be more protected, you can generate a password for them. You have the choice to make up a password or click on Generate button and a password will be created for you. Once you share the Webinar link with a participant, remember that you need to give them the password too.
Friendly URL: You can customize the URL of your webinar. Otherwise, a random session ID will be created for you.
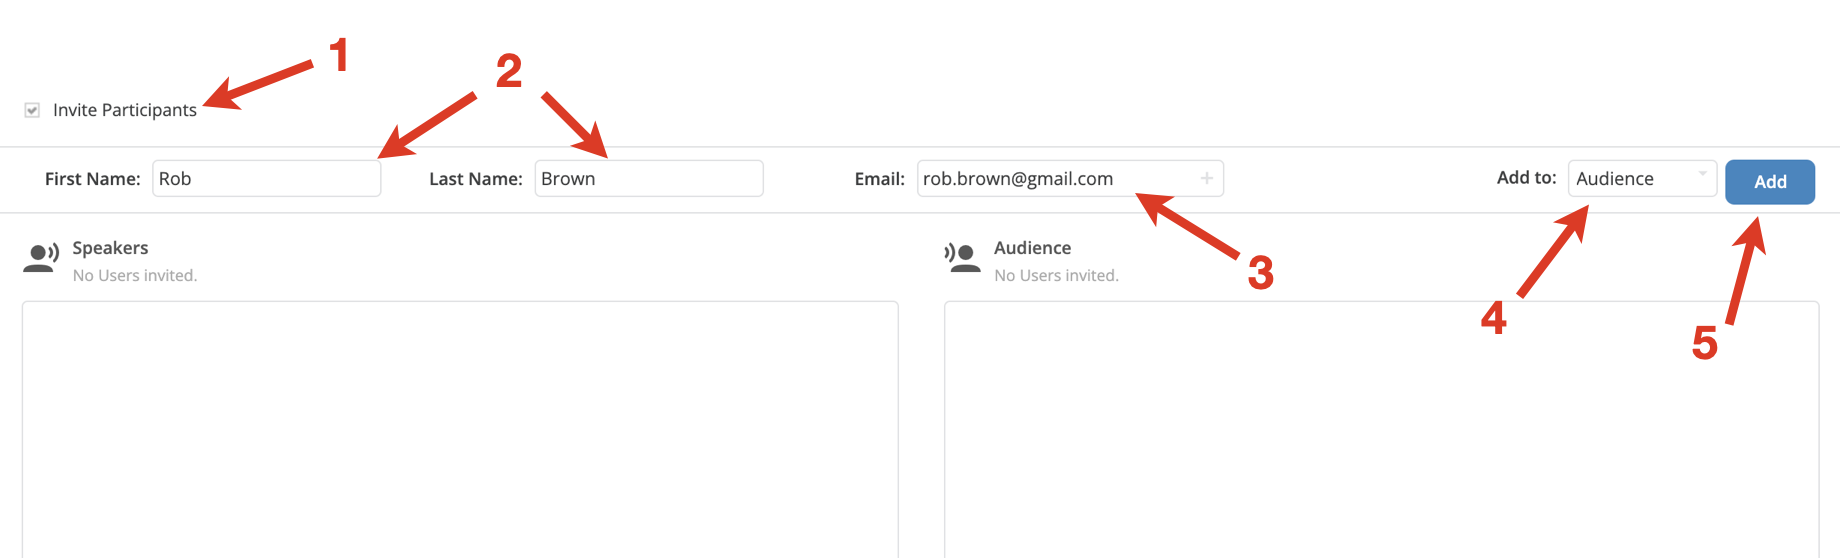
(Optional, you can do it later) Invite participants:
- Check the box Invite Participants (1)
Enter First Name, Last Name (2), Email (3), choose role (Audience or Speaker) (4) and click Add button (5). Detailed information about adding participants is described in the Participants section
- Click Save in the lower part of the screen
Once saved, the scheduled meeting appears on your Schedule (on the left panel, below Dashboard).
Edit or delete a scheduled webinar
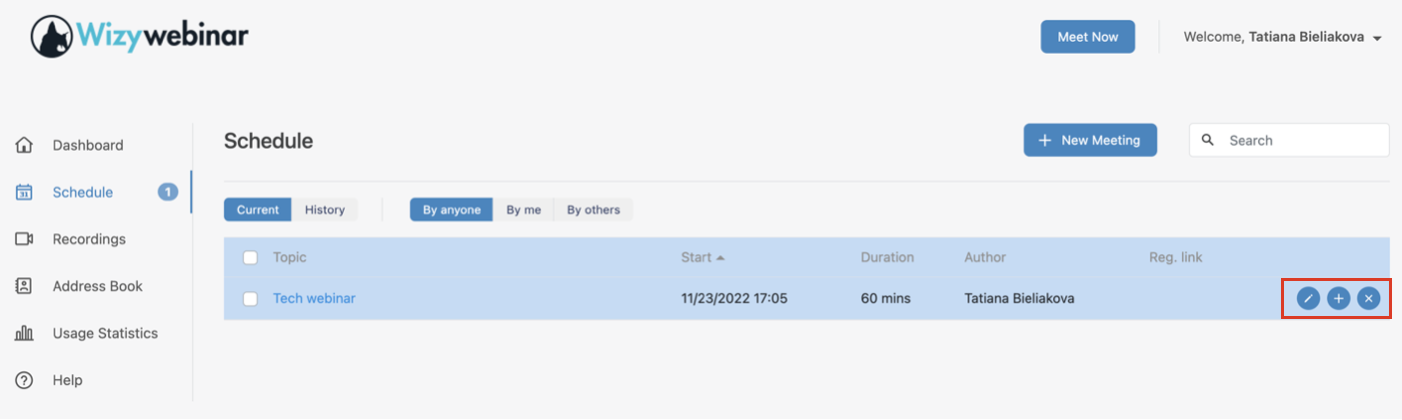
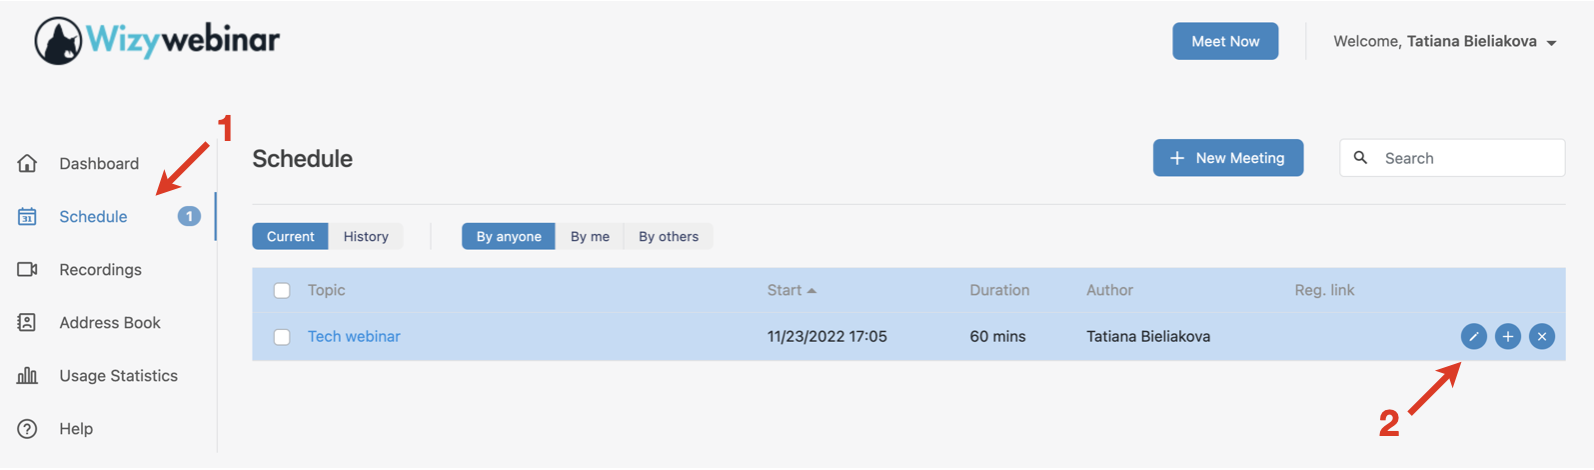
After creating a webinar, you can edit or delete it in the Schedule menu. Click on the Schedule from the left-hand panel.
To edit: hover the mouse cursor over your scheduled meeting and click on the Pencil icon (Edit Meeting)
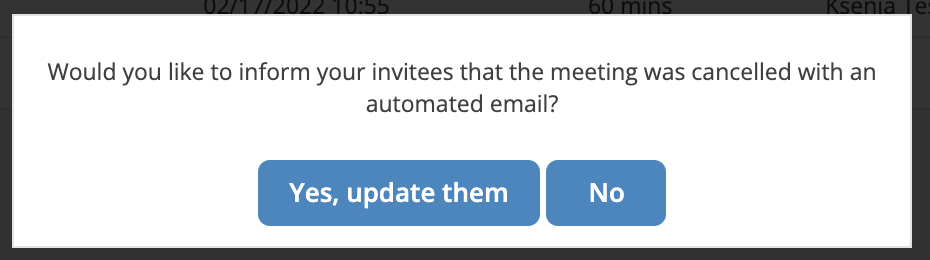
To delete: hover the mouse cursor over your scheduled meeting and click on the x icon (Delete Meeting). If you want to inform your invitees about the webinar cancellation with an automated email, click Yes, update them button
In this menu, you can see webinars scheduled by all the users, but you can edit and deleted only webinars scheduled by you.
Schedule a webinar - advanced options
- Click on the Schedule menu from the left-hand panel
Hover the mouse cursor over your scheduled meeting and click on the Pencil icon (Edit Meeting):
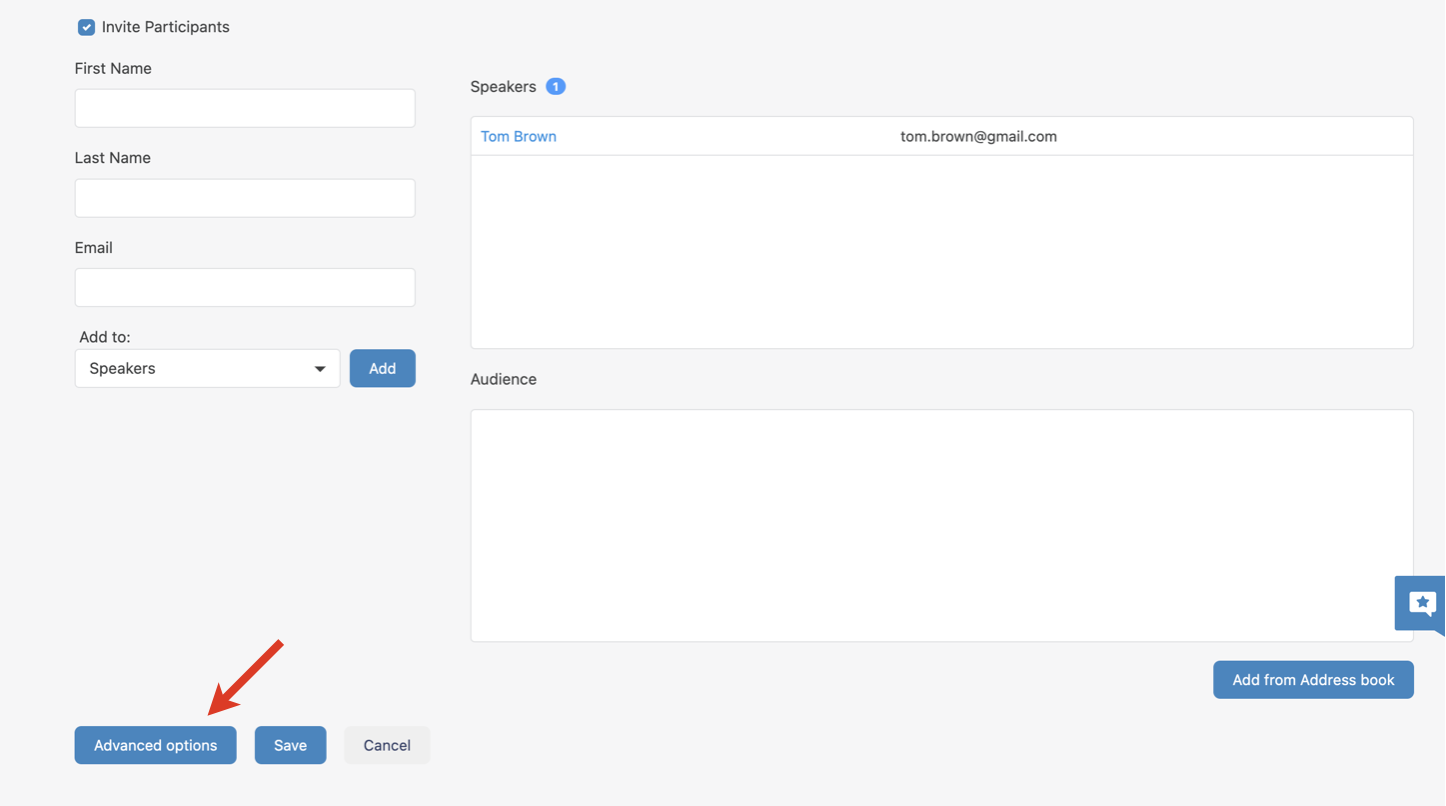
Click Advanced options in the lower part of the screen:
Invite participants: add manually, import via CSV file, add from Address Book
- Click on the Participants tab. In this menu, you can add participants to your webinar using one of 3 modes:

1 - add participants manually: enter user’s name (1), email (2), set a role (3) and click Add button (4). By default, new contacts are automatically saved in Address Book, unless you change this behavior (see the additional control options in this section):
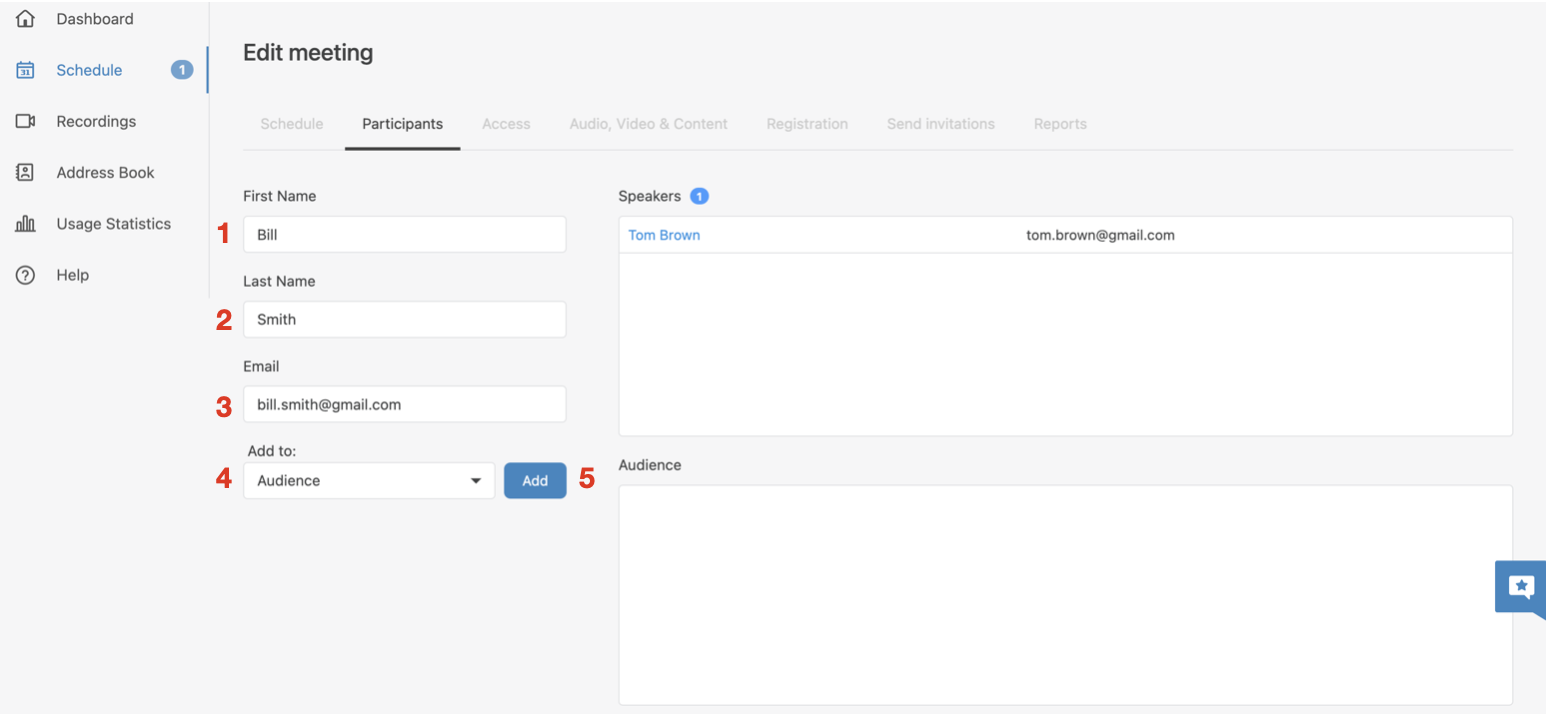
Note: When you add participants, you always need to indicate their role:
- Speaker – someone who runs the webinar, broadcasts their audio and video and controls various aspects of the webinar. There can be more than one speaker. Speakers have a number of privileges over other participants, which include: the ability to speak, show video, start the recording, manage other participants, use group chat for speakers, and more as you’ll see later in this Guide
- Audience – mostly passive listeners of the webinar. By default, they don’t have permission to speak, unless allowed by speakers. If needed, they can interact using chat in Conversations, Questions and Answers, etc.
There is also an Account holder – someone who sets up the webinar and the only person who can edit the details of the event before it starts. Account holder belongs to Speakers of the webinar by default.
- 2 - add participants from Address Book: you can add them one by one or select multiple participants
To add one by one, start typing participant's name or email, choose them from the drop-down list below, set role and click Add button. Or click the Plus icon next to email (1), find participants in the list, check the box in front of them (2), set a role (the role applies to all users you choose), and click Add button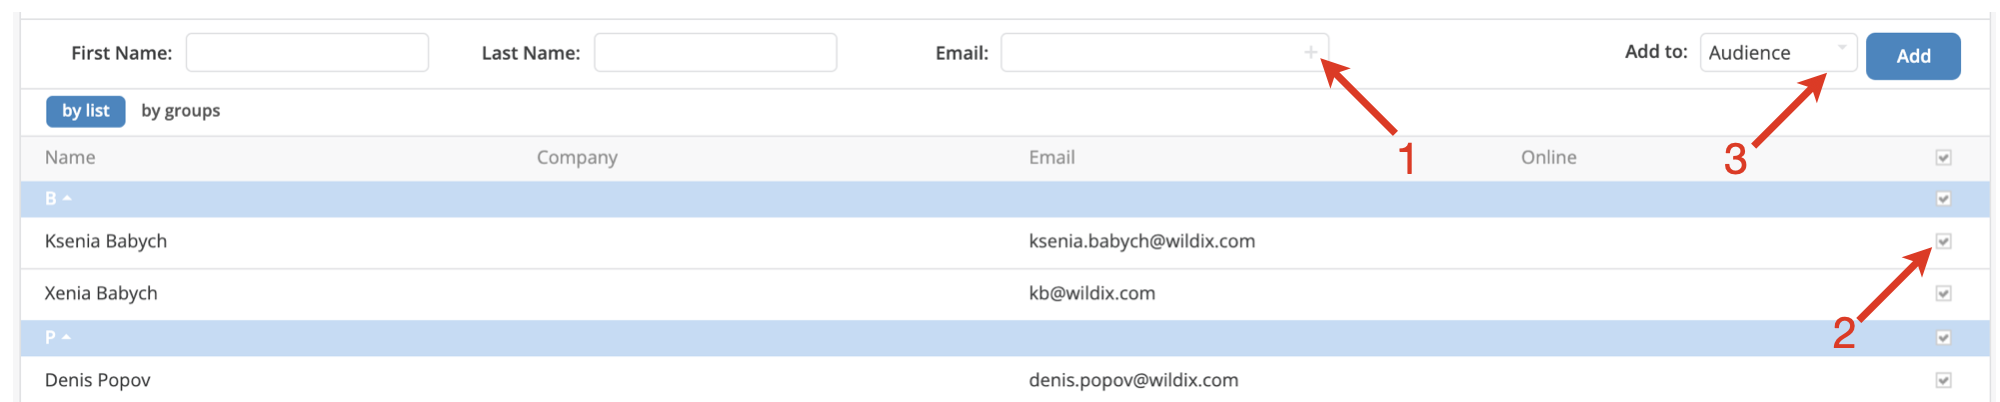
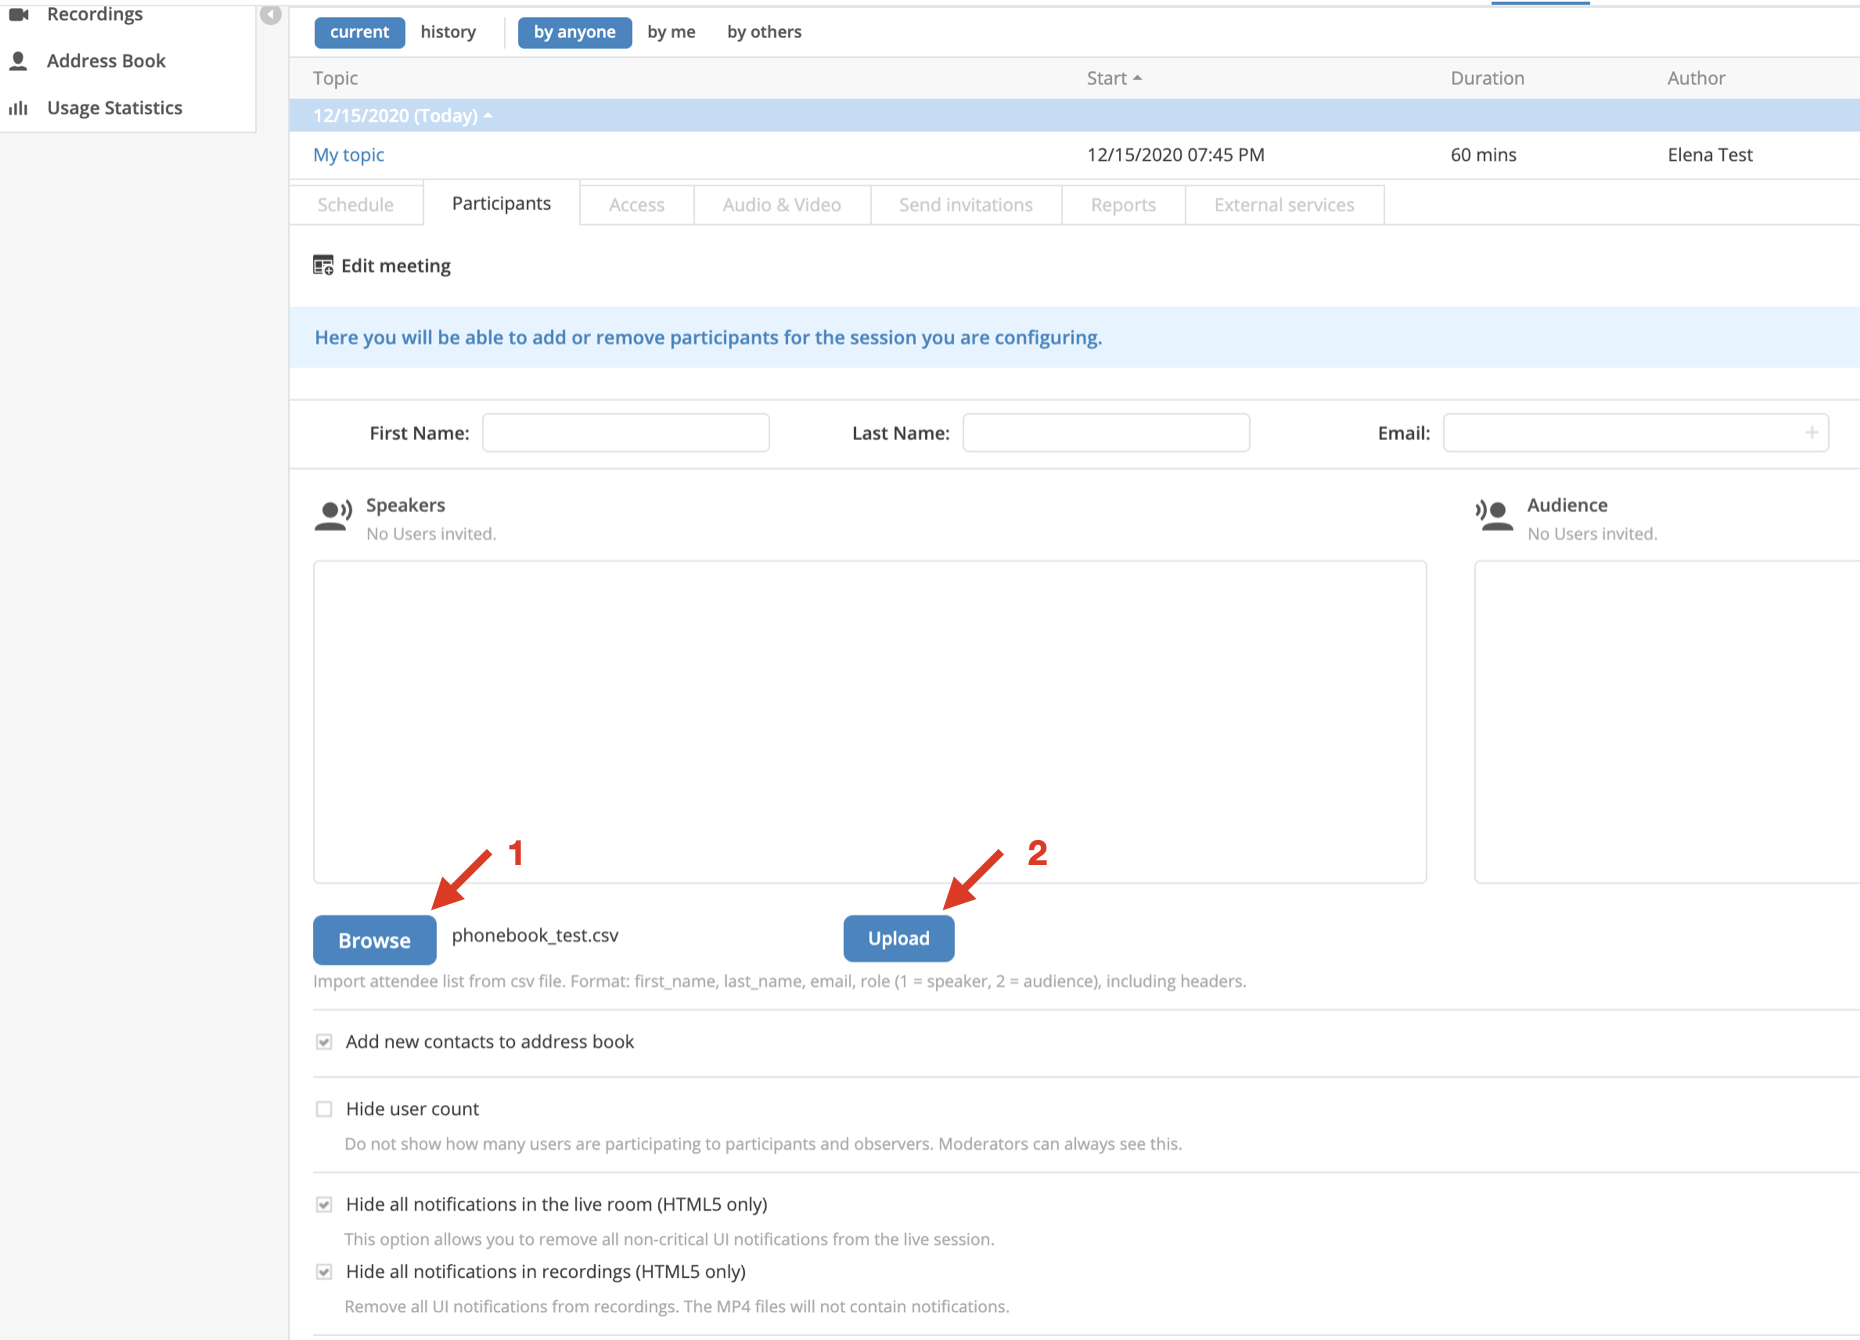
3 - import participants: click on Browse to select the CSV file on your PC (1) and click Upload button to import the list of participants (2):
Make sure your CSV file is compliant with the required format: first_name, last_name, email, role (1 = speaker, 2 = audience), including headers.
Example:
first_name last_name email role first_name_of_person1 last_name_of_person2 email@person1 1 first_name_of_person2 last_name_of_person2 email@person2 2 or download a sample CSV file: Sample Wizywebinar participants import.csv.
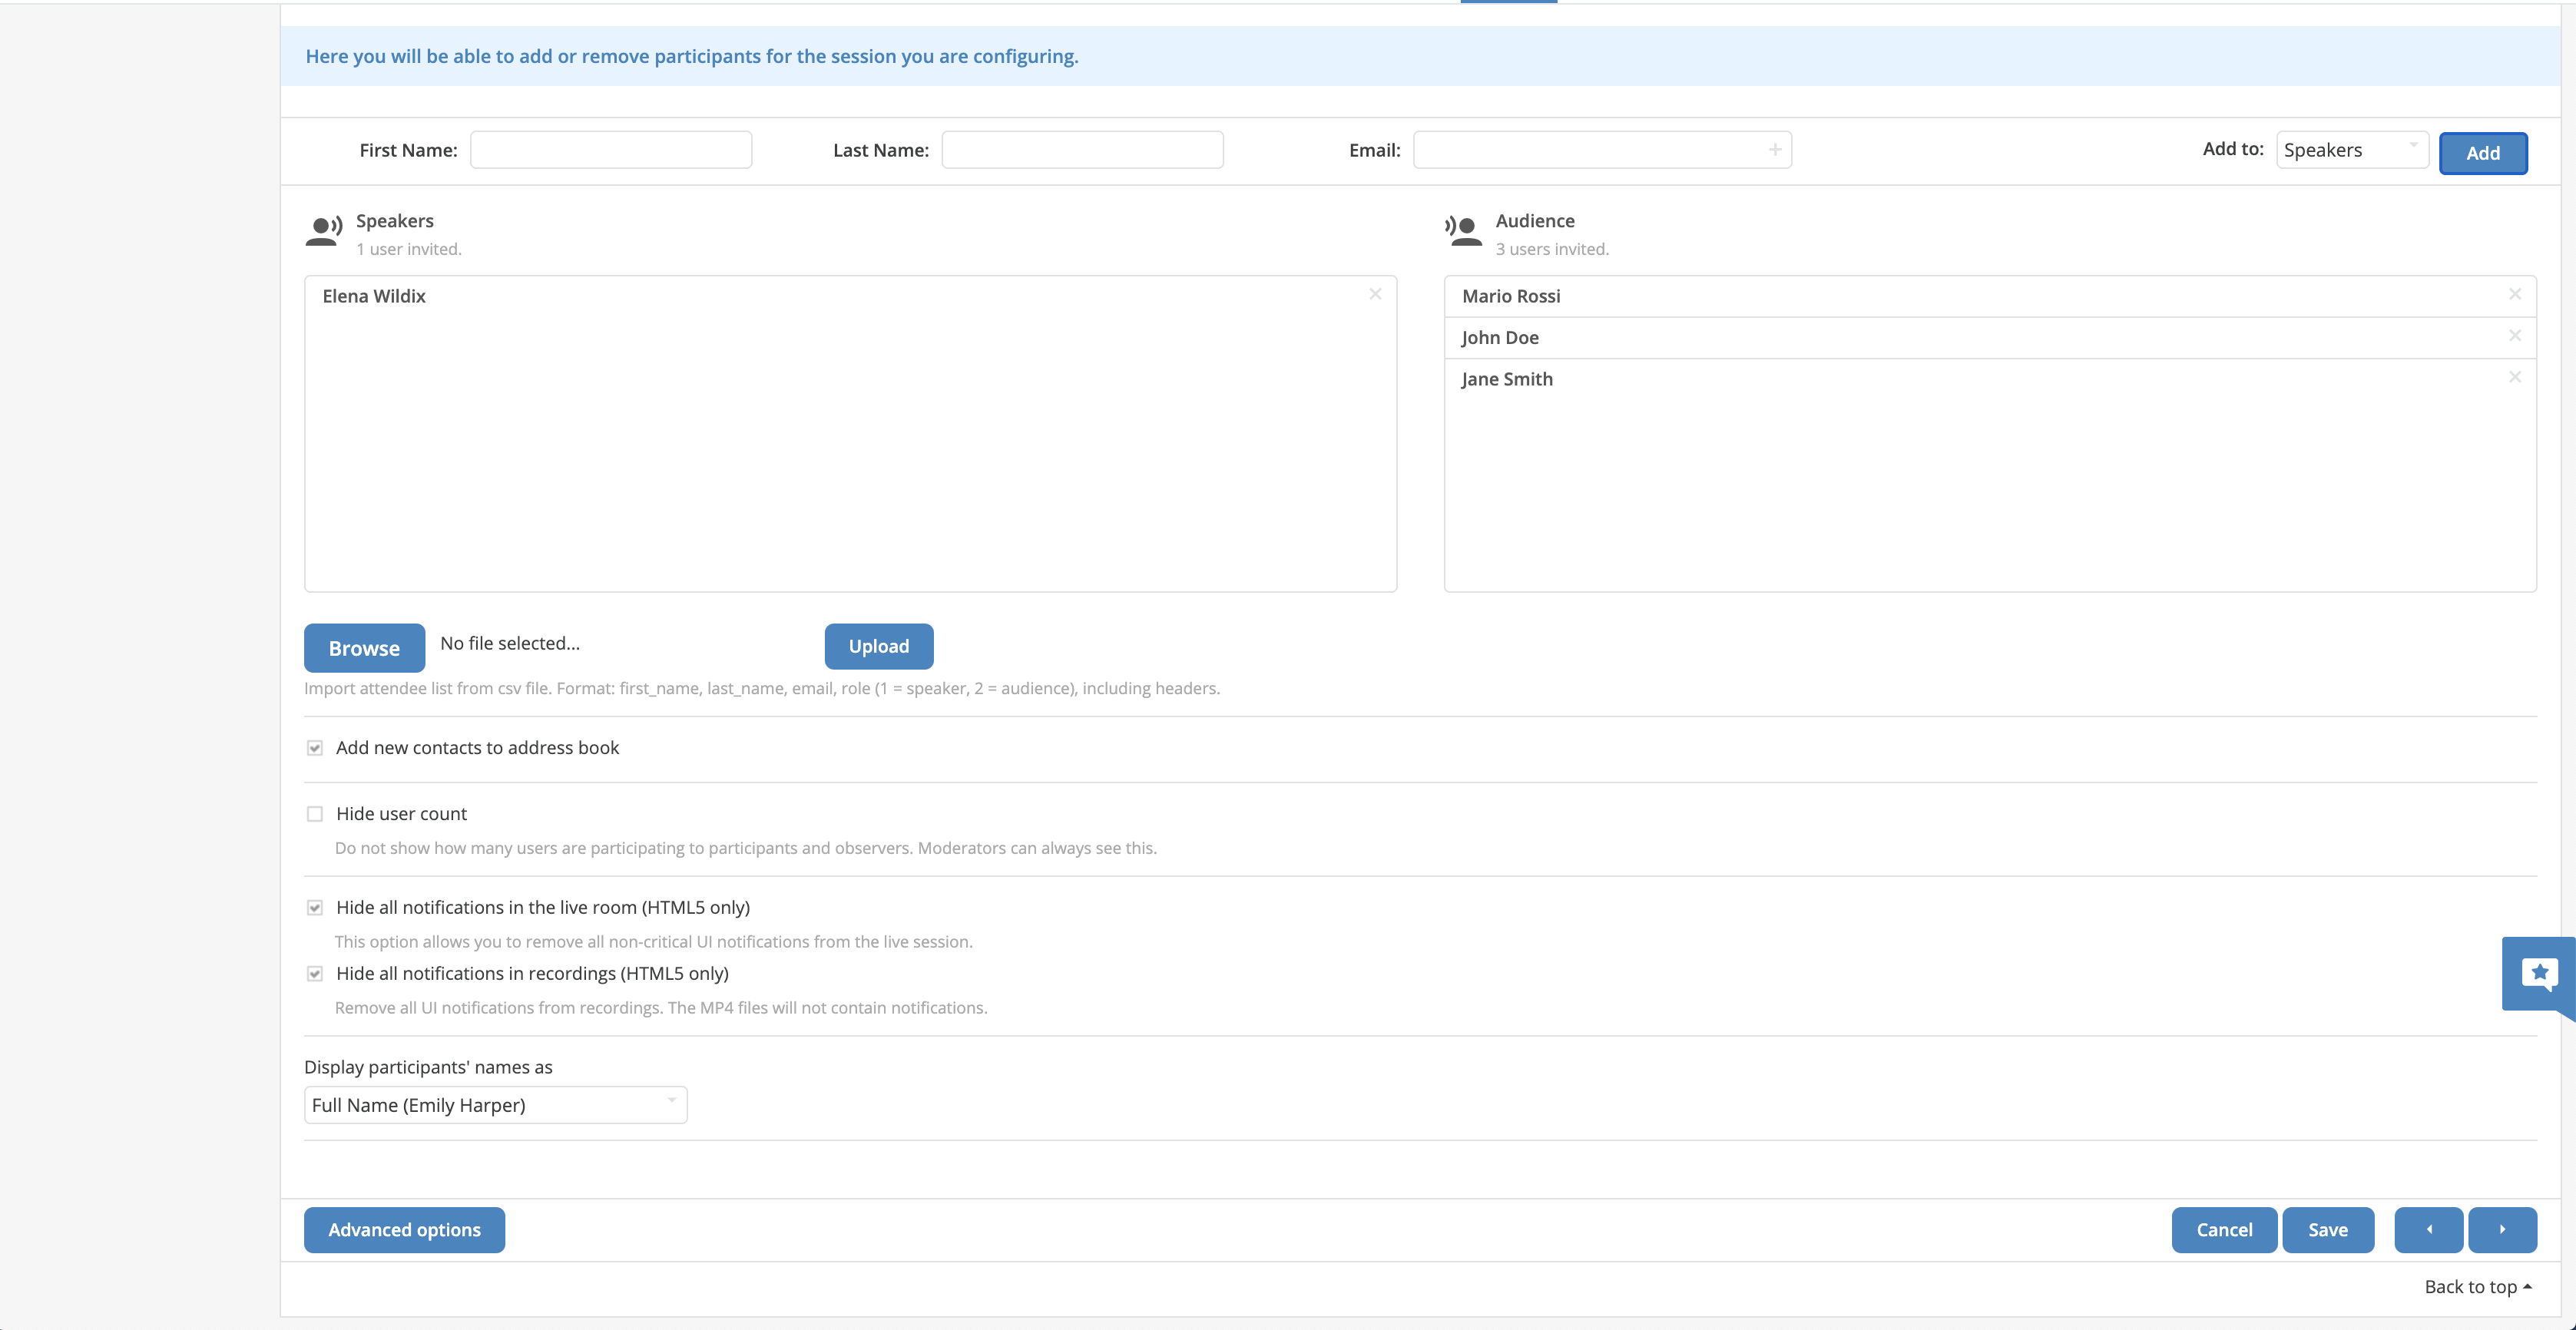
Once imported, participants appear in the list of Speakers/ Audience, depending on their role:
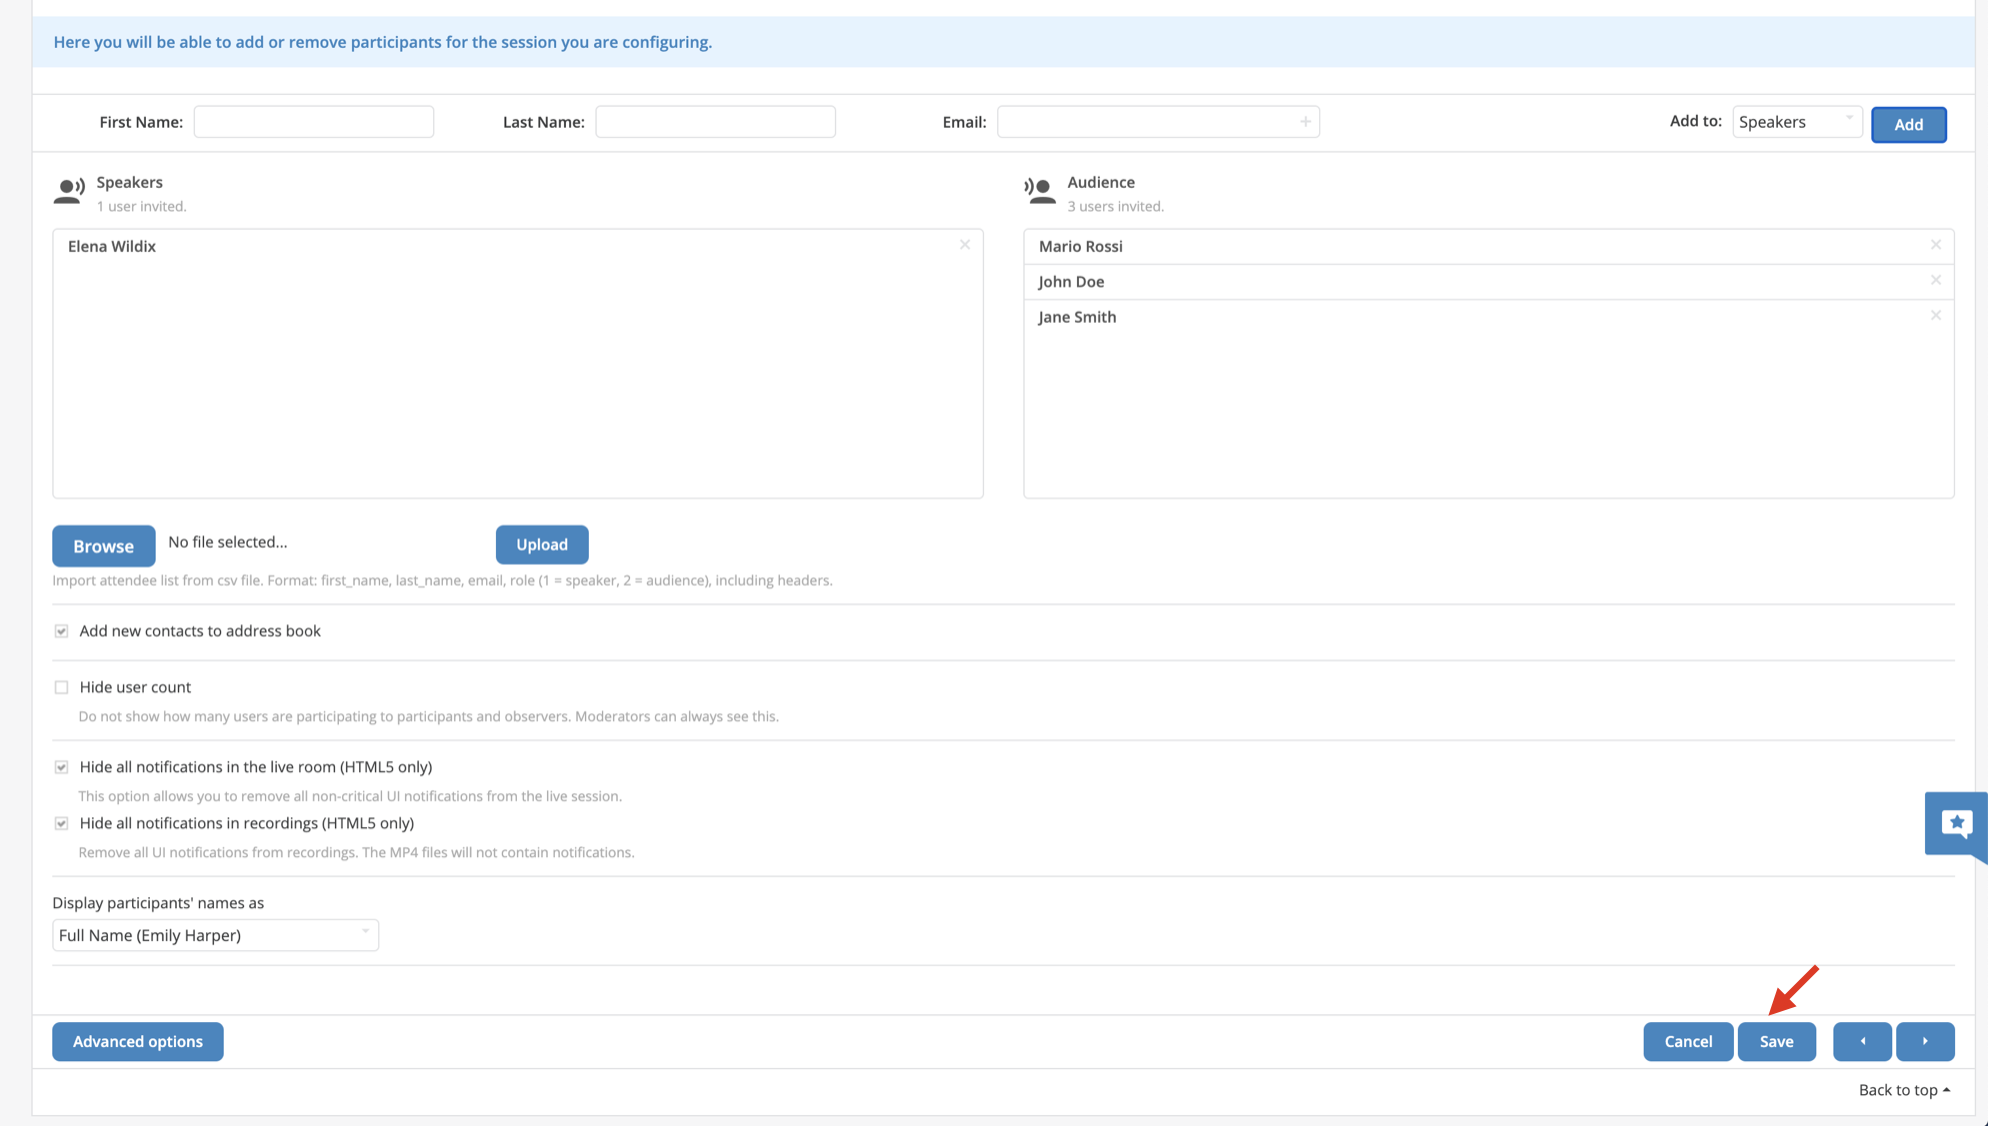
When the list of participants is complete, scroll down and hit Save button:
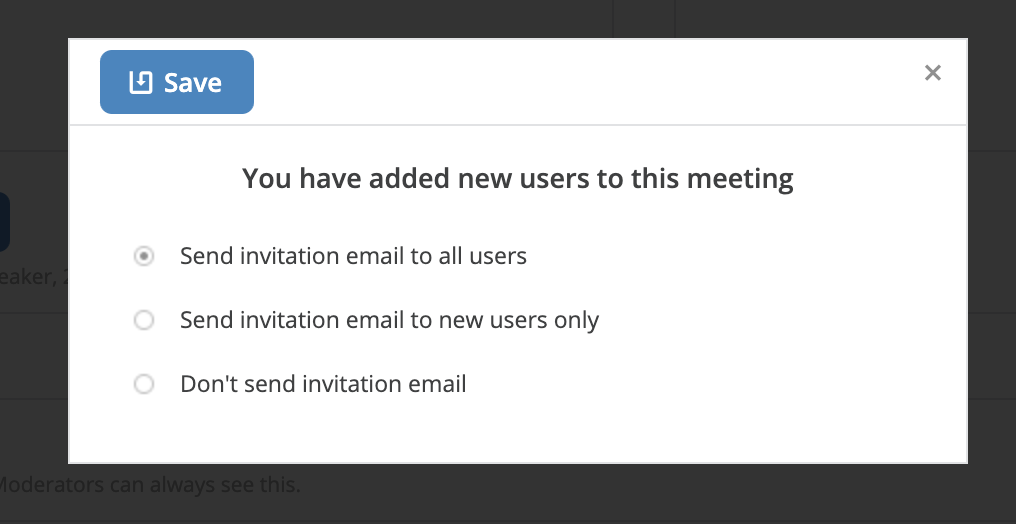
A new dialog opens, make your choice, whether or not the invitation emails should be sent to the participants:
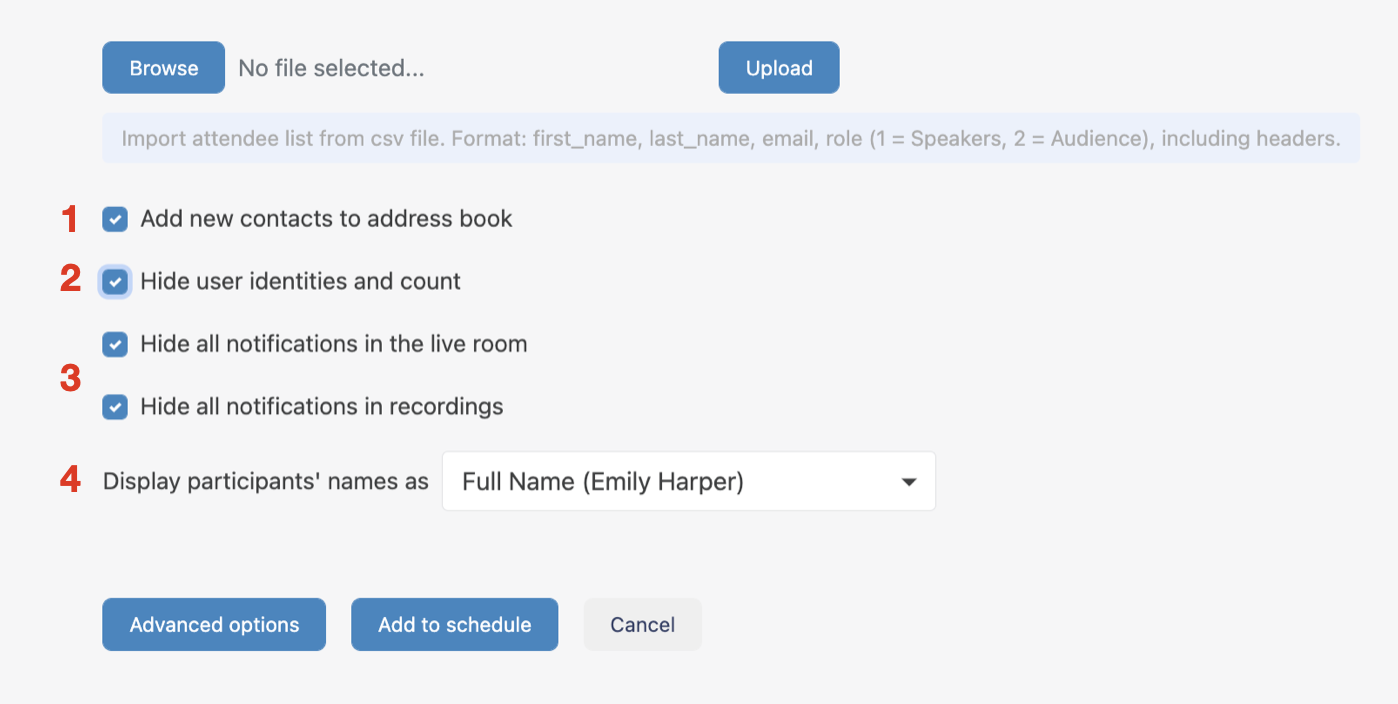
Below the Browse button there are the following checkboxes providing you with additional control options:
- Add new contacts to address book (1) - when enabled, all newly added contacts are automatically added to Address Book
- Hide user identities and count (2): when enabled, people in the audience can't see the total number and names of participants in the participants’ panel
- Hide all notifications in the live room/ in recordings (3) - these options allow you to remove all non-critical UI notifications (e.g. when someone joins a webinar) from a session and UI notifications from recordings correspondingly
- Display participants' names as (4) - decide how to display participants' name: full name, initials etc
Description, Agenda, Recurrent webinar, Calendar link or file
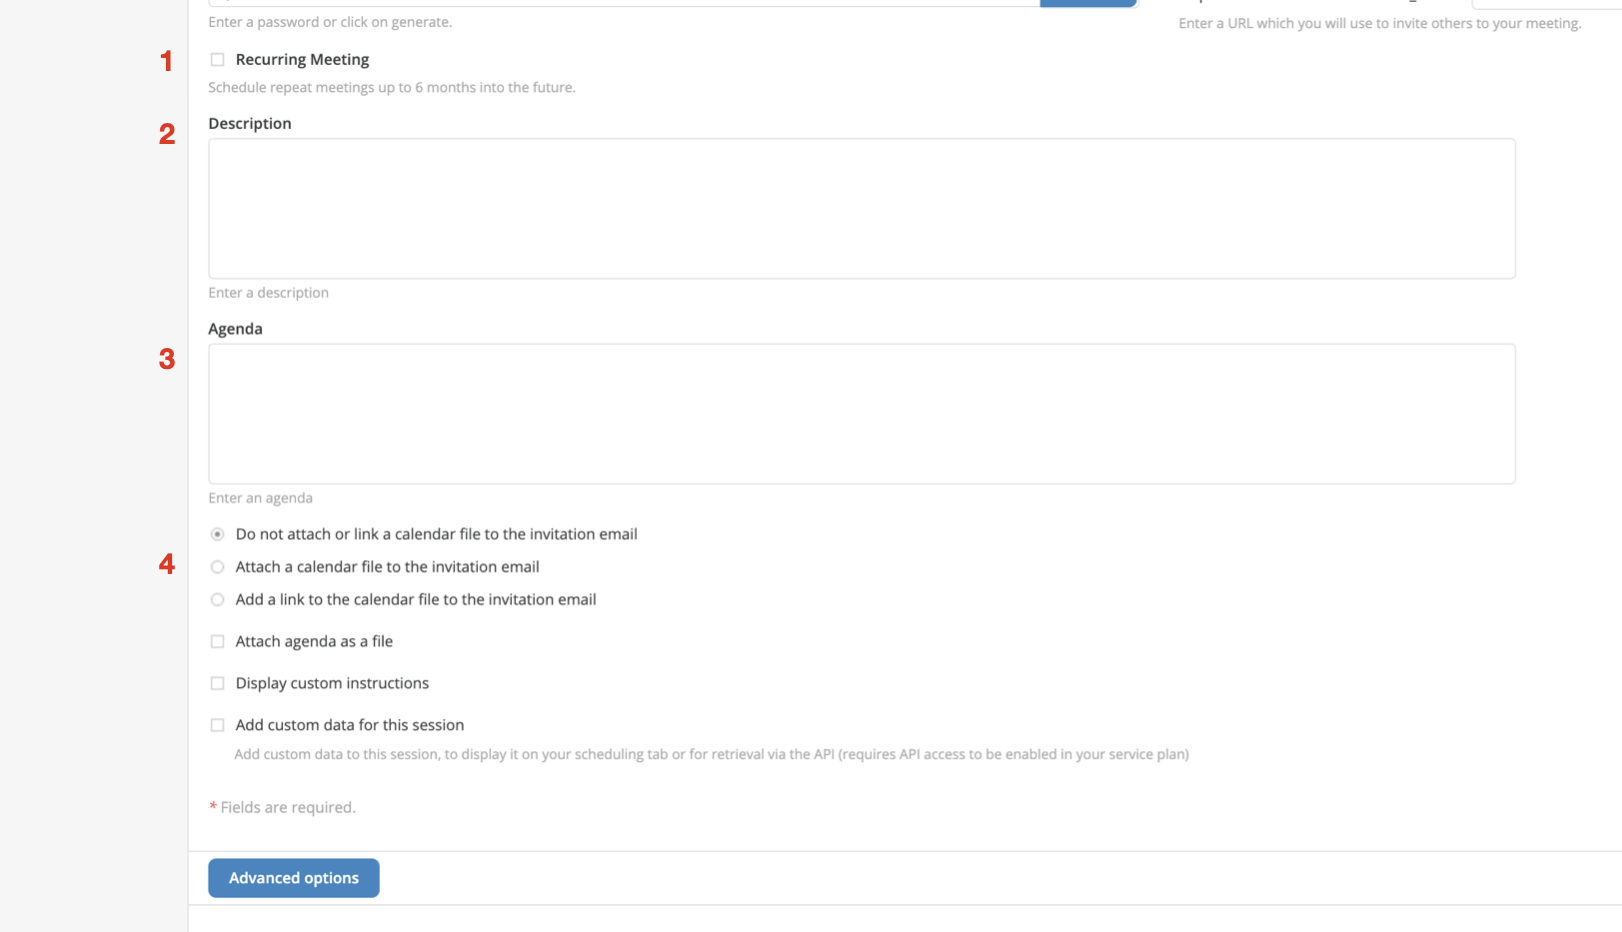
In the first tab (Schedule), you have the following options to customize your webinar:
- Set a webinar as a Recurring event (1)
- Add Description (2)
- Add Agenda (3)
Decide whether or not to attach a calendar link/ file to the invitation email (4)
Important: If you plan to customize an invitation email, the option of attaching a link doesn’t work. For customized emails, you can:
- Choose to attach a calendar file
- Or add a calendar link using the variable {ics_link}.
See more in the section Send invitations: Customizing invitation email, reminder and follow-up emails.
Access control: Lobby and Early access
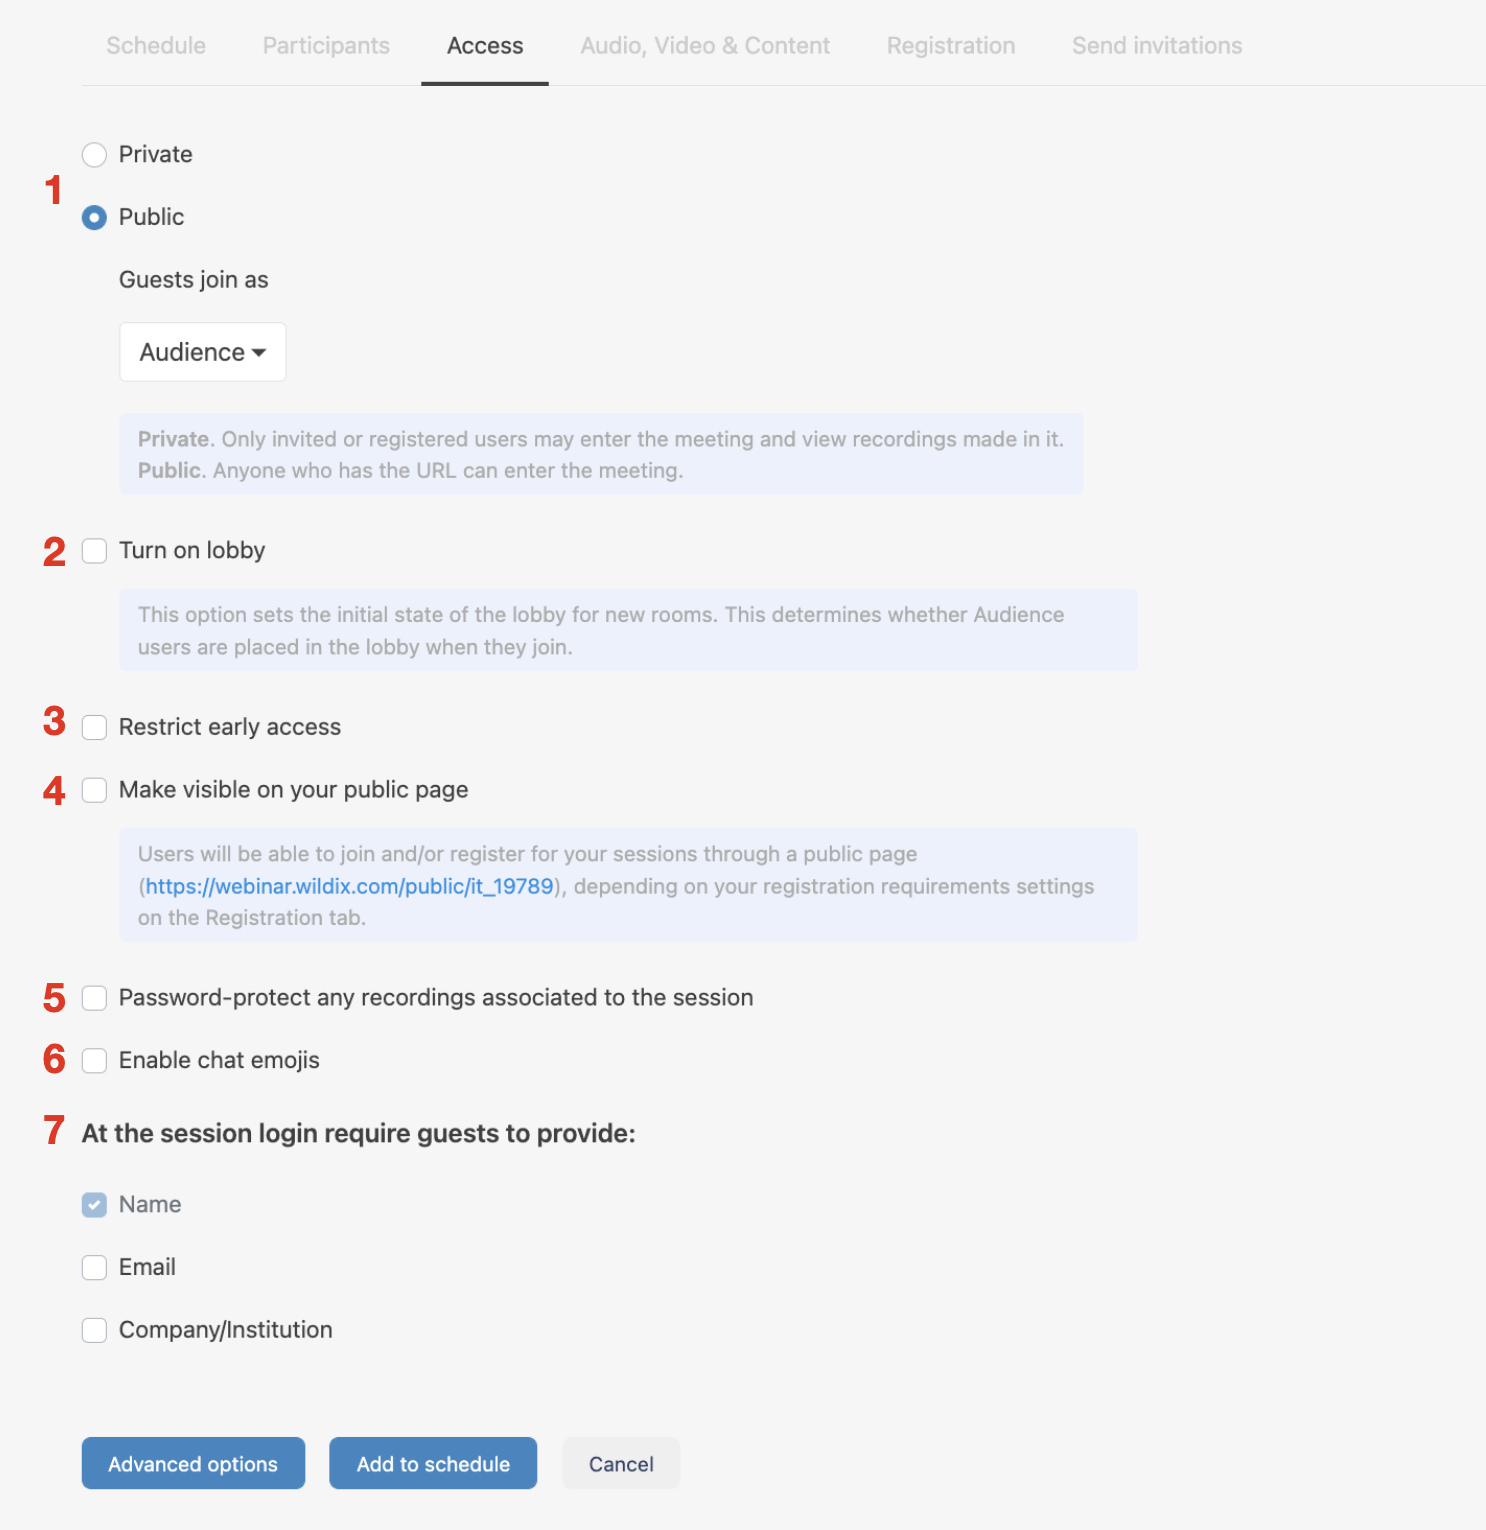
Click on the Access tab. In this menu, you can control the access permissions to your webinar:
- Private/ Public (1): if you choose Private, only registered/ invited guests can enter the webinar. If you choose Public, anyone with the link can join
- Turn on lobby (2): this feature allows you to manage who enters the room. When enabled, participants show up in the lobby list and are held there, unless the webinar host allows certain participants to enter the webinar or decides to remove a participant from the list
- Restrict early access (3): this option allows you to control how early participants can join the webinar
- Make visible on your public page (4): this option lets you display all events scheduled from your account on a dedicated public page. Depending on registration requirements, users may be able to join or register for your webinars through this page
- At the session login require guests to provide (5): choose which information to request from guests when they join the session via the link. Guests are those people who didn’t register for the webinar and weren’t invited via email, so they don’t have a private link to join
Audio, Video and Content: starting audio and video broadcast automatically; setting default layout
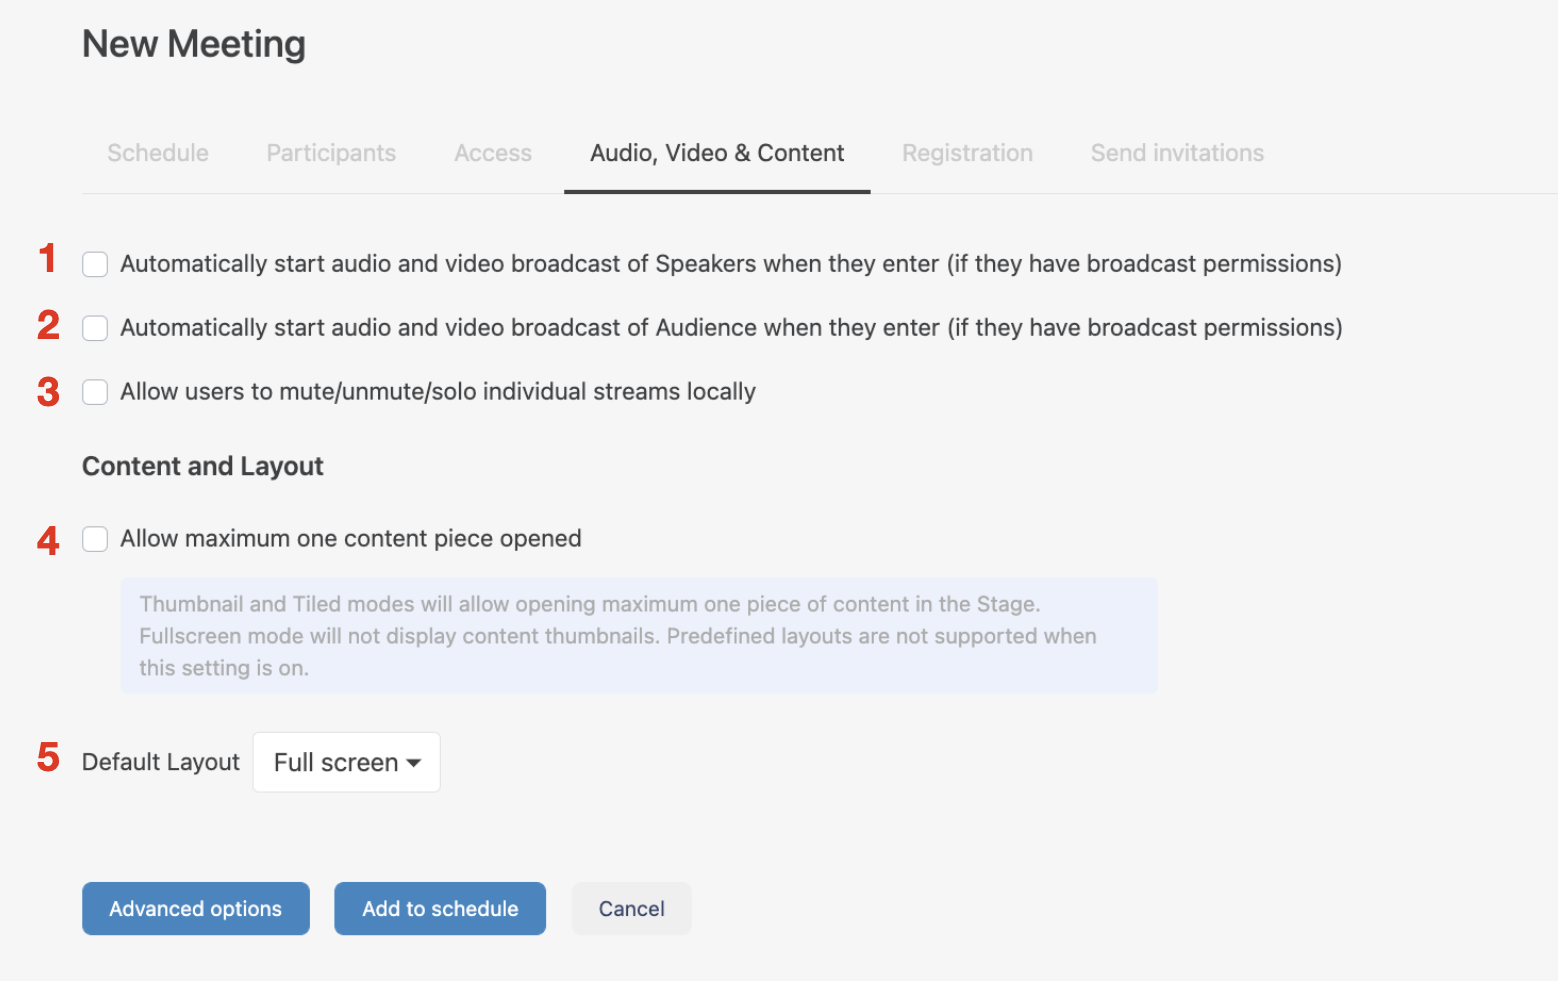
Click on the Audio, Video & Content tab. In this menu, you can decide whether other speakers or broadcasters should join a webinar session with the possibility to automatically enable audio and video:
- Allow maximum one content piece opened (4): if enabled, any piece of content loaded from the Content Library is displayed in the Stage area, entirely replacing the previously loaded content regardless of type. In other words, the Stage area can never be split with multiple content pieces
- Default Layout (5): set the default layout for the session (Full screen, Tiled, or Mixed):
Registration: allowing participants to register for a session
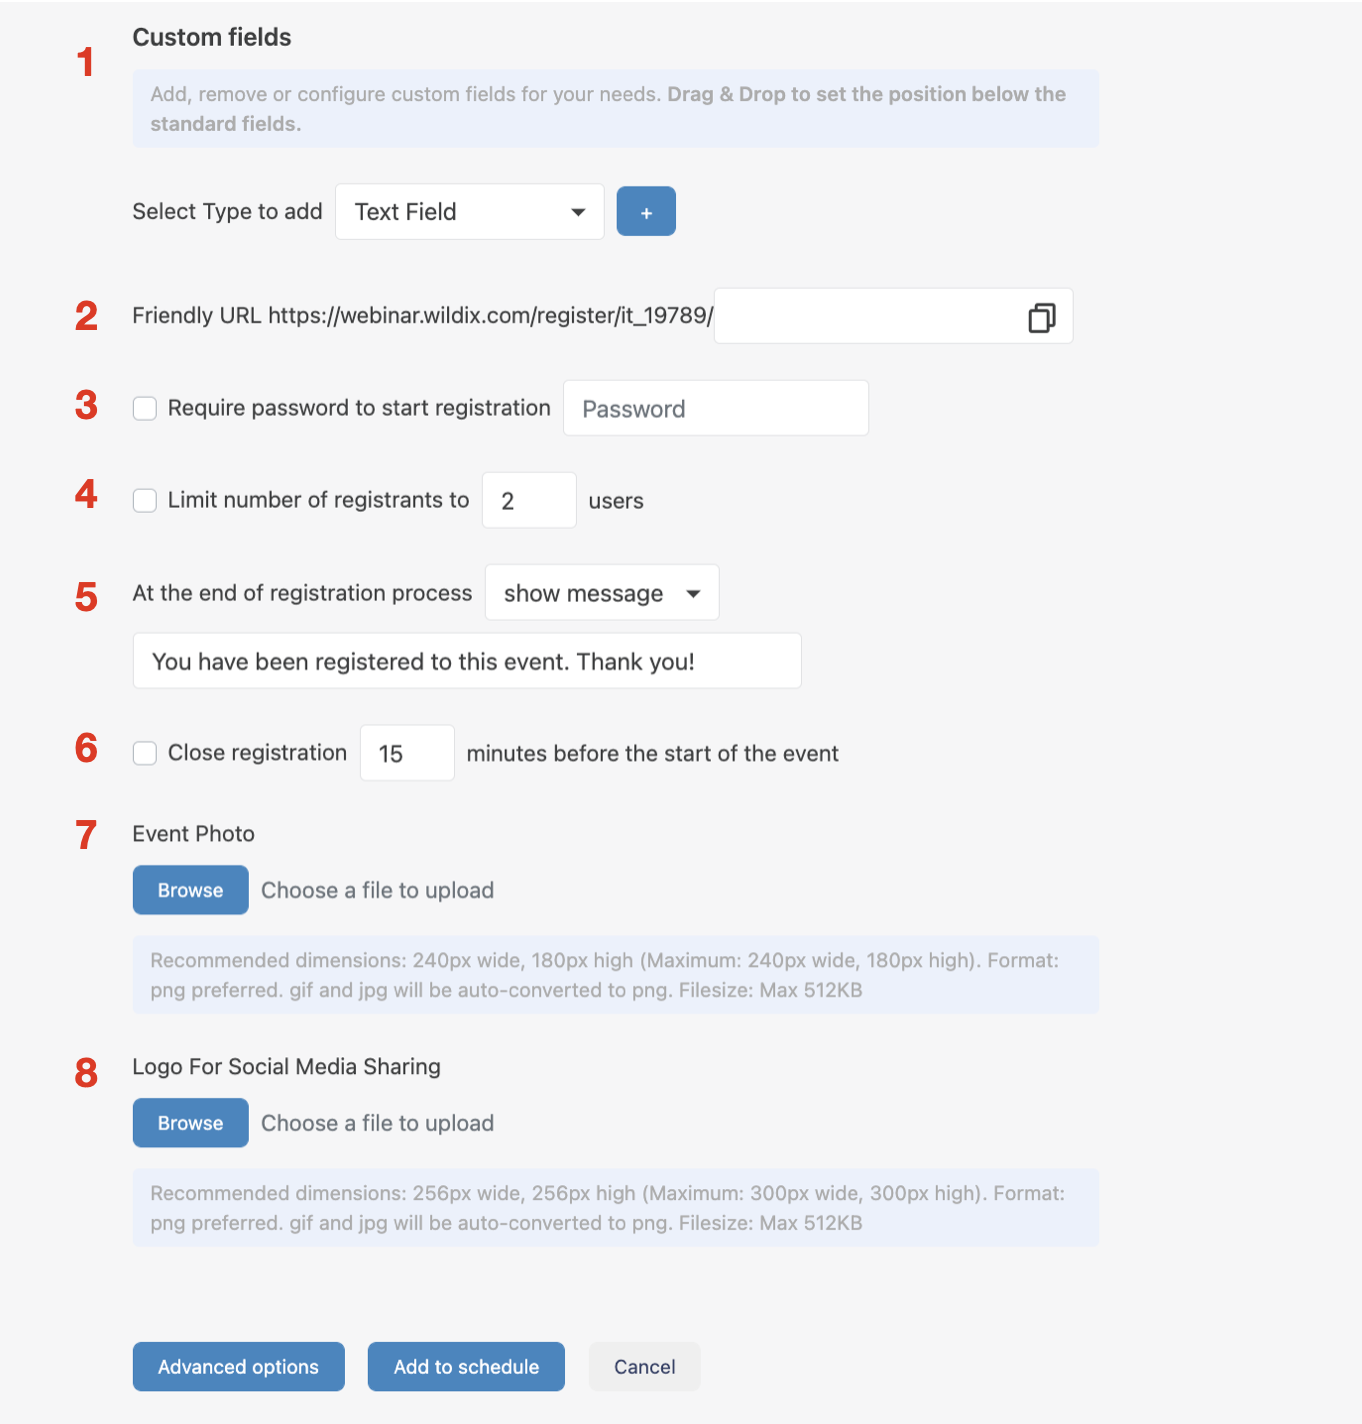
Click on the Registration tab. In this menu, you can activate a registration page for participants. To activate it, check off Allow registration or Require registration. There are predefined fields, but you can customize the way the registration page should look like:
Custom fields (1): here you can add your own custom form fields and decide if you want to make any of these fields mandatory during the registration process. If you have several custom fields, you can drag and drop them to change the order
- Friendly URL(2): customize your registration URL rather than use the randomly generated characters to identify your event registration page
- Require password (3): optionally require a password before a participant can complete registration
- Limit registrants (4): limit the amount of people who can register for your event
- Show message (5): once someone has completed the registration process, you can modify the message that is shown or redirect them to a webpage of your choice
- Registration period (6): set a time limit after which participants are no longer allowed to register for your event
Event Photo (7): upload the image that represents your event. This can be a logo, a picture of the speaker, etc.
- Logo For Social Media Sharing (8): upload the specific image for social media sharing that overrides the Event Photo
Example of the Registration page: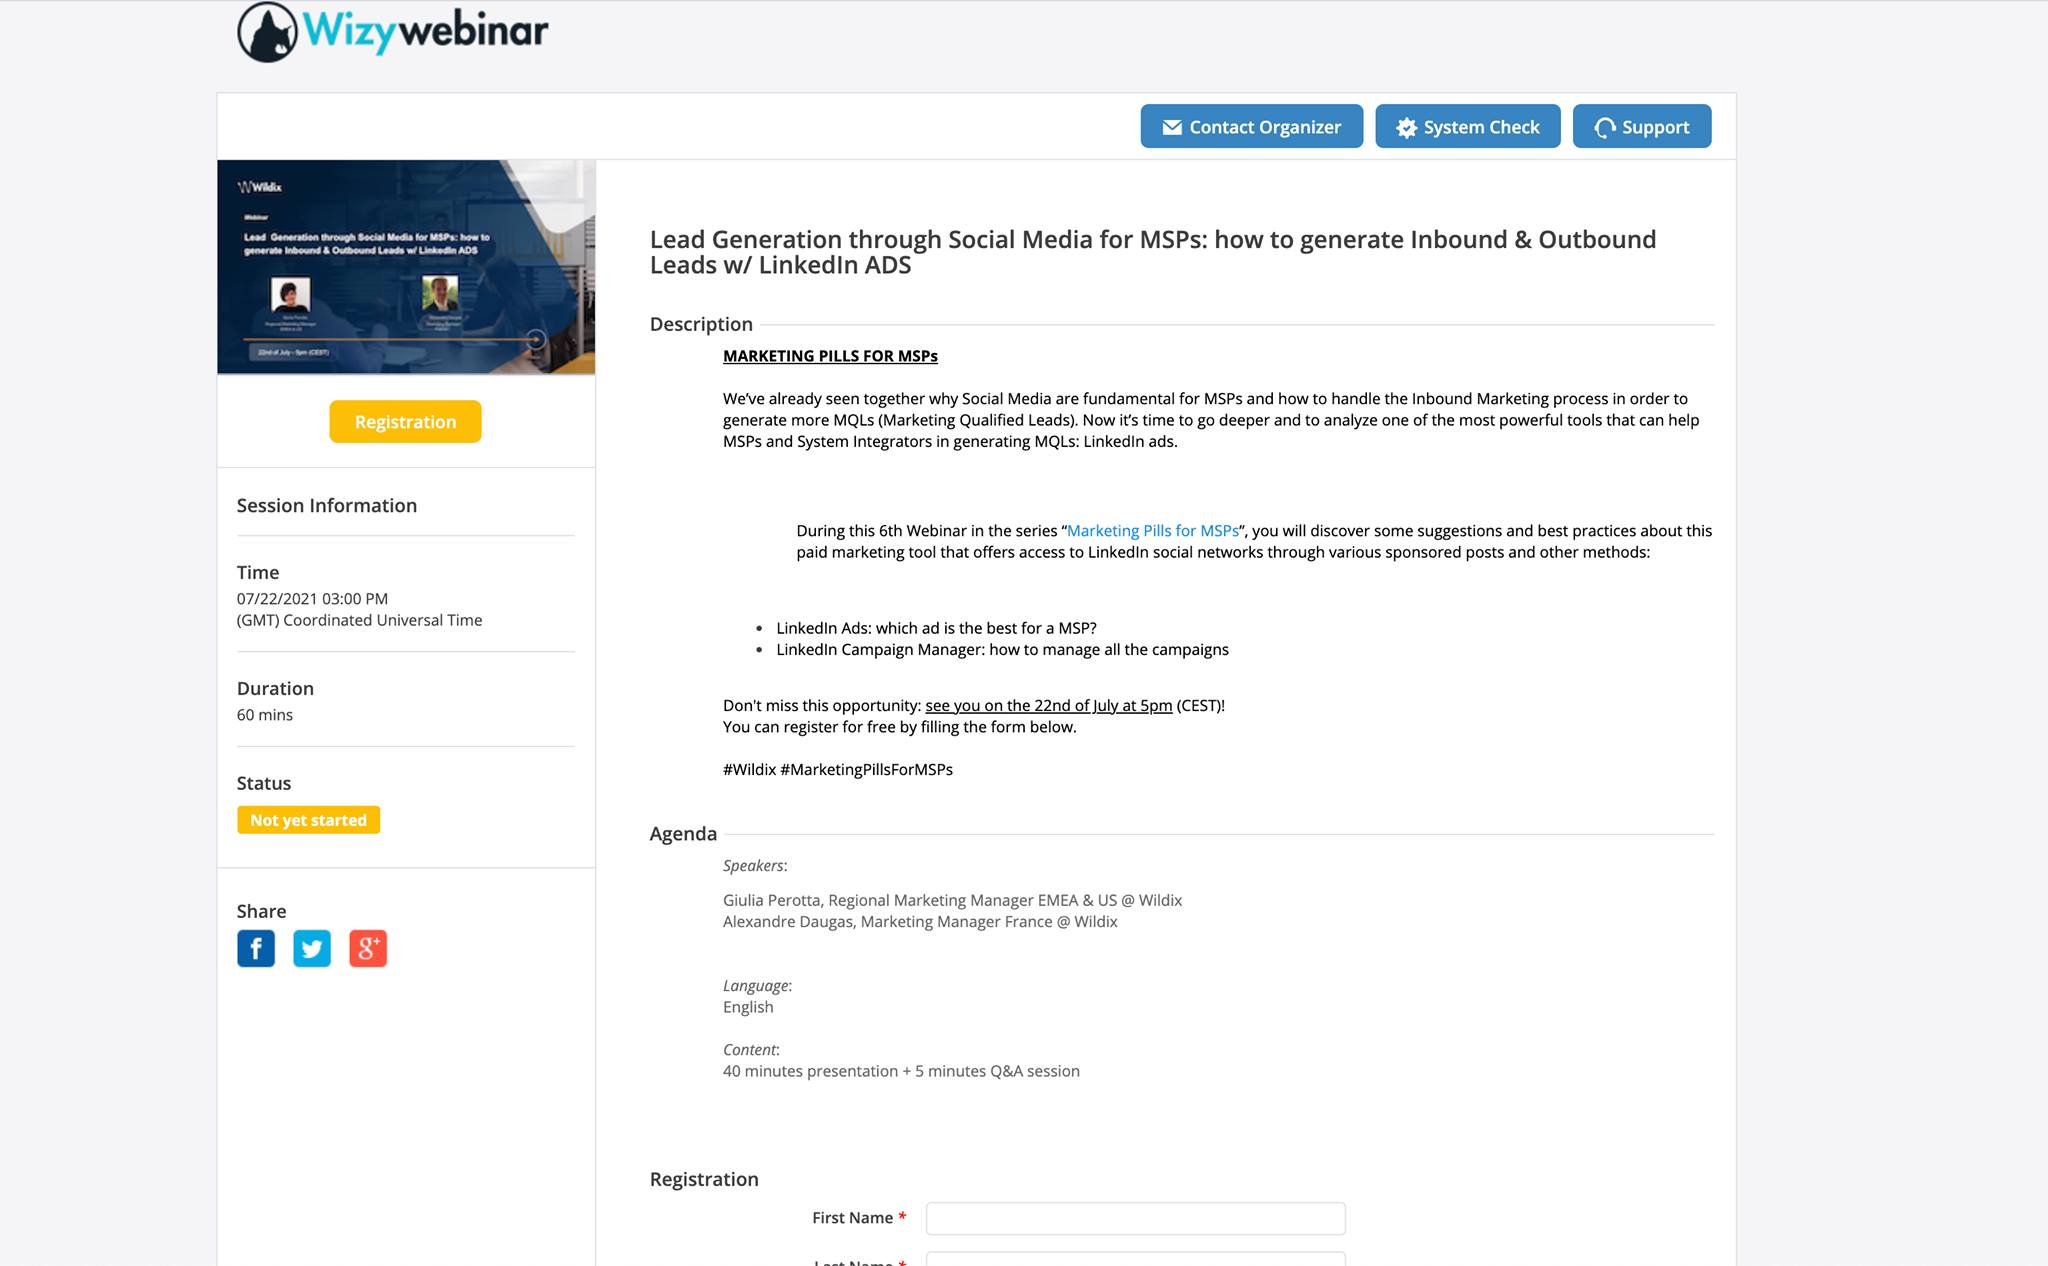
To see the list of those who have registered or were invited to your webinar, go to the Reports tab and download the CSV or Excel file. You can find more information about reports in the Statistics section of this guide.
Send invitations: Customizing invitation email, reminder and follow-up emails
Click on the Send invitations tab. In this menu, you can customize the email sent out to the participants:
- Send a customized invitation email (1): here you can customize the content of your initial invitation email. Once you check this option, an Email Content window opens, where you can type in the desired content of the custom invitation email:
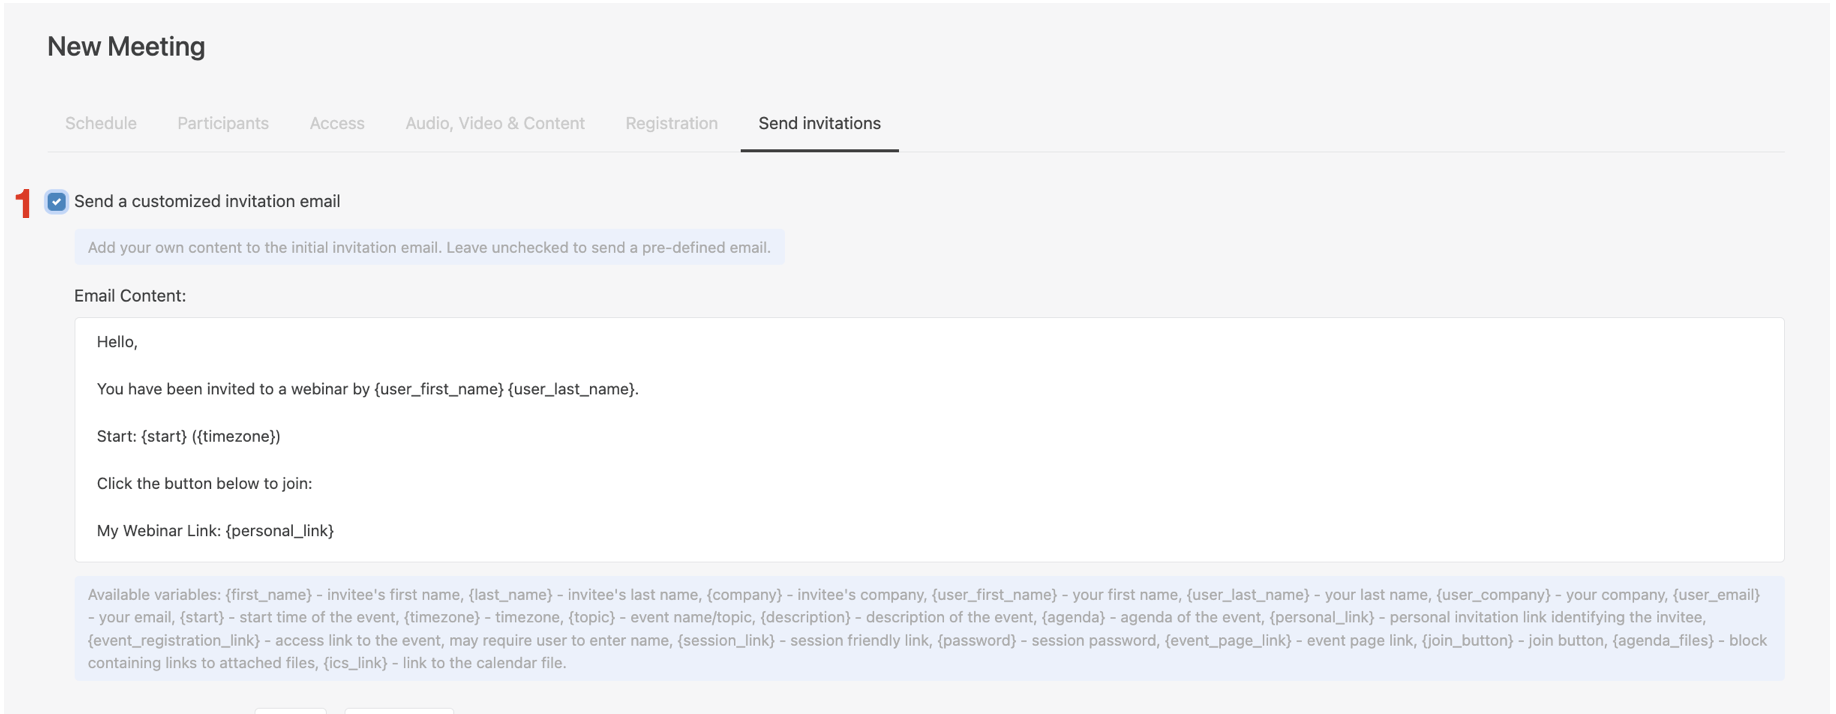
When customizing content of the invitation email, you can use the following variables:
- {first_name} - invitee's first name
- {last_name} - invitee's last name
- {company} - invitee's company
- {user_first_name} - your first name
- {user_last_name} - your last name
- {user_company} - your company
- {user_email} - your email
- {start} - start time of the event
- {timezone} - timezone
- {topic} - event name/topic
- {description} - description of the event
- {agenda} - agenda of the event
- {personal_link} - personal invitation link identifying the invitee
- {event_registration_link} - access link to the event, may require user to enter name
- {session_link} - session friendly link
- {password} - session password
- {event_page_link} - event page link
- {join_button} - join button
- {agenda_files} - block containing links to attached files
- {ics_link} - link to the calendar file
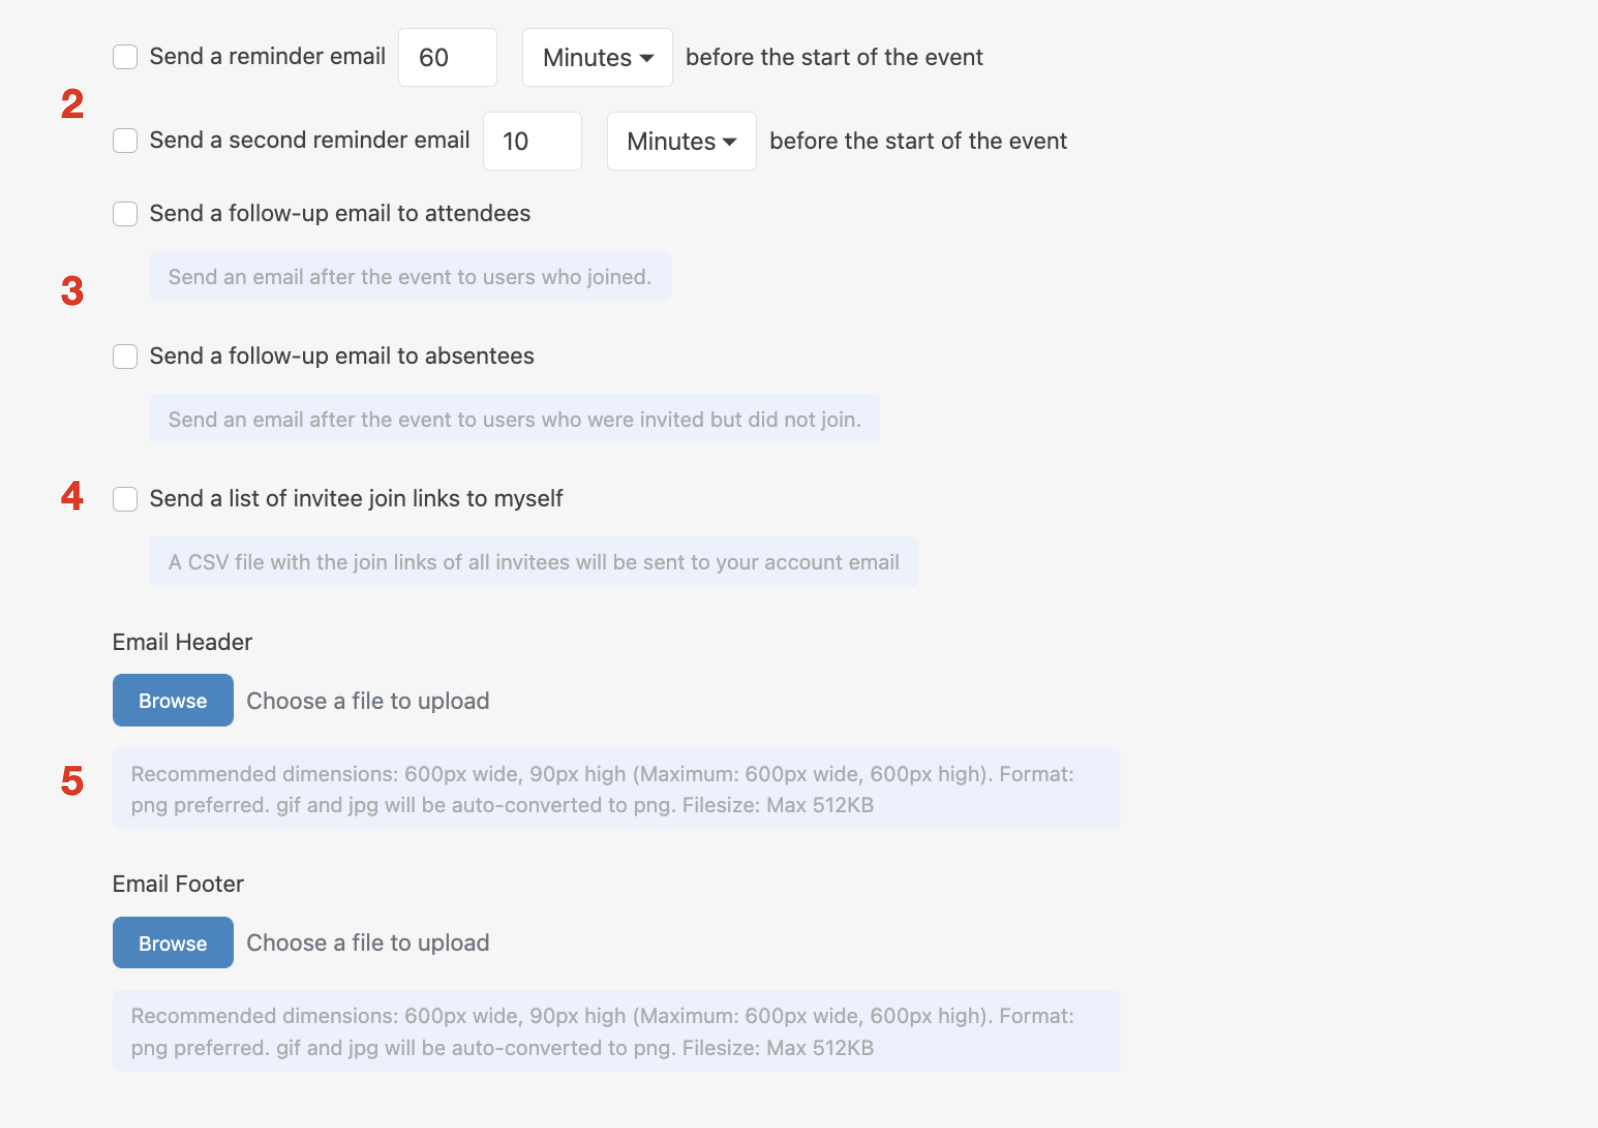
- Send a reminder email/ second reminder email (2): here you can decide when the first and the second reminder emails should be sent, as well as the content of these emails
- Send a follow-up email to attendees/ absentees (3): customize emails to be sent out to those who attended the webinar, and to those who were invited but didn't attend
When configuring reminder and follow-up emails, you also have an option to attach files and send a copy of the emails to yourself - Send a list of invitee join links to myself (4): tick it off if you want to receive a CSV file with the join links of all invitees to your account email
- Email Header/ Footer (5): upload a custom image that should be used as a header or footer.
Requirements to the image: - Recommended dimensions: 200px wide, 50px high (Maximum: 600px wide, 600px high)
- Format: png is preferred. gif and jpg will be auto-converted to png
- Filesize: Max 512 KB
Address Book
Click on the Address Book menu on the left-hand panel to access and manage your list of contacts. To add a user to the Address Book, click Add Contact, provide the necessary details, and click Save. 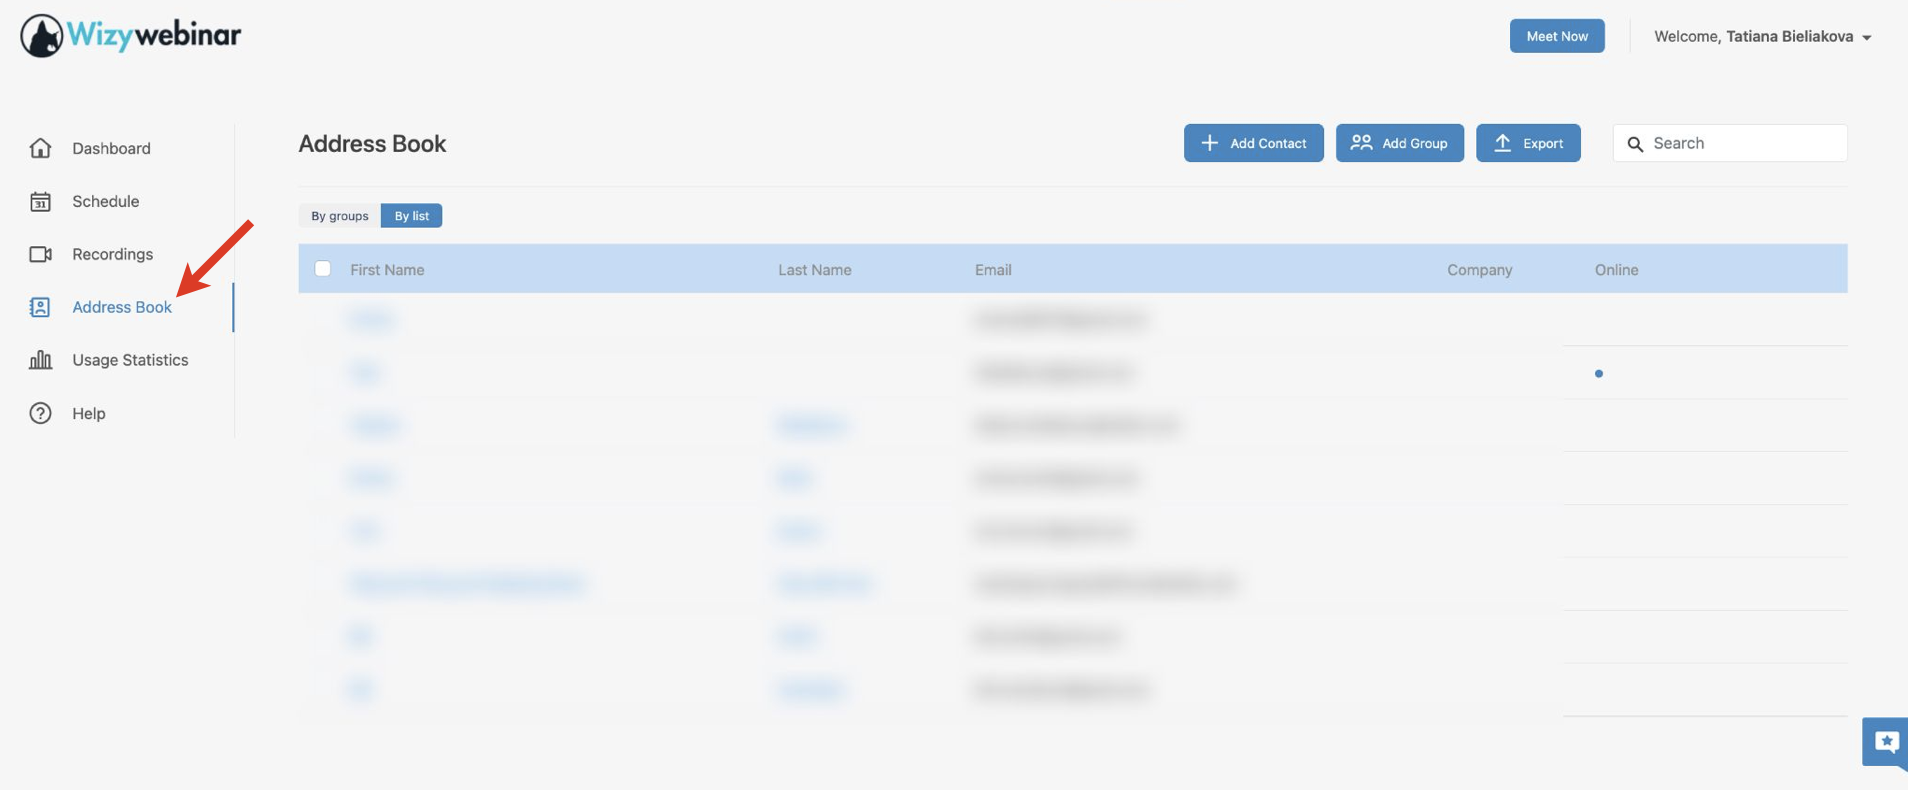
You may also add groups and indicate which groups your contacts belong to. To create groups, either use the Add Group button or use the Groups section when creating/ editing contacts.
The list of contacts can be filtered by groups or by list, and by First or Last name. You can also use the Search field to find the contact you need.
If you want to export the list of contacts, click on the Export to CSV or Export to Excel button, depending on the preferred file format.
Run a webinar session
Wizywebinar Video Tutorial - Manage a webinar
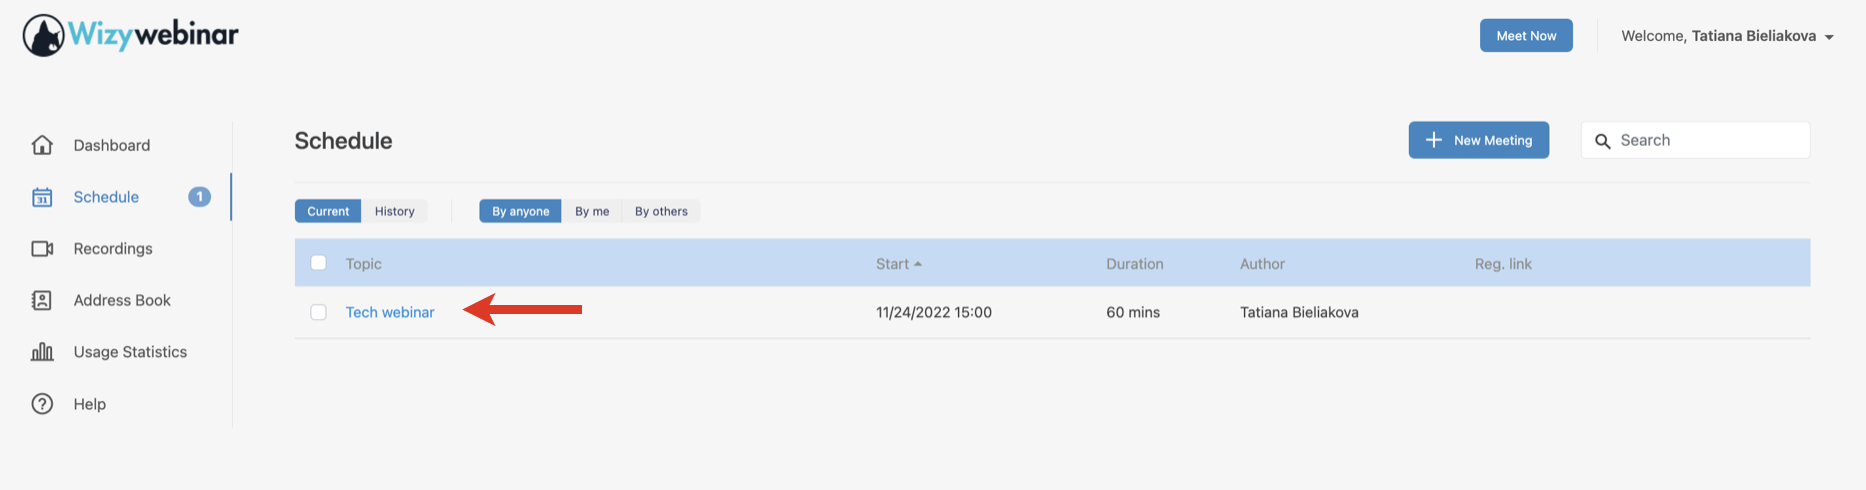
Join a scheduled webinar session as a host
- Click on the Schedule menu from the left-hand panel
Click on the scheduled Webinar to enter the room
The webinar room opens in a new browser tab and you are prompted to set the speakers, to enter the room, click Join button: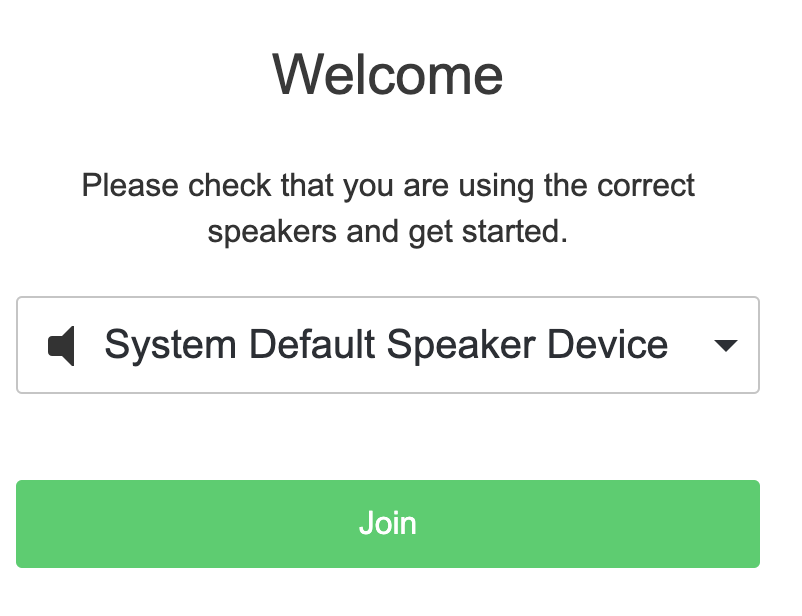 After joining the webinar room, your Collaboration user status changes to DND.
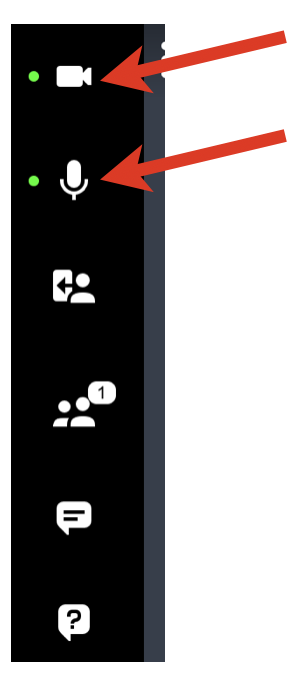
Camera and microphone controls
By default, you enter the room with the webcam and microphone disabled (you can change it in Audio & Video settings).
Click on the Camera and Microphone icons on the left panel to enable them:
You can additionally activate HD video and reduce screenshare bandwidth in Video and Audio settings (see below).
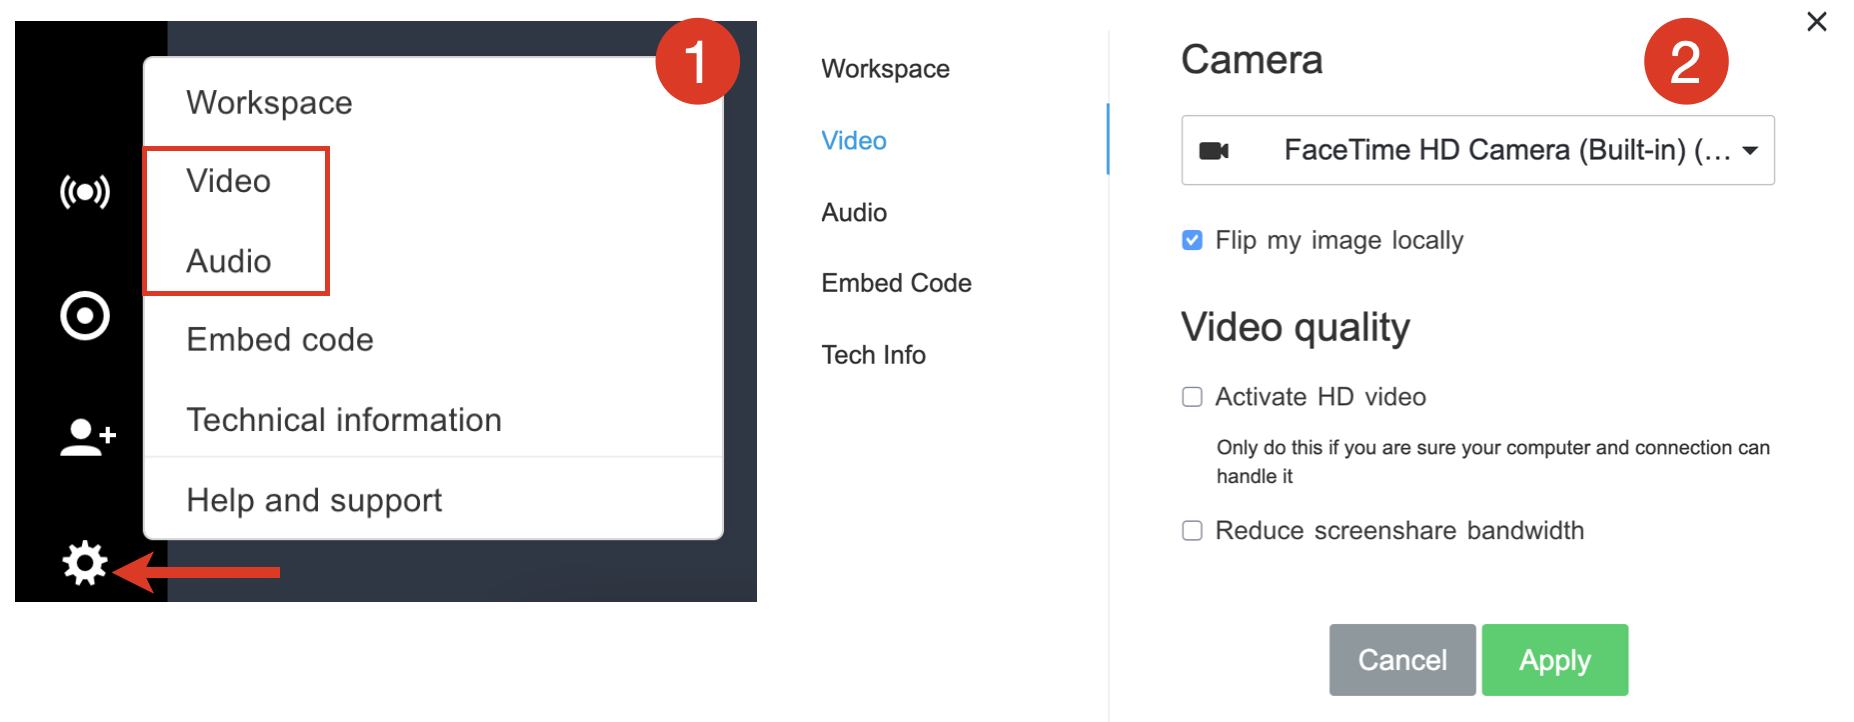
To access Camera, Microphone and Speakers settings:
- Click on the Settings button (Gear icon) at the bottom of the left panel -> select Video or Audio
- Change the desired settings
- Click Apply to save the changes
Managing the Participants
As mentioned, there are two types of user roles:
- Speaker: someone who can broadcast their audio and video as well as control all aspects of the webinar. Note that the number of Speakers per 1 Wizywebinar license is limited to one Speaker
- Audience: someone who attends the webinar and is largely a passive viewer. They cannot share their content in a meeting unless granted permission to do so by a Speaker
To manage Participants you need to open the Participants panel: click on the Participants button on the left panel: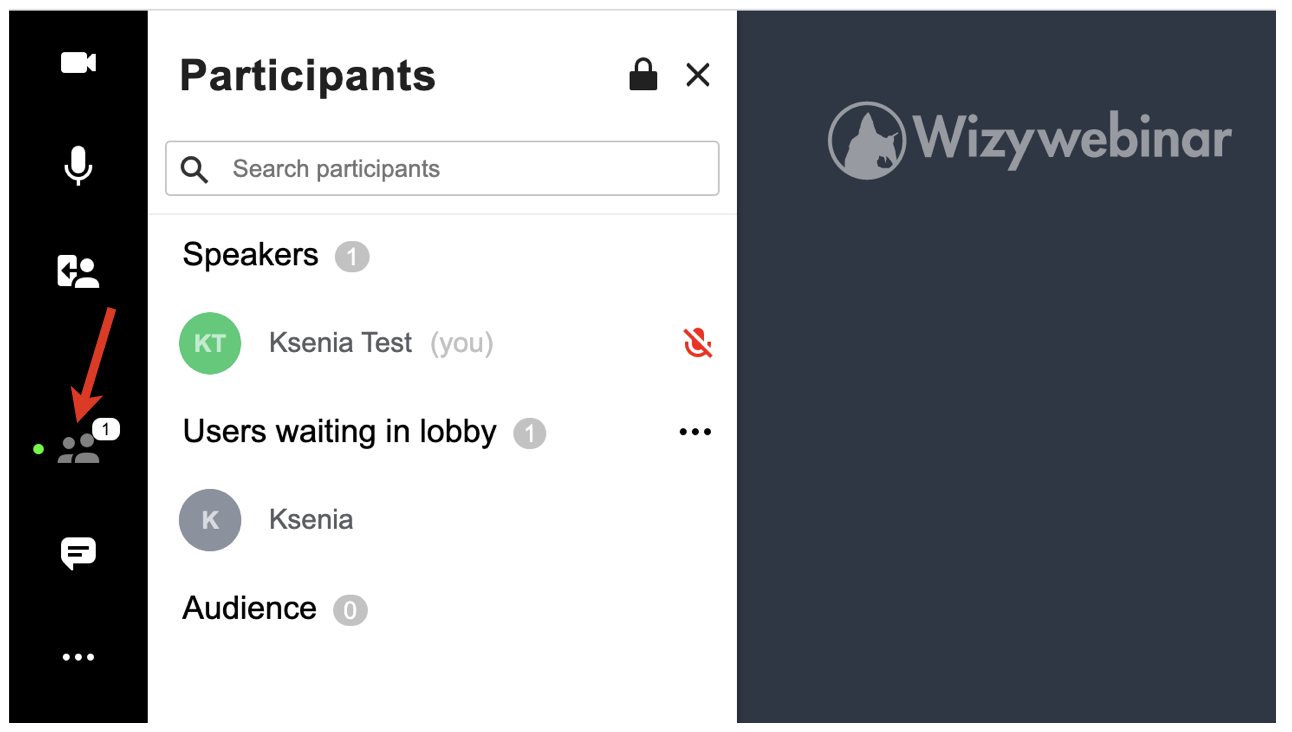
Invite participants during a webinar
Speakers can invite more people to the room at any time by clicking on the Invite Participants button located on the left panel: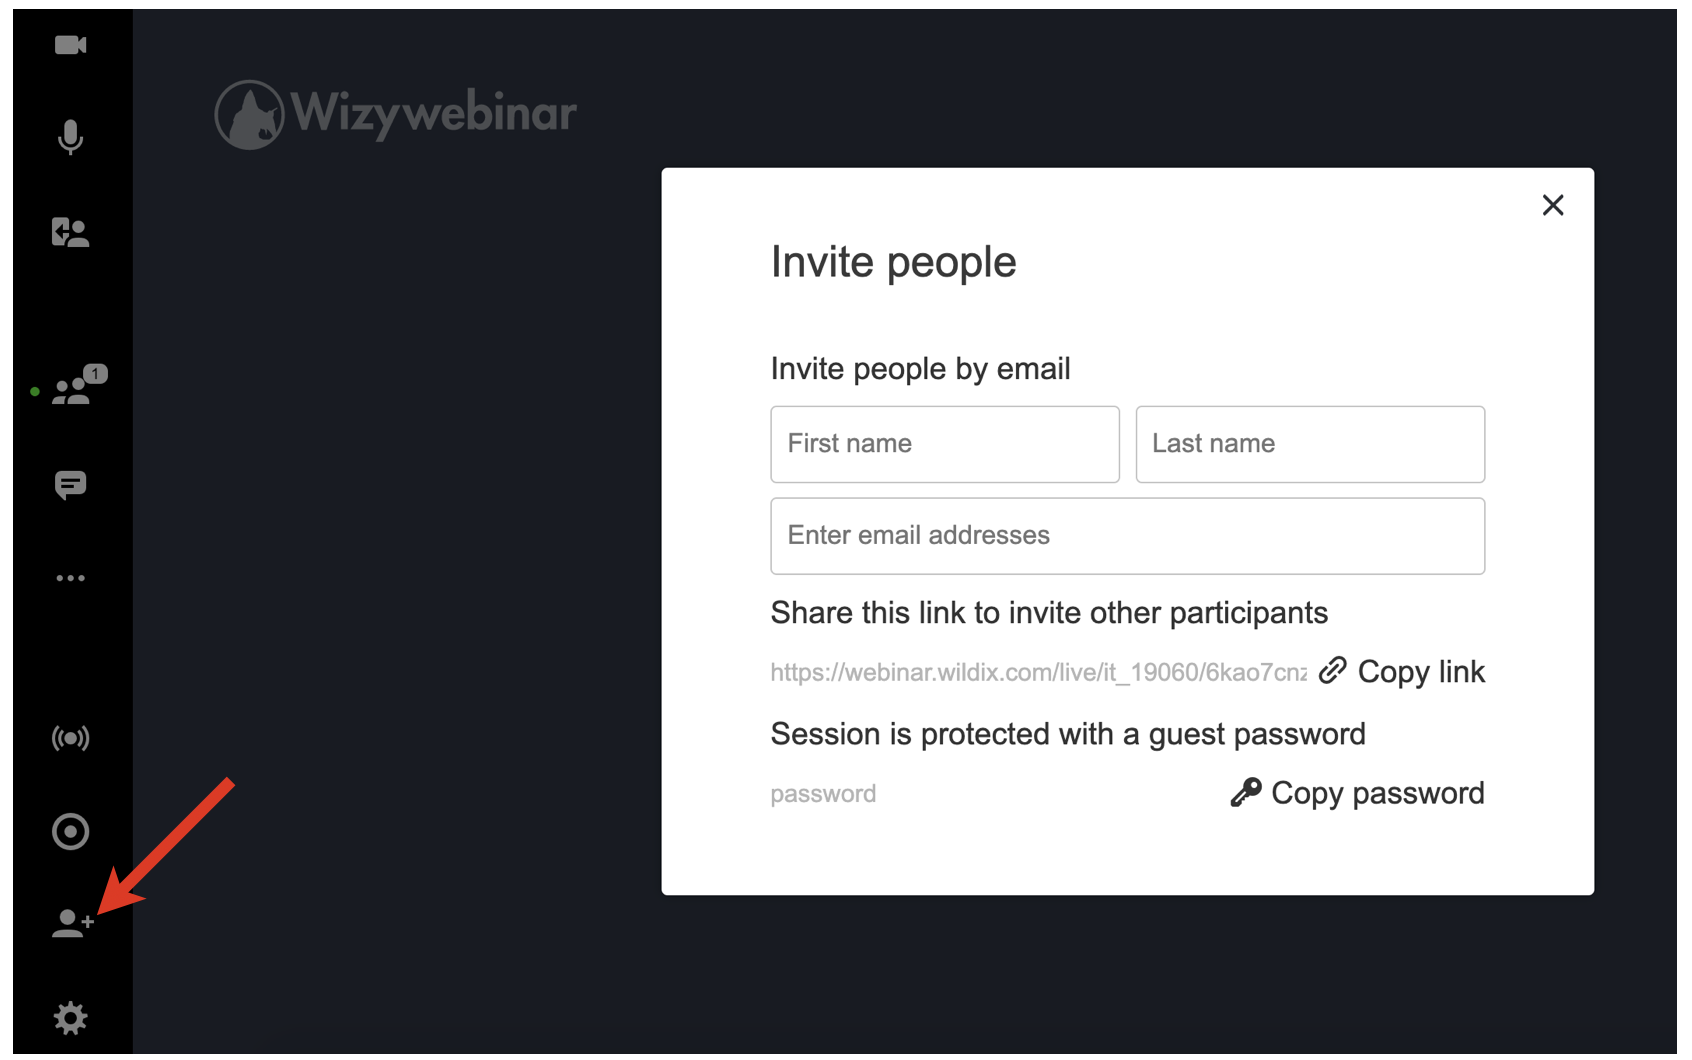
You have two options here:
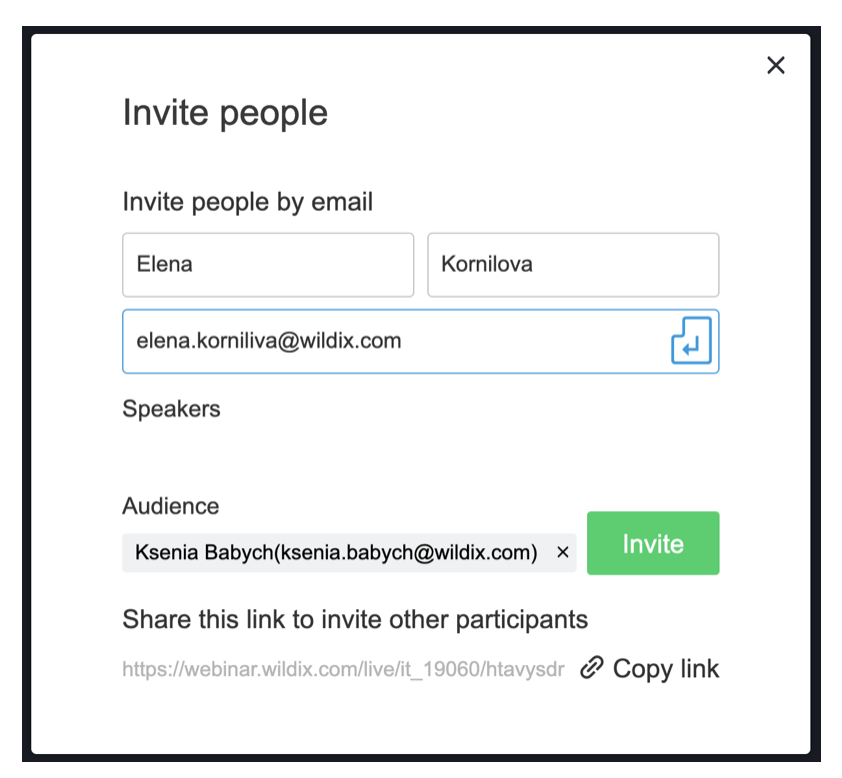
- Invite people by email: enter person's First/ Last names and email into the field and hit Enter button. A person receives an email with the link to join. The link is pre-authenticated, so they don't need to insert the password, should your webinar have any. You can drag and drop the added email addresses to assign them the Speaker role. Once you have built your invite list, hit the green Invite button:
- Share this link to invite other participants: this option allows you to send out the meeting link and password manually to the intended audience
Note: If the event is private, simply sharing the link won’t work. In this case, you need to invite users via email.
The same applies to events that require registration.
Manage lobby
The lobby feature can be either enabled upon scheduling a webinar or during the session.
Disable/ enable lobby during the session:
- Click on the Lock icon in the upper part of the Participants panel to enable/ disable the lobby:

A green dot right next to the Participants icon indicates that the lobby is active.
When the lobby is turned on, all the participants’ names are listed under the Users Waiting in the Lobby section in the Participants panel. From there, you have the option to (1) Allow into the room, Remove participant, or (2) Allow all users into the room: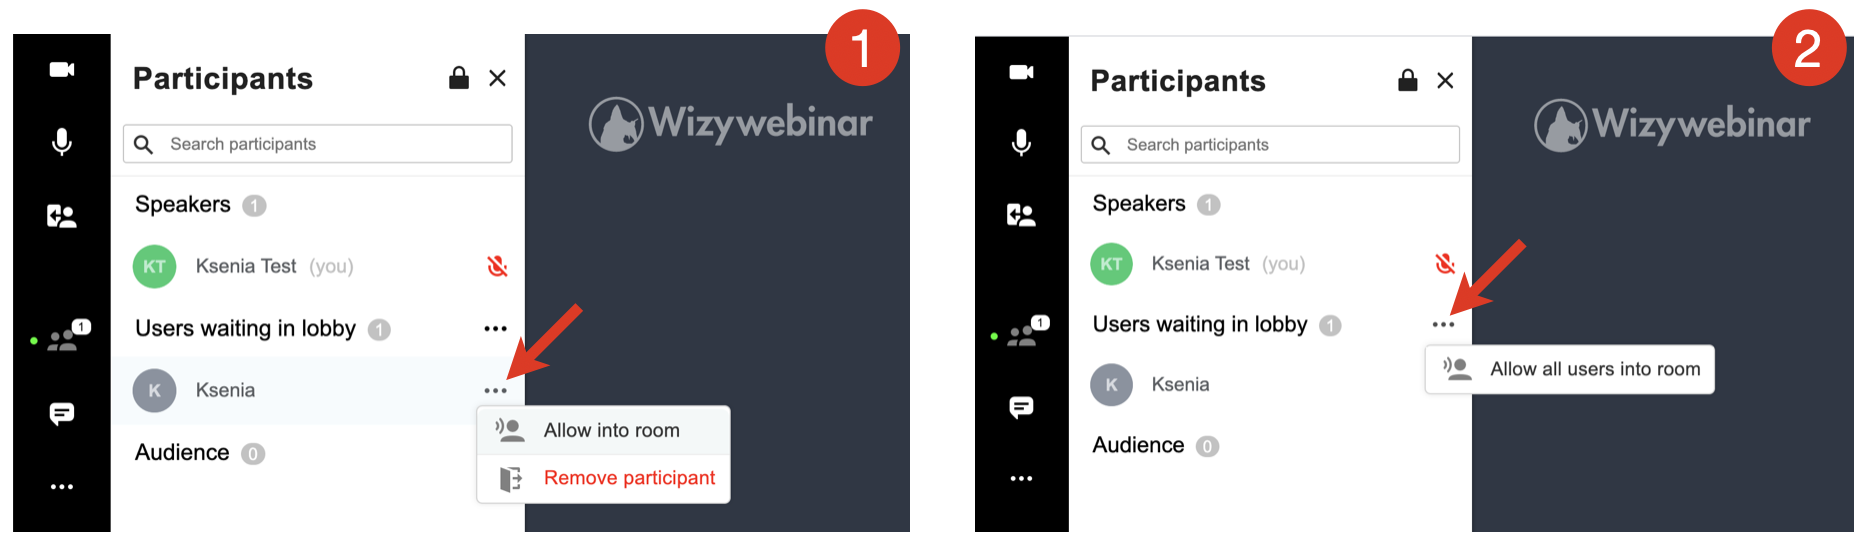
Manage the audience
- Find your audience member in the list and click on three dots next to them:
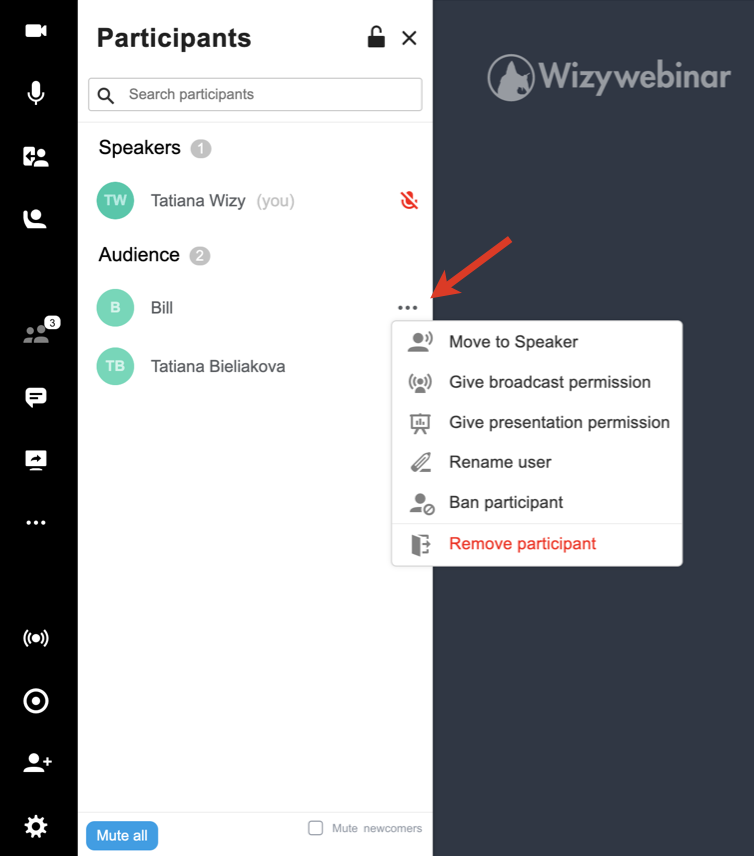
Here you have the following options:
- Move to speaker: gives administrative permission to a participant as well as the possibility to broadcast their audio and video
- Give broadcast permission: gives permission to broadcast audio and video
- Give presentation permission: grants permission to the webinar's whiteboard, and a permission to start screen sharing
- Rename user: allows to edit name of the participant during the webinar
- Ban participant: allows you to ban participant for a period of time by their IP
- Remove participant: expells participant from the webinar
You can remove certain permission (e.g. presentation or broadcast) in the same way as you granted it.
Stop other broadcasts
A Speaker has the ability to stop all other broadcasts in a room, except for their own:
- Click on the three dots next to the lock icon and click Stop other broadcasts
- A new dialog opens, confirm by clicking Stop broadcasts:

Mute all
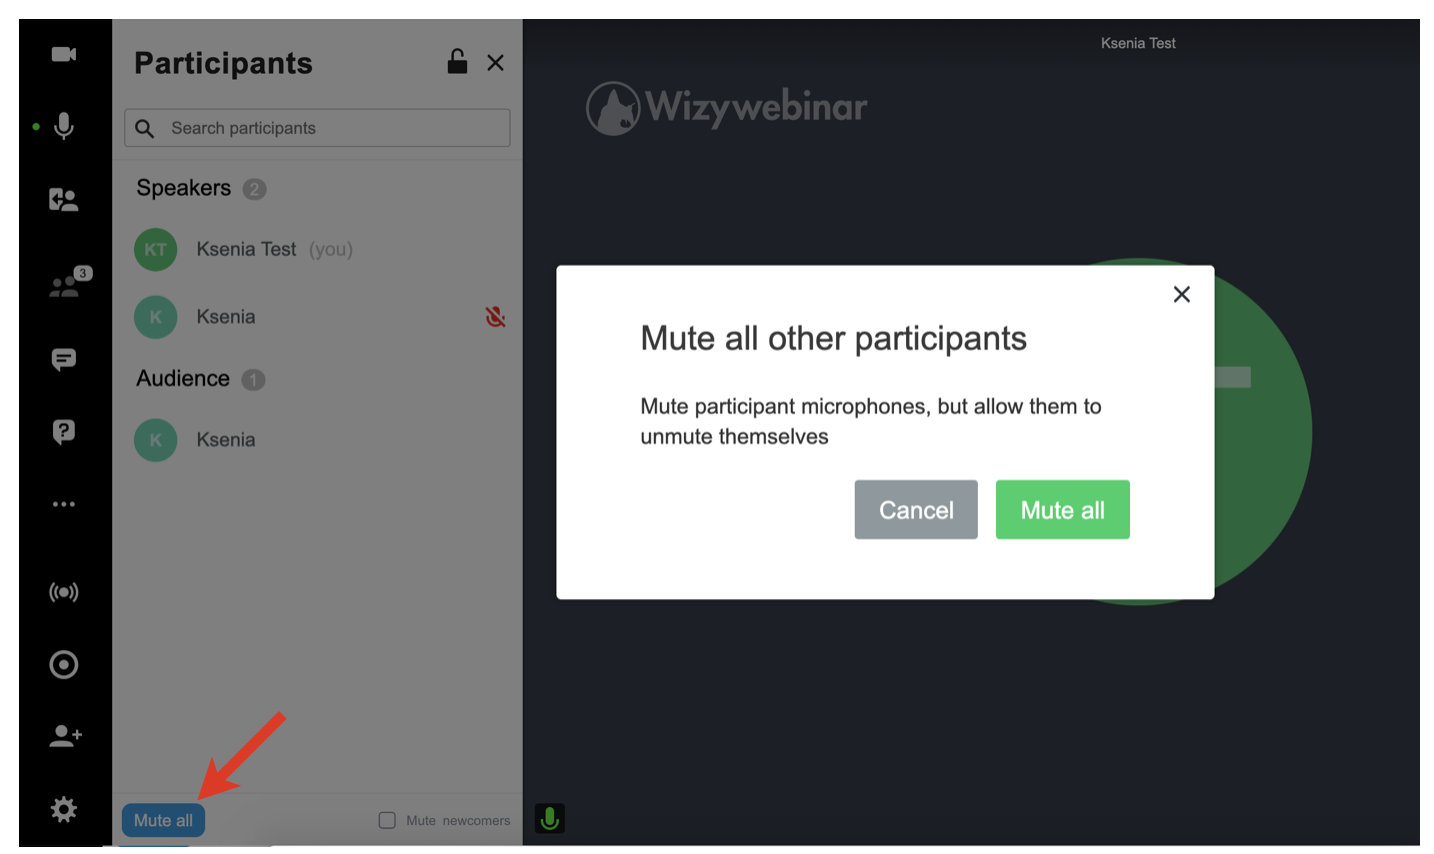
A Speaker has the ability to mute all other participants including other speakers. Tick off Mute newcomers if you want to mute new participants as they join a session:
Click Mute all located in the lower left-hand part of the screen
A new dialog opens, confirm by clicking Mute all:
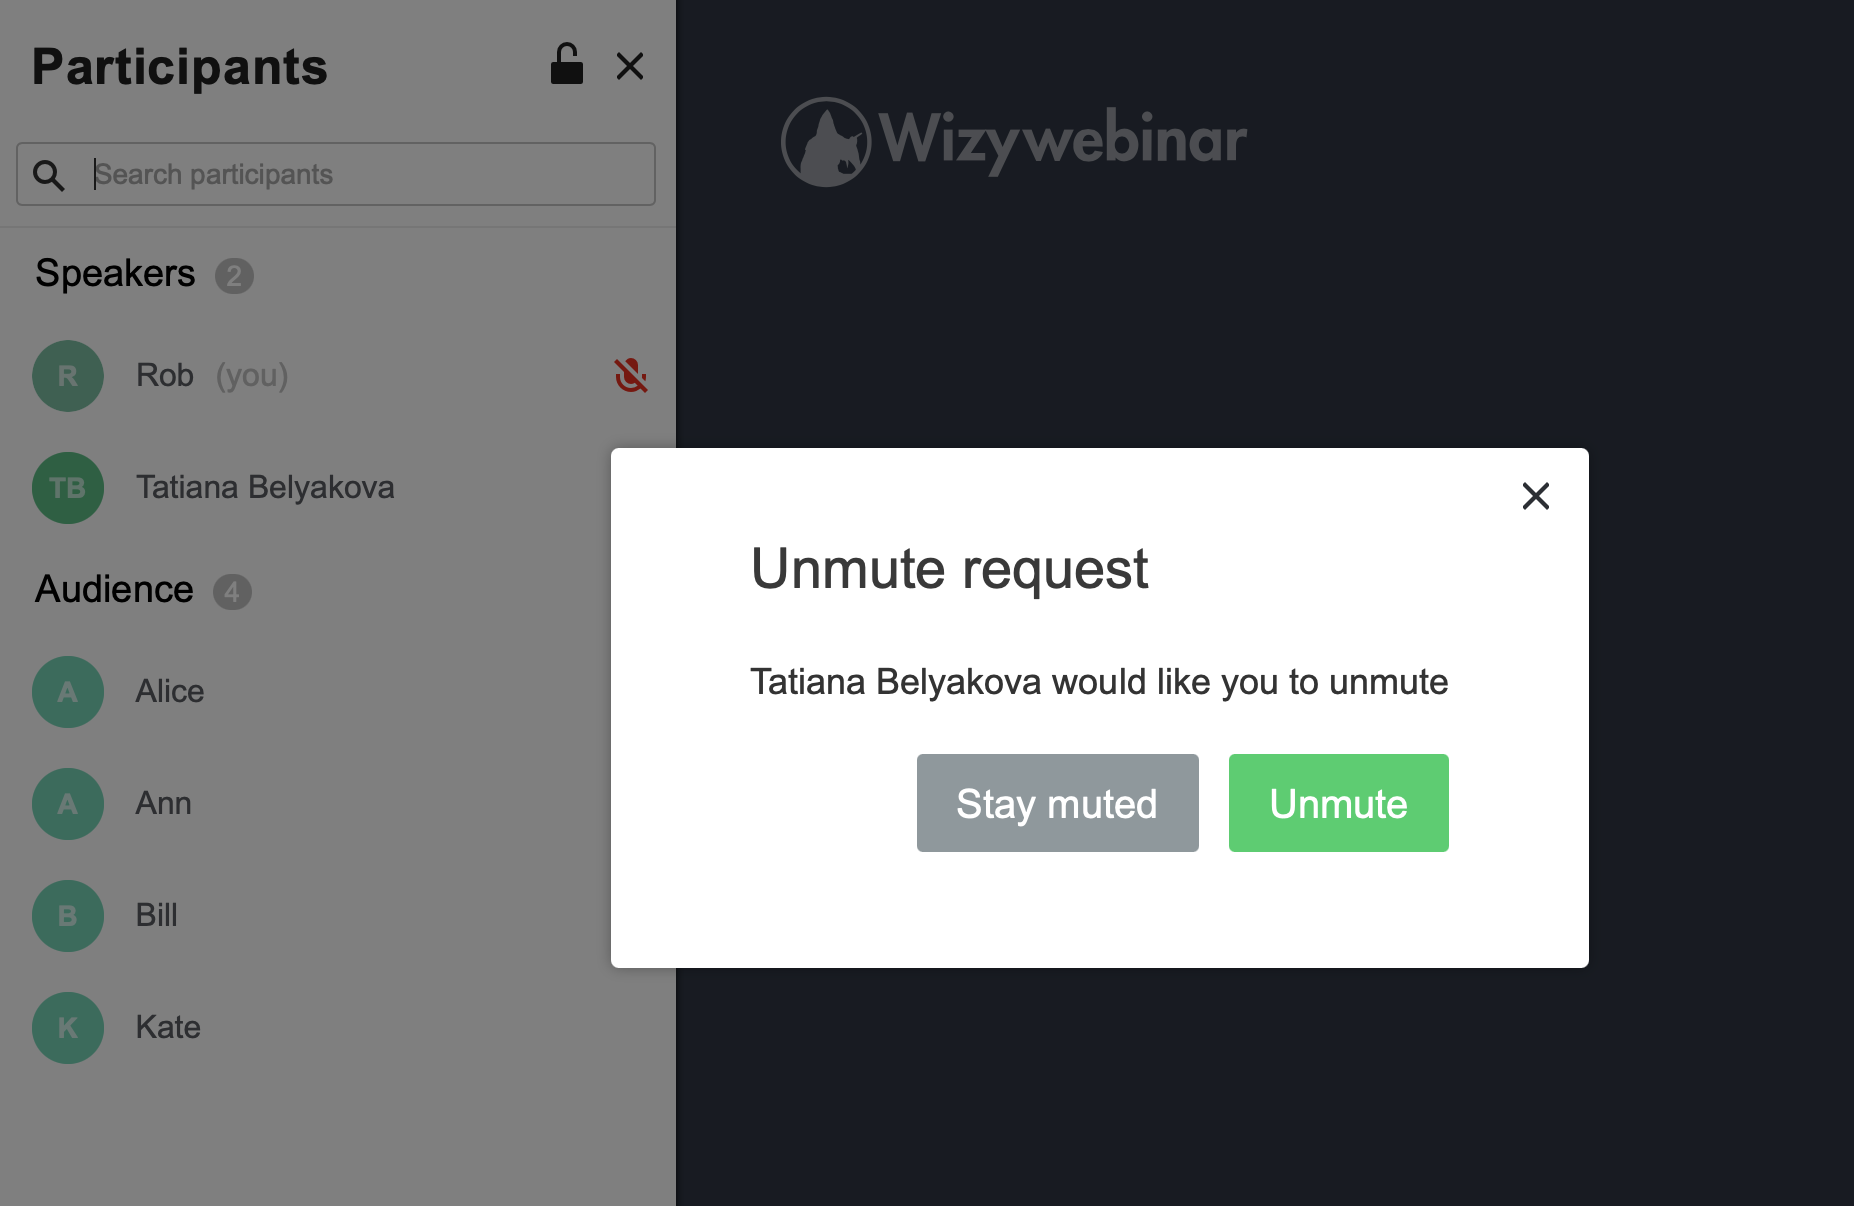
Ask user to unmute
Ask user to unmute is an option available to speakers, which allows them to ask another speaker to unmute their microphone:
Next to the relevant speaker's name click the muted microphone icon. Then, on the pop-up window that appears, press the Ask to unmute button:
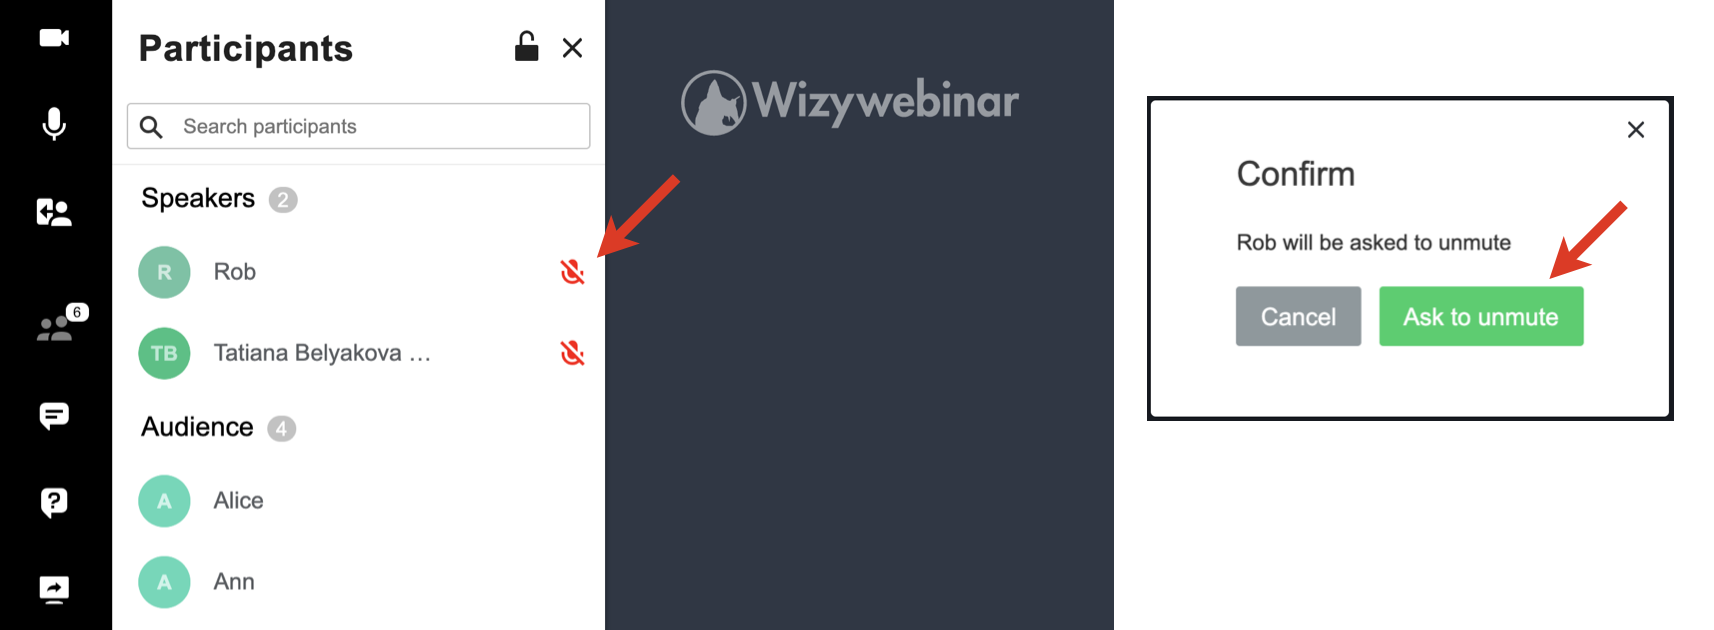
The speaker is then prompted to unmute:
Conversations
Conversations panel is where you can interact with your Audience, and where they can interact with you and each other throughout the meeting.
Click on the Message icon on the left panel to open the Conversations panel: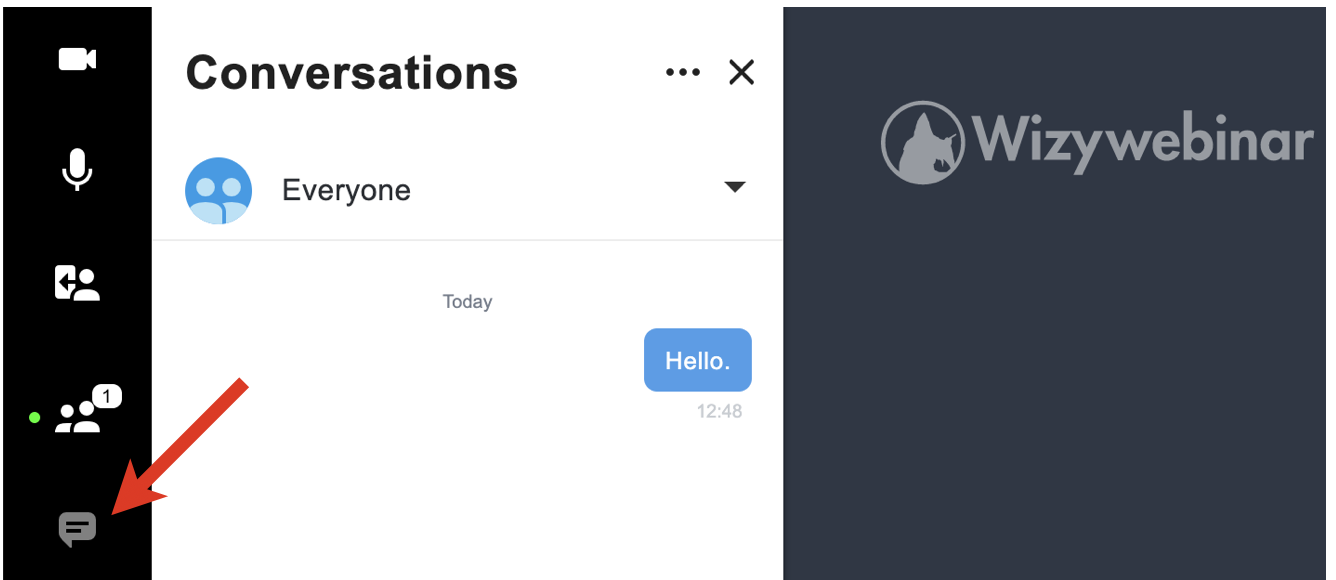
In here, Speakers see two channels:
- Everyone: this is a channel for chatting with everyone in the meeting
- Speakers: this is a private channel for Speakers only. Audience members do not have access to Speakers channel
You access a channel by clicking on it.
Both Speakers and Audience members can do a lot in Conversations – like react to messages with emojis or format text in different styles.
Speakers can also clear chat history and both Speakers and Audience can export chat history by clicking on the three dots in the upper part of the Conversations panel. 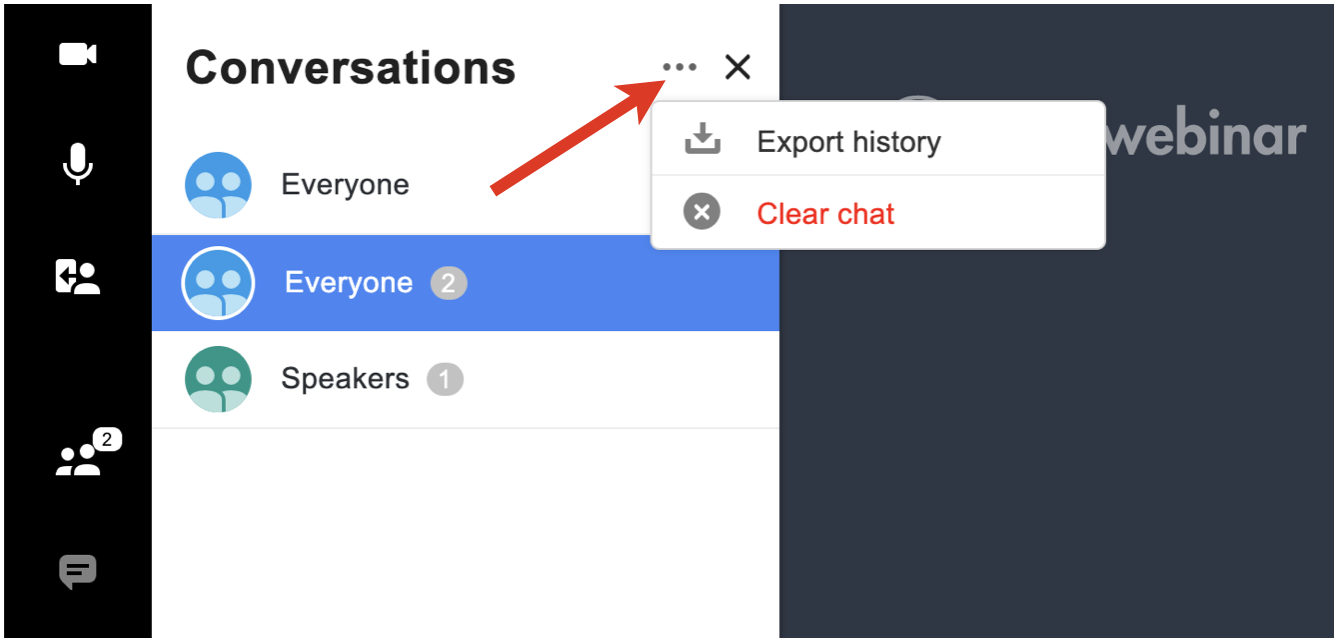
Questions and Answers
Questions & Answers are disabled by default, you need to activate the option in Workspace settings.
When inside a meeting, you have the option to ask questions as Audience and Speakers are able to answer them.
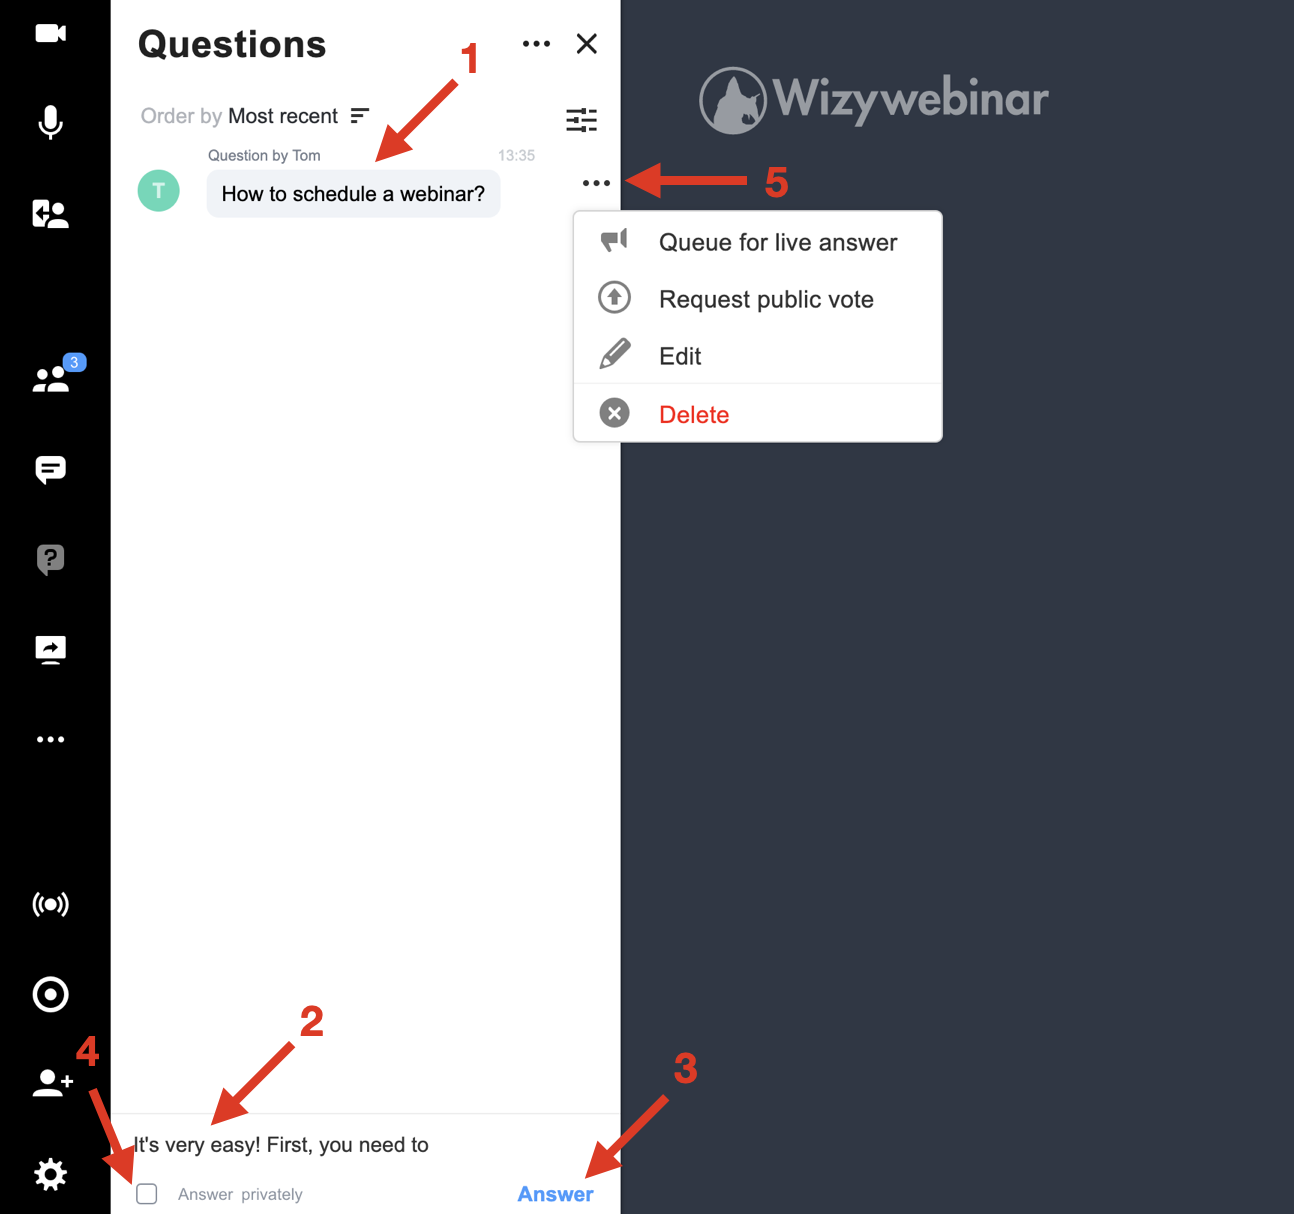
To ask a question, click on the Question icon on the left panel (1), type your question in the field below (2), and click Ask (3). If you want to ask a question anonymously, tick off the option Ask anonymously (4). 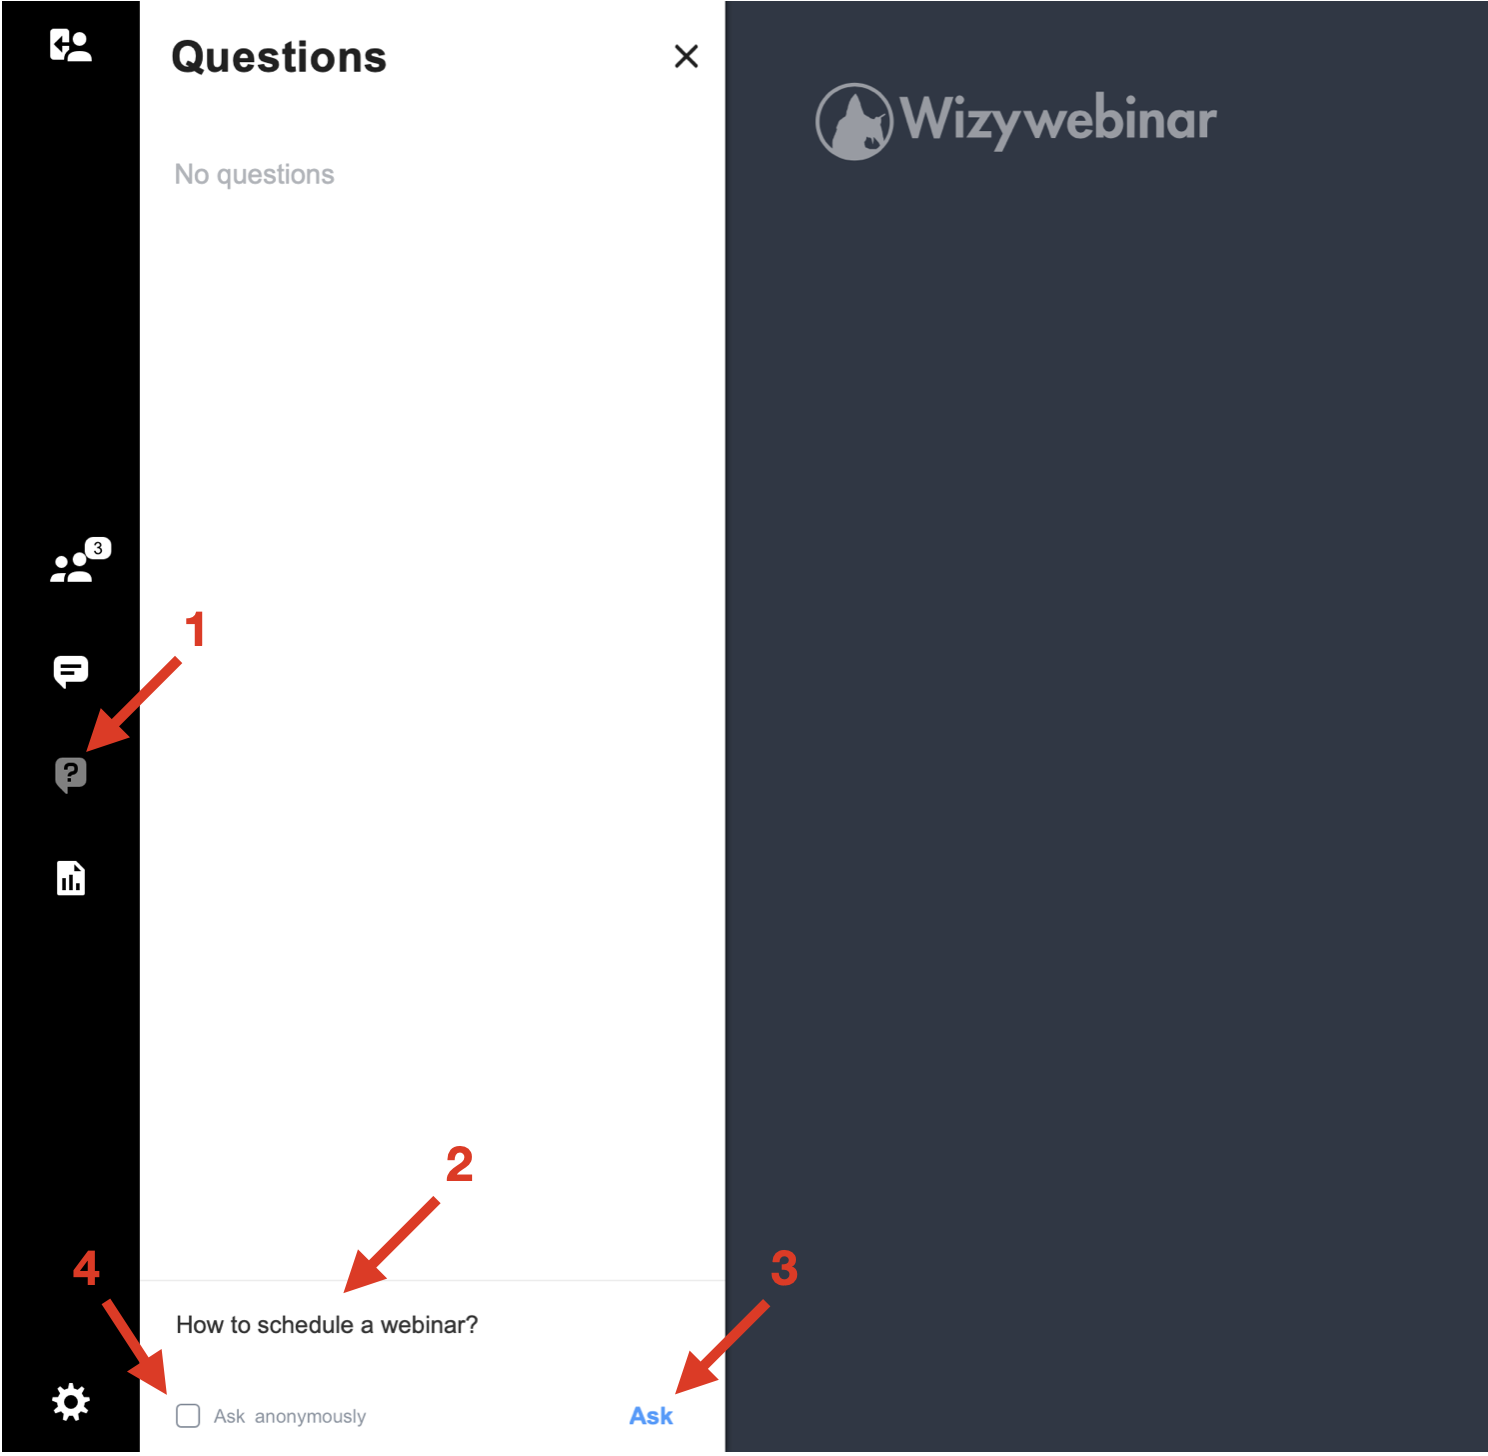
To answer, click on the question (1), type your answer below (2), and click Answer. You can answer privately (4) if you choose to.
If you click on the three dots icon next to the question (5), you get the following choice of actions:
- Queue for live answer
- Request public vote
- Edit
- Delete
Speakers can also clear questions and answers history and make all questions public and both Speakers and Audience can export history by clicking on the three dots in the upper part of the Questions & Answers panel.
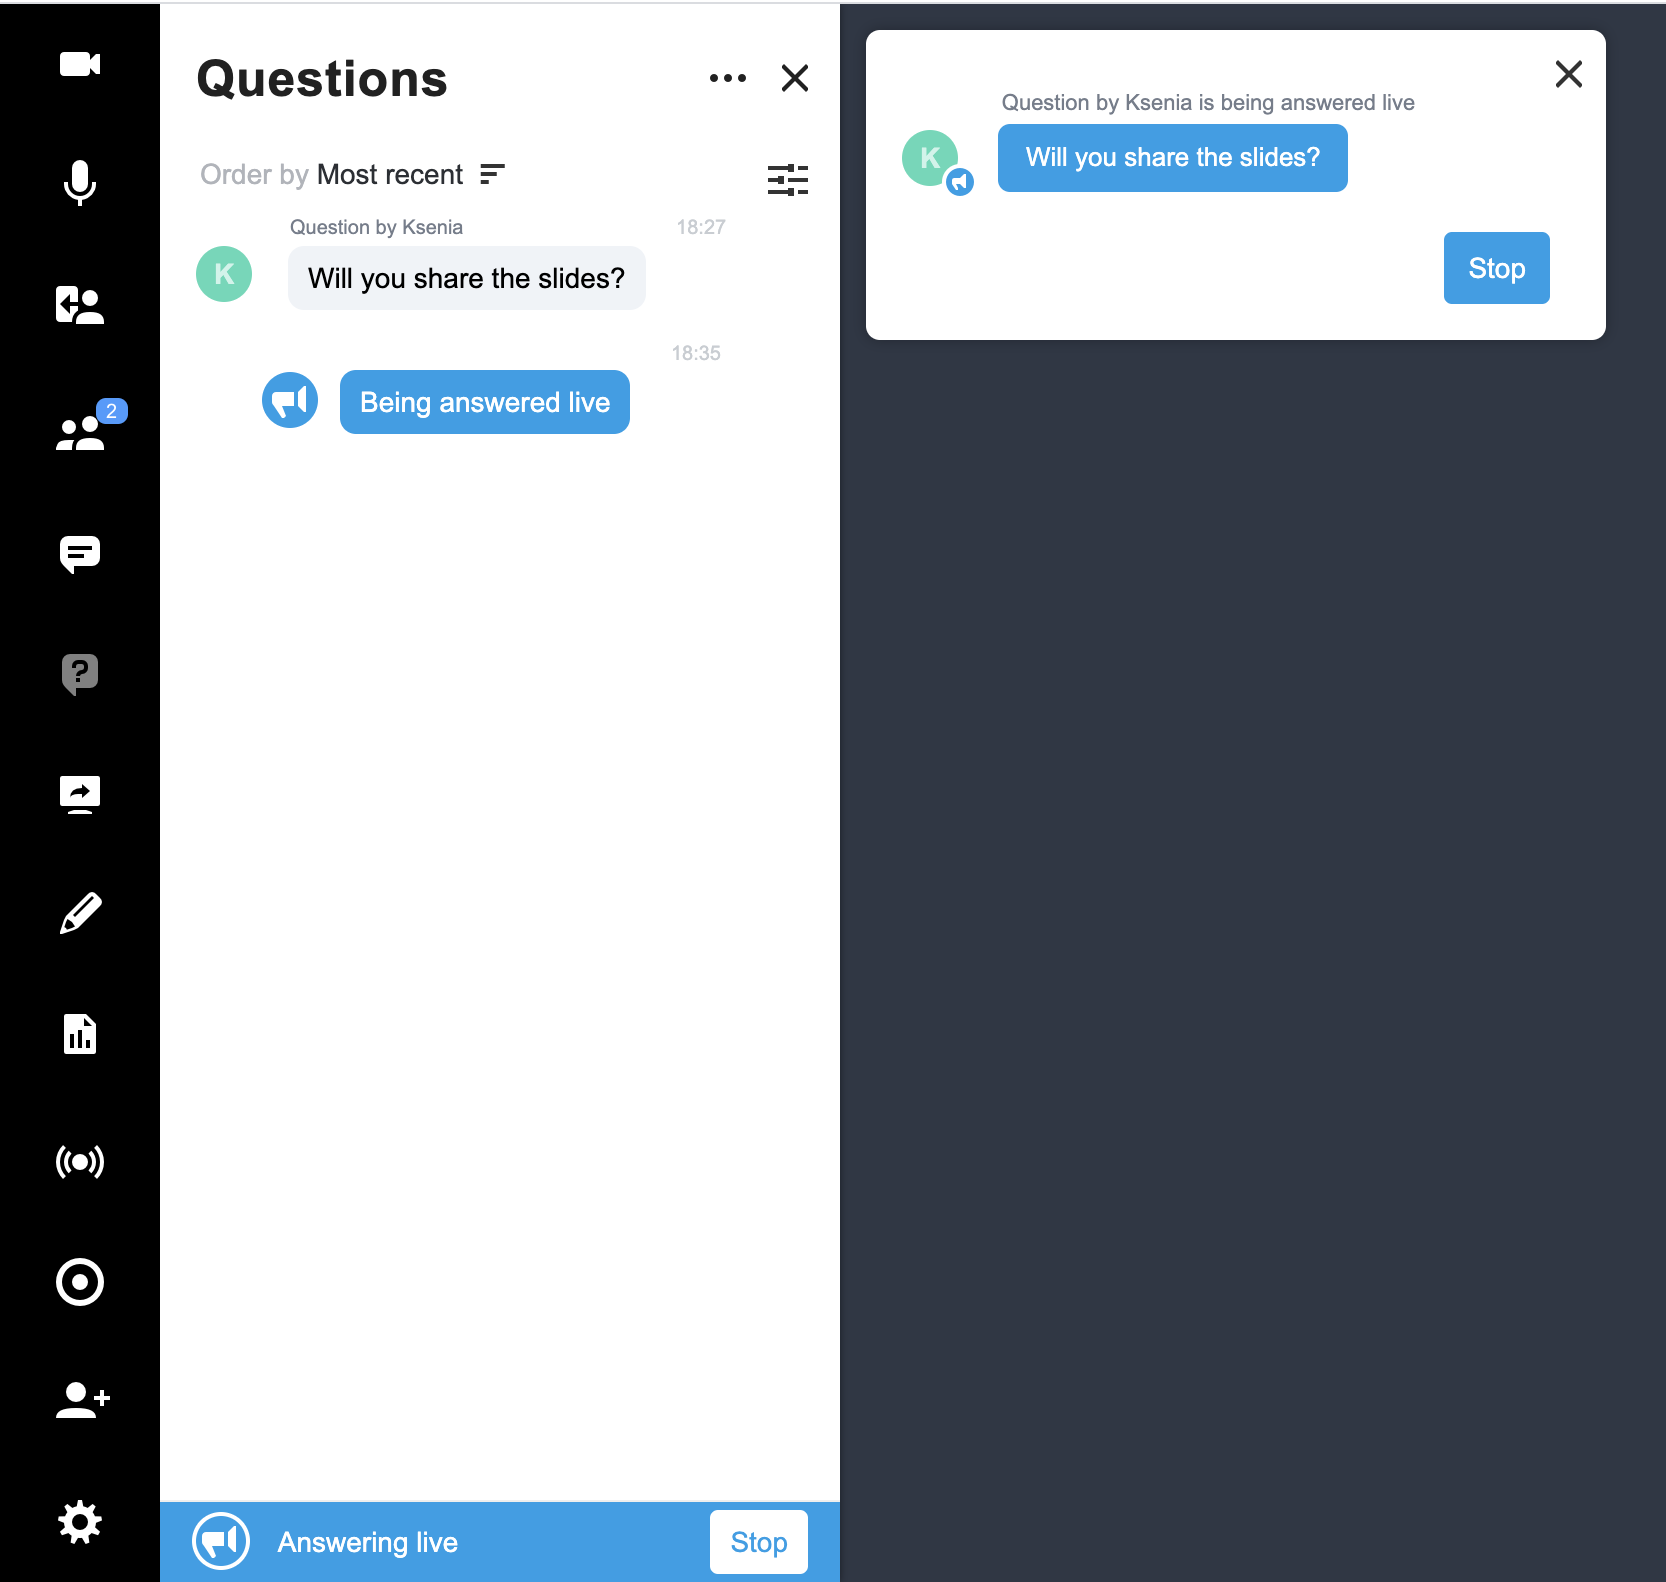
Live answer
This option allows you to show the message to everyone on the main screen and to answer it live.
To use the live answer option:
- Click on the queued question and hit Live Answer in the lower part of the Questions & Answers panel (next to Type your answer here) and start answering
- The question shows Being answered live next to it until you hit Stop – then it shows as Answered live:
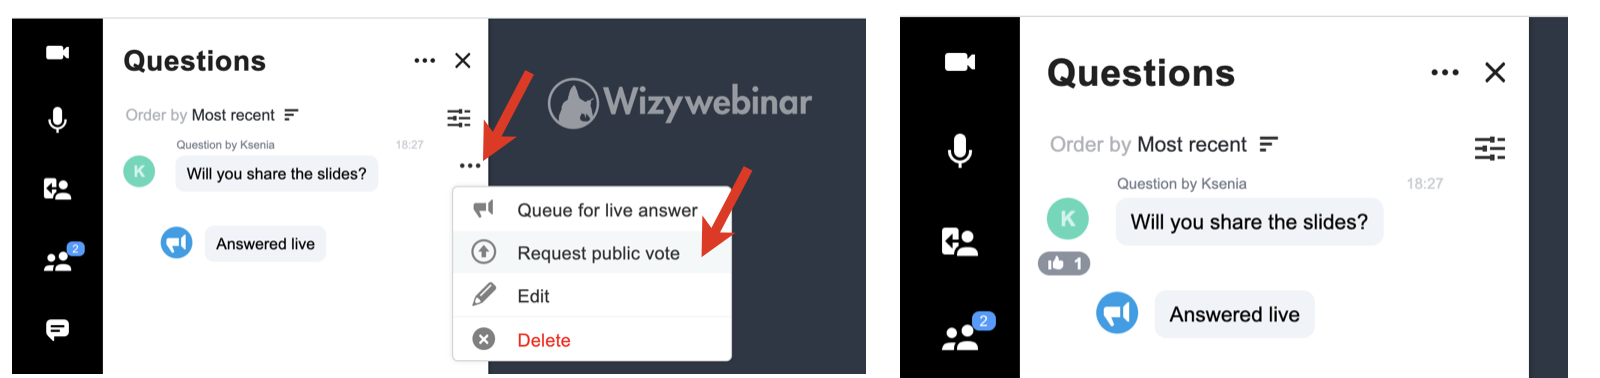
Request a vote
You can start a vote related to questions with other audience members.
To request a public vote:
- Click on the three dots next to the question and click Request public vote
- You can see the number change while the audience members cast their votes:
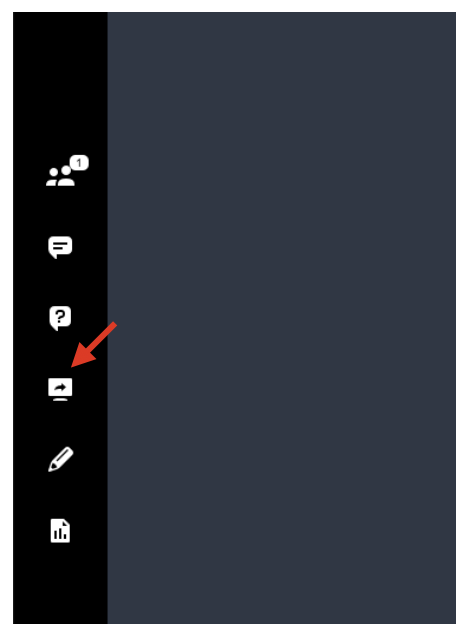
Screen share
Once inside your meeting, to start screen share, click on the Screen icon on the left panel.
You can choose among three options:
- Your Entire Screen allows you to share everything that is showing on your desktop
- Application Window allows you to select a specific program and only share that selection with your audience
- Browser Tab allows you to select only one tab from the ones you have open in your browser to share with your audience:
To stop sharing your screen, click on the Screen icon once again.
Whiteboard
To open the in-meeting whiteboard, click on the Whiteboard button (Pencil icon) on the left panel. Speakers have a set of whiteboard tools on the right-hand side of the Content Viewer window for drawing on a whiteboard. The same tools, except for a pointer, are available for annotating shared documents: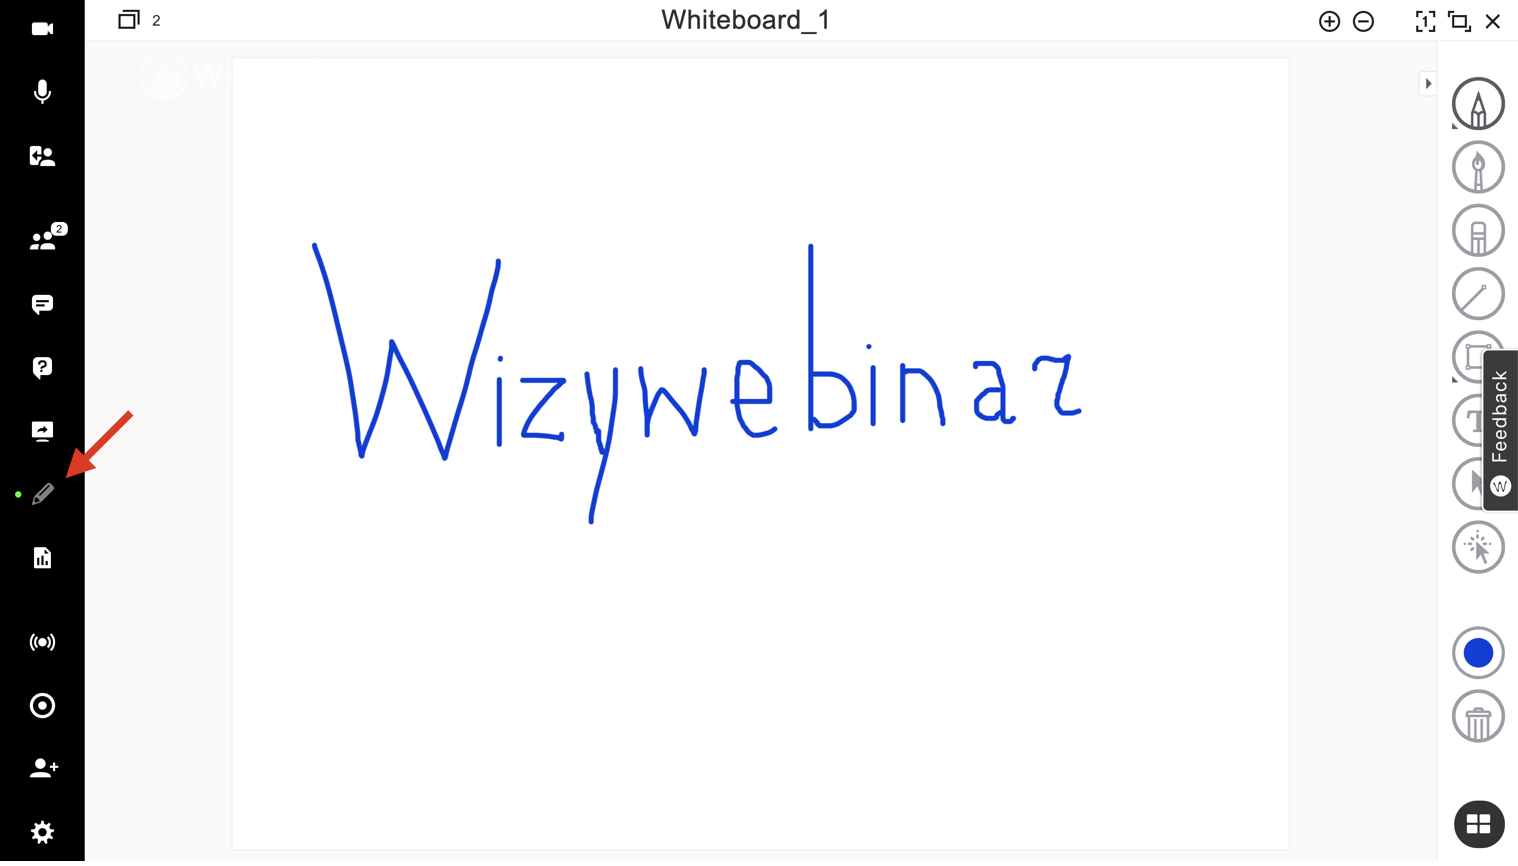
Content library
Content Library is where you manage documents and other media that you plan to share with your audience in a webinar. It supports lots of file types including all office document formats as well as MP4s and many image formats.
To access Content library, click on the Graph icon on the left panel. By default, there is Shared Files folder. In this folder you can find all media that you shared with other speakers or which was shared with you: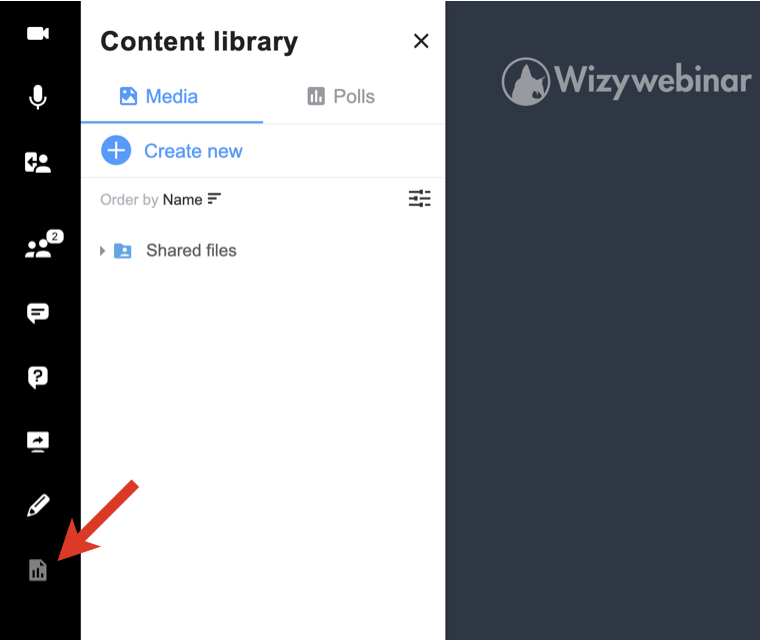
Note: The files and links you upload to your Content library remain in your Wizywebinar account even after the event is over, so you can further reuse them in other webinars.
Upload file and share it with the Audience
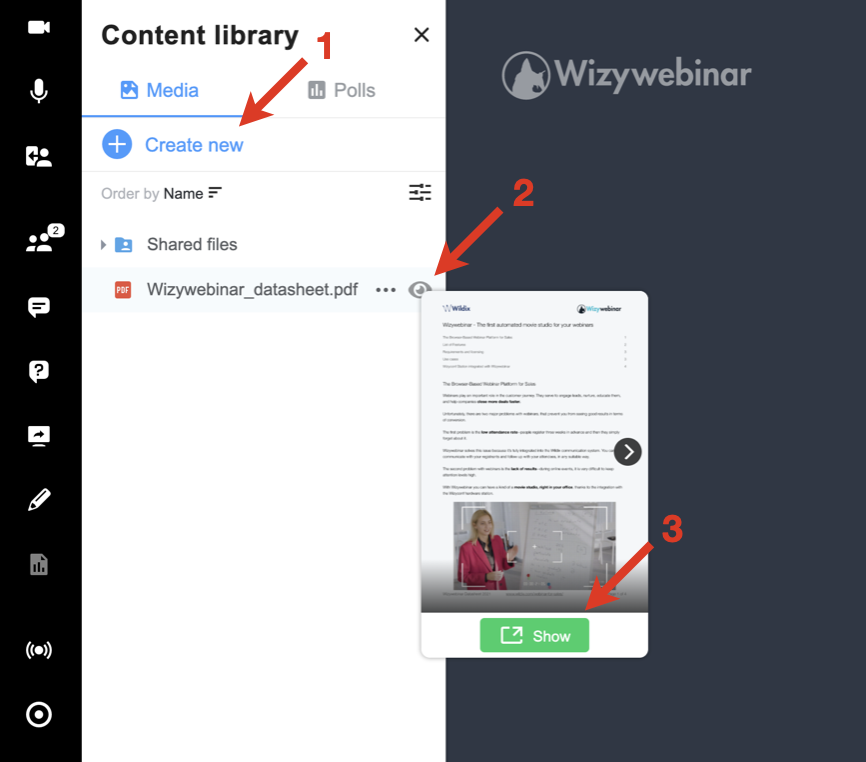
Click on Create new in the upper part of the Content library panel. Click Upload file from the drop-down list and select the file to upload
- Once the file has been uploaded, share it with the Audience:
- Option 1. You can double-click the file you want to share
- Option 2. You can hover the mouse cursor over it and click on the Eye icon next to the name of the file. File preview opens. Click Show from the file preview to show that file to the audience:
The presentation opens on the same slide as the preview.
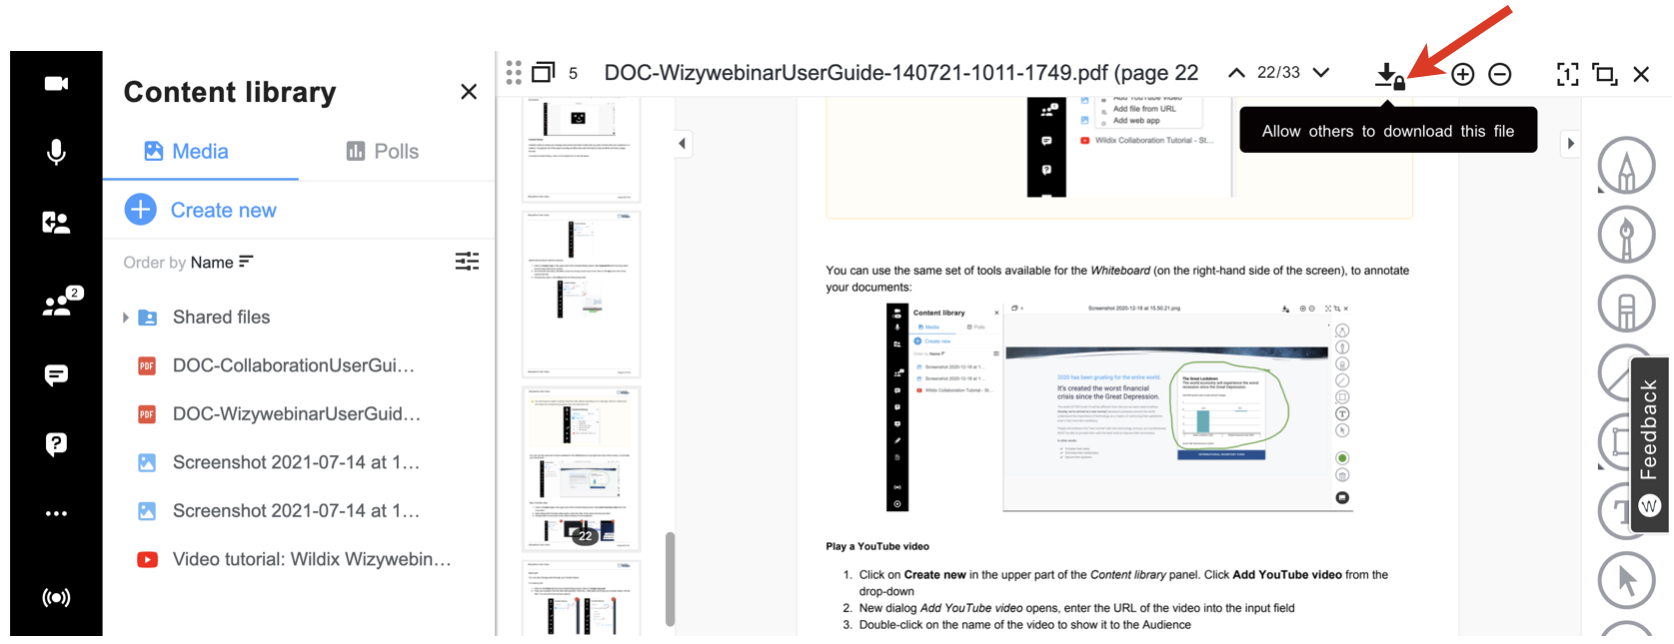
- You can allow the Audience to download the shared file: click on the Lock icon next to the Download Arrow to give permission:
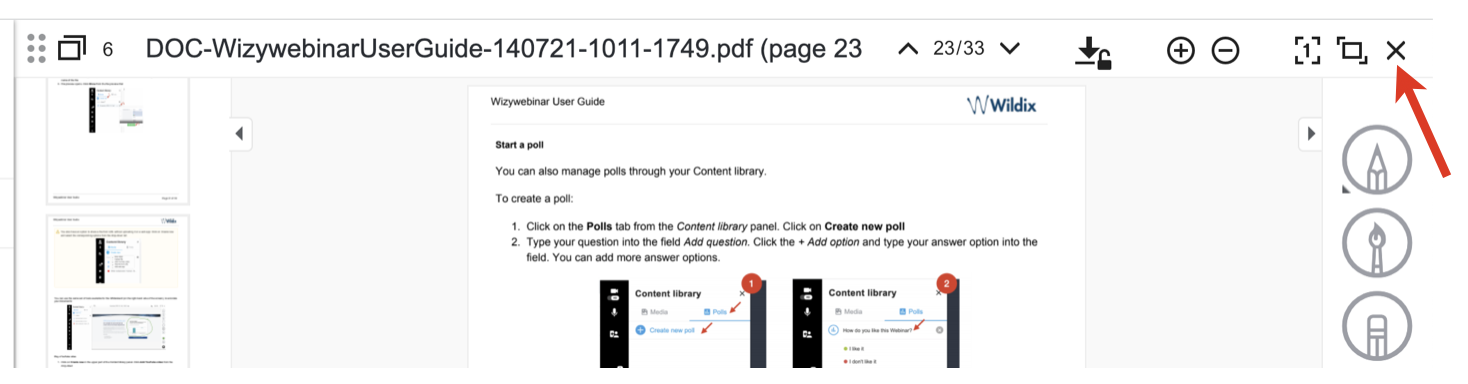
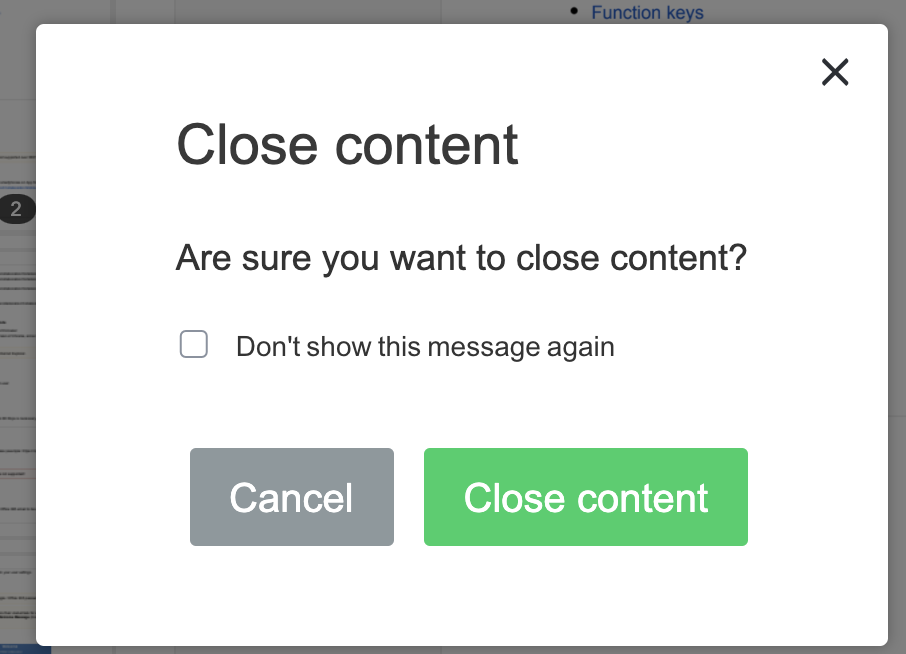
- To stop sharing the file, click the X button at the top right of the screen and confirm by clicking Close content button:
You also have an option to share a file from URL without uploading it or a web app: click on Create new and select the corresponding options from the drop-down list: 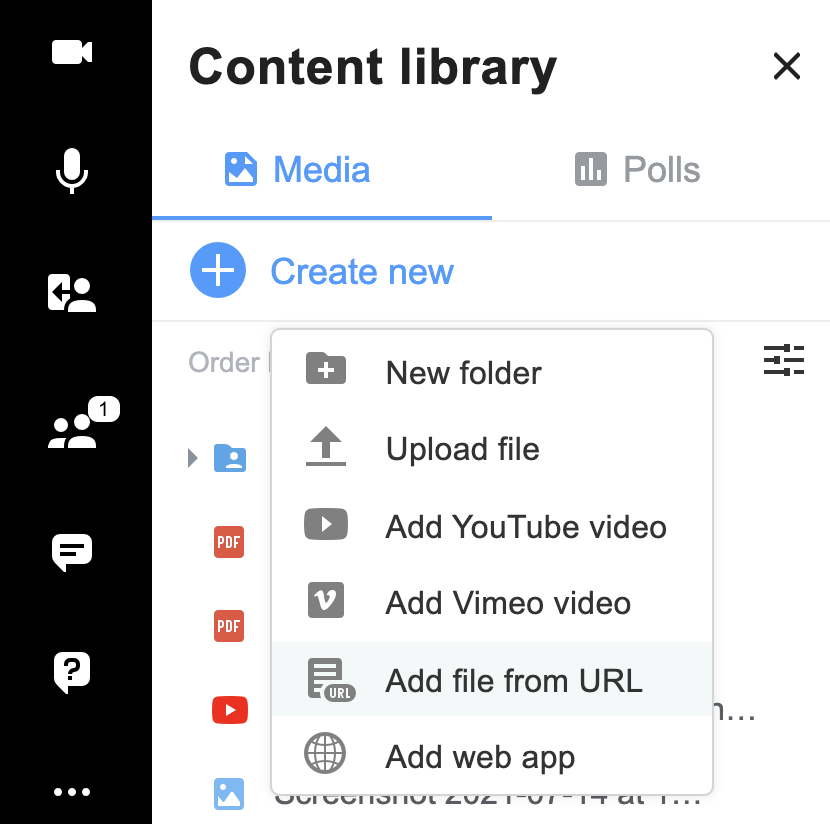
You can use the same set of tools available for the Whiteboard (on the right-hand side of the screen), to annotate your documents: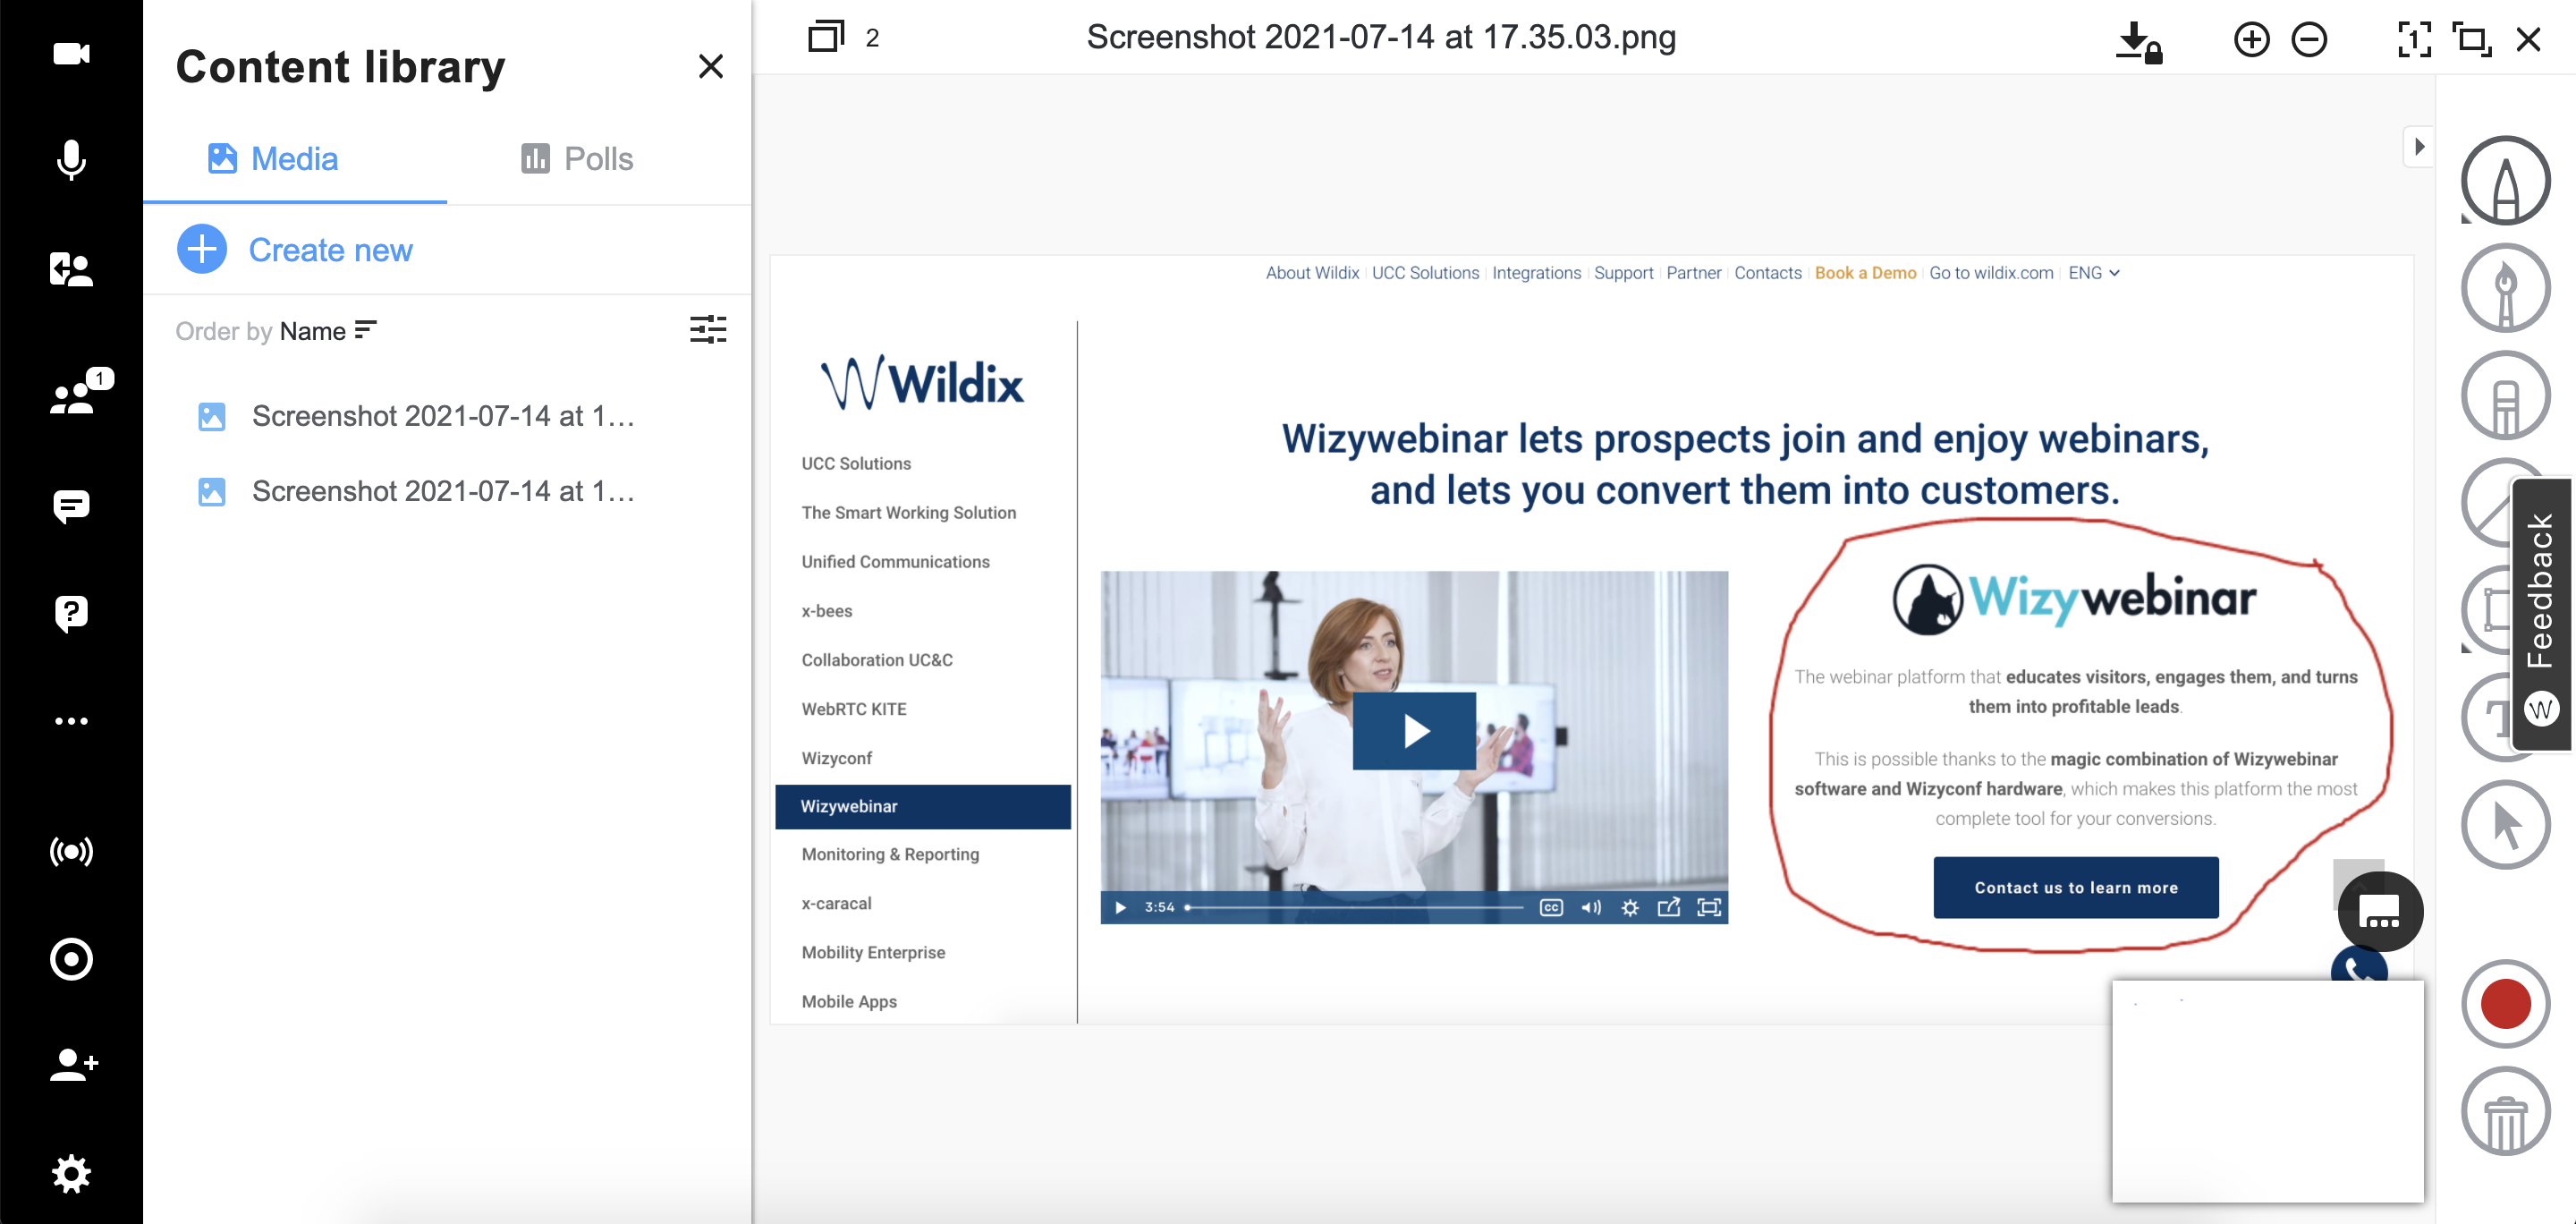
Share files with other speakers
- You can share media of your Content library with other speakers. To do this, click on the three dots next to the necessary file or folder and press Share:
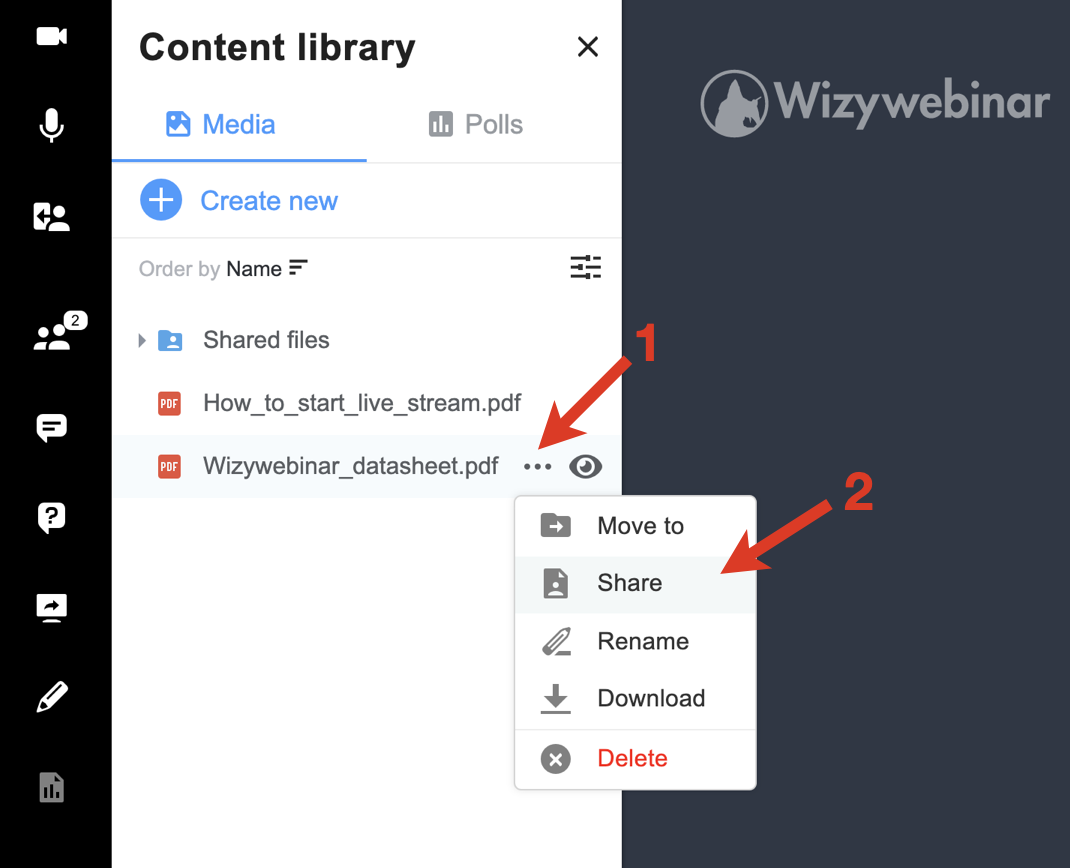
- The shared file or folder is then marked as shared and is added to the Shared files folder:
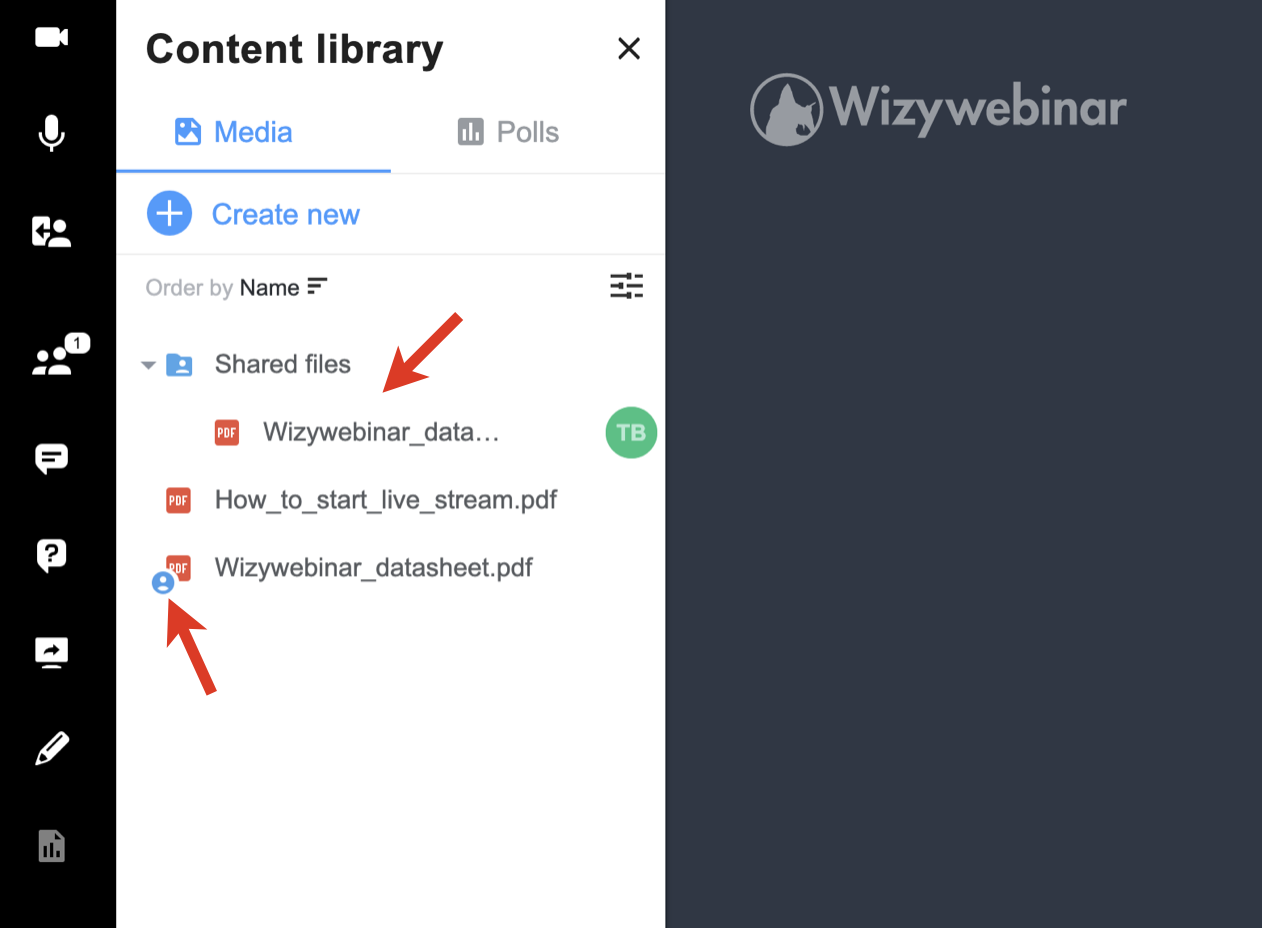
- The speakers you’ve shared the file/ folder with, can access them in the Shared files folder, download, and show to the audience.
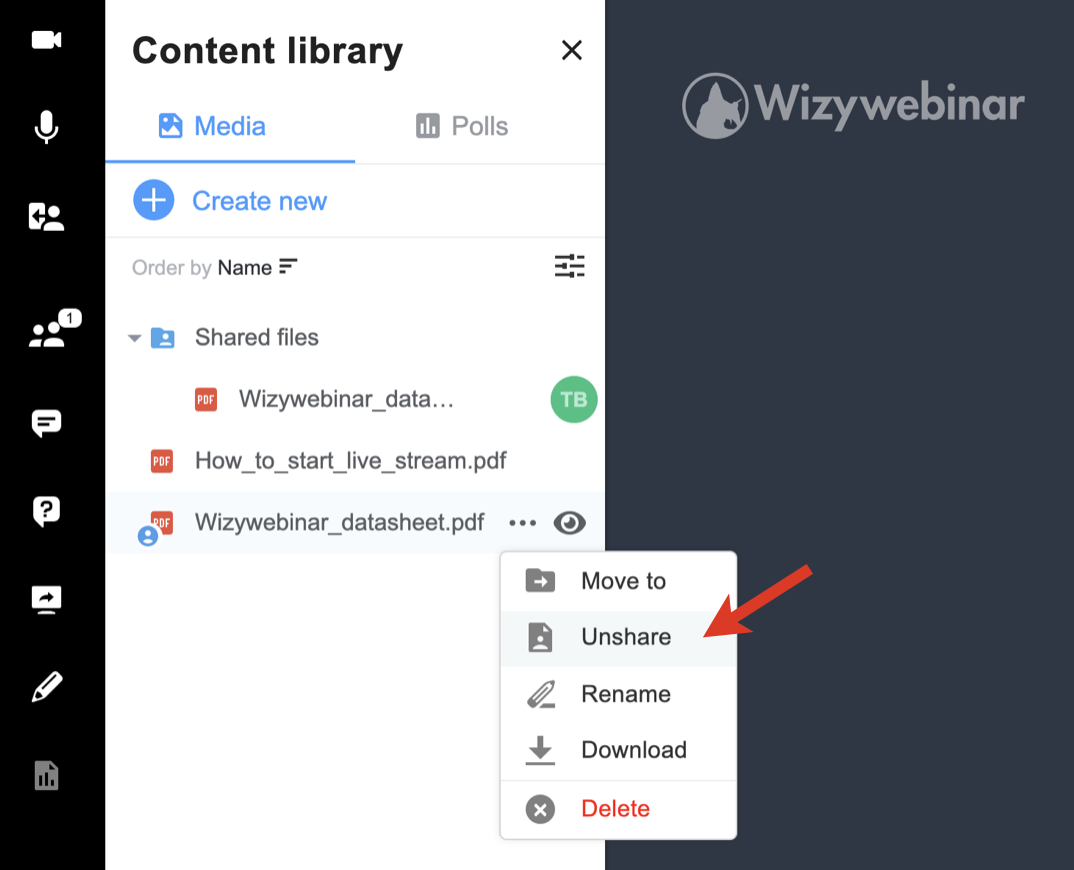
- To unshare the file/ folder, click on the three dots -> Unshare. Any Speaker can unshare files that are shared by other Speakers:
Play a YouTube/ Vimeo video
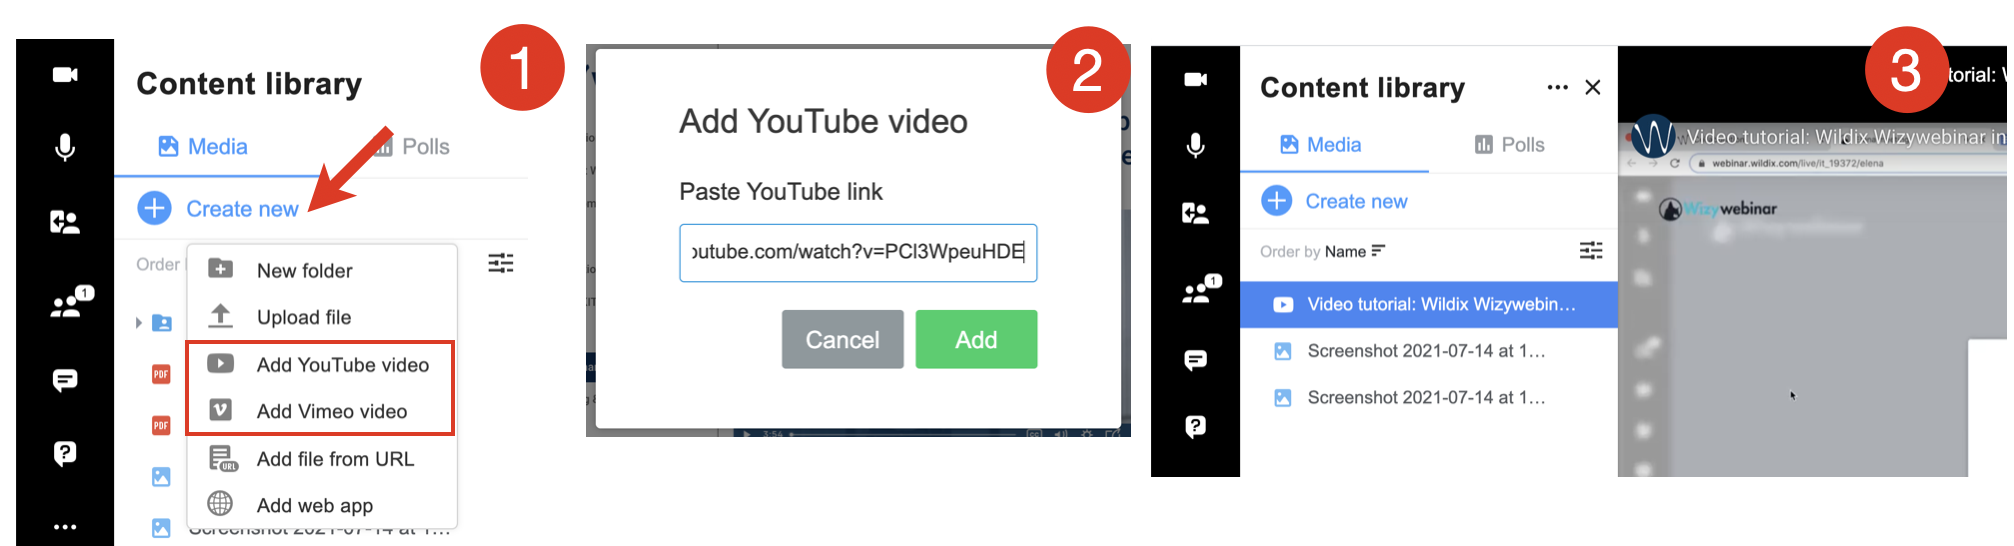
- Click on Create new in the upper part of the Content library panel. Select one of the options Add YouTube video / Add Vimeo video from the drop-down list
- New dialog Add YouTube video / Add Vimeo video opens, enter the URL of the video into the input field and click Add
- Double-click on the name of the video to show it to the Audience:
Start a poll
You can also manage polls through your Content library.
Create a poll
- Click on the Polls tab from the Content library panel
Click on Create new and select New poll
It is possible to import polls from a CSV file.
Before importing, download a template CSV file: Wizywebinar polls template.csv.
Type your question into the field Add question. Click the + Add option and type your answer option into the field. You can add more answer options by clicking the Multiple answers check box
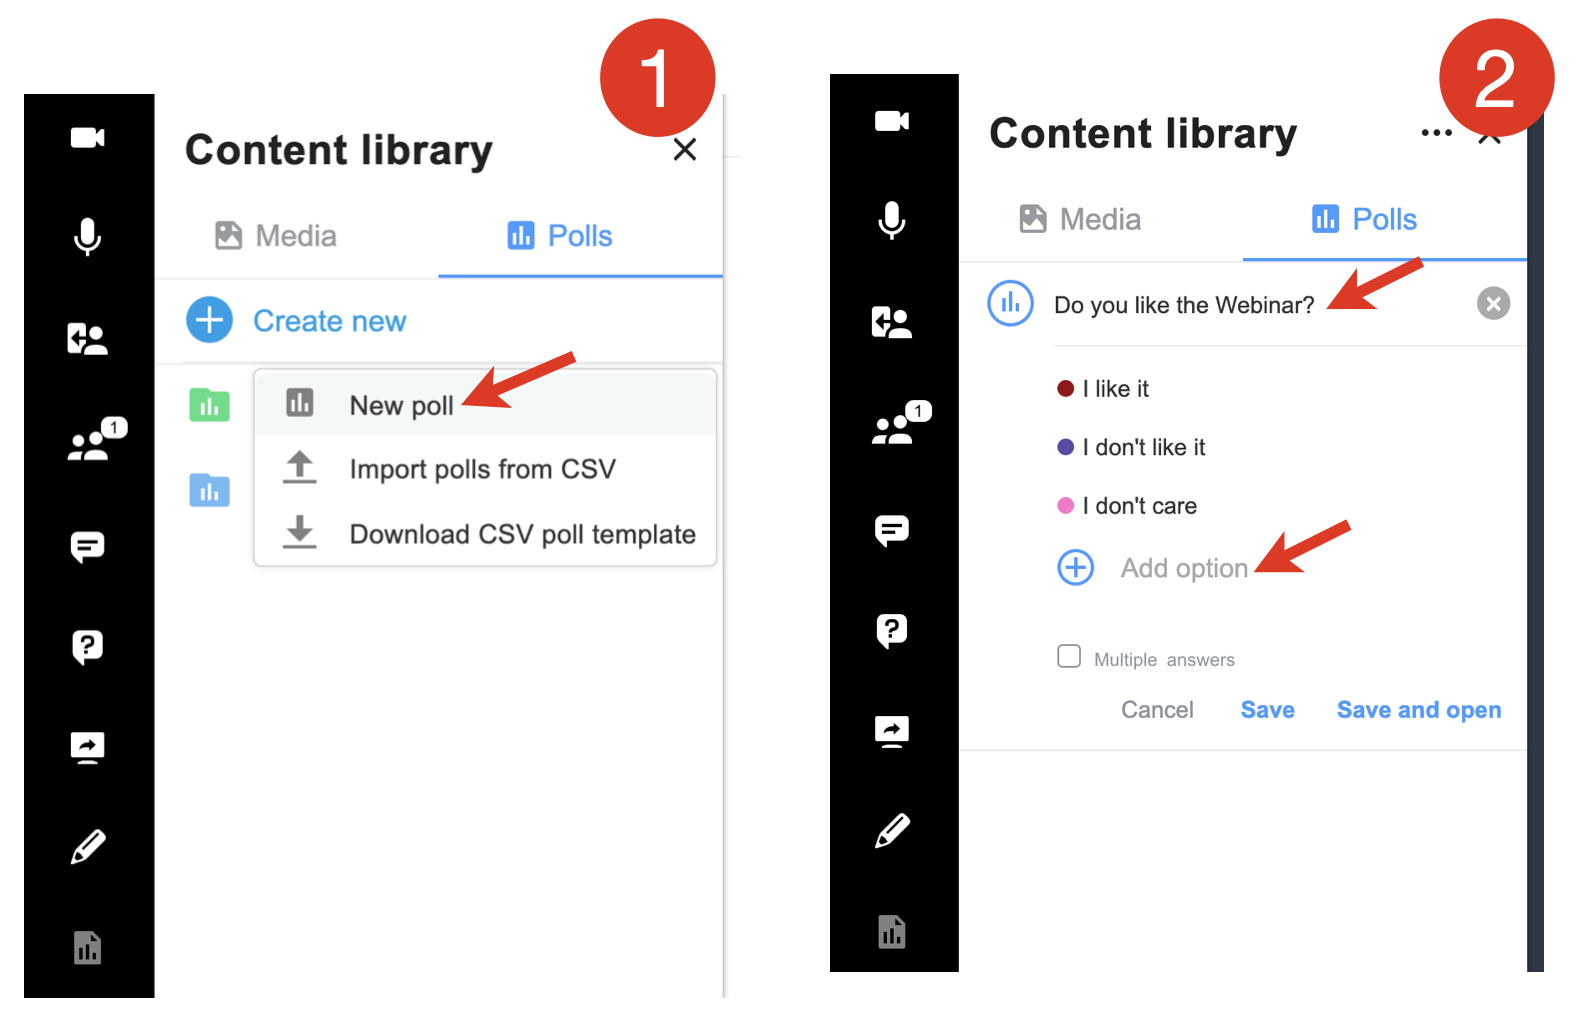
When finished, click Save to save the poll in the Content library. Click Save and open to save the poll in the Content library and open it for your audience to vote:
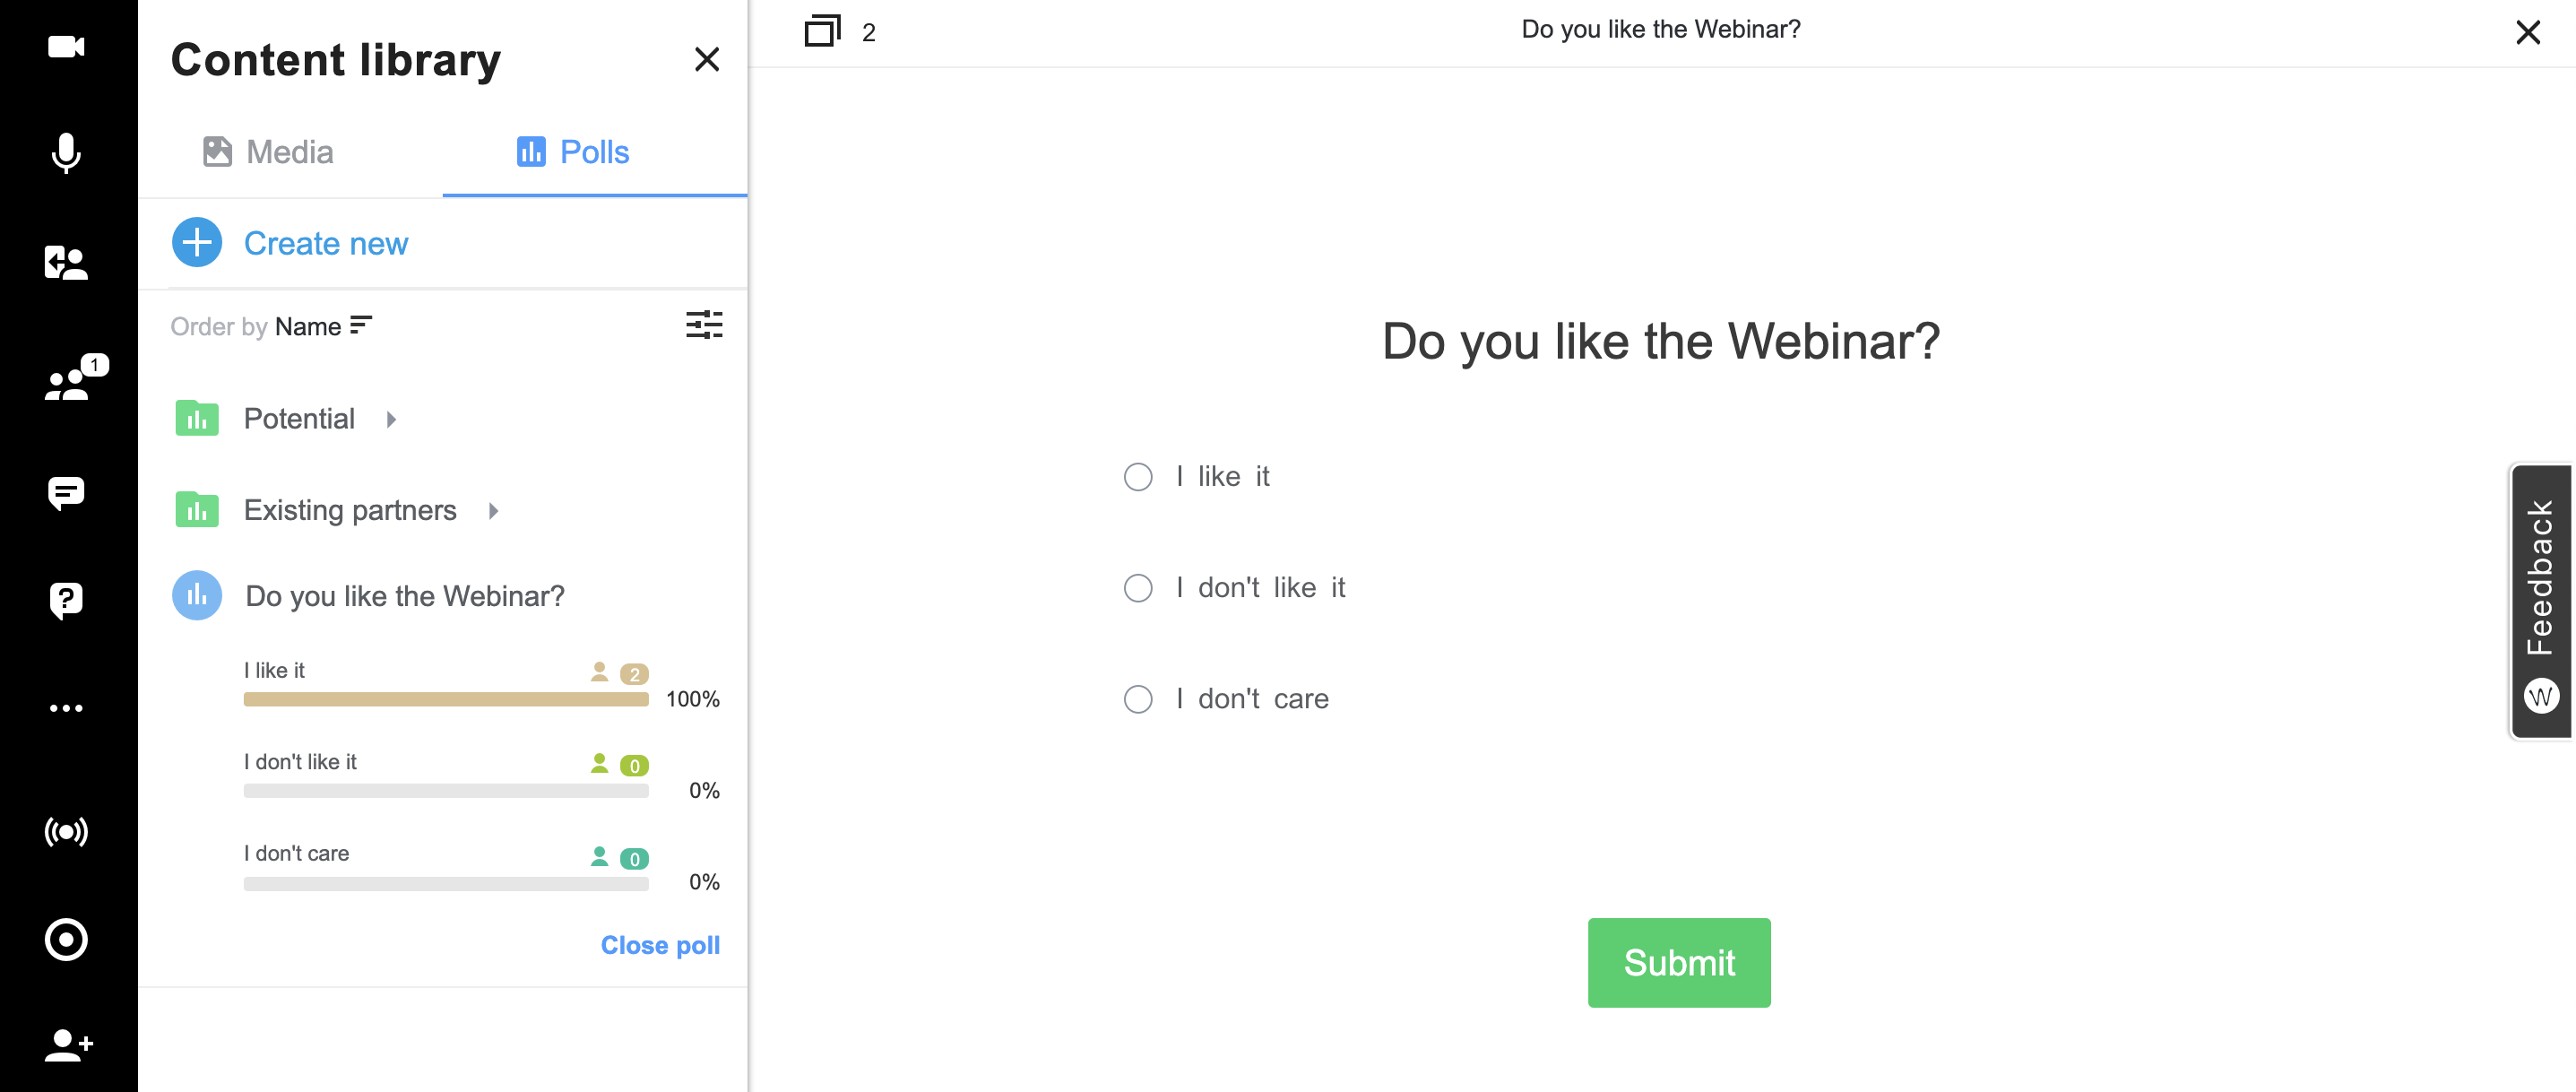
To finish voting, click Close poll:

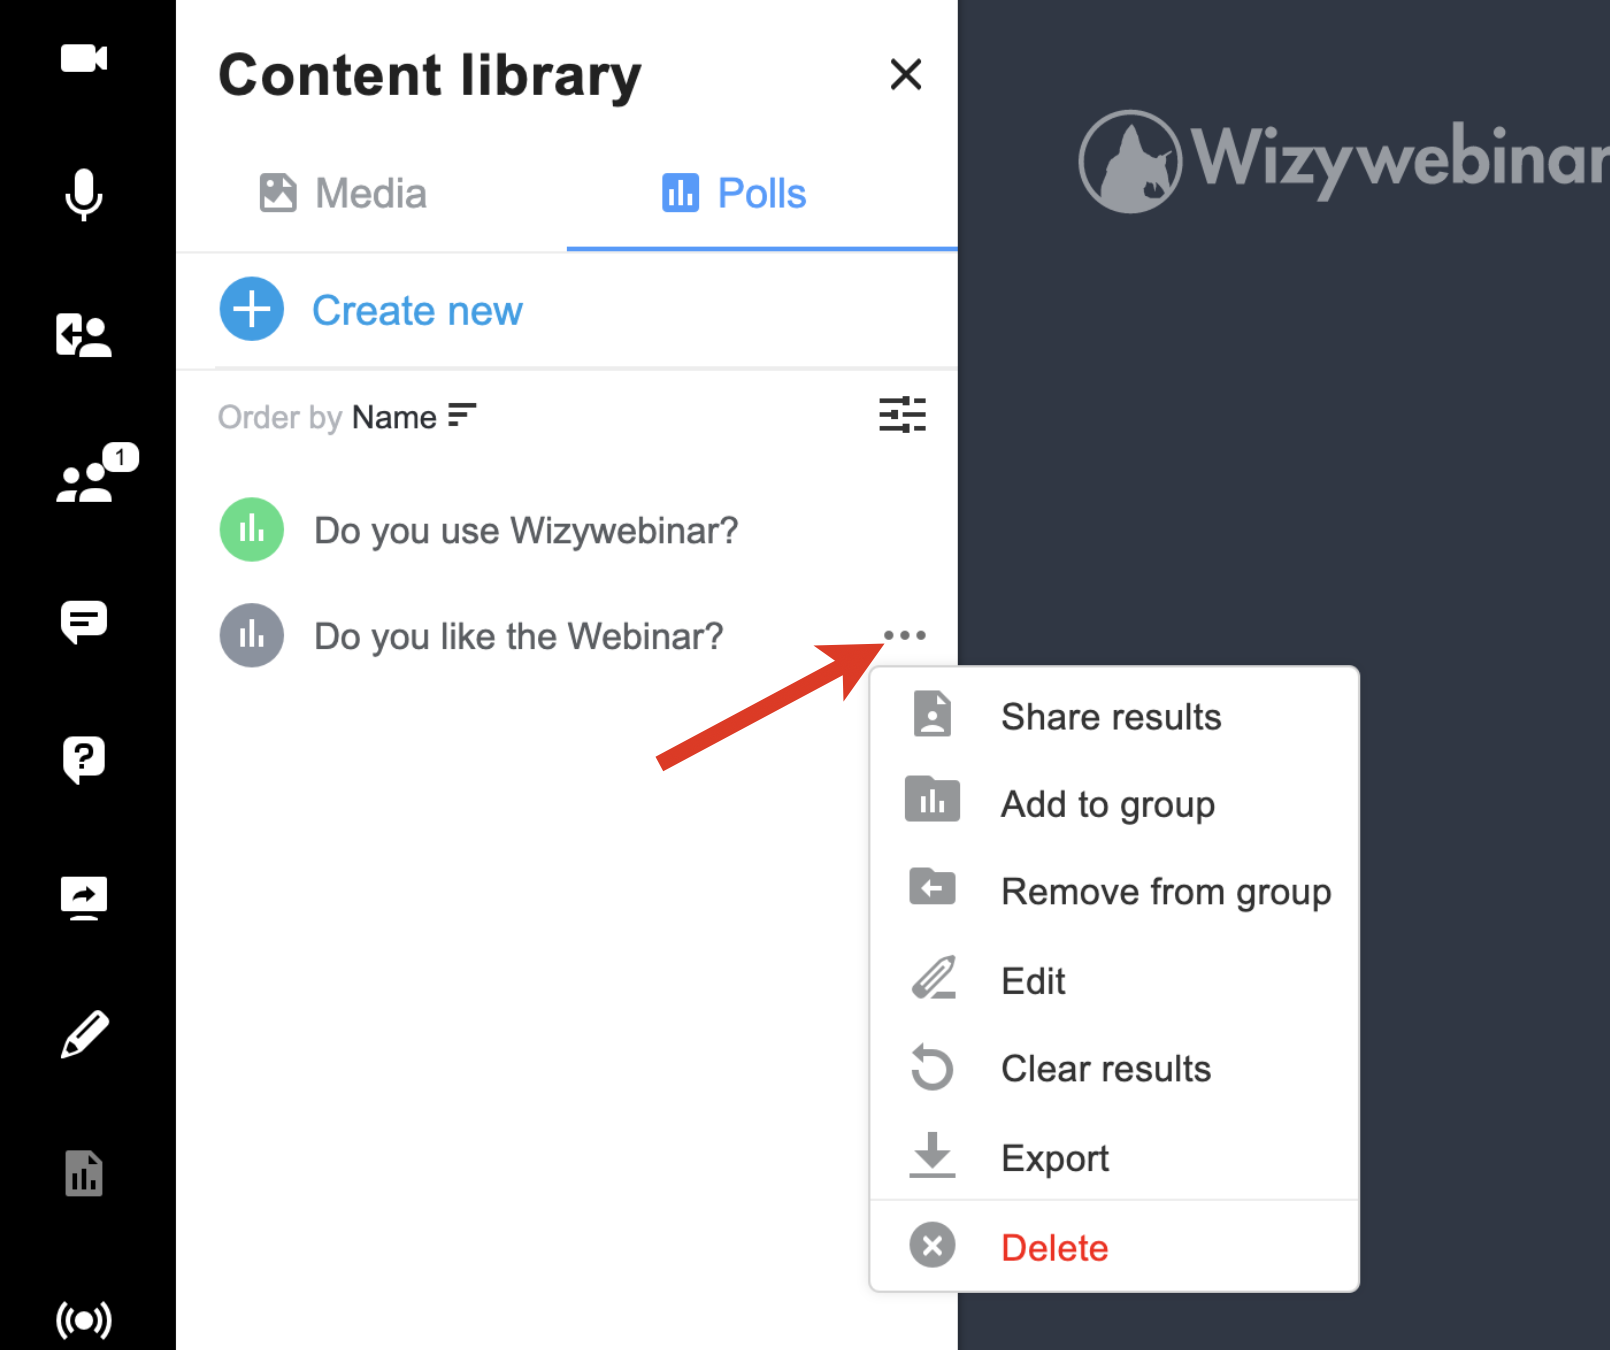
Manage polls
After you close the poll, you have some other options by clicking on the three dots icon next to the question:
- Share Results: share the results of the poll with everyone in your meeting
- Add to group: you can create folders and organize your polls into groups
- Remove from group: allows you to remove a poll from the group
- Edit: allows you to edit the poll. You should Clear and Re-open the poll if new options have been added so that the audience can re-vote with the new options
- Clear results: delete all previous votes in your poll
- Export: export poll results in .txt, .pdf or .csv format. We recommend exporting the poll results before ending the session
Delete: delete the poll
Share polls
You can let other Speakers reuse your poll by adding it to the Shared polls folder.
- Click on the three dots icon next to the necessary question and click Share:
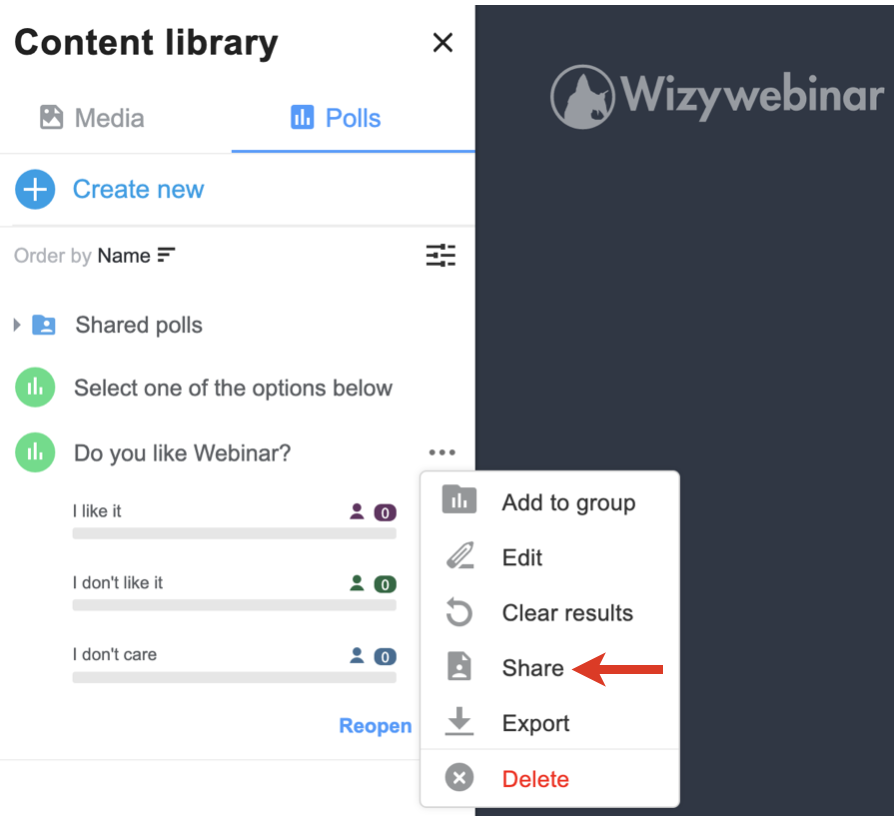
- When notified that poll is shared without existing votes, click Share:
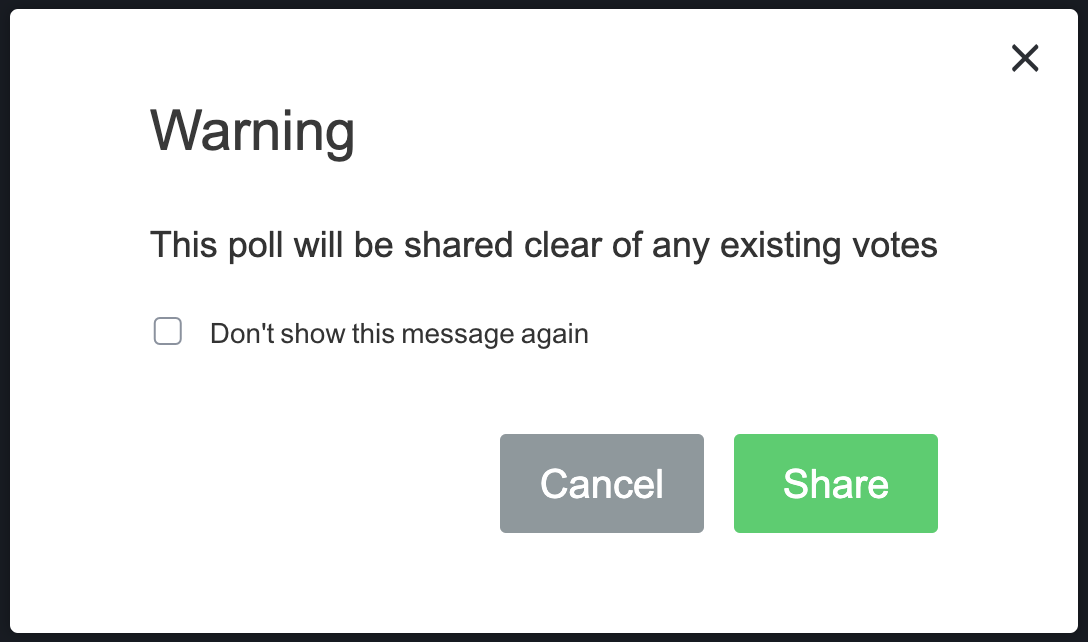
- The shared question appears in the Shared polls folder (1) and the question gets marked as shared (2):
![]()
Livestream
Through Livestream you can broadcast your meeting to a larger audience via Facebook Live or YouTube.
To start live streaming, click on the Live streaming button (Broadcast icon) from the left panel: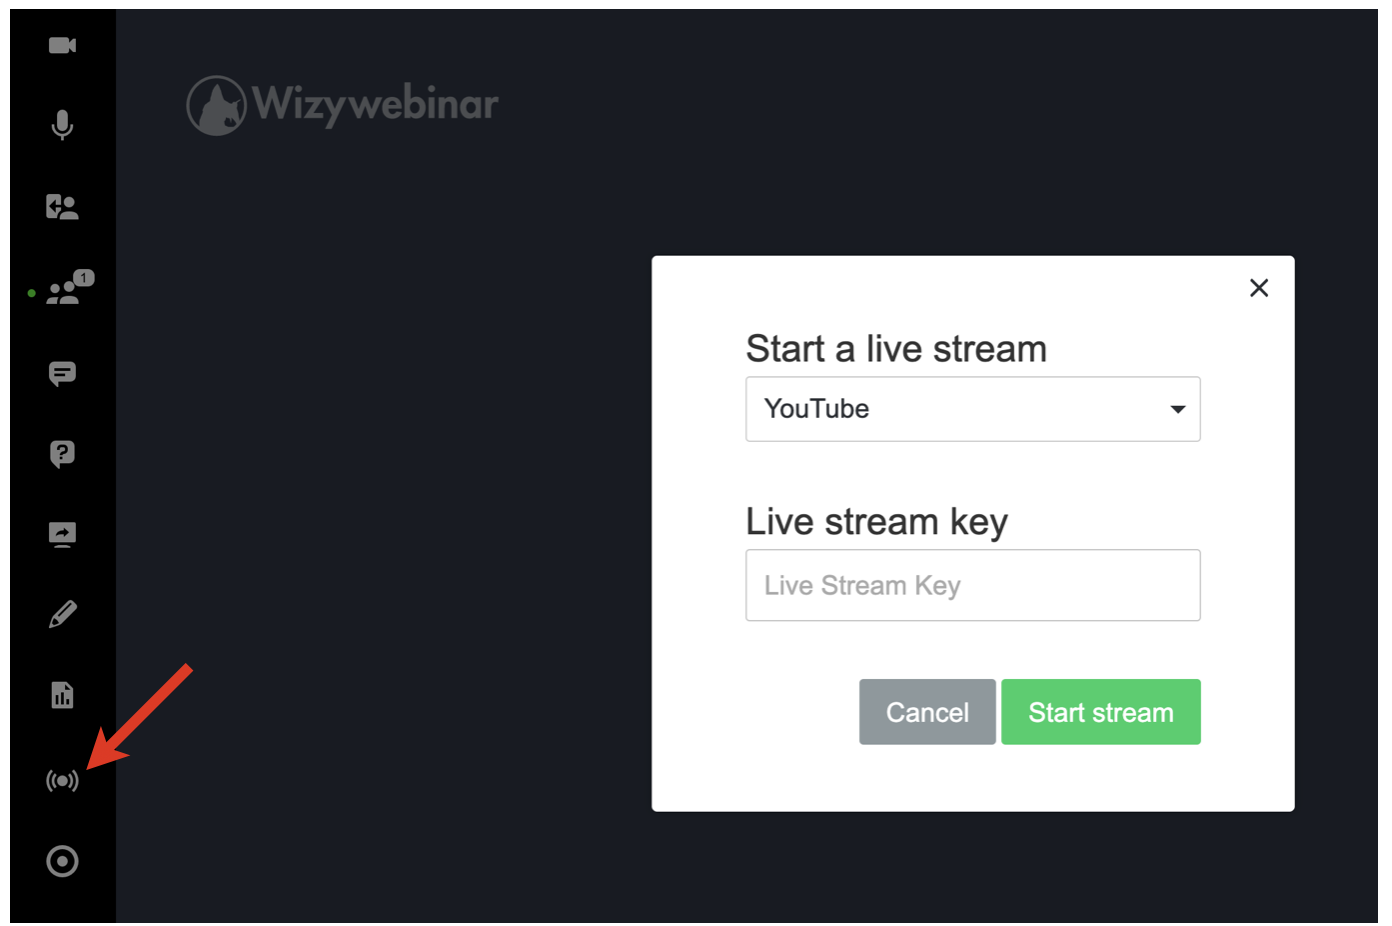
Then you need to select YouTube or Facebook and enter the Live stream key into the input field.
For detailed instructions on how to get the stream key, read the guide: How to Start Live Stream.
Recording webinars
- To start/stop a recording, click on the Recording button from the left panel:

- When stopping a recording, click Stop recording button to confirm:

The number of concurrent recordings for Wizywebinar is limited to one per license.
Access your recordings
To access your recordings:
- Open Wizywebinar tab in Collaboration
- Click Recordings from the left panel
- Click on the file to view the recording. If you want to download it, hover the mouse over and click the green arrow-down icon:
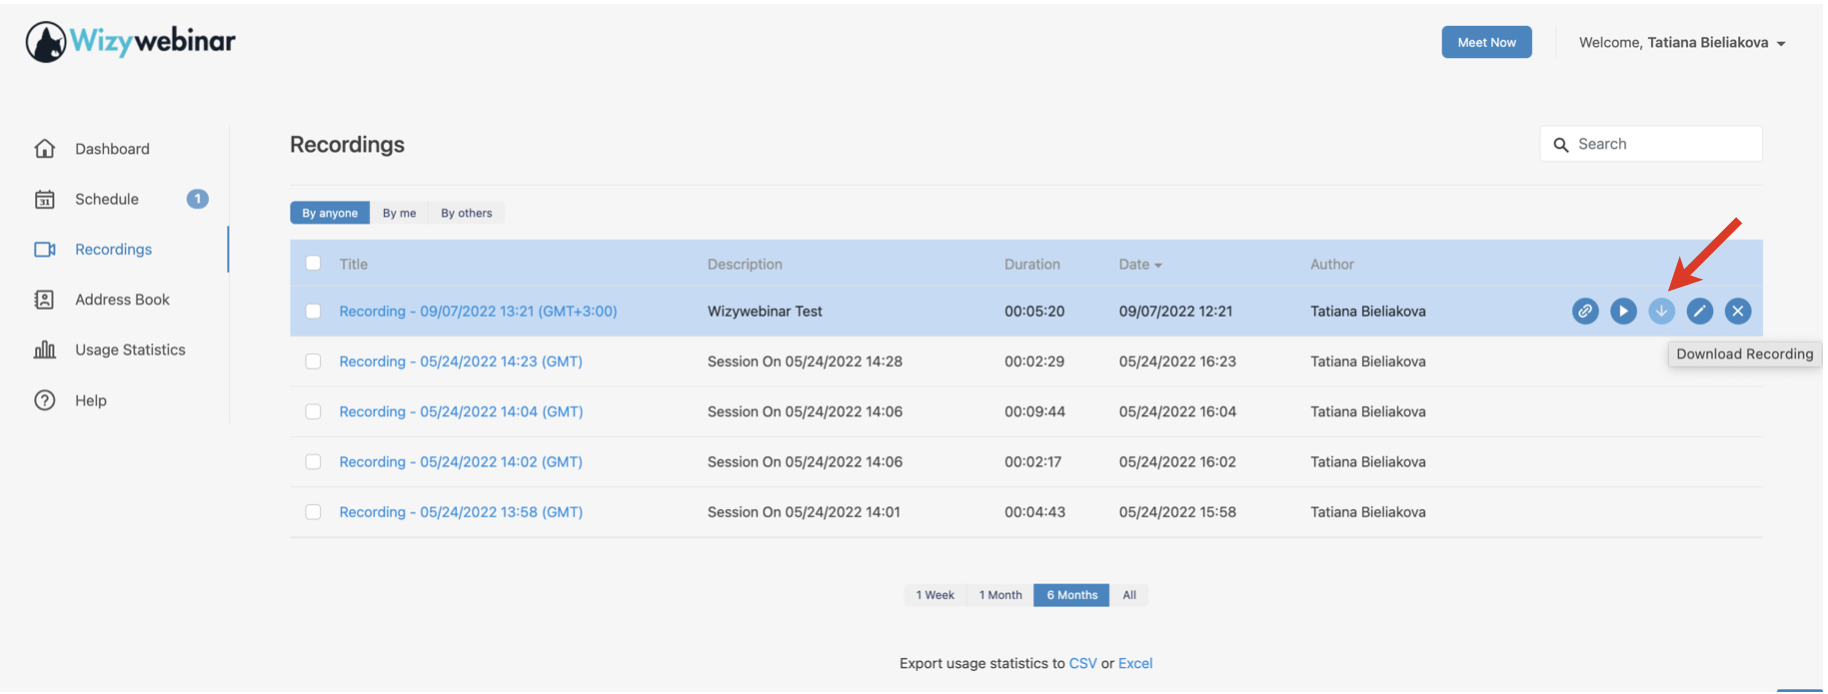
Besides downloading the recording, you also get the following options when you hover the mouse over it: copy the URL, edit the recording name and description, delete the recording. All these actions are also available when you look for the required recording via the search field.
When you click on the edit (pencil) icon next to the recording, the Edit section opens where you have the following options:
- Edit recording Name and Description
- Enter Password to password protect the recording link
- Share recording link
Share downloadable link
Note: Downloadable link is not covered by password protection.

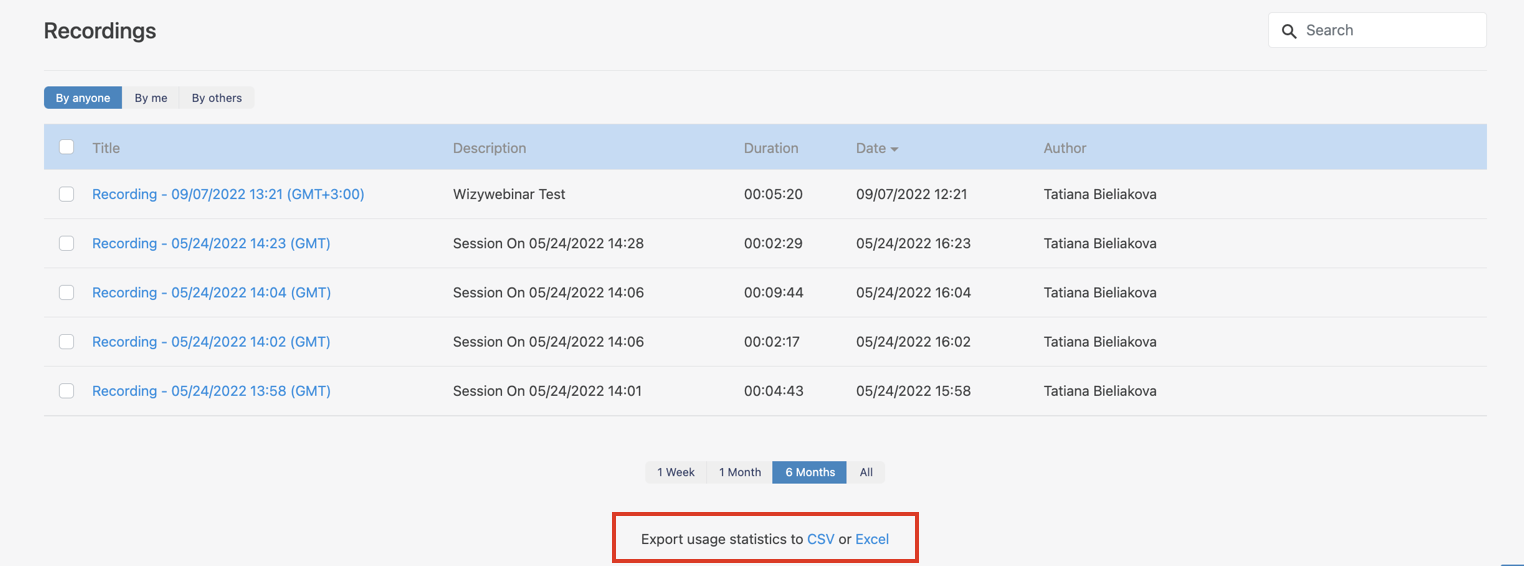
Export usage statistics
Wizywebinar allows to export recording statistics which shows how often and extensively the recordings are played. For this, navigate to the bottom of the Recordings list to Export usage statistics to CSV or Excel and click on the preferred file format (CSV or Excel):
Create bookmarks during recording
Note: The feature is available upon request. The request should be sent to denis.popov@wildix.com.
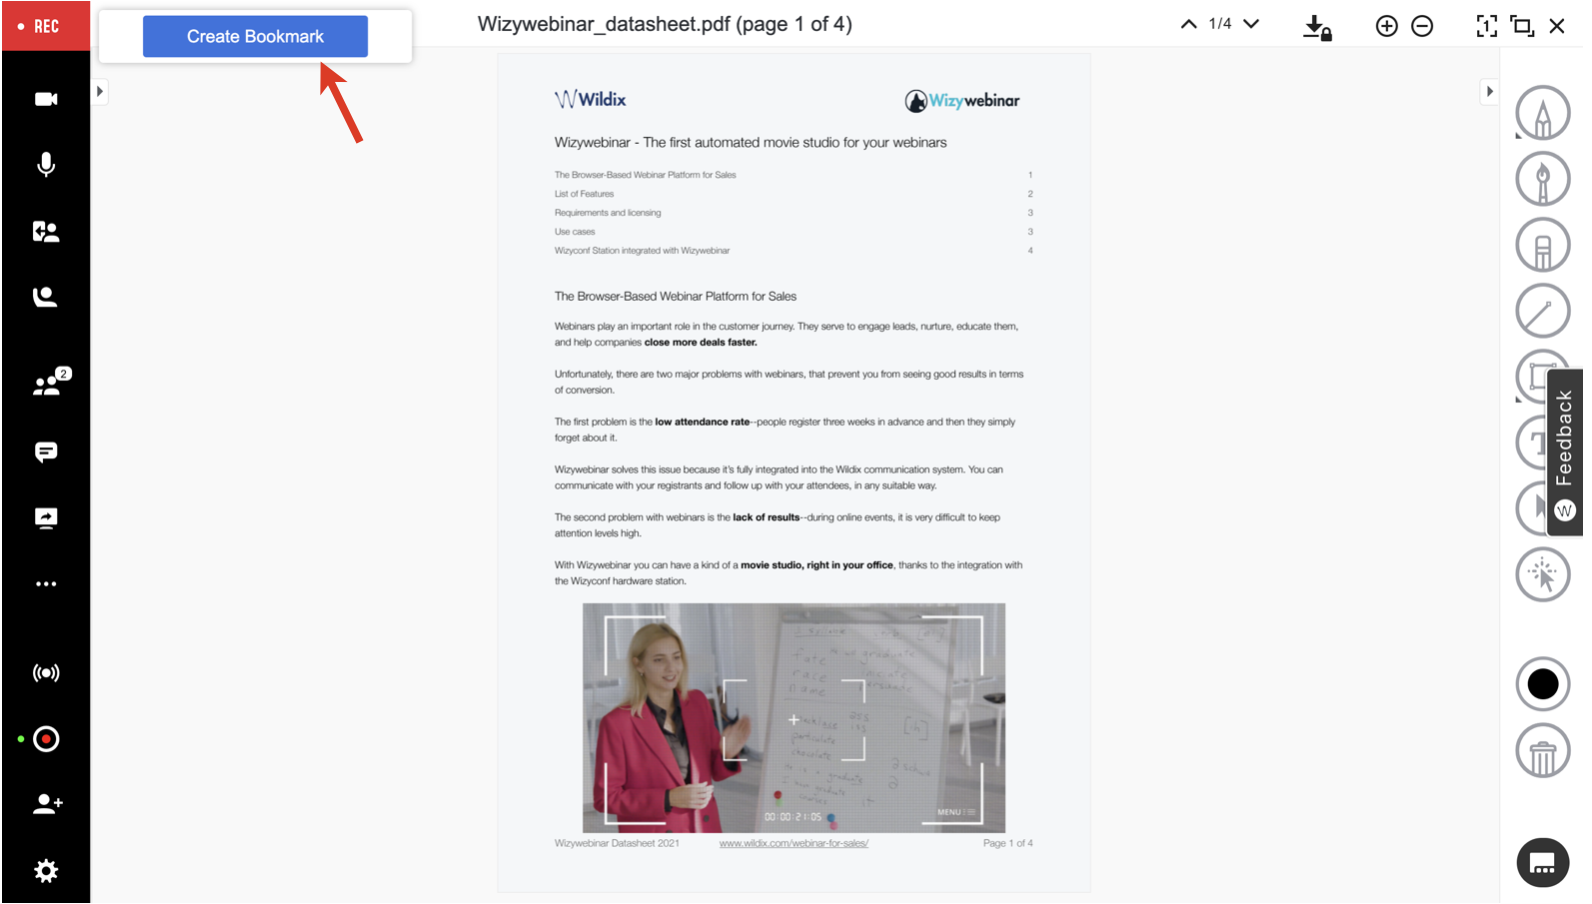
Bookmarks functionality allows to indicate points of interest while the recording is running during a session.
- If the functionality is enabled, when recording starts, the Create Bookmark button appears at the top. Click on it to create a bookmark:
2. Enter the Bookmark name and click Create: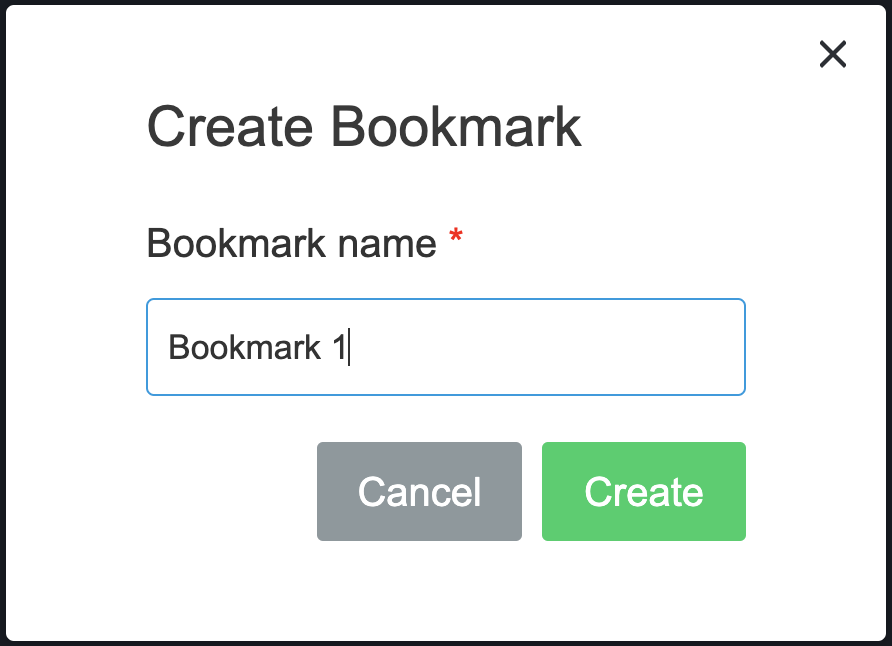
Download bookmarks
- Open Wizywebinar tab in Collaboration
- Click Recordings on the left panel
- Click Edit (pencil icon) next to the necessary recording
- Click Download Bookmarks
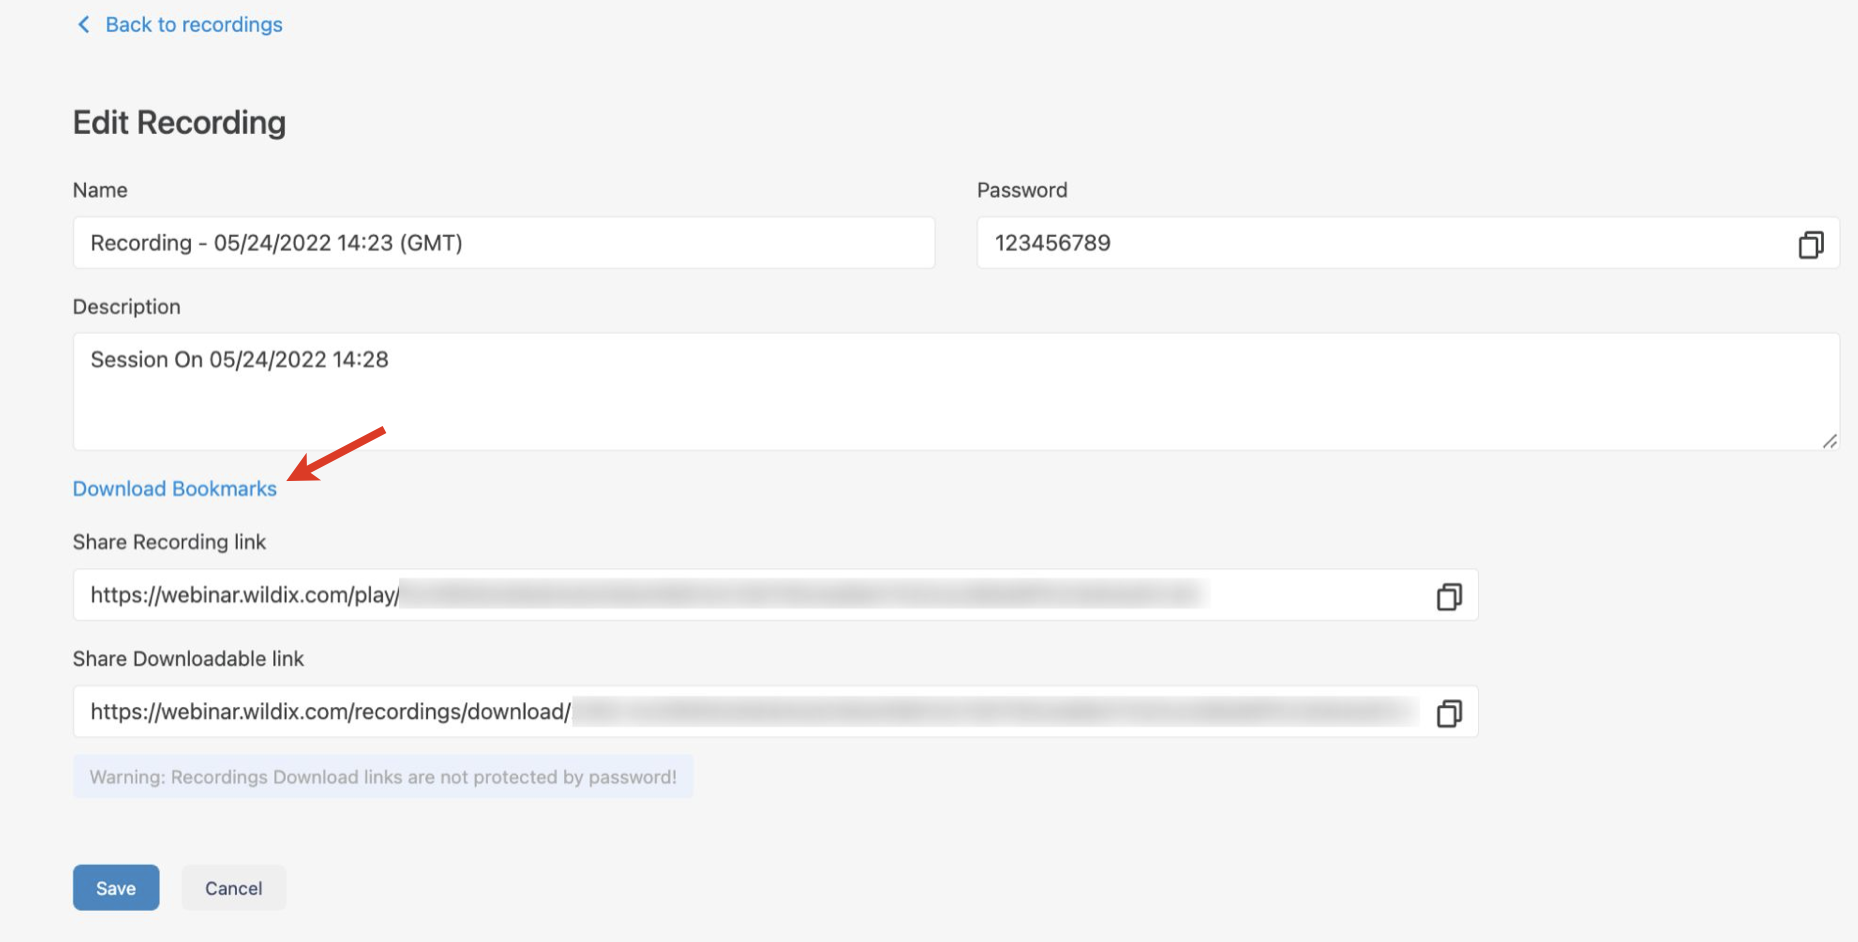
The file is uploaded in .json format and contains the following information: time, label (bookmark name), and user.
End a webinar session
To end a webinar session, click on the Leave/ End session button (Exit icon) from the left panel: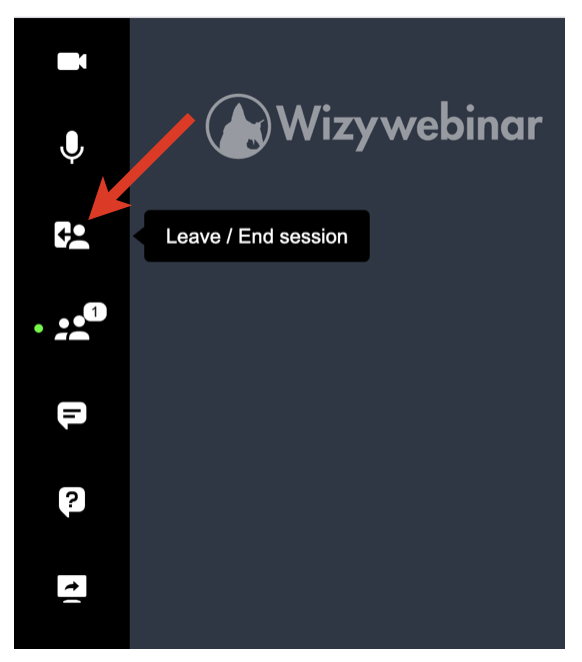
You have three options here:
- Disconnect audience users
- Leave session
- End session
Workspace settings
You can enable or disable certain options that are available for your Audience and Speakers during the webinar.
To access Workspace settings:
- Click the Gear icon from the left panel -> select Workspace
- A new dialog opens, allowing you to adjust the following settings:
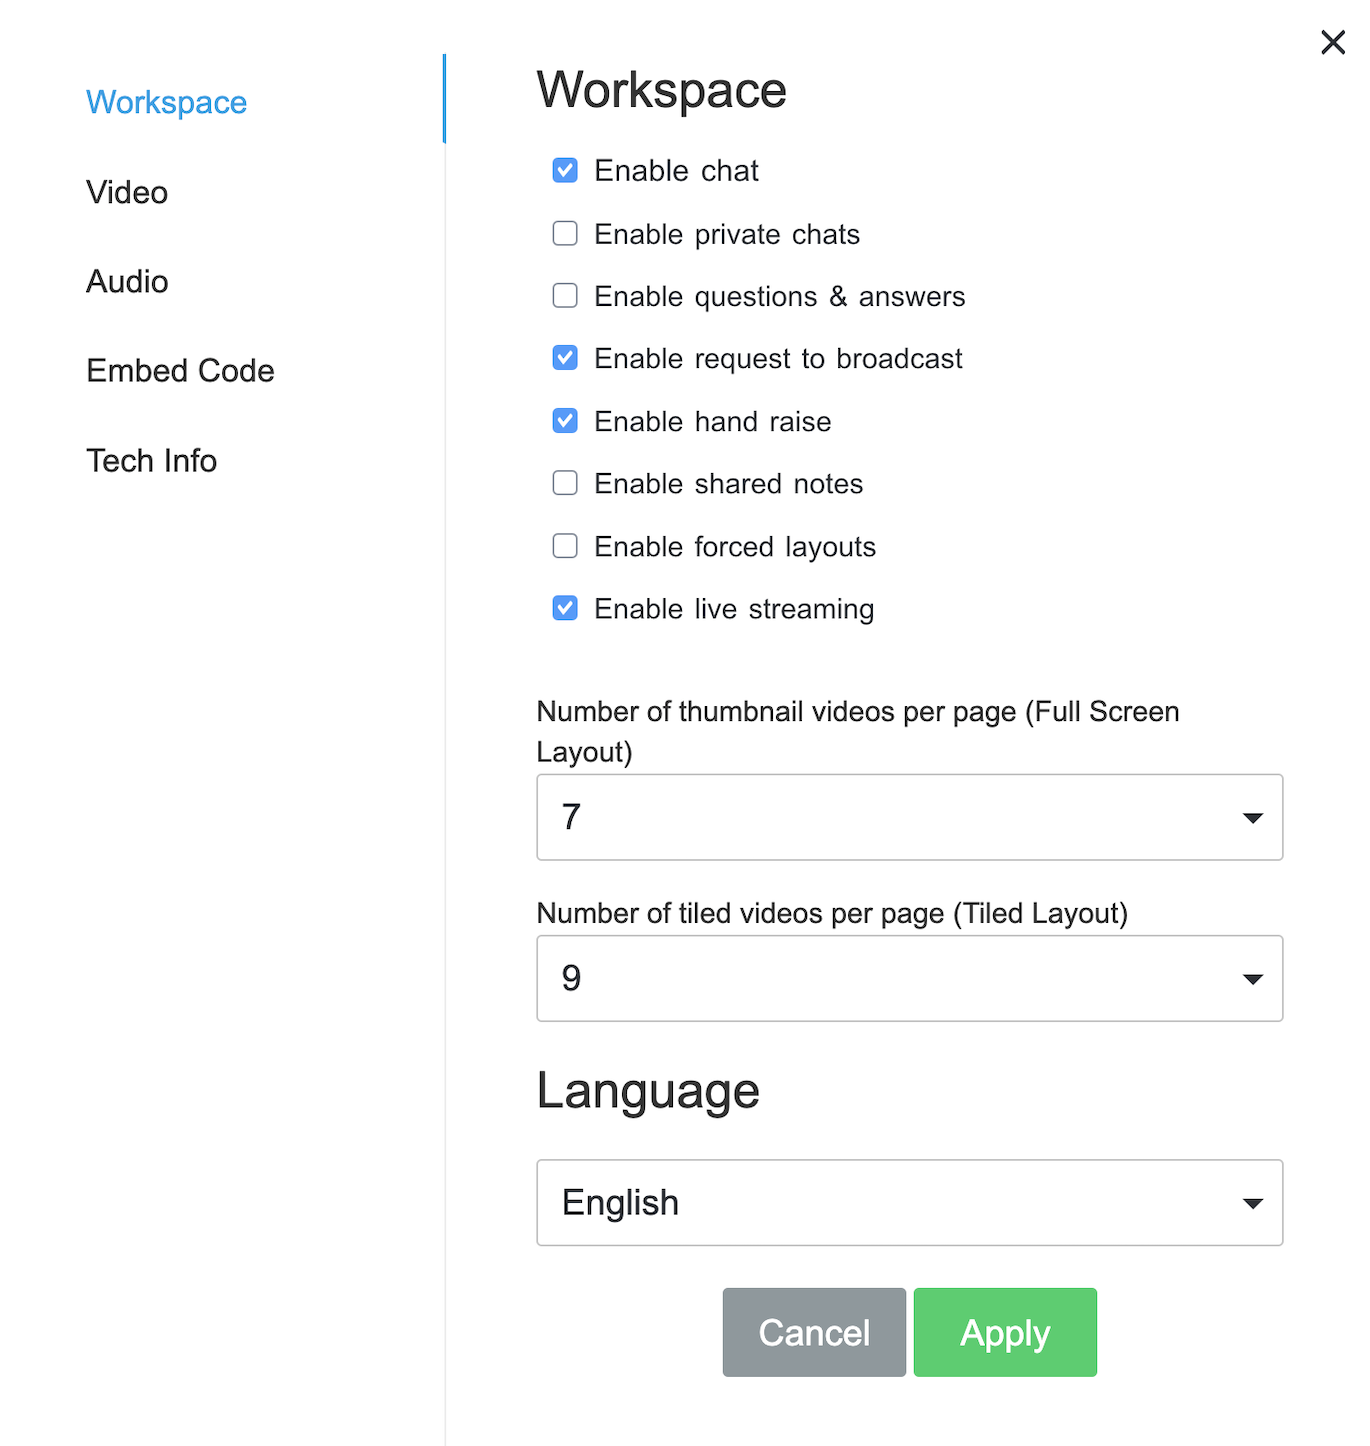
- Enable chat
- Enable private chats (disabled by default)
- Enable questions & answers (disabled by default)
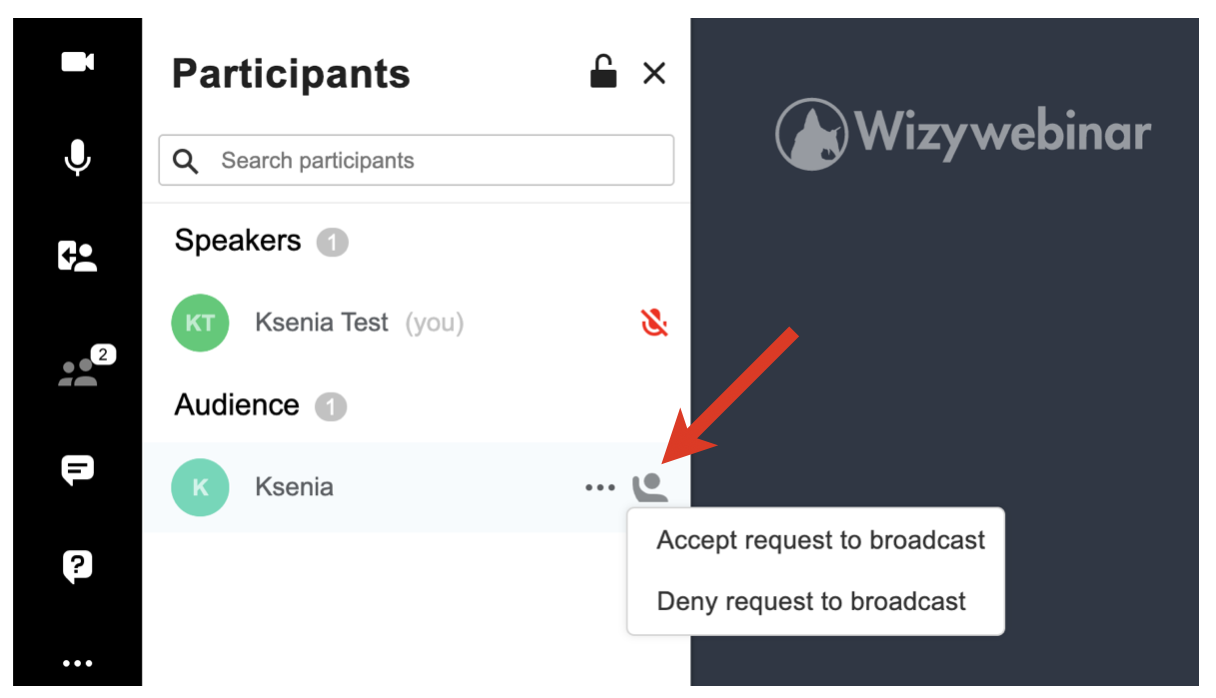
Enable request to broadcast (disabled by default): when enabled, a participant can raise a hand to request to broadcast; you can give broadcast permission from the Participants panel:
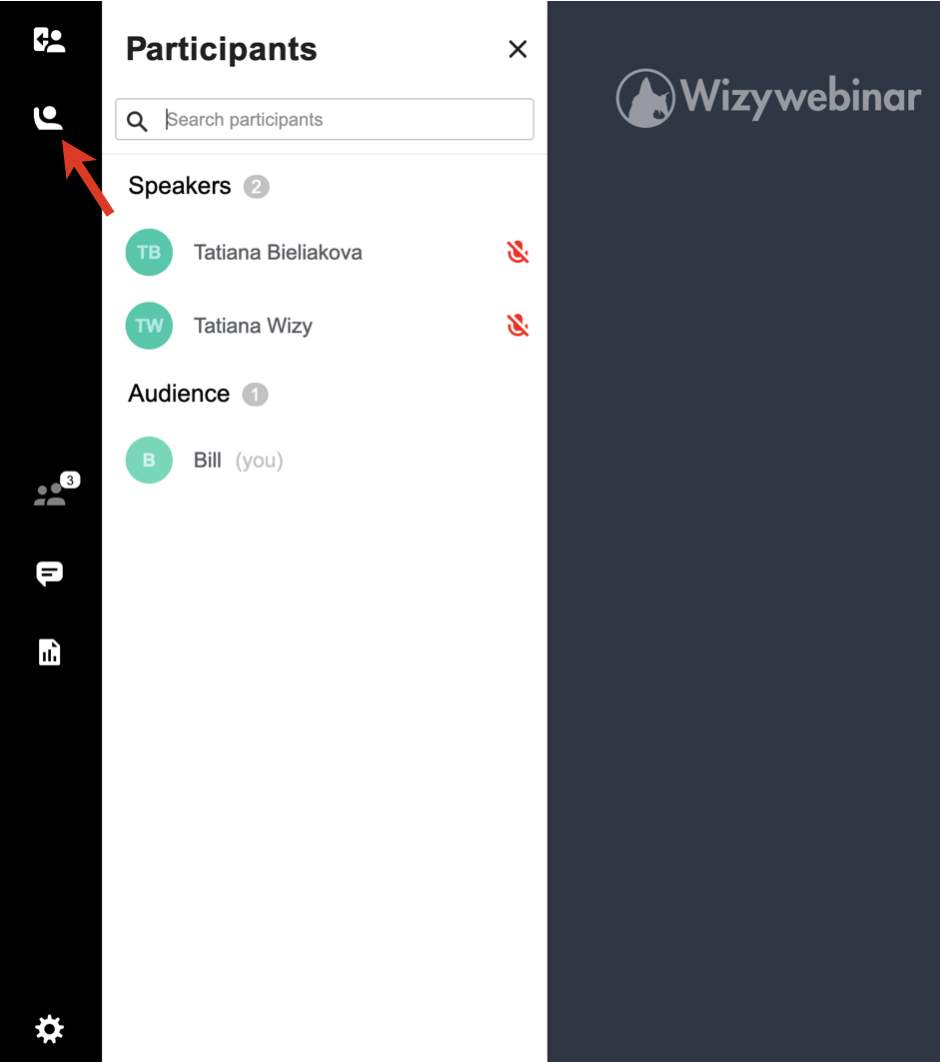
- Enable hand raise: allows speakers and users with broadcast permissions to unobtrusively request a turn to speak:
Other speakers get the following raised hand notification: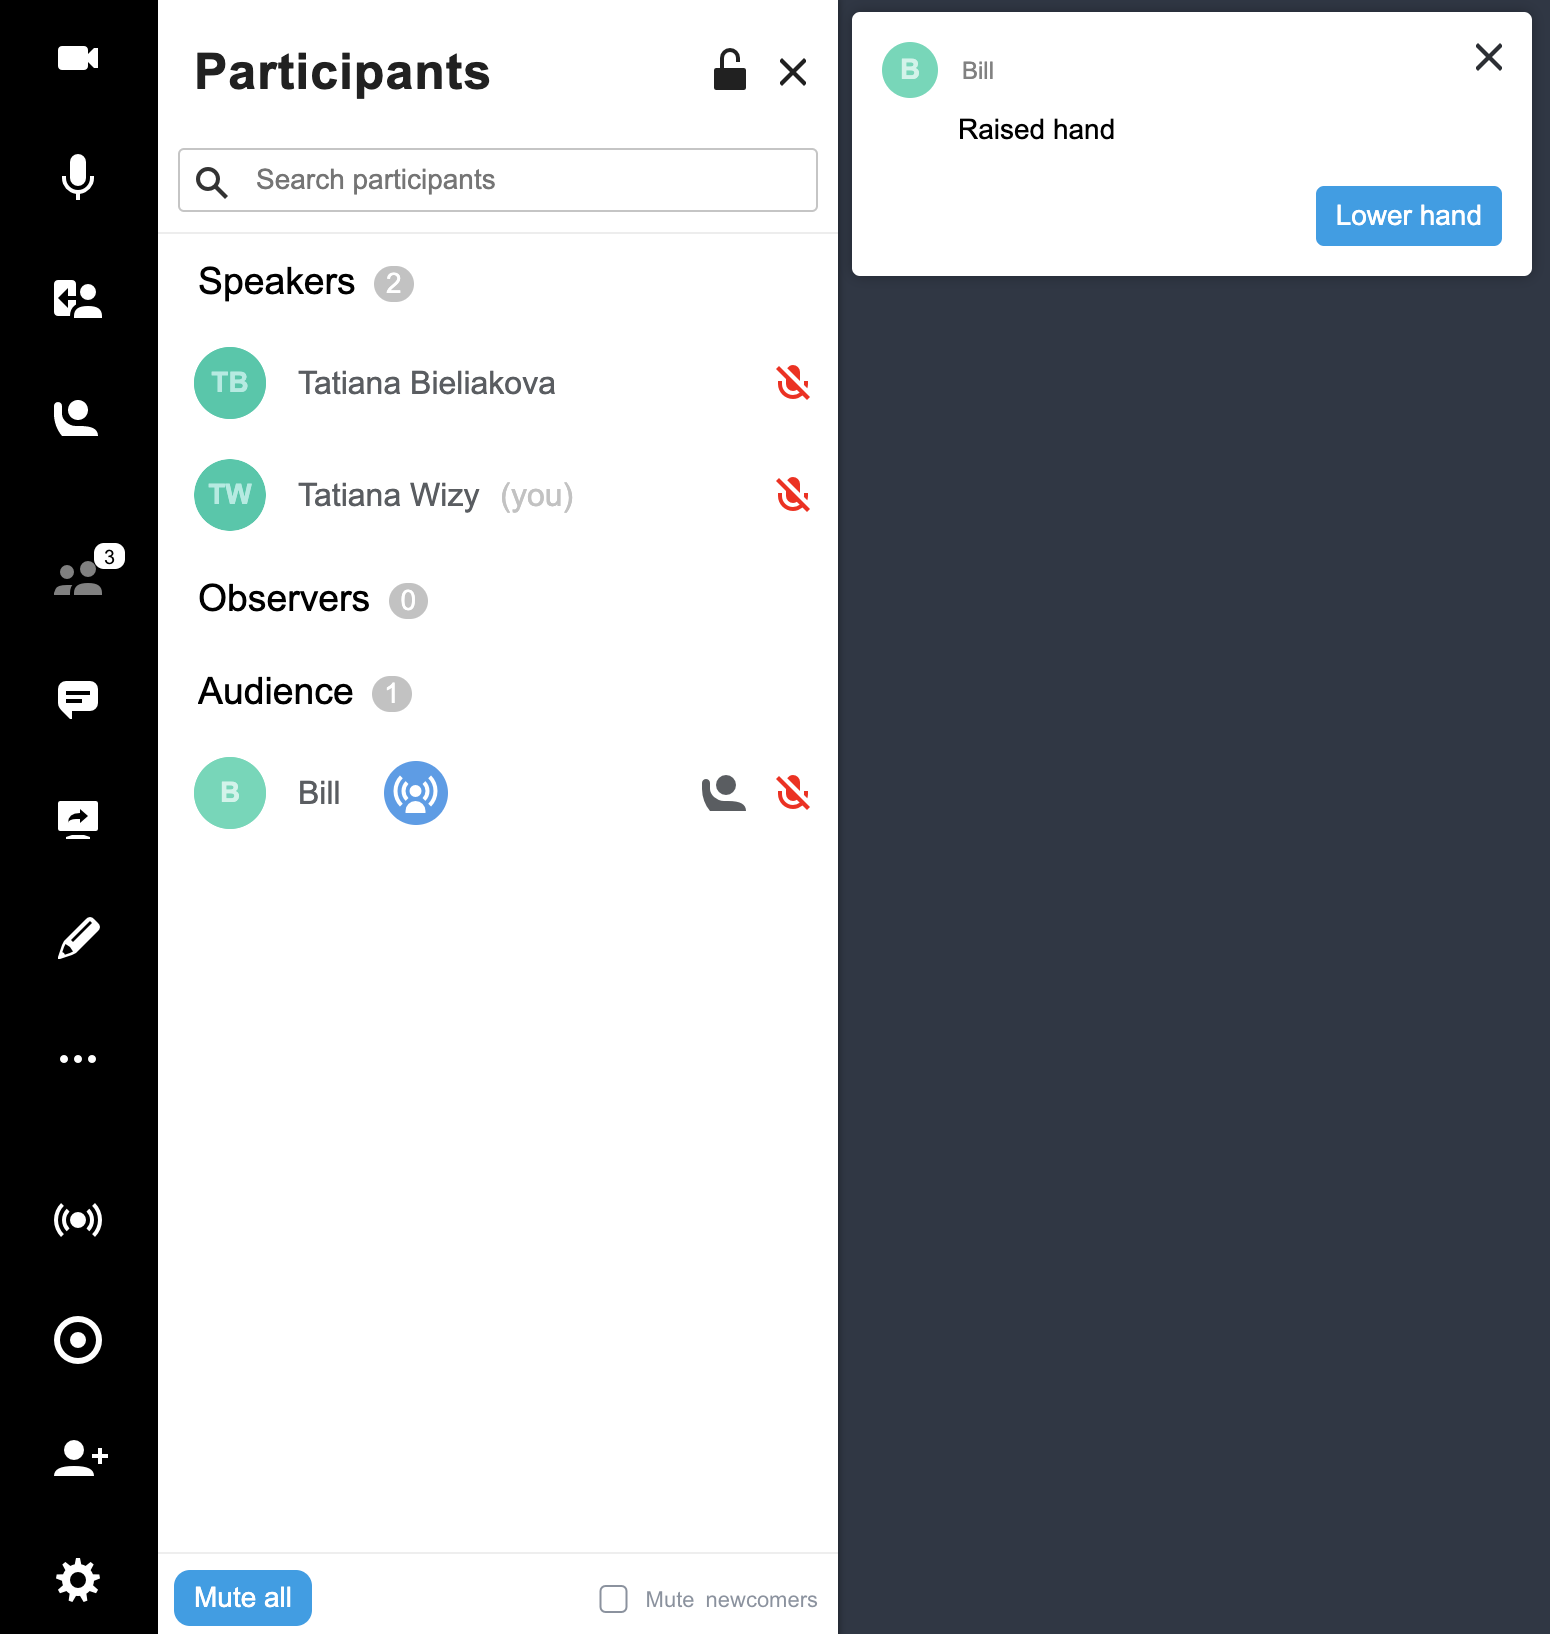
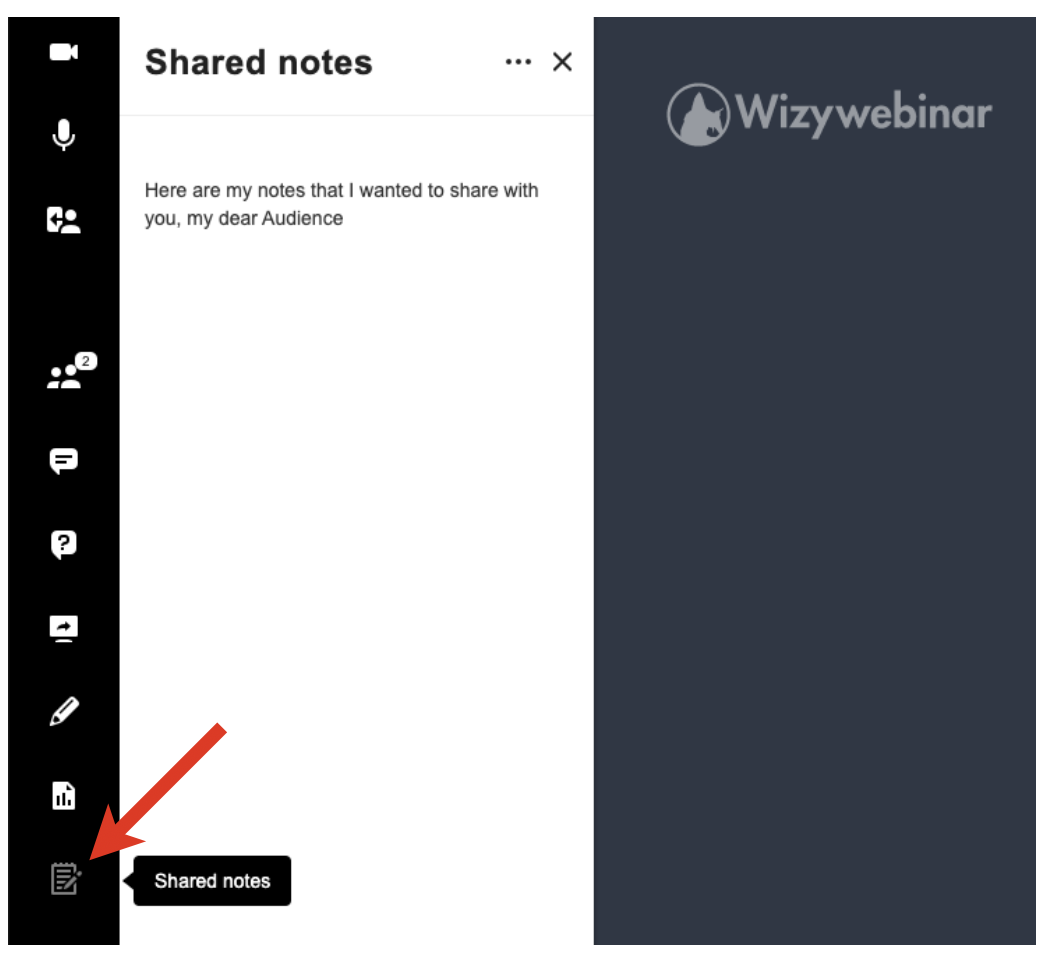
- Enable shared notes (disabled by default): when enabled, speakers can add and edit notes by clicking on the Note icon from the left panel; in 3 seconds notes are shared with the participants:
- Enable forced layouts (disabled by default): More information in the chapter Forced layouts
- Enable live streaming
In addition, in this menu, you can change the number of thumbnail videos per page to be displayed for Full Screen Layout/ tiled videos for Tiled Layout and change the Language of the web interface.
Available screen layout modes
Change layout
Participants, including speakers and audience, can choose one of the pre-defined layouts to view the content:
- Fullscreen: default mode where you can view one element at a time
- Tiled view: allows you to split your screen so you can see multiple elements (up to 8 tiles) at once, including your own video.
- Thumbnail mode: similar to tiled mode, only that it keeps your own video at the bottom right side of the screen
Hover the mouse cursor over the Screen icon located in the lower right-hand part of the screen, and then select the preferred mode:
Tiled and thumbnail modes can be customized by users to fit their viewing experience.
To rearrange:
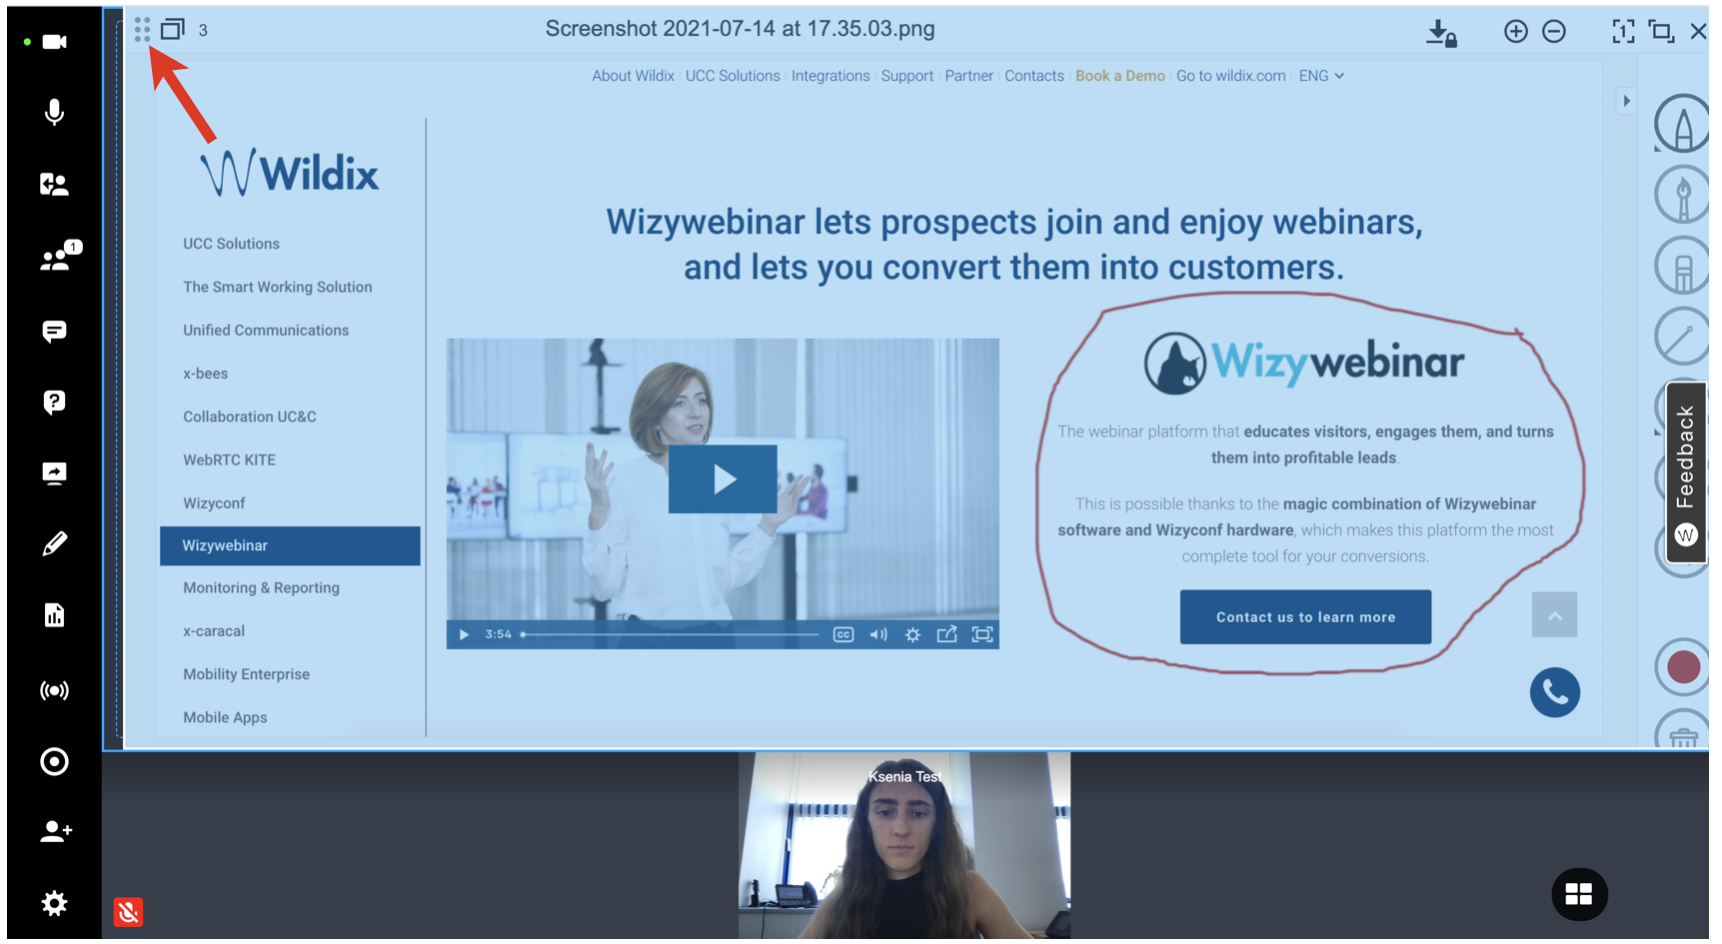
- Hover to the uppermost left corner of the element that you would like to move until you see the Dice icon
- Tap and hold the icon and then drag and drop the element to rearrange your workspace:
To resize:
- Hover the mouse cursor over the border between the two elements on the screen, if you would like to resize one of them
- The border between the two elements is now highlighted. Tap and hold the mouse on the highlighted border. You can now see the percentage that each element occupies of the total workspace
- Drag the border up/down, or to the right/to the left to resize the elements; release the mouse when finished:

Forced layouts
By enabling the Forced layouts feature, you can take full control over how you’d like your Audience to view your content.
Important: When Forced layouts are enabled, the Audience can no longer change their layouts individually. They can no longer view the Chat and Questions and Answers unless you left this tab open before enabling Forced layouts.
To enable forced layout:
- Open Settings -> Workspace, check the box Enable forced layouts and click Apply
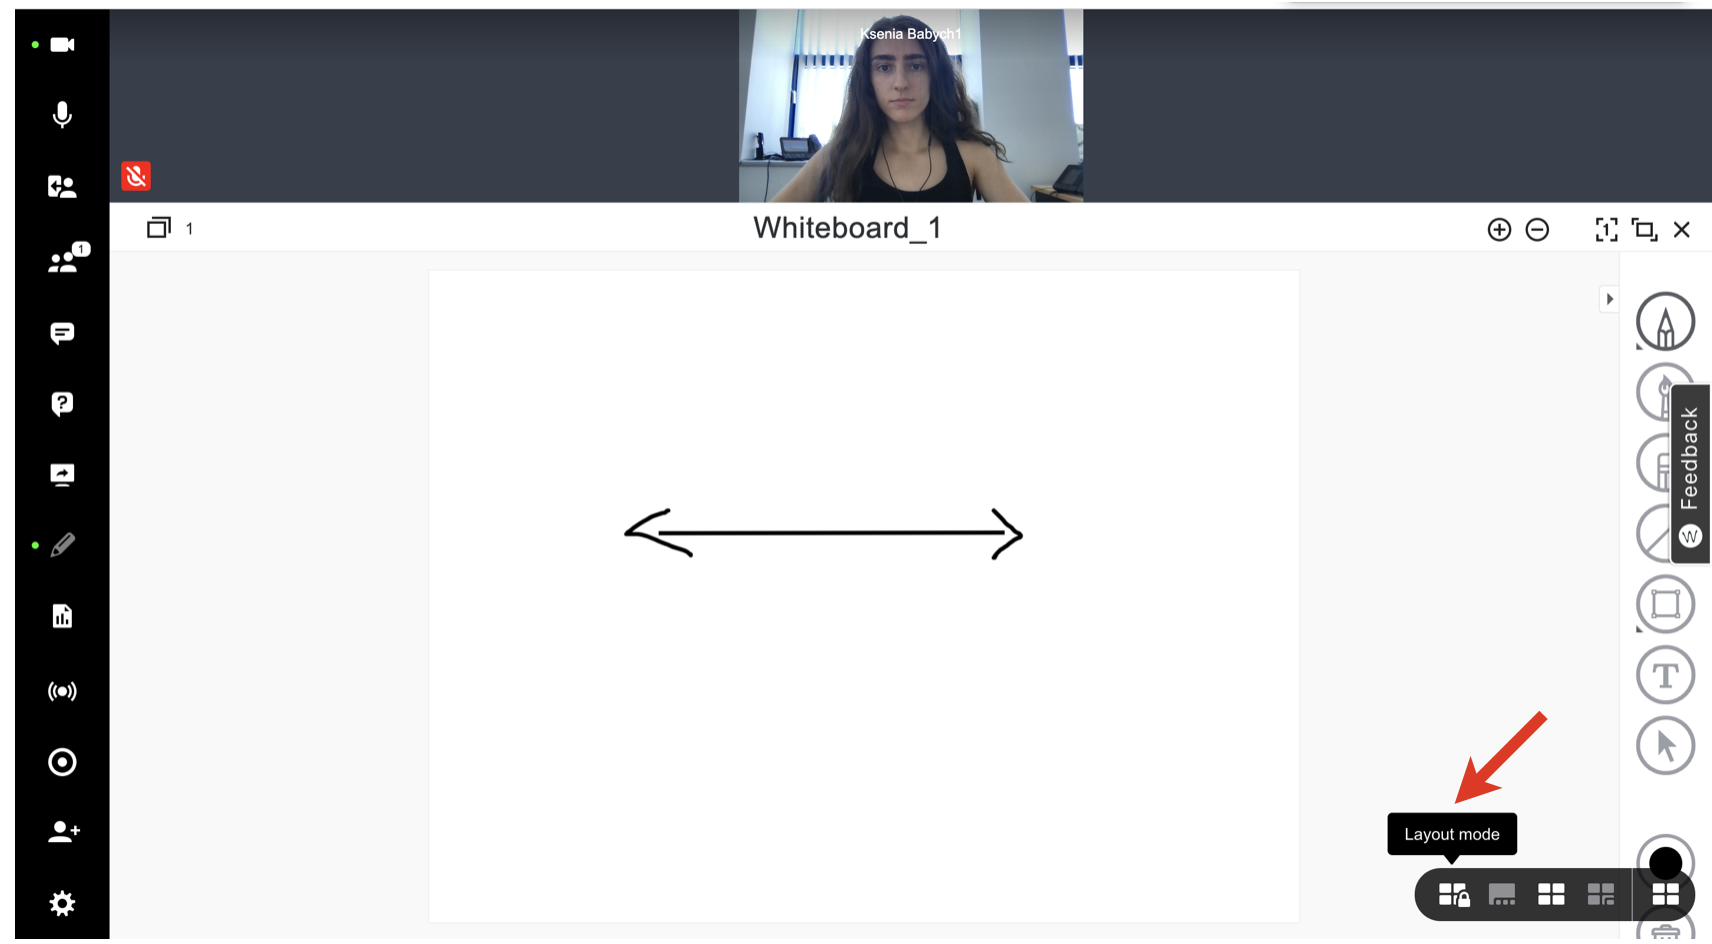
Hover the mouse over the Screen icon in the bottom right-hand part of the screen and click Layout mode:
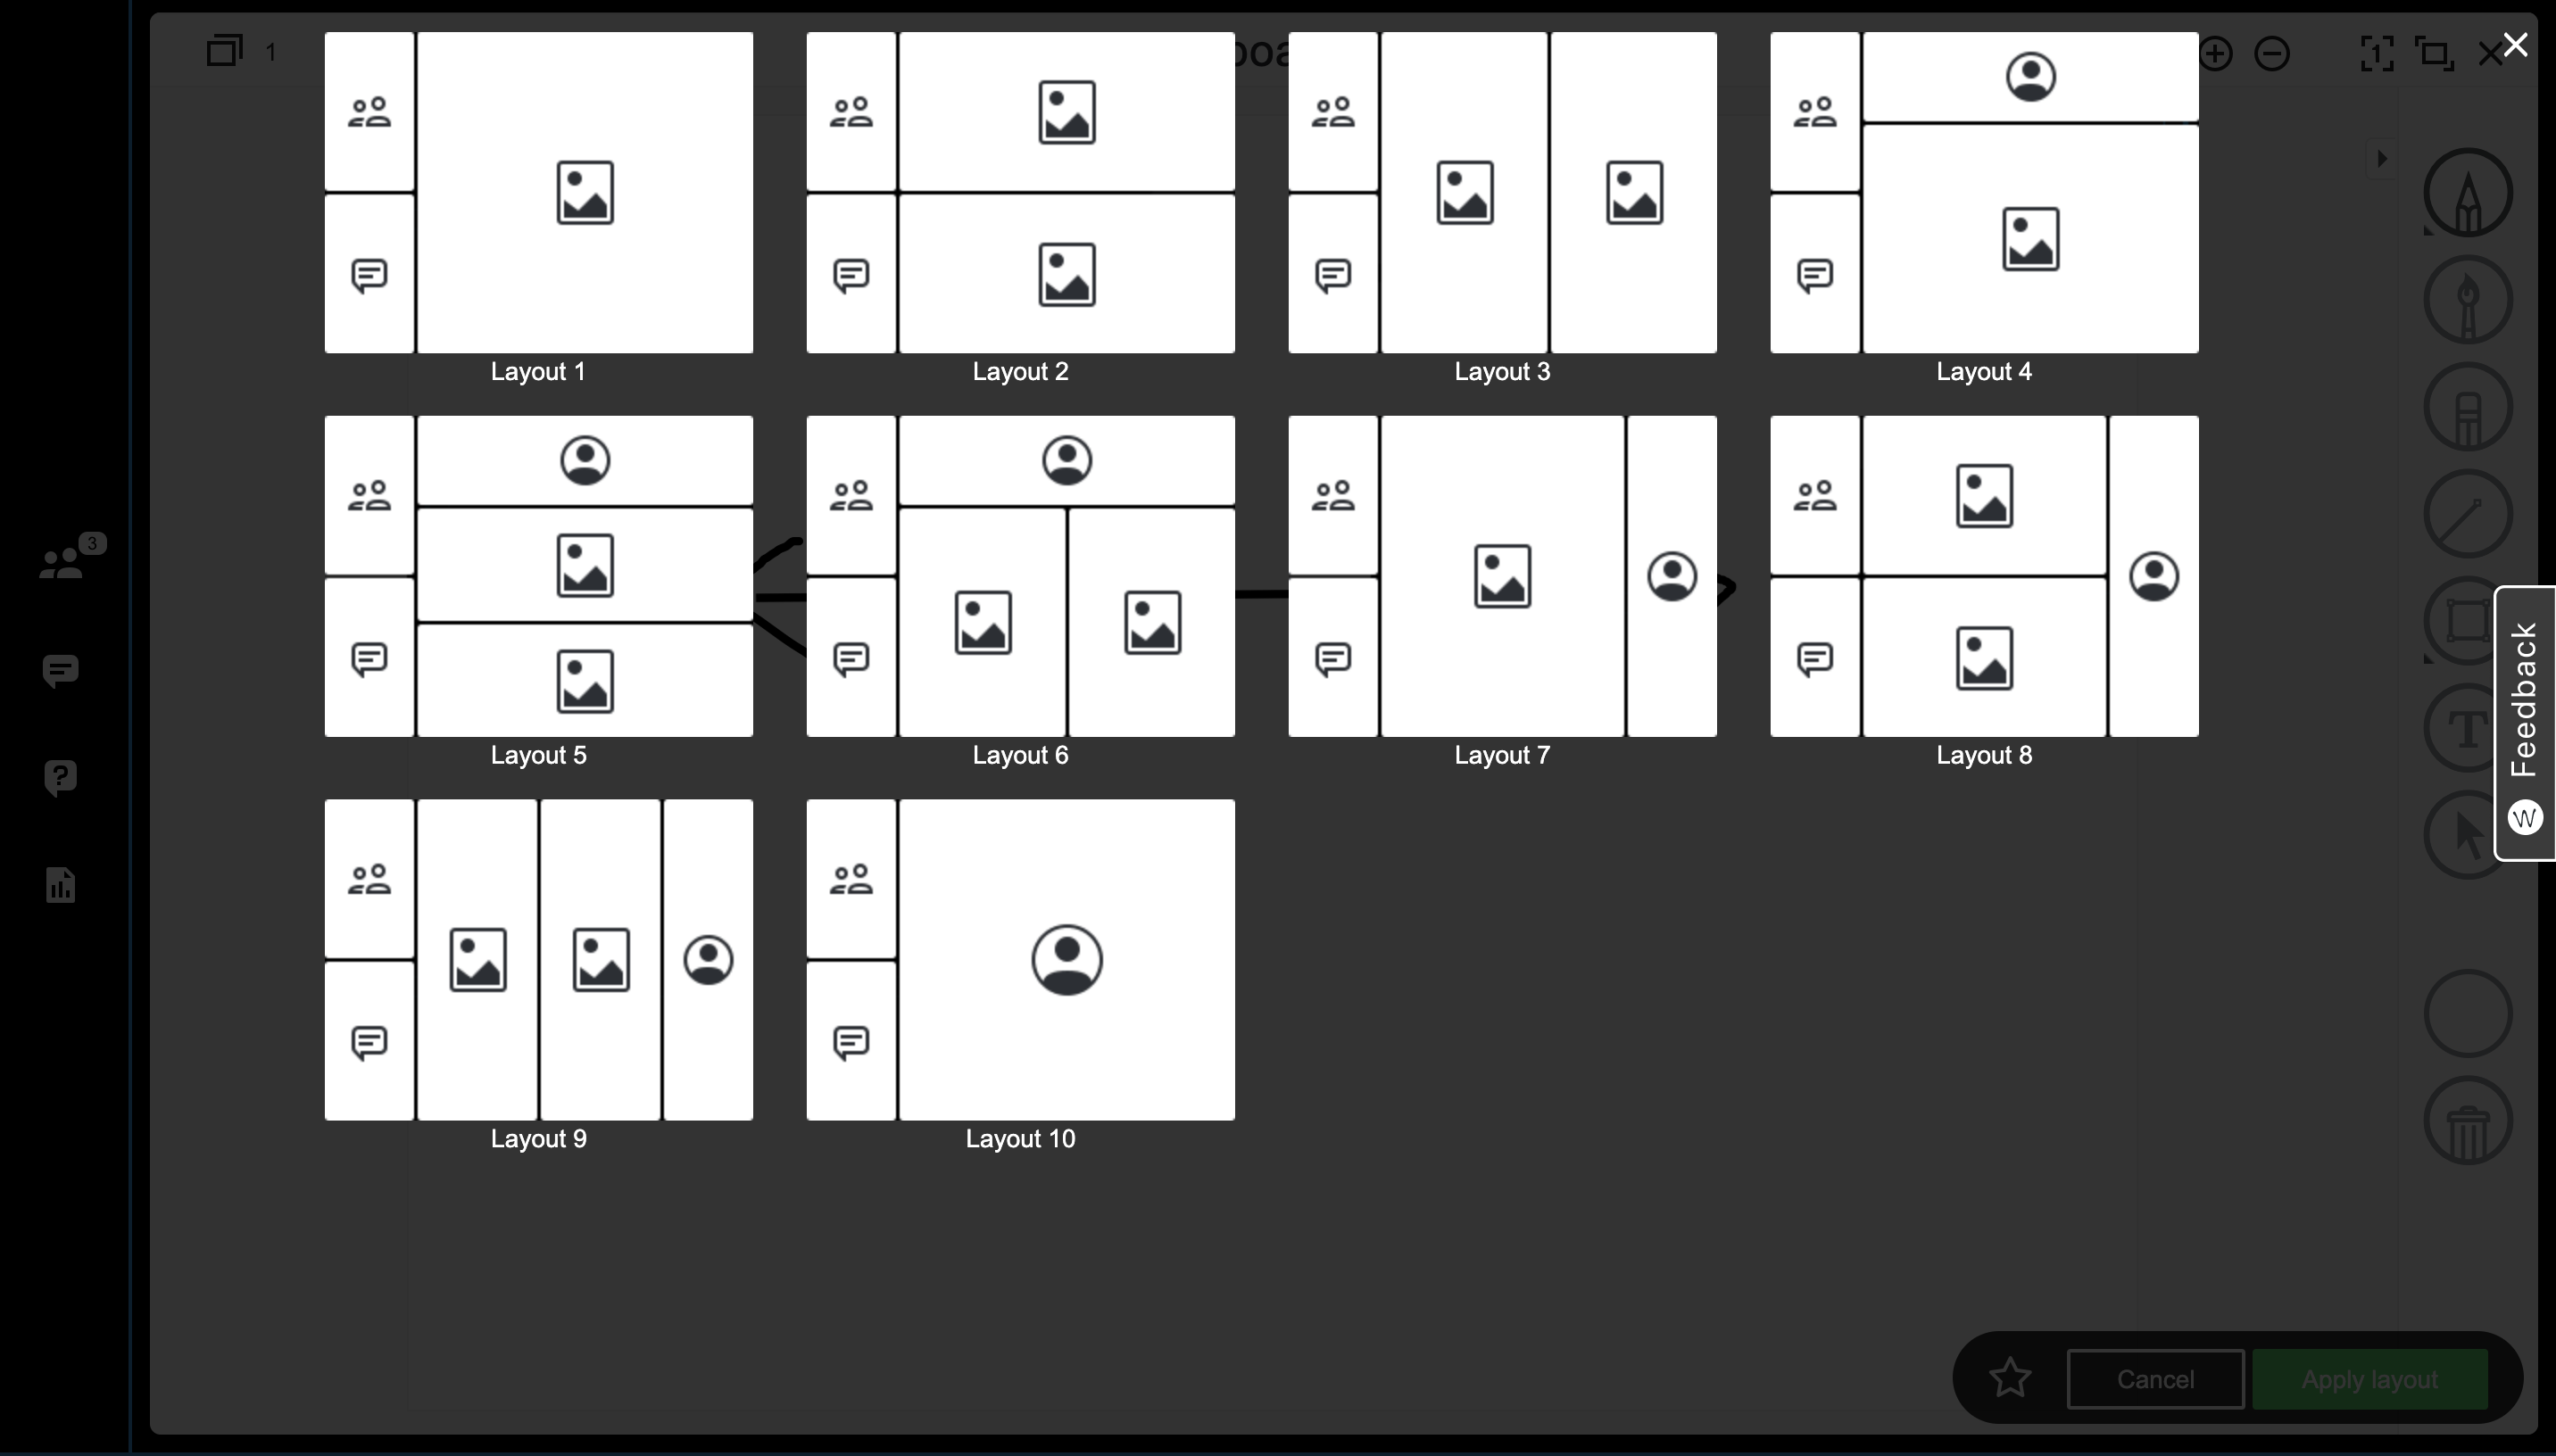
In the Layout mode, you can either arrange menus manually or choose one of the 10 predefined layout templates
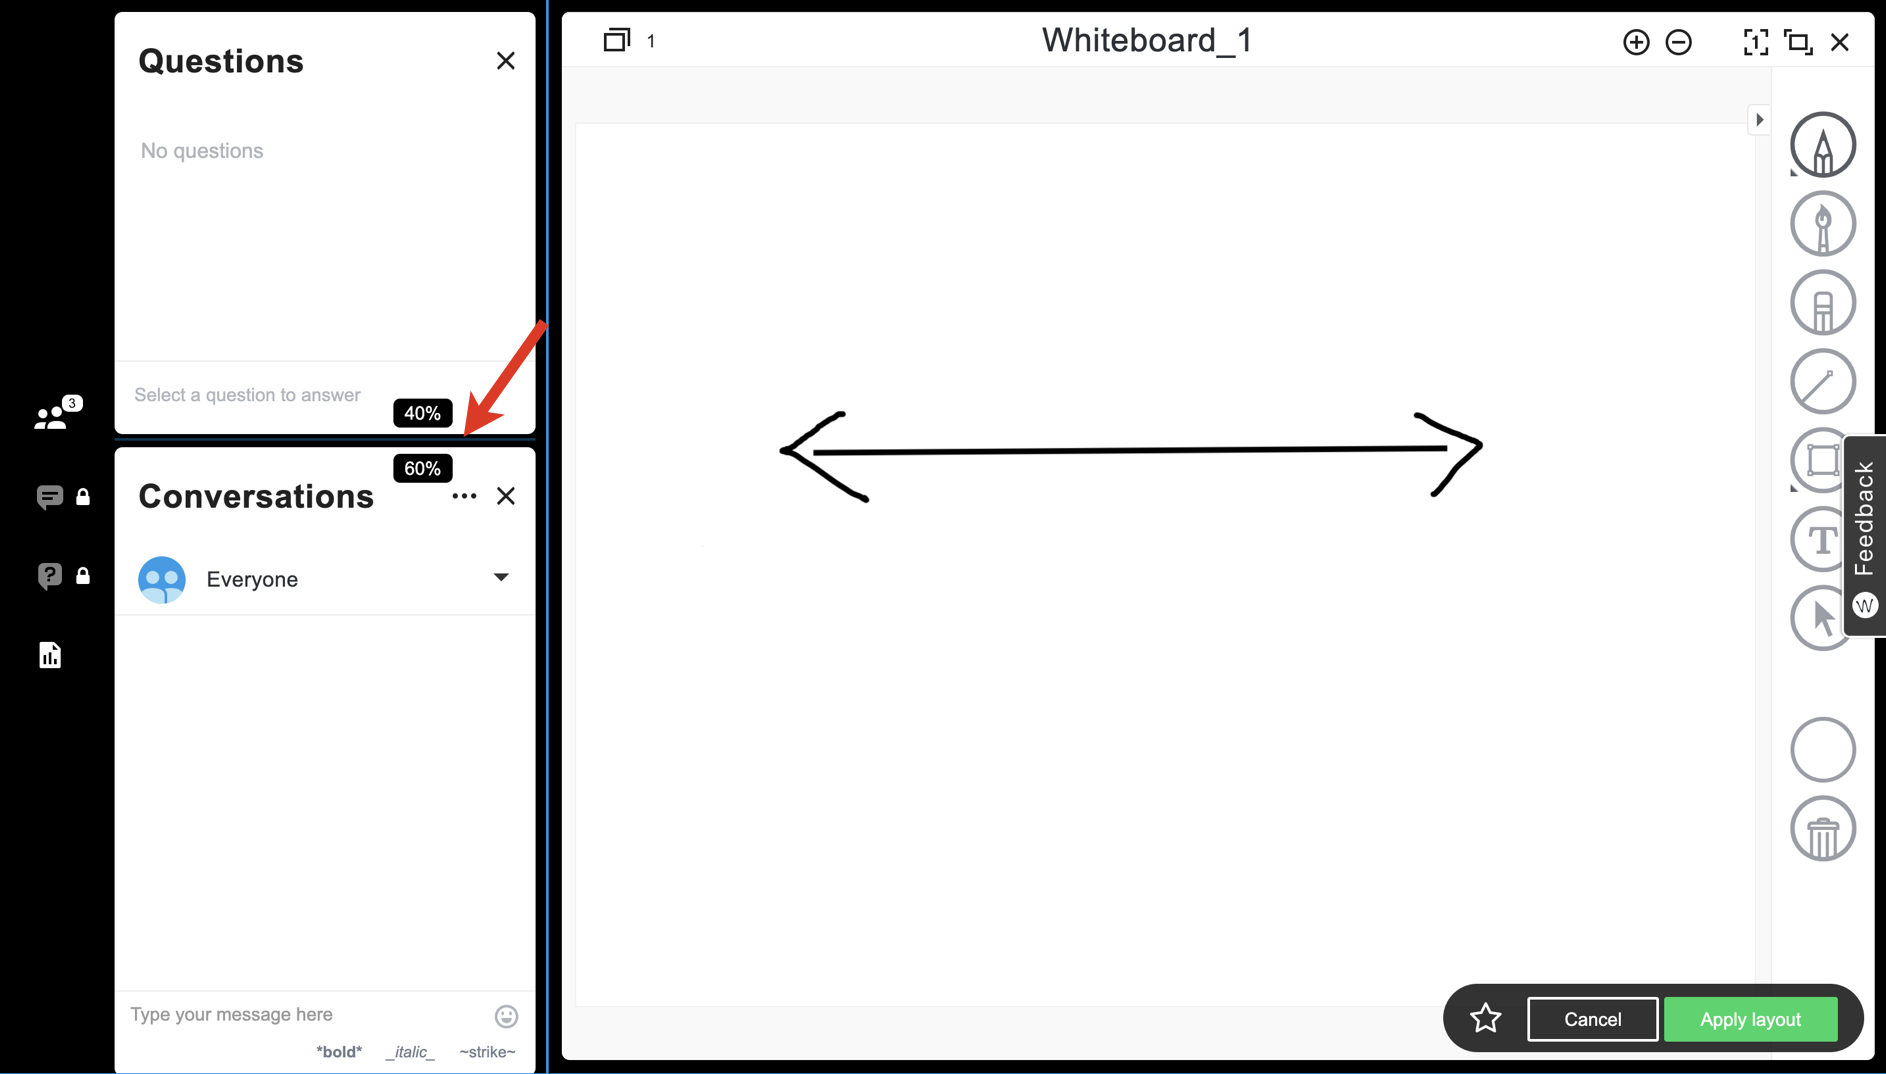
For manual arrangement, select the menus that you would like your Participants to view: Participants, Questions & Answers, Conversations, Content library
If you want to choose one of predefined layout templates, click the star icon to the left of the Apply layout and Cancel buttons:

Choose the preferred layout template:
Remember that you can also resize and rearrange the elements of your workspace (explained in chapter Change layout). For example:
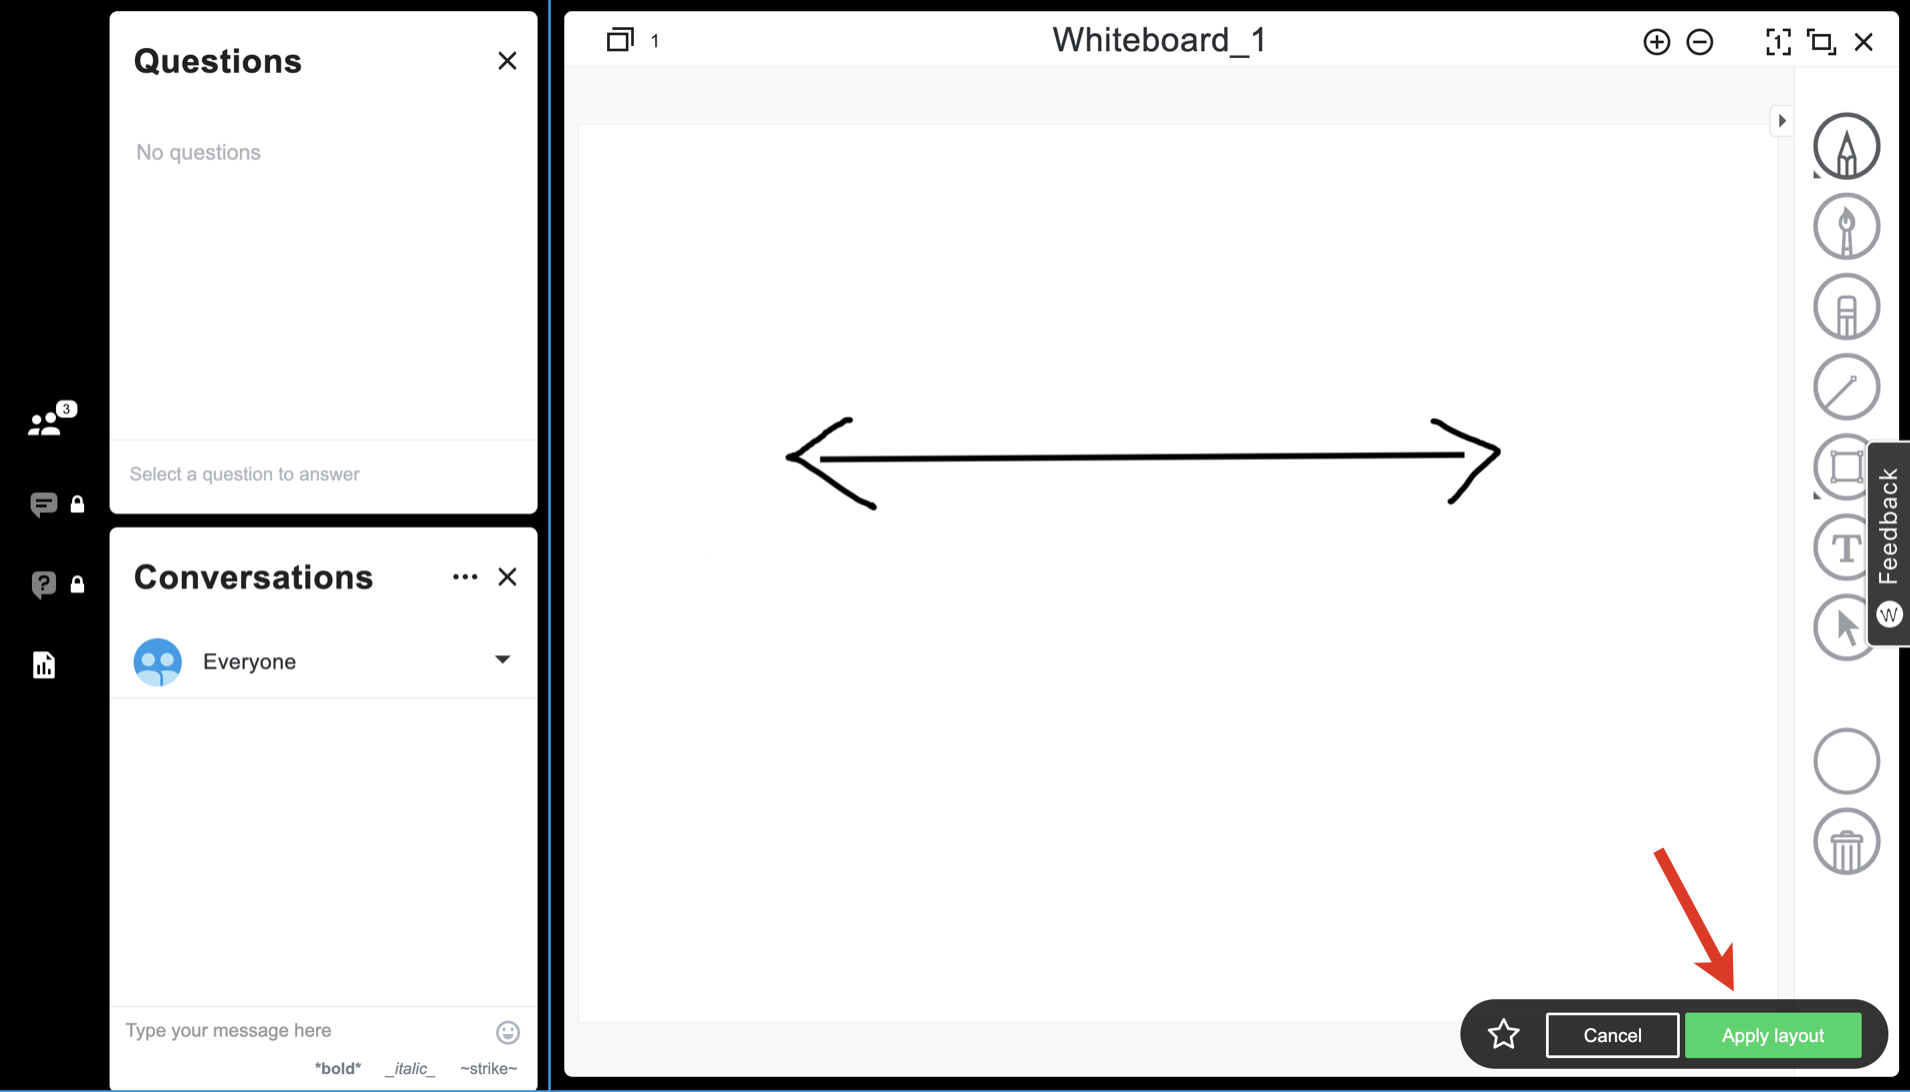
- When you are happy with the layout, click Apply layout in the bottom right-hand part of the screen
Remember that the Audience can only see the locked menus. In the example below, Audience can only access Conversations and Questions & Answers, but they can't access Participants and Content library. As a Speaker, you can still access other menus (for example, Participants, Conversations, Questions and Answers, Content Library) even if they are not pinned in Forced layouts. 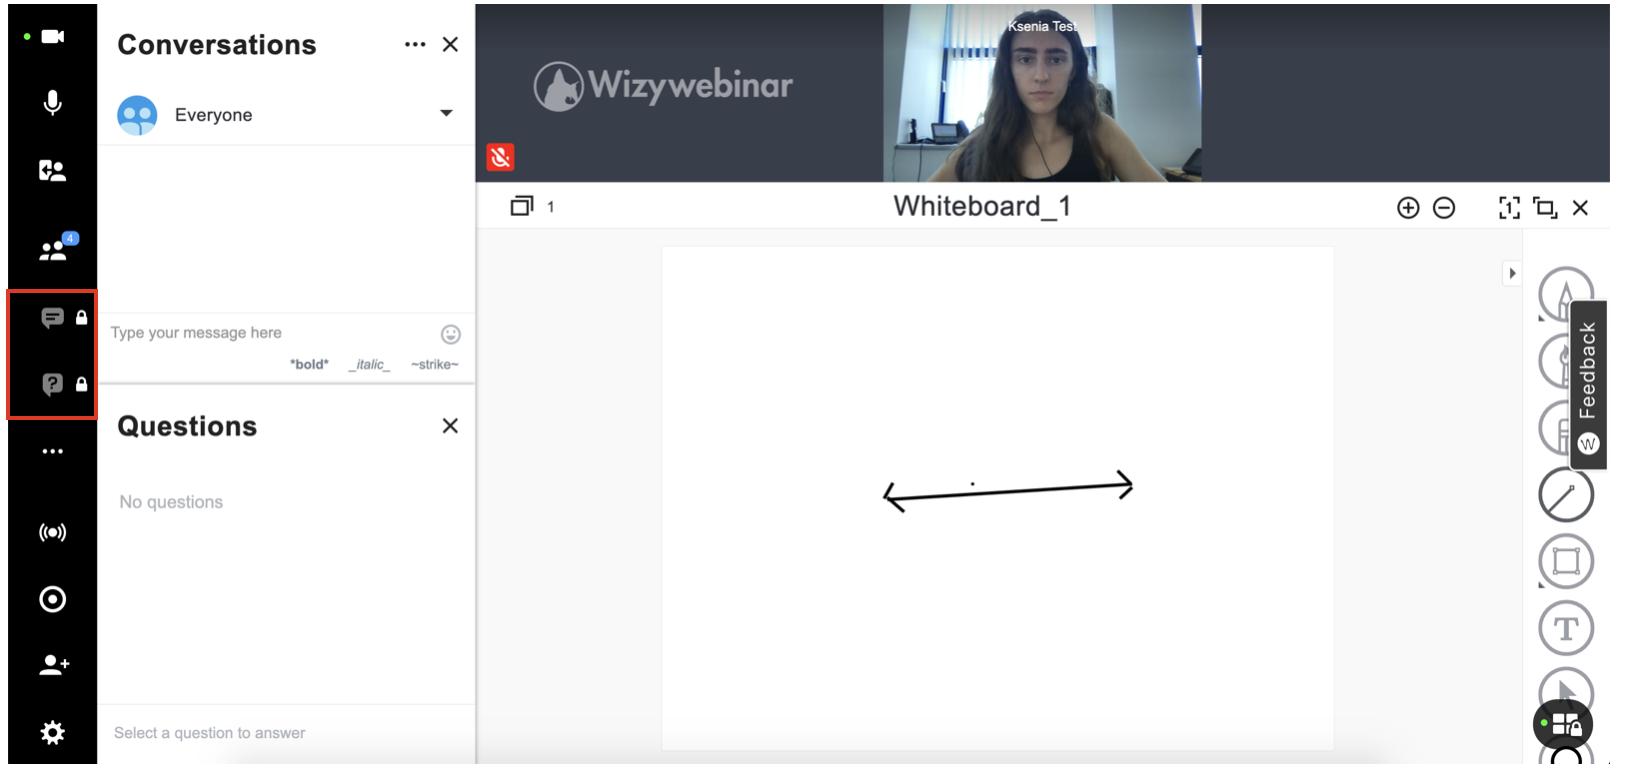
To change forced layout (Option 1):
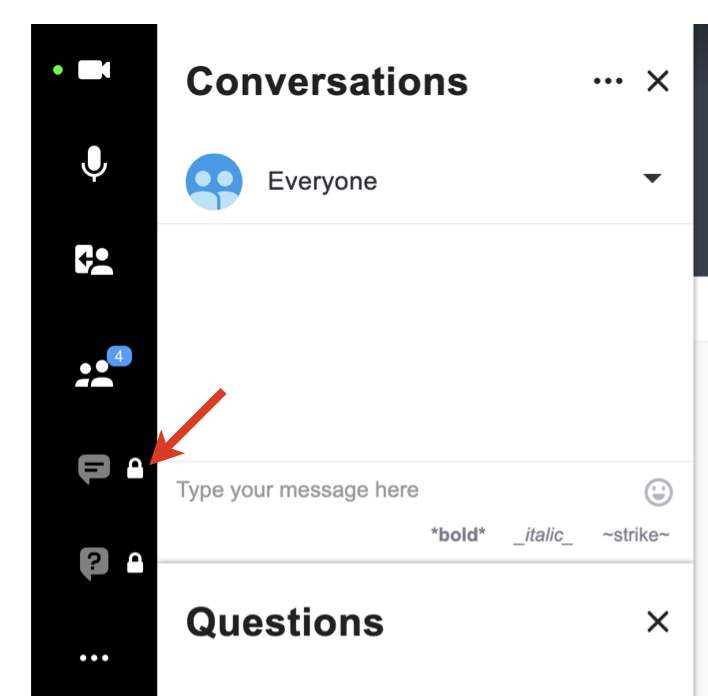
Click on one of the locked menus (if any):
- Rearrange your layout
Click Apply layout in the bottom right-hand part of the screen:
To change (Option 2) or exit forced layout:
- Hover the mouse on the Locked tiles icon in the bottom right-hand part of the screen
Click on Create layout to change your forced layout. Click on Exit layout mode to exit the forced layout:

Statistics
Download the list of attendees
In Collaboration -> Webinar tab:
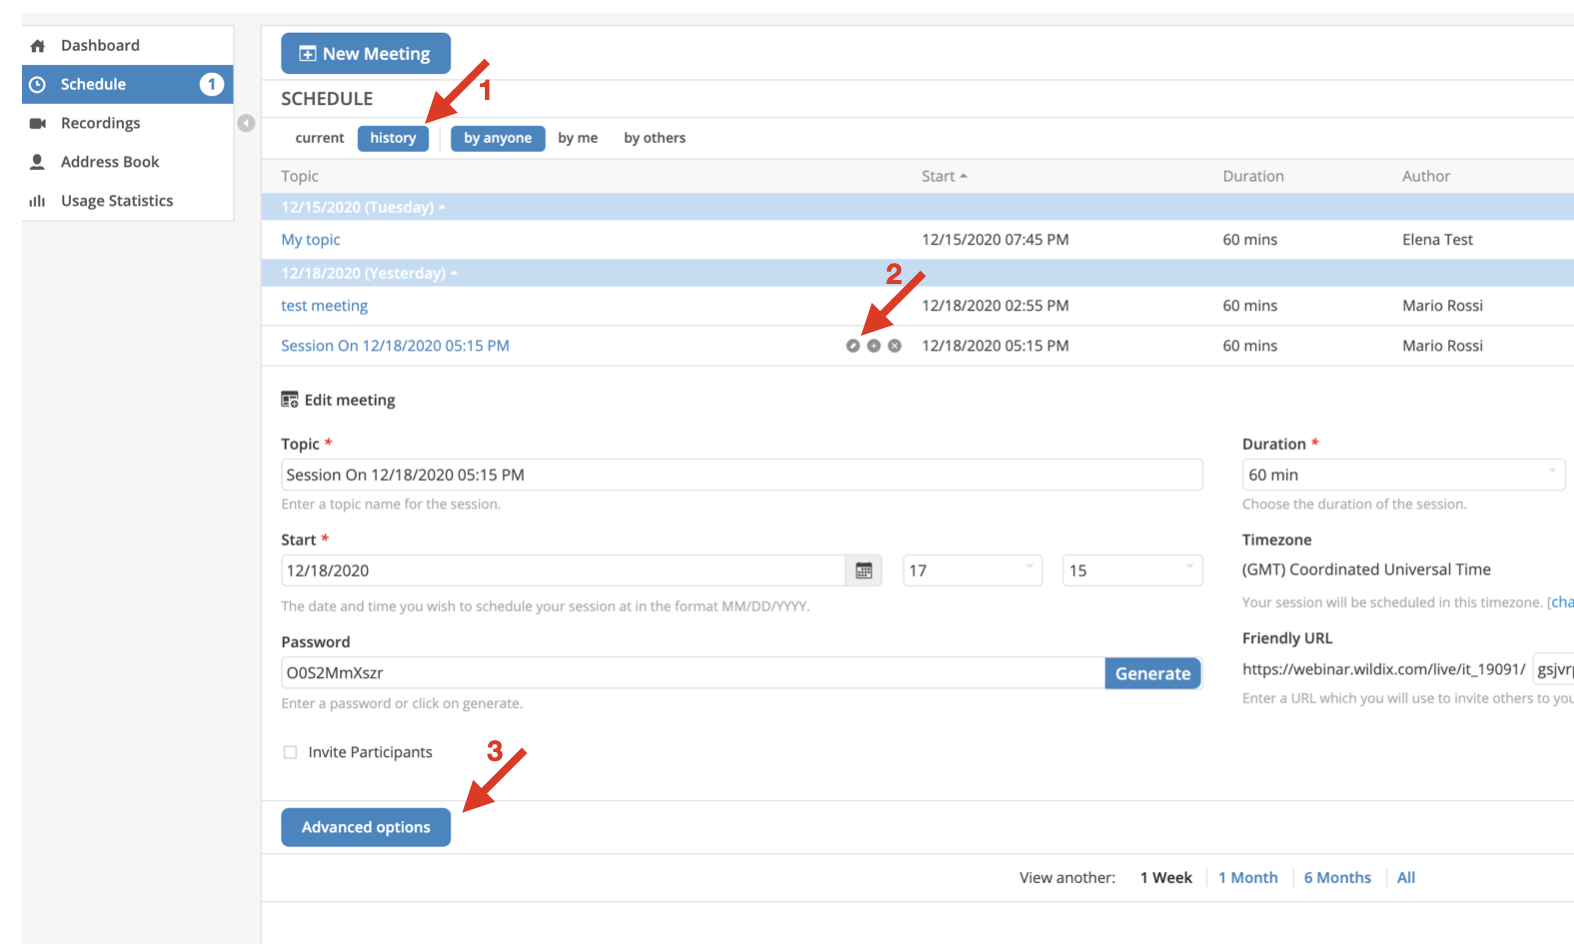
- Click on the Schedule tab from the left panel and then hit history tab. In this menu you can view all the past webinar sessions
- Hover the mouse cursor over a webinar and then click on the Pencil icon
Click Advanced options:
Open the Reports tab. Here you can see a short Summary Report and download it in CSV or Excel:
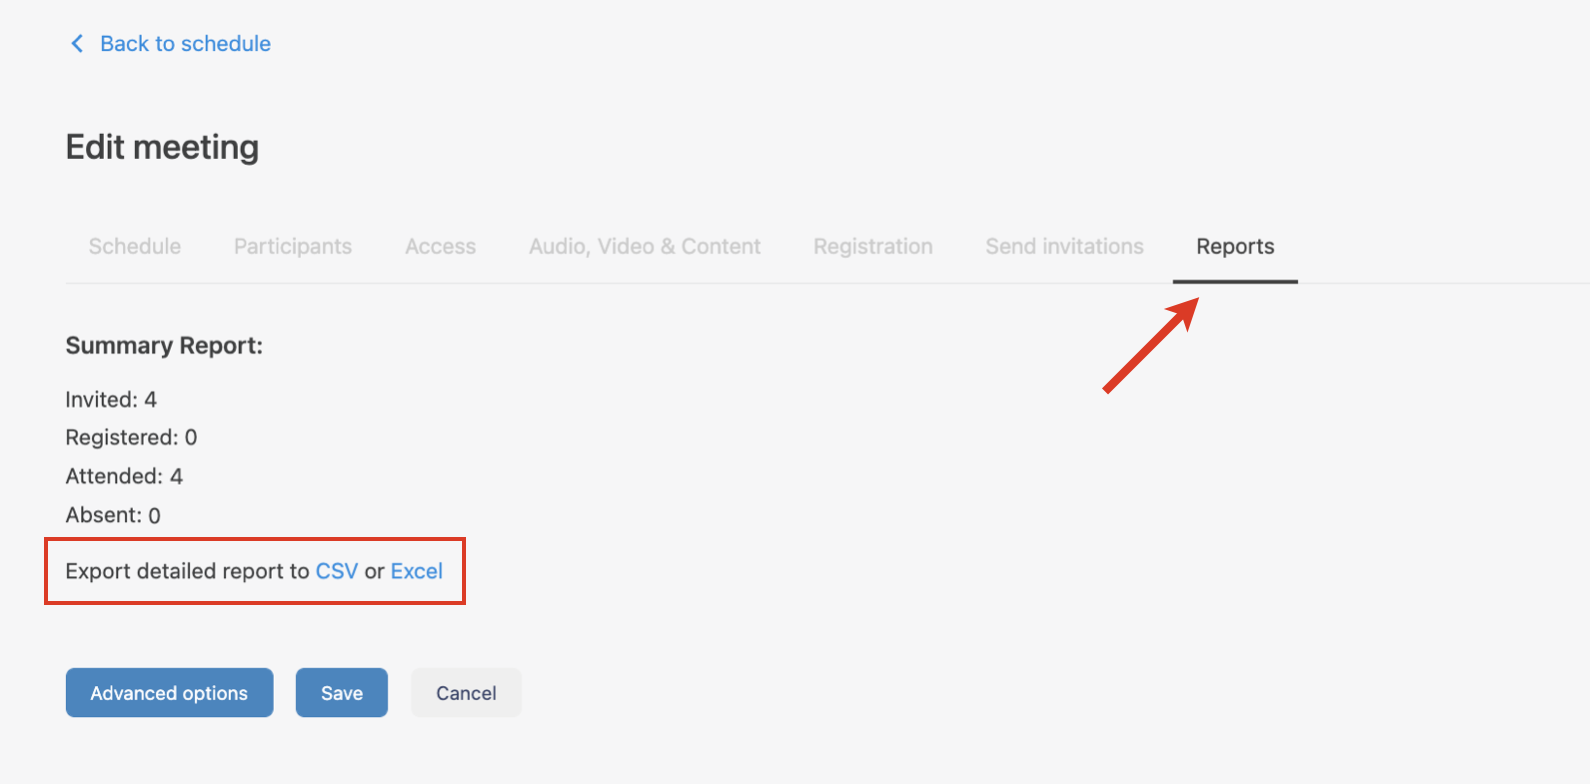
In the report, you can find information about attendees: whether they were invited, registered, or joined as guests, whether they attended or missed the webinar, as well as the details they provided when registering or joining the webinar.
Also, if Questions & Answers and/or Polls were used during the webinar, the relevant reports with QAs and Polls results are also available for download in CSV or Excel format. They include the following information: the questions, the answers, the date and time asked, users who asked and answered the question, public vote details if any, etc.
Usage stats
In Collaboration -> Webinar tab, open the Usage Statistics tab located on the left panel. Here you can see the total duration of connections per day and the total number of users joining across all sessions per day: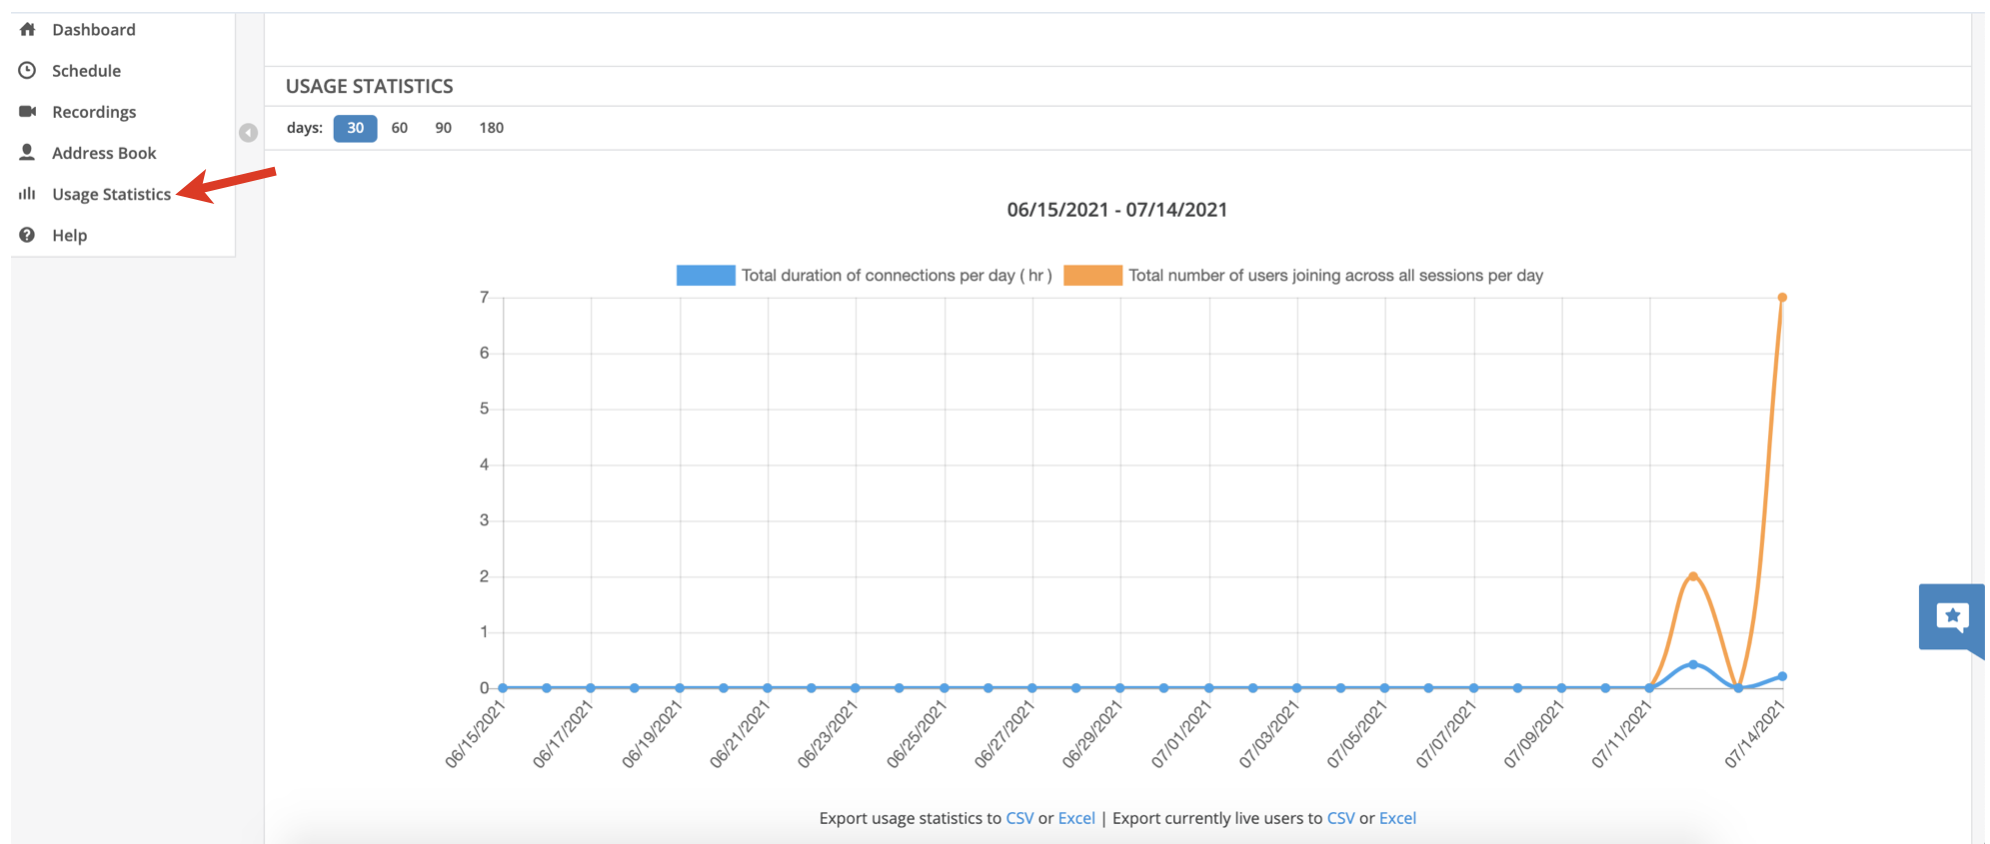
- Click on plot points to see the detailed report: the overall duration of participants' staying in a particular webinar session and the exact time the joined and left the session:

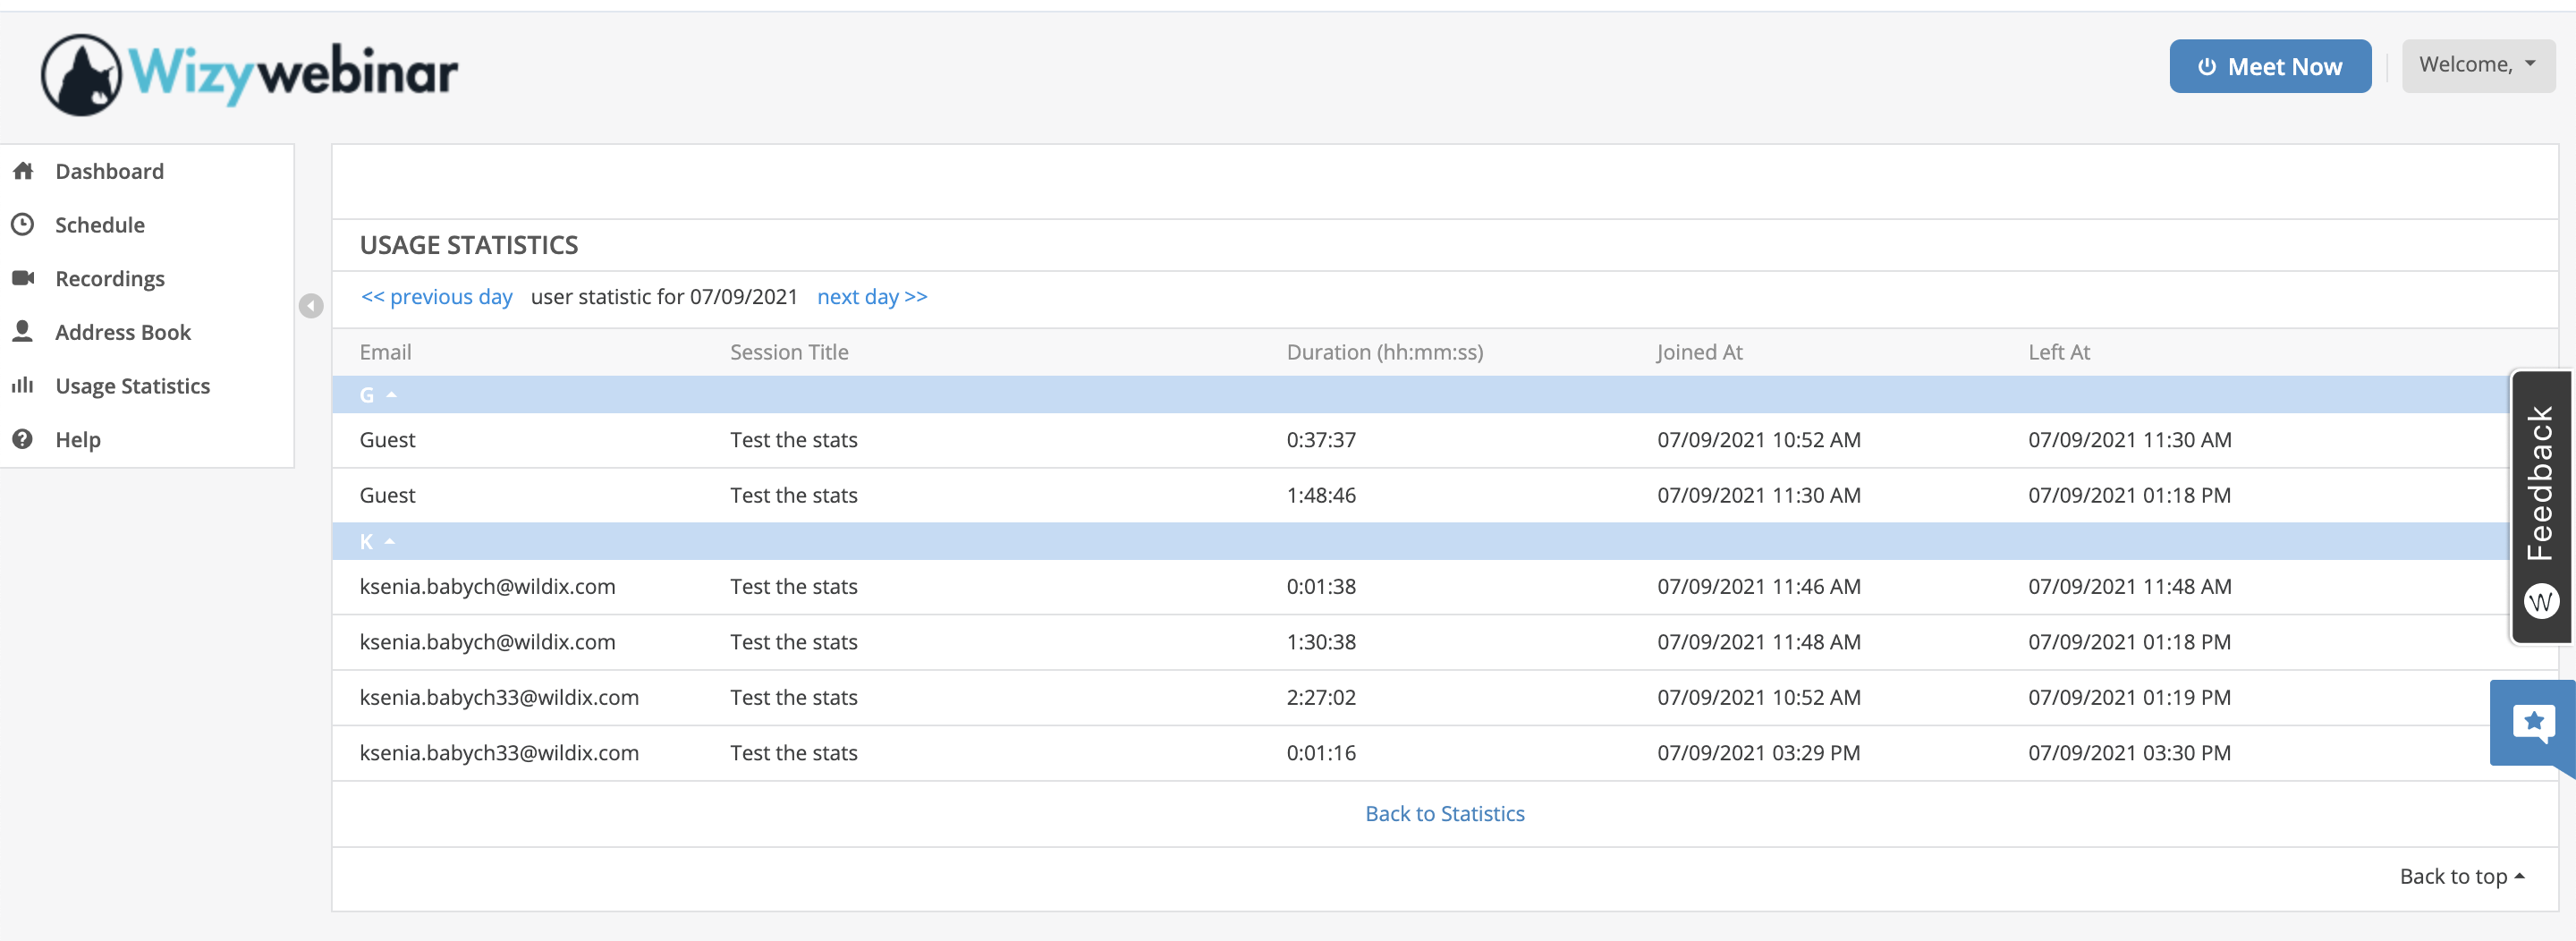
You can export usage statistics to CSV or Excel file by clicking on the relevant option under the chart. The exported report includes the following information: session title and ID, scheduled date and time, user ID, first and last name, email, role, duration, and time when user joined and left. 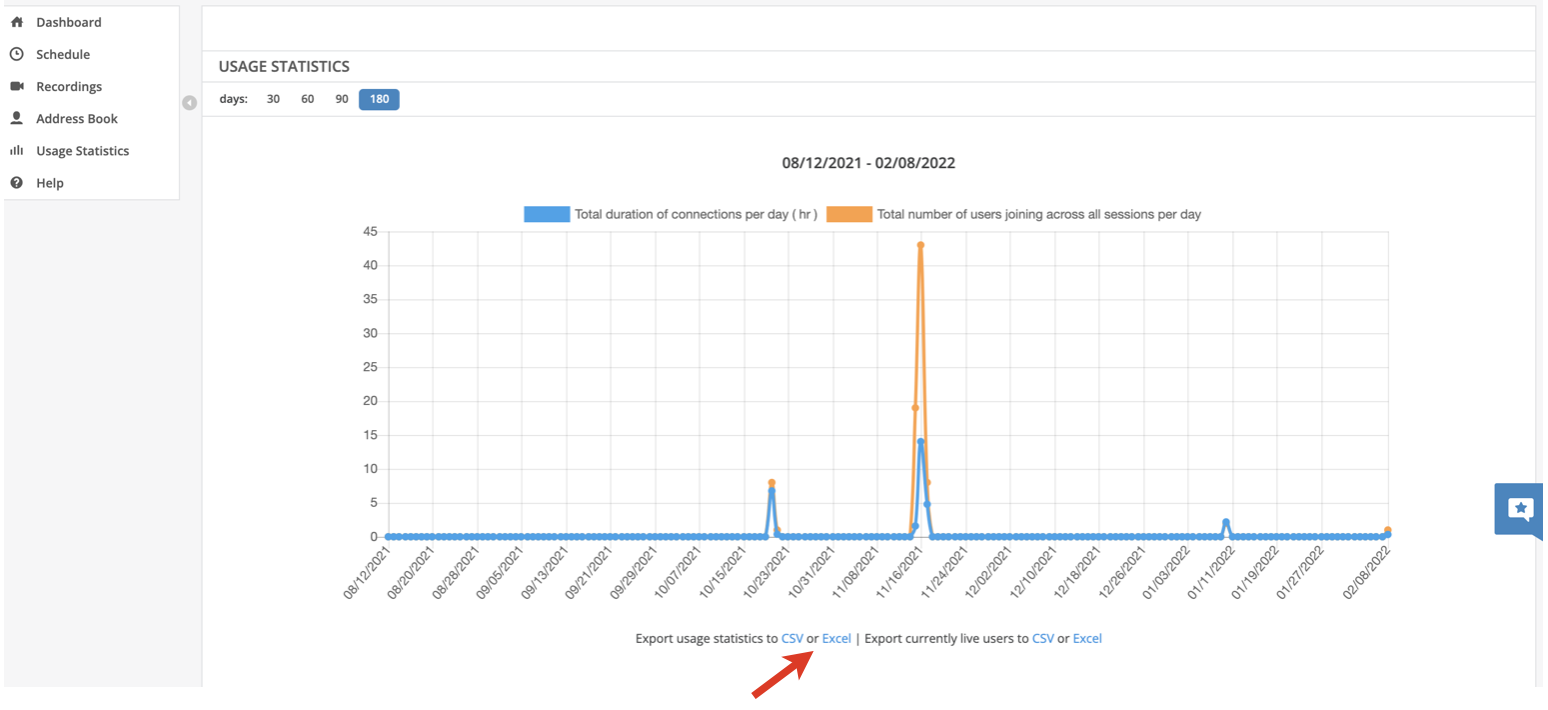
Besides, the same report in CSV or Excel file is available about users who are currently live: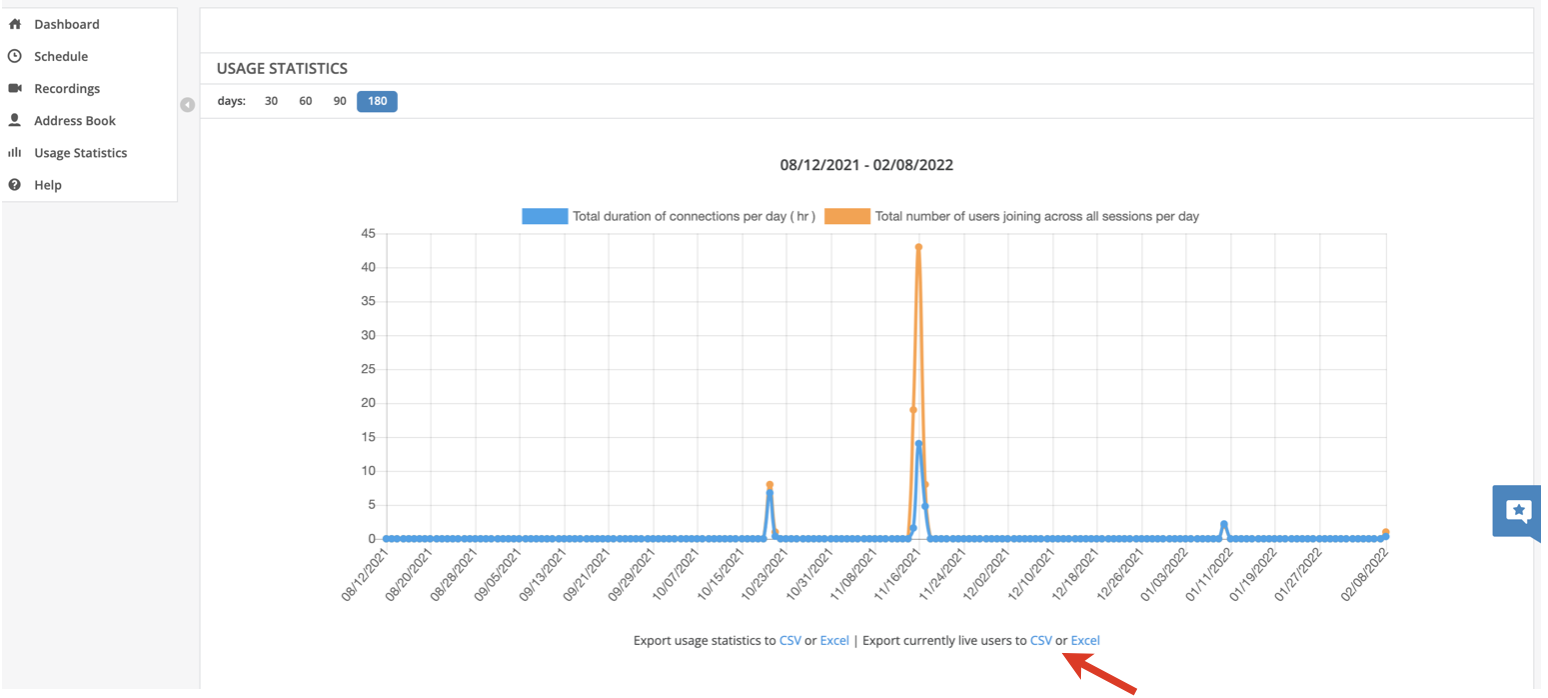
Integration with Wizyconf HW Station
Starting from Wizyconf App v 1.2.16, Wizyconf Station integrates with Wizywebinar, consult this documentation for details.
Other functionality
Protect sessions with end-to-end encryption (E2EE)
Starting from v. 5.42.4, there is an option to protect sessions with end-to-end encryption (E2EE), which ensures that both audio and video streams, including screen share, are not being read or secretly modified by anyone other than the actual senders and their recipients.
The feature is available upon request only. The request should be sent to denis.popov@wildix.com.
Note: E2EE is not compatible with Recordings, Live Streaming. E2EE is also not compatible with mobile - mobile users won't be able to join encrypted sessions.
Emoji Reactions
Note: The feature is available upon request only. The request should be sent to denis.popov@wildix.com.
To enable emoji reactions, follow the below steps:
- Click on the Gear icon from the left panel -> select Workspace
- Check the box next to Enable emoji reactions:
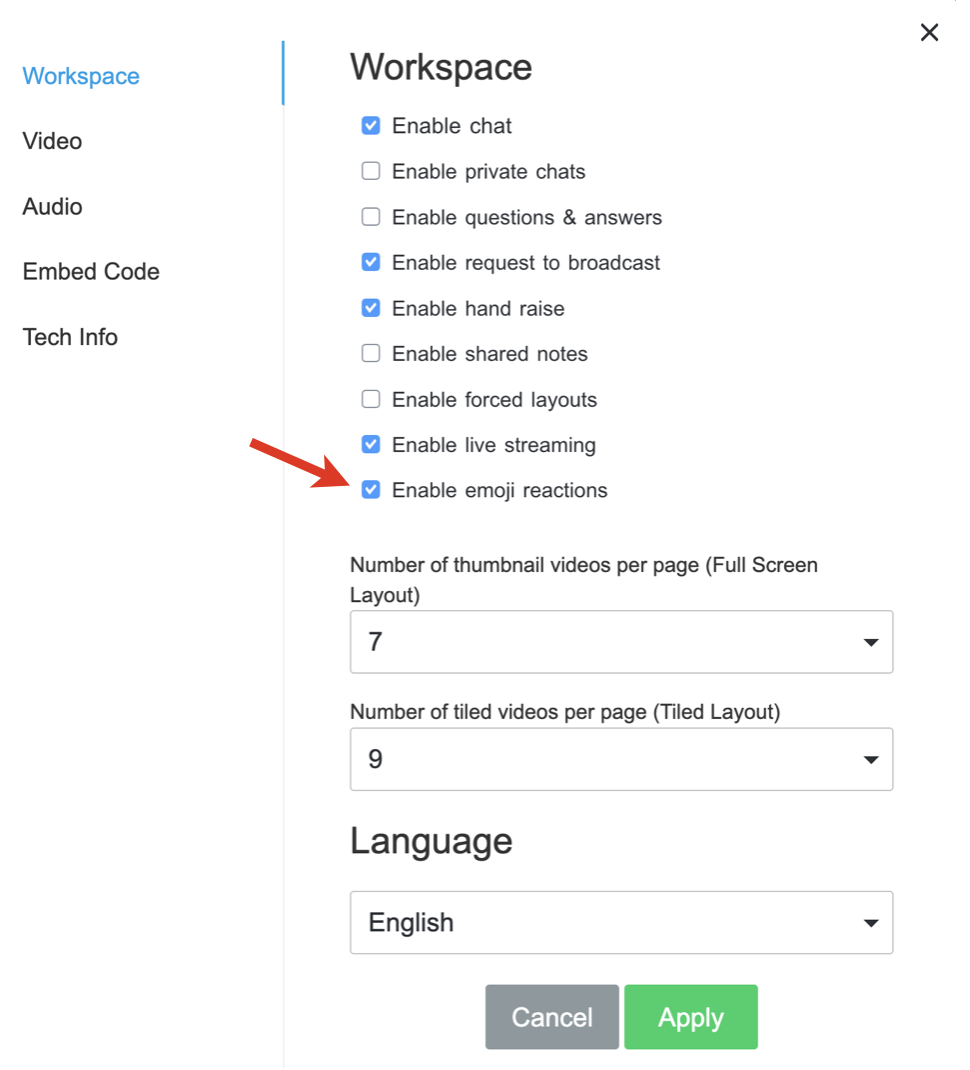
- Click Apply.
Once Emoji Reactions is enabled in Workspace Settings, you can access them by clicking the three dots icon on the left side of your screen (1) and select the Emoji Reaction icon (2):
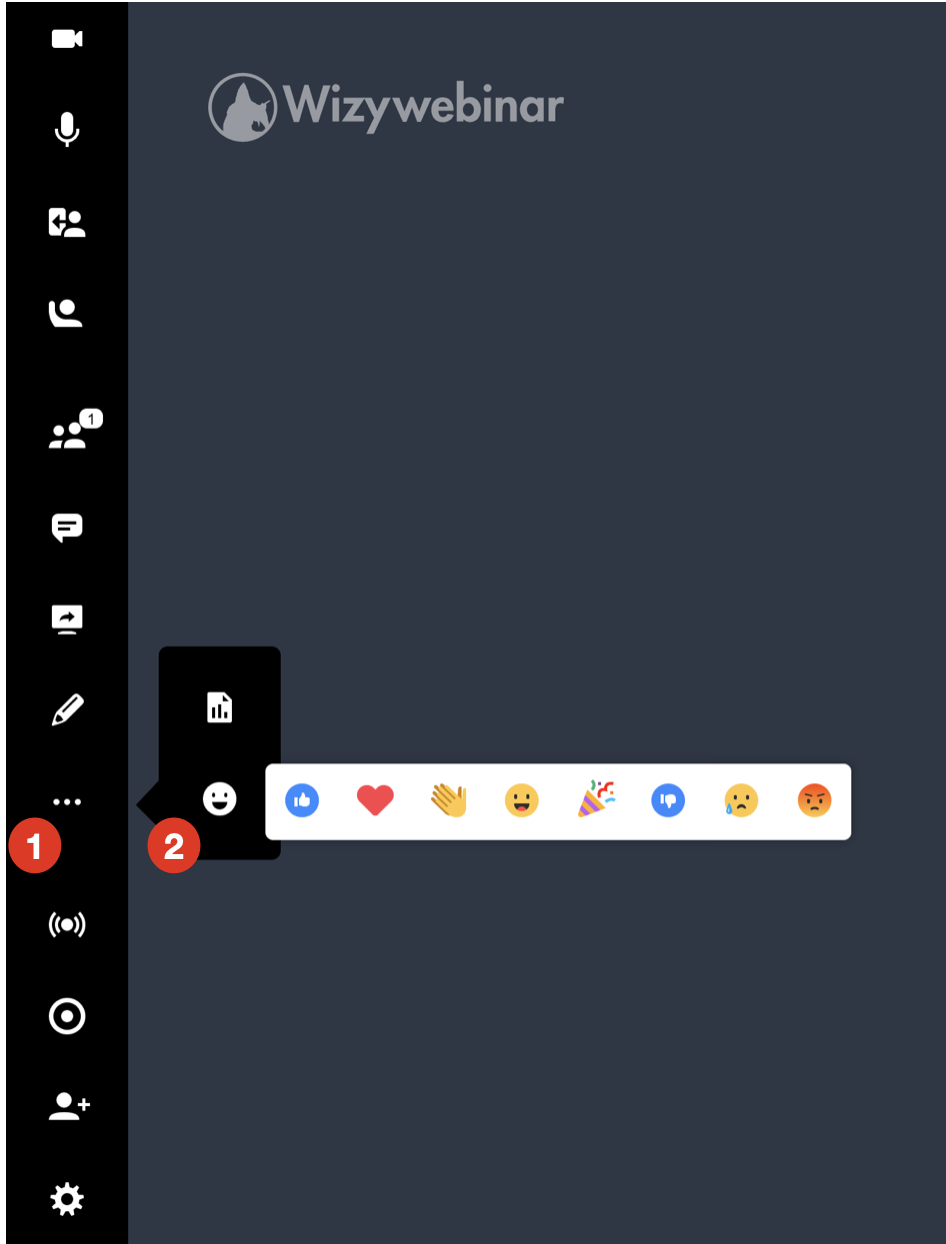
Select the reaction you find more suitable for the situation, and click on it. Sent reactions appear at the bottom of the page: