| Html |
|---|
<div id="fb-root"></div>
<script>(function(d, s, id) {
  var js, fjs = d.getElementsByTagName(s)[0];
  if (d.getElementById(id)) return;
  js = d.createElement(s); js.id = id;
  js.src = 'https://connect.facebook.net/en_US/sdk.js#xfbml=1&version=v2.11';
  fjs.parentNode.insertBefore(js, fjs);
}(document, 'script', 'facebook-jssdk'));</script> |
| Html |
|---|
<div class="fb-like" data-href="#" data-layout="button_count" data-action="recommend" data-size="large" data-show-faces="true" data-share="true"></div> |
| Html |
|---|
 <div class="lang-box-pdf">
	<div>
		<div class="google-lang">
			<div id="google_translate_element">
			</div>
			<script type="text/javascript">
					function googleTranslateElementInit() {
						new google.translate.TranslateElement({pageLanguage: 'en', includedLanguages: 'de,es,fr,it,nl', autoDisplay: false}, 'google_translate_element');
						}
			</script>
			<script type="text/javascript" src="//translate.google.com/translate_a/element.js?cb=googleTranslateElementInit"></script>
		</div>

		<div class="pdf-button">
			<a href="https://confluence.wildix.com/spaces/flyingpdf/pdfpageexport.action?pageId=103023906" alt="Convert to .pdf" title="Convert to .pdf"><img src="https://confluence.wildix.com/download/attachments/14549012/pdf-button-download-wildix-documentation.png"></a>
		</div>
	</div>
</div> |
| Info |
|---|
This guide explains how to configure Retail mode for x-hoppers – Wildix wireless headset solution that allows fast and easy communication for retail stores. Created: December 2021 Permalink: https://confluence.wildix.com/x/IgUkBg Other x-hoppers documentation: x-hoppers User Guide |
| Table of Contents |
|---|
Introduction
x-hoppers is a solution for individual and chain retail stores, that provides an active channel to colleagues and support anywhere in the store, connects clerks and increases in-store conversions. The solution is built on DECT (Digital Enhanced Cordless Telecommunications) technology, linked to a full communications system in the Cloud. Fully wireless x-hoppers headsets let clerks easily communicate with each other as well as receive calls.
x-hoppers users are connected to one conference in Retail mode (muted) by default. If any user wants to talk in the conference, they just need to press a button to unmute themselves. Besides, users can accept incoming calls, after which they automatically return to the conference.
Also, x-hoppers offers an integrated QR code system, which can provide store clerks with instant buyer alerts and let you gather data on customer engagement. The system logs each occasion of scanning a QR code by customer.
Requirements
- WMS 6.0 or higher
- License requirements: [ ? ]
- W-AIR Network components: W-AIR Base stations and repeaters. Amount depends on the store area and the number of users.
x-hoppers Headset Overview
1 - Microphone
2 - Mute button
3 - Call button
4 - Volume- button
5 - LED Indicator
6 - AUX Function button (Power On)
7 - Volume+ button
8 - Speaker
| Note |
|---|
Note: There are 2 button combinations that have to be pressed at the same time: Register - Call, Volume+ and Volume- Power off - AUX function, Volume+ and Volume- |
LED indicators overview
...
Color
...
LED indication
...
Status
...
Green
...
Short blink followed by long blink
...
Power Up
...
Fast short blink, repeated
...
Incoming call
...
Single short blink. Notification of call only via audio in HS
...
2nd incoming call, call active
...
Single short blink
...
In call
...
Long blink
...
Battery charging
...
Steady on
...
Battery charging, full
...
Red
...
Long blink followed by short blink
...
Power Down
...
Fast, short blink
...
Low battery
...
Steady on
...
Battery charging, low battery
...
Long blink
...
Registration failed
...
Single short blink repeated slow
...
Idle, out of range
...
Blue
...
Short blink repeated fast
...
Registration, ongoing
...
Long blink
...
Registration completed
...
Single short blink repeated slow
...
Idle, connected
...
Purple
...
Steady on
...
Menu
...
None
...
Deregistered
Default settings
The following default settings apply to x-hoppers headsets in the Retail mode:
...
Multi-charger overview
Multi-charger consists of 6 chargers connected in parallel with a 5V/ 4A power supply and can simultaneously charge up to 6 headsets.
1 - Charging pins
2 - Charger connection
Using the charger
When charging a Headset for the first time, it is necessary to leave it in the charger for at least 10 hours before the battery is fully charged, and the Headset is ready for use.
For correct charging, ensure that the room temperature is between 5°C and 45°C / 41°F and 113°F. Do not place the Headset in direct sunlight when charging. The Headset is automatically deactivated and can’t receive calls while charging.
Activation
1. Configure Retail mode on the PBX
It will be possible to enable Retail mode on the PBX side, so Retail mode is automatically activated for all headsets registered on the PBX.
The documentation will be updated soon, once the settings are available.
2. Set up multicell DECT Network
First of all, you need to install and provision W-AIR Base stations and set up a multicell W-AIR DECT network. For detailed information and instructions on how to plan and configure multicell network, check this guide: W-AIR Network Admin Guide - Sync over LAN.
3. Register headsets
Before headsets can be assigned to specific users, they need to be registered to W-AIR Base Station.
| Warning |
|---|
Limitation: It is impossible to register a headset if the code of DECT network set up in WMS → Devices → W-AIR Networks is different from "0000" (default code). Workaround: you can temporarily change the code to default one ("0000") on the W-AIR Networks page in WMS, register and assign the Headset(s), and then change it back to the custom one. |
| Note |
|---|
Note: in case you have several W-AIR networks (for example, in a test environment), the Headset might register to a Base station belonging to another network. In such a situation it’s recommended to hold the Headset closer to the Base station you would like to register it to. |
...
The Headset connects to the Base Station. When the Headset is subscribed, the voice prompt announces “Headset subscribed”.
| Note |
|---|
Note: If the registration fails, the voice prompt announces “Headset not subscribed”. Before trying to register the Headset again, please check if it is within range of W-AIR Base station and the voice prompt announces “Registering”. |
...
4. Assign headsets to PBX users
Headsets can be assigned to users via the W-AIR devices tab in WMS, where you can find the list of all x-hoppers headsets:
- Go to WMS -> Devices -> W-AIR devices
- Choose the headset and click Assign to user
- Enter user extension and click Save.
| Note |
|---|
Note: After assigning headsets to users, to figure out which headset belongs to whom, you can dial users’ extensions and see which headsets respond. |
Assigning headset to a different user
- Choose the headset on the W-AIR devices tab -> click Assign to user
- Enter a different extension and click Save.
Deassigning a headset
- Choose the headset on the W-AIR devices tab -> click Assign to user
- Select “unknown” in the Extension field and click Save.
| Note |
|---|
Documentation: WMS Start Guide: Devices management |
5. Configure Dialplan
Modify the users dialplan as follows:
...
Enter *wair*
| Note |
|---|
Note: It is the value which is dialled by the headset in the Retail mode. This value is default and should not be changed. |
...
- Set -> Language -> choose language
- Play sound -> click Browse (three dots) and choose the sound to be played on joining the conference
- Conference -> enter the conference room ID number. This can be any number, e.g. 1, 2, 3, etc.
...
6. Configure auto-reconnect
The configuration is required for x-hoppers headsets to automatically rejoin the conference after charging or in case they unexpectedly drop out of the conference for any reason. For this, you need to enable the wair-retail-helper service. It also allows to:
- Automatically add headset to the Conference room when it’s registered to the base and assigned to a user
- After a specified timeout, return device from hold
If a user has a call with another user, and it is put on hold, the PBX returns this call from hold automatically, if there are no other calls for the headset except for the conference call.
By default, the wair-retail-helper service is disabled. To enable it, follow the below instructions to configure the service:
...
11 (means Shell, type it in Enter an option line)
su
wildix (Password line)
...
USER_AGENT="Wildix W-AIR-SP/HS"
CONF_EXTEN="*wair*"
TIMEOUT="10"
Where:
- USER_AGENT is the SIP user agent of the headset. It consists of two parts, one referring to the base station (Wildix W-AIR-SP), and the other stands for the headset (HS).
| Note |
|---|
Note: Make sure the base station part corresponds to the base station you’re actually using. For example, for a headset registered to SBR2 base station, the user agent should be "W-AIR-SBR2/HS" |
...
Also, configure the service to be started automatically after reboot of the PBX:
...
Other commands to manage the service
- To stop the service:
systemctl stop wair-retail-helper- To check the service status:
systemctl status wair-retail-helperJoining the Conference from Other Devices
Wildix desk phones can also join the conference, as long as they are connected to the same PBX. There are two options:
- A user should dial the feature code for Conference access (98 by default) + the conference room number. Example: 981 for conference room number 1.
- Alternatively, a Dialplan can be configured so that when users dial a certain number, e.g. 333, the call is automatically put into the conference.
| Note |
|---|
Documentation: Dialplan Applications - Admin Guide |
...
| Scroll export button | ||||||||
|---|---|---|---|---|---|---|---|---|
|
| Info |
|---|
This guide explains how to configure Retail mode for x-hoppers – Wildix wireless headset solution that allows fast and easy communication for retail stores. Created: May 2022 Updated: May 2024 Permalink: https://wildix.atlassian.net/wiki/x/QB-OAQ Other documentation: x-hoppers User Guide, x-hoppers datasheet, x-bees documentation |
| Table of Contents |
|---|
Introduction
x-hoppers is a solution for individual and chain retail stores, that provides an active channel to colleagues and support anywhere in the store, connects clerks and increases in-store conversions. The solution is built on DECT (Digital Enhanced Cordless Telecommunications) technology, linked to a full communications system in the Cloud. Fully wireless x-hoppers headsets let clerks easily communicate with each other as well as receive calls.
x-hoppers users are connected to a broadcast, in Retail mode (muted) by default. If any user wants to talk in the broadcast, they just need to press a button to unmute themselves. Besides, users can accept incoming calls, after which they return to the broadcast.
Also, x-hoppers offers an integrated QR code system, which can provide store clerks with instant buyer alerts and lets you gather analytics on customer engagement. The system logs each occasion of scanning a QR code by customer. To set up the QR code system, you need to create dedicated pages on your web server, each page devoted either to a category of products or a separate product. Then, generate QR code for each of these pages, print and attach them wherever required in the store, letting customers request for assistance right on the spot. See more in the QR code system section of this guide.
Requirements
- WMS 6
- W-AIR Network components: W-AIR Base stations and repeaters. Amount depends on the store area and the number of users
Licensing
x-hoppers licenses can be ordered in Wildix Partner Community. The following licenses are available:
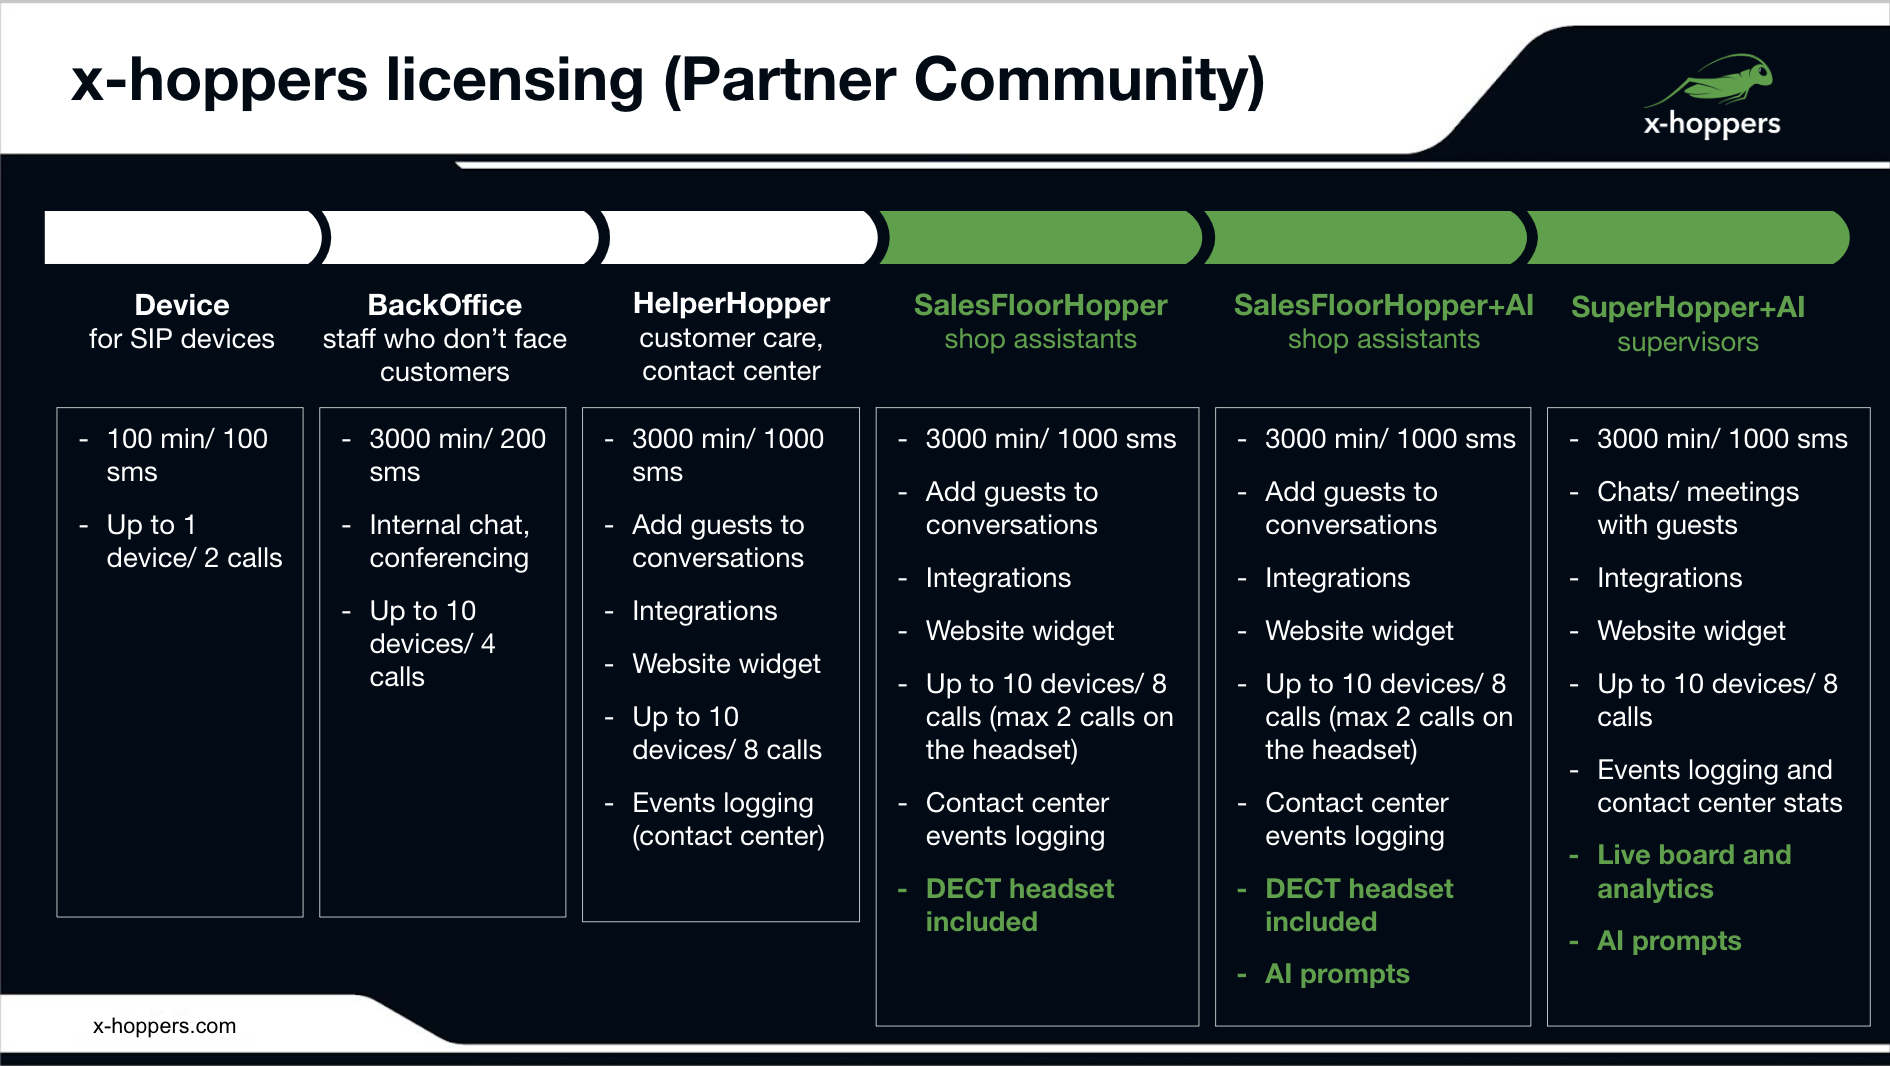
| Device | BackOffice | HelperHopper | SalesFloorHopper | SalesFloorHopper + AI | SuperHopper + AI | |
|---|---|---|---|---|---|---|
| Ideal for: | For SIP devices | Administration and support users who don't face customers | Customer care, contact center, users who need access to integrations | Retail assistants who work on the shop floor | Retail assistants who work on the shop floor | Managers and supervisors |
| Free minutes for outbound calls | 100 min | 3000 min | 3000 min | 3000 min | 3000 min | 3000 min |
| SMS included | 100 sms | 200 sms | 1000 sms | 1000 sms | 1000 sms | 1000 sms |
| Chats and videoconferencing | ➖ | ✅ | ✅ | ✅ | ✅ | ✅ |
| Using x-bees apps | ➖ | ✅ | ✅ | ✅ | ✅ | ✅ |
| Adding guests to conversations | ➖ | ➖ | ✅ | ✅ | ✅ | ✅ |
| Integrations | ➖ | ➖ | ✅ | ✅ | ✅ | ✅ |
| Personal contact-me link, meeting scheduler, website widget | ➖ | ➖ | ✅ | ✅ | ✅ | ✅ |
| Website widget setup | ➖ | ➖ | ➖ | ➖ | ➖ | ✅ |
| Max number of devices / calls | Up to 1 device / 2 calls | Up to 10 devices / 4 calls | Up to 10 devices / 8 calls | Up to 10 devices / 8 calls | Up to 10 devices / 8 calls | Up to 10 devices / 8 calls |
| Contact center events logging | ➖ | ➖ | ✅ | ✅ | ✅ | ✅ |
| DECT headset included | ➖ | ➖ | ➖ | ✅ | ✅ | ➖ |
| Internal broadcast channel | ➖ | ➖ | ➖ | ✅ | ✅ | ➖ |
Customer service powered by AI prompts | ➖ | ➖ | ➖ | ➖ | ✅ | ✅ |
Wallboard and analytics | ➖ | ➖ | ➖ | ➖ | ➖ | ✅ |
| Note | ||
|---|---|---|
Note:
|
x-hoppers Headset Overview
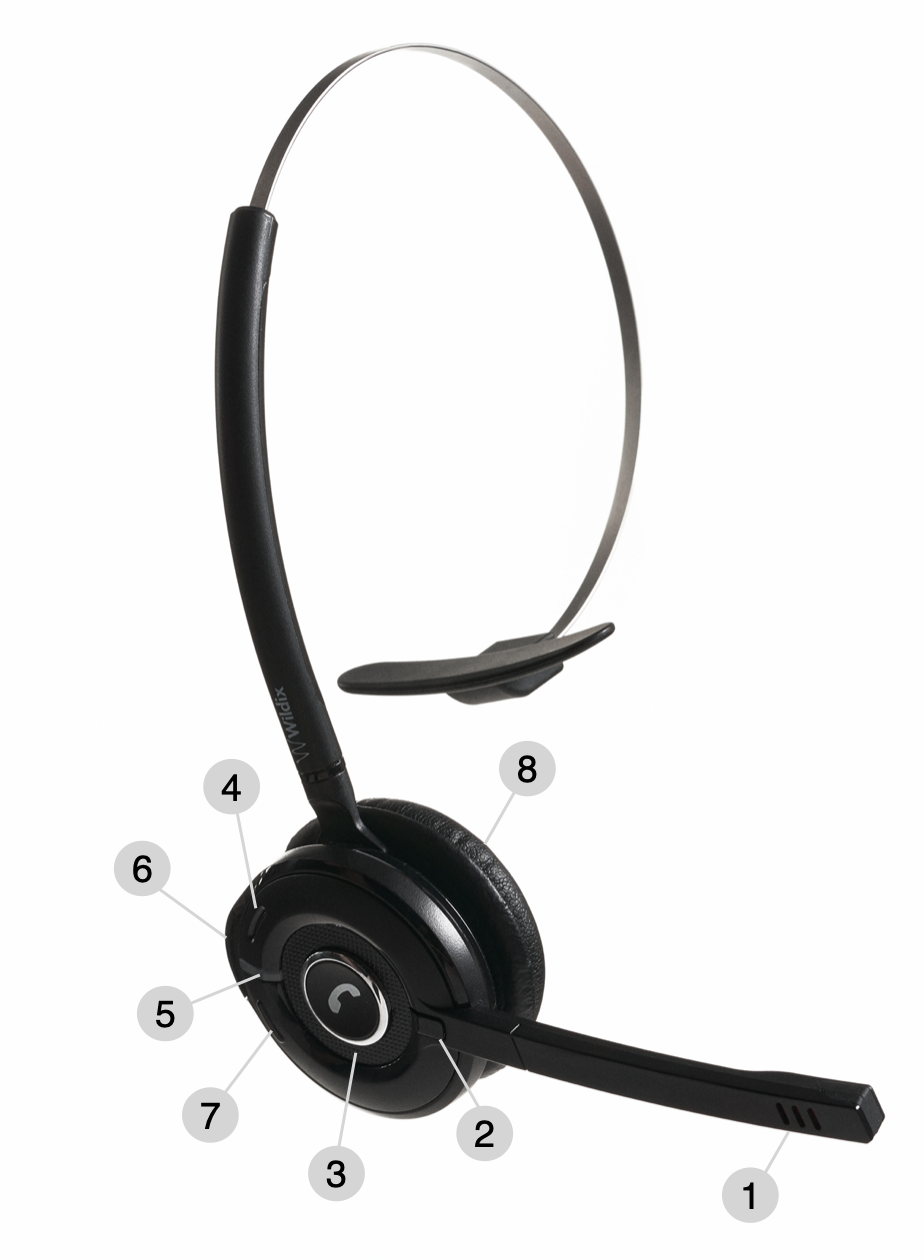
1 - Microphone
2 - Mute button
3 - Call button
4 - Volume- button
5 - LED Indicator
6 - AUX Function button (Power On)
7 - Volume+ button
8 - Speaker
| Note |
|---|
Note: There are 2 button combinations that have to be pressed at the same time: Register - Call, Volume+ and Volume- Power off - AUX function, Volume+ and Volume- |
LED indicators overview
Color | LED indication | Status |
Green | Short blink followed by long blink | Power Up |
Fast short blink, repeated | Incoming call | |
Single short blink. Notification of call only via audio in HS | 2nd incoming call, call active | |
Single short blink | In call | |
Long blink | Battery charging | |
Steady on | Battery charging, full | |
Red | Long blink followed by short blink | Power Down |
Fast, short blink | Low battery | |
Steady on | Battery charging, low battery | |
Long blink | Registration failed | |
Single short blink repeated slow | Idle, out of range | |
Blue | Short blink repeated fast | Registration, ongoing |
Long blink | Registration completed | |
Single short blink repeated slow | Idle, connected | |
Purple | Steady on | Menu |
None | Deregistered |
Multi-Сharger overview
Multi-Сharger consists of 6 chargers connected in parallel with a 5V/ 4A power supply and can simultaneously charge up to 6 headsets.
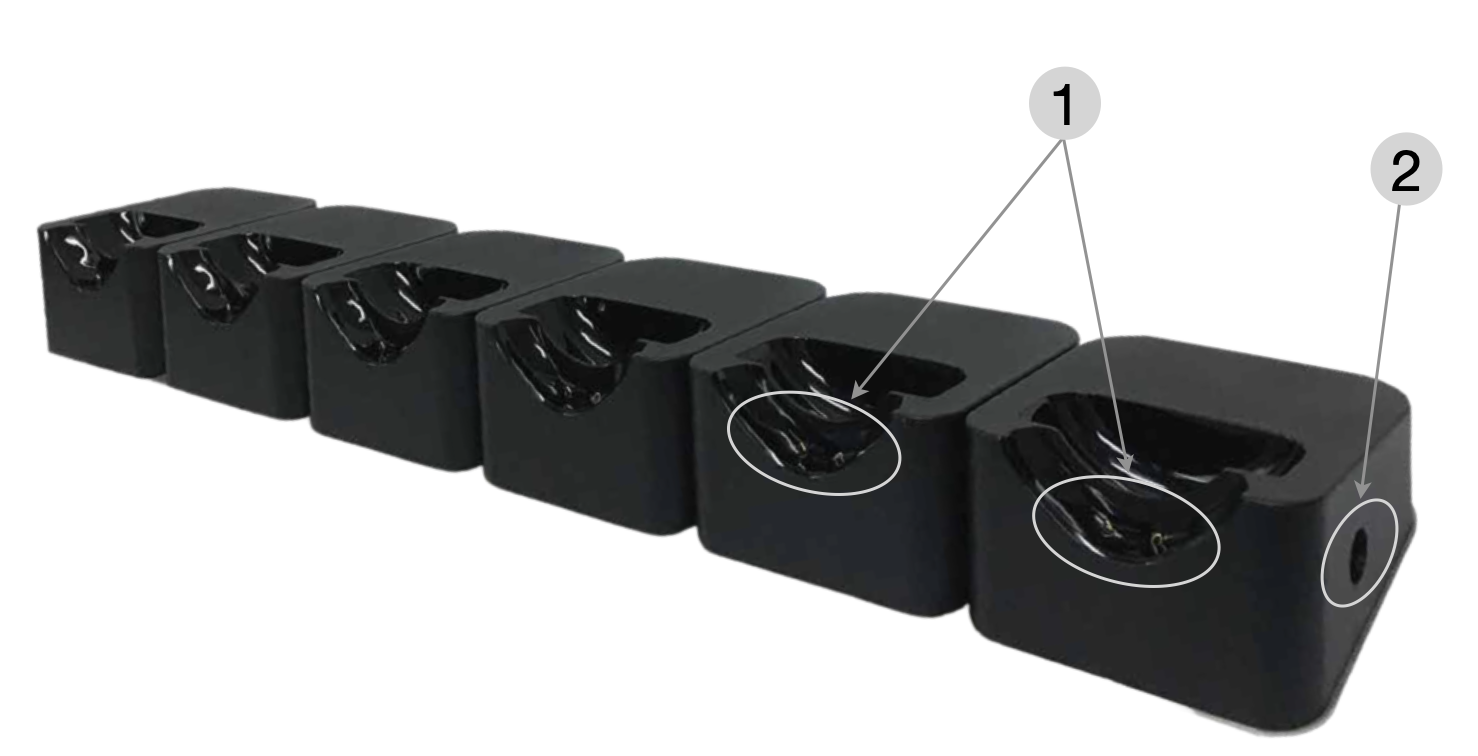
1 - Charging pins
2 - Charger connection
Using the charger
When charging a Headset for the first time, it is necessary to leave it in the Multi-Charger for at least 10 hours before the battery is fully charged, and the Headset is ready for use.
For correct charging, ensure that the room temperature is between 5°C and 45°C / 41°F and 113°F. Do not place the Headset in direct sunlight when charging.
The Headset is automatically deactivated and can’t receive calls while charging.
Activation
1. Set up multicell DECT Network
You need to install and provision W-AIR Base stations and set up a multicell W-AIR DECT network. For detailed information and instructions on how to plan and configure multicell network, check this guide: W-AIR Network Admin Guide - Sync over LAN.
2. Register headsets
Before headsets can be assigned to specific users, they need to be registered to W-AIR Base Station.
| Warning |
|---|
Limitation: It is impossible to register a headset if the code of DECT network set up in WMS → Devices → W-AIR Networks is different from "0000" (default code). Workaround: you can temporarily change the code to default one ("0000") on the W-AIR Networks page in WMS, register and assign the Headset(s), and then change it back to the custom one. |
| Note |
|---|
Note: in case you have several W-AIR networks (for example, in a test environment), the Headset might register to a Base station belonging to another network. In such a situation it’s recommended to hold the Headset closer to the Base station you would like to register it to. |
- Put the Headset in the registration mode by pressing Call, Volume+ and Volume- buttons at the same time for more than 5 seconds. When the Headset is in registration mode, the LED indicator blinks with short blue flashes and a voice prompt announces “Registering”.
The Headset connects to the Base Station. When the Headset is subscribed, the voice prompt announces “Headset subscribed”.
Note Note: If the registration fails, the voice prompt announces “Headset not subscribed”. Before trying to register the Headset again, please check if it is within range of W-AIR Base station and the voice prompt announces “Registering”.
- To check if the Headset is registered to the Base station, go to W-AIR Base Station web interface -> Extensions. If the registration is successful, the device appears in the list of available extensions with the state SIP Registered@RPN00
3. Assign headsets to PBX users
Assigning via WMS
Headsets can be assigned to users via the W-AIR devices tab in WMS, where you can find the list of all x-hoppers headsets:
- Go to WMS -> Devices -> W-AIR devices
- Choose the headset and click Assign to user
- Enter user extension and click Save.
| Note |
|---|
Note: After assigning headsets to users, to figure out which headset belongs to whom, you can dial users’ extensions and see which headsets respond. |
Assigning headset to a different user
- Choose the headset on the W-AIR devices tab -> click Assign to user
- Enter a different extension and click Save.
Starting from W-AIR firmware v 650b2, headsets get the following pre-configured settings:
- Retail Mode: On
- Audio feedback: Voice
- Silent charging: On
- Silent mode: Off
| Note |
|---|
Notes:
|
Deassigning a headset
- Choose the headset on the W-AIR devices tab -> click Assign to user
- Select “unknown” in the Extension field and click Save.
| Note |
|---|
Documentation: WMS Start Guide: Devices management. |
4. Configure Dialplan
Modify the users dialplan as follows:
- Click Add number
Enter *Wairhotline*
Note Note: It is the value which is dialled by the headset in the Retail mode. This value is default and should not be changed.
- Add the below Dialplan applications:
- Set -> Language -> choose language
- Play sound -> click Browse (three dots) and choose the sound to be played on joining the broadcast or create it dynamically using TTS, for example Welcome to x-hoppers, joining the broadcast
- Conference -> enter the conference room ID number. This can be any number, e.g. 1, 2, 3, etc.

| Note |
|---|
Documentation:Dialplan Applications - Admin Guide. |
Joining the Broadcast from Other Devices
Wildix desk phones can also join the broadcast, as long as they are connected to the same PBX. There are two options:
- A user should dial the feature code for Conference access (98 by default) + the conference room number. Example: 981 for conference room number 1.
- Alternatively, a Dialplan can be configured so that when users dial a certain number, e.g. 333, the call is automatically put into the broadcast.

| Note |
|---|
Documentation: Dialplan Applications - Admin Guide. |
Make Announcement to Users of Specific Departments
Starting from WMS 6.07, it is possible to make announcement in x-hoppers broadcast to users of specific Departments only.
- Create a CURL request that triggers a message to the required department.
Example:
| Code Block |
|---|
curl -X POST --header 'Authorization: Bearer {token}'

https://{pbx domain}/api/v1/Originate -d

'channel=Local/999@myDialplan&application=System&async=true' -d

'variable=dst=777,dept=Sales,msg=help required at checkouts' |
Where:
- 999 (you can set a custom number) = the Dialplan rule that processes the request.
- dst = the rule in the outgoing Dialplan of users that should receive the announcement
- dept = department name
- msg = the announcement: a text prompt or a path to an audio file stored on the PBX
| Note |
|---|
Note: msg and dept values can be wrapped in double quotation marks (“) |
2. Create rule 999 (you can set a custom number) and call the following script in that rule:
| Code Block |
|---|
Custom app :: System(data_engine_cli OriginatePlayback ${dst} '${dept}' '${msg}') |

3. Create a Dialplan rule with dst number (this can be any number that is not occupied by a user or by another real destination, e.g. 111 or 777) in the outgoing users Dialplan(s). If users have different Dialplans, the rule with dst number should be created in each of them (or it can be added as an included procedure). Configuration:
- Set :: Language :: en (this one is needed for TTS processing)
- Set(sound=${SHELL(/usr/sbin/data_engine_cli GetSound ${CALLERID(num)})})
- Play sound :: ${sound}
| Warning | ||
|---|---|---|
Important: In case of changing Department name, make sure to reload PBX engine to apply the changes:
|
Modifying the timeout of broadcast mute
Starting from WMS Beta 6.06.20240315.1, users have possibility to mute the broadcast by double-pressing the Call button. By default, the broadcast gets muted for 60 seconds. If user wants to unmute the broadcast before the 60-second timeout, user can double-press the Call button again.
The default timeout can be customized. To do this:
1. Add the following line to the file /etc/systemd/system/pbx-data-engine.service.d/override.conf:
| Code Block |
|---|
# vi /etc/systemd/system/pbx-data-engine.service.d/override.conf
[Service]
Environment='XHOP_UNHOLD_TIMEOUT=120' |
Where 120 is the custom timeout. If you want to disable the timeout, set the value to 0:
| Code Block |
|---|
Environment='XHOP_UNHOLD_TIMEOUT=0' |
2. Reload systemd and restart the service to apply the changes:
| Code Block |
|---|
# systemctl daemon-reload
# systemctl restart pbx-data-engine |
| Note |
|---|
Note: For WMS versions prior to 6.07, instead of XHOP_UNHOLD_TIMEOUT, the parameter UNHOLD_TIMEOUT should be used. |
QR code system
Use cases
- QR code for each product
Have a separate web page for each of the products and want customers to get to that exact page when scanning the QR code? Then, this option is just for you. Attach QR code next to each product, which customers can scan and get to the page with the product description.
- QR code for a category of products
If you have a huge store, rather than attaching QR code to every single product, you can opt for using one QR code for a category of products. In this case, you can place the code in each row in your store, to be easily found by customers.
In either of the above scenarios, once QR code is scanned, clerks are instantly notified which exact product or product category a customer is interested in and can provide any necessary assistance and guidance. Moreover, you can collect statistics (e.g. via Google Analytics) on which product QRs were scanned and how many times, which allows you to analyze customer engagement and make weighted decisions.
Additionally, on the product web page you can place a Kite button, letting customers contact clerks or back office via chat, audio or video call.
| Note |
|---|
Kite documentation: Wildix WebRTC Kite - Admin Guide - English. |
How to set up
Generate a call
We provide SDK (REST APIs), which can be used to set up call generation when someone scans the code. So for this part, you need a web developer, who would configure the relevant POST and CURL requests for each QR code.
| Note |
|---|
Documentation: Developer Documentation. |
| Note |
|---|
Note: To protect the system from spam, you may set up CAPTCHA on your website before the call is initiated. |
Configure Dialplan
On the Dialplan side, you need to configure the call to be sent to the broadcast with clerks. The call should be accompanied with notification via our Text-to-speech feature, to inform clerks which page was scanned/ where in the store assistance is required. QR codes require separate Dialplan entries.
| Note |
|---|
Documentation: Dialplan applications - Admin Guide. |
Click and collect setup
Click and collect functionality speeds up and simplifies the process of processing the orders made online. When customers with online orders come to the store, they just need to enter their order ID number on a dedicated tablet. The staff is immediately notified in the conference that the relevant order number is there to collect.
To configure click and collect functionality:
- Create a Dialplan rule e.g. clickcollect
- Add number default:
- Add Verify number of calls application, enter 1 for the max number of active calls and select the relevant procedure
- Add application Play sound and enter the text that should be pronounced in the conference, e.g. Order number ${text} has arrived to collect the order
- Add number wait with the following applications:
- Custom application with parameter Wait(3)
- Jump to application with the procedure clickcollect
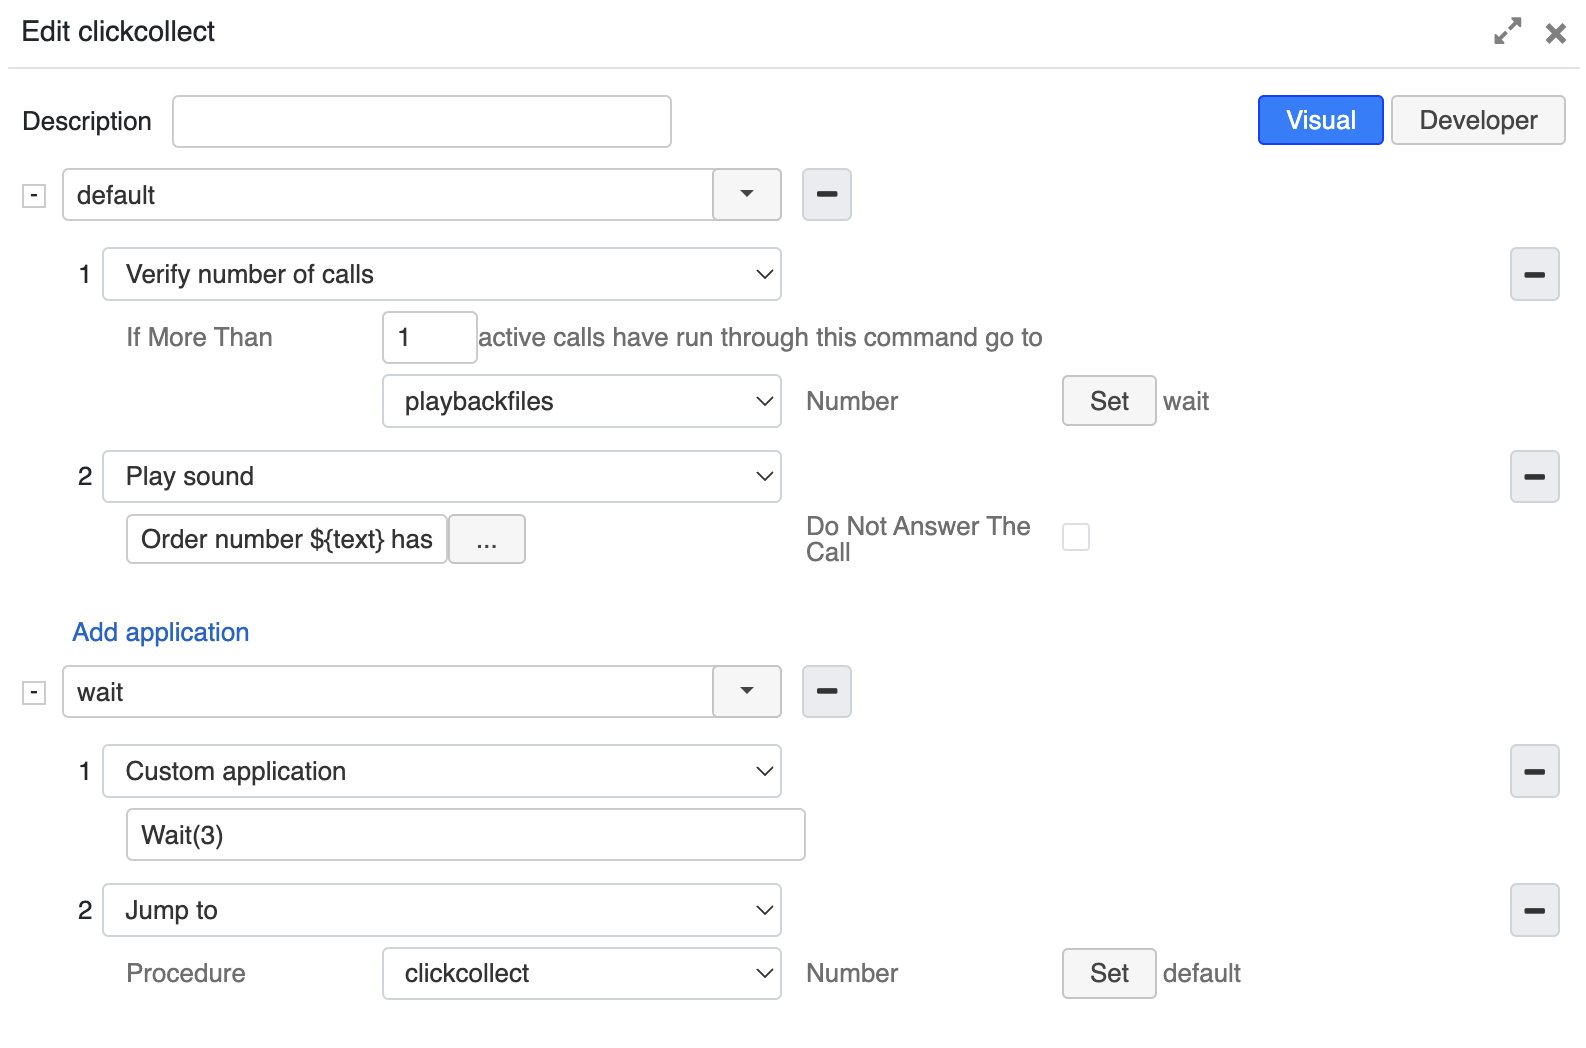
Example of CURL request:
curl -u admin:admin_password -X POST 'https://xhoppersdemo.wildixin.com/api/v1/Originate' --data-urlencode "channel=Local/conf*1@pbxservices" --data-urlencode "context=clickcollect" --data-urlencode "priority=1" --data-urlencode "exten=s" --data-urlencode "variable=text=124" --data-urlencode "callerid=1"
Gather & Post content to x-bees channel
| Note |
|---|
Note:
|
| Warning |
|---|
Important: For correct work of the features of gathering and posting content to x-bees channel, a correct email has to be set up for all the users in the channel. |
Record in-store conversations (listen in CDR-View)
Starting from WMS 6.03.20230630.3, it is possible to record in-store conversations and listen them via CDR-View. The recording starts when user unmutes himself in the conference and begins talking.
Conversations recording is also required if you wish to transcribe in-store conversations and post content to x-bees channel (setup instructions available in further section of this guide).
To enable the functionality:
create directory /etc/systemd/system/pbx-data-engine.service.d
Code Block # mkdir /etc/systemd/system/pbx-data-engine.service.dAdd the following key to the file:
Code Block # nano-tiny /etc/systemd/system/pbx-data-engine.service.d/override.conf [Service] ExecStart= ExecStart=/usr/sbin/pbx_data_engine.py --daemon --mode calls presence -crReload systemd and restart the service to apply the changes:
Code Block # systemctl daemon-reload # systemctl restart pbx-data-engineNote Note: Reloading systemd is required each time you make any changes to the /etc/systemd/system/pbx-data-engine.service.d/override.conf file.
Once enabled, the recording of in-store conversations get displayed in the CDR-View. Recording starts when a user unmutes themselves in the conference and starts talking.
| Note |
|---|
Current limitations:
|
Post content to x-bees channel
Use case 1: Veesion integration
When there is an alert from Veesion, the relevant message, containing alert type, date, time, camera IP, ID of the camera and group, as well as video attachment, is sent to x-bees conversation.
Documentation: x-hoppers integration with Veesion
Use case 2: Transcribe all in-store conversations
It is possible to transcribe the content of x-hoppers conference (everything that was said during the day) and post it to x-bees conversation (both the transcription and the audio recording of each piece of the conversation). The transcription is posted on behalf of the users that were talking at a given moment.
| Warning |
|---|
Important: Make sure you've also set up recording of the in-store conversations (see the "Record in-store conversations (listen in CDR-View)" section of this guide. |
How to configure
Create x-bees conversation with all the users that are participating in the x-hoppers conference and also needed managers.
Copy x-bees conversation ID (available in the URL of the conversation)
Add the following data to the /rw2/etc/pbx/x-hoppers.json file:
Code Block [ { "audio_conf_id": "2", "xbees_channel_id": "f6d17593-98b6-471d-941a-cd03153f" } ]
Where:- audio_conf_id: ID of the audio broadcast channel in x-hoppers where the communication takes place
- xbees_channel_id: ID of the x-bees conversation, copied in step 2, where the content will be posted
When the feature is enabled, whatever is told in the conference is automatically transcribed and displayed in x-bees conversation, so managers could monitor what was discussed in the conference.
| Note |
|---|
Note: If user talks for more than 60 seconds without a pause, the message is not transcribed. |
How to increase volume for noisy environments
| Note |
|---|
Note: The support starts from WMS Beta 6.03.20230601.1. |
In case of noisy environment, you can increase x-hoppers volume. To do this, add the following parameters to the section [default_bridge] of the file /etc/callweaver/confbridge.conf:
| Code Block |
|---|
default_listening_volume=6 |
Where 6 is the preferred volume. The maximum value is 10. The default value for both parameters is 0.
Other features
ChatGPT Integration
ChatGPT integration with x-hoppers can enhance customer support and information sharing, allowing to ask questions and instantly receive answers. Powered by ChatGPT, x-hoppers processes the questions and generates the response based on its knowledge base, which is then played back to the user through the broadcast channel.
Documentation: How to set up ChatGPT for x-hoppers
Voice authorization
x-hoppers allows to configure voice authorization for assigning headsets to users. When enabled, the system compares the voice of the user with user voices previously saved in the system and in case of a match, allows authorisation, eliminating the risk of user logging in under a different name.
Documentation: How to set up Voice Authorization for x-hoppers
Push-to-talk on mobile
This option allows to send Push-to-talk messages to x-hoppers broadcast from x-bees conversation. Users can send voice messages to x-hoppers broadcast via mobile and receive broadcast messages to x-bees conversation, having them played automatically in Speaker mode.
Read more in the documentation How to configure and use Push-to-talk for x-hoppers
| Macrosuite divider macro | ||||||||||||||||||||||||||
|---|---|---|---|---|---|---|---|---|---|---|---|---|---|---|---|---|---|---|---|---|---|---|---|---|---|---|
|
| Button macro | ||||||||||||||||||||||||||||||||||||||||
|---|---|---|---|---|---|---|---|---|---|---|---|---|---|---|---|---|---|---|---|---|---|---|---|---|---|---|---|---|---|---|---|---|---|---|---|---|---|---|---|---|
|