| Html |
|---|
<div id="fb-root"></div> <script>(function(d, s, id) { var js, fjs = d.getElementsByTagName(s)[0]; if (d.getElementById(id)) return; js = d.createElement(s); js.id = id; js.src = 'https://connect.facebook.net/en_US/sdk.js#xfbml=1&version=v2.11'; fjs.parentNode.insertBefore(js, fjs); }(document, 'script', 'facebook-jssdk'));</script> |
...
| Info |
|---|
This guide explains how to access and to use Wildix Collaboration and describes the basic operations: call, chat, video call, conference, fax, SMS. WMS Version: 5.0X Other Collaboration related documentation: Collaboration and Mobile Apps Documentation. Created: June 2020 Updated: July 2022 Permalink: https:// |
...
...
...
...
| Table of Contents |
|---|
Prerequisites
...
| Note |
|---|
Note: PBX admin can automatically send users their credentials for access to Collaboration via email: WMS Users -> select users and click Send Welcome Message (more details can be found in WMS Start Guide). |
Login window:

- 1 - Login
- 2 - Password
- 3 - “Remember me” option
- 4 - Single sign-on with Google
- 5 - Single sign-on with Office 365
- 6 - Click to log in
...
Quick menu introduction
Top menu:

1 - Search field with speech recognition and call button: search for colleagues and contacts and perform quick actions from drop-down list: call, chat, send a fax/ Post-It etc:
2 - Device selection: active device to place and answer calls using Collaboration
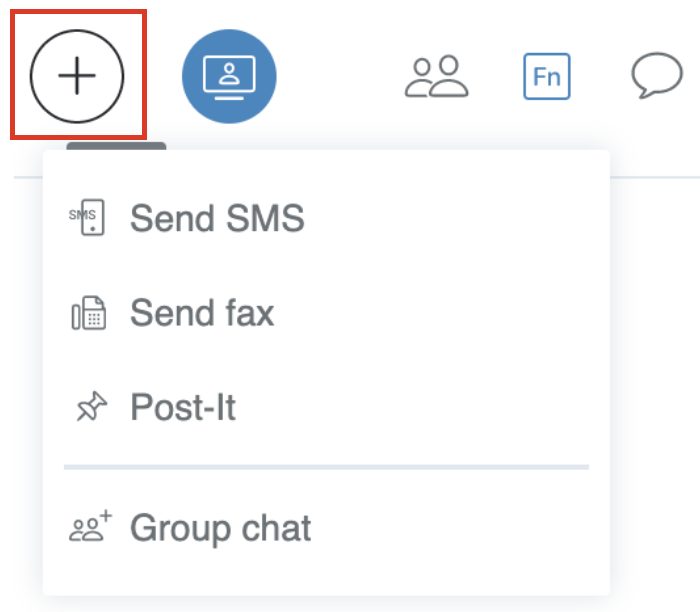
3 - Add option: access to SMS / Fax / Post-It / Group chat dialog window:
4 - Video conference: create and manage videoconferences based on WebRTC. Read the Guide for the detailed description: Wizyconf Videoconference User Guide
5 - Other tabs of Collaboration:
Colleagues: list of colleagues with presence status and geolocation
Fn keys: monitoring / management of colleagues / features (same as BLF keys of phone)
Note Note: this menu becomes visible only if you have configured these keys in Settings -> Function keys.
Chat: active chat sessions
Phonebook: PBX shared and personal phonebooks
History: history of calls (synced with other Wildix devices), faxes, notes
Voicemail: access to Voicemail messages
Web CRM: allows opening of a web application inside Collaboration. Refer to the section Personal in Settings for more information
Note Note: this menu becomes visible only if you have configured it in Settings -> Personal -> Web CRM.
Settings: user settings, call features, feature keys settings and more
...
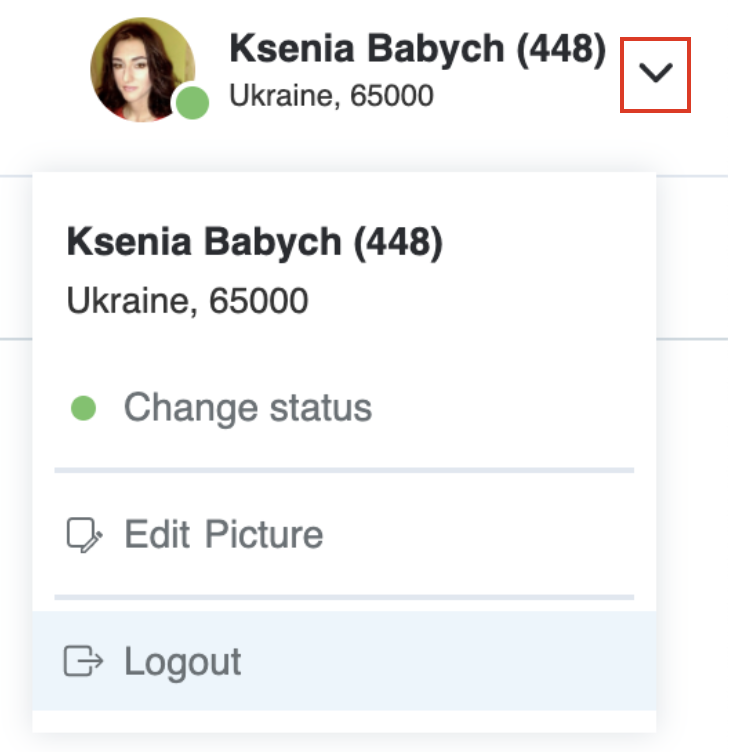
- Click on your current user status
Select a different user status from the list of available ones:

To add a status message:
- Click on your user status in the top menu
- Click + Advanced
- Enter the status message into the field
Click OK:

To set up Do Not Disturb (DND) / Away status:
- Click on available status
- Select DND (Do not disturb) or Away from the list
- Select Until date and time (“until” value is optional while setting Away/ DND status. If it is not defined, user status switches back to Available after one hour)
Click OK:

Additionally, you can change user status via Change status option:

| Note |
|---|
It is possible to disable/ enable call/ chat/ voicemail popup notifications when in DND: go to Collaboration Settings -> Chat/ Presence -> Show notifications in DND status. |
...
| Note |
|---|
It is possible to set up the system to manage incoming calls based on your current user status (available, DND, away) and on call type (internal, external, whitelist, blacklist). See chapter: Call features. |
| Note |
|---|
It is possible to add Custom statutes with predefined status message and duration period (read chapter Chat/ Presence). After you add them, they will be available for quick selection in the drop-down list in the menu of user status setting: |

User picture
Users who have not set up their user picture, are displayed with initials (default avatar).
...
- Expand your user status in the top menu
Click Edit picture

Choose the File on your PC (the picture is loaded)- Resize the picture (optional)
Click Save:

It is also possible to take a picture using a web camera, instead of loading it from PC:
...
Click on your user status in the top menu and select Advanced
Click Set location
Select Custom to set up your location manually: enter the address into the field or move the red indicator (otherwise select Auto detect to enable the browser to automatically detect your location)
Click Save:

| Note |
|---|
Note: Maps in Collaboration are available only via .*wildixin.com domain. |
...
User status, user name, and user picture are displayed for each colleague. Mouse over a colleague shows additional buttons with available actions (Call / Chat / Post-It / Call me back etc):

| Note | ||
|---|---|---|
Notes:
|
...
1. Select Other in the top menu -> Edit Colleagues:

2. Select the colleagues (or work teams) that you want to add to your roster:

3. Click the Tick icon to save
...
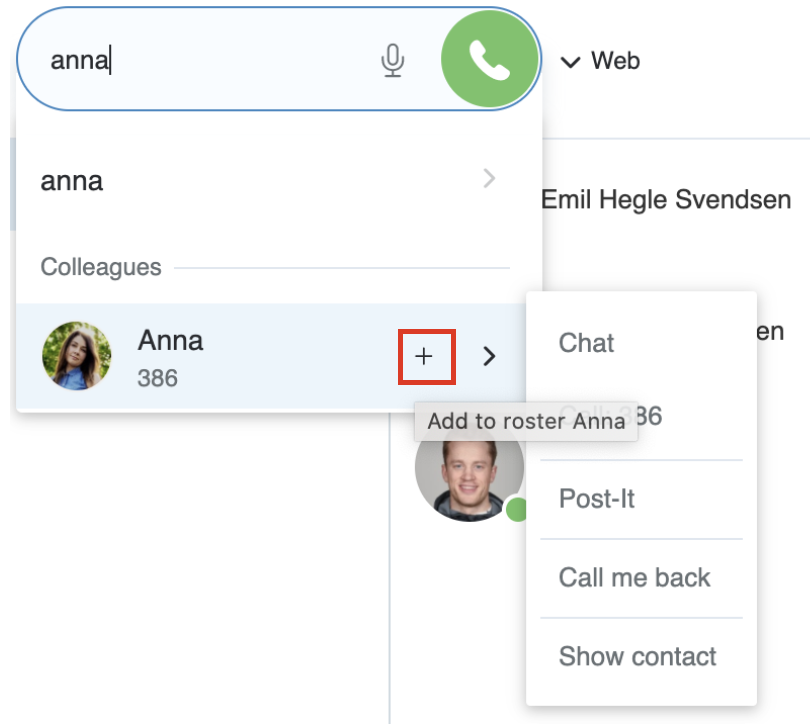
Add colleagues via Search field:
Find a colleague by name / number and click on + icon:
Delete colleagues via Colleagues tab:
Mouse over a colleague, click on Options button (three dots) and select Remove
Or right-click on a colleague and select Remove:

User status icons explanation
...
Go to the Colleagues tab and focus the mouse cursor on the colleague:

Same information can be consulted from Messaging / Feature keys tabs.
...
- Mouse over a colleague, click on Options button (three dots) and select Set presence
- Or right-click on a colleague and select Set presence
Proceed in the same way as you do for changing the personal user status:

Call intrusion (barging)
| Note |
|---|
| Note: only users with certain permissions can do intrusion; to enable the option, the PBX admin must add ACL ability "Can" - "Intrusion". |
...
Go to the Colleagues tab
Mouse over a colleague who has a ringing call, click on Options button (three dots) and select Pick up
Or right-click on a colleague and select Pick up

Video tutorial:
| Html |
|---|
<div class="container">
<div class="video"><script src="https://fast.wistia.com/embed/medias/blwzfnk5b1.jsonp" async></script><script src="https://fast.wistia.com/assets/external/E-v1.js" async></script><div class="wistia_embed wistia_async_blwzfnk5b1" style="height:315px;width:560px"> </div></div></div> |
...
Select Other from the top menu -> Map View. All colleagues who enabled location sharing are indicated on the map:

Note Note: Maps in Collaboration are available only via .*wildixin.com domain.
...
Сlick on a colleague’s geolocation in Messaging tab to open a geographical map where the geolocation of that user is indicated:

Instant Messaging
Start a chat session
...
Messaging tab opens and you can start typing your message and use chat input options:

Use speech recognition: click the Microphone icon in the lower right section of the chat session window and start talking, the system transforms your speech into text.
Use emoticons: click on the Smiley icon in the lower right section of the chat session window to open the list of emoticons:
![]()
| Note |
|---|
Note: chat input options, except of emoticons, become hidden when you start typing your message. |
...
- Mouse over a user, click on Options button (three dots) and select Remove
- Or right-click on a user and select Remove:

File transfer
Transfer of files up to 100Mb:
...
Open a chat session with user
Click on the Paperclip icon in the lower right section of the chat session window
Choose file on your PC

Drag&Drop file transfer
During a chat session:
...
Open a chat session with a user
Click on More actions (three dots) button -> Screen

Screen sharing launches (screen sharing icon is displayed on the menu bar of your PC) and a red border around the screen indicates its start
The other party must accept incoming screen sharing stream:

Viewers can see mouse movements/ pointer during screen sharing stream (available starting from Screen Sharing version 3.2.3).
...
When screen sharing is launched, the following notification is displayed:

- Click Open Preferences Pane to access Security & Privacy tab
- Click + to add the component to permissions
- Select Wildix from Application and click Open
...
Upon installation of the WIService or at the launch of screen sharing, the following notification appears:

- Go to macOS System Preferences -> Security & Privacy -> Privacy
Select Screen Recording and check off Wildix

3. Remote control permissions on macOS Mojave and later versions
...
- Go to System preferences -> Security & Privacy -> Privacy
Click Accessibility and check Wildix to allow remote control

Start screen sharing during a call:
...
- Start a screen sharing session
- From the menu bar (macOS) / taskbar (Windows), click on Screen icon -> Apps and select which application to share:

Enable remote control
| Warning |
|---|
Remote control is disabled by default. |
...
If you have extra monitors connected to your PC, you can select the monitor from the menu bar:

Screen sharing management
...
1. Select Other in the top menu -> Screen sharing manager:

2. You can see the viewers who are currently connected:
Click X in front of the viewer to disconnect this user
Click Stop to disconnect all users

Video tutorial:
| Html |
|---|
<script src="https://fast.wistia.com/embed/medias/6l72liuzpr.jsonp" async></script><script src="https://fast.wistia.com/assets/external/E-v1.js" async></script><span class="wistia_embed wistia_async_6l72liuzpr popover=true popoverAnimateThumbnail=true" style="display:inline-block;height:315px;position:relative;width:560px"> </span> |
...
Click on Add button -> choose + Group chat from the list:

Edit the conference title (optional)
Add participants
Click the Tick icon to create a group chat

Participants receive conference invitation via chat.
...
Add user: start typing a participant's name/ extension number in the field and click the Tick icon to confirm
Remove user: mouse over a participant and click on the x icon in front of the participant’s name

Close the group chat:
Only the group chat manager can close the chat.
...
Click on Logout icon in the group chat management section
Click OK to confirm

Post-It & Call me back
Post-It
...
Click on Add button in the top menu and select Post-It:

To: select the Post-It recipient
...
Input field: enter your text
Send Post-It as SMS: option is available for Post-It to user and requires a GSM media gateway
Normal / Important: select the color based on importance:
Green (Post-It to user) / Yellow (personal reminder): normal
Red: important
Click the Paper plane icon to post a note

From Search field:
Enter the colleague name / extension and select Post-It from the drop-down menu
...
Select Other in the top menu -> Hide Post-It / Show Post-It
Post-It History
Select Other in the top menu -> Post-It History

It is possible to:
show / hide any Post-It previously received from users or sent as personal reminders
clear Post-It history
...
Call me back Post-It is displayed to the recipient:

Recipient can call back the sender by clicking on the green Handset button.
...
Select the active device for making and receiving calls in the top menu:

| Note |
|---|
Note: when selected device becomes unavailable, “Web phone” is automatically selected. |
...
“Any” option makes it possible to select the device by clicking on the green Handset button in the call dialog, the moment you receive an incoming call:

Outgoing calls
In case you have selected WP / WorkForce / WelcomeConsole / Vision / SuperVision / W-AIR / iOS/Android / Mobility device, outgoing calls are placed using this device.
...
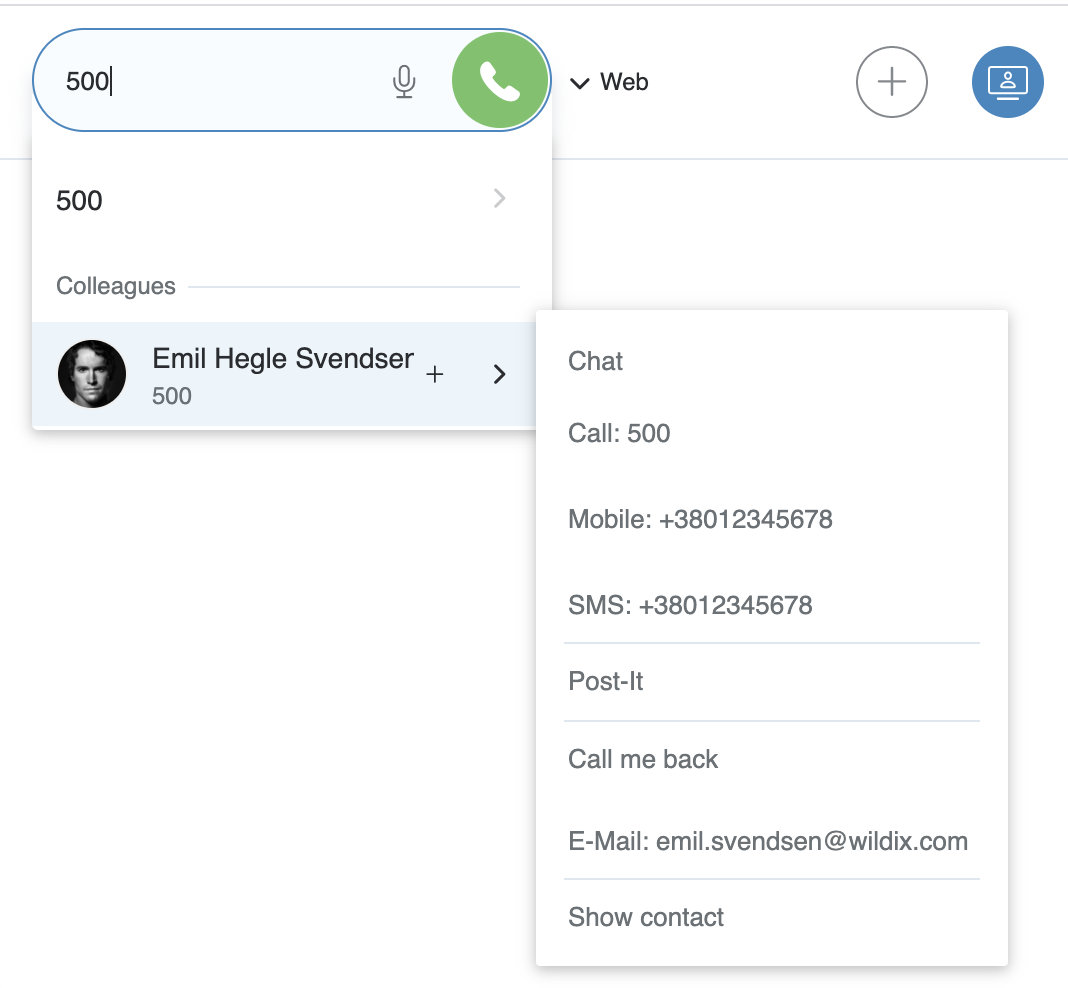
Enter the name (user name or contact) or phone number (extension number or any external phone number) and select Call: [number] from the drop-down menu:


It is possible to use speech recognition for search: click on the Microphone icon (make sure the microphone is connected to your PC or your PC has a built-in microphone) and start talking, the system automatically transforms your speech into text.
In case you would like to call a number from your contacts:
Enter the name/ number/ company name and select a number you'd like to call:

From Colleagues:
Mouse over a colleague and click on the Handset icon
- Or mouse over a colleague, click on Options button (three dots) and select Call
- Or right-click on a colleague and select Call

From Fn keys:
- Mouse over a colleague and click on the Handset icon
- Or mouse over a colleague, click on Options button (three dots) and select Call
Or right-click on a colleague and select Call

From Messaging:
- Click on the Handset icon in the upper right part of the chat session window
- Or mouse over a colleague, click on Options button (three dots) and select Call
- Or right-click on a colleague and select Call
...
Right-click on an entry and select Call / Call the mobile mobile

From Phonebook:
Find a contact and click on the number you wish to call

Otherwise right-click on a contact from the right section of the screen and select Call

From Voicemail:
...
A call dialog window is displayed when there is an incoming call:

To answer a call: click the green Handset icon
To decline a call: click the Hang up (red) icon
To forward a call without answering: click Arrow icon, select the contact to forward a call to (using search)/ or transfer a call to Voicemail:

You can set up automatic call forwarding based on user status (available, DND, away) and call type (internal, external, whitelist, blacklist). See chapter: Features.
Call management
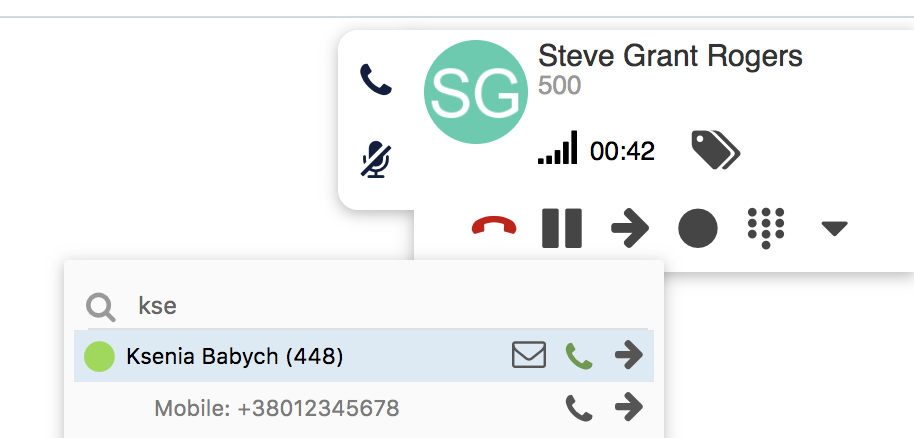
You can manage a call directly from call dialog window:

1 - Hang up
2 - Hold/ resume
3 - Transfer
4 - Call recording
5 - Dialpad / Send DTMFs
6 - Other (expanded):

Note If you have more than one webcam, you can change the active webcam for video streaming in your browser permissions.
7 - Add tags (See chapter: Setting tags)
8 - Add notes, not available for calls between colleagues (See chapter: Contact notes)
9 - Call quality (shown only in case of a single call)
10 - Hide/ display a call dialog window:

11 - Mute/ unmute your microphone. Mute icon is crossed out by default (flashing when muted)
...
It is possible to swap between an active call and a call on hold by pressing the Hold icon (Hold icon is blinking in for the call which is currently on hold):

Switch active device during a call
...
- Click Other -> Continuity and select the device you want to continue the call on
The call is automatically picked up on the selected device

- To switch the device back to Web, dial Continuity Feature Code *5 (refer to Feature Codes Instruction for more information)
...
During a call, click on the Transfer icon
Enter the contact name/ number (user status and additional phone numbers are displayed)
Click on the Envelope icon to transfer a call to Voicemail, the Handset icon for attended transfer and Arrow for blind transfer, in front of the number you wish to dial:
Drag&Drop Call transfer
Drag the Caller Name from the call dialog window and drop it onto the desired user in Colleagues/ Messaging tab.
...
When you have two calls, click Other -> Conference from one of the call dialogs to merge calls
To invite more parties: make a new call and click Conference from the call dialog window:

To close the conference, wait till other parties hang up. Otherwise, the conference manager receives an automatic callback after 5 seconds from each party who has not hung up.
...
| Note |
|---|
| Note: if you were looking for chat conference in Collaboration, read more: Multiuser group chat. |
Video tutorial:
| Html |
|---|
<div class="container">
<div class="video"><script src="https://fast.wistia.com/embed/medias/wvj6o9wvjo.jsonp" async></script><script src="https://fast.wistia.com/assets/external/E-v1.js" async></script><div class="wistia_embed wistia_async_wvj6o9wvjo" style="height:315px;width:560px"> </div></div></div> |
...
For more information about Intercoms integration, check documentation in the section Doorphone integrations.
For the details of how to configure intercoms for sending video stream and adding an unlock button, check the online documentation: Intercoms integration with Wildix - Video before answer and Unlock button.
...
Click Other -> Video from the call dialog:

Start video call during chat:
Video icon is available in the Messaging menu (upper right corner). By clicking Video, audio call is started automatically with video:

Record a call
During a call click Call recording icon to start / stop call recording.
...
Click Other from the top menu and select Open attendant console:

Set up a shortcut to open Attendant Console:
...
When you have active calls, click on the quick buttons (Answer, Hangup, Hold, Transfer, Decline, Record) relative to each line to manage the call:

Call management via numeric keypad:
Click Help to view the list of the hotkeys that allow you to manage calls via a numeric keypad:

Make a call
Press +
Enter the name / number (internal / external)/ organization (company) name into the search field
Press Enter
If a contact has several phone numbers, use the arrow keys of your keyboard to select the right one:

Answer a call
Press Enter to answer an incoming call in case you do not have active calls or your calls are on hold
...
During a call make a new call to the recipient of call transfer
Wait till the third party answers
Press * and select the call using arrow buttons of your keyboard
Press Enter to transfer the call

Blind transfer
Transfer a call without consulting the recipient:
...
2. Choose Send fax from the list

3. Fill in the following information:
...
4. Click on the Paper plane icon to send a fax:

| Note |
|---|
Notes:
|
...
2. Choose Send SMS from the list

3. Fill in the following information:
...
4. Click the Paper plane icon to send SMS:

From Search field:
...
- Click on the Pencil icon In Collaboration Settings -> Personal, near “Two factor authentication”
- Select one of options: Application (see the detailed description below), SMS to/ E-mail to and click SEND CODE
After receiving the code to your mobile phone/ email, enter the 6-digit code into Collaboration and your password for access to Collaboration:

- Click OK
The next time you login, you are required to enter a code sent to your app/ mobile number/ email after you provide your login and password for access to Collaboration:

| Note |
|---|
The feature is also supported by Vision/ SuperVision and WP600A(CG) starting from version 2.9.98. |
...
- Download an external application to your smartphone that generates one-time passwords
- Click on the Pencil icon In Collaboration Settings -> Personal, near “Two factor authentication”
- Open the external application and scan the barcode using your smartphone
- Enter the 6-digit code generated by the application into Collaboration and your password for access to Collaboration:

- 5. Click OK
The next time you login, you are required to enter a code generated by this application after you provide your login and password for access to Collaboration:

Open the application on your smartphone, generate a code and enter it on Collaboration side to complete the login.
...
Go to Collaboration Settings -> Features:

The upper menu (internal / external / blacklist / whitelist) allows you to set up call features for different call types.
...
Activate class: activated by default for internal call type and Available user status
Call reject: if enabled, you do not receive incoming calls
Call Forward Busy: enable the option and enter the number into the field or select VOICEMAIL to enable call forwarding when busy on the phone
Note Note: you can start entering a contact name into the field to view all the contacts matching your search; click on one of the phone numbers displayed below the contact. 
Call Forward No Answer: enable the option and enter the number into the field or select VOICEMAIL to enable call forwarding in case of no answer
Call Forward All: enable the option and enter the number into the field or select VOICEMAIL to enable the forwarding of all the incoming calls
Call waiting: if enabled, you receive more than one call at a time
Call timeout: if enabled, the incoming call is terminated in case there is no answer within a specified timeout
Enable mobility with timeout: if enabled, you receive incoming calls also to your Mobility extension number (mobile number) after the specified timeout; mobile number must be configured in Collaboration Settings -> Personal
Mobility confirmation: if enabled, the user is notified on who the caller is when he receives the call on mobility extension number
Missed calls notification via email / via SMS: enable to receive missed calls notifications
Custom ring: select the ringtone for WP4X0, WorkForce, WelcomeConsole and Collaboration
...
Select the Fn key from the list and click +

Change the order of BLF keys:
...
Select Exp module from the list
Click +
Move those BLF keys that you would like to monitor from the Expansion module to the corresponding section of the table (Exp. module 1)
In the same way you can add more expansion modules

The following additional options in Collaboration -> Fn keys and on WP4X0, WorkForce and WelcomeConsole are available for BLF keys Colleague, Call group, Speed Dial, Park Location:
View calls (eye icon): when enabled, there is a visual notification with caller information, you can press BLF to pick up
Audio notification (speaker icon): when enabled, a beep is played when there is an incoming call
Direct transfer (arrow icon): when enabled, pressing the BLF key during a call performs a blind transfer

Setting up BLF keys - Video tutorial
...
| Warning |
|---|
In case you are using Call groups or Pickup groups feature (this feature can be enabled only by the system administrator in WMS; feature is enabled when at least one value is present in "Call groups"/ "Pickup groups" field in WMS -> Users -> Edit preferences -> Settings): BLF "Group pick up" does not work. Instead of the BLF, you can use the BLF "Speed dial" and indicate 88*<call_group_name>:  In this scenario, 88 is Pickup Feature Code, while <call_group_name> is the value (call group name, e.g. "sales"), specified in the field "Call group" in the preferences of one or more users in WMS, and the same value ("sales") must be specified in the field "Pickup groups" in WMS, in the preferences of the user who picks up the call of this Call group. |
...
Notify unread messages via email: enable / disable email notifications about new chat messages (disabled by default)
- Show notifications in DND status: enable / disable chat / call popup notifications in DND status
Auto away status: if enabled, your status automatically switches to “away” after minutes of inactivity on local PC, specified in the field next to the checkbox
Custom statutes: you can add custom Available / Away / DND user statuses with predefined duration period and status message; custom statuses added in this menu appear then for selection in the menu of user status setting. To add a custom Available / Away / DND status, proceed as follows:
Click on “available”: you can select to add a custom duration period for “available”, “away” or for “DND”
Add a status message that will be visible for other users (optional)

Select the duration period for this status (if you don't need duration, disable the switch next to the time duration)
Note Note: When the duration of the custom Away or DND status ends, the user is automatically switched to Available. In case of custom Available status, when its duration ends, the user remains Available.
Click on the + icon to add a new custom status
Click Save
Click on your user status: now this custom status is available for quick selection under the relevant status - Available, Away, or DND Away:

Video tutorial:
| Html |
|---|
<div class="container">
<div class="video"><script src="https://fast.wistia.com/embed/medias/h03vgatg05.jsonp" async></script><script src="https://fast.wistia.com/assets/external/E-v1.js" async></script><div class="wistia_embed wistia_async_h03vgatg05" style="height:315px;width:560px"> </div></div></div> |
...
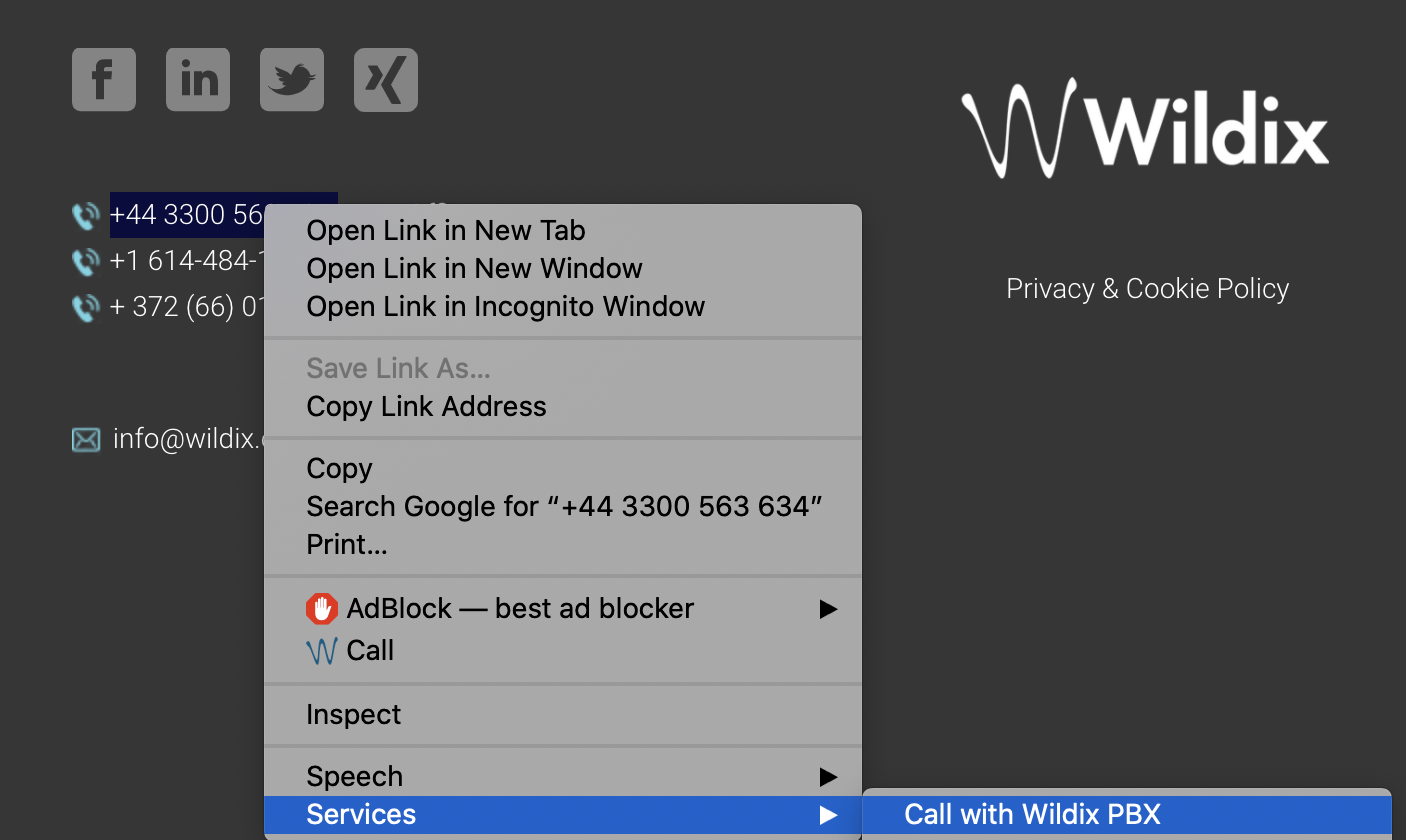
Browser Extension (Chrome browser only): adds a shortcut for quick access to Collaboration from Chrome toolbar (click W icon to show the browser tab where Collaboration is running / to open Collaboration in the web browser in case it’s not running) and click2call (right-click on a phone number or a link on a web page and select Call)

It is also possible to use the W icon to open Collaboration as a standalone application; download the Chrome extension: https://chrome.google.com/webstore/detail/wildix-collaboration/lobgohpoobpijgfegnlhdnppegdbomkn
...
Integration service (WIService): this component is required by CDR-View, Popup App, includes headset integration, screen sharing, as well as adds support for additional features (separate documentation about WIService):
Headset integration (merged into WIService starting from v 3.2.2 on Windows and from v 3.2.17 on macOS): adds support for remote call answer/ hangup and volume control from headset via USB connector on Mac OS X / Windows.
Fax Printer (merged into WIService starting from v. 3.7.1): this component allows sending faxes from Windows / Mac OS X applications
Read the guide: Fax Printer for Microsoft Windows / Mac OS X
Also adds support for Kuando Busylight (https://www.wildix.com/portfolios/kuando-busylight/)Warning Important:
- Headset integration is not compatible with SfB (skype for business).
- If you are using a Wildix compatible third-party headset (Jabra, Plantronics, Sennheiser), uninstall the software provided by the third-party vendor and use Wildix Integration service.
- Screen sharing component (merged into WIService starting from v 3.4.1 on Windows and macOS): lets you share your screen and provide remote access to your desktop.
See chapter: Screen Sharing and remote control Mac OS X:
call generation by clicking on a web page link containing a phone number (support of “sip:”, “wildix:” URI)
call generation by right-clicking on a phone number and selecting Services -> Call with Wildix PBX:
- Windows:
- URI support; call via shortcut (Dialing hot key, configured in Collaboration Settings -> Personal). Note: WIService for Windows requires .NET Framework v.4.0
- Outlook Integration (merged into WIService starting from WIService v. 3.5.1): adds support for Calendar Sync, Presence, click2call, IM, call popup from Outlook
Check this guide for more info:Outlook integration for Microsoft Windows
...
Create/ edit a contact
| Note |
|---|
Note: only users with certain permissions can modify public phonebooks; to enable the option, the PBX admin must add ACL ability "Can" - "Modify public phonebook". |
Go to Collaboration -> Phonebook:
...
Type of contact (internal / external / whitelist / blacklist): in case contact type is defined, the rules of call features selected in Collaboration Settings -> Features is applied for calls from this contact (it is also possible to define rules for call routing based on call type in WMS -> Dialplan)
Custom ring: it is possible to select a custom ringtone for the contact
Notes: notes entered here are visible and can be edited by other PBX users
Warning Important: these notes can be consulted only from Phonebook; for contact notes that can be displayed and added to contact during a call, see chapter: Contact notes.
3. Click on the Tick icon (Save):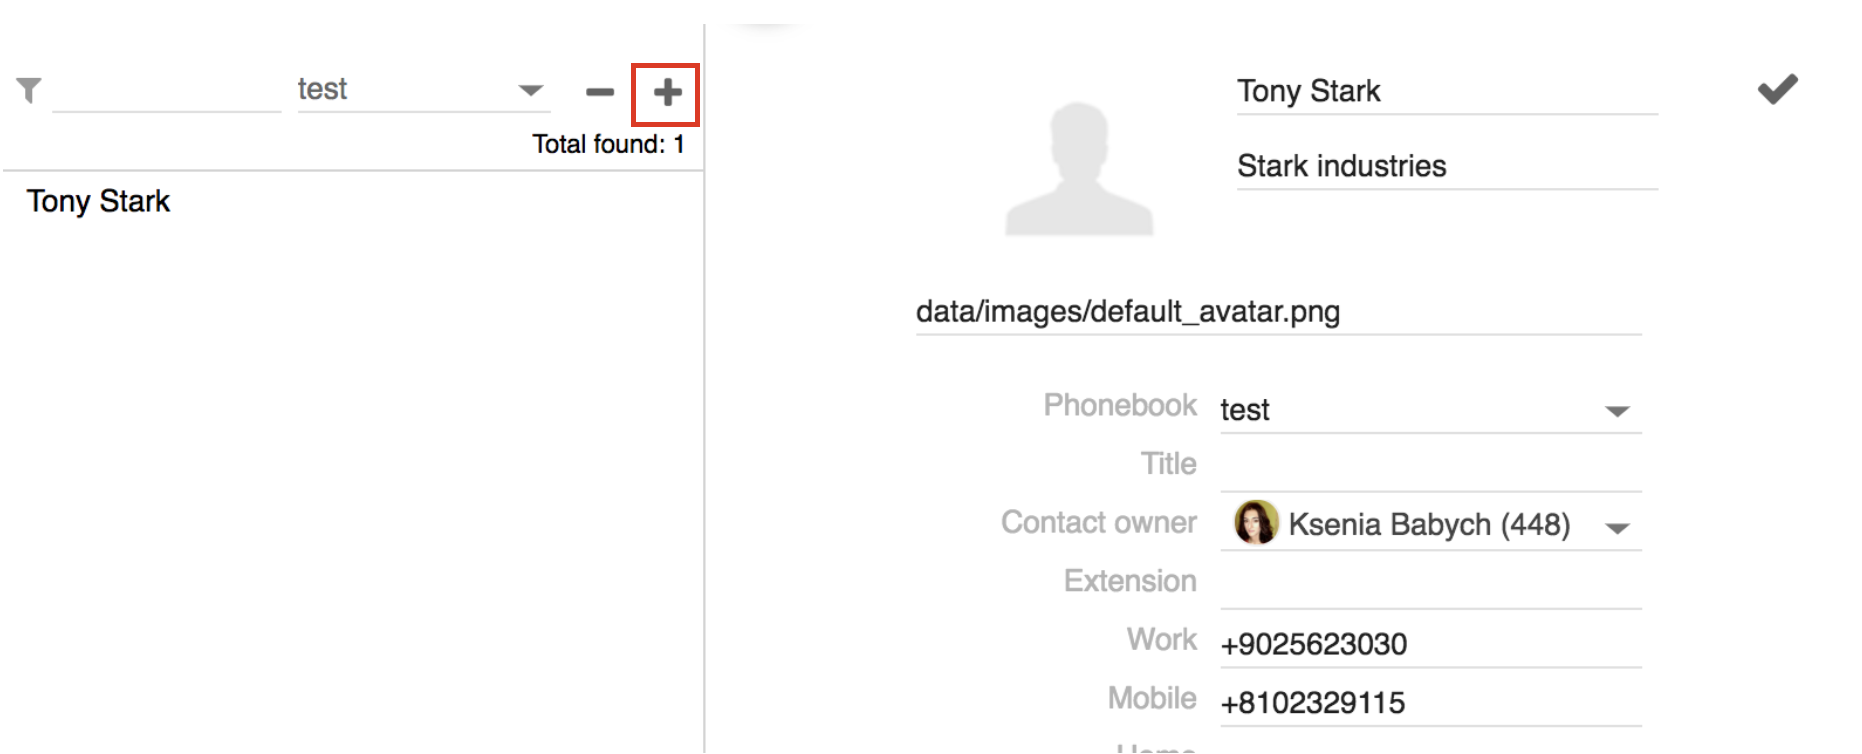
Add/ edit contact during a call:
Click on the Contact name/ number during a call to edit the contact (if it exists) or create a new one:

Add a new contact before making a call:
Enter a number into the search field
Select Add contact from the drop down menu
Add a new contact

Add a new contact after a call:
Go to Collaboration -> History
Right click on the number and select Add contact
Add a new contact

Delete a contact:
Go to Collaboration -> Phonebook
Find the contact using Search
Click - in the upper left section to delete the contact and click OK to confirm (otherwise click x to close the window)

Otherwise right-click on a contact and select Remove:

Edit a contact:
Go to Collaboration -> Phonebook
Find the contact using Search
Click the Pencil icon (Edit) to edit the contact
Edit the fields
Click the Tick icon (Save) to save the changes:

Personal phonebook
| Note |
|---|
Personal phonebooks are used only for outgoing calls and not designed for CID lookup during incoming calls. |
...
- Go to Collaboration -> Phonebook
Click on All in the upper left section, then click on Edit phonebooks:

Add a personal phonebook:
Click +
Enter the name of the phonebook and click on the Tick icon to confirm
Now you can proceed with adding contacts

Delete a personal phonebook:
Select a phonebook
Click -
Click OK to confirm (otherwise click x to close the window):

Edit the name of the personal phonebook:
...
During a call:
Click the Notes icon

From Phonebook:
Right-click on a contact from the left section of the screen and select Notes
Write notes and click Add

Delete option is available only for notes added by you.
...
Click on the date
Select a certain date
Click Apply:

Calls / faxes history Anchor history history
| history | |
| history |
...
Filter the events by contact name / number:

Filter by incoming / outgoing / missed calls / fax in / fax out / archived events:

Filter by date (only the events that took place up to the date selected are displayed):

For detailed analysis of call activity of users and groups, click CDR-View (read the guide CDR-View – User Guide).
...
Right-click on an entry and select Archive

To recover an archived event:
- Filter events by Archived
- Right-click on an entry
Select Recover

To delete an event:
| Note |
|---|
| Note: only users with certain permissions can delete events; to enable the option, the PBX admin must add ACL ability "Can" - "Delete calls". |
...
Faxes / fax reports can be downloaded by clicking on PDF icon: 
Call recordings can be downloaded by clicking on the audio file icon: 
At the moment it is not possible to filter calls containing call recording. In case a call contains a call recording file, the audio file icon is displayed for this entry in Collaboration -> History.
...
Go to Collaboration -> History
Right-click on an entry
Select Tags
Tick off the tags that you wish to set for this entry:

Set tags during a call
Click Tags icon
Tick off the tags that you wish to set for this call:

Voicemails
| Note |
|---|
Note: Detailed information about Voicemail Service: Voicemail. |
...
Listen to Voicemails
Click the Download icon:

Mark Voicemail as read
Select one or multiple Voicemails
Click Mark as read icon in the upper part of the screen or Right-click on selected entry/ entries and click Mark as read

Delete Voicemails
- Select one or multiple Voicemails
Click Remove icon in the upper part of the screen or Right-click on selected entry/ entries and click Remove:

| Note |
|---|
| Note: you can also listen to your Voicemails by dialing the Voicemail Feature Code (81); it is not currently possible to configure your welcome message from Collaboration: dial the Feature Code and follow the audio instructions (press 0 and then press 1 / 2 / 3 to record your Unavailable / Busy message and your name). Consult Feature Codes Guide for details. |
...
- Expand your user status in the top menu
Click Logout