Salesforce Integration with x-bees
This Guide describes main points of Salesforce Integration usage, including leads creation and management and logging activities (inbound, outbound calls, conferences).
For Salesforce integration setup, check the documentation: x-bees Admin Guide.
Other x-bees documentation: x-bees documentation.
Blog covering available Salesforce integrations: Optimizing Your Salesforce Integration Experience.
Created: February 2022
Updated: March 2024
Permalink: https://wildix.atlassian.net/wiki/x/7hfOAQ
Activation
For Requirements and installation, check x-bees Admin Guide.
To activate the integration inside x-bees, you need to go to x-bees Settings -> Integrations -> find Salesforce, click Activate and log in. 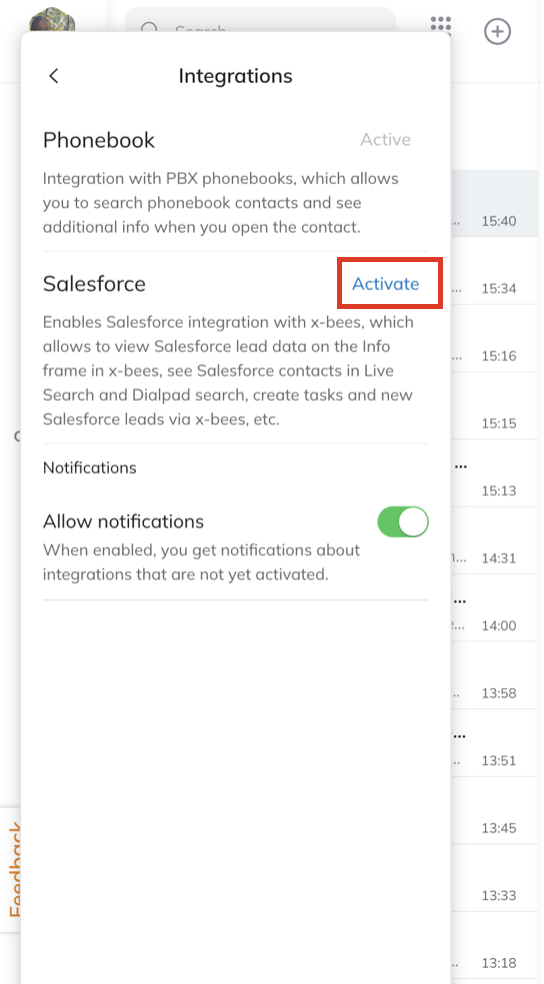
Features
From x-bees, it is possible to create new SF leads and manually log activities to SF:
- The user who performs an action on a Salesforce record from x-bees is assigned as the author of this activity in Salesforce
- If the user who performs an action is not present in Salesforce, then the activity is automatically assigned to the account's Admin
For managing calls and contacts directly from Salesforce account, refer to a separate integration: Salesforce Lightning Integration User Guide (compatible only with Lightning).
Salesforce leads management
Note: Salesforce lead management described in this chapter is currently available only on the x-bees web interface.
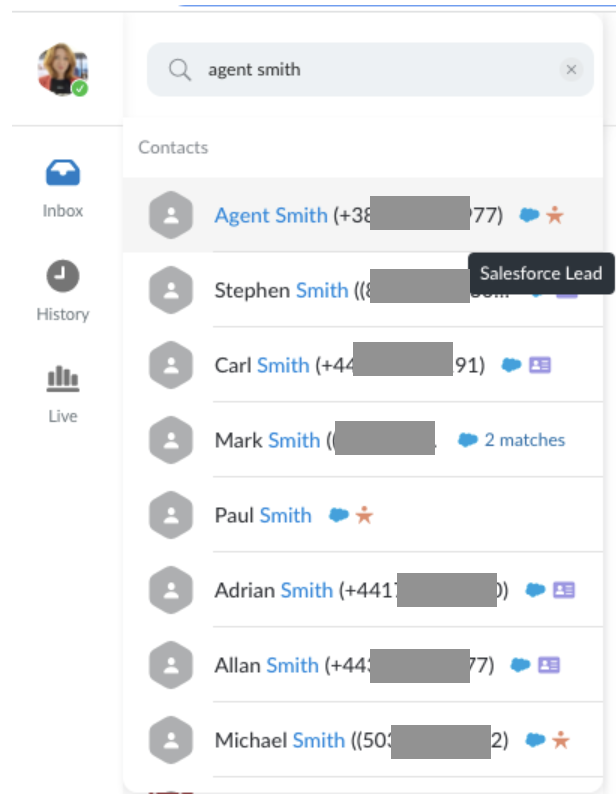
Find Salesforce leads and look up activities
Use the search field in the upper left part of the screen to find Salesforce leads and contacts. All the results matching your criteria from your Salesforce instance appear in the drop-down list with relevant icons:
- Salesforce logo next to a contact indicates that there's a match in your Salesforce instance
- Orange icon indicates this match is a Salesforce lead
- Violet icon indicates this match is a Salesforce contact
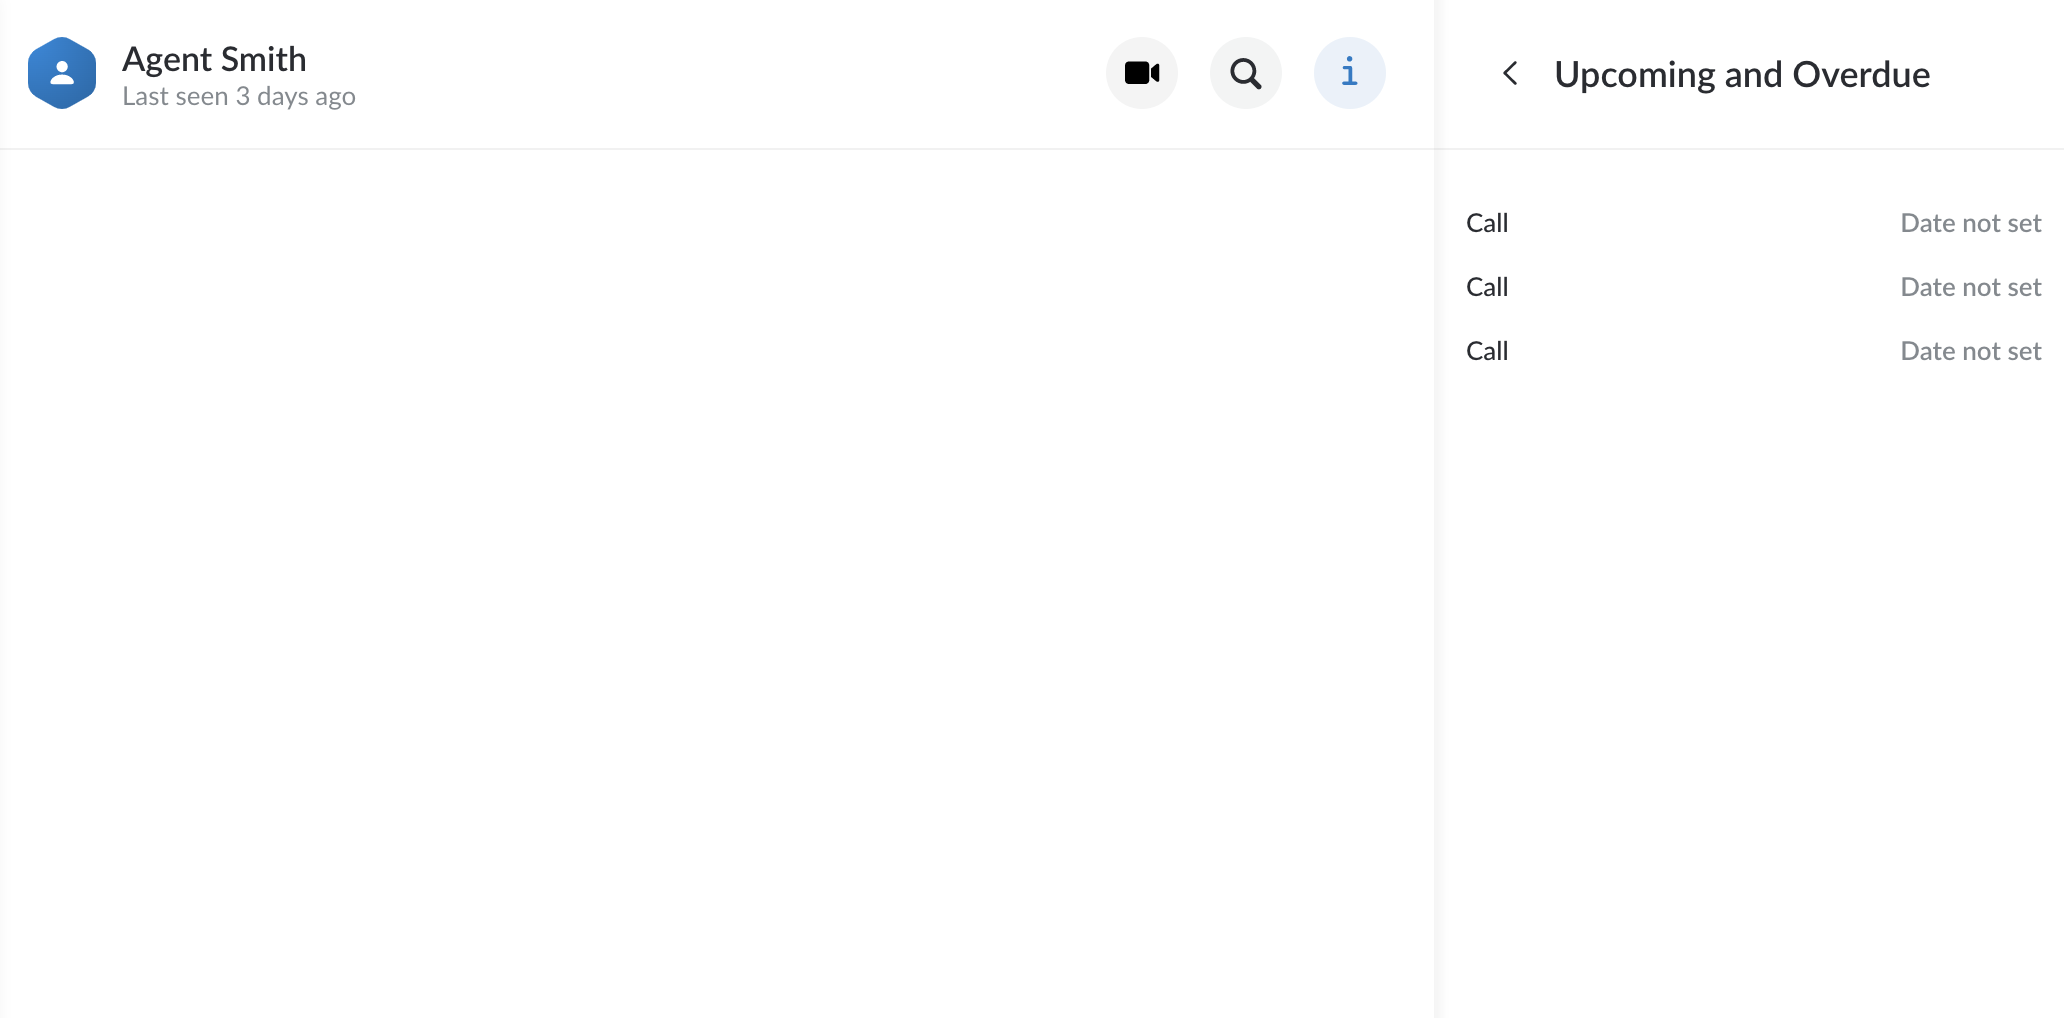
To look up the activities, click on the match and proceed to Upcoming and Overdue and Activity History on the Info panel:
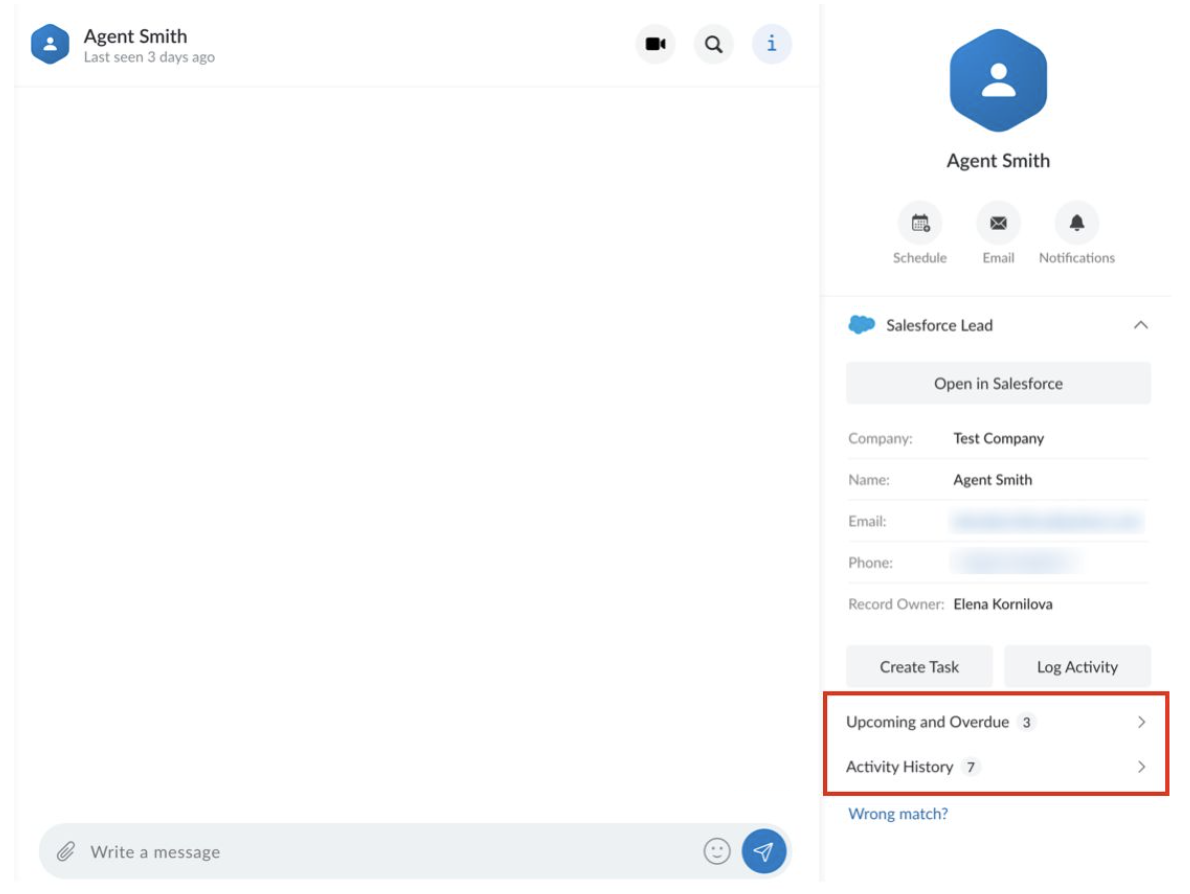
When you click on Upcoming and Overdue or Activity History, the relevant screen opens on the Info frame displaying the necessary details:
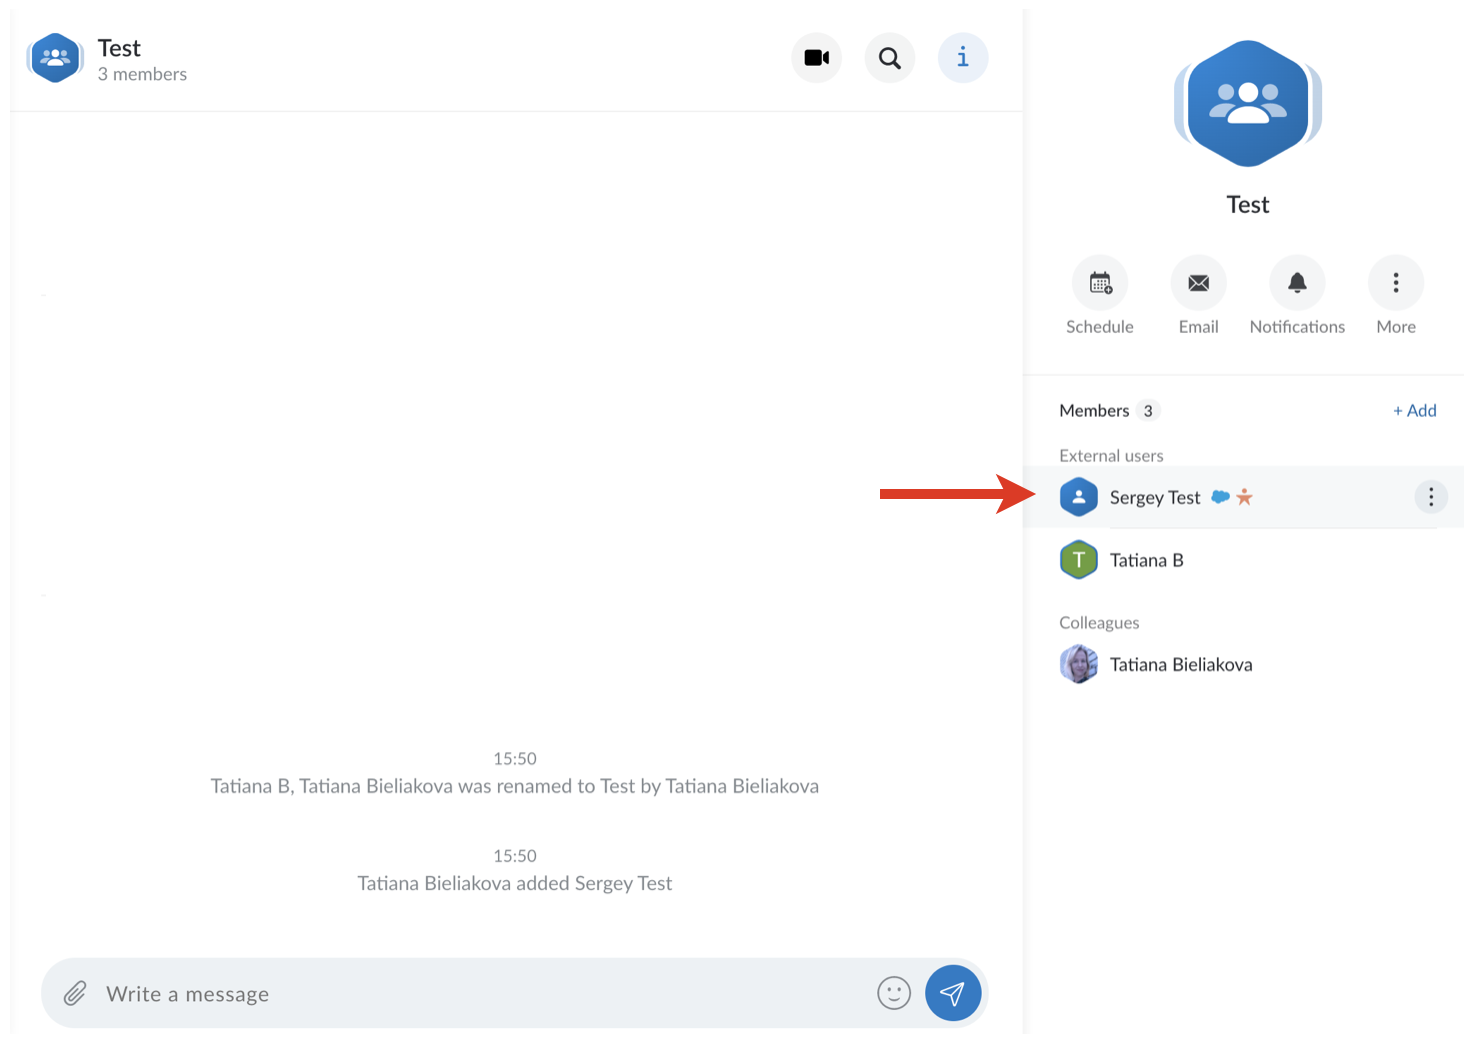
If you are already in a conversation with a Salesforce lead or contact, click on the contact from the Info tab to view the information on this Salesforce match:
Note:
- In case of a SIP call, for the lookup data to be displayed in the Call popup, Conversation name on Inbox, and Call dialog, SalesForce Auto Logging should be enabled in WMS. Documentation: x-bees Admin Guide
Logging activities
To manually log activities, open a Salesforce lead on x-bees. You have two options:
- Create Task
- Log Activity

Users who created a task or logged a call via x-bees, can edit the tasks in Salesforce.
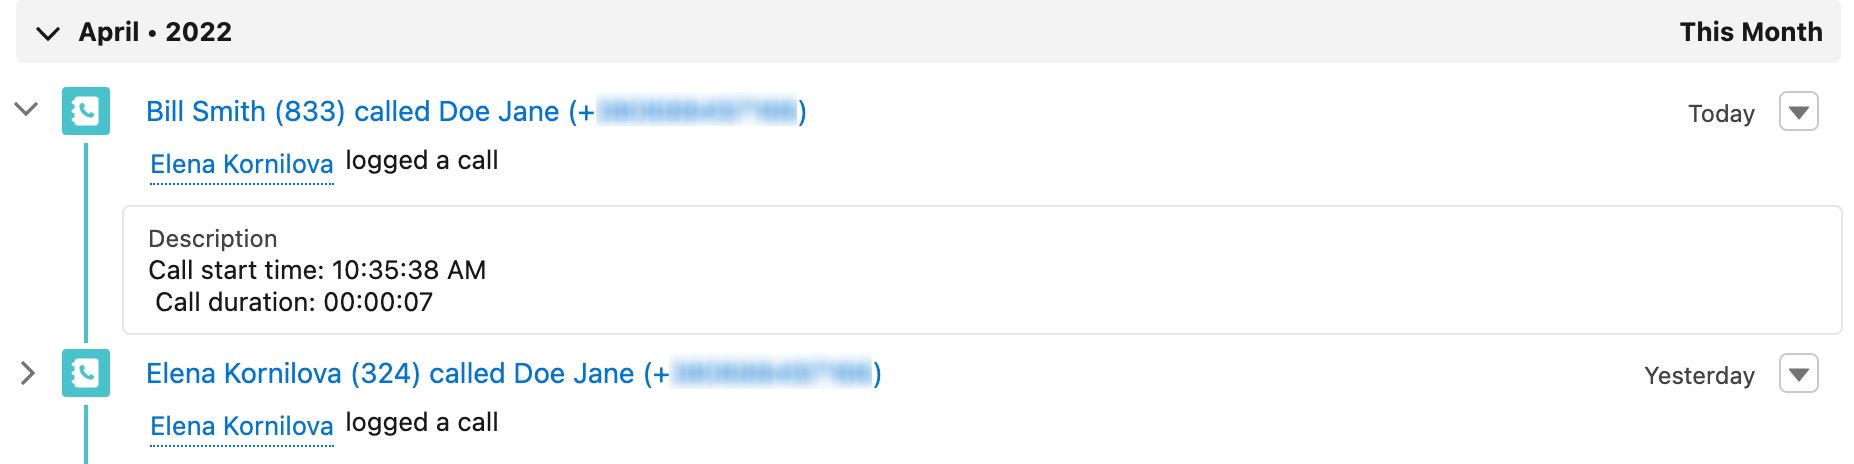
Note, that inbound and outbound calls via PBX are automatically logged for all users that have a match in Salesforce (leads, contacts, accounts) and are displayed in Salesforce as completed tasks.
Logged call data includes: participants, call type and duration, date and time the call was received/made, information about transfers.
In case real-time transcription of calls is configured and the call was recorded, the call summary and transcription are automatically added to Salesforce (see more in the documentation: How to use real-time transcription of x-bees calls and conferences), as well as link to Sales Intelligence (documentation: Sales Intelligence in x-bees).

Notes:
- The following calls are not logged:
- Received and missed PBX calls in case of an unknown number.
- Calls made and canceled within 5 seconds.
- Calls between users of the same PBX/ WMS Network.
- If the lead has multiple matches, task is created for the newest lead.
- This logic applies if the duplicate lead was created after installation of the integration. Otherwise, if a lead had multiple matches before installation of the integration, the match is chosen randomly.
- When the lead match is changed, all new tasks are created for the assigned match. Old tasks are not changed.
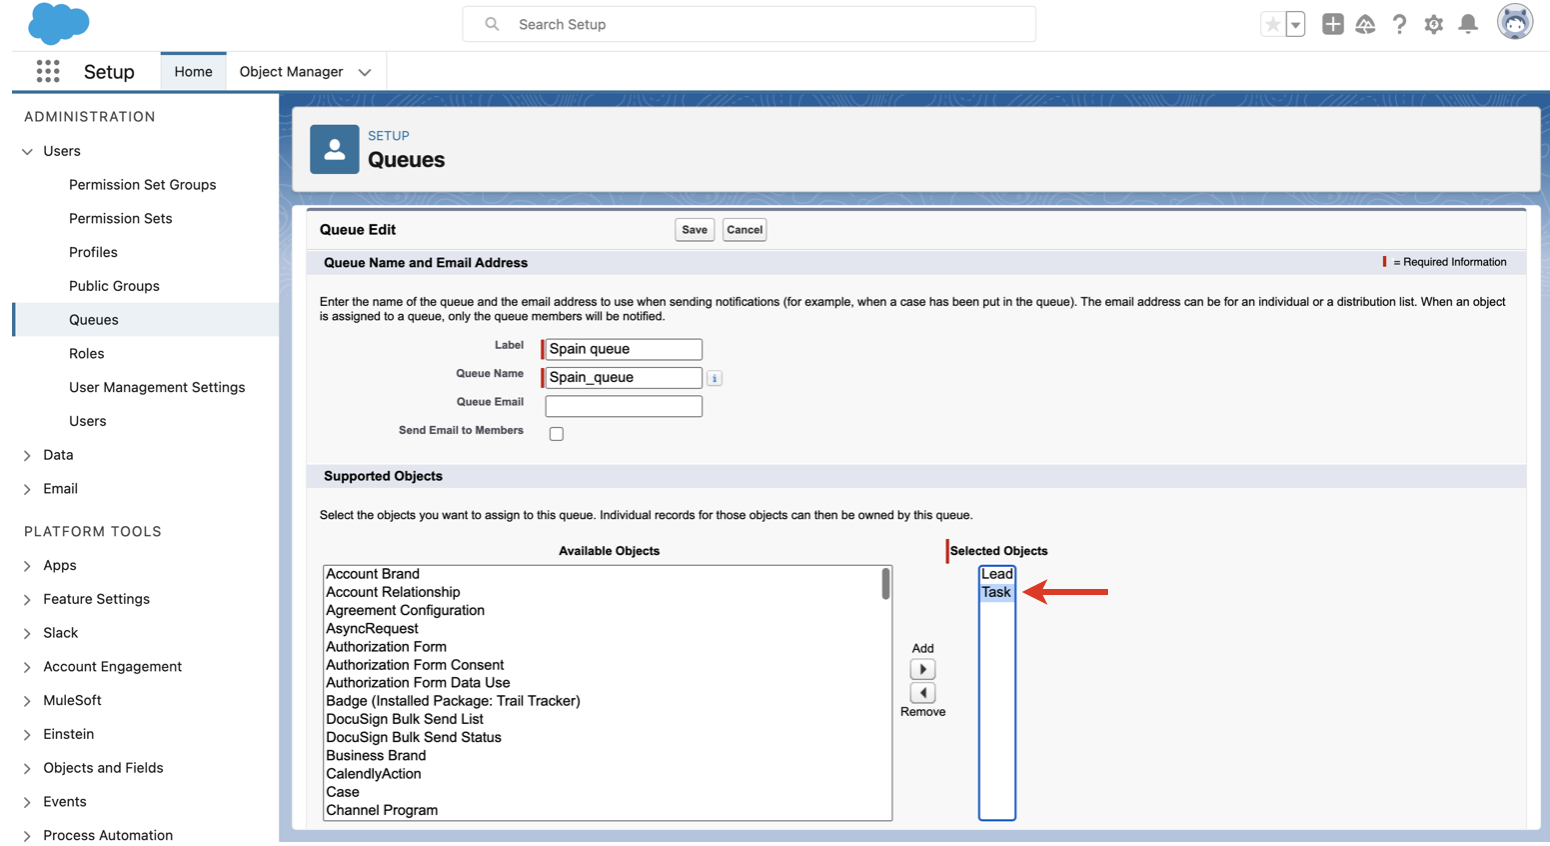
In case you are using queues in Salesforce and the Lead belongs to a queue, you may not be able to create a Task for this Lead in x-bees. In this case, you need to apply the following settings in Salesforce:
- Go to Setup -> Users -> Queues
- Select the queue and click Edit
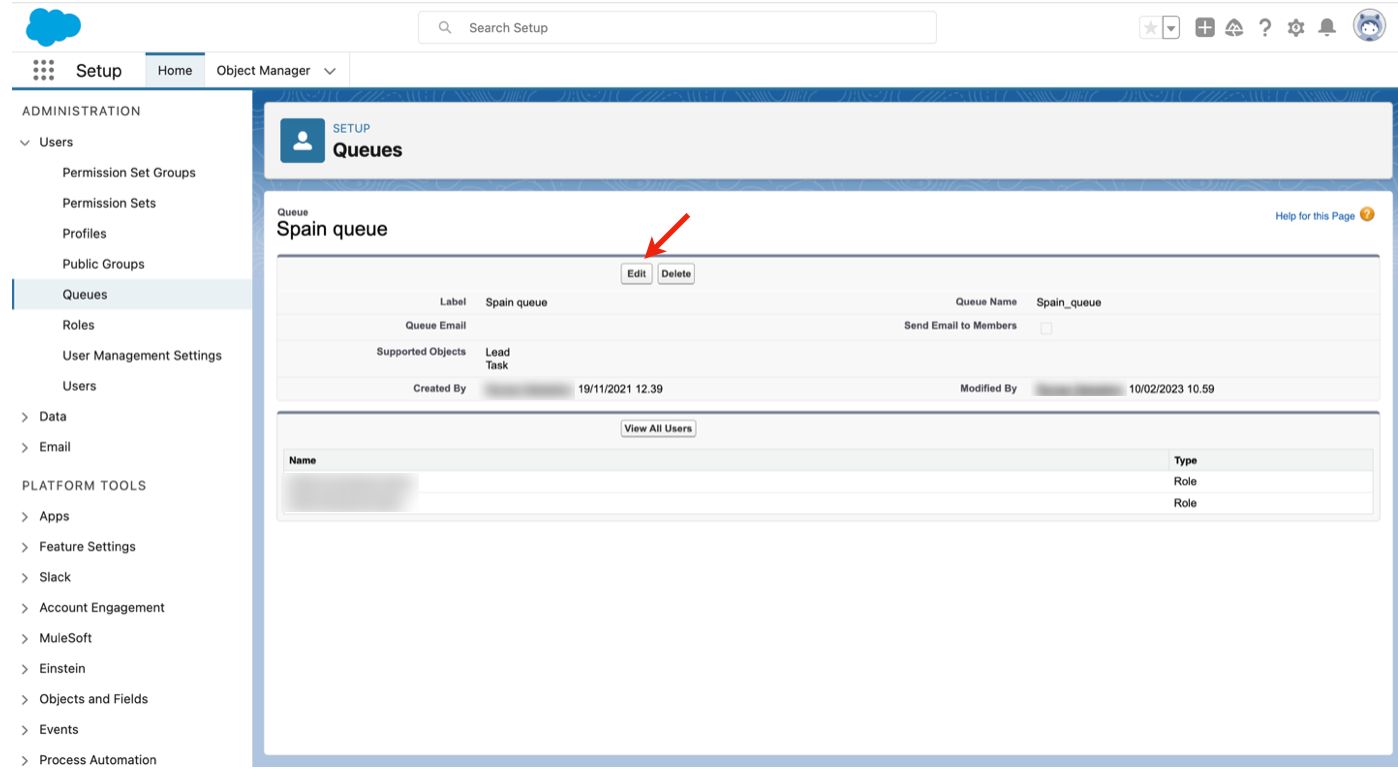
- Navigate to Supported Objects -> move the option Task to Selected Objects:
Conferences with leads are also automatically logged to Salesforce as completed tasks. Logged data includes conference title, conference start time, duration and participants:
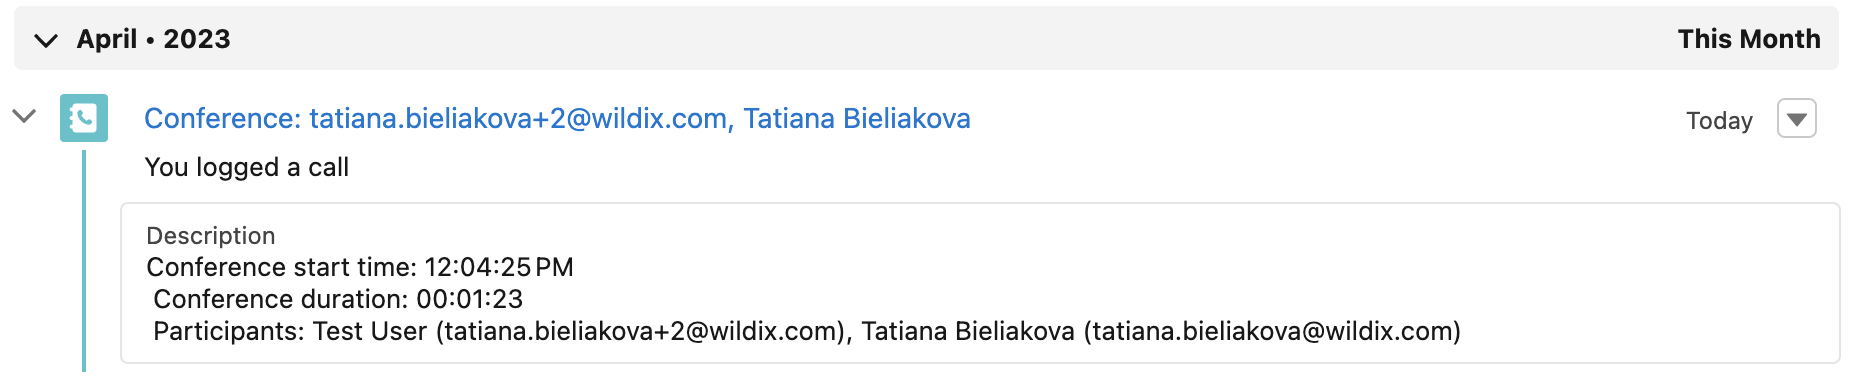
In case conference transcription was enabled, it is automatically added to Salesforce, read more in the guide How to use real-time transcription of x-bees calls and conferences.
Note: The logging process follows the below rules:
- If x-bees user, who adds a task or makes a call or conference with Lead or Contact, is not present in Salesforce, the task in Salesforce is displayed as created by user who installed the integration. Otherwise, the task is displayed as created by user, who actually created the task, or had a call or conference with Salesforce Lead or Contact.
- When the user who manually logged the activity is not in Salesforce, in the Task Information section a comment is added informing whom the task was created by.
- Internal activities, which involve only x-bees users are not logged.
- In case of a conference with multiple Leads or Contacts, a task is created for each Lead or Contact that has a match in Salesforce.
- If a Lead's owner is present in the conference, the Lead's owner is displayed as the creator of the task for this Lead. Otherwise, the creator is the user who installed the integration
Logging Scheduled Meetings
In case the contact exists in Salesforce, meetings scheduled via Meeting Scheduler are automatically logged as activities in Salesforce:
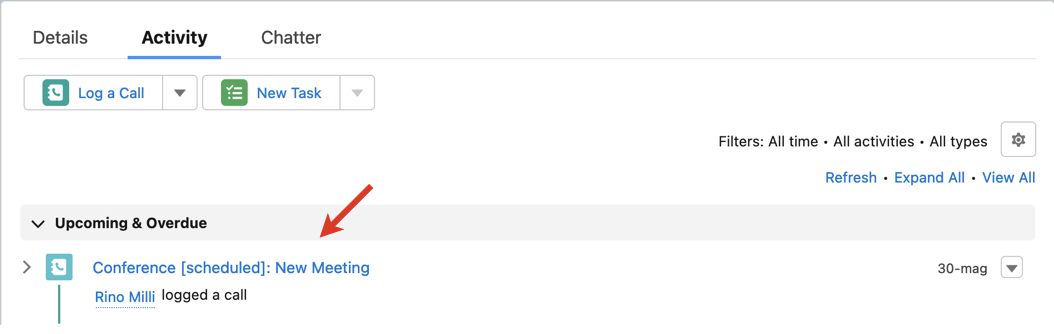
The logged activity includes meeting details and description and is marked as open; due date is the meeting date.
Note:
- The logging works only for meetings created by guest users using Meeting Scheduler. Scheduled meetings are automatically logged as activities in Salesforce only if the contact already exists in the CRM records.
- The agent should be present in Salesforce with the same email as in x-bees.
In case the meeting was rescheduled or cancelled, the changes are automatically synced to Salesforce:


Cancelled meetings are marked as completed.
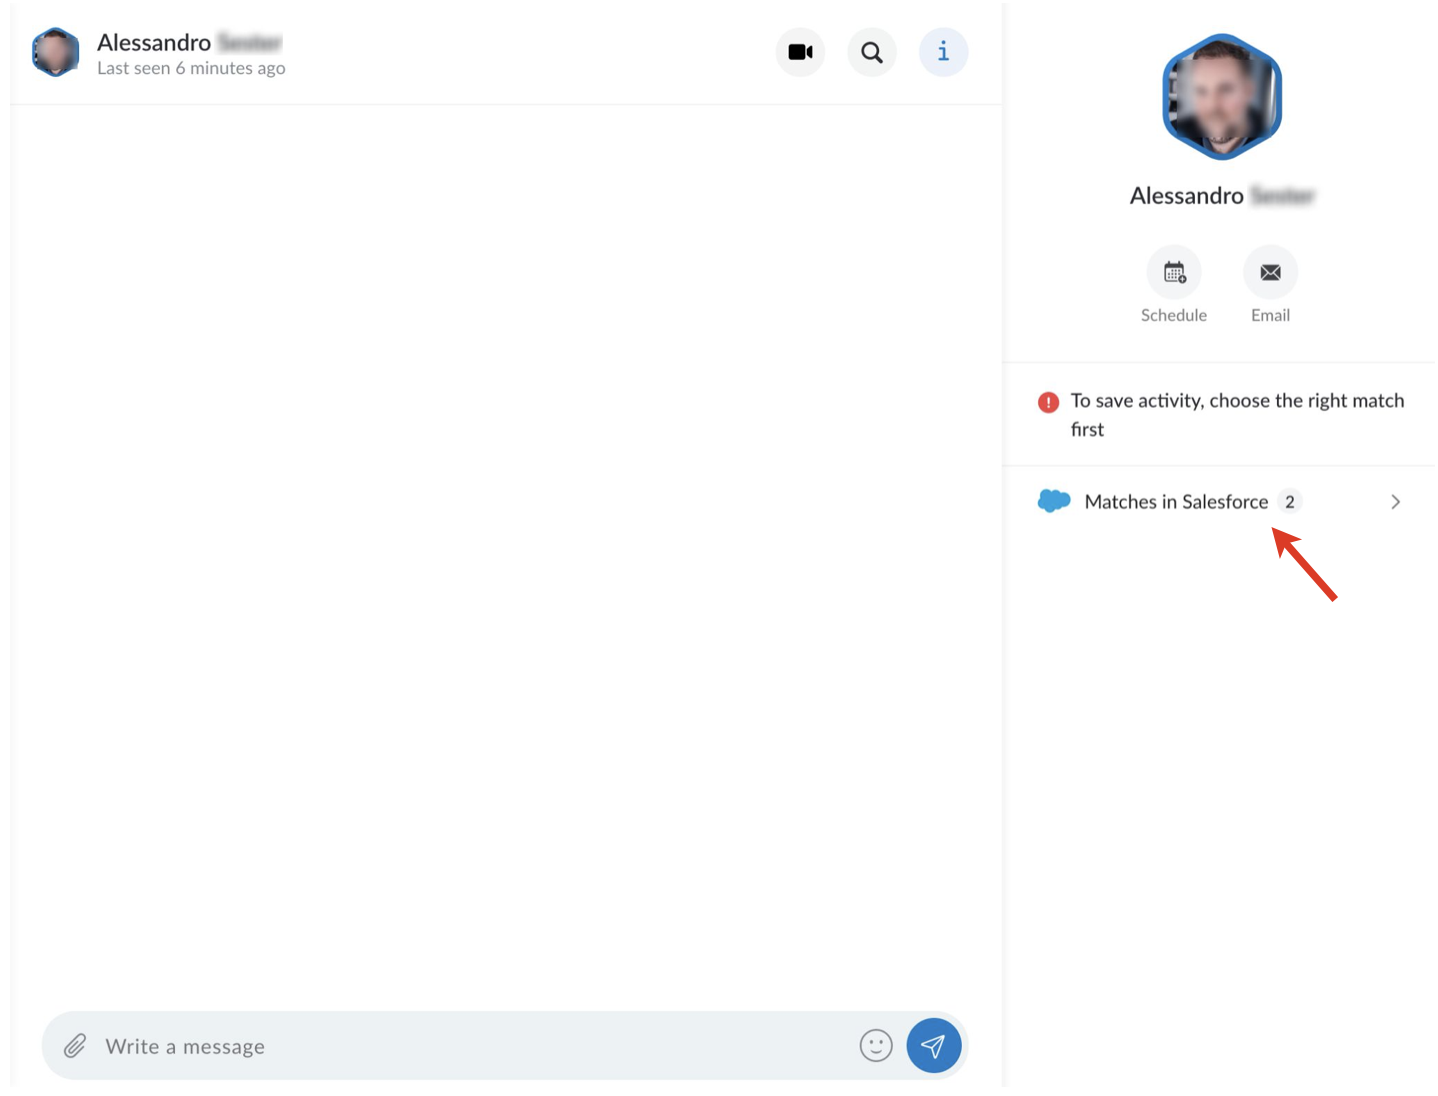
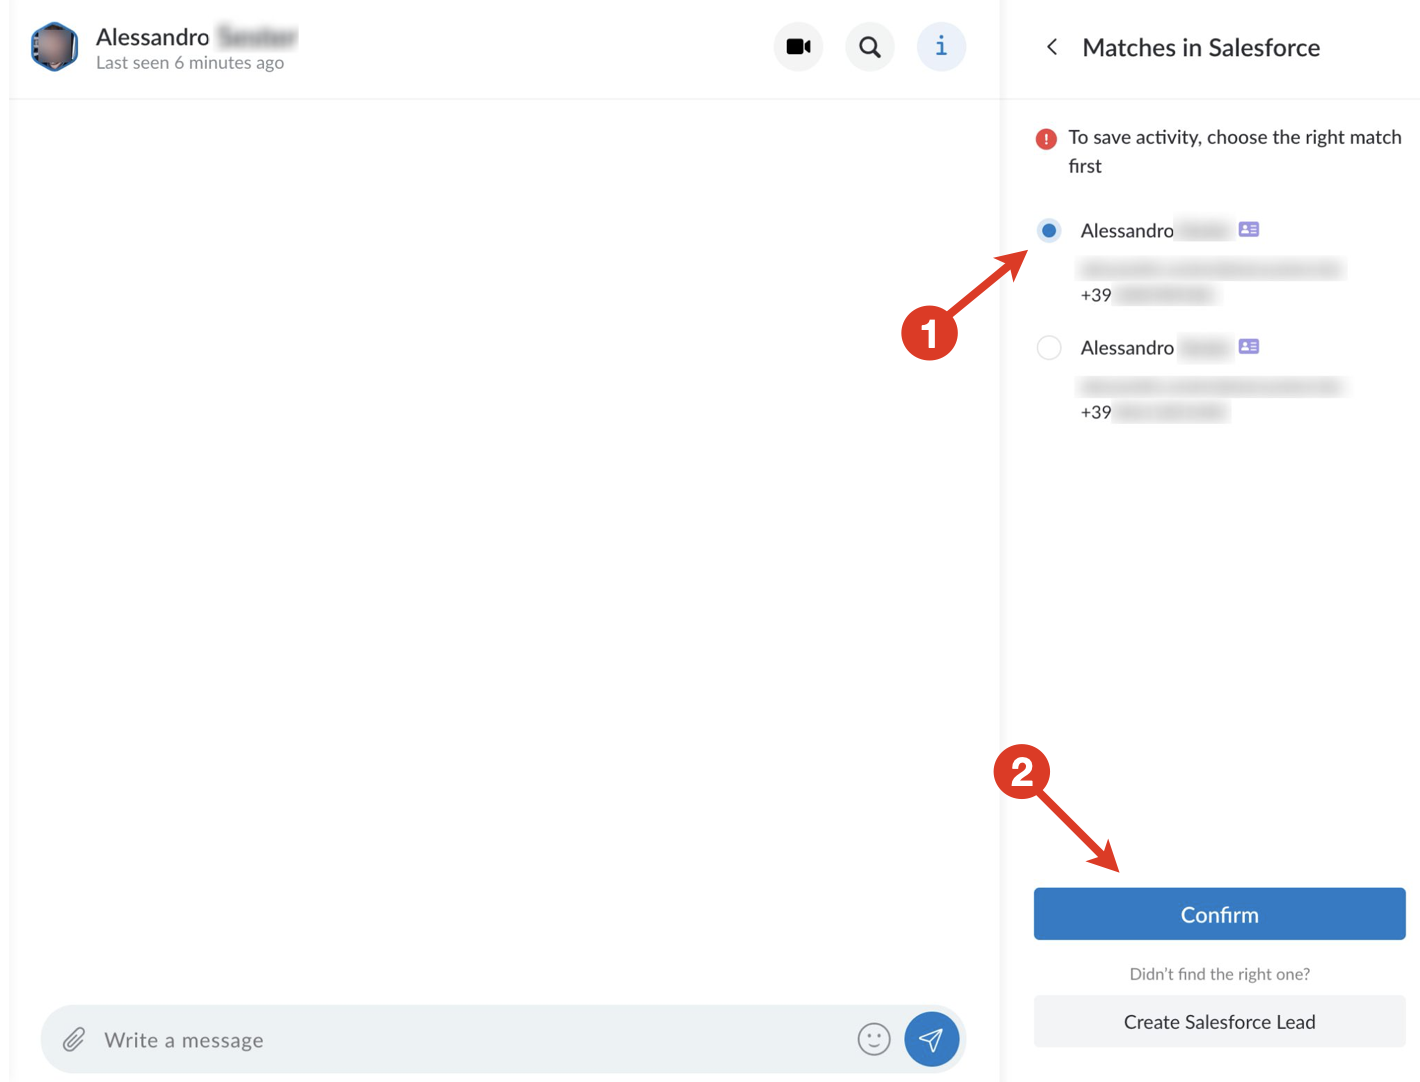
Multiple matches found in Salesforce
In some cases, when looking for a Salesforce lead on x-bees, multiple matches are found. In this case, you need first confirm the match, and then log the activity.
Note: Keep in mind that the same Salesforce match can appear as a lead (orange icon) and a contact (violet icon). In this case, you need to select whether to log the activity to the Salesforce lead or to the Salesforce contact.
Click on the Matches in Salesforce field:
Choose the relevant match (1) and click Confirm (2):
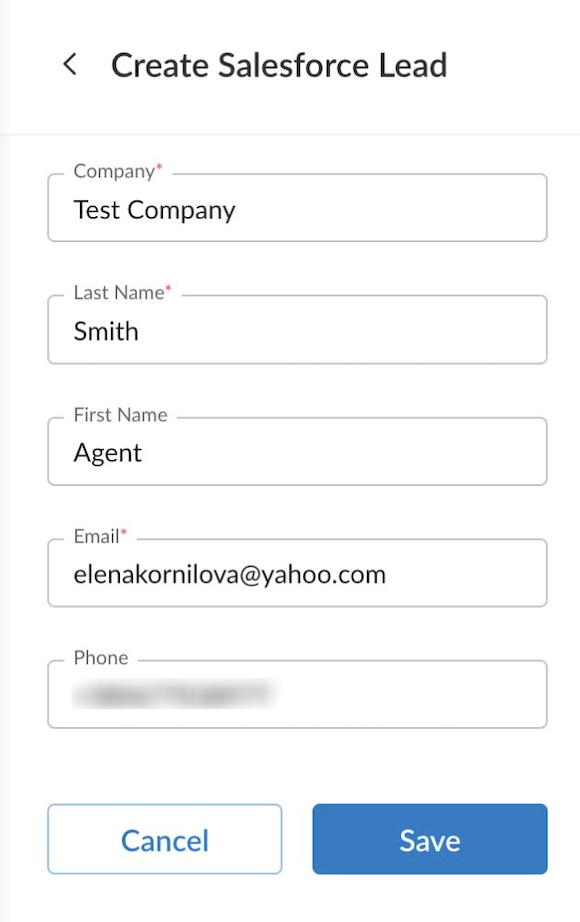
Create a Salesforce lead
You can create a Salesforce lead in x-bees from a conversation or from a contact card.
- From a conversation
In case you are in a conversation with an external person who is not present in Salesforce, you can add this contact:
- From a contact card
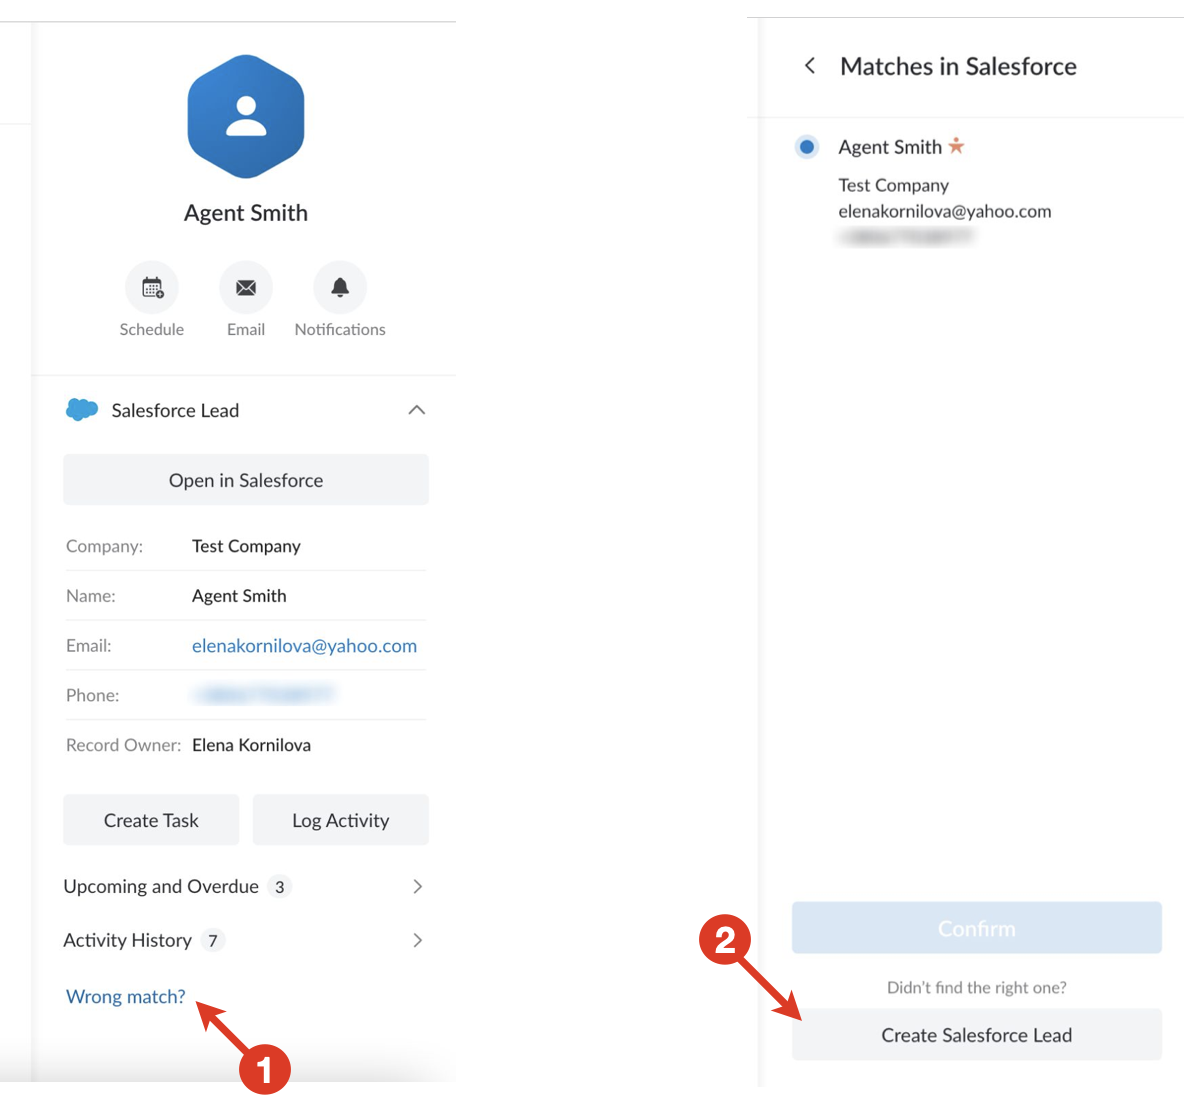
In case you opened a Salesforce lead and you consider it a wrong match, you have an option to create a new Salesforce lead:
One match found in Salesforce:
- Click Wrong match?
- Click Create Salesforce Lead
Multiple matches found in Salesforce:
- Click Matches in Salesforce (1) ->Create Salesforce Lead (2):

- At the next step, fill out the fields and click Save: