...
| Info |
|---|
This document is a complete guide explaining how you can enable access to Wizywebinar and use it to schedule and run your webinars. Created: January 2021 Updated: May 2023 Permalink: https://wildix.atlassian.net/wiki/x/ahLOAQ |
| Table of Contents |
|---|
| Noprint |
|---|
Wizywebinar White paper |
...
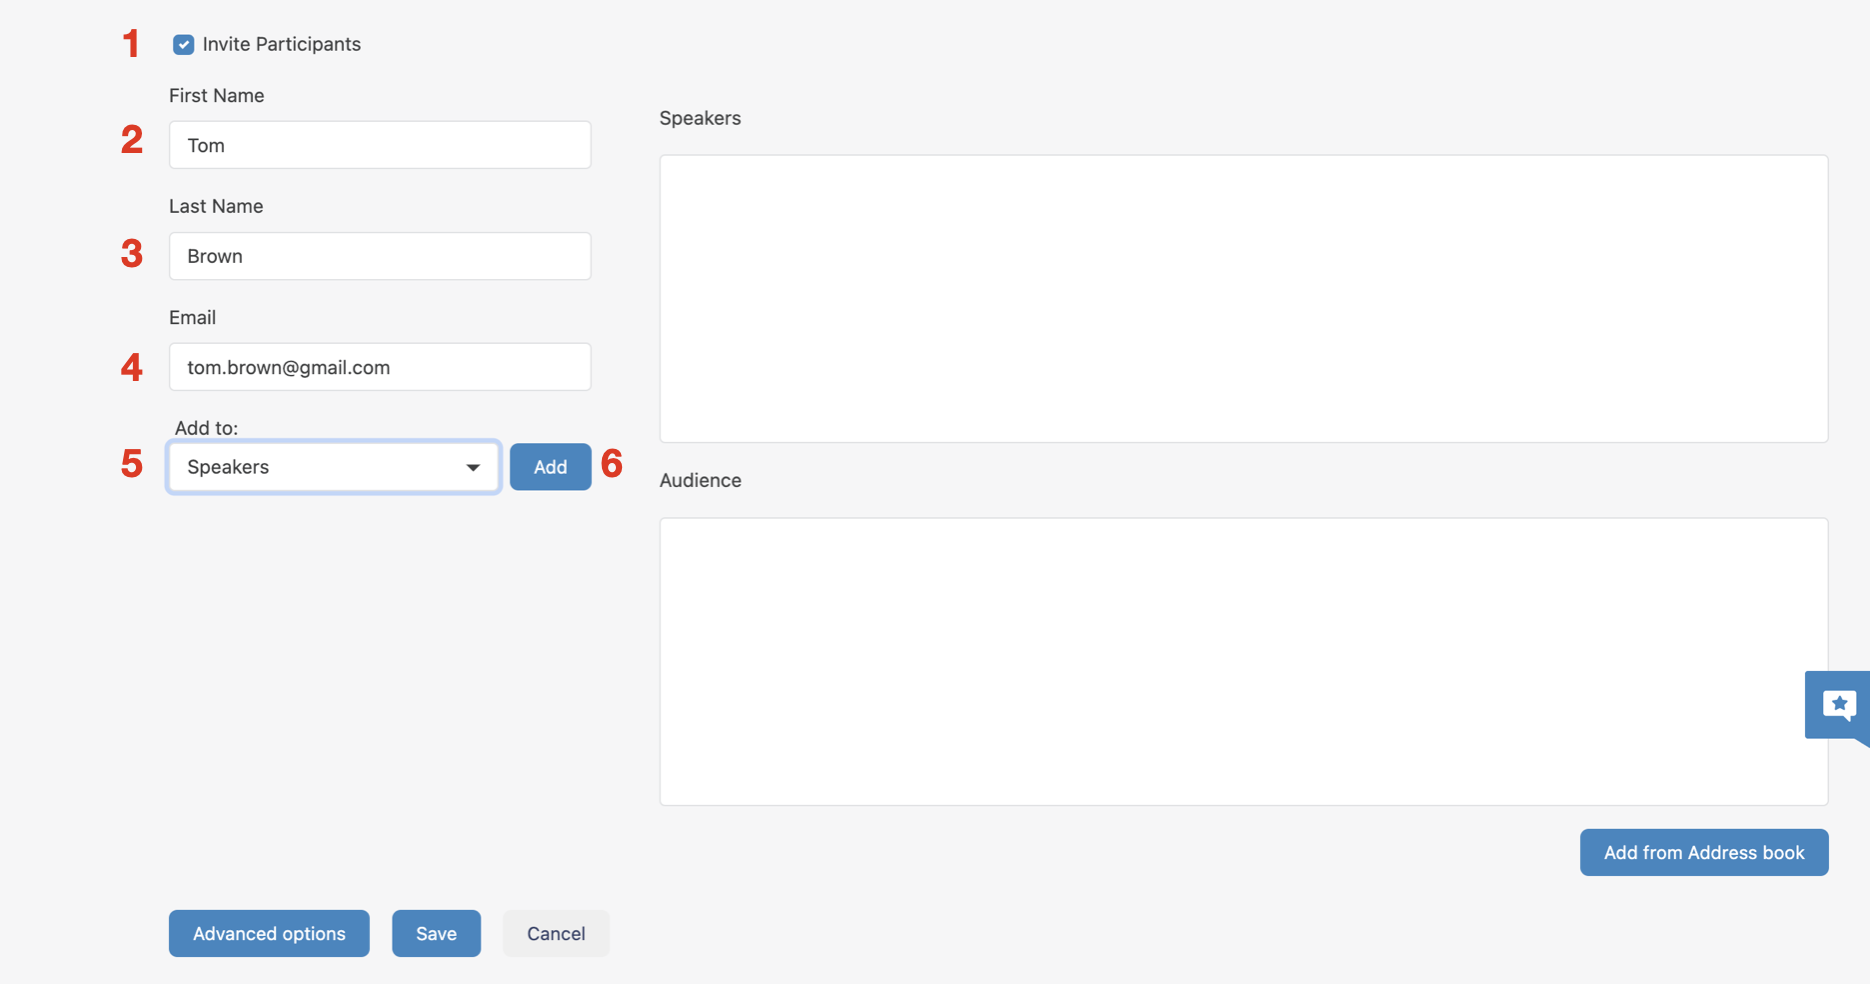
- Check the box Invite Participants (1)
Enter First Name (2), Last Name (3), Email (4), choose role(Audience or Speaker) (5)and click Add button (6). Detailed information about adding participants is described in the Participants section
- Click Save in the lower part of the screen
...
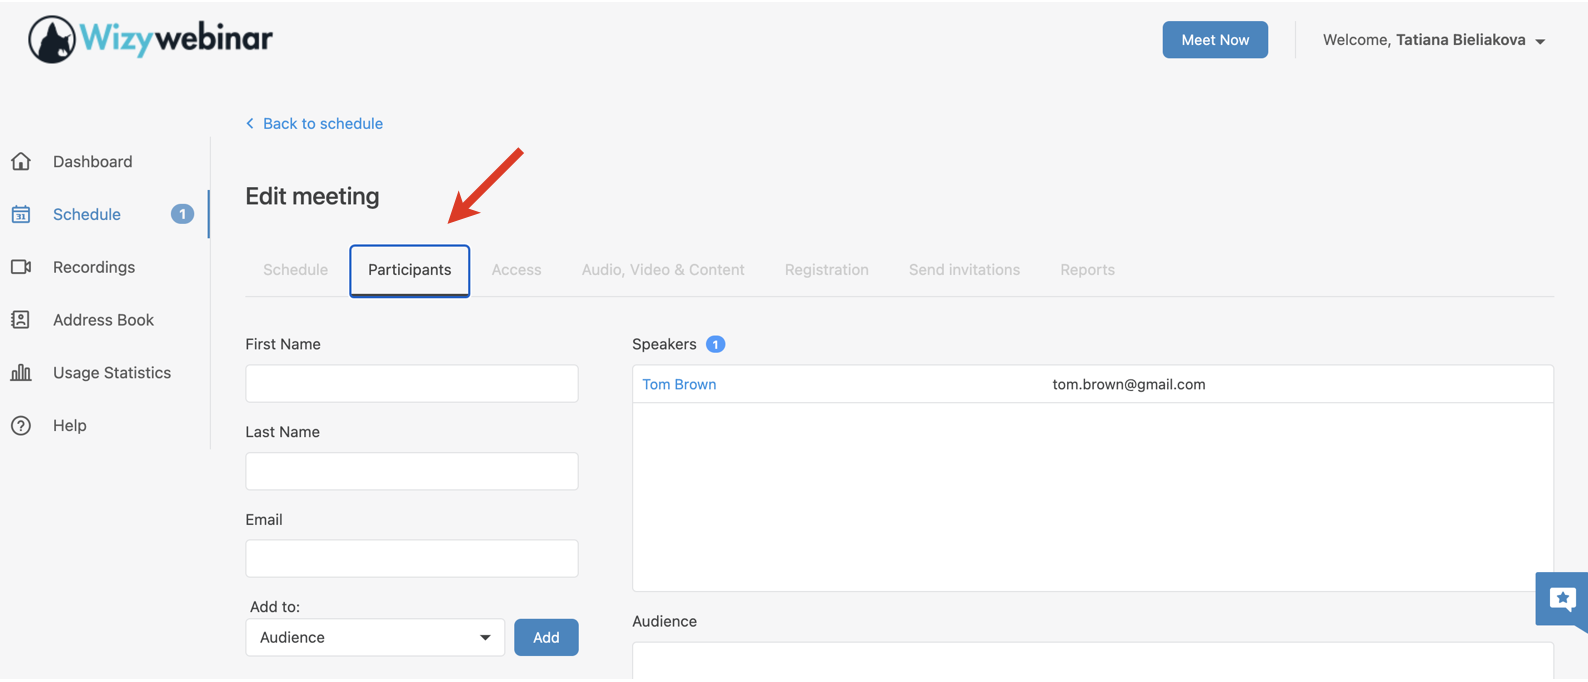
- Click on the Participants tab. In this menu, you can add participants to your webinar using one of 3 modes:
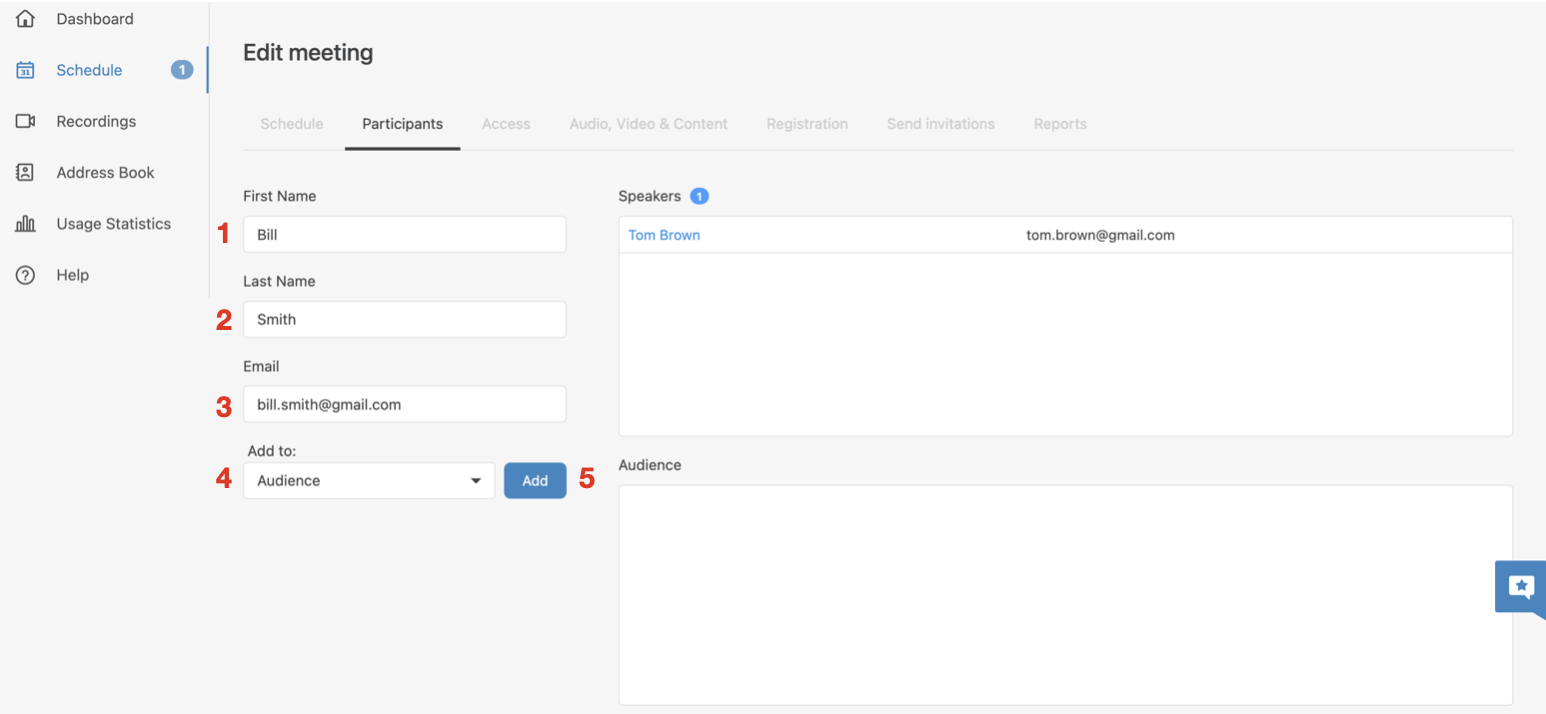
1 - add participants manually: enter user’s First name (1), Last name (2), email (3), set a role (4) and click Add button (5). By default, new contacts are automatically saved in Address Book, unless you change this behavior (see the additional control options in this section):
Note Note: When you add participants, you always need to indicate their role:
- Speaker – someone who runs the webinar, broadcasts their audio and video and controls various aspects of the webinar. There can be more than one speaker. Speakers have a number of privileges over other participants, which include: the ability to speak, show video, start the recording, manage other participants, use group chat for speakers, and more as you’ll see later in this Guide
- Audience – mostly passive listeners of the webinar. By default, they don’t have permission to speak, unless allowed by speakers. If needed, they can interact using chat in Conversations, Questions and Answers, etc.
There is also an Account holder – someone who sets up the webinar and the only person who can edit the details of the event before it starts. Account holder belongs to Speakers of the webinar by default.
- 2 - add participants from Address Book: you can add them one by one or select multiple participants
Click the button Add from Address book: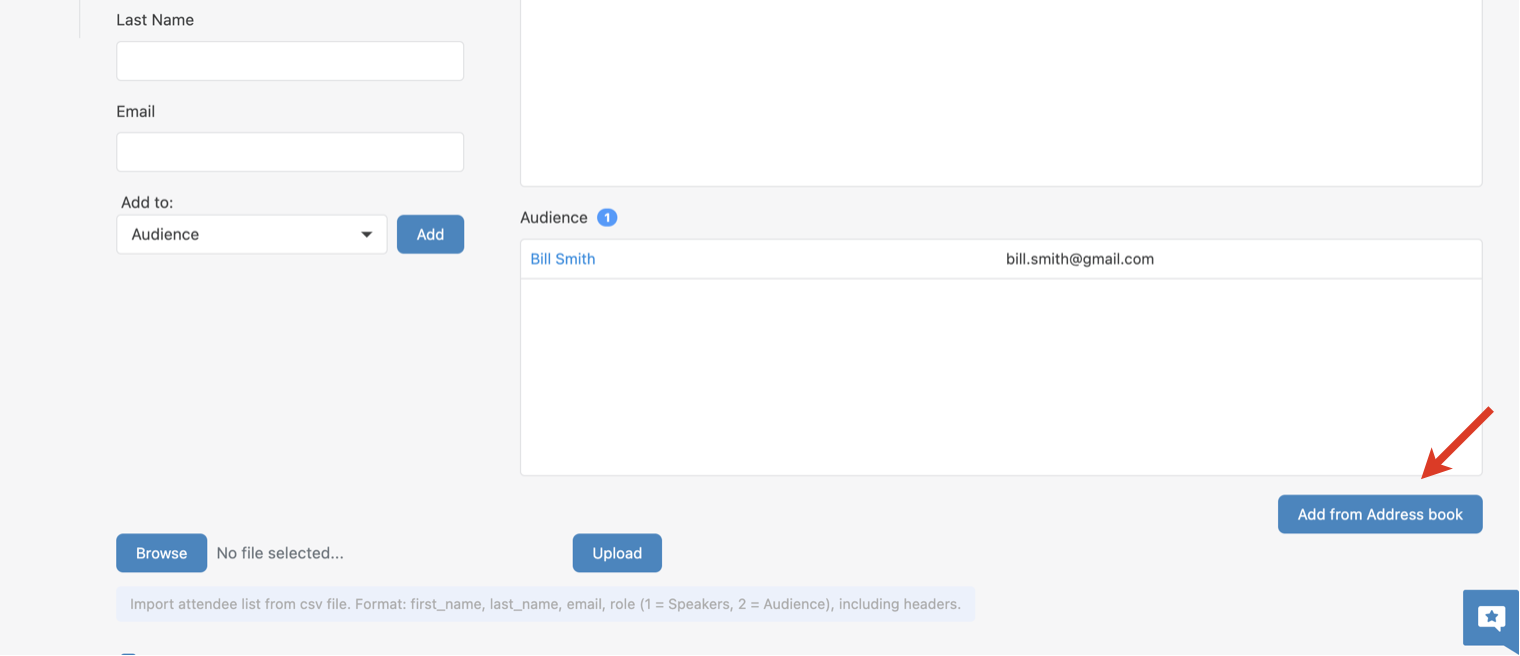
Select participants (1) and click Add (2):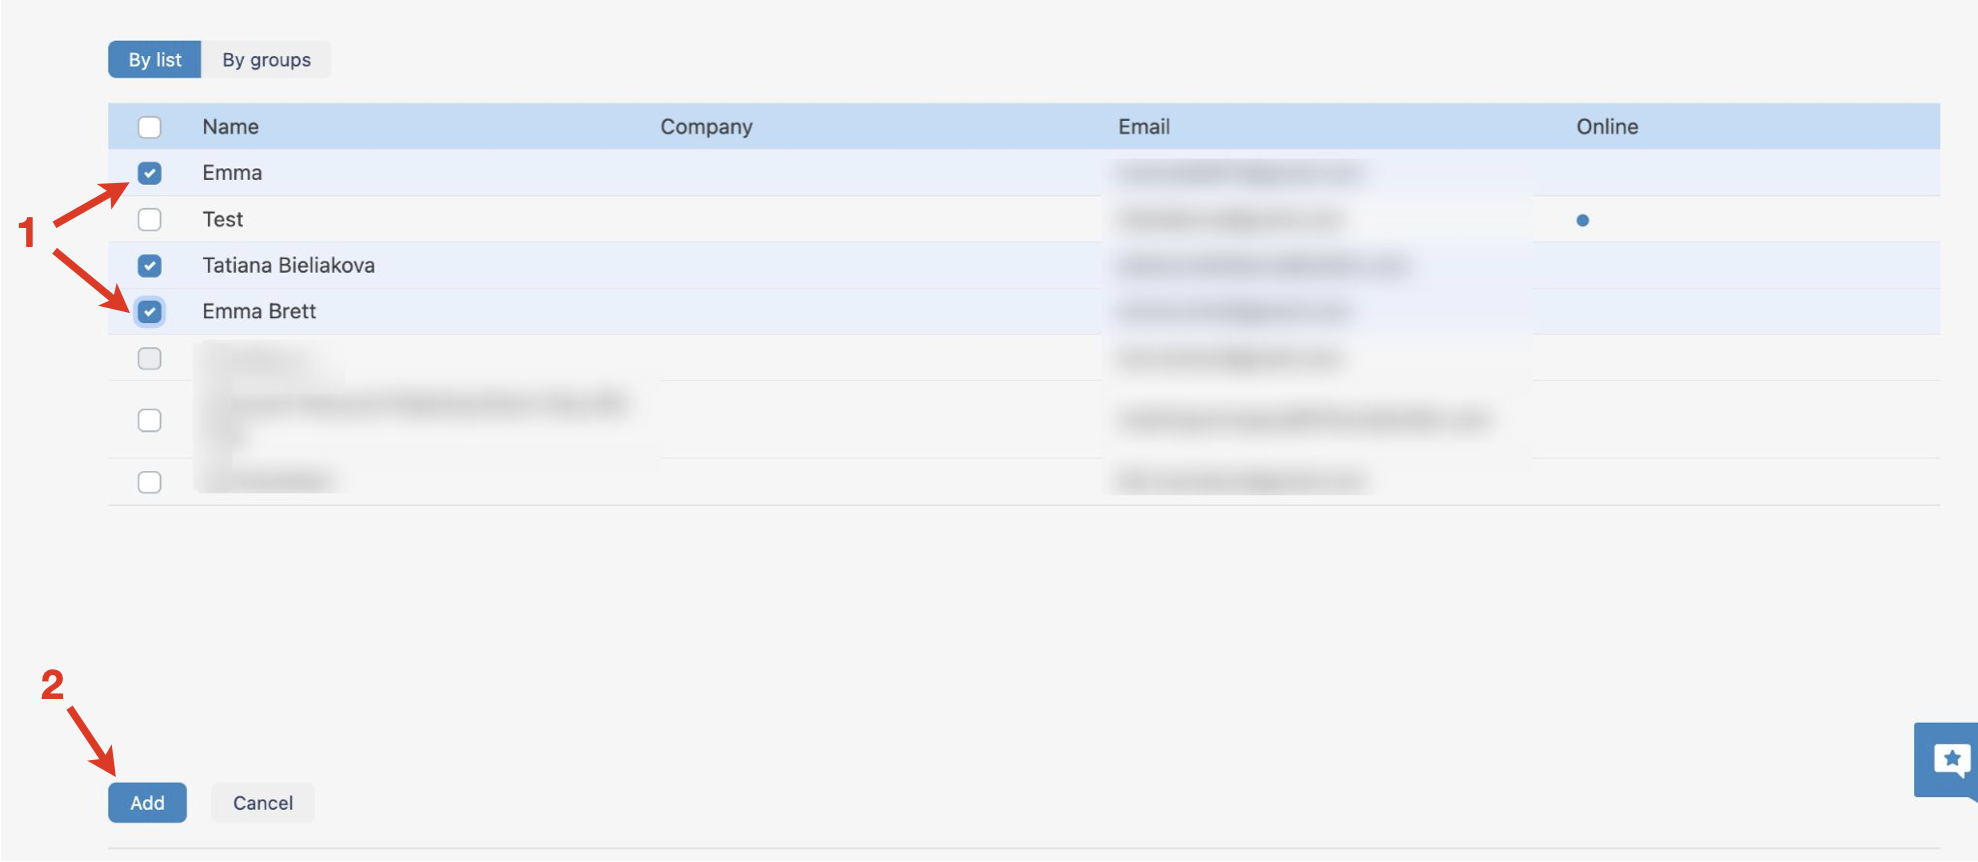
Note: Participants are added to the group (Speakers/ Audience) chosen above. So, if you want to add users from Address book to another group, make sure to adjust the setting accordingly: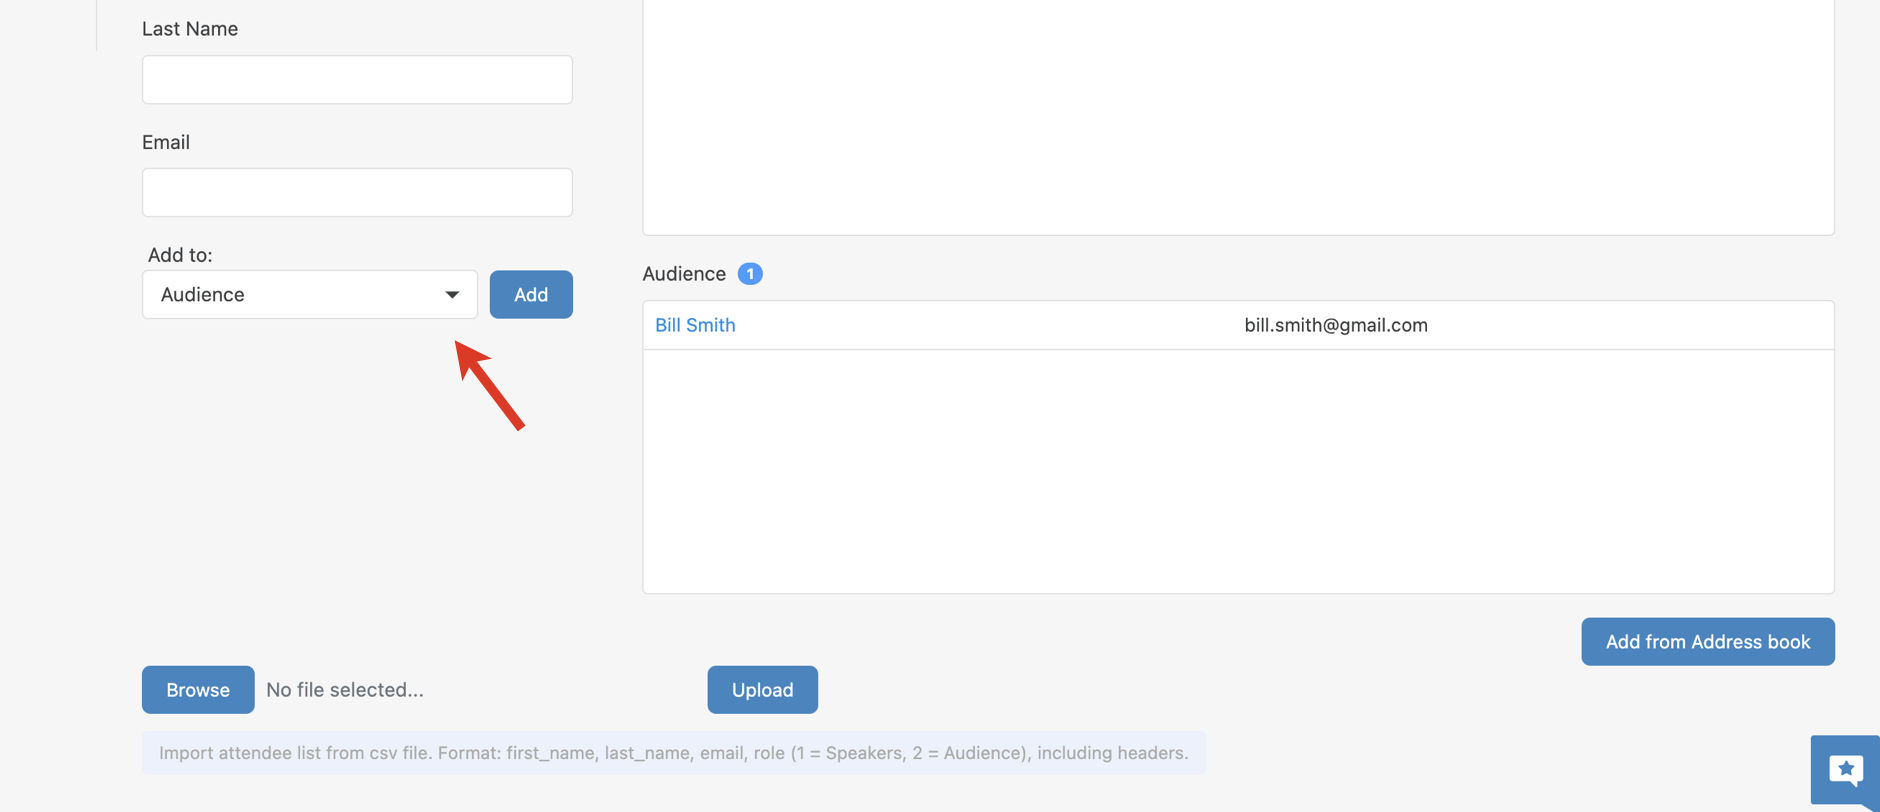
3 - import participants: click on Browse to select the CSV file on your PC (1) and click Upload button to import the list of participants (2):
Note Make sure your CSV file is compliant with the required format: first_name, last_name, email, role (1 = speaker, 2 = audience), including headers.
Example:
first_name last_name email role first_name_of_person1 last_name_of_person2 email@person1 1 first_name_of_person2 last_name_of_person2 email@person2 2 or download a sample CSV file: Sample Wizywebinar participants import.csv.
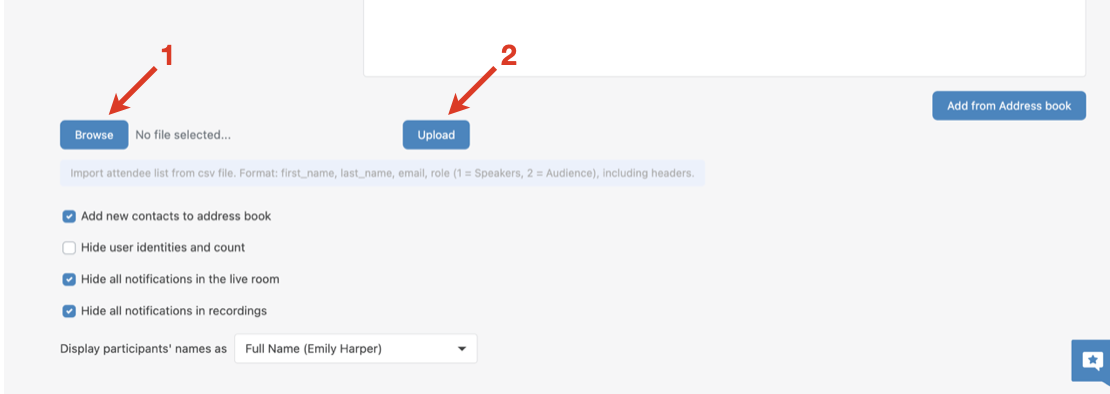
Once imported, participants appear in the list of Speakers/ Audience, depending on their role
When the list of participants is complete, scroll down and hit Save button:
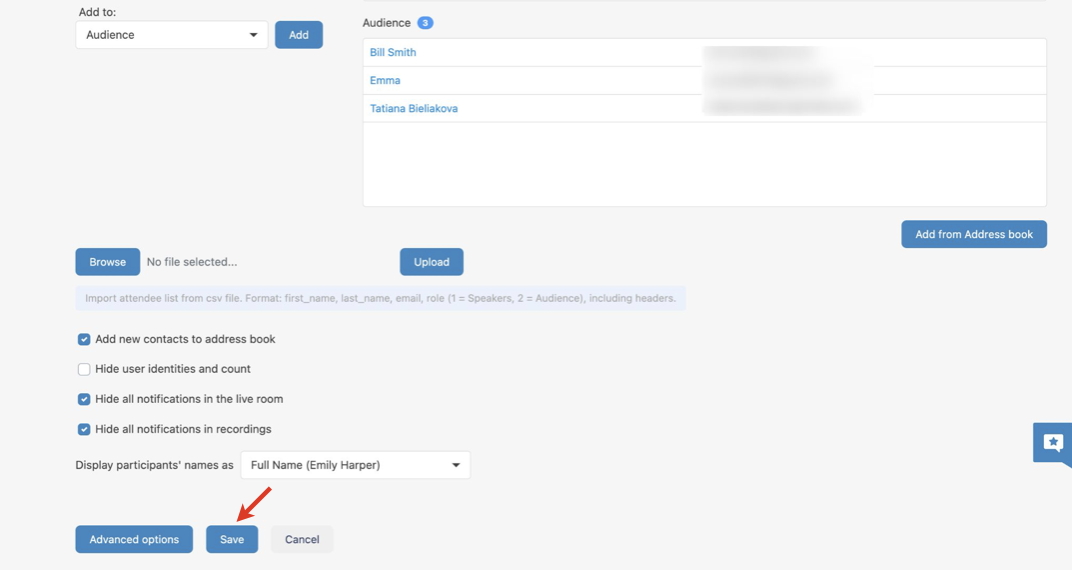
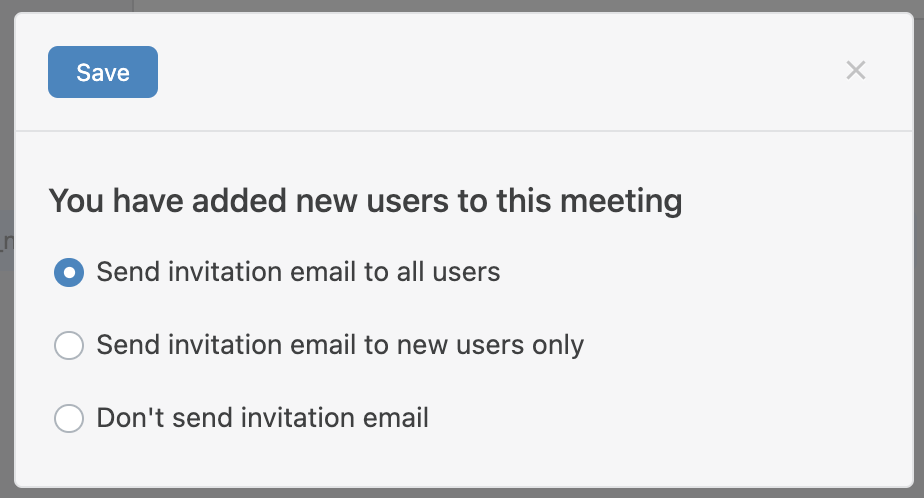
A new dialog opens, make your choice, whether or not the invitation emails should be sent to the participants:
...
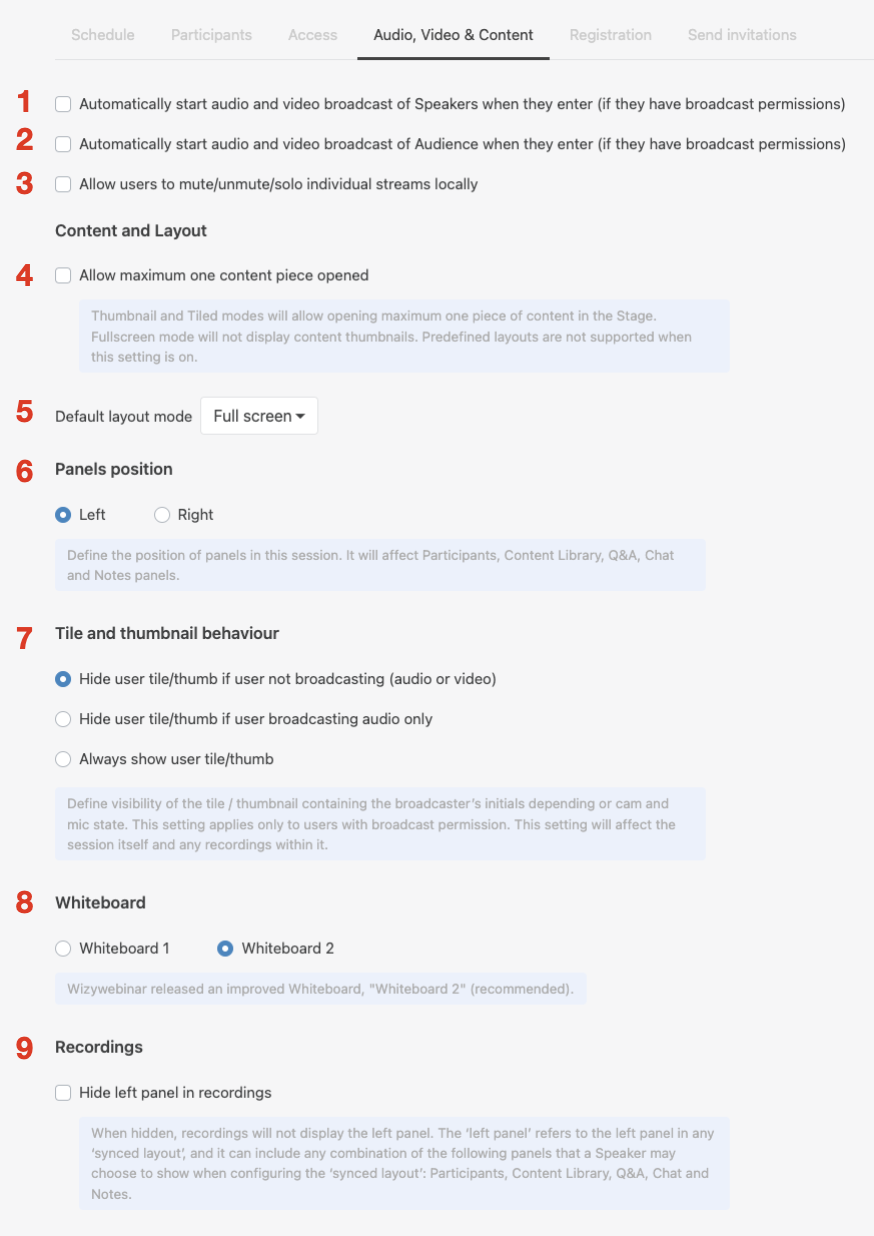
- Allow maximum one content piece opened (4):if enabled, any piece of content loaded from the Content Library is displayed in the Stage area, entirely replacing the previously loaded content regardless of type. In other words, the Stage area can never be split with multiple content pieces.
- Default Layout (5): set the default layout for the session (Full screen, Tiled, or Thumbnail)
- Panels position (6): choose the position of panels (Participants, Content Library, Q&A, Chat and Notes) in the session
- Tile and thumbnail behaviour (67): define visibility of tiles and thumbnails containing broadcaster’s initials depending on the state of their camera and microphone (applies only to users with broadcast permissions and affects sessions and recordings).
- Whiteboard (78): you have an option to choose which Whiteboard to use, the old one (Whiteboard 1) or the new Whiteboard 2 (default one).
- Hide left panel in recordings (89): when the option is on, the left panel (the left panel in a synced layout, which may include Participants, Content Library, Chat or a set of other sections configured by a Speaker for the synced layout) is not displayed in recordings:

Registration: allowing participants to register for a session
...
To see the list of those who have registered or were invited to your webinar, go to the Reports tab and download the CSV or Excel file. You can find more information about reports in the Statistics 30282285 section of this guide.
Send invitations: Customizing invitation email, reminder and follow-up emails
| Anchor | ||||
|---|---|---|---|---|
|
...
- {first_name} - invitee's first name
- {last_name} - invitee's last name
- {company} - invitee's company
- {user_first_name} - your first name
- {user_last_name} - your last name
- {user_company} - your company
- {user_email} - your email
- {start} - start time of the event
- {timezone} - timezone
- {topic} - event name/topic
- {description} - description of the event
- {agenda} - agenda of the event
- {personal_link} - personal invitation link identifying the invitee
- {event_registration_link} - access link to the event, may require user to enter name
- {unsubscribe_link} - event unsubscribe link
- {unsubscribe_button} - event unsubscribe button
- {session_link} - session friendly link
- {password} - session password
- {event_page_link} - event page link
- {join_button} - join button
- {agenda_files} - block containing links to attached files
- {ics_link} - link to the calendar file
...
By default, you enter the room with the webcam and microphone disabled (you can change it in Audio & Video settings).
Click on the Camera and Microphone icons on the left panel to enable them:
...
| Note |
|---|
Questions & Answers are disabled by default, you need to activate the option in Workspace settings. |
When inside a meeting, you have the option to ask questions as Audience and Speakers are able to answer them.
...
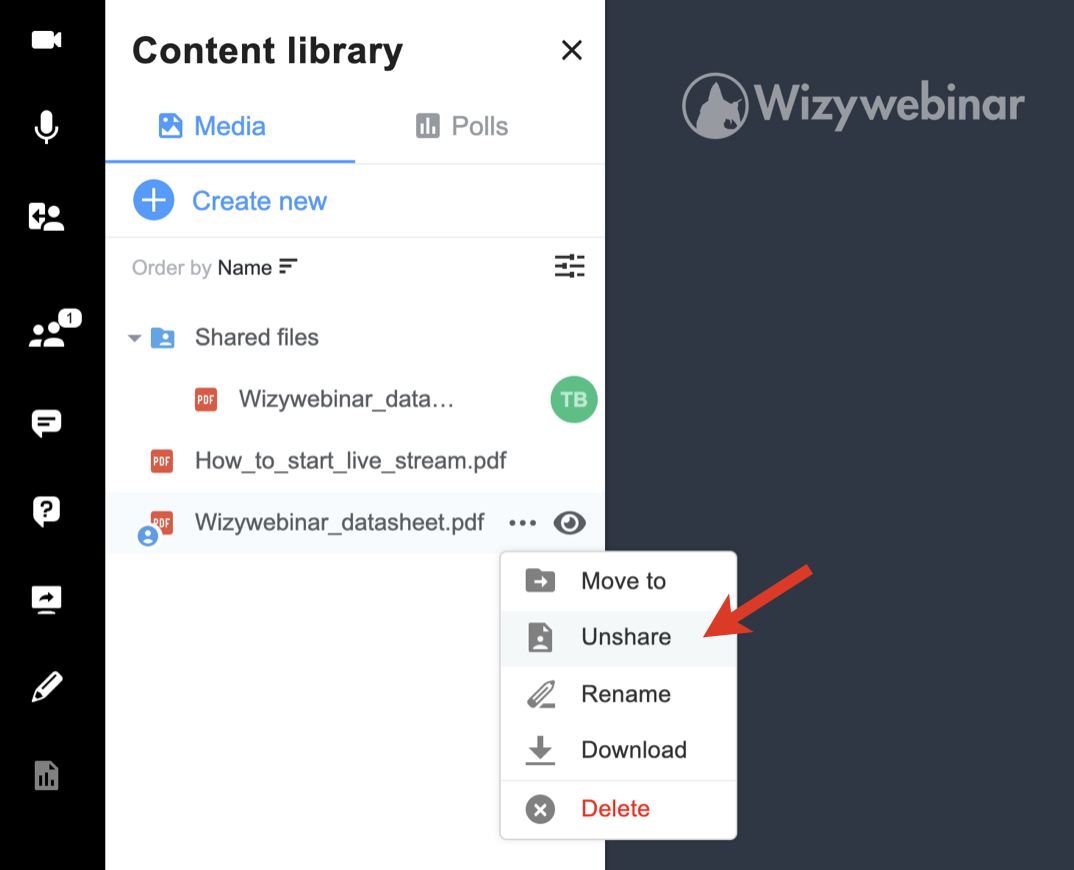
- The shared file or folder is then marked as shared and is added to the Shared files folder:
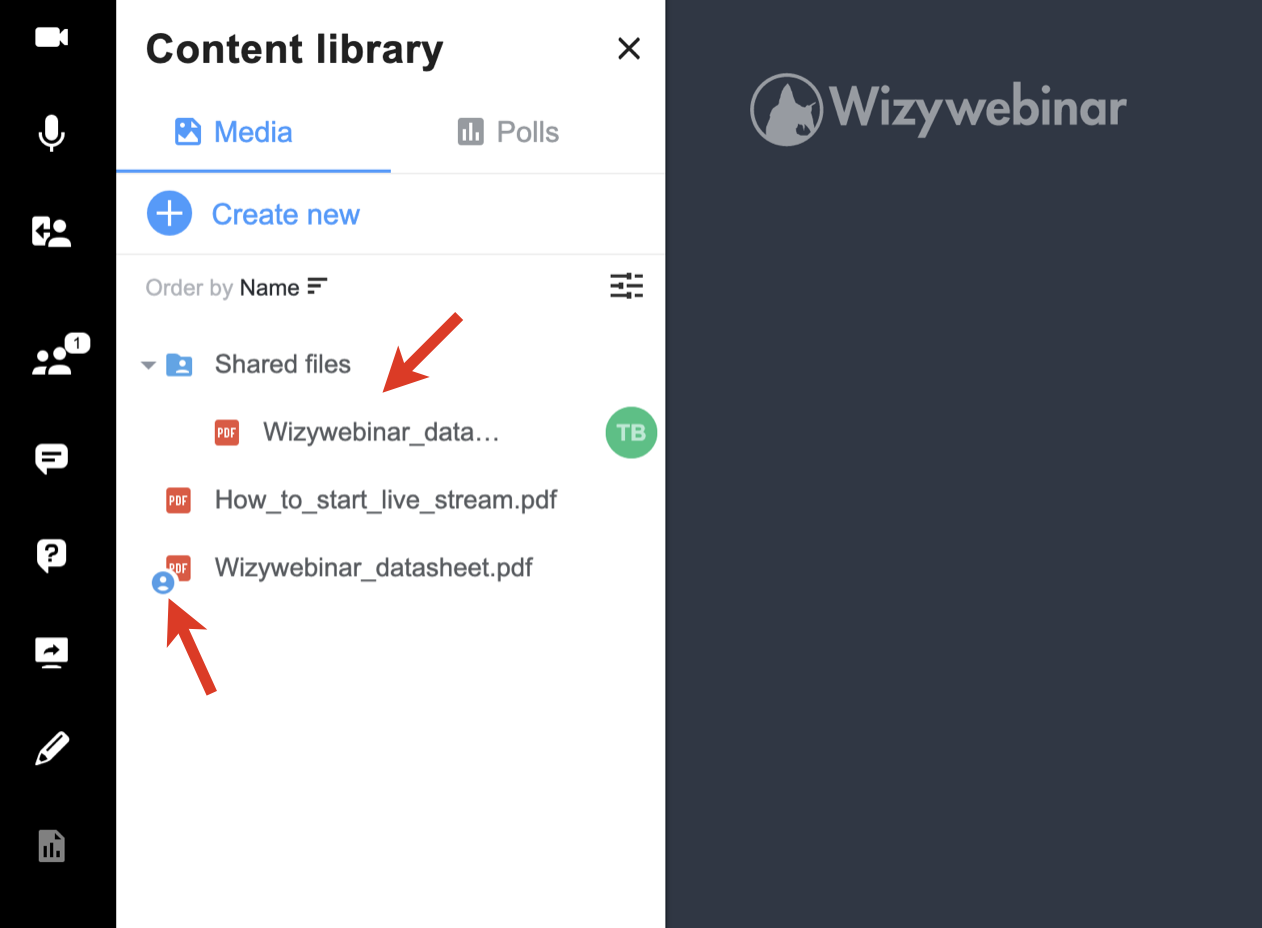
- The speakers you’ve shared the file/ folder with, can access them in the Shared files folder, download, and show to the audience.
- To unshare the file/ folder, click on the three dots -> Unshare. AnySpeaker can unshare files that are shared by other Speakers:
Play a YouTube/ Vimeo video
...
- Enable synced layouts (disabled by default): More information in the chapter Synced layouts
- Enable live streaming
In addition, in this menu, you can change the number of thumbnail videos per page to be displayed for Full Screen Layout/ tiled videos for Tiled Layout and change the Language of the web interface.
...
- Broadcast a message to all rooms: you can broadcast a message to all Breakout Rooms to announce some important messages or the end of the group activity
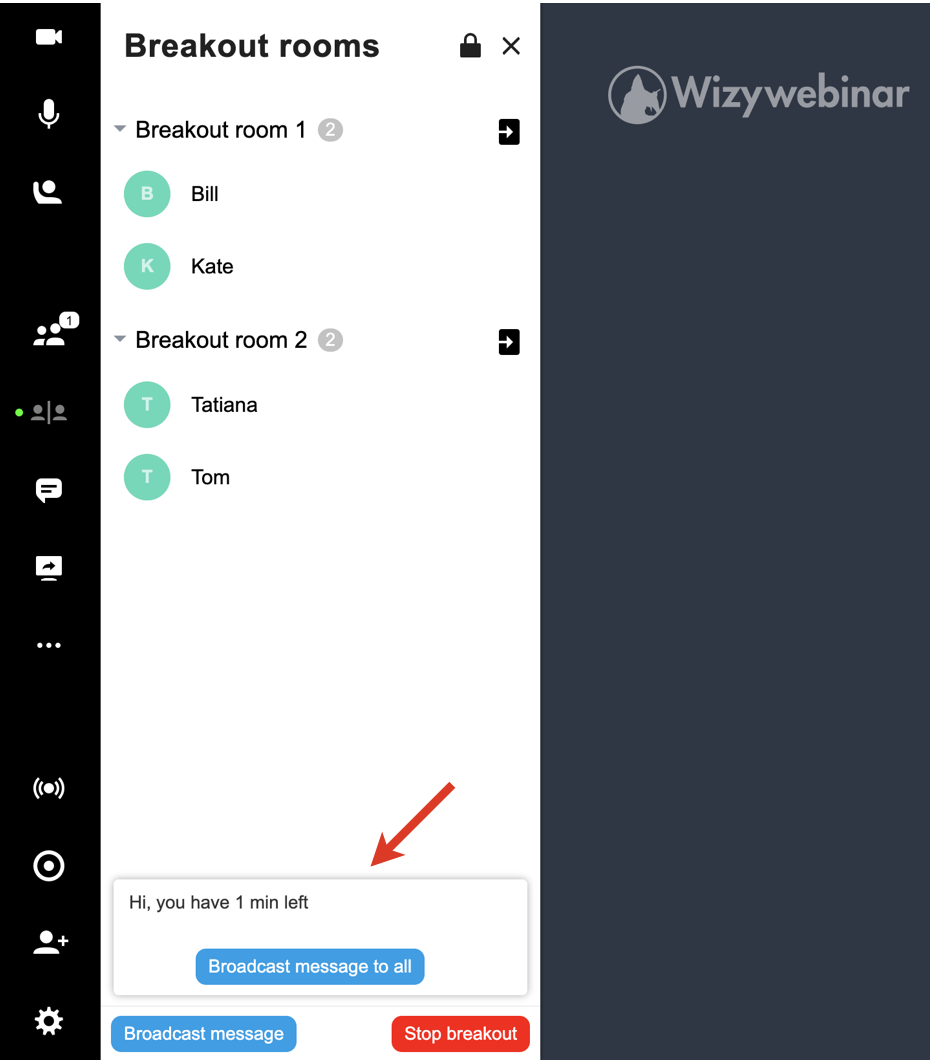
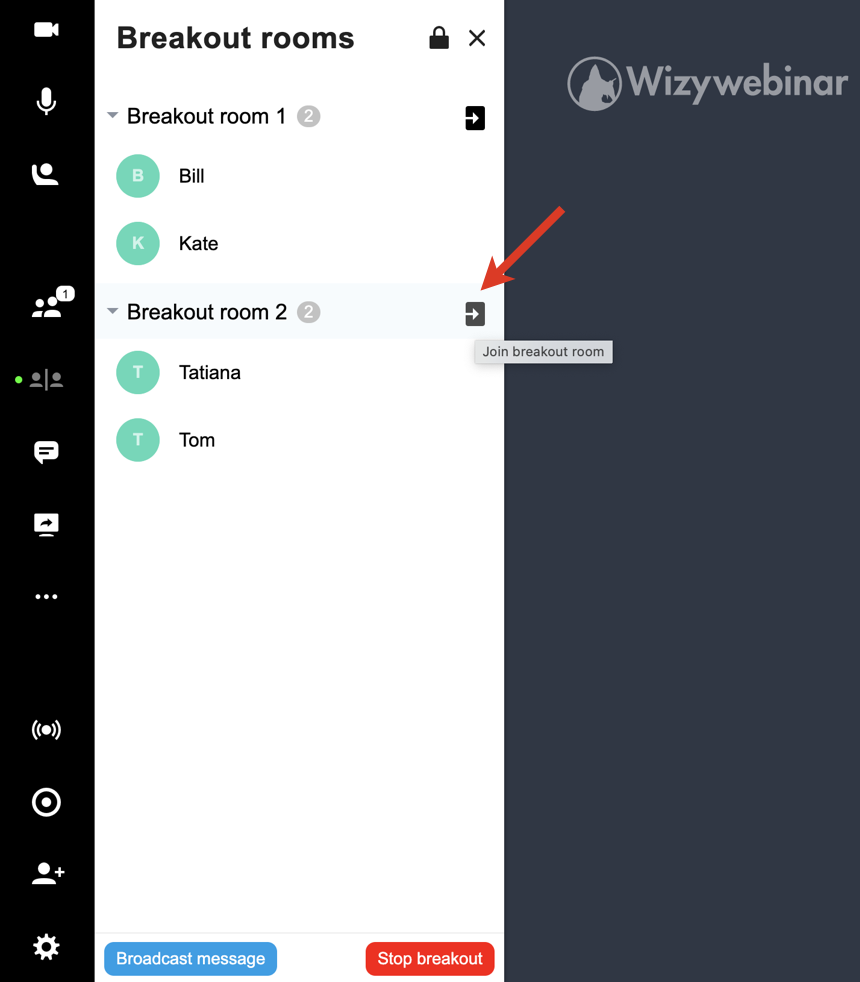
- Join a Breakout Room: Speakers can join any breakout room at any time by clicking the Join button next to the Breakout Room name:
Note Note: Breakout room participants can ask invite speakers to join the room if required:
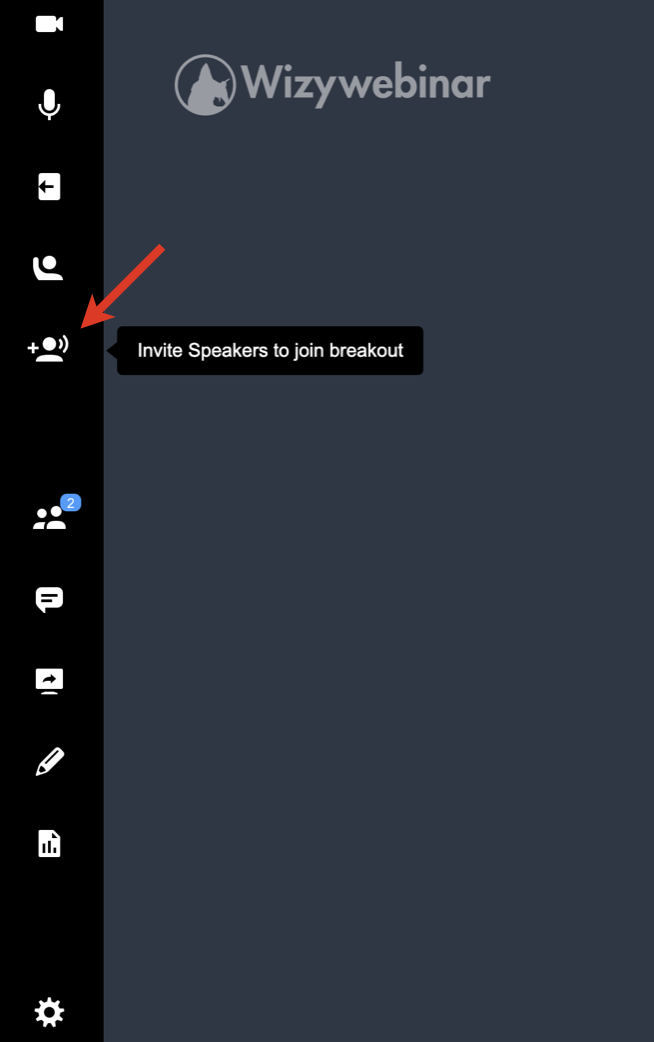
Speakers get the relevant notification, informing which room they are invited to.
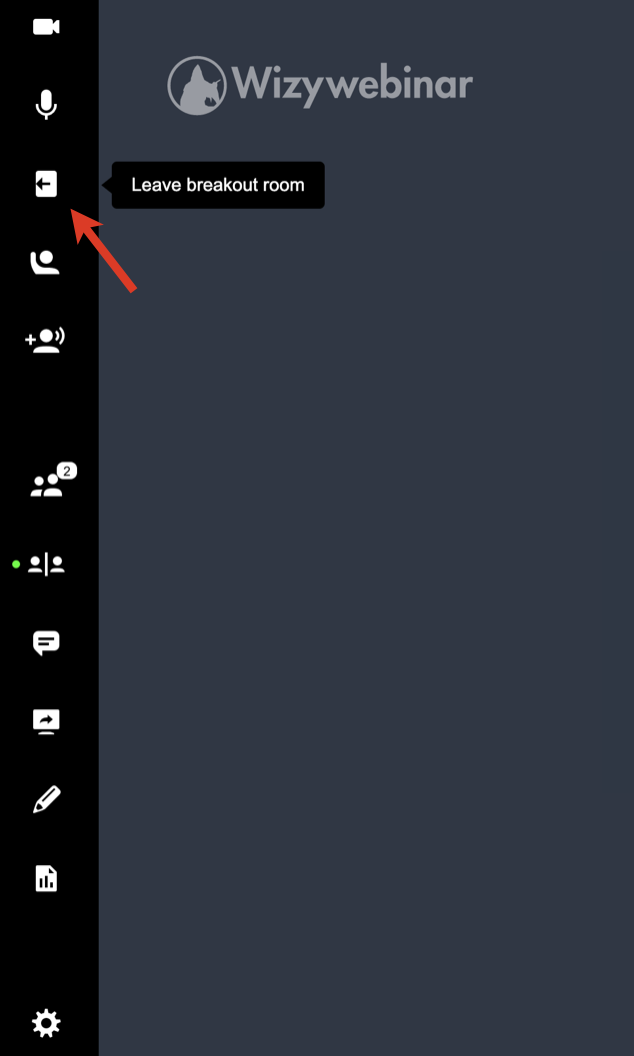
- To leave breakout room, participants and Speakers can click the Leave breakout room button:
End breakout rooms
To end all breakout rooms and pull back your participants to the main room, click the Stop breakout button:
...
- Open Settings -> Workspace, check the box Enable synced layouts and click Apply
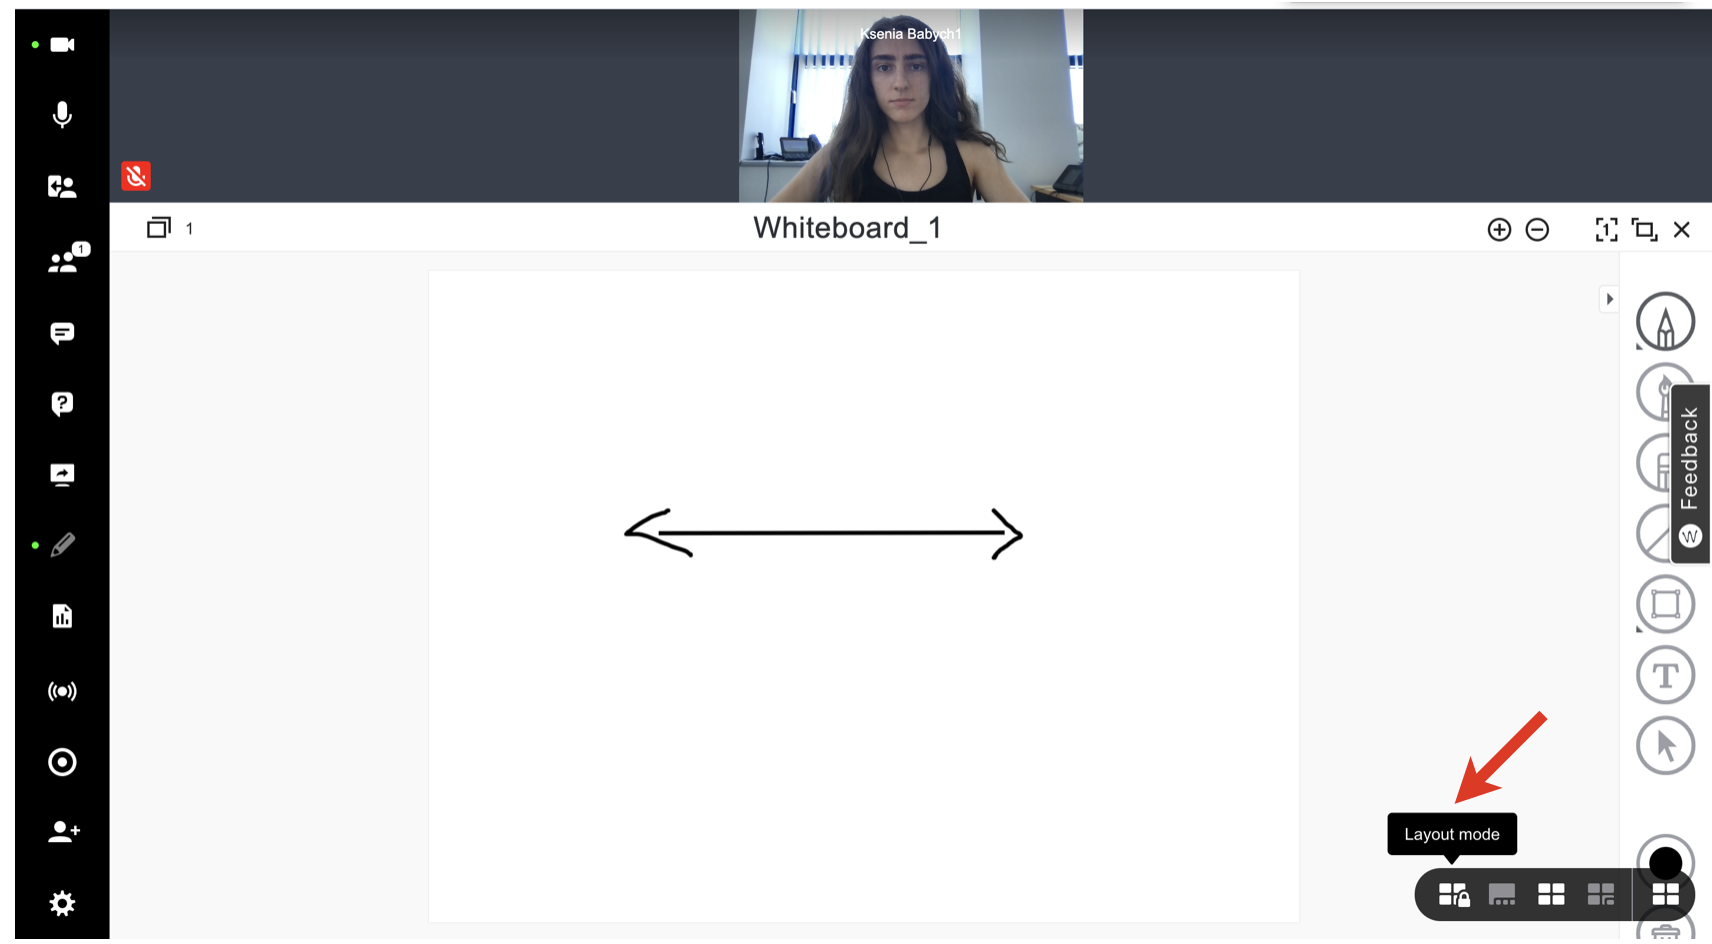
Hover the mouse over the Screen icon in the bottom right-hand part of the screen and click Layout mode:
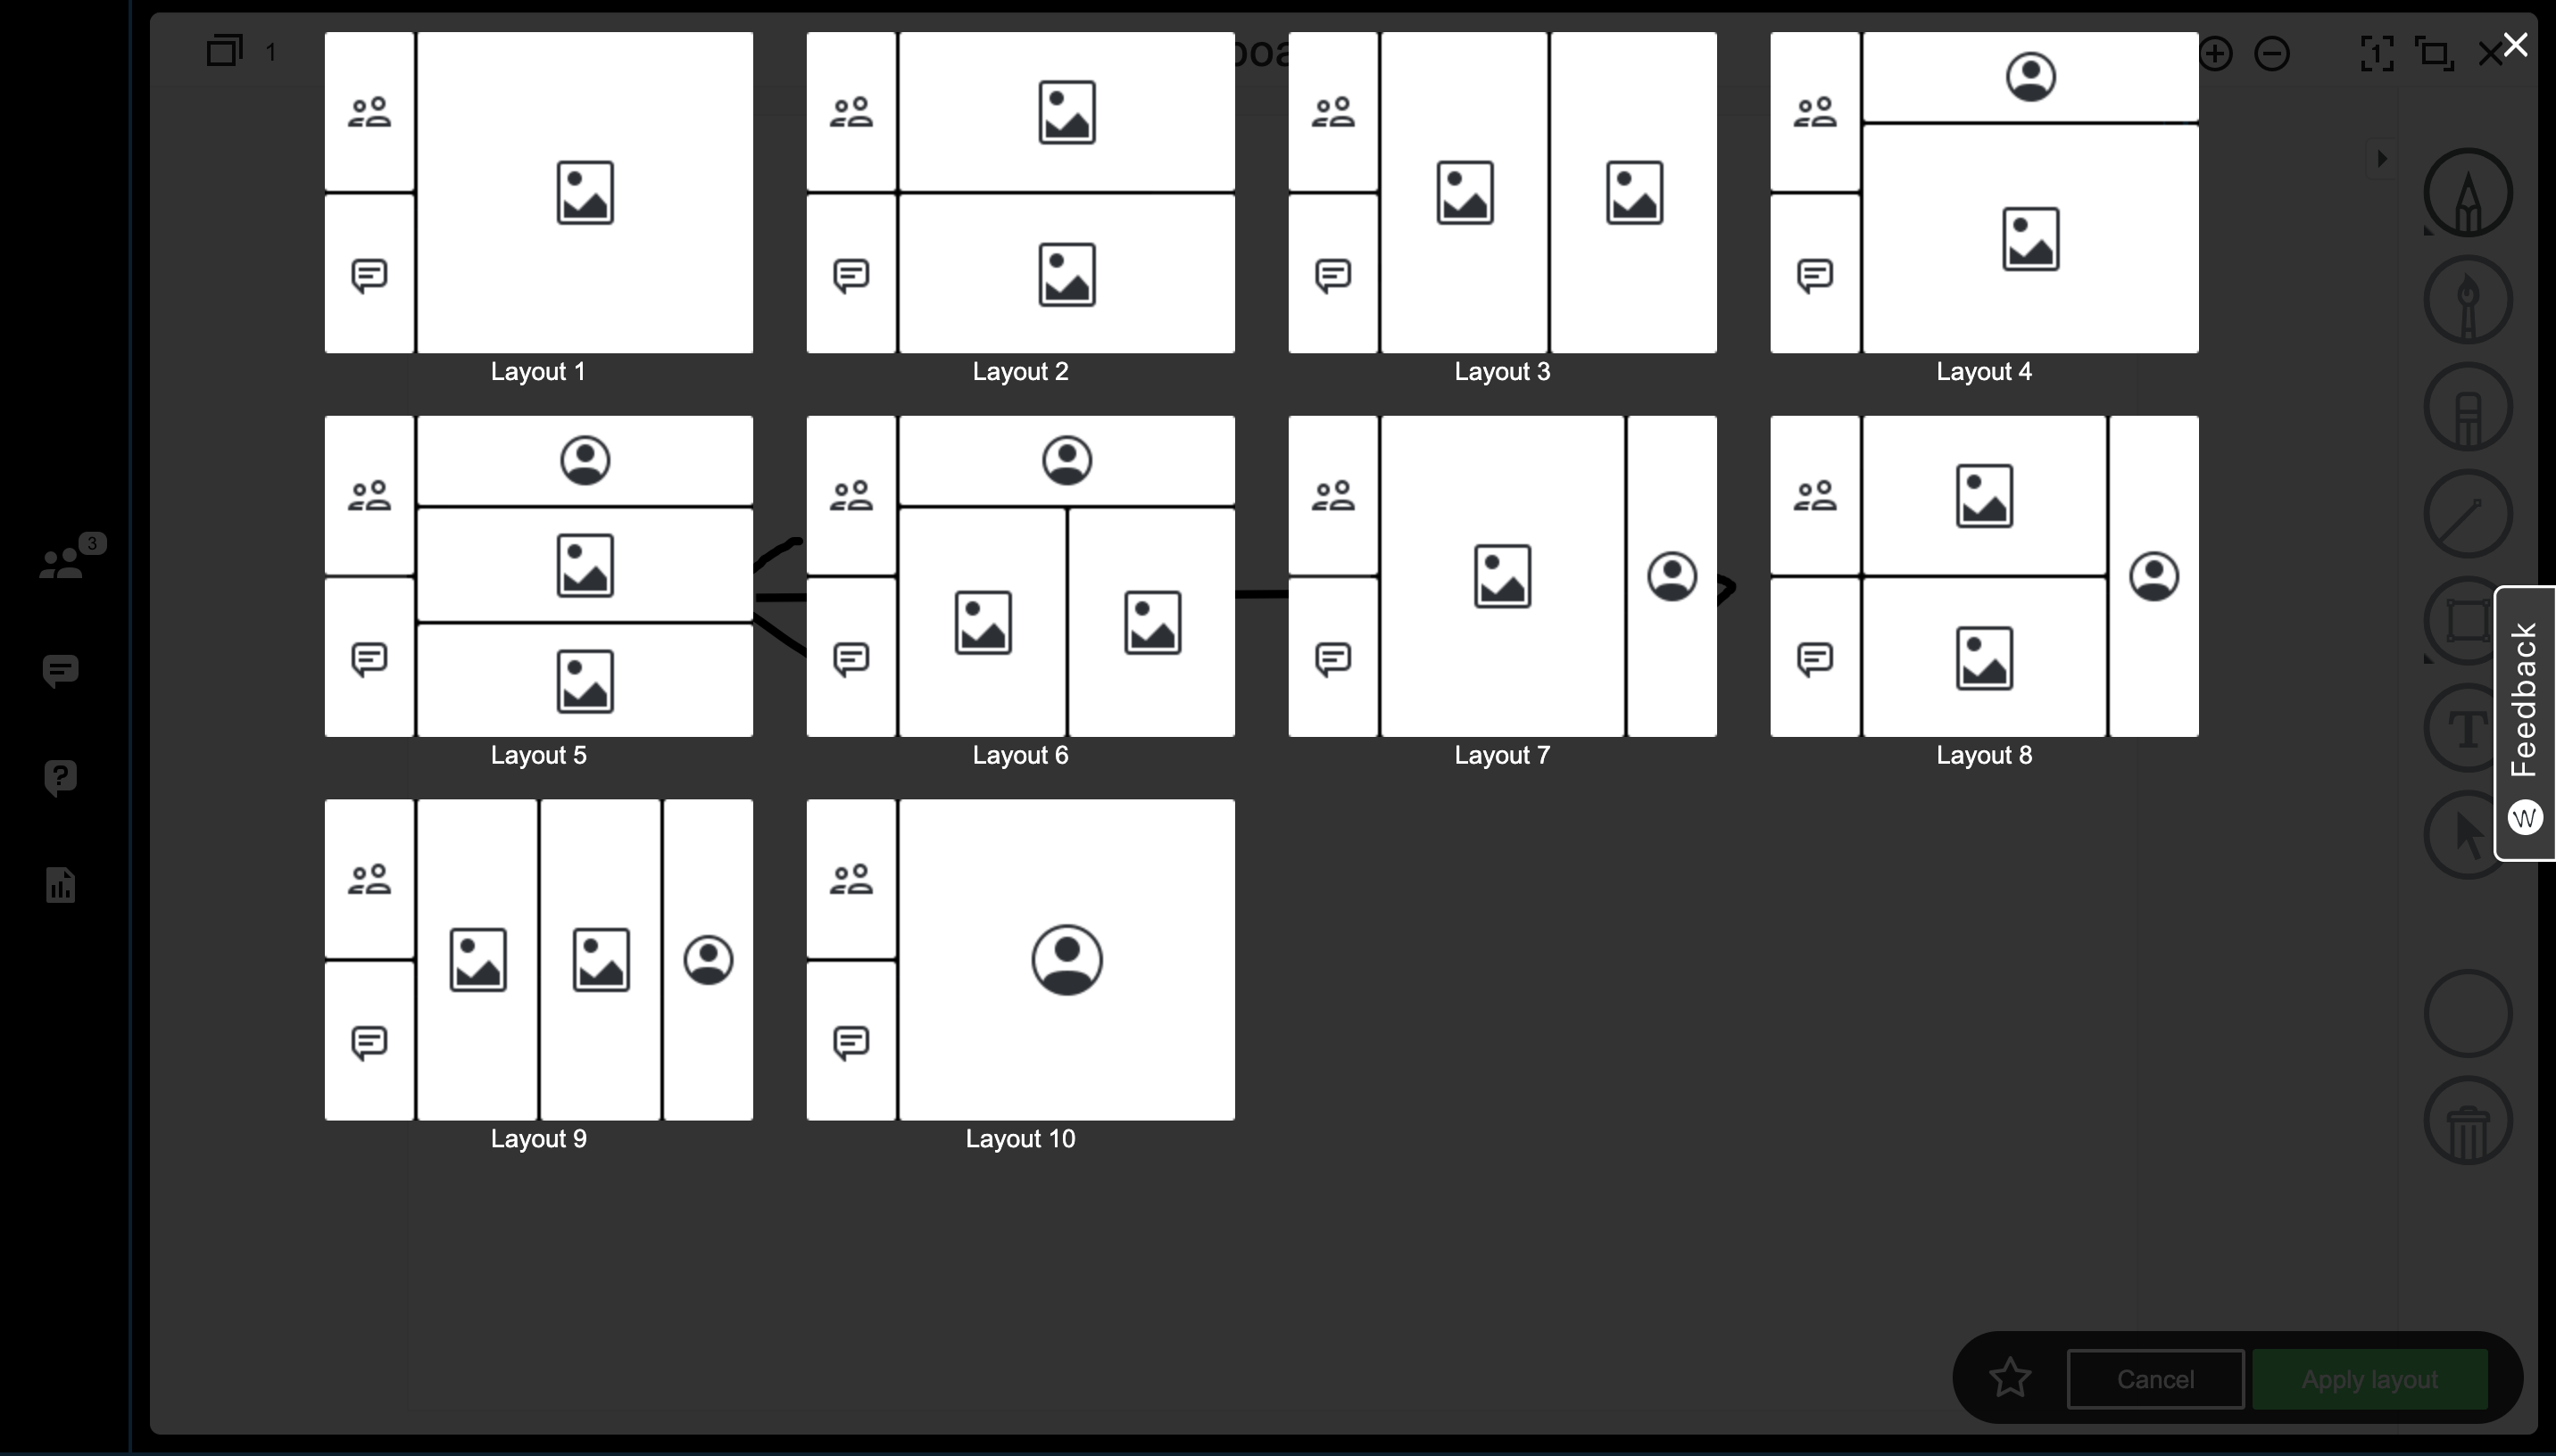
In the Layout mode, you can either arrange menus manually or choose one of the 10 predefined layout templates
For manual arrangement, select the menus that you would like your Participants to view: Participants, Questions & Answers, Conversations, Content library
If you want to choose one of predefined layout templates, click the star icon to the left of the Apply layout and Cancel buttons:

Choose the preferred layout template:
Remember that you can also resize and rearrange the elements of your workspace (explained in chapter Change layout). For example:
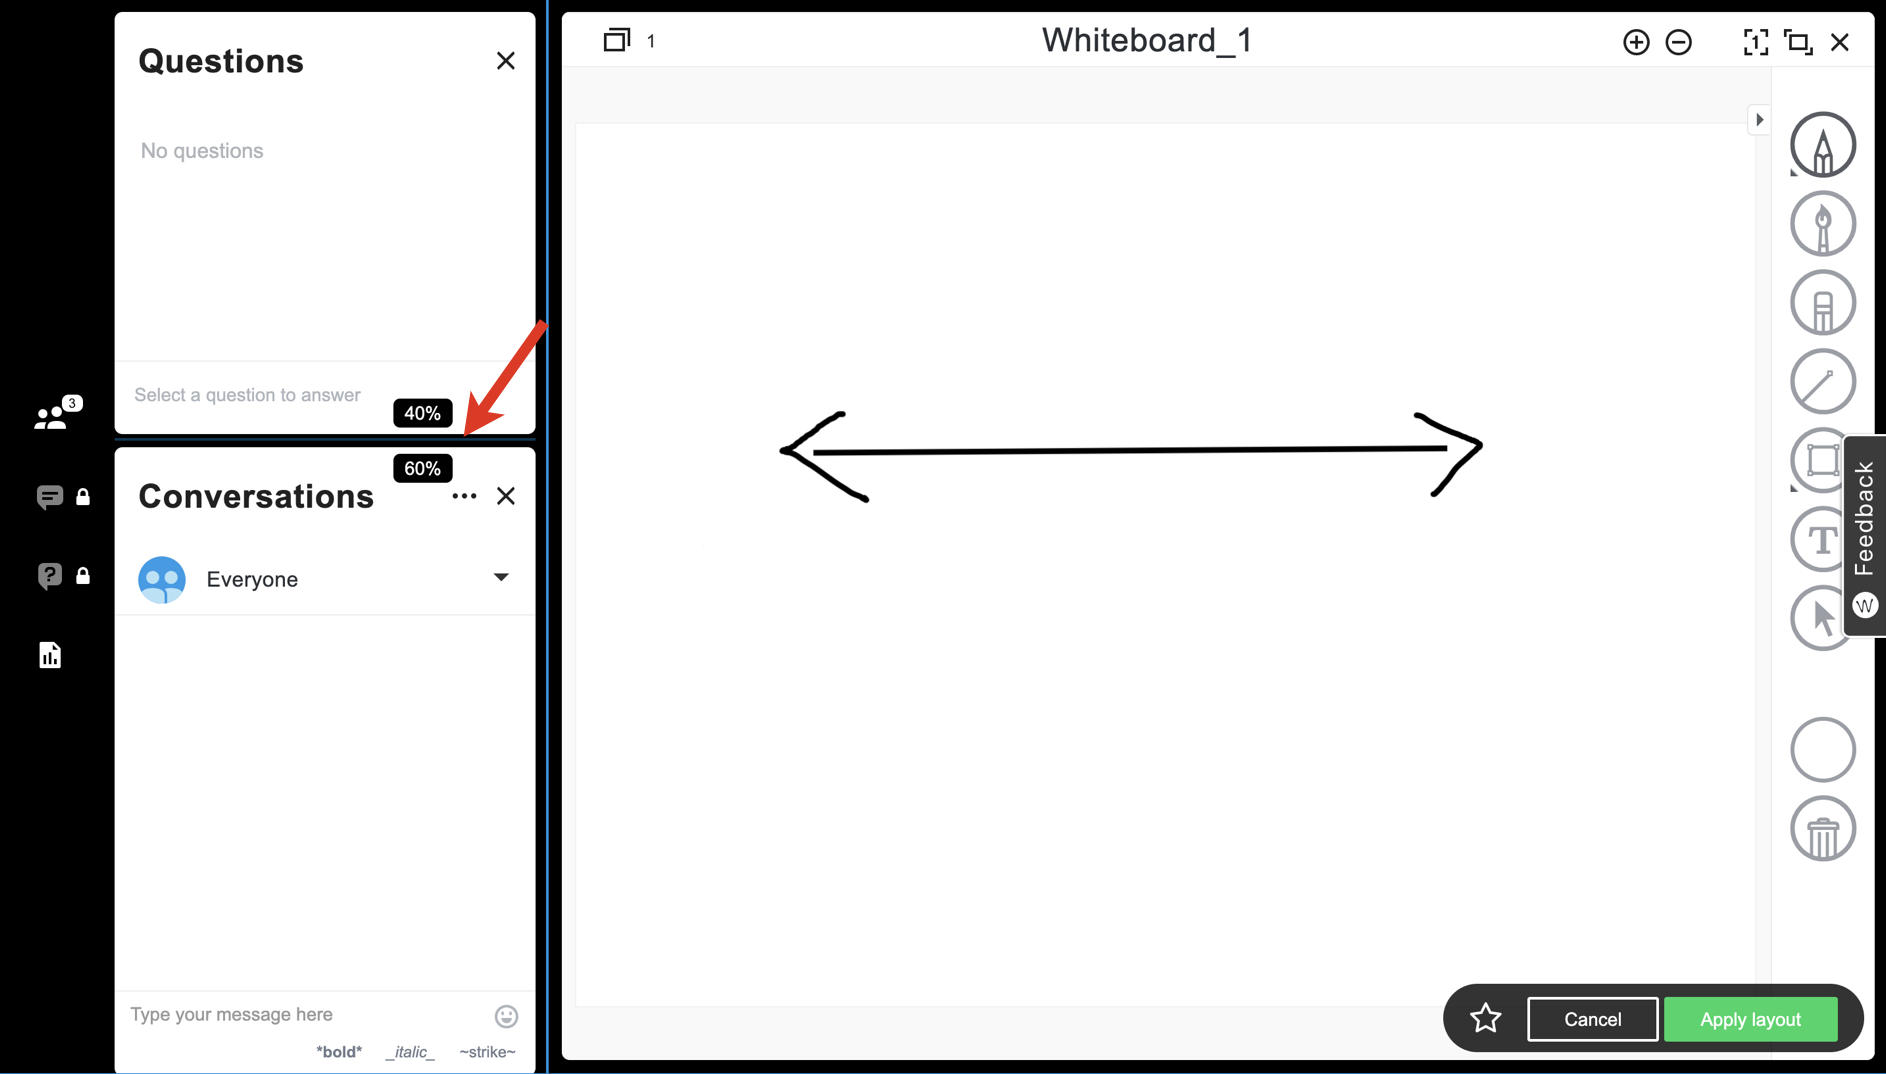
- When you are happy with the layout, click Apply layout in the bottom right-hand part of the screen
...
Integration with Wizyconf HW Station
Starting from Wizyconf App v 1.2.16, Wizyconf Station integrates with Wizywebinar, consult this documentation for details.
Other functionality
Protect sessions with end-to-end encryption (E2EE)
...
| Note |
|---|
Note: E2EE is not compatible with Recordings, Live Streaming. E2EE is also not compatible with mobile - mobile users won't be able to join encrypted sessions. |
Emoji Reactions
| Note |
|---|
Note: The feature is available upon request only. The request should be sent to denis.popov@wildix.com. |
...