| Html |
|---|
<div id="fb-root"></div>
<script>(function(d, s, id) {
  var js, fjs = d.getElementsByTagName(s)[0];
  if (d.getElementById(id)) return;
  js = d.createElement(s); js.id = id;
  js.src = 'https://connect.facebook.net/en_US/sdk.js#xfbml=1&version=v2.11';
  fjs.parentNode.insertBefore(js, fjs);
}(document, 'script', 'facebook-jssdk'));</script> |
...
| Scroll export button | ||||||||
|---|---|---|---|---|---|---|---|---|
|
| Info |
|---|
This document is a complete guide explaining how you can enable access to Wizywebinar and use it to schedule and run your webinars. Created: January 2021 Updated: July 2022 Permalink: https://confluencewildix.wildixatlassian.comnet/wiki/x/W4PPB |
...
| Table of Contents |
|---|
| Noprint |
|---|
Wizywebinar White paper |
Requirements and features
...
Wizywebinar Video Tutorial - Enable Access to Wizywebinar
...
Wizywebinar
| Scroll only inline |
|---|
https://wildix.wistia.com/medias/u5z6zya75b |
| Easy html macro |
|---|
<script src="https://fast.wistia.com/embed/medias/u5z6zya75b.jsonp" async></script><script src="https://fast.wistia.com/assets/external/E-v1.js" async></script><span class="wistia_embed wistia_async_u5z6zya75b popover=true popoverAnimateThumbnail=true" style="display:inline-block;height:315px;position:relative;width:560px"> </span> |
...
- Go to WMP -> Customers
- Select your company and customer
Go to PBXes tab -> Select the PBX -> click on More options (three dots) and select Edit:
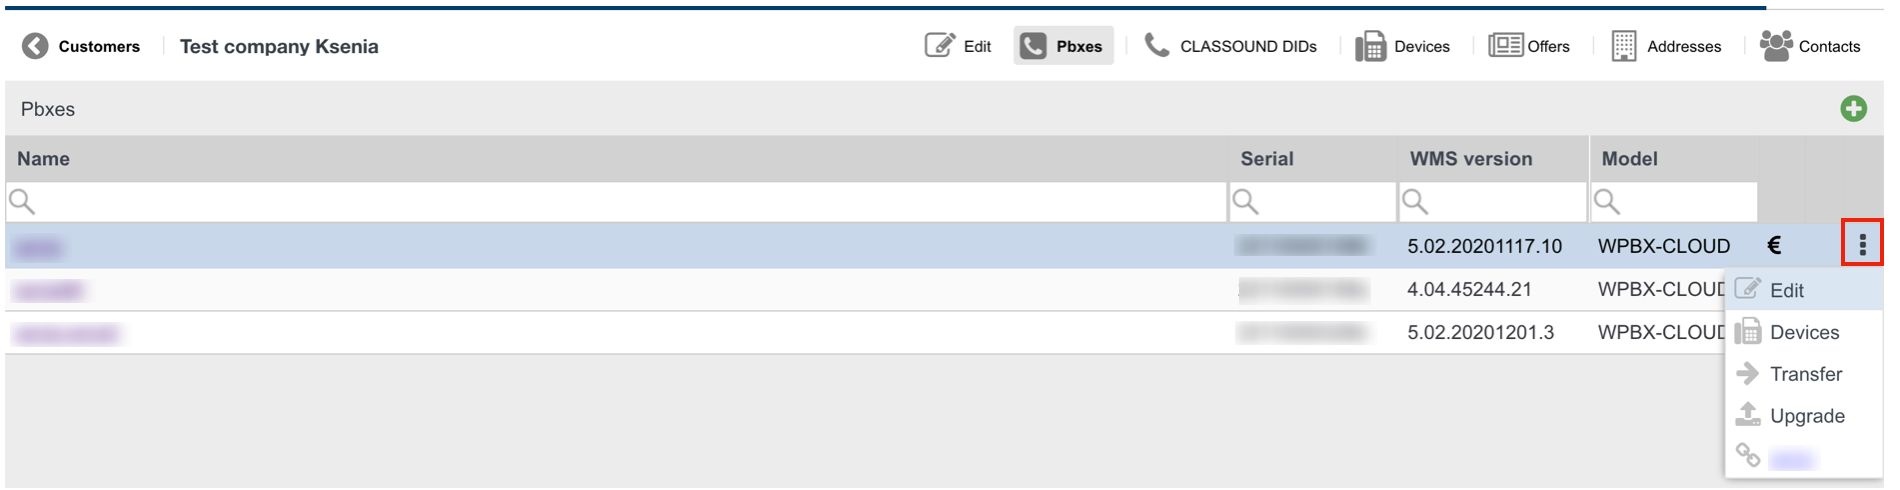
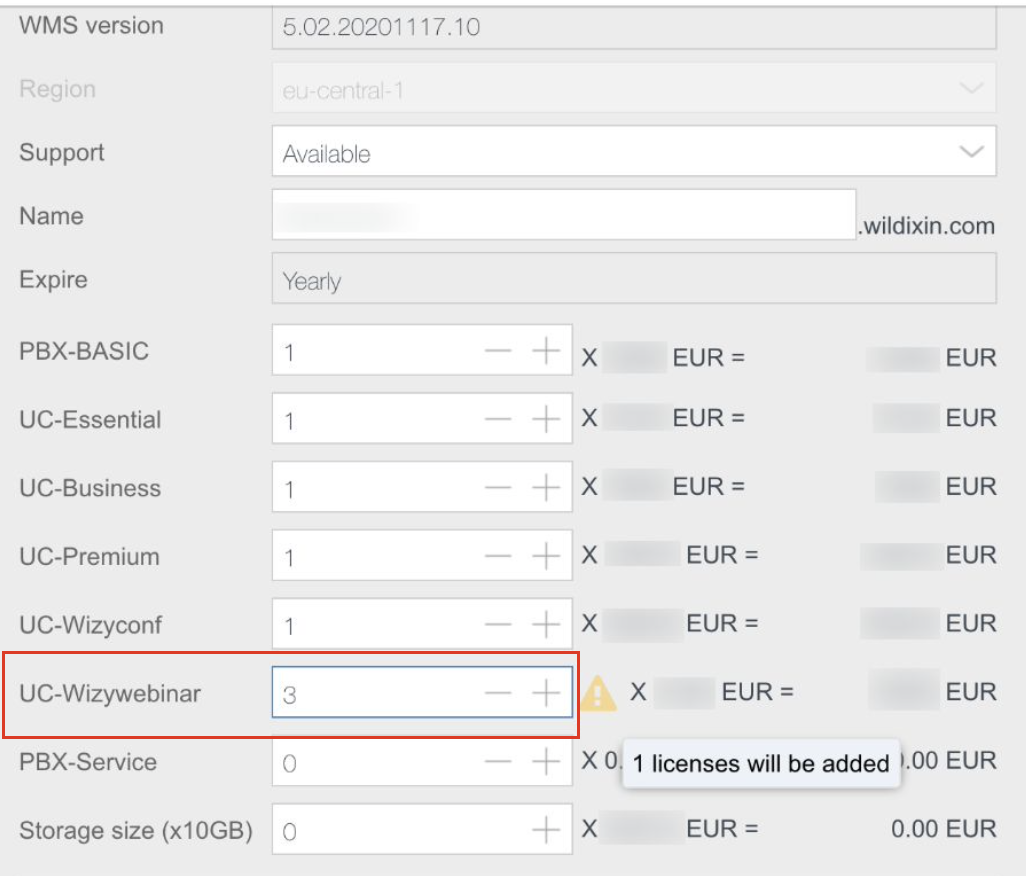
- Add the required amount of UC-Wizywebinar licenses and click Save:
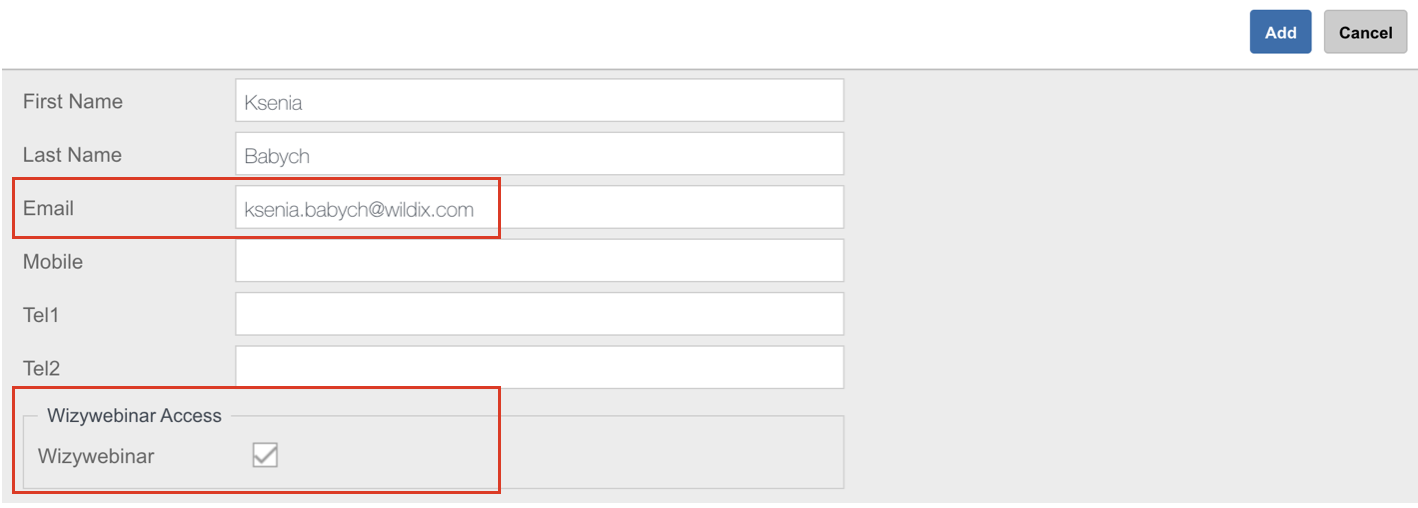
Step 2. Create an associated contact
...
- Go to Contacts tab and click + to add a new contact:

- Fill in First and Last Names and specify Email
- Tick off Wizywebinar Access
- Click Add
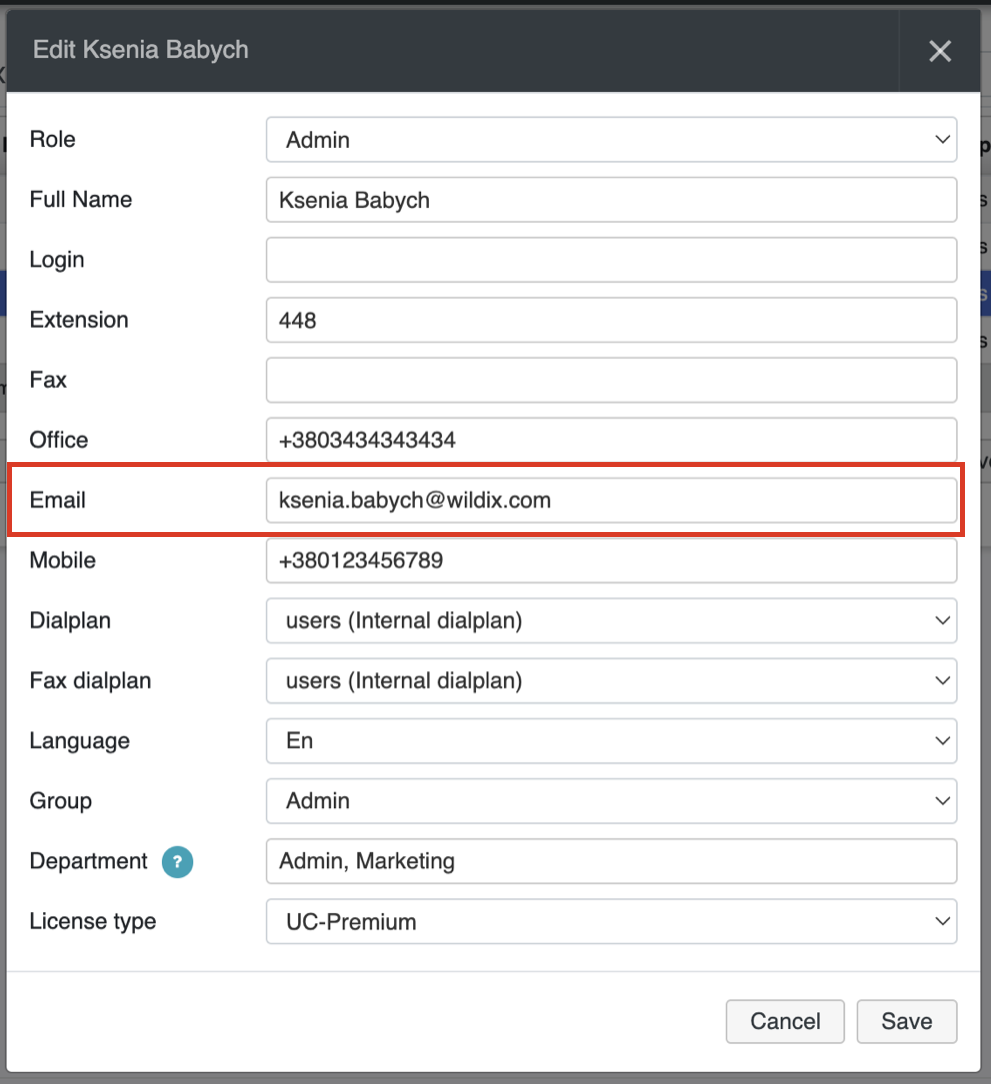
After WMP configuration, associate the previously created contact on WMP and a user in WMS by using Email.
...
- Create a new user or modify the already existing one in WMS -> Users
- Make sure the Email is the same that you used on WMP for Wizywebinar access and make sure this user has at least a Business license:
If all the conditions are observed, a user should have Webinar tab available in Collaboration:

Schedule a webinar session
Wizywebinar Video Tutorial - Schedule a webinar session
...
session
| Noprint |
|---|
| https://wildix.wistia.com/medias/qkl2u7rqu8 |
| Easy html macro |
|---|
<script src="https://fast.wistia.com/embed/medias/qkl2u7rqu8.jsonp" async></script><script src="https://fast.wistia.com/assets/external/E-v1.js" async></script><span class="wistia_embed wistia_async_qkl2u7rqu8 popover=true popoverAnimateThumbnail=true" style="display:inline-block;height:315px;position:relative;width:560px"> </span> |
...
- Go to Collaboration -> Webinar
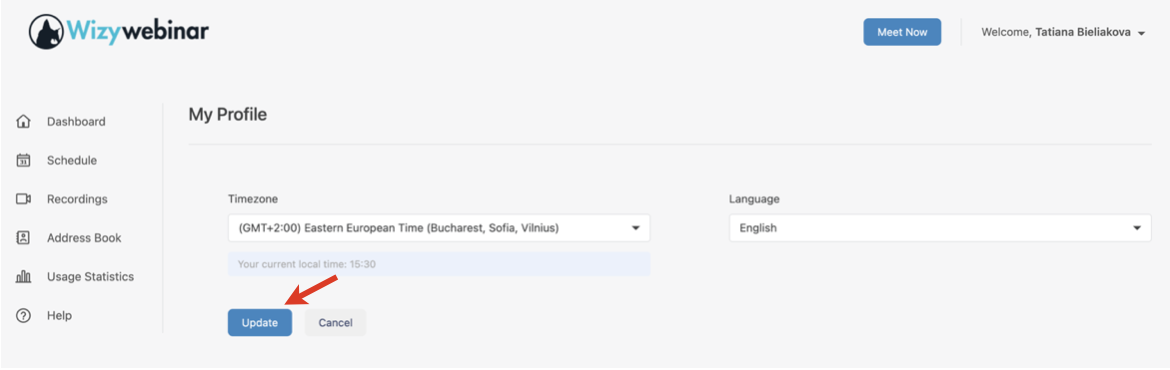
- Click Welcome located in the top left-hand part of the menu and select My profile
Change timezone/ language
Warning Make sure the timezone corresponds to the one a webinar is going to take place in.
Click Update to save the changes:
Create a webinar
...
If you need more sophisticated scheduling options, keep on reading:
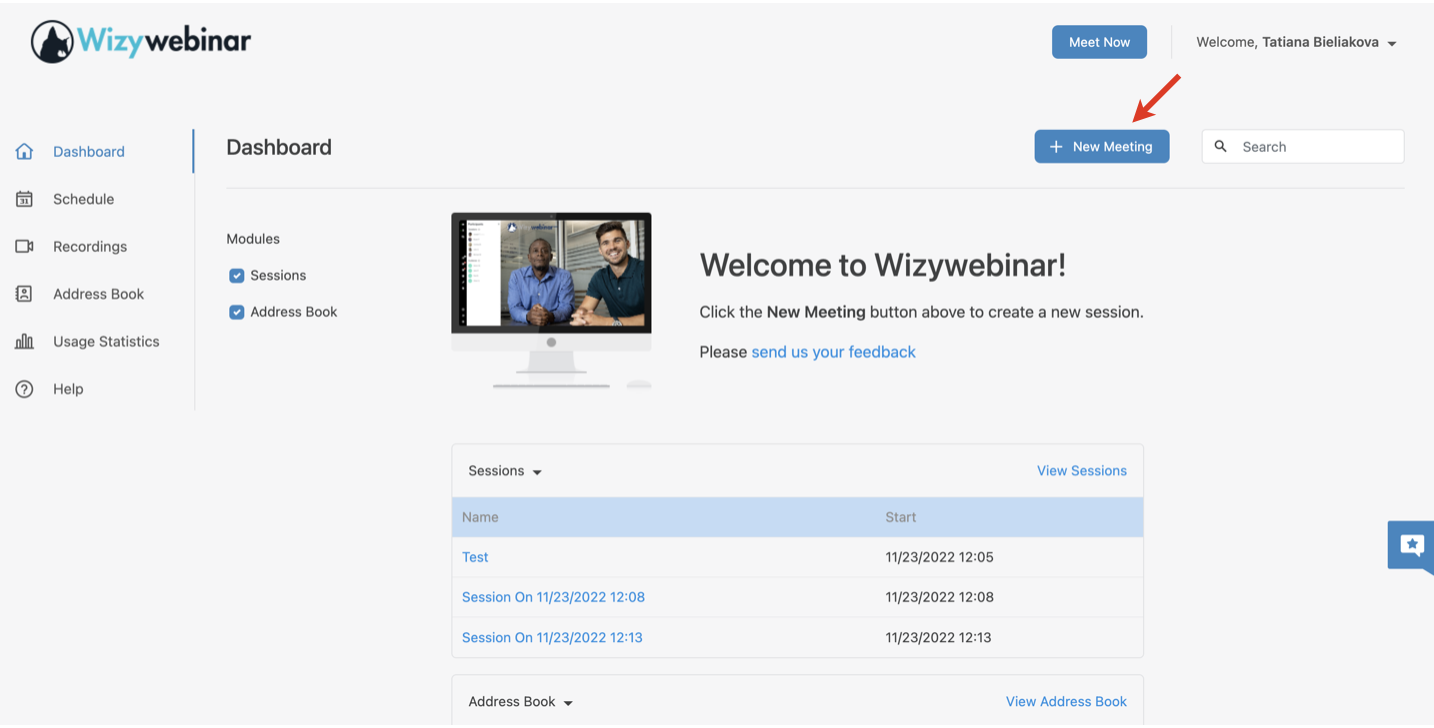
Click New Meeting button:
Fill out mandatory fields: Topic, Start date and Duration:
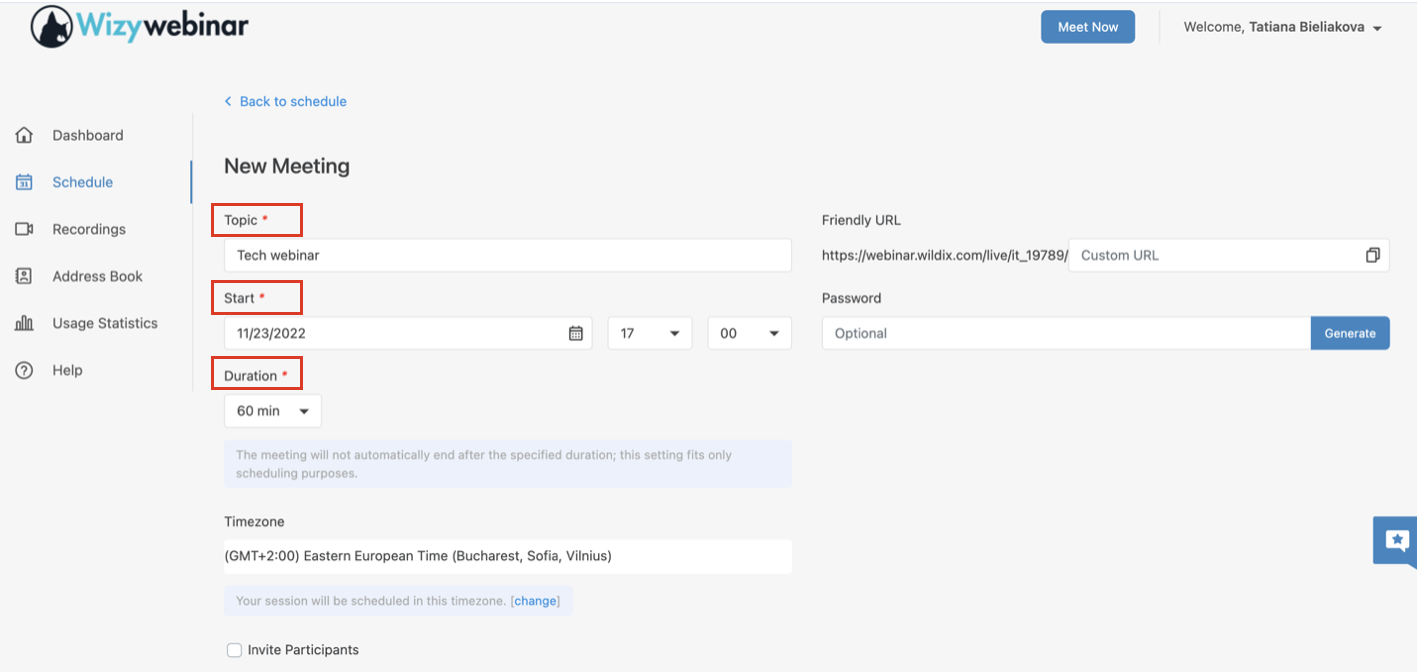
Warning Important: When scheduling a webinar, please check the timezone and make sure it corresponds to the timezone the meeting is going to take place in. If you need to change the timezone, click change.
(Optional) Set Password and Friendly URL:
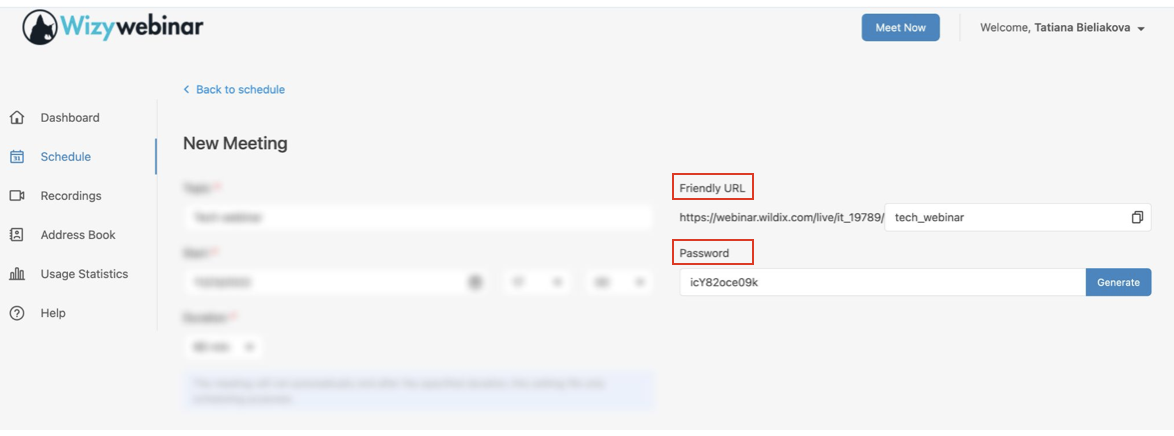
Note Password: If you would like your webinars to be more protected, you can generate a password for them. You have the choice to make up a password or click on Generate button and a password will be created for you. Once you share the Webinar link with a participant, remember that you need to give them the password too.
Friendly URL: You can customize the URL of your webinar. Otherwise, a random session ID will be created for you.
...
- Check the box Invite Participants (1)
Enter First Name, Last Name (2), Email (3), choose role(Audience or Speaker) (4)and click Add button (5). Detailed information about adding participants is described in the Participants section

- Click Save in the lower part of the screen
...
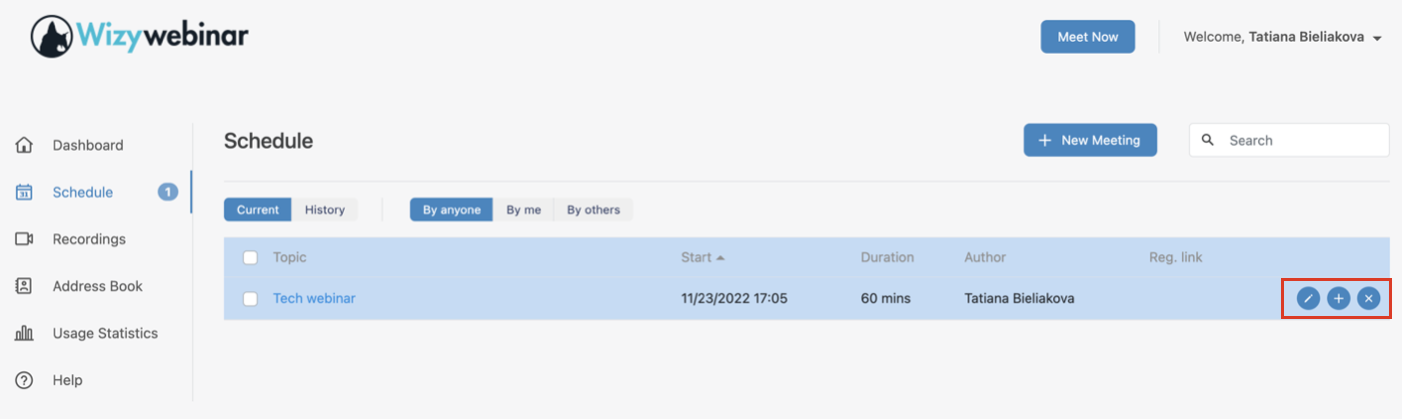
To edit: hover the mouse cursor over your scheduled meeting and click on the Pencil icon (Edit Meeting)
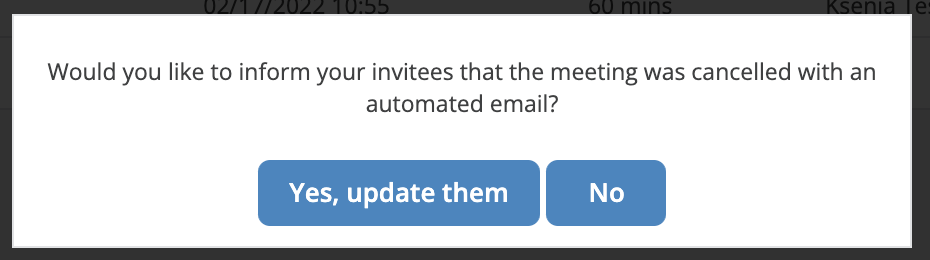
To delete: hover the mouse cursor over your scheduled meeting and click on the x icon (Delete Meeting). If you want to inform your invitees about the webinar cancellation with an automated email, click Yes, update them button
| Note |
|---|
In this menu, you can see webinars scheduled by all the users, but you can edit and deleted only webinars scheduled by you. |
Schedule a webinar - advanced options
- Click on the Schedule menu from the left-hand panel
Hover the mouse cursor over your scheduled meeting and click on the Pencil icon (Edit Meeting):
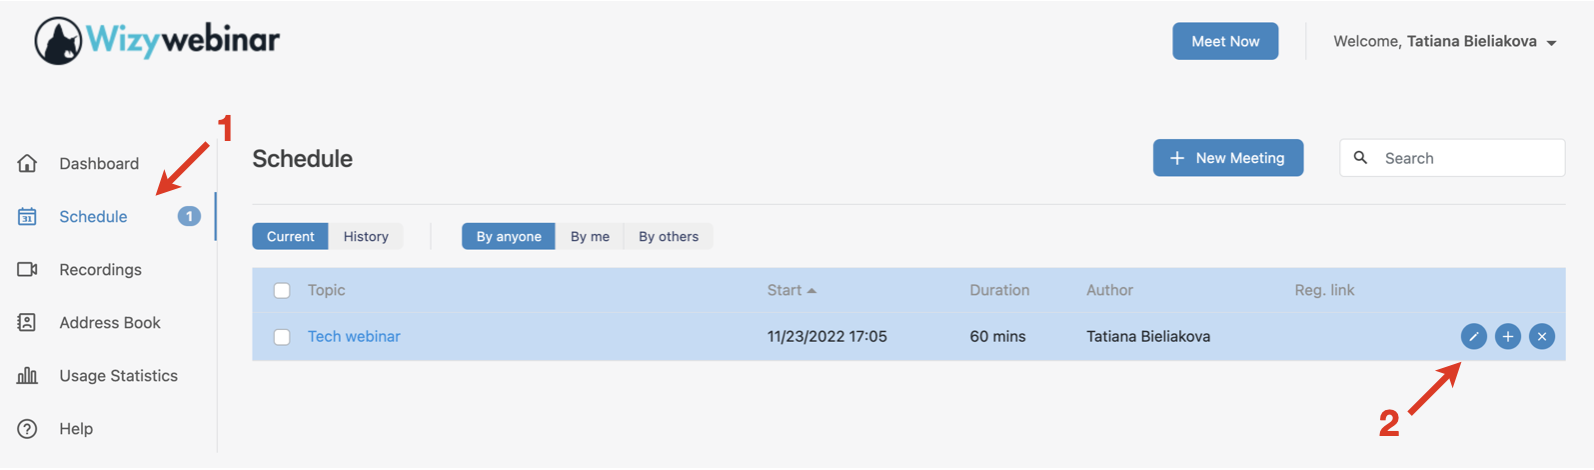
Click Advanced options in the lower part of the screen:
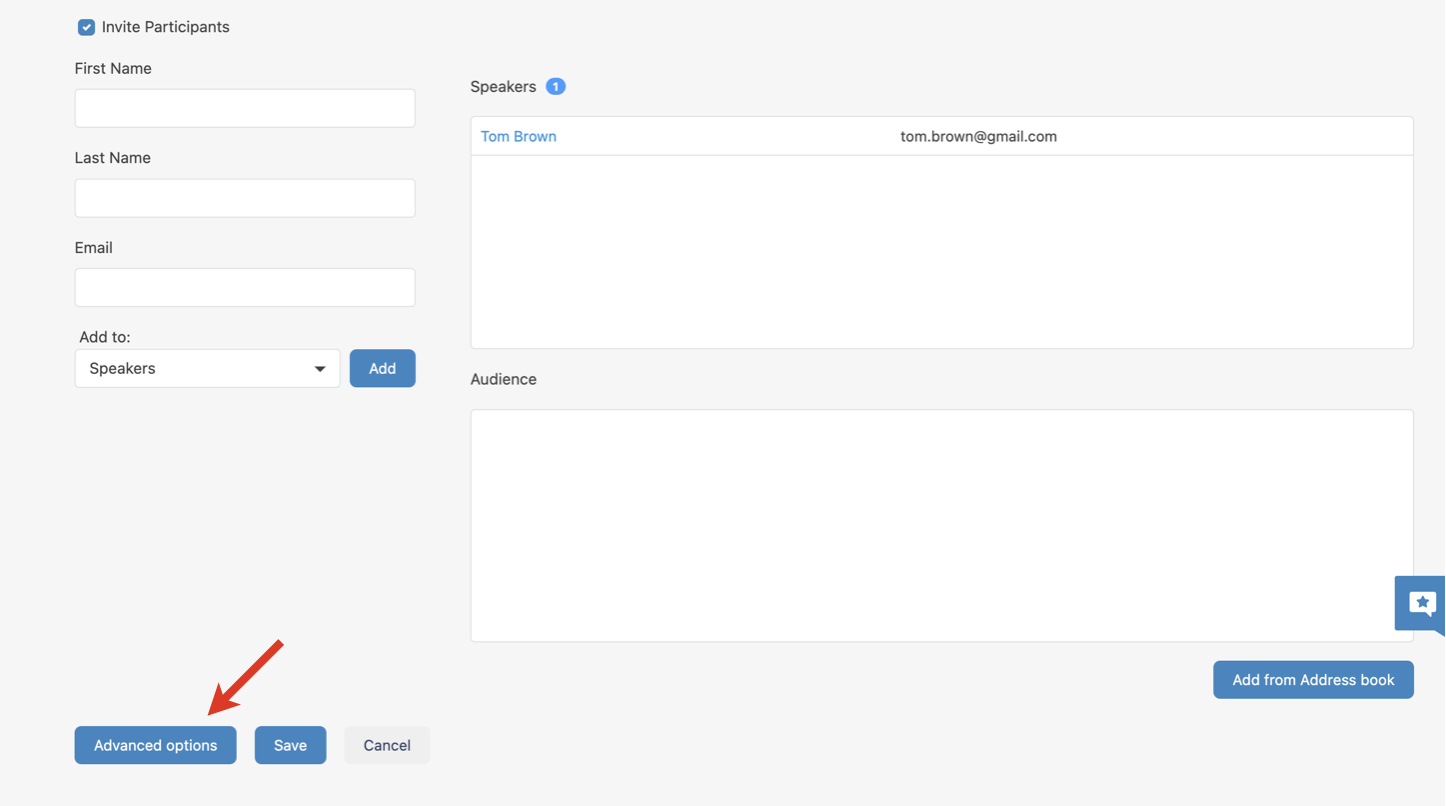
Invite participants: add manually, import via CSV file, add from Address Book Anchor participants participants
| participants | |
| participants |
- Click on the Participants tab. In this menu, you can add participants to your webinar using one of 3 modes:
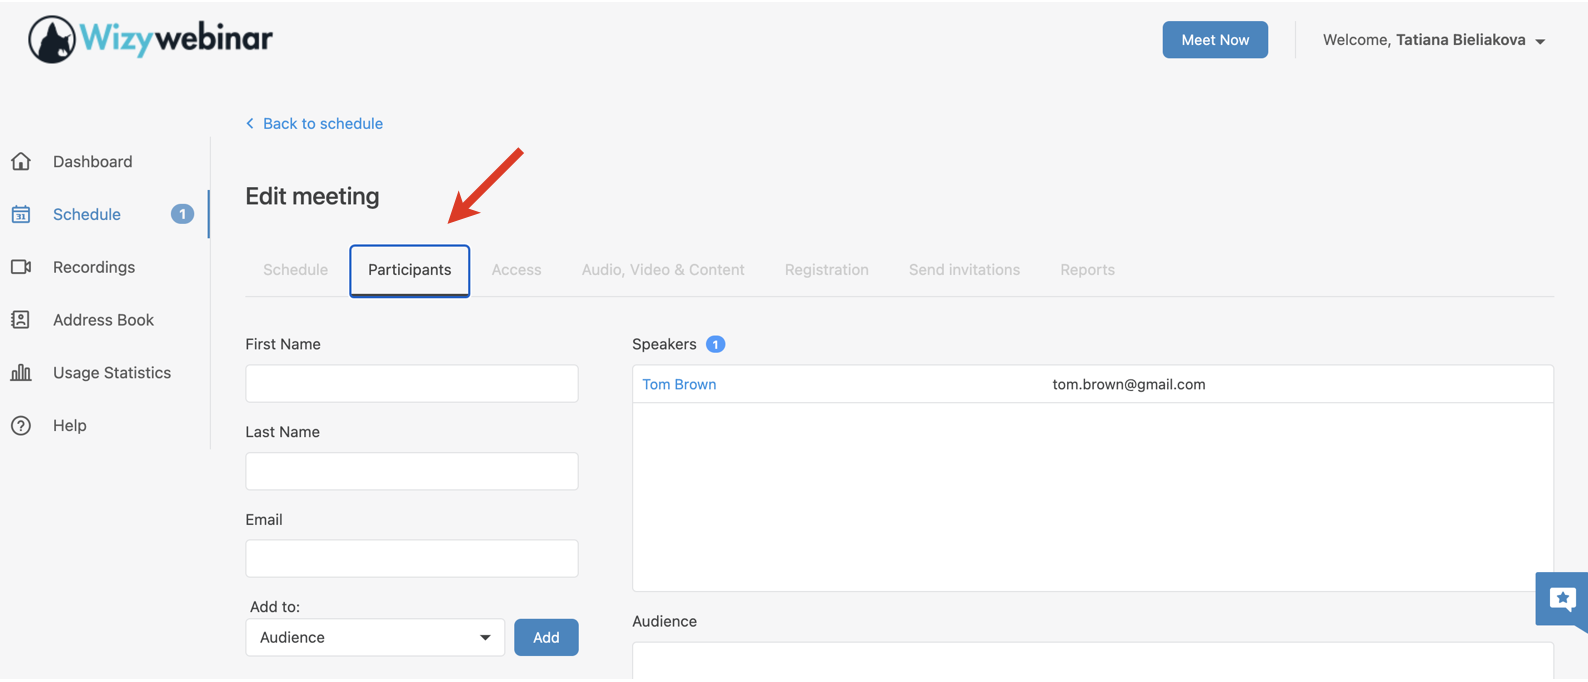
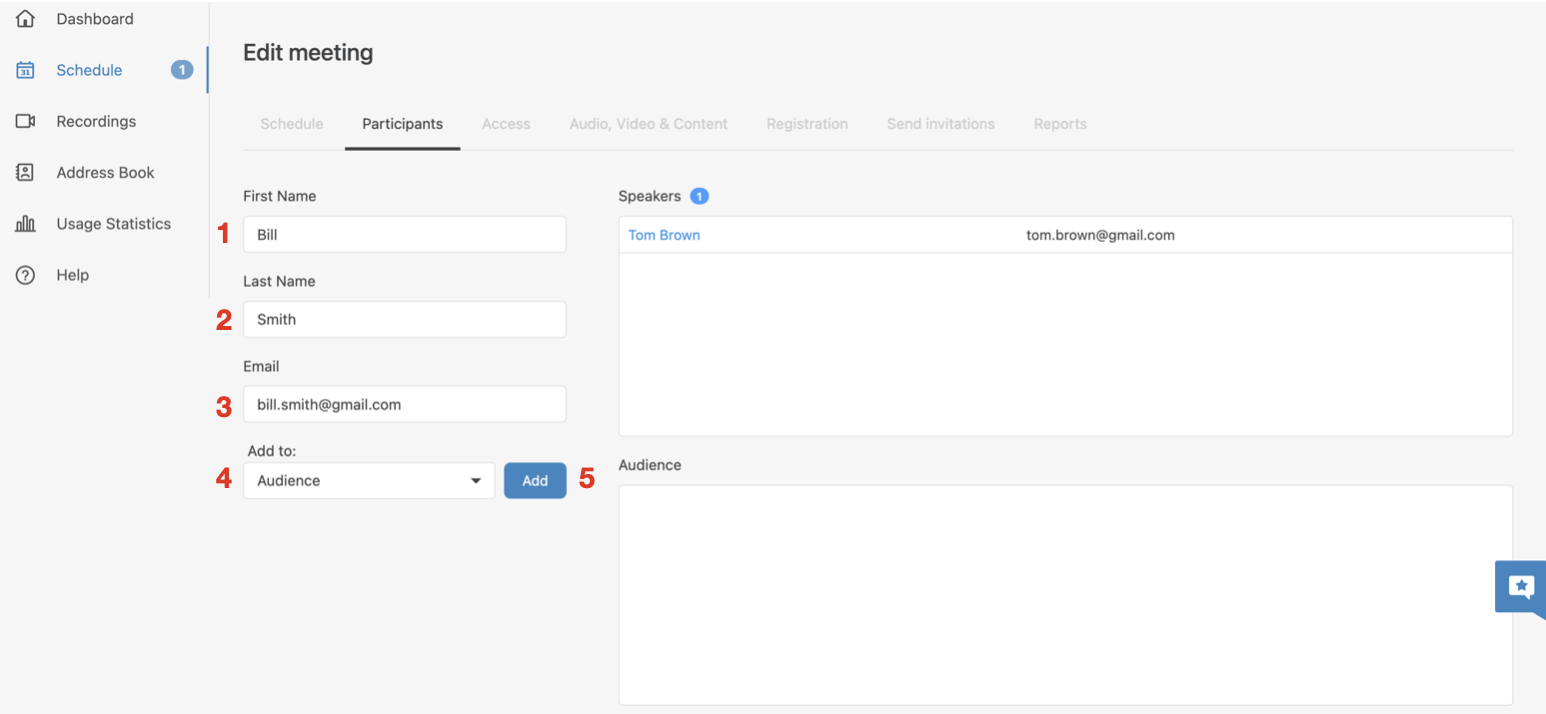
1 - add participants manually: enter user’s name (1), email (2), set a role (3) and click Add button (4). By default, new contacts are automatically saved in Address Book, unless you change this behavior (see the additional control options in this section):
Note Note: When you add participants, you always need to indicate their role:
- Speaker – someone who runs the webinar, broadcasts their audio and video and controls various aspects of the webinar. There can be more than one speaker. Speakers have a number of privileges over other participants, which include: the ability to speak, show video, start the recording, manage other participants, use group chat for speakers, and more as you’ll see later in this Guide
- Audience – mostly passive listeners of the webinar. By default, they don’t have permission to speak, unless allowed by speakers. If needed, they can interact using chat in Conversations, Questions and Answers, etc.
There is also an Account holder – someone who sets up the webinar and the only person who can edit the details of the event before it starts. Account holder belongs to Speakers of the webinar by default.
- 2 - add participants from Address Book: you can add them one by one or select multiple participants
To add one by one, start typing participant's name or email, choose them from the drop-down list below, set role and click Add button. Or click the Plus icon next to email (1), find participants in the list, check the box in front of them (2), set a role (the role applies to all users you choose), and click Add button
3 - import participants: click on Browse to select the CSV file on your PC (1) and click Upload button to import the list of participants (2):
Note Make sure your CSV file is compliant with the required format: first_name, last_name, email, role (1 = speaker, 2 = audience), including headers.
Example:
first_name last_name email role first_name_of_person1 last_name_of_person2 email@person1 1 first_name_of_person2 last_name_of_person2 email@person2 2 or download a sample CSV file: Sample Wizywebinar participants import.csv.

Once imported, participants appear in the list of Speakers/ Audience, depending on their role:

When the list of participants is complete, scroll down and hit Save button:

A new dialog opens, make your choice, whether or not the invitation emails should be sent to the participants:

Below the Browse button there are the following checkboxes providing you with additional control options:
- Add new contacts to address book (1) - when enabled, all newly added contacts are automatically added to Address Book
- Hide user identities and count (2): when enabled, people in the audience can't see the total number and names of participants in the participants’ panel
- Hide all notifications in the live room/ in recordings (3) - these options allow you to remove all non-critical UI notifications (e.g. when someone joins a webinar) from a session and UI notifications from recordings correspondingly
- Display participants' names as (4) - decide how to display participants' name: full name, initials etc

Description, Agenda, Recurrent webinar, Calendar link or file
...
| Warning |
|---|
Important: If you plan to customize an invitation email, the option of attaching a link doesn’t work. For customized emails, you can:
|

Access control: Lobby and Early access
...
- Private/ Public (1): if you choose Private, only registered/ invited guests can enter the webinar. If you choose Public, anyone with the link can join
- Turn on lobby (2): this feature allows you to manage who enters the room. When enabled, participants show up in the lobby list and are held there, unless the webinar host allows certain participants to enter the webinar or decides to remove a participant from the list
- Restrict early access (3): this option allows you to control how early participants can join the webinar
- Make visible on your public page (4): this option lets you display all events scheduled from your account on a dedicated public page. Depending on registration requirements, users may be able to join or register for your webinars through this page
- At the session login require guests to provide (5): choose which information to request from guests when they join the session via the link. Guests are those people who didn’t register for the webinar and weren’t invited via email, so they don’t have a private link to join

Audio, Video and Content: starting audio and video broadcast automatically Anchor audiovideo audiovideo
| audiovideo | |
| audiovideo |
...
- Allow maximum one content opened (4):if enabled, any piece of content loaded from the Content Library is displayed in the Stage area, entirely replacing the previously loaded content regardless of type. In other words, the Stage area can never be split with multiple content pieces

Registration: allowing participants to register for a session
...
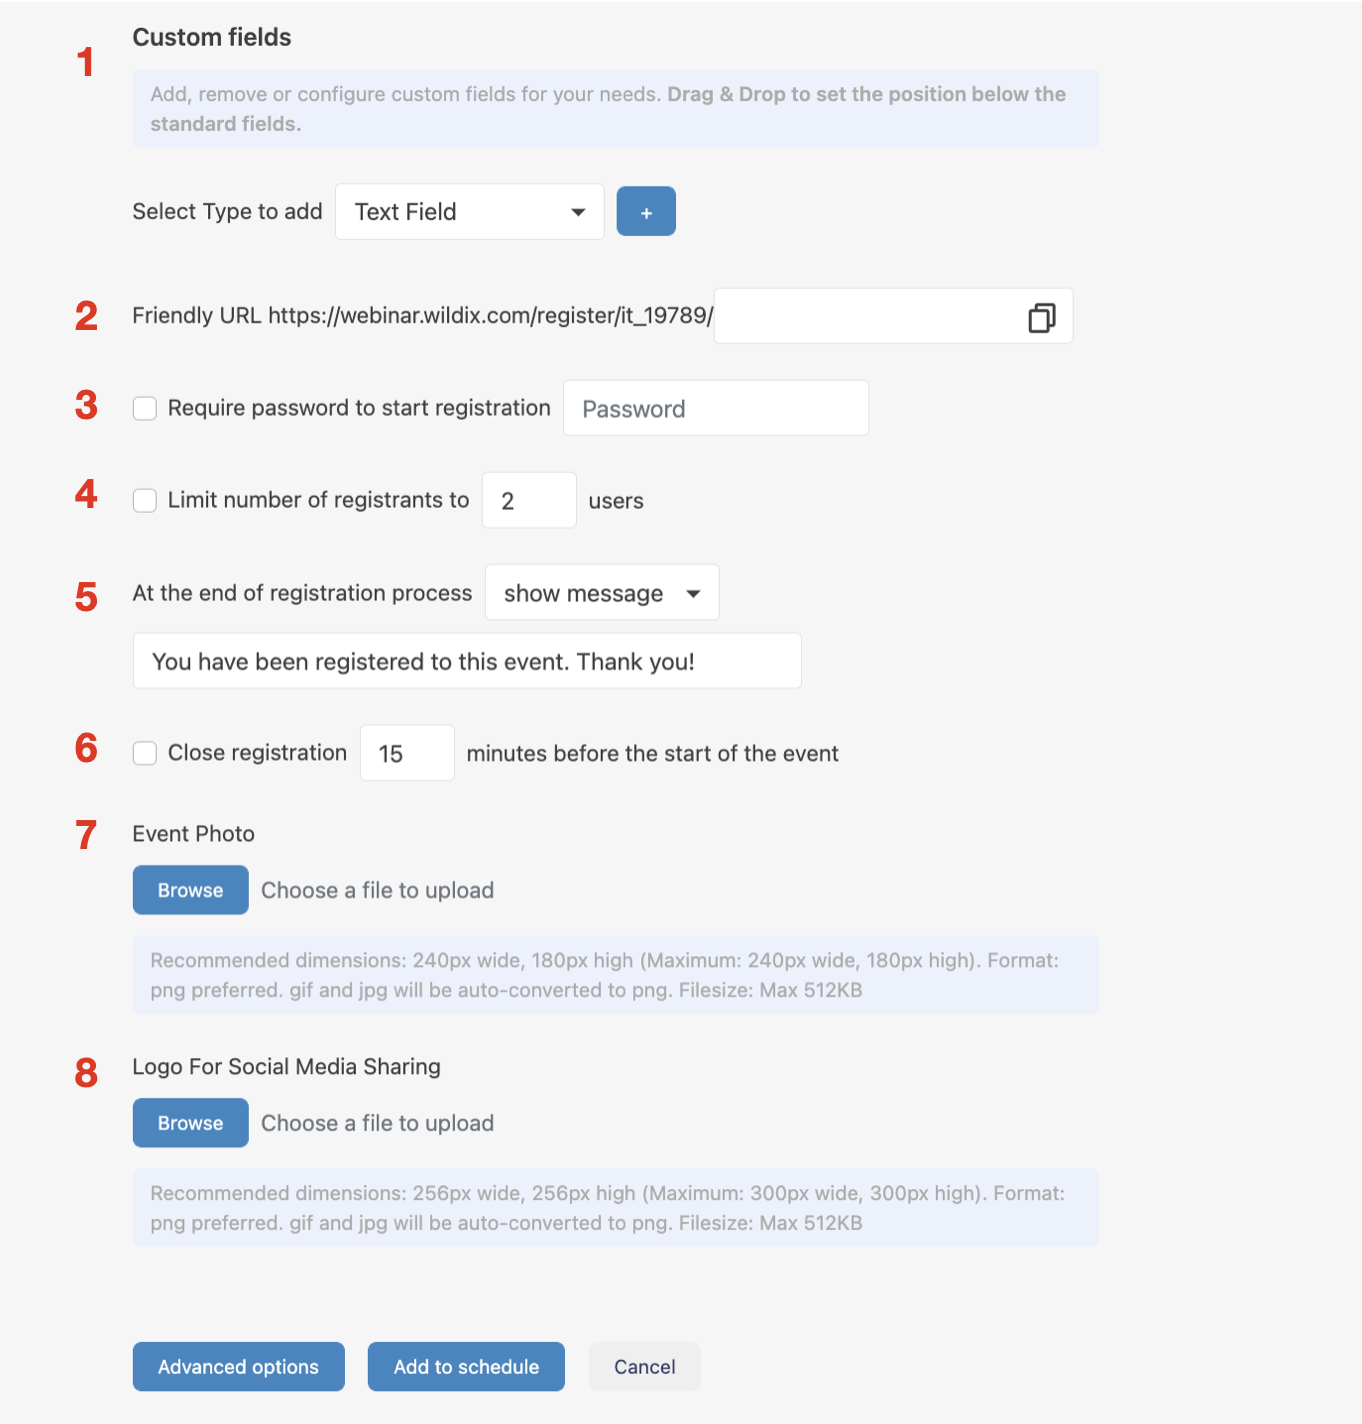
Custom fields (1): here you can add your own custom form fields and decide if you want to make any of these fields mandatory during the registration process. If you have several custom fields, you can drag and drop them to change the order
- Friendly URL(2): customize your registration URL rather than use the randomly generated characters to identify your event registration page
- Require password (3): optionally require a password before a participant can complete registration
- Limit registrants (4): limit the amount of people who can register for your event
- Show message (5): once someone has completed the registration process, you can modify the message that is shown or redirect them to a webpage of your choice
- Registration period (6): set a time limit after which participants are no longer allowed to register for your event
Event Photo (7): upload the image that represents your event. This can be a logo, a picture of the speaker, etc.
- Logo For Social Media Sharing (8): upload the specific image for social media sharing that overrides the Event Photo Photo
Example of the Registration page: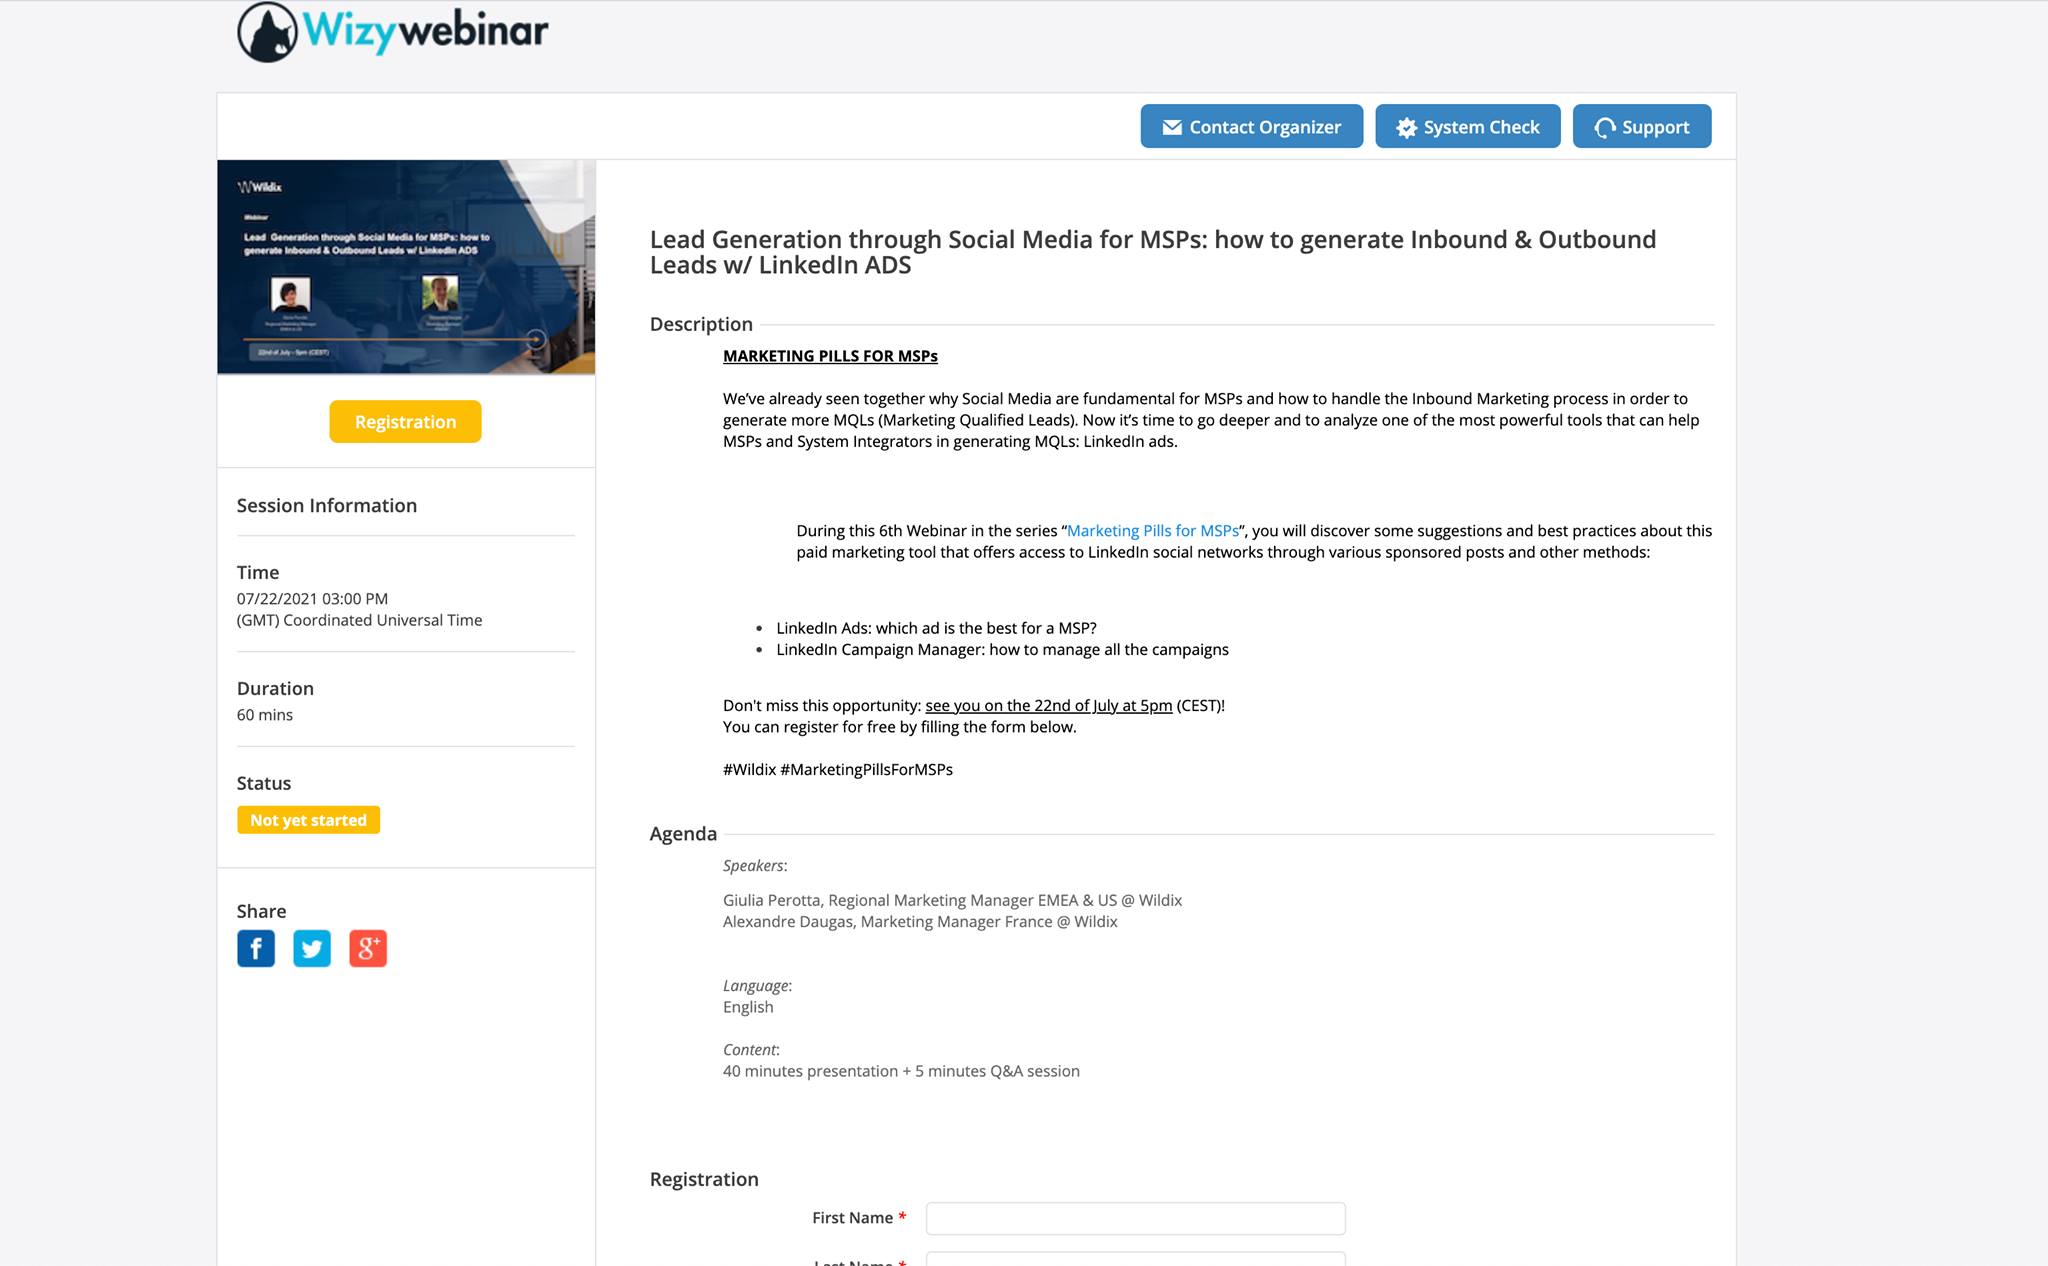
To see the list of those who have registered or were invited to your webinar, go to the Reports tab and download the CSV or Excel file. You can find more information about reports in the Statistics section of this guide.
...
- Send a customized invitation email (1): here you can customize the content of your initial invitation email. Once you check this option, an Email Content window opens, where you can type in the desired content of the custom invitation email:
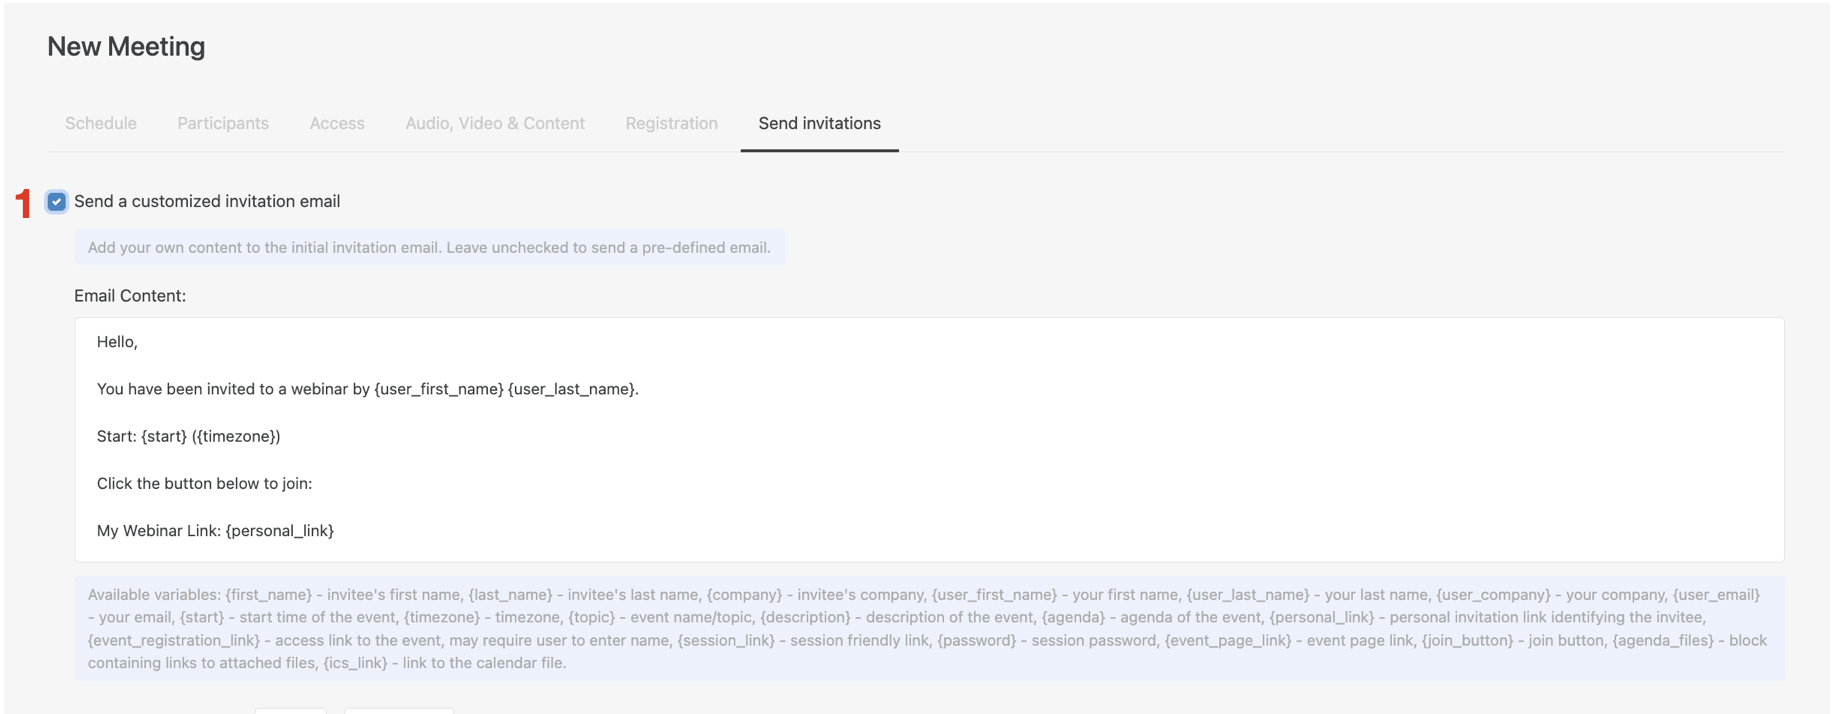
When customizing content of the invitation email, you can use the following variables:
...
- Send a reminder email/ second reminder email (2): here you can decide when the first and the second reminder emails should be sent, as well as the content of these emails
- Send a follow-up email to attendees/ absentees (3): customize emails to be sent out to those who attended the webinar, and to those who were invited but didn't attend
When configuring reminder and follow-up emails, you also have an option to attach files and send a copy of the emails to yourself - Send a list of invitee join links to myself (4): tick it off if you want to receive a CSV file with the join links of all invitees to your account email
- Email Header/ Footer (5): upload a custom image that should be used as a header or footer.
Requirements to the image: - Recommended dimensions: 200px wide, 50px high (Maximum: 600px wide, 600px high)
- Format: png is preferred. gif and jpg will be auto-converted to png
- Filesize: Max 512 KB

Address Book
Click on the Address Book menu on the left-hand panel to access and manage your list of contacts. To add a user to the Address Book, click Add Contact, provide the necessary details, and click Save. 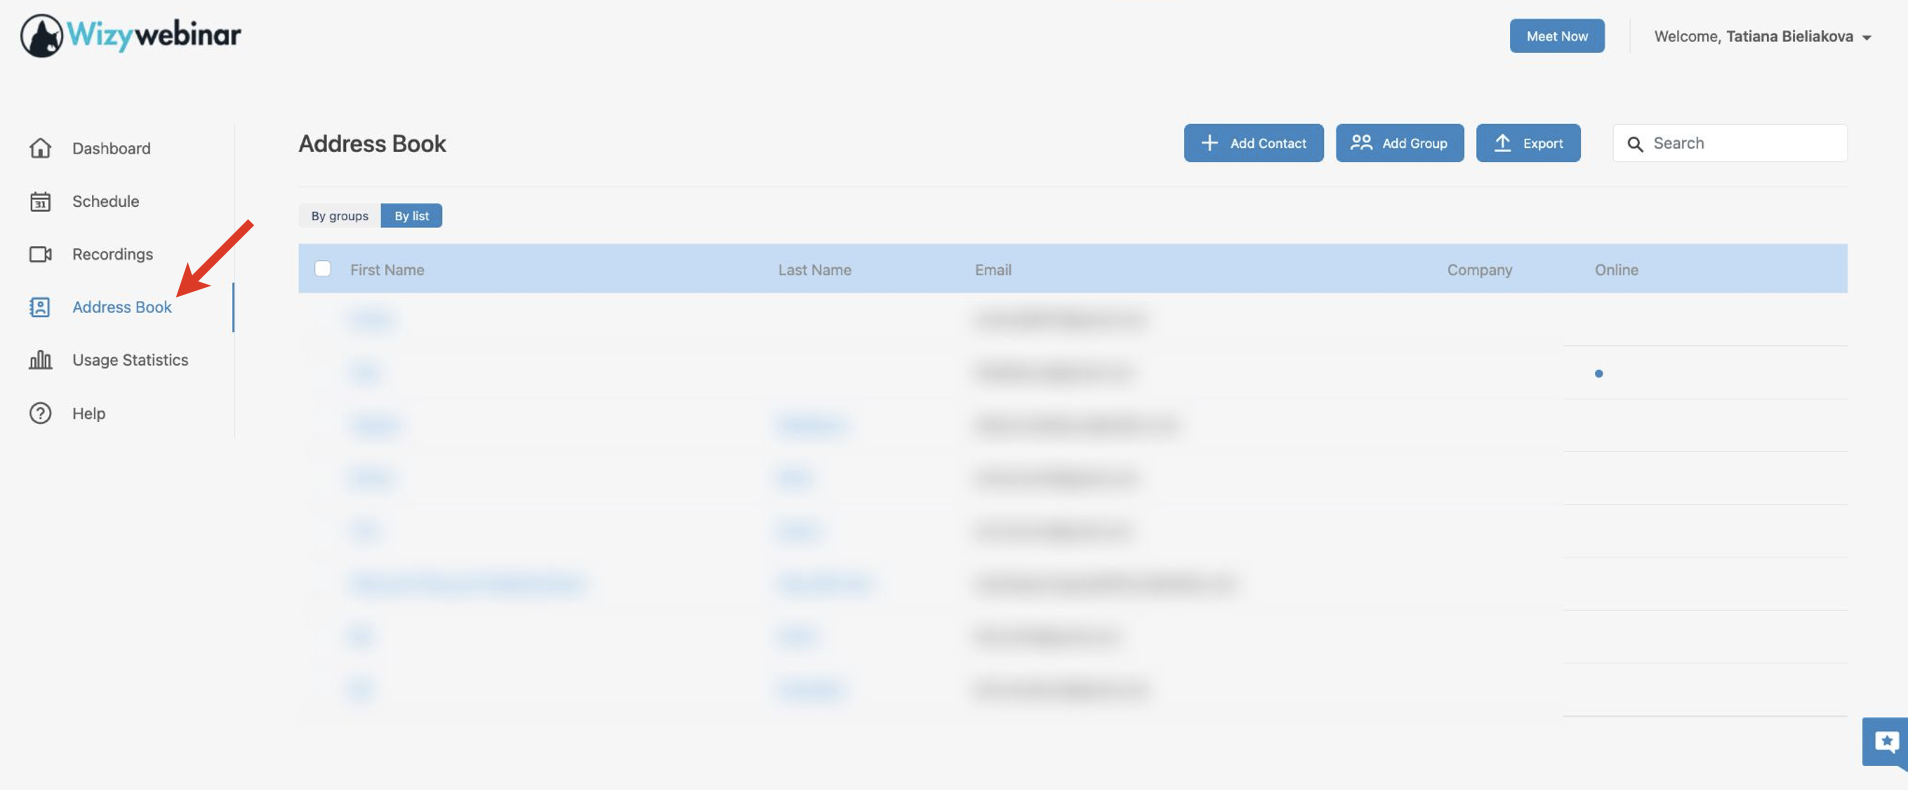
You may also add groups and indicate which groups your contacts belong to. To create groups, either use the Add Group button or use the Groups section when creating/ editing contacts.
...
Wizywebinar Video Tutorial - Manage a webinar
...
webinar
| Scroll only inline |
|---|
https://wildix.wistia.com/medias/s5ktl3rq2n |
| Easy html macro |
|---|
<script src="https://fast.wistia.com/embed/medias/s5ktl3rq2n.jsonp" async></script><script src="https://fast.wistia.com/assets/external/E-v1.js" async></script><span class="wistia_embed wistia_async_s5ktl3rq2n popover=true popoverAnimateThumbnail=true" style="display:inline-block;height:315px;position:relative;width:560px"> </span> |
...
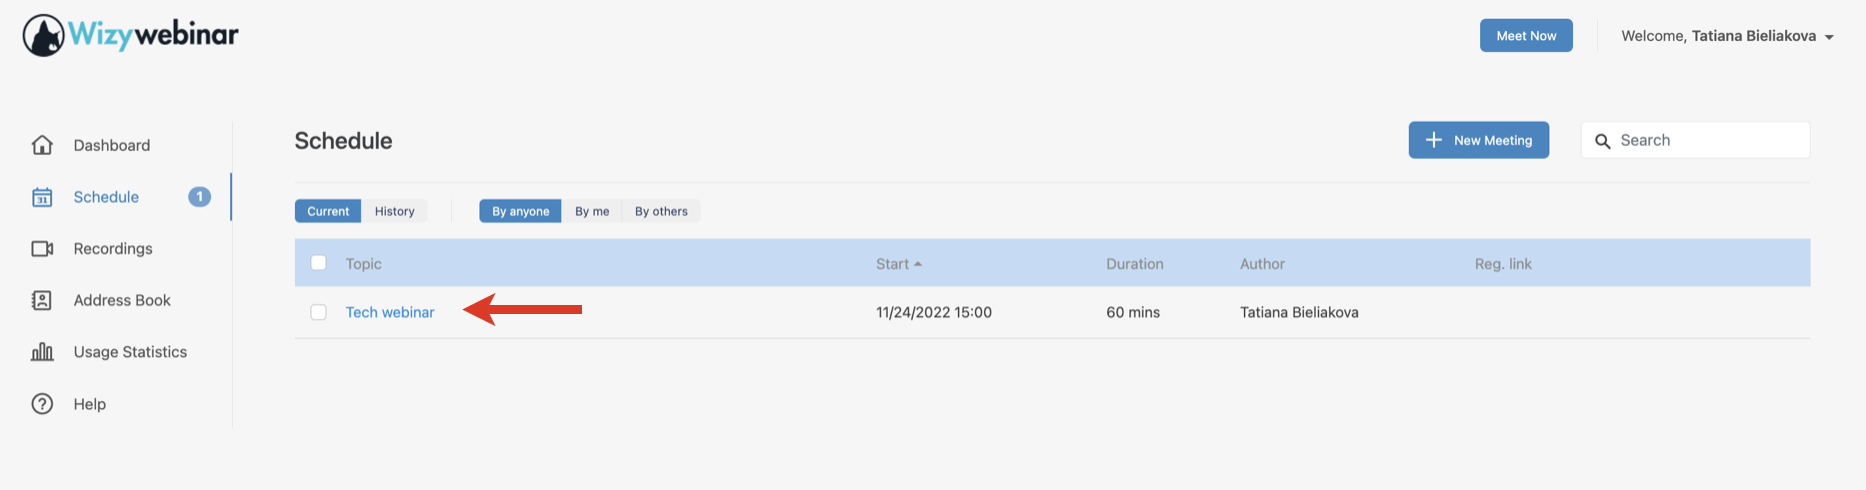
- Click on the Schedule menu from the left-hand panel
Click on the scheduled Webinar to enter the room
The webinar room opens in a new browser tab and you are prompted to set the speakers, to enter the room, click Join button: After joining the webinar room, your Collaboration user status changes to DND.
...
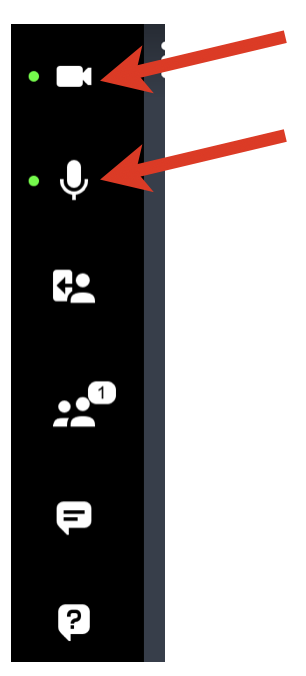
By default, you enter the room with the webcam and microphone disabled (you can change it in Audio & Video settings).
Click on the Camera and Microphone icons on the left panel to enable them:
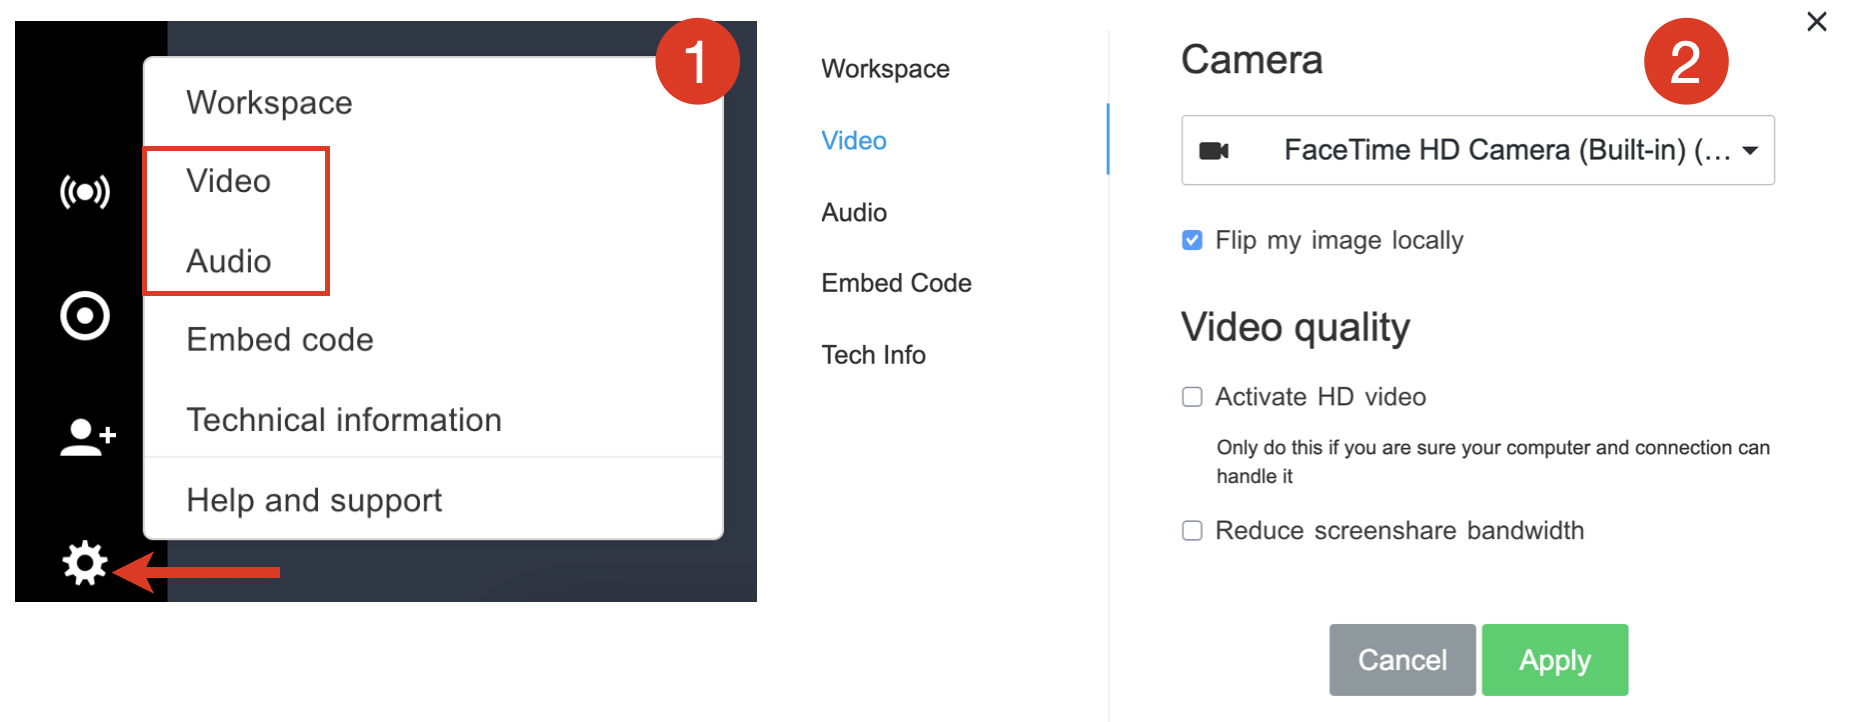
You can additionally activate HD video and reduce screenshare bandwidth in Video and Audio settings (see below).
...
- Click on the Settings button (Gear icon) at the bottom of the left panel ->select Video or Audio
- Change the desired settings
- Click Apply to save the changes
Managing the Participants
...
To manage Participants you need to open the Participants panel: click on the Participants button on the left panel:
Invite participants during a webinar
Speakers can invite more people to the room at any time by clicking on the Invite Participants button located on the left panel: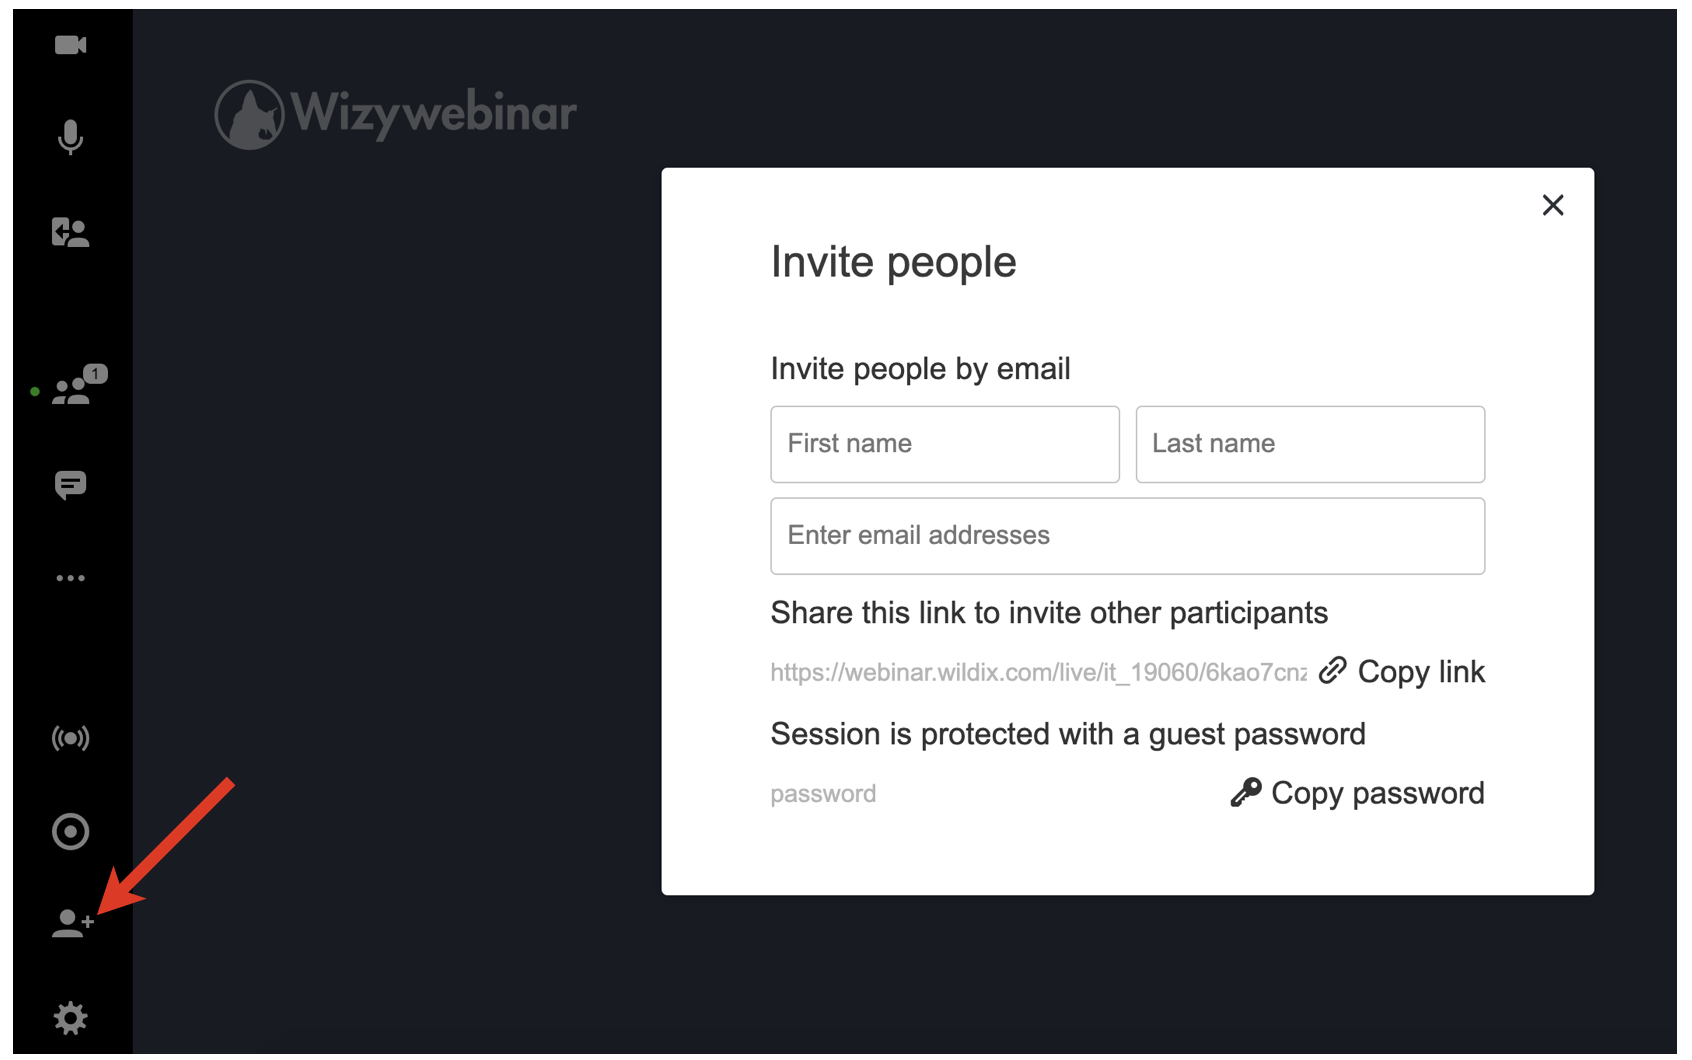
You have two options here:
- Invite people by email: enter person's First/ Last names and email into the field and hit Enter button. A person receives an email with the link to join. The link is pre-authenticated, so they don't need to insert the password, should your webinar have any. You can drag and drop the added email addresses to assign them the Speaker role. Once you have built your invite list, hit the green Invite button:
- Share this link to invite other participants: this option allows you to send out the meeting link and password manually to the intended audience
...
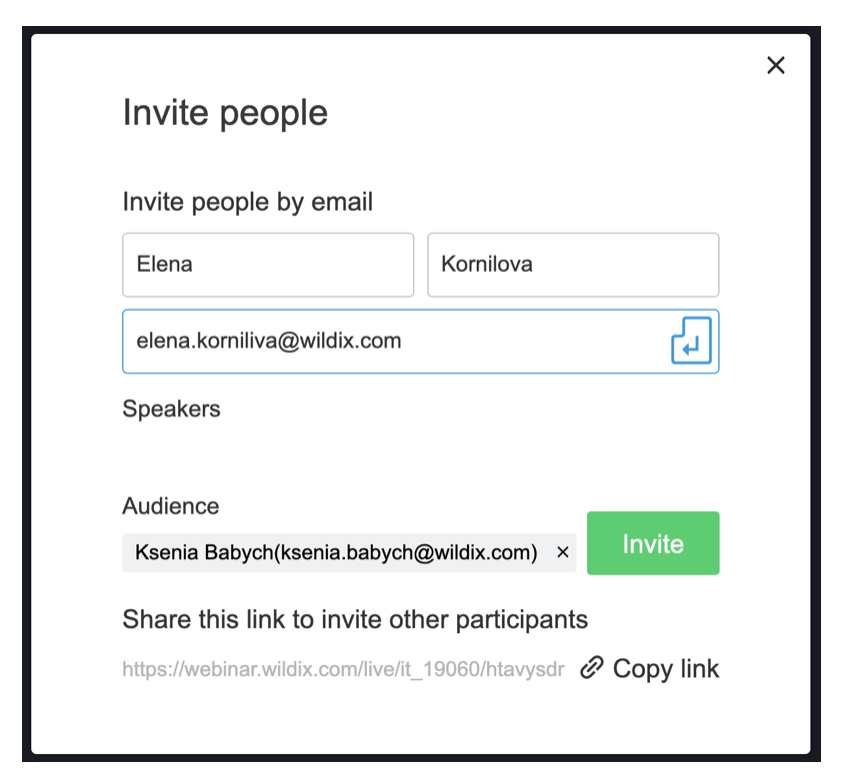
- Click on the Lock icon in the upper part of the Participants panel to enable/ disable the lobby:
| Note |
|---|
A green dot right next to the Participants icon indicates that the lobby is active. |
When the lobby is turned on, all the participants’ names are listed under the Users Waiting in the Lobby section in the Participants panel. From there, you have the option to (1) Allow into the room, Remove participant, or (2) Allow all users into the room: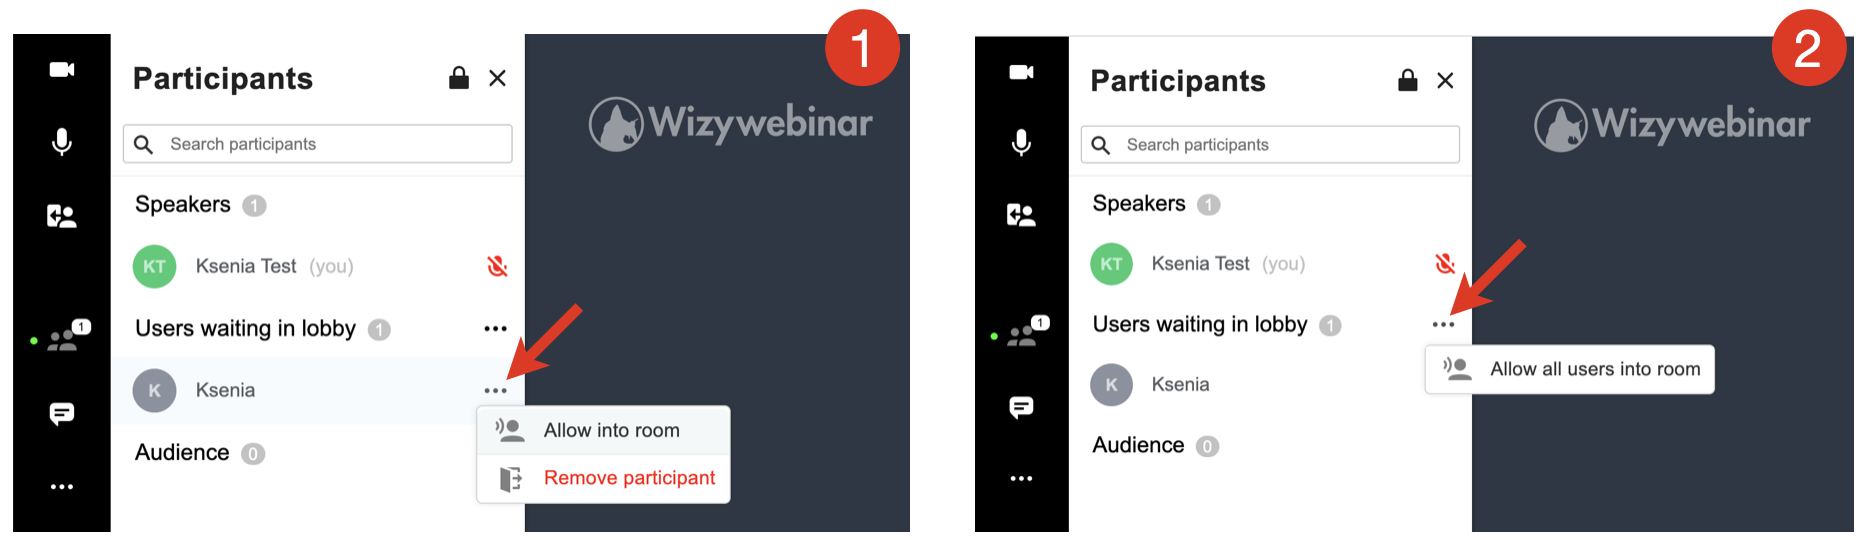
Manage the audience
- Find your audience member in the list and click on three dots next to them:
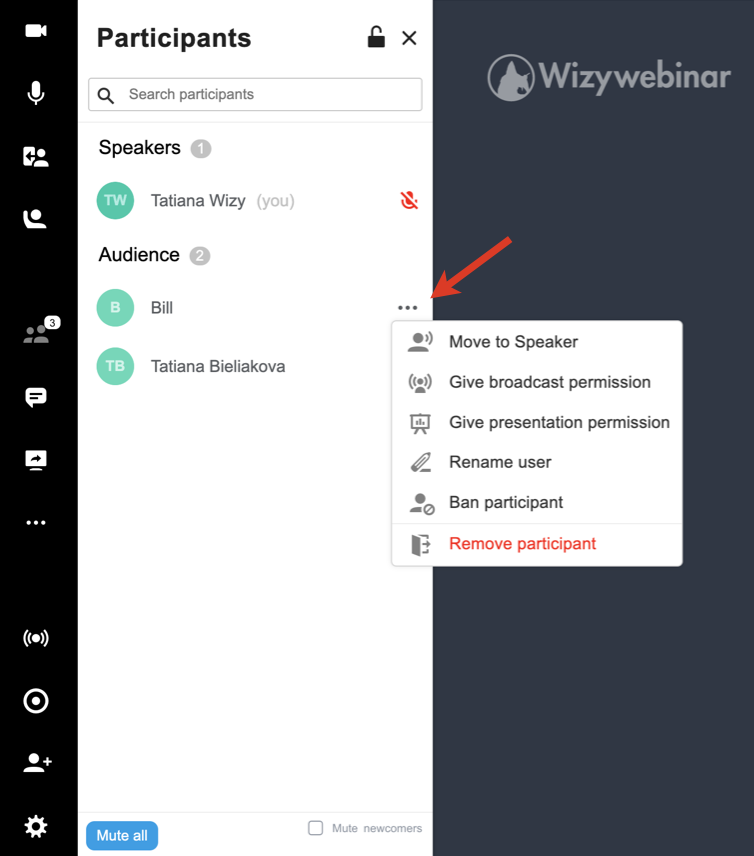
\Here you have the following options:
...
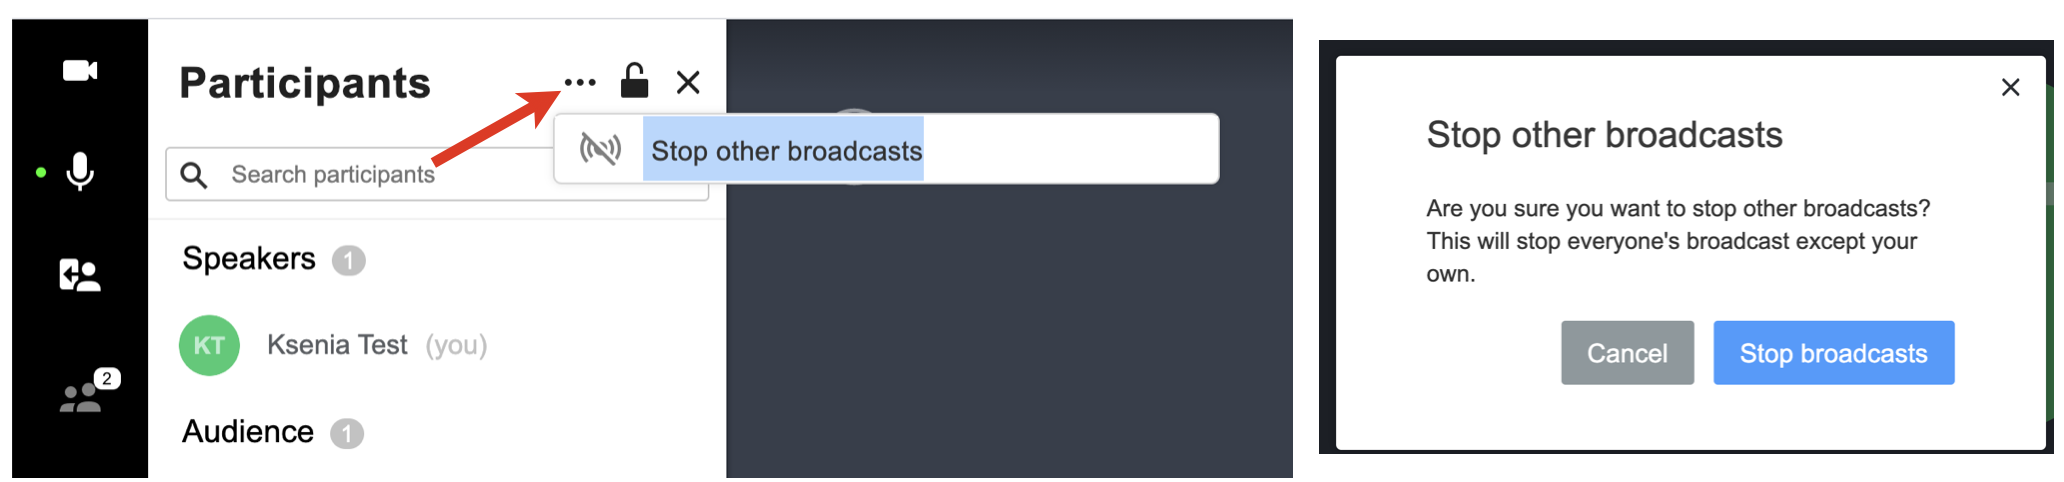
- Click on the three dots next to the lock icon and click Stop other broadcasts
- A new dialog opens, confirm by clicking Stop broadcasts:
Mute all
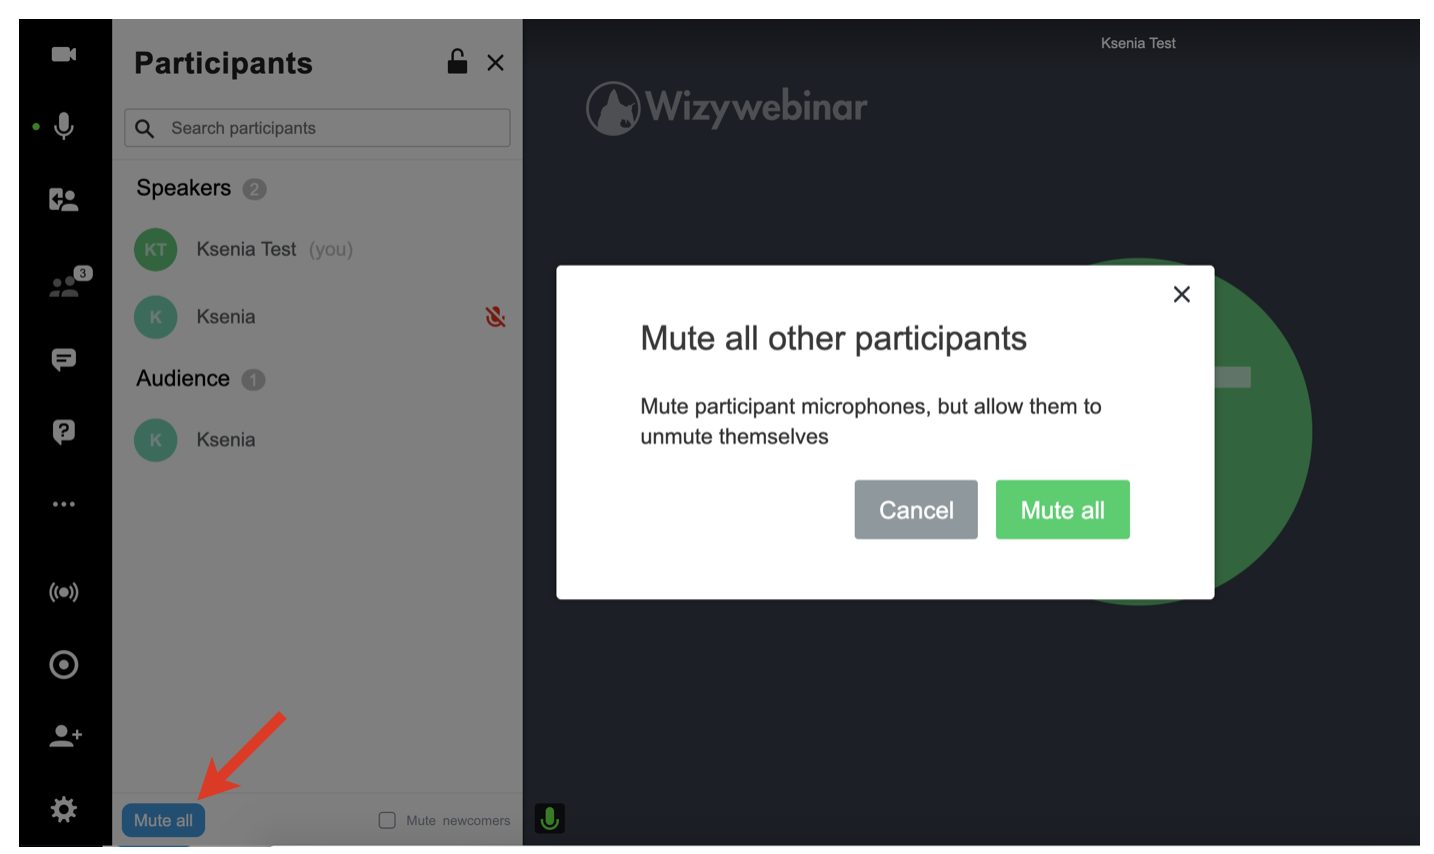
A Speaker has the ability to mute all other participants including other speakers. Tick off Mute newcomers if you want to mute new participants as they join a session:
Click Mute all located in the lower left-hand part of the screen
A new dialog opens, confirm by clicking Mute all:
Ask user to unmute
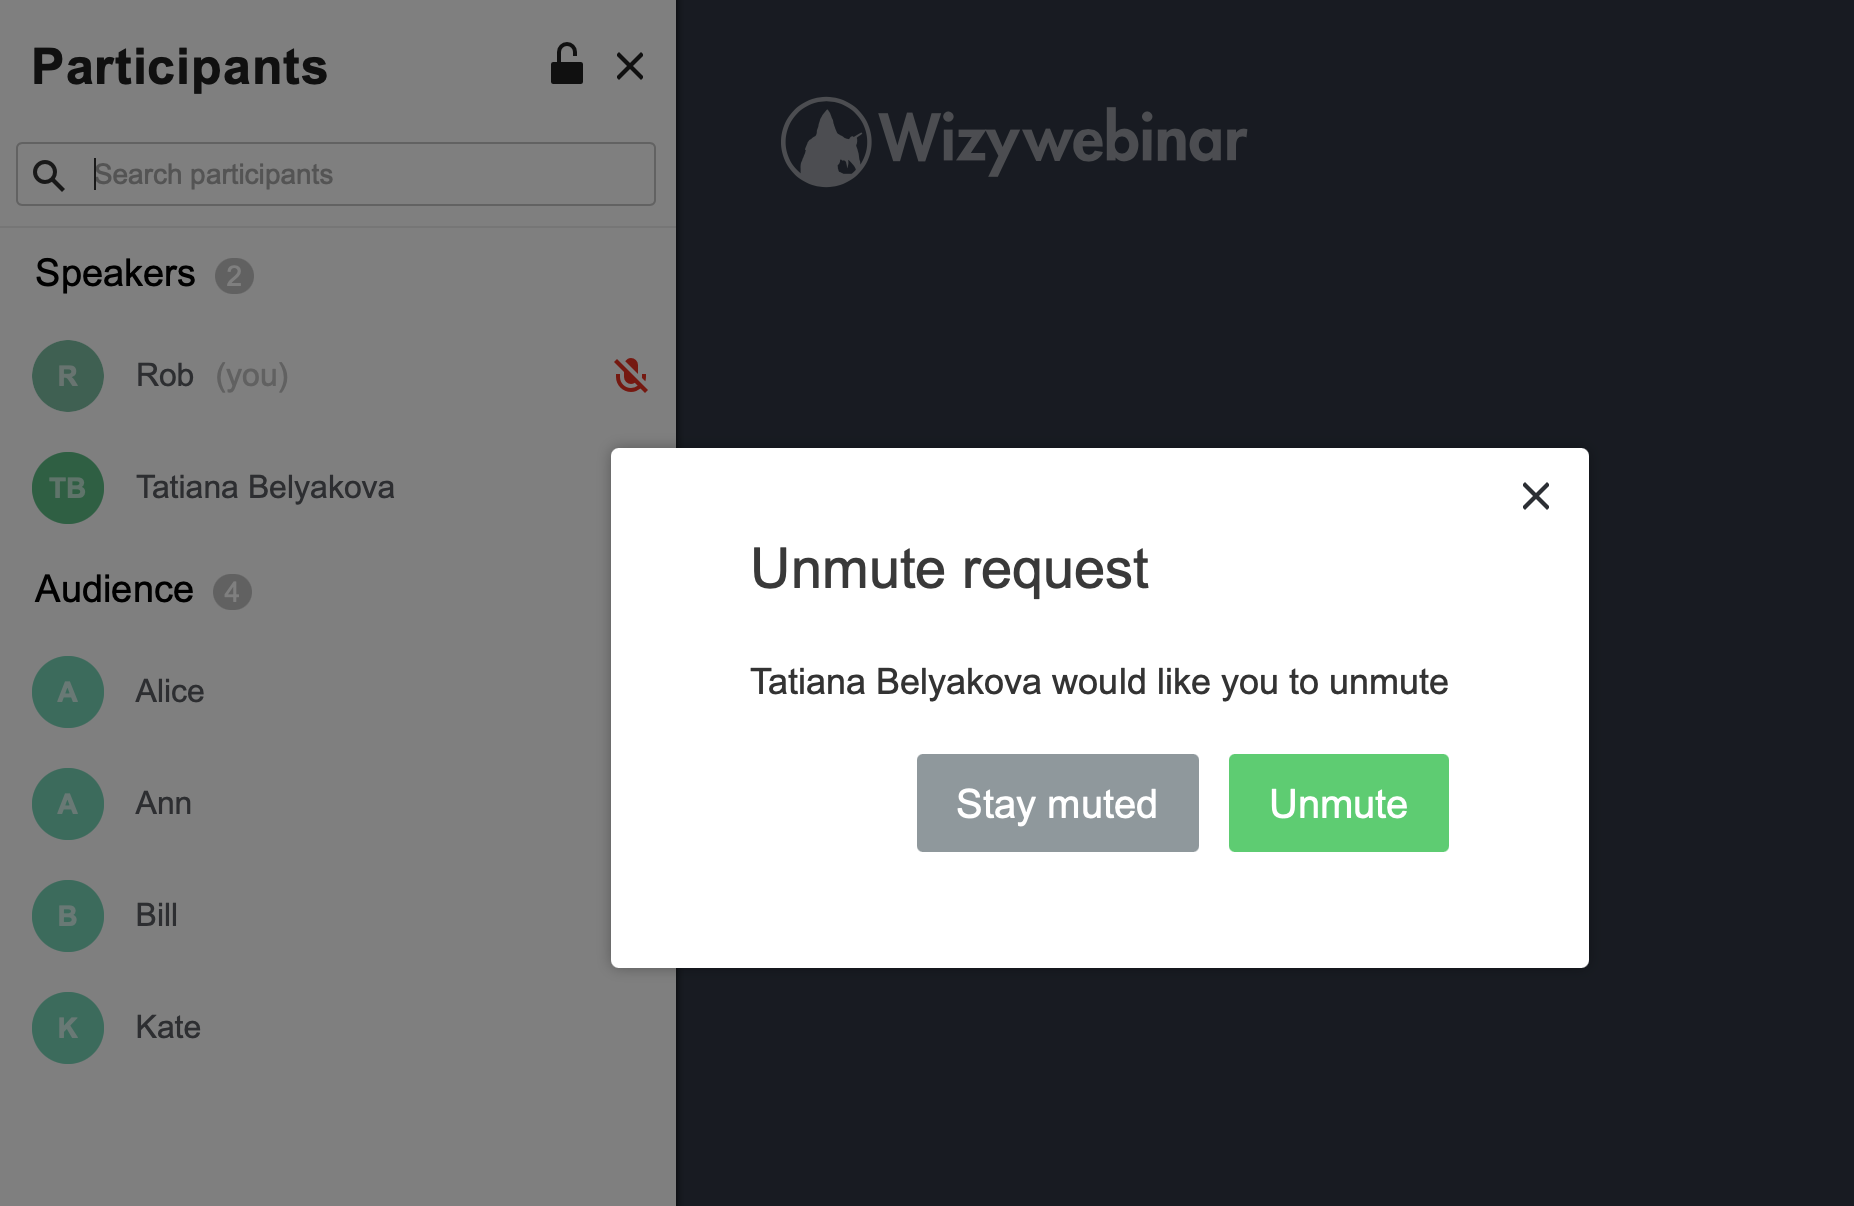
Ask user to unmute is an option available to speakers, which allows them to ask another speaker to unmute their microphone:
Next to the relevant speaker's name click the muted microphone icon. Then, on the pop-up window that appears, press the Ask to unmute button:
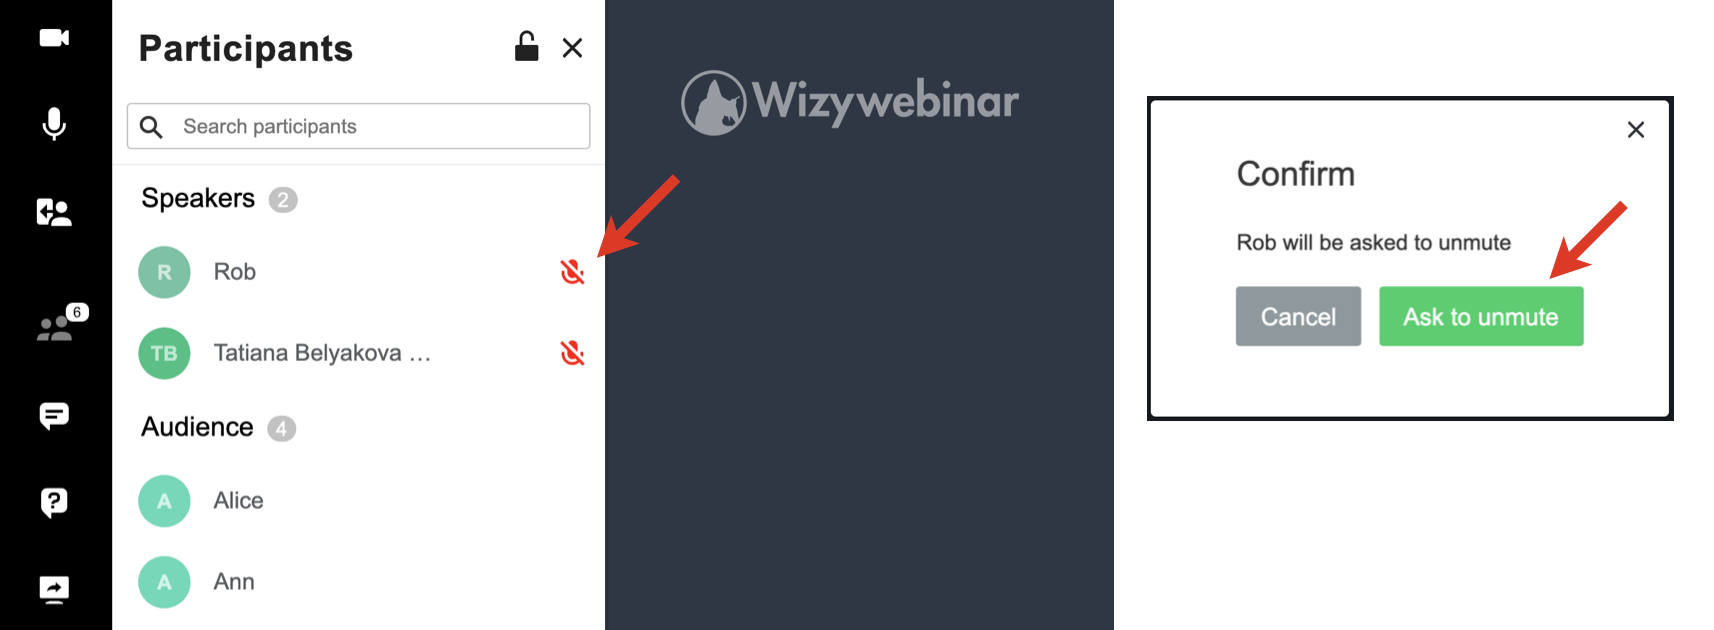
The speaker is then prompted to unmute:
Conversations
Conversations panel is where you can interact with your Audience, and where they can interact with you and each other throughout the meeting.
Click on the Message icon on the left panel to open the Conversations panel: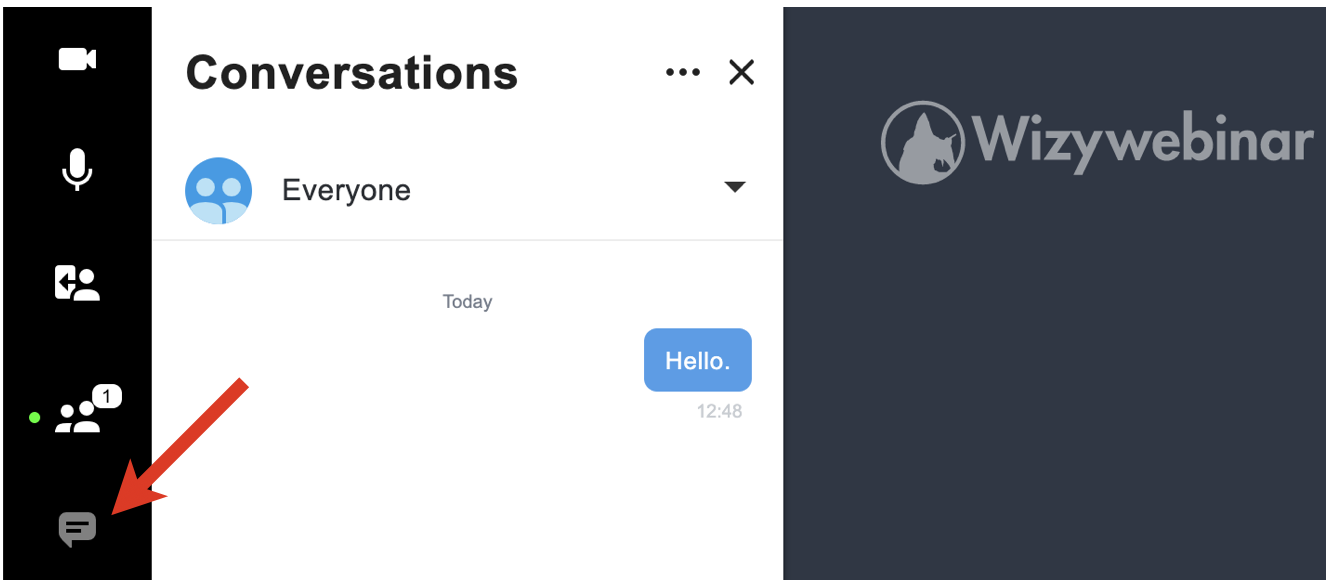
In here, Speakers see two channels:
...
Speakers can also clear chat history and both Speakers and Audience can export chat history by clicking on the three dots in the upper part of the Conversations panel. 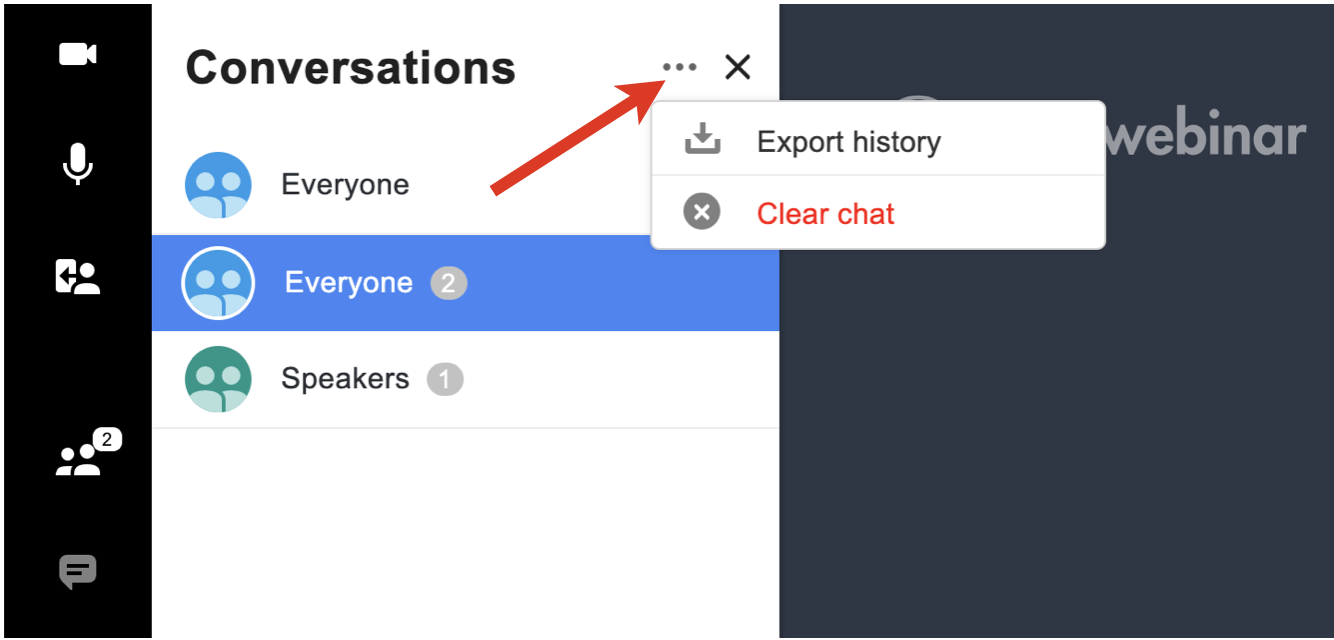
Questions and Answers
| Note |
|---|
Questions & Answers are disabled by default, you need to activate the option in Workspace settings. |
When inside a meeting, you have the option to ask questions as Audience and Speakers are able to answer them.
To ask a question, click on the Question icon on the left panel (1), type your question in the field below (2), and click Ask (3). If you want to ask a question anonymously, tick off the option Ask anonymously (4). 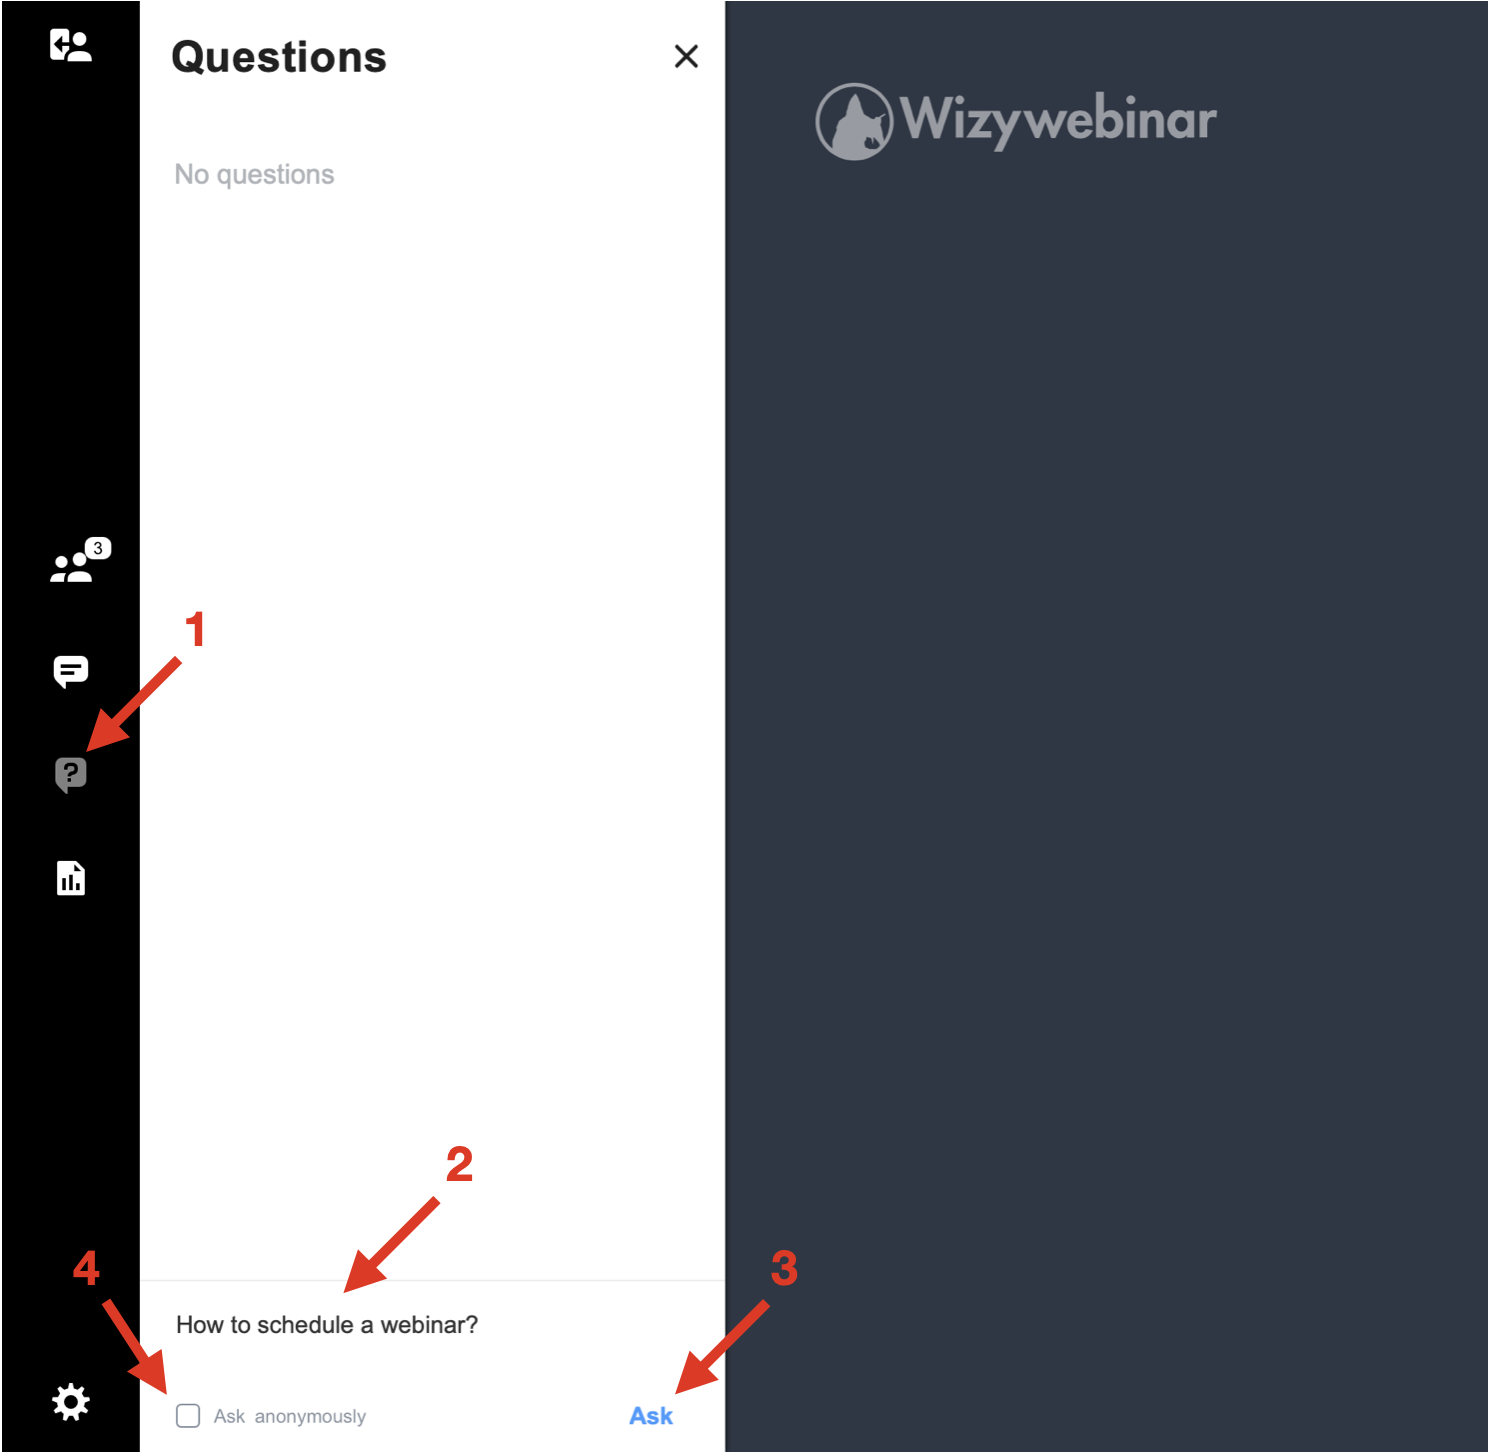
To answer, click on the question (1), type your answer below (2), and click Answer. You can answer privately (4) if you choose to.
...
- Queue for live answer
- Request public vote
- Edit
- Delete
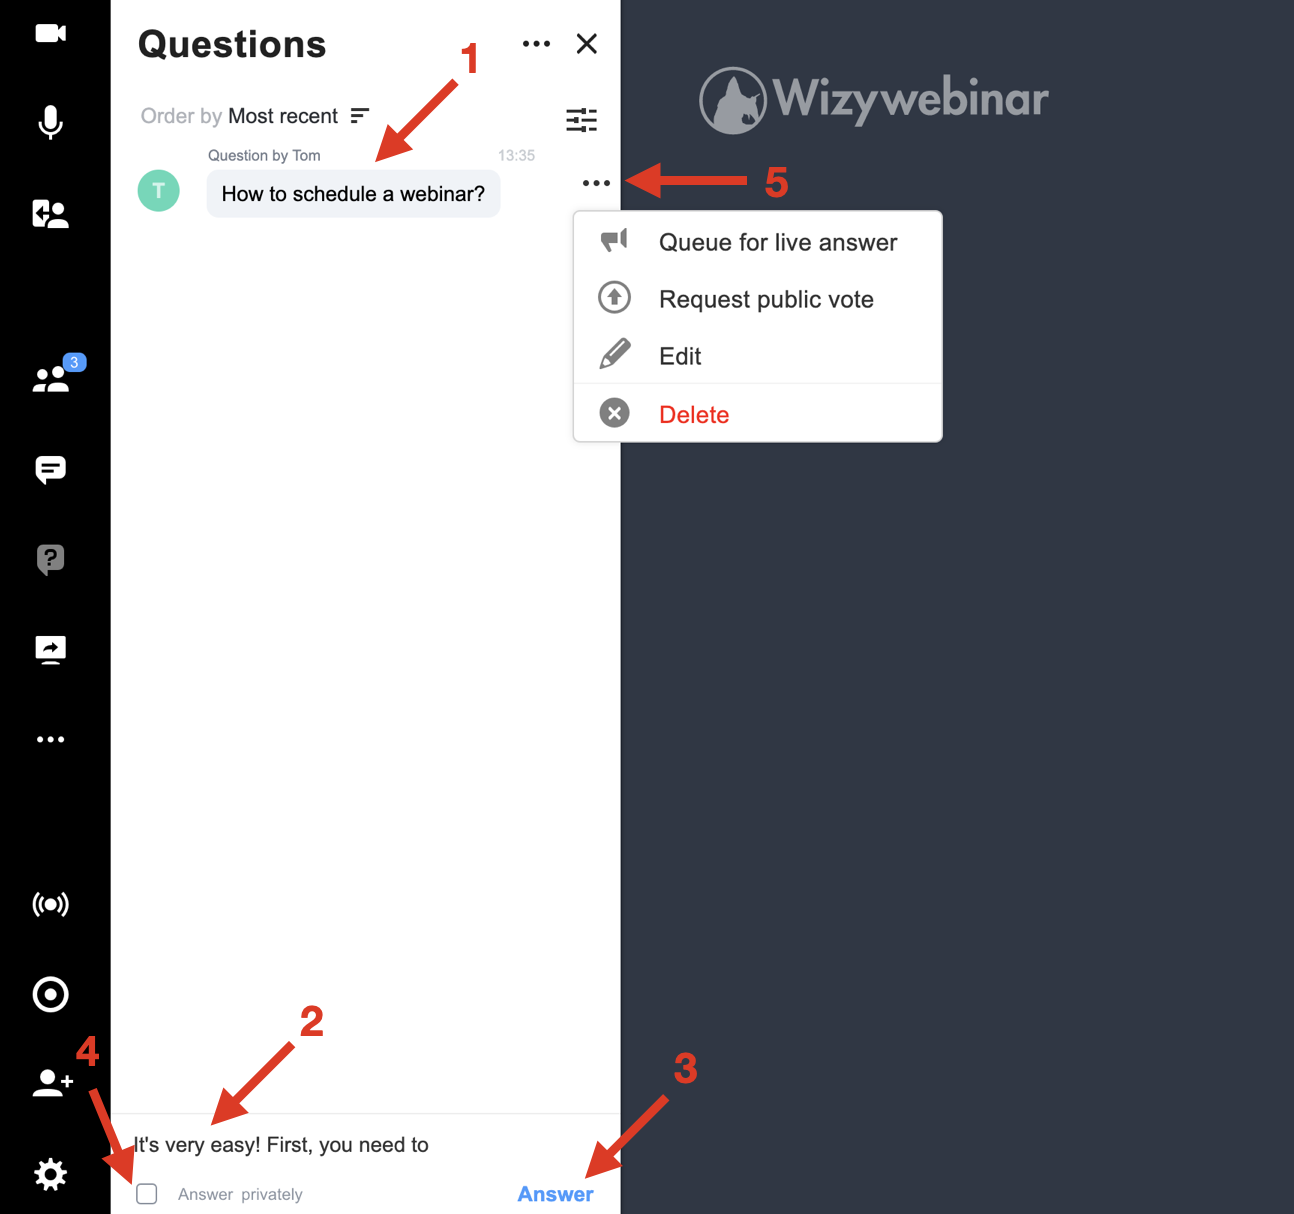
Speakers can also clear questions and answers history and make all questions public and both Speakers and Audience can export history by clicking on the three dots in the upper part of the Questions & Answers panel.
...
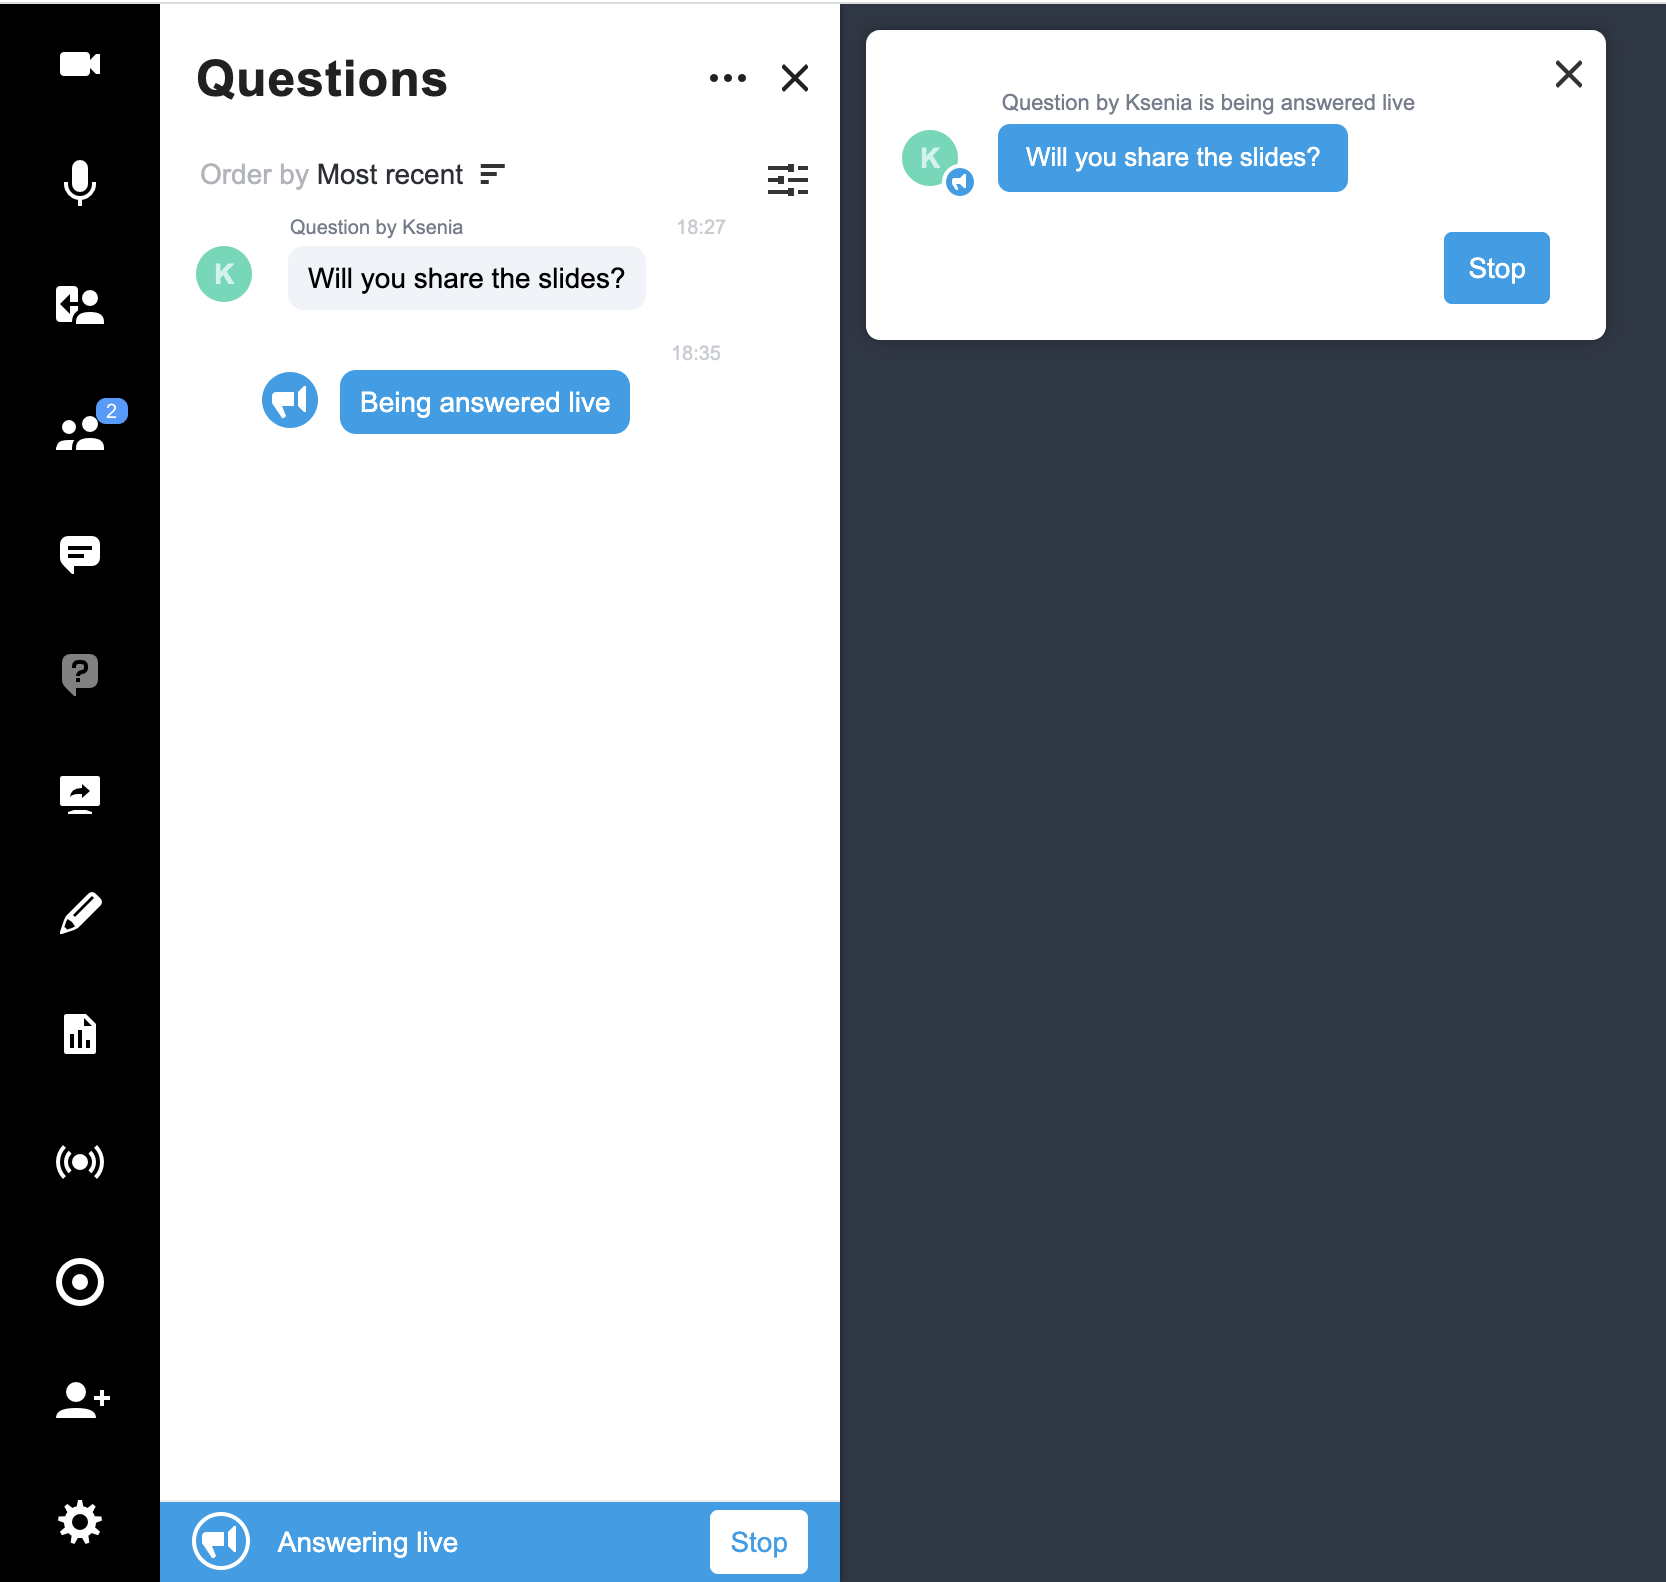
- Click on the queued question and hit Live Answer in the lower part of the Questions & Answers panel (next to Type your answer here) and start answering
- The question shows Being answered live next to it until you hit Stop – then it shows as Answered live:
Request a vote
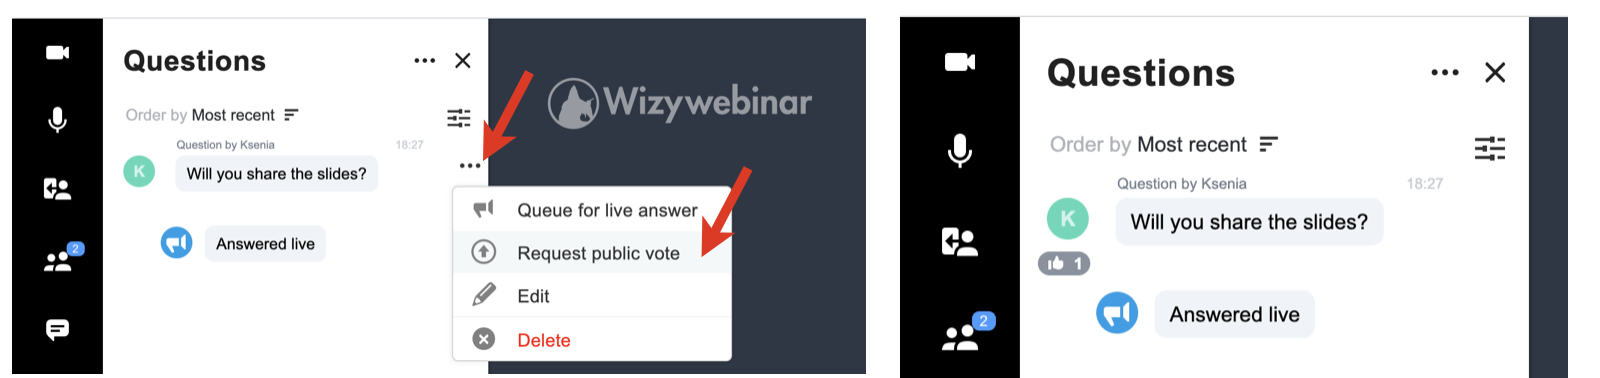
You can start a vote related to questions with other audience members.
...
- Click on the three dots next to the question and click Request public vote
- You can see the number change while the audience members cast their votes:
Screen share
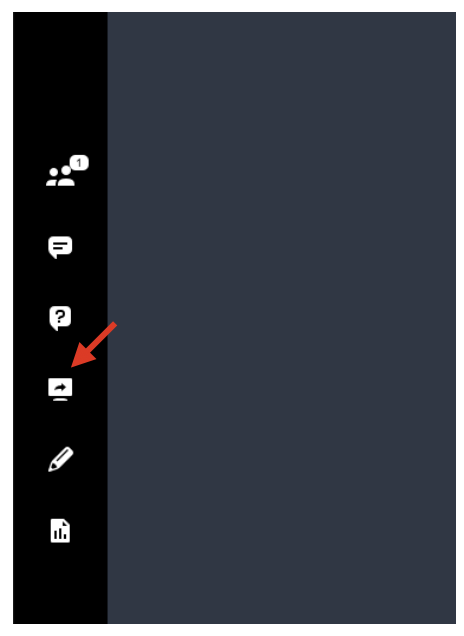
Once inside your meeting, to start screen share, click on the Screen icon on the left panel.
...
- Your Entire Screen allows you to share everything that is showing on your desktop
- Application Window allows you to select a specific program and only share that selection with your audience
- Browser Tab allows you to select only one tab from the ones you have open in your browser to share with your audience:
To stop sharing your screen, click on the Screen icon once again.
Whiteboard
To open the in-meeting whiteboard, click on the Whiteboard button (Pencil icon) on the left panel. Speakers have a set of whiteboard tools on the right-hand side of the Content Viewer window for drawing on a whiteboard. The same tools, except for a pointer, are available for annotating shared documents:
Content library
Content Library is where you manage documents and other media that you plan to share with your audience in a webinar. It supports lots of file types including all office document formats as well as MP4s and many image formats.
To access Content library, click on the Graph icon on the left panel. By default, there is Shared Files folder. In this folder you can find all media that you shared with other speakers or which was shared with you: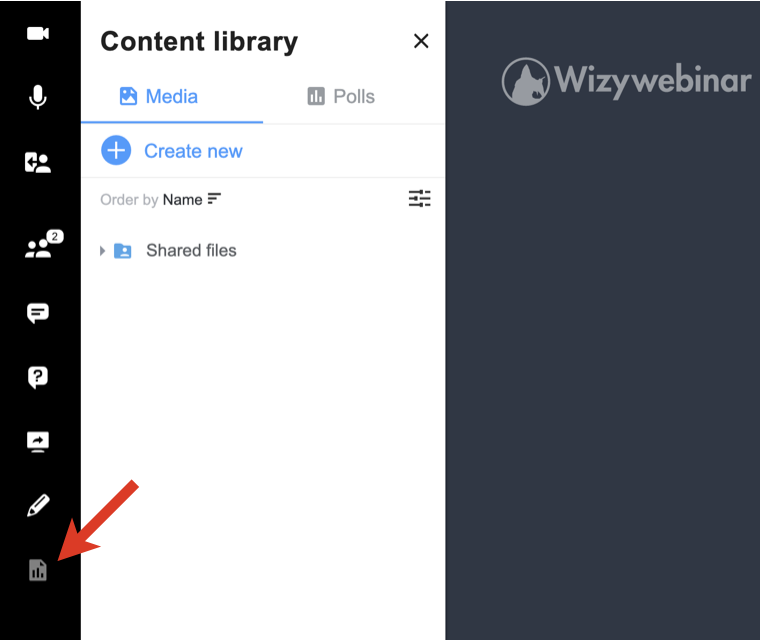
| Note |
|---|
Note: The files and links you upload to your Content library remain in your Wizywebinar account even after the event is over, so you can further reuse them in other webinars. |
...
- The speakers you’ve shared the file/ folder with, can access them in the Shared files folder, download, and show to the audience.
- To unshare the file/ folder, click on the three dots -> Unshare. AnySpeaker can unshare files that are shared by other Speakers:
Play a YouTube/ Vimeo video
...
- Enable forced layouts (disabled by default): More information in the chapter Forced layouts
- Enable live streaming
In addition, in this menu, you can change the number of thumbnail videos per page to be displayed for Full Screen Layout/ tiled videos for Tiled Layout and change the Language of the web interface.
...
- Open Settings -> Workspace, check the box Enable forced layouts and click Apply
Hover the mouse over the Screen icon in the bottom right-hand part of the screen and click Layout mode:
In the Layout mode, you can either arrange menus manually or choose one of the 10 predefined layout templates
For manual arrangement, select the menus that you would like your Participants to view: Participants, Questions & Answers, Conversations, Content library
If you want to choose one of predefined layout templates, click the star icon to the left of the Apply layout and Cancel buttons:
Choose the preferred layout template:
Remember that you can also resize and rearrange the elements of your workspace (explained in chapter Change layout). For example:
- When you are happy with the layout, click Apply layout in the bottom right-hand part of the screen
...
Integration with Wizyconf HW Station
Starting from Wizyconf App v 1.2.16, Wizyconf Station integrates with Wizywebinar, consult this documentation for details.
Other functionality
Starting from v. 5.42.4, there is an option to protect sessions with end-to-end encryption (E2EE), which ensures that both audio and video streams, including screen share, are not being read or secretly modified by anyone other than the actual senders and their recipients.
...
| Note |
|---|
Note: E2EE is not compatible with Recordings, Live Streaming. E2EE is also not compatible with mobile - mobile users won't be able to join encrypted sessions. |