| Html |
|---|
<div id="fb-root"></div>
<script>(function(d, s, id) {
  var js, fjs = d.getElementsByTagName(s)[0];
  if (d.getElementById(id)) return;
  js = d.createElement(s); js.id = id;
  js.src = 'https://connect.facebook.net/en_US/sdk.js#xfbml=1&version=v2.11';
  fjs.parentNode.insertBefore(js, fjs);
}(document, 'script', 'facebook-jssdk'));</script> |
...
| Html |
|---|
 <div class="lang-box-pdf">
	<div>
		<div class="google-lang">
			<div id="google_translate_element">
			</div>
			<script type="text/javascript">
					function googleTranslateElementInit() {
						new google.translate.TranslateElement({pageLanguage: 'en', includedLanguages: 'de,es,fr,it,nl', autoDisplay: false}, 'google_translate_element');
						}
			</script>
			<script type="text/javascript" src="//translate.google.com/translate_a/element.js?cb=googleTranslateElementInit"></script>
		</div>

		<div class="pdf-button">
			<a href="https://confluence.wildix.com/spaces/flyingpdf/pdfpageexport.action?pageId=62488759" alt="Convert to .pdf" title="Convert to .pdf"><img src="https://confluence.wildix.com/download/attachments/14549012/pdf-button-download-wildix-documentation.png"></a>
		</div>
	</div>
</div> |
| Info |
|---|
This guide will lead you through the process of SAP Business One integration usage, starting from an installation, and ending with practical examples for call receiving. Requirements:
Created: November 2019 Updated: December 2019 Permalink: https://confluence.wildix.com/x/t4C5Aw |
| Panel | ||||||||||||||
|---|---|---|---|---|---|---|---|---|---|---|---|---|---|---|
| ||||||||||||||
|
| Table of Contents | ||
|---|---|---|
|
Installation Link
...
| Note |
|---|
Make sure you did install and configured the TAPI driver first. |
- Download the Wildix Integration according to your version. Both x64 and x84 are supported.
- In the archive you should see two files:
- The add-on registration data (.ard) file
- The add-on setup (.exe) file
Setup the Integration as SAP Business One addon
Setup the Custom App
- Go to Admin tab in your Freshdesk dashboard
- Choose Apps
from Helpdesk Productivity category
- Go to Custom Apps tab and press the New Custom App button
Once in a Freshdesk Developer, you need to:
- Click on Add New App button
- Select Custom App
- And Upload app file
Setup information
To proceed you must fill up the mandatory fields:
- App Name
- Overview
- Description
- Support Email
You can use any text for now. Whenever you fill the information click on the Publish button. In case of success you can spot the notification:
You can close the page now and return to your Freshdesk dashboard. Go back to the Custom App page and press the Get Custom Apps button.
In case of app was published and time has passed, you should see your application in Custom App Gallery sidebar. Click on it and press the Install button
One last thing is to insert your API key. You can discover your key in your Profile Settings. Just press on your avatar in the top-right corner.
Finish the installation process by copy your API key from the setting page and past it to the sidebar of the installer.
Application Usage
| Warning |
|---|
Keep Collaboration open while working with Freshdesk |
The Integration placed in two places:
- The down - left button that shows pop-up
- Contact info sidebar where a Click-to-call button located
Make a Call
| Warning |
|---|
Keep Collaboration open while working with the application |
Making a Call Using Click-to-Dial
You can not call contacts without a phone number. The application recognizes both Work phone and Mobile phone fields from the Freshdesk.
...
- A number that has already been clicked cannot be clicked again for five seconds.
- The button does not appear next to fax numbers.
...
om the SAP Business One Main Menu, choose
 Administration
  Add-Ons Add-On Administration Company Preference
  tab.
tab.Choose the Register Add-On button.
The Add-On Registration window appears.
In the Installation Information section, locate and select the add-on registration data (.ard) file for the add-on by choosing
 (Browse) button next to the Registration Data File field.
If the selected .ard file contains installer information and the installer file is located in the same folder as the .ard file, SAP Business One automatically fills the installer file in the Installation Package field. If you use the silent installation mode, SAP Business One automatically fills the fields in the Silent Installation Information section.
If the Installation Package field is not filled automatically, locate and select the setup.exe file for the add-on by choosing
(Browse) .To assign the add-on to the current company, select the Assign to Current Company checkbox.
To install the add-on after registration, select the Install as Part of Registration checkbox.
SAP Business One installs the add-on on the current machine immediately after registration. You do not have to log off your company and log on again. Installing the add-on on other machines depends on company and user preferences.
To register the add-on, choose the OK button.
If you assigned the add-on to the current company in step 5, the add-on appears in the Company-Assigned Add-Ons list in the Add-On Administration window. The add-on is registered and assigned to the current company.
Add-ons that are not mandatory are registered as Disabled and Active for the company. For more information about these settings, see Add-On Administration: Company Preferences Tab.
If you did not assign the add-on to the current company in step 5, the add-on appears in the Available Add-ons list in the Add-On Administration window. The add-on is registered for the current company.
To notify all the users in the current company about the new add-on, proceed as follows:
Choose the Send Notification to Users button.
The You Have new Add-Ons to Install window appears.
Enter the notification message header and text.
Choose the Send Notification button.
Users receive the notification message within a minute after you have sent it.
To close the Add-On Administration window, choose the OK button.
Answer a Call
| Warning |
|---|
Keep Collaboration open while working with the application |
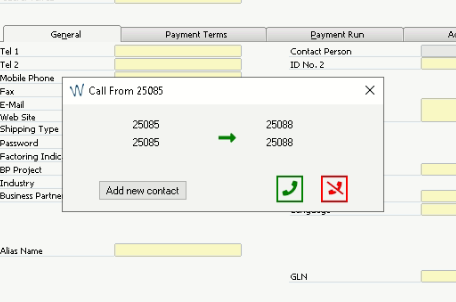
You can tell that you have an incoming call if you see a flashing red button near your tab name on the browserthis pop-up above all other windows. It also plays the ringtone. You should also receive a notification in the top-right corner
Details about the call, if any, are displayed just above the Answer button, and typically include the phone number of the caller and the number that the caller dialed to reach you.
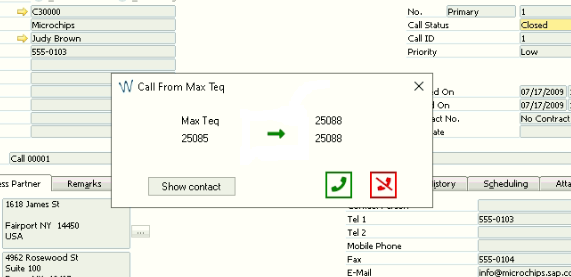
When the caller's phone number can be matched with a number in an existing Freshdesk SAP record, that record is also displayed in a new tab.will be displayed once you press the Answer button. You also can also open it by pressing on the Show contact button.
To answer an incoming call, press the green button in the pop-up.
...