Integration of CyberData IP Endpoints with Wildix IP PBX
The Guide explains how to set up the Integration of CyberData IP Endpoints with Wildix IP PBX.
Created: November 2021
Permalink: https://wildix.atlassian.net/wiki/x/6wPOAQ
Before You Start
This Configuration Guide documents the integration process of a CyberData SIP Call Button, SIP Intercoms, SIP Paging Adapter, SIP Paging Amplifier, SIP Paging Server, SIP Speaker, SIP Strobe.
Network Advisories
Wildix uses a Fully Qualified Domain Name (FQDN) for the SIP server address. The CyberData SIP Devices need to perform a DNS A query to resolve the IP address of Wildix’s SIP Server FQDN. It is necessary to ensure the configured DNS server(s) have an A record for the SIP Server address.
In addition, be sure to verify the following ports are available for the device to use:
UDP 5060 (SIP)
UDP 10500 (RTP)
The Devices need to traverse the public internet in order to operate with Wildix in the cloud.
The Device's paging extension uses SIP port 5060 to receive SIP messages. The paging extension sends SIP messages to port 5060, the port used by Wildix’s SIP Server.
SIP ports 5060 and RTP port 10500 are the default values on all noted firmware levels.
Alternatively, SIP ports for the paging extension are configurable on the SIP page of the web interface.
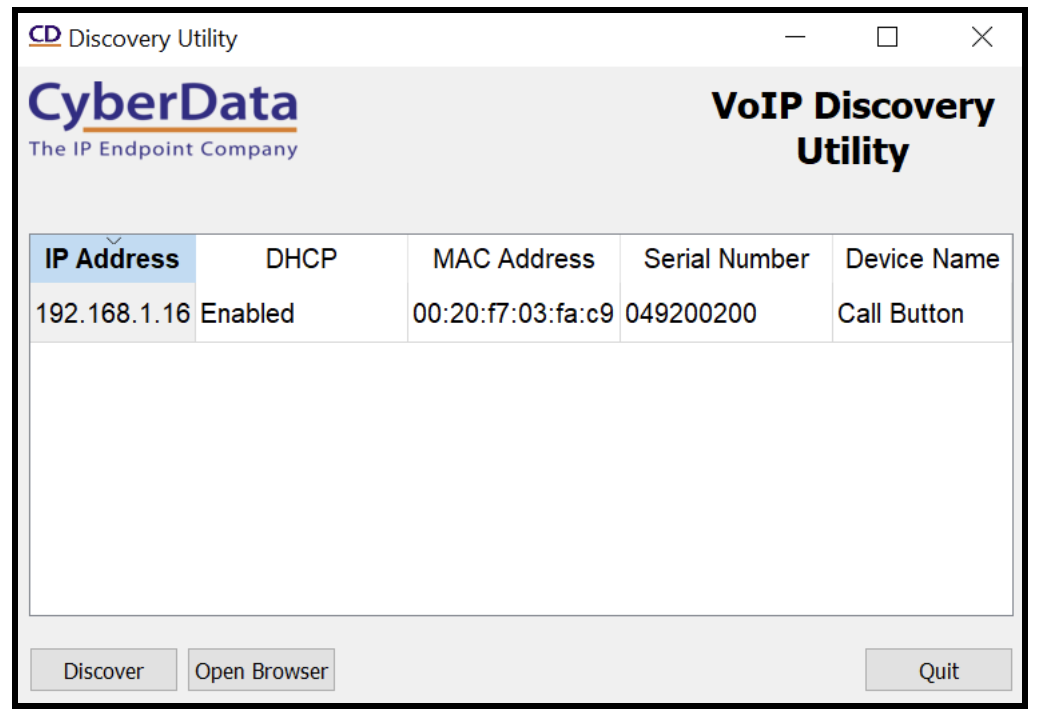
The CyberData Discovery Utility can be used to locate CyberData devices on your network. You may download it from the following web address: https://www.cyberdata.net/pages/discovery.
Note: DHCP addressing mode is enabled on default on all noted firmware levels.
Product Documentation and Utilities
Before you start, search for and download the Operation and Quick Start guides from the products webpage: https://www.cyberdata.net/pages/quick-downloads.
You can also download separate Guides describing the Integration of CyberData IP Endpoints and Wildix from https://www.cyberdata.net/pages/connecting-to-ip-pbx-servers?_pos=1&_sid=28a47d4bb&_ss=r
Setup Diagram
Interoperability Test Infrastructure
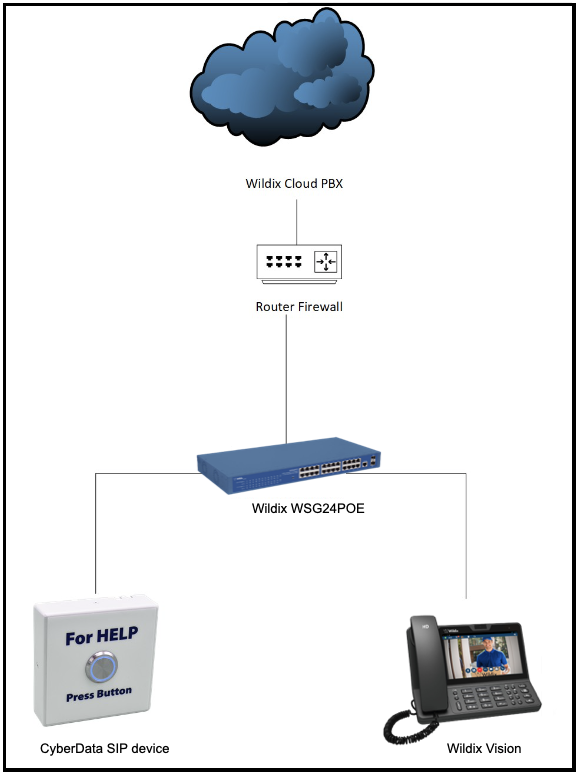
Devices tested on Wildix side
- Wildix WSG24POE Switch
- Vision/ SuperVision/ Collaboration
Devices tested on CyberData side
Equipment | Model or part number | Firmware version |
| SIP Call Buttons | ||
CyberData SIP Call Button | 011049 | 20.3.0 |
CyberDataOutdoor SIP Call Button | 011491 | 20.3.0 |
| SIP Intercoms | ||
CyberData Indoor Intercom | 011211 | 20.0.0 |
| CyberData H.264 Video Intercom * | 011410 | 1.4.1 |
| CyberData H.264 Video Intercom with Keypad * | 011414 | 1.4.1 |
| CyberData H.264 Video Intercom with RFID * | 011478 | 1.1.0 |
| CyberData Outdoor Intercom | 011186 | 20.1.0 |
| CyberData Outdoor Keypad Intercom | 011214 | 20.0.0 |
| CyberData Outdoor Intercom with RFID | 011477 | 1.0.0 |
| CyberData SIP Emergency Intercom | 011209 | 20.0.0 |
| SIP Paging Adapter | ||
CyberData SIP Paging Adapter | 011233 | 20.1.0 |
| SIP Paging Amplifiers | ||
| CyberData SIP IP66 Outdoor Horn | 011457 | 12.1.0 |
| CyberData SIP Loudspeaker Amplifier – AC powered | 011404 | 12.1.0 |
| CyberData SIP Loudspeaker Amplifier - POE | 011405 | 12.1.0 |
CyberData SIP Paging Amplifier | 011324 | 12.1.0 |
| SIP Paging Server | ||
CyberData SIP Paging Server | 011146 | 20.0.0 |
| SIP Speaker | ||
CyberData SIP Speaker | 011394 | 12.1.0 |
| CyberData SIP Talkback Speaker | 011398 | 12.1.0 |
| SIP Strobe | ||
CyberData SIP Outdoor RGB (multicolor) Strobe | 011479 | 20.0.0 |
| CyberData SIP RGB (multi-color) Strobe | 011376 | 20.0.0 |
* At the time of writing, video does not work properly with Wildix, this is an issue with CyberData’s video intercom devices not Wildix. Due to this issue, the Video Intercom’s are not recommended.
Configuration Procedure
Step 1. Creating a dedicated user on Wildix side
Log into Wildix:

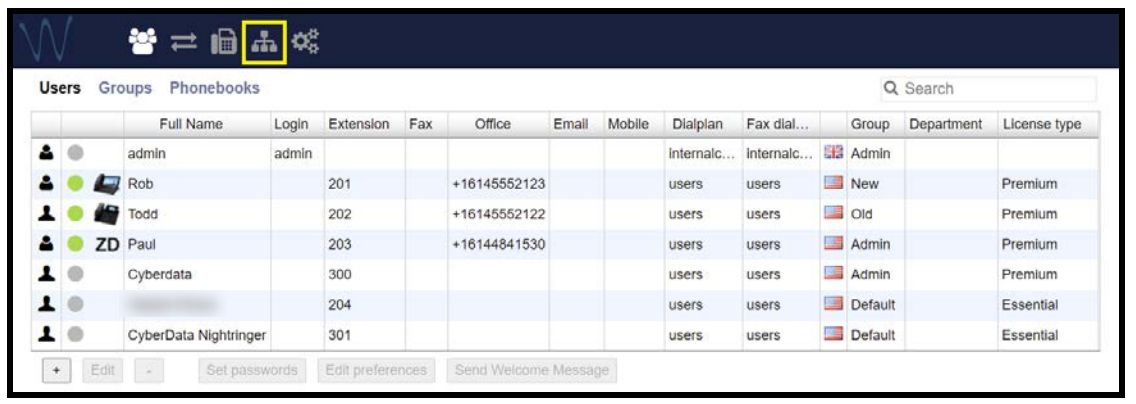
On the Users Menu page, press the + button to add a new user:
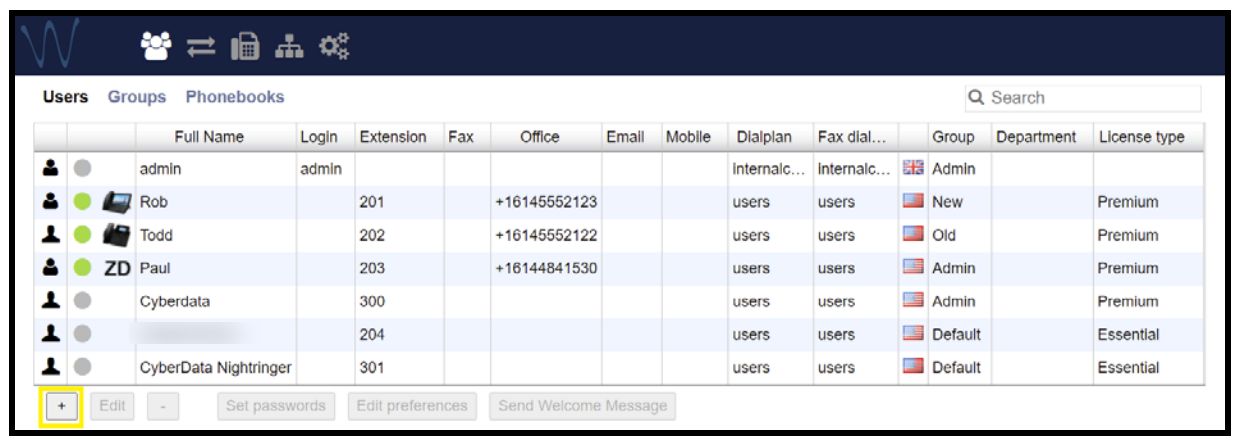
A pop-up to create the user appears:

Make sure the drop-down menu has User selected
Set the full name to the location of the device
Set the Extension desired for the device
- Set the desired License type (typically, Basic or Essential)
Note: Other values can be set, but for the purposes of this Guide all other fields are left blank.
- Press Ok to save the user
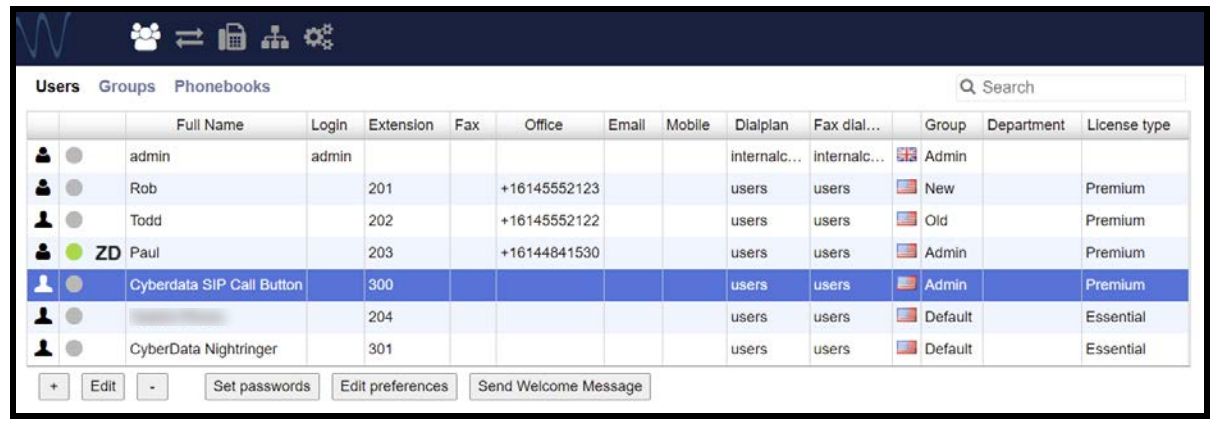
After creating, select it the user and press Set passwords:
Click on Generate button for SIP/VoIP to create a password:
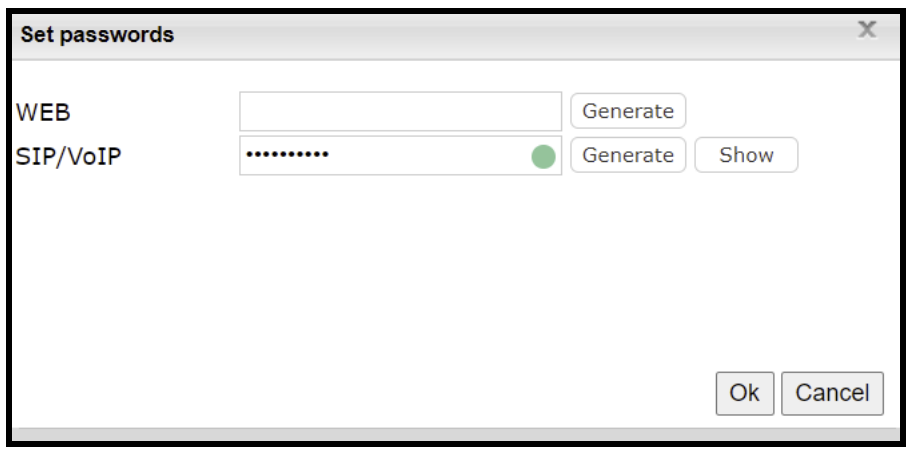
- Click Show button and copy the auto-generated password which is required in the next step
Step 2. Setting up the Paging Extension and the Nightringer on CyberData web interface
If you are configuring through the web interface, use the following steps to login to the web interface of your CyberData device.
CyberData Setting | Wildix Provisioning Pop-up |
| Primary SIP Server | SIP Domain |
| Primary SIP User ID | Extension Number |
| Primary SIP Auth ID | Extension Number |
| Primary SIP Auth Password | Password |
Click Launch Browser from the CyberData Discovery Utility or point your browser to the CyberData device’s IP address to access the Home Page of the web interface:
Enter the default credentials admin : admin when prompted and click Log In button:

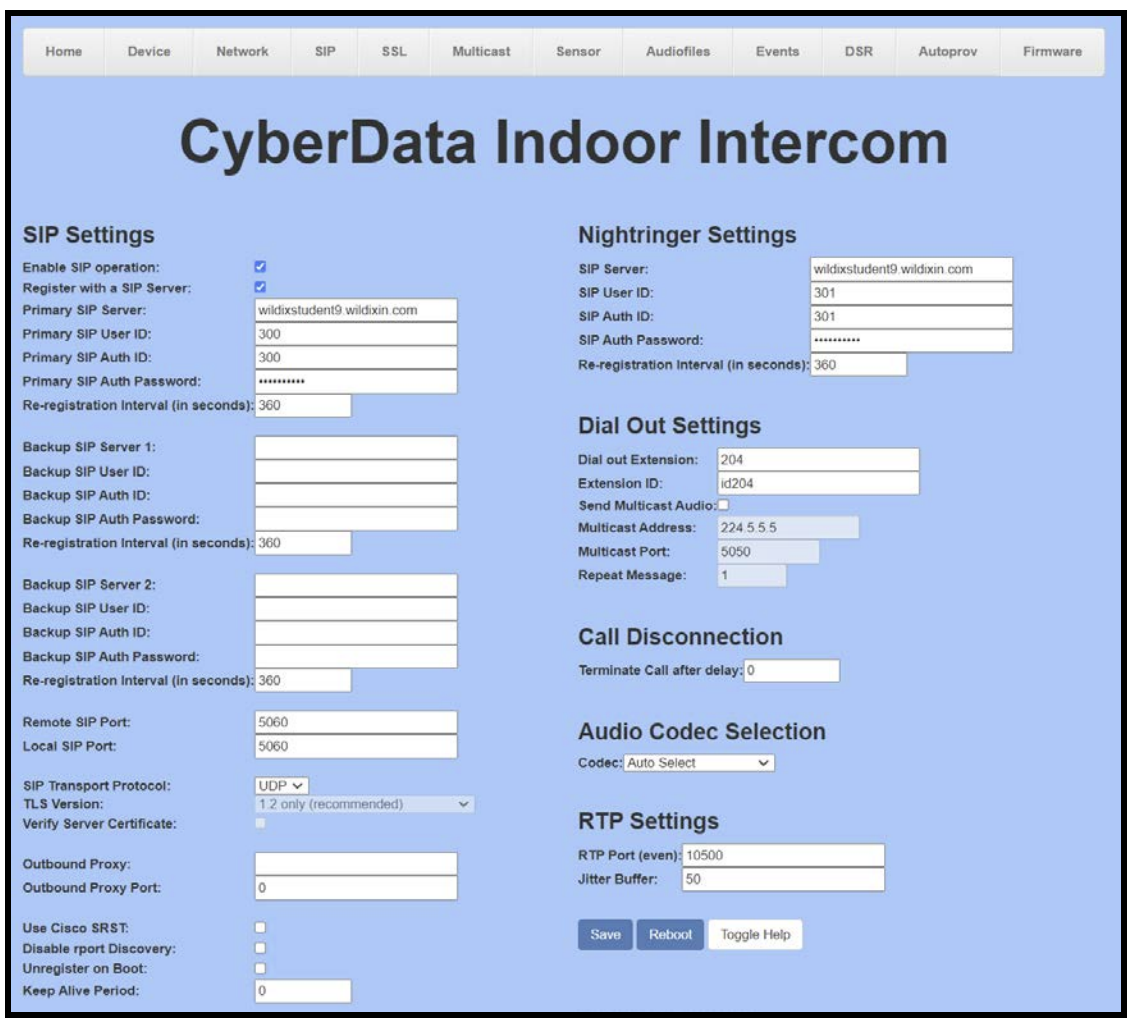
Navigate to SIP tab:

SIP Settings (applicable for all devices)
Set Primary SIP Server with the FQDN of the Wildix Server
Set Primary SIP User ID to the extension number
Set Primary SIP Auth ID to the extension number
- Set Primary SIP Auth Password to the auto-generated password from the previous step
- Set Keep Alive Period to 0 for SIP Intercoms/ SIP Paging Adapter/ SIP Paging Server/ SIP Speaker/ SIP Strobe
- Save and reboot
After the reboot, the device should be registered with Wildix:
Nightringer Settings (SIP Intercoms/ SIP Paging Adapter/ SIP Paging Amplifier/ SIP Paging Server/ SIP Speaker/ SIP Strobe)
- Set SIP Server to the FQDN of the Wildix Server
- Set SIP User ID to the extension number
- Set SIP Auth ID to the extension number
- Set SIP Auth Password to the auto-generated password from the previous step
- Set Keep Alive Period to 0
- Save and reboot
After the reboot, the device should be registered with Wildix.
Using CyberData Devices in Wildix system
SIP Call Button
CyberData SIP Call Buttons are designed for sending a call to a phone or making an announcement. The button can call an extension number, ring group/call queue, or send multicast audio. When the call button is pressed, it makes a call to the configured number and play a pre-recorded WAV File.
Setting the Dialout extension and loading an audio file
Once the call button is registered with Wildix, the Dialout extension needs to be configured and an audio file may be loaded to customize the message. The Dialout extension is set on the SIP tab:
CyberData devices require audio files in a specific format. The process to convert audio files to WAV format is covered in the operations manual for the SIP Call button:
- Microsoft PCM
- 16Bit
- Mono
- 8000Hz
- WAV format
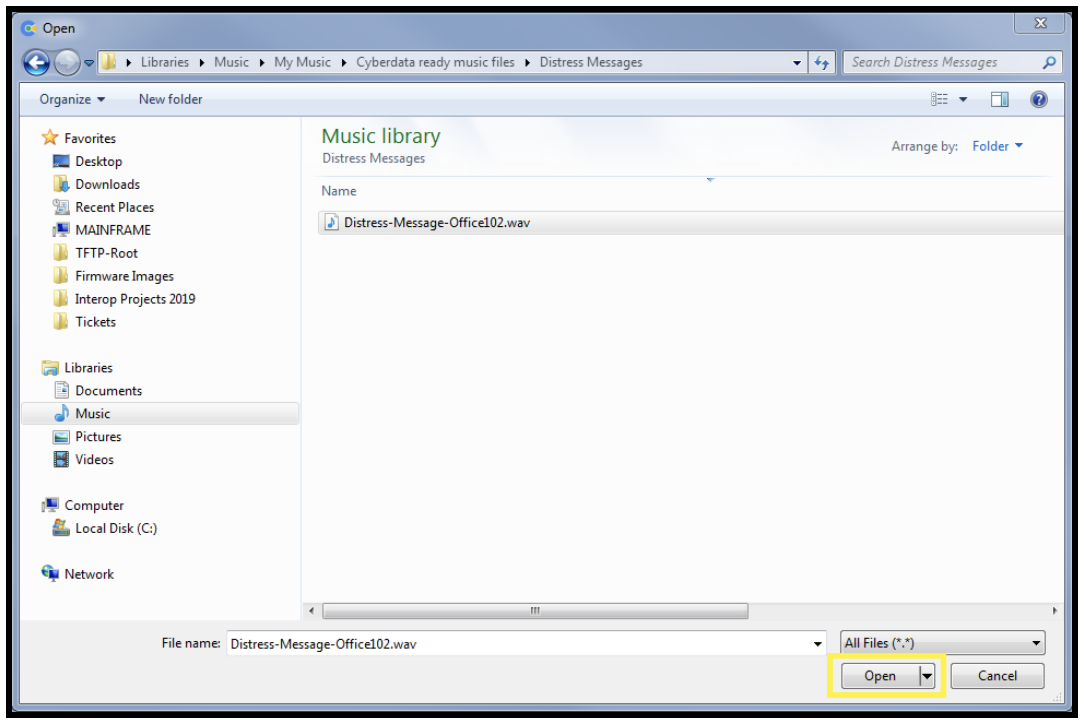
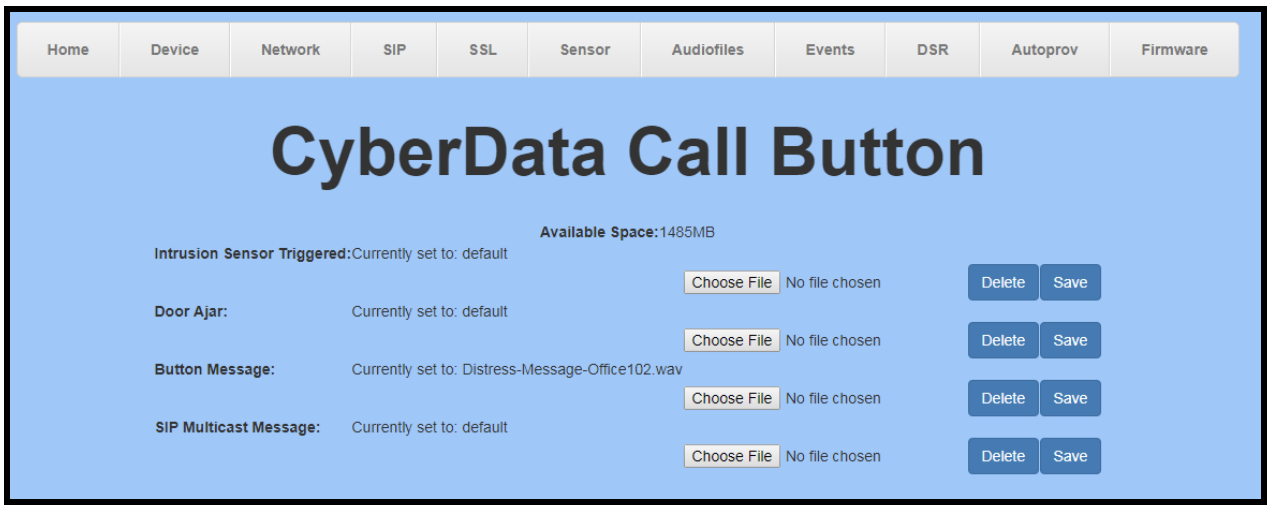
To load the audio file after creating it:
Navigate to Audiofiles Tab

Press Choose File button, then select the audio file:
Once the audio file is selected, press Save button to load the audio file:

- Once the file is loaded, a press of the call button will trigger the message:
SIP Intercom
CyberData SIP Intercoms are designed for making two-way calls. The button can call an extension number, ring group/call queue, or send multicast audio. When the call button is pressed, makes a call to the configured number and play a pre-recorded WAV File.
Setting the Dialout extension
Once the Intercom is registered with Wildix, the Dialout extension needs to be configured. The Dialout extension is set on SIP tab: 
SIP Strobe
CyberData SIP Strobe is designed to provide visual notification to events. With two SIP extensions the strobe is ideally used in Ring Groups for added notification capability. One benefit of the design is the use of RGB LED’s which allow for custom colors for different events.
Creating a Ring Group
Once the call button is registered with Wildix, either the paging or Nightringer extension can be added to ring groups.
From the manage PBX page, press Dialplan button:
From the Dialplan page, select Call Groups tab and then press +Add:
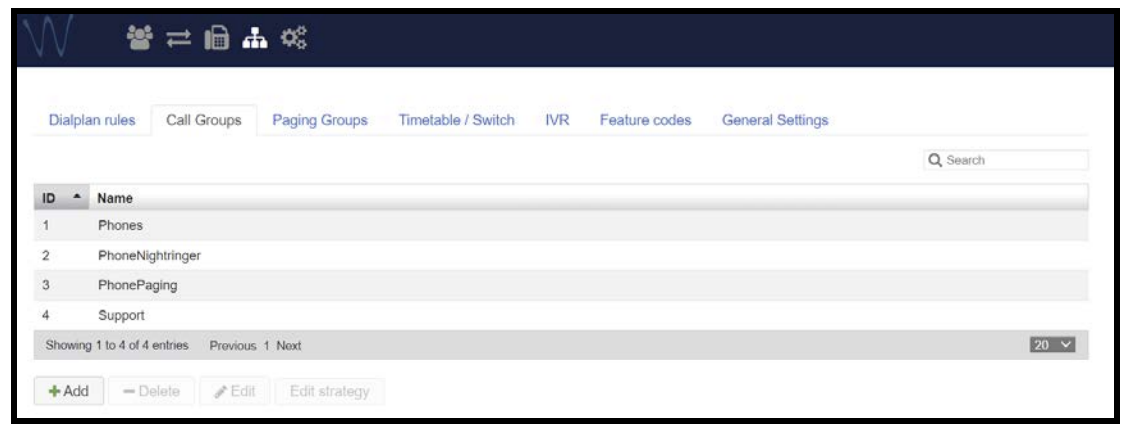
- After creating the group, test the group by dialing *79 and the group number
Setting up the Strobe
Setting the blink scene and color of the strobe is essential for the use of the strobe. For strobe illumination for SIP calls, adjust the strobe settings on the SIP tab:
Strobes have two setting customizations: Blink Scene and Color. Blink Scene is the pattern of the blink, and the color is the color shown by the strobe during that blink pattern. There are 5 blink patterns possible Slow Fade, Fast Fade, Slow Blink, Fast Blink, and ADA.
Note: Per ADA requirements, when set to ‘ADA’ the strobe can only illuminate in white.
- Blink Strobe on Ring controls the blink pattern and color for incoming calls
- Blink Strobe during Call controls the blink pattern and color for outbound calls
- Blink Strobe on MWI controls the blink pattern and color for Message Waiting Indicator
- Blink Strobe on Nightring controls the blink pattern and color for the Nightringer