This Guide explains hot to activate Google Calendar integration so that Guest Users can can have access to Agent's calendar and schedule meetings with them.
Created: July 2022
Permalink:
Introduction
Thanks to Google Calendar integration, guest users can schedule meetings with agents by offering them available slots they can book with you.
And as agent I want my scheduling needs addressed, whether it be to schedule a time to connect in with a client and address a support issue, or to do a sales demo/discovery call. Currently, scheduling meetings is rather hard to discover.
Requirements
- Min. supported WMS version: 5.04.20220627.1 or higher
- Licensing: xb-Business for access to Kite
- Admin access to PBX, Google Suite Admin Console and Google Workspace
Current limitations
- Scheduling of meetings is currently not available for group of agents
Google Calendar Integration Activation
The steps described in this section are done by PBX admin!
To activate the integration, take the following steps:
- Go to WMS Settings -> PBX -> Integrations -> x-bees
- Click on Google Calendar

- Click Install

- Proceed with 2 activation steps

- On the 1st step, perform Domain-wide delegation:
- go to https://admin.google.com/ac/owl/domainwidedelegation
- click Add new

- insert Client ID and Scopes copied on Google Calendar page and click AUTHORIZE

- the delegation is performed and you can move to the 2nd step

- On the 2nd step, insert Administrator email which has access to Google Workspace and organization's Primary domain indicated in Google Workspace
- Click Install to complete the activation

- The integration is activated

Integration Settings
Calendar Settings
Once the integration is activated, agent needs to set up calendars from which to sync availability and so that external users can book available slots.
To select calendars, take the following steps:
- Click on your user picture in the upper left-hand part of the screen to open Settings. Under Settings, click Kite settings
- Go to Calendar Settings tab

- Select calendars to be used to add meetings to and check available slots
- Set duration options (min - 15 minutes, max - 360 minutes)
- Set available working days and hours
- Click Save
The link in the user’s Profile appears and Agent can copy it and share with Guest User:
Manage booked meetings
- When Guest User schedules a meeting, a dedicated conversation is automatically created

- Agent also receives an email notification about the scheduled meeting
 |
| - An event for the scheduled meeting is automatically added to Agent’s calendar. To confirm it, click Yes, otherwise, the slot is assumed as available

- Agent can change the meeting's duration, reschedule or delete it. In case of changing meeting details, the relevant notification is displayed in the conversation and emails are sent both to Guest User and Agent
- A reminder notification is sent before the meeting
Meeting scheduling
Schedule a meeting
It is possible to schedule a meeting:
- in Kite 1-1 widget
by direct link to the Meeting Scheduler shared by a specific Agent, e.g. https://x-bees.biz/kite/ksenia.babych@wildix.com/schedule
To schedule a meeting, take the following steps:
- Click Schedule a meeting
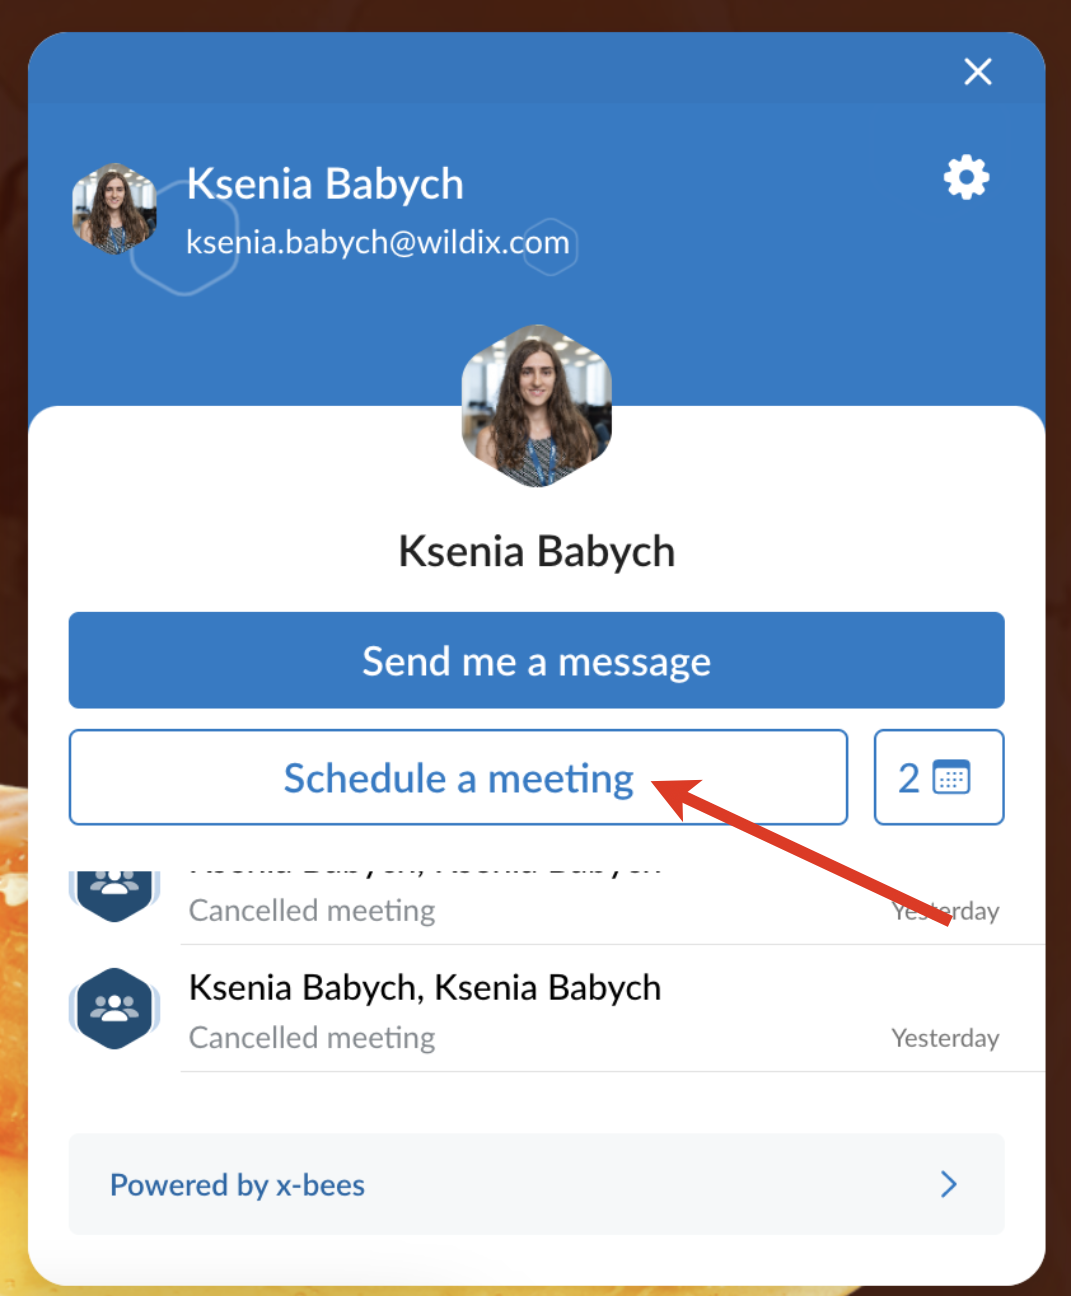
- Specify a subject (optional), duration (by default, meeting duration is 30 min.) and choose an available slot (it is possible to schedule a meeting a month in advance at maximum)
- Click Schedule

- Log in if required
- The meeting is scheduled

Manage scheduled meetings
When a meeting is scheduled, a dedicated conversation is automatically created
Current limitation: scheduled meetings with the same Agent are nos synced in one conversation, each time a new conversation is created.

- Guest User also receives an email notification about the scheduled meeting

- Guest user can edit or delete the meeting via Kite interface by clicking on the calendar icon next to the Schedule a meeting button