| Html |
|---|
<div id="fb-root"></div>
<script>(function(d, s, id) {
  var js, fjs = d.getElementsByTagName(s)[0];
  if (d.getElementById(id)) return;
  js = d.createElement(s); js.id = id;
  js.src = 'https://connect.facebook.net/en_US/sdk.js#xfbml=1&version=v2.11';
  fjs.parentNode.insertBefore(js, fjs);
}(document, 'script', 'facebook-jssdk'));</script> |
...
| Html |
|---|
 <div class="lang-box-pdf">
	<div>
		<div class="google-lang">
			<div id="google_translate_element">
			</div>
			<script type="text/javascript">
					function googleTranslateElementInit() {
						new google.translate.TranslateElement({pageLanguage: 'en', includedLanguages: 'de,es,fr,it,nl', autoDisplay: false}, 'google_translate_element');
						}
			</script>
			<script type="text/javascript" src="//translate.google.com/translate_a/element.js?cb=googleTranslateElementInit"></script>
		</div>

		<div class="pdf-button">
			<a href="https://confluence.wildix.com/spaces/flyingpdf/pdfpageexport.action?pageId=44695645" alt="Convert to .pdf" title="Convert to .pdf"><img src="https://confluence.wildix.com/download/attachments/14549012/pdf-button-download-wildix-documentation.png"></a>
		</div>
	</div>
</div> |
| Info |
|---|
This guide will lead you through the process of Salesforce Classic integration usage, starting from a Softphone installation and activation, and ending with practical examples for call receiving. Requirements:
Created: June 2019 Updated: October 2020 Permalink: https://confluence.wildix.com/x/XQCqAg |
| Panel | ||||||||||||||
|---|---|---|---|---|---|---|---|---|---|---|---|---|---|---|
| ||||||||||||||
|
...
The integration is available for the installation through the Salesforce AppExchange

Call Сenter
Setup
Step - 1

- 1 - Click on your Profile name
- 2 - Go to the My Settings page
Step - 2

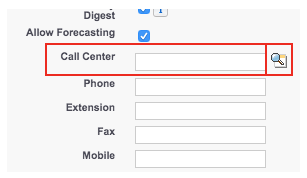
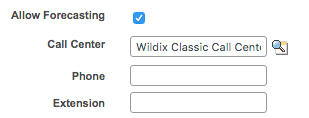
- Choose Advanced User Details subcategory
- Press the Edit button
- Scroll down to the Call Center field and press the Magnifier button
Step - 3
...
You see a popup with two options:
...
| Note |
|---|
In order to switch to Salesforce Lightning you also need to change Lighten Call Center. |
Step - 1
- 1 - Click on your profile
- 2 - Go to the Settings page
Step - 2
- Choose Advanced User Details subcategory
- Press the Edit button
- Scroll down to the Call Center field and press the Magnifier button
Step - 3
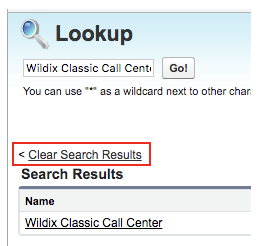
You see a popup with only one option. Click on Clear Search Results to get:
...
Once you have ended the setup process you can access the application on the left side of the page from all tabs except Reports and Dashboards.
The application contains four tabs:
...
- Shows caller info
- Suggest to add in the contact list
History
...
List of previous calls with:
...
| Note |
|---|
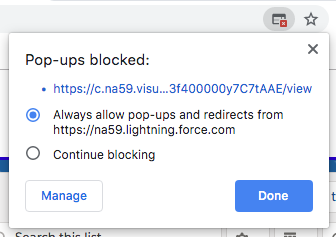
By default, Google Chrome does not allow pop-ups. Click on the error icon on the Address bar and change it. |
Make a Call
| Warning |
|---|
Keep the Collaboration open while working with the application. |
Making a Call by Click-to-Dial
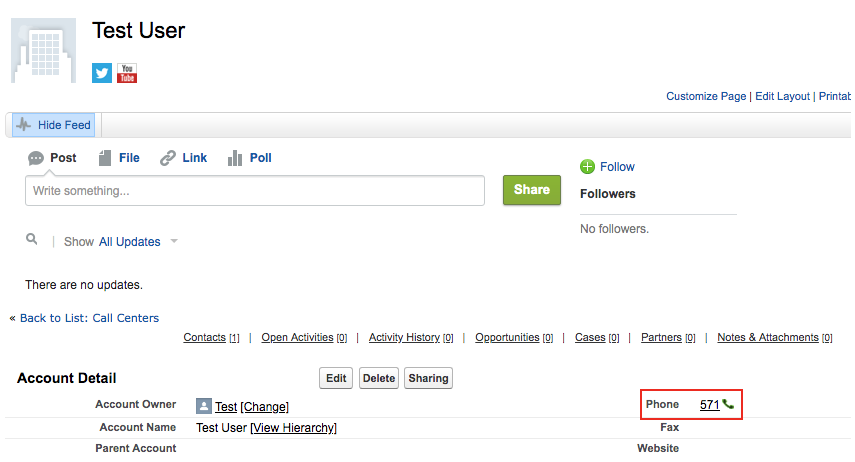
- Locate the number that you want to dial in the Contact Page.
- Click the
 button or the number. The number is automatically dialed in the softphone (Collaboration application).
- A number that has already been clicked cannot be clicked again for five seconds.
- The button does not appear next to fax numbers.
-
 icon displays if you have trouble with connection to collaboration
Making a Call by Application
...
- Go to the Menu tab.
- Search for the right contact.
- By using the search bar.
- By choosing from previous calls.
- Call it by pressing.
- Action icon.
- Contact name.
- Contact number
...
You can set up automatic call forwarding based on user status (available, DND, away) and call type (internal, external, whitelist, blacklist). See chapter: Features.