| Html |
|---|
<div id="fb-root"></div>
<script>(function(d, s, id) {
  var js, fjs = d.getElementsByTagName(s)[0];
  if (d.getElementById(id)) return;
  js = d.createElement(s); js.id = id;
  js.src = 'https://connect.facebook.net/en_US/sdk.js#xfbml=1&version=v2.11';
  fjs.parentNode.insertBefore(js, fjs);
}(document, 'script', 'facebook-jssdk'));</script> |
| Html |
|---|
<div class="fb-like" data-href="https://confluence.wildix.com/x/PIDIAQ" data-layout="button_count" data-action="recommend" data-size="large" data-show-faces="true" data-share="true"></div> |
...
| Scroll export button | ||||||||
|---|---|---|---|---|---|---|---|---|
|
| Info |
|---|
The Guide explains how to connect Mobotix T25 IP Video Door Station to a Wildix PBX and configure an unlock button with a video preview before answer. Created: October 2018 Updated: January 2020 Permalink: https://confluencewildix.wildixatlassian.comnet/wiki/x/PIDIAQNQ7OAQ |
| Table of Contents |
|---|
WMS Configuration
...
- Go to WMS -> Dialplan -> Dialplan rules
- Click + to add a new procedure
- Specify the called number ("333" in the example) and a number/ numbers (e.g. Call group) of users who can receive calls from the intercom

| Note |
|---|
Note: You can also add a Called number used for managing calls from the Intercom to the existing procedure used for incoming calls ("users" for example). |
...
- Go to WMS -> Users
- Click + to add a new user
- Fill in the following fields:
- Full name: name of the intercom user
- Extension: extension number used by the intercom
- Dialplan: select the Dialplan procedure used by the intercom
- License type: select Basic

Mobotix Configuration
Access the web interface
...
Fill in the following fields in SIP Accounts:

- SIP Address: enter the extension number of the Intercom user and IP address/ domain name of PBX
Authentication: enter the extension number and SIP Password
Note How to generate the SIP Password:
- Go to WMS -> Users and select the intercom extension (106 in our example)
- Click Set passwords
- Click on Generate near SIP/VoIP, copy this password from WMS
- Click Ok to confirm
...
Go to Admin menu -> Audio and VoIP Telephony -> Outgoing Calls Settings.
Add a new profile:

- Phone number or SIP Address: specify the number of user/ users who can receive calls from the Intercom
- Dial Attempts and Dial Timeout: specify the number of dial attempts and timeout
- SIP Proxy: select your PBX
- Connection type: select SIP Video
- After the message has been sent: select Intercom
- Click Set to save the settings
...
- Go to Admin menu -> Audio and VoIP Telephony -> Incoming Calls Settings
- Make sure that VoIP is activated in Phone Call-In

Remote Control Settings
| Note |
|---|
Note: Before configuration, you need to connect external modules (e.g. MX-OPT-IO1 for door opening). The menu becomes available only after the connection. Setting these parameters allows using an unlock button (described in the next chapter). |
...
- Go to Admin menu -> Audio and VoIP Telephony -> SIP Client Settings
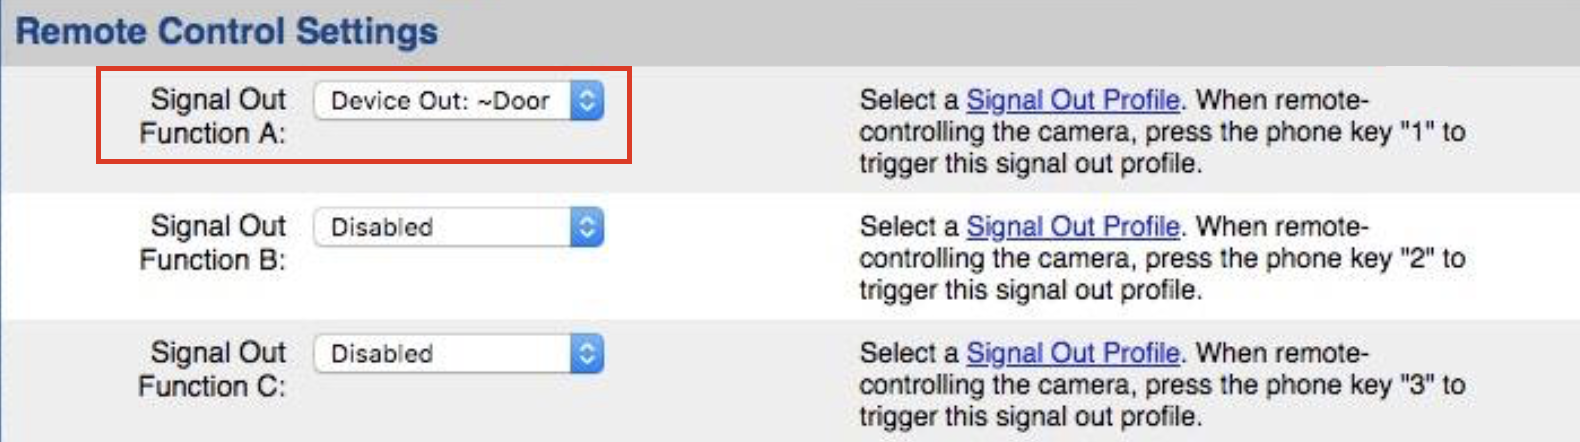
- Access Remote Control Settings
- Select an external module used as a door opener, for example, IO Module in Signal Out Function A
- Click Set
- DTMF code "1" can be used to open the door
Jpeg Streaming Settings (required only for W-AIR Handsets) Anchor mobotixjpeg mobotixjpeg
| mobotixjpeg | |
| mobotixjpeg |
...
Frame rate: 2fps
Image size: PDA (160x120)

Image Quality: Normal

JPEG Quality: 20%(Low)

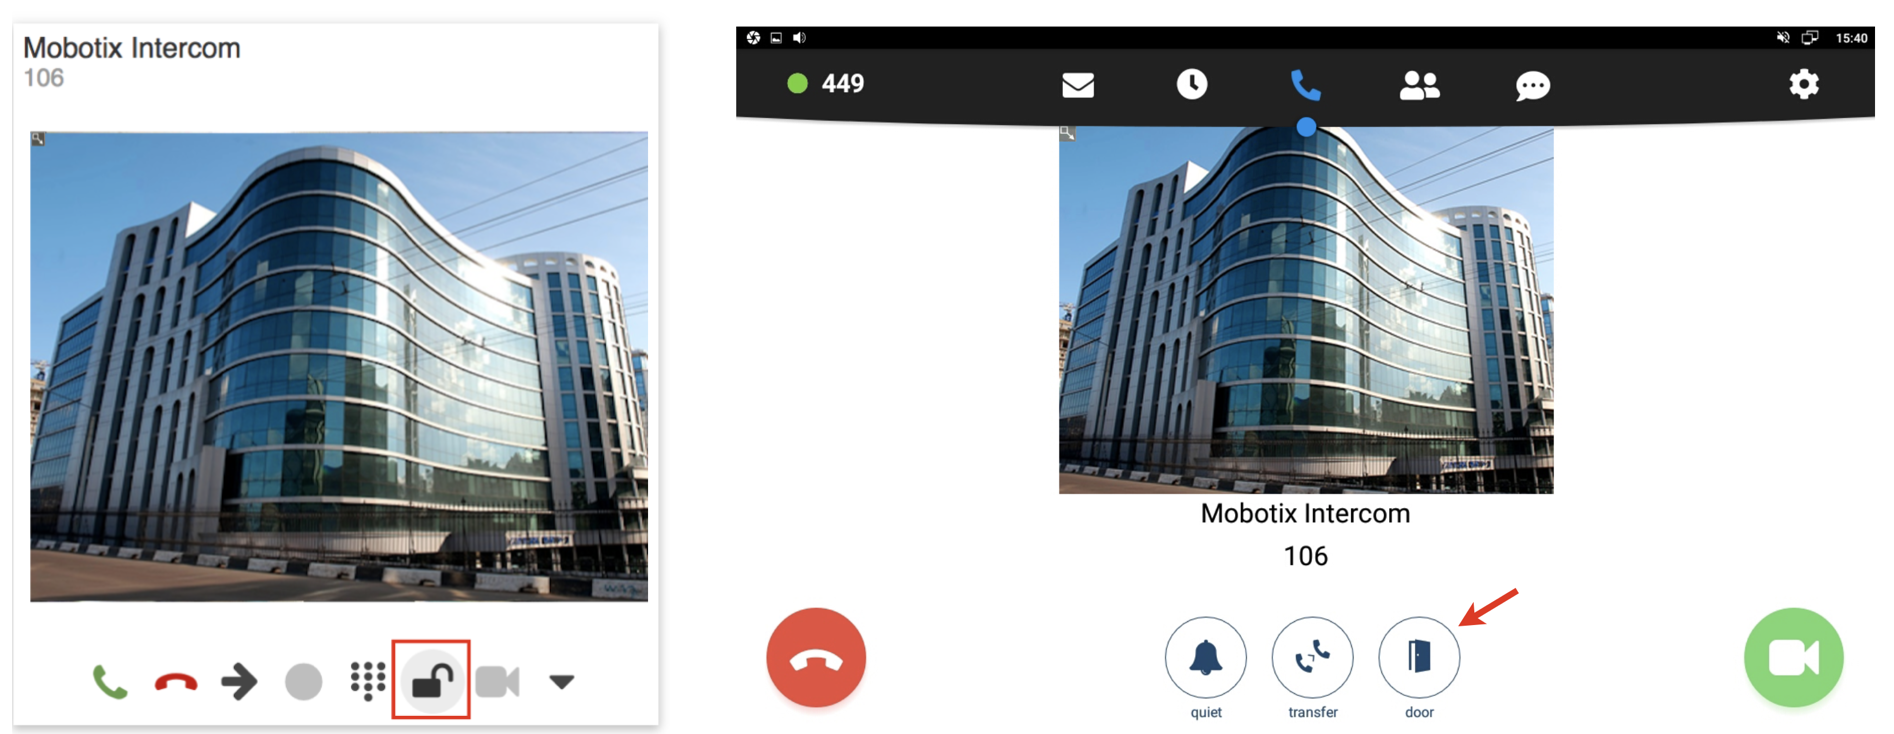
Door open function from Wildix IP phones/ Collaboration
...
- Go to WMS -> Dialplan -> Dialplan rules and select the Dialplan procedure used for managing intercom calls
Add 2 Custom applications:

- SIPAddHeader(Camera:http://10.100.4.134/record/current.jpg) adds a video preview
where:
10.100.4.134 – IP address of the intercom
/record/current.jpg - picture URL - SIPAddHeader(Unlock-Button:1) adds an unlock button
where:
1 - DTMF code to unlock the door
- SIPAddHeader(Camera:http://10.100.4.134/record/current.jpg) adds a video preview
Example of video preview with an unlock button:
JPEG streaming on W-AIR Handsets
...
- Before proceeding, make sure you set the necessary jpeg settings in Jpeg Streaming Settings
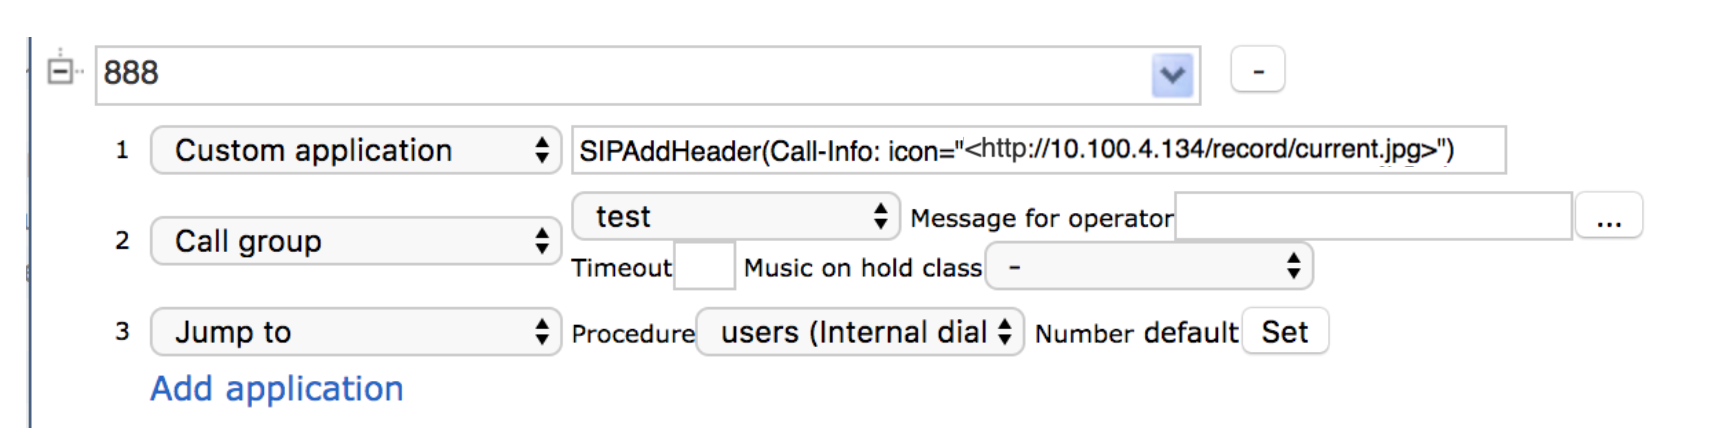
- Modify the Dialplan procedure used by the intercom by adding the Custom application -> SIPAddHeader(Call-Info: icon="<http://10.100.4.134/record/current.jpg>")
...
- 10.100.4.134 – IP address of the intercom
/record/current.jpg– function which retrieves a camera image
Note Note: the Custom application works only for W-AIR Handsets and on local PBXs.
Dialplan example:
...
| Macrosuite divider macro | ||||||||||||||||||||||||||
|---|---|---|---|---|---|---|---|---|---|---|---|---|---|---|---|---|---|---|---|---|---|---|---|---|---|---|
|
| Button macro | ||||||||||||||||||||||||||||||||||||||||
|---|---|---|---|---|---|---|---|---|---|---|---|---|---|---|---|---|---|---|---|---|---|---|---|---|---|---|---|---|---|---|---|---|---|---|---|---|---|---|---|---|
|