| Html |
|---|
<div id="fb-root"></div>
<script>(function(d, s, id) {
  var js, fjs = d.getElementsByTagName(s)[0];
  if (d.getElementById(id)) return;
  js = d.createElement(s); js.id = id;
  js.src = 'https://connect.facebook.net/en_US/sdk.js#xfbml=1&version=v2.11';
  fjs.parentNode.insertBefore(js, fjs);
}(document, 'script', 'facebook-jssdk'));</script> |
| Html |
|---|
<div class="fb-like" data-href="https://confluence.wildix.com/x/qADwAQ" data-layout="button_count" data-action="recommend" data-size="large" data-show-faces="true" data-share="true"></div> |
| Html |
|---|
 <div class="lang-box-pdf">
	<div>
		<div class="google-lang">
			<div id="google_translate_element">
			</div>
			<script type="text/javascript">
					function googleTranslateElementInit() {
						new google.translate.TranslateElement({pageLanguage: 'en', includedLanguages: 'de,es,fr,it,nl', autoDisplay: false}, 'google_translate_element');
						}
			</script>
			<script type="text/javascript" src="//translate.google.com/translate_a/element.js?cb=googleTranslateElementInit"></script>
		</div>

		<div class="pdf-button">
			<a href="https://confluence.wildix.com/spaces/flyingpdf/pdfpageexport.action?pageId=32506024" alt="Convert to .pdf" title="Convert to .pdf"><img src="https://confluence.wildix.com/download/attachments/14549012/pdf-button-download-wildix-documentation.png"></a>
		</div>
	</div>
</div> |
| Scroll export button | ||||||||
|---|---|---|---|---|---|---|---|---|
|
| Info |
|---|
This document explains how to set up the integration of 2N intercom Helios IP with Wildix IP PBX. Updated: November 2021 Permalink: https://confluencewildix.wildixatlassian.comnet/wiki/x/qADwAQCgjOAQ |
| Table of Contents |
|---|
Step 1: WMS Configuration
...
Go to WMS -> Users and click on + to add a new user:
- Fill in the fields:
- Full name: name of the user
- Extension: extension number used by the intercom
- Dialplan: select the Dialplan procedure used by the intercom* (“users” by default)
- License type: select Basic

2. Create a Dialplan procedure to manage calls from the intercom
- Go to WMS -> Dialplan -> Dialplan rules and add a new procedure, example:
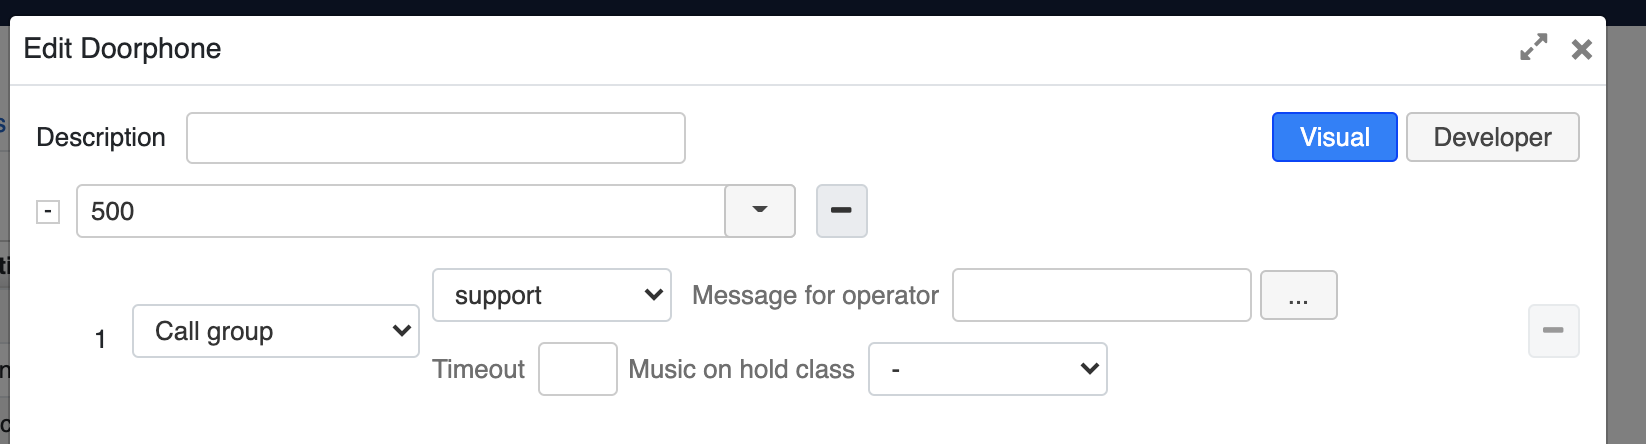
Where:
- 500: is the phone number called from the intercom
Call group (support): is the call group that receives calls from the intercom (it can be an extension, several extensions, or several call groups…)
Note Note: you can also add "Dial the phone" application instead of "Call group" and set a specified extension.
- Go to WMS -> Users, select the intercom extension and select the newly created Dialplan procedure to be used for outgoing calls

| Note |
|---|
Note: In case you don’t want to create a new procedure, you can add Number and Application to the Dialplan procedure used by the intercom (“users” for example). |
...
Note that upon your first login you are advised to change the default password.

2. Check for updates
- Go to System -> Maintenance
- Click Check Now (Check Firmware Online) to check if there is a new firmware version available and to update the intercom:

| Note |
|---|
Note: Update process takes around 30 seconds. During the update procedure the intercom is restarted. |
...
- Go to Services -> Phone -> SIP 1
- Fill out the fields as described below:

| Warning |
|---|
Important: use the SIP password of intercom extension, not the WEB password! |
...
- Go to WMS -> Users and select the intercom extension (409 in our example)
- Click Set passwords
- Click on Generate near SIP/VoIP, then click Ok (copy this password from WMS and paste it into the field SIP/VoIP Password)

- Go to WMS -> Users
Check that the intercom is successfully registered to the system:
| Note |
|---|
Note: status of the user is green which means that the intercom is successfully registered; focus the mouse on the status to see device’s name, IP address and the transport method. |
...
Enable the option SIP INFO (RFC-2976) in DTMF Receiving section and click Save: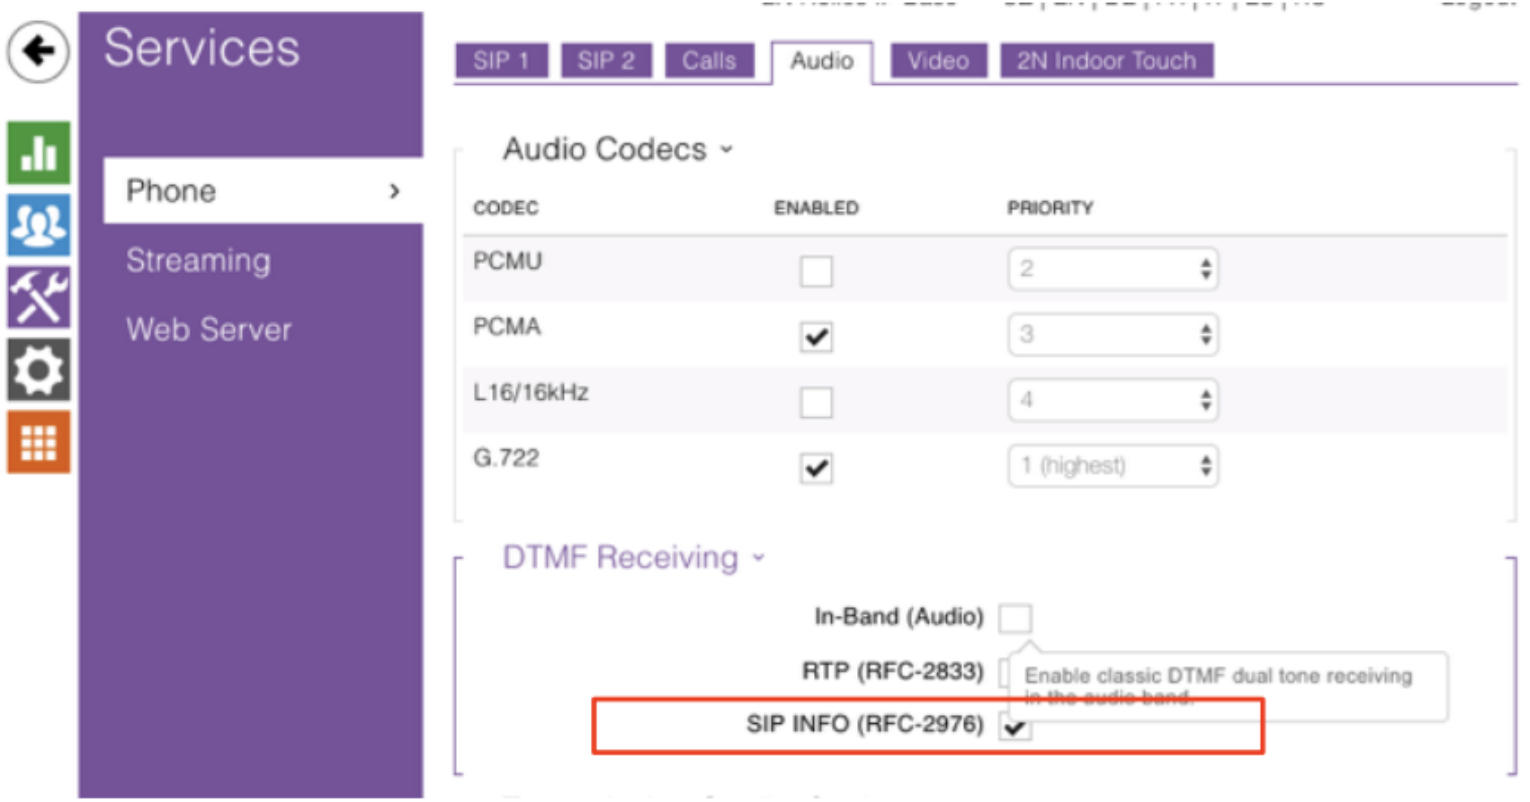
4. Quick Dial Button Setting
...
- Go to Directory -> Users -> Position 1 (position 1 corresponds to quick dial button 1)
- Fill the fields Name and Phone Number and click Save:

5. Electric Lock Switching Settings
...
- Go to Hardware -> Switches -> Switch 1
- Enter the code, for example “1234” under Switch Codes section and click Save:

Make sure the box “Legacy Switch Code” is activated in Advanced Settings section. When this box is checked, the first code listed above does not require confirmation by pressing “*” from the phone. If the box is not check, it might be necessary to press “*” from the phone to confirm the door opening.
6. JPEG Streaming Settings (required only for W-AIR Handsets)
| Anchor | ||||
|---|---|---|---|---|
|
...
- Go to Services > Streaming > JPEG > set JPEG Compression Level to 60:

Step 3. Door open function from Wildix IP phones/ Collaboration
...
Here is what Unlock button looks like on Vision and in Collaboration
Video streaming before answer on WP600AXX / Vision/ SuperVision/ Collaboration / Android App
...
- Go to Services > HTTP API (2N® Helios IP web interface)
- Enable Camera API and choose Unsecure (TCP) Connection type and Basic authentication, click Save:

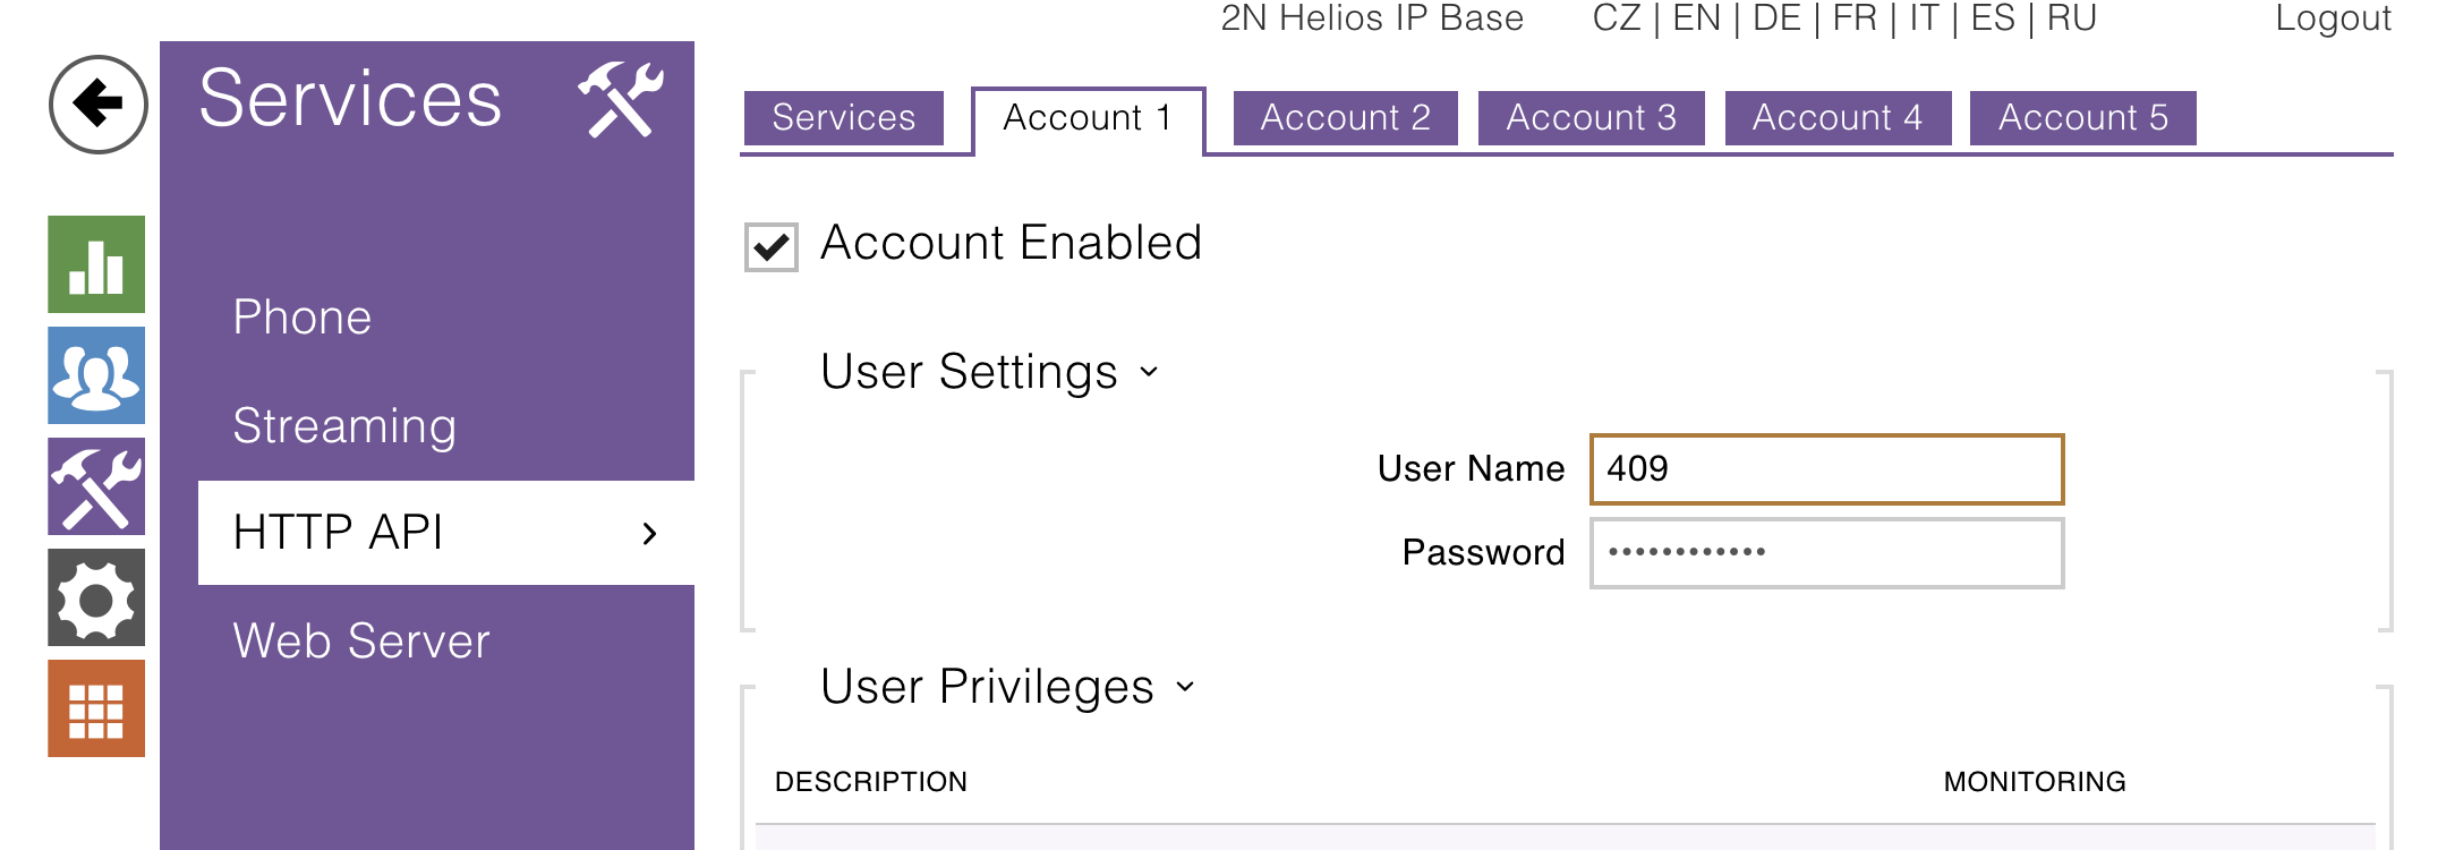
- Go forward to the next tab Account 1 and check the box “Account Enabled”
- Fill in User settings: User name and password and click Save
- Go to WMS -> Dialplan and add Custom application to the Dialplan procedure used by the intercom SIPAddHeader(Camera:), for example:
...
Dialplan example with Unlock button and Video streaming before answer

Where:
- “500” – is the number specified in the quick dial button menu of the intercom (the number called by the intercom)
- “Custom application” – SIPAddHeader(Unlock-Button:*1234#) – adds unlock button to call dialog
- “Custom application” – SIPAddHeader(Camera:http://409:admin@10.100.4.133/api/camera/snapshot?width=1280&height=960) – enables video preview before answer
...
- Before proceeding, make sure you set the necessary compression level in JPEG Streaming Settings
- Modify the Dialplan procedure used by the intercom by adding the Custom application:
...
The configuration can also be set for 2N Helios IP Verso/ Solo/ Vario/ Force/ Video Kit.
Dialplan example: 
Troubleshooting
...
Solution: disable DirectRTP via Dialplan for such calls (Dialplan application "Set" - "DirectRTP" - "no")
...
| Macrosuite divider macro | ||||||||||||||||||||||||||
|---|---|---|---|---|---|---|---|---|---|---|---|---|---|---|---|---|---|---|---|---|---|---|---|---|---|---|
|
| Button macro | ||||||||||||||||||||||||||||||||||||||||
|---|---|---|---|---|---|---|---|---|---|---|---|---|---|---|---|---|---|---|---|---|---|---|---|---|---|---|---|---|---|---|---|---|---|---|---|---|---|---|---|---|
|