| Html |
|---|
<div class="fb-like" data-href="#" data-layout="button_count" data-action="recommend" data-size="large" data-show-faces="true" data-share="true"></div> |
...
| Info |
|---|
This document helps you understand Wildix licensing and explains how to activate a Wildix PBX (Hardware, Virtual, Cloud) Per-User or Per-Service. Minimum WMS version: 3.86 Date: January 2018 Permalink: |
Table of Contents
Understanding Licensing
Wildix currently offers two types of licensing:
Per User
Per Service
PBX Per User
If you choose Per User licensing, you can add as many users of each profile as you need and add more users whenever you need. You pay per user / per period of time.
...
Details on each user profile: https://manuals.wildix.com/licensing/
Per User licensing is available for any PBX type:
Hardware
Virtual
Cloud
PBX Per Service
If you choose Per Service licensing, you need to purchase one Activation license based on the maximum number of PBX users you need and accordingly purchase UC&C licenses which will be then available for all PBX users.
...
Per Service licensing is available only for the following PBX types:
Hardware
Virtual
Activation of Per User PBX | Cloud, Virtual, Hardware
Step 1. Create a Per User PBX on WMP
Proceed as follows:
Connect to WMP using your credentials
Go to PBX per user tab
...
Fill in the fields:
Model: select WPBX-CLOUD for Cloud / WPBX-HW for Hardware / WPBX-VM for Virtual
Region (only for Cloud PBX): select the datacenter region
Serial (only for Hardware PBX): select the PBX serial from the drop-down list
Name: PBX domain name by which your PBX is accessible via the browser; in the example provided below, the PBX can be accessed by URL https://elenatest2.wildixin.com
Expire: select the recurring billing period: monthly / yearly / lifetime (lifetime is not available for Cloud PBX)
PBX-BASIC / UC-Essential / UC-Business / UC-Premium: add the number of users of each profile (more about each profile: https://manuals.wildix.com/licensing)

Click Add; your PBX has been created:

Step 2. Activate PBX from WMS
For Virtual PBX: before proceeding, follow the guide to deploy PBX image: https://manuals.wildix.com/install-pbx-as-virtual-machine-or-server-hw-virtualization/
Proceed as follows:
Connect to PBX via HTTPS to access WMS using credentials admin : wildix
Change admin user password:
Select admin user and click Set passwords
Generate or create a new WEB password, click Ok
Upgrade WMS to the latest stable release
go to WMS Settings -> Tools and utilities -> Upgrade
In case there is a new version available, click Perform Upgrade
Copy PBX key from WMP:
go to the tab PBX per user, select your company, then select the PBX that you have created on step 1
click Edit
...
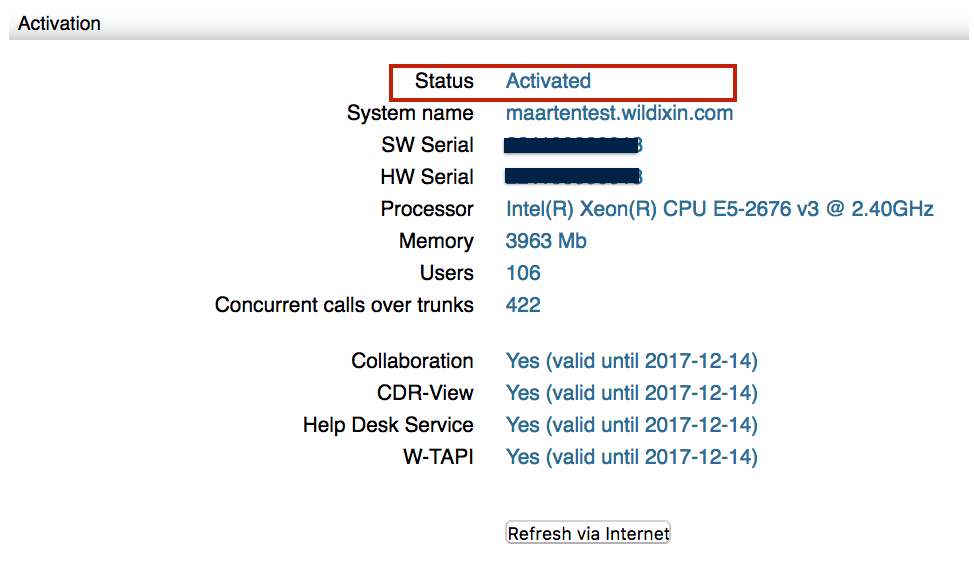
Your PBX is now activated:
Sharing of Per User Licenses between PBXs over WMS Network for Failover
It is possible to share licenses over other PBXs in the WMS Network in a scenario, where one PBX is Primary and another PBX is secondary (Failover). Documentation on how to set up Failover: https://manuals.wildix.com/failover/
Prerequisites for this scenario:
...
Note: after you click Save, an automated email is sent to a corresponding Wildix Administration manager who must manually apply this change; please mind that the WMS Network License sharing will be activated during working hours.
Activation of Per Service PBX | Hardware, Virtual
Before proceeding with PBX activation:
For Hardware PBX, read WMS Start Guide for PBX connection and first access to WMS: https://manuals.wildix.com/wms-start-guide/
For Virtual PBX, read Virtualization Guide to deploy the PBX image: https://manuals.wildix.com/install-pbx-as-virtual-machine-or-server-hw-virtualization/
For PBX activation, proceed as follows:
Go to WMP -> More -> Licenses

Copy the serial number and the activation code of the PBX activation license
...
To activate permanent UC&C licenses (non-trial), proceed as follows:
Go to WMP-> PBXs
Select your PBX and click Details
...
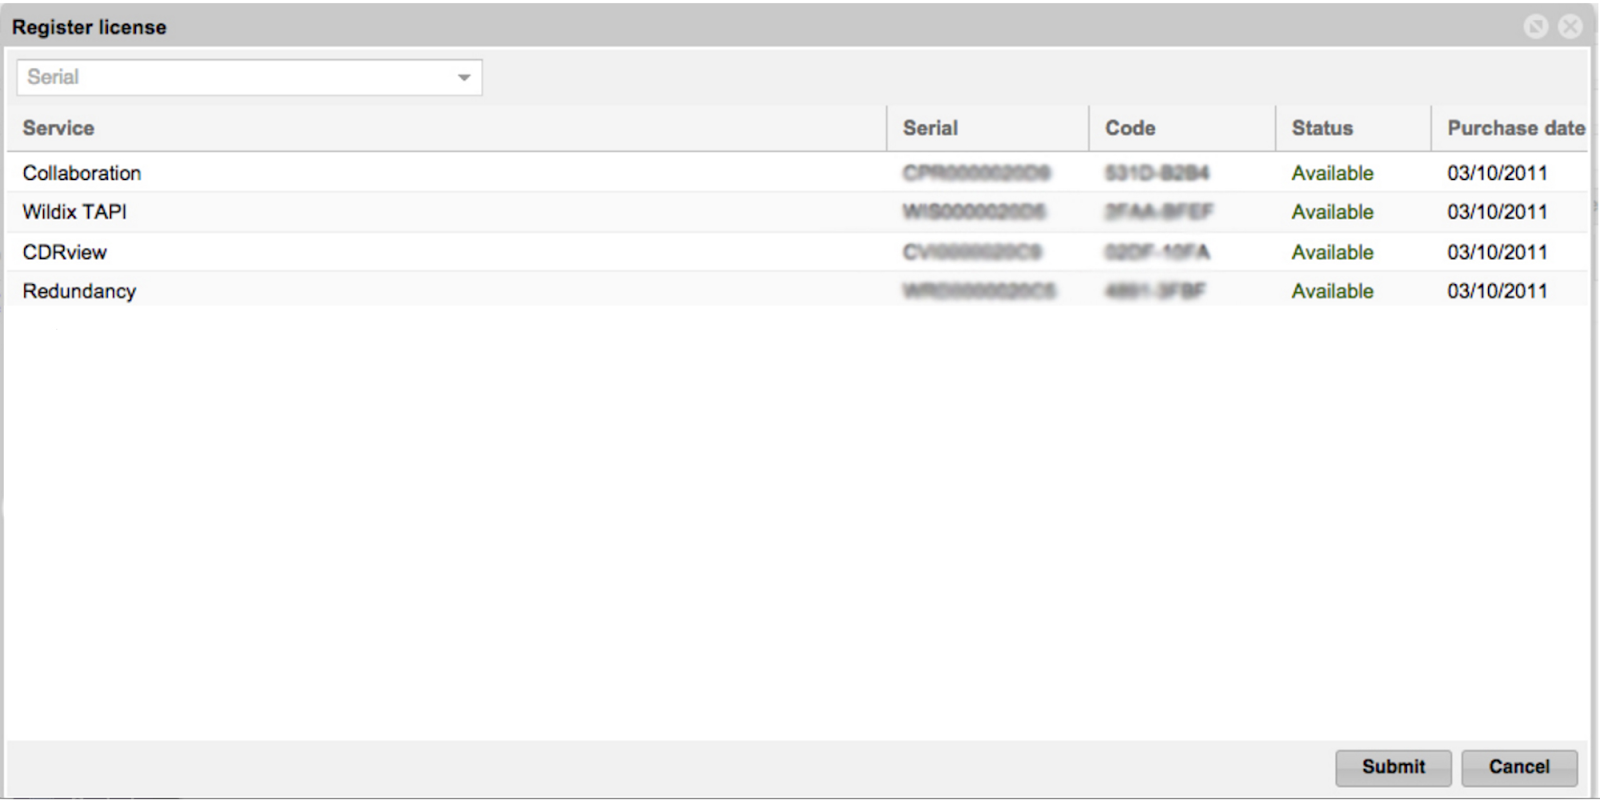
Click Register
Select the licenses from the list and click Submit
Replace an old PBX by reusing PBX Activation license on a new PBX
First you need to generate a backup on your old PBX in WMS Settings -> Tools and utilities -> Backup system, and download it. In this case you will be able to restore your new PBX from this backup.
To reuse the PBX Activation License of your old PBX on your new PBX, proceed as follows:
Go to WMP -> PBXs
Find your old PBX on the list and click Details:
...
Go to WMS Settings -> Tools and utilities -> Activation / Licensing on your new PBX and activate PBX using the Activation serial and code copied on the previous step as described in chapter Activation of Per Service PBX | Hardware, Virtual
Once your new PBX is activated, the Activation license is disabled on your old PBX. Now you can restore your new PBX from backup that you had previously created on your old PBX and saved.
...