...
| Info |
|---|
WMS Settings Menu Guide provides the basic information on the Settings options and explains how to set up various parameters. Updated: January March 2023 Permalink: https://wildix.atlassian.net/wiki/x/mBfOAQ |
...
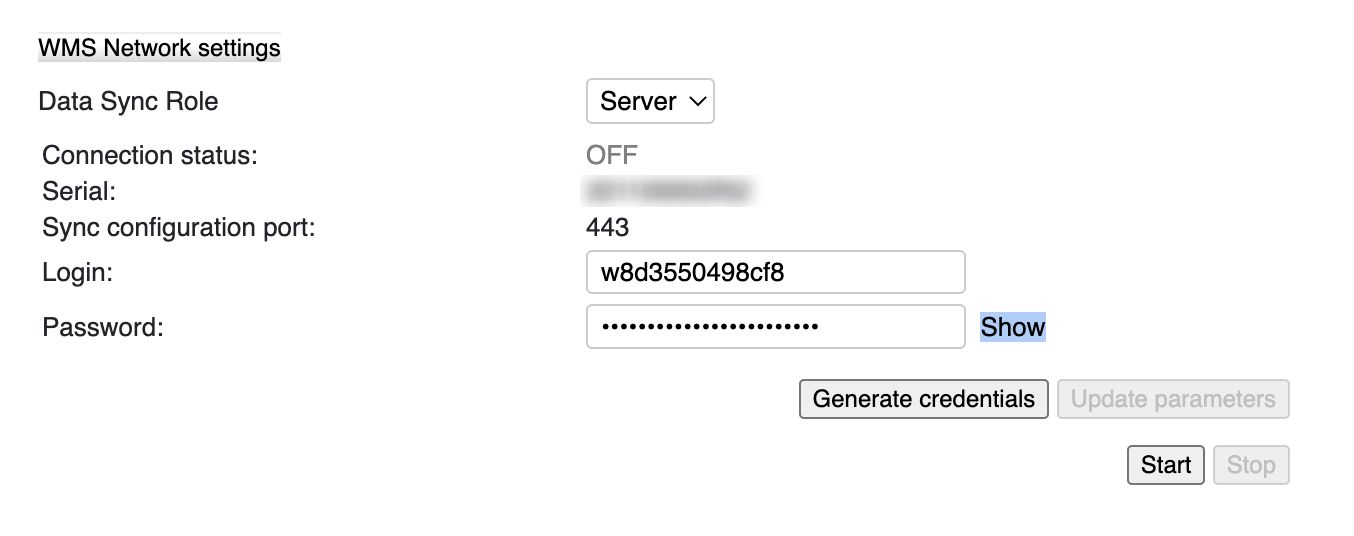
Server configuration example:

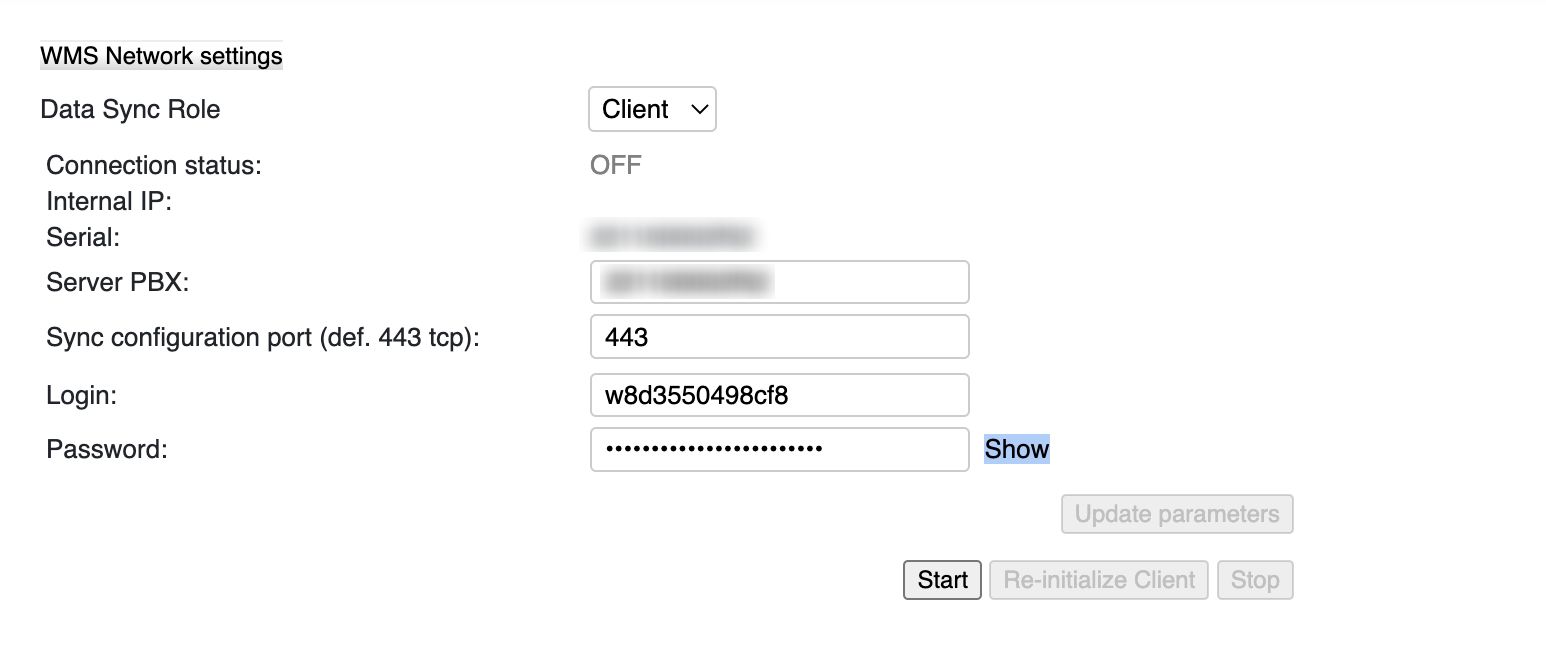
Client configuration example:

| Note |
|---|
All the PBXs belonging to the same WMS Network can have only one admin user, which is the admin user of the Server PBX. |
...
Time zone: select your time zone for the sync with the external NTP server (NTP server section)
Sounds packages: select the sound packages to be installed
...
| Note |
|---|
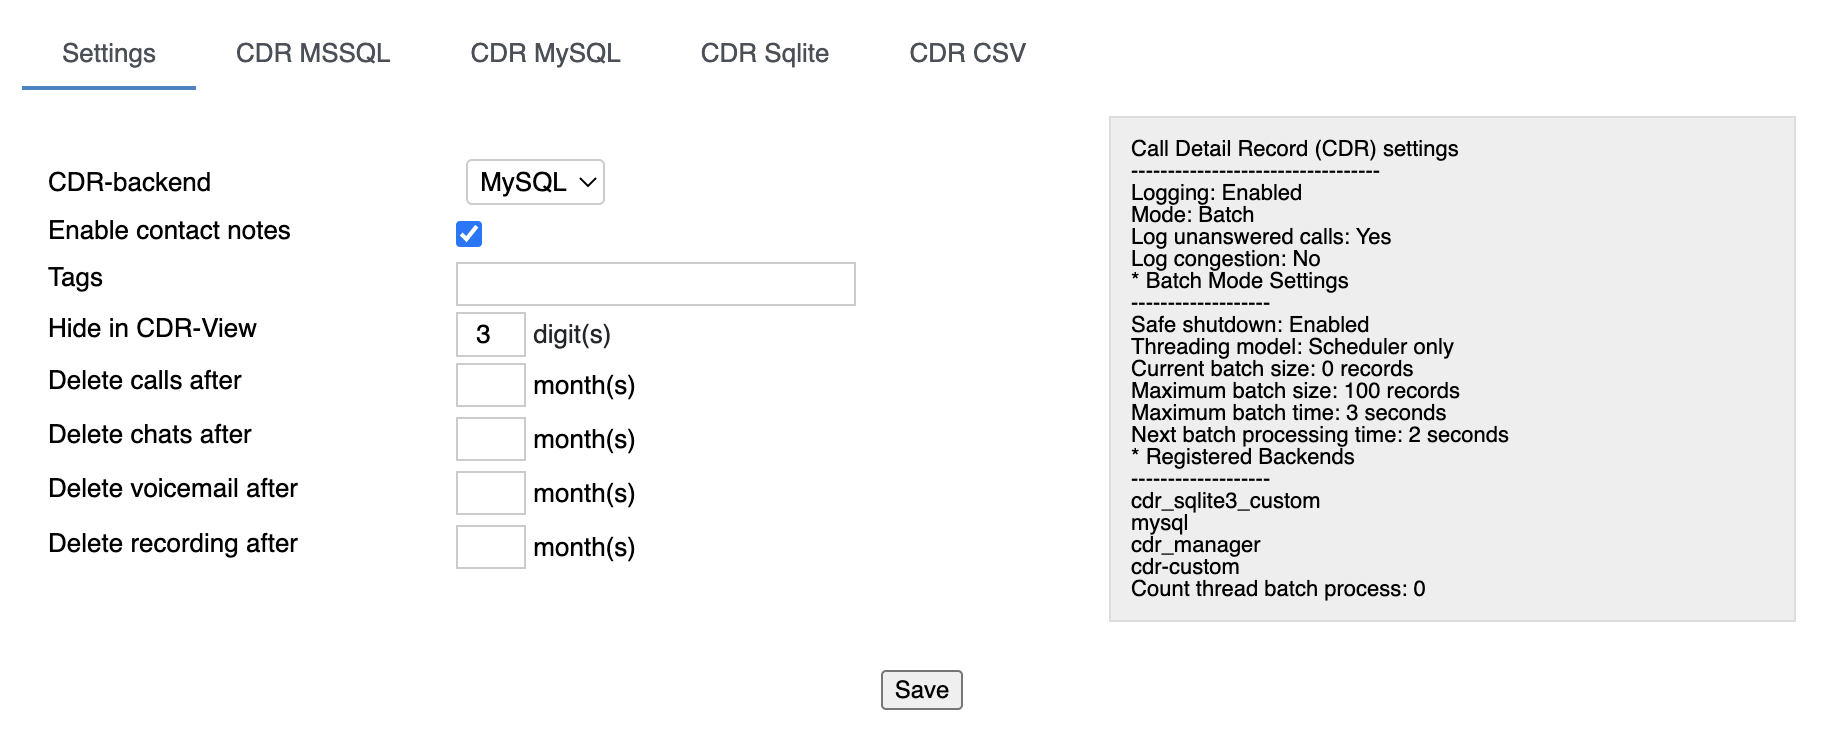
Note: Starting from WMS Beta 6.01.2022072120221019.14, it is possible to set up backend for storing chat and call history (CDR) on Cloud PBX. |
...
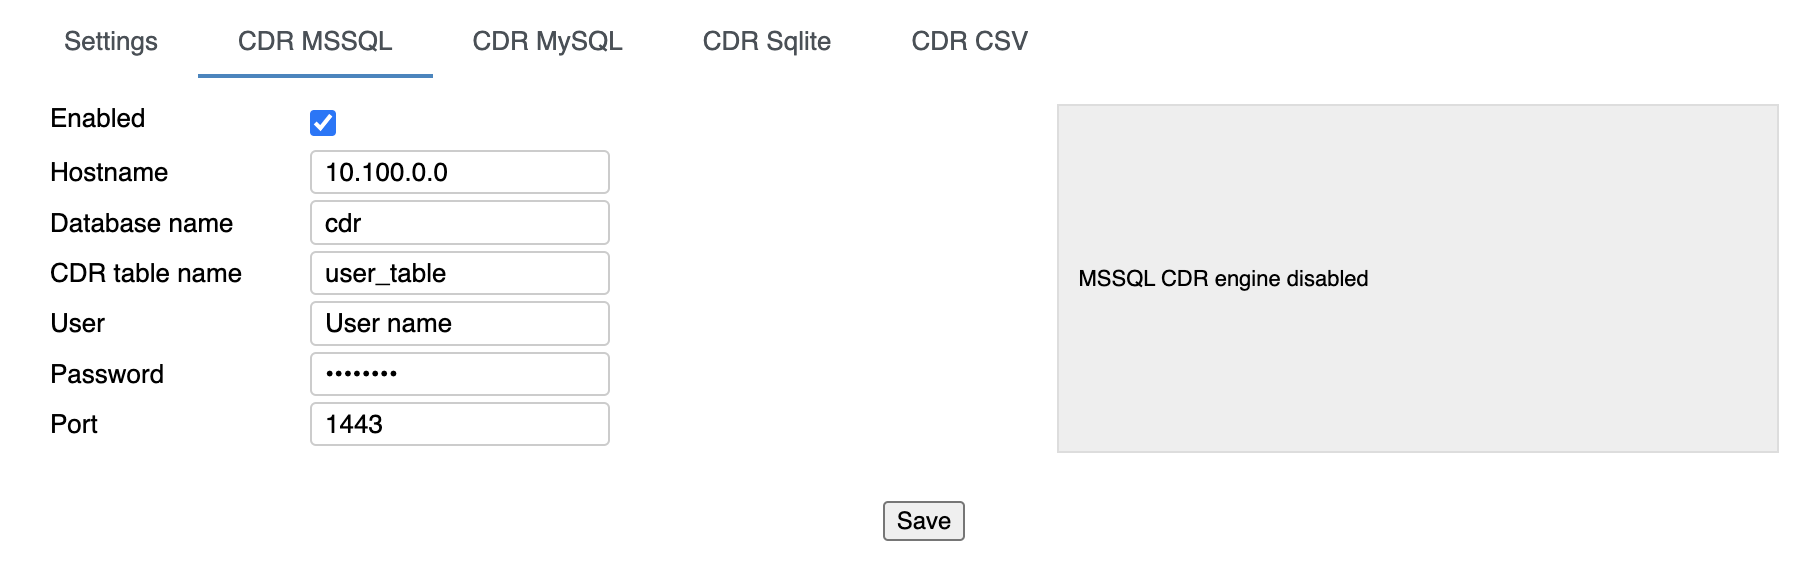
External server Microsoft SQL: MySQL or MSSQL. The server must be previously installed and must be reachable by the PBX
Internal database: CDR Sqlite. In this case CDR is stored on the PBX (on the backend specified for CDR storage). This backend is recommended for PBXs with 40 users and less
CSV file: file can be saved to a storage device (USB or network share)


Other Settings:
...
- Hide in CDR-View: allows hiding last X digits in CDR-View from phone numbers consisting of more than 7 digits. Must be used together with ACL “Can/cannot see full number in CDR-View” (see ACL rules and Call classes management Guide)
Delete calls / chats / voicemail / recording after: these options allow auto-deleting old calls, chats, voicemails and recordings after a specified number of months
Note Notes:
- By default, the system clears data older than 12 months, if other values are not specified. Clearing of old data is run at 4 am every day.
- Deleting chat history in WMS Network.
In case WMS Network is enabled, chat history from CDR-backend will be deleted using the minimum value. For example, "Delete chats after 2 month" is set on Server PBX and "Delete chats after 1 month" is specified on Client PBX -> chats will be deleted after 1 month (the value of Client PBX is applied).


| Warning |
|---|
Limitation: in case of applying backup, empty icons for Call recordings and Voicemails that had been deleted, are still present in CDR-View (also on History page for call recordings). |
...
- Enabled: check the box to enable connection to the backend
- Hostname: the name or the IP address of the remote server
- Database name: the existing database where the CDR must be saved
- CDR table name: the name of the table that the PBX creates on the remote database
- User: the user to access to the server
- Password: the password to access to the server
- Port: specify the port used for connection

| Note |
|---|
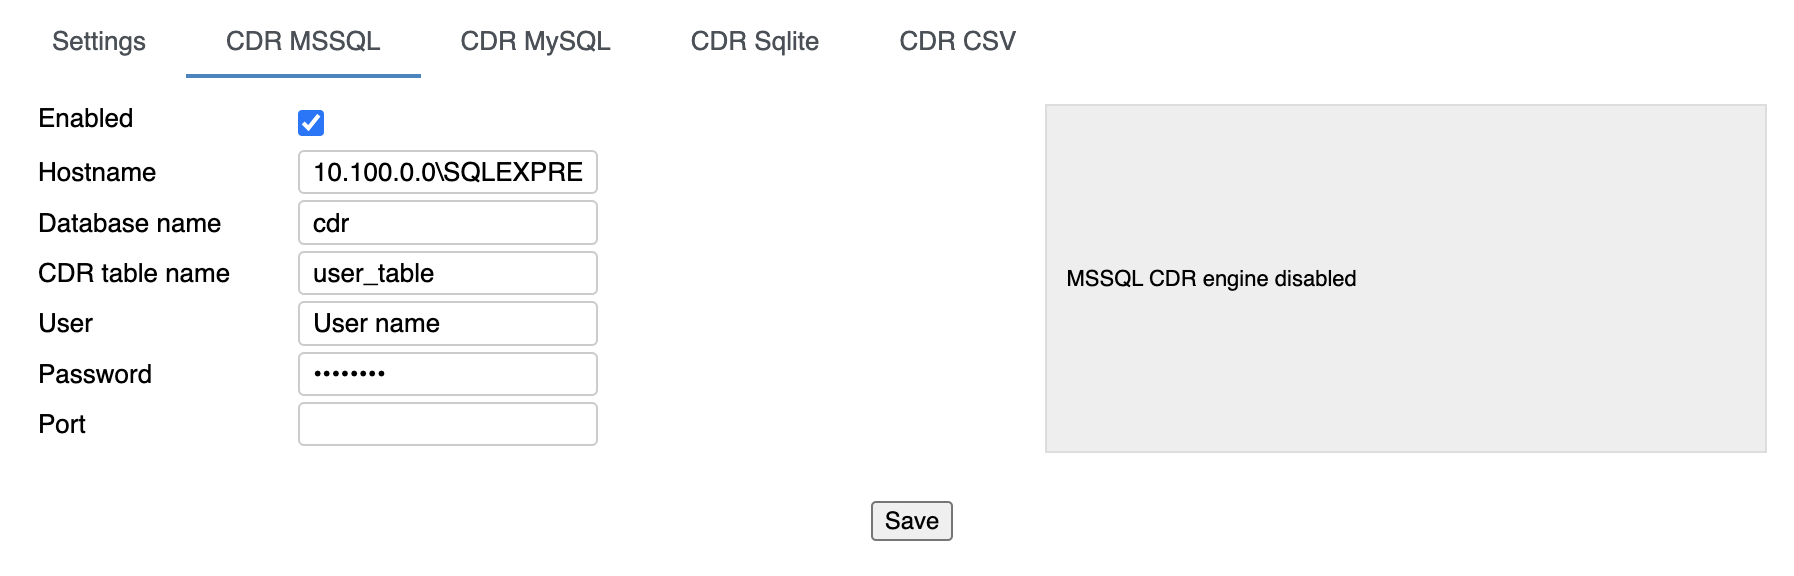
Note: It is also possible to enable connection to MSSQL instance. Requirement: SQL Server browser must be running on MSSQL host. Please check the Microsoft documentation for detailed information on SQL browser. To enable the connection, check the box "Enabled" and fill in the following data:
  |
Step 2. Select the backend for CDR storage (Hardware, Virtual PBX)
...
For each backend there is a log shown in the right part of the screen, with the actual status and eventual problems and errors:

SIP-RTP
General PBX parameters and parameters for the voice transport:
...
If the PBX’s WAN interface is connected to the network with the active DHCP server, the entry is automatically created in this table, containing the gateway assigned by DHCP server.
- Click +Add to add a new interface
- Click - to delete Edit to edit the settings of a selected interface
- Click Edit to edit the settings of -Delete to delete a selected interface
Hosts

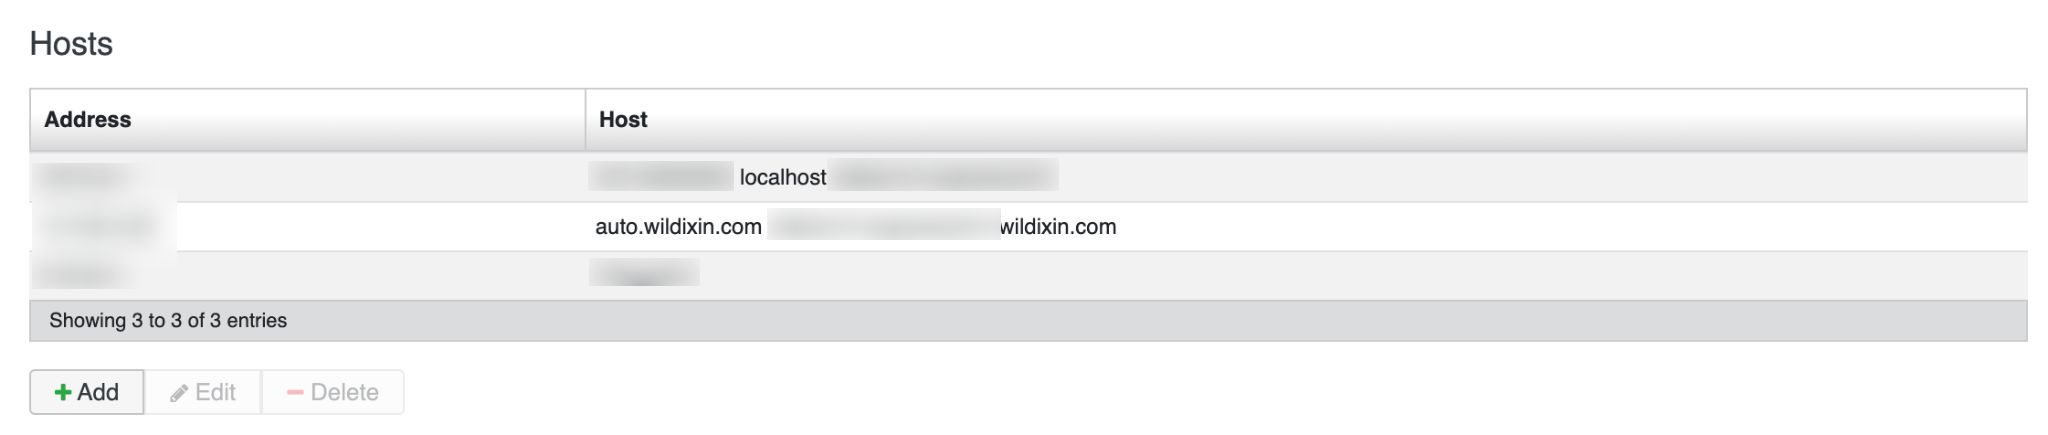
- Click +Add to add a new host. Enter its address and hostname
- Click - Edit to delete edit parameters of a selected host
- Click Edit to edit parameters of -Delete to delete a selected host
You can also modify the DNS server and System name. System name is used as the PBX alias name – *.wildixin.com domain name.
Each PBX with Public IP can be accessed by either its serial number or by the value set up in System name:
...
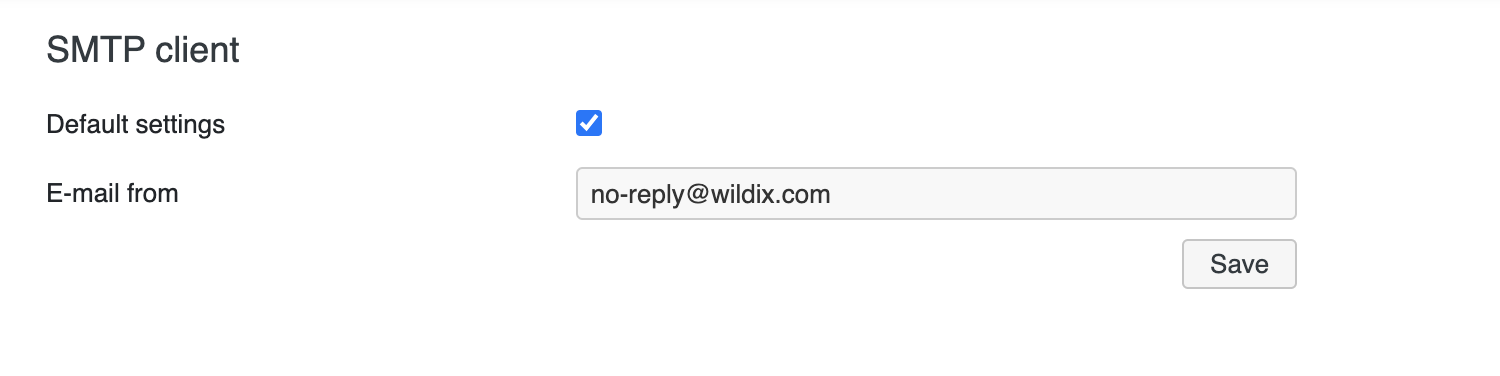
Wildix Cloud PBXs offer default server for sending email notifications. Just enable Default settings option and click Save to be able to use the default server.

To activate SMTP client on Hardware and Virtual PBXs, enter the following parameters:
...
Click Save
To make sure that the entered parameters are correct, enter the email address into the field located in the upper right section and click Test

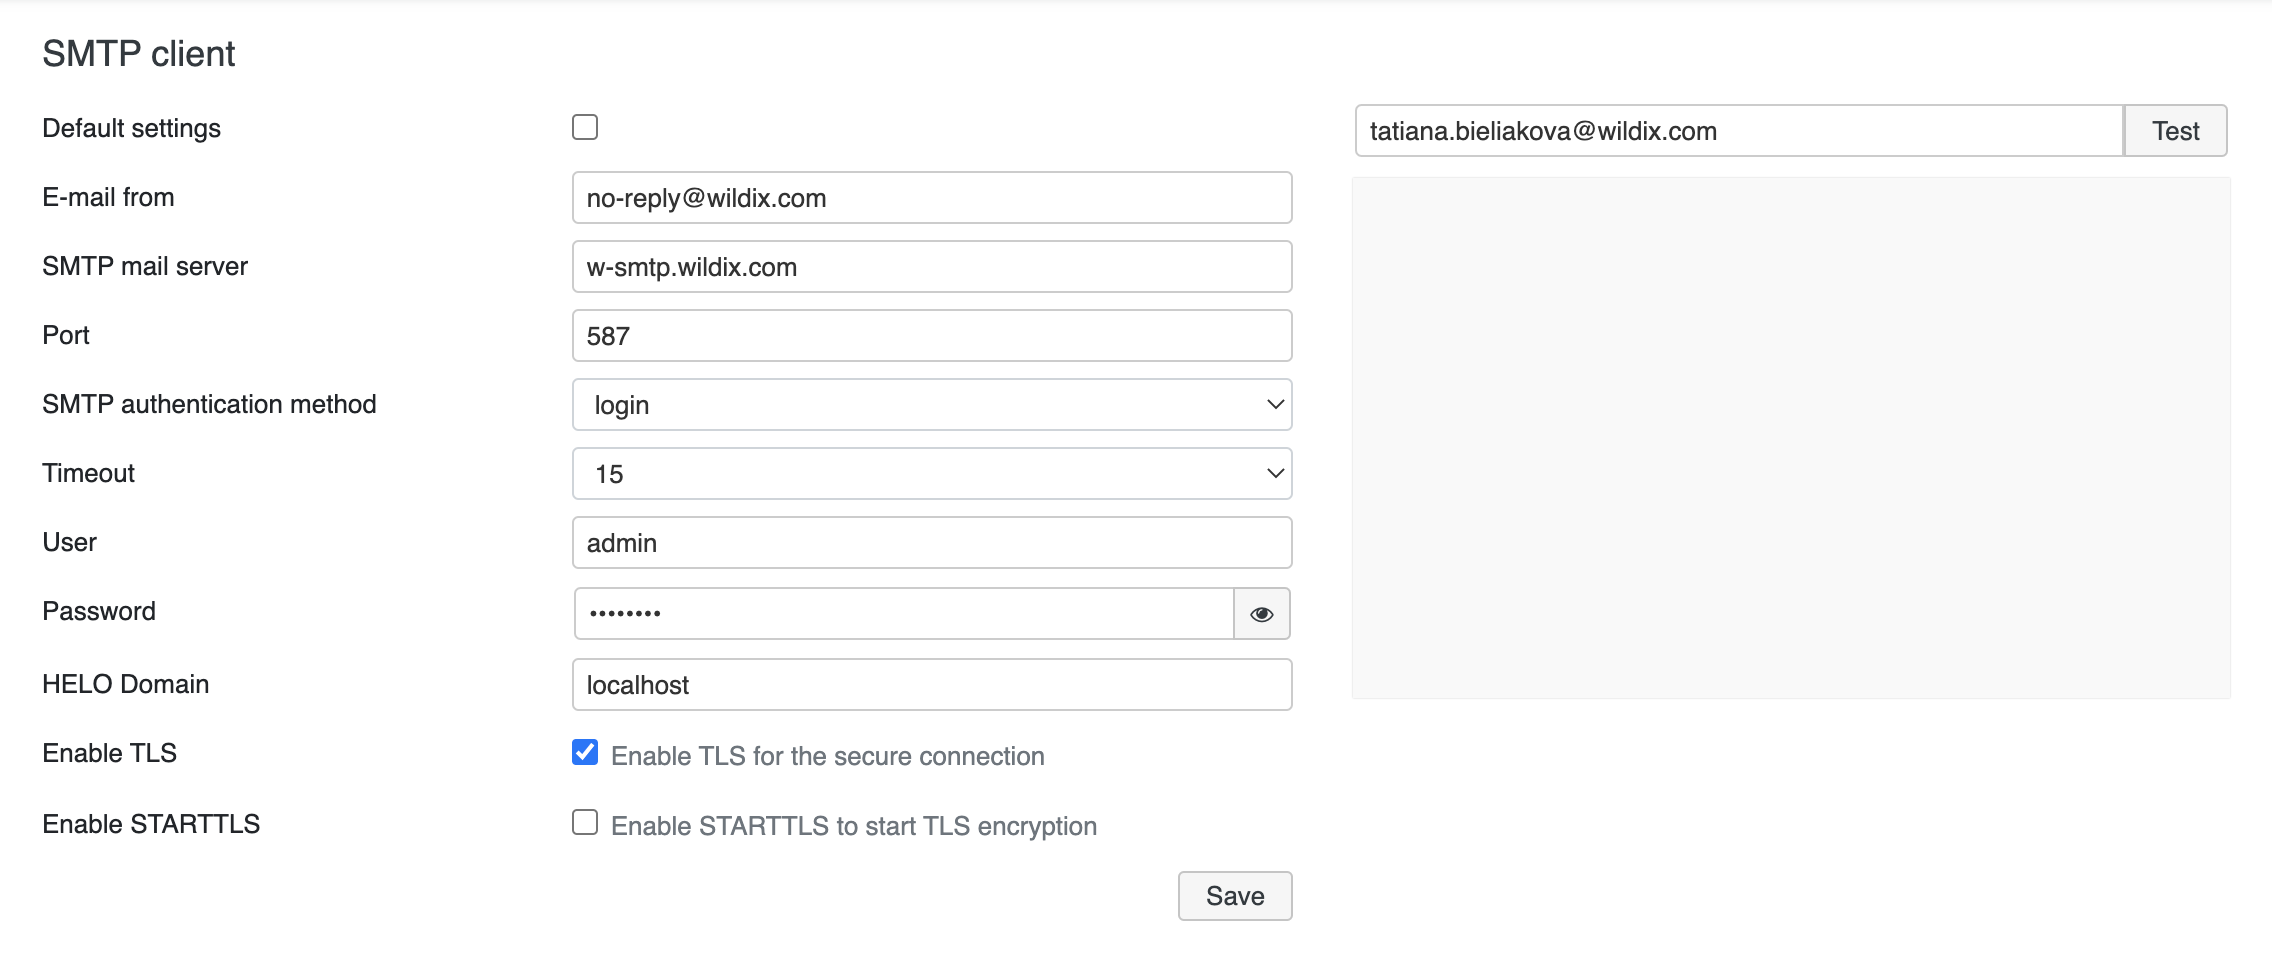
The logs are displayed in the field below and you receive the following email:
...
- Send a copy of sent and received faxes and sent SMS to this e-mail: this option allows you to enter an email address to which all the incoming and outgoing faxes are saved
- Standard SMS header: allows you to enter the header for SMS messages sent by PBX
- Remote PBX (for SMS sending): allows you to select the PBX in WMS Network to send SMS messages
- Fax delivery notification: allows you to enable fax delivery confirmation notification
Curl SMS send enabled: enable this option for SMS sending via HTTP request without registering GSM media gateway
Note Note: Curl SMS has a higher priority compared to GSM gateway. If the parameter is unavailable or incorrectly configured (incorrect login, password or wrong API request), then the message will be sent via GSM gateway.
Curl SMS send: the feature allows sending SMS via CURL request using third-party service or another PBX with a configured GSM trunk (using SMS API).
To send SMS via third-party service, use the list of of curl command examples and possible variables (click ? button to see the list). For example, curl –request POST \ --url http://www.maitaly.it/maws20/default.asmx/SendSimple? \ d "user=user_name&psw=user_pass&num=(TO_NUMBER)&body={MESSAGE}&idserivce=4&from={FROM_NUMBER}"
To send SMS via another PBX with a configured GSM trunk, you can use the following request: curl -k -X POST -u user:password --url "http://<PBX_IP_Address>/api/v1/originate/sms" --data-urlencode "number={TO_NUMBER}" --data-urlencode "message={MESSAGE}", where <PBX_IP_Address> is IP address of PBX with a configured GSM trunk

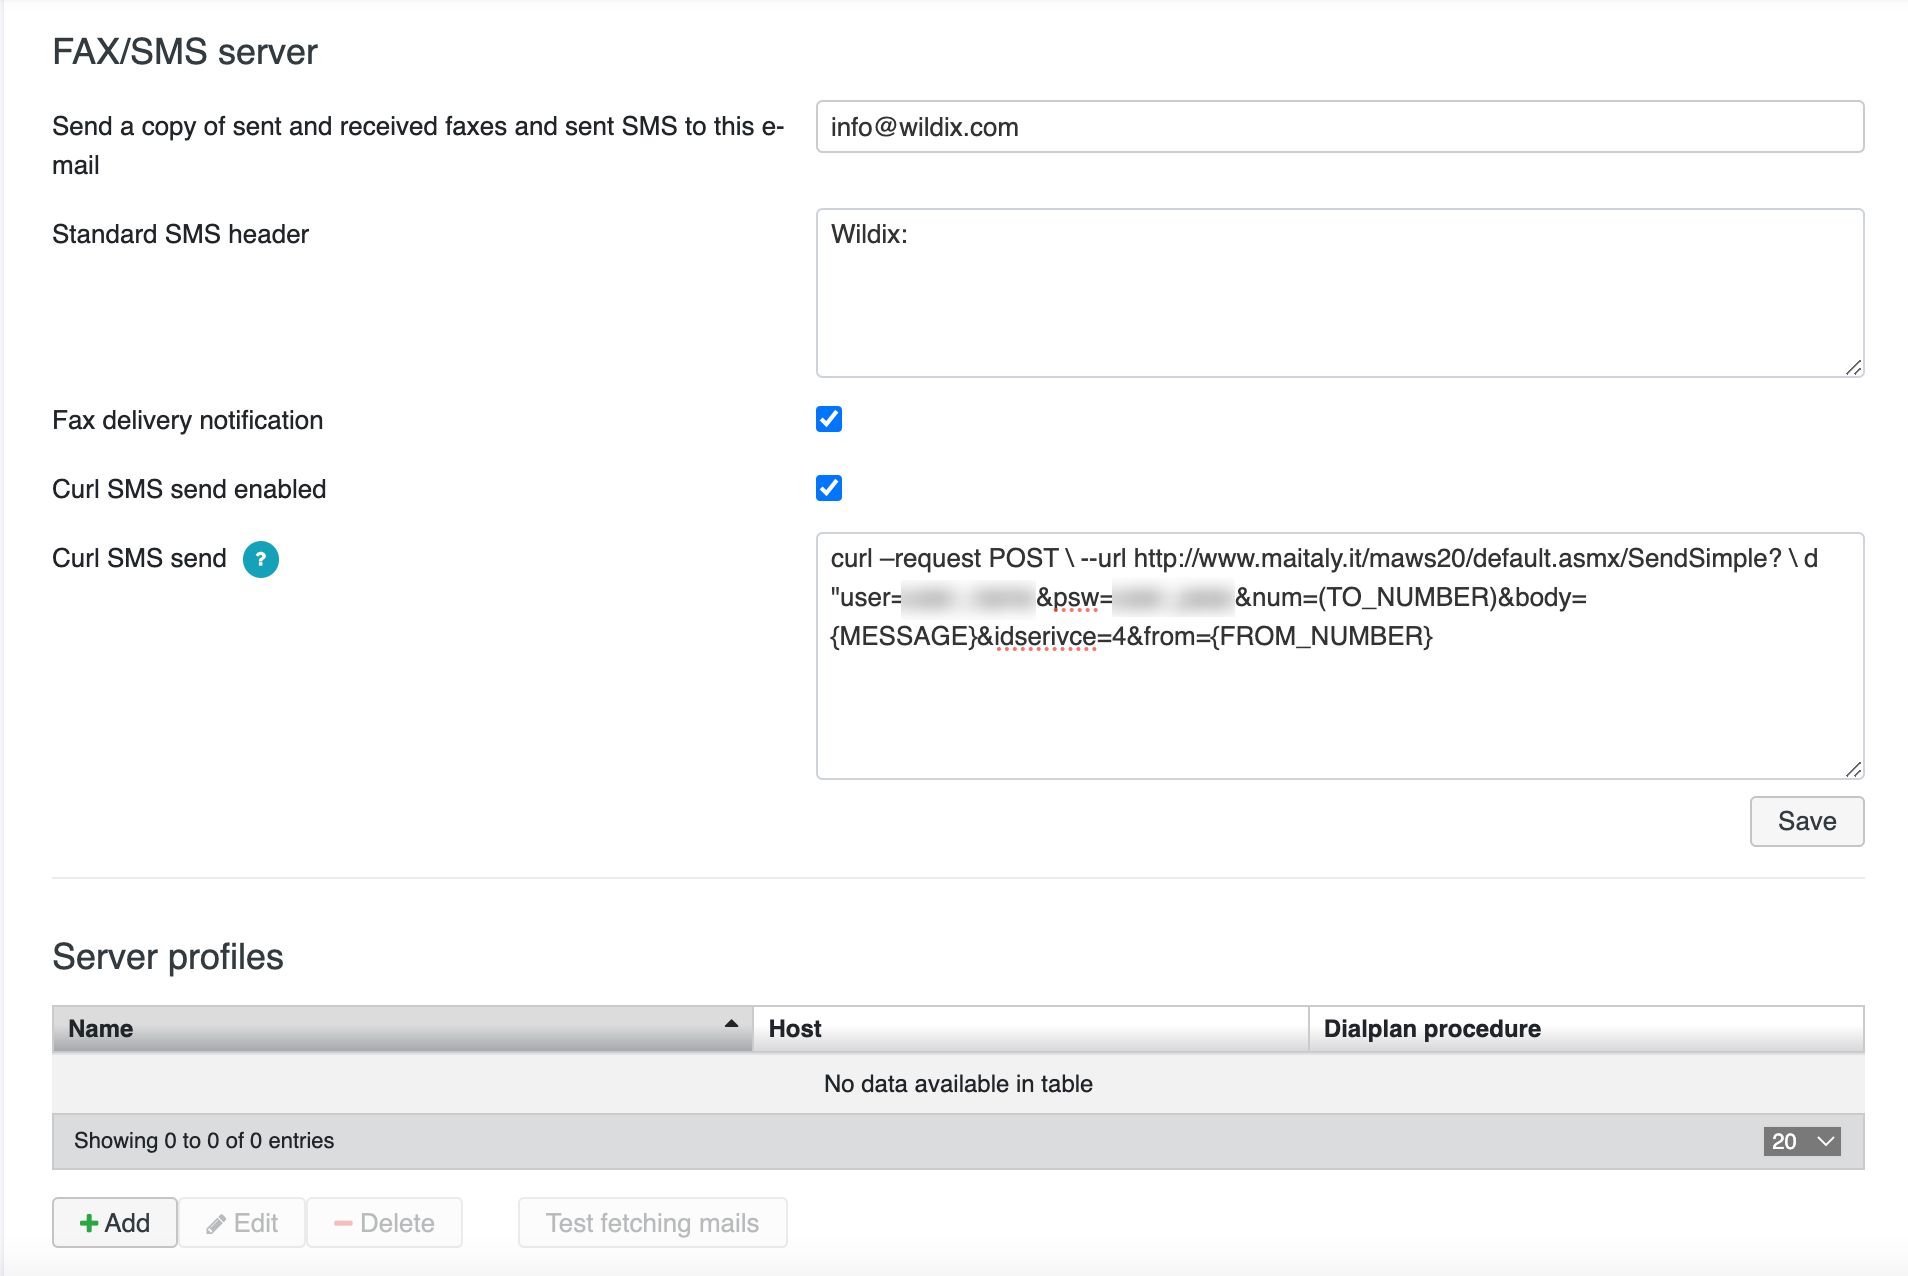
Click Save to apply the settings.
...
- Click Initialize to start the partition and formatting procedure of the storage device
- Click + to add the partition for each service
- Click - to remove a selected partition

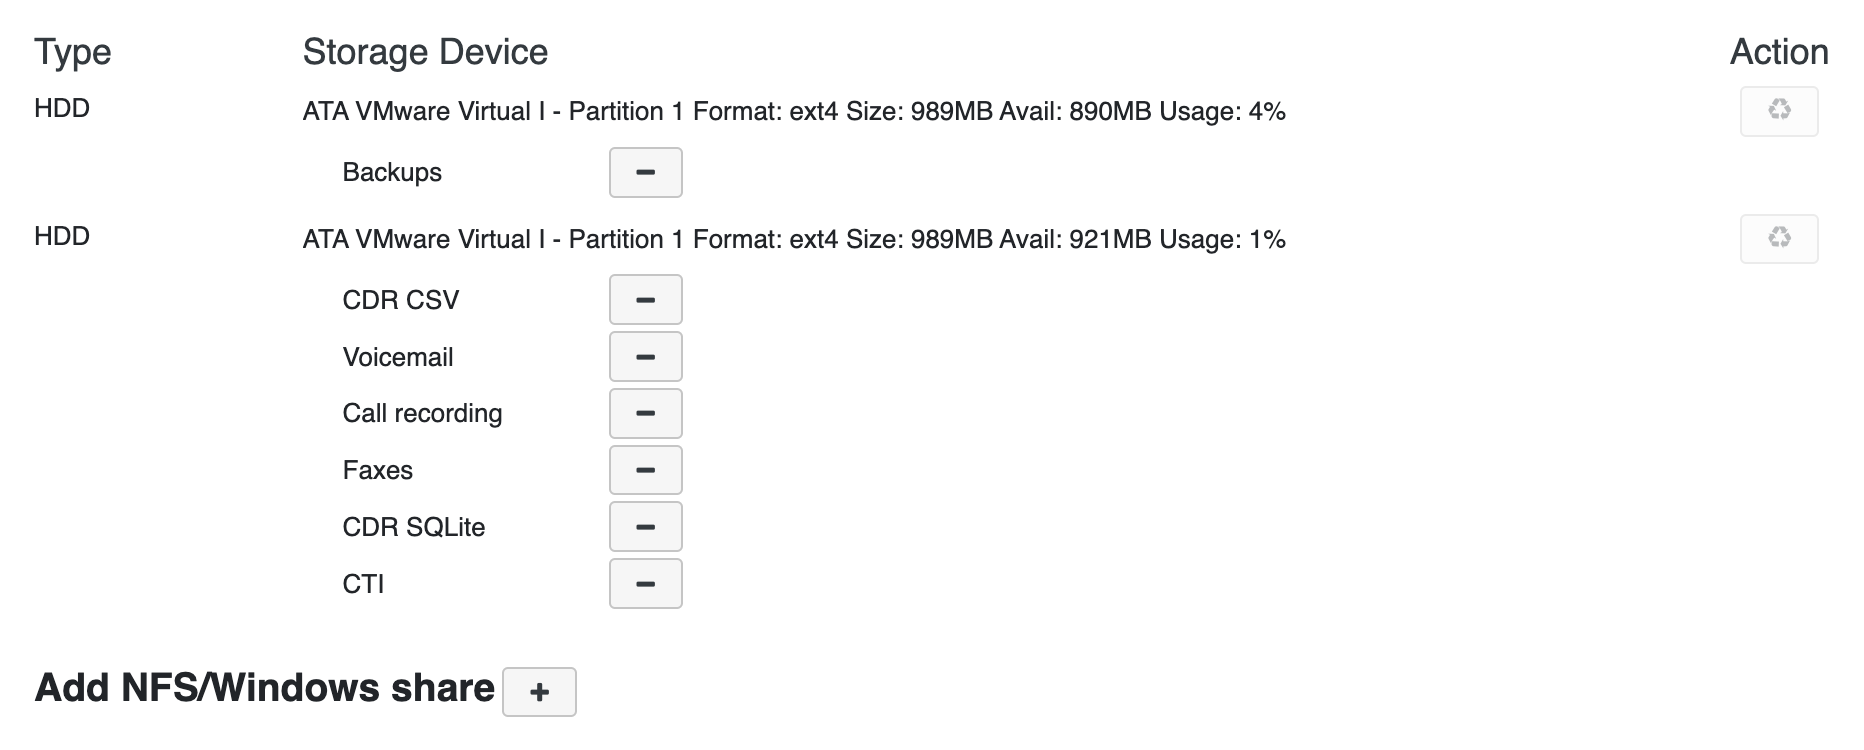
Add NFS/Windows share
...
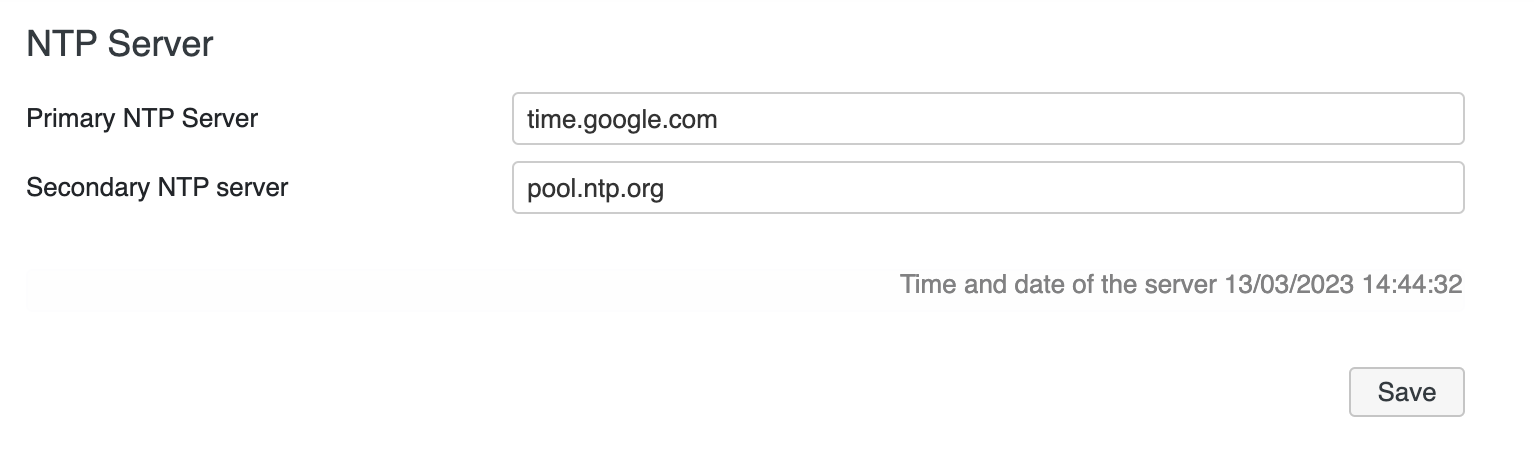
- Primary NTP server: enter the primary server address. For example, time1.google.com
- Secondary NTP server: enter the secondary server address. For example, time2.google.com

Remote syslog
Enable remote syslog for log processing in addition to local syslog.
...
- Click Generate and download backup to generate a copy of the backup file and saves it to your PC. The downloaded file can be used for performing the backups on other PBXs)
- Click Generate and download sounds backup to generate a backup copy of all the sounds saved on the PBX. The backup of the configuration does not contain all the sounds that can be saved after the first modifications to a separate file
- Click - Delete to delete a selected backup file
- Click Download to download a selected backup file to your PC
- Click Reset o reset to the default parameters
...
- Wait till the system checks whether there is a new version available in the selected repository
- In case there is a new version available, click Perform upgrade button:


Note Note: Starting from WMS 5.0420220819.1, to be able to upgrade to the next major WMS version, e.g. from WMS 5 to WMS 6, WMS Network has to be configured correctly, matching the licences ordered on the Wildix Management Portal.
- As a rule, the Upgrade procedure takes several minutes (however it depends on your Internet connection and the number and volume of packages that must be downloaded. During the procedure, you can review the upgrade log:
...
| Note |
|---|
Note: Starting from 6.01.20220708.5, there is one Upgrade repository field on the Upgrade page in WMS -> Settings -> Tools and utilities. Automatic upgrades are performed from the repository that was manually entered in the field.
|


Custom firmware server
...
Click Renew to update SSL Certificate.
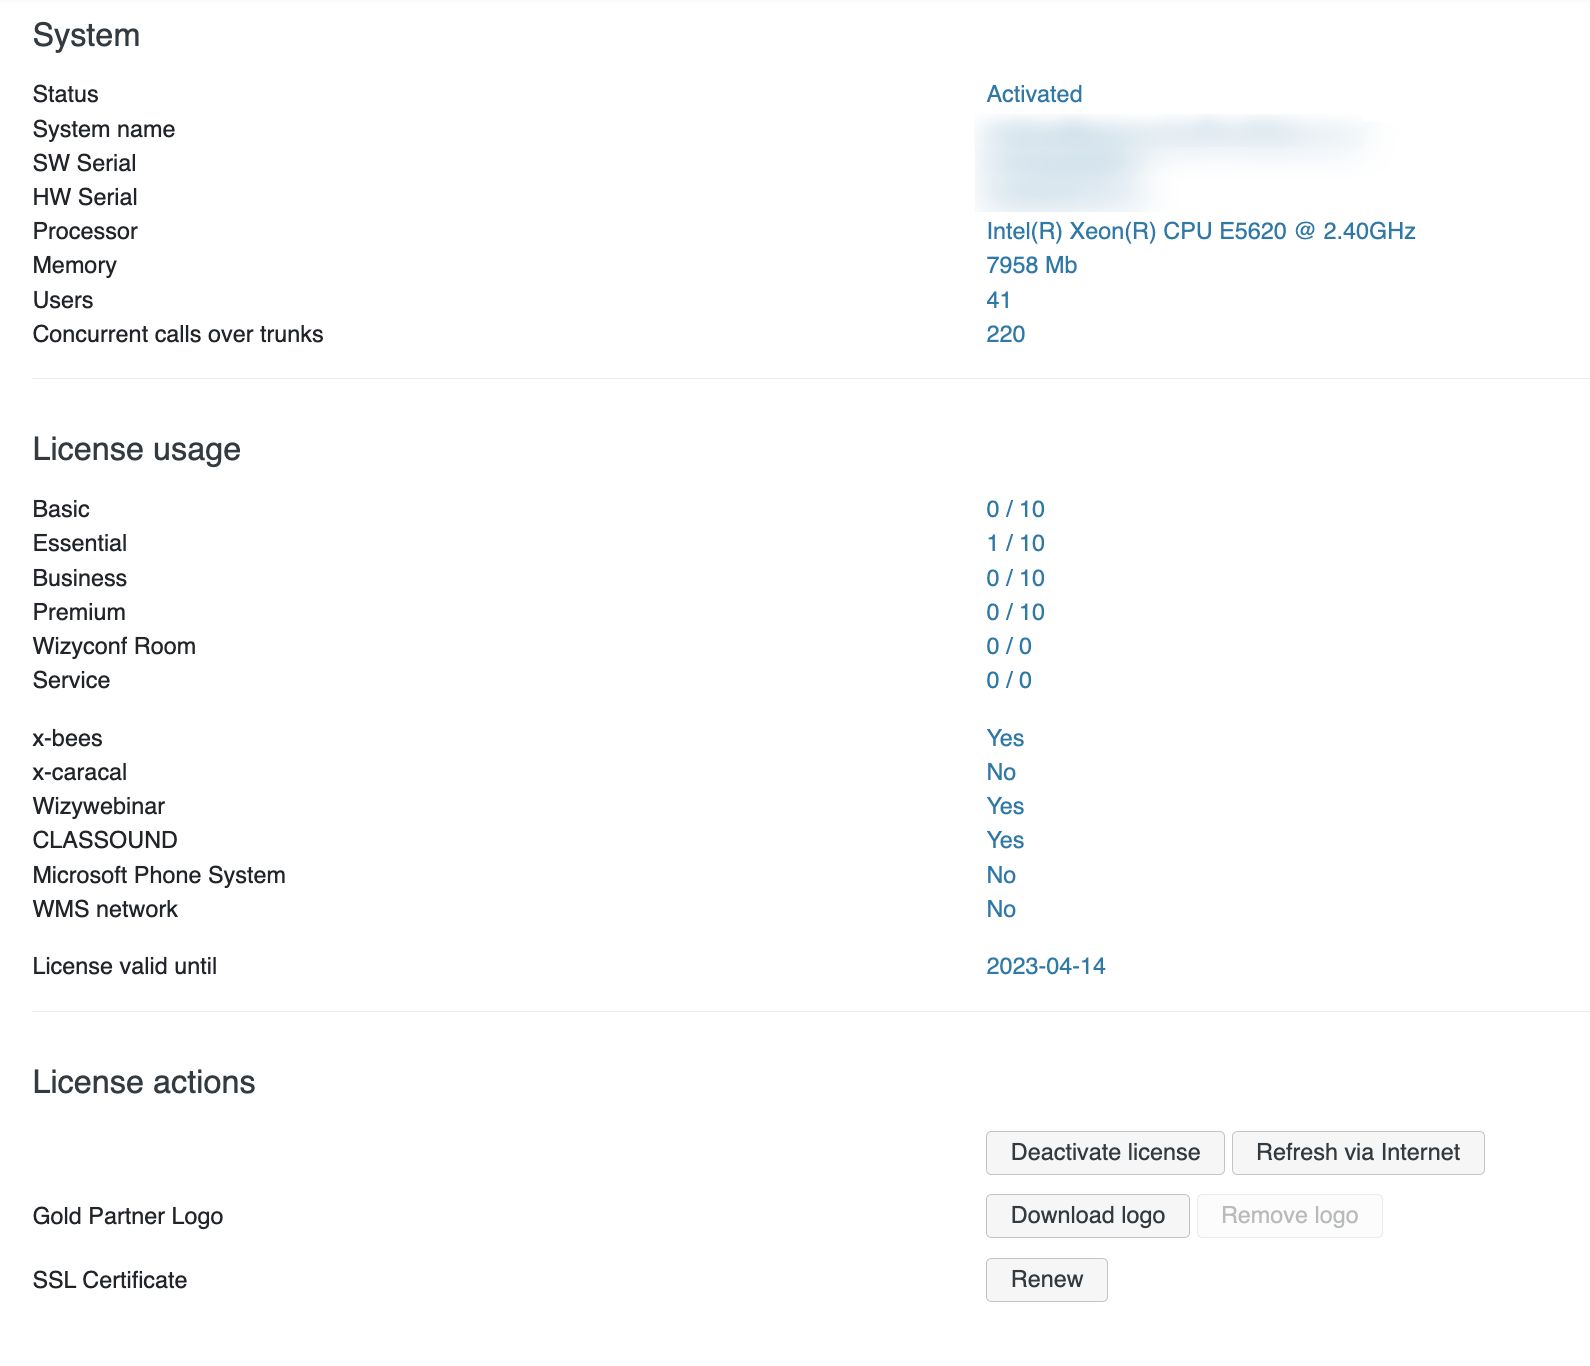
Generate trace
...
- Tick off Custom tcpdump and specify the interfaces, the ports and the hosts in the input field
Example:
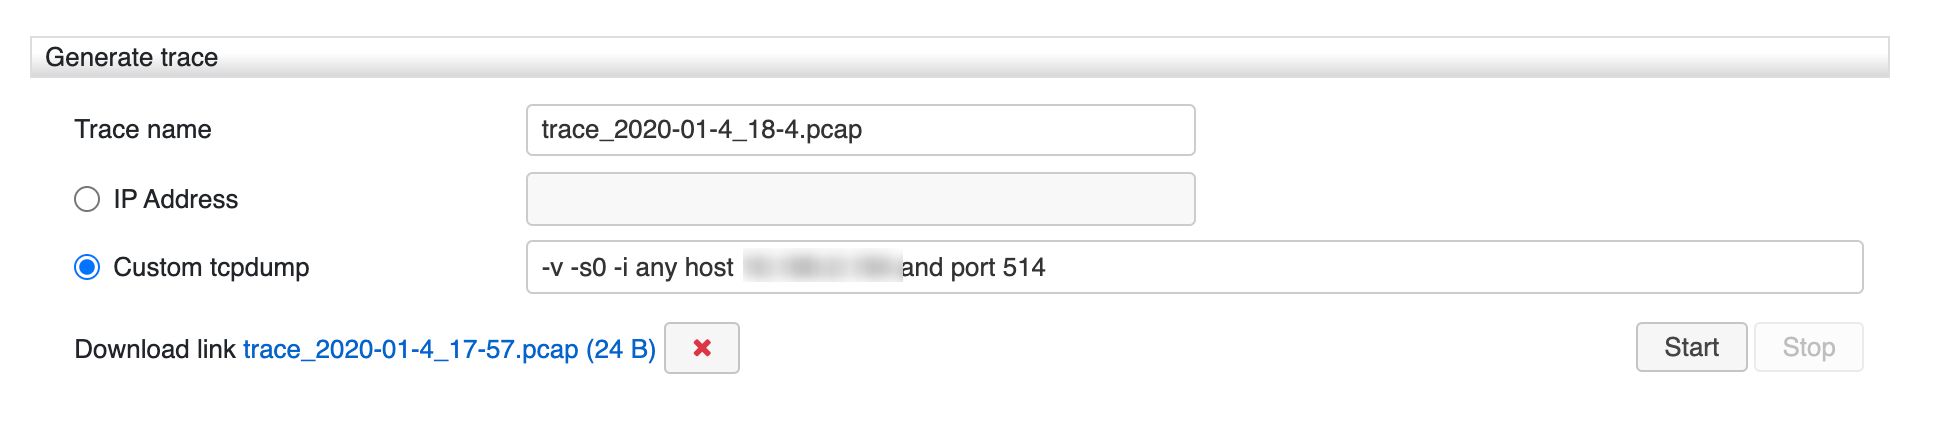

After you have selected the way to generate a trace, enter the Trace name and click Start.
When finished, click Stop. You can start a trace and continue navigating other menus of the WMS.
...