This guide will lead you through the process of Freshdesk integration usage, starting from an installation, and ending with practical examples for call receiving.
Requirements:
- WMS version: 4.01
- Wildix UC-Business license
- Installed WIService
Created: July 2019
Updated: October 2019
Permalink: https://confluence.wildix.com/x/MADmAg
Click-to-call working on "Contacts" and "Tickets" pages
- Incoming call popup
Outgoing call popup
- Auto-detect existing contact and redirect to its page
- Creating a new contact via sidebar
Link to the application
While we are working on listing to Freshdesk Marketplace the Integration can not receive updates from the air. Please check for the updates manually
You need to get the application from this link
Setup the Integration
Setup the Custom App
- Go to Admin tab
 in your Freshdesk dashboard
 - Choose Apps
 from Helpdesk Productivity category
 - Go to Custom Apps tab and press the New Custom App button
Once in a Freshdesk Developer, you need to:
- Click on Add New App button
- Select Custom App
- And Upload app file
Setup information
To proceed you must fill up the mandatory fields:
- App Name
- Overview
- Description
- Support Email
You can use any text for now. Whenever you fill the information click on the Publish button. In case of success you can spot the notification:

You can close the page now and return to your Freshdesk dashboard. Go back to the Custom App page and press the Get Custom Apps button.

In case of app was published and time has passed, you should see your application in Custom App Gallery sidebar. Click on it and press the Install button

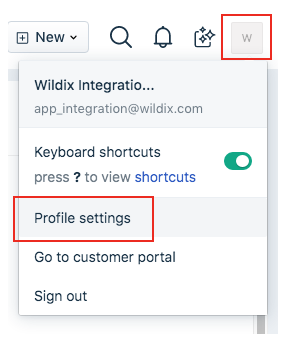
One last thing is to insert your API key. You can discover your key in your Profile Settings. Just press on your avatar in the top-right corner.
Finish the installation process by copy your API key from the setting page and past it to the sidebar of the installer.
Application Usage
Keep Collaboration open while working with Freshdesk
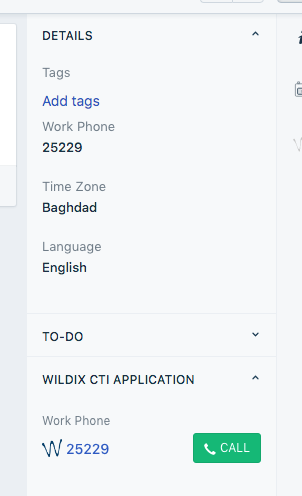
The Integration placed in two places:
- The down - left button that shows pop-up
- Contact info sidebar where a Click-to-call button located
Make a Call
Keep Collaboration open while working with the application
Making a Call Using Click-to-Dial
You can not call contacts without a phone number. The application recognizes both Work phone and Mobile phone fields from the Freshdesk.
- Locate the number that you want to dial in a Сontact or Ticket pages.
- Click the
 call button or the number. The number is automatically dialed in the softphone (Collaboration application).
- A number that has already been clicked cannot be clicked again for five seconds.
- The button does not appear next to fax numbers.
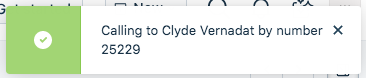
- Pop-up now shows contact info: name and phone number. And you'll receive a notification about an outgoing call in the top-right corner.
Answer a Call
Keep Collaboration open while working with the application
You can tell that you have an incoming call if you see a flashing red button near your tab name on the browser. It also plays the ringtone. You should also receive a notification in the top-right corner
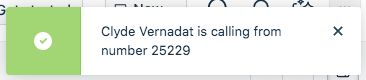
Details about the call, if any, are displayed just above the Answer button, and typically include the phone number of the caller and the number that the caller dialed to reach you. When the caller's phone number can be matched with a number in an existing Freshdesk record, that record is also displayed in a new tab.
To answer an incoming call, press the green button in the pop-up.
