| Html |
|---|
<div id="fb-root"></div>
<script>(function(d, s, id) {
  var js, fjs = d.getElementsByTagName(s)[0];
  if (d.getElementById(id)) return;
  js = d.createElement(s); js.id = id;
  js.src = 'https://connect.facebook.net/en_US/sdk.js#xfbml=1&version=v2.11';
  fjs.parentNode.insertBefore(js, fjs);
}(document, 'script', 'facebook-jssdk'));</script> |
| Html |
|---|
<div class="fb-like" data-href="https://confluence.wildix.com/x/ToDt" data-layout="button_count" data-action="recommend" data-size="large" data-show-faces="true" data-share="true"></div> |
| Html |
|---|
<div class="lang-box-pdf">
	<div>
		<div class="google-lang">
			<div id="google_translate_element">
			</div>
			<script type="text/javascript">
					function googleTranslateElementInit() {
						new google.translate.TranslateElement({pageLanguage: 'en', includedLanguages: 'de,es,fr,it,nl', autoDisplay: false}, 'google_translate_element');
						}
			</script>
			<script type="text/javascript" src="//translate.google.com/translate_a/element.js?cb=googleTranslateElementInit"></script>
		</div>

		<div class="pdf-button">
			<a href="https://confluence.wildix.com/spaces/flyingpdf/pdfpageexport.action?pageId=15564878" alt="Convert to .pdf" title="Convert to .pdf"><img src="https://confluence.wildix.com/download/attachments/14549012/pdf-button-download-wildix-documentation.png"></a>
		</div>
	</div>
</div> |
| Info |
|---|
Wildix Collaboration Mobile application provides access to Wildix Unified Communications from your iPhone, iPod touch and iPad. iOS Version: 5.1.34122 To check the current version, go to iOS changelog: https://www.wildix.com/changelog-of-wildix-collaboration-mobile-for-ios/ WMS Version: 3.86 Updated: November 2017 Permalink: https://confluence.wildix.com/x/ToDt |
| Table of Contents |
|---|
Before using the app
Requirements
To use this application, you must be a user of a Wildix system and have fast internet connection that doesn’t block VoIP traffic.
...
- WMS version 3.84.35087 or higher
- iOS version 9.0 or higher
- Minimum iPhone 4S
Push notifications
Thanks to push notification, the app no longer needs to run all the time. Once you receive a call / a text, the app “wakes up” in the background, even in case the app was closed.
| Note |
|---|
| Note: Since since iOS device disconnects from SIP, it disappears from the list of active devices in Wildix Collaboration interface, once you wake it up or receive a push, it appears again. |
To deactivate access to Presence and SIP server and to stop receiving notifications, you can set the status to Offline or log out from the app. Read the chapters Status and Log out for more info.
| Note |
|---|
| Note: You you can also receive push notifications to your Apple watch. Go to iPhone Watch -> Notifications -> Collaboration and enable receiving notifications. |
Read about push notification: https://blog.wildix.com/en/what-is-push-notification-for-mobile-apps/
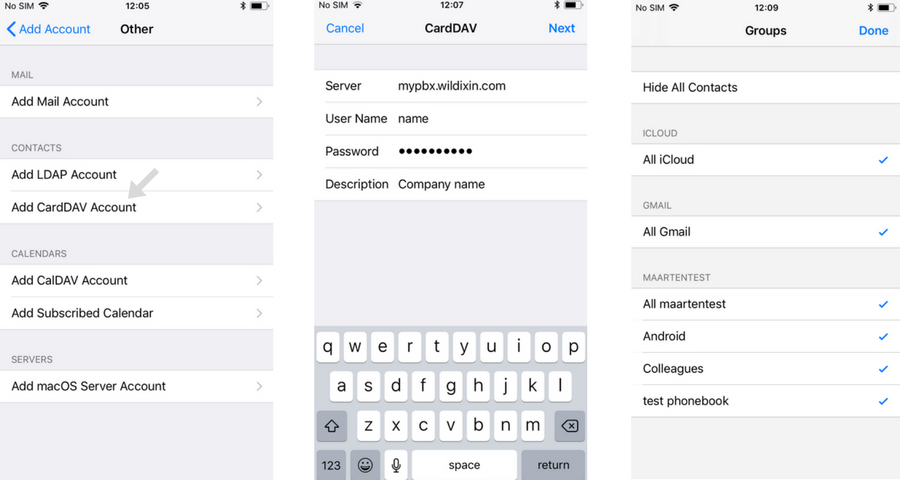
Sync of enterprise phonebooks
Go to iPhone Settings -> Accounts & Passwords
Select Add Account
Select Other
Select Add CardDAV Account
Enter the Server name (PBX domain name or IP), User name, Password and Description
Now all your PBX contacts appear in your iPhone phonebookGo to iPhone Phone -> Contacts and select the groups that you wish to be displayed in the phonebook of your iPhone

Login
Domain: PBX IP or domain name
| Note |
|---|
| Note: You you can enter the PBX name, wildixin.com domain is added automatically. |
User name: Extension / User name / Email address
Password: WEB password of a user for access to Collaboration

Menu description
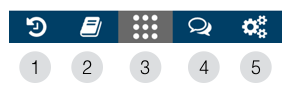
- 1 - Call history
- 2 - Contacts
- 3 - Dialpad
- 4 - Chat
- 5 - Settings
| Note |
|---|
| Note: For for DND / Away it is possible to set up expiry time, after which your status passes to online. |
| Note |
|---|
| Note: Offline offline status is available only for mobile apps and it allows you to disconnect from Presence and VoIP servers; you will not receive push notifications at all. |
Call
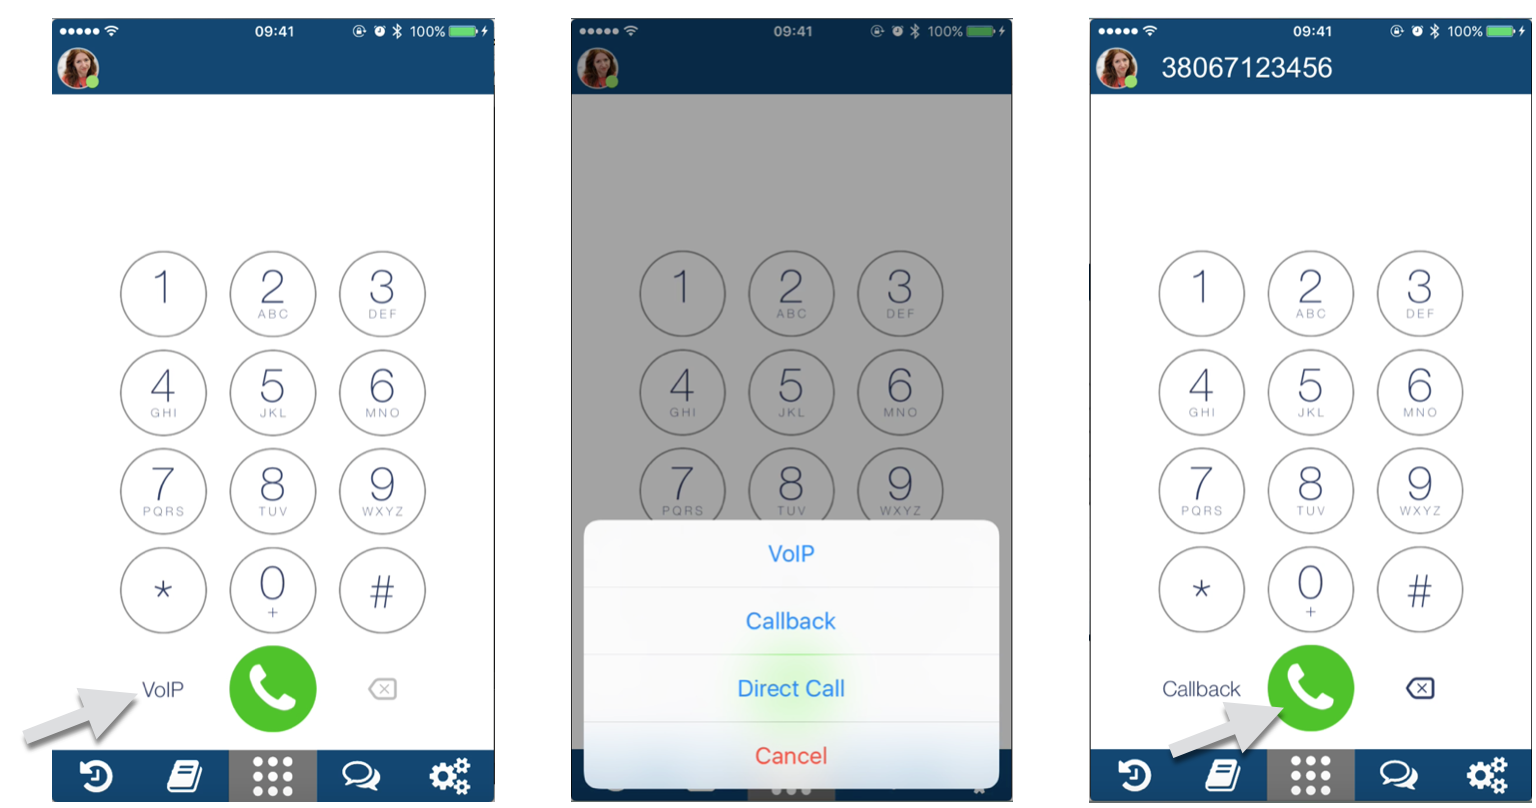
Place a call from Dialpad
Tap Dialpad
Select the mode to place a call:
...
Enter the number
Tap the green Handset button
From Enterprise Contacts
| Note |
|---|
| Note: By by default the local contacts from your device’s phonebook appear in this menu; to access the enterprise phonebooks, set up the sync of contacts, as described in the chapter Sync of enterprise phonebooks. |
Tap the contact you wish to call
Tap the number you wish to call
| Note |
|---|
| Note: Call call is made using the mode selected in Dialpad menu (VoIP / Callback / Direct Call). |
From History
Go to History
Tap on a user
A call is placed automatically
From your device’s contacts
Tap a contact in your iOS contacts
Tap and hold the Call button
Select Collaboration

From Browser (Support of URI for call generation)
Thanks to URI support it is possible to generate a call from the browser by clicking on a link containing a phone number. It allows you to start calls from various web pages.
...
Tap on a telephone number containing the supported link
Select Collaboration from the drop-down list
Answer a call
| Note |
|---|
| Note: On on iOS mobile calls and VoIP calls have the same priority, you VoIP call is not interrupted in case you receive an incoming mobile call. |
- Tap the green Handset button to answer
Tap the red Handset button to decline

Call management
During a call you can navigate your device, open the App and tap Dialpad to come back to the active call.
...
- 1 - Video
- 2 - Hold
- 3 - Transfer
- 4 - New call
- 5 - Mute
- 6 - Speakerphone
- 7 - Conference (in case there is more than one active call)
- 8 - DTMF
- 9 - Hang up
Transfer
Blind transfer:
(transfer without notification)
...
Tap New call button during a call
Make a new call (select a contact from Contacts or dial the number manually)
Wait till the other party answers (the previous call is now on hold)
Tap Transfer button and select the call on hold to complete the transfer
Video tutorial:
Widget Connector url https://www.youtube.com/watch?v=HfxIDPLKu2U&feature=youtu.be
Chat
All the colleagues added to your roster appear in Chat menu.
Tap Chat
Use the search field to find a user
Tap a user and enter your message
Tap Paperclip icon to send the message

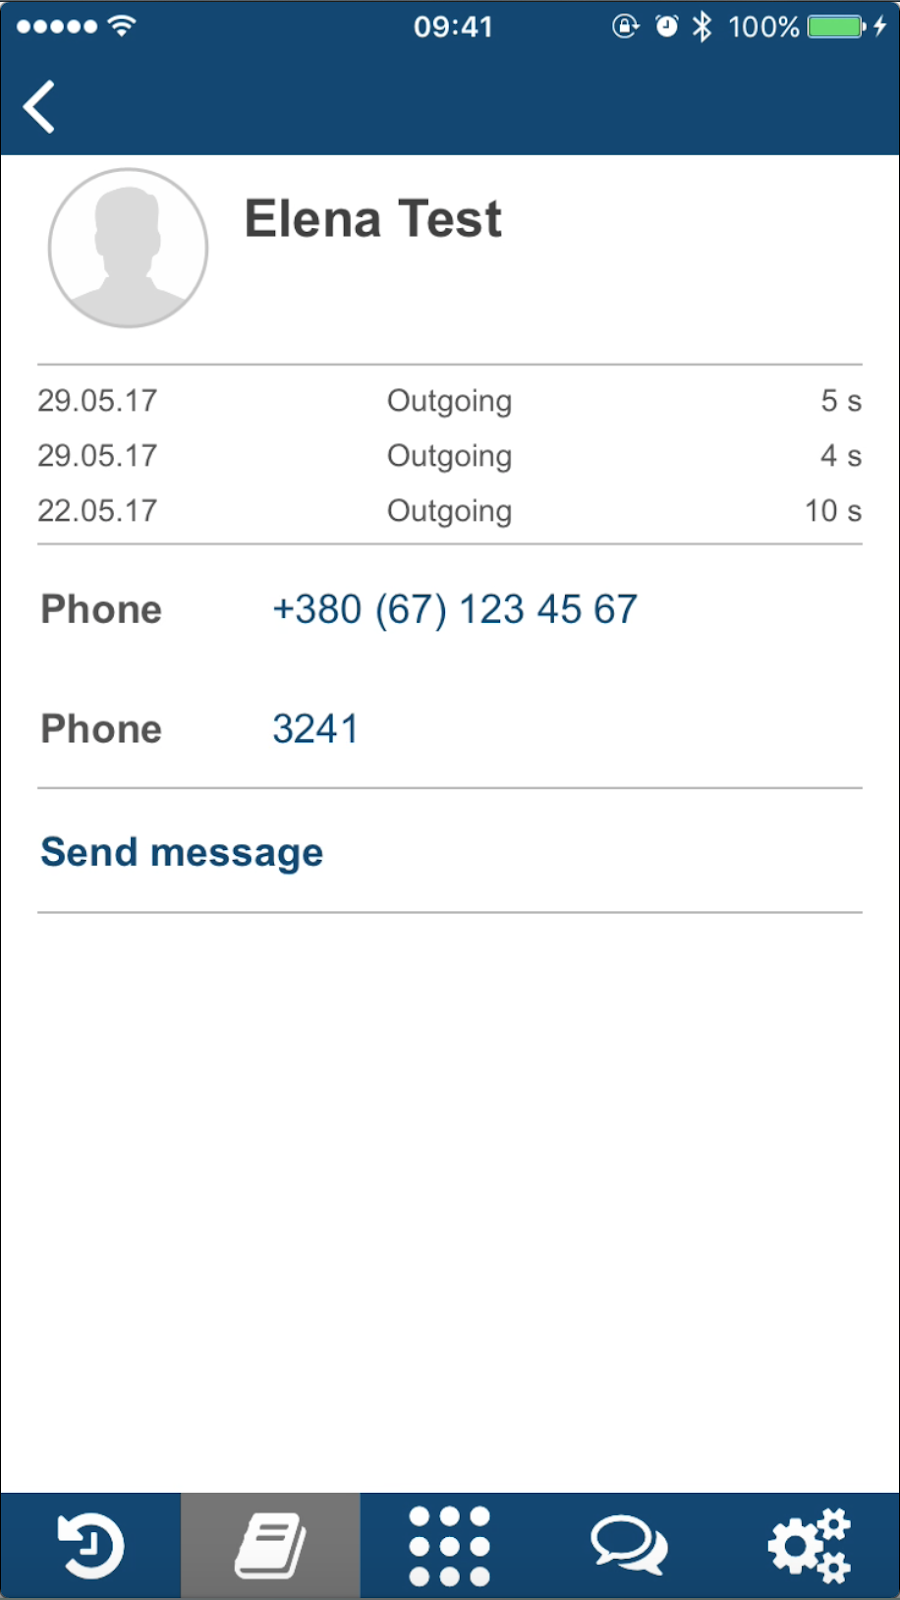
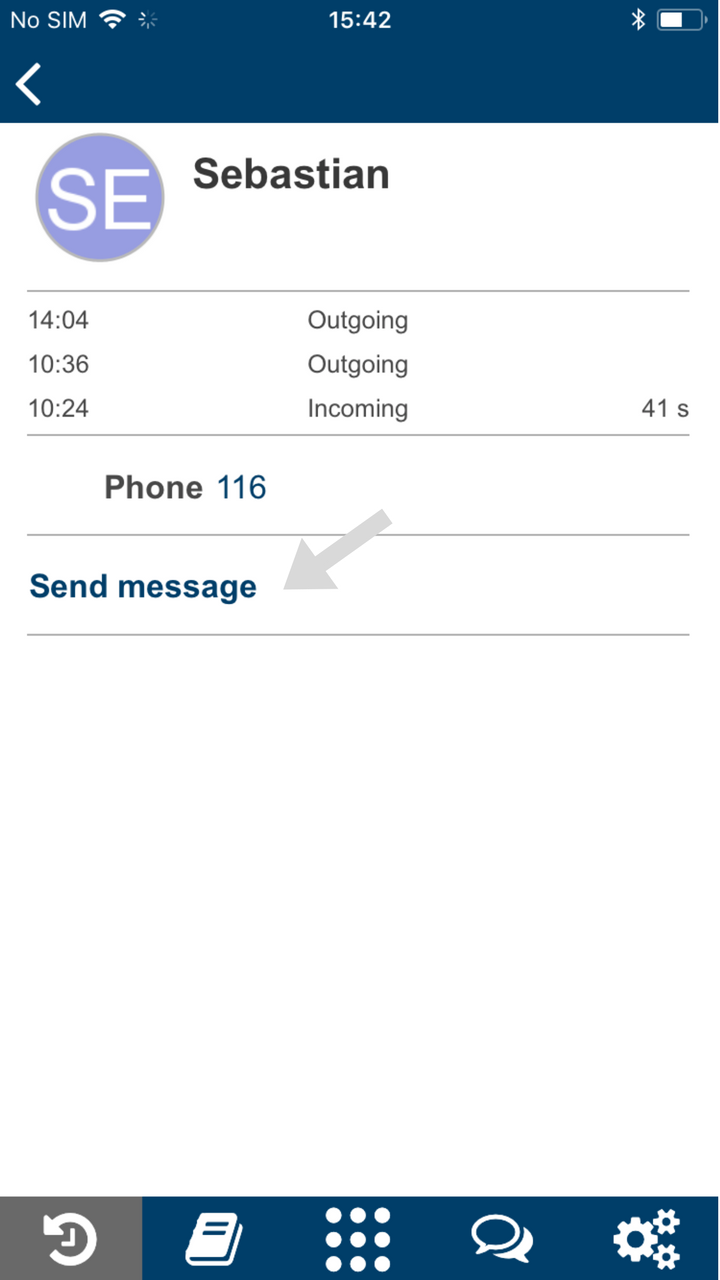
Start a chat session from History
You can also start a chat session with a user from History tab.
Go to History
Select a user you would like to chat with and tap the double Arrowhead icon to view user contact details
Tap Send message
Send a File / an Image / a Post-It
Send a file / an image:
Start a chat with a user
Tap +
Select the source:
...
Start a chat with a user
Write your message
Tap +
Select the option Send as Post-It

History
| Note |
|---|
| Note: Call call history and missed calls notifications are synced over the PBX among all the devices registered to your account (except for W-AIR handsets). |
Tap History to access the log of calls. Incoming, outgoing and missed calls (highlighted in red) are displayed in All tab. To view only missed calls, tap Missed tab.
Tap the double Arrowhead icon to view user contact details and a call log.

| Note |
|---|
Note: In in case the call log is empty, make sure that:
|
| Note |
|---|
| Note: Calls calls via Collaboration application are also displayed in the device’s call history (Phone -> Recents). |
Settings
Account: login window
Personal: contact details
E-mail
mobile number
Features by call class (Internal, External, Blacklist, Whitelist)
Activate class: available for External / Blacklist / Whitelist (activates the class)
Call reject: if enabled, you do not receive incoming calls
Busy call forward: check the box and enter the number or VOICEMAIL, to enable call forwarding when busy on the phone
Unavailable call forward: check the box and enter the number or VOICEMAIL, to enable call forwarding in case of no answer
Force call forward: check the box and enter the number or VOICEMAIL, to enable the forwarding of all the incoming calls
Call waiting: enable to be able to receive more than one call at a time
Mobility with timeout: if enabled, you receive incoming calls to your mobile number after the specified timeout; mobile number must be configured in Collaboration Mobile app Settings -> Personal
About: Info about App version and developer
Log out
Tap Settings
Tap the Log out icon

| Note |
|---|
| Note: After after you log out, you will no longer receive calls and texts. |
| Html |
|---|
<div class="fb-like" data-href="https://confluence.wildix.com/x/ToDt" data-layout="button_count" data-action="recommend" data-size="large" data-show-faces="true" data-share="true"></div> |